1
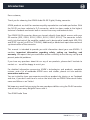
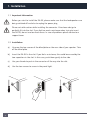
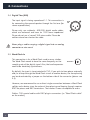
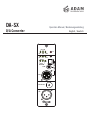
DA-SX
Operation Manual / Bedienungsanleitung
English / deutsch
D/A Converter
-10dB -30dB
Att.
-0dB
-20dB
-40dB
XLR
Coax
Optical
Mode
Clock
S/PDIF
AES3
Word Clock In
Digital
Thru
DIGITAL INPUTS
L
R
Channel
Table of contents
2
Introduction........................................................3
1.
1.1
1.2
Installation. ........................................................4
Important Information........................................4
Installation. ........................................................4
2.
2.1
2.2
2.3
2.4
2.5
Connections.......................................................5
AES3 (XLR).........................................................5
SPDIF coaxial......................................................5
AES3 optical (TOSLINK)......................................5
Digital Thru (XLR)................................................5
Word Clock In.....................................................5
3.
3.1
3.2
3.3
3.4
Operating Modes................................................7-8
Modes.................................................................7
Digital Inputs......................................................7
Channel Options.................................................8
Synchronisation/Word Clock.............................8
4.
4.1
4.2
Attenuation of the audio signal...........................9
Attenuation settings...........................................9
Notes on Level settings......................................9
5.
5.1
5.2
5.3
Trouble Shooting.................................................10
D/A LED glows, no signal...................................10
D/A LED does not glow, no signal......................10
Parasitic noises..................................................10
6.
EU Declaration of Conformity.............................11
7.
7.1
7.2
Limited Warranty................................................12
Terms and Conditions.........................................12
How to claim.......................................................12
8.
Technical Data....................................................13
Introduction
Dear customer,
Thank you for choosing the ADAM Audio DA-SX Digital/Analog converter.
ADAM products are built for maximum quality reproduction and audio perfection. With
the DA-SX you have selected a D/A converter, which has been made to the highest
technical standards and excels both in musical accuracy and technical data.
The ADAM DA-SX converter allows you to work directly from digital sources with your
SX monitor (S2X, S3X-H, S3X-V, S4X-H, S4X-V, S5X-H, S5X-V). The converter installs
easily into the back of the amplifier module and is designed to handle both AES/EBU
and SPDIF signals (via RCA or TOSLINK). Additionally a word clock input allows external
synchronisation of the converter.
This manual is intended to provide you with information about your new ADAMs. It
contains important information regarding safety, setting up, handling, and
warranty. We request that you read these sections carefully to ensure easy set up and
prevent potential problems.
If you have any questions about this or any of our products, please don’t hesitate to
contact us – we will be happy to assist you.
For detailed information concerning ADAM’s technologies and products, complete
reviews, and a list of worldwide ADAM users and studios, please visit our website:
www.adam-audio.com
You are invited to share your experience with our products by joining us on Facebook
and also, if you don’t want to miss out on the latest info on ADAM Professional Audio,
come and follow us on Twitter!
We hope very much that you enjoy the new sound possibilities using the DA-SX converter
and we wish you many delightful hours with it.
The ADAM Audio Team
DA-SX Manual / english
3
1. Installation
1.1 Important Information
Before you start to install the DA-SX, please make sure that the loudspeakers are
being switched off and also to unplug the power plug.
Please act with caution while installing the converter. It has been design to
perfectly fit into the slot. If you feel too much resistance when trying to insert
the DA-SX, do not use too much force. In case of problems please contact our
support team.
1.2 Installation
a) Unscrew the two screws of the blind plate on the rear side of your speaker. Take
off the blind plate.
b) Insert the DA-SX in the slot. If you feel a resistance, this could be caused by the
two capacitors in the slot. In this case, push them gently to the side.
c) Use your thumb to push in the converter all the way into the slot.
d) Use the two screws to screw in the panel tight.
-10dB
-0dB
Att.
Mode
DIGITAL INPUTS
F
AES3
Word
Clock
Digita
l
Thru
Word
Clock
Digita
l
Thru
4
In
Att.
Mode
In
DIGITAL INPUTS
l
AES3
-40dB
S/PDI
F
Optica
L
R
Chann Clock
el
S/PDI
Optica
L
R
Chann Clock
el
-40dB
Coax
Coax
l
-30dB
-20dB
XLR
-30dB
-20dB
XLR
-10dB
-0dB
2. Connections
-10dB -30dB
One of the most frequently asked questions are: Can I use the digital and the analog
-0dB -20dB -40dB
inputs simultaneously? Yes you can. Both signals are being mixed together
internally.
For highest quality and optimized signals, we recommend to use only oneXLRconnection
Coax Optical
at a time and to unplug the cable not being used.
2.1 AES3 (XLR)
Clock
S/PDIF
Probably the most favored connection for long cable ways
up to 100 meters.
Mode
DIGITAL INPUTS
L
R
Channel
Att.
AES3
Please only use authentic “AES/EBU” digital audio cables,
which are balanced and have an 110Ω wave impedance.
Please do not use a ‘normal’ XLR microphone cable.
Please do neither extend nor shorten the cable.
-10dB
-30dB
Word
Clock
In
-0dB -20dB
Digital
Thru
XLR
Coax
2.2 SPDIF coaxial
For unbalanced 75Ω coaxial cables with RCA plugs.
Again, please use specified digital cables (up to about 10m) only,
no other RCA cables. Do not extend the cable.
Please note:
Mode
Optical
Clock
DIGITAL INPUTS
L
R
Channel
Att.
-40dB
S/PDIF
AES3
The RCA plug connection is mechanically less stable than other connections.
-10dB -30dB
Att.
-0dB
-40dB
Word-20dB
Clock In
2.3 AES3 optical (TOSLINK)
Mode
XLR
Digital
Thru
L
R
Channel
Optical
Clock
S/PDIF
Please note:
DIGITAL INPUTS
For TOSLINK optical fiber cables. Maximum length depends
on the quality and/or used fiber technology, usually up to 10m.
Coax
In principle, the TOSLINK connection is mechanically a rather fragile one.
AES3
Word Clock In
DA-SX Manual / english
Digital
Thru
5
PUTS
2. Connections
AES3
2.4 Digital Thru (XLR)
Word Clock In
The input signal is being reproduced 1:1. This connection is
for connecting the second speaker through the first one (for
stereo reproduction).
Digital
Thru
-10dB -30dB
Att.
Please only use authentic AES/EBU digital audio cables,
which are balanced and have an 110Ω wave impedance.
Please do not use a ‘normal’ XLR micro cable. Please do
neither extend nor shorten the cable.
-0dB
-20dB
-40dB
XLR
Coax
Optical
Mode
Clock
S/PDIF
Never plug a cable carrying a digital signal into an analog
connector or vice versa!
DIGITAL INPUTS
L
R
Channel
AES3
2.5 Word Clock In
This connection is for a Word Clock used in many studios.
The Word Clock needs to have the same frequency as the sampling rate of the digital signal. Also, the two frequencies
need to be absolutely synchronous.
Word Clock In
Digital
Thru
By default, the input is terminated with 75Ω. If you wish to time-phase externally
and/or to loop through the Word Clock circuit to another device, the time-phasing
can be deactivated by a jumper on the bottom side of the converter (please see
3.4).
However, we recommend to use a direct single connection between a Word Clock
splitter and a device since the external time-phasing and looping through requires
BNC-Tee pieces and BNC terminators. That makes it more susceptible to errors.
Cables: 75Ω coaxial cables with BNC plug-in connectors (as “Word Clock cable”
on the market).
6
3. Operating Modes
3.1 Modes
You can choose the operating mode by using the “Mode” button. They are in
circular order (i.e. after the last follows the first setting).
1. AES L (factory setting)
2. AES R
3. AES L WCLK
4. AES R WCLK
5. COAX L
6. COAX R
7. COAX L WCLK
8. COAX R WCLK
9. OPTICAL L
10. OPTICAL R
11. OPTICAL L WCLK
12. OPTICAL R WCLK
With the “Mode” button (operable with a pen or alike) you can set a certain
operating mode which can be a combination of the following possibilites.
-10dB -30dB
3.2 Digital Inputs
Att.
-0dB
-20dB
-40dB
-10dB -30dB
If XLR (AES3) is activated the “XLR” LED glows.
•
If RCA (SPDIF-coaxial) is activated the “Coax” LED glows.
•
If TOSLINK (SPDIF-optical) is activated the “Optical” LED glows.
Att.
XLR
Coax Optical
-0dB -20dB -40dB
Mode
-10dB -30dB
Mode
L
R Clock
Att.
XLR
Coax
ChannelOptical
-0dB -20dB -40dB
S/PDIF
L
R Clock
Coax
ChannelOptical
Mode
S/PDIF
L
R Clock
Channel AES3
S/PDIF
If a valid audio data stream is being received the blue D/A LED
on the frontpanel of your monitor glows.
AES3
-10dB -30dB
DIGITAL INPUTS
Please note:
DIGITAL INPUTS
XLR
DIGITAL INPUTS
•
Att.
3.3 Channel options
•
Word
-0dB Clock
-20dBIn -40dB
AES3
-10dB -30dB
XLR
If the left channel of the digital signal is selected, the “L” LED glows.
If the right channel of the digital signal is selected, the “R” LED
L
R Clock
Coax
ChannelOptical
Word Digital
Clock In
glows.Thru
Att.
Mode
S/PDIF
Clock
S/PDIF
AES3
DA-SX Manual / english
AES3
Mode
DIGITAL INPUTS
L
R
Digital Channel
Thru
Optical
7
DIGITAL INPUTS
XLR
•
Coax
Word
Clock
-0dB Digital
-20dBIn -40dB
Thru
3. Operating Modes
3.4 External Synchronisation to a Word Clock
If you operate several SX monitors and wish to make sure all speakers
get their sampling values simultaneously by being on the other hand
independent of digital cable lengths, using a Word Clock can be
advisable. In this case, the D/A converters do not need to reconstruct
the sampling rate from the stream of data (something that cannot be
done without small imprecisions concerning the timing). Instead, they
get a clean clock pulse ready to be used.
That is why the Word Clock needs to be in exact synchronicity with the
physical sampling rate of the incoming data stream. A real divergence is
not permitted. If the divergence becomes too big (more than one or two
samples) the D/A converter has to either double the samples or drop
them. This can result in increasing distortion or even in considerable
parasitic noises (Jitter). If you have to use asynchronic rates anyway,
you will need an external asynchronic resampling converter.
•
•
If you do not have a Word Clock connected or do not wish to use a
Word Clock that is being connected, switch off the Word Clock (LED
is off).
If you want to synchronise the D/A converter with a Word Clock please
activate the Word Clock input (LED is on).
Please note:
If the Word Clock input is activated but there either is no cable connected
to the input or the cable does not carry a signal, the converter works
exactly the same way as if the input were not activated. The converter
automatically switches to standard operating mode.
8
4. Attenuation of the audio signal
4.1 Attenuation settings
-10dB -30dB
To alter the volume of the audio signal and to adapt it to
specific requirements, you can use the “Att.” button. -0dB -20dB -40dB
The attenuation works within 5 cyclic steps (after the last
XLR
Coax Optical
step follows the first) and each step attenuates the signal
by 10 dB.
L
R Clock
Att.
Mode
Setting
-40 dB (factory setting)
-30 dB
-20 dB
Att.
-0dB
-20dB
-40dB
-10dB -30dB
XLR
Coax Optical
-0dB -10dB
-20dB -30dB
-40dB
Mode
Att.
L -0dBR Clock
-20dB -40dB
Channel
XLR
Coax Optical
-10dB -30dB
XLRS/PDIF
Coax Optical
L -0dBR -10dB
Clock -30dB
-20dB
-40dB
Channel
L -0dBR -20dB
Clock -40dB
Channel
XLRS/PDIF
Coax Optical
0 dB
4.2 Notes on Level settings
S/PDIF
AES3
XLR S/PDIF
Coax Optical
L
R Clock
Channel
L
R Clock
S/PDIF
Channel
AES3
Att.
Mode
DIGITAL INPUTS
DIGITAL INPUTS
DIGITAL INPUTS
DIGITAL INPUTS
DIGITAL INPUTS
-10 dB
LED
-10dB -30dB
DIGITAL INPUTS
Channel
Mode
Att.
Word Clock In
Att.
Mode
Digital
Thru
Mode
The settings from -40 dB to -20 dB
AES3are rather suitable for monitoring
finished mixes, already mastered musical
pieces or final consumer
AES3 In
S/PDIF
Word Clock
sound carriers, especially if they have been mastered at high volumes.
AES3
The settings from -20 dB to 0 dBDigital
willClock
beInpreferred when it comes
Word
Thru
to monitoring of unmastered (sub)mixes,
AES3 raw single audio tracks or
Word Clock In
signals, etc., where the dynamic range
of a 24Bit sampling is not being
Digital
Thru
fully utilized.
Digital
Word Clock In
Thru
The two volume controls on the frontpanel
Word Clockof
In your SX monitor are not
active (whereas the filters are activeDigital
) when you use the digital inputs.
Thru
Thus, a fine tuning of the volume other
than the 10 dB steps has to be
Digital
Thru
done in the digital domain.
Please note:
Especially at attenuation steps of -20 dB to 0 dB it is possible that you
overdrive your SX monitor. We recommend utmost care when using the
digital settings.
DA-SX Manual / english
9
5. Troubleshooting
All ADAM products are designed and manufactured to the highest quality standards. However, if any problems with your D/A converter card occur, we recommend to
proceed as follows:
5.1 Problem: The blue “D/A” LED on the frontpanel is glowing but there is no audio
signal:
• The “D/A” LED only glows when a valid digital audio data stream is being received correctly. If there’s no audible signal, there probably is ‘digital silence’ (i.e.
the channel is muted via the mixing desk, etc.).
5.2 Problem: I have plugged in a cable that surely carries a valid audio data stream
but neither is the “D/A” LED glowing nor is there any audio signal:
•
Have you chosen the correct input with your D/A converter?
•
Are you using a specified digital cable, not longer than necessary and in one
piece?
•
Have you accidentally plugged an AES/EBU digital cable into the analog input?
5.3 Problem: I can hear parasitic noises.
•
•
10
If you are using word clock: a) Does its rate fit the digital signal and b) is it really
sample-synchronous to the digital signal?
Some word clock splitters allow for multiples of the incoming frequency. Please
make sure that you have not accidentally set for a multiple.
6. EU Declaration of Conformity
We,
ADAM Audio GmbH
whose registered office is situated at
Ederstr. 16, 12059 Berlin, Germany
declare under our sole responsibility that the product:
DA-SX
complies with the EU Electro-Magnetic Compatibility (EMC) Directive 89/336/EEC, in
pursuance of which the following standards have been applied:
EN 61000-6-1 : 2001
EN 61000-6-3 : 2001
EN 55020 : 2002
EN 55013 : 2001
and complies with the EU General Product Safety 2001/95/EC, in pursuance of which
the following standard has been applied:
EN 60065 : 2002.
This declaration attests that the manufacturing process quality control and product
documentation accord with the need to assure continued compliance.
The attention of the user is drawn to any special measures regarding the use of this
equipment that may be detailed in the owner’s manual.
Signed:
Klaus Heinz
Director ADAM Audio
DA-SX Manual / english
11
7. Warranty
ADAM Audio GmbH provides a five year limited warranty for this product.
7.1 Terms and Conditions
This warranty is limited to the repair of the equipment or, if necessary, the replacement of parts or the product and return shipping within the country of
purchase.
This warranty complements any national/regional law obligations of dealers or
national distributors and does not affect your statutory rights as a customer.
Neither other transportation, nor any other costs, nor any risk for removal, transportation and installation of products is covered by this warranty.
Products whose serial number have been altered, deleted, removed or made illegible are excluded from this warranty.
The warranty will not be applicable in cases other than defects in materials and/or
workmanship at the time of purchase and will not be applicable:
a) for damages caused by incorrect installation, connection or packing,
b) for damages caused by any use other than correct use described in the user
manual,
c) for damages caused by faulty or unsuitable ancillary equipment,
d) if repairs or modifications have been executed by an unauthorized person,
e) for damages caused by accidents, lightning, water, fire heat, public disturbances or
any other cause beyond the reasonable control of ADAM Audio.
7.2 How to claim repairs under warranty
Should service be required, please contact the ADAM Audio dealer where the
product has been purchased.
If the equipment is being used outside the country of purchase, the international
shipping costs have to be paid for by the owner of the product.
Service may be supplied by your ADAM Audio national distributor in the country of
residence. In this case, the service costs have to be paid for by the owner of the
product whereas the costs for parts to be repaired or replaced are free of charge.
Please visit our website to get the contact details of your local distributor.
To validate your warranty, you will need a copy of your original sales invoice with
the date of purchase.
12
8. Technical Data
DA-SX D/A Converter
Input Formats
Supported Sampling rates
Supported Bit Depth
THD+N @ 1 kHz, 0 dBfs, 24 Bit
AES/EBU (AES3), SPDIF, TOSLINK
32 kHz, 44.1 kHz, 48 kHz, 88.2 kHz, 96 kHz, 176.4 kHz, 192 kHz
16 - 24 Bit
≤ -104 dB (= ≤ 0,0006% at all sampling rates, bandwith: 20 kHz)
Signal to Noise ratio @ 0 dB Attenuation
≥ 114 dB
Warranty
5 years
Operating temperature
0° C to 40° C (32° F to 104° F)
DA-SX Manual / english
13
Notes/Notizen
............................................................................................................
............................................................................................................
............................................................................................................
............................................................................................................
............................................................................................................
............................................................................................................
............................................................................................................
............................................................................................................
............................................................................................................
............................................................................................................
............................................................................................................
............................................................................................................
............................................................................................................
............................................................................................................
............................................................................................................
............................................................................................................
............................................................................................................
............................................................................................................
............................................................................................................
............................................................................................................
............................................................................................................
............................................................................................................
............................................................................................................
...........................................................................................................
...........................................................................................................
............................................................................................................
............................................................................................................
............................................................................................................
............................................................................................................
............................................................................................................
............................................................................................................
DA-SX
Bedienungsanleitung
deutsch
D/A Converter
-10dB -30dB
Att.
-0dB
-20dB
-40dB
XLR
Coax
Optical
Mode
Clock
S/PDIF
AES3
Word Clock In
Digital
Thru
DIGITAL INPUTS
L
R
Channel
Inhalt
Einleitung.................................................17
1. Montage. .................................................18
1.1 Wichtige Hinweise. ..................................18
1.2 Einbau......................................................18
2.
2.1
2.2
2.3
2.4
2.5
Anschlüsse...............................................19-20
AES3 (XLR)...............................................19
SPDIF coaxial...........................................19
AES3 optisch (TOSLINK)..........................19
Digital Thru (XLR).....................................20
Word Clock In...........................................20
3.
3.1
3.2
3.3
3.4
Betriebsarten...........................................21-22
Auswahl und Anzeige...............................21
Digitaleingänge........................................21
Kanalauswahl...........................................21
Synchronisierung/Word Clock.................22
4. Absenkung des Ausgangspegels..............23
4.1 Absenkung/Anzeige.................................23
4.2 Hinweise zur Pegeleinstellung..................23
5.
5.1
5.2
5.3
Fehlerbehebung.......................................24
D/A-Anzeige leuchtet, aber kein Signal...24
D/A-Anzeige leuchtet nicht, kein Signal...24
Störgeräusche..........................................24
6. Konformitätsbescheinigung......................25
7. Garantie...................................................26
7.1 Garantiebedingungen...............................26
7.2 Inanspruchnahme....................................26
8. Technischen Daten...................................27
16
1. Einleitung
Sehr verehrte Kundin, sehr verehrter Kunde,
vielen Dank, dass Sie sich für den ADAM DA-SX Digital-/Analog-Wandler entschieden
haben. Er wurde konzipiert, um die ADAM Monitore der SX Serie (S2X, S3X-H, S3X-V,
S4X-H, S4X-V, S5X-H, S5X-V) direkt in eine digitale Signalkette einbinden zu können.
Er wird im rückwärtigen Slot des Verstärkereinschubs montiert und kann sowohl AES/
EBU- Signale als auch SPDIF und TOSLINK verarbeiten.
Bitte lesen Sie diese Bedienungsanleitung vor der Inbetriebnahme und beachten
Sie die Sicherheitshinweise und Garantiebestimmungen. Die nachfolgenden Tipps und
Überlegungen sollen Ihnen dabei helfen, die Fähigkeiten des Wandlers möglichst gut
zu nutzen.
Sollten Sie Fragen zu weiteren Einzelheiten haben oder Probleme auftauchen, zögern
Sie bitte nicht uns zu kontaktieren. Wir helfen gerne!
Detaillierte Informationen zu den ADAM-Technologien und Produkten, ausführliche
Testberichte und Hintergrundberichte finden Sie auf unserer Website:
www.adam-audio.com
Wenn Sie Ihre Erfahrungen mit unseren Produkten mit anderen ADAM-Usern teilen
wollen oder die aktuellsten Informationen suchen, besuchen Sie uns auf Facebook
und Twitter!
Wir wünschen Ihnen viele schöne Stunden mit Ihrem neu erworbenen ADAM-Produkt.
Ihr ADAM Audio Team aus Berlin
DA-SX Bedienungsanleitung / deutsch
17
2. Montage
2.1 Wichtige Hinweise
Vergewissern Sie sich vor dem Einbau des DA-SX, dass sowohl die Lautsprecher
(Netzschalter) ausgeschaltet als auch deren Netzstecker gezogen sind.
Bitte lassen Sie beim Einbau des DA-SX Vorsicht walten. Sollte sich der Wandler
nicht ohne größere Widerstände einbauen lassen, wenden sie keine Gewalt an. Bei
Problemen kontaktieren Sie bitte unseren Service/Support.
2.2 Einbau
a) Nehmen Sie die Blindplatte von der SX-Rückwand ab, indem Sie die beiden
Schrauben entfernen.
b) Führen Sie den DA-SX an den Schienen entlang in den Schacht ein. Sollte ein
Widerstand zu spüren sein, drücken Sie die beiden Kondensatoren im Schacht
ganz leicht zu Seite.
c) Befestigen Sie das Panel mit mittlerem Daumendruck, bis ein bündiger Sitz erreicht wird.
d) Schrauben Sie das Panel fest.
-10dB
-0dB
Att.
Mode
L
R
Chann Clock
el
DIGITAL INPUTS
AES3
AES3
Word
Clock
Digita
l
Thru
Word
Clock
Digita
l
Thru
18
In
Att.
Mode
In
DIGITAL INPUTS
l
F
S/PDI
F
Optica
S/PDI
-40dB
Optica
L
R
Chann Clock
el
-40dB
Coax
Coax
l
-30dB
-20dB
XLR
-30dB
-20dB
XLR
-10dB
-0dB
3. Anschlüsse
Eine besonders häufig gestellte Frage betrifft die Möglichkeit, ob man den analogen
-10dB -30dB
und den digitalen Eingang gleichzeitig nutzen kann. Ja, denn die Signale von analogem Att.
-20dB -40dB
und digitalem Eingang werden intern zusammengemischt. Wir empfehlen-0dBjedoch,
für
Mode
höchste Qualität und einen optimimalen Rauschspannungsabstand, immer
nur
eine
XLR
Coax Optical
Eingangsart zu benutzen und das nicht benötigte Kabel abzuziehen.
3.1 AES3 (XLR)
Clock
DIGITAL INPUTS
L
R
Channel
S/PDIF
Die bevorzugte Anschlussart auch für lange Kabelwege
bis 100m.
AES3
Bitte verwenden Sie nur echte AES/EBU-Digitalaudio-Kabel,
symmetrisch und mit 110Ohm Wellenwiderstand (kein normales
XLR-Mikrofonkabel) und vermeiden Sie es, Kabel zu verlängern
oder zu stückeln.
-10dB -30dB
Att.
-0dB
-20dB -40dB
Word Clock In
XLR
Coax
Digital
Thru
Mode
3.2 SPDIF coaxial
Für unsymmetrisches 75Ohm-Coaxialkabel mit RCA-Steckern
(Cinch-Stecker).
Clock
DIGITAL INPUTS
L
R
Channel
Optical
S/PDIF
Bitte verwenden Sie auch hier nur spezifizierte Digitalkabel
(bis max. 10m) und vermeiden Sie es, diese zu verlängern.
AES3
Bitte beachten Sie:
Word Anschlüsse.
Clock In
Die RCA-Steckverbindung ist mechanisch weniger stabil als andere
-10dB -30dB
-0dB
3.3 AES3 optisch (TOSLINK)
Att.
Mode
XLR
Coax
L
R
Channel
Optical
Clock
S/PDIF
DIGITAL INPUTS
Für TOSLINK-Lichtleiterkabel (mögliche Länge je nach
Qualität/Fasertechnologie bis zu 10m).
Bitte beachten Sie:
Digital
-20dB -40dB
Thru
Prinzipbedingt ist die TOSLINK-Verbindung mechanisch leider recht fragil und störanfällig und daher nur für kurze Kabelwege gut geeignet.
AES3
DA-SX Bedienungsanleitung / deutsch
Word Clock In
19
PUTS
3. Anschlüsse
AES3
3.4 Digital Thru (XLR)
Word Clock In
Das Signal des ausgewählten Eingangs wird hier 1:1 wieder
ausgegeben, Sinn ist das Durchschleifen des Signals auf den
zweiten Lautsprecher für die Stereowiedergabe.
Bitte verwenden Sie nur echte AES/EBU-Digitalaudio-Kabel,
symmetrisch und mit 110Ohm Wellenwiderstand (kein normales
XLR-Mikrofonkabel) und vermeiden Sie es, Kabel zu verlängern
oder zu stückeln.
Digital
Thru
-10dB -30dB
Att.
-0dB
-20dB
-40dB
XLR
Coax
Optical
Mode
Bitte beachten Sie:
Clock
S/PDIF
Stecken Sie nie ein Kabel mit einem Digitalsignal in einen analogen XLR-Eingang
oder umgekehrt!
AES3
3.5 Word Clock In
Hier lässt sich eine studioübliche WordClock anschließen,
die zum einen die gleiche Frequenz haben muss wie die Abtastfrequenz (Samplerate) des digitalen Audiosignals und
zum anderen synchron zu dieser getaktet sein muss.
Word Clock In
Digital
Thru
Standardmäßig ist der Eingang terminiert. Sollte dies nicht erwünscht sein (weil
extern terminiert wird und/oder die WordClock durchgeschliffen werden soll zu
einem weiteren Gerät), kann die Terminierung mit einem Jumper auf der Unterseite
der Baugruppe deaktiviert werden.
Wir empfehlen jedoch immer die direkte Einzelverbindung von einem WordClockverteiler zu jedem Gerät, weil das Weiterschleifen und externe Terminieren des
WorldClocksignals (immer am letzten Gerät) BNC-T-Stücke und BNC-Abschlusswiderstände erfordert und damit störungsanfälliger ist.
Kabel: 75Ohm-Coaxialkabel mit BNC-Steckverbindern (als „WordClock-Kabel“ im
Handel erhältlich).
20
DIGITAL INPUTS
L
R
Channel
4. Betriebsarten
4.1 Auswahl und Anzeige der Betriebsarten
Die Betriebsarten werden mit dem “Mode”-Taster in folgender zyklischer
Reihenfolge aufgerufen:
1. AES L (Werkseinstellung)
2. AES R
3. AES L WCLK
4. AES R WCLK
5. COAX L
6. COAX R
7. COAX L WCLK
8. COAX R WCLK
9. OPTICAL L
10. OPTICAL R
11. OPTICAL L WCLK
12. OPTICAL R WCLK
Mit dem “Mode”-Taster (bedienbar mittels Kugeschreiberspitze o.ä.) lässt sich ein
bestimmte Betriebsart der Baugruppe einstellen, die eine Kombination aus folgenden Möglichkeiten sein kann:
-10dB -30dB
4.2 Digitaleingänge
-0dB -20dB
-10dB -30dB
•
Ist XLR (AES3) aktiv, leuchtet die „XLR“ Anzeige.
•
Ist RCA (SPDIF-Coaxial) aktiv, leuchtet die „Coax“ Anzeige.
Ist TOSLINK (SPDIF-Optisch) aktiv, leuchtet die „Optical“ Anzeige.
S/PDIF
Clock
-10dB -30dB
-20dB
-10dB -30dB
Coax
AES3 XLR
Ist der linke Kanal des Digitalsignals ausgewählt, leuchtet die “L”AES3
Anzeige.
-40dB
DIGITAL INPUTS
AES3
-0dB
S/PDIF
Ist der rechte Kanal des Digitalsignals ausgewählt, leuchtet die “R”Anzeige.
Mode
S/PDIF
L
R Clock
Coax Optical
Channel
L
R
Channel
4.3 Kanalauswahl
•
Mo
L
R Clock Att.
XLR
Coax
Optical
-20dB Channel
-40dB
XLR
Wenn ein gültiger Audio-Datenstrom empfangen wird, leuchtet auch
vorn auf dem Bedienpanel der SX die blaue „D/A“-Anzeige auf.
•
Att
-0dB XLR
-20dB Coax
-40dB Optical
-10dB -30dB
-0dB
•
-40dB
Optical
-20dB -40dB
WordLClockR In Clock
Channel
XLR
Coax Optical
A
-0dB
S/PDIF
Word Clock
DigitalIn
LThru R Clock
Channel
Word Digital
Clock In
S/PDIF
Thru
AES3
Digital
Thru
AES3
Word Clock In
DA-SX Bedienungsanleitung / deutsch
21
M
3. Betriebsarten
3.4 Externe Synchronisation mit Hilfe eines WorldclockSignals
Der Einsatz einer Wordclock in einem Verbund von SX-Monitoren ist dann
sinnvoll, wenn man unabhängig von Kabellängen sicherstellen möchte, dass
alle Lautsprecher exakt miteinander synchronisiert sind, um alle Samplewerte
gleichzeitig empfangen zu können. Ausserdem muss der D/A-Wandler nicht aus
dem Datenstrom die Abstastrate rekonstruieren (was Timingungenauigkeiten mit
sich bringt und eine schlechtere Audioqualität zur Folge hat), sondern wird von
einer externen Masterclock mit einer sauberen Taktung versorgt. Es ist bei der
Benutzung einer Wordclock daher unabdingbare Voraussetzung, dass diese exakt
synchron zur physikalischen Samplerate des eingehenden Datenstromes ist, weil
ein Auseinanderlaufen des Taktes der Datenströme nicht zulässig ist. Wird diese
Drift zu groß (mehr als ein oder zwei Samples), wird der D/A-Wandler entweder
Samples verdoppeln oder fallen lassen, was zu Verzerrungen und deutlichen
-10dB -30dB
Störgeräuschen (Jitter) führen kann. Sollte dennoch die seltene Notwendigkeit
auftreten, dass Sie zueinander asynchrone Taktungen verwenden müssen,
dann
-0dB -20dB
-40dB
benötigen Sie einen asynchronen Sampleraten-Konverter.
XLR
•
Wenn Sie keine Wordclock angeschlossen haben oder eine -0dB -20dB -40dB
L
R Clock
angeschlossene nicht benutzen möchten, dann stellen Sie die Channel
XLR
Coax Optical
Wordclock-Auswahl auf AUS („Clock“-Anzeige ist aus).
S/PDIF
Wenn Sie die Synchronisation der D/A-Wandlung mit einer Wordclock
L
wünschen, dann aktivieren Sie den Wordclock-Eingang („Clock“-Anzeige ChannelR Clock
leuchtet).
Hinweis:
AES3
S/PDIF
Wenn bei aktiviertem Wordclock-Eingang kein Wordclock-Kabel eingesteckt
ist
AES3
oder kein Signal an einem eingesteckten Kabel anliegt, funktioniert die Baugruppe
Word Clock In
trotzdem und genau so wie bei deaktivierter Wordclock. Es wird erkannt, dass kein
Wordclock-Signal anliegt und automatisch der Standardmodus benutzt.
Digital
Thru Clock In
Word
Digital
Thru
22
Mode
Att.
Mode
DIGITAL INPUTSDIGITAL INPUTS
•
-10dB -30dB
Coax Optical
Att.
4. Absenkung des Ausgangspegels
4.1 Absenkung/Anzeige
-10dB -30dB
Mit dem “Att.”-Taster (“Attenuation”) kann das Audiosignal durch
-0dB -20dB -40dB
Absenken des Ausgangspegels an die Erfordernisse angepasst
werden, und zwar in 5 Schritten zu je 10 dB. Auch hier erfolgt
Optical
die Änderung zyklisch, d.h. nach dem letzten Schritt inXLRderCoax
Liste
folgt wieder der erste.
L
R Clock
AnzeigeS/PDIF
-10dB -30dB
-40 dB (Werkseinstellung)
Att.
-0dB
-20dB
-40dB
-10dB -30dB
-30 dB
Mode
Att. AES3
XLR
Coax Optical
-0dB -10dB
-20dB -30dB
-40dB
-20 dB
Att.
Mode
XLRS/PDIF
Coax Optical
L -0dBR -10dB
Clock -30dB
-20dB
-40dB
Channel
L -0dBR -20dB
Clock -40dB
Channel
XLRS/PDIF
Coax Optical
0dB
4.2 Hinweise zur Pegeleinstellung
AES3
XLR S/PDIF
Coax
Optical
L
R Clock
Channel
L
R Clock
S/PDIF
Channel
DIGITAL INPUTS
DIGITAL INPUTS
DIGITAL INPUTS
DIGITAL INPUTS
DIGITAL INPUTS
L -0dBR Clock
-20dB -40dB
Channel
XLR
Coax Optical
-10dB -30dB
-10dB
Mode
DIGITAL INPUTS
Channel
Einstellung
Att.
Mode
Att.
Word Clock In
Att.
Mode
Digital
ThruMode
AES3 dB eignen sich eher zum Abhören fertiger
Die Einstellungen von -40 dB bis -20
Mixe, bereits gemasterter Musikstücke
von Endkonsumenten-Tonträgern, beAES3oder
S/PDIF
Word Clock
In
sonders, wenn diese laut gemastert sind.
Digital
AES3 In
Word Clock
Der Bereich -20 dB bis 0 dB wird bevorzugt
beim Abhören nicht gemasterter (Sub-)
Thru
AES3kommen, wo der Dynamikbereich einer
Mixe, Einzelspuren etc. zur Verwendung
Word Clock
In
24Bit-Abtastung nach oben hin nichtDigital
voll ausgenutzt wird.
Thru
Digital
Word Clock In
Thru
Bedienpanel
Ihrer
Die beiden Pegelsteller auf dem
SX werden bei Benutzung des
Clock In
Digitaleingangs nicht berücksichtigt (dieWord
anderen
Bedienelemente der OrtsanpasDigital des Pegels jenseits der einstellbaren
sung sind jedoch aktiv). Eine Feinjustierung
Thru
10 dB-Pegelstufen muss daher auf digitaler
Digital Ebene erfolgen.
Thru
Bitte beachten Sie:
Insbesondere im Bereich -20 dB bis 0 dB ist es möglich, dass Sie ihre SX-Lautsprecher übersteuern. Wir empfehlen größte Vorsicht bei der Nutzung dieser Einstellungen.
DA-SX Bedienungsanleitung / deutsch
23
5. Fehlerbehebung
Alle ADAM Produkte werden nach höchsten Qualitätsstandards gefertigt. Sollte
wider Erwarten dennoch ein Problem auftauchen, empfehlen wir, zunächst folgende
Maßnahmen durchzuführen:
5.1 Es kommt kein Signal, obwohl die blaue “D/A”-Anzeige vorn am Panel leuchtet:
•
Die “D/A”-Anzeige leuchtet nur, wenn ein gültiger Digital-Audio-Datenstrom
korrekt empfangen wird, wenn also kein hörbares Signal kommt, haben Sie
vermutlich “digitale Stille” anliegen (z.B. Kanal am Mischpult gemutet, etc).
5.2 Ich habe ein Kabel angeschlossen, das mit Sicherheit einen gültigen
Audiodatenstrom trägt, aber die “D/A”-Anzeige leuchtet nicht und es kommt
auch kein Signal.
•
•
•
Ist der korrekte Eingang an der Baugruppe ausgewählt?
Verwenden Sie ein spezifiziertes Digital-Kabel, nicht länger als notwendig und in
einem Stück?
Haben Sie aus Versehen ein AES/EBU-DigitalKabel am Analogeingang eingesteckt?
5.3 Ich habe Störgeräusche auf dem Signal.
• Wenn Sie eine Wordclock verwenden, passt a) deren Rate zum Digital-Signal, und
b) ist sie auch wirklich sample-synchron zum Digital-Signal?
• Manche Wordclock-Verteiler erlauben Vielfache der eingehenden Frequenz, prüfen
Sie ob Sie nicht aus Versehen eine solche Vervielfachung eingestellt haben.
24
6. Konformitätsbescheinigung
Wir, die
ADAM Audio GmbH
mit dem eingetragenen Firmensitz in der
Ederstr. 16, 12059 Berlin, Deutschland,
erklären hiermit eigenverantwortlich, dass das Produkt
DA-SX
den folgenden Normen entspricht:
EN 61000-6-1 : 2001
EN 61000-6-3 : 2001
EN 55020 : 2002
EN 55013 : 2001
Ebenfalls stimmt es überein mit der EU General Product Safety 2001/95/EC, und richtet
sich nach folgendem Standard:
EN 60065 : 2002.
Diese Erklärung bezeugt, dass die Qualitätskontrolle und Produktdokumentation mit der
Notwendigkeit fortlaufender Einhaltung der EU-Direktiven übereinstimmt.
Ausgestellt in Berlin.
Gezeichnet:
Klaus Heinz
Geschäftsführer ADAM Audio
DA-SX Bedienungsanleitung / deutsch
25
7. Garantie
11.1 Die ADAM Audio GmbH gewährt auf Ihre aktiven Lautsprecher eine beschränkte Garantie
von 5 Jahren.
Alle Produkte werden nach den höchsten Qualitätsstandards entwickelt und hergestellt.
Sollte ein Produkt wider Erwarten dennoch Mängel aufweisen, gelten folgende Bedigungen
für die Inanspruchnahme der Garantie:
Garantiebedingungen
Die Garantie beinhaltet die Reparatur und gegebenenfalls den Ersatz von Einzelteilen
oder des Gerätes sowie den Rücktransport innerhalb des Landes, in dem das Gerät
gekauft worden ist.
Diese Garantie schränkt weder die gesetzlichen Rechte des Verbrauchers nach dem
jeweils geltenden nationalen Recht noch die Rechte des Verbrauchers gegenüber dem
Händler oder den nationalen Vertriebsgesellschaften ein.
Die Garantie gilt nur mit dem Nachweis des Kaufbelegs (Original oder Kopie, mit Händlerstempel und Kaufdatum). Produkte, bei denen die Seriennummer geändert, gelöscht, entfernt oder unleserlich gemacht wurde, sind von der Garantie ausgenommen. Die Garantie
bezieht sich auf Mängel, die auf Material- und/oder Herstellungsfehler zum Zeitpunkt des
Kaufes zurückzuführen sind und deckt keine Schäden durch:
a)
b)
c)
d)
e)
f)
unsachgemäße Montage sowie unsachgemäßen Anschluss,
unsachgemäßen Gebrauch für einen anderen als den vorgesehenen Zweck,
Nichtbeachtung der Bedienungsanleitung,
Modifikation der Lautsprecher oder defekte oder ungeeignete Zusatzgeräte,
Reparaturen oder Veränderungen durch unberechtigte Personen,
Unfälle, Blitzschlag, Wasser, Feuer, Hitze, Krieg, Unruhen oder andere nicht in der Macht
von Adam Audio liegende Ursachen.
11.2 Inanspruchnahme der Garantie im In- und Ausland
Sollte Ihr ADAM Audio Produkt innerhalb des Garantiezeitraumes einen Mangel aufweisen,
wenden Sie sich bitte an den Händler, bei dem das Gerät gekauft worden ist.
Wenn das Gerät nicht in dem Land benutzt wird, in dem es gekauft wurde, kann die
Reparatur gegebenenfalls auch durch den ADAM Audio Vertrieb des jeweiligen Landes
vorgenommen werden, wobei die Kosten der Reparatur durch den Auftraggeber zu übernehmen sind. Gleiches gilt für einen internationalen Transport zum und vom Händler, bei
dem das Gerät gekauft worden ist. Die zu reparierenden oder ersetzenden Teile hingegen
bleiben frei.
Die Adressen unserer Vertriebsgesellschaften erfahren Sie auf unserer Homepage:
www.adam-audio.com
26
8. Technische Daten
DA-SX D/A Converter
Eingangsformate
Unterstützte Abtastraten
Bit-Tiefe
THD+N @ 1 kHz, 0 dBfs, 24 Bit
AES/EBU (AES3), SPDIF, TOSLINK
32 kHz, 44.1 kHz, 48 kHz, 88.2 kHz, 96 kHz, 176.4 kHz, 192 kHz
16 - 24 Bit
≤ -104 dB (= ≤ 0,0006% bei allen Abtastraten, Bandbreite: 20 kHz)
Rauschspannungsabstand @ 0 dB Abschwächung
≥ 114 dB
Garantie
5 Jahre
Betriebstemperatur
0° C to 40° C (32° F to 104° F)
DA-SX Bedienungsanleitung / deutsch
27
ADAM Audio GmbH
Ederstr. 16
12059 Berlin
GERMANY
tel: +49 30-863 00 97-0
fax: +49 30-863 00 97-7
email: [email protected]
ADAM Audio UK Ltd.
email: [email protected]
www.adam-audio.com
ADAM Audio USA Inc.
email: [email protected]
Join us on Facebook
ADAM Audio China
email: [email protected]
Follow us on Twitter
DA-SX Manual/Bedienungsanleitung. Version 03.2011 English/deutsch.
All data subject to change without prior notice.
Änderung der technischen Daten ohne Vorankündigung vorbehalten.