1
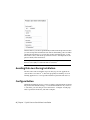
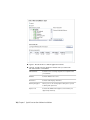
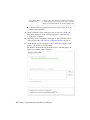
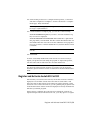
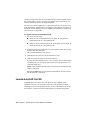
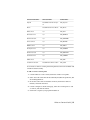
AutoCAD Civil 3D 2010
Stand-Alone Installation
Guide
April 2009
Contents
Chapter 1
Quick Start to Stand-Alone Installation . . . . . . . . . . . . . . 1
Preparing for Installation . . . . . . . . . . . . . . . . . . . . . . . . . 1
System Requirements . . . . . . . . . . . . . . . . . . . . . . . . . 1
Understanding Administrative Permission Requirements . . . . . . 3
Locating Your Serial Number and Product Key . . . . . . . . . . . 3
Avoiding Data Loss During Installation . . . . . . . . . . . . . . . 4
Configure Button . . . . . . . . . . . . . . . . . . . . . . . . . . . 4
Installing Multiple or Bundled Products . . . . . . . . . . . . . . . 5
Installing and Running the Product . . . . . . . . . . . . . . . . . . . . 6
Installing AutoCAD Civil 3D . . . . . . . . . . . . . . . . . . . . . 6
Register and Activate AutoCAD Civil 3D . . . . . . . . . . . . . . 13
Launch AutoCAD Civil 3D . . . . . . . . . . . . . . . . . . . . . 14
Add or Remove Features . . . . . . . . . . . . . . . . . . . . . . . 15
Reinstall or Repair AutoCAD Civil 3D . . . . . . . . . . . . . . . 16
Uninstall AutoCAD Civil 3D . . . . . . . . . . . . . . . . . . . . 17
Installing Design Review . . . . . . . . . . . . . . . . . . . . . . 18
Chapter 2
Customizing AutoCAD Civil 3D . . . . . . . . . . . . . . . . . . 19
Locating Customized Files .
Locate Data Link Files .
Locate Plot Style Files .
Locate Plotter Files . .
Locate the PMP File . .
.
.
.
.
.
.
.
.
.
.
.
.
.
.
.
.
.
.
.
.
.
.
.
.
.
.
.
.
.
.
.
.
.
.
.
.
.
.
.
.
.
.
.
.
.
.
.
.
.
.
.
.
.
.
.
.
.
.
.
.
.
.
.
.
.
.
.
.
.
.
.
.
.
.
.
.
.
.
.
.
.
.
.
.
.
.
.
.
.
.
.
.
.
.
.
.
.
.
.
.
.
.
.
.
.
.
.
.
.
.
. 19
. 20
. 20
. 21
. 21
iii
Locate Support Files . . . . . . . . . . . . . . . . . . . . .
Locate Drawing Template Files . . . . . . . . . . . . . . .
Locate Texture Files . . . . . . . . . . . . . . . . . . . . .
Customizing Issues . . . . . . . . . . . . . . . . . . . . . . . .
What are the benefits of identifying my industry? . . . . .
How is this information being used? . . . . . . . . . . . .
What happens if I skip or cancel Initial Setup? . . . . . . .
What are the benefits of selecting task-based tools? . . . .
What is a workspace? . . . . . . . . . . . . . . . . . . . .
How do I make changes to a workspace at a later time? . .
What is a drawing template file? . . . . . . . . . . . . . .
How do I modify drawing templates at a later time? . . . .
What are the benefits of customizing AutoCAD Civil 3D? .
How do I return to this later? . . . . . . . . . . . . . . . .
Chapter 3
.
.
.
.
.
.
.
.
.
.
.
.
.
.
.
.
.
.
.
.
.
.
.
.
.
.
.
.
. 21
. 24
. 24
. 24
. 25
. 25
. 25
. 26
. 26
. 26
. 26
. 27
. 27
. 28
Installation Troubleshooting . . . . . . . . . . . . . . . . . . . 29
General Installation Issues . . . . . . . . . . . . . . . . . . . . . .
What is Autodesk Vault . . . . . . . . . . . . . . . . . . . . .
What are the Hydraflow Extensions? . . . . . . . . . . . . . .
What is the Survey Data Collection Link Extension? . . . . .
How can I check my graphics card driver to see if it needs to be
updated? . . . . . . . . . . . . . . . . . . . . . . . . . . . .
What is a text editor used for? . . . . . . . . . . . . . . . . .
When performing a Typical installation, what gets
installed? . . . . . . . . . . . . . . . . . . . . . . . . . . .
What are Content Packs? . . . . . . . . . . . . . . . . . . . .
What are Configurable Folders? . . . . . . . . . . . . . . . .
Why should I install the Material Library? . . . . . . . . . . .
Where are my product manuals? . . . . . . . . . . . . . . . .
Licensing Issues . . . . . . . . . . . . . . . . . . . . . . . . . . . .
What is the difference between a stand-alone license and a
network license? . . . . . . . . . . . . . . . . . . . . . . . .
What is the benefit of using a network licensed version of the
software? . . . . . . . . . . . . . . . . . . . . . . . . . . . .
What is Internet Explorer used for? . . . . . . . . . . . . . . .
Uninstall and Maintenance Issues . . . . . . . . . . . . . . . . . .
When adding or removing features, how can I tell what features
get installed by default? . . . . . . . . . . . . . . . . . . . .
Is it possible to change the installation folder when adding or
removing features? . . . . . . . . . . . . . . . . . . . . . .
When should I reinstall the product instead of a repair? . . . .
Do I need my original disc to reinstall my software? . . . . . .
When I uninstall my software, what files are left on my
system? . . . . . . . . . . . . . . . . . . . . . . . . . . . .
iv | Contents
.
.
.
.
.
.
.
.
.
.
.
.
.
.
.
.
.
.
. 29
. 29
. 30
. 31
. . 31
. . 32
.
.
.
.
.
.
. 32
. 33
. 36
. 37
. 37
. 38
. . 38
. . 39
. . 39
. . 39
. . 39
. . 41
. . 41
. . 41
. . 41
Index . . . . . . . . . . . . . . . . . . . . . . . . . . . . . . . . 43
Contents | v
vi
Quick Start to Stand-Alone
Installation
1
The Stand-Alone Installation Guide provides instructions about how to prepare for installing and
install AutoCAD Civil 3D 2010. If you have never installed the product before, familiarize
yourself with the entire installation process and options before beginning.
For information about installing network-licensed versions of the program, see:
■
Choose an Installation Type in the AutoCAD Civil 3D 2010 Netwok Administrator’s Guilde.
■
Select a License Type (optional) in the AutoCAD Civil 3D 2010 Netwok Administrator’s
Guilde.
■
What is the difference between a stand-alone license and a network license? on page 38
■
What is the benefit of using a network licensed version of the software? on page 39
Preparing for Installation
To prepare for installation, you should review the system requirements,
understand administrative permission requirements, locate your AutoCAD Civil
3D serial number and product key, and close all running applications. Complete
these tasks, and you are ready to begin installing AutoCAD Civil 3D.
System Requirements
Make sure that your computer meets the minimum system requirements.
Whether your Windows operating system is the 32-bit or the 64-bit version,
the version is automatically detected during installation. AutoCAD Civil 3D
will run only in a 32-bit mode on all supported operating systems.
1
See the following table for hardware and software requirements.
32-bit Hardware and Software Requirements
Operating systems
Microsoft® Windows® XP Professional
SP2 or later
Microsoft Windows XP Professional 64bit Edition SP2 or later
For more information on Windows
Vista versions see
Microsoft Windows Vista® SP1 or later
or Microsoft Windows Vista 64-bit Edition SP1 or later including:
■
Windows Vista Enterprise
■
Windows Vista Business
■
Windows Vista Ultimate
■
Windows Vista Home Premium
Browser
Internet Explorer® 7.0 or later
CPU type
Windows XP - Intel® Pentium® 4 or AMD
Athlon™ Dual Core, 3.0 GHz or higher
with SSE2 technology
Windows Vista - Intel Pentium 4 or AMD
Athlon Dual Core, 3.0 GHz or higher
with SSE2 technology
Memory
Windows XP - 3 GB RAM
Windows Vista - 3 GB RAM
Display resolution
1280 x 1024 with True Color
Hard disk
Installation 7 GB and 2 GB free space
after installation
Pointing device
MS-Mouse compliant
3D Modeling Additional Requirements
1600 x 1200 or higher, 32-bit color
video display adapter (True Color) 128
MB or greater, Direct3D®-capable,
workstation-class graphics card
2 | Chapter 1 Quick Start to Stand-Alone Installation
NOTE Adobe Flash Player is not installed by default. If a version of Flash is not
currently installed on your system, a message is displayed requesting that you
download it from Adobe’s website. If you do not have Internet access, you can
also access the Flash installer on the AutoCAD Civil 3D disc.
Understanding Administrative Permission Requirements
To install AutoCAD Civil 3D, you must have administrator permissions. You
do not need to have domain administrative permissions. See your system
administrator for information about administrative permissions.
You do not need administrator permissions to run AutoCAD Civil 3D. You
can run the program as a limited user.
Locating Your Serial Number and Product Key
When you install AutoCAD Civil 3D, you are prompted for your serial number
and product key in the Product and User Information page. The serial number
and product key are located on the outside of the product packaging, or in
the email you received if you downloaded your product. Make sure to have
these available before you install the program so that you don't have to stop
in the middle of the installation.
The serial number must contain a three-digit prefix followed by an eight-digit
number. The product key consists of five digits.
Understanding Administrative Permission Requirements | 3
The information you enter is permanently retained with the product. Because
you can't change this information later without uninstalling, take care when
entering the information. To review this product information later, on the
InfoCenter toolbar, click the drop-down arrow next to the Help button (the
question mark). Then click About.
NOTE If you have lost your serial number or product key, contact the Autodesk
Business Center (ABC) at 1-800-538-6401 for assistance.
Avoiding Data Loss During Installation
The AutoCAD Civil 3D installation process may stop if some applications
®
(such as Microsoft Outlook or anti-virus programs) are running. Close all
running applications to avoid possible installation problems and data loss.
Configure Button
During the installation process, you choose either a typical installation (install
the product with default settings), or a customized installation. If you choose
to customize, you start that process in the Review - Configure - Install page.
Select a product from the list, and click Configure.
4 | Chapter 1 Quick Start to Stand-Alone Installation
The following dialog boxes and options are displayed:
■
Select the License Type - Stand-Alone license or Network license. If you choose
Network license, you also need to select the license server model - Single,
Distributed, or Redundant.
■
Select the Installation Type - Typical or Custom. If you choose a Typical
installation (default settings), the product installs the most common
application features. To see which features are included in a Typical
installation, see When performing a Typical installation, what gets
installed? on page 32 If you choose Custom, you select specific features to
install.
■
Include a Service Pack - If a service pack is available for your installation,
you can include it.
After you completed your choices, click Configuration Complete, review your
selections in the Review - Configure - Create page, and complete the
installation process.
NOTE To get a copy of your settings, click Copy to Clipboard.
If you do not wish to make configuration changes on the Review - Configure
- Install page, click Install. Then click Yes, to continue installing using the
typical configuration.
Installing Multiple or Bundled Products
Some Autodesk packages are comprised of multiple products or are part of
multi-product bundles.
In the Installation wizard, for packages containing multiple products, you can
choose which products you want to install. During the install process, you
are informed whether a copy of the software is already installed. You are also
Installing Multiple or Bundled Products | 5
warned if your system does not meet the minimum system requirements for
the product. Each product name is displayed on its own tabbed panel; you
can configure them individually.
If you purchased a package that is a multi-product bundle, such as an
educational or institutional package, you may have a package that includes
several Autodesk products. For these bundled packages, an Installer disc
contains information for all the products in the package. The Installer disc
helps you install all of the products.
Installing and Running the Product
To use the product, you must install the product, register and activate it, and
then launch it. You must have administrative permissions to install AutoCAD
Civil 3D.
This section provides instructions for installing and activating AutoCAD Civil
3D for an individual user on a stand-alone computer. For information about
installing network-licensed or multi-seat stand-alone versions of the program,
see the Network Administrator's Guide.
Installing AutoCAD Civil 3D
The AutoCAD Civil 3D installation wizard contains all installation-related
material in one place. From the installation wizard, you can access user
documentation, select a language-specific product, install supplemental tools,
and add online support services.
■
Review installation documentation before you install. It is recommended
that you take the time to familiarize yourself with the complete installation
process before you install AutoCAD Civil 3D. You can access PDF versions
of the installation and licensing manuals from the product's Installation
wizard by selecting the Read this Documentation selection, the
Documentation link at the bottom, left pane of the install pages, or through
the Help system.
You can also access PDFs from the product discs by navigating to the
documentation (docs) folder. For late-breaking information, it is also
recommended that you review the product Readme.
®
®
NOTE To view or print any files with an extension of .pdf, Adobe Reader
must be installed on your computer. If you do not have Adobe Reader, you
can download the latest version at www.adobe.com.
6 | Chapter 1 Quick Start to Stand-Alone Installation
To install AutoCAD Civil 3D using default values on a stand-alone computer
This is the fastest means of installing AutoCAD Civil 3D on your system. Only
default values are used which means it is a typical installation being installed
to C:\Program Files\<AutoCAD Civil 3D>.
1 Insert AutoCAD Civil 3D 2010 disc 1 into DVD-ROM drive.
2 In the AutoCAD Civil 3D Installation wizard, click Install Products.
3 Select the products you want to install. Click Next.
NOTE Autodesk Design Review 2010 is installed by default when you install
AutoCAD Civil 3D. It is recommended that you install Design Review if you
need to view DWF or DWFx files. For more information about Design Review,
see Installing Design Review.
4 Review the Autodesk software license agreement for your country or
region. You must accept this agreement to proceed with the installation.
Select your country or region, click I Accept, and then click Next.
NOTE If you do not agree to the terms of the license and want to terminate
the installation, click Cancel.
5 On the Products and User Information page, enter your serial number,
product key, and user information. Review the Privacy Policy from the link
at the bottom of the dialog box. After reviewing, click Next.
Installing AutoCAD Civil 3D | 7
NOTE The information you enter here is permanent and is displayed in the
Help menu on your computer. Because you can't change this information
later without uninstalling the product, make sure you enter the correct
information.
6 If you do not want to make configuration changes on the Review Configure - Install page, select Install. Then select Yes to continue
installing using the default configuration.
The wizard does the following:
■
Uses a Typical installation, which installs the most common
application features. To see which features are included in a Typical
installation, refer to When performing a Typical installation, what
gets installed? on page 32
■
Includes the Express Tools library. The library provides additional
productivity tools.
■
Installs AutoCAD Civil 3D to the default install path of C:\Program
Files\<AutoCAD Civil 3D>.
7 Click Install.
8 On the Installation Complete page, you can choose the following:
View the installation log file: If you want to view the installation log
file, its location is displayed.
View the AutoCAD Civil 3D Readme: The Readme file is opened from
this page when you click Finish. This file contains information that was
unavailable when the AutoCAD Civil 3D documentation was prepared.
If you do not want to view the Readme file now, clear the check box next
to Readme.
NOTE You can also view the Readme file after you have installed AutoCAD
Civil 3D.
To install AutoCAD Civil 3D using configured values on a stand-alone
computer
With this installation method, you can fine-tune exactly what gets installed
by using the Configure option. You can alter the installation type, the install
path, and the license type. You can also install Material libraries and Tutorial
files.
8 | Chapter 1 Quick Start to Stand-Alone Installation
1 Insert AutoCAD Civil 3D 2010 disc 1 into DVD-ROM drive.
2 In the AutoCAD Civil 3D Installation wizard, click Install Products.
3 Select the products you want to install. Click Next.
NOTE Autodesk Design Review 2010 is installed by default when you install
AutoCAD Civil 3D. It is recommended that you install Design Review if you
need to view DWF or DWFx files. For more information about Design Review,
see Installing Design Review on page 18.
4 Review the Autodesk software license agreement for your country or
region. You must accept this agreement to proceed with the installation.
Choose your country or region, click I Accept, and then click Next.
NOTE If you do not agree to the terms of the license and want to terminate
the installation, click Cancel.
5 On the Products and User Information page, enter your serial number,
product key, and user information. Review the Privacy Policy from the link
at the bottom of the dialog box. After reviewing, click Next.
NOTE The information you enter here is permanent and is displayed in the
Help menu on your computer. Because you can't change this information
later without uninstalling the product, make sure you enter the correct
information.
6 On the Review - Configure - Install page, click Configure to make
configuration changes such as installation type, installing optional tools,
or changing the installation path.
7 On the Select the License Type page, you can choose to install a
Stand-alone or Network license. Click Next.
8 On the Select the Installation Type page, you can choose to make the
following configuration changes:
Installing AutoCAD Civil 3D | 9
■
Typical - Installs the most common application features.
■
Custom - Installs only the application features that you select from
the Select Features to Install list
CAD Standards
Contains tools for reviewing design files for compliance with
your standards.
Database
Contains database access tools.
Dictionaries
Contains multi-language dictionaries.
Drawing Encryption
Allows you to use the Security Options dialog box to protect
a drawing with a password.
Express Tools
Contains AutoCAD Civil 3D support tools and utilities (not
supported by Autodesk).
10 | Chapter 1 Quick Start to Stand-Alone Installation
Fonts
Contains AutoCAD Civil 3D fonts and TrueType fonts.
Autodesk Impression
Toolbar
The Impression toolbar allows you to quickly export any view
to Autodesk Impression for advanced line effects.
Autodesk Seek
Autodesk Seek.
NOTE Seek will only be installed in the English version
of AutoCAD Civil 3D.
Material Library
The Material Library contains over 300 professionally built
materials to apply to your model.
New Features Workshop
Contains animated demos, exercises, and sample files to help
users learn the new features.
License Transfer Utility
Allows users to transfer an Autodesk product license between
computers.
NOTE The utility will not be installed on unlocked versions of AutoCAD Civil 3D.
Initial Setup
Allows users to set up their initial configuration of AutoCAD
Civil 3D (online content, workspaces) based on their units
system, industry, and commonly used task-based tools.
Reference Manager
Allows users to view and edit the paths of externally referenced
files associated with a drawing.
Samples
Contains various feature sample files.
Tutorials
Contains tutorials.
Hydraflow Extensions
Installs the Hydraflow Extensions that comprise hydraulics and
hydrology applications, including Hydraflow Storm Sewers,
Hydraflow Hydrographs, and Hydraflow Express.
Installing AutoCAD Civil 3D | 11
Survey Data Collection
Link Extension
■
Installs the Survey Data Collection Link Extension that allows
to transfer data from survey data collectors and convert raw
data files and coordinate data files into field book (.fbk) format.
Product Install Path - Specifies the drive and location where AutoCAD
Civil 3D will be installed.
9 On the Configure Content Packs page, select at least one content pack
and specify whether to create a desktop shortcut for it. See What are
Content Packs? on page 33
10 Optionally, on the Configurable Folders page, modify the default location
of the content folders. See What are Configurable Folders? on page 36
11 On the Include Service Packs page, if service packs are available for your
product, you can select to include them.
The installer automatically checks autodesk.com for available updates. If
updates are available, a link is displayed.
12 | Chapter 1 Quick Start to Stand-Alone Installation
12 Click another product tab to configure another product, or click Next
and then Configuration Complete to return to the Review - Configure Install page. Then, click Install.
NOTE If you want a copy of your configuration summary information, click
the Copy to Clipboard button.
13 On the Installation Complete page, you can choose the following:
View the installation log file If you want to view the installation log
file, its location is displayed.
View the AutoCAD Civil 3D Readme The Readme file is opened from
this page when you click Finish. This file contains information that was
unavailable when the AutoCAD Civil 3D documentation was prepared.
If you do not want to view the Readme file now, clear the check box next
to Readme.
NOTE You can also view the Readme file after you have installed AutoCAD
Civil 3D.
14 Click Finish.
You have successfully installed AutoCAD Civil 3D. You are now ready to
register your product and start using the program. To register the product,
start AutoCAD Civil 3D and follow the on-screen instructions.
NOTE Autodesk does not recommend or support the distribution of AutoCAD
Civil 3D using imaging software. However, if you plan to use this method of
distribution, please review the instructions detailed in the Network Administrator’s
Guide.
Register and Activate AutoCAD Civil 3D
The first time you start AutoCAD Civil 3D, the Product Activation wizard is
displayed. You can either activate AutoCAD Civil 3D at that time or run
AutoCAD Civil 3D and activate it later. Until you register and enter a valid
activation code for AutoCAD Civil 3D, you are operating the program in trial
mode and the Product Activation wizard is displayed for 30 days from the first
time that you run the program.
If after 30 days of running AutoCAD Civil 3D in trial mode you have not
registered and provided a valid activation code, your only option is to register
Register and Activate AutoCAD Civil 3D | 13
and activate AutoCAD Civil 3D. You will not be able to run in trial mode after
the 30 days expires. Once you register and activate AutoCAD Civil 3D, the
Product Activation wizard is no longer displayed.
The fastest and most reliable way to register and activate your product is by
using the Internet. Simply enter your registration information and send it to
Autodesk over the Internet. Once you submit your information, registration
and activation occur quickly.
To register and activate AutoCAD Civil 3D
1 Do one of the following:
■
(Windows XP) Click Start menu ➤ Programs ➤ Autodesk ➤
<AutoCAD Civil 3D> ➤ <AutoCAD Civil 3D>.
■
(Windows Vista) Click Start menu ➤ All Programs ➤ Autodesk ➤
<AutoCAD Civil 3D> ➤ <AutoCAD Civil 3D>.
2 In the AutoCAD Civil 3D Product Activation wizard, select Activate the
Product, and then click Next.
This starts the Register Today process.
3 Click Register and Activate (Get an Activation Code).
4 Click Next and follow the on-screen instructions.
If you do not have Internet access, or if you want to use another method
of registration, you can register and activate AutoCAD Civil 3D in one
of the following ways:
Email Create an email message with your registration information and
send it to Autodesk.
Fax or Post/Mail Enter your registration information, and fax or mail
the information to Autodesk.
Launch AutoCAD Civil 3D
Assuming that you followed all of the previous steps outlined in this
installation section, you can launch AutoCAD Civil 3D and start taking
advantage of its new and updated features. For more information about the
new features, see the New Features Workshop after you launch the product.
14 | Chapter 1 Quick Start to Stand-Alone Installation
You can start AutoCAD Civil 3D in the following ways:
■
Desktop shortcut icon. When you install AutoCAD Civil 3D, an AutoCAD
Civil 3D shortcut icon is placed on your desktop unless you cleared that
option during installation. Double-click the AutoCAD Civil 3D icon to
start the program.
■
Start menu. On the Start menu (Windows XP), click Programs or (Windows
Vista) All Programs ➤ Autodesk ➤ <AutoCAD Civil 3D> ➤ <AutoCAD Civil
3D>.
■
Location where the AutoCAD Civil 3D is installed. If you have administrative
permissions, you can run AutoCAD Civil 3D in the location where you
installed it. If you are a limited-rights user, you must run AutoCAD Civil
3D from the Start menu or from the desktop shortcut icon. If you want to
create a custom shortcut, make sure that the Start In directory for the
shortcut points to a directory where you have write permissions.
Add or Remove Features
You can add or remove AutoCAD Civil 3D features at any time. For example,
you may have chosen a Custom installation option when you first installed
AutoCAD Civil 3D, but now you want to add features that you did not install
originally. Or you may no longer need to use all of the features that were
installed originally. You can add or remove features by using the Add or
Remove Programs dialog box.
To add or remove features
1 Do one of the following:
■
(Windows XP) Click Start menu ➤ Settings ➤ Control Panel ➤
Add or Remove Programs.
■
(Windows Vista) Click Start menu ➤ Control Panel ➤ Programs
and Features ➤ Uninstall or Change a Program.
2 In the Add or Remove Programs dialog box, click AutoCAD Civil 3D, and
then click Change/Remove.
The AutoCAD Civil 3D Installation wizard re-opens in Maintenance Mode.
3 Click Add or Remove Features.
Add or Remove Features | 15
4 On the Add/Remove Features page, select a feature to install or uninstall.
The icons to the left of the selections give you an indication of the action
that will be taken.
Indicates a feature that was marked for installation will be in a typical
installation.
Indicates a feature that is not currently scheduled for installation.
Indicates a feature that was not originally marked for installation, but
was added to the installed feature list.
Indicates an installed feature that is chosen for removal.
NOTE If you need to revert to AutoCAD Civil 3D features that you selected
in your original installation, click Cancel.
Click Next.
5 On the Configure Content Packs page, select the content packs to
uninstall. Click Next.
6 On the Update AutoCAD Civil 3D Installation page, click Next.
7 On the Update Complete page, you are informed when the updates have
been performed. Click Finish.
Reinstall or Repair AutoCAD Civil 3D
If you accidentally delete or alter files that are required by AutoCAD Civil 3D,
AutoCAD Civil 3D might not perform correctly, and you might receive error
messages when you try to execute a command or find a file. You can attempt
to fix this problem by reinstalling or repairing AutoCAD Civil 3D. The
reinstallation or repair uses the features that were part of the installation type
you chose when you initially installed the program.
To reinstall or repair AutoCAD Civil 3D
1 Do one of the following:
■
(Windows XP) Click Start menu ➤ Settings ➤ Control Panel ➤
Add or Remove Programs.
■
(Windows Vista) Click Start menu ➤ Control Panel ➤ Programs
and Features ➤ Uninstall or Change a Program.
16 | Chapter 1 Quick Start to Stand-Alone Installation
2 Then, do one of the following:
■
(Windows XP) In the Add or Remove Programs window, select
AutoCAD Civil 3D, then click Change/Remove.
■
(Windows Vista) In the Uninstall or Change a Program window, select
AutoCAD Civil 3D, then click Uninstall/Change.
The AutoCAD Civil 3D Installation wizard re-opens in Maintenance mode.
3 Select Repair or Reinstall. On the Select Repair or Reinstall page, select
one of the following options, and then click Next to start the process.
■
Repair My <AutoCAD Civil 3D> Installation. This option replaces all
registry entries that AutoCAD Civil 3D initially installed and restores
AutoCAD Civil 3D to its default state. If you are missing AutoCAD
Civil 3D files, use this option.
■
Reinstall My <AutoCAD Civil 3D> Installation. This option repairs the
registry and reinstalls all files from the original installation. Use this
option if the Repair My <AutoCAD Civil 3D> Installation option does
not solve the problem.
4 On the Repair Complete page, click Finish.
Uninstall AutoCAD Civil 3D
When you uninstall AutoCAD Civil 3D, all components are removed. This
means that even if you've previously added or removed components, or if
you've reinstalled or repaired AutoCAD Civil 3D, the uninstall removes all
AutoCAD Civil 3D installation files from your system.
To uninstall AutoCAD Civil 3D
1 Do one of the following:
■
(Windows XP) Click Start menu ➤ Settings ➤ Control Panel ➤
Add or Remove Programs.
■
(Windows Vista) Click Start menu ➤ Control Panel ➤ Programs
and Features ➤ Uninstall or Change a Program.
2 Then, do one of the following:
■
(Windows XP) In the Add or Remove Programs window, select
AutoCAD Civil 3D, then click Change/Remove.
Uninstall AutoCAD Civil 3D | 17
■
(Windows Vista) In the Uninstall or Change a Program window, select
AutoCAD Civil 3D, then click Uninstall/Change.
The AutoCAD Civil 3D Installation wizard re-opens in Maintenance mode.
3 Click Uninstall.
4 On the Uninstall <AutoCAD Civil 3D> page, click Next to remove AutoCAD
Civil 3D from the system.
5 When informed that the product has been successfully uninstalled, click
Finish.
NOTE Even though AutoCAD Civil 3D is removed from your system, the software
license remains. If you reinstall AutoCAD Civil 3D at some future time, you will
not have to register and re-activate the program.
Installing Design Review
Autodesk Design Review 2010 is installed by default when you install AutoCAD
Civil 3D. Install Design Review if you need to view DWF or DWFx files.
NOTE If you use Windows Vista, you can view and print DWFx files without
installing Design Review.
Autodesk Design Review is a free program used for creating and reviewing
DWF or DWFx files. An open, published, and secure file format developed by
Autodesk, DWF enables you to combine and publish rich 2D- and 3D-design
data, and share it with others.
The following commands create DWF or DWFx files.
■
PUBLISH
■
PLOT
■
3DDWF
■
PUBLISH TO WEB
■
EXPORT
■
AUTOPUBLISH
■
SSM
18 | Chapter 1 Quick Start to Stand-Alone Installation
Customizing AutoCAD Civil
3D
2
If you have a previous version of AutoCAD Civil 3D installed on your system, you can install
a newer version of AutoCAD Civil 3D and keep other versions of the program on the same
system. This is called a side-by-side installation. If you've purchased an upgrade version of
AutoCAD Civil 3D, you are required to uninstall the previous version within 120 days of
installing your newer product. See your license agreement for more information.
Locating Customized Files
Beginning with AutoCAD Civil 3D 2004, the location of some of the customized
files has changed to allow for:
■
Limited user rights on a workstation. You can run AutoCAD Civil 3D as a
limited user. This means that you no longer need power user or Administrator
permissions to run AutoCAD Civil 3D once it is installed.
■
Roaming profiles. Roaming profiles allow you to log on to any computer
within a network and retain your user settings. Some files, such as your
personal settings and documents, follow you from computer to computer,
while other files, such as templates (including Publish to Web templates),
reside only on your system.
If roaming profiles are allowed on your network, your “roamable” files are
located in the \Application Data\Autodesk\<Product Version> folder, and your
“nonroamable” files are located in the \Local Settings\Application
Data\Autodesk\<Product Version> folder.
19
NOTE In some operating systems, the folders that are located under your profile
are hidden by default. To display these files, you may need to change your display
settings. On the Start menu, click Control Panel ➤ Folder Options. In the Folder
Options dialog box, on the View tab, click Show Hidden Files and Folders.
Locate Data Link Files
Beginning with AutoCAD Civil 3D 2004, the default location of your data link
files has changed. For information about the default location of these files,
see Locating Customized Files on page 19.
To locate your data link files
1 In AutoCAD Civil 3D, at the command line, enter options.
2 In the Options dialog box, Files tab, expand Data Sources Location.
3 Under Data Sources Location, click the path name to view the location
of your data link files.
NOTE The changes you make do not take effect until you restart the program.
Locate Plot Style Files
Beginning with AutoCAD Civil 3D 2004, the default location of your plot
style files has changed. For information about the default location of these
files, see Locating Customized Files on page 19.
To locate your plot style files
1 In AutoCAD Civil 3D, at the command line, enter options.
2 In the Options dialog box, Files tab, expand Printer Support File Path.
3 Expand Plot Style Table Search Path file.
4 Under Plot Style Table Search Path, click the path name to view the
location of your plot style files.
NOTE You can also locate your plot style files by entering stylesmanager at the
AutoCAD Civil 3D command line.
20 | Chapter 2 Customizing AutoCAD Civil 3D
Locate Plotter Files
Beginning with AutoCAD Civil 3D 2004, the default location of your plotter
files has changed. For information about the default location of these files,
see Locating Customized Files on page 19.
To locate your plotter files
1 In AutoCAD Civil 3D, at the command line, enter options.
2 In the Options dialog box, Files tab, expand Printer Support File Path.
3 Expand Printer Configuration Search Path.
4 Under Printer Configuration Search Path, click the path name to view
the location of your plotter files.
NOTE You can also locate your plotter files by entering plottermanager on the
AutoCAD Civil 3D command line.
Locate the PMP File
Beginning with AutoCAD Civil 3D 2004, the default location of your PMP file
has changed. For information about the default location of this file, see
Locating Customized Files on page 19.
To locate your PMP file
1 In AutoCAD Civil 3D, at the command line, enter options.
2 In the Options dialog box, Files tab, expand Printer Support File Path.
3 Under Printer Description File Search Path, click the path name to view
the location of your PMP file.
Locate Support Files
Beginning with AutoCAD Civil 3D 2004, the default location for some of your
support files has changed. For information about the default location of these
files, see Locating Customized Files on page 19.
Support files include the following:
■
Configuration file (acad2010.cfg)
Locate Plotter Files | 21
■
Customization file (acad.cui)
■
Custom icon files
■
Help and miscellaneous files
■
Font mapping file (acad.fmp)
■
Alternate font file (simplex.shx)
■
Support path files (acad.dcl, acad.lin, acad.mnl, acad.pat, acad.pgp, acad.psf,
acad.unt, acadiso.lin, acadiso.pat, ase.dcl, base.dcl, dbcon.cui, doshelp.dcl, and
gdt.shx)
To find the default location of the configuration file
1 In AutoCAD Civil 3D, at the command line, enter options.
2 In the Options dialog box, Files tab, expand Help and Miscellaneous File
Names.
3 Expand Configuration File.
4 Under Configuration File, click the path name to view the location of
your configuration file.
To find the default location of the customization files
1 In AutoCAD Civil 3D, at the command line, enter options.
2 In the Options dialog box, Files tab, expand Customization Files.
3 Expand Main Customization File.
4 Under Main Customization File, click the path name to view the location
of your main customization file.
5 Expand Enterprise Customization File.
6 Under Enterprise Customization File, click the path name to view the
location of your enterprise customization files.
NOTE By default, the path to an enterprise customization file is empty until
you define the file. For more information about defining a customization file,
see “Customize the User Interface” in the Customization Guide.
22 | Chapter 2 Customizing AutoCAD Civil 3D
To find the default location of the custom icon files
1 In AutoCAD Civil 3D, at the command line, enter options.
2 In the Options dialog box, Files tab, expand Customization Files.
3 Under Custom Icon Location, click the path name to view the location
for the custom button image files used with your customization files.
To find the default location of the Help and miscellaneous files
1 In AutoCAD Civil 3D, at the command line, enter options.
2 In the Options dialog box, Files tab, expand Help and Miscellaneous File
Names.
3 Expand the file you want to locate, and then click the path name to view
the location of the files.
To find the default location of the font mapping file
1 In AutoCAD Civil 3D, at the command line, enter options.
2 In the Options dialog box, Files tab, expand Text Editor, Dictionary, and
Font File Names.
3 Expand Font Mapping File.
4 Under Font Mapping File, click the path name to view the location of
your font mapping file.
To find the default location of the alternate font file
1 In AutoCAD Civil 3D, at the command line, enter options.
2 In the Options dialog box, Files tab, expand Text Editor, Dictionary, and
Font File Names.
3 Expand Alternate Font File.
4 Under Alternate Font File, click the path name to view the location of
your alternate font file.
To find the default location of the support path files
1 In AutoCAD Civil 3D, at the command line, enter options.
2 In the Options dialog box, Files tab, expand Support File Search Path.
Locate Support Files | 23
3 Under Support File Search Path, click a path name to view the location
of your support files.
Locate Drawing Template Files
Beginning with AutoCAD Civil 3D 2004, the default location of your drawing
template files has changed. For information about the default location of these
files, see Locating Customized Files on page 19.
To locate your drawing template files
1 In AutoCAD Civil 3D, at the command line, enter options.
2 In the Options dialog box, Files tab, expand Template Settings.
3 Under Template Settings, expand Drawing Template File Location.
4 Under Drawing Template File Location, click the path name to view the
location of your drawing template files.
Locate Texture Files
Beginning with AutoCAD Civil 3D 2004, the default location of your texture
files has changed. For information about the default location of these files,
see Locating Customized Files on page 19.
To locate your texture files
1 In AutoCAD Civil 3D, at the command line, enter options.
2 In the Options dialog box, Files tab, expand Texture Maps Search Path.
3 Under Texture Maps Search Path, click the path name to view the location
of your texture files.
Customizing Issues
This section outlines common issues and their solutions with regards to and
customizing AutoCAD Civil 3D.
24 | Chapter 2 Customizing AutoCAD Civil 3D
What are the benefits of identifying my industry?
By identifying your industry, Initial Setup can determine which default drawing
template might be the one that best fits your needs. Along with defining the
default drawing template, the industry you choose is also used to:
■
Identify partner products. Partner products are developed by third-party
developers; they extend the base functionality of your product and add
specific functionality that is related to your industry. For more information
about partner products, see http://partnerproducts.autodesk.com/.
■
Control Autodesk Seek results. Autodesk Seek is a content search site that
contains symbols, specifications, and other design-related content that
might be placed into a drawing or bid package. The specified industry
filters the information that is found based on the content that is best
related to you. For more information about Autodesk Seek, see
http://seek.autodesk.com/.
How is this information being used?
The information gathered from Initial Setup is used to configure several
different features and to help guide the future direction of the program. The
following features are customized with Initial Setup:
■
The default drawing template (DWT) file used to create new drawings.
■
The industry that best relates to you to use for filtering search results on
Autodesk Seek.
■
Which task-based tools to display in a workspace.
No information is shared with Autodesk about the choices you make unless
you participate in the Customer Involvement Program (CIP). For information
about the Customer Involvement Program, see Customer Involvement Program
(CIP) in the Network Administrator’s Guide.
What happens if I skip or cancel Initial Setup?
If you skip or cancel Initial Setup, AutoCAD Civil 3D is not changed from its
current state. You can return to Initial Setup when AutoCAD Civil 3D is
restarted by checking Remind Me the Next Time AutoCAD Civil 3D Starts on
the Skip Initial Setup page or through the Options dialog box.
What are the benefits of identifying my industry? | 25
To change settings from Initial Setup through the Options dialog box
1 Click the Application menu button ➤ Options.
2 In the Options dialog box, User Preferences tab, click Initial Setup.
3 In Initial Setup, make the desired changes and click Finish.
4 In the Options dialog box, click OK.
What are the benefits of selecting task-based tools?
Workspaces control which task-based tools are displayed in the application
window and when they are displayed. You can create different workspaces
based on the types of drawings you work on. For more information about
customizing the user interface and workspaces, see Customize Workspaces in
the AutoCAD Customization Guide.
What is a workspace?
Workspaces are sets of menus, toolbars, palettes, and ribbon control panels
that are grouped and organized so that you can work in a custom, task-oriented
drawing environment. When you use a workspace, only the menus, toolbars,
and palettes that are relevant to a task are displayed. For more information
about customizing workspaces, see Workspaces in the AutoCAD Civil 3D 2010
User’s Guide.
How do I make changes to a workspace at a later time?
Workspaces are used to control many of the tools displayed in the Application
window of AutoCAD Civil 3D. You can modify the current workspace in a
limited way from the Application window or you have full control over all
aspects of a workspace with the Customize User Interface (CUI) Editor. For
more information about customizing workspaces, see Customize Workspaces
in the AutoCAD Customization Guide.
What is a drawing template file?
A drawing template (DWT) file is used to provide consistency for each new
drawing (DWG) file that is created. DWT files can contain named objects,
26 | Chapter 2 Customizing AutoCAD Civil 3D
drawing based settings, and geometric objects. Stored named objects include
layers, and text and dimension styles among others. Along with named objects,
a DWT file can hold values for drawing based system variables, and any
geometric object that might be common across multiple drawings such as a
title block. For information about using a DWT file, see Use a Template File
to Start a Drawing in the AutoCAD User’s Guide.
How do I modify drawing templates at a later time?
Drawing template (DWT) files are no different than a drawing (DWG) file,
with the exception of its file extension. Once a DWT file is opened, you can
modify named objects such as layers, and text and dimension styles just as
you would in a drawing. You open a DWT file with the OPEN command.
To open a drawing template (DWT) file
1 Click the Application menu button ➤ Open.
2 In the Select File dialog box, select Drawing Template (*.dwt) from the
Files of Type drop-down list.
3 Browse to and select the drawing template (DWT) file you want to modify.
4 Click Open.
5 Make the desired changes to the DWT file.
6 Click the Application menu button ➤ Save.
What are the benefits of customizing AutoCAD Civil 3D?
Customizing AutoCAD Civil 3D provides many benefits that can increase your
productivity and make your drawings have a consistent appearance.
Customization can be as simple as creating a block that can be used in many
drawings over and over again, such as a title block, to setting up a default
template with Initial Setup, or customizing the user interface with the
Customize User Interface (CUI) Editor. For information about customizing
the user interface, see Work with the Customize User Interface (CUI) Editor
in the AutoCAD Customization Guide.
How do I modify drawing templates at a later time? | 27
How do I return to this later?
You can return to Initial Setup in two ways. You can check the Remind Me
the Next Time AutoCAD Civil 3D 2010 Starts check box on the Skip Initial
Setup page. Initial Setup displays the next time you start AutoCAD Civil 3D.
You can also change settings for Initial Setup through the Options dialog box.
28 | Chapter 2 Customizing AutoCAD Civil 3D
Installation
Troubleshooting
3
This section provides solutions to installation issues and answers to commonly asked questions
that may arise while installing your product(s). Additional troubleshooting information and
support is also available at http://autodesk.com/support.
General Installation Issues
The following outlines common issues and their solutions that may arise while
you are performing a general installation of your product(s).
What is Autodesk Vault
Autodesk Vault is a project management solution that can be used with AutoCAD
Civil 3D in a collaborative environment involving multiple design teams. Based
on the client-server networking model, the main Vault database resides on a
designated server and can be accessed from client computers of project
participants. Vault allows you to share and manage not only DWG files, but all
of your engineering and related data, such as hydraulic designs, analyses, and
data generated from Microsoft Office applications or other design software.
You can install Autodesk Vault during the AutoCAD Civil 3D installation. Select
the corresponding option on the Select the Products to Install page of the
Installation wizard.
29
For more information on Autodesk Vault, click the Documentation link from
the AutoCAD Civil 3D 2010 Installation wizard or see the AutoCAD Civil 3D
2010 online help.
What are the Hydraflow Extensions?
The Hydraflow extensions are comprised of the following applications:
■
Hydraflow Storm Sewers Extension
Hydraflow Storm Sewers Extension for AutoCAD Civil 3D is a full-featured
application for urban hydrosystems engineering. It is designed primarily
for hydrologic and hydraulic analysis of simple and complex storm sewer
networks. It can be used as a basic tool for determining the hydraulic grade
line in an existing system or planning and designing new systems.
■
Hydraflow Hydrographs Extension
Hydraflow Hydrographs Extension for AutoCAD Civil 3D is an application
for urban hydrosystems engineering. It is designed primarily for hydrologic
analysis of both simple and complex drainage basins. It can be used as a
basic tool for determining runoff from various historical and synthetic
storms, and in planning or modeling flood control measures, such as
detention ponds.
■
Hydraflow Express Extension
Hydraflow Express Extension for AutoCAD Civil 3D is an application for
performing everyday hydraulics and hydrology tasks, such as designing
culverts, open channels, inlets, and weirs. Hydraflow Express Extension
enables you to quickly generate informative graphs, rating curves, and
on-screen reports as well as formal printed reports.
To install the Hydraflow extensions, ensure that the corresponding option is
selected. It is selected by default in Typical installation.
30 | Chapter 3 Installation Troubleshooting
What is the Survey Data Collection Link Extension?
Survey Data Collection Link extension for AutoCAD Civil 3D is an application
that allows you to transfer data from data collectors and convert raw data files
and coordinate data files into field book (.fbk) format. You can then import
the .fbk file using the Survey functionality in AutoCAD Civil 3D.
To install Survey Data Collection Link extension, ensure that the corresponding
option is selected. It is selected by default in Typical installation.
How can I check my graphics card driver to see if it needs
to be updated?
It is recommended that you verify and update your graphics card driver to
optimize your program. Use the following procedure to identify your current
graphics card driver.
To identify your graphics card driver
1 Start AutoCAD Civil 3D.
2 At the command line, enter 3dconfig.
What is the Survey Data Collection Link Extension? | 31
3 In the Adaptive Degradation and Performance Tuning dialog box, click
View Tune Log.
4 Review the 3D Device section for information about your system's graphics
card driver and driver version.
TIP Many newer graphic cards offer tabbed pages where you can learn more
precise information about your specific graphic card. If specific tab pages are
present, refer to them instead of the Adapter tab.
What is a text editor used for?
The text editor you designate during installation is used for editing text files
such as PGP and CUS dictionary files while you are running your product.
When performing a Typical installation, what gets
installed?
A Typical installation includes the following features:
CAD Standards
Contains tools for reviewing design files for compliance with
your standards.
Database
Contains database access tools.
Dictionaries
Contains multi-language dictionaries.
Drawing Encryption
Allows you to use the Security Options dialog box to protect
a drawing with a password.
Express Tools
Contains AutoCAD Civil 3D support tools and utilities (not
supported by Autodesk).
Fonts
Contains AutoCAD Civil 3D fonts and TrueType fonts.
Autodesk Impression
Toolbar
The Impression toolbar allows you to quickly export any view
to Autodesk Impression for advanced line effects.
32 | Chapter 3 Installation Troubleshooting
Autodesk Seek
Autodesk Seek.
NOTE Seek will only be installed in the English version of
AutoCAD Civil 3D.
Material Library
Contains over 300 professionally buit materials to apply to
your model.
New Features Workshop
Contains animated demos, exercises, and sample files to help
users learn the new features.
License Transfer Utility
Allows users to transfer an Autodesk product license between
computers.
NOTE The utility will not be installed on unlocked versions of
AutoCAD Civil 3D.
Initial Setup
Allows users to set up their initial configuration of AutoCAD
Civil 3D (online content, workspaces) based on their units
system, industry, and commonly used task-based tools.
Reference Manager
Allows users to view and edit the paths of externally referenced
files associated with a drawing.
Samples
Contains various feature sample files.
Hydraflow Extensions
Installs the Hydraflow Extensions that comprise hydraulics and
hydrology applications, including Hydraflow Storm Sewers,
Hydraflow Hydrographs, and Hydraflow Express.
Survey Data Collection
Link Extension
Installs the Survey Data Collection Link Extension that allows
to transfer data from survey data collectors and convert raw
data files and coordinate data files into field book (.fbk) format.
What are Content Packs?
Content packs are collections of locale- and discipline-specific files to install
with AutoCAD Civil 3D. The available content packs allow you to work on
US or international projects and always reference the appropriate standards
for each geographical region.
What are Content Packs? | 33
Files contained in content packs can include the following data:
■
Layer standard files
■
Standard blocks of various types
■
Border sheets for plotting
■
Civil drawing templates
■
Symbol drawings
■
Superelevation standards
■
Reporting style sheets
■
Pipe catalogs
■
Corridor catalogs
■
Tool Palettes for subassemblies, material styles, and landscape symbols
■
API Samples
■
Reports
You can select content packs on the Configure Content Packs page of the
installation wizard. You can select the AutoCAD-only profile, AutoCAD Civil
3D Metric or Imperial profiles, or the Benelux profile. By default, there is only
one shortcut icon created on the desktop. You can specify whether to display
additional desktop shortcuts for each of the installed profiles. You can also
specify a new location for the Content Browser Library file.
Each content pack is installed in a separate program group, which allows you
to create a content pack shortcut that was not created using the installation
wizard. You must install at least one content pack.
The following table lists the content packs available, shortcut names, and
profile names for AutoCAD Civil 3D 2010.
Content Pack Name
Shortcut Name
Profile Name
AutoCAD Civil 3D 2010 as
AutoCAD
AutoCAD Civil 3D as AutoCAD
2010
AutoCAD
34 | Chapter 3 Installation Troubleshooting
Content Pack Name
Shortcut Name
Profile Name
Imperial
AutoCAD Civil 3D 2010 Imperial
C3D_Imperial
Metric
AutoCAD Civil 3D 2010 Metric
C3D_Metric
ANZ Content
n/a
C3D_ANZ
Benelux Content
n/a
C3D_BENELUX
Denmark Content
n/a
C3D_DENMARK
France Content
n/a
C3D_FRANCE
DACH Content
n/a
C3D_DACH
Norway Content
n/a
C3D_NORWAY
Romania Content
n/a
C3D_ROMANIA
Sweden Content
n/a
C3D_SWEDEN
UKIE Content
n/a
C3D_UKIE
US California Content
AutoCAD Civil 3D 2010 USCA
C3D_USCA
You can add or remove content packs using the AutoCAD Civil 3D 2010 Add
or Remove Features utility.
To add or remove content packs
1 On the Windows Control Panel, click Add or Remove Programs.
2 Select AutoCAD Civil 3D from the Currently Installed Programs list, and
click Change/Remove.
3 In the AutoCAD Civil 3D installation wizard, click Add or Remove
Features, and then click Next.
4 On the Configure Content Packs page, select the content packs to add
or remove, and then click Next.
5 Click Next to update your program installation.
What are Content Packs? | 35
What are Configurable Folders?
On the Configurable Folders page, you can specify custom locations for folders
with specific content. Content folders are devided into two groups: Support
and Survey.
The Support content folder group includes the following folders:
Folder name
Contains
Working Projects
Local copies of files for all the projects stored in the Vault
database.
Data
Items, such as preview drawings, quantities reports style
sheets, and layer and corridor standards.
Content Roots
A predetermined folder structure that can be used for
your new projects. When a new project is created, you
can specify to use a project template, and the new project
will inherit a folder structure defined in the Content Roots
folder.
Corridor Model
Corridor model and pipe network support files.
The Survey content folder group includes the following folders:
Folder name
Contains
Survey Equipment Database
Survey Equipment database files. For example, each
database can contain a library of equipment by
manufacturer.
Survey Figure Database
Survey Figure Prefix database files. Each figure prefix
database contains line feature naming conventions
pertaining to company or third-party standards.
Survey Database Settings
SDB_SET files containing settings for the creation of
new survey databases. Each file can be a survey
database settings template.
Survey Extended Properties
Definitions
SDX_DEF (extended properties schema) files, as well
as LandXML and user-defined extended property
schema files.
36 | Chapter 3 Installation Troubleshooting
Folder name
Contains
Survey Linework Code Sets
User-defined linework coding definitions (or conventions), each set pertaining either to company or
third-party standards.
Specify one of the following configurable folder modes for your content
■
Default
Default content files are installed in the default location in the Document
and Settings folder in Windows XP and Program Data folder in Windows
Vista. When you uninstall the program, default content files are also
uninstalled.
■
Local
Local content files are installed in non-standard locations. You can install
a content group to a location other than the default folder. When you
uninstall the program, local content files are also uninstalled.
■
Shared
Shared content files are installed in a shared location, enabling multiple
users to access the same copy of AutoCAD Civil 3D content. If you specify
the same location for a subsequent installation, you will be prompted to
overwrite the existing shared content files. When you uninstall the
program, shared content files are not uninstalled.
Why should I install the Material Library?
The Material Library contains over 300 professionally made materials that you
can immediately apply to objects in your model. They can also act as a basis
for custom materials that you want to create.
For more information regarding materials, see Materials and Textures in the
AutoCAD User’s Guide.
Where are my product manuals?
Documentation for AutoCAD Civil 3D is in two formats: PDF files and CHM
files.
■
PDF files are made available during installation; click the Documentation
link in the installer.
Why should I install the Material Library? | 37
■
CHM files are available after the product is installed; they are accessed in
the Help system in the product.
The PDF files are also available from within your installed product’s Help
system.
Files are also installed to the \<AutoCAD Civil 3D>\Help folder.
Licensing Issues
This section outlines common issues and their solutions with regards to
software licenses and licensing your product(s).
What is the difference between a stand-alone license
and a network license?
Stand-alone licensed products are registered and activated to an individual
workstation. While the software can be installed on multiple systems in your
facility, the license only allows one system to be operational. If you need to
run more systems, you need to purchase more stand-alone licensed products,
or consider converting to network licenses.
Network licensed products rely on the Network License Manager to keep track
of software licenses. The software can be installed and run on multiple systems,
up to the maximum number of licenses you’ve purchased. The Network License
Manager “checks out” licenses until they are all in use. No further systems
can run the program until a license is “checked in.” If you need to run more
systems, you can purchase additional licenses for the Network License Manager
to maintain.
Stand-alone licensed products are registered and activated to an individual
workstation. While the software can be installed on multiple systems in your
facility, the license only allows one system to be operational. If you need to
run more systems, you need to purchase more stand-alone licensed products,
or consider converting to multi-seat stand-alone licenses.
You cannot purchase a network licensed version of PRODNAME. However, a
multi-seat stand-alone licensed version is available that does not rely upon
servers to maintain licenses. Multi-seat stand-alone licensing means that each
installation of your product uses a single serial number for registration and
activation.
38 | Chapter 3 Installation Troubleshooting
What is the benefit of using a network licensed version
of the software?
Network licensed products are recommended for large drafting/design facilities,
classrooms, and lab environments. The main advantage is that you can install
products on more systems than the number of licenses you have purchased
(for example, purchasing 25 licenses but installing on 40 workstations). At
any one time, products will run on the maximum number of systems for
which you have licenses. This means you get a true floating license. If software
needs to be run on more systems, additional licenses can be purchased.
Registration and activation occurs only once and the licenses are maintained
on your Network License Server.
What is Internet Explorer used for?
After installing your product, you can operate in trial mode for a given number
of days. Whenever you launch the program, you are prompted to activate the
software. When you choose to activate the software, Internet Explorer makes
this process much faster. Once you entered your registration data and submit
it to Autodesk, an activation code is returned and you are not prompted again
during startup.
Uninstall and Maintenance Issues
This section outlines common issues and their solutions with regards to adding
and removing features, reinstalling or repairing your installation, and
uninstalling products.
When adding or removing features, how can I tell what
features get installed by default?
To quickly see what gets installed during a typical, default installation, click
the Restore Defaults button on the Add/Remove Features page.
CAD Standards
Contains tools for reviewing design files for compliance with
your standards.
Database
Contains database access tools.
What is the benefit of using a network licensed version of the software? | 39
Dictionaries
Contains multi-language dictionaries.
Drawing Encryption
Allows you to use the Security Options dialog box to protect
a drawing with a password.
Express Tools
Contains AutoCAD Civil 3D support tools and utilities (not
supported by Autodesk).
Fonts
Contains AutoCAD Civil 3D fonts and TrueType fonts.
Autodesk Impression
Toolbar
The Impression toolbar allows you to quickly export any view
to Autodesk Impression for advanced line effects.
Autodesk Seek
Autodesk Seek.
NOTE Seek will only be installed in the English version of
AutoCAD Civil 3D.
Material Library
Contains over 300 professionally buit materials to apply to
your model.
New Features Workshop
Contains animated demos, exercises, and sample files to help
users learn the new features.
License Transfer Utility
Allows users to transfer an Autodesk product license between
computers.
NOTE The utility will not be installed on unlocked versions of
AutoCAD Civil 3D.
Initial Setup
Allows users to set up their initial configuration of AutoCAD
Civil 3D (online content, workspaces) based on their units
system, industry, and commonly used task-based tools.
Reference Manager
Allows users to view and edit the paths of externally referenced
files associated with a drawing.
Samples
Contains various feature sample files.
Hydraflow Extensions
Installs the Hydraflow Extensions that comprise hydraulics and
hydrology applications, including Hydraflow Storm Sewers,
Hydraflow Hydrographs, and Hydraflow Express.
40 | Chapter 3 Installation Troubleshooting
Survey Data Collection
Link Extension
Installs the Survey Data Collection Link Extension that allows
to transfer data from survey data collectors and convert raw
data files and coordinate data files into field book (.fbk) format.
Is it possible to change the installation folder when
adding or removing features?
Once your product is installed, you cannot change the installation path from
the Add/Remove Features page. Changing the path while adding features
results in program corruption, so it is not an option.
When should I reinstall the product instead of a repair?
You should reinstall your product if you accidentally delete or alter files that
are required by the program. Missing or altered files adversely affect the
performance of your product and cause error messages when you try to execute
a command or find a file.
If an attempt to repair an installation fails, reinstalling is the next best option.
See also:
■
Reinstall or Repair PRODNAME on page 16
Do I need my original disc to reinstall my software?
When performing a reinstall of the product, you do not need to have the
original discs on hand. Installation data is cached locally on your drive and
that data is reused when reinstalling.
When I uninstall my software, what files are left on my
system?
If you uninstall the product, some files remain on your system such as files
you created or edited (drawings or custom menus).
Is it possible to change the installation folder when adding or removing features? | 41
Your license file also stays on your workstation when you uninstall your
product. If you reinstall on the same workstation, the license information
remains valid and you do not have to reactivate the product.
42 | Chapter 3 Installation Troubleshooting
Index
A
activating programs 13
administrator permission requirements
stand-alone installation 3
Adobe Flash Player 3
anti-virus software 4
applications
anti-virus software 4
closing during installation 4
Autodesk Design Review
installing 18
viewing DWFs 18
Autodesk products
versions of 19
D
data link files, locating 20
data loss 4
DCL (dialog control language) files,
location 22
Design Review
installing 18
viewing DWFs 18
drawing templates, locating files 24
DWF files
Design Review 18
DWFx files
Design Review 18
DWT files, locating 24
B
browsers 1–2
bundled products
E
5
extensions, installing
30–31
C
F
CFG files, support for 21
computers 1
configurable folders, about 36
configuration files, locating 21
content packs, about 33
content roots, location 36
corridor models, support file location 36
custom icon files, locating 22
customization files (CUI), locating 22
customizing
installation 15
issues 24
locating files 19
tips 24
types of files 19
faxing registration information 14
Flash Player 3
FMP (font mapping) files, locating 22
font mapping files, location 22
H
hard disks
system requirements 1
hardware
installation requirements
Help, locating files 22
hidden files, displaying 20
Hydraflow extensions, about
installing 30
1
43 | Index
I
icons, custom 22
installation
adding or removing features 15
Autodesk Design Review 18
Installation wizard 6
licensing 38
multiple or bundled products 5
preparing for 1
registration and activation 13
repairing 39
repairing damaged installations 16
serial numbers 3
side-by-side 19
stand-alone installation 1, 6–7
starting 14
system requirements 1
troubleshooting 29
typical 32
uninstalling 17, 39
Installation wizard 6
Internet
program registration and
activation 13
Internet Explorer (Microsoft) 1–2
L
licenses
issues 38
limited user rights 15
LIN (linetype library) files, locationg
22
mailing registration information 14
material libraries, about installing 37
memory (RAM)
system requirements 1
Microsoft Internet Explorer 1–2
Microsoft Windows operating systems 1
migrating
issues 24
tips 24
MNL files, locating 22
1
O
operating systems
system requirements
1
P
PAT files, locating 22
PGP (program parameters) files,
locating 22
plot style files, locating 20
plotter configuration files, locating
PMP (plot model parameter) files,
locating 21
pointing device configuration files,
locating 21
pointing devices
system requirements 1
processors 1
Product Activation wizard 13
product keys 13
product manuals 37
PSF files, locating 22
R
M
44 | Index
monitors 1
multi-product bundles 5
multi-seat stand-alone installations
RAM
system requirements 1
regional settings, selecting 33
reinstalling programs 16, 39
removing
uninstalling programs 17
repairing
damaged installations 16, 39
roaming profiles, files location 19
S
serial numbers
stand-alone installation
service packs 1
3
21
shortcuts
creating 15
side-by-side installation 19
software installation requirements 1
stand-alone installations
process 7
program registration and
activation 13
Quick Start 1
support files, locations 21
Survey Data Collection Link, about
installing 31
survey equipment databases, file
location 36
survey figure prefix databases, file
location 36
survey linework code sets, file
location 36
system requirements
stand-alone installations 1
T
template files, locating
textures files, locating 24
trial mode 13
troubleshooting installation
29
U
uninstalling programs 39
UNT files, locating 22
upgrade installations 19
V
video cards 1
video monitors 1
virus software 4
W
web browsers 1–2
Windows operating systems
system requirements 1
working projects, location 36
24
Index | 45
46