1
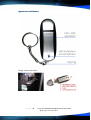
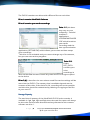
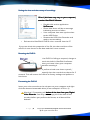
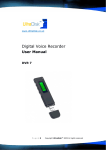
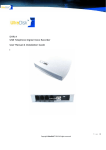
www.UltraDisk®.co.uk
USB Memory Stick
Digital Voice Recorder
User Manual
UltraDisk® DVR 10
We can brand the DVR10 with your own company name and logo.
It makes an excellent corporate gift. Please contact us for further
Information and prices.
Page |0
Copyright UltraDisk® Digital Voice Recorders
© All rights reserved 2011
Table of Contents
Function overview ...........................................................................2
Technical specifications .....................................................................3
Precautions....................................................................................4
Appearance and Buttons ...................................................................5
Operation .....................................................................................6
Switch the Recorder On.....................................................................6
Turn the Recorder Off .......................................................................6
Automatic Save ...............................................................................6
Playing Recordings...........................................................................6
USB Drive contents and file structure .....................................................7
Or to view contents via ‘My Computer’ ...................................................7
Storage Capacity .............................................................................8
Setting the time and date stamp of recordings. .........................................9
Resetting the DVR10 ........................................................................9
Formatting the DVR10 ......................................................................9
Additional Voice & Audio Editing Software ............................................ 10
UltraDisk Support .......................................................................... 10
Logo Printing ............................................................................... 10
Page |1
Copyright UltraDisk® Digital Voice Recorders
© All rights reserved 2011
Function overview
Recordings are started silently by using the switch on the side
Auto save feature. Audio recordings are automatically saved
Brushed aluminium silver design shell with black trim
Recording - WAV format
Complete charging time - 2 - 3hrs
Digital Audio Recorder & USB Data storage
Playback via Windows Media Player
High sensitivity microphone
USB transmission speed - USB 2.0/ 960kbps
Maximum recording files - 99
Dimensions - 64 x 20 x 8mm
Operating System - PC OS XP, Vista & Windows 7
Supplied in a presentation box
Plug and Play
Promotional branding service available
Page |2
Copyright UltraDisk® Digital Voice Recorders
© All rights reserved 2011
Technical specifications
• Size:64mm*20mm*8mm
• Power: lithium battery
• USB Memory : 1GB to 16GB
• Bit Rate : 64kbps Mono
• Total Recording time
o 1gb = 36 hours
o 2gb = 72 hours
o 4gb = 144 hours
o 8gb = 288 hours
• Battery life : 4 Hours
• Charging time : 3 hours
• Battery charge indicator : LED
• Frequency response: Mono 11Hz~11KHz
Page |3
Copyright UltraDisk® Digital Voice Recorders
© All rights reserved 2011
Precautions
Please recharge the battery fully before use
Please read the instruction manual carefully before using
Please keep the recorder away from moisture and high
temperature and do not place near naked flames
Please avoid strong vibration or shocks when using the recorder
Do not press forcefully as this may cause damage to the device
Take care not to knock the USB when it is inserted into the PC,
this could damage the USB connection
If you find any quality related problem with the recorder please
contact [email protected] Please do not disassemble or
replace the internal parts yourself
Please backup any files before sending the recorder for repair.
We are not responsible for the loss of files during repair or
replacement of the recorder
Please note it is an offence to record third parties without their
written approval. UltraDisk® can take no responsibility for the
users’ recording third parties without their approval
We reserve the right to modify the design and specifications. We
have no responsibility to give separate notice for the
modification
Page |4
Copyright UltraDisk® Digital Voice Recorders
© All rights reserved 2011
Appearance and Buttons
Single switch operation
Page |5
Copyright UltraDisk® Digital Voice Recorders
© All rights reserved 2011
Operation
Operation
Switch the Recorder
Recorder On
From Power Off
•
Push the power switch(ON/OFF) at the side of the recorder to
the “ON” position towards the microphone / LED indicator.
The LED indicator will Flash Blue, then
The LED indicator will Flash Red to indicate recording.
Turn the Recorder Off
•
Push the power switch(ON/OFF) at the side of the recorder to
the “OFF” position towards the USB Connection / USB lid.
The LED indicator will stop, indicating that recording has stopped.
Automatic Save
If the battery runs low during recording mode, the recordings will be
saved automatically.
Playing
Playing Recordings
ecordings
The recordings are stored in WAV format and can be played back on any
windows pc without issue, defaulting to play in windows media, or any
other media player you may have installed that supports the file type. When
you insert the usb device into the pc, you will be prompted by windows for
an action.
Page |6
Copyright UltraDisk® Digital Voice Recorders
© All rights reserved 2011
USB Drive contents and file structure
If you do not have free space on your USB voice recorder it will not
allow you to record anymore files. You can view the saved voice
recordings and other synchronised files on the device using windows
file explorer.
•
Insert the USB
Two new drives are identified by windows autorun, in this case new
drives J: and K: have been mapped to the UltraDisk® DVR10
Or to view
view contents via ‘My
‘My Computer’
Computer’
•
•
Insert DVR10
On windows select the start/prompt button and browse the
contents of the new drive via my computer.
When the DVR10 is inserted you will see that 2 new drives have
appeared mapped to your computer.
Page |7
Copyright UltraDisk® Digital Voice Recorders
© All rights reserved 2011
The DVR10 contains two drives with different files on each drive.
Drive J contains UltraDisk® Software
Drive K contains your audio recordings
Drive 1 'J
'J' (this letter
may vary on your
computer) - 'voicelist'
contains 2
applications
VOICEMEMOPLAYER
.EXE which launches
your audio
recordings and the
time synchronisation
application (SETTIME.EXE) which allows you to date and time stamp
your recordings.
This drive is not writeable and you cannot change any of its contents,
but you can execute the programs.
Drive 2 'K
'K'Folder
REC_DATA
contains your
voice
recordings in
WAV format and will also contain any other music or file types copied
to the device
Drive 2 (K) is therefore the area where saved files and recordings will be
stored on the DVR10. The memory that is available depends on the
contents of this drive, if the device is full, recording will not be possible
and this drive should be maintained by deleting or copying to the files
to your own PC.
Storage Capacity
The total size of memory of the UltraDisk® DVR10 voice recorder is
available in 1gb, 2gb, 4gb and 8gb sizes, the total free space will always
be this value less the total allocated memory allocated to the autorun
software on drive 1.
Page |8
Copyright UltraDisk® Digital Voice Recorders
© All rights reserved 2011
Setting the time and date stamp of recordings.
Drive J (this
(this letter may vary on your computer)
computer)
contains UltraDisk® Software
Double click on the application
SetTime.exe
• Please note there will be no message
indicating success or failure
• Your computer time now synchronises
to the USB Device
• Remove the USB Voice Recorder and
make a test recording
Re-insert the UltraDisk® DVR10 voice recorder into the PC
•
•
If you now check the properties of the file, the date and time of the
wav file is now shown as the date and time it was created.
Resetting the DVR10
If the DVR10 is failing to respond, charge or
launch the built in UltraDisk® software
when you insert it into your computer
consider resetting it.
To perfom a hard reset insert a pencil /
paperclip into the reset hole as shown for 3
seconds. This will restore the unit to its factory settings and perform a
hard reset.
Formatting the DVR10
Insert your voice recorder to the usb port on your computer and right
click the detected removable drive (In our example it is Drive K).
Warning !! Formatting will delete all the data from your Digital
Voice Recorder.
Recorder You may wish to copy all of the data off the
recorder before you perform the format, as all data will be
deleted!
Page |9
Copyright UltraDisk® Digital Voice Recorders
© All rights reserved 2011
Right mouse click over the drive letter and select format from the drop
down box.
The general properties of the Digital Voice Recorder
reveals it is FAT32, so select FAT32 in the format utility
Then just select “Quick
Quick Format”
Format and “Start” and all data
will be deleted .
Unplug the voice recorder and operate as normal.
Additional Voice & Audio Editing Software
You can now download audacity software for free to edit your
recordings on your pc. Access more audio software, the UltraDisk®
shop and our support pages by visiting our support desk at:
WWW.ULTRADISK.CO.UK
UltraDisk Support
If you are experiencing any problem please visit the DVR 10 support
articles online.
Visit:
http://www.ultradisk.co.uk/support-center/kb/browse/000986
Logo Printing
The DVR10 is also available with logo printing to compliment your
existing product range or business
Please contact us for more
information on this service.
P a g e | 10
Copyright UltraDisk® Digital Voice Recorders
© All rights reserved 2011