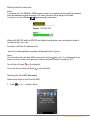
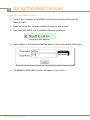
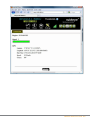
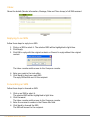
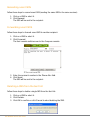
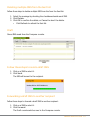
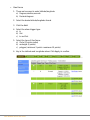
1
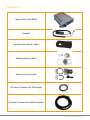
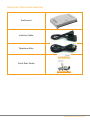
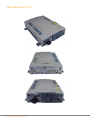
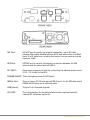
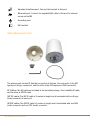
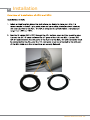
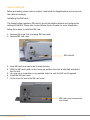
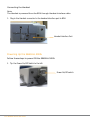
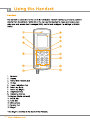
SYSTEM USER
GUIDE BOOK
REV 1.0
Table of Contents
Regulatory Information .............................................................................................. 1
Chapter 1
Introduction .............................................................................................................. 5
Chapter 2
Installation ............................................................................................................... 15
Chapter 3
Using the Handset ................................................................................................... 28
Chapter 4
Using the Web Console ........................................................................................... 60
Chapter 5
Using the FaxConnect .............................................................................................. 91
Troubleshooting ................................................................................................... 93
Regulatory Information
EC Declaration of Conformity:
Addvalue Communications Pte Ltd, 28 Tai Seng Street #06-02 , Singapore 534106 declares
under our sole responsibility that the Product, brand name as Wideye and model: SEAGULL
5000i voice, data and fax Satellite terminal with a build in GPS tracking system, to which
this declaration relates, is in conformity with the following standards and/or other normative
documents:
ETSI EN 301 681, ETSI EN 301 489-1, -19, - 20, IEC 60945 / EN 60945, IEC 60950-1
AND EN 60950-1
We hereby declare that all essential radio test suite have been carried out and that the
above named product is in conformity to all the essential requirements of Directive 1999/5/
EC.
The Conformity Assessment procedure referred to Article 10 and detailed in Annex [III] or
[IV] of Directive 1999/5/EC has been followed with involvement of the following Certified
body:
TUV SUD PSB Pte Ltd. 1 Science Park Drive, Singapore 118221
The technical documentation relevant to the above equipment are held at:
• Addvalue Communications Pte Ltd, 28 Tai Seng Street #06-02, Singapore 534106
• Signed by Mr. Tan Khai Pang (Chief Technology Officer, 25 January, 2011) and
• Mr. Prabakar Kuttaniseeri (Manager-Quality Engineering, 25 January, 2011).
SEAGULL 5000i User Guide
1
Safety Summary
For the sake of safety and protection, please read the user guide before you attempt to use
the SEAGULL 5000i system. In particular, read this safety section carefully. Keep this safety
information where you can refer to it if necessary.
The following general safety precautions must be observed during all phases of operation,
service and repair of this equipment. Failure to comply with these precautions or with
specific warnings elsewhere in this user guide violates safety standards of design,
manufacture and intended use of the equipment.
Addvalue Communications Pte Ltd assumes no liability for the customer’s failure to comply
with these requirements.
Antenna Radiation Warning
During transmission, the antenna in the system radiates high power levels of radio
frequency. This radiation is considered health hazardous to any personnel that come very
close to the antenna.
It is important to maintain a separation distance from the transmitting antenna to any
personnel of at least 30cm.
Service
User access to the interior of the terminal is not allowed. Only a qualified personnel
authorized by its manufacturer may perform service. Failure to comply with this rule will
result in the warranty void.
Grounding and Antenna Cables
The terminal has a grounding stud to ground the terminal to the hull of the ship by using
the ground cable.
The antenna cables are shielded and they should not be affected by any magnetic field. It
is recommended to avoid the cables being installed in parallel with any AC wiring as it may
possibly cause malfunction of the equipment.
Ship’s Power Supply
The input voltage for SEAGULL 5000i System is 12V DC, 0.8A or 24V DC, 0.4A. It is
recommended to use 24V DC power line, provided that it is available on the ship.
In case of unavailability of 24V DC power line provided by the ship, an external AC/DC
power supply (115/230V AC to 24V DC ) can be used.
2
SEAGULL 5000i User Guide
Equipment Ventilation
To ensure adequate cooling of the terminal, 5-centimeter of unobstructed space must be
maintained around all sides of the unit except the bottom side. The ambient temperature
range of the terminal is: -10°C to +55°C.
The equipment shall not be operated in the presence of flammable gases or fumes as well
as any explosive atmosphere. Operation of any electrical equipment in such an environment
constitutes a definite safety hazard.
Obtaining Licensing For SEAGULL 5000i System
Under rights given under ITU Radio Regulations, local telecommunications administrations
establish and enforce national rules and regulations governing types of emissions, power
levels, and other parameters that affect the purity of signal, which may be radiated in the
various frequency bands of the radio spectrum.
To legally operate the SEAGULL 5000i system, it is necessary to obtain permission from the
local telecommunications regulatory authorities of the country you are operating from.
Using your equipment in any country without permission causes you to run the risk of
confiscation of the equipment by the local authorities. The normal procedure to bring such
equipment into another country is to apply for a license before travel. If a license has not
been obtained before travel, the equipment may be put in to storage by local authorities
until such time license is obtained.
Information in this document is subject to change without notice and does not represent a
commitment on the part of Addvalue Communications Pte Ltd.
Copyright
© 2011 Addvalue Communications Pte Ltd. All rights reserved.
Website: www.wideye.com.sg
SEAGULL 5000i User Guide
3
Copyright
© Copyright 2011 Addvalue Communications Pte Ltd.
All rights reserved. This publication and its contents are proprietary to Addvalue
Communications Pte Ltd. No part of this publication may be reproduced in any form or by
any means without the written permission of Addvalue Communications Pte Ltd.
Warranty
Addvalue Communications Pte Ltd has made every effort to ensure the correctness and
completeness of the material in this document. Addvalue Communications Pte Ltd shall
not be liable for errors contained herein. The information in this document is subject
to change without notice. Addvalue Communications Pte Ltd makes no warranty of any
kind with regard to this material, including, but not limited to, the implied warranties of
merchantability and fitness for a particular purpose.
Trademarks
All trademarks, marks, names, or product names referenced in this publication are the
property of their respective owners, and Addvalue Communications Pte Ltd neither
endorses nor otherwise sponsors any such products or services referred to herein.
Microsoft, Windows, Windows NT, Windows 2000, and Windows XP are registered
trademarks of Microsoft Corporation in the U.S.A. and/or other countries.
All other company and product names may be the registered trademarks or trademarks of
their respective owners.
4
SEAGULL 5000i User Guide
1
Introduction
The SEAGULL 5000i is a voice, data and fax satellite terminal with a build-in GPS tracking
system specially designed for reliable performance in the harsh maritime and land
environment. This affordable, easy-to-install and user-friendly terminal enables users to
make satellite voice calls to normal PSTN phones, mobile phones and other satellite phones
through the Thuraya satellite network.
Besides supporting SMS services through its easy-to-use menu on the large colour
LCD screen on the handset, the SEAGULL 5000i provides full-duplex, IP-based data
communication capabilities through the Thuraya GmPRS technology. These data
communication capabilities, coupled with an onboard GPS receiver enables the SEAGULL
5000i to transmit such information as ship’s identity and ship’s position with date and
time stamp necessary for Long Range Identification and Tracking (LRIT) services that is
increasingly being made mandatory by many national maritime and fisheries authorities.
The user can also take advantage of this internet data connection to check emails, weather
reports or just simply for web-browsing. When the optional FaxConnectTM interface box is
connected to the SEAGULL 5000i, the user can also send G3 faxes to other G3 fax machines
on a global basis.
Tracking and monitoring functions are user-configurable for fixed time interval or eventtriggered operation. They can also be remotely activated by a monitoring centre. An Alert
button is available to notify pre-configured contacts during an emergency. When the Alert
button is activated, the SEAGULL 5000i shall immediately send a pre-determined SOS
message which includes the time-stamped GPS coordinates of the position to a maximum
of three preset contacts for emergency response.
The SEAGULL 5000i is truly a robust, versatile and cost effective solution for medium-size to
small fishing vessels, pleasure boats, patrol boats and any other sea vessels or land vehicles
that need a combination of voice telephony, data, fax and tracking functions.
Applications
• Supports Communication needs of fishing vessels, leisure boats, coastal guard boats, land vehicles, etc.
• Coastal surveillance
• In-land rural area communications
• Fleet management
• Low data rate telemetry and tracking
SEAGULL 5000i User Guide
5
Features
Handset
• Supports basic telephony functions, Calling Line Identification Presentation (CLIP) and Short Message Services (SMS)
• Phone book retrieval from the SIM card
• Call log: last 5 missed, received and dialed calls each with date and time stamps
• Menu-driven graphical user interface with 65K colors, 220 x 176 pixels, 2” TFT LCD screen
• MMI in English and Chinese
• Back-lit keypad
• 2.5mmHeadset jack
• Handsfree headset
• Wallmount cradle
Base Terminal
•
•
•
•
One Alert button for triggering an emergency alert to pre-configured contacts via SMS or GmPRS
External Alert button input port (external Alert button is optional)
Ringer output port (external ringer is optional)
Configuration to support
Automatic Position Reports (APR)
Polling for an on demand position report
Geo-fencing. Up to 10 polygon areas can be configured. Sends an alert when the vessel enters or leaves an area
• Support G3 Fax via FaxConnectTM
• Internet Access
• Save position logs in device memory for later retrival
• Over-the-air updates of system configuration parameters
Antenna
Passive Antenna
• Omni-directional passive Thuraya satellite antenna with build in active GPS antenna
• Up to 5 meters of LMR400 (or equivalent) co-axial satellite antenna cable
Active Antenna
6
• Omni-directional active Thuraya satellite antenna with build-in active GPS antenna
SEAGULL 5000i User Guide
Recommended Cable lengths for Active antenna
SAT & GPS Cables
Cable Type
Loss @ 1.6GHz
[dB/m]
Maximum Cable
Length [m]
LMR400
0.174
40
LMR240
0.335
20
LMR195
0.493
15
Note:
Active antenna must be used with an external power supply unit
Operating environment
ADU
Operating Temperature
-250C ~ + 550C
Storage Temperature
-400C ~ + 800C
BDU
Operating Temperature
-100C ~ + 550C
Storage Temperature
-200C ~ + 700C
Handset
Operating Temperature
-200C ~ + 550C
Storage Temperature
-300C ~ + 700C
System
Power Supply
10.8 – 31.2VDC
Power consumption (max)
10W
Operating Humidity
Up to 95% (non-condensing) at 400C
FaxConnect (Optional Accessory)
Operating Temperature
00C ~ + 550C
Storage Temperature
-400C ~ + 800C
SEAGULL 5000i User Guide
7
General specifications
Thuraya Approved
Compliant to CE
Service
Voice
Standard IP:
SMS:
Fax:
up to 60/15 kbps
up to 160 characters
up to 9.6kbps
Ingress Protection Rating: Handset Antenna
IP66
IP66
GPS specifications
Number of
tracking channels:
20 (SiRF Star-III)
Position accuracy:<10m 95%
Time to First Fix:
Hot start
<1 second
Warm start
<30 seconds
Cold start
<35 seconds
Mechanical specifications
Size
Handset [LxWxH]:
Handset Cradle [LxWxH]:
Base Terminal [LxWxH]:
FaxConnect:
Passive Antenna:
Active Antenna: 142mm x 56mm x 22mm
147mm x 65mm x 32mm
254mm x 155mm x 55mm
185mm x 130mmx 32mm
95mm (Dia.) x 150mm (H)
210mm (Dia.) x 180mm (H)
Weight
Handset:
Handset Cradle:
Base Terminal:
FaxConnect:
Passive Antenna:
Active Antenna:
8
SEAGULL 5000i User Guide
370g
55g
1kg
275g
300g
1.7kg
Packing list
Below Deck Unit (BDU)
Handset
Handset wall mount cradle
Passive antenna (ADU)
Antenna mounting kit
RF cable (5 meters) for GPS signal
RF cable (5 meters) for Satellite signal
SEAGULL 5000i User Guide
9
Hands free headset
Power cable
Grounding cable
RJ45 Ethernet cable
Starter Kit
(Quick Start Guide and CD)
10
SEAGULL 5000i User Guide
Faxconnect (Optional Accessories)
FaxConnect
Interface Cable
Telephone Wire
Quick Start Guide
SEAGULL 5000i User Guide
11
BDU (Below Deck Unit)
12
SEAGULL 5000i User Guide
SAT Port: SAT ANT port is used for the physical connection - via an RF cable - between the passive satellite antenna (ADU) and below deck unit (BDU). Note: The RF cable loss, including the losses in the connectors shall be less than 1.5dB
GPS Port: GPS ANT port is used for the physical connection between the GPS antenna and the below deck unit (BDU).
DC INPUT: Power input connector is used for connecting the external power source (10.8 ~ 31.2 volts) to the BDU
POWER ON/OFF: This is the system power On/Off switch
SERIAL Port: This is a 3 wires (TX, RX and ground) RS232 port. It is for GPS data output (NMEA-0183 format) via an optional cable
USB [client]:
This port is for firmware upgrade.
I/O PORT: This is the interface for the external alert button (optional) and the external MT call alerter (optional)
SEAGULL 5000i User Guide
13
:
Handset interface port. Connect the handset to this port.
: Ethernet port. Connect the supplied RJ45 cable to this port for internet access via GmPRS.
:
:
Grounding stud.
SIM card slot.
ADU (Above Deck Unit)
The antenna unit has two RF (female) connectors at its base. One connector is the SAT
signal port (N-type connector), and the other is the GPS signal port (SMA connector).
RF Cables: Two RF cables are included in the standard package. One is satellite RF cable
and the other is GPS RF cable.
SAT RF cable: The SAT RF cable is 5 meters in length and is terminated with an N-type
(male) connector at each end.
GPS RF cable: The GPS RF cable is 5 meters in length and is terminated with one SMA
(male) connector and one TNC (male) connector.
14
SEAGULL 5000i User Guide
2
Installation
SEAGULL 5000i User Guide
15
3. After tightening the connectors, wrap the connectors with self-bonding vinyl tape or apply silicon sealant to make them waterproof.
4. Fix the O-ring securely in to the groove on the bottom cover.
5. Fasten the bottom cover onto the antenna unit using the 4 screws.
6. Use the U-bolts and the mounting bracket to fix the assembled ADU on to the vessel’s mounting pole. Tighten the nuts and make sure they will not become loose.
7. Fix the cables to the mounting pole with cable tie.
8. Connect and tighten the RF connectors of SAT and GPS RF cables to the BDU.
16
SEAGULL 5000i User Guide
A complete ADU with pole-mount mounting plate and cables.
A typical pole mouned ADU.
The ADU can be installed on a rooftop with 3 screws and nuts.
SEAGULL 5000i User Guide
17
18
SEAGULL 5000i User Guide
BDU Configuration/ Connecting Up
BDU BACK PANEL
GROUND CABLE
SIM CARD
ADU WITH RF CABLES
BDU FRONT PANEL
POWER CABLE
PC
FAX M/C
FAXCONNECT
HANDSET
Note: Remove the bracket before
plugging in the handset. Re-assemble
the bracket to secure the cable.
SEAGULL 5000i User Guide
19
Getting Started
Before proceeding, please refer to chapter 2 and install the Seagull system and connect all
the cables accordingly.
Installing the SIM card
The Seagull system requires a SIM card to access the satellite network and configure the
settings of the BDU. Please refer to your Airtime Service Provider for more information.
Follow these steps to install the SIM card:
1. Remove the screw that is securing SIM card cover.
2. Remove SIM card cover.
SIM card slot
3.
4.
5.
6.
7.
Keep SIM card cover and screw in a safe location.
With the SIM card’s gold contact facing up, position the card as indicated and slide it
into the slot.
You may use a screwdriver or any pointed object to push the SIM card if required.
Install the SIM card cover.
Fix the screw to secure the SIM card cover.
SIM card cover is secured by
the screws
20
SEAGULL 5000i User Guide
Connecting ADU
Two RF cables (5 meters each) are provided for connecting ADU & BDU.
Follow these steps to connect the antenna cables to the BDU:
1. Plug the 2 RF cables to the RF cable connectors on the BDU.
2. Lock the connector till it is properly secured to the BDU.
RF cable connector
for satellite signal
RF cable connector
for GPS signal
Connecting to DC Power Source
Follow these steps to connect the SEAGULL 5000i BDU to the ship’s power source:
1. Connect the power cable plug to the BDU’s black DC power socket.
DC Power
Socket
2. Connect the power cable to a DC power source (10.8V-31.2V).
SEAGULL 5000i User Guide
21
Connecting the Handset
Note:
The Handset is powered from the BDU through Handset Interface cable.
1. Plug in the Handset connector to the handset interface port in BDU.
Handset Interface Port
Powering Up the SEAGULL 5000i
Follow these steps to power ON the SEAGULL 5000i
1. Tip the Power On/Off Switch to the left.
Power On/Off switch
22
SEAGULL 5000i User Guide
Making the first voice call
Note:
To make a call, the SEAGULL 5000i system must be connected to the satellite network
with an adequate signal strength of at least 4 bars at Setup page of the Web
signal strength sub-menu.
Console or on the Handset
When both SAT LED and the GPS LED are lighted steady green, you are ready to make or
receive the first voice call.
To make a call from the Handset, dial
+<country code><phone number> followed by the
key.
Note:
For international calls and SMS, press and hold the key until ‘+’ is displayed, then
enter <country code> and <phone number> without using the leading “00”.
To end the call, press
on the Handset.
To accept an incoming call, press
on the Handset.
Sending the first SMS (Message)
Follow these steps to send the first SMS:
1. Press
or
to select Menu.
SEAGULL 5000i User Guide
23
The Menu selection screen will be displayed on the handset screen.
Messaging
Log
Contacts
Telephony
Data
Settings
Terminal
Phone Manager
Security Settings
3.
4.
5.
Using the 4-way navigation ring, navigate to the Messaging icon.
Press
to confirm selection.
The SMS editor will be displayed on the Handset screen.
Type in your SMS message using the Handset alpha-numeric keypad.
Tips for writing text:
• To add a space, press the 0 key.
• To quickly change the text input method when writing text, press
check the indicator at the top of the display:
<ABC>: Capital letters
<123>: Numbers
<abc>: Small letters
<Abc>: Initial Capital letter followed by small letters
• To add a number, press and hold the desired number key.
repeatedly and Insert symbols to your message:
• To get a list of special symbols, press .
• Using the 4-way navigational ring, navigate to the desired symbol.
to confirm selection.
•Press
Clearing text:
• To clear text, press once to clear one character at a time.
• To clear the whole text entry, press and hold to clear the whole text entry.
24
SEAGULL 5000i User Guide
Connecting to the Internet
Note:
For the LAN (Local Area Network) interface to work without any further setup,
the computer must be set up to obtain an IP address and a DNS server address
automatically.
Follow these steps to connect a computer to the SEAGULL 5000i BDU:
1.
2.
3.
4.
Connect LAN cable between the network connector on computer and the LAN port on the SEAGULL 5000i.
Power up your computer.
Start Internet browser.
Type http://192.168.0.1/ in the Address field and press Enter.
5. Type in admin in the Username field and admin in the Password field. Click Login button.
The SEAGULL 5000i Web Console will open. The terminal will proceed automatically to
Register to the network.
SEAGULL 5000i User Guide
25
LED visual indications
There are 4 LEDs on the BDU to provide visual status indications:
Indicate the status of the terminal
Indicate reception of GPS signal
Indicate reception of Satellite signal
Indicate the operating mode of the terminal
Power LED
LED behavior
Status
Off
BDU is in power-off state.
Red and green alternately
Blinking
BDU is booting up.
Blinking green
(heartbeat)
BDU has boot-up successfully and ready for use.
Steady red
System failure during boot-up or operation. User
action required.
GPS LED
26
LED behavior
Status
Blinking red
No GPS antenna detected.
Blinking green
Acquiring GPS fix.
Steady green
GPS fix acquired.
Steady red
Failure in GPS. User action required.
SEAGULL 5000i User Guide
SAT LED
LED behavior
Status
Blinking orange
SATCOM module is initializing.
Steady orange
Registering to the Network.
Steady green
SATCOM module is Registered to the Network.
Blinking green
CS call in progress.
Steady red
System failure. User action required.
GmPRS LED
LED behavior
Status
Steady green
• GmPRS only mode.
• GmPRS + GmPRS tracking mode.
Off
• Phone mode.
• Phone + SMS tracking mode.
• Configured for GmPRS and waiting to start
the connection setup.
Blinking green
GmPRS connection setup in progress. Try not to
make an outgoing call.
SEAGULL 5000i User Guide
27
28
29
30
31
32
33
34
35
36
37
38
39
40
41
42
43
44
45
46
47
48
49
50
51
Each point of the fencing area is defined using latitude and longitude GPS coordinates.
Number of point for setting up the fencing area varies depending on the selected fencing
type. Table below summarizes number of points required for each fencing type:
Note:
When authentication is enabled, this sub menu is tracking password protected and
no change of setting is allowed unless the correct password is entered.
External Buzzer
Select this to enable or disable the external buzzer.
Fax
Select this to view or change settings related to fax. The following settings are available in
this sub menu:
• Num. Of Retries
Select this to set the number of retries when the UE failed to send/print the fax.
The following settings are available in this sub menu:
Send
Select this to set the number of retries for outgoing fax. Set to zero indicates that there will be no attempt to resend the fax when the UE failed to send the fax.
Note:
Airtime charge may apply for each retry attempt.
Print
Select this to set the number of retries for fax printing once the UE has received an incoming fax. Set to zero indicates that there will be no attempt to reprint the fax when the UE failed to print the received fax to the connected fax machine.
52
53
54
55
56
57
58
59
4
Using the Web Console
Logging in to Web Console
1. Connect your computer to the SEAGULL 5000i terminal using a LAN (Local Area Network) cable.
2. When the connection has been established, open the web browser.
3.Type http://192.168.0.1/ in the Address field and press Enter.
The Login screen appears.
4. Type in admin in the Username field and admin in the password field. Click Login.
5.The SEAGULL 5000i Web Console will appear on your screen.
60
SEAGULL 5000i User Guide
SEAGULL 5000i User Guide
61
Menu Overview
Setup
Phone
Terminal Info
SMS
Settings
Phonebook
Compose
Language
Call History
Inbox
Terminal Info
Sent
PIN
Draft
SMS
GmPRS
Tracking
Fax
Admin
About
Status Indicators
Status Indicators
• Green indicates the item is activated.
• Grey indicates the item is not activated.
These icons indicate the status of SEAGULL 5000i terminal.
• Status icons
CS icon: indicates the Circuit Switch status (Voice calls, SMS).
PS icon: indicates the Packet Switch information (Internet Browsing, FTP, email).
Signal icon: indicates the signal strength of the satellite network.
62
System operation mode icon:
Phone Only
GmPRS Only
SEAGULL 5000i User Guide
GmPRS & Tracking
Fax
Log Out
SMS icon: indicates when there is a new SMS.
SEAGULL 5000i User Guide
63
Setup Menu
Viewing Terminal Information
1.Click
64
.
2. The terminal information is displayed.
Signal
Indicates the received signal strength.
GPS
Indicates the latitude, longitude, Date/Time of the GPS acquisition
the speed and direction of the SEAGULL 5000i.
SEAGULL 5000i User Guide
Phone Menu
Phone menu provides the following options:
•Phonebook
Allows you to view, add, edit and delete entries on your Phonebook list. You can write and send SMS messages directly from your Phonebook entries. The Phonebook entries are stored on the SIM card.
• Call History
To check on the history log of calls made and received.
SEAGULL 5000i User Guide
65
Phonebook
• Storage Usage
Shows the number for Phonebook entries in the SIM card.
For example:
(SIM – 3/250) indicates:
Storage location – SIM card
Total number of entries used = 3
Total number of entries available = 250
66
SEAGULL 5000i User Guide
Adding a new Phonebook entry
Follow these steps to add a new Phonebook entry:
1.
Click Add.
2. Enter the Name and Phone number.
3.
Click Save.
Editing a Phonebook entry
Follow these steps to edit a Phonebook entry:
1. Select the entry from the Phonebook list.
2.
Click Edit.
3. Proceed to change the Name and/or Phone number.
4.
Click Apply.
Deleting a Phonebook entry
Follow these steps to delete a Phonebook entry:
1. Select the entry from the Phonebook list.
2.
Click Delete.
3.
Click Ok to confirm to delete the entry. Click Cancel to abort delete.
SEAGULL 5000i User Guide
67
Sending SMS from the Phonebook
Follow these steps to send SMS from the Phonebook:
1. Select the entry from the Phonebook list.
2.
Click Send SMS.
The Phonebook console switches over to the Compose SMS console.
3. Type in the text message and click Send.
•
Click Refresh to refresh the Phonebook list.
Call History
68
SEAGULL 5000i User Guide
•
View option
The View option allows you to view the Call History entries.
From the drop-down menu, select:
All
To view the list of the dialed, received and missed calls.
Dialed Call
To view the list of dialed calls only.
Received Call
To view the list of received calls only.
Missed Call
To view the list of missed calls only.
Sending SMS from the Call History list
Follow these steps to send an SMS from the Call History list:
1. Select the entry from the list.
2.
Click Send SMS.
The Call History console switches over to the Compose SMS console.
3. Type in the text message and click Send.
Deleting a Call History entry
Follow these steps to delete a Call History entry:
1. Select the entry from the Call History list.
2.
Click Delete.
3.
Click Ok to confirm or click Cancel to abort deleting the entry.
•
Click Refresh to refresh the Call History list.
SEAGULL 5000i User Guide
69
SMS Menu
SMS menu provide the following options:
•Compose
To compose and send text messages. Simply enter a phone number, type your message and click Send.
•Inbox
Shows the details (Sender information, Message, Date and Time stamp) of all SMS received.
•Sent
Shows the details (Receiver information, Message, Date and Time stamp) of all SMS sent.
•Draft
Stores unsent messages for retrieval later.
70
SEAGULL 5000i User Guide
Composing A New Message
Follow these steps to compose a new SMS:
1. Enter the receiver’s phone number in the Phone no. field or click the Phonebook if the receiver’s number is listed in the Phonebook.
icon
2. Type the message in the text editor box.
Note:
Each message is limited to 160 characters including spacing between words.
Messages longer than 160 characters will be split into 2 or more messages.
3.Uncheck Store a copy in SIM checkbox if you do not wish to store a copy of the
sent SMS into SIM card.
4.Click Send to send the SMS.
• To save an unsent SMS, click Save and the unsent SMS will be saved in Draft.
• To clear the typed message on the text editor, click Clear.
5.Click Append GPS to attach the current GPS position to an SMS message prior to
sending.
SEAGULL 5000i User Guide
71
Inbox
Shows the details (Sender information, Message, Date and Time stamp) of all SMS received.
Replying to an SMS
Follow these steps to reply to an SMS:
1. Click on a SMS to select it. The selected SMS will be highlighted in light blue.
2.Click Reply.
3.Click OK to reply with the original contents or Cancel to reply without the original content.
The Inbox console switches over to the Compose console.
4. Enter your reply in the text editor.
5.Click Send to send your reply SMS.
The reply SMS will be sent to the recipient.
Forwarding an SMS
Follow these steps to forward an SMS:
1. Click on an SMS to select it.
The selected SMS will be highlighted in light blue.
2.Click Forward.
The Inbox console switches over to the Compose console.
3. Enter the receiver’s number in the Phone No. field.
4.Click Send to forward the SMS.
The SMS will be sent to the recipient.
72
SEAGULL 5000i User Guide
Deleting a single SMS from the Inbox list
Follow these steps to delete a single SMS from the Inbox list:
1. Click on a SMS to select it.
2.Click Delete.
3.Click OK to confirm or click Cancel to abort deleting the SMS.
Deleting multiple SMS from the Inbox list
Follow these steps to delete multiple SMS from the Inbox list:
1. Select the messages by checking the checkboxes beside each SMS.
2.Click Delete.
3.Click OK to confirm the delete, or Cancel to abort the delete.
•
Click Refresh to refresh the Inbox list.
Sent
Shows the details (Receiver information, Message, Date and Time stamp) of all SMS sent.
SEAGULL 5000i User Guide
73
Resending a sent SMS
Follow these steps to resend a sent SMS (sending the same SMS to the same receiver):
1. Click on a SMS to select it.
2.Click Resend.
The SMS will be sent to the recipient.
Forwarding a sent SMS
Follow these steps to forward a sent SMS to another recipient:
1. Click on a SMS to select it.
2.Click Forward.
The Sent console switches over to the Compose console.
3. Enter the receiver’s number in the Phone No. field.
4.Click Send.
The SMS will be sent to the recipient.
Deleting a SMS from the Sent list
Follow these steps to delete a single SMS from the Sent list:
1. Click on a SMS to select it.
2.Click Delete.
3.Click OK to confirm or click Cancel to abort deleting the SMS.
74
SEAGULL 5000i User Guide
Deleting multiple SMS from the Sent list
Follow these steps to delete multiple SMS from the from the Sent list:
1. Select the message by checking the checkboxes beside each SMS.
2.Click Delete.
3.Click OK to confirm the delete, or Cancel to abort the delete.
•
Click Refresh to refresh the Sent list.
Draft
Stores SMS saved from the Compose console.
Follow these steps to send a draft SMS:
1. Click on a SMS to select it.
2.Click Send.
The SMS will be sent to the recipient.
Forwarding a draft SMS to another recipient
Follow these steps to forward a draft SMS to another recipient:
1. Click on a SMS to select it.
2.Click Forward.
The Draft console switches over to the Compose console.
SEAGULL 5000i User Guide
75
3. Enter the receiver’s number in the Phone No. field.
4.Click Send to forward the SMS.
The SMS will be forwarded to the recipient.
Deleting a SMS from the Draft list
Follow these steps to delete a SMS from the Draft list:
1. Click on a SMS to select it.
2.Click Delete.
3.Click OK to confirm or click Cancel to abort deleting the SMS.
Deleting multiple SMS from the Draft list
Follow these steps to delete multiple SMS from the Draft list:
1. Select the message by checking the checkboxes beside each SMS.
2.Click Delete.
3.Click OK to confirm the delete, or Cancel to abort the delete.
•
Click Refresh to refresh the Draft list.
76
SEAGULL 5000i User Guide
Settings Menu
Click the following tabs to view and edit the configuration settings for the SEAGULL 5000i
terminal:
•Language
• Terminal Info
•PIN
•SMS
•Tracking
•Fax
•Admin
•About
SEAGULL 5000i User Guide
77
Language
Select the desired language for the Web Console to be displayed.
Terminal Info
This tab shows general information about the SEAGULL 5000, Call/Data Usage.
•Information
Displays information about the Software version, Model ID, IMEI number, IMSI number (only when a SIM card is inserted), Subscriber number.
78
SEAGULL 5000i User Guide
• CALL Log
Displays the CS (Circuit Switch), PS (Packet Switch) and Fax information of the terminal.
CS Call Log: Indicates the Circuit Switch status (Voice calls, SMS)
PS Call Log: Indicates the Packet Switch information (Internet Browsing, FTP, email)
SEAGULL 5000i User Guide
79
Fax Call Log: Indicates Fax information
• CALL/Data Usage
Displays the call and data usage of the terminal.
80
SEAGULL 5000i User Guide
PIN
• SIM PIN
1.
Click SIM PIN to configure the SIM PIN settings.
2.
Select Disabled if you do not need to set the SIM PIN.
3.
Select Enabled to set the SIM PIN.
4. If Disabled is selected, enter PIN number and click Apply.
5. If Enabled is selected, enter old PIN number, new PIN number twice and click
Change PIN Password.
SMS
To change the SMS service Center Address number, enter the new number in the space
provided and click Update.
SEAGULL 5000i User Guide
81
Note:
Please contact your distributor or service provider if you do not know the Service
Center Address.
GmPRS
Tracking
•Settings
1. Select Disabled if you do not need GPS reporting.
2. Select Enabled if you need GPS reporting.
3. Select either GmPRS or SMS mode.
4. Key in the desire frequency in seconds. (the time interval to update the server).
5. Key in the server phone number (SMS mode only).
6. Key in the server IP address (GmPRS mode only).
7. Key in server Port number (GmPRS mode only)
8. Server Connection type is fixed to TCP (GmPRS mode only)
9. Key in the Distance interval.
10. Key in the speed limit alarm.
11. Key in 3 authorized phone numbers (SMS mode only)
12.Key in 3 emergency phone numbers (SMS mode only)
13. Enable external alarm: Tick the box if an external Alert button is being used.
82
SEAGULL 5000i User Guide
*’Resend Frequency’ refers to the retry frequency when a distress alert fails to send out due
to unexpected error (e.g. wrong SMSC number). This setting will not apply to successful
sent emergency alerts.
*’Maximum Number of Tries’ refers to the maximum of attempts when a distress alert fails
to send out due to unexpected error (e.g. wrong SMSC number). This setting will not apply
to successful sent emergency alerts.
SEAGULL 5000i User Guide
83
• Geo Fence
1. There are two ways to enter latitude/longitude:
a)
Degrees,minutes,seconds.
b)
Decimal degrees.
2. Select the desire latitude/longitude format
3.
Click the Add.
4. Select the alarm trigger type:
a)
In
b)
Out
c)
In and Out
5. Select the type of Geo Fence:
a) Circle (1 points, radius)
b)
rectangle (2 points)
c) polygon (minimum 3 points. maximum 10 points)
6. Key in the Latitude and Longitude values. Click Apply to confirm.
84
SEAGULL 5000i User Guide
• Emergency Text
Emergency text will be sent when the Alert button on the BDU is pressed.
• Authentication
Allow the user to enable/disable tracking authentication on Handset when changing tracking related configurations.
SEAGULL 5000i User Guide
85
Fax
•Setting
1. Number of Retries
•
Send
Select this to set the number of retries for outgoing fax. Set to zero indicates that there will be no attempt to resend the fax when the UE failed to send the fax.
Note:
Airtime charge may apply for each retry attempt.
•
Print
Select this to set the number of retries for fax printing once the UE has received an incoming fax. Set to zero indicates that there will be no attempt to reprint the fax when the UE failed to print the received fax to the connected fax machine.
2.
Discard all pending Fax jobs after power cycle
• Select this to discard all pending fax jobs upon power reset. Leave the box blank for the UE to resume last pending fax jobs when fax transactions are interrupted due to power reset.
3.
Print Report
Select this to configure settings related to the printing of fax reports. The following settings are available:
•Incoming
a)
Enabled
Select this to allow printing of report for incoming fax.
b)
Disabled
Select this to disable printing of report for incoming fax.
c)
Error Only
Select this to print error report only. Error report is printed when there is any error detected during the fax transaction.
•Outgoing
a)
Enable
Select this to allow printing of report for outgoing fax.
b)
Disable
Select this to disable printing of report for outgoing fax.
SEAGULL 5000i User Guide
86 c) Error Only
Select this to print error report only. Error report is printed when there is any error detected during the fax transaction.
Note:
All changes in the setting must complete with the “Update” button press once
SEAGULL 5000i User Guide
87
Admin
• Change Password
Follow these steps to change the Web Console login Password:
1. Enter the old password in the Old Password field.
2. Enter the new password in the New Password field.
3. Re-enter the new password in the Re-type Password field.
4.
Click Update.
The Web Console login password is now changed.
• Reboot Terminal
If you wish to reboot the SEAGULL 5000 terminal, click Reboot Terminal. Click
Reboot and wait for a few minutes to allow the terminal to reboot. Refresh your
browser to update the Web Console page after reboot.
88
SEAGULL 5000i User Guide
• Factory Reset
To perform a Factory Reset, enter the Security code 000000 and click Factory Reset.
Warning:
All the settings and user data (e.g., Phone Book, GPS, etc.) of the SEAGULL 5000 terminal will be cleared and reset to the default settings. If you do not wish to lose critical user data such as Phone Book, please use limited reset option available via Handset.
• System operation mode
The UE can be configured to operate in the following modes:
Phone only
Voice centric operating mode. You can make / receive voice call or send /
receive SMS in this mode.
GmPRS only
Data centric operating mode. You can browse Internet in this mode.
GmPRS & Tracking
Data centric operating mode. You can browse Internet in this mode with GmPRS (Internet) based tracking enabled.
Phone & SMS Tracking
You can make/receive voice calls or send/receive SMS in this mode. Additionally,
SMS based tracking is enabled in this mode.
SEAGULL 5000i User Guide
89
90
SEAGULL 5000i User Guide
5
Using the FaxConnect (Optional Accessory)
• Connect the G3 Fax machine and Seagull 5000i to FaxConnect as shown below.
• Make sure to insert a fax enabled Thuraya SIM card in Seagull 5000i BDU.
BDU FRONT PANEL
POWER CABLE
PC
FAX M/C
FAXCONNECT
HANDSET
Note: Remove the bracket before
plugging in the handset. Re-assemble
the bracket to secure the cable.
5.1 Sending a Fax
5.1.1 Feed the document you wish to send out to the fax machine.
5.1.2 Dial the recipient number in the following format and press the ‘START’ button on the fax machine.
<00><Country code><Telephone number>
5.1.3 Sending fax will take place in two phases. In the 1st phase, fax machine will scan the document(s) and send the data to Seagull 5000i terminal with an icon
being displayed in the webconsole. In the 2nd phase, Seagull 5000i terminal will send the fax data out to the recipient through the Thuraya network with an icon being displayed in the webconsole. During this period, the handset will .
display the out-going fax icon
SEAGULL 5000i User Guide
91
5.1.4 If the sending is not successful, an error message will be shown on the handset display. An error report can be printed out on the fax machine depending on the Print Report configuration.
5.1.5 Note:
The procedure may vary with different fax machines. Refer to the operating manual of the fax machine if necessary.
5.2
Receiving a Fax
5.2.1 When there is an incoming fax, receiving fax will take place in two phases. In the
1st phase, Seagull 5000i terminal will receive the fax data from Thuraya network with an
being displayed in the webconsole. In the 2nd phase, the terminal will forward
icon
the incoming fax data to the fax machine. After the ringing, If the fax machine answers the
will be displayed in the webconsole. During this period, the handset will
call. An icon
.
display the in-coming fax icon
92
SEAGULL 5000i User Guide
Troubleshooting
Warnings
Servicing
SEAGULL 5000i does not contain consumer serviceable components. You are advised not
to carry out any kind of troubleshooting. In case you face any problems, contact the nearest
service center. Only authorized service personnel can repair the equipment.
Antenna and RF cables
Use only SEAGULL 5000i antenna and RF cables that have been specifically designed for
your terminal.
Unauthorized antennas, cables and cable length modifications, or attachments could
damage SEAGULL 5000i and may violate the relevant regulations, causing loss or degradation
of performance and radio frequency (RF) energy above the recommended limits. If your
SEAGULL 5000i antenna gets damaged, please take it to an authorized Service Provider.
General
Do not place SEAGULL 5000i in a wet area.
Do not expose SEAGULL 5000i to temperatures greater than +55 degree Celsius or less than
–10 degree Celsius.
Do not expose SEAGULL 5000i to moisture, dust etc.
Avoid placing SEAGULL 5000i close to open flames or any source of heat.
Do not expose SEAGULL 5000i to direct sunlight.
Do not disassemble SEAGULL 5000i; this will void your warranty.
Care and Maintenance
SEAGULL 5000i is a product of superior design and craftsmanship and should be treated
with care.
The following suggestions will help you to fulfill any warranty obligations and allow you to
enjoy this product for many years.
Do not store it in hot areas. High temperatures can shorten the life of electronic devices,
damage batteries, and warp or melt certain plastics.
Do not attempt to open it. Mishandling of the device may damage it.
Do not drop, apply pressure or shake it. Rough handling can break internal circuit boards.
Do not use chemicals, cleaning solvents, or strong detergents to clean it. Wipe it smoothly
with a soft cloth.
Use only the supplied or approved replacement antenna. Unauthorized antennas,
modifications or attachments could damage the SEAGULL 5000i and may violate
regulations regarding radio devices.
If the SEAGULL 5000i, handset or any accessory does not function properly, take it to your
nearest authorized service center. The personnel there will assist you, and if necessary,
arrange for service.
SEAGULL 5000i User Guide
93
Common problems
Satellite signal strength is inadequate (indicated in SEAGULL 5000i display).
The cable connections are not proper and firm.
The SIM card may have been not installed properly or it may have been expired.
FAQ
Question:
How can I access the WebConsole?
Answer:
You need a PC/laptop and an Ethernet cable to connect to the RJ45 port of the BDU in
order to access the WebConsole. Open a web browser and type http://192.168.0.1 in the
address field. The default user name and password are admin.
Question:
Error ‘executing AT+cpin?’ is seen when I am trying to access the WebConsole. Why?
Answer:
Because there is only one AT command interface with the modem, if the modem is
busy processing another AT command (for example activating GmPRS or CS call), then
another Terminal Equipment (TE) try to query information using AT command (in this case
WebConsole), then most probably it will timeout or give error. Refreshing the web page
will usually solve the problem. If not, wait for the SAT LED on the BDU has turned orange or
green before retrying.
94
SEAGULL 5000i User Guide
Question:
Does the Seagull 5000i unit support over the air (OTA) firmware upgrade?
Answer:
Seagull 5000i does support BDU over the air (OTA) firmware upgrade provided it has
GmPRS tracking enabled and the device is already connected to the server. Server will
issue a command to the unit to retrieve the appropriate firmware. Please refer to the latest
protocol document for more information.
Question:
Inside the call log, why am I getting time offset for all the call history?
Answer:
You need to manually configure your time zone in order to get an accurate call log. You
can go to Phone manager>>Local time zone to adjust your time zone. The default time
zone is UTC+8.
Question:
What can I do with the external I/O interface?
Answer:
The I/O connector allows you to install an external buzzer and an external alert button.
The buzzer is working as an external ringer to indicate an incoming call. The external alert
button behaves in the same manner as the internal Alert button. A momentary push button
is recommended. Below illustrates the recommended configurations.
In order to enable/disable this external alert button, you can go to Settings>>Alarm
reporting>>Panic button>>External for configuration. In order to enable/disable the
external buzzer, you can go to Settings>>Alarm reporting>>External buzzer for
configuration.
SEAGULL 5000i User Guide
95
Question:
What is the difference between the Factory reset function inside the Terminal menu and
the Phone manager menu?
Answer:
The factory reset function in the Phone manager menu will clear the user settings inside
the phone. Those settings include wallpaper, backlight, tone, volume, language, caller ID,
time zone and speed dialling.
On the other hand, the factory reset function in the Terminal menu will clear the user
settings inside the BDU. Those settings include GPS reporting, operating mode, alarm
reporting, geo-fencing, call log and APN. A system reboot will take place after the factory
reset.
Question:
How can I protect the confidential configurations (e.g. GPS reporting settings, operating
mode settings, etc)?
Answer:
You can enable the password protection for these confidential configurations. It is under
Security settings>>Tracking in the handset menu. Once it is enabled, user needs
password to access the following menus, Settings>>Operating mode, Settings>>GPS
reporting, Settings>>Alarm and Settings>>Geo-fencing. The default password is
000000.
SMS RELATED
Question:
I am not able to send SMS in GmPRS mode or GmPRS plus Tracking mode. Why?
Answer:
In order to send an SMS in this mode, the unit has to terminate the current GmPRS session,
thus incurring more overheads to the user. The unit is designed in a way that SMS can
only be sent in either Phone only mode or SMS tracking mode. If user really wants to send
an SMS in GmPRS mode or GmPRS plus Tracking mode, he or she should select a suitable
operating mode before composing the SMS.
However, user is still able to receive incoming SMS in GmPRS mode or GmPRS plus Tracking
mode.
96
SEAGULL 5000i User Guide
Question:
I am not able to receive SMS in GmPRS mode or GmPRS plus Tracking mode. Why?
Answer:
You should be able to receive SMS immediately in these 2 modes most of the time.
However, the receiving will be delayed if there is a continuous IP (GmPRS) data transfer
going on. This may be due to heavy internet surfing, large size file download/upload,
Windows updates, PC software update and frequent GPS location update. If you are
expecting a timely SMS receiving in these 2 modes, please try to limit the internet usage,
turn off the automatic windows and software updates and adjust the GPS reporting
frequency to be more than 1 minute. But before that, make sure the SIM is not full.
Question:
Is there any command that I can send via SMS to remotely reboot the Seagull 5000i unit?
Answer:
Yes. Remote reboot of system is supported. The command is mentioned in the protocol
document. Refer to the ‘Master Reset’ portion for more information.
This method will work provided,
1. You are using the authorized SIM to send the SMS, which means your number has been configured as one of the 3 authorized numbers inside the Seagull 5000i unit.
2. The SIM in the unit is not full.
GMPRS RELATED
Question:
How can I change the GmPRS APN?
Answer:
The APN setting is under Data menu in the handset. Similar setting is also available in
WebConsole.
Question:
Why does the Seagull 5000i keep rebooting at fixed intervals with GmPRS enabled?
Answer:
After certain numbers of tries, if the unit is still not able to establish the GmPRS connection,
system reboot at fixed interval is anticipated. This could be due to,
1. GmPRS service is not activated in the SIM. You need to firstly activate the GmPRS service in your SIM before you can initiate a GmPRS session.
2. Poor coverage of the GmPRS network at the particular location.
SEAGULL 5000i User Guide
97
Question:
Why does the Seagull 5000i keep rebooting at fixed intervals with GmPRS Tracking
enabled?
Answer:
After certain numbers of tries, if the unit is still not able to initiate a tracking session, system
reboot at fixed interval is anticipated. This could be due to,
1. GmPRS service is not activated in the SIM. You need to firstly activate the GmPRS service in your SIM before you can initiate a GmPRS session.
2. Poor coverage of the GmPRS network at the particular location.
3. Invalid tracking server IP address or port number. Please make sure valid information is filled up inside Settings>>GPS reporting menu.
4. Failure to connect to the tracking IP address and port number. Please make sure the
backend tracking server is running properly on the configured IP address and port number.
Question:
Why does the Seagull 5000i keep rebooting at random intervals with GmPRS enabled (NO
Tracking enabled)?
Answer:
The random reboot could be mostly due to
1. Unstable power supply to the unit. Generally speaking, the recommended operating voltage ranges from 10.8V to 31.2V. The recommended operating power will be 10W for the standard passive antenna system and 30 to 40W for the active antenna systems, depending on the types of antenna used.
Question:
Why does the Seagull 5000i keep rebooting at random intervals with GmPRS tracking
enabled?
Answer:
The random reboot could be mostly due to the following two reasons
1. Unstable power supply to the unit. Generally speaking, the recommended operating voltage ranges from 10.8V to 31.2V. The recommended operating power will be 10W for the standard passive antenna system and 30 to 40W for the active antenna systems, depending on the types of antenna used.
2. Heavy traffic on the Ethernet port due to large-size file downloading or multi-pages web surfing, which disrupt the tracking functions.
98
SEAGULL 5000i User Guide
TRACKING RELATED
Question:
Does Seagull 5000i support Global Maritime Distress Safety System (GMDSS)?
Answer:
It is not GMDSS compliant. However, it does support a distress alert functionality.
Question:
What is the distress alert functionality that Seagull 5000i supports?
Answer:
There is a yellow distress alert button on the BDU. Once it is pressed, pre-defined distress
messages will be sent via SMS or GmPRS.
Question:
How can I configure the distress alert functionality of Seagull 5000i?
Answer:
Seagull 5000i supports distress alert via either SMS or GmPRS. You can select the mode
under Settings>>GPS reporting>>Mode in the handset menu.
When SMS mode is selected, reporting SMS server number must be defined in order
to receive SMS distress alerts. The SMS server number can be configured under
Settings>>GPS reporting>>SMS number in the handset menu. Distress alerts will be
in the form of protocol messages under this configuration. Please refer to the protocol
document for more information.
When SMS mode is selected, if you want to receive pre-defined SOS messages, emergency
numbers and emergency messages must be pre-configured. They can be configured under
Settings>>Alarm>>Alert button>>Emergency num and Settings>>Alarm>>Alert
button>>Emergency text in the handset menu. GPS information will be appended to the
pre-defined SOS message.
When GmPRS mode is selected, tracking IP address and port number must be
defined in order to receive GmPRS distress alerts. These 2 fields can be configured
under Settings>>GPS reporting>>Server IP Address and Settings>>GPS
reporting>>Server Port Number in the handset menu. Distress alerts will be in the form
of protocol messages under this configuration. Please refer to the protocol document for
more information.
Similar menus are available in the WebConsole.
SEAGULL 5000i User Guide
99
Question:
Do I need to enable GPS reporting in order to have the distress function?
Answer:
No. Distress alerts will be sent out even if the GPS reporting is disabled. However, you need
to pre-configure the alert mode and the related configurations (e.g. alert server number) in
order to receive the alert.
Question:
The server is receiving multiple distress alert messages with the same GPS information
(latitude, longitude, heading, speed, etc). Why?
Answer:
Distress alert is considered a critical emergency event. The alert flag will not be cleared
until the server acknowledgement is received. Please refer to the ‘Disable Alarm’ section
for more information on how to acknowledge the distress alert message. The same alarm
message will be sent upon every system reboot until it has been acknowledged.
Question:
What will happen if the distressed button is pressed multiple times?
Answer:
Multiple distress alerts will be sent. However, only one ‘Disable Alarm’ message is required
to clear the distress flag.
Question:
In case a distress alert fails to send out, will Seagull 5000i retry?
Answer:
In case a distress alert is triggered, but Seagull 5000i fails to send out alert message due to
various reasons, e.g. alert recipient information is not configured properly; SMSC number is
configured wrongly, Seagull 5000i will still retry sending the alert message at certain time
intervals with a maximum number of retries. These can be configured in the WebConsole
under Settings>>Tracking>>Emergency>>Resend Frequency and Settings>>Trackin
g>>Emergency>>Maximum Number of Tries.
100
SEAGULL 5000i User Guide
Question:
How can I know my GPS tracking ID? Is it unique?
Answer:
You can find your tracking ID under Settings>>GPS reporting>>Unit ID. All the Seagull
5000i units should have unique tracking IDs.
FAX RELATED
Question:
Will a pending fax job survive a power cycle?
Answer:
Seagull 5000i classifies fax jobs into 4 categories, namely Send, Receive, Scan and Print.
Sending and receiving faxes are satellite network activities while scanning and printing are
local activities involving the connected fax machine. Seagull 5000i can reinitiate Sending
and Printing activities, but not Receiving and Scanning.
There is an option in Seagull 5000i for the user to configure whether the unit
should resume the last pending fax job (either printing or sending) when the fax
transaction was interrupted due to a power failure or a reset. In the handset menu,
it is under Settings>>Fax>>Power Cycle Disc. In the WebConsole, it is under
Settings>>Fax>>Discard all pending Fax jobs after power cycle.
Question:
What is the maximum number of pages for sending and receiving faxes at one time?
Answer:
20 pages. Please note the maximum number of pages that can be put in the fax machine
paper tray also.
SEAGULL 5000i User Guide
101
Question:
How can I know whether the fax job is successful or not?
Answer:
Status indicator icons will be displayed on the handset and WebConsole user interface when
there is a fax transaction.
At the end of the transaction, messages such as, [phone number] Sending FAX
- Successful, [phone number] Sending FAX - Unsuccessful, [phone number]
Receiving FAX - Successfully or [phone number] Receiving FAX - Unsuccessful will
appear on the handset screen for a few seconds before they disappear.
A similar report will be printed if the user enables the Print Report option. In the
handset, it is under Settings>>Fax>>Print Report. In the WebConsole, it is under
Settings>>Fax>>Print Report.
In addition to the handset messages and the printed report, the unit will keep track of
the last 20 fax transactions inside the log page, which include missed fax calls, outgoing
fax calls and incoming fax calls. In the handset, the log page is under Log>>Fax. In the
WebConsole, it is under Settings>>Terminal Info>>Call Log>>Fax.
Question:
What should I do if the fax machine connected to FaxConnect is always complaining ‘unable
to send’?
Answer:
Seagull 5000i should be able to work with most of the G3 fax machines without adjusting
any configuration settings.
However, due to certain special settings or compatibility issues, such problems may happen.
Below is a checklist you can try when you encounter such problem.
a. Ensure that the interface cable is securely connected between the FaxConnect and Seagull 5000i BDU.
b. Ensure that the POWER LED of the FaxConnect is ON.
c. Ensure that the IN USE LED of the FaxConnect is ON when the fax machine is off-
hook.
d. Set the resolution of the fax machine to STANDARD.
e. Make sure that the paper is properly fed to the fax machine.
f. Set the fax machine operating mode to FAX ONLY.
g. Try a different dialing method. (e.g. press HOOK on the fax machine first, key in the phone numbers and then press START.)
h. Reduce the TX speed of the fax machine.
i. Reboot the fax machine.
j. Factory reset the Seagull 5000i BDU.
102
SEAGULL 5000i User Guide
Question:
What should I do if my fax sent from the fax machine connected to the FaxConnect is not
received by the recipient, even though my fax machine is saying ‘transmission successful’?
Answer:
The fax function of Seagull 5000i is done in store and forward manner. Fax data is firstly
buffered into the Seagull 5000i before the satellite fax call is made. Therefore, there might
be some discrepancy between the job status indicated by the fax machine and the actual
result at that point of time. User is advised to check the status on the handset or the
WebConsole UI as described in one of the other FAQs.
However, it should not take more than 5 minutes for the receiving party to receive the fax
call. If it takes longer than expected, follow the below checklist to identify and solve the
problem.
a. Ensure that the SIM card of the sending Seagull 5000i is fax enabled. If the receiving end is also a Seagull 5000i setup, the SIM has also to be fax enabled. Consult the service provider if required.
b. Make sure that, the antenna has a clear satellite view and the signal strength is 4 or 5 bars on the handset.
c. Make sure that the power supply is adequate especially for an active antenna setup.
d. Make sure that the receiving party has turned on the fax machine.
e. Execute factory reset on the Seagull 5000i BDU to see whether the problem still exists.
f. Reboot the fax machine and try again to see whether the problem still exists.
A retry mechanism is implemented in the Seagull 5000i to improve the fax success rate.
The user can increase the number of retries when the unit fails to deliver the fax. In the
handset, the option is under Settings>>Fax>>Num. Of Retries. In the WebConsole, it
is under Settings>>Fax>>Number of Retries. But please note that airtime charges will
apply for each retry.
SEAGULL 5000i User Guide
103