1
[ENGLISH 1
Video Camcorder
8ram
COLOR LCD
SCL700/L710/L750/L770
Hi[] SCL7001L7101L7501L770
Owner's Instruction Book
Before operating the unit, please read
this instruction book thoroughly, and retain it for
future reference.
IENGLISHI
Contents
Notices
and Safety
Instructions
Getting
to Know Your Camcorder
Features
Descnpt_ons
• Front V_ewSFdeV_ewRear V_ew
• OSD [On Screen Dtsplayl
Accessones SupRhed w_ththe Camcorder
Remote Control iSCL710 L750 L770 onlyl
• Self Timer Recording
12
13 14 15
16
18
19
19
Preparing
Ad ust_n the Hand Strap and Shoulder Strap
Ltt_lum [_atter_ Installation
Connecting the Power Source
• To use the AC Power Adapter
• To use the Battery Pack
Using the Battery Pack
• Continuous Recording t_metable
• BatterryLevel Dtsplay
Insedtng andEjectmg a Cassette
2O
21
22
22
23
24
24
25
26
Basic Recording
MakngYour F_rstRecording
H_ntsfor Stable Image Recordtnq
• Record_n9 wtti_LCD Mon¢[or
• Record_n_ewtth Vtewfinder
Ad ust_n9 the LCD
Ad ust_ng Focus of the VIEWFINDER
Playmgback a tape on the LCD
mad ust_ngthe LCD dunng PLAY
• Controlhng the Sound from the Speaker
• Vtewtng a sttrl Ptcture
• Prcture Search
27
29
29
29
30
31
32
33
33
33
33
Advanced
Recording
Zoomm rnandOut
D_ltal _oom
EASY mode [for beglnnersl
CUSTOM-Creating your own customtzed recording settings
DIS iDrgttal Image StabFllzer SCL750'L770 only
MF AF [Ivlanual Focus Auto Focust
BLC
34
35
37
38
39
40
41
A
I ENGLISH_
Contents
(continued)
ProqramAE (Automatic Exposurel
DSE IDrgttal Special Effects_ in CAMERA mode
Settm and Recordln DATE TIME
SeIec_ng and Recor_ng a T_tle
Fade hqand Out
PIP (SCL750,L770 onry;;
Snap Shot ISCL750,L770 only;
White Balance
Demonstration
Setting the Date Title color
Lightrng Techniques
42
44
46
48
5O
51
52
53
54
55
56
Playing back a Tape
To watch with LCD
To watch wtth TV monttor
Various Functrons in PLAYER mode
Adjusting the LCD
Setting the S_p_eaker
QNIOFF
DSE i_ PLAYER mode
Multi Playback (Using the PAL60 Systeml
57
57
59
6O
6O
6O
64
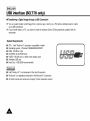
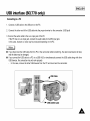
USB interface
(SCL770
only)
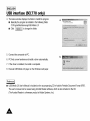
Installing USB Media 2 0 Program
62
63
Maintenance
66
66
66
66
66
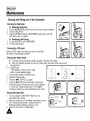
Creanlng and Taking care of the Camcorder
• Cleaning the Vtewflnder
• Cleaning the LCD Panel
• Cleaning the Vtdeo Heads
• Storing the Camcorder
Using
Your
Camcorder
67
Abroad
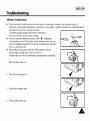
Troubleshooting
Self DBgnosts Dtsplay
Checking
MoFstureCondensation
68
69
71
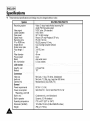
Specifications
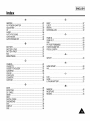
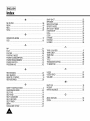
Index
72
Warranty
75
73
A
IENGLISHI
Notices
Notices
and Safety
regarding
rotation
Instructions
of LCD
screen
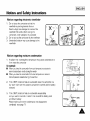
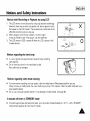
Please rotate t_e LCD screen carefully as illustrated
Unintended rotation may cause da['nage to the inside of the
hinge that connects the LCD screen to [he Camcorder
1]
LCD street, crosed
2)
2]
Standard recording by using the LCD screer,
31 Making a recording by looking at the LCD screen from the top
4]
Making a recording by looking at the LCD screen from the front
51 Making a recording with the LCD screen closed
Notices
d,
regarding
the LENS
Do not let the LENS point toward the sun
Direct sunlight can damage the CCD
I'Charge Coupled Dewce)
A
_
I ENGLISH_
Notices and Safety Instructions
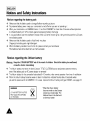
Notices
1)
regarding
electronic
viewfinder
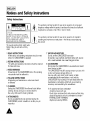
Do not place the camcorder so that the
2
vlewflndef is pointing towards the sun
Direct sunlight can damage the msrde of the
vieMinder Be careful when p[acm9 the
camcorder under sunlight or by a window
2) Do not p_ck up the camcorder by the vieMmder
3_ Unintended rotabon may cause damage to the
v_ewf_nder
Notices regarding
X
3
X
I,
moisture condensation
1) A sudden nse _natmosphenc temperature may cause condensation to
form inside the camcorder
for example
•
When you take the camcorder from cold temperature outside to
warm temperature inside during the winter
•
When you take the camcorder from cool temperature ms,de to
hot temperature outside dunn 9 the summer
2)
If the
DEW"
dry warm
removed
protection
room
feature
with the cassette
is acWated,
leave the camcorder
compartment
opened
m a
and the battery
3_ If the DEW" protection feature B activated unexpectedly
and you want to ovemde _t detach then reinstall the battery pack
and lithium battery
Please make sure that the condensabon has dBappeared
completely isee page 71)
,A
IENGLISHI
Notices and Safety Instructions
Notices
"l'
regarding
the
battery
pack
Make sure that the battery pack is charged before recording outaoors
,,l, To preserve battery power keep your camcorder turned off when you are not operating rt
,,l, When your camcorder is in CAMERA mode if it is left in STANDBY for more than 5 minutes without operation
it will automatically turn off to protect against unexpected battery discharge
,,l, It is a good idea to use the v,ewflnder instead of the LCD when record,ng for a long t,me because the LCD uses
more battery power
Make sure that the battery pack is fitted firmly ,nto place
Dropping the battery pack might damage it
,,l, When the battery reaches the end of its life please contact your local dealer
The battenes have to be dealt with as chem,cal waste
,,l,
Notices regarding the Lithium battery
Warnln_L Keep the LITHIUM BATTERY out of the reach of children Should the battery be swallowed,
consult a doctor =mmedlately
•t,
•t,
•t,
The lithium battery ma,ntams the clock function TITLE CUSTOM function and preset contents memory
even if the battery pack or AC power adapter is removed
The I_thlum battery for the camcorder lasts about 8-10 months under normal operation from trme of installation
When the lithium battery becomes weak or dead the date/time indicator flashes about 5 seconds when
you set the power sw,tch to CAMERA In this case replace the lithium battery with type CR2025 {see page 21/
WARNING
LITHIUM BATTER'( MUST BE
REC_'CLED OR DISPOSED
OF PROPERLY
A
• When the hthlumbattery
becomes weak or dead please
contact your lecaI dealer The
battenes have to be dealt w_th
as chemical waste
I ENGLISH_
Notices and Safety Instructions
Notices
with
Recording
or Playback
by using
LCD
1) The LCD monitor is manufactured by using high precrslon technology
2)
However there may de some tiny specks I red, blue or green in colorj
that appear on the LCD monitor These specks are normal and do not
affect the recorded picture in any way
When using the LCD monitor outdoors m direct sunlight
It may be difficult to view If this occurs use the vlewflnder
3_ The LCD monitor's OSD ,s turned off when the LCD is praced in the
fon.,vard direction
Notices regarding
+
"l'
Notices regarding
'{'
4,
video head cleaning
To ensure normal recording and clear picture clean the video heads When playing back the pictures
if they are noisy or hardly vlsrdle the video heads may de dirty If this happens, clean the video heads with a dry
type cassette cleaner
Do not use a wet type cassette cleaner It may damage the video heads i see page 661
5 minutes
"l'
the hand strap
It Is very important to adjust the hand strap for better recording
(see page 20J
Do not insert your hand in the hand strap forcibly,
the buckle may be darqaged
off timer
in STANDBY
mode
To protect against tape and head-drum wear your camcorder w,II automabcally turn off ,f ,t ,sreft ,nSTANDBY
mode without operabon for more than 5 minutes
A
LENGLISH]
Notices
and Safety
Instructions
Safety Instructions
___
//'/'J_'X'X,
consbtute
risk product
of fire ors electric
shock
/
', magn_tude
dangerous to
voltaqe
withina the
enclosure
that may be of sufhclent
1
]
//',,
This symbol
//'k
This
symbol is
ts intended
intended to
to alert
alert the
the user
user to
to the
the presence
presence of
of important
unmsulated
/ '|, ', operating and malnterlance irlstructlonsm the literatureaccompanylrlg
/ Z 'k this product
To prevent electnc shock match w_de
blade of plug to wide slot and fully
insert
1 READ INSTRUCTIONS
All the safety and operating irlstructlonsshouFdbe read
before the CAMCQRDER _soperated
2 RETAIN INSTRUCTIONS
The safety and operating instructions should be retained
for future reference
3 HEED WARNINGS
All warnings on the CAMCORDER and in the operatlrlg
,nstructlons should be adhered to
4 FOLLOW INSTRUCTIONS
All operating and maintenance ,nstructrons should
be followed
5 CLEANING
Unplug this CANICORDER from the wall outlet before
cleaning Do not use hquld or aerosol cleaners
Use a dry cloth used for dusbng caDnets
6 ATTACHMENTS
Do not use attachments not recommended by the
CAMCQRDER product manufacturer as they may be
hazardous
WATER AND MOISTURE
Do not use this CAMCORDER near water
for example near a bathtub wash bowl kttchensink laundry
tub _na wet basement near a swm_mtngpool or lake
ACCESSORIES
Do not place thin CAMCORDER on an unstable cart stand
tnpod bracket or table
The CAMCORDER may fall causing senous injury to a child
or adult and senous damage to the umt
Use only with a cart, stand tnpod bracket or table
recommended by the manufacturer or sord Wltrl the
CAMCORDER Any mounting of trle untt should follow the
manufacturer s irlstructlons and should use a mounting
accessory recommended by the manufacturer
A An apphance and cart combFnabon
should be moved w_th care
QuFckstops excessive force and uneven surfaces may
cause the appliance and cart combnatlon to overturn
PORTABLE CART WARNING
(Symbol prowded by RETACI
,A
[ ENGLISHI
Notices
and Safety Instructions
9. VENTILATION:
Slots and openings in the cabinet are provided for
ventilation to ensure retiabte operation of
the CAMCORDER and to protect it from overheating.
These openings must not be blocked or covered.
Never place your CAMCORDER on a bed, sofa, rug, or
other similar surface: on or near a radiator or heat
register.
This CAMCORDER should not be placed in a built-in
installationsuch as a bookcase or rack untess
proper ventilation is provided or the manufacturer's
instructionshave been adhered to.
10. POWER SOURCES:
The CAMCORDER should be operated only from the type
of power source indicated on the label.
If you are not sure of the type of power supply at your
home, consult your appliance dealer or local power
company.
A CAMCORDER is intended to be operated from battery
power, or other sources, refer to the operating instructions.
13. OUTDOOR ANTENNA GROUNDING:
If an outside antenna or cable system is connected to the
CAMCORDER, be sure the antenna or cable system is
grounded to provide some protection against voltage
surges and built-up static charges, Section 810 of the
National Electrical Code, ANSt/NFPA No. 70-I984,
provides informationwith respect to proper grounding of
the mast and supporting structure, grounding of the
lead-in wire and supporting structure, grounding of the
mast and supporting structure, grounding of the lead-in
wire to an antenna discharge unit, size of grounding to
conductors, location of antenna-discharge unit, connection
to grounding electrodes and requirements for the
grounding electrode.
See figure below.
11.GROUNDING OR POLARIZATION:
This CAMCORDER may be equipped with either a
polarized 2-wire AC line plug (a plug having one btade
wider than the other) or a 3-wire grounding type plug,
a plug having a third (grounding) pin.
If you are unable to insert the plug fully into the outlet,
try reversing the plug, If the plug still fails to fit,
contact your electrician to replace your outlet.
Do not defeat the safety purpose of the polarized piug.
12. POWER-CORD PROTECTION:
Power-supply cords should be routed so that they are not
likety to be walked on or pinched by items placed upon or
against them, paying particular attention to cords or plugs,
convenient receptacles, and the point where they exit from
the unit.
A=
IENGLISHI
Notices
and Safety Instructions
14. LIGHTNING:
For added protection of this CAMCORDER during a
lightning storm or when it is left unattended and unused
for long periods of time, unptug it from the wall outlet and
disconnect the antenna or cable system.
This will prevent damage to the CAMCORDER due to
lightning and power-line surges.
15. POWER LINES:
An outside antenna system should not be located in the
vicinity of overhead power lines or other electric light or
power circuits where it can fail into such power lines or
circuits.
When installingan outside antenna system, extreme care
should be taken to keep from touching such power lines
or circuits as contact with them might be fatal.
16. OVERLOADING:
Do not overload wall outlets and extension cords as this
can result in a risk of fire or electric shock.
17. OBJECTS AND LIQUIDS:
Never push objects of any kind into this CAMCORDER
through openings as they may touch dangerous voltage
points or short out a part that could result in a fire or
electric shock.
Never spill liquids of any kind onto the CAMCORDER.
Should spillage occur, unplug uni and have it checked by
a technician before use.
18. SERVICING:
Do not attempt to service this CAMCORDER yourself.
Opening or removing covers may expose you to
dangerous voltage or other hazards,
Refer all servicing to qualified service personnel.
A
19. DAMAGE REQUIRING SERVICE:
Unplug this CAMCORDER from the wail outtet and
refer servicing to qualified service personnel under the
following conditions:
a. When the power-supplycord or plug is damaged.
b. If any liquid has been spilled onto, or objects have
fallen into the CAMCORDER.
c. If the CAMCORDER has been exposed to rain or water.
d. If the CAMCORDER does not operate normally by
following the operating instructions, adjust only those
controls that are covered by the operating instructions.
Improper adjustment of other controls may result in
damage and will often require extensive work by a
qualified technician to restore the CAMCORDER to its
normal operation.
e. If the CAMCORDER has been dropped or the cabinet
has been damaged.
f. When the CAMCORDER exhibits a distinct change in
performance, this indicatesa need for service.
20. REPLACEMENT PARTS:
When replacement parts are required, be sure the service
technician has used replacement parts specified by the
manufacturer and having the same characteristics as the
original part.
Unauthorized substitutions may result in fire,
electric shock or other hazards.
21. SAFETY CHECK:
Upon completion of any service or repairs to this
CAMCORDER, ask the service technician to perform
safety checks to determine that the CAMCORDER is
in safe operating order.
[ ENGLISHI
Notices
and Safety Instructions
NOTE TO CATV SYSTEM INSTALLER:
This reminder is provided to caII the CATV system installer's
attention to Article 820-40 of the NEC that provides guidelines
for proper grounding and, in particular, specifies that the
cable ground shall he connected to the grounding system of
the building as cIose to the point of cable entry as practical.
USER INSTALLER CAUTION:
Your authority to operate this FCC certified equipment could
be voided if you make changes or modifications not expressly
approved by this party responsible for compliance to part 15
FCC rules.
A
IENGLISHI
Getting
to Know
Your Camcorder
Features
Your camcorder has many features for recording and playing back
Snap Shot (SCL750/L770 only)
The Snap Shot function lets you record an object at a standst=ll for a I=m,tedt=me =nCamera mode I'see page 521
PIP (SCL750/L770 only)
The PIP function shows where thecenter of the image is while recording ,nD,gital Zoom of the Camera mode qsee page 51
BLC
When you record a sublect w_th the light source behind the subject or a subject with a light background,
use the BLC function i=ee page 41j
DSE (Digital Special Effects)
The DSE enables you to give a creative look to your films by add,ng varrous special effects {see page 441
Program AE (Auto Exposure)
The Program AE enabEes you to adapt the shutter speed and aperture to the type of scene to be filmed (see page 421
DIS (SOL758/L770 only)
The DtS compensates for unstable images caused by hand shake, particularly at hrgh magnification
(see page 39]
22x High ratio zoom lens
Zooming Is a recording technique that lets you chanqe the s_ze of the subject ,nthe picture
For more professronal recordings use the zoom function i'see page 341
Digital Zoom (880x)
Zooms more than 22x are performed digitally (see page 35)
Macro
The macro function allows you to record your sublect at close ranqe
You have to adjust the zoor'n fully wide for macro recording I'see 5age 341
EASY
Th_s mode enables even the beginner to easily make a recordrng Isee page 37_
Multi PLAYBACK (PAL60)
PAL60 is a special output signal format w_th wh,ch a tape recorded or, th,s camcorder {NTSC formatl can be wewed
on a PAL TV
H=8
HI8 B an enhanced 8ram format
When a H_8 cassette B inserted the car'qcorder will automatically select the H_-8 format for record or playback
A
I ENGLISH]
Getting to Know Your Camcorder
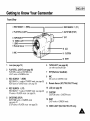
Front View
3 REC SEARCH -
(REW),
4 REC SEARCH '+ (FF)
2 PLAY/STILL (LIGHT)
5 DATE/TIME (STOP)
6 TAPE EJECT
7 EVF
13 VIDEO LIGHT
I LENS
9 Remote Sensor
10 LCD
8 MIC
I1 CUSTOM
12 EASY
2
3
4
5
Lens (see page 72)
6
TAPE EJECT (see page 26)
Use when ejecting the tape
PLAY/STILL (LIGHT) (see page 58)
PLAY.'STILLworks m PLAYER mode
LIGHT works in CAMERA mode
7
EVF (Electronic Vmwflnder)
8
MIC
MIC works m CAMERA mode
9
Remote Sensor (SCL71O/L75O/L770 only)
REC SEARCH - (nEW)
REC SEARCH '- works ,1 STANDBY mode Isee page 28_
REW works in PLAYER mode isee page 591
REC SEARCH + (FF)
REC SEARCH .+ works =nSTANDBY mode Isee page 28_
FF works m PLAYER mode Isee page 59_
DATE/TIME (STOP)
DATE TIME works .7 CAMERA mode
isee page 471
STOP works m PLAYER mode (see page 581
10 LCD (see page 29)
11 CUSTOM
CUSTOM works _nCAMERA mode
12 EASY
EASY works in CAMERA mode
13 VIDEO LIGHT (SCL7OO/L75O/L770 only)
A
IENGLISHI
Getting
to Know
Your Camcorder
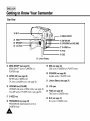
Side View
24 BLC
MENU ON/OFF
23 FADE
15 ENTER (MF)
16 UP/DOWN Dtal (VOLUME)
20 SPEAKER
22 LCD Open--
17 S-VIDEO out
18 PAE
19 DSE
21 Ltth=umBattery
14 MENU ON/OFF (see page 30)
MENU ON/OFF works in CAMERA and
PLAYER mode
15 ENTER (MF) (see page 30)
ENTER works in MENU mode
kIF works in CAMERA mode (see page 40]
16 UP/DOWN dial (VOLUME)
UP/DOWN dial works in MENU mode (see page 30]
VOLUME works tn PLAYER mode qsee page 60_
19 DSE (see page 44)
DSE works ,n CAr_4ERAand PLAYER mode
20 SPEAKER (see page 60)
Speaker works rn PLAYER mode
2t
Ltthtum Battery(seepage21)
22 LCD open
23 FADE (see page 50)
FADE works in CAMERA mode
17 S-VIDEO out
18 PROGRAM AE (see page 42)
PROGRAM AE (Auto Exposurel works in
CAMERA mode
24 BLC (see page 41)
BLC works tn CAMERA mode
I ENGLISH_
Getting to Know Your Camcorder
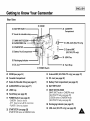
Rear View
25 ZOOM
36 BATTERY EJECT
26 CASSETTE
Compa_ment
37
28 AUDIONIDEO Out
$?__
39 USB JACK (SCL770 only)
32 START/STOF
•
35 Battery Pack
'_'--
33 External MIC
It-,
(SCL750/L770 only)
LENS Cap
38 Recharging Ind=cator
34 DC Jack
30 Hand Strap
31 POWER Sw=tch
25 ZOOM (see page 34)
33
External MIC (SCL750/L770 only) (see page 72)
26
34
DC Jack (see page 22)
27 Hooks for Shoulder Strap (see page 21)
35
Battery Pack Compartment (see page 23)
28 AUDIONIDEO
36
BATTERY EJECT
37
SNAP SHOT/D ZOOM
SNAP SHOT works in CAMERA mode
29
Cassette Compartment
out (see page 57)
LENS Cap
30 Hand Strap (see page 20)
31 POWER Switch (see page 22)
-CAMERA SeLectto record
- OFF Select to turn off the camcorder
- PLAYER Select to playback
32 START/STOP (see page 28}
START/STOP works in CAMERA mode
(SCL750/L770 only see page 52)
D ZOOM works in CAMERA mode
(SCL700/L710 only see page 36j
38
Recharging Indicator (see page 23)
39
USB Jack (SCL770 only) (see page 65)
A
IENGLISHI
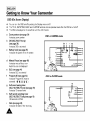
Getting
OSD
(On
to Know
Screen
Your Camcorder
Display)
•t,
•t,
You can turn the OSD on/off by setting the Display menu on/off
The TITLE, DATE/TIME, EASY and CUSTOM functions can be operaLed even after the OSD is Lurnedoff
•t,
The OSD is displayed _nthe vtewfinder and the LCD monitor
a
Zoom position (see page 34)
Indicates zoom postL_on
b
DIS (SCL7501L770 only)
(see page 39)
Indtcates DIS ts activated
c
mode
bat
r
sq
Battery level (see page 25)
Indicates the power left in the battery
I'
d
OSD In CAMERA
I
Manual Focus (see page 40)
Indtcates manual focus rs on
AuLo Focus Is noL displayed
e
BLC (see page 41)
Indtcates BLC ts acttvated
f
Program AE (see page 42)
Indicates Program AE mode ,s
activated I _ _ ,_,_,_- '._
g
Self record waiting timer
(SCL710/L7501L770 only) (see page 19)
Indicates 10 second timer
h
Self record recording timer
(SCL710/L750fL770 only) (see page 19)
1'30seconds or ENDI
J
Date (see page 46)
Indtcates the dale of the recording
A
OSD m PLAYER mode
rq
°
I ENGLISH_
Getting
to Know
Your Camcorder
OSD (On Screen Display)
J
T=me(see page 46)
Indicates the time you are recordFn9
k T=tle see page 48
ndlcates the recorded tlte you have set
It _ssupenmposed on the scene
I
Self dmgnosls (see page 68)
Displays different diagnostic indicators concerning the camcorder s operation
rn DSE (D=g=talSpecml Effect) (see page 44)
Indicates the DSE mode _sactwated
Theoperatron modesare GHOST STROBE SEPIA B&W NEG MIRROR ART MOSArC 169(WIDE_andCINEMA
n Wh=te Balance mode (see page 53)
Indicates the White Balance mode _sactivated
The White Balance modes are AUTO INDOOR( - - i and QLITDQQR(-÷- I
o Tape counter
Indicates amount of the tape used
13 Operation mode
Indicates the operation mode is actrvated
The operation modes are STBY REC • STOP PLAY( Ib'- i FFI I_- ) REW( 4< ; EJECT
q
r
s
t
u
v
w
x
y
z
HI8 see page 58)
Indicates you are using HI8 tape when recordng or p aylrlg back
DEW L6J ) condensation (see page 71)
[_, OTlltOrS
the moisture condensation
Digital zoom (see page 35
In,cares d_g_talzoom _sactwated
Snap Shot (see pa_e 52
Indicates the time lett during Srlap Shot Recording
Zero return (SCL710/L75O/L770 only) (see page 59)
Ind,cates that the zero return _sactivated
PB DSE
Shows that the PB DSE mode _sactrve
VOLUME
EASY&CUSTOM
Shows when the easy or custom mode rsactive
LIGHT (SCL7OO/L75O/L770only)
Shows when the Dght _sswitched on
Remocon ( _1"_ OFF) (SCL71OlL75O/L770 only)
Indicates the remocorl off mode is activated
[ENGLISH]
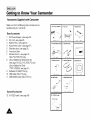
Getting
to Know
Accessories Supplied
Your Camcorder
with Camcorder
"Vlake sure Lhat the followtng bastc accessories are
supphed with your camcorder
I AC PowerAdapter
Basic Accessories
1
2
3
4
5
6
AC PowerAdapter (see page 221
AC cord {see page 221
Battery Pack isee page 23)
Audio/Video Cable qsee page 57_
Shoulder strap (see page 21)
Instruction Book
Remote Control {see page "91
['SCL7"fO/L750/L770 only)
8 Dthtum Battery for Remote Control
['see page 19){SCL710/L75O/L770 onlyl
Dthtum BatLery for Clock
['TYPE CR2025, see page 21]
g Software CD tSCL770 only)
10 USB Cable (SCL770 onlyj
11 USB AUDIO Cable (SCL770 only)
2 AC c_rd
B_tLery
--.
t_ I
_C 4_ , U,, _
4 AU DIO,VIDEO
C_ble
5 Shoulder
Strap
Book
S
_c;_
7 Remote
ConL_o_
Ldhlum
u,,
Z-
Batteries
9 Software
CD
U©
_C_ j u,,,,* z_
_E4
10 USB C_ble
-C
Optional Accessories
12
_
J u,,,,
S VIDEO
_-
c_ble
lul
H
USB AUDIO
ME
I,tl
A
InstrucLl_n
z
7
12 S-VIDEO cable ['see page 58)
Pac_
,,,
Cable
,j_4_
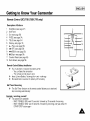
I ENGLISHJ
Getting to Know Your Camcorder
Remote Control
(SCL 710/L 750/L 770 only)
Description of Buttons
1
2
Start/Stop (see page 27]
Self Timer
3
4
5
6
7
8
9
10
11
12
Still Isee page 59)
WIDE (see page 34;
TELE ['see page 341
Display tsee page 16;
_.- {Play) {see page 581
_-I_-(FF] {see page 591
.ql< (REW) isee page 59;
• (Stopl isee page 58)
Counter Reset (see page 59;
Zero Return {see page 591
3
1 -...-]
21
8-9-7-6--!
Remote Control Battery Installat=on
'_
You must insert or replace this battery when
- You purchase the camcorder
- The remote control doesnt work
,_ Insert Lithium Battery forlowlng the + and - markings
,._ Be careful not to reverse the polarity of the battery
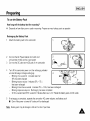
Self Timer Recording
•t,
E_
The Self Timer function on the remote control allows you to start and
stop recording automatrcally
recording yourself
Two options are available
- WAIT-IOS/SELF-30S wait 10 seconds followed by 30 seconds of recording
- WAIT-IOS/SELF-END
wa_t 10 seconds followed by recording until you press the
START/STOP button aga,n
--10
11
IENGLISHI
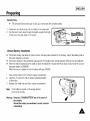
Preparing
1
Set power sw_tch to CAMERA mode
'
CAMERA
_r
-J_{r
--
--_--,
/
/
2
Press Self Timer button until the appropriate tnd,cator ts
disprayed on the LCD
•
WAIT-10S/SELF-30S
•
WAIT-10S/SELF-END
IIL
3
Press START/STOP button to start the ttmer
[ 3
the Hand
Strap
and Shoulder
Strap
Hand Strap
It ts very rmportant to adJust the hand strap for better recording
The hand strap enables you to
- Hold the camcorder tn a stable comfortable posibon
- Press the Zoom and [he red Record button w_thout
havtng to change the posibon of your hand
1
2
Pull open the Hand Strap cover and release the Hand Strap
adjust _tslength and sttck rt back onto the Hand Strap cover
Close the Hand Strap cover back up agatn
A
i
' i
Ii.
jl
When recordmg wt[h the bmer you can press START/STOP button agarn to cancel the funcbon
AdJusting
•t,
•t,
WAIT 10N
ELF 30S
•
If you have selected SELF-30S recordmg stops automabcally
after 30 seconds
After waiting for 10 seconds recording starts
If you have selected SELF-END press START/STOP again
when you w_sh to stop recording
Note
i
}
I ENGLISH_
Preparing
Shoulder Strap
+
1
2
The Shoulder Strap allows you to carry your camcorder withcomplete safety
Insert each end of the strap into the hooks on the cai'ncorder
Put the end of each strap through the buckle adjust the length
of the strap then pull it tight m the buckle
Lithium Battery Installation
"I'
The lithium battery maintains the clock function title and preset contents of the memory even if the battery pack or
AC power adapter is removed
,,I, The lithium battery for the camcorder lasts about 8-10 months under normal operation from the time of installation
,,I, When the khlum battery becomes weak or dead the date/time indicator flashes for about 5 seconds when you set
the power switch to CAMERA
When this occurs replace the Iith,um battery with type CR2025
1
2
Take out the holder from the lithium battery compartment
Insert the + srde of the hthlum battery toward the bottom
of the hoFder
3
Remsert the holder into the lithium battery compartment
Note
If the holder is inserted in the wrong direction
it wdl not fit correctly
Warning
Keep the LITHIUM BATTERY out of the reach of
the children
Should the battery be swallowed, consult a doctor
immediately
,A
LENGLISHI
Preparing
Connecting the Power Source
4" There are b.'_o
ways to connect powersource
Usingthe AC PowerAdapter used for indoor recording
Using the Battery Pack used for outdoor recording
To use the AC Power Adapter
1
2
Connect the AC Power Adapter [o the AC cord
Connect the AC cord to a wall socket
Note
3
4
The plug and ;,.,all socket type may be d_fferent depending on regional conditions
Connect the other end of the DC cable to DC jack of the ca['ncorder
To set the camcorder to the CAMERA mode
a
b
c
Note
,_1ove
Hold down the tab of [he power switch and push the switch to CAMERA mode
Make sure that the Lens Cap is open
Open [he LCD monitor and make sure that the image appears _n the LCD monitor
The LCD monitor is turned on automatically when it's opened more than 30 degrees
If the adapter is used next to a TV or the camcorder
_tmay cause the TV or camcorder to emit noise
the adapter away from the TV camcorder or the antenna cable
I ENGLISH_
Preparing
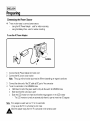
To use the Battery Pack
How long wtll the battery last for recording 9
,,l, Depends on how often zoom ts used m recording Prepareas many batterypacks as posstble
Recharging the Battery Pack
1
Attach the batterypack to the camcorder
', lilr
2
Connect the AC Power Adapter to [he AC cord
and connect the AC cord to a wall socket
3
Connect the DC cadre to the DC Jack of the camcorder
Turn off the car'ncorder power and the recharging _ndlcator
4
will start blinking and begin recharging
Bhnkmg once a second Indicates tess than
50% has been charged
Bhnkmg b.vtcea second Indtcates 50% - 75_:_
has been recharged
Bhnkmg three hmes a second Indtcates 75% - 100_:_has been recharged
Bhnkmg stops and stays on Recharging has been completed
On for a second and off for a second Indtcates there ts an error Reset the battery pack and DC cable
5
1
If recharging rscompleted, separate the camcorder AC power adapter, and battery pack
•
Even d the power _sturned off battery will be dtscharged
Note
Battery pack may be charged a I,ttle at the time of purchase
A
[ENGLISHI
Preparing
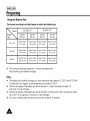
Using the Battery Pack
Continuous recording time table based on model and battery type
Model
Battery
SCL700
L710
SCL750 L770
LCD ON
E/IF OFF
LCD OFF
EVF Or4
LCD ON
EVF OFF
LCD OFF
EVF ON
Appro>'kmatel7
90 r=III}L_[_S
Apprc>'kmatel/
130 m_nute_
Apprl3zHIiateFy
80 minutes
Appro×lma[ely
120 minutes
SB-L16:_
Approykmatel/
130 m_nute_
ApprcYkmately
190 m_nutes
Approzlmately
120 mlrlu[es
Appro×lmacely
160 minutes
SB-Ld2O
Approykmatel/
260 m_nutes
ApprcYkmately
390 m_nutes
ApprozHIiately
_.4:=rtllrlutes
Appro×_ma[ely
34,3 minutes
SB-Lfl0A
•1, The continuous recording times given rn the table are approximate
Actual recording brae depends on usage
Notes
•1, The battery pack should be recharged in a room temperature that is between 0 CI'32_FI and 40 CI'lO4_FI
It should never be charged in a room temperature that is below 0 C(32 FI
•1, The Ide and capacity of tile battery pack will be reduced _f_tis used in temperatures below 0 C
even when rt is fully recharged
•1, The Ide and capacity of the battery pack will be reduced _fthe battery pack is left in temperatures above
40 C_104CF) for a long period even when it is fully recharged
•1,
Do not put the battery pack near any heat source Ifire or flames for exampre]
[ ENGLISHI
Preparing
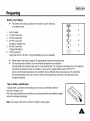
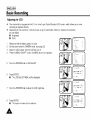
Battery Level Display
•t-
The battery tevel display indicates the amount of power remaining
in the battery pack.
1. Fully charged
2. 10+40%consumed
3. 40+60% consumed
4. 60+80% consumed
(preparea charged one)
5. 80+95% consumed
(change the battery)
6. 100%consumed
(camcorderwifl turn off soon, change the battery as soon as possible)
•t•t-
_
1
JI
_
2
3
!
_°_+'_
5
t
\
,
6
Please refer to the table on page 24 for approximate continuous recording times.
The recording time is affected by environmental temperature and conditions.
The recording time becomes very short in a cold environment. The continuous recording time in the operating
instructions is measured under the condiUon of using a fully charged battery pack at 25°C(77°F).
As the environmental temperature and conditions may be different when you actually use the camcordeh
the remaining battery time may not be the same as the approximate continuous recording times given
in these instructions.
Tips for Battery Identification.
A charge mark is provided on the batterypack to help you rememberwhether it
has been charged or not.
Two colors are provided(red and black)-you may choosewhich one indicatescharged
and which indicates discharged.
Note: The charge mark does not affect the battery's charge status.
A
[ENGLISHI
Preparing
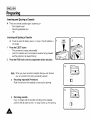
Inserting and Ejecting a Cassette
4,
There are several cassette types depending on
Color system used
Recording/playback ttme
Hr8
Insertmg and Ejecting a Cassette
4" Check to see tf the battery pack ts _n place or the AC adapter _s
connected
t
Press the EJECT button
The compartment opens automattcally
Insert the cassette ;',,tth the transparent wtndow facing outward
and the protectton tab toward the top
2
Press the PUSH mark untg the compartment chcks mto place
a
Note
a
When you have recorded a cassette that you wish to keep
you can protect tt from betng acctdentally erased
, []
Recording Imposstble (Protecbon)
Push the red tab on the cassette to cover up the opening
b
Recording poss=ble
If you no longer wish to keep the recordtng on the cassette
push the red tab back so that rt no longer covers up the opening
,A.
, []
I ENGLISH_
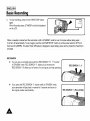
Basic Recording
Making
Your First Recording
Please make these preparations before recording
•
Did you connect a power source?
(Battery Pack or AC Power Adapterl
•
Did you set the power switch to CAMERA positron?
CAMERA
LS.
Lq_
•
Dtd you insert a cassette? isee page 26_
•
Open the LCD monitor and make sure that STANDBY is displayed in the OSD
(if the red tab of the cassette is opened, STANDBY wrll not be displayed]
Did you open the LENS CAP?
Make sure the image you want to record appears m the LCD monttor
Make sure the battery level mdtcates that there B enough remaining power for recording {see page 251
•
•
•
•
/
_ f_,.
We recommend that beginners who are using the camcorder for the first ttme
swttch the EASY mode on (see page 37]
To start recording
press the red START/STOP button
Recording starts and REC should be dBplayed on the LCD
A
IENGLISHI
Basic Recording
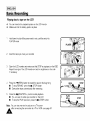
b. Tostop recording, pressthe red START/STOPbutton
again.
When Recordingstops, STANDBYshould be displayed
on the LCD.
[
When a cassette is loaded and the camcorder is left in STANDBYmode for over 5 minutes without being used,
it will turn off automatically,To use it again, pushthe red START/STOP buttonor set the power switch to OFF and
then back to CAMERA,This Auto PowerOff feature is designedto save batterypower and to protect the Head Drum
and tape.
RECSEARCH
,e Youcan view a recorded picturewith the REC SEARCH 8, O function
in STANDBYmode. REC SEARCH G allows you to reverse and
REC SEARCH _ allowsyou to forward, for as long as you keep pressing.
_,
If you press the REC SEARCH O button briefly in STANDBY mode,
your camcorder will play back in reverse for 3 seconds and return to
the original position automatically.
,A
REC SEARCH 8,
SEARCH _
(
I ENGLISH_
Basic Recording
Hints
for Stable
Image
Recording
•
While recording
•
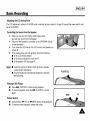
For stable recording fix the LENS cap firmly by chpp_ng _ton the hand strap
(refer to figure)
Recording
1
2
3
4
5
6
with the LCD monitor
I
I
i
',
iI I
with the Vmwfinder
5
Hold the camcorder firmly with the hand strap (see page 20)
Place your nght elbow against your srde
Place your left hand under the carncorder to support tt
Do not touch the bufl[-tn mtcrophone
Choose a comfortable stable posrbon for the shots
You can lean against a wall or on a table for greater stabdlty
Do not forget to breathe gently
Put your eye frrmly against the eyecap
6
7
Use the we_,drnder frame as a gutde to determtne the honzontal plane
Whenever possible use a tnpod
4
%-
Hold the camcorder firmly usrng the hand strap (see page 201
Place your nght elbo;v against your srde
Place your left hand under or next to the LCD to support and adjust it
Do not touch the buflt-tn microphone
Choose a comfortable stable posrtlon for the shots that you are taking
You can lean against a wall or on a table for greater stability
Do not forget to breathe gently
Use the LCD frame as a guide to determine the horizontal plane
Whenever posstble, use a tripod
Recording
1
2
3
_t_svery important to hold the camcorder correctry
i r
•
ih
I,I
I
I
I
I
i
A
[ENGLISHI
Basic Recording
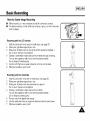
AdJusting the LCD
+
Yourcamcorder is equippedwith a 2 Sinch color LiquidCrystal D_splay{LCD; screen which allowsyou to wew
recording or playback directly
Depending on the conditions _nwhich you are using the camcorder undoors or outdoors for examplel,
you can adjust
•
Brightness
•
Color
1
2
Make sure that the battery pack is in prace
Set the power switch to CAMERA mode [see page 22_
3
Open the LCD monitor then the LCD will turn on
4
Press the MENU ON/OFF button the MENU list will be dlsprayed
5
Turn the UP/DOWN dial to LCD ADJUST
6
Press ENTER
• The LCD ADJUST MENUw41be displayed
7
Turn the UP/DOWN dial to adjust the LCD brightness
8
Press ENTER
•
The cursor will move to the next item
A
I ENGLISH_
Basic Recording
9
Turn the UP/DOWN dial to adjust the LCD color setting
10 Press ENTER
•
1I
For further adjustment
repeat steps 7, 8, 9
Press the MENU ON/OFF button to end the settm 9
Notes
• If you don't press a button within 30 seconds, the settm 9 w_ll disappear
• The MENU ON/OFF function wdl not operate _nEASY mode
Adjusting
Focus of the VIEWFINDER
Focus:
Use the focus adjustment knob of the VIEWFINDERto focus the p_cture
A
[ENGLISHI
Basic Recordin 9
Playing
back
a tape on the LCD
,,t, You can monitor the playback picture on the LCD mon,tor
•t, Make sure that the battery pack Is In place
Hold down [rle tab of the power switch and push the switch to
PLAYER mode
1
2
Insert the tape you have just recorded
r
f2 ,'
,,,--"_ :__'_-_
,
3
Open the LCD monitor and make sure that STOP is displayed on the OSD
Adjust the angle of the LOB monitor and set the brightness or the color
,f necessary
4
Press the _'<qREWI button to rewind the tape to the beginning
•
To stop REWIND press the • tSTOPI button
•
5
Camcorder stops automatically after rewm@ng
Press the IHI['PLAY/STILLJ button to start playback
•
You can see the video you recorded or, the LCD
•
To stop the PLAY operation press the • {STOPj button
Note
You can also monitor the picture on a TV screen
after connecting the camcorder to a TV orVCR {see page 571
',I
"_L_L._t.
PLAYER
-_i_
_
,"
[ ENGLISHI
Basic Recording
Adjusting the LCD during PLAY
The LCD adjustmentmethod in PLAYERmode is identicalto step number 4 of page 30, exceptthe power switchmust
be set to PLAYER.
Controlling
•t,
•t,
the Sound from the Speaker
When you use the LCD monitor while playing back,
you can hear sound from the Speaker.
Volume of the Speaker is controlled by the UP/DOWN dial tab
on the camcorder.
•t,
if you close the LCD monitor, the LCD monitor and Speaker are
turned off.
•t,
if the speaker does not work properly, check the following:
• is the LCD monitor closed?
Notes:
•
•
Is the volume adjusted to a low level?
Is the speaker off? (see page 60)
•
Lower the volume if vibration from the built-in speaker
causes screen disturbance.
•
Volume display will automatically disappear 2 seconds
after adjusting,
PLAY/STILL
Viewing a Still Picture
•
•
Press INI (PLAY/STILL)buttonduring playback.
To resumeplayback, press the IHI (PLAY/STILL)button
again,
REW
FF
Picture Search
•
•
Keep pressing I,,_-(FF) or <_I(REW) button during playback.
To resume normal playback, release the button.
A
[ENGLISHI
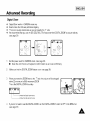
Advanced
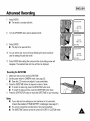
Zooming
Recording
In and Out
'_
÷
Zoom works _n CAMERA mode onry
Zooming is a recording technique that lets you change the stze of the subject tn the p_cture For more professtonal
'_
Iooktng recordings do not use the zoom functton too often
You can also choose from two zoom speeds to suit d_fferent needs
•
Gradual zoom 19-12 seconds from TELE/WlDE to WlDE/TELEI
'_
•
Htgh-Speed zoom 1'3-6 seconds from TELE/WlDE to WlDE/TELE)
rise these features for d_fferent shots, please note that overuse of the zoom feature can lead to unprofessional
Iooktng results and a reduchon of battery pack usage t_r'qe
Move the zoom lever a IlttEefor a gradual zoom
move it further for a hFgh-speedzoom
Your zooming is monitored on the OSD
2
w
T
T {Telephoto) srde
Subject appears closer
3
W (Wtde anglel stale
Subject appears further away
Note
MACRO
If you cannot get a sharp focus in telephoto zoom move the lever to the W" stde unN the focus is sharp
You can record a subject that _sat least 1 mr'q away from the lens surface tn the wide angle posttion
I ENGLISH]
Advanced
Recording
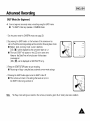
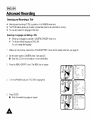
Digital Zoom
+
+
Digital Zoom works in CAMERA mode on4y
Zooms more than 22x are performed d_gltally
+
+
The p_cture quahty detenorates as you go towards the T' s_de
We recommend that you use the DIS {SCL750/L770_ feature with the DIGITAL ZOOM for picture stability
{see page 391
L:[5 _C
[51_"
OZO2H
,
gErl
ZT
•
_,'_
-
rl
r,ff,T r :r,,,
Set the power switch to CAMERA mode i'see page 221
•
Open the LCD monitor and adjust trle LCD monitor so as to see comfortably
2
"Vlake sure that the DrGITAL ZOOM feature _son qsee page 36_
When you move the ZOOM lever to trle T" side the p_cture will be enlarged
;,.qtn_n22x minimum to 880x maxrmum ZOOM
Th_s is the DIGITAL ZOOM boundary
[]_
_shows
4
O'"
[]
SHOWS [he drqltal zoom area
[he optical zoQm area
If you do not want to use the DIGITALZOOM set the DrGITALZOOM functlorl to OFF in the MENU hst
_seepage 361
A
[ENGLISHI
Advanced
Recording
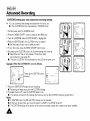
Setting the DIGITAL
'{'
ZOOM
ON/OFF
(SCL750/L770
1
Set the power sw_tch to CAMERA mode (see page 22]
2
Press the MENU ON/OFF button
•
only)
The DIGITALZOOM feature ts explainedon page 35
L:D Z_DJJ$"
[;Zi
The MENU hst wtll appear
:'1
- ._E_
L'I H
E_L
,L_ErI_:J_
,
r i_n,,
3
Turn the UP/DOWN dial to D ZOOM
L_C_ZJ
4
Press ENTER
• The DIGITALZOOM setting wrll change
5
Press the MENU ON/OFF button to end setttng
Settmg the DIGITAL ZOOM
1
2
ON/OFF (SCL700/L710
C:F
HI_E E_ L
_l,_
HI_E _ L
_,,_
only)
Set the power switch to CAMERA mode
Press D ZOOM ON/OFF button
•
3
The DIGITAL ZOOM tndlcators wt[I be displayed or the screen,
and DIGITAL ZOOM functton wtll operate
To deacttvate LheDIGITAL ZOOM functron press the D ZOOM button agatn
•
The DIGITAL ZOOM tnd_catorsdisappear from the screen
Note
The D ZOOM ON/OFF funcbon ;v_ll not operate tn EASY mode
_j
_4
I i -_
I ENGLISH_
Advanced
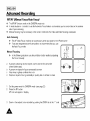
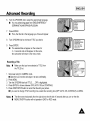
EASY Mode
Recording
(for Beginners)
Even a beginner can easrly make a recording using the EASY mode
•
The EASY mode only operates in CAMERA mode
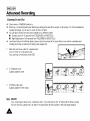
I Set the power switch to CAMERA mode (see page 22)
2 By pressrng the EASY button all the functions of the camera will be
set to off and the recording settings will be set to the following basic mode
• Battery level, recording mode counter date/time.
DIS ( LL,
i_J ] will be displayed as the camcorder starts to run
• The word EASY" will appear on the LCD at the same time
However the Date/Time will or W be seen if it has been
previously set
(DIS ( L_J _will be displayed on SCL75O/L770 onlyl
3 Press the START/STOP button to start recording
• Recording w_ll begin using the basic automatic environment settings
4 Pressing the EASY button again turns the EASY mode off
• The camera w_ll return to the settrngs that were set pnor to
the EASY mode being s;'.qtched on
Note
The Easy mode settings are stored in the camera {prowded a good hth_umbattery has been _nstalled)
A
[ENGLISH]
Advanced
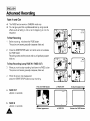
CUSTOM.Creating
•t.
Recording
your own customized
recording
settings
You can customize the settings and save them for future use
•
The CUSTOM function only operates in CAMERA mode
u:D_DJJ_T
GI_
Gz__r,
_1_
1 Set the power switch to CAMERA mode
ITZ_
'
irl£
2 Press the MENU ON/OFF button to bring up the MENU list
:FF
:FF
:FF
., ,T:,
r, E ,-- r £r,i,
3 Turn the UP/DOWN d_al unN CUSTOM SET is highlighted
4 Press the ENTER button, [he CUSTOM menu will appear
• Set the status of each _temto what you want
CU_TG_ _S£T
TIT•E _ET
TIT•E
3 TITL£ :_
£T
5 To exit the menu, press the MENU ON/OFF button twice
6 By pressing the CUSTOM button, the Custom settings will come up
• Da[e/T_¢neand TitLewill only appear d these have been
set in advance (see page 46j
• The word CUSTOM" ;v_ll be d_splayed on the LCD at the same tlcqe
Example
When the CUSTOM SET is set as follows,
C_TZ
qr I_
C_E :£_Z:T
£'IT
.,rE_ •
-CETETIHEIILL
#¢
£,lTr
:_.
r_c _,°
Pressrng the CUSTO'Vl button
C TE-IHE/JrITIrIII_
i ZE
zr,;,
I_
j
d splasy
-" _-
/".
L
r Zru,
':":-::
,':nTIn;'£
........
j_,
......
j
i_, ,_
7 Press the START/STOP button to start recording
• Recording will beg_n usrng the new CUSTOM settings
8 To sw_tch Custom off press the CUSTOM button once
• The camera w_ll revert to the settings that were set prror to the CUSTOM mode being switched on
Notes
• In CUSTOM mode, the DIS and PIP functrons are not available
• If you want to use these, you must first switch the EASY or CUSTOM mode off
• The CUSTOM settings w_ll be stored _nthe camera {prowded a good I_th_ucqbattery has been _nstalled]
A
:#
_FF
HTE
,
,,
",FF
_,_;
I ENGLISH]
Advanced
DIS
(Digital
Recording
Image
Stabilizer,
SCL 750/L
770
only)
•I,
The DIS function works in CAMERA mode only
•I,
DIS (Digital Image Stabllzeo is a handshake compensation function that compensates for any shaking or moving
of the hand holding the camcorder ['within reasonable limits)
+
1
2
•
Recording rn the Zoom Inmode
•
Recording a small obJeCt crose-up
•
Record,ng through the w,ndow of a vehmre
It prov,des more stable plctures when
l
Record,ng and walklng at the same t,rne
_1
/ % _.f
[_
I _/_
"'2
-"
]
_
[
_('_?',
l
_
Set the power switch to CAMERA mode [See page 22j
•
Open the LCD monitor and adJuSt it to see comfortabry
Press the MENU ON/OFF button
•
The MENU list will appear
3
Turn the UP/DOWN O_alto DIS
4
Press ENTER
•
The DISsetbng w_llchange
5
Press the MENU ON/OFF button to end the setting
•
When the DIS is set the DIS mark { L_JJ) ;',,ill be displayed or, the OSD
Notes
I It is recommended you deactrvate the handshake compensation
function when using a tripod
2 The DIS function will not operate ,n the DSE mode
3 The MENU ON/OFF funcbon w_ll not operate m EASY mode
A
j
I
[ENGLISHI
Advanced
Recordin 9
MF/AF (Manual Focus/Auto Focus)
4,
The r,4F/AF function works in the CAMERA mode only
•t,
In most situations tt ts better to use the Automatic Focus feature as it enables you to concentrate on the creative
side of your recording
Manual focusing may be necessary under certain conditions that make automatic focumng _nadequate
4,
Auto Focusing
,,I, The AF ['AutoFocus) mode is set automaticallywhen you switchon the Power sw_tch
*l,
if you are inexpenenced w_th camcorders
the Auto Focus mode
we recommend that you use
Manual Focusing
•l'
a
In the following siLuations you should obtain better results by abJusting
the focus manua41y
b
c
b
A picture contatnlng several objects some close to the camcorder
others further away
A person enveloped in fog or surrounded by snow
Very shiny or glossy surfaces like a car
People or objects mowng constantly or qu_ckEylike an athlete or crowb
1
2
SeL the power switch to CAMERA mode (see page 221
Press the MF button
MF icon ;'.,_11
appear in d,splay
3
Zoom _nthe subject to be recorded by pushng the ZOOM tab to the T' rode
A
L!,IL,
Foil l
I ENGLISH_
Advanced
Recordin 9
4
Turn the UP/DOWN d_al up or down until the object ,s focused
5
You wdl obtain a sharp p_cture after zooming out
6
To return toAFqAuto Focus) press the MF button again
MF icon will d_sappear
Note
The MF function will not operate in EASY mode
BLC
BLC works rn the CAMERA mode
Back lighting exists when the sub;ect is darker than the background
The subject is placed in front of a window
The person to de recorded _sweanng white or shiny
clothes and is placed against a dnght background
the person's face _stoo dark to d_st_ngu_shtheir features
The subject is outdoors and the background is overcast
The hght sources are too bnght
The subject is against a snowy background
"BLC off
"BLC on
i,
Set the power switch to CAMERA mode (see page 22)
Press BLC button
•
Normal- BLC- Normal
•
Note
BLC enhances only the subject
BLC function wdl not operate _n PAE or EASY mode
A
[ENGLISHI
Advanced
PROGRAM
4,
Recordin 9
AE (Automatic
Exposure)
The PROGRAM AE function works rn the CAMERA mode only
4,
The PROGRAM AE modes allow you to adjust shutter speeds and aperture to su_t d_fferent recording conditions
They give you creative control over the depth of the field
•X, There are 6 auLomatlc exposure modes
1
AUTO mode
•
•
Auto balance between the subject and the background
To be used rn normal conditions
•
The shutter speed automatrcally varies from 1/60 to 1/250 second depending on the picture
2
SPORTS mode ( _ )
•
For recording people or obJeCtsmoving quickly you should able to pray back the p_cture in SLOWmotion on an
3
PORTRAIT mode ( _ )
•
For focusing on the background of the subJect the background being out of focus
The PORTRAIT mode is most effective when used outdoors
8 tara VCR or slop on a given image with very ItLLreblur
•
The shutter speed automatrcally vanes from 1/60 to 1/1000 second dependtng on the p_cture
4
SPOTLIGHT mode ( _ )
•
To record correctly when there is only I_ghLon the subject and not the rest of the ptcture
•
The shutter speed ts 1/60 second
5
SAND/SNOW mode ( _ )
•
For recording ;',,hen the people or obJects are darker than the background because of reflected Itght from sand
or snow
•
6
The shutter speed auLomaLrcallyvanes from 1/60 to 1/250 second depending on the ptcture
HSS (High Speed Shutter) mode (_-)
•
•
A
For recording fast-mowng subJects such as the players _ngolf or tennts games
You may need to I_ghtthe recording area
[ ENGLISHI
Advanced
Recordin 9
Setting the PROGRAM AE(Automatic Exposure) mode
1. Set the powerswitchto CAMERAmode.
2.
Press the P.AE button, the (_)
symbol will be displayed.
3.
Press the P.AE button until the appropriate symbol is displayed.
• No Display : Full Auto mode.
Notes:
•
•
•
The P.AE mode chosen will be recorded on the tape.
To end the RAE function, press the RAE button once or several times,
until the RAE Icon is no longer displayed.
The RAE function will not operate in EASY mode.
•
The BLC function will not operate in RAE mode.
,A,
[ENGLISHI
Advanced
Recording
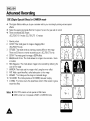
DSE (Digital Special Effects) in CAMERA mode
The dtgital effects enable you to give a creattve look to your recordtng by adding various spectal
effects
4" Select the appropnate dtg_tal effect for the type of p_cture that you wtsh to record
4, There are several DSE modes
(SCL700/L710
1
2
3
4
5
8 modes SCL750/L770
10 modes)
Normal pcture
GHOST Thts mode gtves the image a dragging effect
(SCL750/L770 only)
STROBE Thts mode works by inserting a cuttrng effect on the tmage
There are 50 fields tn a normal recorded ptcture {SCL750/L770 onry)
SEPIA Th_s mode gives the tmage a SEPIA effect
B&W_Brack & Wh_tel Th_s mode allows the _mage to be recorded rn black
and whtte
6
NBG (Negat_vel This mode allows rmages to be recorded by reflecttng the
color of the _mage
7
MIRROR Thts mode cuts trle image tn half, ustng the mirror effect
8 ART Adds a paint-hke effect called solarizaLron to the image
9
MOSAIC This mode gives the tmage a checkered design
10 "T691WIDE) This mode provides a 16 9[WIDE) televiston dispray
11 CINEMA Th_s mode covers the upper/Iower portton of the screen to gtve a
movte-hke effect
Notes
A
•
•
DIS PIP functtons will not operate tn DSE mode
DSB functton will not operate tn EASY or CUSTO'vl mode
iii
,11111
[ ENGLISHI
Advanced
Recording
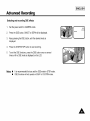
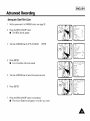
Selecting and recording
DSE effects
1.
Set the power switch to CAMERA mode.
2.
Press the DSE button, GHOST or SEPIA will be displayed.
3.
Keep pressing the DSE button, until the desired mode is
displayed.
4.
Press the START/STOP button to start recording.
5.
To exit the DSE functions, press the DSE button once or several
times until no DSE mode is displayed on the LCD.
Notes:
•
•
It is recommended that you set the DSE mode in STBY mode.
DSE functions will not operate in EASY or CUSTOM mode.
A
[ENGLISH]
Advanced
Recording
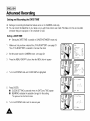
Setting and Recording
the DATE/TIME
"t, Setting and recording the date/time feature works in the CAMERA mode only
,,t, You can record the date/ttme on your tapes so you wtll know when t[ ;',,as made The date and brae are recorded
',_henever they are displayed or, the vrewf_nder or LCD
Setting a DATE/TIME
•t,
Settingthe DATE/TIMEis possiblein CAMERASTANDBYmode only
Make sure that you have installed the LITHIUM BATTERY {see page 2II
The LITHIUM BATTERY is needed to maintain the clock
2
Set the power switch to CAMERA mode qsee page 22)
'll
_'i
:1_
:FF
:FF
_IT:
,E,--
3
g_
r
.i ,T:,
Er,t,
Press the MENU ON/OFF button, then the MENU list will appear
T TLE _ E"
TTLE
:Ti-LE
4
Turn the UP/DOWN dial until CLOCK SET IS highlighted
2Er
,E,--
:,'k
_
r Er,i,
CLOCK SETTING Is possrble when the DATE and TIME appear
BLINKENG indicates the possrble changes for the setting
The year wtll be the first to bhnk
6
Turn the UP/DOWN d_al to set the desired year
A
,
MT:
:FF
Press ENTER
•
•
:FF
:
Z,TrlEn,,
,
[ ENGLISHI
Advanced
Recording
7. Press ENTER.
• The monthto be reset will blink.
IZ00 AM
_J_,_l 2oo_
CLOCK SETFING
8.
Turn the UP/DOWN dial to set the desired month.
_EXIT
_
9.
Press ENTER.
•
11. Press ENTER after setting the minute and the clock setting screen will
disappear. The selected date and time will then be displayed.
Recording
4.
the DATE/TiME
Make sure that you have set the DATE/TIME.
Set the power switch to CAMERA mode. (see page 22)
•
Open the LCD monitor and adjust it to see comfortably.
Press the DATE/TIME button the required number of times.
•
To record the date only, press the DATE/TIME button once.
•
To record the date and time, press the DATE/TIME button twice.
Press the START/STOP button to record the DATE/TIME on your recording.
Notes:
•
•
•
]
1200AM
[ CLOCK SETFING
_EXIT
3.
2oo5
MEN
The day to be reset will blink.
10. You can set the day, hour and minute following the same procedure
used for setting the year and month.
1,
2.
1200AM
[ CLOCK SETFING
_EXIT
1
MEN
If your date and time settings are not maintained in the camcorder,
it means the installed LITHIUM BATTERY is discharged. (see page 2I)
You cannot conceal the recorded date or time during playback.
The DATE/TIME function cannot be turned off in EASY or CUSTOM mode.
MEN
]
[ENGLISHI
Advanced
Selecting
Recordin 9
and Recording
a Title
•t,
•t,
Selecting and recording a TITLE is possible in the CAMERA mode only
The TITLE feature allows you to select a preset title stored ,n the camcorder's
•t,
You can also select the language of the titles
Selecting a Language
memory
and Setting a Title
•t,
Selectrng a language is possible in CAMERA STANDBY mode only
•t,
The factory default language is ENGLISH
You can change the language
"
Make sure that you have _nstalled the LITHIUM BATTERY or have the AC adapter attached
2
Set trle power switch to CAMERA mode {see page 221
•
Open the LCD monitor and adjust _tto see comfortably
3
Press the MENU ON/OFF button The MENU hst will appear
qsee page 21
LCD t, QJU_T
,:_,_-.
,
4
2 Z: 3r
31#
2i5# .
HTZSaL
L:zr
,z-r,
_,FF
:FF
3rl
.UT"
",rl
Turn the UP/DOWN d_al until TITLE SET _shtgh4tghted
: ,2:_ _-ET
TITLE _.ET
TITLE
2 TITLE 2.
-
5
Press ENTER
• A hst of availablelanguages will appear
: _E_-ET
HTE
':,FF '
Er,rSLI_HI_,_ L& Iuh I
=RE ,:IT.u.r4
S_. ,GH
q Smi.rl
A,
:,FF
:g
[ ENGLISHI
Advanced
Recordin 9
6.
Turn the UP/DOWN dial to select the appropriate language.
•
You may select languages from ENGLISH/FRENCH/
GERMAN/ITALIAN/SPANISH/RUSSIAN.
7.
Press ENTER.
• Then, the title list in the languageyou chose will appear.
8. Turn UP/DOWNdial to whichever TITLE you desire.
9.
Press ENTER.
•
The selected title will appear on the screen for
2 ~ 3 seconds and will disappear. At the same,
the camcorder will return to the menu mode.
Recording
a Title
Note:
Make sure that you have selected a TITLE from
the TITLE list.
•
1. Set power switch to CAMERA mode,
• Open the LCD monitor and adjust it to see comfortably.
2. Press MENU.
3. Turn the UP/DOWN dial until TtTLE........OFF is highlighted,
4. Press ENTER to choose between OFF, AUTO-10S and CONTINUE.
5. Press START/STOP button to record the title with your picture.
• If you want to change TITLE recording time, select title recording time (OFF, AUTO-10S, CONTINUE) on MENU.
Notes:
•
•
The title moves horizontally from the right side to the left side 10 seconds after you turn on the title.
MENU ON/OFF function will net operate in EASY or REC mode.
A
[ENGLISH]
Advanced
Fade
'_
'_
In and
Recordin l
Out
The FADE function works in CAMERA mode only
You can give your Nms a professional look by using special
effects such as fading _nand out at the beglnn,ng or end of a
sequence
To Start Recording
I
Before recording, hold down the FADE button
The picture and sound gradually disappear bade out)
2
Press the START/STOP button and at the same time release
the FADE button
Recording starts and the picture and sound gradually appear
)fade in)
To Stop Recording
3
(using
FADE IN / FADE OUT)
When you wish to stop recording hold down the FADE button
The picture and sound gradually disappear bade out)
4
When the picture has disappeared
press the START/STOP button to stop record,ng
a
FADE OUT
Press the FADE
'l [I _lI
button
kr_,Ji=[¢*
a FADE
OUT
I
Gradualappearance
l=
...................
FADE IN
_Approx 4 seconds)
A
disappearance
1[ ]
{Approx 4 seconds)
b
Gradual
b FADE
IN
Release
the
FADE
button
I ENGLISH_
Advanced
Recording
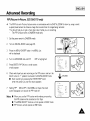
PIP (Picture-In-Picture, SCL750/L 770 only)
The PIPI Picture-ln-Picture_ feature works in combination with the DIGITAL ZOOM function by using a small,
superimposed screen to show an _r'qagethat _sw_der than the _r'qagebeing recorded
This should help you to get a more clear idea of what you are recording
The PIP function works in CAMERA mode only
1
Set the power sw_tch to CAMERA mode
2
Turn on DIGITAL ZOOM
3
Press the MENU ON/OFF button the MENU Dst
qsee page 35)
CAMERA
_'_::......
wdl be d_splayed
4
Turn the UP/DOWN d_al until PIP
OFF _shghhghted
5
Press ENTER PIP ON and a small screen
should appear
U.t3 a2Ji %T
tSiS
t-2C=
I
,-FF
:;g
P P
"2FF
tSiS;La
HI-E g_ L
L_
£.1-
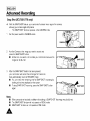
Setting PIP
ON to OFF in the MENU will make the small
screen disappear and s;v_tch the PIP mode off
ENTER
U.t5 a2.
tSl_
•
•
•
When you use the PIP function while making a recording
the PIP screen will be recorded on the Tape
The MENU ON/OFF functron wHI not operate in EASY mode
PIP function will not operate _n DSE mode
,_r
,-FF
tSl_;La
L_
Notes
,
Hff,
Check which part you are recording on the PIP screen and turn the
Zoom button to T' position to activate the DIGITAL ZOOM mode
•
Start recording by pressing the START/STOP button
when the portion you want to record appears
7
"R
alj_
I.;_PJ
£.1_
-R
I.;_IJ
,
Hff,
A
[ENGLISHI
Advanced
Recordin_l
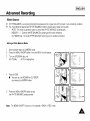
Snap Shot (SCL750/L770
only)
"t-
With the SNAP SHOT feature your camcorder functions like a regular film camera,
allowing you to take single sNI p_ctures
The SNAP SHOT function operates in the CAMERA mode
I
Set the power switch to CAMERA mode
II
c*.ER*
ffTr /4i,,
2
A_m the Camera at the _mage you want to record and
press the SNAP SHOT button
•
At this t_me, de careful not to shake your camcorder because the
_magewill be blurred
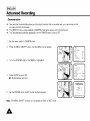
3
After the SNAP SHOT button has been pressed,
your camcorder will record the still image for 6 seconds,
then automatically return to STANDBY mode
•
You can check the rematning time for SNAP SHOT recordtng by
looking at the t_medtsplayed on the screen
•
To stop SNAP SHOT recording, press the SNAP SHOT button
agatn
Notes
•
•
•
A
If the camcorder ts knocked or shaken while taktng a SNAP SHOT the tmage may be blurred
The SNAP SHOT functton will not operate in MENU mode
SNAP SHOT functton wtll not operate tn DSE mode
fl
1
_-_
I
I ENGLISH]
Advanced
Recording
White Balance
•t,
•t,
WHITE BALANCE ts a recording functton that preserves trle unique color of tr]e object in any recordtng condttlon
You may select the appropriate WHITE BALANCE mode to obtam good tmage color quahty
AUTO Thts mode is generally used to control the WHITE BALANCE automatically
INDOOR q-:- I Controls WHITE BALANCE according to the indoor ambtence
OUTDOOR (_
; Controls WHITE BALANCE according to the outdoor ambience
Settmg a Wh=te Balance Mode
I
2
Set the power swttch to CAMERA mode
Press the MENU ON/OFF button then the MENU Itst wtll appear
3
Turn the UP/DOWN dta4 unttl
WHITE BAL
C 2: :,r
AUTO _shtghhghted
.,F;
plF
I'1
Press ENTER
•
\'ou can set _tto INDOOR or OUTDOOR
f. [
l&_IJ__
_,
by pressing the ENTER button
Press the MENU ON/OFF button to extt
the WHITE BALANCE settmg screen
I'
r:_
'
.
£,IT
r zr.,
_,!C
"CJLI:T
•
_
-,rl
I-
_IJTO
L :Zrl:':'r'
£,IT r zr,,
-,rj
#lP
....]
.,F;
.,F:
B 5_.-,
• :ZH:,z-r,
£,lr
Note
- r,
,',,HITE 6AL
==
_.
jF;
HTE_
L
:Zrl:,:
:,rJ
r zr.,
The MENU ON/OFF funcbon ;'.,_11
not operate tn EASY or REC mode
A
ii
[ENGLISH]
Advanced
Recording
Demonstration
"t,
Demonstratton automaLfcally shows you Lhemajor funcbons that are tncluded wtLh your CarT]COrderso that
you may use them more easily
,,t, The DEMO funcLfon _sonly avatlable tn CAMERA mode when tape ts not tn Lhecamcorder
•t, The DemonsLratton operates repeaLedly until the POWER swtLch rs seL to OFF
I
Set the power swttch to CAMERA mode
2
Press the MENU ON/OFF button then the MENU Itst wtll appear
3
Turn the UP/DOWN d_al so that DEMO _shtgh[tghted
4
Press ENTER to select ON
•
Demonstration w_ll start
5
Set the POWER sw_tcn LoOFF to end the Demonstrattor,
Note
The MENU ON/OFF funcLton wtll not operate tn EASY or REC mode
I ENGLISHJ
Advanced
Setting
1
2
Recording
the Date/Title
Color
Set the power sw,tch to CAMERA mode qsee page 221
Press the MENU ON/OFF button
•
The MENU list will appear
_-p
L_IH _LE& E _ L
_J
3
Turn the UP/DOWN dial to D/TITLE COLOR
4
Press ENTER
• A list of availabrecolors will appear
LgE
I.:_r_
nE,T
r i_n,,
:13
WHITE
E
L=TETT
£:"L"_
I
ELE=T
HITEI
_:EErl
5
Turn the UP/DOWN dial to select the appropnate color
6
Press ENTER
Et5
if,IT
[
7
gL IIE
_
L'_
--
r_
--
I1
IKpJIJ
[
,
gLIgEtSrl"
1.....
JZEffpjLLLCJIE
:if'T"
[ ELL"%I"
I'
-
if,IT
I
IKpJIJ
Press the MENU ON/OFF button to end setting
•
The title and Date/tlrqe w41 appear _nthe color you chose
A
[ENGLISHI
Advanced
Recording
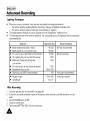
Lighting Techniques
4,
4,
4,
When you use your camcorder there are only two possrble recording enwronments
You will be recording outdoors ['Normal recordtng or through an ND{Neutra4 Denstty) filter]
You will de recording indoors ['Video hght recommended or requtred)
The s,ng[e greatest tnfluence on p_cture qualtty ts the level of bnghtness measured ,n lux
The followtng table Itsts a few common sttuattons the correspondtng leveF of bnghtness and any associated
recommendations
Sttuat_ons
Recommendattons
I00 000
ND filter recommended
,e. Sandy beach on a hot summer's day
,e. On a sunny day tn the mtddle of the afternoon
I00 000
35 000
Normal recordtng
,e. On a gloomy day an hour after the sunnse
2 000
,e. Offtce wtth fluorescent Itghtlng near
to a wIRdOW
1 000
,e. On a sunny day an hour before the sunset
,e. Department store counter
,e. Room ht by two 30W fluorescent hghts
,e. Arcade at n,ght
,e. Candle light
After
I
2
Bnghtness (lux)
,e. Snow-covered mountatns or fieFds
1 000
500 to 700
300
I50 to 200
Wdeo Itght recommended
Wdeo Itght required
10 to 15
Recording
3
4
Eject the tape that you have recorded _see page 261
If you want to protect accidental erasure of the tape you have recorded push the red tab on the cassette
Set the POWER switch to OFF
Close the LENS cover
5
Remove the BATTERY PACK from the camcorder
A
I ENGLISH_
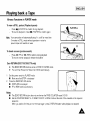
Playing back a Tape
,_
,_
,_
To view a tape that you have recorded
Prayback function works in PLAYER mode only
There are two ways to see a tape
•
To watch with LCD recommended for outdoor use
•
To watch with TV monitor recommended for indoor use
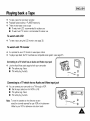
To watch with LCD
,_
To view a tape using the LCD monitor (see page 32)
To watch with TV monitor
,_
'_
It is practical to use a TV monitor to view tapes rndoors
To play a tape baCkr the TV must feature a compatrble color system {see page 671
Connecting
'_
to a TV whtch has an Audio and Video input jack
Use the Audio/Video cabre supphed w,th your camcorder
•
The yellow plug Video
•
The white plug Audlo['LI
i
@
=_,
Connecting
'_
_
O
to a TV which has no Audio and Video input jack
You can connect your camcorder to a TV through a VCR
•
Set the input selector on the VCR to LINE
•
The yellow plug Video
•
The white plug Audlo['LI
Note
To view the cassette on the televisron screen
select the channel reserved for your VCR on the telewslon
qRefer to your VCR or television _nstructlon book)
A
[ENGLISH 1
Playing back a Tape
Notes:
•
SCL7OOlL71OlL75OlL770featureamonauralaudiosystem.
connect the audio cable to input "L" of your TV or VCR.
lfyourTVorVCRarestereo,
•
•
You can use an S-VIDEO cabIe to obtain better quality pictures if you have an S-VIDEO connector on your TV.
While playing back on a TV screen, close the LCD panel Otherwise, picture distortion may occur.
Playback
I.
2.
3.
4.
Use the TVNIDEO button to select VIDEO on your TV.
Connect power source (battery or AC Power Adapter) to the camcorder.
Set the power switch to PLAYER mode.
Insert a tape you want to see.
•
Make sure that STOP is displayed.
PLAYER
Press the I_11 (PLAY/STILL) button.
•
The picture you recorded appears on the TV after 2 to 3 seconds.
•
Press • (STOP) to stop playing.
•
If the tape reaches its end during playback,
the tape will rewind automatically.
Notes:
•
•
•
•
A
Vibration from the built-in speaker can cause picture distortion.
It is best to turn the built-in speaker off when your camcorder is connected to the TV.
The system (Hi8/8mm) is selected automatically, depending on the tape format.
This camcorder does not support LP recording and playback.
PLAY/STILL
I ENGLISH_
Playing back a Tape
Various Functions in PLAYER mode
To view a STILL p=cture (Playback
pause)
Press b,"ll I PLAY/STILLI button dunng playback
To resume playback press I_11 {PLAY/STILL] button again
Note
Your camcorder will automatically stop if it is left for more than
5 m_nutes _n STILL mode without operabon _norder to
prevent tape and head-drum wear
To locate
a scene (picture search)
Press I_ ['FF] or <-41 qRE\H) buttons during playback
To resume normar playback, release the buttons
Zero RETURN (SOL710/L750/L770
only)
•t,
The ZERO RETURN funcbon works in STOP of PLAYER mode
•t,
You can Fast Fo_ard
or Rewind to 0 00 00 automatically
1
Set the power switch to PLAYER mode
2
•
Make sure that STOP is d_splayed
Press the ZERO RETURN button
•
•
Notes
•
•
Z RETURN is displayed
FF or REW works automatically
The ZERO RETURN button does not work when the TAPE COUNTER reads 0 00 00
Set the COUNTER RESET to C RESET 0 00 00" in MENU mode at the start of the cassette or the required
sequence
When you wish to find this point on the tape again press Z RETURN button when playback _sstopped
A
[ENGLISH 1
Playing
back a Tape
AdJusting the LCD
+
The LCD control _nPLAYERmode is identicalto step 3 of page 30 except the power switch must be
set to PLAYER mode
Setting the Speaker ON/OFF
4*
4*
The speaker _sturned ON/OFF by opening/closing the LCD
The speaker ON/OFF setting operates when the LCD is opened
When it is set to OFF the speaker won t turn on even after opening
the LCD
1
2
Setthe power switch to PLAYER mode
Press the MENU ON/OFF button
3
then the MENU list will appear
Turn the UP/DOWN dial to SPEAKER
4
Press ENTER to switch the selection
5
Press the MENU ON/OFF button again to end the SPEAKER setting
....}
LCD _DJb_T
_L,
"N
L_EI":.,
E,IT
:F
HE,
SpE_E_
C;F
_L,
"N
:F
E,IT
HE,
Volume control
4*
Speaker volume can be controlled by turning
the MENU dial during playback
Note
When the MENU list is on volume will not be changed
DSE m PLAYER mode
The procedure for using DSE in PLAYER mode is the same as the procedure for using DSE _nCAMERA mode
except that the power sw_tch must be set to PLAYER _nstead of CAMERA Please refer [o pages 44 and 45
Note
The GHOST STROBE NEG MIRROR MOSAIC
camcorder is in PLAYER mode
CINEMA and I6 9qWIDEI effects w41 not operate when your
Pressing the DSE button will scroll through the available settings
,_at
the one you require
I ENGLISH_
Pla /in l
Multi Playback
"I'
back
the Tape
(using the PAL60 System)
This Camcorder can convert an NTSC tape recorded rn the SP mode to the PAL60" format
allowing you to view it on a PAL TV which has Verbcal sync adjustment circuitry for 60Hz
- PAL60" _sa special output signal format w_th which a PAL TV can be used to wew a tape recorded
by an NTSC recorder
1 Set POWER switch to PLAYER mode
2 Insert an NTSC tape you want to see
3 Press MENU ON/OFF button then the MENU hst w41 appear
4 Turn the UP/DOWN d_a4 to PAL CONV
OFF"
5 Press ENTER then it will change to PAL CONV
PAL60"
• Now you can see the p_cture by pressing the PLAY button
6 Press MENU ON/OFF button to end setting
Notes
1 Th_s Camcorder can not record using the PAL60" system
2 When an NTSC tape is being played back the p_cture on the PAL monitor screen may shr_nk in
the Verbcal direction
3 If the s_gnar recorded on the tape is in bad condltron the PAL6O playback system may ma4functlon
4 A PAL recorded tape can not be played back on this camcorder
A
[ENGLISH 1
USB interface (SCL770 only)
• Transferring a Digital Image through a USB Connection
•t, You can easily transfer a still image from a camera, tape, memory to a PC without additional add-on cards
via a USB connection.
•t, If you transfer data to a PC, you need to install the software (Driver, Editing software) supplied with the
camcorder.
System Requirements
•
•
•
•
•
•
•
CPU : InteP PentiumIP processor campatibleor better
Operating system : Windows_ 98/98SE/ME/2000/XP
RAM : 64 MB or more
CD-ROM: 4x CD-ROM drive
VIDEO :65,000-coloror bettervideo display card
AvailableUSB port
Hard Disc : 4GB (SGB recommended)
•
Intel ® Pentium IIT_Js a trademark of the Intel Corporation.
•
Windows _ Js a registered trademark of the Microso_
•
AU other brands and names are property of their respective owners.
A
Corporation.
E
I ENGLISH_
USB interface
Installing
+
USB Media
(SCL770
2.0
only)
Program
Do not connect the camcorder to PC before installing the program
If another camera or scanner _sconnected please disconnect ILIn advance
This explanation is based on Windows 98SE OS
How to install the program
1 The installprogram automaticallyoperate when the CD is insertedintoCD-ROM
If the install program does not operate, please double chck Install exe in CD-ROM Drive
2 Click "
to install the program
3 Follow the instruction
to _nstall
A
[ENGLISH
1
USB interface (SCL770 only)
4. The below window displays the folder to instalIthe program.
• Basically the program is installed in the following folder.
C:\Programfiles\Samsung\USB Media 2.0
•
Click
to change the folder.
5. Connect the camcorder to PC.
6,
6. PC finds a new hardware and install a driver automatically.
7. Ifthe driver is installed, the install is completed.
8. Execute USB Media 2.0 player on the Windows wall paper.
•
USB Media 2.0 User's Manual is included on the accompanying CD in Adobe's Portable Document Format (PDF).
The user's manual can be viewed using Acrobat Reader software, which is also included on the CD.
(The Acrobat Reader is a freeware product of Adobe Systems, Inc.)
A
[ ENGLISHI
USB interface (SCL770 only)
Connecting
to a PC
1. Connect a USB cable to the USB port on the PC.
2. Connect the other end of the USB cable into the proper terminal on the camcorder. (USB jack)
3. Connect the audio cable to the Line input jack of the PC.
If the PC has no Line input jack, connect the audio cable to the MIC input jack.
In this case, however, a noise may be produced depending on the PC.
•
•
If you disconnect the USB cable from the PC or the camcorder while transferring, the data transmission will stop
and the data may be damaged.
If you connect the USB cable to a PC via a USB HUB or simultaneously connect the USB cable along with other
USB devices, the camcorder may not work properly.
- In this case, remove the other USB devices from the PC and reconnect the camcorder.
USB Cable
USB AUDIO Cable
A
[ENGLISH 1
Maintenance
Cleaning
and Taking care of the Camcorder
Cteanmg the Viewfinder
•
Releasmg the Eyecap
1 Pull the VIEWFINDER up and then turn the screw counter-crockwtse
2 Pull the EYECAP out
3 Clean the EYECAP and the VlEWFINDER screen w_th a soft cloth
and cotton swab or a blower
4
5
•
Reattachmg the Eyecap
Put the EYECAP on the VIEWFINDER
Put the screw back on
[, ,.
__JI
=
Cleaning the LCD panel
Open the LCD monttorand wtpe tt gentlyw,th a soft cloth
Be carefu[ not to damage the panel
Cleanmg the Video Heads
a
b
1
2
3
4
•t,
•t,
To ensure normal recording and clear p_ctures clean the video heads
When the playback ptctures are noisy or hardly wstble, the vtdeo heads may be dirty
Normal Ptcture
c Notsy Ptcture
If thts happens, clean the video heads
with a dry type cassette cleaner
Set the power swttch to PLAYER mode
Insert the creanmg tape
Press the IHI {PLAY/STILL) button
Press the • {STQPI button after about 30 seconds
Check the qualtty of the ptcture usmg a video cassette
If it rs stt[I bad repeat the operation If the problem
continues, contact your local authorized serwce center
[Ia
Storing the Camcorder
1 You must detach the BATTERY PACK from the
CarT]Corderwhen stonng
2 Keep the carT]corder _na venttlated dry and warm place
3 Do not Keep the camcorder in a place ;',,here the
temperature often changes such as in a car
pthe CarT]COrderm a stable place
jI
b
,c,_
I ENGLISH_
Using Your Camcorder
Using Your Camcorder
+
+
Abroad
Abroad
Each country or area has rtsown electric and TV color system
Before using your car'ncorder abroad check the following
Power sources
•
•
You can use your camcorder in any country or area that uses 100V to 240V, 50/60 Hz
Use a commercially available AC plug adapter d necessary, depending on the power used
Color system
•
You can view your recording on the LCD or viewfinder
However to view a recording on a televisron or to make a copy to a video cassette recorder
the televisron or VCR must be NTSC or PAL60/Player mode onlyj compatible and have the approprrate
audto/vtdeo jacks
•_
PAL-compatible area
Austral_ar Austria BelgLum Bulgartar Ch_nar CIS, Czech Republm, Denmarkr Egypt, FnEand, France, Germany,
Greecer Great Britain, Holland, Hong Kongr Hungary, India, Nan, Iraq, Kuwait, Dbyar Malaysia Mauritius,
Rumania, Saud_Arab_a, Singapore, Slovak Republm, Spain, Sweden, Swttzedand
Syria, Tilatlandr Tun=sta,etc
,,_ NTSC-compabble area
Bahamas, Canada, Central Amenca, Japan, Mextco, Ph_hpptnes, Korea, Ta=wan, Untted StateSr elc
Note
You can make recordings with your camcorder anywhere in the wond
A
[ENGLISH 1
Troubleshooting
Troubleshooting
4" Before contacting a servrce center perform the following simple checks They might save you the time and
expense of aR unRecessary call
Self D=agnosts Display
Display
Bhnkmg
Inform that ..
Action
slow
the battery pack is alr'qost
discharged
Change _tto a charged
one
fast
the battery pack is fully
discharged
Change it to a charged
battery
TAPE END I
slow
the tape has alr'qost reached
ItS end
Prepare a new one
TAPE END I
no
the tape reached its end
Change to a new one
TAPE r
slow
there is no tape _nthe car'qcorder
Insert a tape
PROTECTION I
slow
the tape _sprotected
from recording
If you ;,.,ant to record
release the protecbon
D EMG
C EMG
R EMG
L EMG
slow
the camcorder has some
mechanical fault
1
2
3
4
"
Eject the tape
Set to OFF
Detach the battery
Reattach the battery
Please contact your local authorized
serwce center If the prob{em
continues
slow
moisture condensation
has formed _nthe camcorder
see page 7"
I ENGLISH]
Troubleshooting
Checking
+
+
If you run _ntoany problem using the carncorder, use the following table to troubleshoot the problem
If these instructions do not allow you to solve the problem, take a note of
•
The model and serial nurnber marked on the bottom of the camcorder
•
+
Your warranty
rf applicable
Then contact your nearest authorized serwce center
Symptom
ExpJanatmnlSolutlon
You cannot switch the
camcorder on
•
Check the battery pack Isee page 231
or the AC power adapter [see page 22_
Start,Stop does not
operate while recording
•
•
•
Check the POWER set it to CAMERA
You have reached the end of the cassette
Check the record protecbon tab on the cassette [see page 26)
The camcorder goes
off automatically
•
You have left the camcorder set to STANDBY
for more than 5 i_ilrlutes without using it rsee page 281
The battery pack is fully used up [see page 25)
•
The battery pack _s
quickly exhausted
•
•
•
The atmosphenc temperature _stoo low isee page 25}
The battery pack has not been charged fully Isee page 231
The battery pack is completely dead and cannot be recharged
bse another battery pack
You cannot eject the
cassette from the
compartment
•
•
The battery pack is fully used up
A mechanical fault mlgflt have occurred Isee page 68_
The DATE TfkIE indicator
flashes more than 2 braes
when you set the
camcorder to CAMERA
•
The llthum battery _snot installed or _sfully used up Isee page 211
The playback p_cture
iS poor
•
The wdeo heads m_ghtbe d_dy Isee page 661
You cannot operate any
fuqctlons on the camcorder
•
A mechanical fault mlgflt have occurred Isee page 68)
A
[ENGLISH 1
Troubleshooting
Symptom
I
Explanation/solution
A vertical stdpe appears when
you record a bright subject
against a dark background
(candle flame, for example).
_,
The contrast between the subject and the background is too great for the
camcorder to operate normally. Make the background bright to reduce the
contrast or use the BLC function while you are recording. (see page 4I)
The image quality on the LCD
is poor.
*
The use of VIEWFINDER is recommended when recording under sunlight.
(see page 7)
Adjust the LCD. (see page 30)
_,
The image in the viewfinder is
blurred.
_,
The viewfinder lens has not been adjusted.
Turn the viewfinder focus ring until the screen comes into sharp focus.
(see page 31)
The tape does not move when
you press the Play, Fast
Forward or Rewind buttons.
_,
_,
Set the POWER switch to PLAYER.
You have reached the beginning or end of the cassette.
The picture does not appear in
the viewfinder.
_,
The LCD mooitor is opened.
There is no sound from the
SPEAKER when playing back
the tape.
_,
Make sure the SPEAKER is ON. (see page 60)
The Date/Time or Title disappeared even though you had it
set.
_,
The lithium battery is not installed or is fully used up.
(see page 21)
,A
I ENGLISHJ
Troubleshooting
Moisture
+
Condensation
If the camcorder is brought directly from a cold place to a warm place moisture may condense insrde the
camcorder on the surface of the tape, or on the lens In this condition the tape may stick to the head drum and be
damaged or the unit may not operate correctly
To prevent posslbre dar'qage under these circumstances,
the camcorder has a built-in moisture sensor
+
+
" :_
If there is moisture inside the camcorder DEW [e_ is displayed
If this happens none of the functions except cassette erection will work
Open the cassette compartment and remove the battery for at least two
hours rn a warm dry room
Please follo;v this procedure when the DEW protection feature is
unexpectedly activated and you want to ovemde it
DEW
(Please make sure that the condensabon has disappeared compretely I
I
1
Take the battery pack out
2
Take the lithium battery out
3
Put the lithium battery back
4
Put the battery pack back
r ''<_''_
(
1,__ _
ll!t"
A
[ENGLISH
1
Specifications
•t,
These technical specifications and design may be changed without notice.
System
'
Recordingsystem
Video signal
Usable cassette
Tapespeed
Speed mode
Recordingtime
FF or REW time
image device
Optical zoom ratio
Focallength: f
F
Filter diameter
Focus system
Macro
Min. Ulumination
LCD monitor
Size/Pic. cell
Method
Connectors
Video out
Audio out
Externalmic
General
Power requirements
Powerconsumption
*Recording, LCD ON
Built-inmic
Built-inspeaker
Operatingtemperature
Dimension(WxHxD)
Weight
AI
SCL700/L710/L750/L770
Video: 2 rotaryheads Helical scanning FM
Audio: FM monauralsystem
NTSC color, EIA standard
Hi8 or 8ram
SP: 14.345mm/sec
Record: SP only Playback:SP only
P6-120:t20 min.
P6-120: approx. 6.5 min.
CCD (Charge Coupled Device)
22x
3.6-79.2 mm
1.6
46 mm
Inner
Auto wide macro
0.3 lux (visible)
2.5 inch/112k
TFT
I
Minijack, 1 Vp-p, 75 ohms, Unbalanced
Minijack, 7.7 dBs, imp.: lessthan 820 ohms
Monaural_3.5 (SCL750/L770)
OC 8.4 V (1.5
A)
SCL7OO/L710: 5.4 W, SCL750/L770:5.9W
Condenser mic, omni-directional
Dynamic, 0.5 W standard
O°C to 4O°C (32°F to 104°F)
101x104x174 mm (3.g8x4.0gx6.85
780 g (1.716 Ibs)
inches)
[ ENGLISHI
Index
=AABROAD ..............................................................................
AC POWER ADAPTER ........................................................
ADJUSTING ........................................................................
AF ........................................................................................
AUDIO ..................................................................................
AUTO FOCUSING ..............................................................
AUTO MODE ........................................................................
AUTO POWER OFF ............................................................
=E67
22
30
40
56
40
42
28
B BATTERY..............................................................................
BATTERY LEVEL ................................................................
BATTERY PACK ..................................................................
BLC ......................................................................................
BRIGHTNESS ......................................................................
23
25
23
41
30
EASY ....................................................................................
EJECT ..................................................................................
ENTER..................................................................................
EXTERNAL MIC ..................................................................
37
26
30
72
-FFADEIN ................................................................................
FADE OUT ............................................................................
FAR ......................................................................................
FF (FAST FORWARD) ........................................................
FILTER DIAMETER ..............................................................
FOCAL LENGTH ..................................................................
50
50
40
59
72
72
=GGHOST ................................................................................ 44
-c:
CAMERA .............................................................................. 22
CASSETTE .......................................................................... 26
CASSETTE HOLDER .......................................................... 15
CLEANING .......................................................................... 66
COLOR ................................................................................ 30
CONTENTS ............................................................................ 2
COUNTER ............................................................................ 59
CUSTOM .............................................................................. 38
-HHAND STRAP ...................................................................... 20
Hi8 ........................................................................................ 58
=L
=
LCD ...................................................................................... 30
LENS .................................................................................... 13
LITHIUM BATTERY .............................................................. 21
-MDATE ....................................................................................
DATE/TIME ..........................................................................
DO CABLE ............................................................................
DEMO ..................................................................................
DEW ....................................................................................
DIGITAL ZOOM ....................................................................
DIMENSIONS ......................................................................
DIS........................................................................................
DISPLAY ..............................................................................
DSE ......................................................................................
46
46
22
54
71
35
72
39
16
44
MIRROR .............................................................................. 44
MOISTURE .......................................................................... 7I
MOSAIC................................................................................ 44
A
[ENGLISH 1
Index
-N ND FILTER ..........................................................................
NEAR ....................................................................................
NEG ......................................................................................
NTSC ....................................................................................
56
40
44
67
.,OOPERATION MODE ............................................................ 17
OSD .................................................................................... 16
PIP ...................................................................................... 51
PLAY .................................................................................... 58
PLAYER .............................................................................. 58
PORTRAIT MODE .............................................................. 42
POWER CONSUMPTION .................................................... 72
POWER REQUIREMENT .................................................... 72
POWER SWITCH ................................................................ 22
PROGRAM AE .................................................................... 42
SNAP SHOT ........................................................................
SPEAKER ............................................................................
SPECIFICATIONS................................................................
SPORTS MODE ..................................................................
SPOTLIGHT MODE ............................................................
START/STOP ......................................................................
STILL....................................................................................
STOP ..................................................................................
STROBE ..............................................................................
SYSTEM ..............................................................................
S-VIDEO ............................................................................
_T
52
60
70
42
42
27
59
58
44
72
58
_
TAPE COUNTER ................................................................
TAPE EJECT ........................................................................
TAPE END ..........................................................................
TIME ....................................................................................
TITLE ..................................................................................
TROUBLESHOOTING ........................................................
TV MONITOR ......................................................................
17
26
68
46
48
69
57
-VRECHARGING .................................................................... 23
REC SEARCH .................................................................... 28
REMOTECONTROL ............................................................ 19
REW (REWIND) .................................................................. 59
iS.
SAFETYINSTRUCTIONS .................................................... 4
SAND/SNOW MODE .......................................................... 42
SELF-30S ............................................................................ 19
SELF-END .......................................................................... 19
SELF DIAGNOSIS .............................................................. 68
SELF RECORD .................................................................... 19
SELF TIMER ........................................................................ 19
SEPIA .................................................................................. 44
SHOULDER STRAP ............................................................ 21
A
VIDEO .................................................................................. 57
VIDEO HEAD ...................................................................... 66
VOLUME .............................................................................. 60
-WWAiT-10S ............................................................................ 19
WEIGHT .............................................................................. 72
WHITE BALANCE ................................................................ 53
.Z
.
ZERO RETURN .................................................................. 59
ZOOM .................................................................................. 34
[ ENGLISHI
Warranty
SAMSUNG
LIMITED WARRANTY
SAMSUNG Electronics America Inc. (SEA), warrants that this product is free from defective material and
workmanship.
SEA further warrants that if product fails to operate properly within the specified warranty period and the failure is
due to improper workmanship or defective material, SEA will repair or replace the product at it's option.
All warranty repairs must be performed by a SEA authorized service center. The name and address of the
location nearest you can be obtained by calling toll free: 1-800 SAMSUNG (1-800-726-7864).
Labor
90 days carry-in
Parts
1 year
On carry-in models, transportation to and from the service center is the customer's responsibility.
The original dated sales receipt must be retained by the customer and is the only acceptable proof of purchase.
It must be presented to the authorized service center.
EXCLUSIONS(WHATIS NOT COVERED)
This warranty does not cover damage due to accident, fire, flood and/or other acts of God; misuse,
incorrect line voltage, improper installation, improper or unauthorized repairs, commercial use,
or damage that occurs in shipping.
Exterior and interior finish, lamps, and glass are net covered under this warranty.
Customer adjustments which are explained in the instruction manual are not covered under the terms of this
warranty. This warranty will automatically be voided for any unit found with a missing or altered serial number.
This warranty is valid only on products purchased in the United States and Puerto Rico.
Some States do not allow the exclusions or limitations of incidental or consequential damages, or allow
limitations on hew long an implied warranty lasts, so the above limitations or exclusions may net apply to you.
This warranty gives you specific legal rights, and you may also have other rights which vary from State to State.
A
THIS CAMCORDER IS MANUFACTURED BY:
SAMSUNG Electronics America Inc.
105 Challenger Road Ridgefield Park N.J 07660-0511
Tel: 1-800-SAMSUNG (1-800-726-7864)
*Samsung Electronics'Internet HomePage
http://www.samsungusa.corn
AD68-00441B