1
SONY
Trinitron
Operating
Instructions
KV-32XBR48
KV-34XBR48C
KV-35XBR48
KV-35XBR88
KV-37XBR48M
© 1997 by Sony Corporation
_Color
TV
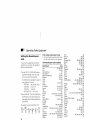
Welcome!
Precautions
Thank you for purchasing
the Sony Trinitron ®
Color TV. This manual is for models
KV-32XBR48, 34XBR48C, 35XBR48, 35XBR88
and 37XBR48M.
Model KV-35XBR48 is used for illustration
purposes.
Differences in operation are
indicated in the text; for example,
"KV-35XBR48 only".
The features you will enjoy include:
• Two ON/OFF TIMERS
•
•
•
•
Picture-in-Picture
(PIP) and Picture
Picture (P&P) (Twin View TM)
Safety
•
•
•
•
&
Operate the TV only on 120 V AC
(except KV-34XBR48C)
Operate the TV on 220 V AC
(KV-34XBR48C only)
The plug is designed, for safety purposes,
to fit into the wall outlet only one way. If
you are unable to insert the plug fully into
the outlet, contact your dealer.
(except KV-34XBR48C)
If any liquid or solid object should fall inside
the cabinet, unplug the TV immediately
and
have it checked by qualified service
personnel before operating it further.
If you will not be using the TV for several
days, disconnect the power by pulling the
plug itself. Never pull on the cord.
FAVORITE CHANNEL feature, allowing
you to view and choose from eight of your
favorite programs
•
CHANNEL INDEX feature, allowing you
to view and choose from twelve programs
Customized
on-screen menus
For details concerning safety precautions, see the
supplied leaflet "IMPORTANT SAFEGUARDS".
• One Y/B-Y/R-Y
connection
input for DVD Player
• Three AUDIO/VIDEO
• Two S Video inputs
inputs
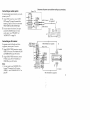
Installing
•
To prevent internal heat buildup, do not
block the ventilation openings.
• Do not install the TV in a hot or humid
place, or in a place subject to excessive
dust or mechanical vibration.
The AC power cord is attached to the rear of
the TV with hooks. Do not attempt to remove
the cord from these hooks. Doing so could
cause damage to the TV. (see "Note on AC
Power Cord" on page 2)
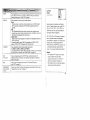
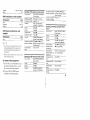
Using
This Manual
This manual is divided into four major
sections. We recommend
that you carefully
review the contents of each section in the
order provided to ensure that you fully
understand
the operation of your new TV.
.= in a residenl
generates,
us
=nergy and, if
with the instf
: with
radio
_uarantee
ar installatior
:ul interferenc
thich
can be c
_ff and
1 Installing and Connecting the TV.
This section will guide you through your
initial set up. It -will show you how to
your antenna
accessories.
or cable, and connect
any
Basic Set Up.
This section will teach you the basic skills
needed to operate your new TV. It will
show you how to operate special functions
of the remote control.
3 Using your New TV.
This section will show you how to begin
using your new TV. It will show you how
to use the AUTO SET UP feature, and how
to use your remote control's features.
4 Adjusting your Set Up (menus).
This section will teach you how to access
on-screen menus and adjust your TV's
settings.
Instructions in this ,_mual atv written jor the remote
control. Sbnilar controls trulybefound on the TV console.
o
tha
on, th
nterference
b
easures:
_r relocate
th,
he separatior
he equipmenl
from that to \
I.
=e dealer
or a_
for help.
Jtioned
that
_ns not expre_
dd void
your
ltisforthe
-32XBR48,34
35XBR88,37
r¢
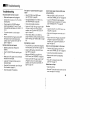
Table of Contents
Welcome!
........................................
Precautions
Using
Note
......................................
This Manual
Connecting
and
Making
Types
1
..........................
Installing
on AC Power
Connector
1
Cord
the
TV
............................
..........................................
Connections
1
...................................
2
2
2
Connecting two VCRs for tape editing
using MONITOR OUT ....................... 8
Connecting a DVD Player ....................... 9
Connecting a DVD Player with component
video output connectors ...................... 9
Connecting a camcorder ........................ 10
Using the S-Link function ...................... !1
Using the CONTROL S feature ............ 12
Using the Console Box
(KV-35XBR88 only) .......................... 13
Using the VIDEO Menu ...............................
23
Using the AUDIO Men_L..............................
24
Using the TIMER Menu ...............................
25
Using tee SET UP Menu .............................
26
Setting and Selecting
FAVORITE CHANNEL
Custon_zing
the Menu ................................
Operating
Video
2
Basic Set Up
Setting the Manufacturer's
Cable or m_telma
3
h_serting Batteries ......................................... 14
Operating
......................................
....................................
Connecting
a. cable box ............................
Cable box and cable ..................................
Connecting
an antelma/cable
TV system
with a VCR ..........................................
3
3
3
Using the Remote Control Joystick .............. 14
Adjusting Sliders ..........................................
14
On Line Help/Instructions
14
..........................
4
Using your
Connecting
to an S Video equipped
VCR .....................................................
4
Connecting
a VCR and TV with a cable
box .......................................................
5
New
Setting Up the TV Automatically
................. 15
Watching the TV ..........................................
16
Index
Connecting
to an S Video equipped
VCR
with a cable box .................................
5
Connecting
a DBS receiver
......................
Using CHANNEL
INDEX ...........................
in the
Connecting
a DBS receiver
and a VCR .... 6
Connecting
Connecting
an audio system
...................
an AV receiver ......................
Adjusting
SET UP (menus)
your
Leamhlg Menu Selection .............................
20
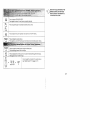
of the I"V,
and
serial
below
the
numbers
Sony
also on the TV box (white
spaces
call upon
Model
22
................................
No.
Serial No.
2_
q,
i:):
,:2
7""
i'!
37
38
Record
model
you
35
...........................
..............................................
Owner's
The
7
7
a Cable Box or DB5 Receiver
Troubleshooting
Watching Two Programs at One Time
- PIP/P&P (Twin ViewS9 ................ 18
6
CcKte ................. 32
Settin,g the Manufacturet's Code ................. 34
Specifications
TV
31
Equipment
Connecfialg directly to cable
or an antenna .......................................
Cable and anteima
..................... 28
provided
your
label).
below.
Sony
KV-
logo,
dealer
are located
at the
ore, the sticker,
rear
and
Record these numbers
Refer
to them
regarding
this
whenever
product•
_
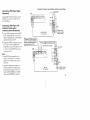
_ Connecting
Note
and Installing
on AC Power
Audio/Video
Conventional
Cord
The AC power cord is attached to the rear of
the TV with hooks. Do not attempt to remove
the cord from these hooks. Doing so could
cause damage to the TV.
YOU can
_=_l_
detachtheI
cordfrom--_
this
hook
I _
I
_. --
_
Connector
1
Do not remove
the cord from
these hooks.
AC Power
cord
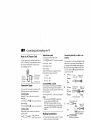
Types
You may find it necessary to use some of the
following connector types during set up.
Coaxial
cable
Standard TV cable and antenna connector
PlugType
__
-'_ (_
Press onto connection
Screw-on
Type
_
S Video
_
Screw onto connection
cable
High quality video connector
picture quality
_
2
_)
the TV
_Z_
Audio
cable
Audio/Video
_
(_
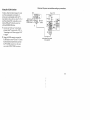
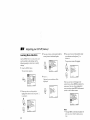
Connecting
antenna
cable
Press onto connection
(Left) - White
Audio (Right) - Red
Video - Yellow
(Some DVD Players are equipped
following three video connectors.)
Y - Green
with the
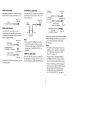
directly
to cable or an
The connection you choose will depend on the
cable found in your home. Newer homes will
be equipped with standard coaxial cable (see
A); older homes will probably have 300-ohm
twin lead cable (see B); still other homes may
contain both (see C).
A
B-Y (Cb) - Blue
°
VHF only
or
VHF/UHF
75-ohm
coaxial
or
R-Y (Cr) - Red
Cable
S-Link/CONTROL
S cable
Sony connector for S-Link and CONTROL S
connections. These features are exclusive to
Sony products, and allow greater control of all
Sony equipment.
--_::E23_
_
_
Press onto connection
Note:
• For S-Link and CONTROL S connections,
vou can use the combined S-Link!
CONTROL S cable provided with some
Sony video equipment, or you can purchase
a separate S-Link/CONTROL
S cable (RKG69HG).
B
VHF only
UHF only
or
VHF/UHF
or
300-ohm twin
lead cable
_:_
Making
Connections
For the best picture quality, a cable TV system
or outdoor antenna is recommended.
(Rear of TV)
VHF/UHF
_,._
c_
Antenna
75-ohm
C
VHF
coaxial
cable
__"!
(Rear of TV)
and
__
for enhanced
Align guides and
press onto connection
(Rear of TV)
VHF/UHF
cable
EAC-66 U/V mixer
(not supplied)
UHF
I
300-ohm
twin
lead
cable
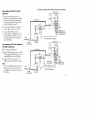
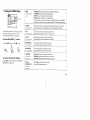
Cable
or antenna
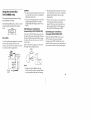
Connecting
Most simple connection. Connection
is made
directly from the cable or antenna to the TV.
a cable
box
v,=,=, of TV)
VHFIUHF
Cable
*Cable
Some pay cable TV systems use scrambled or
encnded signal_ that requiro a cahlo hnw* ta
view all channels.
(Rear of TV)
...
AUX
I
scrambled
r_ ....
io
__s_
TO CONVERTER
I .........
':"
(Rear of TV)
VHF/UHF
Cable
box
75-ohm
cable
(not
coaxial
{
supplied)
i (signal)
i
Cable
and
antenna
|
Ynu may find it
following set up
not feature local
receive using an
convenient to use the
if your cable provider does
channels that you are able to
antenna.
(Rear of TV)
AUX
CATV cable
cD---._
(No connection
"TO
CONVERTER"
in this
Antenna
cable
case)
TO CONVERTER
,N
Select Cable or ANT mode by pressing
the remote control.
ANT on
|
•
t
*Cable
CATV cable
(unscrambled
channels)
I
I OUT
box
Note:
• If you will be controlling all channel
selection through your cable box, you
should consider using the CHANNEL FIX
feature. (see "CHANNEL
SET UP" on
page 26)
VHF!UHF
For this set up, you can switch between scrambled
channels (through your cable box), and normal
(CAT_,Od_nnels by pressing ANT on your
remote control.
Notes:
cable
• You may be able to program your Sony
remote control to operate your cable box.
(see "Operating a Cable Box or DBS
Receiver" on page 34)
Some pay cable TV systems use scrambled or
encoded signals requiring a cable box* only for
certain channels (e.g. HBO, SHOWTIME, etc.).
• During PIP, P&P, CHANNEL INDEX or
FAVORITE CHANNEL viewing, the AUX
input can only be viewed in the main picture.
Cable
VHF/UHF
I
box
and
•
.:(
If you are com_ecting a cable box through the
AUX input and would like to switch between
the AUX and normal (CATV) input you
should consider using CHANNEL FIX.
(see "CHANNEL
SET UP" on page 26)
J_
"9
_m
,7
Connecting
and Installing
the TV (continued)
Disconnect
Connecting
an antenna/cable
system
with a VCR
all power
sources
before
TV
making
any connections.
(Rear of TV)
ff
woc_3
1 Attach the coaxial connector
cable or antenna
from your
to IN on your VCR.
2 Using AUDIO/VIDEO
connectors, connect
AUDIO and VIDEO OUT on your VCR to
AUDIO and VIDEO IN on your TV
(Yellow-VIDEO,
White-AUDIO
Left, RedAUDIO Right).
3
CONinT{B
Coaxial
3
cable
VCR
Cable
I_
...............
°"T
1 ,,,-..,.-=¢..f._
,.
(Q/
OUT
Using a coaxial connector, connect OUT on
your VCR to VHF/UHF
on your TV.
AUDIO-L
(white)
VIDEO (yellow)
!
Connecting
VCR
to an S Video
equipped
2
VMC-810S/820S
(not
supplied)
1 Attach the coaxial connector from your
cable or antenna to IN on your VCR.
2 Using AUDIO connectors, connect AUDIO
OUT on your VCR to AUDIO IN on your TV
(White-AUDIO Left, Red-AUDIO Right).
3
Using a coaxial connector,
,yu_l
v_,-l\
t',_ vla,
l
/
,,_.,1_1
connect
,JJl
4 Using an S VIDEO connector,
),_pul
OUT on
•
(Rear of TV)
TO
3
Coaxial
cable
AUO_OR
AUOK_t_vEo
U
2
V
,,_o
VCR
v.
connect
S VIDEO on your VCR to S VIDEO on
your TV.
Note:
• if you are connecting a monaural VCR,
connect only the single audio output to the
left (MONO) input on your TV.
4
" _
_
I_
s vloEo
4
YC-15V/30V
(not supplied)
RK-74A
T
(not
supplied)
,v,o o
AUDIO-R
AUDIO-L
(red)
(white)
Connecting
cable box
a VCR and TV with
1
,
_m_le
ColtllecL
"
the
,:
_ ,_ :___.
_,Ht_pUt/
)clL_I_
Disconnect
a
_c,,__
UI
LILt2
J
UDIJ.
_
L_
ATTT_,Tn
IlylT_.r.'_x,
.z_Xt-JJ-."J._.,"/
V J. LJJ£,'.,...,'
.........
making
To
r ....
2 Using a coaxial connector, connect OUT
on your cable box to IN on your VCR.
It_:__
sources before
any connections.
(Rear of TV)
Splitter to your incoming cable connection,
and connect the other two (output) jacks
(using coaxial cable) to IN on your cable
box and VHF/UHF
on your TV.
'_
all power
_
v
--LI-
:_l
....®®®
In
OUT IUDIO
OUT
....
_ ....
R
AUtO
L VLD[O
_
_
_
_
_
_
S VI_O
S._
t_
_
_
AUDIO-R
(red)
_ _
AUDIO-L
(white)
L.UILIL_'_LUID,
./-kLJalo
_. a ,tvIDL,,aOu_
7
e¢'_
• TT onyour
....
ATT • anu
VCR to AUDIO and VIDEO IN on your
TV (Yellow-VIDEO,
White-AUDIO
Left,
Red-AUDIO Right).
COItlteCt
Connecting
to an S Video
VCR with a cable box
equipped
2
Cable
--
Splitter
(not supplied)
_
i
,11,, i
Cable
3
_
f
VMfi-810S/820S
(not
Perform
as described
to
Coaxial
above.
cable
sv_el
0
V_EC
3 Using AUDIO connectors,
connect AUDIO
OUT on your VCR to AUDIO IN on your TV
(White-AUDIO Left, Red-AUDIO Right).
4 Using an S VIDEO connector, connect S
VIDEO on your VCR to S VIDEO on your TV.
Note:
• To view scrambled channels through your
cable box, select the video input which
your cable box is connected to by pressing
TV/VIDEO.
of TV)
i 'l/
CONVERTER
1-2
supplied)
(Rear
box
VIDEO(yeiiow)
VCR
2
1L
.....u._
(notsupplied)
YC-15V/30V
_ 4
Q_
!
3
Splitter
(not
Cable
RK-74A
box
supplied)
A
(not
supplied)
®:®
_
S VIDEO
AUDIO-R
(red)
AUDIO-L
(white)
mm
,_
Connecting
and Installing
the TV (continued)
Disconnect
Connecting
a DBS (Direct
Satellite)
receiver
all power
sources before
Broadcast
making
any connections.
(Rear of TV)
2
1 Connect
the cable from your satellite antenna
to your DBS receiver.
2 Attach the coaxial connector from your cable or
antenna to VHF/UHF on your TV.
3
Using AUDIO/VIDEO
connectors,
connect
AUDIO and VIDEO OUT on your DBS receiver
to AUDIO and VIDEO IN on your TV.
DBS receiver
1
Satellite I .....I © © © ©q L_o_
antenna
cable
_
--'_
l_ I_
Connecting
a DBS (Direct
Broadcast
Satellite)
receiver
and a VCR
IO-R (red)
AUDIO-L (white)
- VIDEO
3
1 Connect the cable from your satellite antenna
to your DBS receiver.
2 Attach the coaxial connector from your cable or
antenna to VHFiUHF IN on your VCR.
VMC-810S1820S
VMC-810S/820S
(not
T(not
supplied)
supplied)
(Rear of TV)
3 Using a coaxial connector, connect VHF/UHF
OUT on your VCR to VHF/UHF on your TV.
4
Using AUDIO/VIDEO connectors, coru-Lect
AUDIO and VIDEO OUT on your DBS receiver to
AUDIO and VIDEO IN on your VCR.
5 Using AUDIO/VIDEO
connectors, connect
',
AUDIO and VIDEO OUT on your VCR to
AUDIO and VIDEO IN on your TV.
Note:
To view input from the DBS or VCR, select the video
input which your DBS receiver or VCR is connected
to by pressing TV/VIDEO
on the remote control.
, ........
....
[DBfre_ce,v_er_l
I
VCR
.LLL ..... I
'_]o":::,oo
I
I _K-K
L_
t
_t ...... I/1
..... [!
1
VIDEO (yellow)
AUD!_O-L(white,!
_
_
5
(yellow)
3
VMC-810S/820S
(not
supplied)
Disconnect all power sources before making any connections.
Connecting
an audio
For more dynamic sound,
system to your TV.
system
connect
(Rear of TV)
your audio
1 Using ATJDTOconnect_rs, connect AUDIO
OUT on your TV to one of the unused Line
inputs (e.g. Tape-2, AUX1, etc.) on your stereo
(White-AUDIO Left, Red-AUDIO Right).
I _-oq_@)_lC_-
....
-_o@_1
I
I AUDIO-L
(white)
2 Set },our stereo to the chosen Line input
and use the AUDIO menu to set your
audio cmtput. (see "SPEAKER" and
"AUDIO OUT" on page 24)
Connecting
For greater
equipment,
"lied"
input
I i,o
an AV receiver
control of all audio and video
connect your AV receiver.
"noisu
AUDIO-L
(white)
VIDEO (yellow)
AUDIO-R (red)
1 Using AUDIO/VIDEO
connectors, connect
VIDEO 1 IN on your TV to Monitor AUDIO
and VIDEO OUT on your AV receiver.
VMC-810S/820S
(Rear
'
(not
_
"
I
CLHI i
]
supplied)
of TV)
1
_AV
AV receiver
outputs
000
2 Using AUDIO/VIDEO
connectors, connect
TV OUT on your TV to TV AUDIO and
VIDEO IN on your AV receiver.
Note:
° You may want to use CHANNEL FIX to
fix your TV's input to the AV receiver
(VIDEO 1). (see "CHANNEL SET UP" on
page 26)
AUDIO-L
(white)
AUDIO-R
(red)
VIDEO
(yellow)
2
T
VMC-810S/820S
(not
supplied)
_V
inputs
'i
mJ
iil Connecting
and Installing
the TV (continued)
Disconnect
Connecting
two VCRs for tape
editing
using MONITOR
OUT
MONITOR OUT gives you the ability to use a
second VCR to record a program being played
by the primary VCR or to perform tape
editing and dubbing."
1 Connect the VCR intended for playback
using the connection instructions
on page
4 of this manual.
all power
VCR (for
_o _@1_ .....
playback)
¢@_@1i
LrNC
OUT
IN
_
_
_._
,_
(not
supplied)
VMC-810S1820S
(Rear of TV)/
__
Indicates
of signal
direction
VIDEO
(yellow)
AUDIO-L
AUDIO-R
2
T
Notes:
• Do not change the input signal while
editing through MONITOR OUT.
.
any connections.
AU_ORAU_0L_O
VMC-810S/820S
1 1
making
(Rear of TV)
Using AUDIO/VIDEO
connectors,
connect AUDIO and VIDEO IN on your
VCR intended for recording to MONITOR
AUDIO and VIDEO OUT on your TV.
• When connecting a single VCR to the TV;
if VCR LiNE OUT is connected to TV
VIDEO IN, do not connect the TV
MONITOR OUT jacks to the VCR LINE
INPUT (see right). Doing so will cause
program interference and other viewing
sources before
(not
supplied)
(white)
(red)
Disconnect
Connecting
illustration)
a DVD
Player
VIDEO 1 IN on your
your DVD Player.
1
T To;no-
connectors,
making
any connections.
TV to LINE
........
OUT
on
a DVD Player with
video output
(Lower
illustration)
A T TT_TN
_,_,_,_o_t-_rc
t
connect
r,o)_)_or_
I
Using three VIDEO connectors, connect Y,
B-Y, and R-Y on the COMPONENT
VIDEO OUT on your DVD Player to Y, BY, and R-Y on the VIDEO IN 4 panel at
the rear of your TV.
Notes:
• Some DVD Player terminals may be
labeled Y, Cb, and Cr. If so, connect Y
(green) to Y, B-Y (blue) to Cb, and R-Y
(red) to Cr.
Because the high quality pictures on a
DVD disc contain a lot of information,
picture noise may appear. In this case,
adjust the SHARPNESS in the VIDEO
menu. (see SHARPNESS on page 23)
_r-fi_
[
A T TI-_T_"J
R and L of the LINE OUT on your DVD
Player to AUDIO R and L on the VIDEO IN
4 panel at the rear of your TV.
2
before
DVD
AUDIO/VIDEO
Connecting
component
connectors
sources
(Rear of TV)
1
Using
all power
(Upper
VMC-810S/820S
L
!
Connect
TV.
your
DVD
Connecting
throughunwantedOther
video
cause
Player
the
directly
to
DVD Piayel
equipmentnoise,
will
picture
• ,DE_
(willte)
we,low_
I
!
DVO
l
AUUIU-L
Y
(,,ut_upplied)
your
A_u_m°_-R
!red.) .
_
I
I
(
I
r
711
VMC-i0HG
(not
(not
RK-74A
supplied)
?:
A,
Zi
supplied)
_
(Rear of TV)
s v_o
_Y
v_o
R-y
_
AUDIO-L{white)
AUDIO-R {red)
Connecting
and Installing
the TV (continued)
Disconnect
Connecting
all power
sources before making
a camcorder
Use this connection to view a picture directly
from your camcorder.
VIDEO
Using AUDIO/VIDEO
connectors, connect
AUDIO and VIDEO OUT on your camcorder
to AUDIO and VIDEO IN on the front panel
of your TV (Yellow-VIDEO, White-AUDIO
Left, Red-AUDIO Right).
Notes:
• If you are connecting a monaural
camcorder, connect only the single audio
output to the left (MONO) input on your
TV.
•
10
If you have an S Video equipped
camcorder, you can use an S Video
connection.
AUDIO-R
(yellow)
(red)
VMC-810S/820S
_
_
AV output
(not
supplied)
)
any connections.
Using
the
S-Link
Disconnect
function
S-Link is a Sony innovation designed to make
your Sony components work together. It
allows you to automatically
switch the TV
input mode to video when you Dress PI,AY on
your Sony S-Link VCR. It also ailows you to
turn the VCR and TV off at the same time
with the SYSTEM OFF button.
1 Connect your VCR. (see "Connectin_
an
antenna/cable
TV system with a VCR" or
"Connecting
to an S Video equipped VCR"
on page 4)
2 Using an S-LINK connector, connect the
S-LINK jacks on your VCR and TV. Ensure
that both ends are seated firmly and that
the TV S-LINK connector is in the same
row as the AUDIO/VIDEO
connectors.
all power
sources
VCR
before
(Rear
making
any connections.
of TV)
r
AIJ I')IO-R
(rpd'h
AUDlO-L(whJiei
VIDEO
(yellow)
_
a
_
a
,
_
mS-LINK
1 _(black)
1I
[
L _
L
L
R---
R
R
J
z
i
Audio/Video/S-Link
(not supplied)
cable
11
if'
Connecting
and Installing
the
TV (continued)
Disconnect
Using
the
CONTROL
CONTROL S allows you to control your TV
and other Sony equipment
with one remote
control.
To control other Sony equipment with your
TV's remote control, connect the CONTROL S
IN jack of the equipment
to the CONTROL S
OUT jack on the TV with the CONTROL S
cable.
sources before making
(Rear of TV)
sw_o
Vl_O
_-Y
p_y
VlOEO
_
/ _, fOf@l@M ,,._@t@q@i
L
L
L
I___do@lol"r ._®_ol
_o.,,I_-1._<-...6..1_.1
To control your TV with other Sony
equipment's
remote control, connect the
CONTROL S OUT jack of the equipment
to
the CONTROL S IN jack on the TV with the
CONTROL S cable.
12
all power
S feature
_1 _
J
any connections.
Using
the
Console
(KV-35XBR88
CAUTION
Box
•
only)
The console box features electronic
doors and three AC outlets.
sliding
The AUTO ACCESS switch on the front of the
console controls operation of the sliding
doors.
=o_..._
/
i
II1oO.VoV
_ v° I I/I
L..... _:::
ill
AC outlets
Your TV cord has been designed to connect to
one of the AC outlets on the rear of the
console. You will have two additional outlets
to connect accessory equipment to.
,
;_
_;_
_
to console
Connect
outlet TV
Do not connect the console AC power cord
to a wall outlet until you have completed
making all connections.
• The ultrasonic sensor may detect movement,
drafts, vibrations, sound waves, or electronic
signals that will cause the doors to open
inadvertently.
_" it ut+ ttav+£
wattage of more than 300 W/3 A to the
console outlet (the wattage of this TV set is
198 W).
Operating
automatically
your
console
box
(AUTO ACCESS
ON)
When the AUTO ACCESS switch is set to ON,
the doors will operate automatically. Whenever
the sensor detects movement within its range,
the doors will open and remain open until the
range is clear.
Refer to the following diagram to determine
the range of the automatic feature.
approx.
u++ L£te uuo,[b
l:_ mLe_rupteu,
they
will reopen automatically
and remain
opened. When you want to close the doors
again, press the OPEN/CLOSE
button (or
set the AUTO ACCESS switch to OFF).
rl_+i_
_,_,,_
vl.elll;iilllliU
_
manually
_1_
,yli.llli41
I_
ll_.ll,,llllillll_lllll
(AUTO
I,Jllillilll
ACCESS
OFF)
When the AUTO ACCESS switch is set to
OFF, the doors will operate manually.
Pressing on the OPEN/CLOSE
button will
cause the doors to open or close and remain in
LILCIL
_"J_lLltdlt
ultti£
Llii="
_,VVIL'+..I[
iS
]_l_u
cl_llll.
@+m
+I.....-'+
Notes:
To wall
outlet
j_i
• People with small children and pets
should consider using the manual feature
to avoid possible injury and/or
damage.
13
i!il"
r
_
Basic Set up
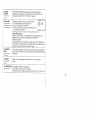
Inserting
Batteries
insert two size AA (R6) batteries (supplied) by
matching the + and - on the batteries to the
diagram inside the battery compartment.
Using the
Joystick
Remote
Control
Q
Avoid dropping
it, getting it wet, or
placing it in direct sunlight, near a heater,
or where the humidity
is high.
• Your remote contro! can be programmed
operate most video equipment.
(see "Operating
Video Equipment"
on
page 32)
14
to
When the instructions are presented, use them to
supplement the instructions in this manual.
The supplied remote control has a joystick
which allows for movement of the on-screen
selector in four directions. Pressing up, down,
left, or right on the joystick will cause the
selector to move in the selected direction.
Pressing down on the center of the joystick
( @ ) will activate the selected item.
Adjusting
Help/Instructions
OU_OE
Select
Notes:
• Remove the batteries to avoid damage
from possible battery leakage whenever
you anticipate that the remote control will
not be used for an extended period.
• Handle the remote control with care.
Line
Several menu windows will provide prompts
and instructions to assist you in navigating
through the different functions.
t
iV,haS
On
Sliders
When menu items present a slider ( H_,lrrlnm=
............or
...............
_...............
), press up, down, left, or right on the
settii-t g
JOybtlCK
tO _ujuat tll_
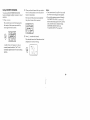
Using
Setting
Up the
Automatically
your
New
TV
1 Press POWER
TV
to turn on the TV.
"AUTO PROGRAM"
appears
and the TV
starts scanning and presetting channels
automatically.
When all the receivable
channels are stored, the lowest numbered
channel is displayed.
If the TV receives
cable TV channels, CABLE is set to ON
automatically.
The EASY SETUP GUIDE screen appears.
POWER
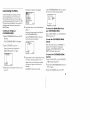
The EASY SETUP GUIDE feature will allow
you to set the on-screen language and set all
receivable channels. The EASY SETUP GUIDE
screen will appear every time you turn on the
TV until you perform AUTO PROGRAM.
ENGLISH
ESPANOL
n
FRAN_AIS
AUTO
DEMO
SET
:
First please
the antenna
Press
:
[CN
* ]
[ CH - ]
:
:
UP
[ VOL
:
* ]
[ VOL-)
[ TV / VJOEO
]
connect
I SET
UP I
to exit.
The EASY SETUP GUIDE feature does not appl V
for installations that use a cable box for all channel
selection.
Press CHANNEL + to select ENGLISH,
CHANNEL - to select LbY,_INUL, or
VOLUME + to select FRAN_AIS.
You can also set up the TV manually.
The screen will change
choice.
...._1,_
SET
(see "Using
UP me::;:" on _a_,_,_
,_ __,_1
- VOLUME
Tips
•
•
+
-CHANNEL +
After using EASY SETUP GUIDE you will still have the
option of adjusting any of the system settings, like erasing
channels, through the SET UP menu. (see "CHANNEL
SET UP" on page26)
Using the buttons
ENGLISH
I CH + ]
:
I
AmIT_ A 14_TF
_ vnl -
I
DEMO
iTVTVlDEO]
l
_rilrenne_?
Optima
d
[CH-]
:
[ VOL
:--.......
[ SET
÷ ]
'a
UP ] para
I
STAND BYISTEREO
!
Press VOLUMEto restore factory
settings ("CONTINUE
TO AUTO
PROGRAM?"
will appear on the screen.)
Press CHANNEL+
to execute or
CHANNELto exit.
• Press SET UP to exit.
3 Press VOLU_CIE- to con_ue.
on the top of the TV:
TIMER
+ to select a language.
Notes:
• Before you perform AUTO SET UP again,
make sure that the input from ANT (not
AUX) is selected by pressing ANT until
"AUX" does not appear next to the
channel number.
For a DEMO of functions and menus, press
TV/VIDEO.
-
f
•
AUTO SET UP again
Press SET UP on top of the TV.
VOLUME
I
FRAN_AIS
Perfor, z this function during the day, with the antem_a
and/or cable properly connected, to ensure that all available
channels will be broadcasting and receivable.
•
to reflect your
ESPAt_OL
*'_°
To perform
VOLUME +
AUTO
When you perform AUTO PROGRAM,
your CHANNEL FIX, TIMER, and
CHANNEL BLOCK settings will be
erased.
PROGRAM
15
L'
i¢
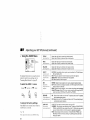
CAPTION
SLEEP
VISION
Press repeatedly until the TV displays the approximate time in minutes (30, 60,
or 90) thai you want the TV to remain on before shutting off automatically.
Cancel by pressing until "SLEEP OFF" appears.
(Closed
Caption)
N_
T_XTI
CAPTiON
DMEN
Press repeatedly to step through available displays:
Status
Channel number, current time, channel caption (if set), and MTS mode (if
SAP is selected) are displayed. SAP indication disappears after three
seconds.
XDS
Press to change between the VHF/UHF input and the AUX input. (For
detailed connection information, see "Cable box and cable" or "Cable and
antenna" on page 3)
MTS
Press to cycle through the Multi-channel
(see "MTS" on page 24)
SYSTEM OFF
(green labeled
button)
Press to turn off the TV and all other equipment
"Using the S-Link function" on page 11)
}
E_L_I
i
TEXT4 from the menu, then press DISPLAY
until Caption Vision is displayed.
CC1, CC2, CC3, or CC4 shows you a caption,
that is, a printed version of the dialogue or
sound effects of a program. (The mode should
be set to CC1 for most programs) TEXT1,
TEXT2, TEXT& or TEXT4 shows you text, that
Press repeatedly to step through available video inputs:
TV, VIDEO 1, VIDEO 2, VIDEO 3 and VIDEO 4
If you select SKIP as a VIDEO LABEL in the SET UP menu, your TV will skip
the video input you selected. (see "VIDEO LABEL" on page 27)
ANT
(AUX input)
Q
Some programs are broadcast with Caption
Vision. To display Caption Vision, select CC1,
CC2, CC3_ CC4_ TEXT1, TEXT2_ TFXT3 or
program type, program length, program description, call letters, and time of
the show if the broadcaster offers this service.
Caption Vision
Caption Vision will be displayed on the screen if the broadcaster offers this
service. (see right)
To cancel the display, press DISPLAY repeatedly until "DISPLAY OFF"
appears. "DISPLAY OFF" disappears after three seconds.
TV/VIDEO
I
U
TEXT4
u_e _I
DISPLAY
VISION
TEXT2
TE×T3
is, information presented, using half of the
screen. It is not usually related to the program.
Notes:
• Poor reception of TV programs can cause
errors in Caption Vision and XDS.
Captions may appear with a white box or
other errors instead of intended text.
TV Sound (MTS) options.
• XDS, Caption Vision, and the status display
cannot be used at the same time.
connected with S-Link. (see
17
ii:
!t..
ili,
;i:"t
Using your
Watching
The
Two
New
Programs
Picture-in-Picture
(PIP)
feature
TV (continued)
at One
allows
Time
--
PIP/P&P
Main
4_--N_
picture
'N,_
6"f_
_
Input-source mode
or TV channel for
i
The sound of the right
X
/
"X'1
I
Sub 4_'_'_'1-picture I Y _
I
18
MANUAL
CHART
}/
[,,._.
FI
AS YOU REVIEW
THIS
Press to display a window picture (PIP).
Each time you press, the picture size will change (1/4 --.1/9 ---,1/16).
Press _
to remove the window picture,
t
J
'theWindowpicturewind°w
picture
nirtHr_
THE
REMOTE
ON THE
EFER
TO THE CONTROL
ILLUSTRATION
OF
INSIDE FRONT COVER OF THIS
Input-sourcemode
or TV channe! for
The Picture-and-Picture
(P&P) feature allows
you to view two channels simultaneously,
both
in a reduced size screen. Tile main picture wiii
appear oil the right.
Ipft
TM)
Input-source mode
or TV channel for
the main picture
I__
fh_
View
you
to view two channels
simultaneously,
one in
the full size "main"
picture
and one in a smaller
"window"
picture.
The sound of the main
picture is received,
(Twin
picture
(_
TV/VIDEO
(_
a_/I "1
I
Main
picture
Press repeatedly to step through available video inputs:
TV, VIDEO 1, VIDEO 2, VIDEO 3 and VIDEO 4
PIP will display the video source in the window picture.
P&P will display the video source in the left picture.
is received
6--t-- Input-source mode
|
or TV channel for
|
the right picture
Press to display right (main) and left pictures (P&P).
Press _
to cancel.
AUDIO
Q
Press to alternate sound between the main picture and the window picture
for PIP and the right and left picture for P&P. The symbol "_' " will appear
for a few seconds to indicate which picture's sound is being received.
Using your
Using
CHANNEL
New
TV (continued)
INDEX
You can use the CHANNEL INDEX feature to
display multiple channels for direct selection.
2 When you find a channel
that you wish to
view, use the joystick to move the yellow
frame to that picture and press @.
Channels used for CHANNEL INDEX will
come directly from the TV's list of receivable
channels (those set during AUTO PROGRAM
or through the SET UP menu).
The selected
Press (_) once to display the current
channel in the center of the screen
surrounded
channels.
displayed
channel
for normal
will be retrieved
and
viewing.
by the first twelve receivable
Notes
• You cannot move the yellow frame until
all of the surrounding
pictures appear.
A yellow frame will appear
current channel selection.
to indicate
T
_
T_7
vvl_l
surrounding
CHANNEL
_.ws[tl_L_ctl_j
ulavt_tt_
each
_g
_-1_
pictures while the
INDEX screen is displayed.
• Sound will only be heard from the center
picture while the CHANNEL INDEX
screen is displayed.
2O
If one of the pictures received through
CHANNEL INDEX is snowy, the entire
screen may appear snowy. In this case,
erase the snowy channel using CHANNEL
ERASE/ADD.
(see "CHANNEL SET UP"
on page 26)
_
j_
__..=
Press to access CHANNEL !,NDEX.
Press again to access the next twelve receivable
REMOTE
ON THE INSIDE
EFER TOCONTROL
THE ILLUSTRATION
OF THE
FRONT COVER OF THIS MANUAL AS
YOU REVIEW THIS CHART
channels.
CH +
Press to cycle through the receivable
channels one at a time.
CH-
CD
IIVIIIICll
FREEZE
Press to freeze the center picture.
TV/VlDEO
Press to cycle the center picture through the video inputs.
The surrounding channels will not change.
ANT
I
V
VII_VVIII_:_,
Press to replace the center picture with a channel received through the AUX input.
Press again to return to CATV input.
CD
CH
(_)'
or
(_'(_)
and ENTER
or
JUMP
Press to select the channel for the center picture.
(see "Watching the TV" on pages 16-17)
C)
21
I'1
,_,:
,_;
::,'
Adjusting
Learning
Menu
your
SET UP (menus)
3 Press up or down on the joystick until the
Selection
cursor
Use the MENU button to access a menu and
use the joystick to alter settings. Use the
following example to learn how to modify
points
to the desired
bCHANNEL
FAVORITE
i_
VIDEO
The main menu
The previous
SET UP
CHANNEL
SET
:
CHANNEL
0
UP
I
use 0' _
appears.
screen will reappear.
MENU
: ENGL4SH
TILT CORRECT)ON
DMENU
%
Press up or down on the joystick to make
your selection and and press (_) to
activate it.
LABEL
CUSTOMIZED
LANGUAGE
settings.
1 Press tile MENU button.
option.
E,,_@
SET
_CABLE
CHANNEL
UP
O¢F
FIX:
OFF
AUTO
PROGRAM
CHANNEL
ERASE/ADD
CHANNEL
CAPTPON
DMENU
PICTURE
m ;ili_l_ltm!_lllllmll
HU E
....
COLOR
BRIGHTNESS
_111
nmllm',,-- .....
mllW'itllfnl.........
4 Press
(:+_.
|.......
Options for your selection
displayed.
SHARPNESSmlmllm
.......
vL%°
.........
TRIN_TONE
:
HIGH
COLOR CORPECTION
O;F
will be
_MENLI
Use
_
C_
E,il
)" CABLE
Press
up or down
on the joystick
I
to
(_
highlight
to activate
the desired
it.
menu
and
press
:
ON
AUTO
PROGRAM
CHANNEL
SET
UP
CHANNEL
ERASE
ADD
CHANNEL
CAPTFON
CHANNEL
FIX : OFF
When you are done with changes to the
selected menu, choose MENU to return to the
main menu. Once you have completed all
menu corrections, press MENU on the remote
control to exit the menu screens.
(_9
CHANNEL
-_MENU
CUSTOMIZED
4t
SET
UP
FAVORITE
CHANNEL
VIDEO
LABEL
MENU
LANGUAGE
: ENGLISH
TILT CORRECTION
:
SET
UP
DMENU
VIDEO
0
LABEL
CUSTOMIZED
MENU
LANGUAGE
: ENGLISH
TILT CORRECTION
:
0
.)MENU
Use
22
_1
_
Exit
@
Note:
° Pressing MENU on the remote control will
allow you to exit from tile menus at any
time.
Using
the
VIDEO
Menu
MODE
DYNAMIC: Select for enhanced picture contrast and sharpness.
STANDARD: Select to display a standard picture.
Customized picture
I r_l_?_°............
I
SPORTS:
_J g%o&oo.._OT,O.
: O_F
I L-_ B_,G.TNESS
,=,,,,ul
...............
I/
use Q! (_
E×it
PICTURE
Adjust slider right (up) to increase picture contrast and create more vivid color.
Adjust slider left (down) to decrease picture contrast and soften the color.
Picture Adjustment
I-If
control
to modify
"Learning
Menu
menu ........ 6 .........
Selection"
on page 22.
To select
VIDEO
Display
the
_
Highlight
_
_
menu:
_
Select
I1_
[
1'2 .:T..............
i
lulul_
mU]Ub(t_l_,nl
I
Adju_
_.uur ,_,t tuuW,u _u
COLOR
Adjust slider right (up) to increase color intensity.
Picture Adjustment
Adjust slider left (down) to decrease color intensity.
BRIGHTNESS
Adjust slider right (up) to brighten the picture.
Plfth
Adil
lr_
.4t_l l lqtm_nt
_qt qlid_r
• "-J .............
To restore
the factory
settings
Press RESET on the remote control while the
VIDEO menu is selected.
Select to display a vivid, bright picture.
You can alter the VIDEO menu settings (e.g., PICTURE, HUE) for each MODE.
Select each mode individually and then press RESET to restore factory settings.
Ipft
/dnwn/
_.....
i
In d_rk_,n
..............
th_
niPh
t-" .......
_r_,
SHARPNESS
Adjust slider right (up) to sharpen the picture•
P/cture Adjustment
Adjust slider left (down) to soften the picture.
TRINITONE
White Intensity
HIGH: Select to give the white colors a blue tint.
MEDIUM: Select to give the white colors a white tint.
Adl'ustment
NTSC STD: Select to give the white colors a red tint.
COLOR
Select ON to emphasize
CORRECTION
Color Ratio
Select OFF to emphasize
reds and blues.
greens.
Adjustment
23
X'
:iil
!'
Adjusting
Using
the
your
AUDIO
TREBLE
Menu
nlnllllflllnt,,..,,....
"1
I!1111111111!11)
.............
) Sliders
BASS
BALANCE
EFFECT
SET UP (menus)
............ | ..........
:
MTS :
OFF
(continued)
Adjust
Adjust
BASS
Sound Adjustment
Adjust slider right (up) to increase low pitched sounds.
Adjust slider left (down) to decrease low pitched sounds.
BALANCE
Adjust slider right (up) to emphasize right speaker volume.
Adjust slider left (down) to emphasize left speaker volume.
STEREO
SPEAKER
: ON
AUDIO
AUDIO
OUT
: VARIABLE
_MENU
Sound Adjustment
UseGJIC_)
E,,_
For detailed information
on using the remote
control to modify menu settings, refer to
"Learning Menu Selection" on page 22.
EFFECT
Customize sound
effect based on the
program's
type.
audio
MTS
To select
Display
the
_
AUDIO
Highlight
.P menu:
,t
_
Select
Enjoy stereo.
bilingual and mono
programs,
f
"T"
%%!2
SPEAKER
Custom selection
To restore
the factory
Press RESET on tile remote
AUDIO menu is selected.
"_"
Press (9
24
settings
control while the
for direct selection of an EFFECT setting.
AUDIO
AUTO SRS: Automatically detects signal type and switches the TV effect between
SRS and SIMULATED.
SRS: Produces a dynamic three dimensional sound for stereo signals.
SIMULATED:
Adds a surround-like effect to mono programs.
OFF: Normal stereo or mono reception.
STEREO: Select for stereo reception when viewing a program broadcast in stereo.
SAP: Select to listen to a bilingual broadcast. (non-SAP programs will be muted
when this feature is selected)
MONO: Select for mono reception. (use to reduce noise during stereo broadcasts)
Quick MTS access: Press MTS on your remote control to cycle through the MTS
options as follows, (STEREO ,_ SAP ,_ MONO ,_ STEREO)
ON:
of
audio output source.
Tip
slider
slider
right (up) to increase high pitched sounds.
left (down) to decrease high pitched sounds.
TREBLE
Sound Adjustment
OUT
Easy control of
volume adlustments.
Select to listen to the sound from the TV speakers alone or the TV speakers
and a separate stereo system.
OFF: Select to turn off the TV speakers and listen to the TV's sound only through
external audio system speakers.
AUDIO OUT can only be set when speakers are set to OFF.
VARIABLE:
Sound output varies according to the TV settings. VOLUME, BASS,
TREBLE, and BALANCE are adjusted through the TV. Useful when you want to
use your remote control to control the output of a separate audio system.
FIXED: Sound output is held at a fixed level. VOLUME. BASS. TREBLE, and
BALANCE are fixed to the factory settings. VOLUME adjustments are made
through your stereo.
Q Using
the
TIMER
Menu
DAYLIGHT
ON / OFF TIMER
CHANNEL BLOCK
u_ G.'!
_I
___
Exit
-:
AM
After setting the clock you can use the timer to
turn the TV on and off.
SAVING
Spring: Select YES to compensate for Daylight Saving Time.
The current time automatically moves ahead one hour.
Automatically adjusts
the time.
Fall: Select NO at the end of Daylight Saving Time.
The current time moves back one hour.
CURRENT
TIME SET
1 Press __, then press up or down on the joystick until
the current day (MON-SUN) is displayed, and press (.:z;.
Necessary for the
TIMER.
2 Press up or down on the joystick until the current hour
(01-12) and AM/PM is displayed, and press (_).
CURRENT
i
3 Press up or clown on the joystick until the current
i ile
For detailed information
on using the remote
control to modify menu settings, refer to
"Learning Menu Selection" on page 22.
To select
the
TIMER
Q
_
Highlight
(_)
TIMER
iiuvv
bLdligU.
FIt:_bb
IM'_EI_ItJ
to
u_ _i _
_
I_,Kl[.
1 Select the desired timer (1 or 2).
_
Wake up or
scheduled
2
viewing.
menu:
_
iio._
SET
ON / OFF TIMER
ON/OFF
3
Display
',.,,lu,,.,r,
TIME
_MENU
Select
Press up or down on the joystick until the desired day
(MON-SUN) or range of days (EVERY SUN-SAT or
EVERY MON-FRI) is displayed, and press (_ •
Z-T_-_
AU
_h CH
_
,,_ , c....
>_"_
a Progr,_,.
,_1
Press up or down on the joystick until the time (hours and
: .... _: ,9
minutes) that you want the TV to remain on is displayed, and press _.
4. Press up or down on the joystick to set the time duration (maximum of 6 hours)
and press _-_. TO CANCEL THE TIMER FUNCTION, PRESS RESET.
't1'
5
Press up or clown on the joystick to select the desired channel and press (:_i'.
The timer is now set. The TIMER indicator on your TV will be lit.
Press MENU to exit. Performing AUTO PROGRAM will erase all TIMER settings
BLOCK
CHANNEL
Tip
"_"
Set daylight saving time before setting the clock. Any
loss of power will cause these settings to be erased.
CHANNEL
BLOCK
Prevent access
to certain channels.
You will be able to block two channels for a period of up to 12 hours.
FOLLOW STEPS 1-5 OF "ONIOFF TIMER" ABOVE
To erase your CHANNEL BLOCK settings, press RESET
while in the CHANNEL BLOCK window. Performing AUTO
PROGRAM wilI erase your CHANNEL BLOCK settings.
_'1 __T___AM
2 ---_-=AM
_ CH___
__ CH___
_MENU
so_
U_
a p_og_am
_2 00AM
_l G
SUN E,,t _-)
25
, &"
i!i:
Adjusting
Using
the
your
SET UP (menus)
(continued)
CHANNEL
SET UP Menu
SET UP
P CHANNEL
SET
Basic set up options
for viewing
UP
FAVORITE CHANNEL
VIDEO LABEL
CUSTOMtZED
MENU
LANGUAGE
TILT
ENGLISH
CORRECT]ON
0
SET
UP
_MENU
For detailed
information
control
to modify
"Learning
Menu
on using
To select the SET UP _
Display
_
the remote
menu settings,
refer to
Selection"
oi1 page 22.
Highlight
I_
menu:
_
Select
+
%,%9
CHANNEL
items
ANT
on your
channel
26
button
number
are "grayed
remote
appears.
uP
;HANNEL ERASEiADD:
With the CHANNEL ERASE/ADD window open:
................
_]
1 Place the cursor next to ERASE or ADD.
._FNU
'*%_
u,._-_0=o,t
o... _
If any menu
SET
With the CHANNEL SET UP window open:
c*BLE o,
CHANNEL fix
oft
1 Use the joystick to select the feature you want to change.
*UTO
PRo_,,,,,,
C_^NNEL EnASE ' ADO
2 Press _ to access the feature,
c.,,,_
c,_,
D_ENU
CABLE: Select ON if your TV is connected to a cable system.
(AUTO SET UP will set CABLE to OFF automatically if a
u,_e: e
E.°
cable channel is not available)
CHANNEL FIX: Press up or down on the joystick to set the TV's input to one of the
following options:
2-6: When the cable box is connected to the VHF/UHF input and you do not want to switch
to AUX mode. Press DBS/CABLE (FUNCTION) and then OH +/- to change channels.
AUX 2-6: When a cable box is connected to AUX and a cable or antenna is connected to
VHF/UHF. You can alternate between the two inputs by pressing ANT.
VIDEO 1: When you have connected video equipment (e.g. AV receiver) and you want the
TV input fixed to it. You will be able to alternate between video sources.
OFF: When you want to switch CHANNEL FIX off.
If the TV is in the AUX mode when you turn CHANNEL FIX off, press ANT to return to
regular (CATV) mode.
TIMER and CHANNEL BLOCK settings are erased when CHANNEL FIX is set.
AUTO PROGRAM:
Signals the TV to automatically program all receivable channels.
out",
control
press
so that
I
2
3
the 0-9 buttons and pressing ENTER.
Select the desired channel using CH+/-, or by selecting with
Press _::_
the
a
;HANNEL CAPTION:
CHANNEL
CAPT
( ON
]
I
1
With the CHANNEL CAPTION window open:
Press _
and then press up or down on the joystick to
select the desired channel, and press (_ again.
Press up or down on the joystick to display.the.!irstletter.or
number of the capuon ano press _y to select t(./Hepea[
until up to four digits are selected)
3 Press _.
To erase a Caption, press RESET.
FAVORITE
CHANNEL
User's
The FAVORITE CHANNEL feature provides a multi-picture presentation to
enable direct channel selection. (for details on how to set up this feature, see
favorite
channels
VIDEO
VIDEO
LABEL
Easy recognition
connected
of
equipment
(e.g. DBS, VHS, etc.).
This feature allows you to label each input mode so that
you can eas ily id en tify the connected equ ip ment
(e.g. you can label VIDEO 1 IN as VHS).
1 Press up or down on the joystick to select the input mode
you want to label and press _.
2 Press uF'.....u, uuw,,"
........ v,, u,u_juy_u_r,:
..... :-' .....tu =u,uut'--"
the ,=uu,'-'.....,_u p_u_
VIDEO LABEL Options:
LABEL
I'VIOEO
_!
VLOEO
I
v,oEo
v,o_o_ _,_.o
v,o.o 43
VIDEO
VIDEO
_,_E,u
_,_®: e
_.,,
-.-----------------_u'.
VIDEO 1: VHS, 8mm, BETA, LD, GAME, DBS, DVD, WEB, RECEIVER,
VIDEO 2/3: VHS, 8mm, BETA, LD, GAME, DBS, DVD, WEB, SKIP
VIDEO 4: DVD, SKIP
SKIP
If you select SKIP, your TV will skip this connection when you scan through video
sources using the TWVlDEO button. When VIDEO LABEL is set to WEB, the screen
will darken, creating an ideal picture for Web TV viewing.
CUSTOMIZED
MENU
Frequently used
Use this feature to create a custom menu which contains only those functions that
you use most. (for details on how to set up this feature, see "Customizing the Menu"
on page 31 )
menu items
LANGUAGE
User's preferred
Select from available languages to display all menus in your language of
choice.
language
TILT CORRECTION
Adjust your picture.
(KV-35XBR48, 35XBR88, 37XBR48M only)
Use this feature to correct any tilt of the picture.
Press up or down on the joystick to select a correction between +5 and -5 and press ¢_
27
:,;4
o.
.?
i:
.A
Adjusting
Setting
and
your
Selecting
SET UP (menus)
FAVORITE
(continued)
5 Press MENU when you are done.
CHANNEL
Your favorite
The FAVORITE
CHANNEL
a multi-picture
presentation
channel
selection.
Your FAVORITE
set automatically
fcature
providcs
to enable direct
CHANNEL options
or manually.
Select MODE and press
Press up or down on the joystick to
display MANUAL and press (-_.
Setting FAVORITE CHANNEL
manually
1 Select FAVORITE CHANNEL from tile
SET UP menu.
MODE,
23
_2
- '
s- ii_
CHANNEL
_I
J
Exil
_
Press down
press @.
on the joystick
Use
28
(_
_
Exit
_!
to select 1 and
Press up or down on the joystick
a channel and press @.
FAVORITE CHANNEL
to select
Simply proceed as described in "Setting
FAVORITE CHANNEL manually" (skip step 2
if MANUAL is already selected). When you
reach step 3, select the position you want to
change and press _,-. Press RESET to clear
the channel for that position.
....
4 Use the joystick
zlz_s! Is 2gl rs_.
! Nee r [
! I ¢Bs i
to
You have the option of returning to the
FAVORITE CHANNEL screen to adjust any
of your favorite channel choices.
You have now selected
for position 1.
26i
Resetting
choices
Se_e,cx
a Pos_
The FAVORITE CHANNEL menu will
appear. If you set CHANNEL
CAPTION,
captions (e.g. CNN, HBO) for the channels
selected will display. (see "CHANNEL
_
_H
are now ready
MANUAL
FAVORITE
Use
channels
use.
can be
The factory setting for FAVORITE CHANNEl,
is AUTO. When FAVORITE CHANNEL is set
to AUTO, tile last eight channels selected with
the 0-9 buttons will be set as FAVORITE
CHANNEL options.
FAVORITE
CHANNEL
* MODE
AUTO
,,_.
__
CI (ANINJFI.
favorite
channel
to select other FAVORITE
r_(_,dtion,_
channels.
a favorite
and
r_r(_ram
_ther
Press up or down on the joystick to select a
new channel and press (_.
Press MENU when you are done.
Note:
• The FAVORITE CHANNEL feature is not
available for the AUX input.
Using
FAVORITE
CHANNEL
You can use the FAVORITE CHANNEL
feature to display multiple channels for direct
selection.
i
Press
@ once.
The current channel will be displayed in
the center of the screen surrounded
by
your eight favorite channels.
2 When you find a channel
view, use the joystick
frame to that picture.
The sound
the yellow
of the picture surrounded
frame wiii be received.
L!II
hi HI
I_.L_,'_I _ _1
Press
displayed
continually
pictures.
update
Notes:
• You cannot move the yellow frame until
all of the surrounding
pictures appear.
• If one of the pictures
by
received
through
entire screen may appear snowy. In this
case, erase the snowy channel using
CHANNEL ERASE/ADD.
(see
"CHANNEL SET UP" on page 26)
_ I
@ to select the channel.
The selected
A ye!low frame will annoar t,_ incticnto
current channel selection. The TV will
that you wish to
to move the yellow
channel
for normal
will be retrieved
and
viewing.
i
each of the surrounding
29
f_
_l
_'_Adjusting
Setting
and
your
Selecting
SET UP (menus)
FAVORITE
CHANNEL
(continued)
(continued)
Press to freeze the center picture.
Press again to cancel the frozen picture and resume normal FAVORITE CHANNEL
viewing.
Press to cancel the current operation and return to normal TV viewing.
TV/VIDEO
Press to cycle the center picture through the video inputs.
The surrounding channels will not change.
Q
ANT
_J
I
Press to replace the center picture with a channel received through the AUX input.
Press again to return to CATV input.
CH
Press to select the channel for the center picture.
or
©,
L
3O
I
_0") - _
and ENTER
or
JUMP
"J
(see "Watch ng the TV" on pages 16-17)
_
REMOTE
ON THE INSIDE
REFER TO CONTROL
THE ILLUSTRATION
OF THE
FRONT COVER OF THIS MANUAL AS
YOU REVIEW THIS CHART
Customizing
the
The menu
Menu
You have the option of creating a custom
menu inciudmg up to seven of the menu
functions that you use most. You can select
any menu items except those found in the SET
UP menu. Once you define a custom menu, it
will appear first whenever you press the
MENU button.
Creating or chanclincl a
CUSTOMIZED MENU
1 Select CUSTOMIZED MENU from the SET
UP menu.
The CUSTOMIZED
for selection
MODE
PICTURE
CUSTOM(ZED
HUE
I
CUSfOMIZED
I* MODE
BRIGHTNESS
]
So_a an r_rn
Use
_)I
_
OMAIN
Exit
Use
Locate the item you wish to include
press @.
and
Grayed out items cannot be included
the CUSTOMIZED
MENU.
in
The CUSTOMIZED
MENU will return
with your choice in position 1.
CUSTOMIZE
anu
press
I
4.
to
7,
DMENU
Se),ecta 3.
poa_a
us_, GI (_
Repeat steps 3 and 4 to assign items to any
or ali of the remaining
positions (2 - 7).
To Access
your
MENU
_l
Se_c_apoa_on
Use
(_
_
3 Press down
press @.
Exit
on the joystick
to select 1 and
Exit
the
MAIN
CUSTOMIZED
MENU
To reset
choices
the
from
MENU
Iil
MENU and press
_-_-U b 1 U[VIILi_
tfI_
U
_.
CUSTOMIZED
MENU
When the cdrsor points to CUSTOMIZE or
position 1 to 7 in step 4 of "Creating or
changing a CUSTOMIZED MENU", press
RESET. All choices will be reset.
To cancel the CUSTOMIZED
MENU
function
1 Select _MA12,/MENU h-Lthe CUSTOMIZED
7.
CUSTOMIZED
DMENU
MENU
(_
E,I_
kCUSTOMIZE:ON
I.
2
3.
4.
_I
: ON
MODE
MENU
kU .
Press up or down on the joystick
display ON and press (_ again.
.....
I....
lll_lll_Jlill_ll-_,-
CORRECTION
MENU will appear.
L. UD i UtVIILn
MENU
: STANDARD
HUE
COLOR
SHARPNESS
COLOR
DMENU
CUSTOMIZED
k 1
2.
nelect
MENU
Your CUSTOMIZED MENU wilt now operate
the same as any of the standard menus.
will appear.
MENU window and press @.
Items which you have already included
will appear in green on the menu for
selection.
2 Select the CUSTOMIZED
SET UP menu.
Press MENU
3 Select CUSTOMIZE
when you are done.
MENU from the
and set it to OFF.
31
..<_,
!i?
:
Operating
Setting
Code
the
Video
Equipment
If the remote
Manufacturer's
VCR manufacturer
You can use the supplied remote control to
operate Sony or non-Sony video equipment
that has an infrared sensor.
1
2
Set the VTR
1/2/3/DVD/MDP
the position
through
switch
which
to access
The
following
each
position
of the switch:
VTR1 (303)
Beta, ED Beta
Sony
VTR2
(302)
VTR3
(301)
equipment
8 mm
VHS
SET, VTR/DVD
press
ENTER.
For example,
to enter
DVD
Player
(FUNCTION),
the manufacturer's
(see the following
to operate
chart),
a Sony 8ram
FUNCTION
_
32
VCRs
VCR
CODE
number
is preset
VCR
(751)
code
to
equipment.
DVD/MDP
the 0-9 buttons
Manufacturer
you would
like
Press
the video
then
VCR:
ENTER
M-/
x
/
control
doesn't
work
• Try repeating the set up procedures
using
the other codes listed for your equipment.
",.-a"
to
code
numbers
Code
Sony
301,302, 303
Aiwa
338,344
Admiral (M. Ward)
327
Audio Dynamic
314, 337
Bell & Howell (M. Ward)
330, 343
Broksonic
319, 317
Canon
309, 308
Citizen
332
Craig
315,302,332
Criterion
315
Curtis Mathis
304,338,309
Daewoo
341,312,309
DBX
314, 336,337
Dimensia
304
Emerson
319,320,316,317,318,341
Fisher
330,334, 335,333
Funai
338
General Electric
329,304,309
Go Video
322
Goldstar
332
Hitachi
306, 304, 305,338
Instant Replay
309,308
JC Penney
309,305, 304,330,314,
336,337
JVC
314, 336,337
Kenwood
314,336,332,337
LXI (Sears)
332, 305,333,334,
330,335,338
Magnavox
308,309, 310
Marantz
314,336,337
Marta
Memorex
Minolta
Mitsubishi/MGA
Multitech
NEC
Olympic
Optimus
Panasonic
Pentax
Philco
Philips
Pioneer
Quasar
RCA/PROSCAN
332
309,335
305, 304
323,324, 325, 326
325, 338, 321
314, 336, 337
309, 308
327
308, 309,306,307
305, 304
308, 309
308,309,310
308
308, 309,306
304, 305, 308, 309, 311,
329,312,313,310
Realistic
309,330, 328,335,324,
338
Sansui
314
Singer
315
Samsung
322,313, 321
Sanyo
330,335
ouuu
,_, _, _ i_, 321,335, 323,324,325,326
Sharp
327, 328
Shintom
315
Signature 2000 (M. Ward)
338, 327
Sylvania
308, 309,338,310
Sy,mp,honic
338
SV2000
338
Tashiro
332
Tatung
314,336,337
Teac
314,336, 338, 337
Technics
309,308
_-----L:L-AJ_
tu_,,u_
j_, 311
Wards
327, 328,335,331,332
XR-1000
315
Yamaha
330,314,336,337
Zenith
rviDP
331
manufacturer
code
Code
Sony
Panasonic
Pioneer
Player
701
704, 710
702
manufacturer
code
numbers
Manufacturer
Code
Sony
Tips
•
Whe_ you remove the batteries, the code nu/nber may
revert to the factory setting.
To operate
1
video
switch
the position through which you would
like to access the video equipment.
2 Use the VCR/DVD/MDP
indicated in the following
to
Press CH +/-.
Press CH +/-.
To record
Press GE) (REC) while
pressing C:D (upper le_t).
To play
Press IP-.
To stop
Press 1.
To fast forward
Press D,-I_.
To rewind the tape
Press _1_1.
To play
Press I_-.
To pause
Press II. Press again to
resume normal playback.
To stop
Press IN.
To pause
Press II. Press again to
resume normal playback.
To step through
different tracks of
an audio disc
Press _
to step forward or
_
to step backward.
To step through
different chapters of
a video disc
Press CH+ to step forward or
CH-to step backward.
To display the Title
menu
Press TITLE.
To display the DVD
menu
Press DVD MENU.
To select tracks •
Press 0-9 buttons.
Press _
playback.
I t',Jt t I tdt
To change input
mode
Operating
JJl_y
vva_u
or
Operating
control
u_vv_lu
a DVD Player
using
the remote
Drc, se \lT_/f'_\lf'_
\ Ot_\t_l_f_',
......
/.
[Green Button]
or _
during
Release to resume
_J_L,_.
Press TV/VTR.
an MDP using
ivJ
Tn
t rn C)n/d3ff
..........................
the remote
control
To turn On/Off
Press VTR/DVD (POWER).
[Green Button]
To play
Press I_-.
To stop
Press m.
To pause
Press II. Press again to
resume normal playback.
equipment
Set the VTR1/2/3/DVD/MDP
To search a chapter
To change channels
To search the picture
forward or backward
In some rare cases, you may not be able to operate your
non-Sony video equipment with the supplied remote
control. In this case, please use the equip_zeHt 's owlz
remote control.
Press I_ or _
during
playback. Release to resume
normal playback.
[Green Button]
Press the 0 - 9 buttons.
751
"'_"
To search the picture
forward or backward
To select a channel
numbers
Manufacturer
DVD
Operating
a VCR using the remote
control
To turn On/Off
Press VTR/DVD (POWER).
directly
To display the menu
(Set up)
buttons
tables.
Press MENU.
33
,t,
:5'.
4
9:"
Operating
Setting
Code
the
a Cable
Box or DBS Receiver
Manufacturer
Manufacturer's
(DBS
code
numbers
Manufacturer
You can program the supplied remote
to operate a cable box or DBS receiver.
control
Press CODE SET, DBS/CABLE (FUNCTION),
the 0-9 buttons to enter the manufacturer's
code number (see the following chart), then
press ENTER.
For example,
to operate
a Sony
CODESEI
Jr
O_E
Manufacturer
(cable
numbers
Manufacturer
Code
Hamlin/Regal
222, 223,224,
Jerrold/G.
201,202,203,
204,205,
206,207, 208, 218
I.
225,226
Oak
227,228,229
Panasonic
219,220,
Pioneer
Scientific A.t!anta
221
801 (preset code for
remote control)
General Electric
802
RCA/PROSCAN
802
To operate
214, 215
If the
•
the
TV
216, 217
Zenith
212,213
remote
control
instructions
doesn't
the
that come
work
First, try repeating
the set up procedures
using
the other codes listed for your
equipment.
Tips
"_"
•
If more than o_le code number is listed, try entering
them one by one until you come to the correct code for
your equipment.
•
If you enter a new code number, the code number you
previously entered at that setting is erased.
209, 2!0, 2! !
Tocom
34
Sony
Refer to the operating
with theequipment.
box)
In some rare cases, you may not be able to operate
ttour equipment with the supplied remote control. In
this case, use the equipment's own remote control
unit.
•
Whenever you remove the batteries -- to replace
them, for exampleif too much time is taken, the
code numbers may revert to the factory setting and
must be reset.
number
For more details
on operating
cable box or DBS receiver
ENTER
code
Code
Press TV (FUNCTION).
Then use the TV
control buttons to control the TV.
DBS receiver:
FUNCTION
•
receiver)
III
N Troubleshooting
Troubleshooting
Dark, poor or no picture (screen lit), good
sound
No picture (screen not lit), no sound
•
• Make sure the power cord is plugged in.
* Operate with the buiiuns on the TV and the
remote control.
•
Check to see if the TV/VIDEO setting is
correct: when watching TV, set to TV, and
when watching video tapes, set to VIDEO 1.2.
3or4.
Try another channel. It could be station
trouble.
•
Perform AUTO SET UP again using the SET
UP button to return to the factory preset
condition. (see "To perform AUTO SET UP
again" on page 15)
Remote control does not operate
Batteries could be weak. Replace the
batteries.
Press TV (FUNCTION) when operating your
TV.
Make sure the TV's power cord is connected
securely to the wall outlet.
Locate the TV at least 3-4 feet away from
fluorescent lights.
Check the S-Link connection. (see "Using the
S-Link function" on page 11)
Check the polarity of the batteries.
Adjust PICTURE in the VIDEO menu.
(see "PICTURE" on page 23)
P,...,I;,
._,1.
/-_UjUOL
•
•
•
Cannot receive upper channels (UHF) when
using an antenna
• Make sure CABLE is OFF in the SET UP
menu. (see "CHANNEL SET UP" on page 26)
• Use AUTO PROGRAM to add receivable
channels that are not presently in TV memory.
(see "CHANNEL SET UP" on page 26)
No color
Dr"}lf"*.UT$.lr'_'€",
UI
H_.ll
i
i
i _IL_O0
:_
II I
_I.A
LI It:_
I IIr-.,r--/"_
V IU
Ct_J
....
11 I(;_I
IU,
(see "BRIGHTNESS" on page 23)
Check antenna!cable connections.
Perform AUTO SET UP again using the SET
I _Pbutton to ret..rn to the factory preset
condition. (see "To perform AUTO SET UP
again" on page 15)
When VIDEO LABEL is set to WEB, the
screen will darken, creating an ideal picture for
WebTV viewing. (see "VIDEO LABEL" on page
28)
Adjuo_. uJe _,_Lv_
vJ_Lw
Jli_liU.
•
Perform AUTO SET UP again using the SET
UP button to return to the factory preset
condition. (see "To perform AUTO SET UP
again" on page 15)
Only snow and noise appear on the screen
Good picture, no sound
Press MUTING so that "MUTING" disappears
from the screen. (see "MUTING" on page 16)
• Check the MTS setting in the AUDIO menu.
(see "MTS" on page 24)
• Make sure SPEAKER is set to ON in the
AUDIO menu. (see "SPEAKER" on page 24)
•
Jii _l_
"COLOR" on page 23)
Black. and white programs cannot be seen in
color.
•
•
•
Perform AUTO SET UP again using the SET
UP button to return to the factory preset
condition. (see "To perform AUTO SET UP
again" on page 15)
•
Check the CABLE setting in the SET UP
menu. (see "CHANNEL SET UP" on page 26)
Checkthe antenna/cable connections.
Make sure the channel is broadcasting
programs.
Press ANT to change the input mode.
(see "ANT" on page 17)
Dotted lines or stripes
• Adjust the antenna.
Move the TV away from noise sources such as
cars, neon signs, or hair-dryers.
35
,,z
$:
4,,
Troubleshooting
(continued)
TV is fixed to one channel
•
•
Cannot receive
cable TV
Try turning CHANNEL FIX off.
(see "CHANNEL SET UP" on page 26)
images
Use a highly directional outdoor antenna or a
cable (when the problem is caused by
reflections from nearby mountains or tall
buildings).
Cannot
•
operate
If the item you want to choose appears
you cannot select it. Press TV/VIDEO
correctly.
The electronic
properly
•
console
(KV-35XBR88
doors
in gray,
Make sure the AUTO ACCESS
ON.
switch is set to
Remove any dirt or dust from the ultrasonic
sensor.
•
The clothes you are wearing may be absorbing
the ultrasonic waves emitted by the sensor.
Try passing a different type of surface before
the sensor.
when
using
a
when using the S-Link function
•
Make sure the TV's power cord is connected
securely to the wall outlet.
•
Check the S-Link connection.
S-Link function" on page 11)
do not operate
only)
volume
Increase the volume at the cable box. Then
press TV (FUNCTION) and adjust the TV's
volume.
TV malfunctions
menu
using
Use AUTO PROGRAM to add receivable
channels that are not presently in TV memory.
(see "CHANNEL SET UP" on page 26)
Cannot gain enough
cable box
or ghosts
when
Make sure CABLE is ON in the SET UP menu.
(see "CHANNEL SET UP" on page 26)
Use AUTO PROGRAM to add receivable
channels that are not presently in the TV
memory. (see "CHANNEL SET UP" on page
26)
Double
any channels
(see "Using the
CHANNEL
INDEX does not display
available channels
•
•
MONITOR OUT win not record both images in
PiI-' or P&P. Only the main picture will be
recorded.
all
Make sure CABLE is ON in the SET UP menu.
(see "CHANNEL SET UP" on page 26)
Use AUTO PROGRAM to add receivable
channels that are not presently in the TV
memory. (see "CHANNEL SET UP" on page
26)
FAVORITE
choices
CHANNEL
does not display
your
Verify that MODE is set to MANUAL in the
FAVORITE CHANNEL menu. (see "Setting
FAVORITE CHANNEL manually" on page 28)
36
The CUSTOMIZED MENU does not appear
when you press MENU
• Verify CUSTOMIZE is set to ON in the
CUSTOMIZED MENU window. (see "Creating
or changing a CUSTOMIZED MENU" on page
31)
• If no items are selected in the CUSTOMIZED
MENU, CUSTOMIZE is set to OFF
automatically. (see "Creating and changing a
CUSTOMIZED MENU" on page 31)
Some video sources do not appear when you
press TV/VlDEO
Ensure that VIDEO LABEL is not set to SKIP.
(see "VIDEO LABEL" on page 27)
Recording through MONITOR OUT does not
function properly when recording in PIP or
P&P mode
•
If you are recording the main picture and you
switch to the sound of the sub picture using the
AUDIO button, the main picture will be
recorded with sound from the other program.
To reset the TV to factory settings
• First, turn the TV on. Then, while pressing the
RESET button on the remote control, press the
POWER button on the TV. The TV will turn
itself off, then back on. When the TV turns on
again, all settings will be reset, and the EASY
SETUP GUIDE will appear.
I
Specifications
KV-
Power
requirements
34XBR48C
35XBR48
35XBR88
37XBR48M
220 V, 50/60 Hz
120 V, 60 Hz
120 V, 60 Hz
120 V, 6O Hz
3
3
3
3
3
2
2
o
o
9
4
4
4
4
1
1
1
1
1
1
1
1
1
1
1
1
32XBR48
120 V, 60
Number of inputs/outputs
Video"
S Video 2_
Audio 3)
Audio out 4)
Monitor
out"
TV out _)
1
S-Link
Y, B-Y, R-Y s)
1
Speaker output (W)
Power consumption
(W)
In use (Max.)
In standby
Dimensions (W/H/D)
(mm)
(in.)
15Wx2
_
15Wx2
15Wx2
15Wx2
15Wx2
195W
!5W
195W
198W
198W
198W
!7W
15W
_6W
15W
864 x 656 x
864 x 656 x
606 mm
936 x 706.5 x
629 mm
936 x 1201.5 x
699.5 mm
936 x 706.5 x
629 mm
606 mm
34 %6 x 25 7/8
Mass
(kg)
(Ibs)
_
1 Vp-p,
2,
Y:
C:
72 kg
158 Ibs 12 oz
75 ohms
unbalanced,
sync
3_
500 mVrms
kilohms
4_
More
than
(100%
408
modulation),
mVrms
setting
(variable)
More than 408 mVrms
Impedance:
50 kilohms
at the maximum
(fix)
negative
Impedance:
72 kg
!581bs 12oz
36%x27ri_
x 24 25/3_in.
90 kg
1981bs 7oz
36 ;/8 x 47 _/_
36%x27%
x 27 9/_ in.
x 24 2s/a_in.
125 kg
276 Ibs 0 oz
90 kg
198 Ibs 7 oz
5, Y: 1.0 Vp-p, 75 ohms, sync negative
B-Y: 0.7 Vp-p, 75 ohms
R-Y: 0.7 Vp-p, 75 ohms
negative
1 Vp-p, 75 ohms unbalanced,
sync
0.286 Vp-E (Burst signal),
75 ohms
34 7,_x25%
x 23 % {n.
23 7/8in.
47
volume
Visible
Screen size
32-inch picture measured diagonally
(KV-32XBR48, 34XBR48C)
(KV-35XBR48,
35XBR88, 37XBR48M)
34-inch picture measured
diagonally
(KV-32XBR48, 34XBR48C)
37-inch picture measured diagonally
(KV-35XBR48, 35XBR88, 37XBR48M)
Supplied accessories
Remote control RM-Y144 (1)
Batteries (2) size AA (R6)
Optional accessories
Connecting
cables
RK-74A, RK-G69HG, VMC-10HG,
VMC-720M, VMC-810S/820S,
YC-15V/30V
TV Stand SU-32XBR48
KV-32XBR48, 34XBR48C
TV qtand gl ]-2_XRR48
KV-35XBR48, 37XBR48C
U/V mixer EAC-66
Design
change
[
Television
system
American TV standard
Channel coverage
VHF: 2-13/UHF:
14 -69/CATV:
1 - 125
Picture tube
Hi Black Trinitron ®tube
Antenna
75 ohm external terminal for VHF/UHF
and specifications
without
notice.
SRS (e)'
(SOUND
are subject
RETRIEVAL
to
SYSTEM)
[
The SRS (O) :_(SOUND RETRIEVAL SYSTEM) is
manufactured
by Sony Corporation
under license
from SRS Labs, Inc. It is covered by U.S. Patent No.
4,748,669. Other
U.S. and foreign
patents
pending.
The word 'SRS' and the SRS symbol (O) are
registered trademarks
of SRS Labs, Inc.
37
'4'.
/
!2: ¸
19
Index
A
AC power cord ...................................................
2
AC outlets .........................................................
!3
Adjusting your SET UP ................................... 22
ANT ...................................................................
17
Antenna cable .....................................................
3
Antenna connector ............................................
2
AUDIO button .................................................
18
AUDIO menu operations
d' .......................... 24
AUDIO OUT ................................................
24
BALANCE ....................................................
24
BASS ..............................................................
24
EFFECT .........................................................
24
MTS ...............................................................
24
SPEAKER ......................................................
24
TREBLE .........................................................
24
AUDIO OUT .....................................................
24
Audio/Video
cable ............................................
2
AUTO PROGRAM ..........................................
26
AUTO SET UP ..................................................
15
AUX Hookup ...............................................
3, 17
B
BALANCE ........................................................
24
BASS ..................................................................
24
Battery installation
..........................................
14
BRIGHTNESS ...................................................
23
C
CABLE ...............................................................
Cable box ........................................................
operation .......................................................
Caption Vision .................................................
38
26
3, 5
34
17
CATV cable .........................................................
3
Coaxial cable ...............................................
2, 4, 5
Console box operation .................................... 13
CH +/-. .............................................................
16
CHANNEL BLOCK ........................................
25
CHANNEL CAPTION .................................... 26
CHANNEL ERASE/ADD
.............................. 26
CHANNEL FIX ................................................
26
CHANNEL INDEX .........................................
20
CHANNEL SET UP .........................................
26
AUTO PROGRAM ...................................... 26
CABLE ..........................................................
26
CHANNEL CAPTION ............................... 26
CHANNEL ERASE/ADD
......................... 26
CHANNEL FIX ............................................
26
COLOR ..............................................................
23
COLOR CORRECTION .................................. 23
CONTROL S feature .......................................
12
Connecting TV to
antenna ...........................................................
2
audio system ..................................................
7
AV receiver .....................................................
7
cable .................................................................
3
cable box and cable .............................
3
camcorder .....................................................
10
DBS receiver ...................................................
6
DBS receiver and VCR .................................. 6
DVD Player ....................................................
9
two VCRs ........................................................
8
VCR .................................................................
4
CURRENT TIME SET ...................................... 25
CUSTOMIZED
MENU
...................................
31
D
DAYLIGHT SAVING ...................................... 25
DBS receiver operation ................................... 34
DVD Player
connection ......................................................
9
operation .......................................................
33
E
EASY SETUP GUIDE ......................................
15
Editing using MONITOR OUT ........................ 8
EFFECT .............................................................
24
F, G
Factory settings ..........................................
23,
FAVORITE CHANNEL
Setting ...........................................................
Selecting ........................................................
FREEZE button ..........................................
16,
H,I
Hook Ups ............................................................
HUE ...................................................................
J,K
Joystick ..............................................................
JUMP button .....................................................
L
LANGUAGE selection .............................. 15,
Learning menus ...............................................
M,N
MDP operation .................................................
Menu selection .................................................
24
28
29
19
2
23
14
16
27
22
33
22
MODE
S
DYNAMIC
...................................................
23 SAP ....................................................................
MOVIE..........................................................
23 S-Link cable ........................................................
_PC)RTg ...........................
STANDARD .................................................
IVIK.YI_£
_ K_YI\ K.YU
1
................................................
MONO ...............................................................
MTS
MONO ..........................................................
SAP ................................................................
STEREO ........................................................
IVIU
I ll_',J
UULLUII
93
23
8
24
24
24
24
..............................................
16
O
On Line Help ....................................................
ON/OFF TIMER ..............................................
P,Q
PICTURE ...........................................................
Picture and Picture (P&P) ...............................
Picture-in-Picture
(PIP) ...................................
P1P/P&P operations
AUDIO ..........................................................
CH+/-. ..........................................................
CHANNEL INDEX .....................................
FREEZE .........................................................
POSITION ....................................................
SWAP ............................................................
TV/VIDEO ...................................................
14
25
23
!8
18
18
19
19
19
19
19
18
R
Remote control .................................................
16
Function buttons ................................... 16, 17
Graphic Illustration ................. (inside cover)
CHANNEL BLOCK ....................................
CURRENT TIME SET .................................
DAYLIGHT SAVING .................................
C)N!O3FF T!MFR
.............................
TREBLE .............................................................
24
2
£-1 .ink connech_r ..............................................
]1
S-Link function .................................................
11
v ,uCu ,_,_u,,: ......................................................
2
Safety ...................................................................
1
Select buttons ...................................................
14
Adjusting sliders .........................................
14
SET UP menu operations
_
................. 26, 27
CHANNEL SET UP .................................... 26
,- u o I w,w,Lnt., ,v,n,, u ............................... 27
a xr
t., T_ t
F,'_
v ORI -t-ti c CHAI,_I,_EL
.............................. 27
LANGUAGE ................................................
27
TILT CORRECTION ................................... 27
VIDEO LABEL .............................................
27
Setting Up the TV Automatically
.................. 15
SHARPNESS ....................................................
23
DIKI!"...................................................................
27
SLEEP button ...................................................
17
Sliders ................................................................
14
SPEAKER
ON .................................................................
24
OFF ................................................................
24
Specifications ....................................................
37
Splitter .................................................................
5
SRS .....................................................................
24
SWAP button ....................................................
19
SYSTEM OFF ....................................................
17
T, U
TILT CORRECTION
.......................................
TIMER menu operations
Q .........................
I I\II_
i I K_YIN
L
......................................................
Troubleshooting
.........................................
35,
TV (FUNCTION) button .................................
TV POWER button ..........................................
TV/VIDEO button ...........................................
25
25
25
25
24
ZO
36
16
16
17
V, W
VCR ..............................................................
4, 5, 8
VCR manufacturer
code numbers ................ 32
VCR operation ..................................................
33
Video Equipment Operation .......................... 32
VIDEO LABEL .................................................
27
VIDEO menu operations
_
........................ 23
BRIGHTNESS ..............................................
23
COLOR .........................................................
23
COLOR CORRECTION .............................. 23
HUE ...............................................................
23
MODE ...........................................................
23
PICTURE ......................................................
23
SHARPNESS ................................................
23
TRINITONE .................................................
23
VOL +/-. ...........................................................
16
VTR ....................................................................
32
X
XDS ....................................................................
Y, Z
Y/B-Y/R-Y
27
25
"2
.........................................................
17
9
39
_0
O.
il
i,i-
i _,
c