1
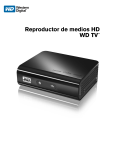
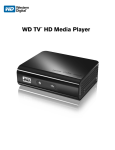
Digital HD Satellite Receiver
Sat HD 100
Ref : 441827
No contract, no subscription,
just a one-off payment
A wide range of digital channels
+ HD programmes - all for free
This unit comes with a 2 year
manufacturer warranty
MET844
CAUTION
We thank you for purchasing a Metronic receiver, and we are sure that it will give you full
satisfaction. Prior to installing or using the receiver, please read carefully the following safety
advice.
The receiver may become warm when in use. It is therefore important to install it in a well
ventilated area. Do not put anything over the top cover, in order to ensure proper ventilation.
The lifetime of your device depends on these conditions. The device may not be exposed
to dripping or splashing and no object filled with liquid, such as vases, must be put on the
device. Installation in premises which are confined or subject to temperature or dampness
changes (sheds, attics, cellars, tiny rooms, dry risers etc.) may cause an overheating of the
device or a premature ageing resulting in failures that are not covered by the guarantee.
Never open the receiver even when it is not connected, because it contains electrical
components which can be dangerous for you. In general, electrical appliances are not
earthed, so you can get electrical discharges (which are not risky), while connecting. Our
advice is to connect the equipment after all the connections have been made.
To clean the receiver or its remote control, do not use any solvent or detergent. Use only a
dry cloth or slightly dampen it with water for the front panel. Always carry out this operation
after having disconnected the receiver from the mains.
For your own safety:
Never open the device. It contains no item that can be serviced by the user. If you open it,
make some changes on circuits or connections of non-compliant equipment it will cancel the
guarantee. If necessary, please return the receiver, for service, only to the point of sale.
In order to reduce the risks of fire, electrocution or damage, do not expose the device to
dampness, bad weather, dust, sand, sun, cold or high temperature. You must use the device
between 0°C to 40°C; 32°F to 104°F. Place your receiver in a dry place, safe from dust. It is
not designed for outdoor use.
For safety reason, ensure that the mains plug is easily accessible.
The remote control needs two AAA 1.5V batteries. Check the polarity before fitting them into
the remote control. Do not throw your used batteries in the bin, take them to your local store
where special containers are provided to recycle them.
This symbol indicates that the
product must not be treated as
household waste. The harmful
substances possibly contained in
the equipment may have
negative consequences on the environment
and / or human health. At the end of its life,
bring any electronic equipment back to your
retailer or to a recycling centre.
3
4
TABLE OF CONTENTS
1
Quick start guide
page 06
2
Receiver description
page 07
3
Remote control description
page 08
4
Main Menu
page 09
5
Channels
page 09
6
Electronic Program Guide
page 11
7
Settings
page 11
8
Installation
page 13
9
System
page 14
10 Trouble Shooting
page 15
11 Error message
page 16
12 Technical specifications
page 17
5
1 - Quick start Guide
If you already have a satellite dish pointing towards the Astra satellite 28.2 E, this Quick Start
Guide will help you to install your Freesat receiver in a couple of minutes.
In case of difficulty, you can always return to the factory settings by following the instructions
in this manual (p14).
• Connect the HDMI lead (supplied) to both your
TV set and the Freesat receiver.
• Connect the cable that comes from the satellite dish to the input marked ANT at the rear of
the receiver.
• Plug in the power supply to the DC unit on the
back of the receiver and then to the mains.
• Insert the batteries into the remote control
ensuring the correct polarity.
• If the front LED is on, press the
key of the
remote control to switch the receiver on.
• The TV screen should display the screenshot
below (01), if this is not the case check that
your HDMI lead is connected (see the user
manual of the TV if necessary).
• For a standard Freesat installation press
the 6 arrow of the remote control to select
START SCAN. Press OK to go to the second
screen (02).
• You now have to enter your postcode.
• Press the appropriate keys to select the letter
or figure.
• Press the select key until the correct post code
has been entered then press OK to confirm.
(FOR A 6 DIGIT POSTCODE PLEASE
SELECT THE RIGHT ARROW KEY TO LEAVE
A SPACE AFTER THE FIRST 3 DIGITS).
• The receiver will start to scan the channels automatically – this will take approximately 2
minutes (03).
• When the installation of the channels is complete the first channel to be displayed will be
BBC 1.
01
6
02
03
2 - Receiver description
A Infrared receiver (detects the remote control infrared signal).
B LNB input to connect the input lead of the satellite.
C LNB output to connect another satellite receiver if necessary.
D Input/Output VCR scart-Connect to the VCR or DVD using a scart cable(not supplied).
E TV scart socket – Connects to the TV using a TV scart cable-note you will only view
programmes in standard definition (SD).
F HDMI output.
G SPDIF-Optical audio output.
H USB in.
I
Ethernet port for future use.
A
C
B
D
E
G
F
H
I
7
3 - Remote control description
1
2
Digital keys. In viewing mode, press these keys to change
channel by pressing the number of the channel you want to
watch. In the programming mode, these keys are used to enter
the digital values. These keys are also used to enter your
postcode.
ON / OFF. Allows switching on or switching off and putting the
receiver in standby.
TTX
10
2
9
15
13
18
3
MENU. Press this key to enter in the main menu or to leave the
main menu. Pressing MENU in a submenu allows to exit this
submenu and come back in the previous menu.
4
5VOL6. In viewing mode, press VOL key to adjust the
volume.
5
6CH5. In viewing mode, press these keys to change
channels.
6
OK. In programming mode, press OK to access to the submenu
related to the currently highlighted item.
5
7
EXIT. Press this key to exit all menus and come back in viewing
mode.
3
8
GUIDE. Give access to the Electronic Program Guide.
19
9
V.FORMAT. Press this key to change the format of the video on
the HDMI output.
7
10
«MUTE». A first press mutes the receiver. A second press
returns in normal mode.
8
11
FAV. To access your favorite channels.
12
12
INFO. Display information about the channel you are currently
watching.
13
A.RATIO. Allows to change the aspect ratio of the screen to
adjust the picture to your TV screen.
14
TV/Radio. To switch between TV mode and Radio mode.
15
PICTURE. Gives access to several settings for the picture (contrast, brightness,…)
16
AUDIO. Shows the list of available languages for the currently viewed channel.
17
BACK. To view the channel you previously watched.
18
Media-player keys. Press the FILE key to browse the content of the media connected to the USB
port. The usual keys PLAY, PAUSE etc have the same functions as for any VCR.
19
Arrows. To move in the menu and select the desired value when the info channel banner is
displayed, shows now and next programs.
8
1
11
14
FAV
4
BACK
17
6
GUIDE
16
SAT HD 100
4 - Main Menu
Press MENU key to display the Main Menu screen. Use the cursor keys 563 and 4 to
move through the menu, the OK button to choose your option.
You may carry out the following operation on the Main Menu:
• Channels
• EPG
• Settings
• Installation
• System
Entering some menus requires a password. The default setting is 0000.
5 - Channels
In the Channels menu, you may carry out the following
functions:
• Channel Edit
• FavChannel Edit
• File Menu
Channel Edit:
Channel Edit allows you to Lock/Unlock a highlighted
channel by using the red button.
Favourite Edit:
You may assign channels to edit favourite groups. Use
numeric keys to conduct the management:
• Select the favourite list.
• Sorting the list by different genres.
• Add channels to the favourite group.
Once a channel is added in a certain FAV list, you can
quickly access this channel by pressing the FAV key
and then the 34 arrow keys to select the desired list.
9
File Menu:
This menu supports multi-media function for your USB
memory storage.
After connecting the USB memory device to the receiver.
Wait and select a USB slot.
Note: Only USB 2.0 hard disks or USB 2.0 memory
sticks are supported. USB multi-cardreaders are not
supported. USB multi-cardreaders are not supported.
The media must be formatted in FTA / FAT32 system.
Select Device:
• Select the partition where the wanted files are located by cursor 65 keys.
• Select the file type categories by using the cursor
34 keys. The menu supports Video file (MPEG),
Audio files (MP3), and Photo files (JPEG) for
viewing or playing. You may select a specific file
type by categories to play, or select All List to display and view all files in the device.
File Management:
In this menu, you may browse your file information. If
you want to preview or play them, use the cursor 65
keys and OK to play the wanted file.
• Disk Usage bar shows the current capacity of your
disk storage device.
• Use the yellow key to return to the previous menu.
Video & Audio:
• You may use the cursor 34 keys and OK or the
playback buttons on the remote controller to play the selected files. Press the stop g button
to exit the menu.
Photo List Menu:
In this menu you may preview all the photos on your
USB stick. Use the cursor 34 keys and OK to select
the picture you want to view.
• Info button: to display a full screen picture. Use the
Exit button to return to the menu.
• CH+/- button: to turn the page.
• Green key: to display all the pictures in a slide
format. During the slide show, you may adjust the
timeout by pressing the yellow key.
10
View Photo:
• CH+/ CH-: Previous and next picture.
• Vol+/ Vol-: Zoom in and Zoom out.
• 5634: Scroll on the viewing area. The blue square
shows the current viewing frame
• Menu button: Return to previous menu.
6 - Electronic Program guide
Select EPG on the Main Menu or press the Guide button on the remote control to start the
Electronic Program guide. Select the genre you want to view details.
In the detail program guide information:
• Use the cursor keys to navigate through programs.
• Press the OK button to select the program.
• Press the red button to view timer reservations. If
•
•
•
•
you highlight a future program, you may use OK
button to reserve a program.
Use the yellow/blue button to switch to previous 24
hour / next 24 hour information.
Use FAV button to classify program genre.
Use the INFO to view extended program information.
Use List button Switch to highlight current viewing
program.
Timer List:
You may view and edit the timer you added after selecting Info Timer. Press OK to modify its details.
When a specific timer starts, the receiver will automatically tune to the channel. If you wish to cancel the timer,
press Exit key to stop a timer.
7 - Settings
In the Settings menu, you may conduct the following functions:
Parental Rate
Audio
Video
Time
OSD
•
•
•
•
•
11
Parental rate (GUIDANCE):
It allows you to prevent your children from viewing sensitive
channels. Once you set the parental rating for the particular
channel, the parental rating transmitted with the channel will
verify if the received rating is higher than the parental lock
rating. A pop-up message will show that the channel is locked.
To see the channel, you have to enter the password before
viewing the channel.
PLEASE NOTE THAT BROADCASTERS ARE NOT CURRENTLY SENDING THIS INFORMATION TO THE
RECEIVER, ONCE THIS INFORMATION IS TRANSMITTED THIS FUNCTION WILL BE ACTIVATED.
Audio:
The Audio menu allows you to setup the following format:
• Audio Language: You may choose between the languages preferred.
• Audio Output: Allows you to choose between PCM or
Dolby output to other devices.
• Audio preference: Allows you to choose between Mpeg
and Dolby as the preferred format for viewing.
• AUDIO description: Allows you to turn on or off the audio descriptor functionality which assists those with restricted sight to
explain the actions, scene changes, gestures and other visual
information.This function can only be used where a broadcaster
is transmitting the appropriate signal
Video:
The Video menu allows you to setup the following format:
• Video Format: You may choose between video resolutions
in progressive or interlaced format for video output.
• Screen Ratio: You may choose between 4:3 or 16:9 for
video output.
Note: The factory setting is Full Screen ; the 4:3 content will be stretched to fill the 16 :9 screen.This is
preferred by most users. If you want a non-distorted picture for 4:3 content, choose PillarBox, which will
add black pillars on left and right.
• Aspect Ratio: You may choose between 4:3 Pillar Box, Full Screen or Centre Cut Out as the aspect
ratio for video output.
• HDCP: You may choose to enable or disable HDCP control.
• Picture Setup: You may adjust Brightness, Contrast, Saturation, Hue, Sharpness, DNR (DN Reduction).
• SCART Setup: You may choose the output format for TV and VCR SCART.
Time :
The Local Time Setup menu allows you to setup the following
local time format:
• Time Zone: You may adjust the local time based on GMT.
• Time Format: 24HR or AM/PM.
• Summer Time: On/ Off
12
OSD:
The OSD Setting Menu allows you to adjust the features of
menus and I-Plate on the screen in the following options:
• Info Bar Timeout: The I-Plate (program information) is
•
•
•
•
•
•
•
•
shown every time the channel changes or after pressing
the information button. You may adjust its timeout period.
Menu Language: The language for the OSD menu.
Transparency: For adjusting the transparency of the OSD
menu or to disable the transparency.
Subtitle Enable: For enabling or disabling subtitles.
Subtitle Language: Language for subtitles.
Subtitle Aspect Ratio: For adjusting the subtitle displaying aspect ratio.
Hearing Impaired: Turn on to activate for those of hard of hearing.
Menu Timeout: Timeout interval for OSD menus.
Preference Language: To select a preferred language.
8 - Installation
In the Installation menu, you may carry out either Freesat
Tuning or Manual Tuning.
Freesat Tuning:
• In Freesat Tuning, postcode is required before
•
conducting scanning. Enter your post code by
either your RCU numeric keys or by selecting
the on-screen virtual keyboard by cursor keys, as
explained in the Quick Start Guide of this instruction
book.
Press OK to start Scan.
Manual Tuning:
You may scan a specific transponder in Manual
Tuning. You may edit a highlighted transponder. Upon
pressing OK button, a transponder menu gives you the
transponder lists to choose from, press Info button to
conduct editing.
Use the green button to start scanning.
13
9 - System
The System menu allows you to carry out the following
options:
• Password
• Information
• Set Defaults
Password:
Password Setting Menu allows you to change the
password for the receiver using the numeric keys.
• Enter the Current Password.
• Enter the New Password.
• Confirm the new password.
Note: The default password of this receiver is 0000.
Information:
The System Information menu shows the current H/W
version S/W version related to the receiver.
You may conduct a software uprade by using a USB
stick in this menu by selecting USB Upgrades or SSU
Upgrade which is for over-the-air software upgrade.
• Copy the software file to the root folder of a USB
•
•
stick (Only USB hard disks or USB sticks drives are
supported. NO USB multi-cardreaders)
Insert the USB stick into any of the two USB ports.
Select the Disk and the partition of the disk.
• Select the file from the disk and press OK.
14
• Wait until the reading of the file is completed and
when the message “Do you want to update?”
appears, select YES to perform software upgrade.
• Please wait until Programming Flash process
•
•
completed (do not switch off the power or remove
the USB device during this process).
Reset to default in the Set Defaults menu.
Remove the power cord from the set-top box, and
insert it again to reboot the receiver.
Set Defaults:
You may restore to system default settings in this menu.
If you select YES, the system will restore to factory
default and all current settings and data will be eliminated.
10 - Trouble Shooting
Cannot lock signal:
• Make sure your reception systems are correctly installed and connected correctly to the
receiver.
• Make sure the postcode is correctly entered.
• Make sure that the antenna setting in the menu is correct.
No video:
• Make sure that the product is powered on and in operation mode.
• Make sure that the AV cable is firmly connected to the TV.
• Make sure that the antenna cable is properly connected to the product.
• Make sure that the antenna setting in the menu is correct.
• Check the brightness level of the TV.
• Check if the channel is currently on air. Contact the broadcaster to ensure that the channel
is running.
No audio:
• Check the receiver and your TV’s volume are properly set and not in «mute» mode.
• Check the audio connectors are correctly and firmly connected
• Make sure the receiver is switched to the correct Audio mode in the menu.
15
Poor picture quality:
• Make sure your reception systems are correctly installed and connected correctly to the
receiver.
• Install the antenna in an obstacle-free place.
• Keep the power and the antenna cable for the satellite apart from each other.
• Check the signal levels and adjust your antenna if the level is too low. The signal level may
be affected by weather conditions.
• Change the satellite dish for a larger one as this will increase the signal levels received.
• Replace the LNB with a lower noise factor in cases where the noise factor is too high or
replace it with a new one in case it is damaged or out of order.
Remote control doesn’t work:
• The top end of the remote control should point directly towards the receiving part of the
product.
• Remove and reinsert the batteries in the remote control.
• Replace the batteries in the remote control for a new set.
11 - Error message
Message
Possible causes
Solutions
No Signal
The satellite dish is not
pointing at the satellite.
Adjust dish alignment.
Signal is too weak.
Increase the LNB voltage or
connect a signal amplifier.
Satellite dish is too small.
Change to a larger dish.
Wrong antenna setting.
Set the antenna correctly.
“Service is unavailable” or
“No Such Service”
The channel has a signal, but Confirm whether the
no audio or video is provided. channel is currently on air.
The channel has not been
deleted by broadcasting
company.
Remove the channel from
the channel list and check
for new transponder details.
The channel is for data
broadcasting.
The channel can only be
viewed with the appropriate
model that supports data
channels.
Service is scrambled
The channel is encrypted.
The channel can only be
viewed with the appropriate
model that supports data
channels.
Channel Locked
The channel is locked by the
user.
Input the default password
“0000” or the password set
previously.
16
12 - Technical specifications
1.
Mechanical
Size (W * H * D) mm
2.
265mm*40mm*162.5mm
Power
Power supply
12V 2A DC input
Power consumption
Max 24W (real power stand-by function)
3.
System
Standard/ Demodulator 1
DVB-S/ QPSK, DVB-S2/QPSK/8PSK
Input Frequency/ connector type
950~2150MHz/ F- Female
Loop through frequency / connector type
950~2150MHz/ F- Female
Main chip
Broadcom 7402C1
FLASH memory
16MB
RAM
DDR SDARM 256MB
4.
Video
Format
MPEG-4.10 (H.264) [email protected]
MPEG-4.10 (H.264) [email protected]
WMV9/VC-1 MP@HL
VC-1 AP@L3
VC-1 SP
HD MPEG-2 and SD MPEG-2
Picture Resolution
up to 1920x1080i30, 1920x1080i25,
1280x720p60, 1280x720p50
Output System
PAL/ NTSC
Video Signal/ Connector
TV SCART x1 (CVBS, RGB, S-VIDEO)
VCR SCART x1 (CVBS, S-VIDEO)
HDMI x1 (1.2)
5.
Audio
Formats
MPEG (Layer I &II)
Sample Rate
32/44.1/48 KHz
Audio Signal/ Connector
Digital Audio Output (Optical)
6.
LNB Control
Polarity control
14/ 19V DC, 500mA maximum, short circuit
protection
Band switching
0/ 22KHz
DiSEqC
N/A
17
7.
Service
USB 2.0
8.
1
Interface
Front panel
•
•
•
5 buttons : Standby, CH UP, CH
DOWN, VOL +, VOL IR sensor
1 LED indicator- Red
For service and support please contact your retailer from where the product was
purchased or alternatively e-mail : [email protected]
As per the EN 60065 norm requirements, please pay particular attention to the following safety guidelines.
Do not obstruct the air vents with objects such as newspapers, table cloths, curtains etc. Allow at least 5 cm around the
product to allow enough ventilation. Do not place the product on or near flamable objects such as lit candles. The device
may not be exposed to dripping or splashing and no object filled with liquid, such as vases, must be put on the device. If
the mains power supply is used as the on / off control, it must be easily accessible.
Please respect the environment and the law : do not throw batteries with the household rubbish ; take them back to your
retailer and dispose of them in the correct container.
18
Metronic Ltd
Park House,
15-23 Greenhill Crescent,
Watford,
Herts,
WD18 8PH.
UK
www.metronic.com
Product made in Asia.