1
Chapter 6 – Formatting Drives Connected via eSATA
Mac OS X Drive Formatting—RAID Sets
This section describes the process of formatting (initializing)
multiple hard drives (or volumes) connected to the Qio
enclosure’s eSATA ports using Disk Utility under Mac OS X
Version 10.5; the process is nearly identical under Mac OS X
Version 10.6. If you choose to do so, you may format your drives
using SoftRAID 3.1 or later; refer to that product’s documentation
for instructions.
Support Note: Depending on how you set it up, a drive
enclosure with a built-in hardware RAID controller like
Sonnet’s Fusion D400QR5 may not present its drives separately
to the operating system. For instance, if you chose RAID 0
or RAID 5 configuration, only one “drive” will appear in Disk
Utility. If this is the case, skip to “Mac OS X Drive Formatting—
Individual Drives” on the next page for drive formatting
instructions.
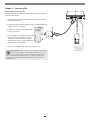
drives connected
to Qio
1.Turn on your computer. During startup, your computer
will display one or more messages referring to unreadable
volumes; click Initialize… to launch Disk Utility. After
Disk Utility launches, click the Initialize button in each
remaining message window.
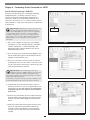
Figure 1
2. If it is not already open, launch Disk Utility (Figure 1). Note
that all attached drives appear in the information window,
regardless of being formatted or not.
3. Select one of the drives you want to format in a RAID set
by clicking the drive icon or the “name” of the drive. At the
bottom of the window, drive capacity, connection type, and
connection ID information are listed.
Support Notes: The remaining steps in this section
describe the creation of a RAID 0 (striped) set. If you intend
to create a RAID 1 (mirrored) or RAID 10 (striped/mirrored) set,
the procedure is similar to the remaining steps. Please refer to Disk
Utility help for further information.
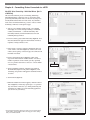
Figure 2
All hard drives connected to the Qio enclosure’s eSATA ports will
be described by Disk Utility as having an internal connection.
4. Click the RAID tab in the Disk Utility window, select all
the drives you will use to create your striped RAID set, and
drag them into the disk field (Figure 2). Be careful NOT to
accidentally drag in a drive you don’t want included in
the RAID set.
5. From the drop-down menus, select the volume format and
the RAID scheme (Striped RAID Set), and then type in the
name for your RAID volume (Figure 2). Click the Create
button.
6. When the Creating RAID window appears, click the Create
button; all of the selected drives will be formatted and
the RAID volume created (Figure 3). Close Disk Utility;
your drives are now ready for use and your installation is
complete.
Figure 3
7