1
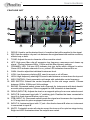
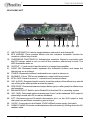
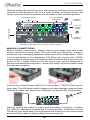
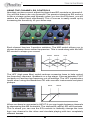
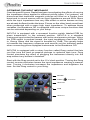
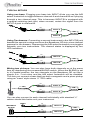
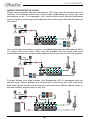
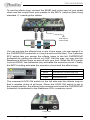
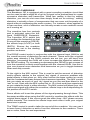
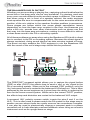
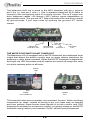
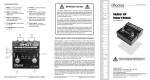
www.tonebone.com
®
True to the Music
BASS GUITAR OVERDRIVE
USER GUIDE
Radial Engineering Ltd.
1588 Kebet Way, Port Coquitlam BC V3C 5M5
Tel: 604-942-1001 • Fax: 604-942-1010
Email: [email protected]
Table of Contents
Page
Introduction .............................................................................................1
Overview .................................................................................................2
Features ..................................................................................................3
Making connections ................................................................................5
Channel EQ controls ...............................................................................6
Optimizing the input impedance ..............................................................7
Using one or two basses .........................................................................8
Effects loop .............................................................................................9
Overdrive .............................................................................................. 11
XLR direct output ..................................................................................12
Mute and tuner output ...........................................................................13
Headphone level and output .................................................................14
Specifications ........................................................................................14
Warranty.................................................................................. Back cover
INTRODUCTION
Thank you for purchasing the Bassbone OD, the ultimate power
‘command center’ for you bass setup with a built-in overdrive to add
character and wow-factor to your performance.
Right about now, you are surely ‘chomping at the bit’ with excitement
getting ready to plug in and get playing! Stop! Wait! You must first read
the manual! In this valuable piece of documentation, you will find all kinds
of helpful hints on how to use the Bassbone OD live, in the studio or for
practicing.
Once you have read it, if you find yourself confused about something
or it lacking detail, please take a minute to visit the Bassbone OD FAQ
page on the web site. This is where we post questions from users and
informational updates. If you still do not find what you are looking for,
send us an email at [email protected] and we will do our very best to
answer you in short order.
Now get ready to turn your old P-Bass into a Thunderbolt of Lightning!
Headphone Safety Warning: Very Loud Amplifier
As with all products capable of producing high Sound Pressure Levels (SPL)
users must be very careful to avoid the hearing damage that may occur from
prolonged exposure. This is particularly important as it applies to headphones.
Prolonged listening at high SPLs will eventually cause tinnitus and can lead
to partial or complete loss of hearing. Please be aware of the recommended
exposure limits within your legal jurisdiction and follow them very closely. The
user agrees that Radial Engineering Ltd. remains harmless from any health
effects resulting from the use of this product and the user clearly understands
that he or she is entirely responsible for the safe and proper use of this product.
Please consult the Radial Limited Warranty for further details.
1
True to the Music
®
OVERVIEW
The Bassbone OD is a powerful two channel instrument preamp that is
able to handle all types of instruments, depending on how it is configured.
Some examples include:
• Two channel preamp with one bass
• Selecting between two electric basses
• Switching between upright bass and electric bass
• Using it with a violin (piezo pickup) and an acoustic guitar (active pickup)
• Mixing two pickups from one instrument together
Using the Bassbone OD is fairly straight forward. Each channel is
equipped with a series of controls for volume, EQ and filtering so that
each instrument or pickup type can be optimized for tone or accentuated
for a specific need. One can select between channels using the A/B
footswitch or combine the two channels when using an instrument
that employs both magnetic and piezo transducers. What makes the
Bassbone OD truly unique is the way it is able to incorporate effects
pedals into the signal chain. These can be active all the time, bypassed
using the overdrive footswitch, or combined with the built-in overdrive to
create exciting new tones.
There are (8) eight audio connection jacks on the Bassbone OD; two
for the inputs, two for the effects loop, a dedicated stage amp output, a
tuner out that works with the mute footswitch, a balanced DI output for
the PA system and finally, a headphone out. These let you configure the
Bassbone OD to your specific application.
The connectors are coupled with various ‘set and forget’ recessed
switches and rotary controls strategically located on the side panels.
These are purposely made to be hard to access as once set, they rarely
need to be changed. A small screwdriver is used to adjust the rotary
controls and push in or out the recessed switches.
Radial Engineering Ltd.
2
Bassbone OD™
True to the Music
®
FEATURE SET
1
2
3
4
5
6
7
8
9
10
11
12
22
13
21
14
20
15
19
1.
2.
3.
4.
5.
6.
7.
8.
9.
10.
11.
12.
13.
14.
15.
16.
18
17
5
16
DRIVE: Used to set the desired level of overdrive that will be applied to the signal.
MIX: Sets the relative ‘dry-wet’ mix between the original bass tone and the overdrive,
effects loop or both.
TONE: Adjusts the sonic character of the overdrive circuit.
HPF: High pass filter rolls-off excessive low frequency resonance and cleans up
signal. Choose between 80Hz, 150Hz and flat (filter bypass) settings.
CHANNEL LED: Full size LED indicator lets you know which channel is active.
Green LED indicates channel-A is on, yellow LED indicates channel-B is on.
GAIN: Used to adjust the individual instrument level.
LOW: Low frequency shelving EQ used to accent or roll off bass.
HIGH: High frequency shelving EQ used to add shimmer or tone down the top end.
MID CONTROL: Semi parametric mid range with switchable center frequency.
MID SWITCH: Selects the center frequency for the mid range control. Choose
between 250Hz, 500Hz and 1kHz settings.
BLEND: Recessed switch mixes both channels for instruments with dual electric/
acoustic pickup systems. When engaged the A/B footswitch is deactivated.
DRAG (INPUT-B): Adjusts the load on a magnetic pickup for a more natural sound.
INPUT-B: Instrument input with ¼” switching jack. Enables the bass connected to
input-A to feed channel-B when not in use.
PZB (INPUT-A): Recessed switch boosts the signal and increases the impedance
to 10 meg-ohms for piezo equipped instruments.
INPUT-A: Instrument input with ¼” jack. Also feeds channel-B when no instrument
is connected to input-B.
MUTE: Footswitch mutes all outputs except the tuner out for quiet on-stage tuning.
Bright red LED illuminates when the outputs are muted.
Radial Engineering Ltd.
3
Bassbone OD™
True to the Music
®
FEATURE SET
23
24
25
26
27
28
29
30
31
17. A/B FOOTSWITCH: Used to toggle between channel-A and channel-B.
18. EFX ASSIGN: Three position switch sets the overdrive footswitch function for
overdrive, effects loop or both.
19. OVERDRIVE FOOTSWITCH: Activates the overdrive. Works in conjunction with
the EFX assign switch to turn on and off the overdrive, effects loop or both. The
LED illuminates when on.
20. OUTPUT: ¼” jack used to feed the artist’s on-stage bass amplifier.
21. LOOP ON: Recessed switch bypasses the footswitch function and keeps the
effects loop on at all times.
22. TUNER: Separately buffered, dedicated tuner output is always on.
23. PHONES: 3.5mm TRS mono headphone output with level control.
24. EFX LOOP: Send & receive ¼” connections for external effects.
25. 180° (LOOP): Recessed switch used to invert the polarity of the effects loop should
one of the guitar effect pedals reverse the phase.
26. PRE-POST: Routes the balanced output before (pre) or after (post) the effects loop
and overdrive.
27. BALANCED OUT: Built-in active Radial DI to feed the PA or recording system.
28. 180° (XLR): Recessed switch reverses pins-2 and 3 at the balanced XLR output to
phase align sound with PA or reduce feedback.
29. LIFT: Recessed ground lift switch disconnects pin-1 on the XLR output to help
eliminate hum and buzz caused by ground loops.
30. 15VDC: Connection for the Radial 15VDC/400mA power supply (included).
31. CABLE CLAMP: Prevents accidental power disconnection by locking down the AC
adapter cable.
Radial Engineering Ltd.
4
Bassbone OD™
True to the Music
®
Start by setting the controls on your bass amp so that they are flat and the
controls on the Bassbone OD to the ‘start’ position as shown below. Set
all the recessed function switches on the sides to their outward position.
Outward positions
7 o’clock position
(minimum)
Outward
position
Outward position
12 o’clock
position
(50%)
Outward
position
Set the controls as shown and check that all seven recessed
switches on the sides are set to their outward position.
MAKING CONNECTIONS
Before making connections, always ensure your stage amp and audio
system levels are turned down. This will avoid loud power-on or plug-in
transients from damaging sensitive components like loudspeakers. There
is no power switch on the Bassbone OD. When you connect the 15VDC
power supply it will spring to life and the LEDs will illuminate to let you know
power is on. A cable clamp next to the power jack can be employed to
prevent accidental disconnection. Loosen the clamp, pass the power cable
through and re-tighten.
Connect your electric bass to INPUT-A. Connect the ¼” OUTPUT jack to your
bass amp. The A/B select switch toggles your bass between channel-A and
channel-B. Make sure channel-A is selected, the green LED will illuminate.
Start by testing the audio to make sure everything is working. Increase
the GAIN on channel-A to about the 2 o’clock position. Slowly turn up the
volume on your bass amp. It is a good practice to test at a low volume level
should a faulty cable or other problem be encountered.
Radial Engineering Ltd.
5
Bassbone OD™
True to the Music
®
USING THE CHANNEL EQ CONTROLS
Now that you have sound, adjust the three-band EQ controls on channel-A.
You will find them to be very powerful! The passive-interactive EQ works a
lot like a vintage guitar amp whereby when you turn the EQ down, you will
reduce the output level significantly. This of course is easily made up by
increasing the sensitivity on your bass amp.
Each channel has two 3-position switches. The MID switch allows you to
choose between three center frequencies. This is used along with the MID
EQ control to shape your sound.
250Hz
500Hz
1kHz
The HPF (high pass filter) switch reduces excessive bass to help control
low frequency resonant feedback on a live stage. Choose between FLAT
(no bass cut) and two low frequency cut-off settings. The HPF is particulary
useful when using the Bassbone OD with acoustic instruments and piezo
pickups.
80Hz
150Hz
When one bass is connected in INPUT-A you can toggle between channels
by depressing the A/B footswitch. The channel-B yellow LED will illuminate.
This is where you can use the EQ controls to radically change the tone
from one channel to the other and simulate playing with two completely
different basses.
Radial Engineering Ltd.
6
Bassbone OD™
True to the Music
®
OPTIMIZING THE INPUT IMPEDANCE
Over the past 20 years, Radial has been investigating the effects of varying
the impedance when applied to different pickup types. For instance, we
discovered that traditional magnetic pickups as found on a Fender Jazz
bass tend to sound warmer with an input impedance around 220k Ohms
while the input impedance has very little effect on active basses as they
are already buffered inside the bass. Piezos on the other hand sound best
when presented with a super high input impedance. To address these
variables, the Bassbone OD is equipped with some unique functions that
can be activated depending on your setup.
INPUT-A is equipped with a recessed function switch labeled PZB for
piezo transducers. In the outward position, INPUT-A is a standard
instrument input suited for basses with active and passive pickups. When
the PZB switch is pushed inward, the input impedance rises from 220k
to 10meg Ohms and the signal is boosted by 10dB. This greatly helps
to broaden the frequency response and smooth out the transient peaks
when connecting piezo equipped instruments to the Bassbone OD.
INPUT-B is equipped with a rotary function called Drag control that lets
you fine tune the load on passive pickups to optimize their tone. Drag
control simulates the effect of plugging the instrument directly into the
amp without any buffers in between.
Start with the Drag control set to the 12 o’clock position. Turning the Drag
control counter-clockwise lowers the input impedance creating a warmer
tone. Turning it clockwise increases the impedance and brightens the
tone. Set the Drag control to your liking.
BLEND
DRAG
12 o’clock
INPUT-B
PZB
INPUT-A
Radial Engineering Ltd.
7
Bassbone OD™
True to the Music
®
TYPICAL SETUPS
Using one bass: Plugging your bass into INPUT-A lets you use the A/B
select footswitch to toggle between channel-A and channel-B as if playing
through a two channel amp. This is because INPUT-B is equipped with
a special switching jack that, when unused, routes the signal from the
INPUT-A jack to channel-B.
¼”
INPUT-A
A/B
SELECT
INPUT-B
Using Two basses: Connecting a second instrument to the INPUT-B jack
breaks this special routing and turns the Bassbone OD into a two channel
preamp for two basses. Depressing the A/B select footswitch now toggles
between your two instruments. The channel status is displayed by two
LED indicators.
¼”
¼
INPUT-A
A/B
SELECT
¼
¼”
INPUT-B
Mixing two pickups: You can also have both channels on at the same
time by depressing the recessed BLEND switch. When the BLEND is set
to it’s inward position, the two channels on the Bassbone OD act like a
simple 2-in, 1-out mixer and the A/B select footswitch will be disabled.
This lets you connect a bass that has both a magnetic and a piezo pickup
using an ‘insert’ style stereo ¼” TRS cable.
¼”
¼
INPUT-A
¼” TRS
¼
A/B
BLEND
¼
¼”
INPUT-B
You can also connect to each channel individually with standard ¼”
cables should this better suit your instrument.
PIEZO
¼”
INPUT-A
MAGNETIC
PICKUP
A/B
BLEND
¼”
INPUT-B
Radial Engineering Ltd.
8
Bassbone OD™
True to the Music
®
USING THE EFFECTS LOOP
When using pedals with the Bassbone OD, they can be positioned in a
number of locations within the signal path depending on what you are
attempting to do. For example, you could have some effects dedicated
to one bass by inserting them between the instrument and the Bassbone
OD input.
PA
SYSTEM
You could also introduce a series of pedals between the Bassbone OD’s
¼” output and your amp. This way the pedals can be used with both
instruments and your amp but the effects will not be sent to the PA system.
PA
SYSTEM
To take things one step further, the Bassbone OD is equipped with an
effects loop. When pedals are connected in the loop you can use them
with both instruments and choose to send the pre-effects signal (dry) or
the post-effect signal (wet) to the PA.
PA
SYSTEM
Radial Engineering Ltd.
9
Bassbone OD™
True to the Music
®
To use the effects loop, connect the SEND jack to the input of your pedal
chain and the output from your pedals to the RECV (receive) jack using
standard ¼” coaxial guitar cables.
180°
POLARITY
FOR LOOP
You can activate the effects loop in one of two ways; you can assign it to
the OVERDRIVE footswitch or it can be active all the time. The 3-position
EFX switch lets you assign the effects loops to the left OVERDRIVE
footswitch by setting the switch to LOOP. Set this way, you can turn the
Bassbone’s effects loops on and off with your foot. When the EFX switch
is set to DRIVE, the footswitch only activates the overdrive circuit. Finally,
the BOTH setting activates the overdrive circuit and the effects loop.
ASSIGN
FOOTSWITCH FUNCTION
BOTH
Activates the overdrive and loop
DRIVE
Activates the overdrive
LOOP
Activates the loop
The recessed LOOP ON switch on the left side sets the effects loop so
that it remains active at all times. When the LOOP ON switch is set to
the inward position, the effects loop remains active and the OVERDRIVE
footswitch is dedicated to the Bassbone OD’s overdrive circuit.
LOOP ON
Radial Engineering Ltd.
10
Bassbone OD™
True to the Music
®
USING THE OVERDRIVE
The Bassbone OD is equipped with a great sounding overdrive circuit that
can be used to add a slight bit of grit to a signal or be pushed hard to create
excessive distortion and harmonics. What few realize is that by adding
distortion, you can do a lot more than simply ‘freak out’ for soloing... adding
distortion is actually a form of compression that can even out the peaks of a
signal without overbearing the audio system. For instance, when applied to
in-ear monitors, a bit of distortion can actually create a more realistic sound
as if moving air.
The overdrive has four controls
and is activated using the lefthand OVERDRIVE footswitch.
The 3-position EFX switch lets
you assign the footswitch so that
it turns on the overdrive (DRIVE),
the effects loop (LOOP) or both
(BOTH). Ensure the overdrive
controls are set to the starting
position as shown.
The DRIVE control works in conjunction with the channel input GAIN to set
the overall amount of distortion for each channel. These work like a typical
guitar amp whereby if the GAIN controls are set low, you will have less
distortion. Increasing the GAIN will in turn increase the distortion relative to
the DRIVE setting. Try increasing or decreasing the DRIVE to get a sense of
how the overdrive controls work together with the channel GAIN. Use this to
give one channel more distortion and harmonics as you to toggle between
clean and dirty sounds.
To the right is the MIX control. This is used to set the amount of distortion
and/or effects relative to the original ‘dry’ signal. A common problem with
pedal effects is that when on, they often reduce the bass content so much
that the fundamental bass frequencies becomes inaudible. The MIX control
lets you retain as much of your ‘dry’ signal as you like and then blend in the
‘wet’ to suit. Start with the MIX control set to 12 o’clock and then experiment
as you rotate the knob in either direction. The MIX control will blend your ‘dry’
instrument signal with either the overdrive, effects loop or both depending on
the position of the EFX switch.
Some effects will invert the phase of the signal passing through them. This
becomes audible when using the MIX control to combine the effects with the
original bass signal. If this occurs push the effect loop -180° phase reverse
switch inwards. This inverts the effects loops and mixes it with your orignal
bass tone in phase.
The TONE control is used to tailor the sound of the overdrive. You can use it
to tame ‘buzzy’ distortion or add a ‘fuzz-like’ shimmer to the overdrive. There
are no rules, have fun and experiment.
Radial Engineering Ltd.
11
Bassbone OD™
True to the Music
®
THE BALANCED XLR DI OUTPUT
Whether you are recording or playing live, capturing a direct feed before the
sound hits a ‘live bass amp’ can be very beneficial. For starters, each and
every room sounds different as the acoustic space is different. This means
that when using a mic in front of a speaker cabinet, the audio engineer
must equalize the tone to compensate both for the room acoustics and the
position of the mic relative to the speaker. Another problem is resonance.
Some stages are hollow which can cause phase cancellation issues
depending on how the bass amp couples to the floor. And because you
have a live mic, sounds from other instruments such as drums can find
their way into the bass amp microphone, making it more difficult to deliver
a clean bass sound to the PA or recording system.
All of these problems go away when using the Bassbone OD’s built-in direct
box to connect to the PA or recording system. Because the direct signal is
always consistent, doing sound checks can take minutes instead of hours.
The direct out also enables the FOH engineer to mix the Bassbone OD
with the sound of the mic’d stage amp should this be preferred.
PA
SYSTEM
The PRE/POST recessed switch allows you to capture the signal before
(PRE) or after (POST) the effects loop to send a ‘wet’ or ‘dry’ signal to the
PA or recording system. When set to the outward ‘PRE’ position, only the
‘dry’ instrument sound is routed to the balanced XLR direct out. This is often
preferred by the sound engineer as it gives them the ability to optimize the
tone for the house sound system. When set to the inward ‘POST’ position,
the effects loop and distortion are routed to the balanced XLR output.
A recessed 180° polarity reverse switch inverts the pins-2 and 3 on the
XLR . This is often used to phase-match the PA system to the stage amp in
smaller venues where these two audio sources can sometimes compete.
It can also be used to electronically change a resonant peak to a phase
cancelled null to help alleviate resonant feedback when using an acoustic
instrument such as an upright bass on stage.
Radial Engineering Ltd.
12
Bassbone OD™
True to the Music
®
The balanced XLR out is wired to the AES standard with pin-1 ground,
pin-2 hot (+) and pin-3 cold (-). Use a standard balanced XLR cable to
connect to the microphone input of a mixing console. This lo-Z output can
drive balanced cables 100 meters (300’) without signal degradation or
appreciable noise. The ground LIFT helps eliminate hum and buzz caused
by ground loops. If you hear noise try pushing the ground LIFT switch
inward.
PRE/POST
FOR XLR OUT
BALANCED
XLR DI OUT
180°
POLARITY
GROUND
LIFT
THE MUTE FOOTSWITCH AND TUNER OUT
The Bassbone OD is equipped with a MUTE footswitch and dedicated tuner
output that allows the artist to quietly tune on stage without disturbing the
audience or other band members. When the MUTE footswitch is depressed,
the bright red LED illuminates and all outputs are turned off except the tuner
out which remains active at all times.
MUTE
LED
MUTE
FOOTSWITCH
TUNER
OUT
The footswitch also serves another very important function. When switching
instruments on stage, instead of having to put your bass amp on standby
and then perform super-human hand signals to let the monitor and FOH
engineers know that you are about to unplug, you simply stomp on the MUTE
footswitch and go about your business. Quick, efficient and professional.
Radial Engineering Ltd.
13
Bassbone OD™
True to the Music
®
THE HEADPHONE AMP
Last but not least, the Bassbone OD is equipped with a headphone
amplifier for practicing. The 3.5mm headphone jack outputs the same
signal as the ¼” amp output so you can use all of the controls, overdrive,
effects and listen to it all in complete privacy!
3.5mm HEADPHONE OUT
HEADPHONE
LEVEL
A standard 3.5 mm (1/8”) mini TRS connector sends the instrument signal
to both ears. Start by setting the recessed level control fully counterclockwise, plug in your ear buds and then slowly increase the level until
you are comfortable. Note: Exposure to high sound pressure levels
over an extended period can lead to hearing loss. You should consult
your local government health authority on acceptable levels to make
sure you are in compliance with local health regulations.
SPECIFICATIONS*
Audio circuit type: ................................................Discrete and integrated, class-A circuits
Frequency response: ...................................20Hz ~ 18kHz (tailored for bass instruments)
Total harmonic distortion:........................................................................ 0.05% @ -15dBu
Inter-modulation distortion: ....................................................................... 0.2% @ -20dBu
¼” Input impedance (1/4” input-A): ...................220k megΩ (PZB off) 10 megΩ (PZB on)
¼” Input impedance (1/4” input-B with Drag control): ............ Variable, 22kΩ ~ 1.8 megΩ
¼” Output:......................................................................................High-Z instrument-level
3.5mm output:.............................. Headphone-level, mono with dedicated volume control
XLR output:................................................. Balanced mic-level, AES standard (pin-2 hot)
Ground lift (XLR direct out): ...................................... Disconnects pin-1 at the XLR output
Power: .......................................................................... +15VDC/400mA adapter included
Construction: ............................................................... 14 gauge steel, powder-coat finish
Size:...............................................................................4.2” x 8” x 2” (107 x 203 x 48mm)
Weight: .......................................................................................................2.55lb (1.13kg)
Shipping Size:...............................................................5”x2.75”x10.75” (127x70x273mm)
Shipping Weight: ..........................................................................................2.8lb (1.27kg)
Conditions:.......................................For use in dry locations only between 5°C and 40°C
Warranty: ..................................................................................Radial 3-year, transferable
*Specifications are subject to change without notice.
Radial Engineering Ltd.
14
Bassbone OD™
THREE YEAR TRANSFERABLE LIMITED WARRANTY
RADIAL ENGINEERING LTD. (“Radial”) warrants this product to be free from defects in material and workmanship and will remedy any such defects free of charge according to the terms
of this warranty. Radial will repair or replace (at its option) any defective component(s) of this
product (excluding finish and wear and tear on components under normal use) for a period of
three (3) years from the original date of purchase. In the event that a particular product is no
longer available, Radial reserves the right to replace the product with a similar product of equal
or greater value. In the unlikely event that a defect is uncovered, please call 604-942-1001 or
email: [email protected] to obtain a RA number (Return Authorization number) before
the 3 year warranty period expires. The product must be returned prepaid in the original shipping container (or equivalent) to Radial or to an authorized Radial repair center and you must
assume the risk of loss or damage. A copy of the original invoice showing date of purchase and
the dealer name must accompany any request for work to be performed under this limited and
transferable warranty. This warranty shall not apply if the product has been damaged due to
abuse, misuse, misapplication, accident or as a result of service or modification by any other
than an authorized Radial repair center.
THERE ARE NO EXPRESSED WARRANTIES OTHER THAN THOSE ON THE FACE HEREOF AND DESCRIBED ABOVE. NO WARRANTIES WHETHER EXPRESSED OR IMPLIED,
INCLUDING BUT NOT LIMITED TO, ANY IMPLIED WARRANTIES OF MERCHANTABILITY
OR FITNESS FOR A PARTICULAR PURPOSE SHALL EXTEND BEYOND THE RESPECTIVE WARRANTY PERIOD DESCRIBED ABOVE OF THREE YEARS. RADIAL SHALL NOT
BE RESPONSIBLE OR LIABLE FOR ANY SPECIAL, INCIDENTAL OR CONSEQUENTIAL
DAMAGES OR LOSS ARISING FROM THE USE OF THIS PRODUCT. THIS WARRANTY
GIVES YOU SPECIFIC LEGAL RIGHTS, AND YOU MAY ALSO HAVE OTHER RIGHTS,
WHICH MAY VARY DEPENDING ON WHERE YOU LIVE AND WHERE THE PRODUCT
WAS PURCHASED.
To meet the requirements of California Proposition 65, it is our responsibility to inform you of the following:
WARNING: This product contains chemicals known to the State of California to cause
cancer, birth defects or other reproductive harm.
Please take proper care when handling and consult local government regulations before discarding.
®
www.tonebone.com
Radial Engineering Ltd.
1588 Kebet Way, Port Coquitlam BC V3C 5M5
tel: 604-942-1001 • fax: 604-942-1010
[email protected] • www.radialeng.com
Radial Bassbone OD user guide - Part #: R870 1053 00
Specifications and appearance are subject to change without notice.