1
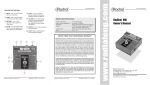
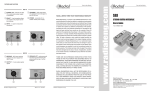
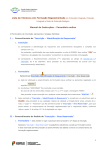
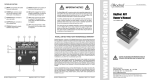
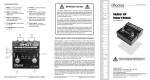
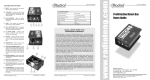
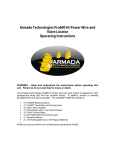
1
2
3
INPUT
Balanced low-Z XLR input jack,
+4dB line-level, 600-ohm. The
XLR female connector is wired
with Pin 2 hot following the AES
standard.
GROUND LIFT
Disconnects pin 1 at the XLR
input and interrupts the ground
path between the recorder and
the ProRMP 1⁄4” output. The
ProRMP must be connected to
a properly grounded amp to use
the LIFT switch.
BOOKEND DESIGN
14 gauge steel outer shell
creates protected zone around
connectors and switches.
4
I-BEAM CONSTRUCTION
Welded internal enclosure features
ultra ridgid I-beam construction to
protect the PC board.
IMPORTANT NOTICE!
OUTPUT
Hi-Z 1⁄4” output connects to guitar
amp or effect pedal input. This
output provides the primary
ground path for the ProRMP. This
output should be connected to a
properly grounded amplifier.
The Radial ProRMP is a passive re-amper specifically designed for use with amplifiers with proper electrical safety grounds approved by nationally recognized electrical authorities such as UL in the United States, CSA in Canada and other similar
bodies in countries around the world.
6
LEVEL
The output LEVEL control sets
the level going to the guitar
amplifier. This recessed control is
adjusted using a guitar pick as a
screwdriver.
This means that you are completely responsible to ensure the safe and proper use
of the ProRMP and to clearly understand that using it confirms you have taken full
responsibility. If you are not 100% sure of your actions, please consult a qualified
technician for advice before using this device or connecting any of your equipment
to it.
7
FULL-BOTTOM NO-SLIP PAD
This provides mechanical isolation
to reduce slipping and electrical
isolation from amplifier frames
and handles.
LIMITED THREE YEAR TRANSFERABLE WARRANTY
5
It is further understood that due to the unpredictable nature of connecting any
number of different amplifiers and pedals together, using the ProRMP can pose a
potential for electric shock, and as such, the user is completely responsible for any
and all consequences as these are beyond our control.
Radial Engineering Ltd. (“Radial”) warrants this product to be free from defects in material and
workmanship and will remedy any such defects free of charge according to the terms of this
warranty. Radial Engineering will repair or replace at its option any defective component(s)
of this product, excluding the finish, the footswitch (footswitch is warranted for 90 days)
and wear and tear from normal use, for a period of three (3) years from the original date of
purchase. In the event that a particular product is no longer available, Radial Engineering
reserves the right to replace the product with a similar product of equal or greater value. To
make a request or claim under this limited warranty, the product must be returned prepaid
in the original shipping container (or equivalent) to Radial Engineering or to an authorized
repair centre and you must assume the risk of loss or damage. A copy of the original invoice
showing date of purchase and the dealer name must accompany any request for work to
be performed under this limited warranty. This limited warranty shall not apply if the product
has been damaged due to abuse, misuse, misapplication, accident or as a result of service
or modification by any other than an authorized repair centre.
THERE ARE NO EXPRESSED WARRANTIES OTHER THAN THOSE ON THE FACE
HEREOF AND DESCRIBED ABOVE. NO WARRANTIES, WHETHER EXPRESSED
OR IMPLIED, INCLUDING BUT NOT LIMITED TO, ANY IMPLIED WARRANTIES OF
MERCHANTABILITY OR FITNESS FOR A PARTICULAR PURPOSE, SHALL EXTEND
BEYOND THE RESPECTIVE WARRANTY PERIOD DESCRIBED ABOVE OF THREE
YEARS.
1
2
Radial Engineering
3
4
5
6
7
ProRMP User Guide
RADIAL ENGINEERING SHALL NOT BE RESPONSIBLE OR LIABLE FOR ANY SPECIAL,
INCIDENTAL OR CONSEQUENTIAL DAMAGES OR LOSS ARISING FROM THE USE
OF THIS PRODUCT. THIS WARRANTY GIVES YOU SPECIFIC LEGAL RIGHTS, AND
YOU MAY ALSO HAVE OTHER RIGHTS, WHICH MAY VARY DEPENDING ON WHERE
YOU LIVE.
Radial Engineering
ProRMP User Guide
www.radialeng.com
True to the Music
FEATURES AND FUNCTIONS
True to the Music
ProRMP Re-amper
Owner’s Manual
CAUTION: PLEASE READ THE IMPORTANT NOTICE ON
THE BACK COVER BEFORE USING THE ProRMP
Radial Engineering
1638 Kebet Way, Port Coquitlam BC V3C 5W9
Tel: 604-942-1001 Fax: 604-942-1010
email: [email protected]
Radial ProRMP users guide v1.0 - Part #: R870 1180 00
Subject to change without notice
CONGRATULATIONS
on your purchase of the Radial ProRMP. Radial products are easy to use and
this short manual contains all the information you need to start using your
ProRMP right away. For more information on the ProRMP, and other Radial
products, visit our website www.radialeng.com.
STEP 1: Record a dry track
For re-amping, its important the source track be as clean and natural sounding
as possible. Start by recording the dry track using a high quality direct box
such as the Radial Pro48 or ProDI. A direct box allows you to to record the
direct signal before its colored by the effects and amp.
OVERVIEW
The Radial ProRMP is a passive re-amplifying device that has been developed to
explore new musical sounds and spur on the creative process through alternative
recording techinques. The ProRMP allows pre-recorded instrument tracks to be
sent through effect pedals and guitar amplifiers. You will find the ProRMP fun
and easy to use but should you have any questions regarding its functions we
invite you to contact us at [email protected]. Now get ready to re-amp that
acoustic track into your Marshall double stack!
Conect your guitar to the direct box. Use the instrument thru-put to connect
your amp. Connect the balanced XLR output from the direct box to your mixing
console. Record the dry track.
USING THE ProRMP
Before making connections, confirm all equipment is turned off and volume
controls are set to zero. This will avoid any loud pops that could cause speaker
damage.
As most re-amping is performed with an electric guitar, we have chosen to
discuss the process using this as an example. The same process applies with
voice, keyboard, drums or any other instrument.
PLEASE READ BEFORE CONNECTING
Caution must be used when connecting electronic equipment to the
ProRMP. The ProRMP bridges all electronic equipment connected to it
so faulty wiring or incorrect grounding of any of the equipment may cause a
shock hazard to be present and/or damage the ProRMP or other connected
equipment. Because grounding schemes differ between manufacturers, it
is important to check for correct polarity, in particular with older amplifiers
using 2-prong ungrounded A/C cords. If the polarity is reversed on an
ungrounded amplifier there may be a potential of 120V present between
the amp chassis and ground. Radial Engineering takes no responsibility
for this or how the ProRMP is connected or used. It is the user’s full
responsibility to ensure that proper electrical polarity is maintained on all
equipment connected to the ProRMP and that proper building electrical
codes have been followed wherever the ProRMP is being used.
To reduce opportunity for shock hazard or damage to the ProRMP or
connected equipment, plug the 1⁄4” connectors into the amplifier first
and then into the ProRMP. This is especially important when using old
amplifiers that do not have 3-prong plugs as the possibility exists to touch
the chassis ground with the connector plug tip when the plug is inserted
into the jack.
Radial Engineering
ProRMP User Guide
Direct Signal
Up to 300 ft. of
balanced cable
Active Direct Box
STEP 2: Driving the dry signal back to the ProRMP
Connect the mixer output to the XLR input on the ProRMP. Use a good quality
balanced XLR cable or microphone snake. Note that balanced cable can be
run up to 300 feet without signal loss so you can keep the amp in the studio
while you listen in the control room. Connect the ProRMP to your amplifier
with a good quality 1⁄4” cable. Effect pedals may also be inserted between the
ProRMP and amplifier. For best results, keep unbalanced 1⁄4” cables short.
Re-amp Track
Up to 300 ft. of
balanced cable
Effect pedals
Play the dry track and turn up the mixer output to a nominal level. Turn the
LEVEL control on the ProRMP to its 12 o’clock position (half-way). Finally,
turn on your guitar amplifier and slowly turn up the volume. Test the setup
with a clean amp tone. If there is distortion check the recorders/mixers output
for clipping and reduce the level if nessasary. If there is hum or buzz, try
depressing the LIFT switch on the ProRMP to interrupt the ground connection
between the recording system and your amp.
STEP 3: Adjusting the level
The ProRMP is equipped with a level control to ensure the signal coming
from the dry track matches the orignal level from your guitar. Because guitar
amplifiers do not have input level meters, follow these steps to match the level
Radial Engineering
ProRMP User Guide
between the dry track and your guitar. Start by plugging your guitar directly
into your amp with a clean sound dialed in. Play a little and note the volume.
Now connect the amplifier to the ProRMP, play the dry track and adjust the
ProRMP’s LEVEL control until the volume matches the direct guitar.
At this point, you have recorded a dry guitar track, inserted the ProRMP
between the mixer and amp and adjusted the LEVEL control to match your
guitar. You would now play the dry track into the ProRMP to drive the guitar
amp. The amp is mic’ed and recorded to another track. The process may be
repeated as long as you have tracks to record to and ideas to try out.
You are now set to go! Have fun! Experiment!
GROUNDING OPTIONS
The Radial ProRMP is equipped with a ground LIFT switch that lifts pin-1 on
the XLR INPUT jack. When the ground LIFT switch is depressed the ProRMP
derives its ground through the 1⁄4” OUTPUT connector to the amplifiers
ground. It is important that the ProRMP only be used with properly grounded
amplifiers.
USING THE ProRMP WITH GUITAR EFFECT PEDALS
You can use the ProRMP with guitar effect pedals. This is accomplished either
by driving the pedal through a guitar amplifier or by sending the output of the
effect pedal to a direct box and then to the recorder. We recommend the Radial
ProDI for this application, because the isolation transformer in the ProDI will
help eliminate noise caused by ground loops.
USING THE ProRMP WITH KEYBOARDS
Keyboards may also enjoy the benefits of the ProRMP by following the same
procedures. There’s no better way to turn a solo synthesizer track into a ‘barn
burner’ than to pass it through a distorted tube guitar amplifier or tube distortion
pedal. Players like the legendary Jan Hammer used this trick to create those
amazing ‘guitar’ solo sounds. This is also a great way to get more ‘growl’ from
those ‘clean’ B3 sounds. Half the magic of a traditional Hammond comes from
the tube amp and Leslie being pushed to the limits. This is why Keith Emerson
also used distorted guitar amps to record and perform. Try mixing sounds
between clean and distorted keyboard tracks and have fun!
USING THE ProRMP WITH VOICE
Sometimes, vocals can be too clean and lack that ‘seasoned’ rough edge. By
driving a voice track through the ProRMP into a distortion pedal like the Radial
Tonebone Classic or through an overdriven amplifier, one can introduce some
great effects. Double the clean track with distorted track and then mix them to
suit. A subtle extra edge is often all that is needed to warm up a stale track.
USING THE ProRMP WITH DRUMS
Re-amping sampled drum sounds can add realism. Snare drum is a mid-range
instrument and can sound great through a 4x12 guitar stack. For the kick drum
try a bass amp.
Radial Engineering
ProRMP User Guide