1
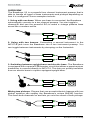
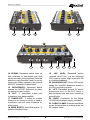
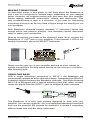
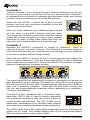
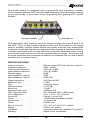
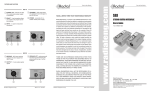
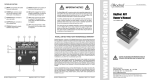
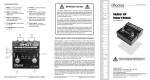
BASSBONE • V2
USER GUIDE
Radial Engineering Ltd.
1588 Kebet Way, Port Coquitlam BC V3C 5M5
Tel: 604-942-1001 Fax: 604-942-1010
email: [email protected]
RADIAL BASSBONE • V2
USER GUIDE
Table of Contents
Page
Overview ................................................................................ 1
Features and Functions .......................................................... 2
Getting Started ....................................................................... 4
Making Connections ............................................................... 5
Channel Controls .................................................................... 6
Using A Second Bass ............................................................. 7
Connecting Piezo Pickups ...................................................... 7
Power Booster, Mute and Tuner ............................................. 8
Using The Blend Control ........................................................ 9
Using Effect Pedals .............................................................. 10
Using The Effects Loop ........................................................ 11
Using The Direct Output ....................................................... 12
Warranty .................................................................Back Cover
Thank you for choosing the Radial Tonebone Bassbone V2
bass command center. This analog pedal lets you connect one
or two basses, control their EQ, connect effect pedals, a tuner,
stage amplifier and output the signal to the PA or recording
system. The Bassbone has been developed to help you take
control of your live performance and open the door to creativity
in the studio.
Before you get started we kindly ask that you take a few
minutes to read the user guide. This explains many of the
functions, and how to get the most out of them. If after reading
you find yourself asking questions, we suggest you visit the
Bassbone FAQ page on the Radial Tonebone web site. This
is where we post questions from users and product updates.
If you can not find an answer to your question we invite you to
contact us at [email protected] and we will do our very best
to answer you in short order.
Now get ready to take command of the stage!
OVERVIEW
The Bassbone V2 is a powerful two channel instrument preamp that is
able to handle all types of bass instruments and pickups depending on
how it is configured. Some examples include:
1. Using with one bass: When one bass is connected, the Bassbone
automatically converts to a two channel preamp. You can toggle to
channel-B and use the powerful EQ to make a vintage passive bass
sound like a modern active.
INPUT-A
A/B
SELECT
INPUT-B
2. Using with two basses: Connecting a second instrument to the
INPUT-B jack turns the Bassbone into a two instrument preamp. You
can toggle between instruments by stomping on the footswitch.
INPUT-A
A/B
SELECT
INPUT-B
3. Switching between upright bass and electric bass: The Bassbone
is equipped with a special PZB booster circuit that allows a passive piezo
transducer to connect directly to INPUT-2. This lets you quickly transition
from an electric bass to a piezo equipped upright bass.
INPUT-A
A/B
SELECT
PIEZO
INPUT-B
Mixing two pickups: Players that use acoustic/electric basses with two
pickup systems can employ the Bassbone's unique BLEND function.
This turns both channels on and lets you mix the sound of both pickups.
INPUT-A
A/B
BLEND
INPUT-B
Radial Engineering Ltd.
1
Bassbone V2 Preamp
FEATURES
5
4
2
3
1
6
7
8
9
8. HPF-2: High pass filter on channel-2
rolls-off excessive low frequency
resonance and cleans up signal. Choose
between 80Hz, 150Hz and off.
1. SELECT FOOTSWITCH: Selects
between channels when used with one
bass. Selects between instruments when
used with two basses. Features a large,
bright LED indicator for each channel.
9. LOOP FOOTSWITCH: Turns the
effects loop on and off. Features a large,
bright LED indicator.
2. LEVEL-1 and LEVEL-2: Adjusts
instrument level for each channel.
10. EQ-1: Three position switch selects
between flat and two preset EQ contour
curves on channel-1.
3. 3-BAND EQ: Passive interactive EQ
on channel-2 lets you carve your tone to
suit any playing style or instrument. Low
+/-12dB @ 75 Hz, Mid +/-10dB @ 470 Hz,
High +/-16dB @ 5.6 Khz.
11. INPUT-1: Primary ¼” instrument
input. The signal is also automatically
sent to channel-2 when no instrument is
connected to the input-2 jack.
4. LOOP WET/DRY: Rotary control lets
you mix the original ‘dry’ bass sound with
the ‘wet’ effects loop.
12. INPUT-2: ¼” instrument input jack for
a second bass.
5. BOOST: Controls the amount of signal
boost from unity-gain to +8dB.
13. PZB (INPUT-2): Recessed switch
turns on the piezo booster and increases
impedance to 10 meg-ohms and gain by
10dB. Push inward to activate or leave
outward for instruments with standard
active/passive pickups.
6. BOOST FOOTSWITCH: Activates
power booster or the mute function. With
a large, easy to see LED indicator.
7. LOOP ASSIGN: Three position switch
used to assign the effects loop to one or
both channels.
Radial Engineering Ltd.
10
2
Bassbone V2 Preamp
11
12
13
14
17
15
18
19
14. BLEND: Recessed switch turns on
both channels for instruments with dual
electric/acoustic pickup systems. Push the
switch in to mix channels-1 and 2 or out for
normal use. When pushed in the channel
SELECT footswitch is deactivated.
21
22
23
19. 180° (XLR): Recessed switch
reverses pins-2 and 3 at the balanced
XLR output to phase align sound with PA
or to reduce feedback.
20. BALANCED OUT: Direct XLR output
sends the ‘post-EQ’ Bassbone sound to
the PA or recording console.
15. BOOST/MUTE: Recessed switch
assigns the BOOST footswitch to either
the power booster or mute.
21. LIFT: Recessed ground lift switch
disconnects pin-1 on the XLR output to
help eliminate hum and buzz caused by
ground loops.
16. OUT: ¼” instrument output jack
connects to your bass amplifier.
17. TUNER OUT: ¼” output for a tuner.
Always on for tuning on the fly or used in
conjunction with the mute footswitch for
silent tuning.
22. 15VDC: Connection for the Radial
15VDC/400mA power supply (included).
23. CABLE CLAMP: Prevents accidental
power disconnection by locking down the
AC adapter cable.
18. SEND & RECV: Send and receive ¼”
jacks for the effects loop.
Radial Engineering Ltd.
20
16
3
Bassbone V2 Preamp
GETTING STARTED
Make sure the volume levels on your amp and audio system are turned
down before making connections. This will help avoid plug-in and turn-on
transients that can damage more sensitive components such as
tweeters.
Set the controls and switches as illustrated in the diagram below. This
represents a neutral starting position for the Bassbone from where
further adjustments will be made.
Some of the Bassbone functions are controlled by 'set & forget' switches
on the side panels. These switches are recessed to prevent accidental
use and can be accessed with a small screwdriver when needed. Ensure
all five of these switches are set to their outward positions to start with.
Use a small screwdriver to
access the set-n-forget
Using the cable clamp prevents
accidental power disconnection.
There is no power switch on the Bassbone. As soon as you connect the
15VDC power supply, it will turn on and either the channel-1 or 2 LED
will illuminate. A handy cable clamp located next to the power jack can be
employed to prevent accidental power disconnection. Use a hex driver to
loosen the cable clamp. Loop the cable through the clamp and re-tighten.
Radial Engineering Ltd.
4
Bassbone V2 Preamp
MAKING CONNECTIONS
As described earlier in this guide, a cool thing about the Bassbone is
that it can be configured in various ways, depending on your desired
setup. However, we suggest testing with one bass and your amplifier
before adding additional instruments, effects and electronics. This
way troubleshooting is kept to a minimum. If you start by connecting
everything at once it can be very hard to figure things out should you run
into a problem.
Both Bassbone channels employ standard ¼” instrument inputs that
accept active and passive pickups. Use standard coaxial instrument
cable to make your connections.
Start by connecting your bass to the channel-1 input. Next, connect the
Bassbone's ¼” OUT jack to your amplifier. If the channel-1 LED is not
already illuminated, press the SELECT footswitch.
Slowly turn the gain up on your amplifier and test at a low volume to
ensure everything is working before turning up the volume to a comfortable listening level.
USING ONE BASS
With a single instrument connected to INPUT-1 the Bassbone will
automatically operate as a two channel preamp. Depressing the SELECT
footswitch toggles between the Bassbone channels. This works because
INPUT-B is equipped with a special switching jack that, when unused,
routes the signal from the INPUT-1 jack to channel-B when selected.
INPUT-A
A/B
SELECT
INPUT-B
The Bassbone is a unity gain preamp designed to work with your
amplifier. You can use channel-1 for your traditional bass/amp sound and
then use the powerful EQ controls on channel-2 to create a completely
different bass tone with the same instrument.
Radial Engineering Ltd.
5
Bassbone V2 Preamp
CHANNEL-1
Think of channel-1 as a ‘straight-through’ channel whereby you will use
the EQ on your amp to set up the tone of your primary bass. Channel-1
is equipped with a control for adjusting the instrument level and a three
position switch for selecting one of two EQ presets.
Start with the LEVEL-1 control set to the 2 o’clock
position and use your instrument amplifier to set the
overall volume and tone.
After you have dialed-in your traditional bass sound
on your amp, try the EQ-1 presets with your amp.
This switch can introduce one of two carefully crafted
preset EQ curves designed to bring a more modern
character to older vintage bass amps that may not
have the tonal range needed for a particular gig.
CHANNEL-2
Depress the SELECT footswitch to switch to channel-2. Think of
channel-2 as the 'override' channel. This features a powerful passiveinteractive EQ that lets you override the tone settings on your amplifier
to create an entirely different bass sound.
Start with the LEVEL-2 control at the 2 o’clock position and adjust the
level to match channel-1. Use the three-band EQ to create a different
tonal response from channel-1. Stomp the SELECT footswitch to toggle
between channels and compare sounds.
The three-band EQ can dramatically increase or decrease the amount of
gain depending on the settings. For instance, rolling off low end with the
EQ will reduce the overall gain. Compensate by adjusting the LEVEL-2
gain until it matches channel-1. Once the EQ and level controls are
set, you can toggle between channels without adjusting your amplifier's
volume or EQ settings.
Channel-2 is also equipped with a 3-position highpass filter HPF-2 that is used to reduce excessive
low frequency resonance that can cause a bass to
sound muddy and indistinct. The HPF-2 filter can be
particularly advantageous for acoustic bass players
who experience resonant feedback when playing live.
The HPF-2 filter has a flat setting (filter bypassed) and two settings that
gently roll off bass. The middle setting rolls off low frequencies below
35Hz and the bottom setting below 60Hz.
Radial Engineering Ltd.
6
Bassbone V2 Preamp
USING A SECOND BASS
Many players employ two basses when they perform. These typically
include a traditional passive bass such as a Fender P-Bass® and a new
generation 5 or 6 string with active pickups. These basses produce very
different output levels and tonal ranges. This poses a problem when
switching from one instrument to the other, as the amplifier settings must
be dramatically adjusted to suit each instrument.
The Tonebone Bassbone V2 solves this problem because each channel
features separate level and equalization controls. You can preset
channel-1 for your active bass and use channel-2, with it's enhanced
EQ, to shape the sound of your passive bass.
Connecting a second bass to the channel-2 input jack automatically
changes the Bassbone V2 into a two instrument preamp. With two
basses, use the SELECT footswitch to transition between instruments.
INPUT-A
A/B
SELECT
INPUT-B
Adjust the 3-band EQ settings to suit your second bass and use the
LEVEL-2 control to match the volumes.
CONNECTING PIEZO PICKUPS
The trouble with most piezo pickup systems is that they are not very
faithful to the original tone when you plug them directly into a regular
instrument amplifier or direct box. The sound is often thin and peaky. To
accommodate acoustic upright players that use piezo pickups we added
the Radial PZB™ piezo booster to channel-2. The PZB booster allows you
to connect a piezo transducer directly to the Bassbone.
The recessed PZB switch is located next to the channel-2 input jack and
is used to turn the piezo booster on/off. Use a small screwdriver to access
the switch. When the PZB switch is
set to the outward position the piezo
booster is off and channel-2 accepts
standard electric bass signals from
active or passive magnetic pickups.
Pushing the PZB switch inward turns
the piezo booster on increasing the
input impedance to 10 meg-ohms
and boosting the gain by 10dB. The
higher impedance widens the piezo's
frequency response to bring out your
instruments natural tone.
Radial Engineering Ltd.
7
Bassbone V2 Preamp
USING THE POWER BOOSTER
The Bassbone is equipped with a
footswitch activated power booster
designed to add gain for soloing. It
can also be used to compensate for
effect pedals that reduce the amount
of bass frequencies, such as pedals
made for guitar. The power booster
consists of a footswitch with LED
indicator and a boost level control.
Set the BOOST level fully counterclockwise for the minimum amount
of boost. Next, depress the BOOST
footswitch and increase the amount
of gain by slowly turning the BOOST
level control clockwise.
MUTE FUNCTION
Since some bass players do not require a power booster the BOOST
footswitch can be converted to a mute that turns off the ¼” AMP and XLR
direct outputs. You can use the mute footswitch to put one bass in standby
mode while changing to another instrument, or tune in silence using the
¼" TUNER output.
The recessed BOOST/MUTE switch
located on the side next to the ¼"
output lets you choose between
the boost or mute functions. Push
the switch inward to convert the
footswitch from boost to a mute
function. The switch is recessed to
prevent accidental use and can be
accessed with a small screwdriver.
CONNECTING A TUNER
The Bassbone is equipped with a buffered ¼” output for your tuner. This
output is always on for tuning on the fly and may be used in conjunction
with the mute footswitch function for silent on-stage tuning.
Radial Engineering Ltd.
8
Bassbone V2 Preamp
USING THE BLEND CONTROL
Some electric basses are equipped with a stereo jack that outputs
the signals from two pickups such as a magnetic pickup and a piezo
bridge transducer at the same time.
To accommodate, the Bassbone
is equipped with a BLEND switch
that turns on both channels
simultaneously and lets you use
the LEVEL-1 and 2 controls to
mix the sound of both pickups.
The BLEND switch is recessed to
prevent accidental use. Using a
small screwdriver, push the switch
inward to turn the blend function on.
Depending on your instrument the pickups can connect in a couple of
ways. If your bass has separate ¼” outputs for each pickup you can
simply connect to channels-1 and 2 using standard coaxial instrument
cables.
PIEZO
MAG
G
Some basses use a 'stereo' jack to output both pickup signals. If your
bass uses one stereo TRS ¼” jack you can use an 'insert' type cable
where the signal is sent to separate ¼" plugs. Because channel-2 is
optimized for acoustic piezo pickups, you will want to ensure the the
piezo pickup is connected to channel-2.
TRS ¼"
STEREO
PIEZO
MAG
Radial Engineering Ltd.
9
Bassbone V2 Preamp
USING EFFECT PEDALS WITH THE BASSBONE
Effect pedals can be positioned in a number of ways depending on what
you are attempting to do. For example, you could have some effects
dedicated to one bass by inserting them between the instrument and the
Bassbone input.
PA
SYSTEM
You could also introduce a series of pedals between the Bassbone's ¼”
output and your amp. This way the pedals can be heard through your
amp but the effects will not be sent to the PA system if using the balanced
XLR output.
PA
SYSTEM
To take things one step further, the Bassbone is equipped with an unique
effects loop designed specially for bass. The effects loop lets you insert pedals
by depressing a footswitch and mix the effects with the original bass signal to
preserve the fundamental tone of your bass. You can also assign the effects
loop to channel-1, channel-2 or both, giving you absolute freedom. Connected
this way, the pedals will be heard through your amp and in the PA system.
PA
SYSTEM
Radial Engineering Ltd.
10
Bassbone V2 Preamp
USING THE ON-BOARD EFFECTS LOOP
Start by connecting the SEND jack to the input of your effect pedal and
the output from your pedal to the RECV (receive) jack using standard ¼”
coaxial guitar cables. In order to familiarize yourself with the setup, start
with one pedal. This will make trouble shooting much easier.
Depress the LOOP footswitch to turn the function on, the LED indicator
will illuminate. Note: If there are no pedals connected to the SEND and
RECV jacks the LOOP footswitch will have no effect on the sound.
You cannot accidentally mute your sound because there are no pedals
connected.
Start with the 3-position LOOP switch on the top
panel set to BOTH. This way the effects will be heard
on both channels. You can use this switch to assign
the effects to one channel exclusively.
The LOOP WET/DRY control lets you dial-in as
much of the effects as you like and helps preserve
the original bass tone. Set the WET/DRY control
to the 12 o’clock position and adjust to either
increase or decrease the amount of effect you hear
in comparison to your original bass tone. In some
instances, you will want a lot of effect, in others only
a little bit. Have fun and experiment.
Radial Engineering Ltd.
11
Bassbone V2 Preamp
THE RADIAL DIRECT BOX
The Bassbone V2 is equipped with a built in Radial direct box with a
balanced XLR direct output. The direct output is used to feed a PA or
recording console. You can use it to reinforce the sound from your bass
amp or go direct without an amp using the Bassbone to control your
sound through the PA. The direct output is particularly handy in the studio
for direct recording, or where bringing an amplifier may not be practical.
Simply connect the XLR direct output to the mixer and use the Bassbone
as your miniature preamp. All your EQ settings are now right at your feet!
It's important to note that because the direct output is post-'everything'
all of the Bassbone's EQ, level and effects-loop settings will be heard.
This is particularly advantageous when playing gigs without a sound
engineer. An example would be on a solo where the engineer would
normally increase the bass volume. By engaging the Bassbone's power
booster, the level will increase on your bass amp and at the mixer at the
same time.
DIRECT
OUT
LEVEL
EFX LOOP
EQ
BOOSTER
AMP
OUT
Connect the direct output to the microphone input of a mixing console
using standard XLR cable up to 100 meters (300’). The XLR male
connector is wired to AES standards with pin-1 ground, pin-2 hot (+) and
pin-3 cold (-).
MIXING CONSOLE
Radial Engineering Ltd.
12
Bassbone V2 Preamp
The direct output is equipped with a ground lift and a polarity reverse.
The recessed ground LIFT switch helps eliminate hum and buzz caused
by ground loops. If you hear noise try pushing the ground LIFT switch
inward.
POLARITY REVERSE
GROUND LIFT
The recessed 180° polarity reverse switch inverts the pins-2 and 3 at
the XLR. This is often used to phase-match the PA system to the stage
amp in smaller venues where these two audio sources can sometimes
compete. It can also be used to electronically change a resonant peak to
a phase cancelled null to help alleviate resonant feedback when using
an acoustic instrument such as an upright bass on stage. These two set
& forget switches are recessed to prevent accidental use so use a small
screwdriver to access them.
SPECIFICATIONS
Audio circuit type: . . . . . . . . . . . . . . . . . .
Frequency response: . . . . . . . . . . . . . . .
Total harmonic distortion: . . . . . . . . . . . .
Intermodulation distortion: . . . . . . . . . . .
Dynamic range: . . . . . . . . . . . . . . . . . . .
Input impedance: Input A: . . . . . . . . . . .
Input impedance: Input B: . . . . . . . . . . .
Output impedance: . . . . . . . . . . . . . . . . .
Maximum input: . . . . . . . . . . . . . . . . . . .
Gain:. . . . . . . . . . . . . . . . . . . . . . . . . . . .
Gain-boost drive: . . . . . . . . . . . . . . . . . .
Noise floor: . . . . . . . . . . . . . . . . . . . . . .
Equivalent input noise: . . . . . . . . . . . . . .
HPF-2 high pass filter: . . . . . . . . . . . . . .
XLR configuration: . . . . . . . . . . . . . . . . .
Ground lift: . . . . . . . . . . . . . . . . . . . . . . .
Power: . . . . . . . . . . . . . . . . . . . . . . . . . .
Construction: . . . . . . . . . . . . . . . . . . . . .
Finish:. . . . . . . . . . . . . . . . . . . . . . . . . . .
Size: (L x W x D). . . . . . . . . . . . . . . . . . .
Weight: . . . . . . . . . . . . . . . . . . . . . . . . .
Conditions: . . . . . . . . . . . . . . . . . . . . . . .
Warranty: . . . . . . . . . . . . . . . . . . . . . . . .
Radial Engineering Ltd.
Discrete class-A FET input with low noise ICs.
20Hz ~ 18kHz
0.05% @ -15dBu
0.2% @ -20dBu
85dB
220K
220K/10M
300 Ohms at XLR
+7 dBu
Unity gain device
0 to 25 dB
-100dB
-92dBu at XLR
Flat, 35Hz and 60Hz (6 dB/Octave)
Pin 2 +, Pin 3 -, Pin 1 Ground
Lifts pin-1 on the XLR
+15VDC/400mA adapter included
14 gauge steel
Powder-coat
5.5" x 4.2" x 2" (203 x107 x 48mm)
2.55lb (1157 grams)
Use in dry locations only between 5°C and 40°C
Radial 3-year, transferable
13
Bassbone V2 Preamp
THREE YEAR TRANSFERABLE LIMITED WARRANTY
RADIAL ENGINEERING LTD. (“Radial”) warrants this product to be free from defects in material and workmanship and will remedy any such defects free of charge according to the terms
of this warranty. Radial will repair or replace (at its option) any defective component(s) of this
product (excluding finish and wear and tear on components under normal use) for a period of
three (3) years from the original date of purchase. In the event that a particular product is no
longer available, Radial reserves the right to replace the product with a similar product of equal
or greater value. In the unlikely event that a defect is uncovered, please call 604-942-1001 or
email [email protected] to obtain a RA number (Return Authorization number) before the
3 year warranty period expires. The product must be returned prepaid in the original shipping
container (or equivalent) to Radial or to an authorized Radial repair center and you must assume the risk of loss or damage. A copy of the original invoice showing date of purchase and
the dealer name must accompany any request for work to be performed under this limited and
transferable warranty. This warranty shall not apply if the product has been damaged due to
abuse, misuse, misapplication, accident or as a result of service or modification by any other
than an authorized Radial repair center.
THERE ARE NO EXPRESSED WARRANTIES OTHER THAN THOSE ON THE FACE HEREOF AND DESCRIBED ABOVE. NO WARRANTIES WHETHER EXPRESSED OR IMPLIED,
INCLUDING BUT NOT LIMITED TO, ANY IMPLIED WARRANTIES OF MERCHANTABILITY
OR FITNESS FOR A PARTICULAR PURPOSE SHALL EXTEND BEYOND THE RESPECTIVE WARRANTY PERIOD DESCRIBED ABOVE OF THREE YEARS. RADIAL SHALL NOT
BE RESPONSIBLE OR LIABLE FOR ANY SPECIAL, INCIDENTAL OR CONSEQUENTIAL
DAMAGES OR LOSS ARISING FROM THE USE OF THIS PRODUCT. THIS WARRANTY
GIVES YOU SPECIFIC LEGAL RIGHTS, AND YOU MAY ALSO HAVE OTHER RIGHTS,
WHICH MAY VARY DEPENDING ON WHERE YOU LIVE AND WHERE THE PRODUCT
WAS PURCHASED.
To meet the requirements of California Proposition 65, it is our responsibility to inform you of the following:
WARNING: This product contains chemicals known to the State of California to cause
cancer, birth defects or other reproductive harm.
Please take proper care when handling and consult local government regulations before discarding.
www.radialeng.com
Radial Engineering Ltd.
1588 Kebet Way, Port Coquitlam BC V3C 5M5
tel: 604-942-1001 • fax: 604-942-1010
[email protected] • www.radialeng.com
Radial Bassbone V2 User Guide - Part #: R870 1050 10
Appearance and specifications subject to change without notice.
Copyright © 2014 Radial Engineering Ltd. All rights reserved.