1
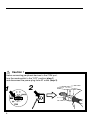
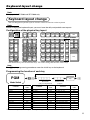
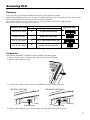
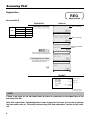
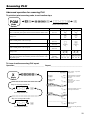
Dealer’s Manual (for SE-S300, SE-S2000, SE-C300, SE-C2000: Ver2.20) Initialization (for SE-S300/ SE-S2000) ..................................................................3 Initializing the cash register ....................................................................................................3 Automatic initialization ........................................................................................................3 Manual initialization ............................................................................................................3 Clearing a machine lock up ....................................................................................................3 Initialization (for SE-C300/ SE-C2000) .................................................................4 Initializing the cash register ....................................................................................................4 Automatic initialization ........................................................................................................4 Manual initialization ............................................................................................................4 Clearing a machine lock up ....................................................................................................4 Keyboard layout change .......................................................................................5 Keyboard layout change .........................................................................................................5 Configuration of the physical key layout .............................................................................5 Programming the function of each key ...............................................................................5 RAC-12B .................................................................................................................6 Usage of RAC-12B .................................................................................................................6 Preparation for using the RAC-12B (formatting RAC-12B) ................................................6 How to backup the programming data to the RAC-12B .....................................................6 How to restore the programming data from the RAC-12B .................................................6 Error code ..........................................................................................................................6 Scanning PLU ........................................................................................................7 Summary ............................................................................................................................7 Preparation ........................................................................................................................7 Registration ........................................................................................................................8 Not found PLU ..........................................................................................................................................8 Unreadable barcode .................................................................................................................................9 Programming......................................................................................................................9 To allocate <OBR> key .............................................................................................................................9 To modify unit price and linked department / add new scanning PLU item ..............................................9 To modify scanning PLU item descriptor ..................................................................................................9 Report ..............................................................................................................................10 To issue individual scanning PLU item report .........................................................................................10 To issue individual scanning PLU item report .........................................................................................10 To reset all scanning PLU item sales data..............................................................................................10 Advanced operation for scanning PLU .............................................................................11 To print/not print scanning code, to set inactive days .............................................................................11 To issue inactive scanning PLU report ...................................................................................................11 Added program ....................................................................................................12 Other added program ...........................................................................................................12 How to ignore the complusory drawer switch ...................................................................12 How to enable auto-sign off after finalization ...................................................................12 How to ignore the electronic journal full alarm .................................................................12 CASIO COMPUTER CO., LTD. 6-2, Hon-machi 1-chome Shibuya-ku, Tokyo 151-8543, Japan 0809-D Printed in Japan 292DEALER_080620_EU_ID Caution ! Before connecting peripheral devices to the COM port, turn the mode switch to the “OFF” position (step 1) and disconnect the power plug from AC outlet (step 2). 1 X REG OFF RF PGM 2 2 Z X2/Z2 Initialization (for SE-S300/ SE-S2000) Initializing the cash register Automatic initialization Use the following procedure to initialize the cash register before using it for the first time after you purchase it. 1. Install the two memory backup batteries (see page 10 of the User's Manual). 2. Plug the cash register into a wall outlet. • At this time, “00000000” appears on the display and the printer operates for a minite. Initialization is complete when the printer stops operating. CAUTION! Automatic initialization (which clears all sales and programming data stored in the register's memory) is performed whenever all power (both the backup batteries and power through power cord) is cut from the cash register and then restored. The program data stored in the flash memory is restored. Remember… Main power cut by: • Unplugging the cash register • Power failure + Backup power cut off by: • Removing the batteries • Dead or low batteries = Automatic initialization when the main power is restored and the mode switch is set to any position besides OFF. Manual initialization Use the following procedure to initialize the cash register and clear all transaction data and program data from its memory. 1. Insert the mode key marked “PGM” into the mode switch. 2. Turn the mode switch to the OFF position. 3. While holding down the f (SE-S300) j (SE-S2000) key, turn the mode switch to the PGM position. 4. Release the f (SE-S300) j (SE-S2000) key. 5. Enter : A : B :C: : D ; and press the s key. (A, B, C, D: Refer to the section below.) A. Language selection B. Area / monetary mode C. Department number D. Program 4 mode This specification defines the This specification defines the language to use for the date area and the decimal position. in receipt/journal printing. This specification defines Program 4 mode availability. English French Spanish German 2 2 2 2 0 1 2 4 German 2 4 Two decimal place 2 1 No decimal place 2 3 This specification defines the number of department keys. SE-S300 2 25 SE-S2000 2 30 w/o PGM4 2 0 with PGM4 2 4 Clearing a machine lock up If you make a mistake in operation, the cash register may lock up to avoid damage to programs and preset data. Should it happens, you can use the following procedure to clear the lock up without losing any data. 1. Power off the register. 2. Insert the PGM key in the mode switch. 3. Press down and hold f (SE-S300) f (SE-S2000), and turn the mode switch to PGM mode. 4. The display shows INIT(SE-S300) / FC (SE-S2000) on alpha-display, then release f (SE-S300) f (SE-S2000). 5. Press s. A receipt is issued. 3 Initialization (for SE-C300/ SE-C2000) Initializing the cash register Automatic initialization Use the following procedure to initialize the cash register before using it for the first time after you purchase it. 1. Install the two memory backup batteries (see page 10 of the User's Manual). 2. Plug the cash register into a wall outlet. • At this time, “00000000” appears on the display and the printer operates for a minite. Initialization is complete when the printer stops operating. CAUTION! Automatic initialization (which clears all sales and programming data stored in the register's memory) is performed whenever all power (both the backup batteries and power through power cord) is cut from the cash register and then restored. The program data stored in the flash memory is restored. Remember… Main power cut by: • Unplugging the cash register • Power failure + Backup power cut off by: • Removing the batteries • Dead or low batteries = Automatic initialization when the main power is restored and the mode switch is set to any position besides OFF. Manual initialization Use the following procedure to initialize the cash register and clear all transaction data and program data from its memory. 1. Insert the mode key marked “PGM” into the mode switch. 2. Turn the mode switch to the OFF position. 3. While holding down the f (SE-C300) j (SE-C2000) key, turn the mode switch to the PGM position. 4. Release the f (SE-C300) j (SE-C2000) key. A : B :C: : D ; and press the s key. (A, B, C, D: Refer to the section below.) 5. Enter : A. Language selection B. Area / monetary mode C. Touch keyboard D. System selection This specification defines the This specification defines the language to use for the date area and the decimal position. in receipt/journal printing. This specification defines touch keyboard with department or flat-PLU. This specification defines the system (Check tracking system or Non-check tracking system) Department keys are allocated 2 72 Check tracking system (Check No. = 50, detail No. = 1600) 2 2 English French Spanish German 2 2 2 2 0 1 2 4 German 2 4 Two decimal place 2 1 No decimal place 2 3 Flat PLU keys are allocated 2 00 Non-check tracking system 2 0 Clearing a machine lock up If you make a mistake in operation, the cash register may lock up to avoid damage to programs and preset data. Should it happens, you can use the following procedure to clear the lock up without losing any data. 1. Power off the register. 2. Insert the PGM key in the mode switch. 3. Press down and hold f (SE-C300) f (SE-C2000), and turn the mode switch to PGM mode. 4. The display shows INIT(SE-C300) / FC (SE-C2000) on alpha-display, then release f (SE-C300) f (SE-C2000). 5. Press s. A receipt is issued. 4 Keyboard layout change Note: This page is for SE-S300 and SE-C2000 only. Keyboard layout change You can change the keyboard layout or allocate some new functions on the keyboard. Note: Before changing the keyboard layout, you must issue the daily and periodic reset reports. Configuration of the physical key layout R-FEED FEED J-FEED 076 082 073 070 067 060 053 046 039 081 087 025 Only for SE-S2000 Only for SE-S300 088 032 075 072 069 066 059 052 045 038 031 024 019 7 8 9 065 058 051 044 037 030 023 018 4 5 6 064 057 050 043 036 029 SUBTOTAL 1 2 3 063 056 049 042 035 028 079 086 085 078 013 084 C 0 011 012 062 055 048 041 034 027 The shadowed keys are fixed function keys. You cannot change the function of these keys. Note: The a key in programming procedures mean the #-013 key on the keyboard. Programming the function of each key PGM Appropriate S S key Record No. (only for Department) Mode Switch Contents Cash/ amount tendered Charge Check tendered Received on account Paid out Coupon Reduction (Minus) Discount Premium Refund Error correct/ cancel Function code 001 002 003 020 021 023 027 028 030 033 034 Contents Receipt Non-add Non-add/ no sale No sale Currency exchange VAT PLU Price Department Open Clerk number Function code 038 040 041 042 045 046 048 049 051 067 072 Function code (3 digits) Contents Subtotal Receipt on/ off Multiplication OBR Help Sign off Tax program Dept no./ Dept shift “00” double zero *1 “000” triple zero *1 “.” decimal point *1 Function code 075 076 082 103 141 150 151 152 096 097 098 *1 Two zero key, three zero key, decimal point key can only be allocated in #-011 and #-012 position. 5 RAC-12B Usage of RAC-12B The RAC-12B (option device) is a memory stick to save the programming data of the cash register. Preparation for using the RAC-12B (formatting RAC-12B) 1. Turn the mode key to the “OFF” mode position. 2. Open the RAC connector cover on the left side of the register. 3. After removing the RAC-12B cap, hold the RAC-12B so that the arrow on the stick is on the top and insert it into the slot in the direction of the arrow. 4. Close the RAC connector cover. 5. Turn the mode key to the “PGM” mode position. 6. 7s2110s02aa How to backup the programming data to the RAC-12B 1. Check the vacant RAC-12B is set to the slot. (If not, follow “formatting RAC-12B” section.) 2. Turn the mode key to the “PGM” mode position. 3. 7s4110sa How to restore the programming data from the RAC-12B 1. Check the appropriate RAC-12B is set to the slot. 2. Turn the mode key to the “PGM” mode position. 3. 7s4100sa Error code If the error occurs, please see the troubleshooting section of the User's manual. E200: Insert RAC E201: Illegal Format 6 Scanning PLU Summary You can easily register items with barcode label by using barcode scanner. Without programming any PLU code, unit price nor linked department, you can register the items and create the PLU programming data automatically by not found PLU registration. You can input the PLU code by scanning the code or enter the PLU code and press ® manually. The barcode system of this register is as follows: Scanner Input method PLU code mamual input EAN-13 (PLU type) ✔ 13 digits with check digit EAN-8 (PLU type) ✔ 8 digits with check digit UPC-A (PLU type) ✔ 10/11 digits without check digit UPC-E (PLU type) ✔ 6 digits without check digit Scanning PLU code Sample barcode Preparation Just connect the HHS-15 handheld scanner (option) with the register. 1. Power off the register, and disconnect the AC plug from AC outlet. 2. Remove the connector cover. 3. Connect the scanner to the register and tighten two screws of the connector. (SE-S300, SE-C300) (SE-S2000, SE-C2000) COM2/SCANNER Connect here COM1/PC Connect here 4. Replace the connector cover, reconnect the AC plug and power on the register. 7 Scanning PLU Registration REG Mode Switch Not found PLU OPERATION Barcode Unit price Item Quantity Department Payment Cash 123456 $1.00 2 1 $2.00 DISPLAY Scanning the barcode .OT&OUND%RROR Error message 5 RPT T1 T2 T3 T4 TOTAL CHANGE AMOUNT )NPUT5NIT0RICE ANDPRESS$%04 Error message 5 RPT T1 T2 T3 T4 TOTAL CHANGE AMOUNT 1-! Enter unit price of the item and press the appropriate department. Scanning the same item After this procedure, the item is automatically programmed. a 34 Link department $%04 name RPT T1 T2 T3 T4 TOTAL CHANGE AMOUNT 34 $%04 RPT T1 T2 T3 T4 TOTAL CHANGE AMOUNT #!3( RPT T1 T2 T3 T4 TOTAL CHANGE AMOUNT RECEIPT 1 DEPT001 #123456 1 DEPT001 #123456 TL CASH •1.00 — Scanned item — Barcode* •1.00 — Barcode* •2.00 •2.00 * These items can be printed by program. NOTE: If there is no room for the not found item, this item is overwritten to the oldest item of the scanning PLU file. After this registration, linked department name is used for this item. If you want to change the item name, refer to “To modify the scanning PLU item descriptor” section of this manual. 8 Scanning PLU Unreadable barcode In case of the scanner cannot read a barcode, enter the PLU code printed underneath the barcode and press the ® key. It is necessary to enter a check digit if you register an EAN-13 or EAN-8 barcode. OPERATION EAN-8 Barcode 49123494 ($2.00) Item 1* Unit price Quantity 1 Department 1 UPC-E 654321 Barcode ($3.00) Item 2* Unit price Quantity 1 Department 1 Payment Cash $10.00 * These items have been stored in the PLU file already. RECEIPT 4912 3494 Enter barcode with check digit. (Press ®.) ® 1 PLU0002 •2.00 #49123494 1 PLU0003 •3.00 #654321 TL •5.00 CASH •10.00 CG •5.00 654 321 Enter barcode without check digit. ® s 10-a (Press ®.) Programming To allocate <OBR> key Refer to the “Keyboard layout change” chapter of this manual (SE-S300/ SE-S2000) / the user's manual (SE-C300/ SE-C2000). (The function code of the <OBR> is “103”.) To modify unit price and linked department / add new scanning PLU item PGM Mode Switch S S To another scanning PLU Use original unit price Scanning ~ A or Appropriate department key S ~ A barcode p Unit price (max. 6-digit) Dept memory No. 9 Scanning PLU Report To issue individual scanning PLU item report Operation ________________________________ Report__________________________________ To another PLU Scanning or S X barcode p Mode Switch X INDIVIDUAL DEPT001 8.13% #49012349 PLU0001 0.53% #123456 — Read symbol / report title — 38 •257.53 — — — 17 •17.00 — — Item name / No. of items Sales ratio* /amount PLU code * item name / No. of items Sales ratio * / PLU amount PLU code * -----------------------— Total No. of items TL 88.61 •516.10 — Total amount * These items can be printed by program. To issue individual scanning PLU item report Operation ________________________________ Report__________________________________ Z X/Z SCAN PLU A Mode Switch Skip for first department No. ~ A Start department No. Skip for last department No. ~ A DEPT001 PLU0001 8.13% #49012349 PLU0001 0.53% #123456 Reset symbol / report title / reset 0001 — counter 0001026 — Report code .....001 — — 109 •257.53 — — — 17 •17.00 — — 45 Link department / Dept No. Item name / No. of items Sales ratio* / amount PLU code* item name / No. of items Sales ratio* / PLU amount PLU code* #893281391742 -----------------------88.61 — Link dept total No. of items •516.10 — Link dept total amount DEPT002 .....002 PLU0101 150 #2395456 •312.34 -----------------------123 •234.00 -----------------------— Total No. of items TL 123 •897.00 — Total amount End department No. * These items can be printed by program. To reset all scanning PLU item sales data Operation ________________________________ Report__________________________________ Z A Mode Switch SCAN PLU PLU Z clear A (reset) S (cancel) 10 Z Reset symbol / report title / reset 0002 — counter 0050026 — Report code Normal End — Result printing Scanning PLU Advanced operation for scanning PLU To print/not print scanning code, to set inactive days PGM ~ A S S S Refer to the table below. Mode Switch Description Alert when the scanning PLU file has no room to add new item. (If “No” is selected, just replace the new item with the oldest item.) Choice Program code Initial value No = 0 Yes = 1 : : ; ; Always “0” D8 D8 D7 Print scanning PLU code on receipt. a Print scanning PLU code on journal. b Print scanning PLU code on report. c No = 0 Yes = 1 No = 0 Yes = 2 No = 0 Yes = 4 Always “00” D7 : (a+b+c) D6 ;; ;; ::: ;;; D5 D 4 Inactive days: (If a scanning PLU did not sell/ program during these days period, this item will be printed on the Inactive scanning PLU report. Significant number (000 ~ 999) ; (a+b+c) D6 D3 D2 D 1 D5 D 4 D3 D 2 D 1 To issue inactive scanning PLU report Operation ________________________________ Report__________________________________ X X A Mode Switch Skip for first deparment No. ~ A Start department No. Skip for last department No. ~ A End department No. NON ACTIVE DEPT001 PLU0001 #49012349 PLU0001 #123456 — Read symbol / report title 0090026 — Report code .....001 — — 0 •0.00 — — — 0 •0.00 — — 0 Link department / Dept No. Item name / No. of items Amount PLU code* item name / No. of items PLU amount PLU code* #893281391742 -----------------------— Link dept total No. of items 0 •0.00 — Link dept total amount DEPT002 .....002 PLU0101 0 #2395456 •0.00 -----------------------0 •0.00 -----------------------— Total No. of items TL 0 •0.00 — Total amount * These items can be printed by program. 11 Added program Other added program How to ignore the complusory drawer switch 1. Turn the mode key to the “PGM” mode position. 2. 3s1022s D10D9 D8 D7 D6 D5 D4 D3 D2 D1 (refer to the table below) as Description Print taxable amount 1 on receipt/ journal. a Print taxable amount 2 on receipt/ journal. b Print taxable amount 3 on receipt/ journal. c Choice Yes = 0 No = 1 Yes = 0 No = 2 Yes = 0 No = 4 Program code (a+b+c) D10 (a+b+c) D10 Yes = 0 No = 1 : ; ;;; ;;; : ; ;;;; ;;;; Print taxable amount 4 on receipt/ journal. Always “000” : No = 0 Yes = 2 Always “0000” ; D9 D9 D 8 D7 D6 Ignore the compulsory drawer switch Initial value D8 D7 D 6 D5 D4 D5 D3 D 2 D1 D4 D 3 D2 D1 How to enable auto-sign off after finalization 1. Turn the mode key to the “PGM” mode position. 2. 3s2622s D7 D6 D5 D4 D3 D2 D1 (refer to the table below) as Description Check number compulsory * a Number of customer compulsory * b Guest receipt compulsory (at finalization) * c Choice No = 0 Yes = 1 No = 0 Yes = 2 No = 0 Yes = 4 Program code Initial value : Always “0” ; (a+b+c) D7 (a+b+c) D7 ; ; D6 D6 Tax calculation by new balance. * (Calculation result is not saved into totalizer.) No = 0 Yes = 1 : ; Auto-sign off No = 0 Yes = 4 : ; D5 D6 D4 D4 ;;; Always “000” D3 D2 D1 ;;; D3 D2 D1 * Only effective for SE-C300 and SE-C2000. How to ignore the electronic journal full alarm 1. Turn the mode key to the “PGM” mode position. 2. 3s1722s D4 D3 D2 D1 (refer to the table below) as Description Print date on journal. a Print consecutive number on receipt/ journal. b Print time on receipt. a Print time on journal. b Choice Yes = 0 No = 2 Yes = 0 No = 4 Yes = 0 No = 1 Yes = 0 No = 2 Always “0” Ignore Electronic journal full alarm. 12 Program code : (a+b) D4 : ; (a+b) D4 ; (a+b) D3 (a+b) D3 ; ; : ; D2 Yes = 0 No = 1 Initial value D1 D2 D1