1
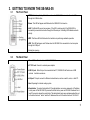
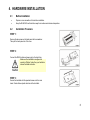
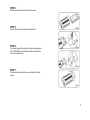
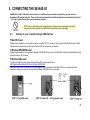
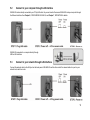
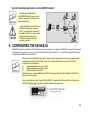
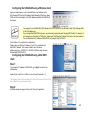
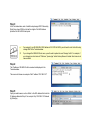
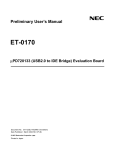
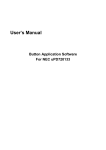
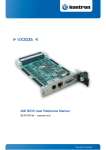
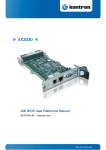
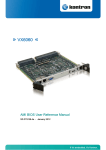
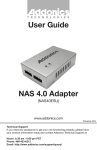
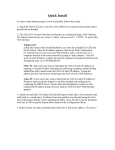
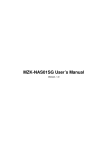
SE-NAS-05
1
Important Notes
Keep this user’s manual for future reference. It contains important information on product setup and
configuration.
Visit the following website for software update and last-minute changes to this document:
http://www.sednacomputer.com/products/se-nas-05.html
Default Factory Setting
Administrator user name = admin
Administrator password = admin
Host name = storage-XXXX, where XXXX is the last four digits of MAC address (physical address) of
SE-NAS-05, printed on the back panel.
IP address: 169.254.0.1
Restore Default Factory Setting
1.
2.
3.
4.
Power off the SE-NAS-05
Press and hold the reset button
Power on the SE-NAS-05 and then wait for at least 10 seconds
Release the reset button.
Disclaimer
1. All contents and specification mentioned in this manual are subject to change without prior notice.
2. All brand names and trademarks referenced and mentioned in this manual are property of their respective
owners.
3. Make sure you use the power supply came with the SE-NAS-05. Using third-party’s power supply with different
output voltage and power rating than that came with this product may result in permanent damage to the
SE-NAS-05 and hard drive.
4. In case of a high electrostatic discharge and fast transient disturbance from the power source, you may need to
power off the device manually, wait for a few seconds before powering it on again.
2
Table of Contents
1. Glossary
2. Introduction
3. Getting to know the SE-NAS-05
4. Hardware Installation
5. Connecting the SE-NAS-05
6. Configuring the SE-NAS-05
7. Operation
8. Installing Backup Tool for Windows
9. Specification
10. Troubleshooting
1. GLOSSARY
DHCP
Ethernet
FTP
IP address
LAN
MAC address
NAS
SMB
SOHO
TCP/IP
Dynamic Host Configuration Protocol, a protocol for assigning IP address automatically to
network devices.
IEEE standard network protocol that specifies how data is placed on and retrieved from a
common transmission medium.
File Transfer Protocol, a protocol used for file transfer between two network devices.
Internet Protocol address, the address used to identify a computer on a network
Local Area Network.
Media Access Control address, the physical address of a network device.
Network Attached Storage.
Server Message Block, a protocol for sharing files among network clients.
Small Office Home Office.
Transmission Control Protocol/Internet Protocol, a set of instructions computer use to
communicate over a network
3
2. INTRODUCTION
SE-NAS-05 is a Network Attached Storage (NAS) server for home and SOHO user. It has one USB 2.0 and one
10/100Mbps Ethernet interface, which provides greatest flexibility for SOHO and frequently traveler. SE-NAS-05
functions as a file / FTP server and provides an easy way for LAN users to backup data or share files through
intranet/internet.
Key Features:
• LAN and USB combo interface – Greatest flexibility for SOHO users and frequent travelers.
• FTP and SMB 2-in-1 server – Simplified file sharing at your home or SOHO network.
• Energy saving – Automatic hard drive spin-down.
• Active cooling system – Big cooling fan and aluminum case prevent hard drive from overheat.
• Free backup tool for Windows, works with SE-NAS-05 USB 2.0 interface.
Package Contents:
Before hardware installation, make sure the package contains the following items. If any item is missing or damaged,
please contact your retailer as soon as possible.
•
•
•
•
•
•
•
•
One SE-NAS-05 (Hard disk not included)
One Power adapter (12VDC, 2A)
One RJ45 network cable
One USB 2.0 cable
One user’s manual
One reset button plastic cover
Screws for hard disk and back panel fastening x 6
One CDROM containing application software
4
3. GETTING TO KNOW THE SE-NAS-05
3.1
The Front Panel
• COPY: File backup hot-key. This button works when SE-NAS-05 is connected to a host PC
through the USB interface.
• Power: This LED will appear solid Red when the SE-NAS-05 is turned on.
• LAN: This Blue LED serves two purposes. If the LED is continuously lit, the SE-NAS-05 is
successfully connected to a device through the Ethernet port. A blinking LED indicates network
activity.
• HDD: This Green LED will blink when the hard drive is performing read/write operation.
• USB: This LED will appear solid Yellow when the SE-NAS-05 is connected to a host computer
through the USB port.
• Cooling fan opening.
3.2
The Back Panel
• Power Button: Press to turn on/off the SE-NAS-05.
• DC 12V Jack: Connect to external power adapter.
• USB 2.0 port: When this port is connected to host PC, SE-NAS-05 will function as a USB
external hard drive enclosure.
• LAN port: This port connects to Ethernet network device, such as a switch, router, or host PC.
• Vent: Openings for internal cooling system.
• Reset button: To restore factory default. If the administrator user name, password, or IP address
is lost, power off the SE-NAS-05, press and hold this button, power on SE-NAS-05 and wait for at
least 10 seconds, release the reset button. The administrator login name and password will be set
to the default value of “admin” and the IP address will be set to the default value of 169.254.0.1.
5
4. HARDWARE INSTALLATION
4.1
•
•
4.2
Before Installation
Prepare a cross screwdriver for hard drive installation.
Keep the SE-NAS-05 and hard drive away from moisture and extreme temperature.
Installation Procedure
STEP 1:
Remove the two screws on the back panel with a screwdriver.
Then pull the back panel out of the case.
STEP 2:
Connect the IDE flat cable and power plug to the hard drive.
Make sure the hard drive is configured to
operate in “Master” mode. See your hard drive
manual for detail instruction.
STEP 3:
Secure the hard disk with the provided screws onto the main
board. Fasten the two plastic side bars to the hard disk.
6
STEP 4:
Slide the main board and hard disk into the case.
STEP 5:
Connect the front panel cable to the main board.
STEP 6:
If you want to prevent the reset button from being accessed
after the SE-NAS-05 is assembled, install the reset button
cover into the back panel
STEP 7:
Put the back panel back to the case and fasten it with the
screws.
7
5. CONNECTING THE SE-NAS-05
SE-NAS-05 is a LAN + USB combo drive enclosure. In addition to being a network storage device, you can use it as a
standalone USB external hard drive. There are three kinds of connection for different applications as described in Section 5.1
~ 5.3. Only one kind of connection can be used at any one time.
Do NOT use any third-party’s power supply with output voltage and power rating different from that
came with the product, otherwise your SE-NAS-05 and hard drive may be damaged.
5.1
Connect to your computer through USB interface
• Max OS X user:
Software driver installation is not required for systems using Mac OS 10.1.2 or above. Simply connect SE-NAS-05 using the included
USB cable and access the data by clicking the “Untitled” HDD icon located on your Desktop.
• Windows XP/2000/Me user:
Software driver installation is not required for Windows XP/2000/Me. Simply connect the SE-NAS-05 using the included USB cable and
access the data via “My Computer”.
• Windows 98se user:
To utilize the USB connectivity, please visit the following URL to download the driver:
http://www.sednacomputer.com/products/se-nas-05.html
Make sure that you install the device driver on your computer before connecting the SE-NAS-05. When you complete the driver
installation, reboot your computer then connect the USB port of SE-NAS-05 to your computer.
8
5.2
Connect to your computer through LAN interface
SE-NAS-05 can be directly connected to your PC by LAN cable. So you can transfer files across SE-NAS-05 and your computer through
the Ethernet interface. See Chapter 6, CONFIGURING SE-NAS-05, and Chapter 7, OPERATION for details.
SE-NAS-05 connected to a computer directly through
USB or LAN interface:
5.3
Connect to your network through LAN interface
Connect the network cable to the LAN port on the back panel of SE-NAS-05 and the other end of the network cable to a port on your
network hub, switch or router.
9
Typical file sharing application in a home/SOHO network
The LAN port on SE-NAS-05 is
Auto-MDI/MDIX, which means you can
connect it using either a crossover or a
direct network cable.
Either the USB port or the LAN port of
SE-NAS-05 can be used at any one
time. If you changed the connection
from USB to LAN, or vice versa, please
power off and then power on the
SE-NAS-05, otherwise abnormal
operation may occur.
6. CONFIGURING THE SE-NAS-05
SE-NAS-05 features a web-based control interface to manage your settings. To configure the SE-NAS-05, connect it to the network
router/switch in your network, or connect to a client PC through the LAN port. Section 6.1 ~ 6.2 describe the procedure of remote
configuration from different kinds of client PC.
When you reset the SE-NAS-05 either by the reset button or through the web control, all user settings will be
erased and replaced with factory default values. The most important default values useful for first-time
configuration are shown below:
z
Default administrator user name = admin
z
Default administrator password = admin
z
Default IP address: 169.254.0.1
Default host name = storage-XXXX (where XXXX is the last four digits of the MAC address of SE-NAS-05,
printed on the back panel).
How to restore factory setting: Power off the SE-NAS-05 Æ press and hold the reset button Æ Power on the
SE-NAS-05 and then wait for at least 10 seconds Æ Release the reset button.
10
Configuring the SE-NAS-05 using a Windows client
Open your web browser, such as Internet Explorer or Netscape, enter
http://storage-XXXX in the URL address field followed by [Enter] key, where
XXXX are the last four digits of the MAC address printed on the SE-NAS-05
back panel.
For example, if your SE-NAS-05’s MAC Address is 00-14-3F-AA-08-D5, you will need to enter “http://storage-08d5”
in the URL address bar.
If you changed the SE-NAS-05 host name, you will need to replace the word “storage-XXXX” with it. For example, if
you changed your host name to “FileServer”, please type “http://fileserver” instead. Host name is not case sensitive.
You can also enter the IP address of SE-NAS-05, for example, http://169.254.0.1
.
Go to Section 6.3 to continue the configuration
Please make sure that the IP address of your PC is compatible with
NAS-05’s IP address. This means it needs to be in the same
address range (e.g. 169.254.0.2 to 169.254.0.254) and using the same
Subnet Mask (255.255.255.0).
Configuring the SE-NAS-05 using a Mac OS/X
client
Step 1:
If you know the IP address of SE-NAS-05, go to Step 5 to continue the
configuration.
Under Finder, select Go >> Utilities, or use hot-key [Command + U]
The following screen shots are taken from a Mac-Mini running OS X and may
vary slightly from your computer screen.
Step 2:
A Utilities window will appear. Click on the “Terminal” application.
11
Step 3:
In the Terminal window, enter “smbutil lookup storage-XXXX” followed by
[Enter] key, where XXXX are the last four digits of the MAC address
printed on the SE-NAS-05 back panel.
•
•
For example, if your SE-NAS-05’s MAC Address is 00-14-3F-AA-08-D5, you will need to enter “smbutil lookup
storage-08d5” in the Terminal window.
If you changed the SE-NAS-05 host name, you will need to replace the word “storage” with it. For example, if
you changed your host name to “FileServer”, please type “smbutil lookup fileserver” instead. Host name is not
case sensitive.
Step 4:
The IP address of SE-NAS-05 will be resolved and displayed in the
Terminal window.
The screen shot shows an example of the IP address “192.168.5.181”
Step 5:
Open your web browser, such as Safari. In the URL address field enter the
IP address obtained in Step 4. For example: http://192.168.5.181 followed
by [Enter] key.
12
Logging in to the Web control
Enter the default login information:
Username: admin
Password: admin
Upon a successful login, you will see the following screen:
For security purposes, your login information can be
changed via the web control interface.
An overview of Web Control Interface layout:
Status
IP Config
Maintenance
SMB Server
FTP Server
Disk Utility
Shows the data related to your SE-NAS-05 such as networking status and hard drive information. You may also edit
administration and file language settings here.
Allows you to manually configure the IP address of SE-NAS-05
Perform firmware upgrade, reboot or reset SE-NAS-05
Configure the Samba feature of SE-NAS-05 for the home/office network file sharing capabilities. You can also
create/remove folders and their share permissions.
Configure the FTP features of SE-NAS-05. You may add/remove users and their permissions.
Perform hard drive maintenance routines such as Scan Disk and Format.
13
Status
The welcome screen displays the IP address, firmware version and the
hard drive information such as the hard drive type and storage space
available.
The administrator may change the web control panel login information in
here.
The Language setting is used to recognize files with characters other
than English. If you have trouble reading your files on SE-NAS-05, please
select the appropriate language.
IP IP
SE-NAS-05 can also act as a DHCP server when one is not present in your network. The default IP of
SE-NAS-05 in DHCP server mode is “169.254.0.1”. Any device that is linked to the same network will be
assigned an IP of “169.254.0.x” automatically.
IP Configuration
Enable “Automatic IP” if the network router in your network has a DHCP
server. SE-NAS-05 will automatically be assigned an IP address.
Enable “Status IP” if you want to manually define the IP address of
SE-NAS-05.
14
Maintenance
The administrator can perform maintenance tasks on SE-NAS-05
here.
Update the firmware only if you are experiencing problems with
your SE-NAS-05. New firmware files are available to download
from our website:
http://www.sednacomputer.com/products/se-nas-05.html
Samba Server
Before starting Samba Server, please perform scan disk. Please go to “Disk Utility”, then press “ scan disk” to do so.
Samba Server is the core function of SE-NAS-05, which is network file sharing. Administrator can determine the folders to be shared.
You can also create, rename and delete folders in the SE-NAS-05. All the folders in the root directory that were previously in your hard
drive before it was installed in SE-NAS-05 will also be shown in the “Folder List”. The arrow keys in the middle are used to determine if
the selected folder is to be shared. Password protection for each shared folder can also be implemented.
When creating folders/directories through the web control panel, please use only English alphabets.
15
FTP Configuration
FTP enables file exchange between computers on the
Internet.
Anonymous FTP is disabled by default. The administrator can
determine if the users have read or write permission and the
“Home Directory” will be the folder the anonymous user can
access upon logging in. The Account List displays the current
FTP user accounts. The administrator can add new users,
modify their permissions, temporary disable users and delete
users.
Disk Utility
If you have installed a new hard drive in SE-NAS-05 that is not
formatted, this will be the place to format it to the FAT32 format.
Since SE-NAS-05 supports power management, you can also
determine the time the hard drive have to be inactive in order for
SE-NAS-05 to enter sleep mode.
The Scan Disk function can be used to detect potential
problems with the hard drive. Click on the refresh button to
display the scandisk result.
16
7. OPERATION
7.1
Accessing SE-NAS-05 from Windows client
In Windows, the data can be accessed by searching for SE-NAS-05 in the “Network Neighborhood” (as a computer with the name
“Storage-XXXX”). Or you can access the data in the SE-NAS-05 with the following instructions.
The screen shots are taken from a PC running Windows XP SP2 and may vary slightly
from your computer screen.
Click on the Windows Start button, select “Run” from the menu and a dialogue box as
shown will appear. Type “\\Storage-XXXX” in the field and click “OK, where XXXX are
the last four digits of the MAC address which is printed on the SE-NAS-05 back panel.
z
If you changed the SE-NAS-05 host name, you will need to replace the word “storage” with it. For example, if you
changed your host name to “FileServer”, please type “\\fileserver” instead. Host name is not case sensitive.
z
You can also enter the IP address of SE-NAS-05, for example, \\169.254.0.1
The Windows Explorer will appear and you should be able to see all the folders
that were previously selected to be shared under “SMB Server” in the control
panel.
17
7.2
Accessing SE-NAS-05 from Mac OS/X client
Step 1:
Under Finder, select Go >> Connect to Server, or use the hot-key
[Command +K]
The follow screen shots are taken from a Mac-Mini running OS X and
may vary slightly from your computer screen.
Step 2:
The dialogue box “Connect to Server” will appear. Type
“smb://storage-XXXX” and click the Connect button, where XXXX are
the last four digits of the MAC address which is printed on the
SE-NAS-05 back panel.
z
If you changed the SE-NAS-05 host name, you will need to replace the word “storage” with it. For example,
if you changed your host name to “FileServer”, please type “smb://fileserver” instead. Host name is not case
sensitive.
z
You can also enter the IP address of SE-NAS-05, for example, smb://169.254.0.1
18
Step 3:
The next dialogue box will prompt you for the folder that you will like to access. Select it
and click the OK button.
Step 4:
You might be prompted to enter a password, unless a password was previously
assigned in the control panel, you can leave it blank
.
Step 5:
After a successful mount, a network folder icon will be created on the Mac OS/X
desktop based on the folder you selected in Step 3.
19
8. INSTALLING BACKUP TOOL FOR WINDOWS
8.1
Introduction
This Windows application software allows user to backup or restore data to and from the SE-NAS-05 by simply pushing the COPY button.
Only USB connection is supported.
8.2
Install Application
Double click on INSTALL.EXE in the following folder on the bundled software CD. Refer to the One-Button user’s manual in this folder
for detail instruction:
\Nec\uPD720133\Backup_AP
Screen shot of One-Button Backup Utility for Windows:
20
9. SPECIFICATION
LAN Interface
USB Device Interface
IDE Interface
LED indicator
Cooling system
Function key
Software functions
System management
Supported Network
client
Power supply
Physical dimension
Minimum system
requirement
z
z
z
z
z
z
z
z
z
z
z
z
z
z
z
z
z
z
z
z
z
z
z
z
z
z
z
z
z
z
z
z
z
z
Standard: IEEE802.3 10BASE-T / IEEE802.3U 100BASE-TX (10 / 100Mbps)
Connector: RJ-45 x 1
USB 2.0 High-Speed mass storage device port x 1 (USB-B connector)
NAS function is automatically disabled when USB device port is connected to host PC.
Supports 3.5” ATA100/ATA133 IDE hard drive. Capacity up to 500GB
Power
LAN Link activity
Hard drive busy
USB Link
Internal 40cm DC +12V cooling fan
One-button backup key for USB interface, supported by the bundled backup software for Windows
Reset button: Restore system to factory settings
Power On/Off push button
Fixed IP or DHCP client (automatic IP assignment)
DHCP server - Allows direct connection with a client PC
FTP server
Samba server (CIFS/SMB protocol) for file sharing
User account and share folder security
Web-based administration.
Hard disk utility: Format, Scan disk
Hard disk file system: FAT32 (Maximum single file size is 4GB)
Supports Unicode filename
Built-in scan disk and disk format utilities
Energy saving setting: Automatic hard drive spin-down after idle for 0~60 minutes (User configurable)
User account and share folder security
Firmware upgrade via HTTP (web-based administration)
Supports NTP (Network Time Protocol) time server
Windows 98se/Me/NT4.0/2000/2003/XP
Apple Mac OS/X
Linux/Unix
External +12VDC, 2A power supply
210(L) x 50(W) x 120(H) mm
Mac or PC with USB port or 10/100/1000Mbps Ethernet port
One 3.5” IDE hard drive
21
10. TROUBLESHOOTING
The SE-NAS-05 cannot be detected on my network.
10.1
z
z
z
The SE-NAS-05 is configured, but I can’t find it in Network Neighborhood.
10.2
z
z
z
z
z
z
z
10.3
Check that the SE-NAS-05 properly installed, that the LAN connections are secure, and that the SE-NAS-05 is
powered ON.
If you are using a router, make sure that your PC and the SE-NAS-05 are on the same network segment.
Make sure that your PC has the TCP/IP network protocol installed.
Go to the Find function in the Start menu. Choose Computer, then enter the SE-NAS-05’s host name. In Windows
2000, go to Files and Folders and use the "Search for a Computer" option.
If this doesn’t work, choose the Network option of the Control Panel to check that a TCP/IP protocol is installed. If it
isn’t installed, use Add - Protocol - Microsoft - TCP/IP to install it. In Windows 2000, click Install, not Add. In Windows
NT, click the Protocols tab, then Add.
Check the network bindings. First, make sure that the TCP/IP protocol is bound to your network card (NIC). Then,
select your network card in the Control Panel, click Properties, and choose the Bindings tab. If TCP/IP is not bound
(checked), check it.
Make sure that the TCP/IP -> network card entry is bound to the Client for Microsoft Networks service. Select the
TCP/IP entry for your network Card, click Properties, and then choose the Bindings tab. If Client for Microsoft
Networks is not bound (checked), check it.
If you don’t have a router, make sure that your IP Address is compatible with the SE-NAS-05’s IP Address. This
means it needs to be in the same address range (e.g. 169.254.0.2 to 169.254.0.254) and using the same Subnet
Mask (e.g. 255.255.255.0)
If you do have a router, check that your Gateway IP Address is set correctly. Ask your LAN administrator for the
correct value.
If you have changed the host name of the SE-NAS-05, change it back to the default name.
When I click the SE-NAS-05 icon in Network Neighborhood, I’m prompted for a
password.
This can happen in the following situations:
z
Your Windows Logon name is recognized by the SE-NAS-05, but your Logon password is not. Simply enter your
password, or make your Windows password the same as the SE-NAS-05’s password.
z
Your Windows Logon name is not recognized by the SE-NAS-05, defaulting you to guest access rights. If you are not
the Network Administrator, ask your Administrator to create a user name for you. (Use the same name as your Logon
name.)
z
You do not have access permission for this share. If you are not the Network Administrator, ask your Administrator to
grant you access.
22
Printed in China
P/N: SE-MANL-NAS-05-EN
23