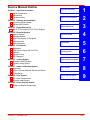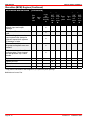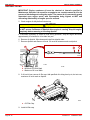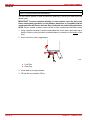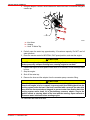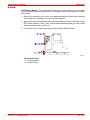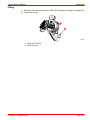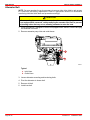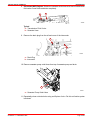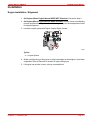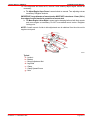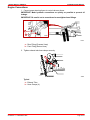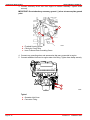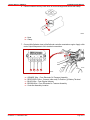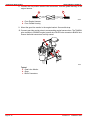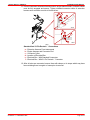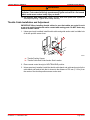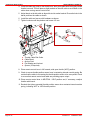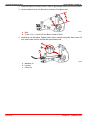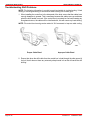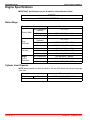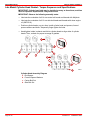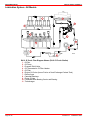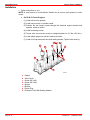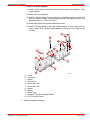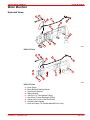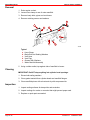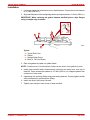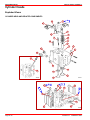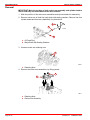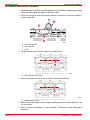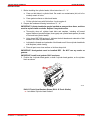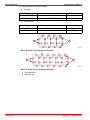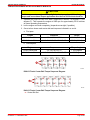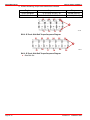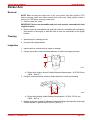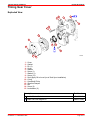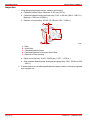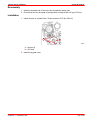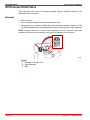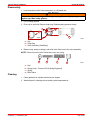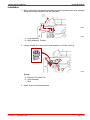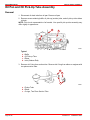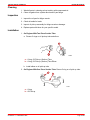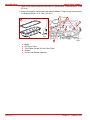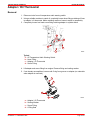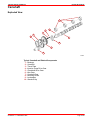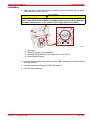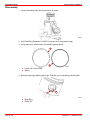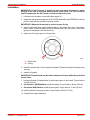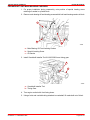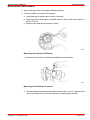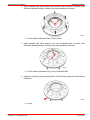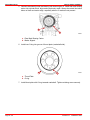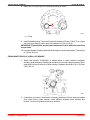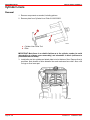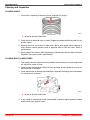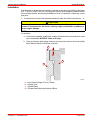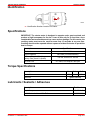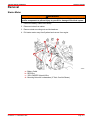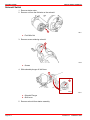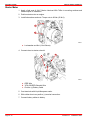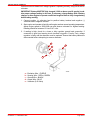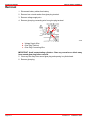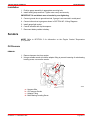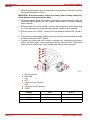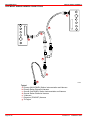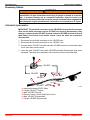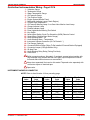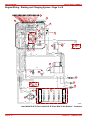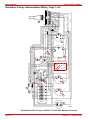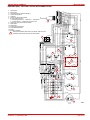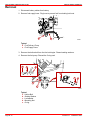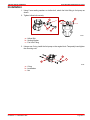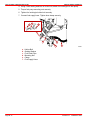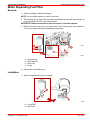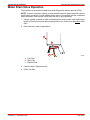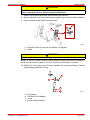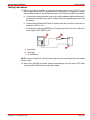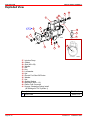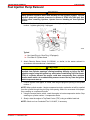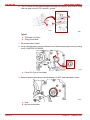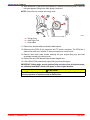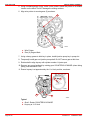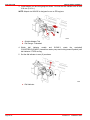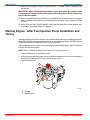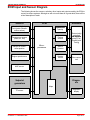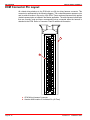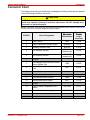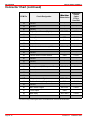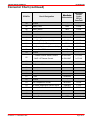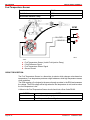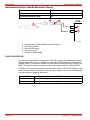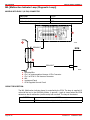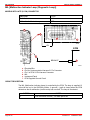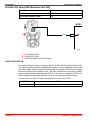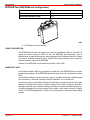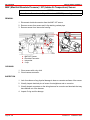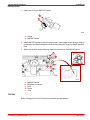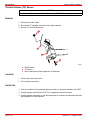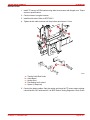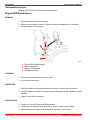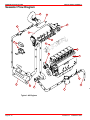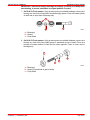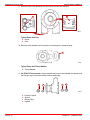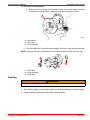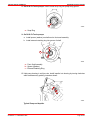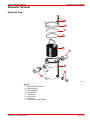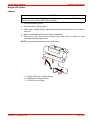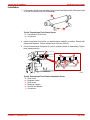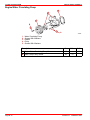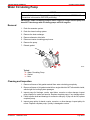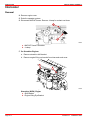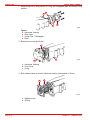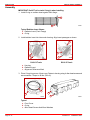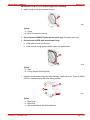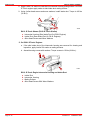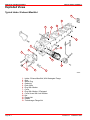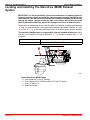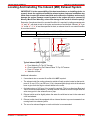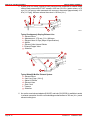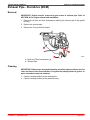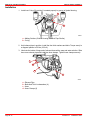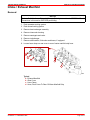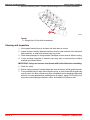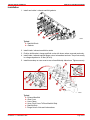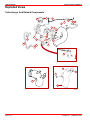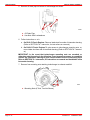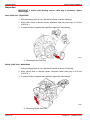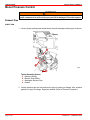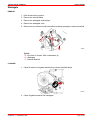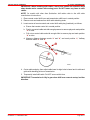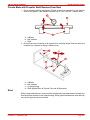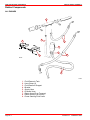
1
SERVICE MANUAL NUMBER 22 MARINE ENGINES IN-LINE DIESEL D2.8L D-Tronic . . . . . . . . Serial Number 0K000001 and Above D4.2L D-Tronic . . . . . . . . Serial Number 0K000001 and Above Printed in U.S.A. 90- 2002, Mercury Marine i 90-860074--1 FEBRUARY 2002 Notice Throughout this publication, Dangers, Warnings and Cautions (accompanied by the International HAZARD Symbol ) are used to alert the mechanic to special instructions concerning a particular service or operation that may be hazardous if performed incorrectly or carelessly. OBSERVE THEM CAREFULLY! These Safety Alerts alone cannot eliminate the hazards that they signal. Strict compliance to these special instructions when performing the service, plus common sense operation, are major accident prevention measures. DANGER Immediate hazards which will result in severe personal injury or death. WARNING Hazards or unsafe practices which could result in severe personal injury or death. CAUTION Hazards or unsafe practices which could result in minor personal injury or product or property damage. 90-860074--1 FEBRUARY 2002 Page i Notice to Users of This Manual This service manual has been written and published by the Service Department of Mercury Marine to aid our dealers’ mechanics and company service personnel when servicing the products described herein. It is assumed that these personnel are familiar with marine product servicing procedures. Furthermore, it is assumed that they have been trained in the recommended service procedures of Mercury MerCruiser product, including the use of mechanics’ common hand tools and the special Mercury Marine or recommended tools from other suppliers. We could not possibly know of and advise the marine trade of all conceivable procedures and of the possible hazards and/or results of each method. Therefore, anyone who uses a service procedure and/or tool, which is not recommended by the manufacturer, first must completely satisfy himself that neither his nor the products safety will be endangered. All information, illustrations and specifications contained in this manual are based on the latest product information available at the time of publication. As required, revisions to this manual will be sent to all dealers contracted by us to sell and/or service these products. We reserve the right to make changes to this manual without prior notification. Refer to dealer service bulletins, operation maintenance and warranty manuals and installation manuals for other pertinent information concerning the products described in this manual. It should be kept in mind, while working on the product, that the electrical system is capable of violent and damaging short circuits or severe electrical shocks. When performing any work where electrical terminals could possibly be grounded or touched by the mechanic, the battery cables should be disconnected at the battery. Any time the intake or exhaust openings are exposed during service they should be covered to protect against accidental entrance of foreign material which could enter the cylinders and cause extensive internal damage when the engine is started. It is important to note, during any maintenance procedure replacement fasteners must have the same measurements and strength as those removed. Numbers on the heads of the metric bolts and on the surfaces of metric nuts indicate their strength. American bolts use radial lines for this purpose, while most American nuts do not have strength markings. Mismatched or incorrect fasteners can result in damage or malfunction, or possibly personal injury. Therefore, fasteners removed should be saved for reuse in the same locations whenever possible. Where the fasteners are not satisfactory for re-use, care should be taken to select a replacement that matches the original. Page ii 90-860074--1 FEBRUARY 2002 Engine Mechanical Components Many of the engine mechanical components are designed for marine applications. Unlike automotive engines, marine engines are subjected to extended periods of heavy load and wide open throttle operation and, therefore, require heavy-duty components. Special marine engine parts have design and manufacturing specifications that are required to provide long life and dependable performance. Marine engine parts also must be able to resist the corrosive action of salt or brackish water that will rust or corrode standard automotive parts within a short period of time. Failure to use recommended Mercury / Quicksilver service replacement parts can result in poor engine performance and/or durability, rapid corrosion of parts subjected to salt water and possibly complete failure of the engine. Replacement Parts Use of parts other than the recommended service replacement parts, will void the warranty on those parts that are damaged as a result. WARNING Electrical and fuel system components on Mercury MerCruiser Engines and Stern Drives are designed and manufactured to comply with U.S. Coast Guard Rules and Regulations to minimize risks of fire or explosion. Use of replacement electrical or fuel system components, which do not comply to these rules and regulations, could result in a fire or explosion hazard and should be avoided. When servicing the electrical and fuel systems, it is extremely important that all components are properly installed and tightened. If not, any electrical component opening would permit sparks to ignite fuel vapors from fuel system leaks, if they existed. 90-860074--1 FEBRUARY 2002 Page iii Models Covered in This Manual Sterndrive (MCM) Page iv Serial Number D2.8L D-Tronic 0K000001 and Above D4.2L D-Tronic 0K000001 and Above Inboard (MIE) Serial Number D2.8L D-Tronic 0K000001 and Above D4.2L D-Tronic 0K000001 and Above 90-860074--1 FEBRUARY 2002 Service Manual Outline Section 1 - Important Information A - General Information B - Maintenance C - Troubleshooting Section 2 - Removal and Installation A - Sterndrive (MCM) Models B - Inboard (MIE) Models Section 3 - Engine Mechanical A - D2.8L D-Tronic And D4.2L D-Tronic Engines Section 4 - Electrical System A - Starting System B - Charging System C - Glow Plug System (If Equipped) D - Instrumentation E - Wiring Diagrams Section 5 - Fuel System A - Description B - Fuel Delivery Pump and Fuel Filter C - Injectors D - Injection Pump E - EDI Diagnosis Section 6 - Cooling System A - Seawater Cooling System B - Closed Cooling System Section 7 - Intake And Exhaust System A - Intercooler B - Intake / Exhaust Manifold, Elbows and Risers C - Turbocharger Section 8 - Drive System A - ZF / Hurth Transmissions B - Propeller Shaft Models Section 9 - Power Steering System A - Pump And Related Components 90-860074--1 FEBRUARY 2002 Important Information 1 Removal And Installation 2 Engine Mechanical 3 Electrical System 4 Fuel System 5 Cooling System 6 Intake And Exhaust System 7 Drive System 8 Power Steering System 9 Page v IMPORTANT INFORMATION Section 1A - General Information Introduction . . . . . . . . . . . . . . . . . . . . . . . . . . . How to Use This Manual . . . . . . . . . . . . . . . Page Numbering . . . . . . . . . . . . . . . . . . . Engine Serial Number / Decal Locations . Operation / Duty Cycle . . . . . . . . . . . . . . . . . 1A-3 1A-3 1A-3 1A-4 1A-5 Engine Break-In . . . . . . . . . . . . . . . . . . . . . . . 1A-6 Initial Break-In Procedure . . . . . . . . . . . . 1A-6 Mercury/Quicksilver Lubricants, Sealants And Adhesives . . . . . . . . . . . . . . . . . . . . . . . 1A-7 IMPORTANT INFORMATION Section 1B - Maintenance Torque Specifications . . . . . . . . . . . . . . . . . . 1B-3 Special Tools . . . . . . . . . . . . . . . . . . . . . . . . . 1B-3 Tools . . . . . . . . . . . . . . . . . . . . . . . . . . . . . . . . 1B-3 Lubricants / Sealants / Adhesives . . . . . . . 1B-3 Engine Specifications . . . . . . . . . . . . . . . . . . 1B-4 Sterndrive (MCM) Engines . . . . . . . . . . . 1B-4 Inboard (MIE) Engines . . . . . . . . . . . . . . 1B-5 Capacities . . . . . . . . . . . . . . . . . . . . . . . . . . . . 1B-6 Engines . . . . . . . . . . . . . . . . . . . . . . . . . . . 1B-6 Drives . . . . . . . . . . . . . . . . . . . . . . . . . . . . . 1B-6 Transmissions . . . . . . . . . . . . . . . . . . . . . . 1B-6 Maintenance Schedules . . . . . . . . . . . . . . . . 1B-7 Maintenance Intervals . . . . . . . . . . . . . . . 1B-7 Sterndrive (MCM) Engines . . . . . . . . . . . 1B-8 Inboard (MIE) Engines . . . . . . . . . . . . . 1B-11 Engine External Views . . . . . . . . . . . . . . . . 1B-13 Starboard Side View . . . . . . . . . . . . . . . 1B-13 Front View . . . . . . . . . . . . . . . . . . . . . . . . 1B-14 Port Side View . . . . . . . . . . . . . . . . . . . . 1B-15 Rear View . . . . . . . . . . . . . . . . . . . . . . . . 1B-16 Engine Oil . . . . . . . . . . . . . . . . . . . . . . . . . . . 1B-17 Oil Level . . . . . . . . . . . . . . . . . . . . . . . . . . 1B-17 Changing Engine Oil and Oil Filter . . . 1B-19 Fuel . . . . . . . . . . . . . . . . . . . . . . . . . . . . . . . . 1B-21 Precautions . . . . . . . . . . . . . . . . . . . . . . . 1B-21 General Information . . . . . . . . . . . . . . . . 1B-22 Diesel Fuel In Cold Weather . . . . . . . . 1B-22 Fuel Filter . . . . . . . . . . . . . . . . . . . . . . . . 1B-23 Closed Cooling System . . . . . . . . . . . . . . . 1B-28 Coolant Requirement . . . . . . . . . . . . . . 1B-28 Checking Level . . . . . . . . . . . . . . . . . . . . 1B-29 Draining . . . . . . . . . . . . . . . . . . . . . . . . . . 1B-30 Filling . . . . . . . . . . . . . . . . . . . . . . . . . . . . 1B-32 Sacrificial Anodes . . . . . . . . . . . . . . . . . . . . 1B-33 Removal . . . . . . . . . . . . . . . . . . . . . . . . . 1B-33 Inspection . . . . . . . . . . . . . . . . . . . . . . . . 1B-33 Disassembly . . . . . . . . . . . . . . . . . . . . . . 1B-34 Reassembly . . . . . . . . . . . . . . . . . . . . . . 1B-34 Installation . . . . . . . . . . . . . . . . . . . . . . . . 1B-34 Flushing Seawater System . . . . . . . . . . . . 1B-35 SternDrive (MCM) Models . . . . . . . . . . 1B-35 Inboard (MIE) Models . . . . . . . . . . . . . . 1B-36 Inspect Water Pickups . . . . . . . . . . . . . . . . 1B-38 SternDrive Gear Housing . . . . . . . . . . . 1B-38 Inboard Though the Hull Pickup . . . . . 1B-38 Lubrication . . . . . . . . . . . . . . . . . . . . . . . . . . 1B-39 Page vi Throttle Cable . . . . . . . . . . . . . . . . . . . . . Shift Cable . . . . . . . . . . . . . . . . . . . . . . . . Engine Coupler / U-joint Shaft Splines U-joints . . . . . . . . . . . . . . . . . . . . . . . . . . . Drive Shaft Extension Models . . . . . . . Sterndrive Unit and Transom Assembly . . . . . . . . . . . . . . . . . . . . . . . . Continuity Circuit . . . . . . . . . . . . . . . . . . . . . Continuity Circuit (continued) . . . . . . . . . . MerCathode . . . . . . . . . . . . . . . . . . . . . . . . . Engine Mounts . . . . . . . . . . . . . . . . . . . . . . . Electrical System . . . . . . . . . . . . . . . . . . . . . Power Steering . . . . . . . . . . . . . . . . . . . . . . Checking Fluid Level . . . . . . . . . . . . . . . Filling and Bleeding . . . . . . . . . . . . . . . . Transmission . . . . . . . . . . . . . . . . . . . . . . . . Checking Fluid Level . . . . . . . . . . . . . . . Power Trim . . . . . . . . . . . . . . . . . . . . . . . . . . Checking Fluid Level . . . . . . . . . . . . . . . Filling . . . . . . . . . . . . . . . . . . . . . . . . . . . . Gear Lube Monitor . . . . . . . . . . . . . . . . . . . Checking Fluid Level . . . . . . . . . . . . . . . Filling . . . . . . . . . . . . . . . . . . . . . . . . . . . . Seawater Strainer . . . . . . . . . . . . . . . . . . . . Air Filter . . . . . . . . . . . . . . . . . . . . . . . . . . . . . Removal . . . . . . . . . . . . . . . . . . . . . . . . . Inspection . . . . . . . . . . . . . . . . . . . . . . . . Cleaning . . . . . . . . . . . . . . . . . . . . . . . . . Installation . . . . . . . . . . . . . . . . . . . . . . . . Drive Belts . . . . . . . . . . . . . . . . . . . . . . . . . . General Information . . . . . . . . . . . . . . . . Inspection . . . . . . . . . . . . . . . . . . . . . . . . Engine Water Circulating Pump Belt . . Alternator Belt . . . . . . . . . . . . . . . . . . . . . Power Steering Pump Belt . . . . . . . . . . Vacuum Pump Belt . . . . . . . . . . . . . . . . Battery . . . . . . . . . . . . . . . . . . . . . . . . . . . . . . Charging System . . . . . . . . . . . . . . . . . . . . . Corrosion and Corrosion Protection . . . . . Saltwater Operation . . . . . . . . . . . . . . . . . . Freezing Temperature and Cold Weather Operation . . . . . . . . . . . . . . . . . . . . . . . . . . . Cold Weather or Extended Storage . . . . . Power Package Layup . . . . . . . . . . . . . Draining . . . . . . . . . . . . . . . . . . . . . . . . . . Recommissioning . . . . . . . . . . . . . . . . . . . . 1B-39 1B-39 1B-40 1B-41 1B-42 1B-42 1B-43 1B-44 1B-45 1B-45 1B-45 1B-46 1B-46 1B-48 1B-49 1B-49 1B-50 1B-50 1B-51 1B-52 1B-52 1B-52 1B-53 1B-54 1B-54 1B-54 1B-55 1B-55 1B-56 1B-56 1B-57 1B-57 1B-58 1B-60 1B-62 1B-64 1B-64 1B-64 1B-64 1B-65 1B-66 1B-66 1B-67 1B-73 90-860074--1 FEBRUARY 2002 IMPORTANT INFORMATION SECTION 1C - Troubleshooting Precautions . . . . . . . . . . . . . . . . . . . . . . . . . . 1C-3 Poor Boat Performance and/or Poor Maneuverability . . . . . . . . . . . . . . . . . . . . . . 1C-5 Improper Full Throttle Engine RPM . . . . . . 1C-6 RPM Too High . . . . . . . . . . . . . . . . . . . . . 1C-6 RPM Too Low . . . . . . . . . . . . . . . . . . . . . . 1C-6 Engine Cranks Over But Will Not Start Or Starts Hard . . . . . . . . . . . . . . . . . . . . . . . . . . 1C-7 Electrical . . . . . . . . . . . . . . . . . . . . . . . . . . 1C-7 Fuel System . . . . . . . . . . . . . . . . . . . . . . . 1C-7 Miscellaneous . . . . . . . . . . . . . . . . . . . . . . 1C-9 Engine Will Not Crank Over or Starter Inoperative . . . . . . . . . . . . . . . . . . . . . . . . . . . 1C-9 Glow Plugs Inoperative . . . . . . . . . . . . . . . 1C-10 Charging System Inoperative . . . . . . . . . . 1C-11 Noisy Alternator . . . . . . . . . . . . . . . . . . . . . . 1C-11 Engine Operates Poorly at Idle . . . . . . . . . 1C-12 Engine Operates Poorly At High Rpm . . . 1C-13 Poor Fuel Economy . . . . . . . . . . . . . . . . . . 1C-14 Engine Smoking . . . . . . . . . . . . . . . . . . . . . 1C-15 Black Smoke . . . . . . . . . . . . . . . . . . . . . . 1C-15 Blue Smoke . . . . . . . . . . . . . . . . . . . . . . . 1C-16 White Smoke . . . . . . . . . . . . . . . . . . . . . 1C-16 Exhaust Gas Temperature . . . . . . . . . . . . . 1C-17 High . . . . . . . . . . . . . . . . . . . . . . . . . . . . . 1C-17 Low . . . . . . . . . . . . . . . . . . . . . . . . . . . . . . 1C-17 Turbocharger . . . . . . . . . . . . . . . . . . . . . . . . Engine Noise . . . . . . . . . . . . . . . . . . . . . . . . Valve Cover Area . . . . . . . . . . . . . . . . . . Cylinder Area . . . . . . . . . . . . . . . . . . . . . Camshaft Area . . . . . . . . . . . . . . . . . . . . Crankshaft Area . . . . . . . . . . . . . . . . . . . Miscellaneous . . . . . . . . . . . . . . . . . . . . . Oil Pressure . . . . . . . . . . . . . . . . . . . . . . . . . Low Oil Pressure . . . . . . . . . . . . . . . . . . High Oil Pressure . . . . . . . . . . . . . . . . . . Excessive Oil Consumption . . . . . . . . . Water / Coolant in Engine . . . . . . . . . . . . . Important Information . . . . . . . . . . . . . . Water / Coolant In Crankcase Oil . . . . Water / Coolant On Top Pistons . . . . . Engine Overheats . . . . . . . . . . . . . . . . . . . . Cooling System . . . . . . . . . . . . . . . . . . . Mechanical . . . . . . . . . . . . . . . . . . . . . . . Power Steering . . . . . . . . . . . . . . . . . . . . . . Poor, Erratic or No Assist . . . . . . . . . . . Noisy Pump . . . . . . . . . . . . . . . . . . . . . . . Fluid Leaks . . . . . . . . . . . . . . . . . . . . . . . Insufficient Water Flow From Belt Driven Seawater Pump . . . . . . . . . . . . . . . . . . . . . ZF / Hurth Hydraulic Transmission . . . . . . 1C-18 1C-19 1C-20 1C-20 1C-21 1C-22 1C-23 1C-23 1C-25 1C-25 1C-26 1C-27 1C-27 1C-27 1C-28 1C-29 1C-29 1C-30 1C-31 1C-31 1C-32 1C-32 1C-33 1C-34 REMOVAL AND INSTALLATION Section 2A - Sterndrive (MCM) Models Torque Specifications . . . . . . . . . . . . . . . . . . 2A-3 Special Tools . . . . . . . . . . . . . . . . . . . . . . . . . 2A-3 Lubricants / Sealants / Adhesives . . . . . . . 2A-4 Removal . . . . . . . . . . . . . . . . . . . . . . . . . . . . . 2A-4 Installation . . . . . . . . . . . . . . . . . . . . . . . . . . . 2A-7 Engine Installation / Alignment . . . . . . . 2A-7 Engine Connections . . . . . . . . . . . . . . . 2A-15 Throttle Cable Installation and Adjustment . . . . . . . . . . . . . . . . . . . . . . . Shift Cable Installation and Adjustment . . . . . . . . . . . . . . . . . . . . . . . Troubleshooting Shift Problems . . . . . . Battery Cables . . . . . . . . . . . . . . . . . . . . 2A-21 2A-23 2A-28 2A-30 REMOVAL AND INSTALLATION Section 2B - Inboard (MIE) Models Torque Specifications . . . . . . . . . . . . . . . . . . Tools/Lubricants/Adhesives . . . . . . . . . . . . . Removal . . . . . . . . . . . . . . . . . . . . . . . . . . . . . Engine Removal . . . . . . . . . . . . . . . . . . . . Installation . . . . . . . . . . . . . . . . . . . . . . . . . . . Engine Installation and Initial Alignment . . . . . . . . . . . . . . . . . . . . . . . . . 90-860074--1 FEBRUARY 2002 2B-3 2B-3 2B-4 2B-4 2B-7 2B-7 Engine Final Alignment . . . . . . . . . . . . . Engine Connections . . . . . . . . . . . . . . . Throttle Cable Installation and Adjustment . . . . . . . . . . . . . . . . . . . . . . . Shift Cable Installation And Adjustment . . . . . . . . . . . . . . . . . . . . . . . Battery Cables . . . . . . . . . . . . . . . . . . . . 2B-11 2B-18 2B-21 2B-21 2B-21 Page vii ENGINE Section 3A - Engine Mechanical Identification . . . . . . . . . . . . . . . . . . . . . . . . . . 3A-3 Torque Specifications . . . . . . . . . . . . . . . . . . 3A-4 Tools . . . . . . . . . . . . . . . . . . . . . . . . . . . . . . . . 3A-6 Special Tools . . . . . . . . . . . . . . . . . . . . . . . 3A-6 Special Tools (continued) . . . . . . . . . . . . 3A-7 Snap-On Tools . . . . . . . . . . . . . . . . . . . . . 3A-8 Kent-Moore Tools . . . . . . . . . . . . . . . . . . . 3A-8 Lubricants/Sealants/Adhesives . . . . . . . . . . 3A-9 Engine Specifications . . . . . . . . . . . . . . . . . 3A-10 Piston Rings . . . . . . . . . . . . . . . . . . . . . . 3A-10 Cylinder Liner Diameter . . . . . . . . . . . . 3A-10 Cylinder Liner Protrusion . . . . . . . . . . . 3A-11 Head Gaskets . . . . . . . . . . . . . . . . . . . . . 3A-11 Cylinder Head . . . . . . . . . . . . . . . . . . . . . 3A-11 Oil Pump . . . . . . . . . . . . . . . . . . . . . . . . . 3A-12 Camshaft . . . . . . . . . . . . . . . . . . . . . . . . . 3A-12 Valve Lifter . . . . . . . . . . . . . . . . . . . . . . . . 3A-12 Rocker Arm . . . . . . . . . . . . . . . . . . . . . . . 3A-13 Valve Adjustment . . . . . . . . . . . . . . . . . . 3A-13 Valve . . . . . . . . . . . . . . . . . . . . . . . . . . . . . 3A-13 Valve Seat . . . . . . . . . . . . . . . . . . . . . . . . 3A-13 Valve Guide . . . . . . . . . . . . . . . . . . . . . . . 3A-14 Valve Spring . . . . . . . . . . . . . . . . . . . . . . 3A-14 Crankshaft . . . . . . . . . . . . . . . . . . . . . . . . 3A-15 Crankshaft (continued) . . . . . . . . . . . . . 3A-16 Connecting Rods . . . . . . . . . . . . . . . . . . 3A-17 Connecting Rod Crank Pin Bore . . . . . 3A-17 Connecting Rod Bushings . . . . . . . . . . 3A-17 Pistons . . . . . . . . . . . . . . . . . . . . . . . . . . . 3A-17 Flywheel . . . . . . . . . . . . . . . . . . . . . . . . . 3A-17 Precautions . . . . . . . . . . . . . . . . . . . . . . . . . 3A-18 General Information . . . . . . . . . . . . . . . . . . 3A-19 Engine Rotation . . . . . . . . . . . . . . . . . . . 3A-19 Engine Firing Order . . . . . . . . . . . . . . . . 3A-19 Late Model Cylinder Head Gasket Torque Sequence and Specifications 3A-20 Early Model Cylinder Head Gasket Torque Sequence and Specifications 3A-25 Lubrication System - All Models . . . . . 3A-28 Examples of Bearing Failures . . . . . . . 3A-29 Compression Testing Procedure . . . . . 3A-30 Engine Cover . . . . . . . . . . . . . . . . . . . . . . . . 3A-31 Removal . . . . . . . . . . . . . . . . . . . . . . . . . 3A-31 Cleaning . . . . . . . . . . . . . . . . . . . . . . . . . 3A-31 Inspection . . . . . . . . . . . . . . . . . . . . . . . . 3A-31 Installation . . . . . . . . . . . . . . . . . . . . . . . . 3A-31 Valve Covers . . . . . . . . . . . . . . . . . . . . . . . . 3A-32 Removal . . . . . . . . . . . . . . . . . . . . . . . . . 3A-32 Cleaning . . . . . . . . . . . . . . . . . . . . . . . . . 3A-33 Inspection . . . . . . . . . . . . . . . . . . . . . . . . 3A-33 Page viii Installation . . . . . . . . . . . . . . . . . . . . . . . . Water Manifold . . . . . . . . . . . . . . . . . . . . . . . Exploded Views . . . . . . . . . . . . . . . . . . . Removal . . . . . . . . . . . . . . . . . . . . . . . . . Cleaning . . . . . . . . . . . . . . . . . . . . . . . . . Inspection . . . . . . . . . . . . . . . . . . . . . . . . Installation . . . . . . . . . . . . . . . . . . . . . . . . Cylinder Heads . . . . . . . . . . . . . . . . . . . . . . Exploded Views . . . . . . . . . . . . . . . . . . . Removal . . . . . . . . . . . . . . . . . . . . . . . . . Disassembly . . . . . . . . . . . . . . . . . . . . . . Cleaning . . . . . . . . . . . . . . . . . . . . . . . . . Inspection . . . . . . . . . . . . . . . . . . . . . . . . Repair . . . . . . . . . . . . . . . . . . . . . . . . . . . Expansion Plugs . . . . . . . . . . . . . . . . . . Assembly . . . . . . . . . . . . . . . . . . . . . . . . . Installation Using Early Model Gaskets . . . . . . . . . Installation Using Late Model Gaskets . . . . . . . . . Rocker Arm . . . . . . . . . . . . . . . . . . . . . . . . . Removal . . . . . . . . . . . . . . . . . . . . . . . . . Cleaning . . . . . . . . . . . . . . . . . . . . . . . . . Inspection . . . . . . . . . . . . . . . . . . . . . . . . Assembly . . . . . . . . . . . . . . . . . . . . . . . . . Installation . . . . . . . . . . . . . . . . . . . . . . . . Timing Gear Cover . . . . . . . . . . . . . . . . . . . Exploded View . . . . . . . . . . . . . . . . . . . . Removal . . . . . . . . . . . . . . . . . . . . . . . . . Cleaning . . . . . . . . . . . . . . . . . . . . . . . . . Inspection . . . . . . . . . . . . . . . . . . . . . . . . Installation . . . . . . . . . . . . . . . . . . . . . . . . Oil Pump . . . . . . . . . . . . . . . . . . . . . . . . . . . . Removal . . . . . . . . . . . . . . . . . . . . . . . . . Cleaning . . . . . . . . . . . . . . . . . . . . . . . . . Inspection . . . . . . . . . . . . . . . . . . . . . . . . Reassembly . . . . . . . . . . . . . . . . . . . . . . Installation . . . . . . . . . . . . . . . . . . . . . . . . Oil Pressure Relief Valve . . . . . . . . . . . . . . Removal . . . . . . . . . . . . . . . . . . . . . . . . . Disassembly . . . . . . . . . . . . . . . . . . . . . . Cleaning . . . . . . . . . . . . . . . . . . . . . . . . . Inspection . . . . . . . . . . . . . . . . . . . . . . . . Assembly . . . . . . . . . . . . . . . . . . . . . . . . . Installation . . . . . . . . . . . . . . . . . . . . . . . . Oil Pan and Oil Pick-Up Tube Assembly . Removal . . . . . . . . . . . . . . . . . . . . . . . . . Cleaning . . . . . . . . . . . . . . . . . . . . . . . . . Inspection . . . . . . . . . . . . . . . . . . . . . . . . Installation . . . . . . . . . . . . . . . . . . . . . . . . 3A-34 3A-37 3A-37 3A-38 3A-38 3A-38 3A-39 3A-40 3A-40 3A-42 3A-44 3A-44 3A-45 3A-50 3A-50 3A-52 3A-55 3A-62 3A-71 3A-71 3A-71 3A-71 3A-72 3A-73 3A-77 3A-77 3A-78 3A-78 3A-78 3A-79 3A-81 3A-81 3A-81 3A-82 3A-83 3A-83 3A-84 3A-84 3A-85 3A-85 3A-86 3A-86 3A-87 3A-88 3A-88 3A-89 3A-89 3A-89 90-860074--1 FEBRUARY 2002 ENGINE (continued) Section 3A - Engine Mechanical (continued) Adapter / Oil Thermostat . . . . . . . . . . . . . . 3A-91 Removal . . . . . . . . . . . . . . . . . . . . . . . . . 3A-91 Disassembly . . . . . . . . . . . . . . . . . . . . . . 3A-92 Cleaning and Inspection . . . . . . . . . . . . 3A-92 Testing . . . . . . . . . . . . . . . . . . . . . . . . . . . 3A-92 Installation . . . . . . . . . . . . . . . . . . . . . . . . 3A-93 Camshaft . . . . . . . . . . . . . . . . . . . . . . . . . . . 3A-95 Exploded View . . . . . . . . . . . . . . . . . . . . 3A-95 Testing - Measuring Lobe Lift . . . . . . . . 3A-96 Removal . . . . . . . . . . . . . . . . . . . . . . . . . 3A-96 Inspection . . . . . . . . . . . . . . . . . . . . . . . . 3A-98 Installation . . . . . . . . . . . . . . . . . . . . . . . . 3A-99 Camshaft Bearings . . . . . . . . . . . . . . . . . . 3A-100 Inspection . . . . . . . . . . . . . . . . . . . . . . . 3A-100 Removal . . . . . . . . . . . . . . . . . . . . . . . . 3A-100 Installation . . . . . . . . . . . . . . . . . . . . . . . 3A-101 Valve Lifters . . . . . . . . . . . . . . . . . . . . . . . . 3A-102 Removal . . . . . . . . . . . . . . . . . . . . . . . . 3A-102 Cleaning . . . . . . . . . . . . . . . . . . . . . . . . 3A-103 Inspection . . . . . . . . . . . . . . . . . . . . . . . 3A-103 Installation . . . . . . . . . . . . . . . . . . . . . . . 3A-104 Valve Push Rods . . . . . . . . . . . . . . . . . . . . 3A-105 Removal . . . . . . . . . . . . . . . . . . . . . . . . 3A-105 Cleaning . . . . . . . . . . . . . . . . . . . . . . . . 3A-105 Inspection . . . . . . . . . . . . . . . . . . . . . . . 3A-105 Installation . . . . . . . . . . . . . . . . . . . . . . . 3A-105 Connecting Rod / Piston Assembly . . . . 3A-106 Measuring Rod Bearing Clearance . . 3A-106 Removal . . . . . . . . . . . . . . . . . . . . . . . . 3A-107 Disassembly . . . . . . . . . . . . . . . . . . . . . 3A-108 Cleaning . . . . . . . . . . . . . . . . . . . . . . . . 3A-109 Inspection . . . . . . . . . . . . . . . . . . . . . . . 3A-109 Assembly . . . . . . . . . . . . . . . . . . . . . . . . 3A-113 Installation . . . . . . . . . . . . . . . . . . . . . . . 3A-114 Rear Oil Seal . . . . . . . . . . . . . . . . . . . . . . . 3A-116 Removal . . . . . . . . . . . . . . . . . . . . . . . . 3A-116 Installation . . . . . . . . . . . . . . . . . . . . . . . 3A-117 Crankshaft and Main Bearings . . . . . . . . 3A-118 Removal . . . . . . . . . . . . . . . . . . . . . . . . 3A-118 Cleaning . . . . . . . . . . . . . . . . . . . . . . . . 3A-123 Inspection . . . . . . . . . . . . . . . . . . . . . . . 3A-124 Installation . . . . . . . . . . . . . . . . . . . . . . . 3A-127 Cylinder Liners . . . . . . . . . . . . . . . . . . . . . . 3A-136 Removal . . . . . . . . . . . . . . . . . . . . . . . . 3A-136 Identification . . . . . . . . . . . . . . . . . . . . . 3A-137 Cleaning and Inspection . . . . . . . . . . . 3A-138 Installation . . . . . . . . . . . . . . . . . . . . . . . 3A-139 Flywheel Housing, Coupler / Drive Plate And Flywheel . . . . . . . . . . . . . . . . . . . . . . . . . . . 3A-144 Exploded View . . . . . . . . . . . . . . . . . . . 3A-144 Flywheel Housing . . . . . . . . . . . . . . . . . 3A-148 Sterndrive (MCM) Coupler / Inboard (MIE) Drive Plate . . . . . . . . . . . . . . . . . . . . . . . 3A-150 Flywheel . . . . . . . . . . . . . . . . . . . . . . . . 3A-151 Engine Mounts . . . . . . . . . . . . . . . . . . . . . . 3A-152 Front Mounts . . . . . . . . . . . . . . . . . . . . . 3A-152 MIE (Inboard) Transmission Mounts . 3A-153 Engine 20-Hour Break-In Period . . . . . . 3A-154 After Break-in Period . . . . . . . . . . . . . . . . 3A-154 ELECTRICAL SYSTEMS Section 4A - Starting System Identification . . . . . . . . . . . . . . . . . . . . . . . . . . Specifications . . . . . . . . . . . . . . . . . . . . . . . . . Torque Specifications . . . . . . . . . . . . . . . . . . Lubricants / Sealants / Adhesives . . . . . . . Replacement Parts . . . . . . . . . . . . . . . . . . . . Starting System Components . . . . . . . . . . . Inspection . . . . . . . . . . . . . . . . . . . . . . . . . . . . Periodic Inspection . . . . . . . . . . . . . . . . . 90-860074--1 FEBRUARY 2002 4A-3 4A-3 4A-3 4A-3 4A-4 4A-4 4A-6 4A-6 Testing Voltage . . . . . . . . . . . . . . . . . . . . . 4A-6 Removal . . . . . . . . . . . . . . . . . . . . . . . . . . . . . 4A-7 Starter Motor . . . . . . . . . . . . . . . . . . . . . . . 4A-7 Solenoid Switch . . . . . . . . . . . . . . . . . . . . 4A-8 Installation . . . . . . . . . . . . . . . . . . . . . . . . . . . 4A-9 Solenoid Switch . . . . . . . . . . . . . . . . . . . . 4A-9 Starter Motor . . . . . . . . . . . . . . . . . . . . . . 4A-10 Page ix ELECTRICAL SYSTEMS Section 4B - Charging System Identification . . . . . . . . . . . . . . . . . . . . . . . . . . 4B-3 Replacement Parts Warning . . . . . . . . . . . . 4B-3 Specifications . . . . . . . . . . . . . . . . . . . . . . . . . 4B-4 Torque Specifications . . . . . . . . . . . . . . . . . . 4B-4 Special Tools . . . . . . . . . . . . . . . . . . . . . . . . . 4B-5 Lubricants/Sealers/Adhesives . . . . . . . . . . . 4B-5 Wire Color Code Abbreviations . . . . . . . . . . 4B-5 Precautions . . . . . . . . . . . . . . . . . . . . . . . . . . 4B-6 General . . . . . . . . . . . . . . . . . . . . . . . . . . . 4B-6 Electronic Diesel Injection (EDI) Electrical System Precautions . . . . . . . 4B-6 Battery Precautions - Multiple EDI Engines . . . . . . . . . . . . . . . . . . . . . . . . . . . 4B-7 Charging System Components . . . . . . . . . . 4B-8 Inspection . . . . . . . . . . . . . . . . . . . . . . . . . . . . 4B-9 Troubleshooting Tests (Alternator on Engine) . . . . . . . . . . . . . . . . . . . . . . . . . . 4B-10 Circuitry Test . . . . . . . . . . . . . . . . . . . . . . . . Output Circuit . . . . . . . . . . . . . . . . . . . . . Excitation Circuit . . . . . . . . . . . . . . . . . . Sensing Circuit . . . . . . . . . . . . . . . . . . . . Current Output Test . . . . . . . . . . . . . . . . Exploded View . . . . . . . . . . . . . . . . . . . . Removal . . . . . . . . . . . . . . . . . . . . . . . . . . . . Alternator . . . . . . . . . . . . . . . . . . . . . . . . . Alternator Bracket . . . . . . . . . . . . . . . . . Installation . . . . . . . . . . . . . . . . . . . . . . . . . . Alternator Bracket . . . . . . . . . . . . . . . . . Alternator . . . . . . . . . . . . . . . . . . . . . . . . . Battery Isolators . . . . . . . . . . . . . . . . . . . . . . Dual Battery Charging Systems . . . . . Battery Isolator Diagram . . . . . . . . . . . . 4B-10 4B-11 4B-12 4B-13 4B-14 4B-16 4B-17 4B-17 4B-17 4B-18 4B-18 4B-18 4B-19 4B-19 4B-20 ELECTRICAL SYSTEMS Section 4C - Glow Plug System Identification . . . . . . . . . . . . . . . . . . . . . . . . . . Specifications . . . . . . . . . . . . . . . . . . . . . . . . . Torque Specifications . . . . . . . . . . . . . . . . . . Lubricants / Sealants / Adhesives . . . . . . . Special Tools . . . . . . . . . . . . . . . . . . . . . . . . . Description . . . . . . . . . . . . . . . . . . . . . . . . . . . Precautions . . . . . . . . . . . . . . . . . . . . . . . . . . Glow Plug Testing (Prior to Removal) . . . . Removal . . . . . . . . . . . . . . . . . . . . . . . . . . . . . Cleaning . . . . . . . . . . . . . . . . . . . . . . . . . . . . . 4C-3 4C-3 4C-4 4C-4 4C-4 4C-4 4C-4 4C-5 4C-6 4C-7 Inspection . . . . . . . . . . . . . . . . . . . . . . . . . . . . 4C-7 Installation . . . . . . . . . . . . . . . . . . . . . . . . . . . 4C-8 Glow Plug Actuator Relay and Auxiliary Relay . . . . . . . . . . . . . . . . . . . . . . . . . . . . . . . 4C-9 Testing . . . . . . . . . . . . . . . . . . . . . . . . . . . . 4C-9 Removal . . . . . . . . . . . . . . . . . . . . . . . . . 4C-10 Cleaning . . . . . . . . . . . . . . . . . . . . . . . . . 4C-10 Inspection . . . . . . . . . . . . . . . . . . . . . . . . 4C-10 Installation . . . . . . . . . . . . . . . . . . . . . . . . 4C-10 Glow Plug Circuit Diagram . . . . . . . . . . . . . 4C-11 ELECTRICAL SYSTEMS Section 4D - Instrumentation Identification . . . . . . . . . . . . . . . . . . . . . . . . . . 4D-3 Gauges . . . . . . . . . . . . . . . . . . . . . . . . . . . 4D-3 Panels . . . . . . . . . . . . . . . . . . . . . . . . . . . . 4D-3 Special Tools . . . . . . . . . . . . . . . . . . . . . . . . . 4D-4 Tools . . . . . . . . . . . . . . . . . . . . . . . . . . . . . . . . 4D-4 Lubricants / Sealants / Adhesives . . . . . . . 4D-4 Wire Color Abbreviations . . . . . . . . . . . . . . . 4D-4 Precautions . . . . . . . . . . . . . . . . . . . . . . . . . . 4D-5 General Information . . . . . . . . . . . . . . . . . . . 4D-6 Special Information . . . . . . . . . . . . . . . . . . . . 4D-6 Tachometer . . . . . . . . . . . . . . . . . . . . . . . . 4D-6 QSI Series Gauge Lighting Options . . . 4D-7 Gauges . . . . . . . . . . . . . . . . . . . . . . . . . . . . . . 4D-8 Removal . . . . . . . . . . . . . . . . . . . . . . . . . . 4D-8 Testing . . . . . . . . . . . . . . . . . . . . . . . . . . . . 4D-8 Installation . . . . . . . . . . . . . . . . . . . . . . . . 4D-11 Senders . . . . . . . . . . . . . . . . . . . . . . . . . . . . . 4D-11 Page x Oil Pressure . . . . . . . . . . . . . . . . . . . . . . Water Temperature - Primary Station . Primary Station Switches . . . . . . . . . . . . . . Ignition Key Switch . . . . . . . . . . . . . . . . Audio Warning Test and Panel Light Switch . . . . . . . . . . . . . . . . . . . . . . . . . . . Audio Warning System . . . . . . . . . . . . . . . . Alarm . . . . . . . . . . . . . . . . . . . . . . . . . . . . Oil Pressure Switch . . . . . . . . . . . . . . . . Water Temperature Switch / Sender . . Transmission Fluid Temperature Switch . . . . . . . . . . . . . . . . . . . . . . . . . . . Second Station Extension Harness . . . . . Remote Control / Neutral Start Safety Circuit . . . . . . . . . . . . . . . . . . . . . . . . . . . . . . Primary Station . . . . . . . . . . . . . . . . . . . . Secondary Station . . . . . . . . . . . . . . . . . 4D-11 4D-13 4D-15 4D-15 4D-17 4D-19 4D-19 4D-20 4D-21 4D-24 4D-26 4D-29 4D-29 4D-30 90-860074--1 FEBRUARY 2002 ELECTRICAL SYSTEMS Section 4E - Wiring Diagrams Wire Color Abbreviations . . . . . . . . . . . . . . . 4E-3 Tools . . . . . . . . . . . . . . . . . . . . . . . . . . . . . . . . 4E-3 Lubricants / Sealants / Adhesives . . . . . . . 4E-3 General Information . . . . . . . . . . . . . . . . . . . 4E-3 Sterndrive (MCM) Models . . . . . . . . . . . . . . 4E-4 Engine Wiring - Starting and Charging System . . . . . . . . . . . . . . . . . . . . . . . . . . . 4E-4 ECM and Fuel System Wiring . . . . . . . . 4E-8 Quicksilver Instrumentation Wiring . . . 4E-10 Power Trim System Wiring Diagram . . 4E-14 MerCathode System Wiring Diagram . Inboard (MIE) Models . . . . . . . . . . . . . . . . . Engine Wiring - Starting and Charging System . . . . . . . . . . . . . . . . . . . . . . . . . . ECM and Fuel System Wiring . . . . . . . Quicksilver Primary Instrumentation Wiring . . . . . . . . . . . . . . . . . . . . . . . . . . . Models With Early Connectors . . . . . . Models With 21-Pin Deutsch t Connector . . . . . . . . . . . . . . . . . . . . . . . . 4E-15 4E-16 4E-16 4E-20 4E-22 4E-26 4E-28 FUEL SYSTEM Section 5A - Description Introduction . . . . . . . . . . . . . . . . . . . . . . . . . . . Precautions . . . . . . . . . . . . . . . . . . . . . . . . . . Testing Procedure . . . . . . . . . . . . . . . . . . General Information . . . . . . . . . . . . . . . . . . . Basic Knowledge and Tools Required . Visual/Physical Inspection . . . . . . . . . . . Electrostatic Discharge Damage . . . . . . Diagnostic Information . . . . . . . . . . . . . . Terminology . . . . . . . . . . . . . . . . . . . . . . . . Electronic Control Module (ECM) and Sensors . . . . . . . . . . . . . . . . . . . . . . . . . General Description . . . . . . . . . . . . . . . . . Computers and Voltage Signals . . . . . . 5A-3 5A-4 5A-5 5A-6 5A-6 5A-6 5A-6 5A-7 5A-7 5A-9 5A-9 5A-9 Analog Signals . . . . . . . . . . . . . . . . . . . . . 5A-9 Analog Value Conditioning . . . . . . . . . . 5A-11 Digital Signals . . . . . . . . . . . . . . . . . . . . . 5A-13 Engine Control Module (ECM) . . . . . . . 5A-15 Speed Density System . . . . . . . . . . . . . 5A-17 ECM Input and Sensor Descriptions . . 5A-18 Fuel Management . . . . . . . . . . . . . . . . . . . . 5A-26 Control . . . . . . . . . . . . . . . . . . . . . . . . . . . 5A-26 Modes Of Operation . . . . . . . . . . . . . . . 5A-27 Diagnosis and Testing . . . . . . . . . . . . . . . . 5A-30 ECM Reactions During Operation . . . . 5A-30 ECM Self-Diagnostics . . . . . . . . . . . . . . 5A-30 FUEL SYSTEM Section 5B - Fuel Delivery Pump and Fuel Filter Identification . . . . . . . . . . . . . . . . . . . . . . . . . . Specifications . . . . . . . . . . . . . . . . . . . . . . . . . Torque . . . . . . . . . . . . . . . . . . . . . . . . . . . . . . . Tools . . . . . . . . . . . . . . . . . . . . . . . . . . . . . . . . Lubricants / Sealants / Adhesives . . . . . . . Precautions . . . . . . . . . . . . . . . . . . . . . . . . . . Exploded View . . . . . . . . . . . . . . . . . . . . . . . . Fuel Delivery Pump, Fuel Filter and Related Components . . . . . . . . . . . 90-860074--1 FEBRUARY 2002 5B-3 5B-3 5B-3 5B-3 5B-3 5B-4 5B-6 Testing . . . . . . . . . . . . . . . . . . . . . . . . . . . . 5B-8 Removal . . . . . . . . . . . . . . . . . . . . . . . . . . . . 5B-10 Installation . . . . . . . . . . . . . . . . . . . . . . . . . . 5B-11 Water Separating Fuel Filter . . . . . . . . . . . 5B-13 Removal . . . . . . . . . . . . . . . . . . . . . . . . . 5B-13 Installation . . . . . . . . . . . . . . . . . . . . . . . . 5B-13 Water Drain Valve Operation . . . . . . . . . . . 5B-15 Purging Air From The Fuel System . . . . . 5B-16 5B-6 Page xi FUEL SYSTEM Section 5C - Fuel Injectors Identification . . . . . . . . . . . . . . . . . . . . . . . . . . Specifications . . . . . . . . . . . . . . . . . . . . . . . . . Torque . . . . . . . . . . . . . . . . . . . . . . . . . . . . . . . Tools . . . . . . . . . . . . . . . . . . . . . . . . . . . . . . . . Bosch . . . . . . . . . . . . . . . . . . . . . . . . . . . . . Lubricants / Sealants / Adhesives . . . . . . . Precautions . . . . . . . . . . . . . . . . . . . . . . . . . . Description . . . . . . . . . . . . . . . . . . . . . . . . . . . Fuel Injector (Cutaway View) . . . . . . . . . . . 5C-3 5C-3 5C-3 5C-4 5C-4 5C-4 5C-5 5C-6 5C-7 Exploded View . . . . . . . . . . . . . . . . . . . . . . . . 5C-8 Injector Test (Engine Misfiring) . . . . . . . . . . 5C-9 Removal . . . . . . . . . . . . . . . . . . . . . . . . . . . . 5C-10 Inspection . . . . . . . . . . . . . . . . . . . . . . . . . . . 5C-12 Testing . . . . . . . . . . . . . . . . . . . . . . . . . . . . . . 5C-12 Installation . . . . . . . . . . . . . . . . . . . . . . . . 5C-13 Purging Air From Fuel Injectors (Bleeding) . . . . . . . . . . . . . . . . . . . . . . . . . . 5C-16 FUEL SYSTEM Section 5D - Injection Pump Identification . . . . . . . . . . . . . . . . . . . . . . . . . . Pump Code and Identification Number Location . . . . . . . . . . . . . . . . . . . Specifications . . . . . . . . . . . . . . . . . . . . . . . . . Injection Pump . . . . . . . . . . . . . . . . . . . . . Timing . . . . . . . . . . . . . . . . . . . . . . . . . . . . Torque Specifications . . . . . . . . . . . . . . . . . . Special Tools . . . . . . . . . . . . . . . . . . . . . . . . . Tools . . . . . . . . . . . . . . . . . . . . . . . . . . . . . . . . Special EDI Tools . . . . . . . . . . . . . . . . . . . Kent-Moore Tools . . . . . . . . . . . . . . . . . . . Lubricants / Sealants / Adhesives . . . . . . . Description . . . . . . . . . . . . . . . . . . . . . . . . . . . Fuel Ratings . . . . . . . . . . . . . . . . . . . . . . . . . . Diesel Fuel in Cold Weather . . . . . . . . . . . . Page xii 5D-2 5D-2 5D-2 5D-2 5D-3 5D-3 5D-3 5D-4 5D-4 5D-4 5D-4 5D-5 5D-6 5D-6 Repair and Service . . . . . . . . . . . . . . . . . . . . 5D-7 General Information . . . . . . . . . . . . . . . . . 5D-7 Service Information . . . . . . . . . . . . . . . . . 5D-7 Precautions . . . . . . . . . . . . . . . . . . . . . . . . 5D-9 Exploded View . . . . . . . . . . . . . . . . . . . . . . . 5D-10 Fuel Injection Pump Removal . . . . . . . . . . 5D-11 Fuel Injection Pump Installation . . . . . . . . 5D-16 Installation With Engine Assembled . . 5D-16 Installation During Engine Reassembly . . . . . . . . . . . . . . . . . . . . . . 5D-19 Fuel Injection Pump Timing . . . . . . . . . . . . 5D-23 Checking . . . . . . . . . . . . . . . . . . . . . . . . . 5D-23 Setting . . . . . . . . . . . . . . . . . . . . . . . . . . . 5D-23 Starting Engine - After Fuel Injection Pump Installation and Timing . . . . . . . . . . 5D-28 90-860074--1 FEBRUARY 2002 FUEL SYSTEM Section 5E - EDI Diagnosis General Information . . . . . . . . . . . . . . . . . . . 5E-2 Introduction . . . . . . . . . . . . . . . . . . . . . . . . 5E-2 Basic Knowledge and Tools Required . 5E-2 Visual/Physical Inspection . . . . . . . . . . . 5E-3 Electrostatic Discharge Damage . . . . . . 5E-3 Special Tools . . . . . . . . . . . . . . . . . . . . . . . 5E-4 Special EDI Tools . . . . . . . . . . . . . . . . . . . 5E-4 Kent-Moore Tools . . . . . . . . . . . . . . . . . . . 5E-4 Service Precautions . . . . . . . . . . . . . . . . . 5E-5 Diagnostic Information . . . . . . . . . . . . . . . . . 5E-7 Abbreviations . . . . . . . . . . . . . . . . . . . . . . 5E-7 ECM Self-Diagnosis . . . . . . . . . . . . . . . . 5E-8 Malfunction Indicator Lamp . . . . . . . . . . 5E-9 Intermittent Problems and Malfunction Indicator Lamp . . . . . . . . . 5E-10 Reading Codes . . . . . . . . . . . . . . . . . . . . 5E-10 Clearing Codes . . . . . . . . . . . . . . . . . . . . 5E-13 Diagnosis of Driveability Concerns . . . 5E-14 ECM Input and Sensor Diagram . . . . . . . . 5E-15 ECM Connector Pin Layout . . . . . . . . . . . . 5E-16 Connector Chart . . . . . . . . . . . . . . . . . . . . . 5E-17 MAP (Manifold Air Pressure) Sensor . 5E-20 ECT (Engine Coolant Temperature) Sensor . . . . . . . . . . . . . . . . . . . . . . . . . . 5E-22 Fuel Temperature Sensor . . . . . . . . . . . 5E-24 RPM (Engine Speed) Sensor . . . . . . . . 5E-26 BARO (Atmospheric Pressure) Sensor . . . . . . . . . . . . . . . . . . . . . . . . . . 5E-28 IAT (Intake Air Temperature) Sensor . 5E-30 Instrumented Injector (Needle Movement Sensor) . . . . . . . . 5E-32 Fuel Quantity Actuator (Pump Actuator) . . . . . . . . . . . . . . . . . . 5E-34 Fuel Quantity Sensor (Control Sleeve Position Sensor) . . . . 5E-36 Timing Fault (Timing Advance Regulation) . . . . . . . 5E-38 TP (Throttle Position) Sensor / Low Idle Switch . . . . . . . . . . . 5E-40 Battery Voltage . . . . . . . . . . . . . . . . . . . . 5E-42 Battery (Switched K15) . . . . . . . . . . . . . 5E-43 Microcontroller Fault . . . . . . . . . . . . . . . 5E-44 ECM Reference Voltage (u_ref - 2.5v) . . . . . . . . . . . . . . . . . . . . . 5E-45 90-860074--1 FEBRUARY 2002 Main Relay . . . . . . . . . . . . . . . . . . . . . . . 5E-46 Timing Actuator (Timing Solenoid Valve) . . . . . . . . . . . . 5E-48 Glow Plug Main Relay (Glow Plug Relay Actuator), If Equipped . . . . . . . . . . . . . . . . . . . . . . . 5E-50 Glow Plug Auxiliary Relay, If Equipped 5E-52 Glow Plug Lamp (Glow Plug Display) . 5E-54 Glow Plug Lamp (Glow Plug Display) . 5E-56 MIL [Malfunction Indicator Lamp (Diagnostic Lamp)] . . . . . . . . . . . . . . . . 5E-58 MIL [Malfunction Indicator Lamp (Diagnostic Lamp)] . . . . . . . . . . . . . . . . 5E-60 Fuel Shut Off Valve [EAB (Electrical Shut Off)] . . . . . . . . . . . . . . . 5E-62 EEPROM Fault (EEPROM and Configuration) . . . . . . . . . . . . . . . . . . . . 5E-64 RPM Signal From Injector (Secondary Engine Speed Sensor) . . 5E-66 Troubleshooting For EDI Systems . . . . . . 5E-68 Trouble Codes . . . . . . . . . . . . . . . . . . . . 5E-68 Display Terminology . . . . . . . . . . . . . . . 5E-69 Troubleshooting Charts . . . . . . . . . . . . . 5E-74 Repair Procedures . . . . . . . . . . . . . . . . . . . 5E-93 Service Precautions . . . . . . . . . . . . . . . . 5E-93 Replacement Parts Warning . . . . . . . . 5E-94 Torque Specifications . . . . . . . . . . . . . . 5E-95 Lubricants / Sealants / Adhesives . . . . 5E-95 System Components . . . . . . . . . . . . . . . 5E-96 Fuel Injection Pump Repair . . . . . . . . . 5E-98 Wiring Harness Service . . . . . . . . . . . . 5E-99 Relay, Module and Sensor Servicing (On-Board Service) . . . . . . . . . . . . . . . . . 5E-102 Precautions . . . . . . . . . . . . . . . . . . . . . . 5E-102 Main Relay . . . . . . . . . . . . . . . . . . . . . . 5E-102 ECM (Electronic Control Module) . . . 5E-104 ECT (Engine Coolant Temperature) Sensor . . . . . . . . . . . . . . . . . . . . . . . . . 5E-106 MAP (Manifold Absolute Pressure) / IAT (Intake Air Temperature) Sensor 5E-108 Throttle Position (TP) Sensor . . . . . . . 5E-110 Instrumented Injector . . . . . . . . . . . . . . 5E-112 Engine RPM Speed Sensor . . . . . . . . 5E-112 Idle Speed Setting Circuit . . . . . . . . . . 5E-113 Page xiii COOLING SYSTEM Section 6A - Seawater Cooling System Torque Specifications . . . . . . . . . . . . . . . . . . 6A-3 Lubricants / Sealants / Adhesives . . . . . . . 6A-3 Tools . . . . . . . . . . . . . . . . . . . . . . . . . . . . . . . . 6A-3 Seawater (Raw Water) System Specifications . . . . . . . . . . . . . . . . . . . . . . . . 6A-4 Seawater Pump Delivery Rates . . . . . . . 6A-4 Seawater Pickup Connections . . . . . . . . 6A-4 Precautions . . . . . . . . . . . . . . . . . . . . . . . . . . 6A-5 Seawater Pickup Connection . . . . . . . . . . . 6A-5 Seacock . . . . . . . . . . . . . . . . . . . . . . . . . . . . . 6A-6 Seawater Strainer . . . . . . . . . . . . . . . . . . . . . 6A-6 Exploded View - Seawater Pumps . . . . . . . 6A-7 D2.8L D-Tronic . . . . . . . . . . . . . . . . . . . . . 6A-7 D4.2L D-Tronic . . . . . . . . . . . . . . . . . . . . . 6A-8 Seawater Flow Diagram . . . . . . . . . . . . . . . 6A-10 Seawater Pump . . . . . . . . . . . . . . . . . . . . . . 6A-12 Removal . . . . . . . . . . . . . . . . . . . . . . . . . 6A-12 Disassembly . . . . . . . . . . . . . . . . . . . . . . 6A-13 Cleaning . . . . . . . . . . . . . . . . . . . . . . . . . 6A-17 Inspection . . . . . . . . . . . . . . . . . . . . . . . . Assembly . . . . . . . . . . . . . . . . . . . . . . . . . Installation . . . . . . . . . . . . . . . . . . . . . . . . Seawater Strainer . . . . . . . . . . . . . . . . . . . . Exploded View . . . . . . . . . . . . . . . . . . . . Removal . . . . . . . . . . . . . . . . . . . . . . . . . Installation . . . . . . . . . . . . . . . . . . . . . . . . Oil / Power Steering / Transmission Fluid Coolers . . . . . . . . . . . . . . . . . . . . . . . . General Information . . . . . . . . . . . . . . . . Exploded View . . . . . . . . . . . . . . . . . . . . Location of Coolers . . . . . . . . . . . . . . . . Inspection Before Removal . . . . . . . . . Cleaning Without Removal . . . . . . . . . . Engine Oil Cooler . . . . . . . . . . . . . . . . . . Power Steering . . . . . . . . . . . . . . . . . . . . Transmission Fluid Cooler . . . . . . . . . . Installation . . . . . . . . . . . . . . . . . . . . . . . . 6A-18 6A-19 6A-25 6A-27 6A-27 6A-28 6A-30 6A-31 6A-31 6A-32 6A-33 6A-34 6A-34 6A-35 6A-40 6A-42 6A-43 COOLING SYSTEM Section 6B - Closed Cooling System Specifications . . . . . . . . . . . . . . . . . . . . . . . . . 6B-4 Capacity . . . . . . . . . . . . . . . . . . . . . . . . . . . 6B-4 Thermostats . . . . . . . . . . . . . . . . . . . . . . . 6B-4 Pressure Cap . . . . . . . . . . . . . . . . . . . . . . 6B-4 Coolant . . . . . . . . . . . . . . . . . . . . . . . . . . . 6B-4 Torque Specifications . . . . . . . . . . . . . . . . . . 6B-5 Lubricants / Sealants / Adhesives . . . . . . . 6B-5 Tools . . . . . . . . . . . . . . . . . . . . . . . . . . . . . . . . 6B-5 Special Tools . . . . . . . . . . . . . . . . . . . . . . . 6B-5 Tools . . . . . . . . . . . . . . . . . . . . . . . . . . . . . . . . 6B-5 Diagrams and Exploded Views . . . . . . . . . . 6B-6 Coolant Flow Diagram . . . . . . . . . . . . . . . 6B-6 Heat Exchanger / Coolant Tank and Related Components . . . . . . . . . . . 6B-8 Engine Water Circulating Pump . . . . . . 6B-10 Checking Coolant Level . . . . . . . . . . . . . . . 6B-11 Testing Closed Cooling System . . . . . . . . 6B-12 Testing Coolant for Alkalinity . . . . . . . . 6B-12 Pressure Testing System . . . . . . . . . . . 6B-12 Testing for Cylinder Head Gasket Leak . . . . . . . . . . . . . . . . . . . . . . 6B-14 Testing Pressure Cap . . . . . . . . . . . . . . 6B-15 Coolant Change Interval . . . . . . . . . . . . . . 6B-17 Coolant Requirement . . . . . . . . . . . . . . . . . 6B-17 Page xiv Draining Closed Cooling System . . . . . . . Cleaning Closed Cooling System . . . . . . . Using A Cleaner . . . . . . . . . . . . . . . . . . . Heat Exchanger and Cooler Cleaning Flushing The Closed Cooling System Filling The Closed Cooling System . . . . . Thermostats . . . . . . . . . . . . . . . . . . . . . . . . . Removal . . . . . . . . . . . . . . . . . . . . . . . . . Testing . . . . . . . . . . . . . . . . . . . . . . . . . . . Installation . . . . . . . . . . . . . . . . . . . . . . . . Heat Exchanger . . . . . . . . . . . . . . . . . . . . . . Testing . . . . . . . . . . . . . . . . . . . . . . . . . . . Repair . . . . . . . . . . . . . . . . . . . . . . . . . . . Removal . . . . . . . . . . . . . . . . . . . . . . . . . Cleaning and Inspection . . . . . . . . . . . . Installation . . . . . . . . . . . . . . . . . . . . . . . . Water Circulating Pump . . . . . . . . . . . . . . . Removal . . . . . . . . . . . . . . . . . . . . . . . . . Cleaning and Inspection . . . . . . . . . . . . Installation . . . . . . . . . . . . . . . . . . . . . . . . Coolant Manifold . . . . . . . . . . . . . . . . . . . . . Corrosion Protection . . . . . . . . . . . . . . . . . . Auxiliary Hot Water Heater Connections . 6B-17 6B-19 6B-19 6B-19 6B-20 6B-21 6B-22 6B-22 6B-23 6B-25 6B-26 6B-26 6B-26 6B-27 6B-28 6B-29 6B-31 6B-31 6B-31 6B-32 6B-33 6B-33 6B-33 90-860074--1 FEBRUARY 2002 INTAKE AND EXHAUST SYSTEM Section 7A - Intercooler Torque Specifications . . . . . . . . . . . . . . . . Lubricants / Sealants / Adhesives . . . . . Exploded Views . . . . . . . . . . . . . . . . . . . . . D2.8L Intercooler . . . . . . . . . . . . . . . . . D4.2L Intercooler . . . . . . . . . . . . . . . . . Intercooler . . . . . . . . . . . . . . . . . . . . . . . . . . 7A-3 7A-3 7A-4 7A-4 7A-6 7A-8 Removal . . . . . . . . . . . . . . . . . . . . . . . . Disassembly . . . . . . . . . . . . . . . . . . . . . Cleaning and Inspection . . . . . . . . . . . Assembly . . . . . . . . . . . . . . . . . . . . . . . . Installation . . . . . . . . . . . . . . . . . . . . . . . 7A-8 7A-11 7A-13 7A-14 7A-17 INTAKE AND EXHAUST SYSTEM Section 7B - Manifolds, Elbows And Risers Torque . . . . . . . . . . . . . . . . . . . . . . . . . . . . . . . Lubricants / Sealants / Adhesives . . . . . . . Description . . . . . . . . . . . . . . . . . . . . . . . . . . . Exploded Views . . . . . . . . . . . . . . . . . . . . . . . Typical Intake / Exhaust Manifold . . . . . Sterndrive (MCM) Exhaust Systems . . . Inboard (MIE) Exhaust Systems . . . . . . Representative View of Complete Inboard Exhaust System . . . . . . . . . . . . Locating and Installing The Sterndrive (MCM) Exhaust System . . . . . . . . . . . . . . . 7B-3 7B-3 7B-3 7B-4 7B-4 7B-5 7B-6 7B-7 Locating And Installing The Inboard (MIE) Exhaust System . . . . . . . . . . . . . . . . . . . . . . 7B-9 Exhaust Pipe - Sterndrive (MCM) . . . . . . . 7B-11 Removal . . . . . . . . . . . . . . . . . . . . . . . . . 7B-11 Cleaning . . . . . . . . . . . . . . . . . . . . . . . . . 7B-11 Installation . . . . . . . . . . . . . . . . . . . . . . . . 7B-12 Intake / Exhaust Manifold . . . . . . . . . . . . . . 7B-13 Removal . . . . . . . . . . . . . . . . . . . . . . . . . 7B-13 Cleaning and Inspection . . . . . . . . . . . . 7B-14 Installation . . . . . . . . . . . . . . . . . . . . . . . . 7B-15 7B-8 INTAKE AND EXHAUST SYSTEM Section 7C - Turbocharger Identification . . . . . . . . . . . . . . . . . . . . . . . . Turbocharger Specifications . . . . . . . . . . Torque Specifications . . . . . . . . . . . . . . . . Lubricants / Sealants / Adhesives . . . . . Description . . . . . . . . . . . . . . . . . . . . . . . . . Turbocharger . . . . . . . . . . . . . . . . . . . . Wastegate . . . . . . . . . . . . . . . . . . . . . . . Exploded Views . . . . . . . . . . . . . . . . . . . . . Turbocharger And Related Components . . . . . . . . . . . . . . . . . . . . Boost Pressure Control (Wastegate) Components . . . . . . . . . . . . . . . . . . . . Turbocharger . . . . . . . . . . . . . . . . . . . . . . . 90-860074--1 FEBRUARY 2002 7C-3 7C-3 7C-4 7C-4 7C-5 7C-5 7C-5 7C-6 7C-6 7C-8 7C-9 Testing Turbocharger Boost Pressure Checking Turbine Bearings (Assembled) . . . . . . . . . . . . . . . . . . . . . Removal . . . . . . . . . . . . . . . . . . . . . . . . Disassembly . . . . . . . . . . . . . . . . . . . . . Cleaning . . . . . . . . . . . . . . . . . . . . . . . . Inspection . . . . . . . . . . . . . . . . . . . . . . . Assembly . . . . . . . . . . . . . . . . . . . . . . . . Installation . . . . . . . . . . . . . . . . . . . . . . . Boost Pressure Control . . . . . . . . . . . . . . Exhaust Pipe . . . . . . . . . . . . . . . . . . . . . Valve . . . . . . . . . . . . . . . . . . . . . . . . . . . . Wastegate . . . . . . . . . . . . . . . . . . . . . . . 7C-9 7C-10 7C-11 7C-15 7C-17 7C-18 7C-19 7C-21 7C-28 7C-28 7C-31 7C-33 Page xv DRIVES Section 8A - ZF/Hurth Transmissions Identification . . . . . . . . . . . . . . . . . . . . . . . . . . Specifications . . . . . . . . . . . . . . . . . . . . . . . . . Operating Specifications . . . . . . . . . . . . . Ratios and Part Numbers . . . . . . . . . . . . Fluid Specifications . . . . . . . . . . . . . . . . . Torque . . . . . . . . . . . . . . . . . . . . . . . . . . . . . . . Tools . . . . . . . . . . . . . . . . . . . . . . . . . . . . . . . . Lubricants / Sealants / Adhesives . . . . . . . Important Information . . . . . . . . . . . . . . . . . . Engine . . . . . . . . . . . . . . . . . . . . . . . . . . . . Transmission . . . . . . . . . . . . . . . . . . . . . . . Propeller . . . . . . . . . . . . . . . . . . . . . . . . . . Transmission / Propeller Rotation . . . . . 8A-3 8A-4 8A-4 8A-4 8A-4 8A-5 8A-5 8A-5 8A-6 8A-6 8A-6 8A-6 8A-7 Transmission Fluid Level . . . . . . . . . . . . . . . 8A-8 Checking . . . . . . . . . . . . . . . . . . . . . . . . . . 8A-8 Filling . . . . . . . . . . . . . . . . . . . . . . . . . . . . . 8A-9 Changing . . . . . . . . . . . . . . . . . . . . . . . . . . 8A-9 Transmission Removal . . . . . . . . . . . . . . . . 8A-12 Transmission Inspection . . . . . . . . . . . . . . 8A-13 Transmission Installation . . . . . . . . . . . . . . 8A-13 Shift Control And Cables . . . . . . . . . . . . . . 8A-15 Transmission Shift Lever And Shift Cable Bracket . . . . . . . . . . . . . . . . . . . . 8A-15 Shift Cable Installation and Adjustment . . . . . . . . . . . . . . . . . . . . . . . 8A-16 Pressure And Temperature Tests . . . . . . . 8A-21 Transmission Repair . . . . . . . . . . . . . . . . . . 8A-21 DRIVES Section 8B - Propeller Shaft Models Lubricants / Sealants / Adhesives . . . . . . . 8B-2 Checks Made with Boat In Water . . . . . 8B-3 Checks Made with Boat Out of Water and Shaft Installed . . . . . . . . . . . . . . . . . 8B-5 Checks Made with Propeller Shaft Removed from Boat . . . . . . . . . . . . . . . . 8B-7 Strut . . . . . . . . . . . . . . . . . . . . . . . . . . . . . . 8B-7 POWER STEERING Section 9A - Pump And Related Components Torque Specifications . . . . . . . . . . . . . . . . . . Lubricants / Sealants / Adhesives . . . . . . . Description . . . . . . . . . . . . . . . . . . . . . . . . . . . Exploded Views . . . . . . . . . . . . . . . . . . . . . . . Power Steering Pump . . . . . . . . . . . . . . . Related Components . . . . . . . . . . . . . . . . Page xvi 9A-2 9A-2 9A-2 9A-3 9A-3 9A-4 Power Steering Pump . . . . . . . . . . . . . . . . . . Removal . . . . . . . . . . . . . . . . . . . . . . . . . . Installation . . . . . . . . . . . . . . . . . . . . . . . . . Checking Fluid Level . . . . . . . . . . . . . . . . . . Filling and Bleeding . . . . . . . . . . . . . . . . . . . . 9A-5 9A-5 9A-6 9A-8 9A-8 90-860074--1 FEBRUARY 2002 THIS PAGE IS INTENTIONALLY BLANK 90-860074--1 FEBRUARY 2002 Page xvii THIS PAGE IS INTENTIONALLY BLANK Page xviii 90-860074--1 FEBRUARY 2002 GENERAL INFORMATION SERVICE MANUAL NUMBER 22 IMPORTANT INFORMATION 1 Section 1A - General Information A Table of Contents Introduction . . . . . . . . . . . . . . . . . . . . . . . . . . . How to Use This Manual . . . . . . . . . . . . . . . Page Numbering . . . . . . . . . . . . . . . . . . . Engine Serial Number / Decal Locations . Operation / Duty Cycle . . . . . . . . . . . . . . . . . 90-860074-–1 FEBRUARY 2002 1A-3 1A-3 1A-3 1A-4 1A-5 Engine Break-In . . . . . . . . . . . . . . . . . . . . . . . 1A-6 Initial Break-In Procedure . . . . . . . . . . . . 1A-6 Mercury/Quicksilver Lubricants, Sealants And Adhesives . . . . . . . . . . . . . . . . . . . . . . . 1A-7 Page 1A-1 GENERAL INFORMATION SERVICE MANUAL NUMBER 22 THIS PAGE IS INTENTIONALLY BLANK Page 1A-2 90-860064--1 FEBRUARY 2002 GENERAL INFORMATION SERVICE MANUAL NUMBER 22 NOTICE For information and procedures on Troubleshooting, refer to SECTION 1C. NOTICE Refer to appropriate Sterndrive Service Manual for transom assembly and sterndrive unit repair. Introduction This comprehensive overhaul and repair manual is designed as a service guide for the models previously listed. It provides specific information, including procedures for disassembly, inspection, assembly and adjustment to enable dealers and service mechanics to repair and tune these engines. Before attempting repairs, it is suggested that the procedure first be read through to gain knowledge of the methods and tools used and the cautions and warnings required for safety. How to Use This Manual This manual is divided into sections that represent major components and systems. Some sections are further divided into parts that more fully describe the component. Page Numbering Two number groups appear at the bottom of each page. The following is an example and description. Page 1A-3 a a b c d e f g b c 90-860074--1 FEBRUARY 2002 d e f g - Section Number - Section Part - Page Number - Manual Number - Revision Number 1 - Month Printed - Year Printed 90-860074-–1 FEBRUARY 2002 Page 1A-3 GENERAL INFORMATION SERVICE MANUAL NUMBER 22 Engine Serial Number / Decal Locations a 71675 75301 d b 7332 75388 3 73929 a SERIAL NUMBER MAX 75298 RPM H P L B K W K G MARINE POWER EUROPE INC MADE IN ITALY BS M12O:11 3 93_ _ c 71688 Typical Sterndrive (MCM) Engine Shown - Inboard (MIE) Similar a - Serial Number Plate b - Manufacturer’s Serial Number (Stamped in Block) c - Exhaust Gas Emissions Certificate Number (Example) d - MerCruiser Specification Decal Page 1A-4 90-860064--1 FEBRUARY 2002 GENERAL INFORMATION SERVICE MANUAL NUMBER 22 Operation / Duty Cycle It is the operator’s responsibility to operate within the following specified operational capability, or duty cycle, as applicable to engine and installation: NOTE: Pleasure duty rating applies to recreational planing craft used exclusively for pleasure and recreation. Light duty rating applies to planing boats where the use of full rated power at maximum rated rpm is limited (as stated above). Examples of Light Duty applications include, but are not limited to: search and rescue craft, fast patrol boats, fire boats, dive boats, and limited season fishing boats such as sport-fish charter boats. Application to common commercial crafts having full-displacement or semi-displacement hulls exceeds the recommended operational capability, or duty cycle. IMPORTANT: Damage caused by improper application or failure to operate within the operational capability, or duty cycle, will not be covered by the Mercury MerCruiser Diesel Limited Warranty. PLEASURE DUTY RATING / DUTY CYCLE D2.8L D-Tronic and D4.2L D-Tronic Specified Operating RPM Range Wide Open Throttle (WOT) Operation 3600 - 3800 Limited to short periods of time. LIGHT DUTY RATING / DUTY CYCLE D2.8L D-Tronic and D4.2L D-Tronic Specified Operating RPM Range 3600-3800 Wide Open Throttle (WOT) Operation Limited to less that 10% of operating time. Continuous cruising RPM Limited to 90% or less of wide open throttle RPM Annual operating time 90-860074-–1 FEBRUARY 2002 Not to exceed 500 hours Page 1A-5 GENERAL INFORMATION SERVICE MANUAL NUMBER 22 Engine Break-In Initial Break-In Procedure The following procedure must be used on new and rebuilt diesel engines. This break-in procedure allows the proper seating of the pistons and rings, which greatly reduces the likelihood of problems. IMPORTANT: It is recommended that the boat not be accelerated hard until this procedure has been completed. IMPORTANT: Never operate the starter motor longer than 15 seconds at a time, to avoid overheating the starter motor. If engine does not start, wait 1 minute to allow the starter motor to cool; then, repeat starting procedure. 1. Refer to appropriate Starting, Shifting and Stopping section in the Operation, Maintenance and Warranty Manual provided with the product and start the engine. Allow the engine to idle until it has reached normal operating temperature. 2. Operate the engine in gear for 3 minutes at each of the following rpms: 1200 rpm, 2400 rpm and 3000 rpm. 3. Operate the engine in gear for 3 minutes at each of the following rpms: 1500 rpm, 2800 rpm and 3400 rpm. 4. Operate the engine in gear for 3 minutes at each of the following rpms: 1800 rpm, 3000 rpm and WOT. Page 1A-6 90-860064--1 FEBRUARY 2002 GENERAL INFORMATION SERVICE MANUAL NUMBER 22 Mercury/Quicksilver Lubricants, Sealants And Adhesives Tube Ref. # Description Container Size Mercury Part Number Quicksilver Part Number 4 Needle Bearing Assy. Lubricant 8 oz (226.8 g) tube N/A 92-802868A1 6 Dielectric Grease 8 oz (226.8 g) can N/A 92-823506-1 7 Loctite 271 - Thread Locker 10 ml tube N/A 92-809819 9 Loctite 567 PST Pipe Sealant 50 ml tube N/A 92-809822 12 Loctite Master Gasket Kit N/A 92-12564-2 14 2 Cycle Premium Outboard Oil 1 US qt (0.94 L) 92-802813A1 92-802813Q1 19 Perfect Seal 16 oz (0.45 kg) can N/A 92-34227-1 Liquid Neoprene 8 oz (226.8 g) can N/A 92-25711-3 Bellows Adhesive 1.5 oz (42.5 g) tube N/A 92-86166Q1 33 Loctite 680 Retaining Compound 10 ml tube N/A 92-809833 34 Special Lubricant 101 8 oz (226.8 g) tube 92-802865A1 92-802865Q1 92-802870A1 92-802870Q1 25 27 42 U-Joint and Gimbal Bearing Grease 51 Loctite 222 Thread Locker 10 ml tube N/A 92-809818 66 Loctite 242 Thread Locker 10 ml tube N/A 92-809821 92-802837A1 92-802837Q1 79 4 Cycle 25W40 Engine Oil 82 Premium Gear Lubricant 1 US qt (0.94 L) 92-802846A1 92-802846Q1 87 High Performance Gear Lube 1 US qt (0.94 L) 92-802854A1 92-802854Q1 91 Engine Coupler Spline Grease 14 oz (0.39 kg) cartridge 92-802869A1 92-802869Q1 94 Anti-Corrosion Grease 8 oz (226.8 g) tube 92-802867A1 92-802867Q1 95 2-4-C with Teflon 8 oz (226.8 g) tube 92-802859A1 92-802859Q1 110 4 Stroke 10W30 Outboard Oil 1 US qt (0.94 L) 92-802833A1 92-802833Q1 Power Trim & Steering Fluid 8 oz (226.8 g) 92-802880A1 92-802880Q1 114 90-860074-–1 FEBRUARY 2002 Page 1A-7 GENERAL INFORMATION SERVICE MANUAL NUMBER 22 Tube Ref. # Description Container Size Mercury Part Number Quicksilver Part Number 115 Premium Plus 2 Cycle TC-W3 Outboard Oil 1 US qt (0.94 L) 92-802824A1 92-802824Q1 116 RTV 587 Silicone Sealer 3 oz (85.05 g) N/A 92-809825 117 Loctite 7649 Primer N 4.5 oz (127.57 g) N/A 92-809824 118 Storage Seal Rust Inhibitor 12 oz (325 ml) spray can 92-802878-56 92-802878Q56 119 Corrosion Guard 12 oz (325 ml) spray can 92-802878 55 92-802878Q55 120 15W40 4-cycle Diesel Engine Oil 1.06 US gal.(4 L) 92-877695K1 92-877695Q1 121 Extended Life Antifreeze/Coolant 1 US gal. (3.78 L) 92-877770K1 92-877770K1 122 Marine Engine Coolant 1.33 US gal. (5 L) N/A 92-813054A2 123 Fuel System Treatment and Stabilizer Concentrate 16 oz (437 ml) 92-802876A1 92-802876Q1 124 Heat Transfer Compound 1.5 oz (42.5 g) tube N/A 92-805701 1 125 Liquid Gasket N/A 92-808137 126 T442 Sealant N/A 92-862258 127 Loctite 5900 Ultra Black RTV Silicone Sealant 13 oz (371 g) tube N/A 92-809826 128 Loctite Gasket Remover 18 oz (532 ml) spray can N/A 92-809828 1 129 Sealer Kit, Two Part Epoxy N/A 92-65150 1 Dexron III Automatic Transmission Fluid Obtain Locally Obtain Locally Loctite 592 Obtain Locally Obtain Locally Loctite Quick Tite Obtain Locally Obtain Locally Isopropyl Alcohol Obtain Locally Obtain Locally Hot Glue Obtain Locally Obtain Locally Loctite 609 Obtain Locally Obtain Locally Loctite 405 Obtain Locally Obtain Locally Cyanacrylate Adhesive Obtain Locally Obtain Locally 3M Permabond #3M08155 Obtain Locally Obtain Locally Loctite 262 Obtain Locally Obtain Locally Page 1A-8 90-860064--1 FEBRUARY 2002 GENERAL INFORMATION SERVICE MANUAL NUMBER 22 THIS PAGE IS INTENTIONALLY BLANK 90-860074-–1 FEBRUARY 2002 Page 1A-9 GENERAL INFORMATION SERVICE MANUAL NUMBER 22 THIS PAGE IS INTENTIONALLY BLANK Page 1A-10 90-860064--1 FEBRUARY 2002 MAINTENANCE SERVICE MANUAL NUMBER 22 IMPORTANT INFORMATION 1 Section 1B - Maintenance B Table of Contents Torque Specifications . . . . . . . . . . . . . . . . . . 1B-3 Special Tools . . . . . . . . . . . . . . . . . . . . . . . . . 1B-3 Tools . . . . . . . . . . . . . . . . . . . . . . . . . . . . . . . . 1B-3 Lubricants / Sealants / Adhesives . . . . . . . 1B-3 Engine Specifications . . . . . . . . . . . . . . . . . . 1B-4 Sterndrive (MCM) Engines . . . . . . . . . . . 1B-4 Inboard (MIE) Engines . . . . . . . . . . . . . . 1B-5 Capacities . . . . . . . . . . . . . . . . . . . . . . . . . . . . 1B-6 Engines . . . . . . . . . . . . . . . . . . . . . . . . . . . 1B-6 Drives . . . . . . . . . . . . . . . . . . . . . . . . . . . . . 1B-6 Transmissions . . . . . . . . . . . . . . . . . . . . . . 1B-6 Maintenance Schedules . . . . . . . . . . . . . . . . 1B-7 Maintenance Intervals . . . . . . . . . . . . . . . 1B-7 Sterndrive (MCM) Engines . . . . . . . . . . . 1B-8 Inboard (MIE) Engines . . . . . . . . . . . . . 1B-11 Engine External Views . . . . . . . . . . . . . . . . 1B-13 Starboard Side View . . . . . . . . . . . . . . . 1B-13 Front View . . . . . . . . . . . . . . . . . . . . . . . . 1B-14 Port Side View . . . . . . . . . . . . . . . . . . . . 1B-15 Rear View . . . . . . . . . . . . . . . . . . . . . . . . 1B-16 Engine Oil . . . . . . . . . . . . . . . . . . . . . . . . . . . 1B-17 Oil Level . . . . . . . . . . . . . . . . . . . . . . . . . . 1B-17 Changing Engine Oil and Oil Filter . . . 1B-19 Fuel . . . . . . . . . . . . . . . . . . . . . . . . . . . . . . . . 1B-21 Precautions . . . . . . . . . . . . . . . . . . . . . . . 1B-21 General Information . . . . . . . . . . . . . . . . 1B-22 Diesel Fuel In Cold Weather . . . . . . . . 1B-22 Fuel Filter . . . . . . . . . . . . . . . . . . . . . . . . 1B-23 Closed Cooling System . . . . . . . . . . . . . . . 1B-28 Coolant Requirement . . . . . . . . . . . . . . 1B-28 Checking Level . . . . . . . . . . . . . . . . . . . . 1B-29 Draining . . . . . . . . . . . . . . . . . . . . . . . . . . 1B-30 Filling . . . . . . . . . . . . . . . . . . . . . . . . . . . . 1B-32 Sacrificial Anodes . . . . . . . . . . . . . . . . . . . . 1B-33 Removal . . . . . . . . . . . . . . . . . . . . . . . . . 1B-33 Inspection . . . . . . . . . . . . . . . . . . . . . . . . 1B-33 Disassembly . . . . . . . . . . . . . . . . . . . . . . 1B-34 Reassembly . . . . . . . . . . . . . . . . . . . . . . 1B-34 Installation . . . . . . . . . . . . . . . . . . . . . . . . 1B-34 Flushing Seawater System . . . . . . . . . . . . 1B-35 SternDrive (MCM) Models . . . . . . . . . . 1B-35 Inboard (MIE) Models . . . . . . . . . . . . . . 1B-36 Inspect Water Pickups . . . . . . . . . . . . . . . . 1B-38 SternDrive Gear Housing . . . . . . . . . . . 1B-38 Inboard Though the Hull Pickup . . . . . 1B-38 Lubrication . . . . . . . . . . . . . . . . . . . . . . . . . . 1B-39 90-860074--1 FEBRUARY 2002 Throttle Cable . . . . . . . . . . . . . . . . . . . . . Shift Cable . . . . . . . . . . . . . . . . . . . . . . . . Engine Coupler / U-joint Shaft Splines U-joints . . . . . . . . . . . . . . . . . . . . . . . . . . . Drive Shaft Extension Models . . . . . . . Sterndrive Unit and Transom Assembly . . . . . . . . . . . . . . . . . . . . . . . . Continuity Circuit . . . . . . . . . . . . . . . . . . . . . Continuity Circuit (continued) . . . . . . . . . . MerCathode . . . . . . . . . . . . . . . . . . . . . . . . . Engine Mounts . . . . . . . . . . . . . . . . . . . . . . . Electrical System . . . . . . . . . . . . . . . . . . . . . Power Steering . . . . . . . . . . . . . . . . . . . . . . Checking Fluid Level . . . . . . . . . . . . . . . Filling and Bleeding . . . . . . . . . . . . . . . . Transmission . . . . . . . . . . . . . . . . . . . . . . . . Checking Fluid Level . . . . . . . . . . . . . . . Power Trim . . . . . . . . . . . . . . . . . . . . . . . . . . Checking Fluid Level . . . . . . . . . . . . . . . Filling . . . . . . . . . . . . . . . . . . . . . . . . . . . . Gear Lube Monitor . . . . . . . . . . . . . . . . . . . Checking Fluid Level . . . . . . . . . . . . . . . Filling . . . . . . . . . . . . . . . . . . . . . . . . . . . . Seawater Strainer . . . . . . . . . . . . . . . . . . . . Air Filter . . . . . . . . . . . . . . . . . . . . . . . . . . . . . Removal . . . . . . . . . . . . . . . . . . . . . . . . . Inspection . . . . . . . . . . . . . . . . . . . . . . . . Cleaning . . . . . . . . . . . . . . . . . . . . . . . . . Installation . . . . . . . . . . . . . . . . . . . . . . . . Drive Belts . . . . . . . . . . . . . . . . . . . . . . . . . . General Information . . . . . . . . . . . . . . . . Inspection . . . . . . . . . . . . . . . . . . . . . . . . Engine Water Circulating Pump Belt . . Alternator Belt . . . . . . . . . . . . . . . . . . . . . Power Steering Pump Belt . . . . . . . . . . Vacuum Pump Belt . . . . . . . . . . . . . . . . Battery . . . . . . . . . . . . . . . . . . . . . . . . . . . . . . Charging System . . . . . . . . . . . . . . . . . . . . . Corrosion and Corrosion Protection . . . . . Saltwater Operation . . . . . . . . . . . . . . . . . . Freezing Temperature and Cold Weather Operation . . . . . . . . . . . . . . . . . . . . . . . . . . . Cold Weather or Extended Storage . . . . . Power Package Layup . . . . . . . . . . . . . Draining . . . . . . . . . . . . . . . . . . . . . . . . . . Recommissioning . . . . . . . . . . . . . . . . . . . . 1B-39 1B-39 1B-40 1B-41 1B-42 1B-42 1B-43 1B-44 1B-45 1B-45 1B-45 1B-46 1B-46 1B-48 1B-49 1B-49 1B-50 1B-50 1B-51 1B-52 1B-52 1B-52 1B-53 1B-54 1B-54 1B-54 1B-55 1B-55 1B-56 1B-56 1B-57 1B-57 1B-58 1B-60 1B-62 1B-64 1B-64 1B-64 1B-64 1B-65 1B-66 1B-66 1B-67 1B-73 Page 1B-1 MAINTENANCE SERVICE MANUAL NUMBER 22 THIS PAGE IS INTENTIONALLY BLANK Page 1B-2 90-860074--1 FEBRUARY 2002 MAINTENANCE SERVICE MANUAL NUMBER 22 Torque Specifications Description Nm lb-in. lb-ft Rear Engine Mounts 51 38 Alternator Tensioning Or Mounting Bolt 28 21 Power Steering Tensioning Or Mounting Bolt 21 15 Vacuum Pump Tensioning Or Mounting Bolt 21 15 Heat Exchanger End Covers Upper 14-15 120132 Lower 11 108120 Special Tools Description Part Number Crankcase Oil Pump 90265A2 Flushing Attachment 44357T 2 Reference Electrode and Test Meter 91-76675T1 Description Part Number Tools Water Tap Hose Adapter To Water Inlet Fitting Typical Hand-operated Grease Gun Obtain Locally Lubricants / Sealants / Adhesives Description Part Number Mercury Diesel Engine Oil 92-877695K1 Liquid Neoprene 92-25711--3 Loctite 567 PST Pipe Sealant 92-809822 Engine Coupler Spline Grease U-Joint and Gimbal Bearing Grease 92-816391A4 1 92-828052A2 2-4-C Marine Lubricant With Teflon 92-802861Q1 Exxon Unirex EP2 Grease Obtain Locally SAE 30W Engine Oil Obtain Locally 1 Except on Bravo X Drive U-joint crosses and bearings - use Exxon Unirex EP2 Grease. 90-860074--1 FEBRUARY 2002 Page 1B-3 MAINTENANCE SERVICE MANUAL NUMBER 22 Engine Specifications Sterndrive (MCM) Engines Specification - Sterndrive (MCM) Description D2.8L D-Tronic D4.2L D-Tronic Crankshaft Kilowatts (Horsepower) 1 123 ( 165 ) 186 ( 250 ) Propeller Shaft Kilowatts (Horsepower) 1 112 ( 150 ) 168 ( 225 ) In-Line 4 Cylinder Diesel In-Line 6 Cylinder Diesel Engine Type Displacement 2.8 liter (169 cu. in.) 4.2 liter (254 cu. in.) Firing Order 1-3-4-2 1-5-3-6-2-4 Bore 94 mm ( 3.700 in. ) Stroke 100 mm ( 3.937 in. ) Compression Ratio 16.5:1 Valve Clearance - Intake / Exhaust Maximum Pressure Difference Between Cylinders Governed rpm Setting (Begins At:) Low Idle rpm Oil Pressure: 2 3850 ± 50 3800 700 3 600 4 750 rpm 1.5 - 3.1 bar [152-310 kPa] ( 22-45 psi ) 3800 rpm 3.5 - 5.6 bar [345-556 kPa] ( 50-80 psi ) Oil Temperature Water: ( 2 Total ) Thermostats: 500 kPa ( 72 psi ) 4200 ± 50 Maximum High Idle No Load rpm Rated rpm at Wide-Open-Throttle Hydraulic 1 at temperature: 100 - 110 degrees C ( 212 - 230 degrees F ) 70 degrees C ( 160 degrees F ) 1 at temperature: 82 degrees C ( 180 degrees F ) Oil: 95 degrees C ( 203 degrees F ) Coolant Temperature 80 - 85 degrees C ( 176 - 185 degrees F ) Electrical System 12-volt Negative ( – ) Ground Alternator Rating 949W, 14.6v, 65 Amp. Recommended Battery Rating Starter 750 cca, 950 mca, or 180 Ah 12v, 2.7 kW 1 Power rated in accordance with NMMA Procedure - ISO 3046 (Technically Identical to ICOMIA 28-83). 2 Refer to Conditions Affecting Operation - Propeller Selection for additional information. 3 Mercury Serial Number 0L343084 and Below on D2.8L D-Tronic Engines. Mercury Serial Number 0L343703 and Below on D4.2L D-Tronic Engines. 4 Mercury Serial Number 0L343085 and Above on D2.8L D-Tronic Engines. Mercury Serial Number 0L343704 and Above on D4.2L D-Tronic Engines. Page 1B-4 90-860074--1 FEBRUARY 2002 MAINTENANCE SERVICE MANUAL NUMBER 22 Inboard (MIE) Engines Specification - Inboard (MIE) Description D2.8L D-Tronic D4.2L D-Tronic 123 ( 165 ) 186 ( 250 ) 119 ( 160 ) 179 ( 240 ) Engine Type In-Line 4 Cylinder Diesel In-Line 6 Cylinder Diesel Displacement 2.8 liter 169 cu. in. 4.2 liter (254 cu. in.) Firing Order 1-3-4-2 1-5-3-6-2-4 Crankshaft Kilowatts (Horsepower) 1 Propeller Shaft Kilowatts (Horsepower) 1 Bore 94 mm ( 3.700 in. ) Stroke 100 mm ( 3.937 in. ) Compression Ratio Valve Clearance - Intake / Exhaust Maximum Pressure Difference Between Cylinders 16.5:1 Hydraulic 500 kPa ( 72 psi ) Maximum High Idle No Load rpm 4200 ± 50 Governed rpm Setting (Begins At:) 3850 ± 50 Rated rpm at Wide Open Throttle 2 3800 700 3 Low Idle rpm Oil Pressure: 600 4 750 rpm 1.5 - 3.1 bar ( 152-310 kPa ) [ 22-45 psi ] 3800 rpm 3.5 - 5.6 bar ( 345-556 kPa ) [ 50-80 psi ] 100 - 110 degrees C ( 212 - 230 degrees F ) Oil Temperature Water: ( 2 Total ) Thermostats: 1 at temperature: 70 degrees C ( 160 degrees F ) 1 at temperature: 82 degrees C ( 180 degrees F ) Oil: ( 1 Total ) 95 degrees C ( 203 degrees F ) Coolant Temperature 80 - 85 degrees C ( 176 - 185 degrees F ) Electrical System 12-volt Negative ( – ) Ground Alternator Rating 949W, 14.6v, 65 Amp. Recommended Battery Rating Starter 750 cca / 950 mca / 180 Ah 12v, 2.7 kW 1 Power rated in accordance with NMMA Procedure - ISO 3046 (Technically Identical to ICOMIA 28-83). 2 Refer to “Conditions Affecting Operation - Propeller Selection” for additional information. 3 Mercury Serial Number 0L343084 and Below on D2.8L D-Tronic Engines. Mercury Serial Number 0L343703 and Below on D4.2L D-Tronic Engines. 4 Mercury Serial Number 0L343085 and Above on D2.8L D-Tronic Engines. Mercury Serial Number 0L343704 and Above on D4.2L D-Tronic Engines. 90-860074--1 FEBRUARY 2002 Page 1B-5 MAINTENANCE SERVICE MANUAL NUMBER 22 Capacities NOTICE All capacities are approximate fluid measures. Engines NOTICE Unit Of Measurement: Liters (U.S. Quarts). D2.8L D-Tronic D4.2L D-Tronic 10 ( 8-1/2 ) 12 ( 12-3/4 ) 8 ( 6-1/2 ) 10 ( 10-3/4 ) Model Total Oil Capacity 1 Oil Pan Oil Drainage Oil Filter 1(1) Oil Cooler 1(1) Closed Cooling Circuit 1 11 ( 11-2/3 ) 13 ( 13-3/4 ) Always use dipstick to determine exact quantity of oil required Drives NOTICE Unit Of Measurement: Liters (U.S. Quarts). Item Specification Drive Unit Oil Capacity (With Gear Lube Monitor) Bravo One 2.6 (2.75) Bravo Two 3 (3.2) Bravo Three 2.9 (3) Transmissions IMPORTANT: It may be necessary to adjust oil levels depending on installation angle and cooling systems (heat exchanger and fluid lines). NOTICE Unit Of Measurement: Liters (U.S. Quarts). Make And Model Hurth 1 Page 1B-6 630A 630V Specification1 Fluid Type 3 (3-1/4) Dexron III Automatic Transmission Fluid 4 (4-1/2) Always use dipstick to determine exact quantity of oil required 90-860074--1 FEBRUARY 2002 MAINTENANCE SERVICE MANUAL NUMBER 22 NOTICE For information and procedures on Troubleshooting refer to SECTION 1C. Maintenance Schedules NOTE: Refer to appropriate Mercury MerCruiser Sterndrive Service Manual for information and procedures on sterndrive maintenance. WARNING Avoid injury or death, product damage, fire or explosion. The electrical system is capable of violent and damaging short circuits or severe electrical shocks. When performing any activity where any electrical terminals could possibly be grounded or touched, the battery cables should be disconnected at the battery. Maintenance Intervals Maintenance intervals and the tasks to be performed are generally based on an average boating application and environment. However, individual operating habits and personal maintenance preferences can have an impact on the suggested intervals. In consideration of these factors, Mercury MerCruiser has adjusted some maintenance intervals and corresponding tasks. In some cases, this may allow for more tasks to be performed in a single visit to the dealer, rather than multiple visits. Therefore, it is very important that the boat owner and servicing dealer discuss the Maintenance Schedule and develop appropriate maintenance intervals to coincide with individual operating habits, the environment and maintenance requirements. 90-860074--1 FEBRUARY 2002 Page 1B-7 MAINTENANCE SERVICE MANUAL NUMBER 22 Sterndrive (MCM) Engines Routine Maintenance * Each Day Start Check crankcase oil (interval can be extended based on experience). If operating in salt, brackish or polluted waters, flush cooling system after each use. Each Day End Weekly Every Two Months D D Drain any water from fuel filter after each use (If operating in freezing temperatures). D Check drive unit oil level, trim pump oil level and power steering pump fluid level. D Check water pickups for debris or marine growth. Check water strainer and clean. Check coolant level. D Inspect drive unit anodes and replace if 50 percent eroded. D Check battery connections and fluid level. D Lubricate propeller shaft and the retorque nut (if operating in only freshwater, this maintenance may be extended to every four months). D Operating in Saltwater Only: treat engine surface with corrosion guard. D Clean air filter every 50 hours of operation. D Ensure that the gauges and the wiring connections are secure. Clean the gauges.1 D * Only perform maintenance which applies to your particular power package. 1 Or every 50 hours, whichever occurs first. If operating in saltwater, interval is reduced to every 25 hours or 30 days whichever occurs first Page 1B-8 90-860074--1 FEBRUARY 2002 MAINTENANCE SERVICE MANUAL NUMBER 22 Sterndrive (MCM) Engines (Continued) Scheduled Maintenance * After First 20 hours Change crankcase oil and filter. Touch-up paint power package and spray with corrosion guard. Every Every Every Every 200 300 500 100 Every Every hours hours hours Annuhours or 2 5 or 3 or 3 or 5 ally Annually years years years years years z z z z D Every 1000 hours or 5 years z D D Change drive unit oil and retorque connection of gimbal ring to steering shaft. D Replace fuel filter(s). D Check steering system and remote control for loose, missing or damaged parts. Lubricate cables and linkages. D Inspect U-joints, splines, and bellows. Check clamps. Check engine alignment. Lubricate U-joints and splines. D Lubricate gimbal bearing and engine coupler * D Check continuity circuit for loose or damaged connections. Test MerCathodeR unit output on Bravo Models. D Retorque engine mounts. D Check electrical system for loose, damaged or corroded fasteners. D * Only perform maintenance which applies to your particular power package. z Whichever Occurs First * Lubricate engine coupler every 50 hours if operated at idle for prolonged periods of time. 90-860074--1 FEBRUARY 2002 Page 1B-9 MAINTENANCE SERVICE MANUAL NUMBER 22 Sterndrive (MCM) Engines (Continued) Scheduled Maintenance * (Continued) After First 20 hours Every Every Every Every 200 300 500 100 Every Every hours hours hours Annuhours or 2 5 or 3 or 3 or 5 ally Annually years years years years years z z z z Lubricate drive shaft U-joints and tailstock input and output bearings. D Inspect condition and tension of belts. D Check cooling system and exhaust system hose clamps for tightness Inspect both systems for damage or leaks. D Disassemble and inspect seawater pump and replace worn components. D Clean seawater section of closed cooling system. Clean, inspect and test pressure cap. Check anodes. D D Replace coolant. Replace air filter. Every 1000 hours or 5 years z D Clean aftercooler core. Clean fuel tank. D D * Only perform maintenance which applies to your particular power package. z Whichever Occurs First Page 1B-10 90-860074--1 FEBRUARY 2002 MAINTENANCE SERVICE MANUAL NUMBER 22 Inboard (MIE) Engines Routine Maintenance * Each Day Start Check crankcase oil (interval can be extended based on experience). If operating in salt, brackish or polluted waters, flush cooling system after each use. Each Day End Weekly Every Two Months D D Drain any water from fuel filter after each use (if operating in freezing temperatures). D Check transmission fluid. D Check water pickups for debris or marine growth. Check water strainer and clean. Check coolant level. D Check battery connections and fluid level. D Clean air filter every 50 hours of operation. D Operating in Saltwater Only: treat engine surface with corrosion guard. D Ensure that the gauges and the wiring connections are secure. Clean the gauges.1 D * Only perform maintenance which applies to your particular power package. 1 Or every 50 hours, whichever occurs first. If operating in saltwater, interval is reduced to every 25 hours or 30 days whichever occurs first 90-860074--1 FEBRUARY 2002 Page 1B-11 MAINTENANCE SERVICE MANUAL NUMBER 22 Inboard (MIE) Engines (Continued) Scheduled Maintenance * After First 20 hours Change crankcase oil and filter. Touch-up paint power package and spray with corrosion guard. Every Every Every 200 500 100 Every hours hours Annuhours or 2 or 3 or 5 ally Annually years years years z z z D Every 1000 hours Per or 5 OEM years z D D Change transmission fluid. D Replace fuel filter(s). D Check steering system and remote control for loose, missing or damaged parts. Lubricate cables and linkages. D Retorque engine mounts. D Check electrical system for loose, damaged or corroded fasteners. D Inspect condition and tension of belts. D Check cooling system and exhaust system hose clamps for tightness. Inspect both systems for damage or leaks. D Disassemble and inspect seawater pump and replace worn components. D Clean seawater section of closed cooling system. Clean, inspect and test pressure cap. Check anodes on diesel models. D D Replace coolant. Replace air filter. Clean aftercooler core. Clean fuel tank. Check engine-to-propeller shaft alignment. D D D D * Only perform maintenance which applies to your particular power package. z Whichever Occurs First Page 1B-12 90-860074--1 FEBRUARY 2002 MAINTENANCE SERVICE MANUAL NUMBER 22 Engine External Views Starboard Side View 2 1 3 4 6 5 7 8 9 10 15 11 14 13 12 78409 Typical In-Line D-Tronic Diesel 1 - Exhaust Riser, or Elbow If Equipped 2 - Intercooler Air Duct 3 - Fluid Cooler 4 - Shift Plate 5 - Intercooler 6 - Sacrificial Anode 7 - Power Steering Fluid Reservoir 8 - Thermostat Housing 9 - Heat Exchanger 10 - Engine Oil Cooler 11 - Power Steering Pump 12 - Front Engine Mount 13 - Oil Pan 14 - Starter Motor 15 - Wastegate 90-860074--1 FEBRUARY 2002 Page 1B-13 MAINTENANCE SERVICE MANUAL NUMBER 22 Front View 1 2 16 3 4 5 15 6 14 13 12 11 7 10 9 8 78310 Typical In-Line D-Tronic Diesel 1 - Sacrificial Anode 2 - Pressure Cap 3 - Heat Exchanger 4 - Engine Oil Cooler 5 - Seawater Pump Outlet Hose 6 - Alternator 7 - Seawater Pump Inlet Hose 8 - Seawater Pump 9 - Oil Pan 10 - Crankshaft Pulley 11 - Engine Water Circulating Pump Pulley 12 - Power Steering Pump 13 - Front Engine Mount 14 - Oil Thermostat 15 - Oil Filter 16 - Exhaust Elbow Page 1B-14 90-860074--1 FEBRUARY 2002 MAINTENANCE SERVICE MANUAL NUMBER 22 Port Side View 1 2 3 6 5 4 7 20 8 9 19 18 17 16 15 14 13 12 11 10 75298 Typical In-Line D-Tronic Diesel 1 - Oil Fill Cap 2 - Engine Cover 3 - Fuel Injector 4 - Fuel Filter 5 - Gear Lube Monitor 6 - PCV / Oil Separator 7 - Air Filter 8 - MerCathode Controller 9 - Rear Engine Mount 10 - Flywheel Housing (Rear Portion) 11 - 5 Amp. ECM Fuse 12 - Electrical Box 13 - Engine Block Ground Stud 14 - Fuel Delivery Pump 15 - Oil Pan 16 - Engine Control Module (ECM) 17 - Throttle Position Sensor 18 - Vibration Damper And Crankshaft Pulley 19 - Seawater Pump 20 - Heat Exchanger 90-860074--1 FEBRUARY 2002 Page 1B-15 MAINTENANCE SERVICE MANUAL NUMBER 22 Rear View 1 2 3 7 4 5 6 74305 Typical In-Line D-Tronic Diesel 1 - Air Filter 2 - Turbocharger 3 - Exhaust Elbow 4 - Rear Engine Mount 5 - Engine Coupler 6 - Flywheel Housing (Rear Portion) 7 - Electrical Box Page 1B-16 90-860074--1 FEBRUARY 2002 MAINTENANCE SERVICE MANUAL NUMBER 22 Engine Oil CAUTION ENVIRONMENTAL HAZARD! Discharge of oil or oil waste into the environment is restricted by law. Do NOT spill oil or oil waste into the environment when using or servicing your boat. Contain and dispose of oil or oil waste as defined by local authorities. To help obtain optimum engine performance and to provide maximum protection, the engine requires engine oil with a rating of HD-SAE-API CG-4 and CH-4. We strongly recommend the use of: MERCURY DIESEL ENGINE OIL QUICKSILVER HEAVY DUTY ENGINE OIL These oils are both specially blended 15W-40 oil with Marine Additives, for all temperature operation. They both exceed requirements for API CH-4, CF-4, CG-4 and CF-2 oils. Other recommended oils: SHELL MYRINA TEXACO URSA SUPER TD VEEDOL TURBOSTAR MOPAR WINTERSHALL MULTI-REKORD WINTERSHALL VIVA 1 These oils are approved by Mercury Marine and Marine Power Europe. For all temperature operation use 15W-40 oil. Oil Level OVERFILLED ENGINE CRANKCASE An overfilled crankcase can cause a fluctuation or drop in oil pressure on Mercury MerCruiser engines. The over-full condition results in the engine crankshaft splashing and agitating the oil, causing it to become aerated. The aerated oil causes a loss of engine performance and an increase in crankcase backpressure. An extreme overfill condition could result in large amounts of oil being drawn into the intake. Care must be taken when checking engine oil level. Oil level must be maintained between the minimum oil level mark and the maximum mark on the dipstick. To ensure that you are not getting a false reading, observe the following before checking the oil level. • Boat at rest in the water, or if boat is on a trailer, raise or lower bow until the boat is setting like it does at rest in the water. • Allow ten minutes for oil to drain into the oil pan if engine has just been operated or oil has just been added. 90-860074--1 FEBRUARY 2002 Page 1B-17 MAINTENANCE SERVICE MANUAL NUMBER 22 CHECKING / FILLING IMPORTANT: Engine crankcase oil must be checked at intervals specified in Maintenance Schedule. It is normal for an engine to use a certain amount of oil in the process of lubricating and cooling the engine. The amount of oil consumed is greatly dependent upon engine speed, with consumption being highest at WOT and decreasing substantially as engine speed is reduced. 5. Check engine oil daily before first start-up. CAUTION Avoid possible injury, or damage to oil dipstick and internal engine components. Do NOT remove crankcase oil dipstick when engine is running. Stop the engine completely before removing or inserting dipstick. If it becomes necessary to check oil level during operation, stop the engine and allow approximately 10 minutes for oil to drain into pan. 6. Remove oil dipstick. Wipe clean and install into dipstick tube. 7. Remove dipstick and observe oil level. Oil must be between marks on dipstick. a c b 75732 71382 a - Oil Dipstick b - Minimum Oil Level Mark c - Maximum Oil Level Mark 71380 8. If oil level is low, remove oil filler cap. Add specified oil to bring level up to, but not over, maximum oil level mark on dipstick. a 75301 a - Oil Filler Cap 9. Install oil filler cap. Page 1B-18 90-860074--1 FEBRUARY 2002 MAINTENANCE SERVICE MANUAL NUMBER 22 Changing Engine Oil and Oil Filter IMPORTANT: Change oil when engine is warm from operation. Warm oil flows more freely, carrying away more impurities. Use only recommended engine oil (see Specifications). 1. Start engine and allow it to reach normal operating temperature. 2. Stop the engine and allow approximately 10 minutes for oil to drain into oil pan. 3. Remove threaded fitting from crankcase oil drain hose. 4. Install crankcase oil pump (90265A2) onto threaded fitting of oil drain hose. b a c b a 70571 75298 a - Oil Drain Hose b - Threaded Fitting c - Crankcase Oil Pump 5. Pump oil out of crankcase into drain pan. 6. Remove crankcase oil pump. 7. Install threaded fitting on crankcase oil drain hose. 90-860074--1 FEBRUARY 2002 Page 1B-19 MAINTENANCE SERVICE MANUAL NUMBER 22 8. Remove and discard oil filter and seal. 9. Coat seal on new filter with engine oil and install filter. Hand tighten only, do NOT use a filter wrench. b b a 75297 a - Oil Filter b - Seal 10. Remove oil fill cap and refill engine with new engine oil. CAUTION Do NOT overfill the engine with oil. Too much engine oil will cause a loss of engine performance and an increase in crankcase back-pressure. 11. Add specified oil to bring level up to, but not over, maximum oil level mark on dipstick. 12. Install oil filler cap. 13. Supply cooling water to water inlet. 14. Start the engine and allow it to reach normal operating temperature. IMPORTANT: Always use dipstick to determine how much oil is required. CAUTION Avoid possible injury or damage to oil dipstick and internal engine components. Do NOT remove crankcase oil dipstick when engine is running. Stop the engine completely before removing or inserting dipstick. 15. Stop engine and allow approximately 10 minutes for oil to drain into oil pan. 16. Remove dipstick and observe oil level. Oil must be between the marks on the dipstick. 17. Start engine and check for leaks. Page 1B-20 90-860074--1 FEBRUARY 2002 MAINTENANCE SERVICE MANUAL NUMBER 22 Fuel Precautions WARNING Always disconnect battery cables from battery BEFORE working on fuel system to prevent fire. This eliminates the engine wiring as a potential source of ignition. WARNING FIRE HAZARD: Fuel leakage from any part of the fuel system can be a fire hazard which can cause serious bodily injury or death. Careful periodic inspection of entire fuel system is mandatory, particularly after storage. All fuel components including fuel tanks - whether plastic, metal or fiberglass - fuel lines, primers, fittings and fuel filters should be inspected for leaks, softening, hardening, swelling or corrosion. Any sign of leakage or deterioration requires replacement before further engine operation. WARNING Electrical system components on this engine are not external ignition protected. DO NOT STORE OR UTILIZE GASOLINE ON BOATS EQUIPPED WITH THESE ENGINES, UNLESS PROVISIONS HAVE BEEN MADE TO EXCLUDE GASOLINE VAPORS FROM ENGINE COMPARTMENT (REF: 33 CFR). Failure to comply could result in fire, explosion and/or severe personal injury. IMPORTANT: Use of improper or water contaminated diesel fuel can cause serious engine damage. Use of improper fuel is considered misuse of engine, damage caused thereby will not be covered by warranty. WARNING Under no circumstances should gasoline, gasohol and/or alcohol be mixed with diesel fuel for any reason. This mixture of gasoline, gasohol and/or alcohol with diesel fuel is highly flammable and produces a significant risk to the user. 90-860074--1 FEBRUARY 2002 Page 1B-21 MAINTENANCE SERVICE MANUAL NUMBER 22 General Information Grade 2-D diesel fuel is required, meeting ASTM Standards D975 (or fuel rated Diesel DIN 51601) and having a minimum cetane rating of 45. The cetane number is a measure of the ignition quality of diesel fuel. Increasing the cetane number will not improve overall engine performance, but it may be necessary to raise the cetane rating for low temperature or high altitude use. A lower cetane number could cause hard starting and slower warm-up and could increase engine noise and exhaust emissions. NOTE: If your engine suddenly becomes noisy after a fuel fill, you may have received substandard fuel with a low cetane rating. CAUTION Avoid fuel system damage. Use of fuels not recommended by Mercury MerCruiser may cause hard-starting and other various troubles such as premature wear of the injection pump plungers and injection nozzles resulting from the deposit of carbon residue and other contaminants. Sulphur content of the above fuel is rated at 0.50% by weight, maximum (ASTM). Limits may vary in countries outside of the United States. On intermittent use engines, high sulphur content diesel fuel will greatly increase: • Corrosion on metal parts. • Deterioration of elastomer and plastic parts. • Corrosion and extensive damage, and excessive wear of internal engine parts, particularly bearings. • Starting and operating difficulties. Diesel Fuel In Cold Weather Unaltered diesel fuels thicken and gel in cold temperatures unless treated. Virtually all diesel fuels are climatized to allow their use in the particular region for that time of the year. It is the owner/operator’s responsibility, if it becomes necessary, to further treat diesel fuel, by adding a commercial standard brand anti-gel diesel fuel additive. Follow product directions. Page 1B-22 90-860074--1 FEBRUARY 2002 MAINTENANCE SERVICE MANUAL NUMBER 22 Fuel Filter PRECAUTIONS WARNING Be careful when draining, filling or replacing water separating fuel filter; diesel fuel is flammable. Ensure that the ignition key is OFF. Do NOT smoke or allow sources of open flame in the area while changing fuel system components. Wipe up any spilled fuel immediately. Do NOT allow fuel to come into contact with any hot surface which may cause it to ignite. WARNING Dispose of fuel-soaked rags, paper, etc., in an appropriate air tight, fire retardant container. Fuel-soaked items may spontaneously ignite and result in a fire hazard which could cause serious bodily injury or death. WARNING Make sure no fuel leaks exist before closing engine hatch. CAUTION Absolute cleanliness is required for work on the fuel injection system, since the injection pump and fuel injectors have very close tolerances. Even minute particles of dirt or small amounts of water can impair the function of the fuel injection system. 90-860074--1 FEBRUARY 2002 Page 1B-23 MAINTENANCE SERVICE MANUAL NUMBER 22 DRAINING NOTICE Refer to Precautions BEFORE proceeding. The filter can be drained of water and small dirt particles by opening the water drain cap (bleed valve). IMPORTANT: To ensure complete draining, in warm weather, open the drain cock before starting daily operations. In cold weather, when there is a possibility that the condensed water will freeze, drain the filter shortly after the end of daily operations. NOTE: Place a suitable container under fuel filter to catch contaminated fuel and/or water 1. Using a suitable container to catch contaminated fuel and/or water, open drain cap at bottom of filter by turning the drain counterclockwise (as viewed from the bottom of the filter). 2. Drain until fuel is clear in appearance. a b 74726 a - Fuel Filter b - Drain Cap 3. Close drain by turning clockwise. 4. Fill fuel filter as outlined in Filling. Page 1B-24 90-860074--1 FEBRUARY 2002 MAINTENANCE SERVICE MANUAL NUMBER 22 FILLING NOTICE Refer to Precautions BEFORE proceeding. Follow this procedure after installing a new filter or if fuel has been completely drained from the filter checking for water. NOTE: Place a suitable container under fuel filter to catch contaminated fuel and/or water 1. Loosen bleed screw on fuel filter bracket. 2. Move plunger knob on pump/primer up and down repeatedly, until an air free stream of fuel flows from bleed screw. Filter is full when this occurs. a b 75301 a - Plunger Knob b - Bleed Screw 3. Securely tighten bleed screw. 4. Supply cooling water to water inlet. 5. Start the engine, check for fuel leaks. If leaks exist stop engine immediately. Recheck filter installation. 90-860074--1 FEBRUARY 2002 Page 1B-25 MAINTENANCE SERVICE MANUAL NUMBER 22 REMOVAL NOTICE Refer to Precautions BEFORE proceeding. NOTE: Place a suitable container under fuel filter to catch contaminated fuel and/or water 1. Twist locking ring by hand. Remove water separating fuel filter and sealing ring from mounting bracket. Do NOT use a filter wrench. a b 70161 75579 a - Locking Ring b - Filter Element IMPORTANT: Element cannot be cleaned and reused. It must be replaced. 2. Remove the drain cap and O-ring from bottom of the existing filter. Note position of O-ring seal. 3. Inspect and replace damaged components. Page 1B-26 90-860074--1 FEBRUARY 2002 MAINTENANCE SERVICE MANUAL NUMBER 22 INSTALLATION 1. Install O-ring and drain cap on new filter. a b 70160 a - O-ring Seal b - Drain Cap 2. Lubricate seal with clean engine oil. 3. Align filter to bracket. Twist locking ring by hand to secure filter to bracket. Do NOT use a filter wrench. a b c d a b c d 74731 - Filter Header - Locking Ring - Seal - Fuel Filter 4. Fill fuel filter as previously outlined. 90-860074--1 FEBRUARY 2002 Page 1B-27 MAINTENANCE SERVICE MANUAL NUMBER 22 Closed Cooling System Coolant Requirement CAUTION Alcohol or methanol based anti-freeze or plain water are not recommended for use in the closed cooling section of cooling system at any time. Because diesel engines are high compression engines and related higher engine operating temperatures are created, the closed cooling system and engine must remain as clean as possible to provide adequate engine cooling. This can only be assured by using the proper anti-freeze, water, additives and inhibitors. It is recommended that the closed cooling section of the cooling system be filled with a low silicate formula of ethylene glycol anti-freeze in solution with deionized water. A low silicate formula prevents anti-freeze separation, which causes a silicate gelatin to form. This gelatin will block engine and heat exchanger passages causing engine overheating. The coolant, if not premixed, should be mixed before being added to the closed cooling system using anti-freeze and deionized water. Common tap water or softened water contains unwanted minerals, which can leave large deposits in the system restricting the cooling system efficiency. In addition, additives and inhibitors introduced into acceptable coolant solutions will form a protective film on internal passages and provide protection against internal cooling system erosion. The closed cooling section should be kept filled year-round with an acceptable coolant solution. Do NOT drain closed cooling section for storage, this will promote rusting of internal surfaces. If engine will be exposed to freezing temperatures, ensure that closed cooled section is filled with a properly mixed anti-freeze/coolant solution to protect engine and closed cooling system to lowest temperature to which they will be exposed. IMPORTANT: The anti-freeze/coolant used in these marine engines must be a low silicate ethylene glycol, containing special additives and deionized, purified water. Using other types of engine coolant may cause fouling of the heat exchangers and overheating of the engine. Do NOT combine different types of coolants without knowing that they are compatible. Refer to the coolant manufacturer’s instructions. Some acceptable types of anti-freeze/coolants are listed in the following table. Refer to Maintenance Schedules for change intervals. Part Number Description Page 1B-28 Premixed Marine Engine Coolant 92-813054A2 Fleetguard Compleat (Product 91-50663 with DCA4 additive) Obtain Locally 90-860074--1 FEBRUARY 2002 MAINTENANCE SERVICE MANUAL NUMBER 22 Checking Level 1. Coolant level must be between the bottom ADD mark and top FULL Hot mark on coolant recovery bottle with the engine at normal operating temperature. a c b 72520 a - Coolant Recovery Reservoir b - Bottom ADD Mark c - Top FULL Hot Mark 2. Add specified coolant to the coolant recovery bottle as required. WARNING Allow engine to cool before removing pressure cap. Sudden loss of pressure could cause hot coolant to boil and discharge violently causing severe injury. 3. Remove pressure cap. 4. Coolant level must be to the bottom edge of the fill neck with the engine cool. a 75299 a - Fill Neck 5. If coolant is low, check the coolant system for malfunction. IMPORTANT: When installing pressure cap, tighten it until it contacts locking tabs on filler neck. 6. Install pressure cap. 90-860074--1 FEBRUARY 2002 Page 1B-29 MAINTENANCE SERVICE MANUAL NUMBER 22 Draining NOTICE For instructions on Draining Seawater Section refer to Cold Weather or Extended Storage in this SECTION 1B. IMPORTANT: Observe the following: w Insert a wire into drain holes to ensure that foreign material is not obstructing the drain holes. w Ensure engine is as level as possible to promote complete draining of cooling system. w Closed cooled section must be kept filled year round with recommended coolant. If engine will be exposed to freezing temperatures, make sure closed cooled section is filled with an ethylene glycol anti-freeze and water solution properly mixed to protect engine to lowest temperature to which it will be exposed. w Do NOT use Propylene Glycol anti-freeze in the closed cooled section of the engine. WARNING Allow engine to cool before removing pressure cap. Sudden loss of pressure could cause hot coolant to boil and discharge violently causing severe injury. 1. Allow engine to cool. After engine has cooled, turn cap 1/4 turn to allow any pressure to escape slowly, then push down and turn cap all the way off of heat exchanger/coolant tank. NOTE: Drain coolant into a suitable container. Dispose of old coolant properly. 2. Drain coolant from intake/exhaust manifold by opening the drain valves. a 71364 Typical a - Intake/Exhaust Manifold Drain Valve Page 1B-30 90-860074--1 FEBRUARY 2002 MAINTENANCE SERVICE MANUAL NUMBER 22 3. –Drain coolant from the engine block by opening the drain valve. a 76391 Typical a - Engine Block Drain Valve 4. After coolant has drained completely, securely close drain valves. 5. Empty the coolant recovery bottle. 6. If required, clean the closed cooled system. Refer to SECTION 6A. 7. Fill system with required coolant, as outlined in Filling. 90-860074--1 FEBRUARY 2002 Page 1B-31 MAINTENANCE SERVICE MANUAL NUMBER 22 Filling 1. Slowly fill with coolant through heat exchanger fill neck. 2. Continue filling until coolant level is at bottom of fill neck. CAUTION Overheating from insufficient cooling water will cause engine and drive system damage. Ensure that there is sufficient water always available at water inlet during operation. 3. Supply cooling water to water inlet. 4. With the pressure cap off, start the engine and run at fast idle (1500-1800 rpm). Add coolant to heat exchanger, as required, to maintain coolant level 1 in. (25 mm) below fill neck. 5. After engine has reached normal operating temperature (thermostats are fully open), and coolant level remains constant, fill heat exchanger to bottom of fill neck. 6. Install pressure cap. 7. Observe engine temperature gauge to make sure that engine operating temperature is normal. If gauge indicates excessive temperature, stop engine immediately and examine for cause. 8. Remove cap from coolant recovery bottle and fill to a level between the ADD and FULL marks with coolant solution. Reinstall cap. 9. With engine still operating, check hose connections, fittings and gaskets for leaks. Page 1B-32 90-860074--1 FEBRUARY 2002 MAINTENANCE SERVICE MANUAL NUMBER 22 Sacrificial Anodes Sacrificial anode locations: • Starboard, aft-side of the heat exchanger. • Top of the intercooler end cover. Removal 1. Allow the engine to cool. 2. Remove anode plugs and sacrificial anodes. a b c c 73326 73327 a - Heat Exchanger b - Intercooler End Cover c - Anode Plug And Sacrificial Anode Inspection 1. Replace anode assembly when deteriorated 50%. • Length When New - 19 mm (3/4 in.) • Diameter When New - 16 mm (5/8 in.) 2. Discard sealing washer. c e a b c d e d b a 71368 - Anode Plug - Sacrificial Anode - Length - Diameter - Sealing Washer 90-860074--1 FEBRUARY 2002 Page 1B-33 MAINTENANCE SERVICE MANUAL NUMBER 22 Disassembly NOTE: Sacrificial anodes are available as an assembly. Replace both the plug and anode, if so desired. 1. Unscrew sacrificial anode from anode plug by holding plug hex head and turning anode. a b 71367 a - Plug b - Anode Reassembly 1. Clean interior threads of anode plug. 2. Apply Loctite Pipe Sealant with Teflon to threads of new sacrificial anode and install into anode plug. Tighten securely. b a 71367 a - Plug b - Anode Installation 1. Install new sealing washer. 2. Install anode plug, with sacrificial anode and washer into heat exchanger or intercooler end cover. Tighten securely. b a 71368 a - Plug And Anode b - Sealing Washer 3. Fill closed cooled system with required coolant, as outlined in Filling. Page 1B-34 90-860074--1 FEBRUARY 2002 MAINTENANCE SERVICE MANUAL NUMBER 22 Flushing Seawater System If engine is operated in salty, polluted or mineral-laden water, flush seawater section of cooling system (preferably after each use) to reduce corrosion and prevent the accumulation of deposits in the system. Thoroughly flush seawater section prior to storage. SternDrive (MCM) Models WARNING When flushing, be certain the area around propeller is clear and no one is standing nearby. To avoid possible injury, remove propeller. 1. Install Flushing Attachment (or equivalent) over water pickup openings in gear housing. 2. Attach a hose between the flushing attachment and a water source. a b 72012 a - Flushing Attachment b - Hose 3. Lower sterndrive unit to full DOWN/IN position. CAUTION Do NOT run engine above 1500 rpm when flushing. Suction created by seawater pickup pump may collapse flushing hose, causing engine to overheat. 4. Partially open water tap (approximately 1/2 maximum capacity). DO NOT use full water pressure. 5. Place remote control in NEUTRAL, IDLE speed position and start engine. 6. Operate engine at IDLE speed in NEUTRAL for 10 minutes, then stop engine. 7. Shut off water tap. 8. If boat is in the water, raise sterndrive unit to TRAILER position. 9. Remove hose and flushing attachment. 90-860074--1 FEBRUARY 2002 Page 1B-35 MAINTENANCE SERVICE MANUAL NUMBER 22 Inboard (MIE) Models WARNING When flushing, be certain the area around propeller is clear, and no one is standing nearby. To avoid possible injury, remove propeller. CAUTION If boat is in the water, seacock (water inlet valve), if equipped, must be closed until engine is to be re-started, to prevent water from flowing into the boat and/or back into the cooling system. If boat is not fitted with a seacock, water inlet hose must be disconnected and plugged (to prevent water from flowing into the boat and/or back into the cooling system). As a precautionary measure, attach a tag to the ignition switch or steering wheel of the boat with the warning: Open seacock or reconnect water inlet hose before starting engine. 1. If the boat is in the water, close the seacock, if equipped, or plug the seawater inlet hose to prevent seawater from entering the boat. 2. Disconnect the seawater inlet hose from the seawater pump connector fitting. b a 75299 Typical a - Inlet Hose b - Connector Fitting Page 1B-36 90-860074--1 FEBRUARY 2002 MAINTENANCE SERVICE MANUAL NUMBER 22 3. Using an adapter, connect a hose between the water inlet hose or connector fitting and a water tap. a b c 75299 a - Inlet Hose b - Adapter c - Hose To Water Tap 4. Partially open the water tap, approximately 1/2 maximum capacity. Do NOT use full water pressure. 5. Place the remote control in NEUTRAL, IDLE speed position, and start the engine. CAUTION Do NOT run engine above 1500 rpm when flushing. Suction created by seawater pickup pump may collapse flushing hose, causing engine to overheat. 6. Operate the engine at IDLE speed in NEUTRAL for 10 minutes, or until discharge water is clear. 7. Stop the engine. 8. Shut off the water tap. 9. Remove the hose and the adapter from the seawater pump connector fitting. CAUTION If boat is in the water, the seacock (water inlet valve), if equipped, must remain closed until engine is to be re-started, to prevent water from flowing back into the cooling system and/or the boat. If the boat is not fitted with a seacock, the water inlet hose must be disconnected and plugged (to prevent water from flowing back into cooling system and/or boat). As a precautionary measure, attach a tag to the ignition switch or steering wheel of the boat with the warning: Open seacock or reconnect water inlet hose before starting engine. 10. Reconnect the water inlet hose. 90-860074--1 FEBRUARY 2002 Page 1B-37 MAINTENANCE SERVICE MANUAL NUMBER 22 Inspect Water Pickups SternDrive Gear Housing 1. Ensure that the gear housing water inlet holes are clean and not obstructed. a 73186 Typical a - Water Inlet Holes Inboard Though the Hull Pickup 1. Ensure that the seawater pickup water inlet holes (slots) are clean and not obstructed. a 70355 Typical a - Water Inlet Holes (Slots) Page 1B-38 90-860074--1 FEBRUARY 2002 MAINTENANCE SERVICE MANUAL NUMBER 22 Lubrication Throttle Cable 1. Lubricate pivot points and guide contact surfaces with SAE 30W engine oil. b a 75332 Single Cable Shown (Dual Similar) a - Pivot Points b - Guide Contact Surfaces Shift Cable 1. Lubricate pivot points and guide contact surfaces with SAE 30W engine oil. a b a a b b a a 22245 Typical Sterndrive Model Shift Cable 73587 Typical Inboard Model Shift Cable and Transmission Linkage a - Pivot Points b - Guide Contact Surface 90-860074--1 FEBRUARY 2002 Page 1B-39 MAINTENANCE SERVICE MANUAL NUMBER 22 Engine Coupler / U-joint Shaft Splines NOTE: Refer to the appropriate Mercury MerCruiser Sterndrive Service Manual for sterndrive unit removal and installation, if necessary. IMPORTANT: These engines are equipped with a sealed engine coupler. The sealed coupler and the shaft splines can be lubricated without removing the sterndrive unit. 1. Lubricate the engine coupler splines through the grease fittings on the coupler by applying approximately 8-10 pumps of Engine Coupler Spline Grease from a typical hand-operated grease gun. If the boat is operated at idle for prolonged periods of time, the coupler should be lubricated on Bravo Models - every 50 hours. a 73346 Bravo Drive Couplers a - Grease Fitting Page 1B-40 90-860074--1 FEBRUARY 2002 MAINTENANCE SERVICE MANUAL NUMBER 22 U-joints NOTE: Bravo Models - The crosses and the bearings on the sterndrive U-joint will need to be lubricated through the grease fittings. The sterndrive unit must be removed to grease these fittings. 1. Remove the sterndrive unit; refer to the appropriate Mercury MerCruiser Sterndrive Service Manual for sterndrive unit removal and installation. 2. Apply U-joint And Gimbal Bearing Grease (Except on Bravo X Drives - use Exxon Unirex EP2 Grease [Obtain Locally] ) from a typical hand-operated grease gun until a small amount of grease begins to push out. 3. Lubricate the U-joint shaft splines using Engine Coupler Spline Grease. b a a 72531 Typical Bravo Drive a - Coupler Splines b - Grease Fitting 90-860074--1 FEBRUARY 2002 Page 1B-41 MAINTENANCE SERVICE MANUAL NUMBER 22 Drive Shaft Extension Models 1. Apply 3-4 pumps of U-joint And Gimbal Bearing Grease to drive shaft grease fittings. a b 71346 71347 a - Transom End Fittings b - Engine End Fittings Sterndrive Unit and Transom Assembly 1. Apply approximately 8-10 pumps of U-joint And Gimbal Bearing Grease to the gimbal bearing. a 70558 a - Gimbal Bearing b - Hinge Pins Page 1B-42 90-860074--1 FEBRUARY 2002 MAINTENANCE SERVICE MANUAL NUMBER 22 Continuity Circuit The transom assembly and the sterndrive unit are equipped with ground circuit wires to ensure good electrical continuity between the engine, the transom assembly and the sterndrive components. Good continuity is essential for the Anode and the MerCathode System to function most effectively. 1. Inspect the following ground circuit components for loose connections, broken or fraying wires. a 22028 a - Steering Lever Ground Wire a b 22650 77079 a - Inner Transom Plate To Gimbal Housing Ground Wire b - Driveshaft Housing To Gear Housing Ground Plate (Inside Anode Cavity) b a 77100 a - Gimbal Housing To Gimbal Ring Ground Wire b - Gimbal Ring To Trim Cylinder Ground Wires 90-860074--1 FEBRUARY 2002 Page 1B-43 MAINTENANCE SERVICE MANUAL NUMBER 22 Continuity Circuit (continued) b a 22028 c a - Flywheel Housing Grounding Stud b - Ground Wire c - Inner Transom Plate Grounding Screw a 22755 b 22031 a - Gimbal Ring To Bell Housing Ground Wire b - Sterndrive Unit To Bell Housing Ground Plate a b 70575 22230 a - Driveshaft Housing To Gear Housing Anodic Plate b - Hydraulic Connector Block To Gimbal Housing Ground Washer b a 50383 22079 a - U-joint Bellows Ground Clip b - Exhaust Bellows Ground Clips Page 1B-44 90-860074--1 FEBRUARY 2002 SERVICE MANUAL NUMBER 22 MAINTENANCE MerCathode If the boat is equipped with a Quicksilver MerCathode System, the system should be tested to ensure that it is providing adequate output to protect the underwater metal parts on the boat. The test should be made where the boat is moored, using Quicksilver Reference Electrode and Test Meter. Refer to the appropriate Mercury MerCruiser Sterndrive Service Manual for testing procedures. Engine Mounts 1. Torque the rear engine mounts to 51 Nm (38 lb-ft). Refer to SECTION 2. Electrical System NOTE: Refer to SECTION 4 for specific procedures. Inspect the entire electrical system for loose, damaged or corroded fasteners. 90-860074--1 FEBRUARY 2002 Page 1B-45 MAINTENANCE SERVICE MANUAL NUMBER 22 Power Steering Checking Fluid Level IMPORTANT: Use only Power Trim and Steering Fluid or automatic transmission fluid (ATF) Dexron III in power steering system. ENGINE WARM 1. Stop engine and center the sterndrive unit. 2. Remove the dipstick from the power steering fluid reservoir and observe the fluid level. 3. The fluid level should be between the full hot mark and the full cold mark on dipstick. a c d b 23162 73326 a b c d - Dipstick - Fluid Reservoir - Full Hot Mark - Full Cold Mark 4. If the fluid level is below marks, but fluid is visible in reservoir, add fluid to bring the level up to the full hot mark on the dipstick. Do NOT overfill. 5. If fluid is not visible in reservoir, a leak exists in the power steering system. Find and correct the cause. Page 1B-46 90-860074--1 FEBRUARY 2002 MAINTENANCE SERVICE MANUAL NUMBER 22 ENGINE COLD 1. With engine stopped, center sterndrive unit. 2. Remove dipstick from power steering fluid reservoir and observe fluid level. 3. The level should be between the full cold mark and the bottom of the dipstick. d a c b 23162 73326 a b c d - Dipstick - Fluid Reservoir - Full Cold Mark - Bottom Of Dipstick 4. If the fluid level is below the bottom of dipstick, but fluid is still visible in the reservoir, add required amount of fluid to bring level up to full cold mark on dipstick. DO NOT overfill. 5. If fluid is not visible in the reservoir, a leak exists in the power steering system. Find and correct the cause. 90-860074--1 FEBRUARY 2002 Page 1B-47 MAINTENANCE SERVICE MANUAL NUMBER 22 Filling and Bleeding 1. With engine stopped, center sterndrive unit. 2. Remove dipstick from power steering reservoir. IMPORTANT: Use only Power Trim and Steering Fluid or Dexron III automatic transmission fluid (ATF) in power steering system. 3. Add fluid to bring the fluid level up to full cold mark on dipstick. IMPORTANT: All air must be removed from the system or fluid in pump may foam during operation and be discharged from pump reservoir. Foamy fluid also may cause power steering system to become spongy, which may result in poor boat control. 4. With engine stopped, turn the steering wheel at a moderate rate, to end of travel in each direction, pausing a few seconds at end of travel. Do this a minimum of 5 complete cycles, then recheck fluid level and add fluid, if necessary. 5. Install dipstick. 6. Supply cooling water to water inlet. 7. Start engine and operate at IDLE until engine reaches normal operating temperature. During this time, slowly turn steering wheel to end of travel in each direction several times. IMPORTANT: Sterndrive unit must be centered and power steering fluid must be hot to accurately check fluid level. 8. With engine stopped, center sterndrive unit. Remove dipstick fluid reservoir. Allow any foam in reservoir to disperse, then check fluid level. Do NOT overfill. 9. If fluid is still foamy in Step 8., repeat Steps 6. and 7. until fluid does not foam and level remains constant. 10. Install dipstick. Page 1B-48 90-860074--1 FEBRUARY 2002 MAINTENANCE SERVICE MANUAL NUMBER 22 Transmission Checking Fluid Level IMPORTANT: To accurately check fluid level, the engine must be operated at 1500 rpm for 2 minutes immediately prior to checking level. 1. Start engine and run at 1500 rpm for 2 minutes to fill all circuits, lines, and cooler. 2. For Hurth Transmissions IMPORTANT: Do NOT screw dipstick in; press it firmly in and remove to obtain an accurate reading. a. Stop the engine and quickly remove the dipstick to check level. b. If fluid is below top (full) line, add Dexron III Automatic Transmission Fluid through dipstick hole. Do NOT overfill. c. If fluid level is below minimum fluid level line, check transmission case, cooler, and hoses for leaks. a b 71383 a - Full Fluid Level Line b - Minimum Fluid Level Line d. Install dipstick securely. IMPORTANT: Use automatic transmission fluid (ATF) Dexron III. 90-860074--1 FEBRUARY 2002 Page 1B-49 MAINTENANCE SERVICE MANUAL NUMBER 22 Power Trim Checking Fluid Level 1. Place sterndrive unit in full DOWN/IN position. IMPORTANT: Some trim pump reservoir fill caps have a small vent hole. Occasionally ensure vent is not restricted. 2. Unscrew reservoir cap. 3. Remove and discard cap plug if present. a b 73183 76631 a - Reservoir Cap b - Cap Plug 4. Observe oil level. Level must be up to, but not over, bottom edge of reservoir fill neck. a b 77348 a - Reservoir Fill Neck b - Reservoir Cap Page 1B-50 90-860074--1 FEBRUARY 2002 MAINTENANCE SERVICE MANUAL NUMBER 22 Filling 1. Add Power Trim and Steering Fluid or SAE 10W-30 engine oil to bring oil to proper level. 2. Install reservoir cap. a b 77348 a - Reservoir Fill Neck b - Reservoir Cap 90-860074--1 FEBRUARY 2002 Page 1B-51 MAINTENANCE SERVICE MANUAL NUMBER 22 Gear Lube Monitor Checking Fluid Level NOTE: Fluid level in gear lube monitor will fluctuate during operation. Level should be checked with engine cold. 1. Check for water at bottom of monitor, or milky-tan appearance. Both conditions indicate a water leak somewhere in the sterndrive unit. Find and correct the cause. 2. Check gear lube monitor oil level. Keep oil level at or near “OPERATING RANGE (FULL)” line and never below the “ADD” line. Filling 1. Remove cap. 2. Add High Performance Gear Lube to gear lube monitor as needed. IMPORTANT: If more than 57 grams (2 oz.) of High Performance Gear Lube are required to fill drive unit, a seal may be leaking. Damage to the unit may occur due to a lack of lubrication. b c a d 77335 75301 Gear Lube Monitor a - Monitor Bottle b - Cap c - OPERATING RANGE (FULL) Line d - ADD Line Page 1B-52 90-860074--1 FEBRUARY 2002 MAINTENANCE SERVICE MANUAL NUMBER 22 Seawater Strainer 1. Visually inspect seawater strainer through glass top. CAUTION When cleaning seawater strainer, close seacock, if equipped. If boat is not equipped with a seacock, remove and plug seawater inlet hose to prevent a siphoning action that may occur, allowing seawater to flow from the drain holes or removed hoses. CAUTION Do NOT overtighten cover screws or cover will warp and leak. 2. With engine off, close seacock (if equipped) or remove and plug seawater inlet hose if no seacock exists. 3. Remove screws, washers, and cover. 4. Remove strainer, drain plug and washer. 5. Clean all debris from strainer housing; flush both strainer and housing with clean water. 6. Check gasket and replace when necessary (if it leaks). 7. Reinstall strainer, drain plug and washer. 8. Reattach cover with screws and washers. 9. After starting engine, check for leaks and/or air in system, which would indicate an external leak. a b f c d e 78157 a b c d e - Screws and Washers - Cover, with glass - Strainer - Housing - Drain Plug and Sealing Washer Gasket 90-860074--1 FEBRUARY 2002 Page 1B-53 MAINTENANCE SERVICE MANUAL NUMBER 22 Air Filter Removal 1. Disconnect crankcase vent hose from end of air intake screen housing mounted on turbocharger inlet. a b 73323 Typical a - Intake Screen Housing b - Crankcase Vent Hose 2. Carefully remove air cleaner foam element from around air intake screen housing. b a 71267 a - Screen Housing b - Air Cleaner Element Inspection 1. Inspect the air cleaner element for tears or holes. 2. Replace the air cleaner element according to maintenance schedules or if it is deteriorated or torn. IMPORTANT: Refer to Maintenance Schedules for replacement interval under normal conditions. Page 1B-54 90-860074--1 FEBRUARY 2002 SERVICE MANUAL NUMBER 22 MAINTENANCE Cleaning 1. Wash air cleaner element in warm water and detergent until clean. IMPORTANT: No treatment (such as partial oil saturation) is required or recommended on air cleaner foam element prior to use. Use element clean and dry for proper filtration. 2. Allow air cleaner element to completely dry before use. Installation 1. Install air cleaner element around air intake screen. 2. Connect crankcase vent hose to end of intake screen housing. Tighten hose clamp securely. IMPORTANT: To prevent unfiltered air from entering the engine be certain that all of the air intake screen is covered by the foam element when installed. 3. Inspect installation to ensure engine draws in filtered air only. 90-860074--1 FEBRUARY 2002 Page 1B-55 MAINTENANCE SERVICE MANUAL NUMBER 22 Drive Belts General Information Belt and pulley replacement guidelines: Page 1B-56 • During belt assembly, do NOT force belt into pulley grooves by prying with a screwdriver, pry bar or similar. This will damage belt side cords, which will cause belt to turn over in pulley grooves, and result in complete destruction of belt. • Do NOT use belt dressing. • Always check condition of remaining belts. Replace belt if worn, cracked, grease-soaked or oil-soaked. • When replacing belt and pulley, pulley alignment must be checked under tensioned condition (brackets securely clamped). A misalignment that can be detected by visual inspection is detrimental to belt performance. • Except for belts controlled by an automatic tensioner, if a belt is disturbed for any reason, it must be tensioned to the correct tension. • Replace pulleys if worn or clean if still suitable for service. • On some engines it may be necessary to remove other drive belts to gain access to a particular belt during replacement. Refer to appropriate sections for information concerning individual drive belts and proceed accordingly. 90-860074--1 FEBRUARY 2002 MAINTENANCE SERVICE MANUAL NUMBER 22 Inspection WARNING Avoid possible serious injury. Ensure engine is shut off and ignition key is removed before inspecting belts. 1. Visually inspect all drive belts for cracks, glazing, fraying or separation. 2. Check drive belts for proper tension by pressing midpoint between the pulleys on the longest belt span. Belts must not deflect more than 5 mm (3/16 in.). a 73190 b b a 71588 Typical a - Drive Belts b - Deflection Measurement Engine Water Circulating Pump Belt Refer to Alternator Belt instructions. 90-860074--1 FEBRUARY 2002 Page 1B-57 MAINTENANCE SERVICE MANUAL NUMBER 22 Alternator Belt NOTE: On some engines it may be necessary to remove other drive belts to gain access to a particular belt during replacement. Refer to appropriate sections for information concerning individual drive belts and proceed accordingly. CAUTION Before removing the seawater pump hoses, close the seacock, if equipped. If boat is not equipped with a seacock, remove and plug the seawater inlet hose to prevent a siphoning action that may occur, allowing seawater to enter the boat. 1. Close the seacock, if equipped. If boat is not equipped with a seacock, remove and plug the seawater inlet hose. 2. Remove seawater pump inlet and outlet hoses. a b 78310 Typical a - Inlet Hose b - Outlet Hose 3. Loosen alternator mounting and tensioning bolts. 4. Pivot the alternator to loosen belt. 5. Remove old belt. 6. Install new belt. Page 1B-58 90-860074--1 FEBRUARY 2002 MAINTENANCE SERVICE MANUAL NUMBER 22 7. Pivot the alternator. Adjust belt deflection to be 5 mm (3/16 in.) measured at midpoint between the pulleys on the longest belt span. 8. Torque tensioning and mounting bolts 28 Nm (21 lb-ft). a b c 74301 73521 Typical a - Deflection: 5 mm (3/16 in.) b - Tensioning Bolt c - Mounting Bolt 9. Install the seawater pump inlet and outlet hoses. 10. Open the seacock, if equipped. If boat is not equipped with a seacock, remove the plug and connect the seawater inlet hose. 90-860074--1 FEBRUARY 2002 Page 1B-59 MAINTENANCE SERVICE MANUAL NUMBER 22 Power Steering Pump Belt NOTE: On some engines it may be necessary to remove other drive belts to gain access to a particular belt during replacement. Refer to appropriate sections for information concerning individual drive belts and proceed accordingly. 1. Loosen the two mounting bolts and the tensioning bolt on power steering pump. 2. Pivot the power steering pump to loosen belt. a a b 70113 a - Mounting Bolts (1 Not Shown) b - Tensioning Bolt CAUTION Before removing the seawater pump, close the seacock, if equipped. If boat is not equipped with a seacock, remove and plug the seawater inlet hose to prevent a siphoning action that may occur, allowing seawater to enter the boat. 3. Remove or loosen seawater pump nuts sufficiently to allow belt to pass between crankshaft balancer and water pump housing. NOTE: Refer to SECTION 6A - Seawater Pump Removal if necessary. a 23161 Typical a - Hex Nut With Washer (4) Page 1B-60 90-860074--1 FEBRUARY 2002 MAINTENANCE SERVICE MANUAL NUMBER 22 4. Remove old belt. 5. Install new belt. 6. Pivot the power steering pump. Adjust belt deflection to be 5 mm (3/16 in.) measured at midpoint between the pulleys on the longest belt span. 7. Torque tensioning and mounting bolts to 21 Nm (15 lb-ft). c a a b 70113 73521 a - Mounting Bolts (1 Not Shown) b - Tensioning Bolt c - Deflection: 5 mm (3/16 in.) IMPORTANT: There is an o-ring seal on the seawater pump. 8. Ensure that the o-ring seal is in the proper position before installing the seawater pump. Also, ensure the pump and keyway align. 9. Install the seawater pump. c a b 70243 23161 a - O-ring b - Key And Keyway c - Hex Nut With Washer 10. Install the seawater pump inlet and outlet hoses. 11. Open the seacock if equipped, or remove plug from seawater inlet hose and reconnect hose. 90-860074--1 FEBRUARY 2002 Page 1B-61 MAINTENANCE SERVICE MANUAL NUMBER 22 Vacuum Pump Belt NOTE: On some engines it may be necessary to remove other drive belts to gain access to a particular belt during replacement. Refer to appropriate sections for information concerning individual drive belts and proceed accordingly. 1. Remove or loosen seawater pump nuts sufficiently to allow belt to pass between crankshaft balancer and water pump housing. NOTE: Refer to SECTION 6 - Seawater Pump Removal if necessary. a 23161 a - Hex Nuts With Washers 2. Loosen the vacuum pump mounting and tensioning bolts, behind the bracket. c a b 74085 a - Mounting Bolt b - Tensioning Bolt c - Vacuum Pump Bracket 3. Pivot the vacuum pump to loosen the belt. 4. Remove old belt. 5. Install new belt Page 1B-62 90-860074--1 FEBRUARY 2002 MAINTENANCE SERVICE MANUAL NUMBER 22 6. Pivot the vacuum pump. Adjust belt deflection to be 5 mm (3/16 in.) measured at midpoint between the pulleys on the longest belt span. 7. Torque tensioning and mounting bolts to 21 Nm (15 lb-ft). c b a 74085 a - Mounting Bolt b - Tensioning Bolt c - Deflection: 5 mm (3/16 in.) IMPORTANT: There is an O-ring seal on the seawater pump. 8. Ensure that the O-ring seal is in the proper position before installing the seawater pump. Also, ensure the pump and keyway align. 9. Install the seawater pump. a c b 70243 23161 a - O-ring b - Keyway c - Hex Nuts With Washers 90-860074--1 FEBRUARY 2002 Page 1B-63 MAINTENANCE SERVICE MANUAL NUMBER 22 Battery 1. Ensure battery connections are clean and tight. 2. Keep exterior surfaces of battery wiped clean with a water/baking soda solution. 3. Ensure battery is securely fastened in place. 4. Refer to battery manufacturer’s recommendations for fluid level and charging. Charging System CAUTION Remove all battery cables from battery (before conducting the following check) to prevent accidentally causing a short circuit in the electrical system. 1. Inspect entire charging system for loose, damaged or corroded connectors. 2. Check wiring for frayed or worn insulation. 3. Check alternator mounting bolts for adequate tightness. 4. Check alternator drive belt for excessive wear, cracks, fraying and glazed surfaces. Corrosion and Corrosion Protection 1. After first cleaning all surfaces, check all metal surfaces and touch up with Paint. 2. To maintain a protective coating on all metal surface areas, spray with Corrosion Guard. NOTICE For additional information on sterndrive unit corrosion protection and external corrosion protection refer to appropriate Mercury MerCruiser Sterndrive Service Manual. Saltwater Operation Seawater section must be flushed after each saltwater use. Refer to SECTION 1B Flushing Seawater System. Page 1B-64 90-860074--1 FEBRUARY 2002 MAINTENANCE SERVICE MANUAL NUMBER 22 Freezing Temperature and Cold Weather Operation IMPORTANT: If boat is operated during periods of freezing temperature, precautions must be taken to prevent freeze damage to power package. Refer to the following and to Cold Weather or Extended Storage for related information and draining instructions. CAUTION Seawater (raw water) section of cooling system MUST BE COMPLETELY drained for winter storage or immediately after cold weather use, if the possibility of freezing temperatures exist. Failure to comply may result in trapped water causing freeze and/or corrosion damage to engine. CAUTION If boat is in the water, seacock (water inlet valve), if equipped, must be left closed until engine is to be started to prevent water from flowing back into cooling system and/or boat. If boat is not fitted with a seacock, water inlet hose must be left disconnected and plugged to prevent water from flowing back into cooling system and/or boat. As a precautionary measure, attach a tag to the ignition switch or steering wheel of the boat with the warning: Open seacock or reconnect water inlet hose before starting engine. 1. At the end of operations each day, COMPLETELY drain seawater section of the cooling system and the seawater strainer to protect against damage by freezing. Refer to SECTION 1B. 2. At the end of operation each day, drain water from water separating fuel filter. 3. Fill fuel tank at end of operation each day to prevent condensation. 4. Closed cooling section of engine must be filled with Premixed Marine Engine Coolant, a mixture of anti-freeze / deionized water solution sufficient to prevent freezing to the coldest temperature of the area. 5. Ensure that proper cold weather lubrication oil is used. 6. Make certain that the battery is of sufficient size and is fully charged. Ensure that all other electrical equipment is in optimum condition. 7. At temperatures of –20° C (–4° F) and below, it is recommended that you use the crankcase mounted coolant heater to improve cold starting. 8. If operating in arctic temperatures of –29° C (–20° F) or lower, consult your dealer for information about special cold weather equipment and precautions. 90-860074--1 FEBRUARY 2002 Page 1B-65 MAINTENANCE SERVICE MANUAL NUMBER 22 Cold Weather or Extended Storage Power Package Layup IMPORTANT: Mercury MerCruiser strongly recommends that this service be performed by an Authorized Mercury MerCruiser Dealer. Damage caused by freezing IS NOT covered by the Mercury MerCruiser Limited Warranty. CAUTION The engine must be prepared for long storage periods to prevent internal corrosion and severe damage. CAUTION Overheating from insufficient cooling water will cause engine and drive system damage. Ensure that there is sufficient water always available at water inlet holes during operation. IMPORTANT: If boat has already been removed from water, before starting engine a source of water must be supplied to water inlet holes. Refer to Flushing Cooling System. 1. Provide sufficient water supply to water inlet holes. 2. Start the engine and operate until it reaches normal operating temperature. 3. Stop the engine. 4. Change the engine oil and filter. 5. Start the engine and operate for about 15 minutes. Ensure there are no oil leaks. 6. Flush cooling system. Refer to SECTION 1B - Flushing Seawater System. 7. Drain seawater section of cooling system and prepare for cold weather or extended storage as outlined. Page 1B-66 90-860074--1 FEBRUARY 2002 MAINTENANCE SERVICE MANUAL NUMBER 22 Draining IMPORTANT: Drain only the seawater section of the cooling system. Closed cooling section must be kept filled year-round with specified coolant. 1. Ensure that the engine is as level as possible to promote complete draining of the cooling system. CAUTION If boat is to remain in the water, seacock, if equipped, must be closed until engine is to be restarted to prevent water from flowing back into seawater cooling system. If boat is not fitted with a seacock, water inlet hose must be disconnected and plugged to prevent water from flowing into cooling system and/or boat. As a precautionary measure, attach a tag to the ignition switch or steering wheel with the warning that the valve must be opened or the water inlet hose reconnected prior to starting the engine. 2. Close seacock, or disconnect and plug seawater inlet hose, if boat is to remain in the water. IMPORTANT: Drain only the seawater section of the cooling system. Closed cooling section must be kept filled year-round with specified coolant. 3. Do NOT open either of these two drain valves in the closed cooled section. 75297 b a 71364 76391 Typical a - Exhaust Manifold Drain Valve b - Engine Block Drain Valve 90-860074--1 FEBRUARY 2002 Page 1B-67 MAINTENANCE SERVICE MANUAL NUMBER 22 4. Remove the end covers from BOTH port and starboard ends on upper and lower sections of heat exchanger tank. 5. Drain tank completely. 6. Sponge out or soak up any water that remains in the bottom part of upper and lower heat exchanger sections, until all water passage tubes are completely free of standing water. CAUTION Avoid damage to heat exchanger and subsequent possible engine damage. Remove all water from heat exchanger sections. Failure to do so could cause corrosion or freeze damage to heat exchanger water passage tubes. a b a 73326 b 73322 a - Upper Section End Cover b - Lower Section End Cover NOTE: In the following it may be necessary to lower or bend the hoses to allow water to drain completely. 7. On Sterndrive (MCM) Engines: Disconnect seawater outlet hose at aft end of power steering fluid cooler. Lower hose and drain completely. b a 75297 Typical a - Power Steering Fluid Cooler b - Seawater Hose Page 1B-68 90-860074--1 FEBRUARY 2002 MAINTENANCE SERVICE MANUAL NUMBER 22 8. On Inboard (MIE) Engines: Disconnect seawater outlet hose at aft end of transmission fluid cooler. Lower hose and drain completely. a b 73335 Typical a - Transmission Fluid Cooler b - Seawater Hose 9. Remove the drain plug from the aft end cover of the intercooler. a b 74303 a - Drain Plug b - Intercooler 10. Remove seawater pump outlet hose from top of seawater pump and drain. a 75301 a - Seawater Pump Outlet Hose 11. Repeatedly clean out drain holes using a stiff piece of wire. Do this until entire system is drained. 90-860074--1 FEBRUARY 2002 Page 1B-69 MAINTENANCE SERVICE MANUAL NUMBER 22 12. Sterndrive (MCM) Only: Insert a small wire (repeatedly) to make sure that speedometer pitot tube, trim tab/anode cavity vent hole and trim tab/anode cavity drain passage are unobstructed and drained. b c a 71217 Typical Bravo Drive Unit a - Speedometer Pitot Tube b - Vent Hole c - Drain Passage 13. After seawater section of cooling system has been drained completely: a. Coat threads of intercooler drain plug with Perfect Seal and reinstall. Tighten securely. b. Reconnect hoses. Tighten hose clamps securely. NOTE: Renew end cover gaskets if worn or deteriorated. c. Install all four end cover gaskets and covers on the heat exchanger tank. d. Torque the end covers on the upper heat exchanger section to 14-15 Nm (120-132 lb-in.). e. Torque the end covers on the lower heat exchanger section to 11 Nm (108-120 lb-in.). Page 1B-70 90-860074--1 FEBRUARY 2002 MAINTENANCE SERVICE MANUAL NUMBER 22 IMPORTANT: Mercury MerCruiser recommends that propylene glycol antifreeze (nontoxic and biodegradable, which makes it friendly to lakes and rivers) be used in seawater section of the cooling system for cold weather or extended storage. Make sure that the propylene glycol antifreeze contains a rust inhibitor and is recommended for use in marine engines. Be certain to follow the propylene glycol manufacturer’s recommendations. 14. Fill a container with approximately 5.6 liter (6 U.S. quarts) of propylene glycol antifreeze and tap water mixed to manufacturer’s recommendation to protect engine to the lowest temperature to which it will be exposed during cold weather or extended storage. 15. Disconnect hose from seawater pump connector fitting. Using an adaptor, temporarily connect an appropriate length piece of hose to seawater pump and place the other end of the hose into container of coolant. b a 75299 Typical a - Inlet Hose b - Connector Fitting 16. Start the engine and operate, at IDLE speed, until antifreeze mixture has been pumped into engine seawater cooling system. 17. Stop the engine. 18. Clean the engine. 19. Coat the engine with Quicksilver Corrosion Guard or equivalent corrosion inhibiting oil. 20. Lubricate all items outlined in Lubrication. 21. Remove and store battery in a cool, dry place. Do NOT store on a concrete surface, or on the ground. Place on a dry, wood board or a thick plastic base. Refer to battery manufacturer’s instructions. 22. Perform all checks, inspections, lubrication and fluid changes outlined in the Maintenance Schedules. 90-860074--1 FEBRUARY 2002 Page 1B-71 MAINTENANCE SERVICE MANUAL NUMBER 22 23. Remove seawater pump impeller for storage: a. Remove seawater pump cover mounting screws, and remove cover and gasket. b. Ease impeller off pump shaft with two screwdrivers. c. Reinstall cover for storage. NOTE: Pump shown removed for visual clarity only. b e c a d 71366 Typical a - Seawater Pump Housing b - Cover Screws c - Cover d - Gasket e - Impeller IMPORTANT: It is recommended that others be informed to NOT operate the engine. 24. Place a CAUTION TAG at instrument panel and in engine compartment stating that the seawater pump is out - Do NOT operate engine. CAUTION Sterndrive unit should be stored in full DOWN / IN position. Universal Joint bellows may develop a set if unit is stored in raised position and may fail when unit is returned to service. 25. Place sterndrive unit in the full DOWN / IN position. Page 1B-72 90-860074--1 FEBRUARY 2002 MAINTENANCE SERVICE MANUAL NUMBER 22 Recommissioning NOTICE Refer to Cold Weather Extended Storage - Precautions, BEFORE proceeding. 1. Reinstall seawater pump components as follows: a. Place impeller in pump housing, turning clockwise while simultaneously pushing firmly inward onto pump shaft. NOTE: Use new gasket. Install in correct position - wide surface on side of cam. b. Install pump cover with new gasket in noted position. c. Install the seawater pump cover mounting screws. Tighten securely. NOTE: Pump shown removed for visual clarity only. a e b a d c 71366 a b c d e - Impeller - Seawater Pump Housing - Gasket (Wide Surface On Cam Side) - Cover - Cover Screws 90-860074--1 FEBRUARY 2002 Page 1B-73 MAINTENANCE SERVICE MANUAL NUMBER 22 2. Ensure that all cooling system hoses are in good condition, connected properly, and hose clamps are tight. Verify that all drain valves and drain plugs are installed and tight. 3. Inspect all drive belts. 4. Perform all lubrication and maintenance specified for completion Annually in Maintenance Schedule, except items that were performed at time of engine layup. 5. Fill fuel tanks with fresh diesel fuel. Old fuel should not be used. Check fuel lines and connections for leaks and general condition. 6. Replace fuel filter 7. For drive unit, refer to appropriate Mercury MerCruiser Sterndrive Service Manual. CAUTION When installing battery, connect POSITIVE (+) battery cable to POSITIVE (+) battery terminal FIRST, and NEGATIVE (–) battery cable to NEGATIVE (–) battery terminal LAST. If battery cables are reversed, or connection order is reversed, electrical system damage will result. 8. Install a fully charged battery. Clean the battery cable clamps and terminals. Reconnect the cables (see CAUTION listed above). Secure each cable clamp when connecting. Coat terminals with a battery terminal anti-corrosion spray to help retard corrosion. 9. Perform all checks on OPERATION CHART in the STARTING PROCEDURE column found in the Operation, Maintenance and Warranty Manual provided with the product. CAUTION Overheating from insufficient cooling water will cause engine and drive system damage. Ensure that there is sufficient water always available at water inlet holes during operation. 10. Supply cooling water to the water inlet openings. 11. Start the engine and closely observe instrumentation. Ensure that all systems are functioning correctly. 12. Carefully inspect the engine for fuel, oil, fluid, water and exhaust leaks. 13. Check the steering system, shift and throttle control for proper operation. Page 1B-74 90-860074--1 FEBRUARY 2002 MAINTENANCE SERVICE MANUAL NUMBER 22 THIS PAGE IS INTENTIONALLY BLANK 90-860074--1 FEBRUARY 2002 Page 1B-75 MAINTENANCE SERVICE MANUAL NUMBER 22 THIS PAGE IS INTENTIONALLY BLANK Page 1B-76 90-860074--1 FEBRUARY 2002 TROUBLESHOOTING SERVICE MANUAL NUMBER 22 IMPORTANT INFORMATION 1 SECTION 1C - Troubleshooting C Table of Contents Precautions . . . . . . . . . . . . . . . . . . . . . . . . . . 1C-3 Poor Boat Performance and/or Poor Maneuverability . . . . . . . . . . . . . . . . . . . . . . 1C-5 Improper Full Throttle Engine RPM . . . . . . 1C-6 RPM Too High . . . . . . . . . . . . . . . . . . . . . 1C-6 RPM Too Low . . . . . . . . . . . . . . . . . . . . . . 1C-6 Engine Cranks Over But Will Not Start Or Starts Hard . . . . . . . . . . . . . . . . . . . . . . . . . . 1C-7 Electrical . . . . . . . . . . . . . . . . . . . . . . . . . . 1C-7 Fuel System . . . . . . . . . . . . . . . . . . . . . . . 1C-7 Miscellaneous . . . . . . . . . . . . . . . . . . . . . . 1C-9 Engine Will Not Crank Over or Starter Inoperative . . . . . . . . . . . . . . . . . . . . . . . . . . . 1C-9 Glow Plugs Inoperative . . . . . . . . . . . . . . . 1C-10 Charging System Inoperative . . . . . . . . . . 1C-11 Noisy Alternator . . . . . . . . . . . . . . . . . . . . . . 1C-11 Engine Operates Poorly at Idle . . . . . . . . . 1C-12 Engine Operates Poorly At High Rpm . . . 1C-13 Poor Fuel Economy . . . . . . . . . . . . . . . . . . 1C-14 Engine Smoking . . . . . . . . . . . . . . . . . . . . . 1C-15 Black Smoke . . . . . . . . . . . . . . . . . . . . . . 1C-15 Blue Smoke . . . . . . . . . . . . . . . . . . . . . . . 1C-16 White Smoke . . . . . . . . . . . . . . . . . . . . . 1C-16 Exhaust Gas Temperature . . . . . . . . . . . . . 1C-17 High . . . . . . . . . . . . . . . . . . . . . . . . . . . . . 1C-17 Low . . . . . . . . . . . . . . . . . . . . . . . . . . . . . . 1C-17 90-860074--1 FEBRUARY 2002 Turbocharger . . . . . . . . . . . . . . . . . . . . . . . . Engine Noise . . . . . . . . . . . . . . . . . . . . . . . . Valve Cover Area . . . . . . . . . . . . . . . . . . Cylinder Area . . . . . . . . . . . . . . . . . . . . . Camshaft Area . . . . . . . . . . . . . . . . . . . . Crankshaft Area . . . . . . . . . . . . . . . . . . . Miscellaneous . . . . . . . . . . . . . . . . . . . . . Oil Pressure . . . . . . . . . . . . . . . . . . . . . . . . . Low Oil Pressure . . . . . . . . . . . . . . . . . . High Oil Pressure . . . . . . . . . . . . . . . . . . Excessive Oil Consumption . . . . . . . . . Water / Coolant in Engine . . . . . . . . . . . . . Important Information . . . . . . . . . . . . . . Water / Coolant In Crankcase Oil . . . . Water / Coolant On Top Pistons . . . . . Engine Overheats . . . . . . . . . . . . . . . . . . . . Cooling System . . . . . . . . . . . . . . . . . . . Mechanical . . . . . . . . . . . . . . . . . . . . . . . Power Steering . . . . . . . . . . . . . . . . . . . . . . Poor, Erratic or No Assist . . . . . . . . . . . Noisy Pump . . . . . . . . . . . . . . . . . . . . . . . Fluid Leaks . . . . . . . . . . . . . . . . . . . . . . . Insufficient Water Flow From Belt Driven Seawater Pump . . . . . . . . . . . . . . . . . . . . . ZF / Hurth Hydraulic Transmission . . . . . . 1C-18 1C-19 1C-20 1C-20 1C-21 1C-22 1C-23 1C-23 1C-25 1C-25 1C-26 1C-27 1C-27 1C-27 1C-28 1C-29 1C-29 1C-30 1C-31 1C-31 1C-32 1C-32 1C-33 1C-34 Page 1C-1 TROUBLESHOOTING SERVICE MANUAL NUMBER 22 THIS PAGE IS INTENTIONALLY BLANK Page 1C-2 90-860074--1 FEBRUARY 2002 TROUBLESHOOTING SERVICE MANUAL NUMBER 22 Precautions WARNING Always disconnect battery cables from battery before working around electrical system components to prevent injury to yourself or damage to electrical system. WARNING Be careful when changing fuel system components; diesel fuel is flammable. Ensure that ignition key is OFF. Do NOT smoke or allow sources of spark or flame in the area while changing fuel system components. Wipe up any spilled fuel immediately. Do NOT allow fuel to come into contact with any hot surface which may cause it to ignite. WARNING Avoid diesel fuel fire. Improper installation of brass fittings or plugs into fuel filter base can crack casting and/or cause a fuel leak. Follow specific procedure, given in SECTION 4 of this manual, for all fuel line connections. WARNING FIRE HAZARD: Fuel leakage from any part of the fuel system can be a fire hazard which can cause serious bodily injury or death. Careful periodic inspection of entire fuel system is mandatory, particularly after storage. All fuel components including fuel tanks, whether plastic, metal or fiberglass, fuel lines, primers, fittings, and fuel filters should be inspected for leakage, softening, hardening, swelling or corrosion. Any sign of leakage or deterioration requires replacement before further engine operation. WARNING Dispose of fuel-soaked rags, paper, etc., in an appropriate air tight, fire retardant container. Fuel-soaked items may spontaneously ignite and result in a fire hazard which could cause serious bodily injury or death. 90-860074--1 FEBRUARY 2002 Page 1C-3 TROUBLESHOOTING SERVICE MANUAL NUMBER 22 WARNING Make sure no fuel leaks exist before closing engine hatch. WARNING When running engine with boat out of water, be certain that area in vicinity of propeller is clear and that no person is standing nearby. As a precautionary measure, it is recommended that the propeller be removed. WARNING Do NOT leave helm unattended while performing idle speed adjustment. WARNING Safety glasses should be worn while working on fuel injection system. The fuel injection pump will generate pressures in excess of 2000 psi (13790 kPa). Use caution when removing injectors, injector lines, or bleeding air from injection system. CAUTION Do NOT operate engine without water being supplied to seawater pickup pump on engine, or pump impeller may be damaged and subsequent overheating damage to engine may result. Engine may be operated with boat out of water, if instructions for running engine with boat out of water, below, are followed. CAUTION Do NOT run engine above 1500 rpm, as suction created by seawater pickup pump may collapse water supply hose and cause engine to overheat Page 1C-4 90-860074--1 FEBRUARY 2002 TROUBLESHOOTING SERVICE MANUAL NUMBER 22 Poor Boat Performance and/or Poor Maneuverability Symptom Cause 1. Bow too low 1. A. Improper drive unit trim angle B. Improper weight distribution C. Boat is underpowered D. Permanent or power hook in boat bottom E. False bottom full of water F. Improperly adjusted trim tabs (after planes) 2. Bow too high 2. A. Improper drive unit trim angle B. Propeller pitch too great C. Dirty boat bottom (marine growth) D. Poor running engine E. Improper weight distribution F. Rocker in boat bottom G. False bottom full of water H. Improperly adjusted trim tabs (after planes) 3. Propeller ventilating 3. A. Drive unit installed too high on transom B. Dirty or rough boat bottom C. Damaged propeller; pitch too small; diameter too small D. Keel located too close to propeller or too deep in the water E. Water pickup or accessories located too close to propeller F. Hook in boat bottom G. Propeller plugged up with weeds 90-860074--1 FEBRUARY 2002 Page 1C-5 TROUBLESHOOTING SERVICE MANUAL NUMBER 22 Improper Full Throttle Engine RPM RPM Too High Cause Special Information 1. Operation 3. Unit trimmed out too far 2. Propeller 1. Damaged; pitch too low; diameter too small; propeller hub slipping 3. Boat 2. A. Water pickup or accessories mounted too close to propeller (ventilation) B. Keel located too close to propeller and/or too deep in the water (ventilation) C. Drive installed too high on transom D. Wrong gear ratio 4. Engine coupler slipping RPM Too Low Cause 1. Operation Page 1C-6 Special Information 3. Unit trimmed in too far 2. Propeller 1. Damaged; pitch too great; diameter too great 2. Boat 2. A. Dirty or damaged bottom B. Permanent or power hook in bottom C. False bottom full of water D. Drive installed too low E. Excessive boat load 90-860074--1 FEBRUARY 2002 TROUBLESHOOTING SERVICE MANUAL NUMBER 22 Engine Cranks Over But Will Not Start Or Starts Hard Electrical Cause 1. Battery, electrical connections, damaged wiring, Lanyard Stop Switch Special Information 1. Ensure ECM 5 Amp. fuse in electrical box is not defective (blown) 2. Ignition switch 3. Glow plugs (if equipped) inoperative 4. Injection timing 4. May crank over hard. Refer to SECTION 5A, 5D, and/or 5E for EDI diagnosis Fuel System Cause 1. Empty fuel tank Special Information 2. Fuel shut off valve closed (if equipped) 3. Anti-siphon valve stuck closed (if equipped) 3. Restricting fuel supply 4. Low grade, stale fuel or water in fuel 5. Fuel waxing or frozen water separator (cold weather) 6. Plugged fuel suction line or filter 7. Air leaks, suction side fuel line or water separator 7. Sucks air into fuel system reducing fuel volume 8. Plugged or pinched fuel line (feed or return) 90-860074--1 FEBRUARY 2002 Page 1C-7 TROUBLESHOOTING SERVICE MANUAL NUMBER 22 Fuel System (continued) Page 1C-8 Cause 9. Fuel tank vent plugged Special Information 9. Engine will start initially. After a short time running, engine will stall and will not restart for a period of time. Can verify if it is a vent problem by running engine with filler cap loose. Filler cap will act as a vent. 10. Injection pump solenoid valve 10 Refer to SECTION 5. Check lanyard stop switch engaged or defective 11. Fuel supply pump 11. Low supply pump pressure. Refer to SECTION 5A, 5D, and/or 5E for EDI diagnosis 90-860074--1 FEBRUARY 2002 TROUBLESHOOTING SERVICE MANUAL NUMBER 22 Miscellaneous Cause Special Information 1. Low grade or stale fuel 2. Water in fuel 3. Incorrect starting procedure 3. Refer to Owners Manual 4. Internal mechanical damage (bent rods, etc.) 5. Low compression 5. Worn valves, rings, cylinder or head gasket 6. Valve timing incorrect 6. Timing gears improperly installed or cam slipped in drive gear 7. Restricted or plugged exhaust Engine Will Not Crank Over or Starter Inoperative Cause Special Information 1. Remote control lever not in neutral position 2. Battery charge low; damaged wiring; loose electrical connections 3. Circuit breaker tripped 4. Defective (blown) fuse 5. Ignition switch 6. Slave solenoid 90-860074--1 FEBRUARY 2002 Page 1C-9 TROUBLESHOOTING SERVICE MANUAL NUMBER 22 Engine Will Not Crank Over or Starter Inoperative (continued) Cause 7. Faulty neutral start safety switch Special Information 7. Open circuit 8. Starter solenoid 9. Starter motor 10. Engine mechanical malfunction Glow Plugs Inoperative Cause Special Information 1. Battery discharged 2. Circuit breaker tripped 2. On dash or in electrical box 3. Poor battery connections 4. Glow plug(s) defective (burned out) 5. Relay defective or inoperative 5. Check Main or Auxiliary Relay in electrical box. Refer to SECTION 4C and/or 5E for EDI Diagnosis 6. Pre-glow circuit of controller inoperative 6. In electrical box 7. ECT malfunction or inoperative 7. Refer to SECTION 5E for EDI diagnosis 8. Ignition switch inoperative 9. Broken or disconnected wire in glow plug circuit Page 1C-10 90-860074--1 FEBRUARY 2002 TROUBLESHOOTING SERVICE MANUAL NUMBER 22 Charging System Inoperative Cause Special Information 1. Loose or broken drive belt 2. Engine rpm too low on initial start 2. Rev engine to 1500 rpm 3. Loose or corroded electrical connections 4. Faulty battery gauge 4. Best way to test is to replace gauge 5. Battery will not accept charge 5. Low electrolyte or failed battery 6. Faulty alternator or regulator 7. Refer to Charging System SECTION 4B for complete diagnostic procedures Noisy Alternator Cause Special Information 1. Loose mounting bolts 2. Drive belt 2. Worn, frayed, loose 3. Loose drive pulley 4. Worn or dirty bearings 5. Faulty diode trio or stator 6. Faulty armature 90-860074--1 FEBRUARY 2002 6. Rubbing, broken wire Page 1C-11 TROUBLESHOOTING SERVICE MANUAL NUMBER 22 Engine Operates Poorly at Idle Cause Special Information 1. Clogged air cleaner 2. Plugged fuel suction line or filter 3. Air leaks: suction side fuel line, water separating fuel filter or loose intake manifold 4. Water in fuel 4. Refer to SECTIONS 1B and 5A 5. Low grade or stale fuel 6. Fuel waxing or frozen water separating fuel filter (cold weather) 7. Valve timing 7. Cam slipped in drive gear 8. Restricted or plugged exhaust 9. Injectors not functioning properly 9. Refer to SECTION 5E for EDI Diagnosis 10. Injection pump timing incorrect 10. Refer to SECTION 5E for EDI Diagnosis 11. Low compression 11. Also check for defective (blown) head gasket 12. Water leaking into cylinders 12. Defective head gasket, exhaust manifold, cracked head or intercooler 13. Loose or broken engine mounts 14. Refer to SECTION 5 for complete diagnostic procedures for EDI Page 1C-12 90-860074--1 FEBRUARY 2002 TROUBLESHOOTING SERVICE MANUAL NUMBER 22 Engine Operates Poorly At High Rpm Cause Special Information 1. Refer to Poor Boat Performance And / Or Poor Maneuverability 2. Crankcase overfilled with oil 2. Check oil level with boat at rest in the water 3. Malfunction of anti-siphon valve (if equipped) 3. Restricting fuel supply 4. Plugged fuel tank vent 5. Low fuel supply 6. Clogged fuel filter 7. Low grade of fuel or water in the fuel 8. Obstructed or kinked fuel lines 9. Injectors not functioning properly 9. Refer to SECTION 5C and / or 5E for EDI Diagnosis 10. Engine overheating 10. Refer to Engine Overheats 11. Low compression 11. Worn valves, rings, cylinders, etc. 12. Restricted or plugged exhaust 13. Refer to SECTION 5 for complete diagnostic procedures for EDI 90-860074--1 FEBRUARY 2002 Page 1C-13 TROUBLESHOOTING SERVICE MANUAL NUMBER 22 Poor Fuel Economy Cause Special Information 1. Fuel leaks 2. Operator habits 2. Prolonged idling; slow acceleration; failure to cut back on throttle once boat is on plane; boat over loaded; uneven weight distribution 3. Engine laboring 3. Bent, damaged, or wrong propeller. Water test boat for proper operating rpm at wide open throttle 4. Clogged air cleaner 5. Engine compartment sealed too tight 5. Not enough air for engine to operate properly 6. Boat bottom 6. Dirty (marine growth), hook, rocker 7. Turbocharger malfunction 8. Improper fuel 9. Crankcase ventilation system not working 10. Engine operating too hot or too cold 11. Plugged or restricted exhaust Page 1C-14 12. Engine 12. Low compression 13. Injectors not functioning properly 13. Refer to SECTION 5E for EDI diagnosis 14. Injection pump timing incorrect 14. Refer to SECTION 5E for EDI diagnosis 90-860074--1 FEBRUARY 2002 TROUBLESHOOTING SERVICE MANUAL NUMBER 22 Engine Smoking Black Smoke Cause Special Information 1. Overload 2. Restricted air cleaner and /or intercooler 3. Excessive fuel delivery 3. Refer to SECTION 5E for EDI diagnosis 4. Faulty injector(s) 4. Refer to SECTION 5C and / or 5E for EDI diagnosis 5. Restricted or plugged exhaust 6. Insufficient coolant temperature 7. Excessive idle time (injector coking) 9. Leaking head gaskets 10. Worn piston rings 90-860074--1 FEBRUARY 2002 Page 1C-15 TROUBLESHOOTING SERVICE MANUAL NUMBER 22 Blue Smoke Cause Special Information 1. Worn piston rings 1. Check compression 2. Sticking piston rings 2. Check compression 3. Crankcase overfilled - incorrect dipstick reading 4. Leaking head gaskets White Smoke Cause Special Information 1. Injection pump timing incorrect 1. Refer to SECTION 5D 2. Faulty injector(s) 2. Refer to SECTION 5C 3. Low compression 4. Plugged fuel suction line or filter 5. Air leaks, suction side fuel line or water separating fuel filter 6. Questionable fuel quality 6. Low cetane 7. Restricted fuel return/excessive return line pressure 8. Leaking head gaskets 9. Inoperative glow plug system 9. Refer to SECTION 4C and/or 5E for EDI diagnosis Page 1C-16 90-860074--1 FEBRUARY 2002 TROUBLESHOOTING SERVICE MANUAL NUMBER 22 Exhaust Gas Temperature High Cause Special Information 1. Excessive load 2. Injection pump timing incorrect 2. Refer to SECTION 5D 3. Faulty wastegate device Low Cause 1. Injection pump timing incorrect Special Information 1. Refer to SECTION 5D 2. Excessive idling time/light loads 90-860074--1 FEBRUARY 2002 Page 1C-17 TROUBLESHOOTING SERVICE MANUAL NUMBER 22 Turbocharger Ensure that troubles are not due to engine components, especially to injection system, before troubleshooting turbocharger and/or carrying out corrective action on turbocharger. Cause 1. Smoke from exhaust Special Information 1. A. Not enough air getting to engine air intake B. Clogged air filter C. Boost pressure too low D. Refer to Engine Smoking - Black, Blue and/or White 2. Loss of power 2. A. Not enough air getting to engine air intake B. Clogged air cleaner C. Boost pressure too low D. Poor lubrication of turbocharger E. Defective wastegate valve F. Rubbing of compressor or turbine impellers against housing G. Defective engine gaskets allowing air or fuel escape into exhaust or intake system 3. Unusual noises and vibrations at turbocharger 3. A. Poor lubrication of turbocharger B. Rubbing of compressor or turbine impellers against housing C. Defective engine gaskets allowing air or fuel escape into exhaust or intake system 4. Rubbing of compressor or turbine impellers against housing 4. A. Poor lubrication of turbocharger B. Low oil pressure at turbocharger C. Defective bearings in turbocharger 5. Oil leakage from compressor side 5. A. Clogged air cleaner B. Boost pressure too low Page 1C-18 90-860074--1 FEBRUARY 2002 SERVICE MANUAL NUMBER 22 TROUBLESHOOTING Engine Noise No definite rule or test will positively determine source of engine noise; therefore, use the following information only as a general guide to engine noise diagnosis. 1. Use a timing light to determine if noise is timed with engine speed or one-half engine speed. Noises timed with engine speed are related to crankshaft, rods, pistons, piston pins, and flywheel. Noises timed to one-half engine speed are valve train related. 2. The use of a stethoscope can aid in locating a noise source; however, because noise will travel to other metal parts not involved in the problem, caution must be exercised. 3. Try to isolate the noise to location in engine: front to back, top to bottom. This can help determine which components are at fault. 4. Sometimes noises can be caused by moving parts coming in contact with other components. Examples are: flywheel or coupler; exhaust flappers rattling against exhaust pipe; crankshaft striking (pan, pan baffle, or dipstick tube); rocker arm striking valve cover; and loose flywheel cover. In many cases if this is found to be the problem, a complete engine teardown is not necessary. 5. When noise is isolated to a certain area and component, removal and inspection will be required. Refer to proper SECTIONs of service manual for information required for service. 6. If noise cannot be distinguished between engine and drive unit, remove drive from boat. Run a water supply directly to engine. Run engine without the drive to determine if noise is still there. 90-860074--1 FEBRUARY 2002 Page 1C-19 TROUBLESHOOTING SERVICE MANUAL NUMBER 22 Valve Cover Area Location 1. Valve cover area, timed to one-half engine speed, noise could be confined to one cylinder or may be found in any multitude of cylinders Possible Cause 1. A. Rocker arm striking valve cover B. Hydraulic lifter C. Worn rocker arm D. Bent push rod E. Worn camshaft F. Sticking valve Cylinder Area Location 1. Cylinder area, may be confined to one cylinder or found in more than one cylinder, timed to engine speed Possible Causes 1. A. Sticking valve B. Carbon build-up C. Connecting rod installed wrong D. Bent connecting rod E. Piston F. Piston rings G. Piston pin H. Cylinder worn 2. Engine knocking 2. A. Faulty injector (white smoke) B. Worn delivery valve C. Wrong injection timing D. Incorrect valve lifter E. Tight piston pin Page 1C-20 90-860074--1 FEBRUARY 2002 TROUBLESHOOTING SERVICE MANUAL NUMBER 22 Camshaft Area Location 1. Camshaft area, front of engine, timed to engine speed Possible Causes 1. A. Camshaft timing gear B. Injection pump C. Fuel pump D. Valve lifter - camshaft wear E. Cam bearings 2. Camshaft area, center of engine, timed to engine speed 2. A. Fuel pump B. Valve lifter - camshaft wear C. Cam bearings 3. Camshaft area, rear of engine, timed to engine speed 3. A. Valve lifter - camshaft wear B. Cam bearings 4. Camshaft area, throughout engine, timed to engine speed 4. A. Loss of oil pressure B. Valve lifter - camshaft wear C. Cam bearings 90-860074--1 FEBRUARY 2002 Page 1C-21 TROUBLESHOOTING SERVICE MANUAL NUMBER 22 Crankshaft Area Location Possible Causes 1. Crankshaft area, front of engine, timed 1. A. Crankshaft timing gear to engine speed B. Oil Pump C. Rod bearing D. Main bearing 2. Crankshaft area, center of engine, timed to engine speed 2. A. Crankshaft striking pan or pan baffle B. Rod bearing C. Main bearing 3. Crankshaft area, rear of engine, timed to engine speed 3. A. Loose flywheel cover B. Loose coupler or drive plate C. Loose flywheel D. Rod bearing E. Main bearing 4. Crankshaft area, throughout engine, timed to engine speed 4. A. Loss of oil pressure B. Rod bearings C. Main bearings Page 1C-22 90-860074--1 FEBRUARY 2002 TROUBLESHOOTING SERVICE MANUAL NUMBER 22 Miscellaneous Location 1. Hissing Possible Causes A. Leaking exhaust (manifolds or pipes) B. Loose cylinder heads C. Blown head gasket 2. Whistle 2. A. Vacuum leak B. Dry or tight bearing in an accessory 3. Squeaks or squeals 3. A. Drive belt slipping B. Dry or tight bearing in an accessory C. Parts rubbing together Oil Pressure Item 1. Measuring oil pressure Special Information 1. Use a good automotive oil pressure test gauge. Do not rely on the oil pressure gauge in the boat. 2. Check engine oil level with boat at rest 2. Oil level should be between the ADD in the water and FULL marks 3. Oil level in crankcase above FULL mark 3. May cause loss of engine rpm, oil pressure gauge fluctuation, drop in oil pressure, and hydraulic valve lifter noise at high rpm 4. Oil level in crankcase below ADD mark 4. Low oil pressure; oil pressure gauge fluctuation; internal engine noise and/or damage 5. Change in oil pressure 90-860074--1 FEBRUARY 2002 5. This may be a normal condition. Oil pressure may read high in the cooler times of the day, and when engine is not up to operating temperature. As the air temperature warms up and engine is running at normal opening temperature, it is normal for oil pressure to drop. Page 1C-23 TROUBLESHOOTING SERVICE MANUAL NUMBER 22 Oil Pressure (continued) Item Page 1C-24 Special Information 6. Low engine oil pressure at idle 6. With modern engines and engine oils, low oil pressure readings at idle do not necessarily mean there is a problem. If valve lifters are not noisy at idle, there is a sufficient volume of oil to lubricate all internal moving parts properly. The reason for the drop in oil pressure is that engine heat causes an expansion of the internal tolerances in the engine and, also, the oil will thin out somewhat from heat. 7. Low engine oil pressure at idle after running at a high rpm 7. Refer to Number 5. and 6. preceding 8. Boats with dual engines 8. It is not uncommon to see different oil pressure readings between the two engines, as long as both engines fall within specifications. Differences in oil pressure can be attributed to differences in engine tolerances, gauges, wiring, senders, etc. 9. Boats with dual stations 9. Refer to Number 8. preceding 90-860074--1 FEBRUARY 2002 TROUBLESHOOTING SERVICE MANUAL NUMBER 22 Low Oil Pressure Cause Special Information 1. Low oil level in crankcase 2. Defective oil pressure gauge and/or sender 2. Verify with an automotive test gauge. 3. Thin or diluted oil 3. Oil broken down; contains water or fuel; wrong viscosity; engine running too hot or too cold; excessive idling in cold water (condensation) 4. Oil pump 4. Relief valve stuck open; pickup tube restricted; worn parts in oil pump; air leak on suction side of oil pump or pickup oil tube 5. Oil leak can be internal or external 5. Oil passage plugs leaking, cracked or porous cylinder block 6. Excessive bearing clearance 6. Cam bearings, main bearings, rod bearings High Oil Pressure IMPORTANT: Oil pressure slightly higher than normal does not always indicate a problem. Oil viscosity, and weather conditions could cause high oil pressure. Cause Special Information 1. Oil too thick 1. Wrong viscosity, oil full of sludge or tar 2. Defective oil pressure gauge and/or sender 2. Verify with an automotive test gauge 3. Clogged or restricted oil passage 4. Oil pump relief valve stuck closed 90-860074--1 FEBRUARY 2002 Page 1C-25 TROUBLESHOOTING SERVICE MANUAL NUMBER 22 Excessive Oil Consumption NOTE: One quart of oil consumed in 15 hours of operation at WOT, especially in a new or rebuilt engine, is normal Cause Special Information 1. Normal consumption 1. One quart of oil consumed in 15 hours of operation at wide-open-throttle (especially in a new or rebuilt engine) is normal 2. Oil leaks 2. Clean bilge, run engine with clean white paper on bilge floor, locate oil leak(s) 3. Oil too thin 3. Oil diluted or wrong viscosity 4. Oil level too high 5. Drain holes in cylinder head plugged 5. Oil will flood valve guides 6. Defective valve stem seals (if equipped) 7. Worn valve stems or valve guides 8. Defective oil cooler (if equipped) 8. Crack in cooler tubes 9. Defective piston rings 9. Glazed, scuffed, worn, stuck, improperly installed; ring grooves worn; improper break-in; wrong end gap 10. Defective cylinders 10. Out of round, scored, tapered, glazed; excessive piston to cylinder clearance; cracked piston 11. Excessive bearing clearance Page 1C-26 90-860074--1 FEBRUARY 2002 TROUBLESHOOTING SERVICE MANUAL NUMBER 22 Water / Coolant in Engine Important Information IMPORTANT: First determine location of water in engine. This information can be of great help when trying to determine where the water came from and how it got into the engine. The three most common problems are water on top of pistons, water in crankcase oil, water in crankcase oil and on top of pistons. The first step, after locating water, is to remove all the water from the engine by removing all glow plugs or injectors and pumping cylinders out by cranking engine over. Next change oil and filter. Now, start engine and see if problem can be duplicated. If problem can be duplicated, there more than likely is a mechanical problem. If the problem cannot be duplicated, the problem is either an operator error or a problem that exists only under certain environmental conditions. If water is contained to cylinder(s) only, it is usually entering through the intake system, exhaust system, or head gasket. If the water is contained to crankcase only, it is usually caused by a cracked or porous block, a flooded bilge, or condensation. If the water is located in both the cylinder(s) and the crankcase, it is usually caused by water in the cylinders getting past the rings and valves, or complete submersion. Checking for rust in the intake manifold or exhaust manifolds is a good idea. Rust in these areas will give clues if the water entered these areas. Water / Coolant In Crankcase Oil Cause Special Information 1. Water in boat bilge 1. Boat has been submerged or bilge water was high enough to run in through dipstick tube 2. Water seeping past piston rings or valves 2. Refer to Water/Coolant On Top of Pistons 3. Engine running cold 3. Defective thermostat, missing thermostat; pro-longed idling in cold water 4. Intake manifold leaking near a water passage 5. Cracked or porous casting 90-860074--1 FEBRUARY 2002 5. Check cylinder head, cylinder block, and intake manifold Page 1C-27 TROUBLESHOOTING SERVICE MANUAL NUMBER 22 Water / Coolant On Top Pistons Cause 1. Rain water running onto air cleaner Special Information 1. Hatch cover 2. Backwash through the exhaust system 3. Improper engine or exhaust hose installation 3. Refer to exhaust specifications 4. Cracked exhaust manifold 5. Improper manifold to elbow gasket installation 6. Loose cylinder head bolts Page 1C-28 7. Blown cylinder head gasket 7. Check for warped cylinder head or cylinder block 8. Cracked and leaking intercooler 8. Defective O-rings or tubes 9. Porous or cracked casting 9. Check cylinder heads/valve bridge, cylinder block, and intake manifold 90-860074--1 FEBRUARY 2002 TROUBLESHOOTING SERVICE MANUAL NUMBER 22 Engine Overheats Cooling System Cause Special Information IMPORTANT: The first step is to verify if the engine is actually overheating or if the temperature gauge or sender is faulty 1. Seacock (seawater shut off valve) partially or fully closed (if equipped) 2. Low coolant level 3. Antifreeze incorrect type or not mixed properly 3. Use low silicate type with special additives 4. Loose or broken drive belt 5. Clogged or improperly installed sea strainer 6. Loose hose connections between seawater pickup and seawater pump inlet 6. Pump will suck air; pump may fail to prime or will force air bubbles into cooling system 7. Seawater inlet hose kinked or collapsed 7. Inlet hose must be wire reinforced to prevent collapsing, and positioned to prevent kinks or restrictions. 8. Seawater pickup clogged 9. Obstruction on boat bottom causing water turbulence 9. Obstruction will be in front of seawater pickup, causing air bubbles to be forced into cooling system 10. Defective thermostat(s) 11. Exhaust elbow water outlet holes plugged 12. Insufficient seawater pump operation 90-860074--1 FEBRUARY 2002 12. Worn pump impeller Page 1C-29 TROUBLESHOOTING SERVICE MANUAL NUMBER 22 Cooling System (continued) Cause Special Information 13. Obstruction in cooling system such as casting flash, sand, rust, salt, etc. 13. Refer to water flow diagram for engine type being serviced 14. Engine water circulating pump defective 18. Heat exchanger core or tubes plugged 15. Also refer to Engine Overheats (Mechanical) Mechanical Cause Special Information 1. Engine rpm below specifications at wide-open-throttle (engine laboring) 1. Damaged or wrong propeller; growth on boat bottom; false bottom full of water 2. Incorrect injection pump timing 2. Injection pump timing too far advanced or retarded 3. Seawater pump impeller slipping 4. Exhaust restriction Page 1C-30 5. Valve timing off 5. Jumped timing chain, or gears improperly installed 6. Insufficient lubrication to moving parts of engine 6. Defective oil pump, plugged oil passage, low oil level 90-860074--1 FEBRUARY 2002 TROUBLESHOOTING SERVICE MANUAL NUMBER 22 Power Steering Poor, Erratic or No Assist Cause 1. Drive belt Special Information 1. Worn, broken or out of adjustment 2. Low fluid level 3. Air in system 3. Air leak in lines, pump, or air from installation. Refer to SECTION 9A for bleeding procedure. 4. Leaking hoses 4. Refer to SECTION 9A for bleeding procedure. 5. Steering cables and/or steering helm 5. Cable or helm partially frozen from corrosion or rust; cable over-lubricated; improper cable installation 6. Binding in sterndrive unit 6. Refer to appropriate Mercury MerCruiser Sterndrive Service Manual 7. Restriction in hydraulic hoses 7. Causes a loss of pressure 8. Control valve not positioned properly, not balanced properly, or the mounting nut is loose 9. Mounting bracket adjusting screw loose or mounting tube is loose 10. Faulty pump 10. Flow control valve may be sticking 11. Worn piston ring or scored housing bore in cylinder 11. Causes loss of pressure 12. Leaking valve body or loose fitting spool 90-860074--1 FEBRUARY 2002 Page 1C-31 TROUBLESHOOTING SERVICE MANUAL NUMBER 22 Noisy Pump Cause 1 Drive belt Special Information 1. Check belt tension 2. Low fluid level 3. Air in fluid 3. Air leak in lines, pump, or air form installation 4. Faulty Pump 4. Use stethoscope to listen for noise in pump 5. Restricted fluid passages 5. Kinks or debris in hoses or debris in passages 6. Stop nut adjusted improperly 6. Refer to appropriate Mercury MerCruiser Sterndrive Service Manual 7. Steering cables installed that do not meet ABYC standards 7. Refer to appropriate Mercury MerCruiser Sterndrive Service Manual Fluid Leaks Cause 1. Loose hose connections Special Information 1. Refer to SECTION 9A for bleeding instructions 2. Damaged hose 3. Oil leaking from top of pump 3. System overfilled; fluid contains water; fluid contains air 4. Cylinder piston rod seal 5. Faulty seals in valve 6 Faulty seals in O-rings in pump 7. Cracked or porous metal parts Page 1C-32 90-860074--1 FEBRUARY 2002 TROUBLESHOOTING SERVICE MANUAL NUMBER 22 Insufficient Water Flow From Belt Driven Seawater Pump Cause 1. Drive belt Special Information 1. Loose, worn or broken 2. Seawater shut off valve partially or fully closed 3. Clogged or improperly installed sea strainer 4. Loose hose connections between seawater pickup and seawater pump inlet 4. Pump will draw in air, pump may fail to prime or will force air bubbles into cooling system 5. Seawater inlet hose kinked or plugged 6. Seawater pickup plugged 7. Obstruction on boat bottom causing water turbulence 7. Obstruction will be in front of seawater pickup, causing air bubbles to be forced into cooling system 8. Faulty seawater pump 90-860074--1 FEBRUARY 2002 Page 1C-33 TROUBLESHOOTING SERVICE MANUAL NUMBER 22 ZF / Hurth Hydraulic Transmission Trouble 1. Transmission gears cannot be shifted Page 1C-34 Possible Cause 1. A. Shifting lever loose Remedy 1. A. Tighten clamping screw on shifting lever B. Remote control does not permit lever travel required for testing B. Lift remote control off, if gears can be shifted by hand, correct remote control C. Remote control faulty C. Repair remote control D. No shifting pressure available D. Refer to Number 7 2. Gears are shifted sluggishly 2. Lever travel of remote control is too short; lever shift just short of minimum traveling distance 2. Lift remote control off, if gears can be shifted by hand, correct remote control 3. Clutch is slipping; propeller speed too low as compared to engine speed 3. A. Incorrect fluid used 3. A. Drain and refill with correct fluid, flush transmission while engine runs in neutral position, drain fluid, refill transmission B. Fluid contains water B. Refer to Number 9 C. Shifting pressure too low C. Refer to Number 6 D. Wear on clutch discs D. Disassemble transmission replace clutch discs E. Piston rings in clutch are damaged E. Disassemble transmission replace clutch 90-860074--1 FEBRUARY 2002 TROUBLESHOOTING SERVICE MANUAL NUMBER 22 ZF / Hurth Hydraulic Transmission (continued) Trouble Possible Cause Remedy 4. Transmission is blocked 4. A. Medium piston ring in input shaft in control block is faulty 4. A. Remove control block, replace piston ring, replace control block if worn 5. Output shaft turns in neutral position 5. A. Rotary slide valve in control block is worn 5. A. Replace control block 6. Shifting pressure too low 90-860074--1 FEBRUARY 2002 B. Faulty needle bearing on input shaft B. Disassemble transmission and input shaft, replace bearing C. Dished discs due to over-heating of slipping clutch C. Refer to Number 3 6. A. Fluid filter dirty 6. A. Replace fluid filter B. Fluid level in transmission is too low B. Fill with fluid; check for fluid loss transmission,cooler and pipelines lines for leaks also refer to steps Number 10 to Number 13 C. Fluid pump is worn out C. Replace control block together with fluid pump D. Piston rings in input shaft in control block are faulty D. Remove control block and replace piston rings. also replace control block E. Piston rings in clutch are faulty E. Disassemble transmission, replace clutch Page 1C-35 TROUBLESHOOTING SERVICE MANUAL NUMBER 22 ZF / Hurth Hydraulic Transmission (continued) Trouble 7. No shifting pressure Possible Cause 7. A. Direction of engine 7. A. Replace with L.H. rotation does not agree rotation engine with arrow on transmission B. No fluid in transmission B. Refill with fluid C. Fluid filter is dirty C. Replace fluid filter D. Fluid level in transmission is too low D. Fill with fluid; check for fluid loss in transmission,cooler and pipelines lines for leaks also refer to steps 10 to 13 E. Replace control block together with fluid pump E. Fluid pump is worn out Page 1C-36 Remedy F. Fitting key in input shaft for fluid pump drive is broken F. Remove control block. Replace fitting key and any other faulty parts G. Shifting pressure relief valve spring is broken G. Replace control block 90-860074--1 FEBRUARY 2002 TROUBLESHOOTING SERVICE MANUAL NUMBER 22 ZF / Hurth Hydraulic Transmission (continued) Trouble 8. Excessive fluid temperature Possible Cause 8. A. Excessive fluid in transmission 8. A. Remove excessive fluid with commercial fluid pump B. Fluid cooler is dirty on water side B. Remove coolant lines and clean fluid cooler on water side C. Worn fluid pump in control block C. Replace control block and fluid pump D. Faulty piston rings in input shaft in control block D. Remove control block, replace piston rings in input shaft. Check control block and replace if damaged from faulty piston rings E. Clutch is slipping E. Refer to Number 3 F. Clutch does not open completely due to worn clutch discs F. Dismount transmission, replace inner disc all faulty parts G. Clutch does not open completely due to broken clutch cup springs G. Disassemble transmission, replace inner disc support and/or clutch H. Low water flow from seawater pump H. Repair or replace seawater pump 9. Water in fluid, fluid 9. A. Fluid cooler faulty looks milky B. High water level in engine compartment, water entering at output shaft seal 90-860074--1 FEBRUARY 2002 Remedy 9. A. Repair leakage at cooler or replace cooler and replace cooler B, Remedy cause for water level in engine compartment, change transmission fluid Page 1C-37 TROUBLESHOOTING SERVICE MANUAL NUMBER 22 ZF / Hurth Hydraulic Transmission (continued) Trouble 10. Fluid leakage at input shaft Possible Cause 10. A. Breather clogged by paint or dirt B. Shaft seal faulty 11. Fluid leakage at output shaft 11. A. Breather clogged by paint or dirt B. Shaft seal faulty 10. A. Remove dirt or paint from breather B. Disassemble transmission, replace seal. If seal location on input shaft is worn repair surface 11. A. Remove dirt or paint from breather B. Disassemble transmission, replace seal. If seal location on input shaft is worn repair surface 12. Fluid leakage at venting filter 12. A. Excessive fluid in transmission 12. A. Pump out excessive fluid with commercial hand pump 13. Fluid leakage at joints or screw connections 13. A. Bolts are not tight 13. A. Tighten bolts to specified torque B. Seals on bolts have been reused several times 14. Fluid leakage at filter cap or breather Page 1C-38 Remedy B. Replace seals, tighten bolts to specified torque 14. A. Filter cap not flush or tight 14. A. Reinstall filter cap flush with housing and tighten B. Filter cap O-ring damaged B. Replace O-ring C. Fluid level too high C. Correct fluid level 90-860074--1 FEBRUARY 2002 TROUBLESHOOTING SERVICE MANUAL NUMBER 22 ZF / Hurth Hydraulic Transmission (continued) Trouble 15. Transmission noise changes, becomes louder Possible Cause Remedy 15. A. Fluid level too low so that pump sucks in air 15. A. Top off fluid to fill mark B. Damage starting on flexible coupling due to wear or fatigue, possible due to misalignment between engine and transmission B. Replace flexible coupling. Check alignment between engine and transmission C. Beginning damage of bearings in transmission; torsional vibrations, running without fluid, overload, wrong alignment of transmission, excessive engine output C. Disassemble transmission, replace bearings concerned and other faulty parts D. Beginning damage of gearings; torsional vibrations, running without, fluid, overload D. Disassemble transmission, remove faulty parts E. Fluid baffle on transmission has come loose E. Disassemble transmission,attach baffle plate F. Fluid suction pipe in transmission has come loose F. Disassemble transmission, fix fluid suction pipe 16. Chattering 16. A. The engine or 16. A. Mount a flexible transmission noise propeller generate coupling with another mainly at low torsional vibrations, which stiffness factor between speed produce a chattering noise engine and transmission; in the transmission a coupling with a higher stiffness factor might be sufficient B. Misaligned cardan shafts on input or output shafts 90-860074--1 FEBRUARY 2002 B. Mount and align cardan shaft strictly according to instructions issued by cardan shaft manufacturer Page 1C-39 TROUBLESHOOTING SERVICE MANUAL NUMBER 22 THIS PAGE IS INTENTIONALLY BLANK Page 1C-40 90-860074--1 FEBRUARY 2002 SERVICE MANUAL NUMBER 22 STERNDRIVE (MCM) MODELS REMOVAL AND INSTALLATION Section 2A - Sterndrive (MCM) Models Table of Contents Torque Specifications . . . . . . . . . . . . . . . . . . 2A-3 Special Tools . . . . . . . . . . . . . . . . . . . . . . . . . 2A-3 Lubricants / Sealants / Adhesives . . . . . . . 2A-4 Removal . . . . . . . . . . . . . . . . . . . . . . . . . . . . . 2A-4 Installation . . . . . . . . . . . . . . . . . . . . . . . . . . . 2A-7 Engine Installation / Alignment . . . . . . . 2A-7 Engine Connections . . . . . . . . . . . . . . . 2A-15 90-860074--1 FEBRUARY 2002 2 Throttle Cable Installation and Adjustment . . . . . . . . . . . . . . . . . . . . . . . Shift Cable Installation and Adjustment . . . . . . . . . . . . . . . . . . . . . . . Troubleshooting Shift Problems . . . . . . Battery Cables . . . . . . . . . . . . . . . . . . . . A 2A-21 2A-23 2A-28 2A-30 Page 2A-1 STERNDRIVE (MCM) MODELS SERVICE MANUAL NUMBER 22 THIS PAGE IS INTENTIONALLY BLANK Page 2A-2 90-860074--1 FEBRUARY 2002 SERVICE MANUAL NUMBER 22 STERNDRIVE (MCM) MODELS NOTICE For information and procedures on Troubleshooting, refer to SECTION 1C. Torque Specifications Description Nm Drive Unit Shift Cable or Power Shift Output Cable End Guide Attaching Nut Tighten Nut Until It Contacts Flat Washer; then, Loosen Nut 1/2 Turn Remote Control Throttle Cable End Guide Attaching Nut Tighten Nut Until It Contacts Flat Washer; then, Loosen Nut 1/2 Turn Remote Control Throttle and Shift Cable Barrel Attaching Nut lb-in. lb-ft Securely Rear Engine Mounts 51 37 Power Steering Fluid Hose Fittings (at Control Valve) 31 23 Sterndrive Unit Fasteners 68 50 Transom Assembly Fasteners 31 23 Seawater Pickup (Inlet) Fitting (On Gimbal Housing) 5 45 Drive Unit Gear Lube 90 Degree Barb Fitting (If Equipped) 9 80 Steering Cable Pivot Bolts 25 (34) Steering Cable Coupler Nut 35 (47) Special Tools Description Part Number Engine Alignment Tool 91-805475A1 90-860074--1 FEBRUARY 2002 Page 2A-3 STERNDRIVE (MCM) MODELS SERVICE MANUAL NUMBER 22 Lubricants / Sealants / Adhesives Description Part Number Liquid Neoprene Perfect Seal 92-25711--2 92-34227--1 Engine Coupler Spline Grease 91-816391A4 Battery Terminal Sealant Obtain Locally Removal CAUTION It is good practice to ventilate the engine compartment prior to servicing any engine components to remove any fuel vapors which may cause difficulty breathing or be an irritant. 7. Disconnect battery cables from battery. 8. Disconnect battery cables from engine. 9. Remove engine cover. IMPORTANT: Sterndrive unit must be removed prior to engine removal. Refer to appropriate Mercury MerCruiser Sterndrive Service Manual. 10. Remove sterndrive unit. 11. Disconnect extension harness connector plug from engine harness connector. 12. Disconnect gear lube monitor wiring. 13. Remove engine mounted gear lube monitor. Page 2A-4 90-860074--1 FEBRUARY 2002 SERVICE MANUAL NUMBER 22 STERNDRIVE (MCM) MODELS WARNING FIRE HAZARD: Fuel leakage from any part of the fuel system can be a fire hazard which can cause serious bodily injury or death. WARNING Be careful when working on fuel system components; diesel fuel is flammable. Be sure that the ignition key is OFF. Do NOT smoke or allow sources of open flame in the area while working on fuel system components. Wipe up any spilled fuel immediately. Do NOT allow fuel to come into contact with any hot surface which may cause it to ignite. WARNING Dispose of fuel-soaked rags, paper, etc., in an appropriate air tight, fire retardant container. Fuel-soaked items may spontaneously ignite and result in a fire hazard which could cause serious bodily injury or death. 14. Close fuel shut off valve, if equipped. 15. Disconnect and suitably plug fuel lines to prevent fuel in tank from leaking into bilge. 16. Disconnect throttle cable from engine. NOTE: After wires are disconnected be sure to loosen them from clamps or tie straps retaining them to engine or hoses. 17. Disconnect trim sender wire connections from engine harness. 18. Disconnect MerCathode controller wires. 19. Close seacock if equipped, or disconnect and plug seawater inlet hose, if boat is to remain in the water. CAUTION Before removing seawater inlet hose, close seacock, if equipped. If boat is not equipped with a seacock, remove and plug seawater inlet hose to prevent a siphoning action that may occur, allowing seawater to flow from the drain holes or removed hoses. 20. Disconnect seawater inlet hose. 90-860074--1 FEBRUARY 2002 Page 2A-5 STERNDRIVE (MCM) MODELS SERVICE MANUAL NUMBER 22 21. Disconnect exhaust system hoses. 22. Remove both shift cables from shift plate. 23. On Engines With Power Shift: Disconnect vacuum hose from power shift cylinder. 24. Disconnect any grounding wires and accessories that are connected to engine. 25. Disconnect and suitably plug fluid hoses from power steering control valve on transom. CAUTION DO NOT allow lifting sling to hook or compress engine components or damage will occur. 26. Support engine with suitable sling through lifting eyes on engine. c c b a 78417 75298 Typical f - Front Lifting Eye g - Rear Lifting Eye h - Suitable Sling 27. Remove front and rear engine mounting bolts. Retain fasteners. 28. Carefully remove engine. Do NOT damage power steering control valve. Page 2A-6 90-860074--1 FEBRUARY 2002 SERVICE MANUAL NUMBER 22 STERNDRIVE (MCM) MODELS Installation Engine Installation / Alignment 1. On Engines Where Engine Mounts WERE NOT Disturbed: Proceed to Step 3. 2. On Engines Where Engine Mounts WERE Disturbed: Ensure front mount adjusting nuts are positioned midway on studs so that adequate up and down adjustment exists for engine alignment. 3. Lubricate coupler splines with Engine Coupler Spline Grease. a 75592 Typical a - Coupler Splines 4. Attach a suitable sling to lifting eyes on engine and adjust so that engine is level when suspended. Refer to Removal for location of engine lifting eyes. 5. Lift engine into position in boat, using an overhead hoist. 90-860074--1 FEBRUARY 2002 Page 2A-7 STERNDRIVE (MCM) MODELS SERVICE MANUAL NUMBER 22 6. Align rear engine mounts with inner transom plate mounts while simultaneously aligning exhaust system. DO NOT relieve hoist tension. 22032 74298 IMPORTANT: Engine attaching hardware must be installed in sequence shown. 7. Install both rear engine mounting bolts and hardware as shown. Torque to 47-54 Nm (35-40 lb-ft). c d e g a f b h a b c d e f g h Page 2A-8 22032 - Rear Engine Mount - Inner Transom Plate Mount - Bolt - Washer - Spacer - Fiber Washer - Double-Wound Lockwasher - Locknut (Not Shown) 90-860074--1 FEBRUARY 2002 SERVICE MANUAL NUMBER 22 STERNDRIVE (MCM) MODELS CAUTION When lowering engine into position Do NOT set engine on shift cable. Shift cable outer casing can be crushed causing difficult or improper shifting. 8. Set engine on stringers. 9. Relieve hoist tension and disconnect sling from engine lifting eyes. 10. Install a separate sling between front lifting eyes to help equalize load on hoist during alignment procedure. a b 75331 a - Sling In Starboard Lifting Eye b - Sling In Port Lifting Eye 11. Attach a suitable hoist to the separate sling. 90-860074--1 FEBRUARY 2002 Page 2A-9 STERNDRIVE (MCM) MODELS SERVICE MANUAL NUMBER 22 CAUTION Do NOT use an alignment tool from another manufacturer. Alignment tools other than Quicksilver Alignment Tool, may cause improper alignment and damage to gimbal bearing and/or engine coupler. CAUTION To avoid damage to gimbal bearing, engine coupler, or alignment tool: • Do NOT attempt to force alignment tool! • Do NOT raise or lower engine with alignment tool inserted (or partially inserted) in gimbal bearing or engine coupler. 12. Attempt to insert the solid end of the alignment tool through the gimbal bearing and into the engine coupler splines. a b a 70013 a - Alignment Tool (Use Only Recommended Quicksilver Alignment Tool) b - Insert This End Of Alignment Tool Through Gimbal Housing Assembly Page 2A-10 90-860074--1 FEBRUARY 2002 SERVICE MANUAL NUMBER 22 STERNDRIVE (MCM) MODELS 13. If the alignment tool does not fit, remove it and carefully adjust engine mounts as necessary: a. To Adjust Engine Up or Down: Loosen locknut on mounts. Turn adjusting nuts as necessary. Retighten locknuts. IMPORTANT: Large diameter of mount trunion MUST NOT extend over 19 mm (3/4 in.) from edge of mount bracket to centerline of mount stud. b. To Move Engine Left or Right: Loosen trunion clamping bolts on both front mounts and move engine as necessary. Do NOT over-extend mount trunion. Retighten locking nuts. NOTE: A small amount of side-to-side adjustment can be obtained from the slots on the engine mount pads. g a f b e c d 23161 Typical a - Locknut b - Bracket c - Mount Adjustment Nut d - Lag Bolts e - Clamp f - Clamp Spread-Screw g - Nuts 90-860074--1 FEBRUARY 2002 Page 2A-11 STERNDRIVE (MCM) MODELS SERVICE MANUAL NUMBER 22 14. Attempt to insert the solid end of the alignment tool. a. Repeat step 13. and 14. until the alignment tool installs easily (SLIDES FREELY WITH TWO FINGERS) all the way into and out of engine coupler splines. Do not check by turning. NOTE: This may require tapping the sides of the tool. Do NOT check by turning. By greasing the splines you can identify which side has interference. c b a 70013 76921 71463 a - Alignment Tool b - Gimbal Bearing c - Engine Coupler 15. Front engine mounts must rest on boat stringer. Adjust front engine mounts if necessary. 16. Relieve hoist tension entirely. Page 2A-12 90-860074--1 FEBRUARY 2002 SERVICE MANUAL NUMBER 22 STERNDRIVE (MCM) MODELS 17. On port front mount do as follows: a. Position ECM assembly mounting bracket holes directly over front, port engine mount holes. NOTE: It may be necessary to lower, or raise, the ECM assembly and bracket in slotted hole, depending upon the final configuration of the power package, to position ECM on front mount. b. Fasten ECM mounting bracket and front mount assembly to boat stringer using appropriate hardware (lag bolts or through bolts etc.). d a b c 75301 a b c d - ECM Assembly Mounting Bracket - Front, Port Engine Mount - Stringer - Slotted Hole For Raising Or Lowering ECM Assembly 18. Tighten both front mounts onto boat stringers using appropriate hardware. 19. Recheck alignment with alignment tool. Tool must enter coupler splines freely. If not, readjust front mounts. NOTE: Turn mount adjustment nut left to lower, and right to raise, the front of the engine. Loosen nuts on mount clamping bolts to move bracket side-to-side. 90-860074--1 FEBRUARY 2002 Page 2A-13 STERNDRIVE (MCM) MODELS SERVICE MANUAL NUMBER 22 20. When alignment is correct, tighten locknuts and jam nuts securely. NOTE: Coat both nuts and threaded portion of mount with Perfect Seal if used in a saltwater environment to reduce rust and ease of serviceability. f a g b e c d 23161 Typical a - Locknut b - Bracket c - Mount Adjustment Nut d - Lag Bolts e - Clamp f - Nuts g - Clamp Spread-Screw 21. Remove alignment tool. 22. Remove chain sling from lifting eyes. 23. Install sterndrive unit. Refer to appropriate Mercury MerCruiser Sterndrive Service Manual. Page 2A-14 90-860074--1 FEBRUARY 2002 SERVICE MANUAL NUMBER 22 STERNDRIVE (MCM) MODELS Engine Connections 1. Connect power steering hoses to control valve as shown. IMPORTANT: Make hydraulic connections as quickly as possible to prevent oil leakage. IMPORTANT: Be careful not to cross-thread or overtighten hose fittings. a b 74045 74249 a - Rear Fitting (Pressure Hose) b - Front Fitting (Return Hose) 2. Tighten exhaust tube hose clamps securely. b a 74298 Typical a - Exhaust Tube b - Hose Clamps (4) 90-860074--1 FEBRUARY 2002 Page 2A-15 STERNDRIVE (MCM) MODELS SERVICE MANUAL NUMBER 22 3. Connect continuity circuit wire from engine to transom assembly. Tighten screw securely. IMPORTANT: Do not attach any accessory ground (–) wires to transom plate ground point. c a b 73567 a - Flywheel Housing Screw b - Continuity Circuit Wire c - Inner Transom Plate Grounding Screw 4. Connect any grounding wires and accessories that were connected to engine. 5. Connect seawater inlet hose to engine water inlet fitting. Tighten hose clamp securely. b a 75299 Typical a - Seawater Inlet Hose b - Connector Fitting Page 2A-16 90-860074--1 FEBRUARY 2002 SERVICE MANUAL NUMBER 22 STERNDRIVE (MCM) MODELS 6. Connect coolant recovery bottle hose to heat exchanger and secure with clamp. b a 70548 a - Hose b - Clamp 7. Connect MerCathode wires to MerCathode controller mounted on engine. Apply a thin coat of Liquid Neoprene to ALL electrical connections. e a b c 71709 d 22232 a b c d e - ORANGE Wire - From Electrode On Transom Assembly - RED/PURPLE Wire - Connect (other end) To Positive (+) Battery Terminal - BLACK Wire - From Engine Harness - BROWN Wire - From Electrode On Transom Assembly - Controller Assembly Location 90-860074--1 FEBRUARY 2002 Page 2A-17 STERNDRIVE (MCM) MODELS SERVICE MANUAL NUMBER 22 8. Connect the trim position sender bullet connectors, from the gimbal housing, to the engine harness. b a BLU/BLK BLK BLK/WHT BLK 24841 a - From Engine Harness b - From Gimbal Housing 9. Mount the gear lube monitor in the engine bracket. Secure with strap. 10. Connect gear lube monitor wires to corresponding engine harness wires. The TAN/BLU wire connects to ORANGE engine harness wire. BLACK wire connects to BLACK wire. Ensure that bullet connectors are fully seated. a c b 75301 Typical a - Gear Lube Monitor b - Strap c - Bullet Connectors Page 2A-18 90-860074--1 FEBRUARY 2002 SERVICE MANUAL NUMBER 22 STERNDRIVE (MCM) MODELS 11. Connect instrument extension harness ends to engine harness ends. Connector collars must be fully engaged and secure. Tighten threaded connector collar of extension harness onto connector on side of electrical box. e b a c 75337 f b a d c 75333 75301 Standard And 21-Pin Deutscht Connections a - Extension Harness From Instruments b - Engine Harness and Connector End c - Connector Collar d - Location of Electrical Box e - Electrical Box - With Standard Connectors f - Electrical Box - With 21-Pin Deutscht Connector 12. After all wires are connected, secure them with clamps or tie straps which may have been retaining them to engine or hoses prior to removal. 90-860074--1 FEBRUARY 2002 Page 2A-19 STERNDRIVE (MCM) MODELS SERVICE MANUAL NUMBER 22 WARNING Be careful when working on fuel system components; diesel fuel is flammable. Be sure that the ignition key is OFF. Do NOT smoke or allow sources of open flame in the area while working on fuel system components. Wipe up any spilled fuel immediately. Do NOT allow fuel to come into contact with any hot surface which may cause it to ignite. 13. Connect flexible fuel line to inlet fitting on fuel pump. Secure with hose clamp. b a c 75298 a - Fuel Line b - Hose Clamp c - Inlet Fitting 14. Connect flexible return fuel line to injection pump return line fitting. Secure with hose clamp. b c a 75579 a - Return Fuel Line b - Hose Clamp c - Return Fitting Page 2A-20 90-860074--1 FEBRUARY 2002 SERVICE MANUAL NUMBER 22 STERNDRIVE (MCM) MODELS WARNING Dispose of fuel-soaked rags, paper, etc., in an appropriate air tight, fire retardant container. Fuel-soaked items may spontaneously ignite and result in a fire hazard which could cause serious bodily injury or death. 15. On Engines with Power Shift: Attach vacuum hose from power shift cylinder to vacuum pump fitting. Tighten hose clamp securely. Throttle Cable Installation and Adjustment IMPORTANT: When installing throttle cables, be sure that cables are routed in such a way as to avoid sharp bends and/or contact with moving parts. Do NOT fasten any items to throttle cables. 1. Unless previously installed, install throttle cable end guide anchor stud in middle hole of throttle position sensor lever. a b 75301 a - Throttle Position Sensor b - Throttle Cable End Guide Anchor Stud Location 2. Place remote control lever(s) in NEUTRAL/IDLE position. 3. Unless previously installed, install the throttle cable barrel end guide anchor stud in the cable barrel end bracket hole that is closest to the distance of 181 mm (7-1/8 in.) from the center of the throttle position sensor anchor stud. 90-860074--1 FEBRUARY 2002 Page 2A-21 STERNDRIVE (MCM) MODELS SERVICE MANUAL NUMBER 22 4. Install the cable end guide on the throttle lever, then push cable barrel end lightly toward throttle lever end. This will place a slight preload on the shift cable to avoid slack in the cable when moving remote control lever. 5. Adjust barrel on throttle cable to align with stud in anchor bracket. Ensure the hole in the barrel positions the cable as shown. 6. Install the cable and secure with hardware as shown. 7. Tighten locknuts until they bottom and loosen 1/2 turn. b aa d c e d 75332 a b c d e - Throttle Cable End Guide - Cable Barrel - Anchor Stud - Flat Washer and Locknut - Spacer (If Required) 8. Place remote control lever in full forward, wide open throttle (WOT) position. 9. Check to ensure throttle position sensor lever is contacting internal override spring. Be certain that the cable is not causing the throttle position sensor to be over-pulled. Check to ensure that remote control and cable are providing proper output. 10. Place remote control lever in NEUTRAL / IDLE position and, if necessary, readjust throttle cable barrel. 11. Recheck that (when operated) throttle position sensor lever contacts internal override spring, indicating WOT or 100% throttle position. Page 2A-22 90-860074--1 FEBRUARY 2002 SERVICE MANUAL NUMBER 22 STERNDRIVE (MCM) MODELS Shift Cable Installation and Adjustment NOTE: Shift Cable Adjustment Tool (91-12427) allows the shift cables to be installed and adjusted, with or without the sterndrive attached. IMPORTANT: The direction of propeller rotation (RH or LH) for this drive unit is determined by the following method. 1. Determine desired propeller rotation according to a., b., or c.: a. All Bravo One / Two - If shift cable end guide moves in direction “A” when control lever is placed in FORWARD, remote control is setup for RIGHT HAND (RH) propeller rotation. b. All Bravo One / Two - If shift cable end guide moves in direction “B” when control lever is placed in FORWARD, remote control is setup for LEFT HAND (LH) propeller rotation. A B 71656 All Bravo One / Two c. All Bravo Three - Front propeller on drive unit is always LH Rotation and rear propeller is always RH Rotation. Shift cable end guide must move in direction “A,” when control lever is placed in FORWARD gear position. A 71656 All Bravo Three IMPORTANT: When installing shift cables, be sure that cables are routed in such a way as to avoid sharp bends and/or contact with moving parts. Do NOT fasten any items to shift cables. 90-860074--1 FEBRUARY 2002 Page 2A-23 STERNDRIVE (MCM) MODELS SERVICE MANUAL NUMBER 22 2. Install shift cable into remote control. Refer to appropriate remote control instructions. 3. Loosen stud and move it to dimension as shown. Re-tighten stud. b a 23345 a - Stud b - 76 mm (3 in.) - Center of Pivot Bolt to Center of Stud 4. Install drive unit shift cable. Tighten locknut until it contacts end guide, then loosen 1/2 turn. Insert cotter pin from the top and spread both ends. a b c 23345 a - Washers (2) b - Locknut c - Cotter Pin Page 2A-24 90-860074--1 FEBRUARY 2002 SERVICE MANUAL NUMBER 22 STERNDRIVE (MCM) MODELS 5. Place adjustment tool over drive unit shift cable. Hold tool in place, using a piece of tape over the barrel retainer. 23242 a. Shift remote control to NEUTRAL. b. Push in on shift cable end with enough pressure to remove play, and mark position “a” on tube. c. Pull out on shift cable end with enough pressure to remove play, and mark position “b” on tube. d. Measure distance between marks “a” and “b” and mark position “c” half-way between marks “a” and “b.” b c a c 22024 IMPORTANT: Be sure to keep center mark “c” aligned with remote control shift cable end guide edge when making the following adjustment. 90-860074--1 FEBRUARY 2002 Page 2A-25 STERNDRIVE (MCM) MODELS SERVICE MANUAL NUMBER 22 6. Adjust remote control shift cable as follows: a. Temporarily install shift cable end guide into shift lever, and insert anchor pin. b. Adjust shift cable barrel so that hole in barrel centers with vertical centerline of stud. Ensure that backlash center mark is aligned with edge of control cable end guide. CAUTION Do NOT attempt to install or remove remote control shift cable barrel from stud, without first removing end guide anchor pin from shift lever, and removing cable. Attempting to bend shift cable to install or remove barrel, will place undue stress on cable end guide and shift lever, and damage to both could occur. c. Remove shift cable end guide from shift lever by removing anchor pin. e d a b c d e b a c 23242 - Remote Control Shift Cable End Guide - Anchor Pin - Backlash Center - Remote Control Shift Cable Barrel - Stud 7. Install remote control shift cable. Tighten locknut until it contacts cable end guide. Insert cotter pin from the top and spread both ends. c a b a b c d Page 2A-26 d 23242 - Locknut - Washers - Both Sides of Barrel - Anchor Pin - Cotter Pin (Not Visible) 90-860074--1 FEBRUARY 2002 SERVICE MANUAL NUMBER 22 STERNDRIVE (MCM) MODELS 8. Remove adjustment tool. 9. Shift remote control lever into full forward position. Place end of adjustment tool in barrel retainer. Rh Rotation - All Bravo One, Two, And Three Models: Rear slot in tool should fit over shift lever stud. Lh Rotation - All Bravo One And Two Models: Forward slot in tool should fit over shift lever stud. If slot does not fit over stud, loosen shift lever stud and slide stud either direction, until slot in tool fits over stud. When adjustment is correct, retighten stud. a c b d 23242 RH Rotation - All Bravo One, Two, Three a b c d 23242 LH Rotation - All Bravo One And Two a - Adjustment Tool b - Barrel Retainer c - Shift Lever Stud d - Shift Lever Adjustment Slot 10. Remove adjustment tool. 11. Lubricate shift cable pivot points with 30W engine oil. 90-860074--1 FEBRUARY 2002 Page 2A-27 STERNDRIVE (MCM) MODELS SERVICE MANUAL NUMBER 22 Troubleshooting Shift Problems NOTE: The following information is provide to assist an installer in troubleshooting, if hard shifting or chucking/racheting is encountered when shifting into forward gear. 1. When installing the control box in the side panel of the boat, ensure that the cables have enough clearance to operate. This is necessary because the cables move up and down when the shift handle is moved. If the control box is mounted too far back towards any fiberglass structure, the cables will be interfered with, this will cause very hard shifting. NOTE: The control box housing can be rotated in 30° increments to improve cable routing. 74689 74688 Proper Cable Bend Improper Cable Bend 2. Ensure that when the shift cable from the control box is lead through the side gunnel of the hull, that it does not have any extremely sharp bends in it as this will cause the stiff shifting. Page 2A-28 90-860074--1 FEBRUARY 2002 SERVICE MANUAL NUMBER 22 STERNDRIVE (MCM) MODELS 3. Before installing the shift cable into the control box, extend the stainless rod eye end of the cable and grease it with 2-4-C Marine Lubricant with Teflon. Move it back and forth to allow even distribution of the grease. 22005 4. Do not strap or clamp the control cables to any other cables or rigid structure within 9 m (3 ft) of the control box. 5. Ensure that the cable is not permanently kinked. 6. Make sure there is proper clearance for cable movement when the control box is installed in the side panel. The cables must have room to move up and down when the control handle is shifted into either forward or reverse. 7. Check to make sure that the engine was not set down on the intermediate shift cable during installation, this will crush the inner cable tubing and cause improper and/or stiff shifting. 8. Do NOT fasten the shift cable with straps or clamps to any other cable within 1.5 m (5 ft) of the shift plate. 9. Do NOT fasten the shift cable to the transom with any type of plastic clips or fasteners within 1.5 m (5 ft) of the shift plate. 10. Do NOT overtighten the throttle or shift cable attaching nuts at the engine end. Barrel and cable end must be free to rotate on the mounting stud. 90-860074--1 FEBRUARY 2002 Page 2A-29 STERNDRIVE (MCM) MODELS SERVICE MANUAL NUMBER 22 Battery Cables 1. Connect battery cables to engine: a. Make sure that grounding stud and starter solenoid terminal are free of paint and any other material that could cause a poor electrical connection. b. After battery cables are connected, apply a thin coat of Liquid Neoprene to the terminals. c. Be sure to slide rubber boot over the positive (+) terminal after Liquid Neoprene dries. 2. Connect battery cables to battery by FIRST connecting positive (+) battery cable (usually red) to positive (+) battery terminal. Tighten clamp securely. Then, connect negative (–) battery cable (usually black) to negative (–) battery terminal. Tighten clamp securely. NOTE: Spray terminals with a battery connection sealant to help retard corrosion. Page 2A-30 90-860074--1 FEBRUARY 2002 SERVICE MANUAL NUMBER 22 STERNDRIVE (MCM) MODELS THIS PAGE IS INTENTIONALLY BLANK 90-860074--1 FEBRUARY 2002 Page 2A-31 STERNDRIVE (MCM) MODELS SERVICE MANUAL NUMBER 22 THIS PAGE IS INTENTIONALLY BLANK Page 2A-32 90-860074--1 FEBRUARY 2002 INBOARD (MIE) MODELS SERVICE MANUAL NUMBER 22 REMOVAL AND INSTALLATION Section 2B - Inboard (MIE) Models Table of Contents Torque Specifications . . . . . . . . . . . . . . . . . . Tools/Lubricants/Adhesives . . . . . . . . . . . . . Removal . . . . . . . . . . . . . . . . . . . . . . . . . . . . . Engine Removal . . . . . . . . . . . . . . . . . . . . Installation . . . . . . . . . . . . . . . . . . . . . . . . . . . Engine Installation and Initial Alignment . . . . . . . . . . . . . . . . . . . . . . . . . 90-860074--1 FEBRUARY 2002 2 2B-3 2B-3 2B-4 2B-4 2B-7 2B-7 Engine Final Alignment . . . . . . . . . . . . . Engine Connections . . . . . . . . . . . . . . . Throttle Cable Installation and Adjustment . . . . . . . . . . . . . . . . . . . . . . . Shift Cable Installation And Adjustment . . . . . . . . . . . . . . . . . . . . . . . Battery Cables . . . . . . . . . . . . . . . . . . . . 2B-11 2B-18 2B-21 2B-21 2B-21 Page 2B-1 B INBOARD (MIE) MODELS SERVICE MANUAL NUMBER 22 THIS PAGE IS INTENTIONALLY BLANK Page 2B-2 90-860074--1 FEBRUARY 2002 INBOARD (MIE) MODELS SERVICE MANUAL NUMBER 22 NOTICE For information and procedures on Troubleshooting, refer to SECTION 1C. Torque Specifications Description Nm Coupler to Flywheel 34 25 Transmission Flange to Flywheel Housing 68 50 Trunnion Clamp Bolt 68 50 Front Engine Mount Bracket to Engine Block 75 55 Transmission Mount Bracket to Transmission Housing 75 55 Rear Engine Mount Rubber Bushing Center Bolt 61 45 Engine Mount Locking (Jam) Nuts 80 59 Transmission Output Flange to Propeller Shaft Coupler Bolts 68 50 Remote Control Throttle and Shift Cable Barrel Attaching Nut Remote Control Throttle and Shift Cable End Guide Attaching Nut lb-in. lb-ft Securely Tighten Nut Until It Contacts Flat Washer; then, Back Nut Off 1/2 Turn Lubricants/Sealants/Adhesives Description Liquid Neoprene Battery Terminal Sealant 90-860074--1 FEBRUARY 2002 Part Number 92-25711-3 Obtain Locally Page 2B-3 INBOARD (MIE) MODELS SERVICE MANUAL NUMBER 22 Removal Engine Removal CAUTION It is good practice to ventilate the engine compartment prior to servicing any engine components to remove any fuel vapors which may cause difficulty breathing or be an irritant. 3. Disconnect battery cables from battery. 4. Disconnect battery cables from engine. 5. Disconnect extension harness connector plug from engine harness connector. WARNING FIRE HAZARD: Fuel leakage from any part of the fuel system can be a fire hazard which can cause serious bodily injury or death. WARNING Be careful when working on fuel system components; diesel fuel is flammable. Ensure that the ignition key is OFF. Do NOT smoke or allow sources of open flame in the area while changing fuel system components. Wipe up any spilled fuel immediately. Do NOT allow fuel to come into contact with any hot surface which may cause it to ignite. WARNING Dispose of fuel-soaked rags, paper, etc., in an appropriate airtight, fire-retardant container. Fuel-soaked items may spontaneously ignite and result in a fire hazard which could cause serious bodily injury or death. 6. Close fuel shut off valve, if equipped. 7. Disconnect and suitably plug fuel lines to prevent fuel in tank from leaking into bilge. Page 2B-4 90-860074--1 FEBRUARY 2002 INBOARD (MIE) MODELS SERVICE MANUAL NUMBER 22 8. Disconnect throttle cable from engine. 9. Disconnect shift cable from transmission. 10. Close seacock if equipped, or disconnect and plug seawater inlet hose, if boat is to remain in the water. CAUTION Before removing seawater inlet hose, close seacock, if equipped. If boat is not equipped with a seacock, remove and plug seawater inlet hose to prevent a siphoning action that may occur, allowing seawater to flow from the drain holes or removed hoses. 11. Disconnect seawater inlet hose. 12. Disconnect exhaust system hoses. 13. Disconnect any grounding wires and accessories that are connected to engine. 14. Disconnect coolant recovery bottle hose from heat exchanger. 15. Disconnect propeller shaft coupler from transmission output flange. On models with V-Drive transmissions, remove propeller shaft coupler. NOTE: It may be necessary to remove the propeller shaft prior to engine removal on engines with V-Drive transmissions. 90-860074--1 FEBRUARY 2002 Page 2B-5 INBOARD (MIE) MODELS SERVICE MANUAL NUMBER 22 CAUTION Do NOT allow lifting sling to hook or compress engine components or damage will occur. 16. Support engine with suitable sling through lifting eyes on engine. c c b a 71706 75298 Typical e-Front Lifting Eye f-Rear Lifting Eye g-Suitable Sling 17. Remove front and rear engine mounting bolts. Retain fasteners. a b a 23161 b 75301 Typical Front Mounts Shown (All Similar) a-Starboard Mounting Bolt b-Port Mounting Bolt 18. Carefully remove engine with transmission. Page 2B-6 90-860074--1 FEBRUARY 2002 INBOARD (MIE) MODELS SERVICE MANUAL NUMBER 22 Installation Engine Installation and Initial Alignment 1. Engine mount or mount adjustment WAS NOT DISTURBED during engine service: Proceed to following Step 3. 2. Engine mount or mount adjustment WAS DISTURBED during engine service: IMPORTANT: Engine mounts must be adjusted, as explained in the following, to center mount adjustment and establish a uniform height on all mounts. Ensure that: a. All mounts are in the center of their up-and-down adjustment. b. Large diameter of mount trunnion extended no more than 19 mm (3/4 in.). c. Each mount base is downward. Tighten clamping screws and nuts slightly to prevent moving in or out. Mounts must be free to pivot when installing engine. b a b b b a 23161 27035 Typical Front Mount Typical Rear Mount a-Trunnion Clamping Bolt and Nut b-Mount Trunnion Extension 90-860074--1 FEBRUARY 2002 Page 2B-7 INBOARD (MIE) MODELS SERVICE MANUAL NUMBER 22 d. Ensure rear engine mount rubber bushings are positioned so that slots in bushing are positioned horizontally. If necessary, loosen center bolt and turn bushing. Torque to 41-61 Nm (30-45 lb-ft). b c a 50688 a-Rubber Bushing b-Slots c-Bolt 3. Attach a suitable sling to lifting eyes on engine and adjust so that engine is level when suspended. Refer to Removal for location of engine lifting eyes. CAUTION Do NOT allow lifting sling to hook or compress engine components or damage will occur. Page 2B-8 90-860074--1 FEBRUARY 2002 INBOARD (MIE) MODELS SERVICE MANUAL NUMBER 22 MODELS WITH 8° DOWN ANGLE TRANSMISSIONS 1. Lift engine into boat and position on engine bed so that transmission output flange and propeller shaft coupler are visibly aligned (no gap can be seen between coupling faces when butted together). Adjust engine bed height if necessary to obtain proper alignment. Do NOT use mount adjustments to adjust engine position at this time. IMPORTANT: Engine bed must position engine so that a minimum of 6 mm (1/4 in.) up and down adjustment still exists on all 4 mounts after performing initial alignment. This is necessary to allow for final engine alignment. c b a 74546 Typical Transmission Shown a-Propeller Shaft b-Propeller Shaft Coupler c-Transmission Output Flange 2. Ensure that all four mounts are still positioned properly, then fasten mounts to engine bed with appropriate lag bolts or screws and hardware. Tighten lag bolts or screws securely. 3. Disconnect and remove sling. Proceed to Engine Final Alignment section. 90-860074--1 FEBRUARY 2002 Page 2B-9 INBOARD (MIE) MODELS SERVICE MANUAL NUMBER 22 MODELS WITH V-DRIVE TRANSMISSIONS 1. Lift engine into boat and position so that enough propeller shaft protrudes through transmission and output flange for propeller shaft coupler to be attached. Then install coupler and position engine (no gap can be seen between coupling faces when butted together). Adjust engine bed height if necessary to obtain proper alignment. Do NOT use mount adjustments to adjust engine position at this time. IMPORTANT: Engine bed must position engine so that a minimum of 6 mm (1/4 in.) up and down adjustment still exists on all 4 mounts after performing final alignment. This is necessary to allow for final engine alignment. a b c d 75534 Velvet Drive d c c a b 50608 50608 Hurth 630V a-Propeller Shaft b-Propeller Shaft Coupler c-Transmission Output Flange d-No Gap Allowed 2. Ensure that all four mounts are still positioned properly, then fasten mounts to engine bed with appropriate lag bolts or screws and hardware. Tighten lag bolts or screws securely. 3. Disconnect and remove sling. Proceed to Engine Final Alignment section following. Page 2B-10 90-860074--1 FEBRUARY 2002 INBOARD (MIE) MODELS SERVICE MANUAL NUMBER 22 Engine Final Alignment CAUTION To avoid vibration, noise and damage to transmission output shaft oil seal and bearings, engine must be properly aligned. IMPORTANT: Engine alignment MUST BE RECHECKED with boat in the water, fuel tanks filled and with a normal load on board. Engine must be aligned so that transmission output flange and propeller shaft coupler centerlines are aligned and coupling faces are parallel within 0.07 mm (0.003 in.). This applies to installations with solid couplings, as well as flexible couplings. 1. Ensure that mating surfaces on transmission output flange and propeller shaft coupler faces are clean and flat. 2. Center propeller shaft in shaft log as follows: a. Push down and then lift shaft as far as it will move. Then place shaft in the middle of the movement. b. Move shaft to port and then to starboard as far as shaft will move. Then place shaft in the middle of the movement. c. With shaft in center of shaft log, as determined by above procedures a. and b. align engine to shaft. a d c b 72595 a-Propeller Shaft b-Propeller Shaft Coupler c-Transmission Output Flange 90-860074--1 FEBRUARY 2002 Page 2B-11 INBOARD (MIE) MODELS SERVICE MANUAL NUMBER 22 3. Ensure that coupling centerlines align, by butting propeller shaft coupler against transmission output flange. Shoulder on propeller shaft coupler should engage recess on transmission output flange face with no resistance. INCORRECT CORRECT 72597 INCORRECT NOTE: Some propeller shaft couplers may not have a shoulder on mating face. On these installations, use a straight edge to check centerline alignment. a b c d 72598 a-Feeler Gauge b-Transmission Coupling c-Propeller Shaft d-Straight Edge Page 2B-12 90-860074--1 FEBRUARY 2002 INBOARD (MIE) MODELS SERVICE MANUAL NUMBER 22 4. Check for angular misalignment, by hand holding coupling faces tightly together and checking for a gap between coupling faces with a 0.07 mm (0.003 in.) feeler gauge at 90 degree intervals. b a c a c b d d 50688 Typical Down Angle Transmission (All Similar) 50608 Typical V-Drive a-Propeller Shaft Coupler b-Feeler Gauge c-Transmission Output Flange d-Check Point Intervals 5. If coupling centerlines are not aligned or if coupling faces are more than 0.07 mm (0.003 in.) out of parallel, adjust engine mounts as follows: a. TO ADJUST ENGINE UP OR DOWN: Loosen locking nut on mounts requiring adjustment and turn both front mount or rear mount adjusting nuts equally. IMPORTANT: Both front mount or rear mount adjusting nuts must be turned equally to keep engine level from side to side. a b 23161 Front Mount Shown (All Similar) a-Locking (Jam) Nut b-Adjusting Nut 90-860074--1 FEBRUARY 2002 Page 2B-13 INBOARD (MIE) MODELS SERVICE MANUAL NUMBER 22 b. TO MOVE ENGINE TO THE LEFT OR RIGHT: Loosen clamping screw and nut on all four mount brackets; move engine to the left or right as necessary to obtain proper alignment. Torque clamping screws and nuts to 68 Nm (50 lb-ft). NOTE: A small amount of side-to-side adjustment can also be obtained from the slots on the engine mount pad (front pads only). Loosen lag bolts (which fasten mounts to engine bed) and move engine, as required. Tighten lag bolts securely. IMPORTANT: Large diameter of mount trunnion MUST NOT extend over 19 mm (3/4 in.) from mount brackets on any of the mounts. b b a a 50687 50687 Front Mounts Rear Mounts a-Clamping Bolts and Nuts b-Mount Trunnion Maximum Extension Page 2B-14 90-860074--1 FEBRUARY 2002 INBOARD (MIE) MODELS SERVICE MANUAL NUMBER 22 c. After engine has been properly aligned, relieve hoist tension entirely. Secure mounts to stringers using appropriate hardware. On port front mount do as follows: (1.) Position ECM assembly mounting bracket holes directly over front, port engine mount holes. NOTE: It may be necessary to lower, or raise, the ECM assembly and bracket, depending upon the final configuration of the power package, to position ECM on front mount. (2.) Fasten ECM mounting bracket and front mount assembly to boat stringer using appropriate hardware (lag bolts or thru-bolts etc.). d a b c 75301 a-ECM Assembly Mounting Bracket b-Front, Port Engine Mount c-Stringer d-Slotted Hole For Raising Or Lowering ECM Assembly 90-860074--1 FEBRUARY 2002 Page 2B-15 INBOARD (MIE) MODELS SERVICE MANUAL NUMBER 22 6. Connect propeller shaft coupler to transmission output flange following instructions a. or b.: IMPORTANT: All coupler bolts must be Metric Grade 10.9 (SAE Grade 8) or better, with a shoulder (grip length) sufficient to pass through the mating face plane of couplers. a. All Couplings Without Propeller Shaft Set Screws: Secure coupling together with bolts, lockwashers and nuts. Torque to 68 Nm (50 lb-ft). d c b a 50687 Hurth 8 Degree Down Angle Transmission Shown (All Similar) a-Propeller Shaft Coupler b-Bolts (4) c-Lockwasher and Nut (4) d-Transmission Output Flange Page 2B-16 90-860074--1 FEBRUARY 2002 INBOARD (MIE) MODELS SERVICE MANUAL NUMBER 22 b. Couplings with Propeller Shaft Set Screws: (1.) If propeller shaft coupler has set screws, remove set screws and mark (dimple) locations using a transfer punch. b a 50609 Hurth V-Drive Shown (All Similar) a-Set Screw Location b-Transfer Punch (2.) Remove propeller shaft coupler and drill shallow dimples at locations marked with punch. (3.) Reinstall propeller shaft coupler and torque bolts to 68 Nm (50 lb-ft). Install set screws and tighten securely. Safety wire set screws to ensure they Do NOT back out. b d c e a 50608 Hurth V-Drive Shown (All Similar) a-Propeller Shaft Couple b-Bolts (4), with Lockwashers and Nuts (4) c-Set Screws d-Safety Wire e-Transmission Output Flange 90-860074--1 FEBRUARY 2002 Page 2B-17 INBOARD (MIE) MODELS SERVICE MANUAL NUMBER 22 Engine Connections CAUTION It is good practice to ventilate the engine compartment prior to servicing any engine components to remove any fuel vapors which may cause difficulty breathing or be an irritant. IMPORTANT: When routing all wire harnesses and hoses, ensure they are routed and secured to avoid coming in contact with hot spots on engine and avoid contact with moving parts. 1. Connect instrument extension harness ends to engine harness ends. Connector collar must be fully engaged and secure. Tighten threaded connector collar of extension harness onto connector on side of electrical box. e b a c 75337 f b a d c 75333 75301 Harness Connections a-Extension Harness From Instruments b-Engine Harness and Connector End c-Connector Collar d-Location of Electrical Box e-Electrical Box - With Standard Connectors f-Electrical Box - With 21-Pin Connector 2. Connect any ground wires or accessories that were disconnected from engine. Page 2B-18 90-860074--1 FEBRUARY 2002 INBOARD (MIE) MODELS SERVICE MANUAL NUMBER 22 WARNING Be careful when working on fuel system components; diesel fuel is flammable. Ensure that the ignition key is OFF. Do NOT smoke or allow sources of open flame in the area while changing fuel system components. Wipe up any spilled fuel immediately. Do NOT allow fuel to come into contact with any hot surface which may cause it to ignite. 3. Connect flexible fuel line to inlet fitting on fuel pump. Secure with hose clamp. c b a d 75298 a-Fuel Line b-Hose Clamp c-Inlet Fitting d-Fuel Pump 4. Connect flexible return fuel line to injection pump fuel return line fitting. Secure with hose clamp. b c a 75579 a-Return Fuel Line b-Return Fitting c-Hose Clamp WARNING Dispose of fuel-soaked rags, paper, etc., in an appropriate airtight, fire-retardant container. Fuel-soaked items may spontaneously ignite and result in a fire hazard which could cause serious bodily injury or death. 90-860074--1 FEBRUARY 2002 Page 2B-19 INBOARD (MIE) MODELS SERVICE MANUAL NUMBER 22 5. After all wires are connected secure them with clamps or tie straps, which may have been retaining them to engine or hoses prior to removal. 6. Connect exhaust elbow, riser or water lift muffler, if equipped, to exhaust system hose using at least two hose clamps at each connection. Tighten hose clamps securely. 7. Connect seawater inlet hose to seawater pump connector fitting. Tighten hose clamp securely. b a 75299 Typical a-Seawater Inlet Hose b-Connector Fitting 8. If removed previously, connect seawater inlet hose to seawater strainer and tighten hose clamps securely. b c a 71362 a-Seawater Inlet Hose b-Seawater Strainer c-Hose Clamps (2) Page 2B-20 90-860074--1 FEBRUARY 2002 INBOARD (MIE) MODELS SERVICE MANUAL NUMBER 22 9. Connect coolant recovery bottle hose to heat exchanger and secure with clamp. b a 70548 a-Hose b-Clamp Throttle Cable Installation and Adjustment Refer to SECTION 2A. Shift Cable Installation And Adjustment Refer to SECTION 8A. Battery Cables 1. Connect battery cables to engine: a. Make sure that grounding stud and starter solenoid terminal are free of paint and any other material that could cause a poor electrical connection. b. After battery cables are connected, apply a thin coat of liquid neoprene to the terminals. c. Slide rubber boot over the positive (+) terminal after liquid neoprene dries. 2. Connect battery cables to battery by FIRST connecting positive (+) battery cable (usually red) to positive (+) battery terminal. Tighten clamp securely. Then, connect negative (–) battery cable (usually black) to negative (–) battery terminal. Tighten clamp securely. NOTE: Spray terminals with a battery connection sealant to help retard corrosion. 90-860074--1 FEBRUARY 2002 Page 2B-21 INBOARD (MIE) MODELS SERVICE MANUAL NUMBER 22 THIS PAGE IS INTENTIONALLY BLANK Page 2B-22 90-860074--1 FEBRUARY 2002 ENGINE MECHANICAL SERVICE MANUAL NUMBER 22 ENGINE Section 3A - Engine Mechanical Table of Contents Identification . . . . . . . . . . . . . . . . . . . . . . . . . . 3A-3 Torque Specifications . . . . . . . . . . . . . . . . . . 3A-4 Tools . . . . . . . . . . . . . . . . . . . . . . . . . . . . . . . . 3A-6 Special Tools . . . . . . . . . . . . . . . . . . . . . . . 3A-6 Special Tools (continued) . . . . . . . . . . . . 3A-7 Snap-On Tools . . . . . . . . . . . . . . . . . . . . . 3A-8 Kent-Moore Tools . . . . . . . . . . . . . . . . . . . 3A-8 Lubricants/Sealants/Adhesives . . . . . . . . . . 3A-9 Engine Specifications . . . . . . . . . . . . . . . . . 3A-10 Piston Rings . . . . . . . . . . . . . . . . . . . . . . 3A-10 Cylinder Liner Diameter . . . . . . . . . . . . 3A-10 Cylinder Liner Protrusion . . . . . . . . . . . 3A-11 Head Gaskets . . . . . . . . . . . . . . . . . . . . . 3A-11 Cylinder Head . . . . . . . . . . . . . . . . . . . . . 3A-11 Oil Pump . . . . . . . . . . . . . . . . . . . . . . . . . 3A-12 Camshaft . . . . . . . . . . . . . . . . . . . . . . . . . 3A-12 Valve Lifter . . . . . . . . . . . . . . . . . . . . . . . . 3A-12 Rocker Arm . . . . . . . . . . . . . . . . . . . . . . . 3A-13 Valve Adjustment . . . . . . . . . . . . . . . . . . 3A-13 Valve . . . . . . . . . . . . . . . . . . . . . . . . . . . . . 3A-13 Valve Seat . . . . . . . . . . . . . . . . . . . . . . . . 3A-13 Valve Guide . . . . . . . . . . . . . . . . . . . . . . . 3A-14 Valve Spring . . . . . . . . . . . . . . . . . . . . . . 3A-14 Crankshaft . . . . . . . . . . . . . . . . . . . . . . . . 3A-15 Crankshaft (continued) . . . . . . . . . . . . . 3A-16 Connecting Rods . . . . . . . . . . . . . . . . . . 3A-17 Connecting Rod Crank Pin Bore . . . . . 3A-17 Connecting Rod Bushings . . . . . . . . . . 3A-17 Pistons . . . . . . . . . . . . . . . . . . . . . . . . . . . 3A-17 Flywheel . . . . . . . . . . . . . . . . . . . . . . . . . 3A-17 Precautions . . . . . . . . . . . . . . . . . . . . . . . . . 3A-18 General Information . . . . . . . . . . . . . . . . . . 3A-19 Engine Rotation . . . . . . . . . . . . . . . . . . . 3A-19 Engine Firing Order . . . . . . . . . . . . . . . . 3A-19 Late Model Cylinder Head Gasket Torque Sequence and Specifications 3A-20 Early Model Cylinder Head Gasket Torque Sequence and Specifications 3A-25 Lubrication System - All Models . . . . . 3A-28 Examples of Bearing Failures . . . . . . . 3A-29 Compression Testing Procedure . . . . . 3A-30 Engine Cover . . . . . . . . . . . . . . . . . . . . . . . . 3A-31 Removal . . . . . . . . . . . . . . . . . . . . . . . . . 3A-31 Cleaning . . . . . . . . . . . . . . . . . . . . . . . . . 3A-31 Inspection . . . . . . . . . . . . . . . . . . . . . . . . 3A-31 Installation . . . . . . . . . . . . . . . . . . . . . . . . 3A-31 Valve Covers . . . . . . . . . . . . . . . . . . . . . . . . 3A-32 Removal . . . . . . . . . . . . . . . . . . . . . . . . . 3A-32 Cleaning . . . . . . . . . . . . . . . . . . . . . . . . . 3A-33 Inspection . . . . . . . . . . . . . . . . . . . . . . . . 3A-33 90-860074--1 FEBRUARY 2002 Installation . . . . . . . . . . . . . . . . . . . . . . . . Water Manifold . . . . . . . . . . . . . . . . . . . . . . . Exploded Views . . . . . . . . . . . . . . . . . . . Removal . . . . . . . . . . . . . . . . . . . . . . . . . Cleaning . . . . . . . . . . . . . . . . . . . . . . . . . Inspection . . . . . . . . . . . . . . . . . . . . . . . . Installation . . . . . . . . . . . . . . . . . . . . . . . . Cylinder Heads . . . . . . . . . . . . . . . . . . . . . . Exploded Views . . . . . . . . . . . . . . . . . . . Removal . . . . . . . . . . . . . . . . . . . . . . . . . Disassembly . . . . . . . . . . . . . . . . . . . . . . Cleaning . . . . . . . . . . . . . . . . . . . . . . . . . Inspection . . . . . . . . . . . . . . . . . . . . . . . . Repair . . . . . . . . . . . . . . . . . . . . . . . . . . . Expansion Plugs . . . . . . . . . . . . . . . . . . Assembly . . . . . . . . . . . . . . . . . . . . . . . . . Installation Using Early Model Gaskets . . . . . . . . . Installation Using Late Model Gaskets . . . . . . . . . Rocker Arm . . . . . . . . . . . . . . . . . . . . . . . . . Removal . . . . . . . . . . . . . . . . . . . . . . . . . Cleaning . . . . . . . . . . . . . . . . . . . . . . . . . Inspection . . . . . . . . . . . . . . . . . . . . . . . . Assembly . . . . . . . . . . . . . . . . . . . . . . . . . Installation . . . . . . . . . . . . . . . . . . . . . . . . Timing Gear Cover . . . . . . . . . . . . . . . . . . . Exploded View . . . . . . . . . . . . . . . . . . . . Removal . . . . . . . . . . . . . . . . . . . . . . . . . Cleaning . . . . . . . . . . . . . . . . . . . . . . . . . Inspection . . . . . . . . . . . . . . . . . . . . . . . . Installation . . . . . . . . . . . . . . . . . . . . . . . . Oil Pump . . . . . . . . . . . . . . . . . . . . . . . . . . . . Removal . . . . . . . . . . . . . . . . . . . . . . . . . Cleaning . . . . . . . . . . . . . . . . . . . . . . . . . Inspection . . . . . . . . . . . . . . . . . . . . . . . . Reassembly . . . . . . . . . . . . . . . . . . . . . . Installation . . . . . . . . . . . . . . . . . . . . . . . . Oil Pressure Relief Valve . . . . . . . . . . . . . . Removal . . . . . . . . . . . . . . . . . . . . . . . . . Disassembly . . . . . . . . . . . . . . . . . . . . . . Cleaning . . . . . . . . . . . . . . . . . . . . . . . . . Inspection . . . . . . . . . . . . . . . . . . . . . . . . Assembly . . . . . . . . . . . . . . . . . . . . . . . . . Installation . . . . . . . . . . . . . . . . . . . . . . . . Oil Pan and Oil Pick-Up Tube Assembly . Removal . . . . . . . . . . . . . . . . . . . . . . . . . Cleaning . . . . . . . . . . . . . . . . . . . . . . . . . Inspection . . . . . . . . . . . . . . . . . . . . . . . . Installation . . . . . . . . . . . . . . . . . . . . . . . . 3A-34 3A-37 3A-37 3A-38 3A-38 3A-38 3A-39 3A-40 3A-40 3A-42 3A-44 3A-44 3A-45 3A-50 3A-50 3A-52 3A-55 3A-62 3A-71 3A-71 3A-71 3A-71 3A-72 3A-73 3A-77 3A-77 3A-78 3A-78 3A-78 3A-79 3A-81 3A-81 3A-81 3A-82 3A-83 3A-83 3A-84 3A-84 3A-85 3A-85 3A-86 3A-86 3A-87 3A-88 3A-88 3A-89 3A-89 3A-89 Page 3A-1 3 A ENGINE MECHANICAL SERVICE MANUAL NUMBER 22 Table of Contents (continued) Adapter / Oil Thermostat . . . . . . . . . . . . . . 3A-91 Removal . . . . . . . . . . . . . . . . . . . . . . . . . 3A-91 Disassembly . . . . . . . . . . . . . . . . . . . . . . 3A-92 Cleaning and Inspection . . . . . . . . . . . . 3A-92 Testing . . . . . . . . . . . . . . . . . . . . . . . . . . . 3A-92 Installation . . . . . . . . . . . . . . . . . . . . . . . . 3A-93 Camshaft . . . . . . . . . . . . . . . . . . . . . . . . . . . 3A-95 Exploded View . . . . . . . . . . . . . . . . . . . . 3A-95 Testing - Measuring Lobe Lift . . . . . . . . 3A-96 Removal . . . . . . . . . . . . . . . . . . . . . . . . . 3A-96 Inspection . . . . . . . . . . . . . . . . . . . . . . . . 3A-98 Installation . . . . . . . . . . . . . . . . . . . . . . . . 3A-99 Camshaft Bearings . . . . . . . . . . . . . . . . . . 3A-100 Inspection . . . . . . . . . . . . . . . . . . . . . . . 3A-100 Removal . . . . . . . . . . . . . . . . . . . . . . . . 3A-100 Installation . . . . . . . . . . . . . . . . . . . . . . . 3A-101 Valve Lifters . . . . . . . . . . . . . . . . . . . . . . . . 3A-102 Removal . . . . . . . . . . . . . . . . . . . . . . . . 3A-102 Cleaning . . . . . . . . . . . . . . . . . . . . . . . . 3A-103 Inspection . . . . . . . . . . . . . . . . . . . . . . . 3A-103 Installation . . . . . . . . . . . . . . . . . . . . . . . 3A-104 Valve Push Rods . . . . . . . . . . . . . . . . . . . . 3A-105 Removal . . . . . . . . . . . . . . . . . . . . . . . . 3A-105 Cleaning . . . . . . . . . . . . . . . . . . . . . . . . 3A-105 Inspection . . . . . . . . . . . . . . . . . . . . . . . 3A-105 Installation . . . . . . . . . . . . . . . . . . . . . . . 3A-105 Connecting Rod / Piston Assembly . . . . 3A-106 Measuring Rod Bearing Clearance . . 3A-106 Removal . . . . . . . . . . . . . . . . . . . . . . . . 3A-107 Disassembly . . . . . . . . . . . . . . . . . . . . . 3A-108 Page 3A-2 Cleaning . . . . . . . . . . . . . . . . . . . . . . . . 3A-109 Inspection . . . . . . . . . . . . . . . . . . . . . . . 3A-109 Assembly . . . . . . . . . . . . . . . . . . . . . . . . 3A-113 Installation . . . . . . . . . . . . . . . . . . . . . . . 3A-114 Rear Oil Seal . . . . . . . . . . . . . . . . . . . . . . . 3A-116 Removal . . . . . . . . . . . . . . . . . . . . . . . . 3A-116 Installation . . . . . . . . . . . . . . . . . . . . . . . 3A-117 Crankshaft and Main Bearings . . . . . . . . 3A-118 Removal . . . . . . . . . . . . . . . . . . . . . . . . 3A-118 Cleaning . . . . . . . . . . . . . . . . . . . . . . . . 3A-123 Inspection . . . . . . . . . . . . . . . . . . . . . . . 3A-124 Installation . . . . . . . . . . . . . . . . . . . . . . . 3A-127 Cylinder Liners . . . . . . . . . . . . . . . . . . . . . . 3A-136 Removal . . . . . . . . . . . . . . . . . . . . . . . . 3A-136 Identification . . . . . . . . . . . . . . . . . . . . . 3A-137 Cleaning and Inspection . . . . . . . . . . . 3A-138 Installation . . . . . . . . . . . . . . . . . . . . . . . 3A-139 Flywheel Housing, Coupler / Drive Plate And Flywheel . . . . . . . . . . . . . . . . . . . . . . . . . . . 3A-144 Exploded View . . . . . . . . . . . . . . . . . . . 3A-144 Flywheel Housing . . . . . . . . . . . . . . . . . 3A-148 Sterndrive (MCM) Coupler / Inboard (MIE) Drive Plate . . . . . . . . . . . . . . . . . . . . . . . 3A-150 Flywheel . . . . . . . . . . . . . . . . . . . . . . . . 3A-151 Engine Mounts . . . . . . . . . . . . . . . . . . . . . . 3A-152 Front Mounts . . . . . . . . . . . . . . . . . . . . . 3A-152 MIE (Inboard) Transmission Mounts . 3A-153 Engine 20-Hour Break-In Period . . . . . . 3A-154 After Break-in Period . . . . . . . . . . . . . . . . 3A-154 90-860074--1 FEBRUARY 2002 ENGINE MECHANICAL SERVICE MANUAL NUMBER 22 Identification b a 7332 75388 3 SERIAL NUMBER MAX RPM H P L B 75298 K W K G MARINE POWER EUROPE INC MADE IN ITALY Typical Sterndrive (MCM) Engine Shown - Inboard (MIE) Similar a - Serial Number Plate b - Manufacturer’s Serial Number The engine model and serial numbers are located on a sticker attached to the port side of the engine. The manufacturer’s serial number is stamped in the cylinder block. 90-860074--1 FEBRUARY 2002 Page 3A-3 ENGINE MECHANICAL SERVICE MANUAL NUMBER 22 Torque Specifications Description Nm Alternator Bracket Bolt M12x1.75 Alternator Brace To Timing Cover lb-in. lb-ft 68.6 50 45-50 34-37 Camshaft Flange Mounting Screw M8x1.25 27.5 20 Connecting Rod Bolt M11x1 29.4 + 60 21 + 60 degrees degrees 196.2 144 Crankshaft Pulley Nut 3 M24x1.5 Cylinder Head Bolts 14mm Dia. 2 See 1. 12mm Dia. 2 Engine Mount M10x1.5 68.6 50 To Block M10x1.5 50 37 Rear Main Bearing Carrier Nut M8x1.25 27.5 20 50 37 110 81 23 17 27.5 20 Flywheel Housing Rear Portion M10x1.5 Flywheel 2 M12x1.25 Glow Plug Idler Gear Mounting Screw M 8 x 1.25 1 : Along with the application of conventional torque, all D2.8L D-Tronic and D4.2L D-Tronic diesel engines will require cylinder head torque with a suitable wrench using a Torque Angle Gauge (obtain locally). Refer to Late Model Cylinder Head Gasket - Torque Sequence and Specifications, Early Model Cylinder Head Gasket - Torque Sequence and Specifications, or Cylinder Head section. 2 : Bolts may be used a maximum of 3 times within the prescribed torque limits. 3 : Use Loctite 222 on threads. Page 3A-4 90-860074--1 FEBRUARY 2002 ENGINE MECHANICAL SERVICE MANUAL NUMBER 22 Torque Specifications (Continued) Description Main Bearing Carrier Halves Bolt 1 Nm lb-in. lb-ft M10x1.5 44.1 32 Main Bearing Carrier Locating Hollow Bolt M14x1.5 53.9 39 Inboard (MIE) Drive Plate 72 53 Sterndrive MCM Coupler 30 22 57 Oil Drain Plug M22x1.25 78.5 Oil Pan Screws M6x1.0 12.7 Oil Pressure Relief Valve Assembly Oil Pump Screw M8x1.25 112 53.9 39 27.5 20 Oil Pick-up Tube Screw 11 Oil Adapter / Thermostat Housing Fitting 60 44 Power Steering Pump Mounting Bolt 21 15 M8x1.25 34 25 M6x1.0 10.8 95 M8 10.8 95 Valve Cover M6x1.0 11.5 101 Vibration Damper (Balancer) M10x1.5 83.4 Water Manifold M6x1.0 11.8 Water Pump M8x1.25 24.5 18 Water Pump Pulley M8x1.25 27.5 20 Rocker Arm Support Flanged Nut 97 Timing Gear Cover 61 104 1 : Bolts may be used a maximum of 3 times within the prescribed torque limits. 90-860074--1 FEBRUARY 2002 Page 3A-5 ENGINE MECHANICAL SERVICE MANUAL NUMBER 22 Tools Special Tools Description Part Number Compression Tester Adaptor 91-881737 Crankshaft Pulley Puller 91-801333507 Crankshaft Gear Puller 91-801333503 Crankshaft Installer 91-801333504 Crankshaft Tool (Rotating) 91-814827 Cylinder Head Guide Pin 91-801333501 Cylinder Liner Puller 91-801333502 Dial Indicator 91-58222A1 Flywheel Holder 91-801333506 Flywheel Seal Installer 91-801111260 Front Main Bearing and Camshaft Bearing Puller 91-801333508 Injection Pump Adaptor Tool 1 Injection Pump Gear Puller 1 91-854220 91-818372 Liner Gauge Bar, Metric 2 91-801333509 Liner Gauge Bar, SAE 3 91-814812A1 Graduated Disc (Timing) 4 Piston Ring Expander Support Block 91-801333500 91-24697 91-814812A1 1 : For use on D2.8L D-Tronic and D4.2L D-Tronic 2 : For use with millimeter dial gauge. 3 : For use with SAE dial gauge. 4 : Some modification may be required for use on some models. Page 3A-6 90-860074--1 FEBRUARY 2002 ENGINE MECHANICAL SERVICE MANUAL NUMBER 22 Special Tools (continued) Description Part Number Cylinder Head Service Tool Kit (For Special Cylinder Head Bolts) 5 806563A1 5 : Refer to the following special information about modification of this tool. NOTE: The 12 mm Triple Square special tool for cylinder head torque can be modified to allow the oil feed line to the rocker arms to remain installed during retorque of the cylinder heads. a c e b i h d j f a b c d e f g h i j k 76067 g k - 12 Point Triple Square - Modified Area - 12.8 mm (0.50 in.) Across Flats Hex - 12.8 mm (0.50 in.) - 11.9 mm (0.47 in.) - 37.6 mm (1.48 in.) - 66.6 mm (2.62 in.) - 24.4 mm (0.96 in.) - 25.2 mm (0.99 in.) - 15.2 mm (0.60 in.) - 42.7 mm (1.68 in.) 90-860074--1 FEBRUARY 2002 Page 3A-7 ENGINE MECHANICAL SERVICE MANUAL NUMBER 22 Snap-On Tools Snap-On Tools 2801 80th Street Kenosha, WI 53141 See Snap-On Catalog for your regions distributor phone number. Description Part Number Compression Gauge MT33B Torque Angle Gauge (Degree Wheel Torquing) TA360 Kent-Moore Tools Kent-Moore Tools, Inc. 29784 Little Mack Roseville, MI 48066 Phone: (313) 774-9500 Description Page 3A-8 Part Number Valve Spring Compressor J-8062 Piston Ring Compressor J-8307 90-860074--1 FEBRUARY 2002 SERVICE MANUAL NUMBER 22 ENGINE MECHANICAL Lubricants/Sealants/Adhesives Description Part Number Loctite Master Gasket 92-12564-2 Loctite 271 Thread Locker 92-809819 Needle Bearing Assembly Lubricant 92-802868A1 Loctite 242 Loctite 620 Molykote Obtain Locally SAE 30W Engine Oil Loctite 290 90-860074--1 FEBRUARY 2002 Page 3A-9 ENGINE MECHANICAL SERVICE MANUAL NUMBER 22 Engine Specifications IMPORTANT: Specifications are for all models, unless otherwise listed. NOTICE UNIT OF MEASUREMENT: mm (in.) Piston Rings Description Groove Width Ring Thickness End Gap Ring to Groove Clearance Measurement 1st Compression (Tapered) 3.0 (.1181) 2nd Compression 2.06 - 2.08 (.0811 - .0818) Oil Control 4.03 - 4.05 (.1586 - .1594) 1st Compression (Tapered) 3.0 (.1181) 2nd Compression 1.978 - 1.99 (.0779 - .0783) Oil Control 3.978 - 3.990 (.1566 - .1570) 1st Compression 0.25 - 0.50 (.010 - .020) 2nd Compression 0.25 - 0.45 (.0098 - .0177) Oil Control 0.25 - 0.58 (.0098 - .0228) 1st Compression Not applicable - Tapered 2nd Compression 0.070 - 0.102 (.0027 - .0040) Oil Control 0.040 - 0.075 (.0016 - .0029) Cylinder Liner Diameter NOTE: Measurements are made at a depth of 108 mm (4.25 inches) down from the top edge of the liner. Measurement Description Standard Class A Maximum Out of Round Page 3A-10 93.995 - 94.015 (3.7007 - 3.7011) 0.008 (.0003) 90-860074--1 FEBRUARY 2002 ENGINE MECHANICAL SERVICE MANUAL NUMBER 22 Engine Specifications (continued) NOTICE UNIT OF MEASUREMENT: mm (in.) Cylinder Liner Protrusion Liner Recess BELOW Block (Without Shim) Shim to Be Used (Thickness) 0.14 - 0.09 (.0055 - .0035) 0.15 (.0059) 0.19 - 0.14 (.0074 - .0055) 0.20 (.0078) 0.22 - 0.17 (.0086 - .0066) 0.23 (.0090) Liner Protrusion ABOVE Block (With Shim) 0.01 - 0.06 (.0004 - .0023) Head Gaskets IMPORTANT: When replacing head gaskets observe the following: • If replacing only one head gasket, use the same size gasket as was removed. • All head gaskets must be the same size on the same engine. Piston Protrusion Above Cylinder Block Gasket Size To Be Used 0.63 - 0.74 (.024 - .029) 1.42 (0.56) 0.73 -0.82 (.028 - .032) 1.52 (0.60) 0.83 - 0.92 (.031 - .037) 1.62 (0.64) Cylinder Head Description Measurement Height 89.95 - 90.05 (3.541 - 3.545) Height of Cylinder Head End Spacers 90-860074--1 FEBRUARY 2002 With Early Model Cylinder Head Gaskets 91.26 - 91.34 (3.593 - 3.596) With Late Model Cylinder Head Gaskets 89.96 (3.542) Page 3A-11 ENGINE MECHANICAL SERVICE MANUAL NUMBER 22 Engine Specifications (continued) NOTICE UNIT OF MEASUREMENT: mm (in.) Oil Pump Description Measurement External Rotor End Float and Internal Rotor End Float External Rotor Clearance to Housing Clearance Between Pump Support and Gear (Axial) 0.030 - 0.087 (.0011 - .0034) 0.13 - 0.23 (.005 - .009) .0059 - .0098 (0.15 - 0.25) Camshaft Description Lobe Lift Journal Diameter Bearing Clearances Measurement Exhaust 7.303 (.287) Intake 7.019 ( .276 ) Front 53.495 - 53.510 (2.1061 - 2.1066) Center 53.450 - 53.470 (2.1043 - 2.1051) Rear 53.480 - 53.500 (2.1055 - 2.1062) Front 0.030 - 0.095 (.0011 - .0037) Center 0.070 -0.140 (.0027 - .0055) Rear 0.040 - 0.110 (.0015 - .0043) Camshaft Thrust Plate Thickness 3.95 - 4.05 (.155 - .159) Valve Lifter Description Page 3A-12 Measurement Lifter Diameter 14.965 - 14.985 (.5891 - .5899) Diameter of Lifter Bore 15.010 - 15.035 (.5909 - .5919) Assembly Clearance 0.025 - 0.070 (.0010 - .0027) Clearance Wear Limit 0.100 (.0039) 90-860074--1 FEBRUARY 2002 ENGINE MECHANICAL SERVICE MANUAL NUMBER 22 Engine Specifications (continued) NOTICE UNIT OF MEASUREMENT: mm (in.) Rocker Arm Description Measurement Journal Diameter 24.97 - 25.00 (.983 - .984) Bushing lnner Diameter 25.021 - 25.020 (.985 - .985) Maximum Clearance 0.062 (.002) Valve Adjustment Valve Clearance Exhaust Intake Hydraulically Controlled Valve Valve Exhaust Intake Head Diameter 38 (1.49) 40.9 (1.61) Stem Diameter 7.93 (.3122) 7.95 (.3129) Face Width Margin (New) 2.64 - 2.99 (.1039 - .1177) 3.57 - 3.85 (.1405 - .1515) 1.73 (.068) Margin (After Grinding) Face Angle (New) 1.82 (.071) 1.30 (.051) 44 degrees 30 minutes 29 degrees 30 minutes Exhaust Intake Seat Angle 45 degrees 30 degrees Seat Width 2.00 (.078) 3.25 (.127) 39 (1.53) 42 (1.653) 7.90 (.311) 7.80 (.307) 2.05 - 2.25 (.080 - .088) 2.17 - 2.37 (.085 - .093) 0.03 (.001) 0.03 (.001) Valve Seat Valve Seat Outer Diameter Seat Height Head SurfaceTo Seat Valve Recession (Max.) 90-860074--1 FEBRUARY 2002 Page 3A-13 ENGINE MECHANICAL SERVICE MANUAL NUMBER 22 Engine Specifications (continued) NOTICE UNIT OF MEASUREMENT: mm (in.) Valve Guide Valve Guide Maximum Clearance Height Above Spring Counterbore Exhaust Intake 0.093 ( .0036 ) 0.073 ( .0028 ) 7.921 - 7.939 (.311 - .312) 7.940 - 7.960 (.312 - .313) Valve Spring Page 3A-14 Valve Spring Height Pressure Free Standing 44.65 (1.757) 0.0 kg (0 lb) Valve Closed 38.60 (1.460) 32 - 36 kg (71 - 79 lb) Valve Open 28.20 (1.110) 92.5 - 96.2 kg (204 - 212 lb) 90-860074--1 FEBRUARY 2002 ENGINE MECHANICAL SERVICE MANUAL NUMBER 22 Engine Specifications (continued) NOTICE UNIT OF MEASUREMENT: mm (in.) Crankshaft D2.8L D-TRONIC - SERIAL NUMBER 0L098203 AND BELOW, AND D4.2 L D-TRONIC - SERIAL NUMBER 0L099524 AND BELOW Measurement Description Main Journal Outside Diameter Main Bearing Clearance Main Bearing Inside Diameter Front 62.985 - 63.005 (2.4797 - 2.4805) Center 63.005 - 63.020 (2.4805 - 2.4810) Rear 69.985 - 70.000 (2.7553 - 2.7559) Front 0.055 - 0.095 (.0022 - .0037) Center 0.030 - 0.088 (.0012 - .0034) Rear 0.060 - 0.125 (.0024 - .0049) Front 63.060 - 63.080 (2.4827 - 2.4835) Center 63.050 - 63.093 (2.4822 - 2.4840) Rear 70.060 - 70.110 (2.7583 - 2.7602) Maximum Main Bearing Wear Connecting Rod Journal Outside Diameter Connecting Rod Bearing Clearance Connecting Rod Bearing Inside Diameter Maximum Rod Bearing Journal Wear Crankshaft End Play (Axial Clearance) Thrust Washers 90-860074--1 FEBRUARY 2002 0.1 (.0039) 53.940 - 53.955 (2.1236 - 2.1242) 0.030 - 0.064 (.0011 - .0025) 53.977 - 54.016 (2.1250 - 2.1266) 0.1 (.0039) 0.153 - 0.304 (006 - .011) Standard 2.311 - 2.362 (.0909 - .0929) 1st Oversized 2.411 - 2.462 (.0949 - .0969) 2nd Oversized 2.511 - 2.562 (.0988 - .101) Page 3A-15 ENGINE MECHANICAL SERVICE MANUAL NUMBER 22 Engine Specifications (continued) NOTICE UNIT OF MEASUREMENT: mm (in.) Crankshaft (continued) D2.8L D-TRONIC - SERIAL NUMBER 0L098204 AND ABOVE, AND D4.2 L D-TRONIC - SERIAL NUMBER 0L099525 AND ABOVE IMPORTANT: The engines included in this serial number range had dimensional changes to the crankshaft, rear main bearing, rear main bearing carrier, thrust washers, O-ring seal, flywheel thrust spacer and flywheel seal. Ensure by serial number that the specifications and parts are the correct ones for the engine. Measurement Description Main Journal Outside Diameter Main Bearing Clearance Main Bearing Inside Diameter Front 62.985 - 63.005 (2.479 - 2.4805) Center 63.005 - 63.020 (2.4805 - 2.4810) Rear 79.985 - 80.000 (3.1490 - 3.1496) Front 0.055 - 0.095 (.0022 - .0037) Center 0.030 - 0.088 (.0011 - .0034) Rear 0.045 - .085 (0.0018 - 0.0033) Front 63.060 - 63.080 (2.4827 - 2.4835) Center 63.050 - 63.093 (2.4822 - 2.4840) Rear 80.045 - 80.070 (3.1514 - 3.1524) Maximum Main Bearing Wear Connecting Rod Journal Outside Diameter Connecting Rod Bearing Clearance Connecting Rod Bearing Inside Diameter Maximum Rod Bearing Journal Wear Crankshaft End Play (Axial Clearance) Thrust Washers Page 3A-16 0.1 (.0039) 53.940 - 53.955 (2.1236 - 2.1242) 0.030 - 0.064 (.0011 - .0025) 53.977 - 54.016 (2.1250 - 2.1266) 0.1 (.0039) 0.080 - 0.280 (0.0031 - 0.0110) Standard 2.310 - 2.360 (0.0909 - 0.0929) 1st Oversized 2.410 - 2.460 (0.0949 - 0.0969) 2nd Oversized 2.510 - 2.560 (0.0988 - 0.1008) 90-860074--1 FEBRUARY 2002 ENGINE MECHANICAL SERVICE MANUAL NUMBER 22 Engine Specifications (continued) NOTICE UNIT OF MEASUREMENT: mm (in.) Connecting Rods Description Measurement Weight 1 1250 grams (44.09 ounces) 1 : All service connecting rods are median weight and class. Connecting Rod Crank Pin Bore Description Measurement Inner Diameter 57.563 - 57.582 (2.2662 - 2.2670) Maximum Allowable Wear or Taper 0.02 (.0008) Connecting Rod Bushings Description Measurement Piston Pin Outer Diameter 29.990 - 29.996 (1.1807 - 1.1809) Connecting Rod Bushing Inner Diameter 30.035 - 30.050 (1.1824- 1.1830) Minimum and Maximum Clearance 0.039 - 0.060 (.0015 - .0023) Pistons Description Diameter Standard Measurement Class A 93.925 (3.6978) Flywheel Description Measurement Runout - Face 0.10 (.004) Runout - Bore 0.10 (.004) 90-860074--1 FEBRUARY 2002 Page 3A-17 ENGINE MECHANICAL SERVICE MANUAL NUMBER 22 Precautions WARNING Always wear safety glasses when using compressed air. WARNING Some tests in this SECTION involve the use of electricity and intense heat. Failure to follow appropriate procedures or warnings can cause burns or shock which can result in severe personal injury or death. While performing the following test, observe these general precautions: w Wear personal protective clothing such as rubber gloves, a non-flammable apron, and eye protection - preferably full face shield or safety glasses. w Work area should include the use of rubber floor mats. Use insulated tools. w The appropriate heat source should only be electric. Heat source should be operated by a qualified person. Follow all instructions of the manufacturer of the heat source. The heat source should be checked each time it is used to ensure it is functioning properly. w The thermometer used in the test should be a high-temperature thermometer with a maximum reading of at least 1505 C (3005 F). Under no circumstances should the operator allow temperatures to exceed test specifications. w Perform test only in a well ventilated area. w Use a suitable container to hold the test medium, such as metal. Avoid use of glass containers unless the operator first confirms for him/herself that the glass container is an appropriate high-temperature vessel. w Because the components will reach high temperatures Do NOT handle materials or components until COMPLETELY cooled. Page 3A-18 90-860074--1 FEBRUARY 2002 ENGINE MECHANICAL SERVICE MANUAL NUMBER 22 General Information Some repairs, that are listed in this section, must be completed with engine removed from boat. Engine removal depends upon type of repair and boat design. Place engine on repair stand for major repairs. NOTE: This section contains disassembly and assembly procedures of the cylinder block and cylinder heads only. Refer to other sections for disassembly and assembly of various other components. IMPORTANT: Do NOT use any sealers or adhesives containing silicone. Silicone can cause blockage in the cooling/heat exchanger systems. Engine Rotation NOTE: Engine rotation is described when observed from the rear of the engine (transmission end) looking forward (water pump end). 75303 Left-hand Rotation - All Models Engine Firing Order 4 3 2 1 D2.8L D-TRONIC Firing Order: 1-3-4-2 90-860074--1 FEBRUARY 2002 6 5 4 3 2 1 D4.2L D-TRONIC Firing Order: 1-5-3-6-2-4 Page 3A-19 ENGINE MECHANICAL SERVICE MANUAL NUMBER 22 Late Model Cylinder Head Gasket - Torque Sequence and Specifications IMPORTANT: Cylinder head bolts may be installed as many as three times, and then must be replaced. Replace bolts if any doubt exists. IMPORTANT: Observe the following assembly notes: • Lubricate the underside of all 14 mm center bolt heads and threads with Molykote. • Lubricate the underside of all 12 mm side bolt heads and threads with clean engine oil (SAE 30 W). • Position cylinder heads, one at a time. Install cylinder head end spacers, formed spacer-washers and bolts. Temporarily finger tighten the bolts. • Hand tighten intake / exhaust manifold to cylinder heads to align sides of cylinder heads. Then, recheck for proper coverage of gaskets. b a a a d c b c a a d 75515 Cylinder Head Assembly Diagram a - End Spacer b - Formed Spacer-Washers c - Center Bolt Set d - Side Bolt Set Page 3A-20 90-860074--1 FEBRUARY 2002 ENGINE MECHANICAL SERVICE MANUAL NUMBER 22 TORQUE PROCEDURE DURING ASSEMBLY 3. Torque the center bolt set as indicated. a. First pass: Engine Sequence Torque D2.8L Center Bolts 3-2-1-4-5-8-9-10-7-6 30 Nm (22 lb-ft) D4.2L Center Bolts 11-12-13-14-10-9-8-4-3-2-1-5-6-7 30 Nm (22 lb-ft) Engine Sequence Torque Angle D2.8L Center Bolts 3-2-1-4-5-8-9-10-7-6 + 65 Degrees D4.2L Center Bolts 11-12-13-14-10-9-8-4-3-2-1-5-6-7 + 65 Degrees Engine Sequence Torque Angle D2.8L Center Bolts 3-2-1-4-5-8-9-10-7-6 + 65 Degrees D4.2L Center Bolts 11-12-13-14-10-9-8-4-3-2-1-5-6-7 + 65 Degrees b. Second pass: c. Third pass: a b 1 9 3 7 5 10 2 8 4 6 1 13 3 11 5 9 7 14 2 12 4 10 6 8 77114 77113 Center Bolt Torque Sequence Diagram a - 4 Cylinder Engine b - 6 Cylinder Engine 90-860074--1 FEBRUARY 2002 Page 3A-21 ENGINE MECHANICAL SERVICE MANUAL NUMBER 22 4. Torque the side bolt set as indicated. a. First pass: Engine Sequence Torque D2.8L Side Bolts 11-12-13-14-15-16-17-18 30 Nm (22 lb-ft) D4.2L Side Bolts 15-16-17-18-19-20-21-22-23-24-25-26 30 Nm (22 lb-ft) Engine Sequence Torque Angle D2.8L Side Bolts 11-12-13-14-15-16-17-18 + 85 Degrees D4.2L Side Bolts 15-16-17-18-19-20-21-22-23-24-25-26 + 85 Degrees b. Second pass: 15 16 17 18 a 11 21 12 22 23 13 14 24 25 77114 26 b 15 16 17 18 19 20 77113 Side Bolt Torque Sequence Diagram a - 4 Cylinder Engine b - 6 Cylinder Engine Page 3A-22 90-860074--1 FEBRUARY 2002 ENGINE MECHANICAL SERVICE MANUAL NUMBER 22 TORQUE PROCEDURE AFTER 20-30 MINUTE BREAK-IN CAUTION Avoid component or engine failure. Cylinder heads require additional angular torque and conventional torque application after the first 20-30 minute break-in. 1. Operate the engine at idle until water temperature reaches 70 degrees C (158 degrees F.). Then operate the engine at 2000 rpm for approximately 20-30 minutes at normal operating temperature. 2. Let the engine cool down completely (inoperative overnight, if possible). 3. One at a time loosen each center bolt and torque as indicated. a. First pass: Engine Sequence Torque D2.8L Center Bolts 3-2-1-4-5-8-9-10-7-6 30 Nm (22 lb-ft) D4.2L Center Bolts 11-12-13-14-10-9-8-4-3-2-1-5-6-7 30 Nm (22 lb-ft) Engine Sequence Torque Angle D2.8L Center Bolts 3-2-1-4-5-8-9-10-7-6 + 120 Degrees D4.2L Center Bolts 11-12-13-14-10-9-8-4-3-2-1-5-6-7 + 120 Degrees b. Second pass: a b 1 9 3 7 5 10 2 8 4 6 1 13 3 11 5 9 7 14 2 12 4 10 6 8 77114 77113 Center Bolt Torque Sequence Diagram a - D2.8L D-Tronic Engine b - D4.2L D-Tronic Engine 90-860074--1 FEBRUARY 2002 Page 3A-23 ENGINE MECHANICAL SERVICE MANUAL NUMBER 22 4. Without loosening, torque each side bolt as indicated. Engine Sequence Torque D2.8L Side Bolts 11-12-13-14-15-16-17-18 90 Nm (66 lb-ft) D4.2L Side Bolts 15-16-17-18-19-20-21-22-23-24-25-26 90 Nm (66 lb-ft) 15 a 11 16 12 17 13 18 14 77114 b 21 22 23 24 15 16 17 18 25 19 26 20 77113 Side Bolt Torque Sequence Diagram a - D2.8L D-Tronic Engine b - D4.2L D-Tronic Engine Page 3A-24 90-860074--1 FEBRUARY 2002 ENGINE MECHANICAL SERVICE MANUAL NUMBER 22 Early Model Cylinder Head Gasket - Torque Sequence and Specifications IMPORTANT: Cylinder head bolts may be installed as many as three times, and then must be replaced. Replace if any doubt exists. IMPORTANT: Observe the following assembly notes: • Lubricate the underside of all 14 mm (center) bolt heads and threads with Molykote. Lubricate the underside of all 12 mm (side) bolt heads and threads with clean SAE 30 W engine oil. • Position cylinder heads, one at a time, ensuring that the gaskets are completely covered by the cylinder heads themselves. Install cylinder head end spacers, formed spacer-washers and bolts. Temporarily finger tighten the bolts. • Hand tighten intake/exhaust manifold to cylinder heads to align sides of cylinder heads. Then, recheck for proper coverage of gaskets. TORQUE PROCEDURE DURING ASSEMBLY 1. In sequence torque 14 mm bolts to 30 Nm (22 lb-ft). Repeat using same specification (to ensure better preload). 2. In sequence tighten each 14 mm bolt through an angle of 70 degrees. 3. In sequence tighten each 14 mm bolt through ANOTHER angle of 70 degrees. 4. In sequence torque port and starboard 12 mm bolts to 30 Nm (22 lb-ft). 5. In sequence tighten STARBOARD 12 mm bolts through an angle of 85 degrees 〈± 5 degrees) 6. In sequence tighten PORT 12 mm bolts through an angle of 85 degrees 〈± 5 degrees) b a 21 c 22 1 13 14 2 15 16 23 3 24 11 12 17 4 25 5 9 7 10 18 26 19 c 6 8 20 a b b b c 75515 a 15 16 1 9 17 3 10 2 8 11 12 18 7 5 c 4 6 13 14 Cylinder Head Assembly And Torque Sequence Diagram a - Center Bolt Set b - Side Bolt Set c - End Spacer 90-860074--1 FEBRUARY 2002 Page 3A-25 ENGINE MECHANICAL SERVICE MANUAL NUMBER 22 TORQUE PROCEDURE AFTER 20-30 MINUTE BREAK-IN CAUTION Avoid component or engine failure. Cylinder heads require additional angular torque and conventional torque application after the first 20-30 minute break-in and then, after the first 100 hours or first operating season whichever occurs first. 1. Operate the engine at idle until water temperature reaches 70 degrees C (158 degrees F.). Then operate the engine at 2000 rpm for approximately 20-30 minutes at normal operating temperature. 2. Let the engine cool down completely (inoperative overnight, if possible). 3. In sequence, and operating on only one bolt at a time, loosen each 14 mm center bolt and then retorque to 30 Nm (22 lb-ft). Continue by tightening the bolt through an angle of 65 degrees and then through ANOTHER 65 degrees (130 degrees total). 4. In sequence and without loosening, check torque on port and starboard 12 mm side bolts to be 90 Nm (66 lb-ft) 21 22 23 24 25 26 a 1 13 3 14 2 12 16 15 11 5 9 4 10 6 17 7 8 19 18 20 b 15 16 17 18 a 1 9 3 7 10 2 8 4 11 12 13 5 6 14 b 75515 Torque Sequence Diagram a - Center Bolt Set b - Side Bolt Set Page 3A-26 90-860074--1 FEBRUARY 2002 ENGINE MECHANICAL SERVICE MANUAL NUMBER 22 TORQUE PROCEDURE AFTER 100 HOURS OF OPERATION, OR FIRST OPERATING SEASON, WHICHEVER OCCURS FIRST CAUTION Avoid component or engine failure. Cylinder heads require additional angular torque and conventional torque application after the first 100 hours or first operating season, whichever occurs first. IMPORTANT: Engine must be have been operated 100 hours or for one operating season, whichever occurs first. 1. Let engine cool down completely (inoperative overnight, if possible). 2. In sequence and without loosening, tighten 14 mm center bolts through an angle of 15 degrees. 3. In sequence and without loosening, tighten port and starboard 12 mm side bolts through an angle of 15 degrees. 21 22 23 24 25 26 a 1 13 3 14 2 12 16 15 11 5 9 4 10 6 17 7 8 19 18 20 b 15 16 17 18 a 1 9 3 7 10 2 8 4 11 12 13 5 6 14 b 75515 Torque Sequence Diagram a - Center Bolt Set b - Side Bolt Set 90-860074--1 FEBRUARY 2002 Page 3A-27 ENGINE MECHANICAL SERVICE MANUAL NUMBER 22 Lubrication System - All Models 7 6 4 8 9 5 3 10 2 11 1 73721 D4.2L D-Tronic Flow Diagram Shown (D2.8L D-Tronic Similar) 1 - Oil Pan 2 - Oil Pump 3 - Pressure Relief Valve 4 - Oil Thermostat In Oil Filter Header 5 - Oil Filter 6 - Engine Oil Cooler (Lower Portion of Heat Exchanger/Coolant Tank) 7 - Rocker Arms 8 - Camshaft Bearings 9 - Piston Oil Jets 10 - Crankshaft Main Bearing Carrier and Bearing 11 - Turbocharger Page 3A-28 90-860074--1 FEBRUARY 2002 ENGINE MECHANICAL SERVICE MANUAL NUMBER 22 Examples of Bearing Failures b a Scratched By Dirt a b c d c Lack Of Oil d 70436 Improper Seating - Scratches - Dirt Imbedded Into Bearing Material - Overlay Wiped Out - Bright (Polished) Sections b a c 70436 Tapered Journal Radius Ride Fatigue Failure a - Overlay Gone From Entire Surface b - Radius Ride c - Craters Or Pockets 90-860074--1 FEBRUARY 2002 Page 3A-29 ENGINE MECHANICAL SERVICE MANUAL NUMBER 22 Compression Testing Procedure Periodically check engine compression pressure. Lowering of pressure causes loss of power, greater fuel consumption, smoke at the exhaust, low acceleration, unsteady slow idle, difficulty in starting and bearing seizure because of engine overheating. 1. Refer to SECTION 5C - Fuel Injectors, and while observing precautions listed, remove all fuel injectors. IMPORTANT: To achieve the cranking rpms needed (300 rpm minimum) for a proper compression test, it will be necessary to remove all of the injectors prior to testing. 2. Clean injector bore and install Compression Tester Adapter Tool 91-881737. 3. Torque the injector clamp to 24 Nm (18 lb-ft). 4. Connect gauge to Compression Adapter Tool and set gauge to zero. 5. Ensure that battery is fully charged. 6. Operate the starter. The engine should be cranking at approximately 300 rpm. Check compression gauge reading. Compression should be 30-32 bar (435-464 psi). Maximum pressure difference between cylinders should not exceed 500 kPa (72 psi). 7. Readings lower than specified, or differences between cylinders greater than specified, indicate engine problems may exist (such as faulty rings, valves, cylinders and pistons). Repair as needed. 8. If readings are within specifications, refer to SECTION 5C - Fuel Injectors, and install injectors in heads from which removed previously. 9. Purge air from injectors. Refer to SECTION 5C - Fuel Injectors. Page 3A-30 90-860074--1 FEBRUARY 2002 ENGINE MECHANICAL SERVICE MANUAL NUMBER 22 Engine Cover Removal 1. Remove the four cover retaining screws and hardware. 2. Remove oil filler cap to allow cover to be removed. 3. Lift cover from engine. 4. To protect engine, temporarily install oil filler cap during service work. c a b 75504 a - Engine Cover b - Retaining Screw and Hardware c - Oil Fill Cap Cleaning 1. Clean the cover with warm soapy water. 2. Air dry the cover. Inspection 1. Inspect engine cover for cracks or deterioration. 2. Inspect rubber isolation grommets for deterioration. 3. Inspect hardware used with each grommet. 4. Replace damaged parts. Installation 1. Remove oil filler cap from engine to allow cover to be installed. 2. Place cover on engine. Position fastener hardware. 3. Install and securely tighten the four retaining screws. 90-860074--1 FEBRUARY 2002 Page 3A-31 ENGINE MECHANICAL SERVICE MANUAL NUMBER 22 Valve Covers Removal 1. Remove engine cover. 2. Remove vent hose. 3. Remove oil fill cap extension tube and sealing washer. 4. Remove engine cover support bar. 5. Remove electrical box support bracket. c d a e b 75374 Typical a - Valve Cover b - Vent Hose c - Oil Fill Cap Extension Tube and Sealing Washer d - Engine Cover Support Bar e - Electrical Box Support Bracket 6. Remove fuel injectors as follows: a. Clean the area around the injectors and pipes. b. Remove injector fuel supply pipes. c. Remove injector fuel return pipe. d. Remove securing nut and injector nozzle hold-down clamp. NOTE: To aid in removal of injectors, it is sometimes helpful to slightly rotate the injector clockwise and counterclockwise to loosen any seal caused by paint or debris. Page 3A-32 90-860074--1 FEBRUARY 2002 ENGINE MECHANICAL SERVICE MANUAL NUMBER 22 e. Withdraw the injectors. c d b a 75336 Typical a - Supply Pipes b - Return Pipe c - Clamp d - Injector 7. Remove the screws retaining the valve cover to the cylinder head. NOTE: The two screws holding the electrical box support bracket to the valve cover are 8 mm (approx. 5/16 in.) longer than the other screws. Do NOT mix fasteners. IMPORTANT: On 6 cylinder engines remove both covers at the same time. 8. Using a rubber mallet, tap against side of valve cover to loosen. 9. Lift the cover, or covers, from the heads. 10. On 6 Cylinder Engines: pull valve covers apart. Discard the two old O-rings on the connector between the valve covers. Cleaning IMPORTANT: Do NOT drop anything into cylinder head openings. 1. Clean gasket material from cylinder heads. 2. Remove old gasket material and clean valve covers. Inspection 1. Inspect sealing surfaces for deep nicks and scratches. 2. On 6 Cylinder Engines: inspect valve cover connector for damage. 3. Inspect plastic plugs for cylinder head screw hole covers. 4. Replace or repair parts as needed. 90-860074--1 FEBRUARY 2002 Page 3A-33 ENGINE MECHANICAL SERVICE MANUAL NUMBER 22 Installation 1. Follow instructions a. or b.: NOTE: A small amount of Loctite Master Gasket can be used to hold gaskets on valve covers. a. On D2.8L D-Tronic Engines: (1.) Install valve cover gaskets. (2.) Install valve covers on cylinder heads. (3.) Position the two longer screws through the electrical support bracket and spacers. Install as shown. (4.) Install remaining screws (5.) Torque valve cover screws evenly in a diagonal pattern to 11.5 Nm (101 lb-in.). (6.) Install plastic plugs into cylinder head screw holes. (7.) Install oil fill cap extension tube with sealing washer. Tighten tube securely. d h c g f b e a 75102 a b c d e f g h Page 3A-34 - Gasket - Valve Cover - Screw (M6 x 80) - Screw (M6 x 88) - Spacer - Bracket - Plastic Plug - Extension Tube With Sealing Washer 90-860074--1 FEBRUARY 2002 ENGINE MECHANICAL SERVICE MANUAL NUMBER 22 b. On D4.2L D-Tronic Engines: (1.) Install 2 new O-rings on connector before pushing valve covers together. Push covers together. (2.) Install valve cover gaskets. (3.) Position the two longer screws through the electrical support bracket and spacers. Install as shown. Install remaining screws Torque screws evenly in a diagonal pattern to 11.5 Nm (101 lb-in.). (4.) Install plastic plugs into cylinder head screw holes. (5.) Install oil fill cap extension tube with sealing washer on front valve cover as shown. Install oil fill cap with sealing washer on aft valve cover. Tighten both securely. f k h i gg d j a b a d c c e a b c d e f g h i j k 75103 - O-ring - Connector - Gasket - Valve Cover - Screw (M6 x 80) - Screw (M6 x 88) - Spacer - Bracket - Plastic Plug - Extension Tube With Sealing Washer - Oil Fill Cap (Aft Cover) 2. Install oil separator vent hose. 90-860074--1 FEBRUARY 2002 Page 3A-35 ENGINE MECHANICAL SERVICE MANUAL NUMBER 22 3. Install engine cover support bar. Torque screws to 27.5 Nm (20 lb-ft). c a b 75374 Typical a - Vent Hose b - Clamp c - Engine Cover Support Bar 4. Install engine cover and oil fill cap. Page 3A-36 90-860074--1 FEBRUARY 2002 ENGINE MECHANICAL SERVICE MANUAL NUMBER 22 Water Manifold Exploded Views f a e b c b d i g h c 75440 D2.8L D-Tronic f a b e b d h e d i c g c 75108 D4.2L D-Tronic a - Hose Clamp b - Banjo Bolt and Sealing Washer c - Screws with Washers d - Water Manifold e - Vent Pipe (To Turbocharger Fitting) f - Vent Hose (To Heat Exchanger Fitting) g - Gasket, End Cover or Manifold Pieces h - Cylinder Head Gaskets i - Hose and Clamp (To Exhaust Manifold End Cover) 90-860074--1 FEBRUARY 2002 Page 3A-37 ENGINE MECHANICAL SERVICE MANUAL NUMBER 22 Removal 1. Drain engine coolant. 2. Loosen hose clamp at rear of water manifold. 3. Remove banjo bolts, pipes and vent hoses. 4. Remove retaining screws and washers. b c b d e a f e 75108 Typical a - Hose Clamp b - Banjo Bolt And Sealing Washers c - Vent Hose d - Vent Pipe e - Screws With Washers f - Water Manifold Assembly 5. Using a rubber mallet, tap against side of manifold to loosen. Cleaning IMPORTANT: Do NOT drop anything into cylinder head openings. 1. Discard old sealing washers. 2. Clean gasket material from cylinder heads and manifold flanges. 3. Clean manifold pieces with solvent and dry with compressed air. Inspection 1. Inspect sealing surfaces for deep nicks and scratches. 2. Inspect castings for cracks or corrosion that might prevent proper seal. 3. Replace or repair parts as needed. Page 3A-38 90-860074--1 FEBRUARY 2002 ENGINE MECHANICAL SERVICE MANUAL NUMBER 22 Installation 1. Use a new gasket and install end cover on manifold pieces. Torque screws with washers to 11.8 Nm (104 lb-in.). 2. Align manifold pieces with a straight edge device and torque screws to 11.8 Nm (104 lb-in.). IMPORTANT: When replacing the gasket between manifold pieces, align flanges using a straight edge as shown. b a b d b c 75108 70660 Typical a - Typical End Cover b - Gasket c - Straight Edge Device d - Bolts (4, Two Not Shown) 3. Place new gaskets in position on cylinder heads. NOTE: A small amount of Loctite Master Gasket can be used to hold gaskets in place. 4. Install water manifold while simultaneously positioning the water hose onto rear of manifold. Torque screws with washers to 11.8 Nm (104 lb-in.) in a diagonal pattern from centermost to outer ends. 5. Install banjo bolt and banjo fittings using new sealing washers. Securely tighten the bolt while simultaneously positioning the fittings. 6. Install vent hose if previously removed. 7. Tighten hose clamp on hose at rear of water manifold. 90-860074--1 FEBRUARY 2002 Page 3A-39 ENGINE MECHANICAL SERVICE MANUAL NUMBER 22 Cylinder Heads Exploded Views CYLINDER HEAD AND RELATED COMPONENTS 20 19 1 A 2 18 3 4 17 5 16 6 7 15 8 9 14 31 8 30 10 13 11 12 75103 22 B 75101 23 A 24 27 25 B A 26 21 28 27 Page 3A-40 29 75102 90-860074--1 FEBRUARY 2002 SERVICE MANUAL NUMBER 22 ENGINE MECHANICAL CYLINDER HEAD AND RELATED COMPONENTS (CONTINUED) 1 - Rocker Pedestal Nut 2 - Valve Cone (Keeper 2) 3 - Spring Retainer 4 - Valve Spring 5 - Plate Washer 6 - Valve Guide (Standard, or 0.10 mm Oversize Available) 7 - Cylinder Head 8 - Plug (2) 9 - Cylinder Head Code Identification Stamping Location 10 - Intake Valve Seat 11 - Intake Valve 12 - Exhaust Valve Seat 13 - Exhaust Valve 14 - Engine Coolant Temperature (ECT) Sensor, Coolant Temperature Audio Warning Switch (Depends on Location of Head) 15 - Plug (Depends on Location of Head) 16 - Valve Cover Stud 17 - Rocker Pedestal Stud 18 - Rocker Pedestal 19 - Rocker Arm 20 - Rocker Arm Bushing 21 - 12 mm Cylinder Head Bolt (1 per head) 22 - 12 mm Cylinder Head Bolt (1 per head) 23 - 14 mm Cylinder Head Bolts (4 per head) 24 - Formed Spacer Washer (Terminal Bridge) (1) 25 - Formed Spacer Washer (Terminal Bridge) (1) 26 - Formed Spacer Washers (Terminal Bridges) (2) 27 - End Spacers (First and Last Cylinder Head) 28 - Oil Pipe 29 - Oil Pipe to Cylinder Head Banjo Bolt 30 - Starboard Side Of D-Tronic Head 31 - Plug (Unless Equipped With Optional Glow Plug Kit) LUBRICANTS / SEALANTS / ADHESIVES Description Part Number A Molykote Obtain Locally B SAE 30W Engine Oil Obtain Locally 90-860074--1 FEBRUARY 2002 Page 3A-41 ENGINE MECHANICAL SERVICE MANUAL NUMBER 22 Removal IMPORTANT: Mark the location of each rocker arm assembly and cylinder head to ensure that they are reassembled in the same location. 1. Mark the position of the rocker arm assemblies and cylinder heads for reassembly. 2. Remove rocker arm oil feed line banjo bolts with sealing washers. Remove line from cylinder heads and from rear (starboard) of cylinder block. b a 75103 b a - Oil Feed Pipe b - Banjo Bolts With Sealing Washers 3. Unscrew rocker arm retaining nuts. a 75387 a - Retaining Nuts 4. Remove the rocker arm assemblies, by lifting upward. a b 75511 a - Retaining Nuts b - Rocker Arm Assembly Page 3A-42 90-860074--1 FEBRUARY 2002 ENGINE MECHANICAL SERVICE MANUAL NUMBER 22 5. Withdraw the valve push rods. Store them so as to place them back in their original locations upon reassembly. 6. Remove the water manifold. 7. Remove the intake / exhaust manifold. IMPORTANT: To avoid distorting cylinder heads, remove heads only when engine is cold. 8. Take note of shape and location of formed spacer washers. Starting at one end of the engine, remove head bolts. a a 75515 D4.2L D-Tronic D2.8L D-Tronic a - Formed Spacer Washers 9. Using a rubber hammer, tap on side of cylinder heads to loosen. Remove the cylinder heads. IMPORTANT: Retain fuel Injectors with their original heads to aid in diagnosis of problems. Faulty fuel injectors can actually melt the aluminum cylinder heads. 90-860074--1 FEBRUARY 2002 Page 3A-43 ENGINE MECHANICAL SERVICE MANUAL NUMBER 22 Disassembly 1. Using valve spring compressor, carefully remove keepers, retainers, springs and spring plates. Place valves in numbered rack according to their position in the engine or label the parts in order for reassembly to the original location. a b 77175 70272 a - Typical Valve Spring Compressor b - Valve Spring and Related Components Cleaning 1. Clean carbon from valves. 2. Being careful not to damage aluminum heads, clean all carbon from combustion chambers and valve ports. 3. Clean gasket material from cylinder head mating surfaces. 4. Thoroughly clean valve guides with valve guide cleaner. 5. Wash cylinder head and components in cleaning solvent. 6. Put on safety glasses. 7. Dry with compressed air. 8. Clean cylinder head bolt hoes in cylinder block. Page 3A-44 90-860074--1 FEBRUARY 2002 ENGINE MECHANICAL SERVICE MANUAL NUMBER 22 Inspection GENERAL 1. Inspect expansion plugs for leakage or damage. 2. Inspect glow plug seats for damage. 1. Inspect injector seats for damage. 2. Inspect all gasket surfaces for deep grooves or pitting. 3. Inspect valve seats for cracks, excessive wear and looseness in counterbore. 4. Inspect valves for cracks, excessive wear or bent stems. 5. Inspect valve springs for discoloration due to excessive heat. 6. Inspect valve guides for cracks or chips. 7. Inspect valve guide bores for seizure marks, carbon deposits or scoring. 8. Inspect valve guide height. 9. Inspect valve spring keepers, retainers and washer for wear, distortion, or cracks. 10. Inspect for melting of aluminum by faulty fuel injectors. 11. Inspect rocker arm support journals for scoring. 12. Inspect rocker arm bushings for excessive wear. EXPANSION PLUGS 1. Remove expansion plugs if leaking or damaged. NOTE: These plugs may be removed with a sharp punch, or they may be drilled and pried out a a 75101 a - Expansion Plugs 90-860074--1 FEBRUARY 2002 Page 3A-45 ENGINE MECHANICAL SERVICE MANUAL NUMBER 22 VALVE GUIDES 1. Remove valve stem seals. 2. Insert new valve into guide. 3. Measure valve stem clearance as follows: a. Attach a dial indicator to cylinder head. Position it against the valve stem and close to the valve guide. b. While holding the valve head off of the seat by about 2 mm (1/16 in.), move valve stem back and forth in directions shown. Compare stem clearance with specifications. 70435 Valve Guide Maximum Clearance b Exhaust Intake 0.093 mm ( .0036 in.) 0.073 mm ( .0028 in.) a a - Intake Valve Guide I. D. Measurement: 7.99 - 8.00 mm (.3145 - .3149 in.) b - Exhaust Valve Guide I. D. Measurement: 7.99 - 8.00 mm (.3145 - .3149 in.) Page 3A-46 90-860074--1 FEBRUARY 2002 ENGINE MECHANICAL SERVICE MANUAL NUMBER 22 VALVE SEATS 1. Measure exhaust and intake valve seats. Refer to valve seat specifications. 2. If measured values are not as specified repair or replace the valve seats. d a g e b f c 50351 Exhaust Valve Seat Specifications a - Valve Recession (Max.): 0.03 mm (.001 in.) b - Head Surface to Seat: 2.05 -2.25 mm (.080 - .088 in.) c - Counterbore Inner Diameter: (Measurement Not Available At Time Of Printing) d - Seat Outer Diameter: 39 mm (1.53 in.) e - Seat Height: 7.90 mm (.311 in.) f - Seat Width: 2.00 mm (.078 in.) g - Seat Angle: 60 Degrees Intake Valve Seat Specifications a - Valve Recession (Max.): 0.03 mm (.001 in.) b - Head Surface to Seat: 2.17 -2.37 mm (.085 - .093 in.) c - Counterbore Inner Diameter: (Measurement Not Available At Time Of Printing) d - Seat Outer Diameter: 42 mm (1.653 in.) e - Seat Height: 7.80 mm (.307 in.) f - Seat Width: 3.25 mm (.127 in.) g - Seat Angle: 45 Degrees 90-860074--1 FEBRUARY 2002 Page 3A-47 ENGINE MECHANICAL SERVICE MANUAL NUMBER 22 VALVES a e b d c 41 mm Intake Valve a b c d e f g h Page 3A-48 h f g 38 mm Exhaust Valve - Stem O. D. Measurement: 7.95 mm(.3129 in.) - Face Width Measurement: 3.57 - 3.85 mm (.1405 - .1515 in.) - Margin (After Grinding) Measurement: 1.82 mm (.071 in.) - Face Angle : 29 Degrees and 30 Minutes - Stem O. D. Measurement: 7.93 mm (.3122 in.) - Face Width Measurement: 2.64 - 2.99 mm (.1039 - .1177 in.) - Margin (After Grinding) Measurement: 1.30 mm (.051 in.) - Face Angle: 44 Degrees and 30 Minutes 90-860074--1 FEBRUARY 2002 ENGINE MECHANICAL SERVICE MANUAL NUMBER 22 VALVE SPRINGS 1. Use a vernier caliper to measure the valve spring free height. Replace spring if less than specified limit. 2. Measure the springs distortion. If the measured value exceeds the specified limit, the valve spring must be replaced. b a b a - Free Standing Height Measurement: 44.65 mm (1.757 in.) b - Distortion Measurement: Maximum 2 mm (.079 [5/64] in.) 3. Use a spring tester to measure the valve spring height under tension. Replace spring if less than specified limit. a b Closed Valve a - Applied Pressure: 32-36 kg (71-79 lb) b - Height Measurement: 38.60 mm (1.460 in.) a b Open Valve a - Applied Pressure: 92.5-96.2 kg (204-212 lb) b - Height Measurement: 28.20 mm (1.110 in.) 90-860074--1 FEBRUARY 2002 Page 3A-49 ENGINE MECHANICAL SERVICE MANUAL NUMBER 22 Repair Expansion Plugs 1. Apply Loctite 290 to outer diameter of expansion plugs. 2. Install plugs flush to outer surface of cylinder head. a a 75101 a - Expansion Plugs VALVE SEAT RECONDITIONING Several different types of equipment are available for reconditioning valve seats. Equipment manufacturer’s recommendations should be followed carefully to attain proper results. Regardless of type of equipment, however, it is essential that valve guide bores be free from carbon or dirt to insure proper centering of pilot in valve guide. Machine valve seat angles to the following specifications: Machine Angle Valve Seat Intake 30 degrees Exhaust 45 degrees VALVE SEAT REPLACEMENT 1. To replace the seats, heat the head in an oven to 150 degrees C (300 degrees F.). Remove old seat. Do NOT damage counterbore. CAUTION To avoid distortion or melting of aluminum heads, Do NOT use a torch to replace valve seats. 2. Clean dirt from counterbore. Check counterbore for nicks and scratches. 3. Reheat head in oven to 150 degrees C (300 degrees F.). 4. Cool new seat in liquid nitrogen and install in counterbore. Seat should fit without using pressure. Allow to cool. Page 3A-50 90-860074--1 FEBRUARY 2002 ENGINE MECHANICAL SERVICE MANUAL NUMBER 22 VALVE GUIDE REPLACEMENT 1. Remove valve stem seals. 2. Heat head in oven to 85 degrees C (185 degrees F). Using a suitable drift, drive out old guide from underside of head. CAUTION To avoid distortion or melting of aluminum heads, Do NOT use a torch to replace valve guides. 3. With head temperature at 85 degrees C (185 degrees F), press new guide in to obtain measurement as shown. a c b a - Spring Seat Counterbore b - Intake Guide Height Measurement: 7.94 - 7.96 mm (.312 -.313 in.) c - Exhaust Guide Height Measurement: 7.92 -7.94 mm (.311 to .312 in.) IMPORTANT: If the valve guide has been removed, both the valve and the valve guide must be replaced as a set. VALVE REFACING Pitted valves can be refaced to proper angle on a valve grinder, thus insuring correct relation between cylinder head seat and valve mating surface. Replace valves with excessive wear on stems or valves which are warped excessively. When an excessively-warped valve head is refaced, a knife edge will be ground on part or all of the valve head, due to amount of metal that must be removed to completely reface. Knife edges lead to breakage or burning. After grinding, measure valves and replace if out of specifications. Various equipment is available for refacing valves. Manufacturer’s recommendations should be carefully followed to attain proper results. Refer to Specifications for valve specifications. CYLINDER HEAD RESURFACING The cylinder heads on these marine diesel engines are treated with a protective nickel coating to resist corrosion and should not be resurfaced. Resurfacing would remove the nickel coating. Do NOT resurface the cylinder heads. 90-860074--1 FEBRUARY 2002 Page 3A-51 ENGINE MECHANICAL SERVICE MANUAL NUMBER 22 Assembly VALVES NOTE: Valve stem seals are used on intake and exhaust valves. 1. Lubricate valve guides and valve stems with clean SAE 30W engine oil. 2. Install each valve in the port from which it was removed or to which it was fitted. 3. Install valve guide seals over valve stem and push down on the seal until seated securely around top of guide. a b 75386 a - Valve Stem Seal b - Seal Installed On Guide NOTE: Grease may be used to hold keepers in place while releasing compressor tool. 4. Install plate washer, valve spring, and retainer on valve stem. Using valve spring compressor tool, carefully compress spring and insert keepers into valve stem groove. a c b d 70275 a b c d - Plate Washer - Valve Spring - Retainer - Keepers 5. Release compressor tool, making sure keepers seat properly in groove of valve stem. Page 3A-52 90-860074--1 FEBRUARY 2002 ENGINE MECHANICAL SERVICE MANUAL NUMBER 22 CYLINDER HEAD STUDS IMPORTANT: All long cylinder head studs are not the same length. Some studs are longer than others and are used for attaching accessories. These studs must be in the correct location before exhaust manifold is installed. When replacing cylinder heads, remove studs and install in new head in same location. a 70273 a - Long Cylinder Head Studs (Lengths Vary) CAUTION Head gasket thickness is very important on diesel engines. If head gaskets are too thin, the pistons will hit the valves or heads, causing severe damage. All head gaskets on one engine must be the same thickness or exhaust manifold and water manifold will not fit correctly. When cylinder heads are removed for service but pistons and cylinder liners are not disturbed, use the same thickness gaskets that were removed. Refer to Head Gasket Identification. Refer to Determining Head Gasket Thickness during a complete engine rebuild or when pistons and liners are being replaced. 90-860074--1 FEBRUARY 2002 Page 3A-53 ENGINE MECHANICAL SERVICE MANUAL NUMBER 22 DETERMINING HEAD GASKET THICKNESS 1. Use dial indicator 91-58222A1 and liner gauge bar 91-801333509 to measure piston height above the cylinder block with piston at Top Dead Center. 2. Place liner gauge bar with dial indicator attached, across liner as shown (parallel to cylinder centerline). b a c 70277 a - Liner Gauge Bar b - Dial Indicator c - Liner 3. Set dial indicator to zero at point shown on cylinder block. a 75524 a - Dial Indicator Zero Point 4. Move dial indicator to point shown on piston. Record measurement. a 75524 a - Measurement Point 5. Measure all piston heights and use largest reading to determine which gaskets to use for all cylinders. 6. Refer to Engine Specifications - Head Gaskets, to determine correct head gasket thickness. Page 3A-54 90-860074--1 FEBRUARY 2002 ENGINE MECHANICAL SERVICE MANUAL NUMBER 22 Installation - Using Early Model Gaskets HEAD GASKET IDENTIFICATION NOTE: All engines with early model gaskets (head gasket fits a single-cylinder) use the same type of cylinder head gaskets in one of three thickness as previously determined and shown following. The 1.52 mm (.060 in.) gasket has two notches while the 1.62 mm (.064 in.) gasket has one notch where indicated. The 1.42 mm (.056 in.) gasket is plain, without notches. a b c 75516 a - 1.62 mm (.064 in.) Gasket, With One Notch b - 1.52 mm (.060 in.) Gasket, With Two Notches c - 1.42 mm (.056 in.) Gasket, Without Notches INSTALLATION 1. Before installing cylinder heads follow instructions a. - c.: a. Clean out bolt holes in cylinder block. Be certain no contaminants (dirt, old oil or coolant) remain in holes. b. Clean gasket surfaces on block and heads. c. Oil cylinder bores with Quicksilver 4 cycle engine oil. 90-860074--1 FEBRUARY 2002 Page 3A-55 ENGINE MECHANICAL SERVICE MANUAL NUMBER 22 2. Prepare hardware following instructions a. - d.: IMPORTANT: Cylinder head bolts may be installed as many as three times, and then must be replaced with new bolts. Replace if any doubt exists. a. Thoroughly clean all cylinder head bolts and washers, including all formed spacer-washers (terminal bridges, three types) and cylinder head spacers (for ends of first and last cylinder heads). b. Using clean SAE 30W engine oil, lubricate the bolt threads and underside of bolt heads of all 12 mm cylinder head bolts. c. Lubricate the threads and underside of bolt heads on all 14 mm cylinder head bolts with Molykote (obtain locally). d. Place all parts on a clean surface or lint-free shop cloth. IMPORTANT: Head gaskets must be installed DRY - Do NOT use any sealer on gaskets. IMPORTANT: Install head gaskets ONLY as shown. 3. Ensure head gaskets are installed as shown. b a 70280 a - Manufacturers Name - Facing Up b - Part Number - Facing Up 4. Using a screwdriver install two Cylinder Head Guide Pins 91-801333501, into 12 mm bolt holes in cylinder block at cylinder number 1 location, as shown. a b a a 70437 a - Guide Pin, Bolt Hole Locations (Two at each cylinder) b - Guide Pins Installed Page 3A-56 90-860074--1 FEBRUARY 2002 ENGINE MECHANICAL SERVICE MANUAL NUMBER 22 IMPORTANT: There is limited space between the cylinder heads after installation. IF all heads were removed, start installation with cylinder number 1 and proceed in numerical order. Ensure that when placed on cylinder block each head and corresponding gasket are properly positioned. Align using a straight edge placed alongside the head and gasket (Port-to-Starboard) until NO PORTION of the gasket FIRE RING metal is visible, prior to HAND tightening 12 mm Cylinder Head Bolts (as in the following steps). CAUTION The following steps must be carried out properly to prevent misalignment of cylInder heads or head gaskets which could result in failure of the cylinder head gaskets or cylinder heads causing severe engine damage. 5. Beginning with cylinder number 1, with gasket facing UP (as previously shown) install new cylinder head gasket and cylinder head, being certain that NO PORTION of the cylinder head gasket FIRE RING metal as shown, is visible or extends out from under the head. Refer to preceding IMPORTANT precaution. a a 70280 a - Cylinder Head Gasket FIRE RING Metal a b 70724 a - Cylinder Head b - Cylinder Head Gasket (NO FIRE RING metal visible) 90-860074--1 FEBRUARY 2002 Page 3A-57 ENGINE MECHANICAL SERVICE MANUAL NUMBER 22 6. ONE AT A TIME, remove Guide Pins and install oiled 12 mm cylinder head bolts with washers HAND tight. Do NOT disturb head placement. 7. Repeat Steps 5. and 6., for each cylinder head and corresponding cylinder, proceeding in numerical order from cylinder number 1. 8. Install all lubricated 14 mm cylinder head bolts, including the proper formed spacer-washers (terminal bridges, three types) and cylinder head spacers for ends of first and last cylinder heads, as shown in the following. b a a a a b a a 75515 a - Spacers. First and Last Cylinder Head Ends b - Formed Spacer-Washers (Terminal Bridges, Three Types) Page 3A-58 90-860074--1 FEBRUARY 2002 ENGINE MECHANICAL SERVICE MANUAL NUMBER 22 9. Lightly HAND tighten bolts in torque sequence. 21 22 23 24 25 1 13 3 11 5 14 2 12 4 10 6 7 8 19 20 15 16 17 18 a 9 26 15 1 16 17 3 9 18 7 5 10 2 4 11 8 12 13 6 14 b 75515 Torque Sequence Diagrams a - D4.2L D-Tronic b - D2.8L D-Tronic 10. Temporarily install intake / exhaust manifold without gaskets and FINGER-tighten each nut with locking washer. 11. Slightly loosen 12 mm and 14 mm bolts as needed, to allow cylinder heads to ALIGN as you HAND tighten exhaust manifold nuts. 12. HAND TIGHTEN all 14 mm and 12 mm cylinder head bolts in torque sequence. 13. In torque sequence tighten 14 mm cylinder head bolts to 30 Nm (22 lb-ft). Refer to Torque Sequence Diagrams. Repeat using the same specification, to ensure the best preload, before proceeding. 90-860074--1 FEBRUARY 2002 Page 3A-59 ENGINE MECHANICAL SERVICE MANUAL NUMBER 22 14. Following the same sequence tighten each 14 mm bolt through an angle of 70 degrees using a Torque Angle Gauge. 15. In sequence tighten PORT and STARBOARD 12mm cylinder head bolts to 30 Nm (22 lb-ft). 16. In sequence tighten only the STARBOARD 12mm cylinder head bolts through an angle of 85 ± 5 degrees using a Torque Angle Gauge. 17. In sequence tighten only the PORT 12mm cylinder head bolts through an angle of 85 ± 5 degrees using a Torque Angle Gauge. 21 22 23 24 25 1 13 3 11 5 14 2 12 4 10 6 7 8 19 20 15 16 17 18 9 26 15 1 16 17 3 9 18 7 5 10 2 4 11 8 12 13 b a 6 14 75515 Torque Sequence Diagrams a - D4.2L D-Tronic b - D2.8L D-Tronic 18. Tighten each 14 mm bolt through ANOTHER 70 degrees following the same sequence. CAUTION Avoid component or engine failure. Cylinder heads require additional angular torque and conventional torque application after the first 20-30 minute run-in and then, after the first 100 hours or first operating season whichever occurs first. 19. Remove exhaust manifold. 20. Refer to the appropriate sections and install the following: a. Lifters and retainers. b. Push rods. c. Rocker arm assemblies. 21. Install rocker arm oil feed line using 2 new sealing washers at each banjo fitting and bolt. Torque each banjo bolt to 12.7 Nm (112 lb-in.). 22. Install water manifold strip with new gaskets on cylinder heads. Torque bolts with washers to 11.8 Nm (104 lb-in.) in a diagonal pattern from centermost to outer ends. 23. Complete engine assembly. Page 3A-60 90-860074--1 FEBRUARY 2002 ENGINE MECHANICAL SERVICE MANUAL NUMBER 22 24. AFTER COMPLETE ENGINE ASSEMBLY AND INSTALLATION, follow these additional cylinder head angular torque instructions: a. Operate engine at idle until water temperature reaches 70° C (158° F) and then operate engine at 2000 rpm for approximately 20-30 minutes at operating temperatures. Let the engine cool down completely (inoperative overnight, if possible). b. Remove valve covers. c. Retorque the cylinder head bolts, as follows: (1.) n torque sequence, and operating on only one bolt at a time, loosen each 14 mm (center) bolt and then retorque to 30 N·m (22 lb-ft). Continue by tightening the bolt through an angle of 65 Degrees and then through ANOTHER 65 Degrees (130 Degrees total). (2.) In sequence and without loosening, check torque on port and starboard 12 mm (side) bolts to be 90 N·m (66 lb-ft) d. Install valve covers. CAUTION Avoid component or engine failure. Cylinder heads require additional angular torque and conventional torque application after the first 100 hours or first operating season, whichever occurs first. 25. AFTER 100 HOURS, OR THE FIRST OPERATING SEASON, WHICHEVER OCCURS FIRST, follow instructions a. - d.: a. Remove valve covers. b. In torque sequence and without loosening, tighten the 14mm (center) cylinder head bolts through an angle of 15 degrees. c. In sequence and without loosening, torque the 12mm (side) cylinder head bolts through an angle of 15 degrees. d. Install valve covers. 90-860074--1 FEBRUARY 2002 Page 3A-61 ENGINE MECHANICAL SERVICE MANUAL NUMBER 22 Installation - Using Late Model Gaskets NOTE: Early model D2.8L D-Tronic and D4.2L D-Tronic diesel engines can be retrofitted with late model cylinder head gaskets if the cylinder head spacers (for ends of first and last cylinder heads) are replaced with new size spacers. HEAD GASKET IDENTIFICATION The following in-line diesel engines now use a new, late model cylinder head gasket which seals more than one individual cylinder and eliminates the 100-hour re-torque that was required for early model gaskets. Gasket Thickness in. (mm) Description D2.8L D-Tronic Serial Number 0L098059 And Above 0.056 (1.42) 0.060 (1.52) Gasket seals all 4 cylinders 0.064 (1.62) Gasket Thickness in. (mm) Description 0.056 (1.42) Gasket seals front 3 cylinders D4.2L D-Tronic Serial Number 0L098232 And Above 0.060 (1.52) 0.064 (1.62) 0.056 (1.42) Gasket seals rear 3 cylinders 0.060 (1.52) 0.064 (1.62) Hold the gasket with the push rod holes up towards the top. Identification marks will be in the lower right hand corner. • No holes indicates a thickness of 0.056 in. (1.42 mm) • 2 holes indicates a thickness of 0.060 in. (1.52 mm) • 1 hole indicates a thickness of 0.064 in. (1.62 mm) a Late Model Gasket (1.52 mm Thickness Shown - 2 Holes) a - Two Holes Page 3A-62 90-860074--1 FEBRUARY 2002 ENGINE MECHANICAL SERVICE MANUAL NUMBER 22 INSTALLATION 1. Before installing the cylinder heads, follow instructions “a” - “c”: a. Clean out bolt holes in cylinder block. Be certain no contaminants (dirt, old oil or coolant) remain in holes. b. Clean gasket surfaces on block and heads. c. Oil the cylinder bores with Quicksilver 4 cycle engine oil. 2. Prepare the hardware following instructions “a” - “d”: IMPORTANT: Cylinder head bolts may be installed as many as three times, and then must be replaced with new bolts. Replace if any doubt exists. a. Thoroughly clean all cylinder head bolts and washers, including all formed spacer-washers (terminal bridges, three types) and cylinder head spacers (for ends of first and last cylinder heads). b. Using clean SAE 30W engine oil, lubricate the bolt threads and underside of bolt heads of all 12mm cylinder head bolts. c. Lubricate the threads and underside of bolt heads on all 14mm cylinder head bolts with Molykote (obtain locally). d. Place all parts on a clean surface or lint-free shop cloth. IMPORTANT: Head gaskets must be installed DRY - Do NOT use any sealer on gaskets. IMPORTANT: Install head gaskets ONLY as shown. 3. Position the 4 cylinder head gasket, or both 6 cylinder head gaskets, on the cylinder block as shown. a 78174 D4.2L D-Tronic Head Gaskets Shown (D2.8L D-Tronic Similar) a - Late Model Cylinder Head Gaskets 90-860074--1 FEBRUARY 2002 Page 3A-63 ENGINE MECHANICAL SERVICE MANUAL NUMBER 22 4. Using a screwdriver install two Cylinder Head Guide Pins (91-801333501) into 12 mm bolt holes in cylinder block at cylinder number 1 location. 5. On D2.8L D-Tronic Engines: Using a screwdriver install two Cylinder Head Guide Pins into 12 mm bolt holes in gasket and cylinder block at cylinder number 4 location. These pins will keep the gasket aligned. 6. On D4.2L D-Tronic Engines: Using a screwdriver install two Cylinder Head Guide Pins 91-801333501, into 12mm bolt holes in gasket and cylinder block at cylinder number 3 location. These pins will keep the gasket aligned. b b a a a a 78143 D4.2L D-Tronic Guide Pin Locations Shown (D2.8L Similar) a - Guide Pin, Bolt Hole Locations (Two at each cylinder) b - Guide Pins Installed 7. Beginning with cylinder number 1, install a cylinder head over the guide pins. 8. ONE AT A TIME, remove Guide Pins and install the oiled 12mm cylinder head bolts with washers HAND tight. Do NOT disturb head placement. 9. Using a screwdriver install two Cylinder Head Guide Pins, into 12 mm bolt holes in cylinder block for the next cylinder in numerical order. 10. On D2.8L D-Tronic Engines: Repeat for each cylinder head and corresponding cylinder 2 through 4. 11. On D4.2L D-Tronic Engines: Repeat for each cylinder head and corresponding cylinder 2 through 3. 12. On D4.2L D-Tronic Engines: Repeat the installation process for the gasket and each cylinder head corresponding to cylinder 4 through 6. Page 3A-64 90-860074--1 FEBRUARY 2002 ENGINE MECHANICAL SERVICE MANUAL NUMBER 22 13. Install all lubricated 14 mm cylinder head bolts, including the proper formed spacer-washers (terminal bridges, three types) and cylinder head spacers, for ends of first and last cylinder heads, as shown in the following. b a a a a b a a 75515 a - Spacer(s). First and Last Cylinder Head Ends b - Formed Spacer-Washers (Terminal Bridges, Three Types) 14. Lightly HAND tighten bolts in torque sequence. 21 22 23 24 25 26 1 13 3 11 5 14 2 12 4 10 6 7 8 19 20 15 16 17 18 9 a 15 1 16 17 3 9 18 7 5 10 2 4 11 8 12 13 b 6 14 75515 Torque Sequence Diagrams a - D4.2L D-Tronic (6 Cylinder) b - D2.8L D-Tronic (4 Cylinder) 90-860074--1 FEBRUARY 2002 Page 3A-65 ENGINE MECHANICAL SERVICE MANUAL NUMBER 22 15. Temporarily install exhaust manifold without gaskets and FINGER-tighten each nut with locking washer. 16. Slightly loosen 12 mm and 14 mm bolts as needed, to allow cylinder heads to ALIGN as you HAND tighten exhaust manifold nuts. 17. HAND TIGHTEN all 14 mm and 12 mm cylinder head bolts in torque sequence. Page 3A-66 90-860074--1 FEBRUARY 2002 ENGINE MECHANICAL SERVICE MANUAL NUMBER 22 18. Torque the center bolt set as indicated. a. First pass: Engine Sequence Torque D2.8L Center Bolts 3-2-1-4-5-8-9-10-7-6 30 Nm (22 lb-ft) D4.2L Center Bolts 11-12-13-14-10-9-8-4-3-2-1-5-6-7 30 Nm (22 lb-ft) Engine Sequence Torque Angle D2.8L Center Bolts 3-2-1-4-5-8-9-10-7-6 + 65 Degrees D4.2L Center Bolts 11-12-13-14-10-9-8-4-3-2-1-5-6-7 + 65 Degrees Engine Sequence Torque Angle D2.8L Center Bolts 3-2-1-4-5-8-9-10-7-6 + 65 Degrees D4.2L Center Bolts 11-12-13-14-10-9-8-4-3-2-1-5-6-7 + 65 Degrees b. Second pass: c. Third pass: 15 16 1 3 9 a 17 18 7 5 b 10 2 11 8 6 4 12 13 77114 14 D2.8L D-Tronic Torque Sequence Diagram 21 a 22 13 1 14 3 2 15 23 11 12 16 24 4 17 18 25 5 26 9 7 10 6 8 19 20 b 77113 D4.2L D-Tronic Torque Sequence Diagram a - Center Bolt Set b - Side Bolt Set 90-860074--1 FEBRUARY 2002 Page 3A-67 ENGINE MECHANICAL SERVICE MANUAL NUMBER 22 19. Torque the side bolt set as indicated. a. First pass: Engine Sequence Torque D2.8L Side Bolts 11-12-13-14-15-16-17-18 30 Nm (22 lb-ft) D4.2L Side Bolts 15-16-17-18-19-20-21-22-23-24-25-26 30 Nm (22 lb-ft) Engine Sequence Torque Angle D2.8L Side Bolts 11-12-13-14-15-16-17-18 + 85 Degrees D4.2L Side Bolts 15-16-17-18-19-20-21-22-23-24-25-26 + 85 Degrees b. Second pass: 15 16 17 18 1 9 3 7 5 10 2 8 4 a b 11 12 13 6 77114 14 D2.8L D-Tronic Torque Sequence Diagram 21 a 22 13 1 14 3 2 15 23 11 12 16 24 4 17 18 25 5 26 9 7 10 6 8 19 20 b 77113 D4.2L D-Tronic Torque Sequence Diagram a - Center Bolt Set b - Side Bolt Set Page 3A-68 90-860074--1 FEBRUARY 2002 ENGINE MECHANICAL SERVICE MANUAL NUMBER 22 TORQUE PROCEDURE AFTER 20-30 MINUTE BREAK-IN CAUTION Avoid component or engine failure. Cylinder heads require additional angular torque and conventional torque application after the first 20-30 minute break-in. 1. Operate the engine at idle until water temperature reaches 70 degrees C (158 degrees F.). Then operate the engine at 2000 rpm for approximately 20-30 minutes at normal operating temperature. 2. Let the engine cool down completely (inoperative overnight, if possible). 3. One at a time loosen each center bolt and torque as indicated in a. and b. a. First pass: Engine Sequence Torque D2.8L Center Bolts 3-2-1-4-5-8-9-10-7-6 30 NM (22 lb-ft) D4.2L Center Bolts 11-12-13-14-10-9-8-4-3-2-1-5-6-7 30 NM (22 lb-ft) Engine Sequence Torque Angle D2.8L Center Bolts 3-2-1-4-5-8-9-10-7-6 + 120 Degrees D4.2L Center Bolts 11-12-13-14-10-9-8-4-3-2-1-5-6-7 + 120 Degrees b. Second pass: 1 9 3 7 5 10 2 8 4 a 6 77114 D2.8L D-Tronic Center Bolt Torque Sequence Diagram a 1 13 3 11 5 9 7 14 2 12 4 10 6 8 77113 D4.2L D-Tronic Center Bolt Torque Sequence Diagram a - Center Bolt Set 90-860074--1 FEBRUARY 2002 Page 3A-69 ENGINE MECHANICAL SERVICE MANUAL NUMBER 22 4. Without loosening, torque each side bolt as indicated. Engine Sequence Torque D2.8L Side Bolts 11-12-13-14-15-16-17-18 90 NM (66 lb-ft) D4.2L Side Bolts 15-16-17-18-19-20-21-22-23-24-25-26 90 NM (66 lb-ft) 15 16 17 18 a 11 12 13 77114 14 D2.8L D-Tronic Side Bolt Torque Sequence Diagram 21 22 23 24 25 26 a 15 16 17 18 19 20 77113 D4.2L D-Tronic Side Bolt Torque Sequence Diagram a - Side Bolt Set Page 3A-70 90-860074--1 FEBRUARY 2002 ENGINE MECHANICAL SERVICE MANUAL NUMBER 22 Rocker Arm Removal NOTE: When servicing the rocker arms of only one cylinder, bring that cylinder to TDC before removing rocker arms. When servicing all rocker arms, bring cylinder number 1 piston up to TDC before removing rocker arms. 1. Remove valve arm covers. IMPORTANT: Rocker arm assemblies and push rods must be reassembled in their original locations. 2. Remove rocker arm assemblies and push rods. Place in a numbered rack according to their position in the engine or label the parts in order for reassembly to the original location. Cleaning 1. Wash all parts in cleaning solvent. 2. Dry parts with compressed air. Inspection 1. Inspect parts for excessive wear, cracks or damage. 2. Using a micrometer, measure outside diameter of rocker arm support journals. a 75349 a - Rocker Arm Support Journal Outside Diameter Measurement - 24.97-25.00 mm (.9830 - .9842 in.) 3. Using an inside micrometer, measure inside diameter of rocker arm bushing. a 75346 a - Rocker Arm Bushing Inside Diameter Measurement - 25.020 - 25.021 mm (.9850 - .9851 in.) 4. Replace rocker arm bushing if difference between bushing inside diameter and journal outside diameter. is greater than 0.062 mm (.0024 in.). 90-860074--1 FEBRUARY 2002 Page 3A-71 ENGINE MECHANICAL SERVICE MANUAL NUMBER 22 Assembly IMPORTANT: When installing rocker arms and valve push rods, coat bearing surfaces with engine oil. 1. Lubricate rocker arm bushings and support journals with SAE 30W engine oil. b a a 75349 a - Rocker Arm Bushings b - Rocker Arm Support Journals 2. Install rocker arms on support. Position as shown. a b 75101 a - Rocker Arms (Positioned Correctly) b - Rocker Arm Support 3. Install strap. Make sure strap is not spread open or valve cover will not fit. a b 75101 a - Rocker Arm Assembly b - Strap Page 3A-72 90-860074--1 FEBRUARY 2002 ENGINE MECHANICAL SERVICE MANUAL NUMBER 22 Installation ESTABLISHING TOP DEAD CENTER (TDC) NOTE: Screw plugs in glow plug holes or glow plugs, if equipped, may be removed to release compression when turning crankshaft. Rocker arm assemblies should be installed when each cylinder is at TDC to avoid damaging the valve train components. If the position of the crankshaft has moved since parts were removed, it may be necessary to establish TDC, if not already known, BEFORE installing the rocker arm assemblies. 1. Remove 3 opposing retaining bolts from the vibration damper (balancer). 2. Using balancer bolts or suitable, attach crankshaft tool 91-814827 to crankshaft balancer. a 70485 a - Crankshaft Tool 3. Align crankshaft and timing mark as follows: a. Temporarily insert a push rod into both cylinder number 1 lifters. b. Slowly rotate the crankshaft CLOCKWISE while watching the first valve push rod (front-most is cylinder number 1 intake valve). Continue to rotate the engine until after the intake valve has opened (valve push rod moved up) and then CLOSED (valve push rod moved down). 90-860074--1 FEBRUARY 2002 Page 3A-73 ENGINE MECHANICAL SERVICE MANUAL NUMBER 22 c. Continue to rotate engine CLOCKWISE until the notch on the pulley aligns with mark on timing gear cover. Cylinder number 1 piston is at Top Dead Center (TDC) on its compression stroke at this point. b a a 70281 75437 a - TDC Notch On Pulley b - Timing Cover Mark NOTE: Some modification to the graduated disc tool may be required for use on some models. 4. Attach graduated disc 91-801333500 to crankshaft pulley or tool. Position the disc with Zero degrees as shown. c a b 78142 a - Graduated Disc b - Crankshaft Tool c - Zero Degrees Page 3A-74 90-860074--1 FEBRUARY 2002 ENGINE MECHANICAL SERVICE MANUAL NUMBER 22 5. Using wire, make a pointer and attach it to a suitable location on engine. Align wire pointer to Zero (“0”) as shown. a 70664 a - Wire Pointer 6. Using crankshaft tool, turn crankshaft clockwise as needed (6 cylinder - 120 degrees or 4 cylinder - 180 degrees) to bring next cylinder in firing order up to TDC. Firing Order D2.8L D-Tronic 1-3-4-2 D4.2L D-Tronic 1-5-3-6-2-4 INSTALLING THE ASSEMBLIES NOTE: Screw plugs in glow plug holes or glow plugs, if equipped, may be removed to release compression when turning crankshaft. 1. Rotate the crankshaft to place each cylinder at TDC, before installing the assembly for that cylinder. Refer to Establishing Top Dead Center (TDC). 2. Install valve push rods in their original locations. Ensure push rods seat in lifter sockets. a b 75401 Typical Cross-Section View a - Push Rod b - Lifter Socket 90-860074--1 FEBRUARY 2002 Page 3A-75 ENGINE MECHANICAL SERVICE MANUAL NUMBER 22 3. Install rocker assembly onto studs. Simultaneously align valve push rods with rocker arm sockets. c a b 75401 Typical Cross-Section View a - Push Rod b - Lifter Socket c - Rocker Arm Socket 4. Install both flanged nuts on rocker arm support. Torque evenly to 34 Nm (25 lb-ft). IMPORTANT: No valve adjustment is required. Valve lash is automatically set when rocker arm nuts are torqued as specified. 5. Refer to appropriate procedures and reassemble remaining components. Page 3A-76 90-860074--1 FEBRUARY 2002 ENGINE MECHANICAL SERVICE MANUAL NUMBER 22 Timing Gear Cover Exploded View 4 5 1 2 A 3 6 7 11 12 9 10 13 B 14 8 15 73778 1 - Cover 2 - Gasket 3 - Pin (2) 4 - Cover 5 - Washer 6 - Screw (1) 7 - Washer (1) 8 - Screw (13) 9 - Seal (Apply Oil to Inner Lips of Seal Upon Installation) 10 - O-ring 11 - Crankshaft Pulley 12 - Vibration Damper 13 - Nut 14 - Screw (6) 15 - Lockwasher (6) Description A Loctite Master Gasket B Clean SAE 30W engine Oil 90-860074--1 FEBRUARY 2002 Part Number 92-12564-2 Obtain Locally Page 3A-77 ENGINE MECHANICAL SERVICE MANUAL NUMBER 22 Removal 1. If equipped, remove power steering pump and vacuum pump belt. 2. Remove alternator belt and upper alternator bracket screw, spacer and hardware from timing gear cover. CAUTION When removing seawater hoses or seawater pump, close seacock, if equipped. If boat is not equipped with a seacock, remove and plug seawater inlet hose to prevent a siphoning action that may occur, allowing seawater to flow from the drain holes or removed hoses and enter boat. 3. Refer to SECTION 6A - Seawater Cooling System, and remove seawater pump inlet hose and outlet hose. Then, remove seawater pump. 4. Install flywheel holding tool 91-801333506. 5. Remove six allen-head bolts and remove crankshaft vibration damper. 6. Using a suitable socket remove the large crankshaft pulley nut. 7. Using Puller 91-801333507, remove crankshaft pulley 8. Remove fasteners, including one at alternator bracket, and remove timing cover. Note size and position of fasteners for reassembly. Cleaning 1. Remove old gasket material from block and timing cover. Be careful not to gouge or nick flanges. 2. Wash all parts in cleaning solvent and dry with compressed air. 3. If oil seal is removed for replacement, clean the seating surface in the cover. Inspection 1. Inspect parts for cracks or damage. 2. Check oil seal for wear or damage. Using a suitable tool remove and replace oil seal if needed. NOTE: Bore in timing cover for oil seal must not be worn. Oil seal must fit securely in cover. Page 3A-78 90-860074--1 FEBRUARY 2002 ENGINE MECHANICAL SERVICE MANUAL NUMBER 22 Installation NOTE: While timing cover is removed renew O-ring if crankshaft and pulleys show signs of oil leakage from center. 1. Ensure that the crankshaft O-ring seal between timing gear and crankshaft pulley is still in place and in good condition. 2. Coat new timing gear cover gasket with Loctite Master Gasket. Install gasket on engine. 3. Install the timing cover as follows: a. Lightly lubricate the timing cover seal with clean SAE 30W engine oil. b. Install the timing cover. c. Torque the M6 x 1.0 screws evenly, in a diagonal pattern, to 10.8 Nm (95 lb-in.). d. Install the single M8 screw (left, mid-point on cover) with the serrated, cupped washer. Torque the screw to 10.8 Nm (95 lb-in.). 4. Ensure that the crankshaft pulley woodruff key is installed. 5. Ensure that the woodruff key remains in proper position and install the crankshaft pulley. 6. Apply Loctite 222 Thread Locker to pulley nut threads. 7. Install the pulley nut. With flywheel holder tool 91-801333506 in place, torque nut to 196.2 Nm (144 lb-ft). 8. If equipped, ensure power steering and vacuum pump belts are in proper positions. 9. Install the vibration damper and torque M10 x 1.5 screws to 83.4 Nm (61 lb-ft). c f g h a d i b e j a b c d e f g h i j 75106 - Crankshaft O-ring Seal - Gasket - Timing Cover - Timing Cover Seal - M6 Screws - M8 Screw with Serrated, Cupped Washer - Crankshaft Pulley - Vibration Damper - Pulley Nut - M10 Screw 90-860074--1 FEBRUARY 2002 Page 3A-79 ENGINE MECHANICAL SERVICE MANUAL NUMBER 22 10. Remove flywheel holder tool. 11. Install seawater pump using a new O-ring seal. 12. Install alternator brace to timing cover, using the bolt, washer, spacer and nut removed during disassembly. Torque nut to 45-50 Nm (34-37 lb-ft). f d a c e b 75106 a b c d e f - Brace - Timing Cover - Screw - Washer - Spacer - Flange Nut 13. Tension the alternator belt, power steering belt, and vacuum pump belt, if equipped. Torque drive belt related mounting and tensioning bolts to specifications. 14. Install seawater pump inlet hose and outlet hose. Tighten hose clamps securely. 15. Open the seacock if equipped, or remove plug from seawater inlet hose and reconnect seawater inlet hose to inlet of seawater strainer. Page 3A-80 90-860074--1 FEBRUARY 2002 ENGINE MECHANICAL SERVICE MANUAL NUMBER 22 Oil Pump Removal 1. Remove the timing gear cover. 2. Remove the screws securing oil pump. a b 70292 a - Screws (3) b - Oil Pump 3. Remove the oil pump from bore in block. a 70287 a - Oil Pump Cleaning 1. Dismantle and wash all parts in cleaning solvent. 2. Put on safety glasses. 3. Dry parts with compressed air. 90-860074--1 FEBRUARY 2002 Page 3A-81 ENGINE MECHANICAL SERVICE MANUAL NUMBER 22 Inspection 1. Using appropriate gauging devices, measure the following: a. Clearance between rotors. Maximum: 0.152 mm (.006 in.). b. Clearance between housing and outer rotor: 0.105 - 0.106 mm (.00413 - .00417 in.). Maximum: 0.500 mm (.01968 in.). c. Diameter of rotor housing: 58.105 - 58.130 mm (2.287 - 2.288 in.). c b e a d a b c d e 70282 - Rotor - Outer Rotor - Clearance Between Rotors - Clearance Between Housing and Outer Rotor - Diameter of Rotor Housing d. Depth of rotor housing: 32.403 - 32.406 mm (1.2757 - 1.2758 in.). e. Axial clearance between pump driven gear and pump body: 0.050 - 0.070 mm (.002 - .003 in.). 2. If measurements are not within specifications the pump is faulty, and must be replaced as a complete unit. Page 3A-82 90-860074--1 FEBRUARY 2002 ENGINE MECHANICAL SERVICE MANUAL NUMBER 22 Reassembly 1. Install the bevelled end of the outer rotor towards the pump gear. 2. Ensure that the rotor and gear coupling resists a rolling torque of 9 kgm (32.4 oz.). Installation 1. Install oil pump in cylinder block. Torque screws to 27.5 Nm (20 lb-ft). a b 70292 a - Screws (3) b - Oil Pump 2. Install timing gear cover. 90-860074--1 FEBRUARY 2002 Page 3A-83 ENGINE MECHANICAL SERVICE MANUAL NUMBER 22 Oil Pressure Relief Valve The oil pressure relief valve (oil pressure regulator valve) is installed vertically in the underside of the crankcase. Removal 1. Remove oil pan. 2. Clean old gasket material from area around relief valve. 3. Unscrew the valve assembly seat/body from the crankcase using a suitable tool. The tool should engage the two slots opposite each other on the edge of the valve assembly. NOTE: Locking compound is used during installation of the oil pressure relief valve assembly. Area around the assembly may need to be heated to aid in removal. a c b 70298 Typical a - Example Of Suitable Tool b - Valve Assembly c - Slots Page 3A-84 90-860074--1 FEBRUARY 2002 ENGINE MECHANICAL SERVICE MANUAL NUMBER 22 Disassembly 1. Lock the pressure relief valve assembly in a soft-jawed vise. WARNING Use caution when removing or installing snap-ring. There is high spring pressure against cap. Wear safety glasses. 2. Put on safety glasses. 3. Push cap in and hold. Remove snap-ring. Release spring pressure slowly. a b c 70284 70285 a - Cap b - Snap-Ring c - Valve Assembly (Seat/Body) 4. Remove cap, spring or springs, and relief valve from bore of the valve assembly. NOTE: Some oil pressure relief valves have only one spring. a a b c d b c d 70283 - Cap - Spring (Inner - Present If Dual Spring Equipped) - Spring - Relief Valve Cleaning 1. Clean gaskets from cylinder block and pan flanges. 2. Wash all parts in cleaning solvent and dry with compressed air. 90-860074--1 FEBRUARY 2002 Page 3A-85 ENGINE MECHANICAL SERVICE MANUAL NUMBER 22 Inspection 1. Replace complete valve assembly if spring is broken. 2. Replace complete valve assembly if valve is badly worn or sticking in bore. 3. The valve can be lapped into its seat using a grinding paste, if necessary to restore pressure. 4. Ensure that valve slides freely in seat/body when coated with oil. Assembly 1. Coat inside of oil pressure relief valve seat/body bore with SAE 30W engine oil. Liberally oil coat remaining components. 2. Assemble valve, spring(s) (inner and outer springs, if dual spring equipped) and cap as shown. Install parts into valve seat/body. 70285 f a b c d e 70284 a b c d e f - Relief Valve - Spring (Inner - Present If Dual Spring Equipped) - Spring (Referred To As Outer - If Dual Spring Equipped) - Cap - Snap ring - Valve Seat/Body 3. Push cap into bore and install snap-ring. Page 3A-86 90-860074--1 FEBRUARY 2002 ENGINE MECHANICAL SERVICE MANUAL NUMBER 22 Installation 1. Apply Loctite 242 to threads when replacing complete oil pressure relief valve assembly. Screw the complete assembly into the crankcase. b 70285 a 70298 a - Valve Assembly b - Apply Sealant to Threads 2. Using a suitable tool, torque relief valve assembly to 53.9 Nm (39 lb-ft). a c b 70298 Typical a - Example Of Suitable Tool b - Valve Assembly c - Slots 3. Install oil pan and related hardware. 90-860074--1 FEBRUARY 2002 Page 3A-87 ENGINE MECHANICAL SERVICE MANUAL NUMBER 22 Oil Pan and Oil Pick-Up Tube Assembly Removal 1. Disconnect oil drain tube from oil pan. Remove oil pan. 2. Remove screws retaining baffle, oil pick-up (suction) tube, and oil pick-up tube elbow to block. NOTE: This view is representative of all models. Your specific pick-up tube assembly may differ slightly in appearance. a b d c 70288 Typical a - Baffle b - Oil Pick-up Tube c - Elbow d - Inlet (Strainer End) 3. Remove old O-ring from suction tube. Remove old O-ring from elbow on engines with two piece suction tube. a b c 70286 a - Pickup Tube b - Elbow c - O-rings, Two Piece Suction Tube Page 3A-88 90-860074--1 FEBRUARY 2002 ENGINE MECHANICAL SERVICE MANUAL NUMBER 22 Cleaning 1. Wash all parts in cleaning solvent and dry with compressed air. 2. Clean old gasket from cylinder block and oil pan flange. Inspection 1. Inspect the oil pan for fatigue cracks. 2. Check all welds for leaks. 3. Inspect oil pick-up assembly for fatigue cracks or damage. 4. Replace parts with those for your specific model. Installation 1. On Engines With Two Piece Suction Tube: a. Renew O-rings on oil pick-up tube and elbow. b a a 70286 a - O-ring, Oil Pick-up (Suction) Tube b - O-ring, Oil Pick-up (Suction) Tube Elbow b. Install elbow on oil pick-up tube. 2. On Engines With One Piece Suction Tube: Renew O-ring on oil pick-up tube. a b 75107 a - O-ring b - Oil Pick-up 90-860074--1 FEBRUARY 2002 Page 3A-89 ENGINE MECHANICAL SERVICE MANUAL NUMBER 22 3. Install oil pick-up tube assembly, with baffle, on cylinder block. Torque screws to 11 Nm (97 lb-in.). 4. Using a new gasket, install oil pan and related hardware. Torque oil pan screws evenly, in a diagonal pattern, to 12.7 Nm (112 lb-in.). d e c b 75107 a a b c d e Page 3A-90 70288 - Baffle - Oil Pick-up Tube - Tube Elbow (Except On One-Piece Tube) - Screws - Oil Pan and Related Hardware 90-860074--1 FEBRUARY 2002 ENGINE MECHANICAL SERVICE MANUAL NUMBER 22 Adapter / Oil Thermostat Removal 1. Disconnect wire from oil temperature audio warning switch. 2. Using a suitable container to catch oil, completely loosen hose fittings retaining oil lines to adapter / oil thermostat. Make matching marks on hoses to assist in reassembly. 3. Completely loosen hex head screw fitting retaining adapter to cylinder block. b d a b c 75385 Typical a - Oil Temperature Audio Warning Switch b - Hose Fitting c - Adapter / Oil Thermostat d - Screw Fitting 4. Lift adapter and screw fitting from engine. Remove fitting and sealing washer. 5. If not already accomplished, remove old O-ring from groove on adapter (on underside when adapter is mounted). c b a d a b c d 75528 - Adapter / Oil Thermostat - Sealing Washer - Screw Fitting - O-Ring Seal 90-860074--1 FEBRUARY 2002 Page 3A-91 ENGINE MECHANICAL SERVICE MANUAL NUMBER 22 6. Refer to appropriate procedures to continue engine disassembly if rebuilding, or proceed if only oil thermostat or adapter and related parts are being serviced. Disassembly 1. Remove hex head plug with sealing washer, O-ring, spring and thermostat from filter head. a b f a b c d e f c d e 75528 - Thermostat - Spring - O-ring Seal - Sealing Washer - Hex Head Plug - Adapter / Oil Thermostat Cleaning and Inspection 2. Clean parts in solvent. 3. Dry with compressed air. 4. Inspect components for cracks or damage. Replace as needed. Refer to Testing to verify if thermostat is functional. Testing NOTICE Read WARNING about testing in Precautions at the front of this SECTION before proceeding with tests. 1. Thermostat pin should be retracted as shown when cold. If not, thermostat is faulty and must be replaced. a b 71085 a - Thermostat b - Thermostat Pin (Retracted) Page 3A-92 90-860074--1 FEBRUARY 2002 ENGINE MECHANICAL SERVICE MANUAL NUMBER 22 2. Observe the preceding precautions and place thermostat in container of water. Water must cover thermostat. Suspend a thermometer in the water. Do NOT allow thermometer to touch the bottom of the pan. 3. Heat water and observe thermostat pin. 4. Pin must begin to extend (push up) as shown, when water temperature reaches 90 degrees C (195 degrees F.). At 100 degrees C (212 degrees F.) pin should be extended approximately 5-7 mm (3/16 - 5/16 in.) more than when it was cold. NOTE: Thermostat shown removed from test water for visual clarity. Do NOT handle until cool. a 71084 a - Thermostat Pin (Extended) 5. If pin does not extend (push out), thermostat is faulty and must be replaced. Installation 1. Coat threads of hex head plug with Loctite Pipe Sealant with Teflon. 2. Install thermostat, spring, new O-ring, and plug with new sealing washer into thermostat housing bore of adapter. Tighten plug securely. f a a b c d e f b c d e 75528 - Thermostat - Spring - O-ring Seal - Sealing Washer - Hex Head Plug - Adapter / Oil Thermostat 90-860074--1 FEBRUARY 2002 Page 3A-93 ENGINE MECHANICAL SERVICE MANUAL NUMBER 22 3. Install large hex head fitting with new sealing washer through adapter. 4. Install a new O-ring in adapter groove where it seats on block. 5. Install adapter and torque the fitting to 44 lb-ft (60 Nm). 6. Observe markings made earlier and connect oil hoses to adaptor. Tighten fittings securely. 7. Connect audio warning wire ring terminal to switch. Tighten nut securely. Coat terminals with Quicksilver Liquid Neoprene. b c f b a c d 75528 f e a a b c d e f 75385 - Adapter - Hex Head Fitting - Sealing Washer - O-ring Seal - Oil Temperature Audio Warning Switch Connection - Hose Fitting 8. Fill engine to proper level with recommended engine oil. 9. Start engine and closely observe instrumentation. Ensure that all systems are functioning correctly. Check for leaks. Page 3A-94 90-860074--1 FEBRUARY 2002 ENGINE MECHANICAL SERVICE MANUAL NUMBER 22 Camshaft Exploded View 1 9 6 7 10 8 2 3 4 5 75105 Typical Camshaft and Related Components 1 - Bearings 2 - Camshaft 3 - Thrust Plate 4 - Injection Pump Drive Gear 5 - Crankshaft Drive Gear 6 - Idler Gear 7 - Camshaft Gear 8 - Mounting Screw 9 - Lockwasher 10 - Woodruff Key 90-860074--1 FEBRUARY 2002 Page 3A-95 ENGINE MECHANICAL SERVICE MANUAL NUMBER 22 Testing - Measuring Lobe Lift 1. Remove all rocker arm assemblies. 2. Secure dial indicator 91-58222A1 to head so indicator plunger rests inside push rod cup. 3. Turn crankshaft so camshaft lobe is at the bottom of its travel and zero dial indicator. 4. Turn crankshaft two complete revolutions while reading dial indicator. Refer to specifications. 5. Measure all lobes of camshaft in the same manner. IMPORTANT: Camshaft replacement will be necessary if lobe dimensions are less than 0.05 mm (.0019 in.) of the values indicated in the specification charts. Removal 1. Turn crankshaft to cylinder number 1 TDC of its compression stroke. 2. Remove: a. Timing Gear Cover b. Fuel Pump IMPORTANT: Place rocker arm assemblies, push rods and lifters in a rack for reassembly in their original locations. c. Valve Push Rods d. Retainers and Roller Lifters 3. Remove camshaft thrust plate mounting screws and lockwashers. b a b 70289 a - Camshaft Gear b - Camshaft Thrust Plate Mounting Screw with Lockwasher 4. Carefully withdraw the camshaft. Take care not to damage the camshaft bearings. Page 3A-96 90-860074--1 FEBRUARY 2002 ENGINE MECHANICAL SERVICE MANUAL NUMBER 22 5. Remove the idler gear If complete engine disassembly is required, or if idler gear is worn or damaged. IMPORTANT: Mark retaining screws for reassembly in their original locations. a b b 70292 a - Idler Gear b - Retaining Screw With Lockwasher 90-860074--1 FEBRUARY 2002 Page 3A-97 ENGINE MECHANICAL SERVICE MANUAL NUMBER 22 Inspection 1. Measure camshaft shaft run-out. 2. Measure lobe lift. If lobe lift is less than specified limit, the camshaft must be replaced. 3. Measure camshaft journal dimensions. 4. Inspect camshaft bearings. Replace as needed. Refer to Camshaft Bearings. 5. Inspect valve lifters and push rods. Replace if needed. IMPORTANT: Camshaft gear is a press-fit on shaft. If removal is needed, upon reassembly gear must be heated in an oven to 180-200 degrees C (360-390 degrees F.) and pressed on the shaft. After installing proper thrust plate and positioning the key, press the gear until gear is tight against shoulder. 6. Measure clearance between thrust plate and camshaft. Camshaft assembly Clearance should be 0.030-0.095 mm (.0012-.0037 in.). Wear limit is 0.200 mm (.0078 in.). If measured value exceeds specification inspect thrust plate thickness at four opposite points. Replace plate if less than specified at any point. b a 70357 a - Measurement: Greater Than 3.95-4.05 mm (.1555-.1594 in.) b - Thickness Dimension At Four Opposite Points Page 3A-98 90-860074--1 FEBRUARY 2002 ENGINE MECHANICAL SERVICE MANUAL NUMBER 22 Installation 1. Install idler gear, if previously removed, so marks align with crankshaft gear as shown. Torque screws to 27 Nm (20 lb-ft). CAUTION Avoid possible severe engine damage. Installation of a screw longer than 16 mm (5/8 in.) will partially block oil gallery in cylinder block causing a lack of lubrication. Be certain retainer screw “c” as shown, is NOT longer than 16 mm (5/8 in.). c a b d 70293 a b c d - Idler Gear - Retaining Screws with Lockwashers - Retaining Screw Must NOT Be Longer Than 16 mm (5/8 in.) - Marks Aligned Properly 2. Lubricate camshaft lobes with a mixture of 20% SAE 30W engine oil and 80% Needle Bearing Lubricant. 3. Lubricate camshaft bearings with SAE 30W engine oil. 4. Carefully insert camshaft. 90-860074--1 FEBRUARY 2002 Page 3A-99 ENGINE MECHANICAL SERVICE MANUAL NUMBER 22 5. Align camshaft gear marks with idler gear marks as shown. Torque camshaft flange mounting screws to 27.5 Nm (20 lb-ft). c a b d 70289 a b c d - Camshaft Gear - Idler Gear - Marks Aligned Properly - Mounting Screws With Lockwashers 6. Complete the engine assembly. Camshaft Bearings Inspection With camshaft removed: 1. Visually inspect bearings. Renew if worn or damaged. 2. Measure inner diameter of bearings. Refer to specifications. Renew bearings if not within specifications. Removal NOTE: Camshaft bearings can only be removed and installed with crankshaft removed. 1. Using special tool 91-801333508 with appropriate hardware, remove camshaft bearings into receiver end of tool (not shown in this view). a b c 70438 a - Cylinder Block b - Special Tool c - Camshaft Bearing Bore Page 3A-100 90-860074--1 FEBRUARY 2002 ENGINE MECHANICAL SERVICE MANUAL NUMBER 22 Installation 1. Clean camshaft bearing bores in cylinder block with solvent and blow out with compressed air. Ensure drilled oil passages are clean. 2. Lubricate outer surface of new camshaft bearings with engine oil to ease installation. CAUTION Avoid engine damage. Oil feed holes in bearings MUST align with drilled oil passages in cylinder block or severe engine damage will result. 3. Align camshaft bearing oil feed holes with drilled oil passages in cylinder block. 4. Using Special Tool 91-801333508 with appropriate hardware, install new camshaft bearings. a c b 70354 a - Special Tool b - Bearing c - Oil Feed Hole (MUST BE Aligned With Drilled Passages In Block) 5. Check position of oil hole in each bearing and drilling in block, to ensure bearings are positioned correctly. 6. Recheck bearing inner dimensions to verify proper installation. 7. Install camshaft. 8. Complete engine assembly. 90-860074--1 FEBRUARY 2002 Page 3A-101 ENGINE MECHANICAL SERVICE MANUAL NUMBER 22 Valve Lifters CAUTION If the camshaft is replaced, the valve lifters (roller tappets) must also be replaced or serious component failure and engine damage could result. The hydraulically operated roller-tipped valve lifters are held in position and prevented from rotation by special retainers. There is one retainer for each head. Care should be exercised when installing the retainers to ensure that the flat portions of the lifters are properly positioned in the retainers. Removal 1. Remove engine cover. 2. Remove valve covers. IMPORTANT: Place rocker arm assemblies, push rods, and lifters in a rack for reassembly in their original locations. 3. Remove rocker arm assemblies and push rods. IMPORTANT: Lifters must be reassembled in the exact same position on the camshaft lobes so that the roller will operate in the same direction on the same lobe, if reused. 4. Make matching marks on all retainers and lifters as to the location and orientation in the bores. 5. Lift the retainer piece away from around the top of the lifters. Do NOT disturb lifters at this time. Page 3A-102 90-860074--1 FEBRUARY 2002 ENGINE MECHANICAL SERVICE MANUAL NUMBER 22 6. Remove lifters, being certain to keep them in order. a d b 75383 c 75103 a b c d - Push Rod - Retainer - Lifter - Roller Cleaning 1. Wash all parts in cleaning solvent. 2. Dry with compressed air. Inspection 1. Inspect lifters carefully. If any parts are damaged or worn, the entire lifter assembly should be replaced. Refer to Specifications. 2. If outer lifter body wall is scuffed or worn, inspect cylinder block lifter bore. 3. If roller is worn or damaged, inspect camshaft lobe. 4. If push rod seat is scuffed or worn, inspect push rod. 90-860074--1 FEBRUARY 2002 Page 3A-103 ENGINE MECHANICAL SERVICE MANUAL NUMBER 22 Installation IMPORTANT: Do NOT install used valve lifters if a new camshaft has been installed. 1. Before installIng lifters, coat entire valve lifter with engine oil. Pour an additive containing EP lube over lifters and camshaft lobes if all are new. 2. Install lifters in bores in order of removal. Align matching marks made prior to disassembly. 3. Install retainers around the square top of the lifters to prevent them from rotating. 4. Install push rods. Ensure push rods seat in lifter socket. c b a 75383 75103 a - Lifter b - Retainer c - Push Rod 5. Install rocker arm assemblies. Torque nuts to 34 Nm (25 lb-ft). 6. Install valve cover(s) using new gaskets and new O-rings on 6 cylinder connector piece). Torque screws to 11.5 Nm (101 lb-in.). IMPORTANT: It is recommended that the engine oil be changed and a new oil filter be installed whenever servicing valve lifters or camshaft. 7. Change engine oil and filter. 8. Start engine and check for leaks. Page 3A-104 90-860074--1 FEBRUARY 2002 SERVICE MANUAL NUMBER 22 ENGINE MECHANICAL Valve Push Rods Removal 1. As previously outlined, remove valve covers. IMPORTANT: Keep rocker arms, rocker arm components, valve push rod and hydraulic lifter from each valve together as a matched set. Mark or store them so they can be reinstalled in the same location later. 2. Remove rocker arm assemblies. 3. Lift push rod from seat in lifter cup. Cleaning 1. Clean all parts with solvent. 2. Clean oil passages of old oil and sludge. 3. Dry parts with compressed air. Inspection 1. Inspect all contact surfaces (spherical tips) for wear. 2. Check run-out (straightness) of each push rod. 3. Replace all damaged or worn parts. Installation IMPORTANT: When installing lifters and rocker arms, coat rocker arm bearing surface, rocker arm and push rod ball and seat with engine oil. 1. Install push rods in order of removal. Ensure push rods seat in lifter socket. 2. Install rocker arm assemblies. Torque nuts to 34 Nm (25 lb-ft). 3. Install rocker arm covers using new gaskets, and new O-rings on the 6 Cylinder’s connector piece between the valve covers. Torque screws to 11.5 Nm (101 lb-in.). 90-860074--1 FEBRUARY 2002 Page 3A-105 ENGINE MECHANICAL SERVICE MANUAL NUMBER 22 Connecting Rod / Piston Assembly Measuring Rod Bearing Clearance 1. Remove oil pan and oil pick-up tube assembly. 2. Turn crankshaft to gain access to connecting rod bolts. 3. One cylinder at a time, remove rod caps and inspect bearings. Refer to Bearing Failure. 4. Measure crank pin with a micrometer for out-of-round, taper, or excessive wear. If not within specifications, replace or recondition crankshaft. 5. Measure new or used bearing clearances with Plastigage or its equivalent as follows: a. Clean oil from crank pin. b. Install bearing in connecting rod. c. Place a piece of gauging plastic the full width of crank pin (parallel to crankshaft). d. Install rod cap with bearing. Torque bolts to 29.4 Nm + 60 degrees (21 lb-ft + 60 degrees). IMPORTANT: Do NOT turn crankshaft while gauging plastic is in place. e. Remove rod cap and, using scale on gauging plastic envelope, measure gauging plastic width at widest point. a b 72358 Typical a - Compressed Gauging Plastic b - Graduated Scale Page 3A-106 90-860074--1 FEBRUARY 2002 ENGINE MECHANICAL SERVICE MANUAL NUMBER 22 6. If clearance exceeds specifications, on used bearings, replace bearings and recheck clearance. With new bearings, if correct clearance is not possible, recheck crank pin (journal) dimensions. If new bearings and replacement (or reconditioned crankshaft) will not yield proper measurement, it will be necessary to remove connecting rod/piston assembly (refer to following section) to check dimension of connecting rod crank pin bore. 7. After obtaining the correct clearance, coat crank pin with SAE 30W engine oil. Coat bearing surface with oil and install rod cap. Torque to 29.4 Nm + 60 degrees (21 lb-ft + 60 degrees). Removal 1. Remove cylinder heads. 2. Remove oil pan and oil pick-up tube. 3. Use a reamer to remove the ridge or any deposits from upper end of cylinder bore. 4. Install crankshaft tool, 91-814827. Turn crankshaft to gain access to connecting rod bolts. NOTE: Connecting rods are numbered similar to as shown. Record the numbers and cylinder location for reassembly. a 70297 a - Connecting Rod Number Placement 5. Remove connecting rod cap and rod bearings. IMPORTANT: Mark or identify each connecting rod assembly to ensure placement in original location during reassembly, if to be reused. 6. Push piston and connecting rod out of cylinder. 7. Retain rod cap and bearings with connecting rod/piston assembly. Do NOT mix components. 90-860074--1 FEBRUARY 2002 Page 3A-107 ENGINE MECHANICAL SERVICE MANUAL NUMBER 22 Disassembly 1. Clamp connecting rod in a soft jawed vise as shown. 70290 2. Use Piston Ring Expander 91-24697 to remove the 2 compression rings. 3. Using same tool, remove lower (oil control) ring and spring. a b 70291 a - Lower (Oil Control) Ring b - Spring 4. Remove snap rings retaining piston pin. Push pin out of connecting rod and piston. a b 70294 a - Snap Ring b - Piston Pin Page 3A-108 90-860074--1 FEBRUARY 2002 ENGINE MECHANICAL SERVICE MANUAL NUMBER 22 Cleaning 1. Clean all parts with solvent. 2. Clean oil passages of old oil and sludge. 3. Put on safety glasses. 4. Dry parts with compressed air. 5. Clean varnish from piston skirts and pins with a suitable cleaning solvent. Do NOT WIRE BRUSH ANY PART OF PISTON. Clean ring grooves. Make sure oil ring holes are clean. a b 70229 a - Ring Grooves b - Oil Ring Holes Inspection CONNECTING ROD AND PIN 1. Wash connecting rods in cleaning solvent and dry with compressed air. 2. Check for twisted or bent rods and inspect for nicks or cracks. Replace damaged connecting rods. 3. Measure connecting rod bushing I.D. and piston pin O. D. Replace bushing if clearance is excessive. Refer to specifications. b a a - Rod Bushing I.D. b - Piston Pin O. D. 90-860074--1 FEBRUARY 2002 Page 3A-109 ENGINE MECHANICAL SERVICE MANUAL NUMBER 22 4. Measure connecting rod crank pin bore with a dial bore gauge or inside micrometer for out-of-round or excessive wear. Crank pin bore must be 57.563-57.582 mm (2.2662-2.2670 in.). Replace connecting rod if measurement exceeds allowable dimension by 0.02 mm (.0008 in.). a 70397 a - Rod Crank Pin Bore PISTONS IMPORTANT: The D-Tronic Engines should have only Class A pistons. Determine the Class of piston by looking on top of piston (as shown following) or by examining the underside of the cylinder liner Refer to Cylinder Liner - Identification for reference details. a 70296 a - Location for Class A Designation 1. Inspect piston for cracked ring lands, skirts or pin bosses, wavy worn ring lands, scuffed or damaged skirts or eroded areas at top of piston. Replace pistons which are damaged or show signs of excessive wear. (Refer to Step 6, following.) 2. Inspect grooves for nicks or burrs that might cause rings to hang up. 3. Except on upper ring groove of pistons (refer to Step 5. following), insert edge of rings into respective piston ring groove and roll ring entirely around the groove to make sure that ring is free. If binding occurs at any point, determine cause. If caused by ring groove, remove by dressing with a fine cut file. Do NOT remove excess material. Verify with a feeler gauge and compare to specifications. If binding is thought to be a distorted ring, check with a new ring. Page 3A-110 90-860074--1 FEBRUARY 2002 ENGINE MECHANICAL SERVICE MANUAL NUMBER 22 4. Measure piston outer diameter about 13 mm (1/2 in.) from bottom of skirt. a 70229 a - Outer Diameter Measurement Point - 13 mm (1/2 in.) 5. Proper clearance of piston ring in its piston ring groove is very important to provide proper ring action and reduce wear. Keep in mind that while the second (scraper) compression ring and the oil control ring are typical in nature, the first (upper) compression ring is “trapezoidal” (tapered) in design. That is, it has a 15 degree taper on both upper and lower surfaces. Correspondingly, the first compression ring groove is tapered 15 degrees on top and bottom. Note also, that the upper ring’s edge (parallel to cylinder liner) is not a straight cut. It is rounded, or arced, in design. IMPORTANT: Do NOT mistake these tapered or different design characteristics for unusual wear patterns. a c b 70441 70440 a - First Compression Ring - Trapezoidal (Tapered) b - First Compression Ring Groove - (Tapered) c - Outer Edge of Upper Compression Ring - (Arced) 90-860074--1 FEBRUARY 2002 Page 3A-111 ENGINE MECHANICAL SERVICE MANUAL NUMBER 22 As always, when fitting serviceable or new rings, clearances between all ring and groove surfaces should be measured. Refer to Specifications. a b c a b c d d - First Compression Ring - Second Compression Ring - Oil Control Ring - Ring Clearance CHECKING RING END GAP 1. Select rings comparable in size to piston being used. 2. Slip compression ring in cylinder bore, then press ring down into cylinder bore about 6 mm (1/4 in.) below ring travel. Ensure that ring is square with cylinder wall. 3. Measure gap between ends of ring with a feeler gauge as shown. Refer to Specifications. 70295 Checking Ring End Gap 4. If gap between ends of ring is below specifications, remove ring and try another for fit. 5. Fit each compression ring to cylinder in which it is going to be used. Page 3A-112 90-860074--1 FEBRUARY 2002 ENGINE MECHANICAL SERVICE MANUAL NUMBER 22 Assembly 1. Coat inside of connecting rod bushing, piston pin bore, and piston pin with SAE 30W engine oil. 2. Assemble piston to connecting rod with the combustion chamber recess aligned with rod numbers. a b 70296 a - Combustion Chamber Recess b - Rod Numbers 3. Insert piston pin and install snap ring. 4. Clamp in a soft jawed vise as shown. 70290 NOTE: Always install rings with ring markings facing the top of piston. 5. Install spring in lower piston groove. 6. Install oil control ring. 7. Squeeze ring into groove to seat spring and check for binding. 90-860074--1 FEBRUARY 2002 Page 3A-113 ENGINE MECHANICAL SERVICE MANUAL NUMBER 22 8. Using Piston Ring Expander 91-24697, install the second compression ring in the center piston groove. Scraper side of ring must face bottom of piston. a 70299 a - Scraper Side Toward Bottom Of Piston IMPORTANT: On all engines the word - TOP - appears on the upper surface of the first compression ring, and MUST FACE UP. 9. Using piston ring expander, install first compression ring in upper piston groove. Installation 1. Before installing pistons into cylinders, ring gaps must be positioned as follows: a. First compression ring (trapezoidal) gap, 30 degrees to the right of combustion chamber recess. b. Second compression ring gap, directly opposite the combustion chamber recess. c. Lower (oil control) ring gap, 30 degrees to the left of combustion chamber recess. b a c 78416 Typical a - First Ring Gap b - Second Ring Gap c - Lower (Oil Control) Ring Gap 2. Lubricate cylinder bore and piston rings with SAE 30W engine oil. 3. Each piston and connecting rod assembly must be installed in the cylinder from which it was removed. Page 3A-114 90-860074--1 FEBRUARY 2002 ENGINE MECHANICAL SERVICE MANUAL NUMBER 22 IMPORTANT: The combustion chamber recess and numbers on connecting rod must face injector and camshaft side of the engine. 4. Turn crankshaft to position crank pin away from cylinder so connecting rod will not damage it during installation. 5. Using ring compressor, install piston by tapping on piston-top with a suitable device. a 70300 a - Ring Compressor 6. Insert bearing shells into connecting rod and matching rod cap. Lubricate bearings and crank pin with a mixture of 20% SAE 30W engine oil and 80% Needle Bearing Assembly Lubricant. 7. Align connecting rod with crankshaft journal and tap on piston top until rod bearing contacts journal. Do NOT scratch or nick crankshaft journal. 8. Ensure that corresponding numbers on rod cap and connecting rod are the same and are on the same (camshaft) side. 9. Install rod cap, lubricate bolt threads with Needle Bearing Assembly Lubricant. Torque bolts evenly to 29.4 Nm + 60 degrees (21 lb-ft + 60 degrees). 10. Ensure that connecting rod assembly and crank pin are not binding and that there is proper side-to-side movement. 11. Install remaining piston and connecting rod assemblies. 12. Measure for head gasket thickness as previously outlined. 13. Refer to appropriate Sections and complete the engine assembly. 90-860074--1 FEBRUARY 2002 Page 3A-115 ENGINE MECHANICAL SERVICE MANUAL NUMBER 22 Rear Oil Seal IMPORTANT: The later, D2.8L D-Tronic - serial number 0L098204 and above and D4.2L D-Tronic - serial number 0L099525 and above, engines had dimensional changes to the crankshaft, rear main bearing, rear main bearing carrier, thrust washers, O-ring seal, thrust plate (flywheel spacer) and flywheel seal. Ensure by serial number that the specifications and parts are the correct ones for the engine. The rear main oil seal rides on both the flywheel and the crankshaft thrust plate (flywheel spacer). Removal 1. Remove the flywheel housing rear portion. 2. On Sterndrive (MCM) Models: Remove the engine coupler. 3. On Inboard (MIE) Models: Remove the drive plate. 4. Remove the six flywheel retaining bolts and the flywheel. 5. Remove the thrust plate (flywheel spacer) IMPORTANT: Do NOT damage main bearing carrier or thrust washers, in the following step. 6. CAREFULLY pry out the old seal using a suitable device. a a d c b 74305 a b c d Page 3A-116 70301 - Flywheel Housing (Rear Portion) - Flywheel Housing (Cylinder Block Portion) - Rear Main Bearing Carrier - Rear Oil Seal 90-860074--1 FEBRUARY 2002 ENGINE MECHANICAL SERVICE MANUAL NUMBER 22 Installation IMPORTANT: Do NOT attempt to install rear main seal using a hammer or mallet. Damage to the seal or rear main bearing carrier could result. The seal is made of special compounds, Do NOT touch or handle the lips of the seal. 1. Lubricate outer surfaces of seal with clean engine oil. 2. Install new seal in carrier using tool 91-801111260 which will evenly PRESS the seal into position. Seal will stop (bottom-out) when seated. IMPORTANT: Whenever thrust plate is removed renew O-ring. 3. Inspect crankshaft thrust plate (flywheel spacer). Be certain there are no scratches, nicks, cracks, or seizure marks on plate. Renew plate if any are found. (Only minor grooves or indentations can be removed.) 4. Install new O-ring into groove of thrust plate. b a 70304 a - Thrust Plate b - O-Ring 5. Install thrust plate with O-ring towards crankshaft. Tighten thrust plate retaining screw securely. 6. Install the flywheel. IMPORTANT: Flywheel bolts may be used a maximum of 3 times within the prescribed torque limits. 7. Lubricate threads of flywheel bolts (6) with clean engine oil and install. Torque bolts to 110 Nm (81 lb-ft). 8. On Sterndrive (MCM) Models: Install the coupler. Torque bolts to 30 Nm (22 lb-ft). 9. On Inboard (MIE) Models: Install the drive plate. Torque bolts to 72 Nm (53 lb-ft). 10. Install flywheel housing rear portion. Torque bolts to 50 Nm (37 lb-ft). 11. Complete the engine assembly. 90-860074--1 FEBRUARY 2002 Page 3A-117 ENGINE MECHANICAL SERVICE MANUAL NUMBER 22 Crankshaft and Main Bearings IMPORTANT: The later, D2.8L D-Tronic - serial number 0L098204 and above and D4.2L D-Tronic - serial number 0L099525 and above, engines had dimensional changes to the crankshaft, rear main bearing, rear main bearing carrier, thrust washers, O-ring seal, thrust plate (flywheel spacer) and flywheel seal. Ensure by serial number that the specifications and parts are the correct ones for the engine. Removal 1. Remove the pistons. 2. Remove the timing gear cover. 3. Remove the camshaft and lifters. 4. Remove the oil pump. 5. Proceed as outlined. REAR MAIN BEARING CARRIER AND BEARINGS 1. Remove the flywheel housing (rear portion). 2. On Sterndrive (MCM) Models: Remove the engine coupler. 3. On Inboard (MIE) Models: Remove the drive plate. 4. Remove the six flywheel retaining bolts and the flywheel. 5. Remove 9 bolts and 6 nuts with washers retaining flywheel housing. 6. Remove cylinder block portion of flywheel housing. a c b b b 70301 a b c d Page 3A-118 - Flywheel Housing - Bolts With Washers - Nuts With Lockwashers - Vacant Holes (Not used) 90-860074--1 FEBRUARY 2002 ENGINE MECHANICAL SERVICE MANUAL NUMBER 22 7. Mark position of rear main bearing carrier in relation to block. a b c 70302 a - Rear Main Bearing Carrier b - Cylinder Block c - Reference Mark 8. Remove the screw locking thrust plate to crankshaft. b a 70302 a - Locking Screw b - Thrust Plate 90-860074--1 FEBRUARY 2002 Page 3A-119 ENGINE MECHANICAL SERVICE MANUAL NUMBER 22 9. To assist in removing the bearing carrier, temporarily reinstall the flywheel housing using only the nuts on the carrier. 10. Tap evenly around the housing as shown. The carrier and thrust plate will be pulled from the cylinder block. c a b 70303 a - Nuts On Carrier (6) b - Flywheel Housing c - Plastic Hammer 11. Remove nuts temporarily holding the flywheel housing to the rear bearing carrier, and proceed to next appropriate section. Page 3A-120 90-860074--1 FEBRUARY 2002 ENGINE MECHANICAL SERVICE MANUAL NUMBER 22 CRANKSHAFT AND MAIN BEARING CARRIERS 1. For proper installation during reassembly, note position of special locating screw retaining oil sender in cylinder block. 2. Remove main bearing oil feed locating screws which hold main bearing carriers in block. c b a 70305 a - Main Bearing Oil Feed Locating Screws b - Special Locating Screw c - Oil Sender 3. Install Crankshaft Installer Tool 91-801333504 over timing gear. b a 70306 a - Crankshaft Installer Tool b - Timing Gear 4. Turn engine vertical with front facing down. 5. Using a hoist and a suitable sling attached to crankshaft, lift crankshaft out of block. 90-860074--1 FEBRUARY 2002 Page 3A-121 ENGINE MECHANICAL SERVICE MANUAL NUMBER 22 MAIN BEARING CARRIERS AND BEARINGS IMPORTANT: Before removing bearing carriers from crankshaft, number or mark them according to journal upon which they are fitted. Also make matching marks on both bearing carrier halves for correct reassembly. Do NOT mix parts. 1. After marking carriers, remove bolts and separate carrier halves. Remove carriers with bearings from crankshaft journals. c b a 70307 a - Bolts with Washers b - Bearing Carrier c - Main Bearings FRONT MAIN BEARING NOTE: If bearings are being inspected prior to replacement, refer to Inspection, in this section, before removing front main bearing. If all bearings are being replaced proceed. 1. Assemble Bearing Puller 91-801333508 into front main bearing, as shown. b a 70308 a - Bearing Puller Tool b - Front Main Bearing 2. Remove front main bearing. Page 3A-122 90-860074--1 FEBRUARY 2002 ENGINE MECHANICAL SERVICE MANUAL NUMBER 22 TIMING GEAR NOTE: Replace timing gear only if worn or damaged. 1. Install Crankshaft Gear Puller 91-801333503 and Crankshaft Pulley Puller 91-801763590 onto timing gear, as shown. 2. Remove the timing gear. 3. Remove the spacer if equipped. a b d c 70309 a b c d - Gear Puller - Pulley Puller - Timing Gear - Spacer, If Equipped (Not Shown) Cleaning 1. Immerse crankshaft in a solvent bath and clean. 2. Put on safety glasses. 3. Clear oil passages with compressed air. 4. Dry with compressed air. 90-860074--1 FEBRUARY 2002 Page 3A-123 ENGINE MECHANICAL SERVICE MANUAL NUMBER 22 Inspection CRANKSHAFT 1. Visually inspect crankshaft for scratches, nicks, cracks and seizure marks. Replace if damaged. IMPORTANT: No material may be removed, either by hand or machine grinding, from thrust faces of crankshaft. 2. Replace crankshaft if machined surfaces on front and rear ends or threaded areas of crankshaft ends are out-of-round, worn or damaged. 3. After a seizure, over-heating or grinding, crankshaft must be Magnafluxed to verify no surface cracks are present. NOTE: It will be necessary to measure inner diameter of bearings in carriers and outer diameter of matching crankshaft journal to determine maximum clearance. Refer to the following section - Main Bearings (Measurement). 4. Measure journals of crankshaft to determine if replacement or grinding is necessary. Refer to specifications. Page 3A-124 90-860074--1 FEBRUARY 2002 SERVICE MANUAL NUMBER 22 ENGINE MECHANICAL MAIN BEARINGS (MEASUREMENT) 1. Inspect bearings. Refer to Examples of Bearing Failures. 2. To check clearance of center main bearings: a. Install bearings in original carrier halves, if removed. b. Observing marks made earlier, assemble carriers. Torque bolts with washers to 42 Nm (31 lb-ft). c. Measure inner diameter of bearing as shown. 70310 Measuring Inner Diameter Of Bearing d. Measure outer diameter of matching crankshaft journal as shown. 70311 Measuring Outer Diameter Of Journal e. Calculate difference between measurement taken in step c. and d. (clearance) and refer to specifications for maximum clearance of bearing being checked. 90-860074--1 FEBRUARY 2002 Page 3A-125 ENGINE MECHANICAL SERVICE MANUAL NUMBER 22 3. Measure rear main bearing clearance in the same manner as the center main bearings (no assembly of carrier is required). 4. To check clearance of front main bearing: a. Measure crankshaft front main bearing journal. b. Measure I.D. of front main bearing in cylinder block as shown. 70312 c. Calculate difference between measurement taken in step a. and b. (clearance) and refer to specifications for maximum clearance. TIMING GEAR 1. Ensure timing gear teeth are not worn or damaged. 2. Remove slight indentations with a very fine grade Carborundum stone. Page 3A-126 90-860074--1 FEBRUARY 2002 ENGINE MECHANICAL SERVICE MANUAL NUMBER 22 Installation FRONT MAIN BEARING 1. Align oil passage with hole of new bearing. b a 70313 a - Oil Passage b - Bearing Hole 2. Place new bearing on Puller/Installer Tool 91-801333508 as shown. Tool will install bearing to the correct depth. Oil passage MUST BE aligned. NOTE: To aid installation retain bearing halves on tool with a rubber band or similar. a b 70402 a - Tool 91-801333508 b - Bearing Halves (On Tool) 90-860074--1 FEBRUARY 2002 Page 3A-127 ENGINE MECHANICAL SERVICE MANUAL NUMBER 22 TIMING GEAR IMPORTANT: The early model crankshaft gear has been superseded to a new gear. A spacer is required behind the new gear to install. Description D2.8L D-Tronic D4.2L D-Tronic Serial Numbers Breaks: for engines 0L344916 And Above 0L344986 and Above using late model gear and spacer 1. Warm the gear in a suitable oven to 180 - 200 degrees C (356 - 392 degrees F.). 2. Ensure timing reference dots are facing the FRONT of the engine. 3. Ensure crankshaft keyway and woodruff key are aligned. 4. On early models, install the timing gear. On later models or if replacing the early gear, install the new spacer and timing gear. b 70309 a a - Timing Gear b - Spacer, If Equipped (Not shown) MAIN BEARING CARRIERS AND BEARINGS 1. Install new bearing shells into matching carrier halves. 2. Lubricate bearings with clean engine oil. a b 70307 a - Main Bearing Shells b - Main Bearing Carrier - Matching Halves Page 3A-128 90-860074--1 FEBRUARY 2002 ENGINE MECHANICAL SERVICE MANUAL NUMBER 22 IMPORTANT: Piston oil jet MUST FACE FRONT (pulley end) of engine when installed. a. Identify piston oil jet location on all main bearing carriers. b. If not already accomplished, stake (peen) each oil jet in its bore in three places. Especially check the rear main bearing carrier oil jet and stake marks. a c b 70382 a - Bearing Carrier b - Piston Oil Jet Location c - Stake (Peen) Marks 3. Ensure that all carriers are positioned so that piston oil jet faces FRONT of engIne, as shown, when installing on journal. Install matching carrier halves (marked earlier) on crankshaft journals in their original locations. Lubricate bolts and washers with clean engine oil. Torque to 44.1 Nm (32 lb-ft). b a 70404 a - Piston Oil Jets (Face Front of Engine) b - Arrow Indicates To Front Of Engine 90-860074--1 FEBRUARY 2002 Page 3A-129 ENGINE MECHANICAL SERVICE MANUAL NUMBER 22 CRANKSHAFT 1. Lubricate main bearing bores in crankcase with Molykote. b a 75389 a - Brush Dipped In Molykote b - Main Bearing Bore 2. Install Crankshaft Installation Tool 91-801333504 on front gear to protect front main bearing. a 70404 a - Tool 91-801333504 3. Position engine crankcase horizontal with oil pan flange facing up. 4. Carefully insert crankshaft, with main bearing carriers attached, into cylinder block. Page 3A-130 90-860074--1 FEBRUARY 2002 ENGINE MECHANICAL SERVICE MANUAL NUMBER 22 5. Rotate all bearing carriers so that the ROUND hole through the casting faces as shown, toward oil pan flange. Ensure that piston oil jets are directed toward FRONT of engine. a 70434 a - Bearing Carrier ROUND Hole 6. Install new sealing washers on all main bearing carrier locating hollow bolts and HAND THREAD CAREFULLY (to avoid damaging carrier threads) into bearing carriers. Where previously noted, install locating bolt for oil sending unit (after removing sending unit and adaptor nozzle from bolt, to allow torquing). Torque all bolts to 53.9 Nm (39 lb-ft). b a b 70386 a - Carrier Locating Hollow Bolts b - Sealing Washer(s) 7. Reinstall adaptor nozzle and oil sending unit on special locating screw. Tighten both securely. 90-860074--1 FEBRUARY 2002 Page 3A-131 ENGINE MECHANICAL SERVICE MANUAL NUMBER 22 REAR MAIN BEARING IMPORTANT: Be certain to press bearing so as to prevent damage to notch arrangement in carrier where bearing tab aligns. 1. Using a suitable mandrel press bearing out of carrier. 2. When pressing new bearing into carrier, bearing tab and notch in carrier MUST BE aligned as shown. b a 70382 a - Bearing Tab b - Notch In Carrier REAR MAIN BEARING CARRIER 1. Refer to Rear Oil Seal - Installation and install new seal in carrier. a b 70406 a - Rear Main Oil Seal b - Rear Main Bearing Carrier Page 3A-132 90-860074--1 FEBRUARY 2002 ENGINE MECHANICAL SERVICE MANUAL NUMBER 22 2. Install standard size thrust washers into flywheel side of carrier as shown. (Use Quicksilver Needle Bearing Lubricant to help keep washers positioned.) a 70407 a - Thrust Washers (Standard Size), Flywheel Side 3. Install standard size thrust washers into front (crankshaft) side of carrier. (Use Quicksilver Needle Bearing Lubricant to help keep washers positioned.) a 70408 a - Thrust washers (Standard Size), Front (Crankshaft) Side 4. Install new O-ring into groove around carrier. Coat with clean engine oil to assist during installation. a 70408 a - O-ring 90-860074--1 FEBRUARY 2002 Page 3A-133 ENGINE MECHANICAL SERVICE MANUAL NUMBER 22 5. Lubricate crankshaft journal and bearing with clean engine oil. Install rear main bearing carrier into cylinder block, align marks previously made. Always be certain lubrication holes on block and carrier align, especially when or if marks are not present. b a 70409 a - Rear Main Bearing Carrier b - Marks Aligned 6. Install new O-ring into groove of thrust plate (crankshaft side). a b 70304 a - Thrust Plate b - O-ring 7. Install thrust plate with O-ring towards crankshaft. Tighten retaining screw securely. Page 3A-134 90-860074--1 FEBRUARY 2002 ENGINE MECHANICAL SERVICE MANUAL NUMBER 22 8. Install new O-ring into groove of flywheel housing as shown. a 70410 a - O-ring 9. Install flywheel housing. Torque the 9 bolts with washers to 50 Nm (37 lb-ft). Then, torque the 6 rear main bearing carrier nuts with washers to 27 Nm (20 lb-ft). IMPORTANT: Flywheel bolts may be used a maximum of 3 times within the prescribed torque limits. 10. Lubricate threads of flywheel bolts with clean engine oil and install flywheel. Torque bolts to 110 Nm (81 lb-ft). CRANKSHAFT END-PLAY (AXIAL) CLEARANCE 1. Attach Dial Indicator 91-58222A1 to cylinder block to check installed crankshaft end-play (axial) clearance. Reading can be taken off of counter weight as shown. Move crankshaft fore and aft in block to obtain reading. Clearance should be 0.121-0.323 mm (.005-.013 in.). 70411 2. If clearance is incorrect, calculate the necessary thickness of thrust washers needed (from sizes listed in parts manual). Install different thickness thrust washers and recheck. Do this until proper clearance is obtained. 90-860074--1 FEBRUARY 2002 Page 3A-135 ENGINE MECHANICAL SERVICE MANUAL NUMBER 22 Cylinder Liners Removal 1. Remove components as needed, including pistons. 2. Remove plate from Cylinder Liner Puller 91-801333502. b a 70412 a - Cylinder Liner Puller Tool b - Plate IMPORTANT: Mark liners in a suitable fashion as to the cylinder number (to avoid mismatching to pistons upon reassembly) and orientation in block (reference to prechamber bore of head). 3. Install puller tool into cylinder and attach plate to tool at bottom of liner. Remove liner(s) as shown. Note location of shim between liner and crankcase bore relief. Also, note O-rings on liner lower part. 70413 Page 3A-136 90-860074--1 FEBRUARY 2002 ENGINE MECHANICAL SERVICE MANUAL NUMBER 22 Identification CAUTION For D-Tronic Engines the cylinder liners are provided in one standard size and correspond to the tolerance class: Class A. Failure to use only the Class A liner designated for your engine, with matching Class A piston, will result in severe engine damage. 1. As shown in the following, inspect underside of liner for tolerance class identification reference mark (a small radial line). NO MARK should be present. The liner is a standard size Class A liner. 2. If a MARK is present the liner is a size Class B liner and is NOT for use on D-Tronic engines. 3. Refer to specifications - Liner I.D. for exact dimensions. a b b 70416 70439 a - Cylinder Liner b - Tolerance Size Class B Reference Mark -NOT For Use With D-Tronic Engines 90-860074--1 FEBRUARY 2002 Page 3A-137 ENGINE MECHANICAL SERVICE MANUAL NUMBER 22 Cleaning and Inspection CYLINDER LINERS 1. Clean liners, especially at areas as shown, and where O-rings fit. a 70414 a - Areas for Special Cleanliness 2. Check liners for abnormal wear or cracks. Replace as needed with those parts for your specific model. 3. Measure liners for out-of-round or taper with a dial or bore gauge, taking readings at three different vertical positions and at opposite sides of the liner bore. Refer to specifications. 4. When cylinder liner wear is within specifications light honing of the liner bore is allowed. Replace if liners are not within specifications. CYLINDER BLOCK (LINER) BORES 1. Thoroughly clean the cylinder block with suitable solvent and blow dry with compressed air. Inspect for cracks or flaws. 2. Check cylinder head mating surfaces of block and area around cylinder liner bores for abnormal wear or damage. 3. Check block bores for damage and cleanliness, especially the flanges and counterbores for cylinder liners as shown. a 70415 a - Areas for Special Cleanliness 4. If any checks or inspections reveal unacceptable conditions replace parts as needed with those for your specific model. Page 3A-138 90-860074--1 FEBRUARY 2002 ENGINE MECHANICAL SERVICE MANUAL NUMBER 22 Installation Cylinder liners on all engines are required to protrude (or rise above the surface of the block) 0.01 - 0.06 mm (.0004 - .0023 in.). By using one of three shims available (placed between the liner flange and the block during installation of liner) it is possible to obtain the correct protrusion. 1. To determine the correct shim thickness needed for each liner follow instructions a. - e.: CAUTION Ensure cylinder liners are fully seated in block in the following instructions or incorrect measurements will occur causing engine performance problems or severe engine damage. NOTE: Liners will spin freely in bore when the block and liner are completely clean and ready for assembly. a. Unless being replaced, install liners in same cylinder block bore as marked or noted upon disassembly WITHOUT shims or O-rings. b. Using a precision depth gauge measure and record the amount of recess (depth below block surface) of each liner as shown. d a b c 70476 a b c d - Liner Recess (Depth of Liner in Block) - Cylinder Liner - Cylinder Block - Cylinder Head Mounting Surface of Block 90-860074--1 FEBRUARY 2002 Page 3A-139 ENGINE MECHANICAL SERVICE MANUAL NUMBER 22 c. Refer to the following chart to determine and select the shim thickness required: Liner Recess BELOW Block (Without Shim) Shim To Be Used (Thickness) 0.14 - 0.09 (.0055 - .0035) 0.15 (.0059) 0.19 - 0.14 (.0074 - .0055) 0.20 (.0078) 0.22 - 0.17 (.0086 - .0066) 0.23 (.0090) Liner Protrusion ABOVE Block (With Shim) 0.01 - 0.06 (.0004 - .0023) d. Remove liner and install shim selected and refit liner. e. Measure protrusion. Adjust using alternate shim if required. a b d c 70475 a b c d Page 3A-140 - Cylinder Liner Protrusion (Height Above Block Surface) - Cylinder Liner - Cylinder Block - Shim 90-860074--1 FEBRUARY 2002 ENGINE MECHANICAL SERVICE MANUAL NUMBER 22 2. Tighten liners, with appropriate shims, to 30 Nm (22 lb-ft) and formed spacer-washers as shown. c b a 75015 a - Liner b - Suitable Bolt c - Formed, Spacer-Washer 3. Recheck-liners for proper amount of protrusion using liner gauge bar 91-184812A1 (SAE) or 91-801333509 (Metric) and appropriate dial gauge as shown. If not as specified, adjust protrusion as previously outlined until each liner is protruded 0.01 0.06mm (.0004 - .0023 in.) above block. 75551 4. Remove liners in order, keeping appropriate shims matched to liners. 90-860074--1 FEBRUARY 2002 Page 3A-141 ENGINE MECHANICAL SERVICE MANUAL NUMBER 22 5. Install two BLACK O-rings in the grooves near the neck of the liner and one BROWN O-ring in groove at the bottom, as shown. b c a 70416 a - Shim b - Black O-Rings (2) c - Brown O-Ring (1) 6. Lubricate LOWER centering collars in cylinder block (those areas where lower liner O-rings seal against the bore) with Needle Bearing Lubricant 92-42649A1 or clean engine oil as shown. IMPORTANT: Do NOT lubricate upper bore area. NOTE: Liner shown fitted ONLY for visual clarity. Do NOT install liners in this step. a 50491 a - Lubricate This Area Of Cylinder Block (Lower Centering Collars) Page 3A-142 90-860074--1 FEBRUARY 2002 ENGINE MECHANICAL SERVICE MANUAL NUMBER 22 7. Apply Loctite Master Gasket 92-12564--1 or Loctite 620 (obtain locally) to liner surfaces AS SHOWN. IMPORTANT: Do NOT apply Loctite to shim or shim contact surfaces. a 70414 a - Loctite Applied To These Areas ONLY 8. Install liners in block, being careful not to damage O-rings or distort shim. Hold liners securely in position with suitable bolts and head bolt formed, spacer-washers as shown. Torque bolts to 50 Nm (37 lb-ft). Allow Loctite to dry. (Do NOT release liners for approximately 1-1/2 to 2 hours.) c b a 75015 a - Liner b - Suitable Bolt c - Formed, Spacer-Washer 9. Once again, verify cylinder liner protrusion and make corrections if required. 10. Continue engine assembly. Refer to appropriate procedures. 90-860074--1 FEBRUARY 2002 Page 3A-143 ENGINE MECHANICAL SERVICE MANUAL NUMBER 22 Flywheel Housing, Coupler / Drive Plate And Flywheel Exploded View STERNDRIVE (MCM) MODELS NOTE: Some engines are equipped with a solid (Single Stage) coupler, in place of the Dual Stage coupler found on others. 1 30 B 11 B 28 27 10 2 4 B 6 9 B 3 5 29 7 8 A 13 12 20 21 14 15 17 18 19 16 25 22 24 26 Page 3A-144 23 73791 90-860074--1 FEBRUARY 2002 SERVICE MANUAL NUMBER 22 ENGINE MECHANICAL STERNDRIVE (MCM ) MODELS (CONTINUED) 1 - Continuity Wire 2 - Washer 3 - Screw 4 - Rear Portion of Flywheel Housing - Sterndrive (MCM) 5 - Screw 6 - Lockwasher 7 - Grease Fitting 8 - Bravo Coupler Assembly 9 - Screw (6) 10 - Washer (6) 11 - Second Stage Coupler 12 - Screw and Washer 13 - Turbocharger Bracket 14 - Flat Washer and Lockwasher 15 - Turbocharger Mounting Screw (2) 16 - Screw, Flat Washer and Lockwasher (9) 17 - Flywheel Ring Gear 18 - Thrust Plate / Guide Ring O-ring Seal 19 - Set Screw and Thrust Plate / Guide Ring 20 - Flywheel With Ring Gear 21 - Flywheel Bolt (6) 22 - RPM Speed Sensor 23 - Wave Washer and Allen Head Screw 24 - O ring Seal 25 - Starter Stud, Washer, and Nut 26 - Flywheel Housing 27 - Lockwasher (6 mm) 28 - Screw, M6 x 1 x 20 (6) 29 - First Stage Coupler 30 - Two-Stage Coupler Assembly Description Part Number A Clean SAE 30W Engine Oil Obtain Locally B Loctite 271 Thread Locker 92-809819 90-860074--1 FEBRUARY 2002 Page 3A-145 ENGINE MECHANICAL SERVICE MANUAL NUMBER 22 INBOARD (MIE) MODELS 3 B 6 5 4 2 A 16 17 1 15 8 14 7 13 12 11 18 10 21 9 19 22 23 Page 3A-146 20 90-860074--1 FEBRUARY 2002 SERVICE MANUAL NUMBER 22 ENGINE MECHANICAL INBOARD (MIE) MODELS (CONTINUED) 1 - Screw 2 - Washer 3 - Rear Portion of Flywheel Housing - Inboard (MIE) 4 - Drive Plate Screw 5 - Washer 6 - Typical Early Drive Plate (Later Plate Not Shown) 7 - Flywheel Screws 8 - Flywheel 9 - Set Screw 10 - Thrust Plate / Guide Ring 11 - Guide Ring O-ring 12 - Ring Gear 13 - Turbocharger Screw 14 - Lockwasher 15 - Washer 16 - Turbocharger Bracket 17 - Screw and Washer 18 - Flywheel Housing To Cylinder Block Screw 19 - RPM Speed Sensor 20 - Wave Washer and Allen Head Screw 21 - Starter Stud,Washer and Nut 22 - O-ring for Flywheel Housing 23 - Flywheel Housing Description Part Number A Clean SAE 30W Engine Oil Obtain Locally B Loctite 271 Thread Locker 92-809819 90-860074--1 FEBRUARY 2002 Page 3A-147 ENGINE MECHANICAL SERVICE MANUAL NUMBER 22 IMPORTANT: The later, D2.8L D-Tronic - serial number 0L098204 and above and D4.2L D-Tronic - serial number 0L099525 and above, engines had dimensional changes to the crankshaft, rear main bearing, rear main bearing carrier, thrust washers, O-ring seal, thrust plate (flywheel spacer) and flywheel seal. Ensure by serial number that the specifications and parts are the correct ones for the engine. Flywheel Housing REMOVAL 1. Remove the starter. 2. Remove rear portion of flywheel housing. 3. On Sterndrive (MCM) Models: Remove engine coupler. 4. On Inboard (MIE) Models: Remove drive plate. 5. Remove the six flywheel retaining bolts and the flywheel. 6. Remove 9 bolts and 6 nuts, with respective washers, retaining flywheel housing. 7. Disconnect and remove the rpm speed sensor. 8. Remove flywheel housing. b a a c 70301 a - Bolts With Washers b - Nuts With Lockwashers c - Vacant Holes (Not used) CLEANING 1. Remove old O-ring in groove of flywheel housing. 2. Clean all parts with solvent. 3. Put on safety glasses. 4. Dry parts with compressed air. Page 3A-148 90-860074--1 FEBRUARY 2002 ENGINE MECHANICAL SERVICE MANUAL NUMBER 22 INSPECTION 1. Visually inspect rear portion of flywheel housing and flywheel housing for cracks, holes, and excessive wear. 2. Inspect O-ring on rpm speed sensor. 3. Replace if necessary. INSTALLATION 1. Install new O-ring into groove of flywheel housing. a 70410 a - O-ring IMPORTANT: Flywheel housing fasteners and hardware must be installed from where removed. 2. Install flywheel housing. Torque the 9 bolts with washers to 50 Nm (37 lb-ft). Then, torque the 6 rear main bearing carrier nuts with washers to 27 Nm (20 lb-ft). IMPORTANT: Flywheel bolts may be used a maximum of 3 times within the prescribed torque limits. 3. Lubricate threads of flywheel bolts with clean engine oil and install flywheel. Torque bolts to 110 Nm (81 lb-ft). 4. On Sterndrive (MCM) Models: Install engine coupler. Apply Loctite 271 to threads and torque bolts to 30 Nm (22 lb-ft). 5. On Inboard (MIE) Models: Install drive plate. Apply Loctite 271 to threads and torque bolts to 72 Nm (53 lb-ft). 6. Install rear portion of flywheel housing. Torque bolts to 50 Nm (37 lb-ft). 7. Using the screw and wave washer, install and connect the rpm speed sensor. 8. Install the starter and other components previously removed. 90-860074--1 FEBRUARY 2002 Page 3A-149 ENGINE MECHANICAL SERVICE MANUAL NUMBER 22 Sterndrive (MCM) Coupler / Inboard (MIE) Drive Plate REMOVAL 1. Remove rear portion of flywheel housing. 2. On Sterndrive (MCM) Models: Remove engine coupler. 3. On Inboard (MIE) Models: Remove drive plate. INSPECTION 1. Inspect splines in drive plate or coupler for wear. 2. On Sterndrive (MCM) Models with two-stage couplers: the first stage piece of the coupler can be replaced. Remove as necessary. b a 78383 a - Two Stage Coupler Assembly b - Coupler (First Stage Piece) 3. Inspect drive plate or coupler for warping. 4. Replace as necessary. Page 3A-150 90-860074--1 FEBRUARY 2002 ENGINE MECHANICAL SERVICE MANUAL NUMBER 22 INSTALLATION 1. On Sterndrive (MCM) Models with two-stage couplers: a. Install first stage piece if being replaced. b. Apply Loctite 271 to threads and torque 6M bolts with lockwashers to 16 Nm (12 lb-ft). b c a 78383 a - Two Stage Coupler Assembly b - Coupler (First Stage Piece) c - 6M Bolts With Lockwashers 2. On Sterndrive (MCM) Models: Install engine coupler. Apply Loctite 271 to bolt threads. Torque bolts to 30 Nm (22 lb-ft). 3. On Inboard (MIE) Models: Install drive plate. Apply Loctite 271 to bolt threads. Torque bolts to 72 Nm (53 lb-ft). 4. Install rear portion of flywheel housing. Torque bolts to 50 Nm (37 lb-ft). 5. Install other components previously removed. Flywheel REMOVAL Refer to Flywheel Housing in this SECTION 3A. CLEANING 1. Clean mating surfaces of flywheel and thrust plate. Remove any burrs. Mating surfaces must be clean bare metal. INSPECTION 1. Check flywheel ring gear for worn and missing teeth. 2. Replace as necessary. INSTALLATION Refer to Flywheel Housing in this SECTION 3A. 90-860074--1 FEBRUARY 2002 Page 3A-151 ENGINE MECHANICAL SERVICE MANUAL NUMBER 22 Engine Mounts Front Mounts IMPORTANT: There are two different types of mounts being used on the D2.8L D-Tronic. Serial numbers 0L343125 and below use an early front mount. Serial numbers 0L343126 and above use a later front mount. Follow these serial number breaks if a front mount is being replaced. Only use the late front mounts on engines with the early serial numbers if the rear bushing are also replaced. The front engine mounts can be installed two ways. Mark the mounts before removing them from cylinder block to ensure installation in same location. a b b c 50533 Front Mount Standard Position NOTE: Reverse mount pad on front mounts by loosening clamp bolts and turning pad over. d a b a c 50533 Front Mount Alternate Position a - Mount Bracket b - Bolts c - Mount Pad d - Clamp Bolt Page 3A-152 90-860074--1 FEBRUARY 2002 ENGINE MECHANICAL SERVICE MANUAL NUMBER 22 MIE (Inboard) Transmission Mounts e f d c g a b 27035 Transmission Mount Components a - Base b - Housing c - Bushing d - Trunion (Pin) e - Snap Ring f - Bracket g - Clamping Bolt a a b b 27035 50533 Standard Mount Position Alternate Mount Position a - Mount Bracket b - Bolts 90-860074--1 FEBRUARY 2002 Page 3A-153 ENGINE MECHANICAL SERVICE MANUAL NUMBER 22 Engine 20-Hour Break-In Period The first 20 hours of operation is the engine (new or rebuilt) break-in period. During this period, it is extremely important that the engine is operated as outlined in the following. 1. Do NOT operate engine below 1500 rpm for extended periods of time during the first 10 hours. During this period, shift into gear as soon as possible after starting engine and advance throttle so that rpm is above 1500 (provided that conditions permit safe operation at this speed). 2. Do NOT operate at any one constant speed for extended periods of time. 3. Do NOT exceed 75% of full throttle during the first 10 hours except during the Engine Initial Break-In Procedure. During the next 10 hours, occasional operation at full throttle (5 minutes at a time maximum) is permissible. 4. AVOID full throttle accelerations from stopped position. 5. Do NOT operate at full throttle until engine reaches normal operating temperature. 6. OBSERVE INSTRUMENTATION carefully. If an abnormal reading occurs, stop engine immediately and determine cause. 7. FREQUENTLY CHECK crankcase oil level and add oil if necessary. It is normal for oil consumption to be somewhat high during the break-in period. 8. AT END OF THE 20-HOUR BREAK-IN PERIOD, drain oil from crankcase and replace oil and filter. Fill crankcase with correct grade and viscosity oil. After Break-in Period To help extend the life of your Mercury MerCruiser power package, the following recommendations should be considered; Page 3A-154 • Use a propeller that allows the engine to operate at or near the top of the maximum rpm range when at full throttle with a normal boat load. • Operation at 3/4 throttle setting or lower is recommended. Refrain from prolonged operation at maximum full throttle rpm. 90-860074--1 FEBRUARY 2002 ENGINE MECHANICAL SERVICE MANUAL NUMBER 22 THIS PAGE IS INTENTIONALLY BLANK 90-860074--1 FEBRUARY 2002 Page 3A-155 ENGINE MECHANICAL SERVICE MANUAL NUMBER 22 THIS PAGE IS INTENTIONALLY BLANK Page 3A-156 90-860074--1 FEBRUARY 2002 STARTING SYSTEM SERVICE MANUAL NUMBER 22 ELECTRICAL SYSTEM Section 4A - Starting System Table of Contents Identification . . . . . . . . . . . . . . . . . . . . . . . . . . Specifications . . . . . . . . . . . . . . . . . . . . . . . . . Torque Specifications . . . . . . . . . . . . . . . . . . Lubricants / Sealants / Adhesives . . . . . . . Replacement Parts . . . . . . . . . . . . . . . . . . . . Starting System Components . . . . . . . . . . . Inspection . . . . . . . . . . . . . . . . . . . . . . . . . . . . Periodic Inspection . . . . . . . . . . . . . . . . . 4A-3 4A-3 4A-3 4A-3 4A-4 4A-4 4A-6 4A-6 Testing Voltage . . . . . . . . . . . . . . . . . . . . . 4A-6 Removal . . . . . . . . . . . . . . . . . . . . . . . . . . . . . 4A-7 Starter Motor . . . . . . . . . . . . . . . . . . . . . . . 4A-7 Solenoid Switch . . . . . . . . . . . . . . . . . . . . 4A-8 Installation . . . . . . . . . . . . . . . . . . . . . . . . . . . 4A-9 Solenoid Switch . . . . . . . . . . . . . . . . . . . . 4A-9 Starter Motor . . . . . . . . . . . . . . . . . . . . . . 4A-10 4 A 90-860074--1 FEBRUARY 2002 Page 4A-1 STARTING SYSTEM SERVICE MANUAL NUMBER 22 THIS PAGE IS INTENTIONALLY BLANK Page 4A-2 90-860074--1 FEBRUARY 2002 STARTING SYSTEM SERVICE MANUAL NUMBER 22 Identification a 70809 a - Identification Number Location On Starter Specifications IMPORTANT: The starter motor is designed to operate under great overload and produce a high horsepower for its size. It can do this only for a short time, since considerable heat accumulates and can cause serious damage. For this reason, the cranking motor must never be used for more than 15 seconds at any one time. Cranking should not be repeated without a pause of at least 2 minutes to permit the heat to escape. Description Specification I.D. Number 0 001 362 3-- Engine Rotation Minimum Required Cranking Battery Size (4 and 6 cylinder) No-Load Test Left Hand (Counterclockwise) 750 cca, 950 mca or 180 Ah 11.5 Volts, 125 Amps At 7000 rpm Torque Specifications Description Nm Starter Motor 68 Solenoid lb-in. lb-ft 50 Tighten Securely Lubricants / Sealants / Adhesives Description Liquid Neoprene 2-4-C Marine Lubricant With Teflon 90-860074--1 FEBRUARY 2002 Part Number 92-25111--3 92-802861Q1 Page 4A-3 STARTING SYSTEM SERVICE MANUAL NUMBER 22 Replacement Parts WARNING Electrical system components on this engine are not external ignition protected. Do NOT STORE OR UTILIZE GASOLINE ON BOATS EQUIPPED WITH THESE ENGINES, UNLESS PROVISIONS HAVE BEEN MADE TO EXCLUDE GASOLINE VAPORS FROM ENGINE COMPARTMENT (REF: 33 CFR) Failure to comply could result in fire, explosion and/or severe personal injury Starting System Components 30 15 50 3 2 1 9 4 2. 3. 10 1. 85 86 87 30 8 5 7 6 86 85 30 87 53 42 46 23 24 12 11 13 3. Typical Page 4A-4 90-860074--1 FEBRUARY 2002 SERVICE MANUAL NUMBER 22 STARTING SYSTEM Starting System Components (continued) 1 - Ignition (Start) Switch, (Start/Stop) 2 - 20 Ampere Fuse 3 - Remote Control Neutral Safety Switch [MCM (Sterndrive)] 4 - Instrument/ Extension Harness Connector at Electrical Box 5 - Circuit Breaker 6 - Circuit Breaker 7 - Start Relay 8 - Main Relay 9 - ECM / Fuel System Harness Connector at Electrical Box 10 - ECM 11 - Battery 12 - Starter 13 - Electronic Shut-Off Solenoid 1. Wire routing on Sterndrive (MCM) engine and instrument harness with Neutral Safety Switch located in remote control. 2. Wire routing on Inboard (MIE) engine and instrument harness with Neutral Safety Switch located on transmission. 3. Shown for clarification of start and stop circuits. 90-860074--1 FEBRUARY 2002 Page 4A-5 STARTING SYSTEM SERVICE MANUAL NUMBER 22 Inspection Periodic Inspection Starter motor with solenoid is completely enclosed when mounted to the drive housing to prevent entrance of moisture and dirt. However, periodic inspection is required. 1. Inspect terminals for corrosion and loose connections. 2. Inspect wiring for frayed and worn insulation. 3. Ensure that mounting nuts are tight. 4. Ensure that mounting surfaces under the starter motor and the mounting bolts are free of paint and corrosion. Treat with lubricant to prevent corrosion. Testing Voltage Always test the voltage at the starter motor to ensure a minimum of 9.5 volts during cranking. IMPORTANT: Voltage below 9.5 causes excessive heat build up, which can damage the starter motor and weld the starter solenoid contacts together. 1. Ensure that battery is fully charged. 2. Connect voltmeter positive (+) lead to the terminal on the starter solenoid. 3. Connect voltmeter negative (–) lead to the starter motor case. Ensure that there is good metal contact to prevent a false voltage reading. 4. Crank engine for 10 seconds and record voltmeter reading. 5. A reading of 9.5 volts or more verifies starter motor is getting sufficient voltage. NOTE: If the starter is getting at least 9.5 volts and the engine is not cranking properly, remove the glow plugs or hole plugs and try turning the engine over by hand. If the engine turns over freely by hand, the starter motor could have a problem. 6. A reading below 9.5 volts suggests a voltage loss between the battery and the starter. Refer to Testing Voltage Drop. Page 4A-6 90-860074--1 FEBRUARY 2002 STARTING SYSTEM SERVICE MANUAL NUMBER 22 Removal Starter Motor WARNING Always disconnect battery cables from battery before working around electrical system components to prevent injury to yourself or damage to electrical system. 1. Disconnect battery cables from battery. 2. Disconnect wires from starter. 3. Remove starter mounting nuts and lockwashers. 4. Pull starter motor away from flywheel and remove from engine. b a d c 70810 a b c d - Battery Cable - RED Wire - YELLOW/RED Solenoid Wire - Mounting Nuts with Lockwashers (2 Total, One Not Shown) 90-860074--1 FEBRUARY 2002 Page 4A-7 STARTING SYSTEM SERVICE MANUAL NUMBER 22 Solenoid Switch 1. Remove starter motor. 2. Remove nut from the field wire on the solenoid. a 70811 a - Field Wire Nut 3. Remove screws retaining solenoid. a 70812 a - Screws 4. Slide solenoid plunger off shift lever. a b 70814 70813 a - Solenoid Plunger b - Shift Lever 5. Remove solenoid from starter assembly. Page 4A-8 90-860074--1 FEBRUARY 2002 STARTING SYSTEM SERVICE MANUAL NUMBER 22 Installation Solenoid Switch 1. Apply a light coat 2-4-C Marine Lubricant with Teflon to the shift lever and sliding portion of the pinion. 2. Slide solenoid plunger onto shift lever. b c a 70833 a - Solenoid Plunger b - Shift Lever c - Drive Gear 3. Install solenoid screws and tighten securely. a 70812 a - Solenoid Screws 4. Install nut on the field wire terminal and tighten securely. a b 70811 a - Field Coil Wire b - Hex Nut 90-860074--1 FEBRUARY 2002 Page 4A-9 STARTING SYSTEM SERVICE MANUAL NUMBER 22 Starter Motor 1. Apply a light coat of 2-4-C Marine Lubricant With Teflon to mounting surfaces and fasteners prior to installation. 2. Position starter motor on engine. 3. Install lockwashers and nuts. Torque nuts to 68 Nm (50 lb-ft). a a 70810 a - Lockwasher and Nut (1 Not Shown) 4. Connect wires to starter solenoid. a c b 70810 a - RED Wire b - YELLOW/RED Solenoid Wire c - Positive (+) Battery Cable 5. Coat terminals with Liquid Neoprene sealer. 6. Slide rubber boot over positive (+) terminal connection. 7. Connect battery cables to battery. Page 4A-10 90-860074--1 FEBRUARY 2002 STARTING SYSTEM SERVICE MANUAL NUMBER 22 THIS PAGE IS INTENTIONALLY BLANK 90-860074--1 FEBRUARY 2002 Page 4A-11 STARTING SYSTEM SERVICE MANUAL NUMBER 22 THIS PAGE IS INTENTIONALLY BLANK Page 4A-12 90-860074--1 FEBRUARY 2002 CHARGING SYSTEM SERVICE MANUAL NUMBER 22 Electrical Systems Section 4B - Charging System Table of Contents Identification . . . . . . . . . . . . . . . . . . . . . . . . Replacement Parts Warning . . . . . . . . . . Specifications . . . . . . . . . . . . . . . . . . . . . . . Torque Specifications . . . . . . . . . . . . . . . . Special Tools . . . . . . . . . . . . . . . . . . . . . . . Lubricants/Sealers/Adhesives . . . . . . . . . Wire Color Code Abbreviations . . . . . . . . Precautions . . . . . . . . . . . . . . . . . . . . . . . . General . . . . . . . . . . . . . . . . . . . . . . . . . Electronic Diesel Injection (EDI) Electrical System Precautions . . . . . Battery Precautions - Multiple EDI Engines . . . . . . . . . . . . . . . . . . . . . . . . . Charging System Components . . . . . . . . Inspection . . . . . . . . . . . . . . . . . . . . . . . . . . Troubleshooting Tests (Alternator on Engine) . . . . . . . . . . . . . . . . . . . . . . . . . 90-860074--1 FEBRUARY 2002 4B-3 4B-3 4B-4 4B-4 4B-5 4B-5 4B-5 4B-6 4B-6 4B-6 4B-7 4B-8 4B-9 Circuitry Test . . . . . . . . . . . . . . . . . . . . . . . Output Circuit . . . . . . . . . . . . . . . . . . . . Excitation Circuit . . . . . . . . . . . . . . . . . Sensing Circuit . . . . . . . . . . . . . . . . . . . Current Output Test . . . . . . . . . . . . . . . Exploded View . . . . . . . . . . . . . . . . . . . Removal . . . . . . . . . . . . . . . . . . . . . . . . . . . Alternator . . . . . . . . . . . . . . . . . . . . . . . . Alternator Bracket . . . . . . . . . . . . . . . . Installation . . . . . . . . . . . . . . . . . . . . . . . . . Alternator Bracket . . . . . . . . . . . . . . . . Alternator . . . . . . . . . . . . . . . . . . . . . . . . Battery Isolators . . . . . . . . . . . . . . . . . . . . . Dual Battery Charging Systems . . . . Battery Isolator Diagram . . . . . . . . . . . 4B-10 4B-11 4B-12 4B-13 4B-14 4B-16 4B-17 4B-17 4B-17 4B-18 4B-18 4B-18 4B-19 4B-19 4B-20 4B-10 Page 4B-1 4 B CHARGING SYSTEM SERVICE MANUAL NUMBER 22 THIS PAGE IS INTENTIONALLY BLANK Page 4B-2 90-860074--1 FEBRUARY 2002 CHARGING SYSTEM SERVICE MANUAL NUMBER 22 NOTICE For information and procedures on Troubleshooting, refer to SECTION 1C. Identification c f d b e a 72078 Mando 65 Amp Alternator a - “EX” Terminal - Excitation Wire b - “S” Terminal - Sensing Wire c - Mando Part Number (Location Not Shown in This View) d - “P” (AC) Terminal e - “L2” Terminal f - “B” Terminal Replacement Parts Warning WARNING Electrical, ignition and fuel system components on your Mercury MerCruiser are designed and manufactured to comply with U.S. Coast Guard Rules and Regulations to minimize risks of fire and explosion. Use of replacement electrical, ignition or fuel system components, which do not comply with these rules and regulations, could result in a fire or explosion hazard and should be avoided. 90-860074--1 FEBRUARY 2002 Page 4B-3 CHARGING SYSTEM SERVICE MANUAL NUMBER 22 Specifications Description Specification Excitation Circuit 1.3-2.5 Volts Current Output 65 Ampere Voltage Output 13.9-14.7 Volts Condenser Capacity .5 MFD 5 mm (3/16 In.) 1 V-Belt Tension 1 : Depress belt with thumb at midway point between circulating pump pulley and alternator. Torque Specifications Page 4B-4 Description Nm lb-in. lb-ft Pulley Nut 58 33 Alternator Brace to Alternator 28 20 Alternator Brace to Engine Block 41 30 Alternator to Mounting Bracket 48 35 Alternator Mounting Bracket to Engine Block 41 30 90-860074--1 FEBRUARY 2002 CHARGING SYSTEM SERVICE MANUAL NUMBER 22 Special Tools Description Part Number Magneto Analyzer 91-76032 Bearing Removal and Installation Kit 91-31229A5 Universal Puller Plate 91-37241 Multi-Meter / DVA Tester 91-99750A1 Ammeter (0-70) Obtain Locally Lubricants / Sealers / Adhesives Description Part Number Liquid Neoprene 92-25711--1 Wire Color Code Abbreviations BLK BLU BRN GRY GRN ORN PNK 90-860074--1 FEBRUARY 2002 Black Blue Brown Gray Green Orange Pink PUR or PPL RED TAN WHT YEL LIT or LT DRK Purple Red Tan White Yellow Light Dark Page 4B-5 CHARGING SYSTEM SERVICE MANUAL NUMBER 22 Precautions General CAUTION The following precautions MUST BE observed when working on the charging system. Failure to observe these precautions may result in serious damage to the alternator or charging system. wDo NOT attempt to polarize the alternator. wDo NOT short across or ground any of the terminals on the alternator, except as specifically instructed in the Troubleshooting Tests. wNEVER disconnect the alternator output lead or battery cables when the alternator is operating wNEVER disconnect regulator lead from alternator regulator terminal when the alternator is operating. wALWAYS remove negative (–) battery cable from battery before working on the charging system. wWhen installing battery, connect battery cables to battery by FIRST installing positive (+) battery cable end on positive (+) battery terminal. Tighten clamp securely. THEN install negative (-) battery cable end on negative (-) battery terminal. Tighten clamp securely wIf a charger or booster battery is to be used, connect it in parallel with existing battery (positive to positive; negative to negative). Electronic Diesel Injection (EDI) Electrical System Precautions CAUTION Avoid damage to the EDI electrical system and components. Refer to the following precautions when working on or around the EDI electrical harness or when adding other electrical accessories: • Do NOT tap accessories into engine harness. • Do NOT puncture wires for testing (Probing). • Do NOT reverse battery leads. • Do NOT splice wires into harness. • Do NOT attempt diagnostics without proper, approved Service Tools. Page 4B-6 90-860074--1 FEBRUARY 2002 SERVICE MANUAL NUMBER 22 CHARGING SYSTEM Battery Precautions - Multiple EDI Engines SITUATION Alternators: Alternators are designed to charge the battery that supplies electrical power to the engine that the alternator is mounted on. When batteries for two different engines are connected, one alternator will supply all of the charging current for both batteries. Normally, the other engine’s alternator will not be required to supply any charging current. EDI Engine Control Module (ECM): The ECM requires a stable voltage source. During multiple engine operation, an onboard electrical device may cause a sudden drain of voltage at the engine’s battery. The voltage may go below the ECM’s minimum required voltage. Also, the alternator on the other engine may now start charging. This could cause a voltage spike in the engine’s electrical system. In either case, the ECM could shut off. When the voltage returns to the range that the ECM requires, the ECM will reset itself. The engine will now operate normally. This ECM shut down usually happens so fast that the engine just seems to have misfired. RECOMMENDATIONS Batteries: Boats with multi-engine EDI power packages require each engine be connected to its own battery. This ensures that the engine’s Electronic Control Module (ECM) has a stable voltage source. Battery Switches: Battery switches should always be positioned so each engine is operating off its own battery. Do NOT operate engines with switches in BOTH or ALL position. In an emergency, another engine’s battery can be used to start an engine with a dead battery. Battery Isolators: Isolators can be used to charge an auxiliary battery used only for accessories. Isolators should not be used to charge the battery of another engine in the boat. Generators: The generator’s battery should be considered another engine’s battery. 90-860074--1 FEBRUARY 2002 Page 4B-7 CHARGING SYSTEM SERVICE MANUAL NUMBER 22 Charging System Components The alternator system consists of the alternator, battery, the ignition switch and the wiring which connects these components. NOTE: The wire color codes vary between models and are not shown. Refer to SECTION 4E Wiring Diagrams for color code information. a c b e d g f h 75420 Typical a - Battery Meter b - Ignition Switch c - Harness Plug and Connector d - Alternator e - Circuit Breaker f - Starter Motor g - Ground Stud h - Battery Page 4B-8 90-860074--1 FEBRUARY 2002 CHARGING SYSTEM SERVICE MANUAL NUMBER 22 Inspection CAUTION Always disconnect battery cables from battery before working around the electrical system components to prevent injury to yourself or damage to electrical system. 1. Inspect entire alternator system for corroded or loose connectors. 2. Check wiring for frayed or worn insulation. 3. Check alternator drive belt for excessive wear, cracks, fraying and glazed surfaces. Also, check drive belt tension and adjust, if necessary, as explained under Drive Belt Tension Adjustment. 4. Check alternator mounting bolts for adequate tightness. 90-860074--1 FEBRUARY 2002 Page 4B-9 CHARGING SYSTEM SERVICE MANUAL NUMBER 22 Troubleshooting Tests (Alternator on Engine) Use the following tests in conjunction with the Troubleshooting in SECTION 1C. Before proceeding with the tests, however, perform the following checks to eliminate possible problem areas. Also observe Precautions, preceding, to prevent damage to alternator system. 1. If problem is an undercharged battery, check to ensure that undercharged condition has not been caused by excessive accessory current draw or by accessories which have accidentally been left on. Also, ensure that undercharged condition has not been caused by operating engine at too low a speed for extended periods of time. 2. Check physical condition and state of charge of battery. Battery MUST BE at least 75% (1.230 specific gravity) of fully charged to obtain valid results in the following tests. If not, charge battery before testing system. 3. Inspect entire alternator system wiring for defects. Check all connections for tightness and cleanliness, particularly battery cable clamps and battery terminals. 4. Check alternator drive belt for excessive wear, cracks, fraying and glazed surfaces and replace if necessary. Also, check drive belt tension and adjust if necessary, as outlined under Drive Belt Tension Adjustment. Circuitry Test Perform the following tests, using a 0-20 volt DC voltmeter, to ensure that all of the circuits between the alternator and the other components within the alternator system are in good condition. Page 4B-10 90-860074--1 FEBRUARY 2002 CHARGING SYSTEM SERVICE MANUAL NUMBER 22 Output Circuit 1. Ensure battery is fully charged with the hydrometer test. 2. Start the engine and increase rpm to approximately 1500 rpm. 3. Check voltage reading. the voltage should be between 13.8 and 14.2 volts. If the reading is below 13,8 volts: 4. Connect positive (+) voltmeter lead to alternator output terminal. 5. Connect negative (–) lead to a ground terminal on alternator. 6. Wiggle engine wiring harness while observing voltmeter. Meter should indicate approximate battery voltage and should not vary. If no reading is obtained, or if reading varies, check alternator output circuit for loose or dirty connections or damaged wiring. d a e c b a b c d e 72784 - Output Wire - BLUE - Excitation Wire - PURPLE - Sensing Wire - RED/PURPLE - Voltmeter (0-20 Volts) - Ground 90-860074--1 FEBRUARY 2002 Page 4B-11 CHARGING SYSTEM SERVICE MANUAL NUMBER 22 Excitation Circuit 1. Connect positive (+) voltmeter lead to tie strap/terminal on alternator and negative (–) lead to a ground terminal on alternator (Test 1). 2. Turn ignition switch to RUN position and note voltmeter reading. Reading should be 1.3 to 2.5 volts. 3. If no reading is obtained, an opening exists in alternator excitation lead or in excitation circuit of regulator. Unplug PURPLE lead from regulator. Connect positive voltmeter lead to PURPLE lead and negative voltmeter leads to ground (Test 2). If voltmeter now indicates approximate battery voltage, voltage regulator is defective and the alternator must be replaced. If no voltage is indicated, check excitation circuit for loose or dirty connections or damaged wiring. 4. If reading is between .75 and 1.1 volts, rotor field circuit probably is shorted or grounded. 5. If reading is between 6.0 and 7.0 volts, rotor field circuit probably is open. TEST 1 TEST 2 d e b c a 72785 a b c d e Page 4B-12 - Excitation Wire - PURPLE - Sensing Wire - RED or GREEN - Tie Strap/Terminal - Voltmeter (0-20 Volts) - Ground 90-860074--1 FEBRUARY 2002 CHARGING SYSTEM SERVICE MANUAL NUMBER 22 Sensing Circuit 1. Unplug RED or GREEN lead from voltage regulator. 2. Connect positive (+) voltmeter lead to RED or GREEN lead and negative (–) voltmeter lead to ground terminal. 3. Voltmeter should indicate battery voltage. If battery voltage is not present, check sensing circuit for loose or dirty connection or damaged wiring. d a e b c 72786 a b c d e - Output Wire - BLUE - Excitation Wire - PURPLE - Sensing Wire - RED or GREEN - Voltmeter (0-20 Volts) - Ground 90-860074--1 FEBRUARY 2002 Page 4B-13 CHARGING SYSTEM SERVICE MANUAL NUMBER 22 Current Output Test Perform this test to check if alternator is capable of producing rated current output, using a 0-80 amp DC ammeter. WARNING Ensure engine compartment is well-ventilated and that there are no gasoline vapors present (during the test) to prevent the possibility of an explosion and/or a fire, should a spark occur. 1. Disconnect negative (–) battery cable from battery. 2. Disconnect BLUE lead from alternator output terminal and connect ammeter in series between lead and output terminal. Connect positive (+) side of ammeter toward output terminal. 3. Reconnect negative battery cable. 4. Turn on all accessories and turn ignition switch to RUN position, and allow glow plug system to operate through one cycle. Turn switch to OFF position. Turn off accessories. 5. Start engine and adjust engine speed to 1500-2000 rpm. Quickly observe ammeter. Reading should be at least 30 amps. 6. If reading is low, stop engine and connect a jumper wire between alternator output terminal and regulator terminal. Repeat Steps 4. and 5. 7. If reading is now within specifications, diodes are faulty. Replace the alternator. 8. If reading is still low with jumper wire connected, perform Voltage Output Test, following. a b e d c 72787 a b c d e Page 4B-14 - Output Wire - BLUE - Ammeter (0-80 Amps) - Jumper Lead - Regulator Terminal - Ground 90-860074--1 FEBRUARY 2002 CHARGING SYSTEM SERVICE MANUAL NUMBER 22 Perform this test to determine if voltage regulator is operating correctly, using a 0-20 volt DC voltmeter. IMPORTANT: Battery MUST BE fully charged (1.260 or above specific gravity) to obtain proper voltage reading in this test. If necessary, charge battery with a battery charger or allow engine to operate a sufficient length of time to fully charge battery before taking reading. 1. Connect positive (+) voltmeter lead to positive battery terminal and negative (–) voltmeter lead to negative terminal. 2. Start engine and operate at fast idle until engine reaches normal operating temperature. Adjust engine speed to 1500-2000 rpm and observe voltmeter for highest reading. Reading should be between 13.9 and 14.7 volts. 3. If reading is high, check for a loose or dirty regulator ground lead connection. If connection is good (and sensing circuit checked out good in Circuitry Test), voltage regulator is faulty and the alternator must be replaced. Ensure that battery cables are disconnected before attempting to remove alternator. d c e b a 72788 a b c d e - Excitation Wire - PURPLE - Sensing Wire - RED or GREEN - Ground Wire - BLACK - Output Wire - BLUE - Voltmeter (0-20 Volts) 90-860074--1 FEBRUARY 2002 Page 4B-15 CHARGING SYSTEM SERVICE MANUAL NUMBER 22 Exploded View 8 9 10 11 A 13 2 3 4 12 1 3 5 7 6 74467 1 - Key 2 - Alternator 3 - Spacer (1 Shown, Some Models May Have 1 Upper and 1 Lower Spacer) 4 - Bracket 5 - Screw and Lockwasher (M14) 6 - Mounting Bolt (M8) 7 - Mounting Nut (M8) 8 - Alternator Brace 9 - Alternator Brace Spacer 10 - Brace Bolt, Washers and Nut (M10) 11 - Tensioning Bolt, Lockwasher and Flat Washer 12 - Pulley, Lockwasher and Nut 13 - Alternator V-Belt Description A Liquid Neoprene Page 4B-16 Part Number 92-25711--1 90-860074--1 FEBRUARY 2002 CHARGING SYSTEM SERVICE MANUAL NUMBER 22 Removal Alternator 1. Disconnect battery cables from battery. 2. Disconnect wiring harness from alternator. 3. Loosen alternator support bracket screw. 4. Remove the drive belt. 5. Remove the alternator brace attaching bolt and washer. 6. Remove the alternator mounting bolt, washer and nut. a b c 78310 a - Alternator Brace b - Brace Bolt c - Alternator Mounting Bolt 7. Remove the alternator. Alternator Bracket 1. Remove the alternator. 2. Remove the bracket mounting bolts. Note the position of the spacer, or of the upper and lower spacers. 3. Remove the bracket. 90-860074--1 FEBRUARY 2002 Page 4B-17 CHARGING SYSTEM SERVICE MANUAL NUMBER 22 Installation Alternator Bracket IMPORTANT: If the mounting bracket has been removed, refer to the Exploded View. Be certain that the mounting spacer and proper length brace spacer are in position for the appropriate engine. 1. Position the spacer, or spacers, between the bracket and the engine block. 2. Install the bracket mounting bolts. Torque the bolts to 41 Nm (30 lb-ft). 3. Install the alternator. Alternator 1. Position the alternator in the mounting bracket. 2. Install the mounting bolt. 3. Position spacer, if equipped, and fasten the alternator brace to the alternator. 4. Position the alternator drive belt on the pulleys and adjust the tension. 5. Torque the alternator brace to alternator bolt to 28 Nm (20 lb-ft). 6. Torque the alternator brace to engine block bolt to 41 Nm (30 lb-ft). 7. Torque the mounting bolt to 48 Nm (35 lb-ft). b e c d a f 74301 a b c d e f Page 4B-18 - Alternator Bracket - Spacer - Brace - Brace To Alternator Bolt - Brace To Block Bolt - Mounting Bolt 90-860074--1 FEBRUARY 2002 CHARGING SYSTEM SERVICE MANUAL NUMBER 22 8. Reconnect the wiring harness to the alternator. Coat terminals with liquid neoprene. d c e b a 72838 a b c d e - Excitation Wire - PURPLE - Sensing Wire - RED or GREEN - Ground Wire - BLACK - Output Wire - BLUE - Charge Indicator Lamp Lead - BROWN 9. Connect battery cables to battery. Battery Isolators Dual Battery Charging Systems NOTE: Mercury MerCruiser engines equipped with a 3-wire, belt driven alternator, can use a battery isolator. Battery isolators allow the addition of an auxiliary (second) battery to the Mercury MerCruiser electrical system. The auxiliary battery is primarily used as a power source for various accessories installed on the boat. The battery isolator will allow the alternator to charge both the cranking and auxiliary batteries at the same time while preventing accessories, connected to the auxiliary battery, from drawing power from the cranking battery. Mercury Marine does not manufacture any battery isolator systems. Battery isolators must be bought from an outside manufacturer. Mercury Marine suggests following the manufacturer’s instructions carefully. IMPORTANT: Alternators used on Mercury MerCruiser engines ARE NOT equipped with an isolation diode. CAUTION Follow battery isolator manufacturer’s instructions for wire gauge. Battery isolator installation must conform to BIA Low Voltage Wiring Standard No. 125-79. 90-860074--1 FEBRUARY 2002 Page 4B-19 CHARGING SYSTEM SERVICE MANUAL NUMBER 22 Battery Isolator Diagram a A B2 2 B1 2 2 2 1. 1 b c (–) RED B+ 2 BLK e d 72934 Typical Alternator a - Isolator b - Alternator c - Starter d - Cranking Battery e - Auxiliary Battery 1 - BLUE Wire From Alternator Battery Terminal 2 - 8 Gauge Minimum 1. Page 4B-20 Sufficient Gauge Wire Spliced To Connect As Shown. 90-860074--1 FEBRUARY 2002 CHARGING SYSTEM SERVICE MANUAL NUMBER 22 THIS PAGE IS INTENTIONALLY BLANK 90-860074--1 FEBRUARY 2002 Page 4B-21 CHARGING SYSTEM SERVICE MANUAL NUMBER 22 THIS PAGE IS INTENTIONALLY BLANK Page 4B-22 90-860074--1 FEBRUARY 2002 GLOW PLUG SYSTEM SERVICE MANUAL NUMBER 22 ELECTRICAL SYSTEMS Section 4C - Glow Plug System Table of Contents Identification . . . . . . . . . . . . . . . . . . . . . . . . . . Specifications . . . . . . . . . . . . . . . . . . . . . . . . . Torque Specifications . . . . . . . . . . . . . . . . . . Lubricants / Sealants / Adhesives . . . . . . . Special Tools . . . . . . . . . . . . . . . . . . . . . . . . . Description . . . . . . . . . . . . . . . . . . . . . . . . . . . Precautions . . . . . . . . . . . . . . . . . . . . . . . . . . Glow Plug Testing (Prior to Removal) . . . . Removal . . . . . . . . . . . . . . . . . . . . . . . . . . . . . Cleaning . . . . . . . . . . . . . . . . . . . . . . . . . . . . . 90-860074--1 FEBRUARY 2002 4C-3 4C-3 4C-4 4C-4 4C-4 4C-4 4C-4 4C-5 4C-6 4C-7 Inspection . . . . . . . . . . . . . . . . . . . . . . . . . . . . 4C-7 Installation . . . . . . . . . . . . . . . . . . . . . . . . . . . 4C-8 Glow Plug Actuator Relay and Auxiliary Relay . . . . . . . . . . . . . . . . . . . . . . . . . . . . . . . 4C-9 Testing . . . . . . . . . . . . . . . . . . . . . . . . . . . . 4C-9 Removal . . . . . . . . . . . . . . . . . . . . . . . . . 4C-10 Cleaning . . . . . . . . . . . . . . . . . . . . . . . . . 4C-10 Inspection . . . . . . . . . . . . . . . . . . . . . . . . 4C-10 Installation . . . . . . . . . . . . . . . . . . . . . . . . 4C-10 Glow Plug Circuit Diagram . . . . . . . . . . . . . 4C-11 Page 4C-1 4 C GLOW PLUG SYSTEM SERVICE MANUAL NUMBER 22 THIS PAGE IS INTENTIONALLY BLANK Page 4C-2 90-860074--1 FEBRUARY 2002 SERVICE MANUAL NUMBER 22 GLOW PLUG SYSTEM Identification 75496 D2.8L D-Tronic and D4.2L D-Tronic Glow Plug Specifications NOTE: Glow plug system will work only when engine temperature is below 50 degrees C (22 degrees F.). D2.8L D-TRONIC ENGINE Description Glow Plug Diameter and Thread Nominal Voltage Current Draw after 30 Seconds of Operation Preheat Time and Afterglow Time Voltage drop, with test current after 30 seconds Specification M12 x 1.25 11 Volts 7.5 - 9.5 Amps Controlled by ECM 0.63 - 0.77 Volt D4.2L D-TRONIC ENGINE Description Glow Plug Diameter and Thread Nominal Voltage Current Draw after 30 Seconds of Operation Preheat Time and Afterglow Time Voltage drop, with test current after 30 seconds 90-860074--1 FEBRUARY 2002 Specification M12 x 1.25 11 Volts 7.5 - 9.5 Amps Controlled by ECM 0.50 - 0.60 Volt Page 4C-3 GLOW PLUG SYSTEM SERVICE MANUAL NUMBER 22 Torque Specifications NOTE: Securely tighten all fasteners not listed below. Description Nm Glow Plug 23 lb-in. lb-ft 17 Lubricants / Sealants / Adhesives Description Part Number Liquid Neoprene 92-25711--3 Special Tools Description Part Number Volt / Ohm Meter 91-93572 Description The D-Tronic engines are not equipped with glow plugs as standard equipment. Description and operation are explained in case the optional kit is installed. This glow plug system consists of the ECT (Engine Coolant Temperature) sensor, the ECM, two power supply relays, glow plug harness and four or six glow plugs. The time period during which the glow plugs are turned ON (supplied 12 volts) depends directly on the temperature of the engine coolant as determined by the ECT sensor and the altitude of the engine as sensed by the BARO pressure sensor located inside the ECM. The ignition OFF time in which the engine can be restarted without the preheat cycle is about 20 seconds. When the ignition switch is turned ON, a preheat indicator lamp will illuminate indicating that the system is activated. Once proper engine temperature is reached (approximately 60 degrees C [140 degrees F.] ), the preheat indicator lamp goes out and an after-glow operation of the glow plugs continues depending on the ECM signal. This cyclic operation of the glow plugs provides for reduced white smoke during start-up, reduced cold engine noise and reduced emissions. Precautions WARNING Always disconnect battery cables from battery before working around electrical system components to prevent injury, or damage to the electrical system. Page 4C-4 90-860074--1 FEBRUARY 2002 GLOW PLUG SYSTEM SERVICE MANUAL NUMBER 22 Glow Plug Testing (Prior to Removal) 10. Disconnect battery cables from battery. 11. Remove hex nut and washer from glow plug terminal. 12. Remove voltage supply wire. 13. Remove glow plug connecting wire from glow plug terminal. c b a 77940 a - Voltage Supply Wire b - Glow Plug Terminal c - Glow Plug Connecting Wire 14. Connect ohmmeter between engine ground and glow plug terminal. Continuity should exist. If no continuity exists, glow plug is faulty. 90-860074--1 FEBRUARY 2002 Page 4C-5 GLOW PLUG SYSTEM SERVICE MANUAL NUMBER 22 Removal 1. Disconnect battery cables from battery. 2. Remove hex nut and washer from glow plug terminal. 3. Remove voltage supply wire. 4. Remove glow plug connecting wire from glow plug terminal. c b a 77940 a - Voltage Supply Wire b - Glow Plug Terminal c - Glow Plug Connecting Wire IMPORTANT: Avoid contaminating cylinders. Clean any corrosion or debris away from around glow plug before removal. 5. Clean any dirt away from around glow plug and opening in cylinder head. 6. Remove glow plug. Page 4C-6 90-860074--1 FEBRUARY 2002 GLOW PLUG SYSTEM SERVICE MANUAL NUMBER 22 Cleaning 1. Clean contact area of connecting wire ring terminals. 2. Clean the power supply wire terminal end. 3. Clean cylinder head glow plug seat area. 4. Clean the glow plug threaded areas, seat and heating element (tip). Inspection 1. With glow plug removed, connect ohmmeter between glow plug terminal (+) and glow plug external (–) threads. Continuity should exist. If no continuity exists, glow plug is faulty. 2. Connect a VOM and check resistance between glow plug terminal (+) and glow plug external (–) threads. Refer to Specifications for value. a b 73198 Typical a - Terminal (+) b - External Threads (–) 90-860074--1 FEBRUARY 2002 Page 4C-7 GLOW PLUG SYSTEM SERVICE MANUAL NUMBER 22 Installation 1. Install glow plug. Torque to 23 Nm (17 lb-ft). 2. Ensure contact areas are clean. CAUTION Avoid shorting electrical circuits. Some voltage supply wire ring terminal ends are large and could contact the cylinder head which is grounded (–). Be certain ring terminal is isolated to the glow plug terminal. 3. Attach connecting wire to glow plug terminal. Ensure that the voltage supply wire is present where previously removed. Supply wire must not contact the cylinder head when installed. c a b 77940 Typical a - Contact Areas b - Voltage Supply Wire Ring Terminal End c - Connecting Wire 4. Coat all connections with liquid neoprene. 5. Connect battery cables to battery. Page 4C-8 90-860074--1 FEBRUARY 2002 GLOW PLUG SYSTEM SERVICE MANUAL NUMBER 22 Glow Plug Actuator Relay and Auxiliary Relay For more information on circuit description and testing refer to SECTION 5E - Diagnostic Circuit Checks. Testing 1. Ensure battery is fully charged. 2. Check the following before testing relays: a. All wires in circuit are connected. b. Plug-in connectors are fully engaged. c. All connections are corrosion free. d. Engine Coolant Temperature switch appears to be present and in usable condition. e. Circuit breakers on electrical box are not open (tripped). f. Fuse at instrument panel is not defective (blown). 3. The following information applies to operations/tests of the main Glow Plug Actuator Relay: NOTE: The relay numbers can be found on the bottom of the relay. • Terminal 30 is connected to battery voltage through a circuit breaker. • Terminal 86 is connected to terminal 30. • Terminal 87 is connected (a circuit is formed) to terminal 30 in the energized (ON) position. Terminal 87 then supplies battery voltage to one half of the engines glow plugs and to the glow Plug Auxiliary Relay. • Terminal 85 is grounded by the ECM, causing the relay to be energized. 4. The following information applies to operations/tests of the Glow Plug Auxiliary Relay: • Terminal 30 is connected to battery voltage through a circuit breaker. • Terminal 86 is connected to terminal 30. • Terminal 87 is connected (a circuit is formed) to terminal 30 in the energized (ON) position. Terminal 87 then supplies battery voltage to one half of the engines glow plugs. • Terminal 85 is grounded causing the relay to be energized. 90-860074--1 FEBRUARY 2002 Page 4C-9 GLOW PLUG SYSTEM SERVICE MANUAL NUMBER 22 Removal 1. Remove electrical box cover. 2. Detach relay from inside of electrical box. 3. Disconnect electrical harness connector and remove relay. Cleaning 1. Clean exterior with a dry cloth. 2. Clean terminals with a suitable cleaner. Inspection 1. Look for evidence of any physical damage to base or connector surfaces of relays. 2. Visually inspect electrical pins of ECT for straightness and no corrosion. 3. Visually inspect connectors on the wiring harness for corrosion and for terminals that may have backed out of the harness. Installation 1. Insert electrical connector onto relay. 2. Attach relay to electrical box. 3. Install electrical box cover. Page 4C-10 90-860074--1 FEBRUARY 2002 GLOW PLUG SYSTEM SERVICE MANUAL NUMBER 22 Glow Plug Circuit Diagram NOTE: For additional information refer to SECTION 5E. b c b BRN BLK/YEL BLK BRN 85 86 87 30 86 85 30 87 BRN f RED BLU/YEL g BLU/YEL BRN h RED/YEL RED/YEL e d BRN a b c d e f g h BRN a 75476 - Glow Plug(s) (Dashed Lines Indicate - Not Present on Four Cylinder Models) - ECM Circuit Path to Glow Plug Indicator Lamp - ECM Supplied Ground (–) Path to Actuator Relay - Starter Positive Terminal (Battery +) - Glow Plug (Actuator) Relay - Glow Plug Auxiliary Relay - Circuit Breaker (60 Amp) - Circuit Breaker (60 Amp) 90-860074--1 FEBRUARY 2002 Page 4C-11 GLOW PLUG SYSTEM SERVICE MANUAL NUMBER 22 THIS PAGE IS INTENTIONALLY BLANK Page 4C-12 90-860074--1 FEBRUARY 2002 INSTRUMENTATION SERVICE MANUAL NUMBER 22 ELECTRICAL SYSTEMS Section 4D - Instrumentation Table of Contents Identification . . . . . . . . . . . . . . . . . . . . . . . . . . 4D-3 Gauges . . . . . . . . . . . . . . . . . . . . . . . . . . . 4D-3 Panels . . . . . . . . . . . . . . . . . . . . . . . . . . . . 4D-3 Special Tools . . . . . . . . . . . . . . . . . . . . . . . . . 4D-4 Tools . . . . . . . . . . . . . . . . . . . . . . . . . . . . . . . . 4D-4 Lubricants / Sealants / Adhesives . . . . . . . 4D-4 Wire Color Abbreviations . . . . . . . . . . . . . . . 4D-4 Precautions . . . . . . . . . . . . . . . . . . . . . . . . . . 4D-5 General Information . . . . . . . . . . . . . . . . . . . 4D-6 Special Information . . . . . . . . . . . . . . . . . . . . 4D-6 Tachometer . . . . . . . . . . . . . . . . . . . . . . . . 4D-6 QSI Series Gauge Lighting Options . . . 4D-7 Gauges . . . . . . . . . . . . . . . . . . . . . . . . . . . . . . 4D-8 Removal . . . . . . . . . . . . . . . . . . . . . . . . . . 4D-8 Testing . . . . . . . . . . . . . . . . . . . . . . . . . . . . 4D-8 Installation . . . . . . . . . . . . . . . . . . . . . . . . 4D-11 Senders . . . . . . . . . . . . . . . . . . . . . . . . . . . . . 4D-11 90-860074--1 FEBRUARY 2002 Oil Pressure . . . . . . . . . . . . . . . . . . . . . . Water Temperature - Primary Station . Primary Station Switches . . . . . . . . . . . . . . Ignition Key Switch . . . . . . . . . . . . . . . . Audio Warning Test and Panel Light Switch . . . . . . . . . . . . . . . . . . . . . . . . . . . Audio Warning System . . . . . . . . . . . . . . . . Alarm . . . . . . . . . . . . . . . . . . . . . . . . . . . . Oil Pressure Switch . . . . . . . . . . . . . . . . Water Temperature Switch / Sender . . Transmission Fluid Temperature Switch . . . . . . . . . . . . . . . . . . . . . . . . . . . Second Station Extension Harness . . . . . Remote Control / Neutral Start Safety Circuit . . . . . . . . . . . . . . . . . . . . . . . . . . . . . . Primary Station . . . . . . . . . . . . . . . . . . . . Secondary Station . . . . . . . . . . . . . . . . . 4D-11 4D-13 4D-15 4D-15 4D-17 4D-19 4D-19 4D-20 4D-21 4D-24 4D-26 4D-29 4D-29 4D-30 Page 4D-1 4 D INSTRUMENTATION SERVICE MANUAL NUMBER 22 THIS PAGE IS INTENTIONALLY BLANK Page 4D-2 90-860074--1 FEBRUARY 2002 INSTRUMENTATION SERVICE MANUAL NUMBER 22 NOTICE For information and procedures on Troubleshooting refer to SECTION 1C. Identification Gauges QUICKSILVER INSTRUMENTS NOTE: One of three distinct series of Quicksilver gauges may be installed. Aside from different gauge face appearances and styling, the back of the gauges and wiring connections are different. 72965 Typical QSI Series 77333 Typical Admiral Series (Back of Flagship Series Similar) Panels QUICKSILVER INSTRUMENTS a b 73546 Typical Quicksilver Instrumentation a - Gauges b - Engine System Monitor Panel 90-860074--1 FEBRUARY 2002 Page 4D-3 INSTRUMENTATION SERVICE MANUAL NUMBER 22 Special Tools Description Part Number MultiMeter 91-99750A1 DMT 2000A Digital MultiMeter 91-854009A2 Equipment for performing tests (suitable container, thermometer, suitable heat source, sandblasting sand or equivalent and a 12 volt Obtain Locally power source) Diesel Timing Tool or suitable service tachometer Obtain Locally Tools Kent-Moore Tools Kent-Moore Tools, Inc. 29784 Little Mack Roseville, MI 48066 Phone: (313) 774-9500 Description Part Number Connector Test Adapter Kit J-35616-A Lubricants / Sealants / Adhesives Description Part Number Liquid Neoprene 92-25711--3 Loctite Pipe Sealant with Teflon Obtain Locally Wire Color Abbreviations BLK BLU BRN GRY GRN ORN PNK Page 4D-4 Black Blue Brown Gray Green Orange Pink PUR or PPL RED TAN WHT YEL LIT or LT DRK Purple Red Tan White Yellow Light Dark 90-860074--1 FEBRUARY 2002 INSTRUMENTATION SERVICE MANUAL NUMBER 22 Precautions WARNING Always disconnect battery cables from battery before working around electrical system components to prevent injury to yourself or damage to electrical system. CAUTION Avoid short circuits. It may be necessary to remove instrument panel from dashboard to gain access to instruments and switches. Do not allow wires to come in contact with metal or other wires. WARNING Switch and sender testing involves the use of intense heat. Failure to follow appropriate procedures or warnings can cause burns which can result in severe personal injury. While performing the following test, observe these general precautions: • Wear personal protective clothing such as rubber gloves, a non-flammable apron and eye protection - preferably full face shield or safety glasses. • The appropriate heat source should only be electric. Heat source should be operated by a qualified person. Follow all instructions of the manufacturer of the heat source. The heat source should be checked each time it is used to ensure it is functioning properly. • The thermometer used in the test should be a high- temperature thermometer with a maximum reading of at least 150°C (300°F). Under no circumstances should the operator allow temperatures to exceed test specifications. • Perform test only in a well ventilated area. • Use a suitable container, such as metal, to hold the sand. Avoid use of glass containers unless the operator first confirms for himself/herself that the glass container is an appropriate high-temperature vessel. • Because the components will reach high temperatures Do NOT handle materials or components until COMPLETELY cooled. WARNING Use only clean, dry sand such as used for general sandblasting purposes. Use of sand containing contaminants could result in hazards such as fire, short circuiting, hot-spots or other hazards. 90-860074--1 FEBRUARY 2002 Page 4D-5 INSTRUMENTATION SERVICE MANUAL NUMBER 22 General Information IMPORTANT: If all instruments appear suspect, an electrical overload may have occurred. A fuse may be defective or a circuit breaker may be tripped open. The cause must be found and corrected before replacing fuse or resetting circuit breaker. IMPORTANT: If all instruments appear suspect, check the main harness or electrical connector to ensure good contact. Before testing individual instruments, check the following: • Battery is fully charged. • Circuit breaker is closed. • All wires in circuit are connected. • All connections are tight and corrosion free. • Connectors are fully engaged. CAUTION Avoid short circuits. It may be necessary to remove instrument panel or Engine System Monitor panel from dashboard to gain access to instruments and switches. Do not allow wires to come in contact with metal or other wires. Special Information Tachometer If using the Quicksilver Tachometer provided for the D2.8L D-Tronic and D4.2L D-Tronic Engines engine packages, the appropriate setting of the switch located on the back of the tachometer is given in the following chart. Tachometer Switch Setting Page 4D-6 Model Number of Cylinders Switch Position D2.8L D-Tronic 4 1 D4.2L D-Tronic 6 2 90-860074--1 FEBRUARY 2002 INSTRUMENTATION SERVICE MANUAL NUMBER 22 QSI Series Gauge Lighting Options These gauges are equipped with optional illumination lighting. Light bulb socket can be removed and contacts can be aligned to be used with ignition switch lighting circuit +12 V or separate instrumentation lighting circuit LT. Standard position on diesel products is for use with the separate Panel Lights/Audio Test switch. IMPORTANT: Light socket must be removed from gauge and turned when adjusting lighting option to desired setting. Turning socket while still installed in gauge could result in damage to gauge or socket. NOTE: For different lighting effects, colored sleeves are available through the Quicksilver Accessories and can be assembled to the bulb. b a a 72968 72969 Separate Instrumentation Lighting Circuit Position (Standard Position) Ignition Switch Lighting Circuit Position (Optional Position) c - +12 V Power Supply from Ignition Switch d - +12 V Power Supply from Panel Lights/Audio Test Switch 90-860074--1 FEBRUARY 2002 Page 4D-7 INSTRUMENTATION SERVICE MANUAL NUMBER 22 Gauges IMPORTANT: If testing proves a gauge to be defective, it must be replaced as there is no repair available. Removal 1. Disconnect battery cables. 2. Remove wires from back of gauge. 3. Disconnect light socket wiring, if separate. 4. Remove holding strap and remove gauge. Testing OIL PRESSURE AND WATER TEMPERATURE 1. Turn ignition switch to the “OFF” position. 2. Remove signal wire from terminal SEND (“S”). a 72819 a - Sender Wire Lead 3. Turn ignition switch to the “RUN” position. Gauge being tested must be at position A. a a 73288 Typical a - Needle at Position A 4. Turn ignition switch to the “OFF” position. Page 4D-8 90-860074--1 FEBRUARY 2002 INSTRUMENTATION SERVICE MANUAL NUMBER 22 5. Connect jumper wire from terminal G (GND) to terminal SEND (“S”). a 72748 a - Jumper Wire 6. Turn ignition switch to the “RUN” position. Gauge being tested must be at position B. a a 73289 Typical a - Needle at Position B CRUISELOG (ENGINE HOUR METER) 1. Remove cables from battery and fully charge battery. 2. Remove wires from back of gauge. 3. Connect positive (+) jumper lead from battery to gauge terminal + (12 V). 4. Connect negative (–) jumper lead from battery to gauge terminal “GND” (ground). 72750 72815 5. Observe gauge run indicator on face of gauge. If indicator is turning, the gauge is operable. If indicator is not turning, replace gauge 90-860074--1 FEBRUARY 2002 Page 4D-9 INSTRUMENTATION SERVICE MANUAL NUMBER 22 VOLT METER GAUGE 1. Remove cables from battery and fully charge battery. 2. Remove wires from back of gauge. 3. Connect negative (–) jumper lead from battery to gauge terminal G (GND). 4. Connect positive (+) jumper lead from a 12 Volt power source, or battery, to gauge terminal I or +12 V. b a 72750 a - Volt Meter b - 12 Volt Power Source 5. Check gauge reading; if not indicating battery voltage, as shown, replace gauge. a 73290 Typical a - Needle Indicating Battery Voltage TACHOMETER 1. If the gauge is not accurate, be certain the switch on the back of the tachometer is set properly. Refer to Special Information - Tachometer. 2. Replace if not within specifications. Page 4D-10 Tachometer Type Allowable Range 5000 rpm maximum + 100 rpm 90-860074--1 FEBRUARY 2002 INSTRUMENTATION SERVICE MANUAL NUMBER 22 Installation 1. Position gauge assembly in appropriate mounting hole. 2. Install holding strap and nuts. Tighten nuts evenly and securely. IMPORTANT: Do not distort case or bracket by over tightening. 3. Connect ground wire to ground terminal, if gauge is not mounted in metal panel. 4. Connect other wires to gauge as shown in SECTION 4E - Wiring Diagrams. 5. Install gauge light socket. 6. Coat all terminals with liquid neoprene. 7. Reconnect battery cables to battery. Senders NOTE: Refer to SECTION 5 for information on the Engine Coolant Temperature (ECT)switch. Oil Pressure REMOVAL 1. Remove harness wire from sender. 2. Using a suitable wrench to hold the adaptor fitting to prevent loosening of main bearing locating screw, unscrew the sender. a b c d 74281 a b c d - Harness Wire - Oil Pressure Sender - Adaptor Fitting - Main Bearing Locating Screw 90-860074--1 FEBRUARY 2002 Page 4D-11 INSTRUMENTATION SERVICE MANUAL NUMBER 22 TESTING IMPORTANT: Use the following test procedure for checking accuracy of oil pressure sender only. If oil pressure gauge indicates zero oil pressure, refer to SECTION 1C - Troubleshooting. 1. Remove harness wire from sender. Temporarily insulate the wire to avoid a possible short circuit. 2. Install a manual pressure gauge graduated in at least 100 kPa or 1 bar (10 psi) increments, using a suitable T-fitting arrangement with the existing sender and adaptor or fitting. 3. Connect an ohmmeter between sender terminal and sender case. NOTE: Sender shown removed for visual clarity. a a c b 70686 72936 74281 a - Oil Pressure Sender b - Adaptor Fitting c - Manual Pressure Gauge Installation Location 4. Check the resistance values of the sender at pressures as shown and verified on manual gauge with engine running. Replace sender if values are not correct. Single Station Sender - 805267 Oil Pressure kPa (psi) Ohms Reading 0 (0) 240 15 Ω 413.7 (60) 103 15 Ω 5. When replacing sender, coat threads with Loctite Pipe Sealant with Teflon and install. Tighten securely. Page 4D-12 90-860074--1 FEBRUARY 2002 INSTRUMENTATION SERVICE MANUAL NUMBER 22 Water Temperature - Primary Station REMOVAL 1. Drain the closed cooling system. 2. Remove harness wiring from temperature switch located behind the electrical box bracket and accessible through a hole in the bracket, as shown. b c a 75298 Typical a - Harness Wiring b - Water Temperature Sender c - Sealing Washer 3. Counter-hold the adaptor with a separate wrench. 4. Remove the sender and sealing washer. TESTING IMPORTANT: Use the following test to determine the accuracy of the Water Temperature Sender gauge circuit. If gauge indicates NO temperature when running engine refer to the SECTION 1C - Troubleshooting. NOTICE Read WARNING about switch and sender testing in Precautions at front of this section before proceeding with tests. 90-860074--1 FEBRUARY 2002 Page 4D-13 INSTRUMENTATION SERVICE MANUAL NUMBER 22 1. Connect an ohmmeter between sender terminal G and switch hex (case) for ground (–) as shown. 70686 2. Using a suitable container, thermometer and heat source, suspend the sender with tip in sand. 3. Heat sand and observe temperature on thermometer. 4. As temperature rises, ohmmeter readings must be within the ranges specified for each temperature. b e d a c 70688 a b c d e - Suitable Container - Thermometer - Heat Source - Water Temperature Sender - Ohmmeter Leads Test Temperature Ohms Reading 60 Degrees C (140 Degrees F.) 121 - 147 90 Degrees C (194 Degrees F.) 47 - 55 100 Degrees C (212 Degrees F.) 36 - 41 NOTE: While sand cools you may recheck ohmmeter readings. 5. Turn heat source OFF. Allow sand and components to cool. Page 4D-14 90-860074--1 FEBRUARY 2002 INSTRUMENTATION SERVICE MANUAL NUMBER 22 INSTALLATION 1. Apply Perfect Seal to threads of sender. 2. Counter-hold the adaptor with a separate wrench and install the sender and sealing washer. 3. Torque the temperature sender to the adapter. Maximum torque is 25 Nm (18 lb-ft). Do NOT overtorque. 4. Connect harness wiring. Apply liquid neoprene to the terminals. 5. Refill closed cooling system. Primary Station Switches IMPORTANT: Disconnect battery cables from battery before testing switches with wires still connected to switches. IMPORTANT: The decal, or decals, on the side of the toggle switches with the arrow and the word UP, refer to the position of the switch when installed on the panel. Ignition Key Switch REMOVAL 1. Disconnect battery cables from battery. 2. Remove nut retaining ignition key switch to Engine System Monitor Panel. c 4 b a 71891 a - Panel b - Switch c - Nut 3. Remove wires from back of switch. 90-860074--1 FEBRUARY 2002 Page 4D-15 INSTRUMENTATION SERVICE MANUAL NUMBER 22 TESTING 1. Before testing key switch, check all fuses and/or circuit breakers in electrical circuit that could prevent operation of starter. IMPORTANT: Disconnect battery cables from battery before testing ignition key switch with wires still connected to switch. 2. Disconnect battery cables from battery, if proceeding to test switch with wires still connected. With key switch in the “OFF” position, there should be no continuity between switch terminals. 3. With key switch in the “RUN” position, continuity will exist between switch terminals B to I. There should be no continuity between terminal S and any other terminals. 4. With key switch in the “START”, continuity will exist between terminals B to I and B to S. 5. Terminals are to make contact at angles shown and to stay in contact condition as switch is rotated toward the “START” position. 6. If ignition key switch tests bad, unscrew or unsolder wire connections and remove switch. Test switch again. If switch tests good, wiring in harness is bad. There should be no continuity between any switch harness wires with key switch removed. h g f e c d a B S I b 74103 a b c d e f g h Page 4D-16 - Key (Front) View - Back View - Key - OFF - Continuity B to I Terminals - RUN - Continuity, B to S Terminals - START Position B to I B to S OFF No Continuity No Continuity RUN Continuity No Continuity START Continuity Continuity 90-860074--1 FEBRUARY 2002 INSTRUMENTATION SERVICE MANUAL NUMBER 22 Audio Warning Test and Panel Light Switch The switch provided for the audio warning test and panel (dash) lights is a three-position toggle switch. It must be wired and installed correctly to provide proper operation of the systems. REMOVAL 1. Remove hex nut retaining switch to Engine System Monitor Panel. 2. Remove wires from back of switch. TESTING 1. With switch lever toggled DOWN to its spring loaded AUDIO TEST position continuity should exist between terminal numbers 1 and 2 (as indicated by decals). If no continuity exists, replace switch. 2. With switch lever toggled UP to the panel light ON position, continuity should exist between terminal numbers 4 and 5 as indicated by decals. If no continuity exists, replace switch. a 2 3 3 c UP 5 4 87-805675 1 2 6 1 UP d É É É É b 73369 a - Audio Test/Panel Light Switch b - Spring-Loaded Audio Test Portion (Direction of Movement DOWN When Installed) c - Terminal Number d - Terminal 90-860074--1 FEBRUARY 2002 Page 4D-17 INSTRUMENTATION SERVICE MANUAL NUMBER 22 INSTALLATION 1. Using screws provided, connect the listed color coded wires to numbered switch terminals as shown. 2. Install switch in Engine System Monitor panel. Tighten hex nut securely to prevent switch from turning in its mounting hole. Do NOT overtighten. a d 3 c b ÉÉ ÉÉ ÉÉ f UP UP 2 87-805675 1 a e b 6 1 5 2 4 3 73369 71886 a - Audio Test/Panel Light Switch b - Spring-Loaded Audio Test Portion (Direction of Movement DOWN When Installed) c - Terminal Number d - Terminal e - Jam Nut f - Locking Washer g - Engine System Monitor Panel h - Hex Nut D2.8L D-Tronic and D4.2L D-Tronic Harness Wire WHITE/RED And WHITE/ YELLOW OR 1 TAN/WHITE And TAN/ BLACK BLACK PINK Or PURPLE1 GREEN Connect To: Terminal Number " 1 " 2 " 4 " 5 1 Model dependent. 3. Make sure that all connections are secure. Seal terminals with liquid neoprene. Page 4D-18 90-860074--1 FEBRUARY 2002 INSTRUMENTATION SERVICE MANUAL NUMBER 22 Audio Warning System The Audio Warning System is divided into two separate circuits. Both circuits have an individual audio warning alarm that does NOT include any time delay. One circuit consists of the engine water temperature switch and related wiring. If this switch is activated (closed) during the operation of the engine, the alarm will sound and the Engine System Monitor panel light will be illuminated until the problem is corrected or the electrical system is shut off (key switched “OFF”). The other circuit consists of the engine oil pressure switch, the transmission temperature switch (Inboard models) or the gear lube monitor bottle switch (Sterndrive models) and related wiring. These switches are connected to the audio warning alarm. Likewise, the Engine System Monitor panel light is illuminated whenever the respective switch is activated (closed) until the problem is corrected or the electrical system is shut off (key switched “OFF”). The function of an audio warning alarm can be tested by holding the toggle lever of the Audio Test switch, on the Engine System Monitor Panel, DOWN momentarily, with the key switch in the “RUN” position. If the alarm sounds it is operable. Alarm WARNING The following test involves the use of electricity. Failure to follow appropriate procedures can cause burns or shock which can result in severe personal injury or death. TESTING 1. If the alarm does not sound: a. Disconnect bullet connectors from suspect alarm. b. Connect a 12 volt positive (+) jumper wire to where the positive (+) wire was connected. c. Connect the remaining wire to a clean, unpainted ground or negative (–) connection using a jumper wire. d. If the alarm does not sound, replace it. 2. If the alarm worked in Step 1., reconnect the wires and do the following. a. Remove the harness wires at the switches involved and briefly jumper the wire ends together. With the key switch in the RUN position, the alarm should sound. b. If the alarm sounds, the problem is in the switch. Refer to Testing individual switches as follows, and test the suspect switch. Replace as instructed. 3. If the alarm did not sound in Step 2., refer to wiring diagrams and check wires or connectors to the individual switches. 4. Repair as needed. 90-860074--1 FEBRUARY 2002 Page 4D-19 INSTRUMENTATION SERVICE MANUAL NUMBER 22 Oil Pressure Switch TESTING When the engine is stopped the switch is normally closed. 1. Remove the harness wire from the switch. Insulate to avoid possible short circuit. 2. Connect continuity meter between switch terminal and switch case (negative –). With the engine stopped the meter should indicate full continuity. NOTE: Sender shown removed for visual clarity. c 70686 a b 74446 Typical a - Oil Pressure Audio Warning Switch b - Harness Wire c - Continuity Meter And Connection Points Oil Pressure kPa (psi) Switch Condition 0 (0) Closed 31 - 52 (4.5 - 7.5) Open INSTALLATION 1. Coat threads of switch with Loctite Pipe Sealant with Teflon. 2. Install switch and tighten securely. 3. Connect harness wire. Seal terminal with Liquid Neoprene. Page 4D-20 90-860074--1 FEBRUARY 2002 INSTRUMENTATION SERVICE MANUAL NUMBER 22 Water Temperature Switch / Sender When the engine is COLD the audio warning circuit is normally open. REMOVAL 1. Drain the closed cooling system. 2. Remove harness wiring from temperature switch / sender located behind the electrical box bracket and accessible through a hole in the bracket, as shown. 3. Counter-hold the adaptor with a separate wrench. 4. Remove the sender and sealing washer. b c a 75298 Typical a - Harness Wiring b - Water Temperature Switch / Sender c - Sealing Washer 90-860074--1 FEBRUARY 2002 Page 4D-21 INSTRUMENTATION SERVICE MANUAL NUMBER 22 TESTING 1. With engine COLD, remove wiring from switch/sender terminals. Note position on switch/sender for terminal referred to as W. b a 78189 Top View a - Water Temperature Switch/Sender b - Terminal W - Audio Warning Switch Circuit 2. Refer to the proceeding and connect a continuity meter between switch terminal W and sender hex case. a. No continuity should exist. b. If continuity exists, replace sender. NOTICE Read WARNING about switch and sender testing in Precautions at front of this section before proceeding with tests. 3. To test switch circuit for closing (alarm ON ), as if coolant temperature rises above operating specifications, follow instructions a. - g. a. Remove the switch/sender. b. Refer to top view of switch/sender in Step 1., and using suitable jumper leads connect alarm terminal – to switch terminal W. c. Then, using suitable jumpers and being careful to avoid short circuits, connect the negative (–) of a 12 volt power source to sender case and the positive (+) to the + on the alarm , as shown following. d. Using suitable container, thermometer and heat source, suspend switch with tip in sand. Page 4D-22 90-860074--1 FEBRUARY 2002 INSTRUMENTATION SERVICE MANUAL NUMBER 22 e. Heat sand and observe temperature on thermometer. e d b 71772 a c 70758 a b c d e f f. - Suitable Container - Thermometer - Heat Source - Water Temperature Switch/Sender - 12 Volt Power Source and Jumper Leads - Audio Warning Alarm With Jumper Lead Replace switch / sender if it does not close (alarm ON ) within the range of temperatures indicated in chart below. Test Temperature Switch Condition 102 - 106 Degrees C (215 - 220 Degrees F.) Closed g. Turn heat source OFF. Allow sand and components to cool. INSTALLATION 1. Apply Perfect Seal to threads of switch / sender. 2. Counter-hold the adaptor with a separate wrench and install the switch / sender and sealing washer. 3. Torque the switch / sender to the adapter. Maximum torque is 25 Nm (18 lb-ft). Do NOT overtorque. 4. Connect harness wiring. Apply liquid neoprene to the terminals. 5. Refill closed cooling system. 90-860074--1 FEBRUARY 2002 Page 4D-23 INSTRUMENTATION SERVICE MANUAL NUMBER 22 Transmission Fluid Temperature Switch When the transmission is COLD or at a temperature less than as shown (refer to Testing - Test Temperature Chart), the switch is open. REMOVAL 1. Disconnect harness wires at switch. 2. Remove the switch and sealing washer. b a 72770 Typical Transmission a - Transmission Fluid Temperature Switch with Sealing Washer b - Harness Wires TESTING 1. With the transmission COLD, connect one lead of an ohmmeter to one terminal of the transmission switch. Connect the other lead of ohmmeter to other terminal. NOTE: Switch shown removed for visual clarity only. a b 72771 a - Ohmmeter Leads b - Transmission Fluid Temperature Switch 2. Switch should show no continuity. Replace switch, if continuity exists. Page 4D-24 90-860074--1 FEBRUARY 2002 INSTRUMENTATION SERVICE MANUAL NUMBER 22 NOTICE Read WARNING about switch and sender testing in Precautions at front of this section before proceeding with tests. 3. With an ohmmeter connected as in Step 1., use a suitable container, thermometer and heat source and suspend sender with tip in sand. 4. Heat sand and observe thermometer. 5. As temperature rises, switch will close and ohmmeter will indicate continuity. Refer to chart below for specifications. e b a d c 72772 a b c d e f - Suitable Container - Thermometer - Heat Source - Transmission Fluid Temperature Switch - Ohmmeter Leads - Audio Warning Buzzer With Jumper Lead Test Temperature Switch Condition 126 - 138 Degrees C (258 - 282 Degrees F.) Closed 103 - 117 Degrees C (218 - 242 Degrees F.) Open 6. Turn heat source off. Allow sand to cool. Note thermometer reading to ensure switch opens at specified temperature while cooling. 7. Replace switch if switch fails to either open or close within the specified temperature. INSTALLATION 1. Apply Perfect Seal to threads of switch. 2. Install switch and sealing washer in transmission. Tighten securely. 3. Reconnect harness wires and coat with liquid neoprene. 4. Check transmission fluid level. 90-860074--1 FEBRUARY 2002 Page 4D-25 INSTRUMENTATION SERVICE MANUAL NUMBER 22 Second Station Extension Harness 5. Connect and tighten threaded collars of instrument extension harnesses to second station instrument harness ends. IMPORTANT: When routing any wiring harness ensure that the harnesses do not rub or get pinched. NOTE: Refer to Wiring Diagrams - Wiring Harness Connections. IMPORTANT: Connectors must be fully engaged and secure. 6. Connect second station instrument harness to Y-box or Y-harness connector, tagged or titled “ 2nd STATION ”. 7. Connect primary station instrument harness to Y-box or Y-harness connector, tagged or titled “ MAIN STATION ”. 8. Connect extension harnesses from engine harness to Y-box or Y-harness connector. 9. Secure harnesses to boat at least every 460 mm (18 in.), using appropriate fasteners. a b a b c c 75871 Early Model Connector - Y-Box 77223 Later Model 21 Pin Connector Y-Harness a - Primary Station Connector (Tagged Or Titled “MAIN STATION”) b - Second Station Connector (Tagged Or Titled “2nd STATION”) c - Engine Harness Connector Page 4D-26 90-860074--1 FEBRUARY 2002 INSTRUMENTATION SERVICE MANUAL NUMBER 22 EARLY MODEL WIRING HARNESS CONNECTIONS d 1 2 3 6 5 4 b a c 75305 76057 e 75871 f g 75884 Sterndrive Shown, Inboard Similar a - Second (2nd) Station Instrumentation b - Second Station Instrument Harness c - Primary Station Instrument Harness d - Primary (MAIN) Station Instrumentation e - Y-Box (Harness) f - Extension Harness g - To Engine 90-860074--1 FEBRUARY 2002 Page 4D-27 INSTRUMENTATION SERVICE MANUAL NUMBER 22 LATE MODEL WIRING HARNESS CONNECTIONS c d b a e f g 77223 Typical a - Primary (MAIN PANEL) Station Instrumentation and Harness b - Primary Station Extension Harness c - Second (2nd PANEL) Station Instrumentation and Harness d - Second Station Extension Harness e - Y-Harness f - Extension (“ENGINE”) Harness g - To Engine Page 4D-28 90-860074--1 FEBRUARY 2002 INSTRUMENTATION SERVICE MANUAL NUMBER 22 Remote Control / Neutral Start Safety Circuit Primary Station WARNING Avoid injury or property damage. Starting an engine while the sterndrive unit or transmission is in gear could cause severe injury to people or animals in or near the boat, or property damage due to unexpected operation. Special circuitry and switches are necessary and must be used to prevent accidental starter engagement and subsequent engine operation while a sterndrive or transmission is in a gear. STERNDRIVE (MCM) MODELS Ensure neutral start safety circuit remote control connections are made before use. IMPORTANT: The two bullet connectors on primary station harness YEL/RED wire, as shipped from the factory, have to be disconnected and reconnected to Neutral Start Safety Circuit wires from the remote control. 1. Disconnect the two YEL/RED bullet connectors. 2. Connect the YEL/RED wires from the Remote Control Neutral Start Safety Circuit to the YEL/RED wires disconnected in Step 1. c YEL/RED YEL/RED a YEL/RED b YEL/RED YEL/WHT YEL/WHT 77413 Typical a - Instrument Harness START Wires b - YEL/RED Wires c - Remote Control / Neutral Start Safety Circuit 90-860074--1 FEBRUARY 2002 Page 4D-29 INSTRUMENTATION SERVICE MANUAL NUMBER 22 Secondary Station WARNING Avoid injury or property damage. Starting an engine while the sterndrive unit or transmission is in gear could cause severe injury to people or animals in or near the boat, or property damage due to unexpected operation. Special circuitry and switches are necessary and must be used to prevent accidental starter engagement and subsequent engine operation while a sterndrive or transmission is in a gear. STERNDRIVE (MCM) MODELS IMPORTANT: The two bullet connectors on the YEL/RED wire must be disconnected. Also, the two bullet connectors on the YEL/WHT wire must be disconnected. After doing so, connect female YEL/WHT terminal and male YEL/RED terminal to Neutral Start Safety Circuit wires from remote control. Leave the other two connectors disconnected. 1. Disconnect the two bullet connectors on the YEL/RED wire. 2. Disconnect the two bullet connectors on the YEL/WHT wire. 3. Connect female YEL/WHT terminal and male YEL/RED terminal to neutral start safety circuit wires from remote control. 4. Leave the male YEL/WHT and female YEL/RED terminals disconnected. Keep wires separated. Tape each wire separately with at least two layers of electrical tape. d YEL/RED YEL/RED b c a YEL/WHT YEL/RED YEL/RED YEL/WHT e f 77776 a - Instrument Harness START Wires b - Female YEL/WHT Terminal c - Male YEL/RED Terminal d - Remote Control / Neutral Safety Start Circuit e - Male YEL/WHT Disconnected f - Female YEL/RED Disconnected Page 4D-30 90-860074--1 FEBRUARY 2002 INSTRUMENTATION SERVICE MANUAL NUMBER 22 THIS PAGE IS INTENTIONALLY BLANK 90-860074--1 FEBRUARY 2002 Page 4D-31 INSTRUMENTATION SERVICE MANUAL NUMBER 22 THIS PAGE IS INTENTIONALLY BLANK Page 4D-32 90-860074--1 FEBRUARY 2002 WIRING DIAGRAMS SERVICE MANUAL NUMBER 22 ELECTRICAL SYSTEMS Section 4E - Wiring Diagrams Table of Contents Wire Color Abbreviations . . . . . . . . . . . . . . . 4E-3 Tools . . . . . . . . . . . . . . . . . . . . . . . . . . . . . . . . 4E-3 Lubricants / Sealants / Adhesives . . . . . . . 4E-3 General Information . . . . . . . . . . . . . . . . . . . 4E-3 Sterndrive (MCM) Models . . . . . . . . . . . . . . 4E-4 Engine Wiring - Starting and Charging System . . . . . . . . . . . . . . . . . . . . . . . . . . . 4E-4 ECM and Fuel System Wiring . . . . . . . . 4E-8 Quicksilver Instrumentation Wiring . . . 4E-10 Power Trim System Wiring Diagram . . 4E-14 90-860074--1 FEBRUARY 2002 MerCathode System Wiring Diagram . Inboard (MIE) Models . . . . . . . . . . . . . . . . . Engine Wiring - Starting and Charging System . . . . . . . . . . . . . . . . . . . . . . . . . . ECM and Fuel System Wiring . . . . . . . Quicksilver Primary Instrumentation Wiring . . . . . . . . . . . . . . . . . . . . . . . . . . . Models With Early Connectors . . . . . . Models With 21-Pin Deutsch t Connector . . . . . . . . . . . . . . . . . . . . . . . . 4E-15 4E-16 4E-16 4E-20 4E-22 4E-26 4E-28 Page 4E-1 4 E WIRING DIAGRAMS SERVICE MANUAL NUMBER 22 THIS PAGE IS INTENTIONALLY BLANK Page 4E-2 90-860074--1 FEBRUARY 2002 WIRING DIAGRAMS SERVICE MANUAL NUMBER 22 Wire Color Abbreviations BLK BLU BRN GRY GRN ORN PNK Black Blue Brown Gray Green Orange Pink PUR or PPL RED TAN WHT YEL LIT or LT DRK Purple Red Tan White Yellow Light Dark Special Tools Description Part Number DMT 2000A Tachometer / Multi-Meter Kit 91-854009A3 Tools Kent-Moore Tools Kent-Moore Tools, Inc. 29784 Little Mack Roseville, MI 48066 Phone: (313) 774-9500 Description Part Number DVOM J-34029-A or Equivalent Lubricants / Sealants / Adhesives Description Liquid Neoprene Part Number 92-25711--2 General Information NOTE: If using other than Quicksilver instrumentation and harnesses, refer to manufacturers’ instructions. 90-860074--1 FEBRUARY 2002 Page 4E-3 WIRING DIAGRAMS SERVICE MANUAL NUMBER 22 Sterndrive (MCM) Models Engine Wiring - Starting and Charging System - Page 1 of 4 BLK BLK RED 1. RED YEL 4 BLK 11 RED/BLK RED RED RED WHT LT.BLU GRY ORN 7 10 9 8 BLK BLK BLK PPL BLK RED/BLK BLK ORN BRN BLU/YEL PPL BRN BRN BLK GRN/WHT BLK BLK GRN/WHT BLU/BLK 2 BLK PPL BLK BRN 11 RED BLK ORN ORN BRN 10 3 RED 6 9 24 YEL GRY 5 7 8 5 6 GRN BRN/WHT BLK BRN 4 1 YEL/BLK BRN/BLK BLK BLK PNK PNK 3 PPL BRN PPL 2 PPL PPL 2 3 1 PNK 23 RED 4 5 6 7 8 9 10 11 12 13 14 15 16 ORN 1 3 BRN 22 2 BLU/BLK GRN/RED 1 RED/PPL RED BLK RED 2. RED RED 12 RED RED/BLK BLK RED RED/PPL 20AMP BLK RED BRN ORN 13 LT.BLU ORN 21 15 R1 GRY WHT G BRN ORN 20 GRY WHT ORN W BRN BRN BLK PPL GRY ORN 14 16 17 19 BRN BRN PPL RED BLK BLK BRN BRN BLK RED PPL BLU 18 BRN B S P EX L2 PPL RED PPL 76439 Early Model D2.8L D-Tronic and D4.2L D-Tronic With Standard Connector Page 4E-4 90-860074--1 FEBRUARY 2002 WIRING DIAGRAMS SERVICE MANUAL NUMBER 22 Engine Wiring - Starting and Charging System - Page 2 of 4 1 - ECM / Fuel System Harness Connector 2 - Electrical Box 3 - Main Relay 4 - Start Relay 5 - Glow Plug Relay (Optional) 6 - Glow Plug Relay (Optional) 7 - 60 Amp. Circuit Breaker 8 - 60 Amp. Circuit Breaker 9 - 12 Volt Battery 10 - Engine Ground Stud 11 - Trim Position Sender, Starboard 12 - Trim Limit Switch, Port 13 - MerCathode Controller 14 - 20 Amp Fuse and Holder 15 - Starter 16 - Engine Coolant Temperature Sender 17 - Glow Plugs ( If So Equipped) 18 - Alternator 19 - Gear Lube Monitor Bottle 20 - Oil Pressure / Audio Warning Switch 21 - Oil Pressure Sender 22 - Diagnostic Connector 23 - Engine Harness Connector 24 - 5 Amp Fuse 1. Wires to trim pump. 2. Wires to MerCathode electrode. ECM / FUEL SYSTEM HARNESS CONNECTOR NOTE: Refer to Item Number , on Electrical Box, from preceding page. Terminal Number Wire Color Code Terminal Number Wire Color Code Terminal Number Wire Color Code 1 PNK 5 BRN/BLK 9 RED 2 BRN/WHT 6 YEL/BLK 10 BLK 3 BLU/BLK 7 GRN 11 BLK 4 PPL 8 RED ENGINE HARNESS CONNECTOR NOTE: Refer to Item Number 23 on Electrical Box, from preceding page. Terminal Number Wire Color Code Terminal Number Wire Color Code Terminal Number Wire Color Code 1 PINK 7 BLK 13 YEL 2 BRN/WHT 8 LT BLU 14 PPL 3 PPL 9 ORN 15 PPL 4 BLK 10 GRY 16 GRN/WHT 5 BRN/BLK 11 WHT 6 YEL/BLK 12 BRN DIAGNOSTIC CONNECTOR NOTE: Refer to Item Number 22 on Electrical Box, from preceding page. Terminal Number Wire Color Code Terminal Number Wire Color Code Terminal Number Wire Color Code 1 PPL 2 BLK 3 PNK (+) 90-860074--1 FEBRUARY 2002 Page 4E-5 WIRING DIAGRAMS SERVICE MANUAL NUMBER 22 Engine Wiring - Starting and Charging System - Page 3 of 4 S G X M D P K L J F C H W A 2 3 4 5 6 7 8 9 10 11 12 1 TAN/BLK RED 11 BLK BLK BLK BLK RED/BLK 8 10 9 BLK RED RED GRN LT.BLU TAN 7 BLK BLK PPL/WHT RED/BLK GRN/WHT BLK BLK YEL/RED BLU 4 RED BLK BRN BLU 6 GRN/WHT RED/PPL RED PPL BRN 1. RED RED ORN BRN BRN 3 RED TAN RED PPL TAN/WHT BRN BRN BLK 5 27 BLK GRN/WHT BLU BLU/BWN BLK 2 RED ORN RED BLK 24 YEL/RED TAN BRN YEL/WHT GRN/RED GRN BLU/BWN PPL/YEL PPL/YEL YEL PPL 1 RED BLK BLK PPL RED BRN BLK BLU/TAN GRY BLU RED/BLK 12 RED/BLK BLK TAN/BLK RED BRN 14 LT.BLU 13 ORN TAN PPL/WHT BRN BLK PPL LT.BLU BRN TAN/WHT RED/PPL 20AMP BLK RED GRN 2. PPL/WHT RED RED GRN BLK 1 2 3 ORN PPL 22 23 B T N V U RED R E 21 15 BRN G 20 BRN 16 TAN/BLK TAN/BLK TAN BLK BRN ORN TAN/BLK BRN TAN/WHT W TAN ORN PPL/WHT BRN BRN 25 BLK TAN/BLK 19 GRN BRN BRN PPL BLK 26 BRN BRN BLK 17 GRN BLU 18 B EX P L2 PPL PPL S BRN GRN BRN PPL 77590 Later Model D2.8L D-Tronic and D4.2L D-Tronic With 21-Pin Deutscht Connector Page 4E-6 90-860074--1 FEBRUARY 2002 WIRING DIAGRAMS SERVICE MANUAL NUMBER 22 Engine Wiring - Starting and Charging System - Page 4 of 4 1 - ECM / Fuel System Harness Connector 2 - Electrical Box 3 - Main Relay 4 - Start Relay 5 - Glow Plug Relay (Optional) 6 - Glow Plug Relay (Optional) 7 - 60 Amp. Circuit Breaker 8 - 60 Amp. Circuit Breaker 9 - 12 Volt Battery 10 - Engine Ground Stud 11 - Trim Position Sender, Starboard 12 - Trim Limit Switch, Port 13 - MerCathode Controller 14 - 20 Amp Fuse and Holder 15 - Starter 16 - Engine Coolant Temperature Sender 17 - Glow Plugs (Optional) 18 - Alternator 19 - Gear Lube Monitor Bottle 20 - Oil Pressure / Audio Warning Switch 21 - Oil Pressure Sender 22 - Diagnostic Connector 23 - Engine Harness Connector (21-Pin) 24 - 5 Amp Fuse 25 - Oil Temperature Overheat Sensor 26 - Wires Joined With Screw and Nut 27 - Idle Speed Setting Circuit 1. Wires to trim pump. 2. Wires to MerCathode electrode. ECM / FUEL SYSTEM HARNESS CONNECTOR NOTE: Refer to Item Number 1 on Electrical Box, from preceding page. Terminal Number Wire Color Code Terminal Number Wire Color Code Terminal Number Wire Color Code 1 PNK 5 BRN/BLK 9 RED 2 BRN/WHT 6 YEL/BLK 10 BLK 3 BLU/BWN 7 GRN 11 BLK 4 PPL 8 RED ENGINE HARNESS CONNECTOR NOTE: Refer to Item Number 23 on Electrical Box, from preceding page. Terminal Letter Wire Color Code Terminal Letter Wire Color Code Terminal Letter Wire Color Code A YEL/RED H TAN R YEL/WHT B RED J LT BLU S ORN C TAN/BLK K BLU/TAN T GRN/WHT D BLK L BLK/YEL U (NOT USED) E GRN/RED M YEL V (NOT USED) F TAN/WHT N PPL/YEL X RED/YEL G PPL P GRY W BRN DIAGNOSTIC CONNECTOR NOTE: Refer to Item Number 22 on Electrical Box, from preceding page. Terminal Number Wire Color Code Terminal Number Wire Color Code Terminal Number Wire Color Code 1 PPL/YEL 2 BLK 3 PPL (+) 90-860074--1 FEBRUARY 2002 Page 4E-7 WIRING DIAGRAMS SERVICE MANUAL NUMBER 22 ECM and Fuel System Wiring - Page 1 of 2 BLU/BLK BLU/BLK BLK/YEL BRN/BLK BLK/YEL RED RED BLU/WHT BLU 7 14 WHT/BLK 29 33 GRN/WHT 49 64 GRN/WHT 5 GRN/WHT 4 YEL 53 BLU 51 65 55 BRN 21 15 ORN/WHT PNK 38 57 YEL/PNK RED BLK/PUR GRN PPL/BLK ORN BRN/RED WHT/BLK 50 37 RED RED BRN/BLK GRN GRN 40 42 68 61 GRN/RED 45 46 23 24 26 1 BLU/YEL RED RED RED YEL 41 BLU/WHT BLU/BLK GRN BLU/WHT BRN/WHT 2 WHT/YEL GRN/RED GRN/BLK BRN WHT WHT/YEL BRN/WHT WHT/RED WHT/RED BLK 8 RED RED BLU/YEL ORN GRN WHT RED BRN/BLK 12 WHT RED/ORN GRN/RED 11 52 PNK 63 3 BLK ORN BLK BLK BRN BLK RED/ORN BLK RED BLK RED/ORN 2 GRN/BLK 10 11 12 YEL/BLK 9 BLU/YEL BLU/RED 8 GRN/BLK 7 WHT/YEL 6 1 GRN 5 WHT BRN BLU/WHT GRN/BLK GRN WHT/YEL WHT 4 GRN/RED BRN RED 3 BLK 2 WHT/RED 1 BRN/BLK BLU/WHT BLK BLK RED BLK BLK BLK PNK WHT/RED BRN/WHT PNK GRN/RED BRN/WHT BLK WHT YEL 55 7 33 24 65 BRN/RED BLU/WHT ORN 52 BLU/YEL 29 GRN BLU/YEL BLK WHT/BLK ORN 68 63 RED GRN RED BLU BLU/RED BLK/PUR 1 2 GRN/WHT GRN/WHT GRN/WHT 65 32 1 GRN/WHT 5 4 7 155 6 YEL/PNK ORN/WHT 15 RED 57 32 1 4 7 56 WHT/BLK BLK WHT/BRN 14 BRN/PPL 33 6 4 1 ORN 5 2 3 ORN/WHT YEL 53 BRN 7 BLK/PUR 1 YEL BLU/RED 2 BLU/WHT 3 RED BLK/PUR BLU/WHT GRN/BLK GRN WHT/YEL BRN BLU 40 YEL 55 64 41 GRN BLK BLU/WHT GRN/BLK GRN WHT/YEL 12 BRN 4 3 21 8 WHT 11 (–) 2 1 (+) 9 WHT BRN BLK BLK/PUR 51 68 BLU RED RED 78407 Typical D2.8L D-Tronic and D4.2L D-Tronic Models Page 4E-8 90-860074--1 FEBRUARY 2002 WIRING DIAGRAMS SERVICE MANUAL NUMBER 22 ECM and Fuel System Wiring - Page 2 of 2 1 2 3 4 5 6 7 8 9 - ECM (Electronic Control Module) / Fuel System Connector - ECM - Engine-Speed Sensor - Throttle Position Sensor - Engine Coolant Temperature Sensor (ECT to ECM) - Electronic Distributor Injection Pump - Electronic Shut Off Solenoid (ELAB) - Manifold Absolute Pressure Sensor (MAP) - Number 1 Cylinder Fuel Injector with Needle Motion Sensor (NBF) ECM / FUEL SYSTEM HARNESS CONNECTOR NOTE: Refer to Item Number 1 connected to Electrical Box, from preceding page. Terminal Number Wire Color Code Terminal Number Wire Color Code Terminal Number Wire Color Code 1 PNK 5 BRN/BLK 9 RED 2 BRN/WHT 6 BLK/YEL 10 BLK 3 BLU/BLK 7 WHT RED 11 BLK 4 GRN/RED 8 RED 12 RED/ORN ECM CONNECTOR NOTE: Refer to Item Number 2 connected to ECM, from preceding page. Terminal Number Wire Color Code Terminal Number Wire Color Code Terminal Number Wire Color Code 1 BLK 23 RED 50 BLU/BLK 2 BRN/BLK 24 BLK 51 BLU 3 YEL/BLK 26 BRN/WHT 52 BLU/YEL 4 GRN/WHT 29 GRN 53 YEL 5 GRN/WHT 33 BLK 55 BLU/WHT 7 ORN 38 PNK 57 YEL/PNK 8 WHT 40 WHT/YEL 61 GRN/RED 11 BRN 41 GRN 63 BLU/RED 12 WHT 42 WHT/RED 64 GRN/BLK 14 WHT/BLK 45 RED 65 BRN/RED 15 ORN/WHT 46 BLK 68 RED 21 BRN 49 GRN/WHT 37 RED/ORN 90-860074--1 FEBRUARY 2002 Page 4E-9 WIRING DIAGRAMS SERVICE MANUAL NUMBER 22 Quicksilver Instrumentation Wiring - Page 1 of 4 1 2 3 PUR 4 PUR BRN/WHT BLK 5 GRY 6 7 8 BLU/TAN BLK GRY BLK TAN/WHT BRN RED GRN BLK BLK LT.BLU 1 TAN GRY RED PUR BLK TAN/BLK BRN/WHT WHT/RED TAN/WHT PUR PUR BLK PUR BLK BLK BLK TAN WHT/YEL BRN RED RED BLU/TAN BRN/WHT YEL/RED YEL/RED BRN/WHT BLK LT.BLU RED RED 14 15 16 PUR TAN/BLK BRN 12 13 PUR 11 13 PUR LT.BLU TAN/WHT TAN 9 10 BLK BLK BLU/TAN WHT/YEL TAN/BLK 2 GRY ORN BRN PUR RED BLK WHT/RED BRN RED 11 BLK 10 TAN/WHT PUR RED BLK RED PUR PUR GRN YEL/RED GRN PUR GRN PUR PUR BRN/WHT BLK BLK PUR TAN PUR BLK PUR WHT/RED B RED S WHT/RED PUR 4 5 6 3 2 1 BLK 8 TAN 4 BRN BLK BLK PUR 5 BLK c. GRN BLK TAN/BLK b. BLK ORN BLK BLK YEL/RED PUR 1. 7 a. BLK BLK d. e. BLK PUR BLU/TAN GRN GRN GRN PUR YEL/RED TAN YEL/RED GRN GRN 3 I GRN YEL/RED BRN/WHT WHT/YEL PUR PUR PUR 9 YEL/RED 1. BRN/WHT GRN GRN PUR 12 YEL/RED BRN GRN BLK BLK TAN/BLK BRN/WHT UP 6 PUR BLK 76440 Early Model D2.8L D-Tronic and D4.2L D-Tronic With Standard Connector Page 4E-10 90-860074--1 FEBRUARY 2002 SERVICE MANUAL NUMBER 22 WIRING DIAGRAMS Quicksilver Instrumentation Wiring - Page 2 of 4 1 - Oil Pressure Gauge 2 - Tachometer Gauge 3 - Trim Gauge 4 - Engine Coolant Temperature Gauge 5 - Voltmeter Gauge 6 - Cruise Log (Engine Hour Meter) 7 - Engine System Monitor Panel a - Preheat Indicator Lamp b - Charge Indicator Lamp c - Oil Pressure Warning Lamp / Low Gear Lube Monitor Level Lamp d - Coolant High Temperature Lamp e - Malfunction Indicator Lamp 8 - Panel Lights/Audio Warning Test Switch 9 - Key Switch 10 - 20 Amp Fuse 11 - Audio Warning Alarms - Oil Pressure and Engine Coolant Temperature 12 - Neutral Start Safety Circuit For Sterndrive (MCM) Remote Control 13 - Instrument Harness Connector 1. Bullet connectors shown. Alternately, if equipped, connect wires together with ring terminals using screws and hex nuts. Apply Liquid Neoprene to connections and slide rubber sleeves over connections. The following circuits on some very early instrumentation harnesses may have alternate color codes as follows. • Ignition (+) - PINK • Positive(+) - PINK • Key Switch “B” Terminal - ORANGE • Key Switch “I” Terminal - PINK • Key Switch “S” Terminal - YELLOW • Sender Coolant Temperature - BLUE or GRAY • Tachometer Signal - BROWN/BLACK 90-860074--1 FEBRUARY 2002 Page 4E-11 WIRING DIAGRAMS SERVICE MANUAL NUMBER 22 Quicksilver Instrumentation Wiring - Page 3 of 4 GRY TAN TAN BRN/WHT PPL/ORN TAN/WHT PPL BLU BRN/WHT YEL 18 GRY BLU 1 PPL TAN/BLK BLK RED BRN BLK/YEL GRY YEL/RED GRN TAN/WHT YEL BLK 2 3 TAN BLU/TAN BLK/YEL X U W V F 3. PPL H B G A GRN/RED TAN/BLK J BLUE/TAN PPL/ORN RED K D E T N P R S L C M BRN YEL/WHT RED/YEL 4 BLU RED/YEL YEL/WHT 5 YEL/RED BLK/YEL BRN/WHT PPL 87 15 PPL 6 BLK UP GRN TAN/WHT BLK YEL PPL TAN/BLK RED PPL/ORN BRN PPL/BLK 30 BLU/TAN 86 87 RED/YEL 23 BLU/TAN 20 85 YEL/WHT PPL/WHT 85 86 30 YEL/RED 21 PPL PPL/WHT BLK/YEL YEL 7 TAN/BLK 8 TAN/WHT 9 BRN/WHT ORN 10 BLU/TAN 11 BLK TAN/WHT PPL 19 TAN/WHT TAN/BLK TAN/BLK 17 12 PPL/ORN PPL TAN/BLK TAN/WHT PPL 22 YEL PPL PPL 1. YEL/RED BLK/YEL TAN/WHT PPL PPL ORN 24 RED/YEL PPL 1. GRN TAN/BLK 14 BLK 16 BRN ORN 13 2. PPL YEL/RED RED/YEL BLK/YEL 2. 76908 Later Model D2.8L D-Tronic and D4.2L D-Tronic With 21-Pin Deutscht Connector Page 4E-12 90-860074--1 FEBRUARY 2002 WIRING DIAGRAMS SERVICE MANUAL NUMBER 22 Quicksilver Instrumentation Wiring - Page 4 Of 4 1 - Voltmeter Gauge 2 - Tachometer Gauge 3 - Water Temperature Gauge 4 - Oil Pressure Gauge 5 - Trim Position Gauge 6 - Engine System Monitor Panel 7 - Malfunction Indicator Lamp (Check Engine) 8 - Coolant High Temperature 9 - Oil Pressure Warning Lamp / Low Gear Lube Monitor Level Lamp 10 - Charge Indicator Lamp 11 - Preheat Indicator Lamp 12 - Panel Lights/Audio Warning Test Switch 13 - Key Switch 14 - Neutral Start Safety Circuit For Sterndrive (MCM) Remote Control 15 - Spare Wires (Optional Hour Meter Gauge) 16 - Audio Warning Alarm - Oil 17 - Audio Warning Alarm - Temperature 18 - Instrument Harness Connector (21-Pin Deutscht) 19 - Fuel Gauge (Optional) 20 - Connector Without Relay (Relay To Be Installed if Second Station Equipped) 21 - Connector Jumper (If Single Station Only) 22 - 20 Amp Fuse 23 - Audio Warning Delay Relay (During Pre-Heat) 24 - Diode Pack 1. Bullet connectors shown. Alternately, if equipped, connect wires together with ring terminals using screws and hex nuts. Apply Liquid Neoprene to connections and slide rubber sleeves over connections. 2. Keep wires separated. Not used on this model. Tape each wire separately with at least two layers of electrical tape. 3. Spare wire. INSTRUMENT HARNESS CONNECTOR NOTE: Refer to Item Number 18 from preceding page. Terminal Letter Wire Color Code Terminal Letter Wire Color Code Terminal Letter Wire Color Code A YEL/RED H TAN R YEL/WHT B RED J LT BLU S ORN C TAN/BLK K BLU/TAN T BRN/WHT D BLK L BLK/YEL U (NOT USED) E GRN/RED M YEL V (NOT USED) F TAN/WHT N PPL/ORN X RED/YEL G PPL P GRY W BRN 90-860074--1 FEBRUARY 2002 Page 4E-13 WIRING DIAGRAMS SERVICE MANUAL NUMBER 22 Power Trim System Wiring Diagram a b c d e f g h - 20 Amp Fuse - Ground Bolt (Floor Mount) - UP Solenoid - 110 Amp Fuse - DOWN Solenoid - Trailer Switch - Neutral Switch To Instrument Wiring Harness - Trim Limit Switch b a c d f e g h BLK BLU BRN GRY GRN ORN PNK PUR RED TAN WHT YEL LT OR LIT DRK = = = = = = = = = = = = = = BLACK BLUE BROWN GRAY GREEN ORANGE PINK PURPLE RED TAN WHITE YELLOW LIGHT DARK 73962 Page 4E-14 90-860074--1 FEBRUARY 2002 WIRING DIAGRAMS SERVICE MANUAL NUMBER 22 MerCathode System Wiring Diagram a - Controller b - 20 Amp Fuse c - Electrode a b c BLK BLU BRN GRY GRN ORN PNK PUR RED TAN WHT YEL LT OR LIT DRK = = = = = = = = = = = = = = BLACK BLUE BROWN GRAY GREEN ORANGE PINK PURPLE RED TAN WHITE YELLOW LIGHT DARK 73596 90-860074--1 FEBRUARY 2002 Page 4E-15 WIRING DIAGRAMS SERVICE MANUAL NUMBER 22 Inboard (MIE) Models Engine Wiring - Starting and Charging System - Page 1 of 4 3 RED BLK BLK RED GRN GRN/WHT BLU/BLK 2 RED BLK YEL 4 PPL BLK RED/BLK BLK 8 10 9 1. 22 RED/BLK PPL/WHT RED RED 7 LT.BLU GRY WHT RED BLK ORN ORN BRN BLU/YEL PPL BRN BRN BLK GRN/WHT PPL BLK 11 RED BLK ORN ORN BRN BRN 10 3 RED 6 9 21 YEL GRY 5 7 8 5 6 1 BRN/WHT BLK BRN 4 PNK 2 YEL/BLK BRN/BLK BLK BLK PNK PNK 1 PPL BRN PPL BRN 2 3 PPL PPL 1 4 5 6 7 8 9 10 11 1213 14 15 16 3 ORN 19 2 BLU/BLK GRN/RED 1 20 RED PPL/WHT BLK RED RED RED RED PPL GRY ORN RED/BLK RED BLK PPL/WHT RED 18 11 R1 GRY WHT G BRN ORN 17 GRY WHT ORN W BRN BRN LT.BLU ORN 12 PPL/WHT BLK BLK 16 RED 15 BRN BRN PPL 13 BLK BRN BRN BLK RED BLU 14 B EX PPL P BRN S RED PPL L2 76451 PPL Early Model D2.8L D-Tronic and D4.2L D-Tronic With Standard Connector Page 4E-16 90-860074--1 FEBRUARY 2002 WIRING DIAGRAMS SERVICE MANUAL NUMBER 22 Engine Wiring - Starting and Charging System - Page 2 of 4 1 - ECM / Fuel System Harness Connector 2 - Electrical Box 3 - Main Relay 4 - Start Relay 5 - Glow Plug Relay (Optional) 6 - Glow Plug Relay (Optional) 7 - 60 AMP Circuit Breaker 8 - 60 AMP Circuit Breaker 9 - 12 Volt Battery 10 - Engine Ground Stud 11 - Starter 12 - Engine Coolant Temperature Sender 13 - Glow Plugs (If Equipped) 14 - Alternator 15 - Transmission Neutral Safety Switch 16 - Transmission Temperature Switch 17 - Oil Pressure / Audio Warning Switch 18 - Oil Pressure Sender 19 - Diagnostic Connector 20 - Engine Harness Connector 21 - 5 Amp Fuse 22 - Wires Not Used On This Model 1. Keep wires separated. Not used on this model. Tape each wire separately with at least two layers of electrical tape. ECM / FUEL SYSTEM HARNESS CONNECTOR NOTE: Refer to Item Number 1 on Electrical Box, from preceding page. Terminal Number Wire Color Code Terminal Number Wire Color Code Terminal Number Wire Color Code 1 PNK 5 BRN/BLK 9 RED 2 BRN/WHT 6 YEL/BLK 10 BLK 3 BLU/BLK 7 GRN 11 BLK 4 PPL 8 RED ENGINE HARNESS CONNECTOR NOTE: Refer to Item Number 20 on Electrical Box, from preceding page. Terminal Number Wire Color Code Terminal Number Wire Color Code Terminal Number Wire Color Code 1 PINK 7 BLK 13 YEL 2 BRN/WHT 8 LT BLU 14 PPL 3 PPL 9 ORN 15 PPL 4 BLK 10 GRY 16 GRN/WHT 5 BRN/BLK 11 WHT 6 YEL/BLK 12 BRN DIAGNOSTIC CONNECTOR NOTE: Refer to Item Number 19 on Electrical Box, from preceding page. Terminal Number Wire Color Code Terminal Number Wire Color Code Terminal Number Wire Color Code 1 PPL 2 BLK 3 PNK (+) 90-860074--1 FEBRUARY 2002 Page 4E-17 WIRING DIAGRAMS SERVICE MANUAL NUMBER 22 Engine Wiring - Starting and Charging System - Page 3 of 4 23 R E S G X M D P K L J F C H W A B T N V U 1 21 2 3 4 5 6 7 8 9 10 11 12 1 BLK BLU/BLK BLK RED/BLK 8 10 9 1. 11 BLK RED RED GRN LT.BLU TAN 7 BLK BLK PPL/WHT RED/BLK BRN/WHT BLU BLU YEL/RED RED TAN/BLK TAN BRN/WHT 4 RED BLK BRN BLU RED RED PPL BRN 6 RED ORN BRN BRN 3 RED RED PPL TAN/WHT BRN BRN BLK 5 24 BRN/WHT BRN BLK 2 RED ORN RED BLK 22 YEL/RED TAN BLU RED BLU/BLK PPL/YEL PPL/YEL YEL PPL YEL/WHT GRN/RED GRN BLU/TAN GRY RED BLK BLK RED BRN BLK PPL 2 3 ORN PPL RED/BLK PPL/WHT RED RED RED GRN RED/BLK 16 TAN PPL/WHT BRN BLK PPL LT.BLU BRN TAN/WHT GRN BLK TAN/BLK RED BLK LT.BLU 19 20 BLK BRN ORN TAN/BLK BRN TAN/WHT BRN G 1 BRN 15 TAN/BLK TAN/BLK TAN W TAN ORN 12 GRN BRN BRN PPL BLK BLK TAN/BLK 1. PPL/WHT BRN 14 13 BRN BRN BRN BLK 18 GRN 17 B S EX P L2 PPL PPL BLU BRN GRN BRN PPL 78408 Later Model D2.8L D-Tronic and D4.2L D-Tronic With 21-Pin Deutscht Connector Page 4E-18 90-860074--1 FEBRUARY 2002 WIRING DIAGRAMS SERVICE MANUAL NUMBER 22 Engine Wiring - Starting and Charging System - Page 3 of 4 1 - ECM / Fuel System Harness Connector 2 - Electrical Box 3 - Main Relay 4 - Start Relay 5 - Glow Plug Relay (Optional) 6 - Glow Plug Relay (Optional) 7 - 60 AMP Circuit Breaker 8 - 60 AMP Circuit Breaker 9 - 12 Volt Battery 10 - Engine Ground Stud 11 - Wires Not Used On This Model 12 - Wires Not Used On This Model 13 - Transmission Neutral Safety Switch 14 - Transmission Temperature Switch 15 - Engine Coolant Temperature Sender 16 - Starter 17 - Glow Plugs (If Equipped) 18 - Alternator 19 - Oil Pressure / Audio Warning Switch 20 - Oil Pressure Sender 21 - Diagnostic Connector 22 - 5 Amp Fuse 23 - Engine Harness Connector (21-Pin Deutscht) 24 - Idle Speed Setting Circuit 1. Keep wires separated. Not used on this model. Tape each wire separately with at least two layers of electrical tape. ECM / FUEL SYSTEM HARNESS CONNECTOR NOTE: Refer to Item Number 1 on Electrical Box, from preceding page. Terminal Number Wire Color Code Terminal Number Wire Color Code Terminal Number Wire Color Code 1 PNK 5 BRN/BLK 9 RED 2 BRN/WHT 6 YEL/BLK 10 BLK 3 BLU/BLK 7 GRN 11 BLK 4 PPL 8 RED 12 RED/ORN ENGINE HARNESS CONNECTOR NOTE: Refer to Item Number 20 on Electrical Box, from preceding page. Terminal Letter Wire Color Code Terminal Letter Wire Color Code Terminal Letter Wire Color Code A YEL/RED H TAN R YEL/WHT B RED J LT BLU S ORN C TAN/BLK K BLU/TAN T BRN/WHT D BLK L BLK/YEL U (NOT USED) E GRN/RED M YEL V (NOT USED) F TAN/WHT N PPL/YEL X RED/YEL G PPL P GRY W BRN DIAGNOSTIC CONNECTOR NOTE: Refer to Item Number 19 on Electrical Box, from preceding page. Terminal Number 1 90-860074--1 FEBRUARY 2002 Wire Color Code PPL/YEL Terminal Number 2 Wire Color Code BLK Terminal Number 3 Wire Color Code PPL (+) Page 4E-19 WIRING DIAGRAMS SERVICE MANUAL NUMBER 22 ECM and Fuel System Wiring - Page 1 of 2 BLU/BLK BLU/BLK BLK/YEL BRN/BLK BLK/YEL RED RED BLU 33 GRN/WHT 49 64 GRN/WHT 5 GRN/WHT 4 YEL 53 BLU 51 GRN 65 8 55 BRN 21 15 ORN/WHT PNK 38 57 YEL/PNK YEL RED RED RED RED RED BLK/PUR GRN PPL/BLK ORN BRN/RED WHT/BLK BLU/BLK 41 50 RED RED RED GRN/BLK WHT/YEL GRN BLU/WHT BRN/WHT 2 40 WHT 42 68 61 GRN/RED 45 46 23 24 26 1 BLK ORN BLK BLK BLK BLU/YEL BRN WHT 2 BLU/YEL 14 WHT/BLK 29 GRN BRN/WHT BLK RED BLK WHT/RED WHT/RED RED BRN/BLK 7 3 GRN/RED ORN GRN BLU/WHT BLU/YEL BLU/RED 12 WHT BRN/BLK BLK BLU/WHT GRN 11 52 PNK 63 WHT/YEL GRN/RED 10 11 BRN 9 GRN/BLK 8 YEL/BLK 7 GRN/BLK 6 1 WHT/YEL 5 WHT BRN BLU/WHT GRN/BLK GRN WHT/YEL WHT 4 GRN/RED BRN RED 3 BLK 2 WHT/RED 1 BRN/BLK BLU/WHT BLK BLK RED BLK BLK BLK PNK WHT/RED BRN/WHT PNK GRN/RED BRN/WHT BLK WHT 1 YEL 55 7 33 15 24 65 BRN/RED BLU/WHT ORN 52 BLU/YEL 29 GRN BLU/YEL BLK WHT/BLK ORN 68 63 RED GRN RED BLU BLU/RED BLK/PUR 1 2 GRN/WHT GRN/WHT GRN/WHT 65 32 1 GRN/WHT 5 4 7 155 6 YEL/PNK ORN/WHT BRN 57 32 1 4 7 56 RED BLK WHT/BRN 14 BRN/PPL 33 6 4 1 WHT/BLK 5 2 3 ORN YEL 53 ORN/WHT 7 BLK/PUR 2 YEL BLU/RED 3 RED BLK/PUR BRN BLU BLU/WHT GRN/BLK GRN WHT/YEL BLU/WHT 40 YEL 55 64 41 GRN BLK BLU/WHT GRN/BLK GRN WHT/YEL 12 BRN 4 3 21 8 WHT 11 (–) 2 1 (+) 9 WHT BRN BLK BLK/PUR 51 68 BLU RED RED 76438 All D2.8L D-Tronic and D4.2L D-Tronic Models Page 4E-20 90-860074--1 FEBRUARY 2002 WIRING DIAGRAMS SERVICE MANUAL NUMBER 22 ECM and Fuel System Wiring - Page 2 of 2 1 2 3 4 5 6 7 8 9 - ECM (Electronic Control Module) / Fuel System Connector - ECM - Engine-Speed Sensor - Throttle Position Sensor - Engine Coolant Temperature Sensor (ECT to ECM) - Electronic Distributor Injection Pump - Electronic Shut-Off Solenoid (ELAB) - Manifold Absolute Pressure Sensor (MAP) - Number 1 Cylinder Fuel Injector with Needle Motion Sensor (NBF) ECM / FUEL SYSTEM HARNESS CONNECTOR NOTE: Refer to Item Number 1, connected on Electrical Box, from preceding page. Terminal Number Wire Color Code Terminal Number Wire Color Code Terminal Number Wire Color Code 1 PNK 5 BRN/BLK 9 RED 2 BRN/WHT 6 BLK/YEL 10 BLK 3 BLU/BLK 7 WHT RED 11 BLK 4 GRN/RED 8 RED 12 RED/ORN ECM CONNECTOR NOTE: Refer to Item Number 2 connected on ECM, from preceding page. Terminal Number Wire Color Code Terminal Number Wire Color Code Terminal Number Wire Color Code 1 BLK 23 RED 50 BLU/BLK 2 BRN/BLK 24 BLK 51 BLU 3 YEL/BLK 26 BRN/WHT 52 BLU/YEL 4 GRN/WHT 29 GRN 53 YEL 5 GRN/WHT 33 BLK 55 BLU/WHT 7 ORN 38 PNK 57 YEL/PNK 8 WHT 40 WHT/YEL 61 GRN/RED 11 BRN 41 GRN 63 BLU/RED 12 WHT 42 WHT/RED 64 GRN/BLK 14 WHT/BLK 45 RED 65 BRN/RED 15 ORN/WHT 46 BLK 68 RED 21 BRN 49 GRN/WHT 37 RED/ORN 90-860074--1 FEBRUARY 2002 Page 4E-21 WIRING DIAGRAMS SERVICE MANUAL NUMBER 22 Quicksilver Primary Instrumentation Wiring - Page 1 of 4 1 2 3 PUR 4 PUR BRN/WHT BLK 5 GRY 6 7 8 BLU/TAN BLK GRY BLK TAN/WHT BRN RED GRN BLK BLK LT.BLU 1 TAN GRY RED PUR BLK TAN/BLK BRN/WHT WHT/RED TAN/WHT PUR PUR BLK PUR BLK BLK BLK TAN WHT/YEL BRN RED RED BLU/TAN BRN/WHT YEL/RED YEL/RED BRN/WHT BLK LT.BLU RED RED 14 15 16 PUR TAN/BLK BRN 12 13 PUR 11 13 PUR LT.BLU TAN/WHT TAN 9 10 TAN/BLK BLK BLU/TAN WHT/YEL TAN/WHT BRN PUR ORN BLK WHT/RED BRN RED 11 BLK 10 TAN/WHT PUR RED BLK RED PUR PUR GRN YEL/RED GRN PUR GRN PUR PUR 2 GRY BRN/WHT BLK BLK GRN PUR TAN BLK PUR B ORN S WHT/RED 5 6 3 2 1 8 TAN 4 7 TAN/WHT BLK GRN BLK PUR 5 BLK c. BLK TAN/BLK b. BLK BRN BLK BLK YEL/RED PUR a. d. e. BLK PUR BLU/TAN PUR YEL/RED 4 BLK BLK BRN/WHT GRN GRN BLK BLK TAN YEL/RED GRN GRN GRN GRN I 12 3 WHT/RED 9 PUR 1. WHT/YEL PUR PUR PUR PUR GRN PUR BRN/WHT YEL/RED BRN GRN BLK BLK TAN/BLK BRN/WHT 6 PUR BLK 76440 Early Model D2.8L D-Tronic and D4.2L D-Tronic With Standard Connector Page 4E-22 90-860074--1 FEBRUARY 2002 SERVICE MANUAL NUMBER 22 WIRING DIAGRAMS Quicksilver Primary Instrumentation Wiring - Page 2 of 4 1 - Oil Pressure Gauge 2 - Tachometer Gauge 3 - Wires Not Used On This Model 4 - Engine Coolant Temperature Gauge 5 - Voltmeter Gauge 6 - Cruise Log (Engine Hour Meter) 7 - Engine System Monitor Panel a - Preheat Indicator Lamp b - Charge Indicator Lamp c - Oil Pressure Warning Lamp / Low Gear Lube Monitor Level Lamp d - Coolant High Temperature Lamp e - Malfunction Indicator Lamp 8 - Panel Lights/Audio Warning Test Switch 9 - Key Switch 10 - 20 Amp Fuse 11 - Audio Warning Horns - Oil Pressure and Engine Coolant Temperature 12 - Neutral Start Safety Circuit - Refer To Transmission Neutral Start Safety Switch Circuit On Inboard Models 13 - Instrument Harness Connector (Standard) 1. Keep wires separated. Not used on this model. Tape each wire separately with at least two layers of electrical tape. The following circuits on some very early instrumentation harnesses may have alternate color codes as follows. • Ignition (+) - PINK • Positive(+) - PINK • Key Switch “B” Terminal - ORANGE • Key Switch “I” Terminal - PINK • Key Switch “S” Terminal - YELLOW • Sender Coolant Temperature - BLUE or GRAY • Tachometer Signal - BROWN/BLACK 90-860074--1 FEBRUARY 2002 Page 4E-23 WIRING DIAGRAMS SERVICE MANUAL NUMBER 22 Quicksilver Primary Instrumentation Wiring - Page 3 of 4 BLK/YEL 1. BLK/YEL YEL/RED YEL/RED YEL/RED YEL/RED PPL 22 YEL 13 S B I ORN ORN TAN/WHT PPL PPL 14 GRN PPL/ORN 17 TAN/BLK PPL TAN/WHT TAN/BLK TAN/WHT BLK BLK BLK/YEL BLU/TAN 10 16 ORN 11 BRN YEL/RED YEL/WHT YEL/RED PPL/WHT 30 87 PPL 21 PPL/WHT PPL 5 87 85 86 20 BLK 15 23 86 30 PPL/BLK 85 BLU/TAN RED BRN PPL/ORN BLU/TAN YEL TAN/WHT GRN PPL TAN/BLK UP TAN/BLK TAN/WHT 8 BLK BRN/WHT 9 7 6 19 PPL PPL TAN/BLK PPL TAN/BLK TAN/WHT 12 BLK PPL PPL PPL 1. 24 PPL 1. BRN/WHT YEL/RED BLK/YEL YEL/WHT U D E T P R S N F A H B J L C M BRN RED PPL YEL BLK PPL/ORN YEL/WHT TAN/BLK YEL/RED GRN BLUE/TAN TAN/WHT K TAN GRN/RED 2 G X 2. BLU/TAN BLK/YEL BLU 3 W V YEL/RED 4 YEL/RED GRY BLK/YEL BRN RED BRN/WHT 18 YEL BRN/WHT BLU TAN PPL/ORN GRY TAN/WHT 1 BLU PPL PPL TAN BLACK BLUE BROWN GRAY GREEN ORANGE PURPLE RED TAN WHITE YELLOW PINK LIGHT DARK TAN/BLK = = = = = = = = = = = = = = BLK BLK BLU BRN GRY GRN ORN PPL RED TAN WHT YEL PNK LT DRK 76908 GRY Later Model D2.8L D-Tronic and D4.2L D-Tronic With 21-Pin Deutscht Connector Page 4E-24 90-860074--1 FEBRUARY 2002 WIRING DIAGRAMS SERVICE MANUAL NUMBER 22 Quicksilver Primary Instrumentation Wiring - Page 4 Of 4 Later Model D2.8L D-Tronic and D4.2L D-Tronic Harness - Deutsch Connector 1 - Voltmeter Gauge 2 - Tachometer Gauge 3 - Water Temperature Gauge 4 - Oil Pressure Gauge 5 - Wires Not Used On This Model 6 - Engine System Monitor Panel 7 - Malfunction Indicator Lamp (Check Engine) 8 - Coolant High Temperature 9 - Oil Pressure Warning Lamp / Low Gear Lube Monitor Level Lamp 10 - Charge Indicator Lamp 11 - Preheat Indicator Lamp 12 - Panel Lights/Audio Warning Test Switch 13 - Key Switch 14 - Neutral Start Safety Circuit - Refer To Transmission Neutral Start Safety Switch Circuit On Inboard Models 15 - Spare Wires (Optional Hour Meter Gauge) 16 - Audio Warning Horn - Oil 17 - Audio Warning Horn - Temperature 18 - Instrument Harness Connector (21-Pin Deutscht) 19 - Fuel Gauge (Optional) 20 - Connector With Relay (If Second Station Equipped) 21 - Connector Jumper (If Single Station Only) 22 - 20 Amp Fuse 23 - Audio Warning Delay Relay (During Pre-Heat) 24 - Diode Pack 1. Keep wires separated. Not used on this model. Tape each wire separately with at least two layers of electrical tape. 2. Spare wire. INSTRUMENT HARNESS CONNECTOR NOTE: Refer to Item Number 18 from preceding page. Terminal Letter Wire Color Code Terminal Letter Wire Color Code Terminal Letter Wire Color Code A YEL/RED H TAN R YEL/WHT B RED J LT BLU S ORN C TAN/BLK K BLU/TAN T BRN/WHT D BLK L BLK/YEL U (NOT USED) E GRN/RED M YEL V (NOT USED) F TAN/BLK N PPL/ORN X RED/YEL G PPL P GRY W BRN 90-860074--1 FEBRUARY 2002 Page 4E-25 WIRING DIAGRAMS SERVICE MANUAL NUMBER 22 Quicksilver Second Station Instrumentation Wiring Models With Early Connectors STERNDRIVE (MCM) - SECOND STATION INSTRUMENTATION 1 2 PUR 4 PUR BRN/WHT BLK 5 GRY 6 7 8 9 BLU/TAN BLK BLK BLK BLK BLK BLK 1 BLK GRY PUR PUR LT.BLU TAN RED PUR 30 86 TAN/BLK BRN/WHT 85 87 BLK PUR ORN BLK BLK BLK BLK TAN PUR BRN ORN PUR ORN GRN 15 PUR BRN/WHT YEL/RED BRN Bullet connectors shown. Alternately, if equipped, connect wires together with ring terminals using screws and hex nuts. Apply Liquid Neoprene to connections and slide rubber sleeves over connections. LT.BLU GRY BLK BRN RED RED BLK 14 BRN/WHT LT.BLU ORN TAN 10 11 12 13 14 15 16 YEL/RED 1. 3 TAN/BLK Oil Pressure Tachometer Trim Gauge Coolant Temperature Voltmeter Cruise Log (Engine Hour Meter) Engine System Monitor a. - Glow Plug Indicator, b. - Alternator, c. - Oil Pressure, d. - Coolant Temp. e. - Malfunction Indicator Lamp 8 - Instrument Lights and Audio Test Switch 9 - Start Switch 10- Stop Switch 11- 20-Amp Fuse and Holder 12- Audio Warning Buzzers 13- Remote Control - (Neutral Safety Circuit) 14- Extension Harness 15- Relay BLU/TAN - PUR 1 2 3 4 5 6 7 BLK BLU/TAN 2 GRY BRN/WHT TAN/BLK GRN PUR GRN 10 6 3 2 1 b. BLK c. BLK BLK d. e. BLK PUR TAN 4 BRN BLK BLK BLK BLK GRN TAN/BLK BLK BLK a. 8 TAN/WHT WHT/YEL BLK WHT/YEL 5 WHT/RED 4 BLU/TAN PUR WHT/RED YEL/RED PUR PUR YEL/RED 1. TAN GRN PUR GRN YEL/RED 3 ORN 9 ORN GRN GRN PUR GRN RED GRN 1. BRN/WHT PUR YEL/RED YEL/RED TAN PUR YEL/RED PUR YEL/RED BLK RED 13 BLK PUR GRN YEL/RED BRN/WHT PUR BRN TAN/WHT RED BLK TAN/BLK BLK ORN BLK RED ORN BRN 12 ORN PUR 11 PUR GRN YEL/RED YEL/RED GRN PUR GRN PUR BLK PUR 5 TAN/BLK BRN/WHT BLK 7 BLK PUR UP Page 4E-26 6 76057 90-860074--1 FEBRUARY 2002 WIRING DIAGRAMS SERVICE MANUAL NUMBER 22 INBOARD (MIE) - SECOND STATION INSTRUMENTATION 1 PUR BRN/WHT BLK GRY 6 7 8 BLU/TAN BLK BRN/WHT YEL/RED BRN ORN BLK BLK BLK TAN GRN BLK BLK 1 TAN GRY BLK PUR PUR PUR LT.BLU BLK BRN/WHT YEL/RED PUR 30 86 TAN/BLK ORN 85 RED BLK PUR BLK BRN ORN PUR BLK RED RED GRY BLK BRN TAN/BLK 14 LT.BLU 10 11 12 13 14 15 16 BRN/WHT LT.BLU ORN TAN 9 87 PUR PUR 4 5 BLK 13 2 3 BLK Oil Pressure Tachometer Wires Not Used on MIE (See NOTE 1.) Coolant Temperature Voltmeter Cruise Log (Engine Hour Meter) Engine System Monitor a. - Glow Plug Indicator, b. - Alternator, c. - Oil Pressure, d. - Coolant Temp. e. - Malfunction Indicator Lamp 8 - Instrument Lights and Audio Test Switch 9 - Start Switch 10- Stop Switch 11- 20-Amp Fuse and Holder 12- Audio Warning Buzzers 13- Relay 14- Extension Harness Keep wires separated. Not used on this model. Tape each wire 1. separately with at least two layers of electrical tape. BLU/TAN - PUR 1 2 3 4 5 6 7 BLK BLU/TAN BRN/WHT 1. TAN/BLK GRN PUR GRN PUR GRN BLK BRN/WHT ORN TAN 10 GRN 3 2 1 BLK c. BLK BLK d. e. TAN 4 BLK BLK BLK BLK BLK PUR 5 TAN/BLK BRN/WHT BLK UP GRN TAN/BLK BLK b. 8 BLK BRN BLK BLU/TAN 6 WHT/YEL 5 PUR WHT/RED 4 a. BLK YEL/RED PUR YEL/RED PUR GRN TAN/WHT WHT/YEL PUR PUR WHT/RED GRN GRN 9 ORN GRN 3 PUR RED YEL/RED TAN PUR YEL/RED PUR YEL/RED BLK RED PUR GRN YEL/RED 2 GRY 7 BLK PUR 6 90-860074--1 FEBRUARY 2002 BRN/WHT PUR BRN TAN/WHT RED BLK TAN/BLK BLK ORN BLK RED ORN BRN 12 ORN PUR 11 PUR GRN YEL/RED YEL/RED GRN PUR GRN PUR 76058 Page 4E-27 WIRING DIAGRAMS SERVICE MANUAL NUMBER 22 Models With 21-Pin Deutscht Connector STERNDRIVE (MCM) - SECOND STATION INSTRUMENTATION GRY TAN TAN 18 TAN/WHT PPL BLU BRN/WHT YEL PPL/ORN GRY BLU BRN/WHT 1 PPL TAN/BLK BLK RED BRN BLK/YEL GRY YEL/RED GRN TAN/WHT YEL BLK PPL 2 3 GRN/RED G A H B X TAN BLU/TAN W V F U 3. BLK/YEL D E T P R S TAN/BLK J BLUE/TAN PPL/ORN RED K N L C M BRN YEL/WHT RED/YEL 4 BLU RED/YEL YEL/WHT YEL/RED 5 BLK/YEL BRN/WHT 6 PPL 87 15 PPL BLK UP TAN/WHT GRN BLK YEL PPL TAN/BLK RED PPL/ORN BRN 30 PPL/BLK BLU/TAN 86 87 23 BLU/TAN 20 85 YEL/WHT PPL/WHT 85 86 30 YEL/RED 21 PPL PPL/WHT YEL 7 TAN/BLK 8 BLK/YEL 10 BLU/TAN 11 BLK TAN/WHT TAN/BLK TAN/WHT PPL RED/YEL YEL/WHT 19 BRN TAN/BLK 17 24 22 RED ORN 2. ORN PPL YEL/RED RED/YEL PPL 14 BLK/YEL YEL/WHT PPL PPL 2. BLK/YEL 13 TAN/WHT PPL PPL YEL 25 PPL GRN PPL TAN/BLK TAN/WHT 2. BLK 12 PPL/ORN TAN/BLK BLK 16 2. Page 4E-28 9 TAN/WHT BRN/WHT YEL/RED RED/YEL 76907 90-860074--1 FEBRUARY 2002 WIRING DIAGRAMS SERVICE MANUAL NUMBER 22 STERNDRIVE (MCM) - SECOND STATION INSTRUMENTATION - PAGE 2 OF 2 1 - Voltmeter Gauge 2 - Tachometer Gauge 3 - Water Temperature Gauge 4 - Oil Pressure Gauge 5 - Trim Position Gauge 6 - Engine System Monitor Panel 7 - Malfunction Indicator Lamp (Check Engine) 8 - Coolant High Temperature 9 - Oil Pressure Warning Lamp / Low Gear Lube Monitor Level Lamp 10 - Charge Indicator Lamp 11 - Preheat Indicator Lamp 12 - Panel Lights/Audio Warning Test Switch 13 - Stop Switch 14 - Start Switch 15 - Spare Wires (Optional Hour Meter Gauge) 16 - Audio Warning Horn - Oil 17 - Audio Warning Horn - Temperature 18 - Instrument Harness Connector (Deutscht) 19 - Fuel Gauge Wires Not Used 20 - Connector Without Relay 21 - Connector Jumper 22 - 20 Amp Fuse 23 - Audio Warning Delay Relay (During Pre-Heat) 24 - Diode Pack 25 - Neutral Start Safety Circuit - Sterndrive (MCM) Remote Control 1. Bullet connectors shown. Alternately, if equipped, connect wires together with ring terminals using screws and hex nuts. Apply Liquid Neoprene to connections and slide rubber sleeves over connections. 2. Keep wires separated. Not used on this model. Tape each wire separately with at least two layers of electrical tape. 3. Spare wire. INSTRUMENT / EXTENSION HARNESS CONNECTOR NOTE: Refer to Item Number 18 from preceding page. Terminal Letter Wire Color Code Terminal Letter Wire Color Code Terminal Letter Wire Color Code A YEL/RED H TAN R YEL/WHT B RED J LT BLU S ORN C TAN/BLK K BLU/TAN T BRN/WHT D BLK L BLK/YEL U (NOT USED) E GRN/RED M YEL V (NOT USED) F TAN/BLK N PPL/ORN X RED/YEL G PPL P GRY W BRN 90-860074--1 FEBRUARY 2002 Page 4E-29 WIRING DIAGRAMS SERVICE MANUAL NUMBER 22 INBOARD (MIE) - SECOND STATION INSTRUMENTATION GRY TAN TAN BRN/WHT 18 TAN/WHT PPL BLU BRN/WHT YEL PPL/ORN GRY BLU 1 PPL TAN/BLK BLK RED BRN BLK/YEL GRY YEL/RED GRN TAN/WHT YEL BLK PPL 2 2. TAN BLU/TAN BLK/YEL V U W T F X S 3 GRN/RED G A H B D E P R TAN/BLK J BLUE/TAN PPL/ORN RED K N L C M BRN YEL/WHT RED/YEL 4 BLU RED/YEL YEL/WHT 1. YEL/RED BLK/YEL 5 BRN/WHT PPL 87 6 PPL 15 BLK UP TAN/WHT GRN BLK YEL TAN/BLK PPL RED PPL/ORN BRN 30 PPL/BLK BLU/TAN 86 87 RED/YEL 23 BLU/TAN 20 85 YEL/WHT PPL/WHT 85 86 30 YEL/RED 21 PPL PPL/WHT BLK/YEL YEL 7 TAN/BLK 8 TAN/WHT 9 BRN/WHT 10 BLU/TAN 11 BLK TAN/WHT TAN/WHT TAN/BLK TAN/BLK 17 PPL TAN/BLK TAN/WHT 25 PPL GRN TAN/BLK PPL 13 TAN/WHT PPL PPL YEL/WHT 24 22 RED ORN PPL 14 YEL PPL PPL BLK 12 PPL/ORN 1. BLK PPL YEL/WHT 19 16 1. BRN 1. ORN PPL YEL/RED RED/YEL BLK/YEL Page 4E-30 YEL/RED RED/YEL BLK/YEL 76907 90-860074--1 FEBRUARY 2002 WIRING DIAGRAMS SERVICE MANUAL NUMBER 22 INBOARD (MIE) - SECOND STATION INSTRUMENTATION - PAGE 2 OF 2 1 - Voltmeter Gauge 2 - Tachometer Gauge 3 - Water Temperature Gauge 4 - Oil Pressure Gauge 5 - Wires Not Used On This Model. 6 - Engine System Monitor Panel 7 - Malfunction Indicator Lamp (Check Engine) 8 - Coolant High Temperature 9 - Oil Pressure Warning Lamp / Low Gear Lube Monitor Level Lamp 10 - Charge Indicator Lamp 11 - Preheat Indicator Lamp 12 - Panel Lights/Audio Warning Test Switch 13 - Stop Switch 14 - Start Switch 15 - Spare Wires (Optional Hour Meter Gauge) 16 - Audio Warning Horn - Oil 17 - Audio Warning Horn - Temperature 18 - Instrument Harness Connector (Deutscht) 19 - Fuel Gauge Wires Not Used 20 - Connector Without Relay 21 - Connector Jumper 22 - 20 Amp Fuse 23 - Audio Warning Delay Relay (During Pre-Heat) 24 - Diode Pack 25 - Neutral Start Safety Circuit - Refer To Transmission Neutral Start Safety Switch Circuit On Inboard Models 1. Keep wires separated. Not used on this model. Tape each wire separately with at least two layers of electrical tape. 2. Spare wire. INSTRUMENT / EXTENSION HARNESS CONNECTOR NOTE: Refer to Item Number 18 from preceding page. Terminal Letter Wire Color Code Terminal Letter Wire Color Code Terminal Letter Wire Color Code A YEL/RED H TAN R YEL/WHT B RED J LT BLU S ORN C TAN/BLK K BLU/TAN T BRN/WHT D BLK L BLK/YEL U (NOT USED) E GRN/RED M YEL V (NOT USED) F TAN/BLK N PPL/ORN X RED/YEL G PPL P GRY W BRN 90-860074--1 FEBRUARY 2002 Page 4E-31 WIRING DIAGRAMS SERVICE MANUAL NUMBER 22 THIS PAGE IS INTENTIONALLY BLANK Page 4E-32 90-860074--1 FEBRUARY 2002 DESCRIPTION SERVICE MANUAL NUMBER 22 FUEL SYSTEM Section 5A - Description Table of Contents Introduction . . . . . . . . . . . . . . . . . . . . . . . . . . . Precautions . . . . . . . . . . . . . . . . . . . . . . . . . . Testing Procedure . . . . . . . . . . . . . . . . . . General Information . . . . . . . . . . . . . . . . . . . Basic Knowledge and Tools Required . Visual/Physical Inspection . . . . . . . . . . . Electrostatic Discharge Damage . . . . . . Diagnostic Information . . . . . . . . . . . . . . Terminology . . . . . . . . . . . . . . . . . . . . . . . . Electronic Control Module (ECM) and Sensors . . . . . . . . . . . . . . . . . . . . . . . . . General Description . . . . . . . . . . . . . . . . . Computers and Voltage Signals . . . . . . 5A-3 5A-4 5A-5 5A-6 5A-6 5A-6 5A-6 5A-7 5A-7 5A-9 5A-9 5A-9 Analog Signals . . . . . . . . . . . . . . . . . . . . . 5A-9 Analog Value Conditioning . . . . . . . . . . 5A-11 Digital Signals . . . . . . . . . . . . . . . . . . . . . 5A-13 Engine Control Module (ECM) . . . . . . . 5A-15 Speed Density System . . . . . . . . . . . . . 5A-17 ECM Input and Sensor Descriptions . . 5A-18 Fuel Management . . . . . . . . . . . . . . . . . . . . 5A-26 Control . . . . . . . . . . . . . . . . . . . . . . . . . . . 5A-26 Modes Of Operation . . . . . . . . . . . . . . . 5A-27 Diagnosis and Testing . . . . . . . . . . . . . . . . 5A-30 ECM Reactions During Operation . . . . 5A-30 ECM Self-Diagnostics . . . . . . . . . . . . . . 5A-30 5 A 90-860074--1 FEBRUARY 2002 Page 5A-1 DESCRIPTION SERVICE MANUAL NUMBER 22 THIS PAGE IS INTENTIONALLY BLANK Page 5A-2 90-860074--1 FEBRUARY 2002 SERVICE MANUAL NUMBER 22 DESCRIPTION Introduction The following information has been prepared for effective service and diagnosis of the Mercury MerCruiser Electronic Diesel Injection (EDI) system. All information, illustrations and specifications contained herein are based on the latest product information available at the time of publication approval. The right is reserved to make changes at any time without notice. An understanding of the material contained in this manual and in subsequent publications issued when necessary, will assist service personnel in properly maintaining the quality to which Mercury MerCruiser engine control systems are built. 90-860074--1 FEBRUARY 2002 Page 5A-3 DESCRIPTION SERVICE MANUAL NUMBER 22 Precautions CAUTION To reduce the chance of personal injury and/or property damage, the following instructions must be carefully observed: proper service and repair are important to the safety of the service technician and the safe, reliable operation of all Mercury MerCruiser Electronic Diesel Injection (EDI) equipped engines. If part replacement is necessary, the part must be replaced with one of the same part number or with an equivalent part. Do NOT use a replacement part of lesser quality. The service procedures recommended and described in this service manual are effective methods of performing service and repair. Some of these procedures require the use of tools specially designed for the purpose. Accordingly, anyone who intends to use a replacement part, service procedure or tool, which is not recommended by the system manufacturer, must first determine that neither his safety nor the safe operation of the engine will be jeopardized by the replacement part, service procedure or tool selected. It is important to note that this manual contains various “Cautions” and “Notes” that must be carefully observed in order to reduce the risk of personal injury during service or repair, or the possibility that improper service or repair may damage the engine or render it unsafe. It is also important to understand that these “Cautions” and “Notes” are not exhaustive, because it is impossible to warn of all the possible hazardous consequences that might result from failure to follow these instructions. The following requirements must be observed when working on EDI equipped engines: Page 5A-4 • Before removing any ECM (Engine Control Module) system component, disconnect the negative battery cable. • Never start the engine without the battery cable terminal ends being solidly connected. • Never separate the battery from the on-board electrical system while the engine is operating. • Never separate the battery feed wire from the charging system while the engine is operating. • When charging the battery, disconnect it from the boat’s electrical system. • Ensure that all cable harnesses are connected solidly and that battery connections are thoroughly clean. • Never connect or disconnect the wiring harness at the ECM when the ignition is switched ON. • Before attempting any electric arc welding, disconnect the battery leads and the ECM connector. • When steam cleaning engines, Do NOT direct the steam cleaning nozzle at ECM system components. If this happens, corrosion of the terminals or damage of components can take place. • Use only the test equipment specified since other test equipment may either give incorrect results or damage good components. • All voltage measurements using a voltmeter require a digital voltmeter with a rating of 10 megohms input impedance. 90-860074--1 FEBRUARY 2002 DESCRIPTION SERVICE MANUAL NUMBER 22 Testing Procedure 5. When a test light is specified, a low-power test light must be used. DO NOT use a high-wattage test light. While a particular brand of test light is not suggested, a simple test, as shown below, on any test light will ensure it to be safe for system circuit testing: a. Connect an accurate ammeter (such as the high impedance digital multimeter) in series with the test light being tested, and power the test light/ammeter circuit with the battery. b. If the ammeter indicates LESS than 3/10 amp current flow (.3 A or 300 mA), the test light is SAFE to use. c. If the ammeter indicates MORE than 3/10 amp current flow (.3 A or 300 mA), the test light is NOT SAFE to use. a b c f - Amp Meter g - Test Light h - 12 Volt Battery NOTE: Using a test light with 100 mA or less rating may show a faint glow when test actually states no light. 6. When using a DVOM to perform voltage measurements, turn the ignition OFF when connecting the DVOM to the circuitry to be tested. 90-860074--1 FEBRUARY 2002 Page 5A-5 DESCRIPTION SERVICE MANUAL NUMBER 22 General Information Basic Knowledge and Tools Required To use the information in this manual most effectively, a general understanding of basic electrical circuits and circuit testing tools is required. You should be familiar with wiring diagrams; the meaning of volts, ohms and amperes; the basic theories of electricity and understand what happens in an open or shorted wire. To perform system diagnosis, several special tools and equipment are required. Please become acquainted with the tools and their use before attempting to diagnose the system. Special tools, which are required for system service, are listed in the particular sections. Visual/Physical Inspection IMPORTANT: A careful visual and physical inspection must be performed as part of any diagnostic procedure. This can often lead to fixing a problem without further steps. Inspect all lines and hoses for correct routing, pinches, cuts or disconnects. Inspect components that are difficult to see. Inspect all the wires in the engine compartment for proper connections, burned or chafed spots, pinched wires or contact with sharp edges or hot exhaust manifolds. This visual/physical inspection is very important. It must be done carefully and thoroughly. Electrostatic Discharge Damage Electronic components used in control systems are often designed to carry very low voltage, and are very susceptible to damage caused by electrostatic discharge. It is possible for less than 100 volts of static electricity to cause damage to some electronic components. By comparison, it takes as much as 4,000 volts for a person to even feel the effect of a static discharge. There are several ways for a person to become statically charged. The most common methods of charging are by friction and by induction. An example of charging by friction is a person sliding across a seat, in which a charge of as much as 25,000 volts can build up. Charging by induction occurs when a person with well-insulated shoes stands near a highly charged object and momentarily touches ground. Charges of the same polarity are drained off, leaving the person highly charged with the opposite polarity. Static charges of either type can cause damage; therefore, it is important to use care when handling and testing electronic components. Page 5A-6 90-860074--1 FEBRUARY 2002 DESCRIPTION SERVICE MANUAL NUMBER 22 Diagnostic Information The diagnostic information and functional checks contained in SECTION 5E of this manual are designed to locate a faulty circuit or component through logic based on the process of elimination. The information was prepared with the requirement that the system functioned correctly at the time of assembly and that there are no multiple failures. Terminology ABBREVIATIONS ADF MAP (Manifold Atmospheric Pressure) Sensor BARO Barometric Pressure BAT Battery Positive Terminal, Battery or System Voltage B+ Battery Positive CKT Circuit CONN Connector CYL Cylinder DEG Degrees DIAG Diagnostic DLC Data Link Connector DTC Diagnostic Trouble Code DVOM Digital Volt Ohmmeter ECM Engine Control Module ECT Engine Coolant Temperature EEPROM Electronic Erasable Programmable Read Only Memory EMI Electromagnetic Interference ENG Engine GND Ground GPH Gallons Per Hour IAT Intake Air Temperature in. hg Inches Of Mercury INJ Injection IGN Ignition 90-860074--1 FEBRUARY 2002 Page 5A-7 DESCRIPTION SERVICE MANUAL NUMBER 22 ABBREVIATIONS (CONTINUED) Page 5A-8 kPa Kilopascal KV Kilovolts LDF MAP or Boost Pressure Sensor LGS Low Idle Switch MAP Manifold Absolute Pressure MIL Malfunction Indicator Lamp msec Millisecond mV Millivolt NBF Instrumented Injector N/C Normally Closed N/O Normally Open PID Packet of Informational Data PROM Programmable Read Only Memory RAM Random Access Memory REF HI Reference High REF LO Reference Low ROM Read Only Memory SRC Signal Range Check SW Switch TACH Tachometer TERM Terminal TP Throttle Position Sensor V Volts VAC Vacuum WOT Wide Open Throttle 90-860074--1 FEBRUARY 2002 SERVICE MANUAL NUMBER 22 DESCRIPTION Electronic Control Module (ECM) and Sensors General Description The Mercury MerCruiser Electronic Diesel Injection (EDI) system is equipped with a computer that provides the operator with state-of-the-art control of fuel delivery. Computers use voltage to send and receive information. Computers and Voltage Signals Voltage is electrical pressure. Voltage does not flow in circuits. Instead, voltage causes current. Current does the real work in electrical circuits. It is current, the flow of electrically charged particles, that energizes solenoids, closes relays and lights lamps. Besides causing currents in circuits, voltage can be used as a signal. Voltage signals can send information by changing levels, changing waveform (shape) or changing the speed at which the signal switches from one level to another. Computers use voltage signals to communicate with one another. The different sections inside computers also use voltage signals to communicate with each other. There are two kinds of voltage signals, analog and digital. Both of these are used in computer systems. It’s important to understand the difference between them and the different ways they are used. Analog Signals An analog signal is continuously variable. This means that the signal can be any voltage within a certain range. An analog signal usually gives information about a condition that changes continuously over a certain range. For example, in a marine engine, information about temperature is usually provided by an analog signal. There are two general types of sensors that produce analog signals: the 3-wire and the 2-wire sensor. 90-860074--1 FEBRUARY 2002 Page 5A-9 DESCRIPTION SERVICE MANUAL NUMBER 22 SENSORS WITH MORE THAN TWO-WIRES (MAP / IAT AND TP) As an example, the following figure shows a schematic representation of a 3-wire sensor. All 3-wire sensors have a reference voltage, a ground and a variable wiper. The lead coming off of the wiper will be the signal to the Engine Control Module (ECM). As this wiper position changes, the signal voltage returned to the computer also changes. 3-Wire Sensor TWO-WIRE SENSORS (ECT) The following figure is the schematic of a 2-wire type sensor. This sensor is basically a variable resistor in series with a fixed-known resistor within the computer. By knowing the values of the input voltage and the voltage drop across the known resistor, the value of the variable resistor can be determined. The variable resistors that are commonly used are called thermistors. A thermistor’s resistance varies inversely with temperature. 2-Wire Sensor Page 5A-10 90-860074--1 FEBRUARY 2002 SERVICE MANUAL NUMBER 22 DESCRIPTION Analog Value Conditioning The analog value conditioning is subdivided into two parts: sampling the analog signals and scaling and checking the raw values. The following analog values are made available as messages by the analog value conditioning circuits of the ECM: • Water temperature • Air temperature • Fuel temperature • Intake manifold pressure (boost pressure) • Atmospheric pressure • Throttle Position (TP) • Instrumented Injector Needle movement • TP current • Reference voltage • Battery voltage ANALOG VALUE SAMPLING Sampling saves the results of the periodic analog/digital conversion as raw values. The stored values are evaluated at a later time. In addition to periodic signal sampling there is also an active speed-synchronous sampling. Upon starts, the speed-synchronous sampling conversion that may be running is stopped. In the next signal sampling period, the discontinued conversion is again started. 90-860074--1 FEBRUARY 2002 Page 5A-11 DESCRIPTION SERVICE MANUAL NUMBER 22 ANALOG VALUE EVALUATION To process the raw values there are three different loop frames: speed-synchronous (speed interrupt-synchronous up to a max of 6 ms), fast time-synchronous (20 ms) and slow time-synchronous (100 ms). To evaluate the analog signals, the raw values are checked and converted. Checking consists of a signal range check (SRC). Upon exceeding the valid signal range, a default value is used for the raw values. As an example, an engine coolant temperature (ECT) sensor malfunction would set an internal switch, causing a default value to replace the signal from the defective ECT sensor. The data set parameter is selected so that the default value is accepted over a ramp (time) function or directly. If the raw value is again in a valid range after a SRC error, the new value is brought to the current value. The raw value is scaled by means of a curve. There are additional special routines for evaluating the TP sensor and MAP sensor. These signals have a supply voltage through which the raw value is scaled. In case of TP sensor failure, such as a SRC defect on supply voltage, a default value for fuel quantity calculation would be substituted by the ECM. The engine would only be capable of a default set speed of 800 rpm. The ECM is programmed to respond appropriately to variations from other devices, also. For example: • The instrumented injector needle movement sensor is only evaluated and checked when the battery voltage is greater than 9 volt. • If the battery voltage is below a given amount for a specified time the ECM determines that the needle movement sensor cannot be evaluated. • If certain preset SRC value thresholds are exceeded or exceeded for specified lengths of time, errors may be reported. At this point devices involved in the variation may be checked for plausibility. NOTE: “Checked for plausibility” means that the ECM will try to establish which component or input from a component is at fault. That is, it will compare data and attempt to “reason” through what might be the most probable faulty component based on information it has received. Page 5A-12 90-860074--1 FEBRUARY 2002 SERVICE MANUAL NUMBER 22 DESCRIPTION Digital Signals GENERAL The computer uses digital signals in a code that contains only ones and zeros. The high voltage of the digital signal represents a one (1), and no voltage represents a zero (0). Each zero and each one is called a bit of information, or just a bit. Eight bits together are called a word. A word, therefore, contains some combination of eight binary code bits: eight ones, eight zeros, five ones and three zeros, and so on. Binary code is used inside a computer and between a computer and any electronic device that understands the code. By stringing together thousands of bits, computers can communicate and store an infinite variety of information. To a computer that understands binary, 11001011 might mean that it should reset engine rpm at a lower level. Although the computer uses 8-bit digital codes internally and when talking to another computer, each bit can have a meaning. PROCESSING THE DIGITAL INPUTS The digital inputs are centrally read, processed and distributed throughout the system. The first input message indicates the raw electrical conditions; a special internal message indicates the logical, validity-checked conditions of the inputs. Digital input signals that are processed: 1. Glow time feedback 2. Low-idle switch 3. Terminal 15 (battery voltage, key ON) 4. Terminal 15, not validity-checked 5. Logical conditions, validity-checked 6. Electrical conditions, not validity-checked Inputs that are not used are masked out. Each input signal is checked for validity (correctness). Every input is converted into its assigned logical level dependant on four data set parameters. The four parameters for every input: a. Maximum b. Off-Limit c. On-Limit d. Minimum For Terminal 15 input, the unchecked (not validity checked) status is also made available. 90-860074--1 FEBRUARY 2002 Page 5A-13 DESCRIPTION SERVICE MANUAL NUMBER 22 SWITCH TYPES Switched inputs (also known as discretes) to the computer can cause one bit to change, resulting in information being communicated to the computer. Switched inputs can come in two types: they are pull-up and pull-down types. Both types will be discussed. With a pull-up type switch, the ECM will sense a voltage when the switch is CLOSED. With the pull-down switch, the ECM recognizes the voltage when the switch is OPEN. Discretes can also be used to inform a computer of FREQUENCY information. PULSE COUNTERS For the computer to determine frequency information from a switched input, the computer must measure the time between voltage pulses. As a number of pulses are recorded in a set amount of time, the computer can calculate the frequency. The meaning of the frequency number can have any number of meanings to the computer. An example of a pulse counter type of input is the Engine rpm Speed sensor reference pulse input. The computer can count a train of pulses, a given number of pulses per engine revolution, and determine the rpm of the engine. Page 5A-14 90-860074--1 FEBRUARY 2002 DESCRIPTION SERVICE MANUAL NUMBER 22 Engine Control Module (ECM) The Engine Control Module (ECM) is the control center of the fuel injection system. It constantly monitors information from various sensors, and controls the systems that affect engine performance. The ECM also performs a diagnostic function check of the system. It can recognize operational problems and store a code or codes, which identify the problem areas to aid the technician in making repairs. 75301 D2.8L D-Tronic and D4.2L D-Tronic Engine Control Module (ECM) The ECM is supplied voltage from the key switch through a 5 ampere fuse and holder located in the electrical box on the port side of the engine. If the fuse is defective (blown) certain systems will not function properly. As an example the engine may crank but not start, since the ECM would not have a 12 volt signal. Also, when the 5 ampere fuse is defective the scan tool will indicate “No Communication” at the Diagnostic Connector. b a 75298 a - Electrical Box b - 5 Amp. Fuse In Holder 90-860074--1 FEBRUARY 2002 Page 5A-15 DESCRIPTION SERVICE MANUAL NUMBER 22 ECM FUNCTION The ECM supplies 4.9 volts (generally rounded to 5 volts, in conversation) or 12 volts to power various sensors or switches. This is done through resistances in the ECM which are so high in value that a test light will not light when connected to the circuit. In some cases, even an ordinary shop voltmeter will not give an accurate reading because its resistance is too low. Therefore, the use of a 10 megohm input impedance digital voltmeter is required to assure accurate voltage readings. MEMORY There are three types of memory storage within the ECM: ROM, RAM and EEPROM. ROM Read Only Memory (ROM) is a permanent memory that is physically soldered to the circuit boards within the ECM. The ROM contains the overall control programs. Once the ROM is programmed, it cannot be changed. The ROM memory is non-erasable, and does not need power to be retained. RAM Random Access Memory (RAM) is the microprocessor scratch pad. The processor can write into, or read from, this memory as needed. This memory is erasable and needs a constant supply of voltage to be retained. EEPROM Electronic Erasable Programmable Read Only Memory (EEPROM) is the portion of the ECM that contains the different engine calibration information that is specific to each marine application. Page 5A-16 90-860074--1 FEBRUARY 2002 SERVICE MANUAL NUMBER 22 DESCRIPTION Speed Density System The Electronic Diesel Injection (EDI) system is a speed and air density system. The system is based on speed/density fuel management. Three specific data sensors provide the ECM with the basic information for the fuel management portion of its operation. That is, three specific signals to the ECM establish the engine speed and air density factors: the Engine rpm Sensor, Intake Air Sensor and the Manifold Absolute Pressure Sensor. SPEED The Engine rpm Speed sensor signal comes from a three-wire magnetic pickup mounted on the port side of the flywheel housing. The ECM uses this information to determine the speed or rpm factor for fuel quantity and injection timing management. DENSITY The Intake Air Temperature (IAT) and the Manifold Absolute Pressure (MAP) sensors are joined into one sensor assembly. These two sensors contribute to determining the air density factor. The IAT sensor circuit measures the temperature of the air entering the intake manifold. The IAT sensor is a thermistor that changes its resistance depending on the air temperature. When the temperature is low, the resistance is high, and when the temperature is high, the resistance is low. The Manifold Absolute Pressure (MAP) sensor circuit is a sensor that monitors the changes in intake manifold pressure which results from changes in engine loads. These pressure changes are supplied to the ECM in the form of electrical signals. As intake manifold pressure increases or vacuum decreases, the air density in the intake manifold also increases, and additional fuel is required. The MAP sensor sends this pressure information to the ECM, and the ECM increases the amount of fuel injected by applying voltage to the Fuel Quantity Actuator (rotary actuator). As manifold pressure decreases or vacuum increases, the amount of fuel is decreased. When no voltage is applied to the actuator, its return springs reduce the injected fuel quantity to zero (none injected). These three inputs MAP, IAT and rpm are the major determinants of the air/fuel mixture, delivered by the fuel injection system. The remaining sensors and switches provide electrical inputs to the ECM which are used for modification of the air/fuel mixture, as well as for other ECM control functions. 90-860074--1 FEBRUARY 2002 Page 5A-17 DESCRIPTION SERVICE MANUAL NUMBER 22 ECM Input and Sensor Descriptions The following shows the sensors, switches, and other inputs used by the ECM to output control the various systems. Although we will not cover them all in great detail, there will be a brief description of each. Sensors Actuat ors ECM Number 1 Cylinder Fuel Injector (Needle-motion sensor) Injected fuel quantity Temperature sensors (water, air, fuel) Engine shut off Sensor for controlcollar position Microprocessors Start of injection Engine rpm Speed sensor Starting control Electronic ally controlled fuel injection pump (Fuel Quantity and Timing) Glow control unit MAP sensor Diagno sis Setpoint generators Maps TP sensor Page 5A-18 Diagnostic display 90-860074--1 FEBRUARY 2002 DESCRIPTION SERVICE MANUAL NUMBER 22 INSTRUMENTED INJECTOR [NEEDLE MOVEMENT SENSOR (NBF)] The injector timing reference is supplied to the ECM by way of the Instrumented Injector (Needle Movement Sensor) in the cylinder number 1 injector. This position variable type input creates the timing signal for the ECM. This signal is used for a number of control and testing functions within the ECM. b a c 75339 Instrumented Injector a - Instrumented Injector b - Electrical Harness Connector c - Locking Tab A failure in the Instrumented Injector circuit should set Code P1201 or P1725. Display of these codes indicates a failure in the sensor circuit, so proper diagnosis will lead to either repairing a wiring problem or replacing the sensor. 90-860074--1 FEBRUARY 2002 Page 5A-19 DESCRIPTION SERVICE MANUAL NUMBER 22 ENGINE COOLANT TEMPERATURE (ECT) SENSOR The Engine Coolant Temperature (ECT) Sensor is a thermistor (a resistor which changes value based on temperature) immersed in the engine coolant stream. Low coolant temperature produces a high resistance, while high temperature causes low resistance. b c a 75341 a - ECT Sensor b - Harness Connector c - Locking Tab The ECM supplies a fixed current to the ECT through a resistor in the ECM and measures the voltage. The voltage will be high when the engine is cold, and low when the engine is hot. By measuring the voltage, the ECM knows the engine coolant temperature. Engine coolant temperature affects most systems the ECM controls. A failure in the ECT circuit should set Code P0115. Remember, this code indicates a failure in the coolant temperature sensor circuit, so proper use of the chart will lead to either repairing a wiring problem or replacing the sensor. Page 5A-20 90-860074--1 FEBRUARY 2002 DESCRIPTION SERVICE MANUAL NUMBER 22 INTAKE AIR TEMPERATURE AND MANIFOLD PRESSURE SENSOR ASSEMBLY Intake Air Temperature (IAT) Sensor The Intake Air Temperature (IAT) sensor and MAP sensor form an assembly. The IAT portion of the assembly is a thermistor (a resistor which changes value based on temperature). Low temperature produces a high resistance, while high temperature causes a low resistance. c b a 75340 a - IAT Sensor b - Harness Connector c - Locking Tab The ECM supplies a fixed current to the sensor through a resistor in the ECM and measures the voltage. The ECM voltage will be high when the intake air is cold, and low when the intake manifold air is hot. A failure in the IAT sensor circuit should set a Code P1110. 90-860074--1 FEBRUARY 2002 Page 5A-21 DESCRIPTION SERVICE MANUAL NUMBER 22 Manifold Absolute Pressure (MAP) Sensor The Manifold Absolute Pressure (MAP) sensor is a pressure transducer that measures the changes in the intake manifold pressure. The pressure changes as a result of engine load and speed change, and the MAP sensor converts this to a voltage output. a e b 75408 c 75340 d a b c d e - Sensor - Pressure Sensor - Temperature Sensor - Electrical Connector Attachment - Locking Tab The ECM sends a 5 volt reference signal to the MAP sensor. As the manifold pressure changes, the electrical resistance of the MAP sensor also changes. By monitoring the sensor output voltage, the ECM knows the manifold pressure. A higher pressure, low vacuum (high voltage) requires more fuel, while a lower pressure, higher vacuum (low voltage) requires less fuel. The ECM uses the MAP sensor to control fuel delivery and injection timing. A closed throttle position on engine coast-down would produce a relatively low MAP output voltage, while a wide open throttle would produce a high MAP output voltage. This higher output voltage is produced because the pressure inside the manifold is increasing. When manifold pressure is high, vacuum is low. A failure in the MAP sensor circuit should set a Code P0105. Page 5A-22 90-860074--1 FEBRUARY 2002 DESCRIPTION SERVICE MANUAL NUMBER 22 FUEL QUANTITY ACTUATOR AND SENSOR Inside the electronic diesel pump the solenoid actuator (rotary actuator) for injected fuel quantity control engages with the control collar through a shaft. Similar to the mechanically governed fuel injection pump, the cutoff ports are opened or closed depending upon the control collar’s position. The injected fuel quantity can be infinitely varied between zero and maximum (e.g., for cold starting). Using an angle sensor (potentiometer) called the Fuel Quantity Sensor the rotary actuator’s angle of rotation, and thus the position of the control collar, are reported back to the ECM and used to determine the injected fuel quantity as a function of engine speed. When no voltage is applied to the actuator, its return springs reduce the injection quantity to zero. b a d c a b c d 75407 - EDI Injection Pump - Fuel Quantity (Control-Collar Position) Sensor - Control Collar - Fuel Quantity Actuator A failure of the Fuel Quantity Actuator circuit should set a Code P1220. A failure of the Fuel Quantity Sensor should set a Code P1225. 90-860074--1 FEBRUARY 2002 Page 5A-23 DESCRIPTION SERVICE MANUAL NUMBER 22 FUEL TEMPERATURE SENSOR The Fuel Temperature Sensor is a thermistor (a resistor which changes value based on temperature) immersed in the fuel inside the upper chamber of the fuel pump. It is not a serviceable item. Low fuel temperature produces a high resistance, while high temperature causes low resistance. The ECM supplies a fixed current to the pump through a resistor in the ECM and measures the voltage. The voltage will be high when the fuel is cold, and low when the fuel is hot. By measuring the voltage, the ECM knows the fuel temperature. A failure in the fuel temperature circuit should set Code P0180. Remember, this code indicates a failure in the fuel temperature sensor circuit, so proper use of the chart will lead to either repairing a wiring problem or determining the failure is the fuel pump. However, it is not suggested that the pump be replaced for this failure unless the customer complains of related driveability problems. ENGINE RPM SPEED SENSOR The Engine rpm Speed sensor is an induction-type pulse generator which scans the leading edge of the flywheel. Four notches (drillings) serve to sense the engine speed. The resulting change in magnetic flux induces an AC voltage signal which is evaluated by the ECM. The ECM processes the signal to establish TDC and the crankshaft position relative to TDC. a b 75311 a - RPM Sensor b - Electrical Connector A failure in the Engine RPM Speed sensor circuit should set a Code P0725. Page 5A-24 90-860074--1 FEBRUARY 2002 DESCRIPTION SERVICE MANUAL NUMBER 22 THROTTLE POSITION (TP) SENSOR The Throttle Position (TP) Sensor is a potentiometer connected to the throttle cable. The TP has one end connected to 5 volts from the ECM and the other to ECM ground. A third wire is connected to the ECM to measure the voltage from the TP. As the throttle cable is operated, the angle of the wiper inside the TP body is changed: the voltage output of the TP also changes. At a closed throttle position, the voltage output of the TP is low (approximately .4 volt). As the throttle position changes the output increases, so that at wide open throttle (WOT), the output voltage should be near 4.5 volts. By monitoring the output voltage from the TP sensor, the ECM can determine fuel delivery based on the throttle position (operator demand). b a 75336 a - TP Sensor b - Electrical Connector Failures that might occur with the TP sensor, are: • TP sensor out of range (SRC High or Low). • Low idle switch defective. • TP sensor supply voltage incorrect. • Plausibility (possibility of error) between TP sensor and low idle switch signal to the ECM. If the TP circuit is open, the ECM will set a Code P1515. If the TP circuit is shorted, the ECM will think the vessel is at WOT, and a trouble Code P1515 will be set. A problem in any of the TP circuits will set a Code P1515. Once a trouble code is set, the ECM will use a default value resulting in an engine speed of 800 rpm. 90-860074--1 FEBRUARY 2002 Page 5A-25 DESCRIPTION SERVICE MANUAL NUMBER 22 Fuel Management Control As stated previously, the Electronic Diesel Injection (EDI) is controlled by an Engine Control Module (ECM). This module is the nerve/decision center of the system. It uses all the information it gathers to manage and deliver increased fuel economy and maximum engine performance. The EDI system has been designed so that the ECM controls the injected quantity and timing by the ECM. This electronic control allows the ECM to maintain optimum engine performance and the lowest exhaust emissions possible. Recall that the EDI system uses inputs from sensors to make decisions on the quantity of fuel and amount of pump timing advance or retard allowed. In order for the ECM to properly calculate advance, it must always know the engine speed. The ECM also performs a diagnostic function check of the system. It can recognize operational problems and store a code or codes, which identify the problem areas to aid the technician in making repairs. 75343 Engine Control Module (ECM) Page 5A-26 90-860074--1 FEBRUARY 2002 SERVICE MANUAL NUMBER 22 DESCRIPTION Modes Of Operation PREHEATING THE GLOW PLUGS (IF EQUIPPED) The operation of the glow plugs and the glow plug preheating on-time is controlled by the ECM. The time period during which the glow plugs are ON (supplied 12 volts) depends directly on the temperature of the engine coolant (coolant temperature sensor) and the altitude of the engine. The altitude is determined by the BARO Barometric Absolute pressure sensor located inside the ECM. The ignition OFF time in which the engine can be restarted without the preheat cycle is about 20 seconds. The ECM also uses a post heat strategy, in which power to the glow plugs (12 v) is maintained after engine start-up. This time period is calculated by the ECM and is based on engine ECT sensor signal equivalent to approximately 60° C (140° F) and engine speed up to 1500 rpm. By using coolant temperature and engine rpm references it is possible to reduce cold engine noise as well as emissions after starting. ENGINE STARTING During engine starting the ECM does not look at the throttle position information. The throttle position has no influence on the starting procedure. Additionally, the ECM ignores the input signal from the instrumented first injector. While starting, the fuel flow rate is determined exclusively on the basis of the engine speed and the engine coolant temperature input information. The ECM sets the fuel injection timing based on the signal from the coolant temperature sensor. ENGINE OPERATION During engine operation, the ECM calculates the fuel flow rate based on signals from the throttle position sensor and Engine rpm Speed sensor. This information is then sent to the injection pump, which regulates the rate of the fuel flowing into the cylinders of the engines. The injection pump uses a rotating electromagnetic actuator to move the delivery plunger which controls the pumps working stroke and the amount of fuel flow. The quantity of fuel to be injected is also corrected based on the following parameters: • Fuel temperature. The ECM uses this information to calculate the exact weight of the fuel injected. The pump actually controls the volume of fuel, but the calculation of the air/fuel ratio by the ECM requires knowledge of the weight of the fuel injected. The weight of the fuel is determined by fuel temperature. • Air intake temperature and absolute barometric pressure. These inputs are needed by the ECM to optimize the ideal air/fuel ratio for the prevailing engine operating conditions. The maximum flow rate of the fuel entering the engine is limited according to the torque curve based on the engine speed. The actual position of the fuel quantity actuator, which is necessary to send the correct amount of fuel to the injectors, is detected by the Fuel Quantity Sensor (an inductive control-collar position sensor or potentiometer) located on the actuator. By comparing the real data and the calculated data, the ECM constantly changes the position of the actuator. 90-860074--1 FEBRUARY 2002 Page 5A-27 DESCRIPTION SERVICE MANUAL NUMBER 22 ENGINE SPEED CHANGES The ECM adjusts the engine operating strategy during acceleration and deceleration in order to avoid unstable operating conditions such as jerkiness and roughness. FUEL FLOW PROPORTIONING The ECM uses information from the Throttle Position sensor and the Engine rpm Speed sensor along with the strategies in its memory to determine the proper fuel quantity to be injected into the engine. After comparing the nominal position on the control collar with the actual position of the control collar, a fuel quantity adjustment is made based on the fuel temperature detected by the sensor on the pump. The adjustment will be made until the actual position of the control collar coincides with its nominal position. In this way the quantity of fuel appropriate for the selected operating conditions is delivered. The maximum flow rate of the fuel is determined by engine rpm. The flow rate adjustment also takes into account the input information detected by the ECM from the engine coolant temperature sensor and the air intake temperature sensor. The ECM also handles an engine operation control function, particularly during acceleration and deceleration. ELECTRONIC INJECTION PUMP The electronic injection pump with its upper chambers (high pressure) and lower chamber (low pressure) pump and actuators are the same as the mechanically controlled injector pump. The pump interior pressure is dependent upon pump speed. Similar to the mechanical timing device, this pressure is applied to the timing-device piston. This pressure on the timing-device pressure side is modulated by the Timing Solenoid Valve (a clocked solenoid valve). With this solenoid valve permanently opened (pressure reduction), start of injection is retarded. With it fully closed (pressure increase), start of injection is advanced. In the intermediate range, the ON/OFF ratio (the ratio of solenoid valve open to solenoid valve closed) can be infinitely varied by the ECM. SENSORS The position of the throttle and the control collar in the injection pump are registered by the angle sensors. These use either contacting or non-contacting methods. Engine speed and TDC are registered by inductive sensors. Sensors with high measuring accuracy and long-term stability are used for pressure and temperature measurements. The start of injection is registered by a sensor that is directly integrated in the nozzle holder and which detects the start of injection by sensing the needle movement. Page 5A-28 90-860074--1 FEBRUARY 2002 SERVICE MANUAL NUMBER 22 DESCRIPTION INJECTOR TIMING REGULATION Determining the proper fuel injection point (timing) depends on the quantity of fuel, engine rpm and coolant temperature. The ECM controls the timing using the signal from the number one instrumented injector and corrects the timing to the nominal timing rate. Timing is changed by modulating the pressure in the upper (high pressure) chamber communicating with the pump body through the Timing Solenoid Valve. During operation, the fuel pressure in the pump upper chamber exerts pressure on the injection timing actuator piston. The piston has a spring on the lower side which, along with the pressure chamber, allows the piston to maintain a regulated pressure in the upper chamber that the ECM can monitor and adjust. The Timing Solenoid Valve is operated by the ECM. The ECM will adjust the pressure in the upper chamber to the level that provides the required timing and discharges the excess pressure into the lower chamber. From the lower chamber, the excess fuel is returned to the tank. The position of the Timing Solenoid Valve piston is actually determined by the difference in the pressure acting on the face of the piston. The position of the injection timing adjustment piston also determines the position of the piston in its valve seat. Rotating the bearing ring changes the piston valve seat phasing compared to the position of the rotating cam disk. This advances the intake phase. With the valve open, the injection is delayed. Reducing the inlet orifice by closing the valve, advances the timing based on the resulting pressure drop. The solenoid is closed if power (12 v) is removed. NOTE: The electronic injection pump is not serviceable. If a pump needs service, consult your Mercury MerCruiser Dealer or the nearest Bosch Dealer Service Network office. ENGINE SHUT OFF The principle of auto-ignition as applied to the diesel engine means that the engine can only be switched off by interrupting its supply of fuel. When equipped with Electronic Diesel Injection control, the engine is switched OFF by the Fuel Quantity Actuator (an input signal from the ECM: injected fuel quantity = zero). The Fuel Shut Off Valve, a separate electrical engine shut off device on the fuel pump, serves as a standby shut off in case the actuator should fail. 90-860074--1 FEBRUARY 2002 Page 5A-29 DESCRIPTION SERVICE MANUAL NUMBER 22 Diagnosis and Testing NOTICE For more information on diagnosis and testing refer to SECTION 5E. ECM Reactions During Operation The ECM is capable of performing diagnostic checks within the electronic diesel fuel injection system. When the ECM senses a problem in the system it will identify the problem(s) by storing fault code number(s) in its memory. The fault code number(s) can be retrieved from the ECM memory and can be used to identify the improperly operating circuit or component. There are two recommended methods of retrieving fault codes from the ECM: 1. Scan Tool 2. Blink Code Tool ECM Self-Diagnostics The ECM performs a continual self-diagnosis on certain control functions. This diagnostic capability is complemented by the diagnostic procedures contained in this manual. The ECM’s language for communicating the source of a malfunction is a system of diagnostic codes. The codes are four digit numbers preceded by the letter P. The prefIx letter P is the abbreviation for Powertrain, an internationally standardize reference. When a malfunction is detected by the ECM, a code is set and the Malfunction Indicator Lamp (MIL) is illuminated in most instances. NOTE: On factory instrumentation the MIL is a lamp with a check mark (n) on the colored lens. Page 5A-30 90-860074--1 FEBRUARY 2002 SERVICE MANUAL NUMBER 22 DESCRIPTION MALFUNCTION INDICATOR LAMP The Engine System Monitor Panel provided in the factory instrumentation package is equipped with a Malfunction Indicator Lamp (MIL). The MIL is a lamp with a check mark (n) on the colored lens. • It informs the operator and service technician that a problem has occurred and that the vessel is in need of service as soon as reasonably possible. • It displays Codes stored by the ECM which help the technician diagnose system problems. As a bulb and system check, the lamp will come ON with the key on and the engine not operating. When the engine is started, the light will turn OFF. If the lamp remains ON, the self-diagnostic system has detected a problem. If the problem is corrected, the light will go out in most cases after ten seconds, but a code will remain stored in the ECM. When the lamp remains ON while the engine is operating, or when a malfunction is suspected due to a driveability problem, an EDI Diagnostic Circuit Check must be performed. These checks will expose malfunctions which may not be detected if other diagnostics are performed prematurely. The ECM has been programmed to illuminate the MIL during or due to the errors associated with the following devices: • Engine Coolant Temperature (ECT) sensor • Intake Air Temperature (IAT) sensor • Manifold Absolute Pressure (MAP) sensor • Throttle Position (TP) and Low Idle Switch (LGS) sensor • Instrumented injector (NBF) • Timing Solenoid Valve • Timing advance regulation • Fuel Shut Off Valve • Battery + (12 Volts) • Fuel Quantity Actuator • Fuel Quantity Sensor • Engine RPM Speed Sensor • EEPROM in ECM 90-860074--1 FEBRUARY 2002 Page 5A-31 DESCRIPTION SERVICE MANUAL NUMBER 22 INTERMITTENT PROBLEMS AND MALFUNCTION INDICATOR LAMP In the case of an intermittent problem, the Malfunction Indicator Lamp will light for ten seconds and then will go out. However, the corresponding code will be stored in the memory of the ECM. When unexpected codes appear during the code reading process, one can assume that these codes were set by an intermittent malfunction and could be helpful in diagnosing the system. An intermittent code may or may not reset. IF IT IS AN INTERMITTENT FAILURE, A DIAGNOSTIC CODE CHART IS NOT USED. Consult the Diagnostic Help section following the Circuit Description information. Troubleshooting also covers the topic of Intermittents. A physical inspection of the applicable sub-system most often will resolve the problem. Page 5A-32 90-860074--1 FEBRUARY 2002 DESCRIPTION SERVICE MANUAL NUMBER 22 THIS PAGE IS INTENTIONALLY BLANK 90-860074--1 FEBRUARY 2002 Page 5A-33 DESCRIPTION SERVICE MANUAL NUMBER 22 THIS PAGE IS INTENTIONALLY BLANK Page 5A-34 90-860074--1 FEBRUARY 2002 FUEL DELIVERY PUMP AND FUEL FILTER SERVICE MANUAL NUMBER 22 FUEL SYSTEMS Section 5B - Fuel Delivery Pump and Fuel Filter Table of Contents Identification . . . . . . . . . . . . . . . . . . . . . . . . . . Specifications . . . . . . . . . . . . . . . . . . . . . . . . . Torque . . . . . . . . . . . . . . . . . . . . . . . . . . . . . . . Tools . . . . . . . . . . . . . . . . . . . . . . . . . . . . . . . . Lubricants / Sealants / Adhesives . . . . . . . Precautions . . . . . . . . . . . . . . . . . . . . . . . . . . Exploded View . . . . . . . . . . . . . . . . . . . . . . . . Fuel Delivery Pump, Fuel Filter and Related Components . . . . . . . . . . . 5B-3 5B-3 5B-3 5B-3 5B-3 5B-4 5B-6 Testing . . . . . . . . . . . . . . . . . . . . . . . . . . . . 5B-8 Removal . . . . . . . . . . . . . . . . . . . . . . . . . . . . 5B-10 Installation . . . . . . . . . . . . . . . . . . . . . . . . . . 5B-11 Water Separating Fuel Filter . . . . . . . . . . . 5B-13 Removal . . . . . . . . . . . . . . . . . . . . . . . . . 5B-13 Installation . . . . . . . . . . . . . . . . . . . . . . . . 5B-13 Water Drain Valve Operation . . . . . . . . . . . 5B-15 Purging Air From The Fuel System . . . . . 5B-16 5B-6 5 B 90-860074--1 FEBRUARY 2002 Page 5B-1 FUEL DELIVERY PUMP AND FUEL FILTER SERVICE MANUAL NUMBER 22 THIS PAGE IS INTENTIONALLY BLANK Page 5B-2 90-860074--1 FEBRUARY 2002 FUEL DELIVERY PUMP AND FUEL FILTER SERVICE MANUAL NUMBER 22 Identification 70163 D2.8L D-Tronic and D4.2L D-Tronic Fuel Delivery Pump Specifications Description D2.8L D-Tronic And D4.2L D-Tronic Fuel Flow per Minute 80 Liters (85 U. S. Qts.) at 2500 rpm Delivery Pressure Supply Restriction Measured at 2500 rpm; no load. Return Pressure 14 - 34 kPa (2-5 psi) 20.261 kPa (6 in. Hg) 13.78 kPa (2 psi) Torque Description Nm Filter Header To Bracket Nut 32 24 Pump To Block Nut 24 18 Fuel Filter lb-in. lb-ft Hand tighten only Tools DESCRIPTION Fuel Pressure Gauge [0-103.35 kPa (0-15 psi)] PART NUMBER Obtain Locally Lubricants / Sealants / Adhesives Description Part Number SAE 30W Engine Oil Obtain Locally 90-860074--1 FEBRUARY 2002 Page 5B-3 FUEL DELIVERY PUMP AND FUEL FILTER SERVICE MANUAL NUMBER 22 Precautions WARNING ALWAYS disconnect battery cables from battery BEFORE working on fuel system to prevent fire. This eliminates the engine wiring as a potential source of ignition. WARNING FIRE HAZARD: Be careful when changing fuel system components; diesel fuel is flammable. Fuel leakage from any part of the fuel system can be a fire hazard which can cause serious bodily injury or death. Ensure that ignition key is OFF. Do NOT smoke or allow sources of open flame in the area while changing fuel system components. Do NOT allow fuel to come into contact with any hot surface which may cause it to ignite. WARNING FIRE HAZARD: Wipe up any spilled fuel immediately. Dispose of rags appropriately. Dispose of fuel soaked rags, paper, etc. in an appropriate air tight, fire retardant container. Fuel soaked items may spontaneously ignite and result in a fire hazard which could cause serious bodily injury or death. WARNING Avoid diesel fuel fire or explosion. Improper installation of brass fittings or plugs into fuel filter base can crack casting and/or cause a fuel leak. Page 5B-4 • Apply #565 Loctite Pipe Sealant with Teflon to threads of brass fitting or plug. Do NOT USE TEFLON TAPE. • Thread brass fitting or plug into fuel pump or fuel filter base until finger-tight. • Tighten fitting or plug an additional 1-3/4 to 2-1/4 turns using a wrench. Do NOT overtighten. • Install fuel line. To prevent overtightening, hold brass fitting with suitable wrench and tighten fuel line connectors securely. • Check for fuel leaks. 90-860074--1 FEBRUARY 2002 FUEL DELIVERY PUMP AND FUEL FILTER SERVICE MANUAL NUMBER 22 WARNING FIRE HAZARD: Fuel leakage from any part of the fuel system can be a fire hazard which can cause serious bodily injury or death. Careful periodic inspection of entire fuel system is mandatory, particularly after storage. All fuel components including fuel tanks, whether plastic, metal or fiberglass, fuel lines, primers, fittings and fuel filters should be inspected for leakage, softening, hardening, swelling or corrosion. Any sign of leakage or deterioration requires replacement before further engine operation. WARNING Make sure that no fuel leaks exist, before closing engine hatch. CAUTION Do NOT operate engine without cooling water being supplied to seawater pickup pump or pump impeller will be damaged, and subsequent overheating damage may result. WARNING Boating industry standards (NMMA, ABYC, etc.) federal standards and Coast Guard regulations must be adhered to when installing fuel delivery system. 90-860074--1 FEBRUARY 2002 Page 5B-5 FUEL DELIVERY PUMP AND FUEL FILTER SERVICE MANUAL NUMBER 22 Exploded View Fuel Delivery Pump, Fuel Filter and Related Components 22 21 3 2 4 12 A 5 9 8 11 10 7 6 20 13 9 10 16 10 1 17 9 18 19 14 15 75406 Page 5B-6 90-860074--1 FEBRUARY 2002 SERVICE MANUAL NUMBER 22 FUEL DELIVERY PUMP AND FUEL FILTER 1 - Fuel Pump 2 - Screw 3 - Lockwasher 4 - Filter Bracket 5 - Fuel Filter 6 - O-ring 7 - Drain Cap 8 - Pipe, Pump-To-Filter Header 9 - Hollow Bolt (3) 10 - Sealing Washer 11 - Pipe, Filter Header-To-Injection Pump 12 - Nut 13 - Fuel Pump Cover 14 - Diaphragm 15 - Diaphragm Spring 16 - O-ring 17 - Stud (2) 18 - Lockwasher (2) 19 - Nut (2) 20 - Fuel Inlet Fitting 21 - Elbow Fittings 22 - Bracket Description Part Number A 30W Engine Oil Obtain Locally 90-860074--1 FEBRUARY 2002 Page 5B-7 FUEL DELIVERY PUMP AND FUEL FILTER SERVICE MANUAL NUMBER 22 Testing IMPORTANT: Avoid a decrease in engine performance. Restrictions of either fuel supply or fuel return circuits will adversely affect engine performance. TESTING FUEL DELIVERY PUMP PRESSURE 3. Remove the bleeder valve from the filter header. 4. Install a suitable barbed , tappered fitting with a short section of fuel hose connected. 5. Attach a suitable 0-100 kPa (0-15 PSI) pressure gauge to this hose. 71967 74726 Testing Delivery Pressure c - Bleeder Valve d - Suitable Barbed Fitting e - Pressure Gauge 6. If the measured value is not within specifications, repair as needed. Page 5B-8 90-860074--1 FEBRUARY 2002 FUEL DELIVERY PUMP AND FUEL FILTER SERVICE MANUAL NUMBER 22 TESTING FUEL SYSTEM RESTRICTION TO DELIVERY PUMP 1. Install a suitable vacuum gauge to the inlet side of fuel delivery pump. 2. If measured value is greater than specified, repair as needed. b 71967 c a 75298 Testing Restriction a - Inlet Fitting b - Suitable Vacuum Gauge c - Fuel Supply From Fuel Tank 90-860074--1 FEBRUARY 2002 Page 5B-9 FUEL DELIVERY PUMP AND FUEL FILTER SERVICE MANUAL NUMBER 22 Removal 1. Disconnect battery cables from battery. 2. Remove fuel supply hose. Plug hose to prevent fuel from leaking into boat. a b 75298 Typical d - Fuel Delivery Pump e - Fuel Supply Hose 3. Remove the hollow bolt from the fuel outlet pipe. Discard sealing washers. 4. Remove the fuel pump. Discard the O-ring seal. a b b e c d a b 75298 Typical a - Hollow Bolt b - Sealing Washer c - Lockwasher d - Mounting Nut e - O-ring Page 5B-10 90-860074--1 FEBRUARY 2002 FUEL DELIVERY PUMP AND FUEL FILTER SERVICE MANUAL NUMBER 22 Installation 1. Using 2 new sealing washers on hollow bolt, attach fuel inlet fitting to fuel pump as shown. 2. Tighten hollow bolt securely. c c b a 75298 a - Hollow Bolt b - Sealing Washer c - Fuel Inlet Fitting 3. Using a new O-ring, install the fuel pump on the engine block. Temporarily hand tighten the mounting nuts. b c a 75298 a - O-ring b - Lockwasher c - Nut 90-860074--1 FEBRUARY 2002 Page 5B-11 FUEL DELIVERY PUMP AND FUEL FILTER SERVICE MANUAL NUMBER 22 4. Using 2 new sealing washers on hollow bolt, attach fuel outlet pipe to fuel pump. 5. Torque fuel pump mounting nuts securely. 6. Tighten fuel outlet pipe hollow bolt securely. 7. Connect fuel supply hose. Tighten hose clamp securely. a b b c e d a b c d e f Page 5B-12 f 75298 - Hollow Bolt - Sealing Washer - Fuel Outlet Pipe - Mounting Nut - Clamp - Fuel Supply Hose 90-860074--1 FEBRUARY 2002 FUEL DELIVERY PUMP AND FUEL FILTER SERVICE MANUAL NUMBER 22 Water Separating Fuel Filter Removal 1. Disconnect battery cables from battery. NOTE: Use a suitable container to catch excess fuel. 2. Twist locking ring by hand. Remove water separating fuel filter and sealing ring from mounting bracket. Do NOT use a filter wrench. IMPORTANT: Element cannot be cleaned and reused. It must be replaced. 3. Remove the drain cap and O-ring from bottom of the existing filter. Note position of O-ring seal. Inspect and replace damaged components. d c a 70161 b 75579 a b c d - Locking Ring - Filter Element - Drain Cap - O-ring 4. Discard filter and sealing ring. Installation 1. Install O-ring and drain cap on new filter. a b b 70160 a - O-ring Seal b - Drain Cap 90-860074--1 FEBRUARY 2002 Page 5B-13 FUEL DELIVERY PUMP AND FUEL FILTER SERVICE MANUAL NUMBER 22 2. Lubricate fuel filter seal with clean 30W engine oil. Align filter to bracket. Twist locking ring by hand to secure filter to bracket. Do NOT use a filter wrench. a b c d 74731 a b c d - Filter Header - Locking Ring - Sealing Ring (Lubricate) - Water Separating Fuel Filter NOTE: Place a suitable container under fuel filter to catch excess fuel. 3. Loosen bleed screw on fuel filter bracket. 4. Move plunger on hand pump/primer up and down repeatedly, until an air free stream of fuel flows from bleed screw. Filter is full when this occurs. 5. Tighten bleed screw. b a 74726 a - Pump/Primer Knob b - Bleed Screw 6. Connect battery cables. 7. Start engine, check for fuel leaks. If leaks exist stop engine immediately. Recheck filter installation. Page 5B-14 90-860074--1 FEBRUARY 2002 FUEL DELIVERY PUMP AND FUEL FILTER SERVICE MANUAL NUMBER 22 Water Drain Valve Operation The fuel filter can be drained of water and small dirt particles without removal of filter. NOTE: To ensure complete draining, in warm weather open the water bleed valve before starting daily operations. In cold weather, where there is a possibility that the condensed water will freeze, drain the filter shortly after the end of daily operations. 1. Using a suitable container to catch contaminated fuel and/or water, open drain cap at bottom of filter by turning the drain counterclockwise (as viewed from the bottom of the filter). 2. Drain until fuel is clear in appearance. a b c 74726 a - Fuel Filter b - Drain Cap c - Expelled Fuel 3. Close the drain. Tighten securely. 4. Fill the fuel filter. 90-860074--1 FEBRUARY 2002 Page 5B-15 FUEL DELIVERY PUMP AND FUEL FILTER SERVICE MANUAL NUMBER 22 Purging Air From The Fuel System CAUTION Absolute cleanliness is required for work on the fuel system, since the injection pump and fuel injectors have very close tolerances. Even minute particles of dirt or small amounts of water can impair the function of the fuel injection system. The practice of draining and replacing the water separating fuel filter, including purging a new filter of air, is generally the only time for purging air from the system. In most cases the design of the EDI System will prevent needing to purge the fuel injection pump itself. However, should it become necessary to purge air from the fuel injection pump proceed as follows. NOTE: Place suitable container under the fuel filter and injection pump to catch excess fuel. 1. Bleed air from the water separating fuel filter. 2. Loosen the bleed screw on injection pump. 3. Move plunger on hand pump/primer up and down repeatedly, until an air free stream of fuel flows from bleed screw. b a 71371 a - Bleed Screw b - Expelled Fuel 4. Close the bleed screw on the injection pump. Tighten securely. 5. Connect the battery cables. 6. Start the engine. Check for leaks. If leaks exist stop the engine immediately. Recheck the filter installation. Page 5B-16 90-860074--1 FEBRUARY 2002 SERVICE MANUAL NUMBER 22 FUEL DELIVERY PUMP AND FUEL FILTER THIS PAGE IS INTENTIONALLY BLANK 90-860074--1 FEBRUARY 2002 Page 5B-17 FUEL DELIVERY PUMP AND FUEL FILTER SERVICE MANUAL NUMBER 22 THIS PAGE IS INTENTIONALLY BLANK Page 5B-18 90-860074--1 FEBRUARY 2002 FUEL INJECTORS SERVICE MANUAL NUMBER 22 FUEL SYSTEM Section 5C - Fuel Injectors Table of Contents Identification . . . . . . . . . . . . . . . . . . . . . . . . . . Specifications . . . . . . . . . . . . . . . . . . . . . . . . . Torque . . . . . . . . . . . . . . . . . . . . . . . . . . . . . . . Tools . . . . . . . . . . . . . . . . . . . . . . . . . . . . . . . . Bosch . . . . . . . . . . . . . . . . . . . . . . . . . . . . . Lubricants / Sealants / Adhesives . . . . . . . Precautions . . . . . . . . . . . . . . . . . . . . . . . . . . Description . . . . . . . . . . . . . . . . . . . . . . . . . . . Fuel Injector (Cutaway View) . . . . . . . . . . . 5C-3 5C-3 5C-3 5C-4 5C-4 5C-4 5C-5 5C-6 5C-7 Exploded View . . . . . . . . . . . . . . . . . . . . . . . . 5C-8 Injector Test (Engine Misfiring) . . . . . . . . . . 5C-9 Removal . . . . . . . . . . . . . . . . . . . . . . . . . . . . 5C-10 Inspection . . . . . . . . . . . . . . . . . . . . . . . . . . . 5C-12 Testing . . . . . . . . . . . . . . . . . . . . . . . . . . . . . . 5C-12 Installation . . . . . . . . . . . . . . . . . . . . . . . . 5C-13 Purging Air From Fuel Injectors (Bleeding) . . . . . . . . . . . . . . . . . . . . . . . . . . 5C-16 5 C 90-860074--1 FEBRUARY 2002 Page 5C-1 FUEL INJECTORS SERVICE MANUAL NUMBER 22 THIS PAGE IS INTENTIONALLY BLANK Page 5C-2 90-860074--1 FEBRUARY 2002 FUEL INJECTORS SERVICE MANUAL NUMBER 22 Identification The Bosch injector for Direct Injected D-Tronic engines can be identified as shown. 75339 Instrumented Injector Shown (Non-Instrumented Injector Similar) Specifications Description Specification Manufacturer Robert Bosch Corporation Injector Type D2.8L D-Tronic D4.2L D-Tronic Opening Pressure (New Injector) Spray Angle Spray Hole Diameter Multi-Orifice, Hole-Type Nozzle 27,000 kPa (3915 psi) 157 Degrees 0.25 mm (.001 in.) Torque Description Nm Injector Clamp Nut 24 Injection Pipe Sleeve Nut 17 156 12.7 112 Injection Pipe Clamp Screws 90-860074--1 FEBRUARY 2002 lb-in. lb-ft 18 Page 5C-3 FUEL INJECTORS SERVICE MANUAL NUMBER 22 Tools Bosch EFEP60H Nozzle Tester 0 681 200 502 Description: Robert Bosch Corporation 2800 South 25th Avenue Broadview, IL 60153 Mailing Address: P.O. Box 4601 North Suburban, IL 60197 Phone: (312) 865-5200 74442 Lubricants / Sealants / Adhesives Page 5C-4 Description Part Number 30W Engine Oil Obtain Locally 90-860074--1 FEBRUARY 2002 FUEL INJECTORS SERVICE MANUAL NUMBER 22 Precautions WARNING ALWAYS disconnect battery cables from battery BEFORE working on fuel system to prevent fire. This eliminates the engine wiring as a potential source of ignition. WARNING FIRE HAZARD: Be careful when changing fuel system components; diesel fuel is flammable. Fuel leakage from any part of the fuel system can be a fire hazard which can cause serious bodily injury or death. Ensure that ignition key is OFF. Do NOT smoke or allow sources of open flame in the area while changing fuel system components. Do NOT allow fuel to come into contact with any hot surface which may cause it to ignite. WARNING FIRE HAZARD: Wipe up any spilled fuel immediately. Dispose of rags appropriately. Dispose of fuel soaked rags, paper, etc. in an appropriate airtight, fire-retardant container. Fuel soaked items may spontaneously ignite and result in a fire hazard which could cause serious bodily injury or death. WARNING FIRE HAZARD: Fuel leakage from any part of the fuel system can be a fire hazard which can cause serious bodily injury or death. Careful periodic inspection of entire fuel system is mandatory, particularly after storage. All fuel components including fuel tanks, whether plastic, metal or fiberglass, fuel lines, primers, fittings, and fuel filters should be inspected for leakage, softening, hardening, swelling or corrosion. Any sign of leakage or deterioration requires replacement before further engine operation. WARNING Safety glasses should be worn while working on fuel injection system. The fuel injection pump will generate pressures in excess of 13790 kPa (2000 psi). Use caution when removing injectors, injector lines, or bleeding air from injection system. CAUTION Keep injectors and injection pump fittings clean. Do NOT allow dirt to enter fittings when removing or installing lines. Dirt will cause injectors or injection pump to malfunction. IMPORTANT: Mercury MerCruiser does not recommend fuel injectors be disassembled for service. If an injector tester is not available, substitute a new injector for any injectors thought to be faulty. IMPORTANT: Always wash hands and use clean tools when working on fuel injection system. 90-860074--1 FEBRUARY 2002 Page 5C-5 FUEL INJECTORS SERVICE MANUAL NUMBER 22 Description In the EDI fuel injection system, the injectors (with their nozzles in the particular nozzle holders) are an important connection between the electronically controlled injection pump and the engine. The injectors job includes the following: • Meter the injected fuel. • Manage and prepare the fuel spray in the cylinder. • Set the rate of fuel discharge. • Close-off the injection system from the combustion process taking place inside each cylinder. The EDI diesel engines use a hole type injector nozzle and holder. In contrast to the previous throttling pintle nozzles, the hole type nozzle must be installed in a given position. The spray holes are at different angles in the nozzle body and must be correctly aligned with regard to the combustion chamber. The nozzle has a specially shaped end, or nozzle cone, into which the needle of the injector seats. Two precisely sized and matched pressure springs hold the needle seated. The springs are calibrated to allow the needle to unseat at about 27,000 kPa (3,915 psi). The shape of the needle, the holes and spring pressures restricts the amount of fuel injected when the needle first starts to open. Not until the needle is completely open is the full amount of fuel injected. Because it promotes a gradual pressure rise, this action gives soft combustion and therefore a smooth operating engine. Page 5C-6 90-860074--1 FEBRUARY 2002 FUEL INJECTORS SERVICE MANUAL NUMBER 22 Fuel Injector (Cutaway View) 1 3 2 4 5 6 7 6 8 7 5 9 10 11 12 75104 75439 Instrumented Injector (Needle Motion Sensor) Shown (Non-Instrumented Similar) 1 - Holder Body 2 - Adjusting Spindle 3 - Contact Lug 4 - Sensor Coil 5 - Pressure Adjustment Shim 6 - Pressure Spring 7 - Pressure Spindle 8 - Guide 9 - Spring Support 10 - Stop Sleeve 11 - Intermediate Disc 12 - Nozzle Retaining Nut 90-860074--1 FEBRUARY 2002 Page 5C-7 FUEL INJECTORS SERVICE MANUAL NUMBER 22 Exploded View 4 6 24 5 26 25 3 2 23 22 1 12 11 23 9 10 8 7 23 22 23 17 21 17 16 15 14 19 20 19 13 73911 18 1 - Injector / Instrumented Injector (Cylinder Number 1 Only) 2 - Nozzle Gasket 3 - O-ring 4 - Nut (M8) 5 - Washer (If Equipped) 6 - Injector Clamp 7 - Injection Pipe (Cylinder #1) 8 - Injection Pipe (Cylinder #2) 9 - Injection Pipe (Cylinder #3) 10 - Injection Pipe (Cylinder #4) 11 - Injection Pipe (Cylinder #5 - D4.2L D-Tronic Only) 12 - Injection Pipe (Cylinder #6 - D4.2L D-Tronic Only) Page 5C-8 13 - Clamp 14 - Clamp 15 - Clamp 16 - Hollow Bolt 17 - Sealing Washer 18 - Hollow Bolt (M14 x 1.5) 19 - Sealing Washer 20 - Fuel Return Fitting 21 - Return Fuel Connector 22 - Hollow Bolt (M8 x 1) 23 - Washer 24 - Return Pipe 25 - Injector / Pressure Pipe Adaptor 26 - Sealing Washer 90-860074--1 FEBRUARY 2002 FUEL INJECTORS SERVICE MANUAL NUMBER 22 NOTICE Read Precautions at front of this SECTION before proceeding. Injector Test (Engine Misfiring) 7. Supply cooling water to seawater inlet holes. 8. Put on safety glasses. 9. With the engine operating at idle, carefully loosen injector pipe sleeve nut at injectors, one cylinder at a time. a. If idle rpm changes, injector is operating. b. If idle rpm does not change, injector may be faulty. a 17 mm 70148 Typical a - Sleeve Nut At Injector 10. Check all injectors, one at a time. 11. Stop engine. Replace injector or injectors as necessary. 12. If engine continues to misfire, check for mechanical problems (faulty injection pump, burned valves). 90-860074--1 FEBRUARY 2002 Page 5C-9 FUEL INJECTORS SERVICE MANUAL NUMBER 22 Removal 1. Remove engine cover. 2. Clean dirt from around fuel injector fittings and pipes. IMPORTANT: Ensure that each pipe adapter is counterheld with a second wrench when removing the return pipe hollow bolts. 3. Counterhold fuel return pipe adapter and remove the fuel return pipe hollow bolts. Discard sealing washers. 4. Remove fuel return pipe. a d b d c c d e 73911 Typical a - Return Pipe Adapter b - Fuel Return Pipe c - Hollow Bolts d - Sealing Washers e - Return Fuel Connector On Injection Pump 5. Loosen fuel injection pipe clamps. 6. Loosen fuel injection pipe sleeve nuts. ba ba bc a c b 73911 75583 a - Injection Pipe Clamp b - Fuel Injection Pipe c - Sleeve Nut Page 5C-10 90-860074--1 FEBRUARY 2002 FUEL INJECTORS SERVICE MANUAL NUMBER 22 CAUTION Do NOT bend fuel injection pipes. Bending may cause metal to flake off inside pipes, causing injectors or injection pump to malfunction. 7. Remove fuel injection pipes from injection pump and injectors. 8. Remove flanged hex nut and washer (some engines may not have washers installed). 9. Remove injector clamp. Retain all components. a b b a 75584 a - Flanged Hex Nut (or Hex Nut and Washer, If Equipped) b - Clamp CAUTION To prevent injector nozzle from rusting, wet parts with diesel fuel before handling. NOTE: To assist in removal, rotate the injector slightly clockwise and counter-clockwise to break any seal formed by paint or corrosion. Repeat for each injector if required. 10. Withdraw the fuel injector from the bore together with mounting hardware. Discard copper sealing washer and O-ring. b a c d a b c d 73911 - Fuel Injector - Fuel Return Pipe Adaptor - O-ring - Copper Sealing Washer 90-860074--1 FEBRUARY 2002 Page 5C-11 FUEL INJECTORS SERVICE MANUAL NUMBER 22 Inspection 1. Remove any injector seals that may have stayed in the head. Do NOT gouge or nick seat. 2. Ensure that cylinder head injector bores are clean. Testing WARNING Test fluid from the injection nozzle tester will spray out under great pressure. It can easily puncture a person’s skin. Keep your hands away from the injection nozzle tester at all times. Mercury MerCruiser recommends using the EFEP60H nozzle tester from the Robert Bosch Corporation. Follow instructions with injector tester for checking nozzle opening pressure and spray pattern. IMPORTANT: Mercury Marine does not recommend fuel injectors be disassembled for service. If an injector tester is not available, substitute a new injector for any injectors thought to be faulty. 74442 EFEP60H Nozzle Tester 1. Put on safety glasses. 2. Use a nozzle tester to check the injection nozzle opening pressure and the spray condition. Specifications Description Opening Pressure 27,000 kPa (3915 psi) 3. If the opening pressure is above or below the specified value, the injector must be replaced or reconditioned. 4. If the spray condition is bad, the injector must be replaced or reconditioned. a b c 77719 a - Correct b - Incorrect (Restrictions In Orifices) c - Incorrect (Dripping) Page 5C-12 90-860074--1 FEBRUARY 2002 FUEL INJECTORS SERVICE MANUAL NUMBER 22 Installation 1. Place new copper sealing washer on injector seat as shown. IMPORTANT: Make certain the sealing washer is centered in the bore, and fully seated on the head. a a 70146 Typical a - Copper Sealing Washer 2. Install new O-ring seal on injector. Lubricate seal with a light coat of 30W engine oil. 3. Point fuel return pipe adaptor away from valve cover and install injector. Ensure seal is not damaged during installation. 4. Install injector clamp nut. Torque nut to 24 Nm (18 lb-ft). e d e d b a b c 73911 a b c d e 75584 - Fuel Injector - Fuel Return Pipe Adaptor - O-ring - Clamp - Flanged Hex Nut (Or Hex Nut And Washer, If Equipped) 90-860074--1 FEBRUARY 2002 Page 5C-13 FUEL INJECTORS SERVICE MANUAL NUMBER 22 5. Install fuel injection pipes . Tighten sleeve nuts to 17 Nm (156 lb-in.). a b 75583 a - High Pressure Fuel Line b - Sleeve Nut 6. Using 2 new sealing washers for each hollow bolt, install fuel return pipe on injector adapters. IMPORTANT: Ensure that each pipe adapter is counterheld with a second wrench when installing the return pipe hollow bolts. 7. Counterhold fuel return pipe adapter and tighten hollow bolts securely. a c c b b a c 73911 Typical a - Fuel Return Pipe b - Hollow Bolts c - Sealing Washers (Two Per Hollow Bolt and Fitting) d - Adapter Page 5C-14 75583 90-860074--1 FEBRUARY 2002 FUEL INJECTORS SERVICE MANUAL NUMBER 22 8. Using 2 new sealing washers for the hollow bolt, install fuel return pipe line on injection pump connector. Tighten hollow bolt securely. a b c 73911 75583 Typical a - Fuel Return Pipe b - Hollow Bolts c - Sealing Washers (Two Per Hollow Bolt and Fitting) 9. Refer to Purging Air From Fuel Injectors (Bleeding) to operate the engine and check for fuel leaks. Repair as needed. 10. Install the engine cover. 90-860074--1 FEBRUARY 2002 Page 5C-15 FUEL INJECTORS SERVICE MANUAL NUMBER 22 Purging Air From Fuel Injectors (Bleeding) In most cases the design of the EDI System will prevent needing to purge air from the fuel lines and injectors. Draining and replacing the water separating fuel filter should include purging air from the new filter, but not usually from the fuel lines, injectors or system. CAUTION Overheating from insufficient cooling water will cause engine and drive system damage. Ensure that there is sufficient water always available at water inlet holes during operation. 1. Supply cooling water to water inlet. CAUTION To prevent damage to starter motor, Do NOT use for more than 15 seconds at one time. Allow at least 2 minutes for starter motor to cool before reusing. 2. Put on safety glasses. 3. Slightly loosen each injection pipe sleeve nut. 4. Crank the engine with the starter motor. NOTE: Engine may attempt to start when fuel appears at sleeve nuts. 5. When an air free stream of fuel appears at sleeve nut, tighten nut. Continue until all injectors are purged and sleeve nuts are tightened. a 17 mm 70148 Typical a - Sleeve Nut 6. Torque sleeve nuts to 17 Nm (156 lb-in.). Page 5C-16 90-860074--1 FEBRUARY 2002 FUEL INJECTORS SERVICE MANUAL NUMBER 22 WARNING Avoid injury. Fuel pressure is high enough to penetrate the skin. Do NOT use your fingers to feel for fuel leaks at fittings. 7. Start the engine. 8. Check for fuel leaks while waiting for engine to reach normal operating temperature. Immediately stop the engine if leaks exist. 9. Recheck the installation. 10. Start the engine. 11. Allow the engine to reach normal operating temperature. Check for fuel leaks at injection pump and injectors by placing a piece of paper near the sleeve nuts or pipes to be checked. The paper should show fuel spray if leaks are present. Do NOT use your fingers to feel for leaks! Watch for fuel spray on paper. 12. Repair as needed. NOTE: It is sometimes helpful to use compressed air to dry area near fittings when checking for fuel leaks. Be certain to observe precautions about the use of safety glasses! 13. Test until certain no leaks are present. 90-860074--1 FEBRUARY 2002 Page 5C-17 FUEL INJECTORS SERVICE MANUAL NUMBER 22 THIS PAGE IS INTENTIONALLY BLANK Page 5C-18 90-860074--1 FEBRUARY 2002 INJECTION PUMP SERVICE MANUAL NUMBER 22 FUEL SYSTEM Section 5D - Injection Pump Table of Contents Identification . . . . . . . . . . . . . . . . . . . . . . . . . . Pump Code and Identification Number Location . . . . . . . . . . . . . . . . . . . Specifications . . . . . . . . . . . . . . . . . . . . . . . . . Injection Pump . . . . . . . . . . . . . . . . . . . . . Timing . . . . . . . . . . . . . . . . . . . . . . . . . . . . Torque Specifications . . . . . . . . . . . . . . . . . . Special Tools . . . . . . . . . . . . . . . . . . . . . . . . . Tools . . . . . . . . . . . . . . . . . . . . . . . . . . . . . . . . Special EDI Tools . . . . . . . . . . . . . . . . . . . Kent-Moore Tools . . . . . . . . . . . . . . . . . . . Lubricants / Sealants / Adhesives . . . . . . . Precautions . . . . . . . . . . . . . . . . . . . . . . . . . . Description . . . . . . . . . . . . . . . . . . . . . . . . . . . Fuel Ratings . . . . . . . . . . . . . . . . . . . . . . . . . . Diesel Fuel in Cold Weather . . . . . . . . . . . . 90-860074--1 FEBRUARY 2002 5D-2 5D-2 5D-2 5D-2 5D-3 5D-3 5D-3 5D-4 5D-4 5D-4 5D-4 5D-5 5D-6 5D-7 5D-7 Repair and Service . . . . . . . . . . . . . . . . . . . . 5D-8 General Information . . . . . . . . . . . . . . . . . 5D-8 Service Information . . . . . . . . . . . . . . . . . 5D-8 Testing Information . . . . . . . . . . . . . . . . . 5D-9 Exploded View . . . . . . . . . . . . . . . . . . . . . . . 5D-10 Fuel Injection Pump Removal . . . . . . . . . . 5D-11 Fuel Injection Pump Installation . . . . . . . . 5D-16 Installation With Engine Assembled . . 5D-16 Installation During Engine Reassembly . . . . . . . . . . . . . . . . . . . . . . 5D-19 Fuel Injection Pump Timing . . . . . . . . . . . . 5D-23 Checking . . . . . . . . . . . . . . . . . . . . . . . . . 5D-23 Setting . . . . . . . . . . . . . . . . . . . . . . . . . . . 5D-23 Starting Engine - After Fuel Injection Pump Installation and Timing . . . . . . . . . . 5D-28 Page 5D-1 5 D INJECTION PUMP SERVICE MANUAL NUMBER 22 NOTICE Refer to SECTION 5A and 5E for additional information on the EDI Fuel System and the Fuel Injection Pump. Identification Pump Code and Identification Number Location a 75409 a - Identification Plate Engine - MCM and MIE Pump Code and Identification Number D2.8L D-Tronic Code:VE 4/12 E 1900 LV1857 L718 Bosch Part Number: 0 460 424 ___ (Quicksilver Part Number: 854213) D4.2L D-Tronic Code:VE 4/12 E 1900 LV1848 L719 Bosch Part Number: 0 460 424 ___ (Quicksilver Part Number: 854134) Specifications Injection Pump Description Manufacturer Type of Injection Pump Ejection Pressure at Fuel Injectors Page 5D-2 Robert Bosch Corporation Distributor Type VE 27,000 kPa (3915 psi) Delivery Begins Electronically Controlled Governor Type Electronically Controlled 90-860074--1 FEBRUARY 2002 INJECTION PUMP SERVICE MANUAL NUMBER 22 Timing IMPORTANT: The following conditions must be met before injection pump timing is changed or set: • Dial Gauge mounted and set on pump. • Notch on crankshaft damper, or power steering pulley, aligns with timing mark on gear housing cover (0 Degrees - TDC). • Number 1 Piston at TDC. Model Setting D2.8L D-Tronic - MCM and MIE 0.60 - 0.65 mm (0.023 - 0.025 in.) D4.2L D-Tronic - MCM and MIE 1.74 - 1.76 mm (0.068 - 0.069 in.) Torque Specifications NOTE: Securely tighten all fasteners not listed below. Description Nm Pump Mounting Nuts 30 22 Pump Gear 88 64 Fuel Line Sleeve Nut (High Pressure) 18 lb-in. lb-ft 156 Special Tools Description Part Number Graduated Disc 1 91-801333500 Injection Pump Gear Puller 91-818372 Crankshaft Tool 91-814827 Injection Pump Adaptor Tools 91-854220 DMT 2000A Tachometer / Multi-Meter Kit 91-854009A3 1 : Some modification may be required for use on some models. 90-860074--1 FEBRUARY 2002 Page 5D-3 INJECTION PUMP SERVICE MANUAL NUMBER 22 Tools Special EDI Tools Tool Name Description Part Number EFI / EDI Scan Tool (Rinda Technologies 1) Displays problem codes stored in the ECM. It also allows monitoring of various circuits and components in the fuel injection system. Allows for test firing injectors. 94050M (English) 94055M (Multi-Language) Quicksilver Diagnostic Blink Code Tool Flashes light to display problem codes. 91-854221 1: Rinda Technologies, 4563 N. Elston Ave., Chicago, IL 60630, Phone: 312-736-6633 Kent-Moore Tools Kent-Moore Tools, Inc. 29784 Little Mack Roseville, MI 48066 Phone: (313) 774-9500 Description High Impedance Multimeter (DVM) 1 Unpowered Test Light 2 Part Number Minimum 10 megohm input impedance required on all voltage ranges. As ammeter, accurately measures low value current flow. As ohmmeter, reads 0-200 ohms, 2/20/200 kΩ, 2/20 mΩ Used to check circuit wiring, short to ground, or voltage. J-34029-A or Equivalent J-34142-B 1 The High Impedance Multimeter that comes with the existing Outboard EFI Tester (91-11001A1) meets the requirements listed above. 2 Using a test light with 100 mA or less rating may show a faint glow when test actually states no light. Lubricants / Sealants / Adhesives Description Liquid Neoprene Page 5D-4 Part Number 92-25711-3 90-860074--1 FEBRUARY 2002 INJECTION PUMP SERVICE MANUAL NUMBER 22 Precautions WARNING Electrical system components on this engine are not external ignition protected. Do NOT STORE OR UTILIZE GASOLINE ON BOATS EQUIPPED WITH THESE ENGINES, UNLESS PROVISIONS HAVE BEEN MADE TO EXCLUDE GASOLINE VAPORS FROM ENGINE COMPARTMENT (ref: 33 CFR). Failure to comply could result in fire, explosion and/or severe personal injury. WARNING Always disconnect battery cables from battery BEFORE working on fuel system to prevent fire. This eliminates the engine wiring as a potential source of ignition. CAUTION It is good practice to ventilate the engine compartment prior to servicing any engine components to remove any fuel vapors which may cause difficulty breathing or be an irritant. WARNING FIRE HAZARD: Fuel leakage from any part of the fuel system can be a fire hazard which can cause serious bodily injury or death. Careful periodic inspection of entire fuel system is mandatory, particularly after storage. All fuel components including fuel tanks, whether plastic, metal or fiberglass, fuel lines, primers, fittings, and fuel filters should be inspected for leakage, softening, hardening, swelling or corrosion. Any sign of leakage or deterioration requires replacement before further engine operation. WARNING Be careful when changing fuel system components; diesel fuel is flammable. Ensure that ignition key is OFF. Do NOT smoke or allow sources of open flame in the area while changing fuel system components. Wipe up any spilled fuel immediately. Dispose of rags appropriately. Do NOT allow fuel to come into contact with any hot surface which may cause it to ignite. WARNING Dispose of fuel soaked rags, paper, etc. in an appropriate air tight, fire retardant container. Fuel soaked items may spontaneously ignite and result in a fire hazard which could cause serious bodily injury or death. WARNING Safety glasses should be worn while working on fuel injection system. The fuel injection pump generates very high pressure. Use caution when removing injection pump, injectors, injector lines or bleeding air from the system. 90-860074--1 FEBRUARY 2002 Page 5D-5 INJECTION PUMP SERVICE MANUAL NUMBER 22 Description Mercury MerCruiser EDI Diesel Engines use the Bosch, Type VE, Distributor Fuel Injection Pump with an electronic governor and integral timing device. The pump is mounted on the port side of the engine and is driven by the camshaft gear. The pump is formed basically by an electrical (upper) part and a mechanical (lower) part. The mechanical (lower) part is mainly the same as the previous mechanically controlled VE-style pump, with the exception of the electric Timing Solenoid Valve that is controlling pressure between the upper and lower chambers (parts) of the pump. When the ECM (Engine Control Module) signals the Timing Solenoid Valve it is electro-mechanically held open (pressure reduction) and the start of injection is retarded. When the valve is fully closed (pressure increase) the start of injection is advanced. In the intermediate range, the ON/OFF ratio (duty cycle) can be infinitely varied by the ECM allowing for a wide range of control over the injected fuel quantity. This is especially so when simultaneously the ECM is controlling the upper electrical portion of the pump. The upper electrical part consists of these main components: • Fuel Quantity Actuator • Fuel Quantity Sensor • Fuel Temperature Sensor • Fuel Shut Off Valve The ECM uses inputs from various sensors to make decisions on the quantity of fuel and amount of pump timing advance or retard allowed. During engine operation, the ECM calculates the fuel flow rate based on signals from the Throttle Position sensor and Engine rpm speed sensor. This information is then sent to the injection pump, which regulates the rate of the fuel flowing into the cylinders of the engine. The injection pump uses a rotational electromagnetic actuator, called the Fuel Quantity Actuator (or control collar actuator), to move the delivery plunger which controls the pumps working stroke and the amount of fuel flow. Fuel quantity adjustments are made based on internally stored information after a comparison is made between the nominal position on the fuel pump’s control collar with the actual position of the control collar. Further adjustment of the fuel quantity actuator can be made based on such inputs as fuel temperature detected by the Fuel Temperature Sensor in the pump. These adjustments will be made until the actual position of the fuel quantity actuator (control collar) coincides with its nominal position. The adjusted fuel quantity is then electronically timed to deliver the correct pressurized amount of fuel to the fuel injectors. Injection pump pressure, at the fuel injectors, exceeds 27000 kPa (3900 psi). Diesel engines are stopped by shutting off the fuel supply. This is accomplished by the Fuel Quantity Actuator delivering no (zero) fuel or by an ECM controlled redundant electric Fuel Shut Off Valve on the pump. Page 5D-6 90-860074--1 FEBRUARY 2002 INJECTION PUMP SERVICE MANUAL NUMBER 22 Fuel Ratings WARNING Under no circumstances should gasoline be mixed with diesel fuel for any reason. This mixture of gasoline and diesel fuel is highly flammable and produces a significant risk to the user. IMPORTANT: Use of improper or water contaminated diesel fuel can damage the engine seriously. Use of improper fuel is considered misuse of engine, and damage caused thereby will not be covered by warranty. Grade 2-D diesel fuel is required, meeting ASTM Standards D975 (or fuel rated Diesel DIN 51601), and having a minimum cetane rating of 45. The Cetane number is a measure of the ignition quality of diesel fuel. Increasing the cetane number will not improve overall engine performance, but it may be necessary to raise the cetane rating for low temperature, or high altitude use. Sulphur content of the above fuel is rated at 0.50% by weight, maximum (ASTM). Limits may vary in countries outside of the United States. On intermittent use engines, high sulphur content diesel fuel will greatly increase: • Corrosion of metal parts. • Deterioration of elastomer and plastic parts. • Corrosion and extensive damage, and excessive wear of internal engine parts, particularly bearings. • Starting and operating difficulties. Diesel Fuel in Cold Weather WARNING Under no circumstances should gasoline be mixed with diesel fuel for any reason. This mixture of gasoline and diesel fuel is highly flammable and produces a significant risk to the user. Unaltered diesel fuels thicken and gel in cold temperatures, unless treated. Virtually all diesel fuels are climatized to allow their use in the particular region for that time of the year. If it becomes necessary to further treat diesel fuel, it is the owner/operator’s responsibility to add a commercial standard brand anti-gel diesel fuel additive, following that product’s directions. 90-860074--1 FEBRUARY 2002 Page 5D-7 INJECTION PUMP SERVICE MANUAL NUMBER 22 Repair and Service General Information The Robert Bosch Corporation has a network of authorized Bosch Service Dealers throughout the world to service their products. The electronically controlled EDI pump and injectors must be sent to an authorized Bosch Service Center. When shipping an injection pump to a service center for adjustments or repairs, the fuel return line hollow bolt must accompany the unit. The hollow bolt incorporates a sized orifice (is calibrated) for proper pressure which is matched to the pump. The pump cannot be properly adjusted without the matched orifice. Contact the Bosch distributor nearest you for the location of an authorized Bosch Service Center. Service Information It is required that you observe the following procedural information when working on EDI equipped engines: Page 5D-8 • Before removing any ECM system component, disconnect the negative battery cable. • Never start the engine without the battery cable terminal ends being solidly connected. • Never separate the battery from the on-board electrical system while the engine is operating. • Never separate the battery feed wire from the charging system while the engine is operating. • When charging the battery, disconnect it from the boat’s electrical system. • Ensure that all cable harnesses are connected solidly and that battery connections are thoroughly clean. • Never connect or disconnect the wiring harness at the ECM when the ignition is switched ON. • Before attempting any electric arc welding, disconnect the battery leads and the ECM connectors. • When steam cleaning engines, Do NOT direct the steam cleaning nozzle at ECM system components. If this happens, corrosion of the terminals or damage of components can take place. • Use only the test equipment specified in the diagnostic charts, since other test equipment may either give incorrect results or damage good components. • All voltage measurements using a voltmeter require a digital voltmeter with a rating of 10 megohms input impedance. 90-860074--1 FEBRUARY 2002 INJECTION PUMP SERVICE MANUAL NUMBER 22 Testing Information 14. When a test light is specified, a low-power test light must be used. Do NOT use a high-wattage test light. While a particular brand of test light is not suggested, a simple test, as shown below, on any test light will ensure it to be safe for system circuit testing: a. Connect an accurate ammeter (such as the high impedance digital multimeter) in series with the test light being tested, and power the test light/ammeter circuit with the battery. b. If the ammeter indicates LESS than 3/10 amp current flow (0.3 amp or 300 mA), the test light is SAFE to use. c. If the ammeter indicates MORE than 3/10 amp current flow (0.3 amp or 300 mA), the test light is NOT SAFE to use. a b c a - Amp Meter b - Test Light c - 12 Volt Battery NOTE: Using a test light with 100 mA or less rating may show a faint glow when test actually states no light. 15. When using a DVOM to perform voltage measurements, turn the ignition OFF when connecting the DVOM to the circuitry to be tested. 90-860074--1 FEBRUARY 2002 Page 5D-9 INJECTION PUMP SERVICE MANUAL NUMBER 22 Exploded View 12 1 2 A 8 13 12 14 6 11 9 7 10 73911 3 4 5 15 75437 27 - Injection Pump 28 - Gasket 29 - Stud (M8 x 30) 30 - Washer 31 - Nut 32 - Key 33 - Lockwasher 34 - Nut 35 - Electric Fuel Shut-Off Device 36 - Washer 37 - Nut 38 - Sealing Washer 39 - Banjo bolt (M14 x 1.5) 40 - Return Fuel Connector 41 - Keyway Orientation During Install (All Settings At TDC Cylinder 1) Description A Perfect Seal Page 5D-10 Part Number 92-25711-3 90-860074--1 FEBRUARY 2002 INJECTION PUMP SERVICE MANUAL NUMBER 22 Fuel Injection Pump Removal WARNING Safety glasses should be worn while working on fuel injection system. The fuel injection pump will generate pressures in excess of 27000 kPa (3900 psi). Use caution when removing injectors, injector lines or bleeding air from injection system. 1. Remove the hex-head plug in cylinder number 1 glow plug hole, or remove cylinder number 1 cylinder glow plug, if equipped. a b 75585 Typical a - Hex Head Plug (or Glow Plug, If Equipped) b - Port Side Of Cylinder Head 2. Attach Remote Starter Switch 91-52024A1, or similar, to the starter solenoid in accordance with manufacturer’s instructions. CAUTION Avoid breathing difficulties or injury. Diesel fuel and diesel fuel vapors may be expelled from cylinder openings causing breathing difficulty or injury. Do NOT crank the engine using the ignition key switch when establishing Top Dead Center (TDC) of a cylinder because the engine could start unexpectedly. Use a suitable remote starter switch. As an added safety measure remove the key from the ignition switch to prevent start up. 3. Position a piece of thin paper, or similar, near the glow plug hole opening of the cylinder number 1. NOTE: When cylinder number 1 begins compression stroke, combustion air will be expelled from the cylinder through the glow plug hole opening. Watch for movement of the paper. Stop cranking on compression stroke. 4. Using the remote starter switch, crank the engine to locate compression stroke. Stop cranking on cylinder number 1 compression stroke. 5. Slowly rotate the engine to Top Dead Center (TDC) using a suitable hand tool. NOTE: Attach and use Crankshaft Tool 91-814827, if necessary. 90-860074--1 FEBRUARY 2002 Page 5D-11 INJECTION PUMP SERVICE MANUAL NUMBER 22 6. The TDC notch is on the pulley aft edge of the larger drive pulleys. Align notch to timing marks on gear cover for TDC number 1 cylinder. b a a 75437 70281 Typical a - TDC Notch On Pulley b - Timing Cover Mark 7. Disconnect battery cables. 8. Using a suitable device remove threaded, round injection pump gear cover by turning cover COUNTERCLOCKWISE. a 70761 a - Cover (Pin-Type or Hex-Head) 9. Remove injection pump gear nut and lockwasher. Do NOT allow crankshaft to rotate. a b 22217 70770 a - Gear b - Nut and Lockwasher Page 5D-12 90-860074--1 FEBRUARY 2002 INJECTION PUMP SERVICE MANUAL NUMBER 22 10. With central bolt of gear puller tool backed out, install tool into timing cover. Puller will hold gear against timing cover while pump is removed. NOTE: Gear puller tool screws into timing cover. a c b 22217 70770 a - Timing Cover b - Gear Puller Tool c - Central Bolt 11. Remove the throttle cable and throttle cable bracket. 12. Disconnect the ECM 68 pin connector and TP sensor connector. The ECM has a slide-to-lock catch on it and the TP sensor connector is a twist-to-lock. 13. Remove three allen head screws retaining the port engine lifting eye and heat exchanger bracket to the timing cover. 14. Remove the two ECM bracket lower isolator flanged nuts. 15. Lift the ECM, ECM bracket and engine lifting eye from the engine. IMPORTANT: Hollow bolts, used to hold fuel inlet and return lines to injection pump, are calibrated and MUST remain with pump in their original location. CAUTION Do NOT bend fuel injector lines. Bending may cause metal to flake off inside lines, causing injectors or injection pump to malfunction. 90-860074--1 FEBRUARY 2002 Page 5D-13 INJECTION PUMP SERVICE MANUAL NUMBER 22 16. Remove the fuel supply line between the pump and filter flange. 17. Remove the fuel return hose from connector. Plug the hose after removal to prevent a fuel leak. 18. Remove the injector fuel return pipe from pump. Discard old sealing washers. a b a c a d 73911 c b 75579 a b c d - Supply Line (Filter to Pump) - Return Hose - Connector - Return Pipe (Injectors to Pump) 19. Unclamp injection pipes. CAUTION Keep injectors and injection pump fittings clean. Do NOT allow dirt to enter fittings when removing lines. Dirt will cause injectors or injection pump to malfunction. 20. Loosen injection pipe sleeve nuts. 21. Remove high pressure fuel injection pipes from the injection pump and fuel injectors. b a c 73911 a - Clamps b - Injector Sleeve Nuts c - Pump Sleeve Nuts Page 5D-14 90-860074--1 FEBRUARY 2002 SERVICE MANUAL NUMBER 22 INJECTION PUMP NOTE: If necessary, refer to SECTION 5E for description and location of electrical items. 22. Disconnect the Fuel Shut Off Solenoid wire. 23. Disconnect the Fuel Quantity Actuator/Sensor connector. 24. Disconnect the Fuel Timing Solenoid Valve connector. 25. Remove the three injection pump mounting nuts and washers. 26. Slowly turn central bolt of gear puller tool CLOCKWISE until pump and gear separate. IMPORTANT: The injection pump shaft and gear use a key to stay in alignment. Be careful not to drop the key into the engine when removing pump. 27. Paying special attention to the key, to avoid dropping it into the engine, carefully remove the pump and place it aside. IMPORTANT: Put suitable protective covers (shipping plugs or similar) over the injection pump fuel ports to avoid contamination. 28. Back the central bolt out of the puller tool, but leave the tool installed. IMPORTANT: Do NOT turn crankshaft after injection pump is removed. Battery cables should remain disconnected and a notice attached to ignition switch to alert others that the engine should not be disturbed. 90-860074--1 FEBRUARY 2002 Page 5D-15 INJECTION PUMP SERVICE MANUAL NUMBER 22 Fuel Injection Pump Installation Installation With Engine Assembled IMPORTANT: If engine has been disturbed, or must be rotated before installing injection pump take care not to wedge pump gear in gear housing while turning crankshaft. 1. Ensure cylinder number 1 piston is at top dead center (TDC) of its compression stroke and timing marks are aligned. 1. Ensure pump gear is held in the same position as when pump was removed. This should be cylinder number 1 TDC. 2. Rotate shaft to align keyway with cylinder number 1 injector port. NOTE: To rotate shaft, temporarily install original shaft nut and a suitable jam nut. Do NOT damage pump shaft threads with improper nuts or overtightening. 70420 Typical a - Shaft Keyway 3. Remove any pump backlash by rotating shaft COUNTERCLOCKWISE (when facing the pump) until resistance is felt. b a 70421 b a 70767 Typical a - Shaft - Rotate COUNTERCLOCKWISE b - Keyway at 11 O’clock Page 5D-16 90-860074--1 FEBRUARY 2002 INJECTION PUMP SERVICE MANUAL NUMBER 22 4. Being careful not to disturb shaft alignment, remove nuts temporarily installed to rotate shaft. 5. Apply Perfect Seal sealant to a new injection pump gasket. 6. Install new gasket on pump mounting studs. 7. Ensure pump gear upper keyway is positioned approximately as shown. c a b 70768 a - Gasket b - Pump Mounting Studs c - Pump Gear Upper Keyway 8. Install injection pump key in pump shaft keyway. Apply heavy grease to hold key in position. 9. Ensure the key is positioned properly. IMPORTANT: Do NOT drop key into engine. If key is dropped into engine the key must be removed before operation of the engine. 10. Insert pump shaft into gear, being careful not to dislodge key. Do NOT turn pump shaft from 11 o’clock position. Rotate pump body in slotted holes to align key with gear slot. 11. Install pump to cylinder block hex nuts with flat washers and lockwashers. Temporarily only finger-tighten the nuts. 12. Remove gear puller tool. Make certain key is in position. 13. Using a new lockwasher, secure gear to shaft with hex nut. Torque nut to 88 Nm (64 lb-ft). 14. Using new O-ring in groove, install and securely tighten injection pump gear cover on timing cover. 90-860074--1 FEBRUARY 2002 Page 5D-17 INJECTION PUMP SERVICE MANUAL NUMBER 22 15. Rotate pump to end of adjustment slot travel in direction shown. a 70422 Typical a - Direction To Rotate 16. Timing of the injection pump MUST BE accomplished. Refer to Fuel Injection Pump Timing for instructions. Page 5D-18 90-860074--1 FEBRUARY 2002 INJECTION PUMP SERVICE MANUAL NUMBER 22 Installation During Engine Reassembly 1. Temporarily install crankshaft pulley, if removed previously. 2. Attach Crankshaft Tool 91-814827 if necessary. CAUTION To avoid severe engine damage the engine MUST BE set on cylinder number 1 COMPRESSION STROKE at Top Dead Center (TDC) before proceeding. IMPORTANT: If crankshaft position was disturbed after assembly (rotated), it may be necessary to slowly rotate the crankshaft, in the direction of rotation, numerous revolutions to align the crankshaft gear, idler gear, and camshaft gear alignment marks. Refer to SECTION 3A - Camshaft, and verify alignment to establish cylinder number 1 Top Dead Center on compression stroke in the following steps. 3. Ensure cylinder number 1 piston is at TDC of its compression stroke and timing marks are aligned. 4. Attach the graduated disc 91-801333500 to crankshaft with zero positioned as shown. NOTE: Use the graduated disc adapter plate if crankshaft vibration damper is installed. a 78198 d c b 70485 70419 Typical Engine a - Adaptor Plate (To Damper, If Installed) b - Bolts (3) c - Graduated Disc d - Crankshaft Tool 90-860074--1 FEBRUARY 2002 Page 5D-19 INJECTION PUMP SERVICE MANUAL NUMBER 22 5. Using a suitable gauge of wire, make a wire pointer. Attach the pointer to a suitable location on the block. Do NOT damage the mating surfaces 6. Align wire pointer to zero degrees (0) as shown. a 70419 b a - Wire Pointer b - Zero (0) Degree Mark 7. Using a heavy grease to hold key in place, install injection pump key in pump slot. 8. Temporarily install gear on injection pump shaft. Do NOT secure gear at this time. 9. Rotate shaft to align keyway with cylinder number 1 injector port. 10. Remove any pump backlash by rotating gear COUNTERCLOCKWISE (when facing pump) until resistance is felt. 11. Ensure keyway is at approximately the 11 o’clock position, as shown. b a 70421 b a 70767 Typical a - Shaft - Rotate COUNTERCLOCKWISE b - Keyway at 11 O’clock Page 5D-20 90-860074--1 FEBRUARY 2002 INJECTION PUMP SERVICE MANUAL NUMBER 22 12. Being careful not to disturb shaft alignment, remove gear. Ensure injection pump key is properly positioned. 13. Apply Perfect Seal sealant to a new injection pump gasket. 14. Install new gasket on pump mounting studs. a b 70768 a - Gasket b - Pump Mounting Studs 15. Install pump to cylinder block. 16. Install hex nuts with flat washers and lockwashers. Temporarily only finger-tighten the nuts. 17. Rotate pump to end of adjustment slot travel in direction shown. b a 70422 Typical a - Hex Nuts With Flat Washers And Lockwashers (3 Total) b - Direction to Rotate 90-860074--1 FEBRUARY 2002 Page 5D-21 INJECTION PUMP SERVICE MANUAL NUMBER 22 18. Ensure injection pump key is properly positioned. IMPORTANT: Do NOT force gear on shaft. 19. Install gear on injection pump shaft, using whichever key slot on gear that allows gear to be installed the easiest. 20. Using a new lockwasher, install gear on shaft with hex nut. Torque to 88 Nm (64 lb-ft). b a c 22217 70424 a - Gear b - New Lockwasher c - Hex Nut 21. Timing of the injection pump MUST BE accomplished. Refer to Fuel Injection Pump Timing in this section for instructions. Page 5D-22 90-860074--1 FEBRUARY 2002 INJECTION PUMP SERVICE MANUAL NUMBER 22 Fuel Injection Pump Timing Checking On completely assembled and/or installed engines, and for the purpose of checking fuel injection pump timing refer to instructions previously outlined and accomplish steps, in that section, dealing with installation of crankshaft tool, graduated disc, positioning of crankshaft and removal of parts to gain access to rear of fuel injection pump and vent screw. Setting 1. Establish that the engine is on TDC of the Number One Cylinder. 2. Remove vent screw and sealing washer from rear of injection pump. NOTE: Pump shown removed for visual clarity. a b 75409 a - Injection Pump b - Vent Screw With Sealing Washer 90-860074--1 FEBRUARY 2002 Page 5D-23 INJECTION PUMP SERVICE MANUAL NUMBER 22 3. Install adaptor tool and dial gauge as shown. Pre-load the dial indicator with at least 2.54 mm (0.10 in.). NOTE: Adaptor tool 854220 is designed to use on EDI engines. a b 70430 a - Suitable Adaptor Tool b - Dial Gauge - Preloaded 4. Watch dial indicator needle and SLOWLY rotate the crankshaft COUNTERCLOCKWISE (viewed from water pump end looking toward flywheel) until dial indicator STOPS moving. 5. Set the dial indicator to zero (0) as shown. a 70431 a - Dial Indicator Page 5D-24 90-860074--1 FEBRUARY 2002 INJECTION PUMP SERVICE MANUAL NUMBER 22 6. SLOWLY rotate crankshaft CLOCKWISE (viewed from water pump end looking toward flywheel) until 0 Degrees (engine Top Dead Center) is indicated on graduated disc as shown (or until notch on crankshaft damper, or power steering pulley, aligns with timing mark on gear housing cover). 70432 NOTE: The dial indicator follows this rotational movement of crankshaft and STOPS when the cylinder number 1 piston is at TDC, when the crankshaft is not turned further. 7. AT THIS MOMENT, the dial indicator should show the specified timing setting. If not, loosen the injection pump mounting nuts and rotate the pump slightly in the appropriate direction to obtain the setting. Model Setting D2.8L D-Tronic - MCM and MIE 0.60-0.65 mm (0.0236 - 0.0256 in.) D4.2L D-Tronic - MCM and MIE 1.74-1.76 mm (0.0685 - 0.0692 in.) a b 70433 70422 Typical a - Direction to Rotate b - Dial Gauge Indication 90-860074--1 FEBRUARY 2002 Page 5D-25 INJECTION PUMP SERVICE MANUAL NUMBER 22 CAUTION Dial gauge indication MUST NOT be allowed to change when mounting nuts are tightened. Failure to maintain setting will result in engine damage. 8. Torque the three injection pump mounting nuts to 27.5 Nm (20 lb-ft). 9. Remove dial gauge and adaptor. Reinstall fuel injection pump vent screw using new sealing washer. Tighten securely. CAUTION Keep injectors and injection pump pipes and fittings clean. Do NOT allow dirt to enter fittings when installing. Dirt will cause injectors or injection pump to malfunction. CAUTION Do NOT bend fuel injector pipes. Bending may cause metal to flake off inside causing injectors or injection pump to malfunction. 10. During Engine Reassembly: Continue engine reassembly. Refer to following instructions after all other necessary engine reassembly steps are complete. 11. With Engine Assembled or After Checking Timing: Install fuel injection pipes on injection pump and injectors. Tighten all sleeve nuts evenly by hand. Then, torque each sleeve nut to 18 Nm (156 lb-in.). b 17MM a 22217 75590 a - Sleeve Nut At Injection Pump b - Sleeve Nut At Injector Page 5D-26 90-860074--1 FEBRUARY 2002 INJECTION PUMP SERVICE MANUAL NUMBER 22 IMPORTANT: Hollow bolts used to hold fuel inlet and return pipes to injection pump are calibrated and MUST remain with pump in their original location. IMPORTANT: Use new sealing washers on hollow bolts to prevent leaks. 12. Install the fuel supply pipe between the pump and filter flange. 13. Unplug and install the fuel return hose to the connector. 14. Install the injector fuel return pipe to the pump. a d c b 75579 a b c d - Supply Pipe (Filter to Pump) - Return Hose - Connector - Return Pipe (Injectors to Pump) NOTE: Refer to the Exploded Views in SECTION 5C and to those in this section in the following. 15. Position the ECM, ECM bracket and engine lifting eye on the engine. 16. Install the ECM bracket lower isolator flanged nuts. Tighten nuts securely. 17. Install three allen head screws retaining the port engine lifting eye and heat exchanger bracket to the timing cover. Torque screws to 50 Nm (37 lb-ft). 18. If you previously removed the upper ECM isolator nut, you will need to adjust the ECM and isolator height before tightening the nut. Tighten nut securely. 19. Attach the ECM 68 pin connector to the ECM. Slide the lock to hold it on the ECM. 20. Attach the TP sensor connector halves together. Twist collar to hold halves together. 90-860074--1 FEBRUARY 2002 Page 5D-27 INJECTION PUMP SERVICE MANUAL NUMBER 22 21. Install throttle cables. Refer to SECTION 2A - Throttle Cable Installation and Adjustment. IMPORTANT: When installing throttle cables, ensure that cables are routed in such a way as to avoid sharp bends and/or contact with moving parts. Do NOT fasten any items to throttle cables. 22. Remove graduated disc and adaptor ring, crankshaft tool and wire pointer from front of engine. Install the three balancer screws previously removed. Torque screws to 50 Nm (37 lb-ft). 23. Refer to Section 4B - MAINTENANCE, and install alternator belt, power steering belt, if equipped, and optional belts, if equipped. Starting Engine - After Fuel Injection Pump Installation and Timing Generally purging air from the system is only needed after draining and replacing the water separating fuel filter or purging a new filter of air. In most cases the design of the EDI System will prevent needing to purge the Fuel Injection Pump itself. After installing the fuel injection pump, checking or setting pump timing, it will be necessary to fill the fuel injection system. NOTE: Place a suitable container under fuel filter to catch excess fuel. 1. Loosen bleed screw on fuel filter bracket. 2. Move plunger on hand pump/primer up and down repeatedly, until an air free stream of fuel flows from bleed screw. Filter is full when this occurs. 3. Tighten bleed screw. a b 74726 a - Plunger b - Bleed Screw Page 5D-28 90-860074--1 FEBRUARY 2002 INJECTION PUMP SERVICE MANUAL NUMBER 22 4. Continue moving the plunger on hand pump/primer up and down repeatedly until resistance is felt. This should have filled the fuel injection pump. However, should the engine not start and it becomes necessary to purge air from the fuel injection pump, proceed as follows. NOTE: Place suitable container under fuel filter and injection pump to catch excess fuel. 5. Bleed air from Water Separating Fuel Filter. 6. Loosen bleed screw on injection pump. 7. Move plunger on hand pump/primer up and down repeatedly, until an air free stream of fuel flows from bleed screw. a c b 71371 a - Injection Pump b - Bleed Screw c - Expelled Fuel 8. Close bleed screw on injection pump. Tighten securely. 90-860074--1 FEBRUARY 2002 Page 5D-29 INJECTION PUMP SERVICE MANUAL NUMBER 22 9. Install a fully charged battery. CAUTION To prevent damage to starter motor, Do NOT operate starter for more than 15 seconds at one time. Allow at least 2 minutes for starter motor to cool before reusing. 10. Attempt to start the engine. WARNING Safety glasses should be worn while working on fuel injection system. The fuel injection pump will generate pressures in excess of 13790 kPa (2000 psi). Use caution when removing injectors, injector lines, or bleeding air from injection system. WARNING Do NOT use your fingers to feel for fuel leaks at fittings. Fuel pressure is high enough to penetrate the skin. 11. IF THE ENGINE STARTS: Operate engine at idle. Check all fuel connections for fuel leaks. If leaks exist, stop engine and refer to following Step 13. and correct as needed. 12. IF THE ENGINE WILL NOT START: Air will have to be bled from injector lines. Follow these instructions: a. Wear safety glasses when bleeding air from injection pipes. Slightly loosen each injection pipe sleeve nut. Turn ignition key switch to the START position while observing injectors. a 17MM 75590 a - Injection Pipe Sleeve Nut b. Tighten each injection pipe sleeve nut when fuel appears at nut, until all fittings are tightened. NOTE: Engine may start during this operation. c. When engine starts, injectors may still be bled by loosening injection pipe sleeve nuts at individual injectors if required. Tighten each after bleeding. d. After bleeding injectors, torque all injection pipe sleeve nuts at injectors to 18 Nm (156 lb-in.). Page 5D-30 90-860074--1 FEBRUARY 2002 INJECTION PUMP SERVICE MANUAL NUMBER 22 13. Check for fuel leaks at injection pump and injectors using a piece of paper placed near the suspect fitting or sleeve nut to be checked. The paper should show leaks if present. Do NOT use your fingers to feel for leaks! Watch for fuel spray on paper. Repair as needed. 14. Retest until certain no leaks are present. NOTE: Be certain to observe precautions about the use of safety glasses! It is sometimes helpful to use compressed air to dry the area near fitting and sleeve nuts when checking for fuel leaks. 15. Allow engine to reach operating temperature. Once again check for leaks as previously outlined and correct as needed. WARNING Dispose of fuel soaked rags, paper, etc. in an appropriate air tight, fire retardant container. Fuel soaked items may spontaneously ignite and result in a fire hazard which could cause serious bodily injury or death. WARNING Make sure no fuel leaks exist, before closing engine hatch. TESTING FUEL RETURN PRESSURE 1. Install a suitable 0-100 kPa (0-15 PSI) pressure gauge in the fuel return hose. 2. If measured value is greater than specified, repair as needed. a c 71967 b 75579 Testing Return Pressure a - Suitable Pressure Gauge b - Fuel Return Hose c - Fuel Return To Fuel Tank 90-860074--1 FEBRUARY 2002 Page 5D-31 INJECTION PUMP SERVICE MANUAL NUMBER 22 THIS PAGE IS INTENTIONALLY BLANK Page 5D-32 90-860074--1 FEBRUARY 2002 EDI DIAGNOSIS SERVICE MANUAL NUMBER 22 FUEL SYSTEMS Section 5E - EDI Diagnosis Table of Contents General Information . . . . . . . . . . . . . . . . . . . 5E-2 Introduction . . . . . . . . . . . . . . . . . . . . . . . . 5E-2 Basic Knowledge and Tools Required . 5E-2 Visual/Physical Inspection . . . . . . . . . . . 5E-3 Electrostatic Discharge Damage . . . . . . 5E-3 Special Tools . . . . . . . . . . . . . . . . . . . . . . . 5E-4 Special EDI Tools . . . . . . . . . . . . . . . . . . . 5E-4 Kent-Moore Tools . . . . . . . . . . . . . . . . . . . 5E-4 Service Precautions . . . . . . . . . . . . . . . . . 5E-5 Diagnostic Information . . . . . . . . . . . . . . . . . 5E-7 Abbreviations . . . . . . . . . . . . . . . . . . . . . . 5E-7 ECM Self-Diagnosis . . . . . . . . . . . . . . . . 5E-8 Malfunction Indicator Lamp . . . . . . . . . . 5E-9 Intermittent Problems and Malfunction Indicator Lamp . . . . . . . . . 5E-10 Reading Codes . . . . . . . . . . . . . . . . . . . . 5E-10 Clearing Codes . . . . . . . . . . . . . . . . . . . . 5E-13 Diagnosis of Driveability Concerns . . . 5E-14 ECM Input and Sensor Diagram . . . . . . . . 5E-15 ECM Connector Pin Layout . . . . . . . . . . . . 5E-16 Connector Chart . . . . . . . . . . . . . . . . . . . . . 5E-17 MAP (Manifold Air Pressure) Sensor . 5E-20 ECT (Engine Coolant Temperature) Sensor . . . . . . . . . . . . . . . . . . . . . . . . . . 5E-22 Fuel Temperature Sensor . . . . . . . . . . . 5E-24 RPM (Engine Speed) Sensor . . . . . . . . 5E-26 BARO (Atmospheric Pressure) Sensor . . . . . . . . . . . . . . . . . . . . . . . . . . 5E-28 IAT (Intake Air Temperature) Sensor . 5E-30 Instrumented Injector (Needle Movement Sensor) . . . . . . . . 5E-32 Fuel Quantity Actuator (Pump Actuator) . . . . . . . . . . . . . . . . . . 5E-34 Fuel Quantity Sensor (Control Sleeve Position Sensor) . . . . 5E-36 Timing Fault (Timing Advance Regulation) . . . . . . . 5E-38 TP (Throttle Position) Sensor / Low Idle Switch . . . . . . . . . . . 5E-40 Battery Voltage . . . . . . . . . . . . . . . . . . . . 5E-42 Battery (Switched K15) . . . . . . . . . . . . . 5E-43 Microcontroller Fault . . . . . . . . . . . . . . . 5E-44 ECM Reference Voltage (u_ref - 2.5v) . . . . . . . . . . . . . . . . . . . . . 5E-45 90-860074--1 FEBRUARY 2002 Main Relay . . . . . . . . . . . . . . . . . . . . . . . 5E-46 Timing Actuator (Timing Solenoid Valve) . . . . . . . . . . . . 5E-48 Glow Plug Main Relay (Glow Plug Relay Actuator), If Equipped . . . . . . . . . . . . . . . . . . . . . . . 5E-50 Glow Plug Auxiliary Relay, If Equipped 5E-52 Glow Plug Lamp (Glow Plug Display) . 5E-54 Glow Plug Lamp (Glow Plug Display) . 5E-56 MIL [Malfunction Indicator Lamp (Diagnostic Lamp)] . . . . . . . . . . . . . . . . 5E-58 MIL [Malfunction Indicator Lamp (Diagnostic Lamp)] . . . . . . . . . . . . . . . . 5E-60 Fuel Shut Off Valve [EAB (Electrical Shut Off)] . . . . . . . . . . . . . . . 5E-62 EEPROM Fault (EEPROM and Configuration) . . . . . . . . . . . . . . . . . . . . 5E-64 RPM Signal From Injector (Secondary Engine Speed Sensor) . . 5E-66 Troubleshooting For EDI Systems . . . . . . 5E-68 Trouble Codes . . . . . . . . . . . . . . . . . . . . 5E-68 Display Terminology . . . . . . . . . . . . . . . 5E-69 Troubleshooting Charts . . . . . . . . . . . . . 5E-74 Repair Procedures . . . . . . . . . . . . . . . . . . . 5E-93 Service Precautions . . . . . . . . . . . . . . . . 5E-93 Replacement Parts Warning . . . . . . . . 5E-94 Torque Specifications . . . . . . . . . . . . . . 5E-95 Lubricants / Sealants / Adhesives . . . . 5E-95 System Components . . . . . . . . . . . . . . . 5E-96 Fuel Injection Pump Repair . . . . . . . . . 5E-98 Wiring Harness Service . . . . . . . . . . . . 5E-99 Relay, Module and Sensor Servicing (On-Board Service) . . . . . . . . . . . . . . . . . 5E-102 Precautions . . . . . . . . . . . . . . . . . . . . . . 5E-102 Main Relay . . . . . . . . . . . . . . . . . . . . . . 5E-102 ECM (Electronic Control Module) . . . 5E-104 ECT (Engine Coolant Temperature) Sensor . . . . . . . . . . . . . . . . . . . . . . . . . 5E-106 MAP (Manifold Absolute Pressure) / IAT (Intake Air Temperature) Sensor 5E-108 Throttle Position (TP) Sensor . . . . . . . 5E-110 Instrumented Injector . . . . . . . . . . . . . . 5E-112 Engine RPM Speed Sensor . . . . . . . . 5E-112 Idle Speed Setting Circuit . . . . . . . . . . 5E-113 Page 5E-1 5 E EDI DIAGNOSIS SERVICE MANUAL NUMBER 22 General Information CAUTION To reduce the chance of personal injury and/or property damage, the following instructions must be carefully observed: proper service and repair are important to the safety of the service technician and the safe, reliable operation of all Mercury MerCruiser Electronic Diesel Injection (EDI) equipped engines. If part replacement is necessary, the part must be replaced with one of the same part number or with an equivalent part. Do NOT use a replacement part of lesser quality. The service procedures recommended and described in this service manual are effective methods of performing service and repair. Some of these procedures require the use of tools specially designed for the purpose. Accordingly, anyone who intends to use a replacement part, service procedure or tool, which is not recommended by the system manufacturer, must first determine that neither his safety nor the safe operation of the engine will be jeopardized by the replacement part, service procedure or tool selected. It is important to note that this manual contains various “Cautions” and “Notes” that must be carefully observed in order to reduce the risk of personal injury during service or repair, or the possibility that improper service or repair may damage the engine or render it unsafe. It is also important to understand that these “Cautions” and “Notes” are not exhaustive, because it is impossible to warn of all the possible hazardous consequences that might result from failure to follow these instructions. Introduction The following pages been prepared for effective diagnosis of the Mercury MerCruiser Electronic Diesel Injection (EDI) system. All information, illustrations and specifications contained in this manual are based on the latest product information available at the time of publication approval. The right is reserved to make changes at any time without notice. An understanding of the material contained herein and in subsequent publications issued when necessary, will assist service personnel in properly maintaining the quality to which Mercury MerCruiser engine control systems are built. Basic Knowledge and Tools Required To use this manual most effectively, a general understanding of basic electrical circuits and circuit testing tools is required. You should be familiar with wiring diagrams; the meaning of volts, ohms and amperes; the basic theories of electricity; and understand what happens in an open or shorted wire. To perform system diagnosis, several special tools and equipment are required. Please become acquainted with the tools and their use before attempting to diagnose the system. Special tools, which are required for system service, are listed later in this section. Refer to the Table of Contents. Page 5E-2 90-860074--1 FEBRUARY 2002 SERVICE MANUAL NUMBER 22 EDI DIAGNOSIS Visual/Physical Inspection A careful visual and physical inspection must be performed as part of any diagnostic procedure. This can often lead to fixing a problem without further steps. Inspect all hoses for correct routing, pinches, cuts, or disconnects. Inspect hoses that are difficult to see. Inspect all the wires in the engine compartment for proper connections, burned or chafed spots, pinched wires, or contact with sharp edges or hot exhaust manifolds. This visual/physical inspection is very important. It must be done carefully and thoroughly. Electrostatic Discharge Damage Electronic components used in control systems are often designed to carry very low voltage, and are very susceptible to damage caused by electrostatic discharge. It is possible for less than 100 volts of static electricity to cause damage to some electronic components. By comparison, it takes as much as 4,000 volts for a person to even feel the effect of a static discharge. There are several ways for a person to become statically charged. The most common methods of charging are by friction and by induction. An example of charging by friction is a person sliding across a seat, in which a charge of as much as 25,000 volts can build up. Charging by induction occurs when a person with well-insulated shoes stands near a highly charged object and momentarily touches ground. Charges of the same polarity are drained off, leaving the person highly charged with the opposite polarity. Static charges of either type can cause damage; therefore, it is important to use care when handling and testing electronic components. 90-860074--1 FEBRUARY 2002 Page 5E-3 EDI DIAGNOSIS SERVICE MANUAL NUMBER 22 Special Tools Tool Name DMT 2000A Description Part Number Tachometer / Multi-Meter Kit - High Impedance Multimeter 91-854009A3 Special EDI Tools Tool Name Description Part Number EFI / EDI Scan Tool (Rinda Technologies 1) Displays problem codes stored in the ECM. It also allows monitoring of various circuits and components in the fuel injection system. Allows for test firing injectors. 94050M (English) 94055M (Multi-Language) Quicksilver Diagnostic Blink Code Tool Flashes light to display problem codes. 91-854221 1: Rinda Technologies, 4563 N. Elston Ave., Chicago, IL 60630, Phone: 312-736-6633 Kent-Moore Tools Kent-Moore Tools, Inc. 29784 Little Mack Roseville, MI 48066 Phone: (313) 774-9500 Description High Impedance Multimeter (DVM) 1 Unpowered Test Light 2 Part Number Minimum 10 megohm input impedance required on all voltage ranges. As ammeter, accurately measures low value current flow. As ohmmeter, reads 0-200 ohms, 2/20/200 kΩ, 2/20 mΩ Used to check circuit wiring, short to ground, or voltage. J-34029-A or Equivalent J-34142-B 1 The High Impedance Multimeter that comes with the existing Outboard EFI Tester (91-11001A1) meets the requirements listed above. 2 Using a test light with 100 mA or less rating may show a faint glow when test actually states no light. Page 5E-4 90-860074--1 FEBRUARY 2002 SERVICE MANUAL NUMBER 22 EDI DIAGNOSIS Service Precautions Observe the following when working on EDI equipped engines: • Before removing any ECM system component, disconnect the negative battery cable. • Never start the engine without the battery cable terminal ends being solidly connected. • Never separate the battery from the on-board electrical system while the engine is operating. • Never separate the battery feed wire from the charging system while the engine is operating. • When charging the battery, disconnect it from the boat’s electrical system. • Ensure that all cable harnesses are connected solidly and that battery connections are thoroughly clean. • Never connect or disconnect the wiring harness at the ECM when the ignition is switched ON. • Before attempting any electric arc welding, disconnect the battery leads and the ECM connectors. • When steam cleaning engines, Do NOT direct the steam cleaning nozzle at ECM system components. If this happens, corrosion of the terminals or damage of components can take place. • Use only the test equipment specified in the diagnostic charts, since other test equipment may either give incorrect results or damage good components. • All voltage measurements using a voltmeter require a digital voltmeter with a rating of 10 megohms input impedance. 90-860074--1 FEBRUARY 2002 Page 5E-5 EDI DIAGNOSIS SERVICE MANUAL NUMBER 22 3. When a test light is specified, a low-power test light must be used. Do NOT use a highwattage test light. While a particular brand of test light is not suggested, a simple test, as shown below, on any test light will ensure it to be safe for system circuit testing: a. Connect an accurate ammeter (such as the high impedance digital multimeter) in series with the test light being tested, and power the test light/ammeter circuit with the battery. b. If the ammeter indicates LESS than 3/10 amp current flow (.3 A or 300 mA), the test light is SAFE to use. c. If the ammeter indicates MORE than 3/10 amp current flow (.3 A or 300 mA), the test light is NOT SAFE to use. a b c d - Amp meter e - Test Light f - 12 Volt Battery NOTE: Using a test light with 100 mA or less rating may show a faint glow when test actually states no light. 4. When using a DVOM to perform voltage measurements, turn the ignition OFF when connecting the DVOM to the circuitry to be tested. Page 5E-6 90-860074--1 FEBRUARY 2002 EDI DIAGNOSIS SERVICE MANUAL NUMBER 22 Diagnostic Information The diagnostic information and functional checks in this manual are designed to locate a faulty circuit or component through logic based on the process of elimination. The information was prepared with the requirement that the system functioned correctly at the time of assembly and that there are no multiple failures. Abbreviations ADF Atmospheric Pressure Sensor (See BARO) BARO Barometric Pressure BAT Battery Positive Terminal, Battery or System Voltage B+ Battery Positive CKT Circuit CONN Connector CYL Cylinder DEG Degrees DIAG Diagnostic DLC Data Link Connector DTC Diagnostic Trouble Code DVOM Digital Volt Ohmmeter ECM Engine Control Module ECT Engine Coolant Temperature EEPROM Electronic Erasable Programmable Read Only Memory EMI Electromagnetic Interference ENG Engine GND Ground GPH Gallons Per Hour IAT Intake Air Temperature in. hg Inches Of Mercury INJ Injection IGN Ignition kPa Kilopascal 90-860074--1 FEBRUARY 2002 Page 5E-7 EDI DIAGNOSIS SERVICE MANUAL NUMBER 22 Abbreviations (continued) KV Kilovolts LDF Boost Pressure Sensor (See MAP) LGS Low Idle Switch MAP Manifold Absolute Pressure MIL Malfunction Indicator Lamp msec Millisecond NBF Instrumented Injector N/C Normally Closed N/O Normally Open PID Packet of Informational Data PROM Programmable Read Only Memory PWG Throttle Position Sensor RAM Random Access Memory REF HI Reference High REF LO Reference Low ROM Read Only Memory SRC Signal Range Check SW Switch TACH Tachometer TERM Terminal TP Throttle Position Sensor V Volts VAC Vacuum WOT Wide Open Throttle ECM Self-Diagnosis The ECM performs a continual self-diagnosis on certain control functions. This diagnostic capability is complemented by the diagnostic procedures contained in this manual. The ECM’s language for communicating the source of a malfunction is a system of diagnostic codes. The codes are four digit numbers preceded by the letter “P.” The prefix letter “P” is the abbreviation for “Powertrain,” an internationally standard reference. When a malfunction is detected by the ECM, a code is set and the Malfunction Indicator Lamp (MIL) is illuminated. NOTE: On factory instrumentation the MIL is a lamp with a check mark (n) on the colored lens. Page 5E-8 90-860074--1 FEBRUARY 2002 SERVICE MANUAL NUMBER 22 EDI DIAGNOSIS Malfunction Indicator Lamp The Engine System Monitor Panel provided in the factory instrumentation package is equipped with a Malfunction Indicator Lamp (MIL). The MIL is a lamp with a check mark (n) on the colored lens. • It informs the operator and service technician that a problem has occurred and that the vessel is in need of service as soon as reasonably possible. • It displays Codes stored by the ECM which help the technician diagnose system problems. As a bulb and system check, the lamp will come ON with the key on and the engine not operating. When the engine is started, the light will turn OFF. If the lamp remains ON, the self-diagnostic system has detected a problem. If the problem goes away, the light will go out in most cases after ten seconds, but a code will remain stored in the ECM. When the lamp remains ON while the engine is operating, or when a malfunction is suspected due to a driveability problem, an EDI Diagnostic Circuit Check must be performed. These checks will expose malfunctions which may not be detected if other diagnostics are performed prematurely. The ECM has been programmed to illuminate the MIL during or due to the errors associated with the following devices: • Engine Coolant Temperature (ECT) sensor • Intake Air Temperature (IAT) sensor • Manifold Absolute Pressure (MAP) sensor • Throttle Position (TP) sensor and Low Idle Switch (LGS) sensor • Instrumented Injector (NBF) • Timing Advance Actuator • Timing Solenoid Valve • Fuel Shut Off Valve • Battery + (12 Volts) • Fuel Quantity Actuator • Fuel Quantity Sensor • RPM Sensor • EEPROM in ECM 90-860074--1 FEBRUARY 2002 Page 5E-9 EDI DIAGNOSIS SERVICE MANUAL NUMBER 22 Intermittent Problems and Malfunction Indicator Lamp In the case of an intermittent problem, the Malfunction Indicator Lamp will light for ten seconds and then will go out. However, the corresponding code will be stored in the memory of the ECM. When unexpected codes appear during the code reading process, one can assume that these codes were set by an intermittent malfunction and could be helpful in diagnosing the system. An intermittent code may or may not reset. IF IT IS AN INTERMITTENT FAILURE, A DIAGNOSTIC CODE CHART IS NOT USED. Consult the Diagnostic Aids information on the same topic as the diagnostic code discussion. Troubleshooting The EDI System also covers the topic of Intermittents. A physical inspection of the applicable sub-system most often will resolve the problem. Reading Codes The provision for communicating with the ECM is the Data Link Connector (DLC) connector. It is part of the EDI engine wiring harness and is a 4-pin connector, of which only 3 pins are currently being used. The connector is mounted on the Electrical Box and is electrically connected to the ECM. It is used in the assembly plant to receive information that the engine is operating properly before it leaves the plant. The code(s) stored in the ECM’s memory can be read by counting the number of flashes of the light on a Blink Code Tool when connected or by using a scan tool, a diagnostic scanner that plugs into the DLC connector. b a 75395 DLC Connector a - Electrical Box b - DLC Connector Page 5E-10 90-860074--1 FEBRUARY 2002 SERVICE MANUAL NUMBER 22 EDI DIAGNOSIS BLINK CODE TOOL 1. Install diagnostic Blink Code Tool (BCT) connector into the cavity of the DLC connector. 2. Switch the key ON. Keep the key ON for all diagnostic work. 3. Press the button on the BCT for 2.5 - 5.0 seconds. 4. When the button is released the BCT lamp will start to flash an output sequence which begins with a long blink followed by four groups of shorter blinks. 5. If there are no fault codes stored, the code 4 4 4 4 will be blinked out. This will appear as: • pause for 2.5 seconds • flash for 2.5 seconds (diagnosis accepted) • pause for 2.5 seconds • 4 flashes of 0.5 seconds at 0.5 second intervals (representing the first blink code number) • pause for 2.5 seconds • 4 flashes of 0.5 seconds at 0.5 second intervals (representing the second blink code number) • pause for 2.5 seconds • 4 flashes of 0.5 seconds at 0.5 second intervals (representing the third blink code number) • pause for 2.5 seconds • 4 flashes of 0.5 seconds at 0.5 second intervals (representing the forth blink code number) • pause for 2.5 seconds • flash for 2.5 seconds (indicating end of the code) NOTE: The Malfunction Indicator Lamp (MIL) on the engine monitor panel (dash) should flash the same sequence as the BCT. 6. If a fault code is stored, the code will be blinked out in the same way. Then, the cycle will repeat itself. 7. Press the button on the BCT for 2.5 - 5.0 seconds to blink out the next code. 8. Repeat Step 7, until the code 0 0 0 0 is observed. This appears as a continuous series of long blinks, such as: • pause for 2.5 seconds • flash for 2.5 seconds • pause for 2.5 seconds • flash for 2.5 seconds • pause for 2.5 seconds • The sequence will continue until a new request for diagnosis is initiated, by pressing the BCT button for between 2.5 - 5 seconds. 90-860074--1 FEBRUARY 2002 Page 5E-11 EDI DIAGNOSIS SERVICE MANUAL NUMBER 22 SCAN CODE TOOL IMPORTANT: If a scan tool is used to read the codes, follow the manufacturer’s instructions. The ECM can communicate a variety of information through the DLC connector. This data is transmitted at a high frequency which requires a scan tool for interpretation. With an understanding of the data which the tool displays, and knowledge of the circuits involved, the tool can be very useful in obtaining information which would be more difficult or impossible to obtain with other equipment. Scan tools Do NOT make the use of diagnostic charts unnecessary, nor can they indicate exactly where a problem is in a particular circuit. The scan tool allows manipulation of wiring harnesses or components with the engine not operating, while observing the scan tool readout. The scan tool can be plugged in and observed while operating the vessel under the condition when the Malfunction Indicator Lamp illuminates momentarily or when the engine driveability is momentarily poor. If the problem seems to be related to certain parameters that can be checked on the scan tool, they should be checked while operating the vessel. If there does not seem to be any correlation between the problem and any specific circuit, the scan tool can be checked on each position, watching for a period of time to see if there is any change in the readings that indicates intermittent operation. The scan tool is also an easy way to compare the operating parameters of a poorly operating engine with those of a known good one. For example, a sensor may shift in value but not set a trouble code. Comparing the senor’s readings with those of the EDI / Scan Tool Normal Specifications readings may uncover the problem. The scan tool has the ability to save time in diagnosis and prevent the replacement of good parts. The key to using the scan tool successfully for diagnosis is the technician’s ability to understand the system as well as an understanding of the scan tool operation and limitations. The technician should read the tool manufacturer’s operating manual to become familiar with the tool’s operation. Page 5E-12 90-860074--1 FEBRUARY 2002 SERVICE MANUAL NUMBER 22 EDI DIAGNOSIS Clearing Codes IMPORTANT: To avoid improper tool functions, Ensure the battery is fully charged. BLINK CODE TOOL 1. Connect BCT (Blink Code Tool), if not already connected. 2. Make certain the ignition key is in the OFF position. 3. Press the button on the Diagnostic Code Tool, and hold it depressed. 4. Switch the key to ON while continuing to press the Tool button for between 2.5 and 5 seconds. 5. When the button on the Tool is released the 0000 Code should be seen. NOTE: The 0000 Code is displayed when all Trouble Codes have been read or cleared. The Code 0000 (meaning end of diagnosis is displayed as follows: A pause in the MIL for 2.5 seconds, a flash for 2.5 seconds, pause for 2.5 seconds, flash for 2.5 seconds.) This code sequence will repeat until a new request for diagnosis interrupts the communication between the Tool and the ECM. 6. Press the button for longer than 2.5 seconds to interrupt the diagnostic procedure. 7. Press the button again for longer than 2.5 seconds to start the ECM checking for codes. 8. See that the 4444 Code (meaning no trouble codes present) is displayed. 9. If codes are still present refer to appropriate Troubleshooting and/or Diagnostic information. 10. Each time the Blink Code Tool (BCT) is employed, the following procedure should be used: a. Interrogate the ECM to check for memory errors. b. Cancel memory errors. c. Use the engine at least 10 minutes to ensure that any errors have been re-recorded. d. Re-interrogate the ECM to find out which errors are really present and which of the previous errors were casual. 11. Refer to appropriate Diagnostic Circuit Check or Troubleshooting section. SCAN TOOL 1. Connect scan tool. 2. Turn Key On. 3. Select clear codes function. 4. Clear codes. 5. Turn key OFF. 6. Turn key ON and read codes. If codes are still present, there is a real system fault. Refer to appropriate Troubleshooting and/or Diagnostic information. 90-860074--1 FEBRUARY 2002 Page 5E-13 EDI DIAGNOSIS SERVICE MANUAL NUMBER 22 Diagnosis of Driveability Concerns If a driveability concern still exists after following the diagnostic circuit checks and reviewing Troubleshooting, an out-of-range sensor may be suspected. Because of the unique design of the EDI system, fail-safes have been incorporated into the ECM to replace a sensed value with a default value in the case of a sensor malfunction or sensor wiring concern. By allowing this to occur, limited engine performance is restored until the vessel is repaired. A basic understanding of sensor operation is necessary in order to diagnose an out-of-range sensor. Page 5E-14 90-860074--1 FEBRUARY 2002 EDI DIAGNOSIS SERVICE MANUAL NUMBER 22 ECM Input and Sensor Diagram The following shows the sensors, switches, other inputs and outputs used by the ECM to control its various systems. Although we will not cover them all in great detail, there will be a brief description of each. Sensors ECM Actuators Number 1 Cylinder Fuel Injector (Needlemotion sensor) Injected fuel quantity Temperature sensors (water, air, fuel) Sensor for controlcollar position Engine shut off Microprocessors Electronically controlled fuel injection pump (Fuel Quantity and Timing) Start of injection Starting control Engine speed sensor Glow control unit MAP sensor Diagnosis Setpoint generators Maps TP sensor 90-860074--1 FEBRUARY 2002 Diagnostic display Page 5E-15 EDI DIAGNOSIS SERVICE MANUAL NUMBER 22 ECM Connector Pin Layout All related wiring attaches to the ECM with one 68 pin wiring harness connector. This connector is represented by the following diagram. The numbered squares represent a pin and its relative location in the cavity of the ECM. Those numbered squares which appear shaded represent pins not utilized in the Marine application. The white squares indicate pins that are currently used and have corresponding wires connected when the harness is attached to the ECM. Refer to Connector Chart for additional information. 46 b 68 46 24 47 25 48 26 49 27 50 28 51 29 52 30 53 31 54 32 55 33 56 34 57 35 58 36 59 37 60 38 61 39 62 40 63 41 64 42 65 43 66 44 67 45 68 1 1 a 2 2 3 4 5 6 7 8 9 10 11 12 13 14 15 16 17 18 19 20 21 22 22 23 23 a - ECM Wiring Harness Connector b - Number And Location Of Individual Pin (68 Total) Page 5E-16 90-860074--1 FEBRUARY 2002 EDI DIAGNOSIS SERVICE MANUAL NUMBER 22 Connector Chart The following chart will aid in identification and diagnosis of wiring circuits that are attached to the ECM through the 68 pin connector. CAUTION AVOID loss of engine operation or wiring damage. Serious electrical damage could result from improper probing of wires and connectors. Do NOT damage wires, connectors or electrical system. NOTE: Clear each code after disconnecting and reconnecting each sensor. Failure to do so may result in an incorrect diagnosis of the problem. ECM Pin Circuit Designation Wire Color Abbreviation Diagnostic Trouble Codes ScanTool BLK P1600 1 Battery Minus 2 Engine Speed sensor signal output BRN/BLK P1735 3 Glowplug Indicator Lamp BLK/YEL P1645 4 Fuel Quantity Actuator GRN/WHT (twisted pair) P1220 5 Fuel Quantity Actuator GRN/WHT (twisted pair) P1220 6 Unused - - 7 Fuel Quantity Control Sleeve Position Sensor (Middle Tap) ORN P1225 8 Engine Speed Sensor Signal (shield wire) WHT P0725 9 Unused - - 10 Unused - - 11 Instrumented Injector Ground BRN P1201 12 Instrumented Injector Signal WHT P1725 13 Unused - - 14 Engine Coolant Temperature (ECT) Sensor WHT/BRN P0115 15 Throttle Position Sensor (signal) ORN/WHT P1515 16 Unused - - 17 Unused - - 90-860074--1 FEBRUARY 2002 Page 5E-17 EDI DIAGNOSIS SERVICE MANUAL NUMBER 22 Connector Chart (continued) ECM Pin Page 5E-18 Wire Color Abbreviation 18 Unused - - 19 Unused - - 20 Unused - - 21 Engine Speed Sensor (Digital) BRN/RED P0725 22 Unused - - 23 Battery Feed RED P1600 24 Battery Minus BLK P1600 25 Unused - - 26 Malfunction Indicator Lamp (MIL) BRN/WHT P1650 27 Unused - - 28 Unused - - 29 Control Sleeve Position Sensor GRN P1225 30 Unused - - 31 Unused - - 32 Unused - - 33 Analog Ground (ECT / Injection Pump) BRN/PUR P0115 34 Unused - - 35 Unused - - 36 Unused - - RED/ORN - PNK P1605 - - WHT/YEL P0105 37 1 1: Circuit Designation Diagnostic Trouble Codes DTC(s) ScanTool Idle rpm Increase Signal 38 Switched battery (15 - Ignition) 39 Unused 40 MAP Sensor Signal 41 5 Volt Output 42 Main Relay 43 Unused GRN WHT/RED P1625 - - Unused on early model engines with 11 Pin ECM harness connector at electrical box. 90-860074--1 FEBRUARY 2002 EDI DIAGNOSIS SERVICE MANUAL NUMBER 22 Connector Chart (continued) ECM Pin Circuit Designation Wire Color Abbreviation Diagnostic Trouble Codes DTC(s) ScanTool - - 44 Unused 45 Battery Feed RED P1600 46 Battery Minus BLK P1600 47 Unused - - 48 Unused - - 49 Fuel Quantity Actuator GRN/WHT P1220 50 Glow Plug Relay (control side) BLU/BLK P1635 51 Solenoid Valve for Timing BLU P1630 52 Fuel Quantity Sensor (Measure Coil) BLU/YEL P1225 53 Electric Shut Off Device YEL P1660 54 Unused - - a. Throttle Position Sensor Ground a. BLU/WHT a. P1515 b. MAP / IAT Sensor Ground b. BLU/WHT b. P1110 55 56 Unused - - 57 TP Sensor - 5 Volt PNK/YEL P1515 58 Unused - - 59 Unused - - 60 Unused - - 61 K-Line GRN/RED 62 Unused - - 63 Fuel Temperature Sender BLU/RED P0180 64 Air Intake temperature Sensor Signal GRN/BLK P1110 65 Low Idle Position Switch BRN/RED P1515 66 Unused - - 67 Unused - - 68 Battery Feed RED P1600 90-860074--1 FEBRUARY 2002 Page 5E-19 EDI DIAGNOSIS SERVICE MANUAL NUMBER 22 MAP (Manifold Air Pressure) Sensor Scan Code: P0105 Blink Code: 2222 Malfunction Indicator Lamp: ON 40 41 64 55 4 3 2 1 a GRN/BLK 64 b GRN WHT/YEL 41 c 40 d BLU/WHT 55 e f a b c d e f 75340 - MAP / IAT Sensor Assembly - IAT Signal - 5 Volt Reference Signal - MAP Signal - Sensor Ground - To Throttle Position Sensor CIRCUIT DESCRIPTION: The MAP (Manifold Air Pressure) sensor and IAT (Intake Air Temperature) sensor form an assembly. The MAP sensor portion of this assembly is a pressure transducer that measures the changes in the intake manifold pressure. The pressure changes as a result of engine load and speed change, and the MAP sensor converts this to a voltage output signal from the assembly. NOTE: Sometimes this component may be referred to as a boost pressure sensor due to the presence of a turbocharger. The ECM sends a 5 volt reference signal to the MAP sensor. As the manifold pressure changes, the electrical resistance of the MAP sensor also changes. By monitoring the sensor output voltage, the ECM knows the manifold pressure. A higher pressure, low vacuum (high voltage) requires more fuel, while a lower pressure, higher vacuum (low voltage) requires less fuel. The ECM uses the MAP sensor to control fuel delivery and injection timing. A failure in the MAP sensor circuit should set a Scan Code P0105. NAME CKT PIN Page 5E-20 40 MAP Signal 41 5 Volt Reference Signal 55 Sensor Ground (–) 90-860074--1 FEBRUARY 2002 EDI DIAGNOSIS SERVICE MANUAL NUMBER 22 TEST DESCRIPTION: Verify continuity between the following pins: ECM 68 PIN CONNECTOR 4 TERMINAL CONNECTOR AT ECT 40 4 41 3 55 1 DIAGNOSTIC HELP: Verify the following: • Open or short in the CKT Pin 40, CKT Pin 41 or CKT Pin 55 will cause low amount of smoke. • Assembly loose on manifold or a damaged O-ring seal, causing improper signal. Will cause high amount of smoke. • Bent terminal or pin at the MAP connection or ECM. • Defective MAP or ECM. MAP failure influences engine performance as follows: • FUEL QUANTITY ACTUATION: Maximum engine rpm is 70% of the normal operating range (45% of fuel quantity reduction). NOTE: Failure of the MAP and IAT sensor at the same time will limit engine performance to 60% maximum of the normal operating range (50% fuel quantity reduction). IMPORTANT: Replace the O-ring seal whenever removing the MAP/IAT sensor. Torque the sensor to specification when replacing. 90-860074--1 FEBRUARY 2002 Page 5E-21 EDI DIAGNOSIS SERVICE MANUAL NUMBER 22 ECT (Engine Coolant Temperature) Sensor Scan Code: P0115 Blink Code: 1113 Malfunction Indicator Lamp: ON a b 1 2 14 c 33 WHT/BRN 14 d BRN/PUR 33 e f 75341 a b c d e f - ECT Sensor - ECT Connector - ECT Signal - 5 Volt Reference Signal - Sensor Ground - To Injection Pump CIRCUIT DESCRIPTION: The ECT (Engine Coolant Temperature) Sensor is a thermistor (a resistor which changes value based on temperature) immersed in the engine coolant stream. Low coolant temperature produces a high resistance, while high temperature causes low resistance. The ECM supplies a 5 volt signal to the ECT through a resistor in the ECM and measures the voltage. The voltage will be high when the engine is cold, and low when the engine is hot. By measuring the voltage, the ECM knows the engine coolant temperature. Engine coolant temperature affects most systems the ECM controls. The voltage received at the ECM will determine operation of the fuel timing solenoid and glow plug relays. A failure in the ECT circuit should set Scan Code P0115. Remember, this code indicates a failure in the coolant temperature sensor circuit, so proper use of the test description information will lead to either repairing a wiring problem or replacing the sensor. NAME CKT PIN Page 5E-22 14 Engine Coolant Temperature Sensor Signal 33 Sensor Ground (–) 90-860074--1 FEBRUARY 2002 EDI DIAGNOSIS SERVICE MANUAL NUMBER 22 TEST DESCRIPTION: Verify continuity between the following pins: ECM 68 PIN CONNECTOR 2 TERMINAL CONNECTOR AT ECT 14 1 33 2 Verify the sensor resistance between the two ECT sensor terminals as a function of temperatures: NOTE: Stabilization time before each measurement should be at least 10 minutes in water. TEMPERATURE °C (°F) RESISTANCE (kOhm) MAXIMUM MEASUREMENT Current (mA) –30 (–22) 22.2 - 31.8 0.2 –10 (13) 8.29 - 10.61 0.4 20 (67) 2.28 - 2.72 1.0 50 (122) 0.751 - 0.901 1.5 80 (175) 0.291 - 0.353 2.0 120 (247) 0.104 - 0.120 3.0 DIAGNOSTIC HELP: Verify the following: • Open or short in the CKT Pin 14 or CKT Pin 33. • Bent terminal or pin at the ECT or ECM. • Defective ECT or ECM. ECT failure influences engine performance as follows: • FUEL QUANTITY ACTUATION: Maximum engine rpm is 80% of the normal operating range (35% of fuel quantity reduction). • LOW IDLE SETPOINT VALUE: The engine operates at 850 rpm for the first 300 seconds after engine start up and then goes to 700 rpm (normal idle). • TIMING ADVANCE: The system adds 3 to 4 degrees of timing throughout the engine operating range (engine is noisier). • GLOW PLUG LAMP: Even if the engine is not equipped with glow plugs, the glow plug lamp flashes at each start up for 12 seconds. IMPORTANT: Torque the ECT sensor to specification when replacing. 90-860074--1 FEBRUARY 2002 Page 5E-23 EDI DIAGNOSIS SERVICE MANUAL NUMBER 22 Fuel Temperature Sensor Scan Code: P0180 Blink Code: 3333 Malfunction Indicator Lamp: OFF ECM c BLU/RED a 6 7 d 33 1 5 4 BRN/PUR b 63 2 3 75409 75565 a b c d - Fuel Temperature Sensor (Inside Fuel Injection Pump) - 5 Volt Reference Signal - Fuel Temperature Sensor Signal - Sensor Ground CIRCUIT DESCRIPTION: The Fuel Temperature Sensor is a thermistor (a resistor which changes value based on temperature). Low temperature produces a high resistance, while high temperature causes a low resistance. The ECM supplies a 5 volt signal to the sensor through a resistor in the ECM and measures the voltage. The ECM voltage will be high when the fuel temperature is cold, and low when the fuel temperature is hot. A failure in the Fuel Temperature Sensor circuit should set a Scan Code P0180. CKT PIN Page 5E-24 NAME 33 Sensor Ground (Analog –) 63 Fuel Temperature Sensor Signal 90-860074--1 FEBRUARY 2002 EDI DIAGNOSIS SERVICE MANUAL NUMBER 22 TEST DESCRIPTION Verify continuity between the following: ECM 68 PIN CONNECTOR 7 TERMINAL CONNECTOR AT FUEL INJECTION PUMP 33 5 63 6 Verify the sensor resistance between terminals 5 and 6 of the injection pump connector as a function of temperatures: TEMPERATURE °C° (F) RESISTANCE (kOhm) –10 (13) 8.29 - 10.61 20 (67) 2.28 - 2.72 50 (122) 0.751 - 0.901 80 (175) 0.291 - 0.353 DIAGNOSTIC HELP: Verify the following: • Open or short in the CKT Pin 33 or CKT Pin 63. • Bent terminal or pin at the fuel pump connector or ECM. • Defective fuel injection pump (temperature sensor circuit) or ECM. Fuel Temperature Sensor failure influences engine performance as follows: • FUEL QUANTITY ACTUATION: No fuel quantity correction can occur as a function of fuel temperature. When sensor is functioning the engine has the same performance for all fuel temperatures. With this sensor failure the engine has better performance with a cold fuel condition then when the fuel is warm. • Unless there is a complaint about performance, it is not necessary to change the injection pump for this failure. 90-860074--1 FEBRUARY 2002 Page 5E-25 EDI DIAGNOSIS SERVICE MANUAL NUMBER 22 RPM (Engine Speed) Sensor P0725 Blink Code: 1131 Malfunction Indicator Lamp: ON 123 Scan Code: 2 b 3 e ECM 1 WHT BRN/RED 8 21 c d a 75311 a b c d e - RPM (Engine Speed) Sensor - Harness Connector - Sensor ECM Input Signal - Sensor Ground (–) - Symbol for Shield Cable CIRCUIT DESCRIPTION: The rpm (Engine Speed) Sensor is an induction-type pulse generator which mounts close the leading edge of the flywheel. Four notches (drilling) serve to sense the engine speed. The resulting change in magnetic flux induces an AC voltage signal which is evaluated by the ECM. The ECM processes the signal to establish TDC and the crankshaft position relative to TDC. A failure in the rpm sensor circuit should set a Scan Code P0725. NAME CKT PIN Page 5E-26 8 ECM Input Signal from rpm (Engine Speed) Sensor 21 Sensor Ground, (Digital –) 90-860074--1 FEBRUARY 2002 EDI DIAGNOSIS SERVICE MANUAL NUMBER 22 TEST DESCRIPTION Verify continuity between the following: ECM 68 PIN CONNECTOR 3 TERMINAL CONNECTOR 8 2 21 1 and 3 (3 is shield wire) 21 3 (shield wire) Verify the resistance between terminals 1 and 2 of the sensor: RESISTANCE (Ohm) MAXIMUM MEASUREMENT 1000 1000 ohm DIAGNOSTIC HELP: Verify the following: • Open or short in the CKT Pin 8 or CKT Pin 21. • Bent pin at the 3 terminal connector or ECM. • Sensor mounting is improper. • Defective rpm sensor or ECM. RPM Sensor failure influences engine performance as follows: • The engine will not start If the engine speed sensor fails during starting procedures. The MIL (Malfunction Indicator Lamp) IS NOT illuminated. • The engine immediately shuts OFF if the engine speed sensor fails with the engine operating. The MIL IS illuminated. 90-860074--1 FEBRUARY 2002 Page 5E-27 EDI DIAGNOSIS SERVICE MANUAL NUMBER 22 BARO (Atmospheric Pressure) Sensor Scan Code: P1105 Blink Code: 1121 Malfunction Indicator Lamp: OFF b a 75336 a - ECM b - BARO (Atomosheric Pressure) Sensor CIRCUIT DESCRIPTION: The BARO (Atmospheric Pressure) Sensor is inside the ECM. It is not serviceable or replaceable individually. The complete ECM must be replaced to repair a faulty BARO sensor. A failure in the BARO sensor circuit should set a Code P1105. CKT PIN Not Applicable Page 5E-28 NAME BARO (Atmospheric Pressure) Sensor 90-860074--1 FEBRUARY 2002 SERVICE MANUAL NUMBER 22 EDI DIAGNOSIS TEST DESCRIPTION Verify failure using either the Blink Code Tool and/or Scan Tool. There are no individual circuits to be tested. All BARO sensor circuits are inside the ECM and are not serviceable. DIAGNOSTIC HELP: BARO Sensor failure influences engine performance as follows: • The engine behavior does not change noticeably when the engine is operated at or near sea level. It is acceptable to operate the engine with this failure, unless there is a complaint. • If the engine is most frequently operated at high altitude [elevation higher than 4900 ft (1500 m)] it is suggested that the ECM be replaced. 90-860074--1 FEBRUARY 2002 Page 5E-29 EDI DIAGNOSIS SERVICE MANUAL NUMBER 22 IAT (Intake Air Temperature) Sensor Blink Code: 1112 Malfunction Indicator Lamp: ON 40 41 64 55 P1110 4 3 2 1 Scan Code: GRN/BLK 64 GRN 41 WHT/YEL a BLU/WHT f a b c d e f 40 55 b c d e 75340 - IAT / MAP Sensor Assembly - IAT Signal - 5 Volt Reference Signal - MAP Signal - Sensor Ground - To Throttle Position Sensor CIRCUIT DESCRIPTION: The IAT sensor and MAP (Manifold Absolute Pressure) sensor form an assembly. The IAT portion of the assembly is a thermistor (a resistor which changes value based on temperature). Low temperature produces a high resistance, while high temperature causes a low resistance. The ECM supplies a 5 volt signal to the sensor through a resistor in the ECM and measures the voltage. The ECM voltage will be high when the intake air is cold, and low when the intake manifold air is hot. A failure in the IAT sensor circuit should set a Scan Code P1110. NAME CKT PIN Page 5E-30 55 Sensor Ground 64 IAT Signal 90-860074--1 FEBRUARY 2002 EDI DIAGNOSIS SERVICE MANUAL NUMBER 22 TEST DESCRIPTION: Verify continuity between the following pins: ECM 68 PIN CONNECTOR 4 TERMINAL CONNECTOR AT MAP 55 1 64 2 Verify the sensor resistance between the two IAT sensor terminals as a function of temperature: NOTE: Stabilization time before each measurement should be at least 10 minutes in test medium. TEMPERATURE °F (°C) MINIMUM RESISTANCE (kOhm) TYPICAL RESISTANCE (kOhm) MAXIMUM RESISTANCE (kOhm) –40 (–40) 1 39.18 48.55 57.92 –30 (–23) 1 22.22 27.00 31.78 –20 (–5) 1 13.24 15.67 18.10 –10 (14) 1 8.160 9.45 10.74 0 (32) 1 5.180 5.89 6.60 10 (50) 1 3.390 3.79 4.190 20 (67) 1 2.270 2.500 2.730 30 (85) 1 1.528 1.692 1.856 40 (104) 1 1.059 1.170 1.281 50 (122) 1 0.748 0.826 0.904 60 (140) 1 0.538 0.594 0.650 80 (175) 1 0.2902 0.3224 0.3546 100 (212) 1 0.1641 0.1852 0.2063 120 (247) 1 0.0970 0.1116 0.1262 DIAGNOSTIC HELP: Verify the following: • Open or short in the CKT Pin 55 or CKT Pin 64. • Bent pin at the ECT or ECM. • Defective ECT or ECM. IAT failure influences engine performance as follows: • FUEL QUANTITY ACTUATION: Maximum engine rpm is 90% of the normal operating range (15% of fuel quantity reduction). NOTE: Failure of the IAT and MAP sensor at the same time will limit engine performance to 60% maximum of the normal operating range (50% fuel quantity reduction). IMPORTANT: Replace the O-ring seal whenever removing the IAT/MAP sensor. Torque the sensor to specification when replacing. 90-860074--1 FEBRUARY 2002 Page 5E-31 EDI DIAGNOSIS SERVICE MANUAL NUMBER 22 Instrumented Injector (Needle Movement Sensor) Scan Code: P1201 Blink Code: 1132 Malfunction Indicator Lamp: ON b a 2 1 2 e ECM 1 BRN 11 d WHT 12 c 75339 a b c d e - Instrumented Injector (Needle Movement Sensor) - Harness Connector - Sensor ECM Signal - Sensor Ground (–) - Symbol for Shield Cable CIRCUIT DESCRIPTION: The injector timing reference is supplied to the ECM by way of the Instrumented Injector (Needle Movement Sensor, or referred to sometimes as NBF) installed in the Number 1 Cylinder injector. This position variable type input device creates the timing signal for the ECM. This signal is used for a number of control and testing functions within the ECM. A failure in the Instrumented Injector circuit should set Scan Code P1201. Display of this code indicates a failure in the sensor circuit, so proper diagnosis will lead to either repairing a wiring problem or replacing the sensor. CKT PIN Page 5E-32 NAME 11 Sensor Ground (–) 12 Instrumented Injector Sensor Signal 90-860074--1 FEBRUARY 2002 EDI DIAGNOSIS SERVICE MANUAL NUMBER 22 TEST DESCRIPTION Verify continuity between the following: ECM 68 PIN CONNECTOR 2 TERMINAL CONNECTOR 11 2 (is shield wire, also) 12 1 Verify the sensor resistance between terminals 1 and 2 of the sensor: RESISTANCE (Ohm) MINIMUM / MAXIMUM MEASUREMENT 100 90 - 110 DIAGNOSTIC HELP: Verify the following: • Open or short in the CKT Pin 11 or CKT Pin 12. • Defective sensor. • Defective ECM. Instrumented Injector failure influences engine performance as follows: • FUEL QUANTITY ACTUATION: Maximum engine rpm is 80% of the normal operating range (35% of fuel quantity reduction). • LOW IDLE SETPOINT VALUE: The engine operates at 850 rpm for the first 72 seconds after engine start up and then goes to 700 rpm (normal idle). • TIMING ADVANCE: Timing actuation is in open loop which means the engine may be slightly noisier. IMPORTANT: Torque the Instrumented Injector to specification when replacing. 90-860074--1 FEBRUARY 2002 Page 5E-33 EDI DIAGNOSIS SERVICE MANUAL NUMBER 22 Fuel Quantity Actuator (Pump Actuator) Scan Code: P1220 Blink Code: 1223 Malfunction Indicator Lamp: ON ECM b 75409 6 5 4 2 c 45 c RED 68 c GRN/WHT 4 d GRN/WHT 5 d GRN/WHT 49 d 7 1 23 RED RED a b RED e 3 75565 a b c d e - Fuel Quantity Actuator (Inside Injection Pump) - Harness Connector - Battery Supply Voltage To Sensor From ECM - Sensor Ground (–) - Twisted Wire Pair CIRCUIT DESCRIPTION: Inside the electronic diesel pump the Fuel Quantity Actuator (a rotary solenoid actuator) for injected fuel quantity control engages with the control collar through a shaft. Similar to the mechanically governed fuel injection pump, the cutoff ports are opened or closed depending upon the control collar’s position. The injected fuel quantity can be infinitely varied between zero and maximum (e.g., for cold starting). When no voltage is applied to the actuator, its return springs reduce the injection quantity to zero. A failure of the Fuel Quantity Actuator circuit should set a Scan Code P1220. CKT PIN Page 5E-34 NAME 4 Fuel Quantity Actuator (1 of 3 total, one of a twisted pair) 5 Fuel Quantity Actuator (2 of 3 total, second of a twisted pair) 49 Fuel Quantity Actuator (3 of 3 total) 23 Battery Supply Voltage (1 of 3) 45 Battery Supply Voltage (2 of 3) 68 Battery Supply Voltage (3 of 3) 90-860074--1 FEBRUARY 2002 EDI DIAGNOSIS SERVICE MANUAL NUMBER 22 TEST DESCRIPTION Verify continuity between the following: ECM 68 PIN CONNECTOR 7 TERMINAL CONNECTOR 4 / 5 / 49 4 23 / 45 / 68 7 Verify the actuators resistance between terminals 4 and 7 of the injection pump connector: RESISTANCE (Ohm) MINIMUM / MAXIMUM MEASUREMENT 1 ± 0.3 Verify supply voltage to injection pump with the 7 terminal connector unplugged and key ON. Measure between terminals 5 and 7 of the harness side connector: CURRENT (VOLTS) MINIMUM / MAXIMUM MEASUREMENT 12 Battery Voltage DIAGNOSTIC HELP: Verify the following: • Open or short in the CKT Pins 4 / 5 / 49, or CKT Pins 23 / 45 / 68. • Improper terminals or pins at the 7 terminal connector or ECM. • Defective fuel injection pump. • Defective ECM. Failure of the Fuel Quantity Actuator influences engine performance as follows: • If the Fuel Quantity Actuator fails with the engine operating, the engine immediately shuts off. If it failed at start up, the engine does not start. In both cases the MIL is illuminated. 90-860074--1 FEBRUARY 2002 Page 5E-35 EDI DIAGNOSIS SERVICE MANUAL NUMBER 22 Fuel Quantity Sensor (Control Sleeve Position Sensor) Scan Code: P1225 Blink Code: 1222 Malfunction Indicator Lamp: ON b ECM a 6 b 7 29 c BLU/YEL 52 d ORN 7 e BRN/PUR 33 f 1 5 4 GRN 2 3 75565 a b c d e f - Fuel Quantity Sensor (Control Sleeve Position Sensor) - Fuel Quantity Sensor Connector - Control Sleeve Position Sensor - Fuel Quantity Sensor (Measure Coil) - Control Sleeve Position Sensor Signal - Analog Ground (–) CIRCUIT DESCRIPTION: Inside the electronic diesel pump the Fuel Quantity Actuator (a rotary solenoid actuator for controlling injected fuel quantity) engages with the control collar through a shaft. Similar to the mechanically governed fuel injection pump, the cutoff ports are opened or closed depending upon the control collar’s position. The injected fuel quantity can be infinitely varied between zero and maximum (e.g., for cold starting). Using this Fuel Quantity Sensor (an angle sensor or potentiometer) the fuel quantity actuator’s angle of rotation, and thus the position of the control collar, are reported back to the ECU. This information is used by the ECM to determine the injected fuel quantity as a function of engine speed. A failure of the Fuel Quantity Sensor circuit should set a Scan Code P1225. NAME CKT PIN Page 5E-36 7 Control Sleeve Position Sensor (Middle Tap) 33 Analog Ground (–) 29 Control Sleeve Position Sensor 52 Fuel Quantity Sensor Input to ECM (Measure Coil) 90-860074--1 FEBRUARY 2002 EDI DIAGNOSIS SERVICE MANUAL NUMBER 22 TEST DESCRIPTION Verify continuity between the following: ECM 68 PIN CONNECTOR 7 TERMINAL CONNECTOR 29 1 52 2 7 3 33 5 Verify the actuators resistance between terminals 1 and 2 of the injection pump connector: RESISTANCE (Ohm) MINIMUM / MAXIMUM MEASUREMENT 11.3 ± 0.3 Verify supply voltage to injection pump with the 7 terminal connector unplugged and key ON. Measure between terminals 3 and 5 of the harness side connector: CURRENT (VOLTS) MINIMUM / MAXIMUM MEASUREMENT 5 ± 0.0 DIAGNOSTIC HELP: Verify the following: • Open or short in the CKT Pin 5, CKT Pin 7 or CKT Pin 52. • Improper terminals or pins at the 7 terminal connector or ECM. • Defective fuel injection pump. • Defective ECM. Failure of the Fuel Quantity Sensor influences engine performance as follows: • If the Fuel Quantity Sensor fails with the engine operating, the engine immediately shuts off. If it failed at start up, the engine does not start. In both cases the MIL is illuminated. 90-860074--1 FEBRUARY 2002 Page 5E-37 EDI DIAGNOSIS SERVICE MANUAL NUMBER 22 Timing Fault (Timing Advance Regulation) Scan Code: P1230 Blink Code: 1321 Malfunction Indicator Lamp: OFF ECM a BLU b 12 c 2 d 51 RED 68 e RED 45 e RED 23 e 1 75409 a b c d e - Fuel Injection Pump - Timing Solenoid Valve - Harness Connector - Sensor Ground (–) - Battery Supply Voltage (1 of 3) CIRCUIT DESCRIPTION: Determining the proper fuel injection point (timing) depends on the quantity of fuel, engine rpm and coolant temperature. The ECM controls the timing using the signal from the number one instrumented injector and corrects the timing to the nominal timing rate. Adjustment of pressure is carried out by an electric Timing Solenoid Valve which the ECM operates. When the actuated timing advance (timing governing) is different from the setpoint (ECM stored information) advance by more or less than 5°, this error will be set. A failure in the Timing Fault circuit should set a Scan Code P1230. NAME CKT PIN Page 5E-38 51 Solenoid 68 Battery Supply Voltage 45 Battery Supply Voltage 23 Battery Supply Voltage 90-860074--1 FEBRUARY 2002 EDI DIAGNOSIS SERVICE MANUAL NUMBER 22 TEST DESCRIPTION Verify continuity between the following: ECM 68 PIN CONNECTOR 2 TERMINAL CONNECTOR 23 / 45 / 68 1 51 2 Verify the solenoid valves resistance between terminals 1 and 2 of the connector: RESISTANCE (Ohm) MINIMUM / MAXIMUM MEASUREMENT 15 ± 0.0 Verify supply voltage to solenoid valve terminal connector with the connector unplugged and key ON. Measure between terminal1 and engine ground (–): CURRENT (VOLTS) MINIMUM / MAXIMUM MEASUREMENT 12 Battery Voltage DIAGNOSTIC HELP: Verify the following: • Open or short in the CKT Pins 23 / 45 / 68 or CKT Pin 51. • Improper terminals or pins at the 2 terminal connector or ECM. • Defective fuel injection pump. • Defective ECM. Failure of the timing governing solenoid valve influences engine performance as follows: • FUEL QUANTITY ACTUATION: Maximum engine rpm is 80% of the normal operating range (35% of fuel quantity reduction). • The engine becomes noisy. 90-860074--1 FEBRUARY 2002 Page 5E-39 EDI DIAGNOSIS SERVICE MANUAL NUMBER 22 TP (Throttle Position) Sensor / Low Idle Switch Scan Code: P1515 Blink Code: 1144 Malfunction Indicator Lamp: ON ECM a b 6 7 1 g 5 4 ORN/WHT 15 c PNK/YEL 57 d BLU/WHT 55 e BRN/RED 65 f 2 3 BLK b 1 75565 a b c d e f g - TP Sensor - Harness Connector - TP Sensor Signal - 5 Volt Reference Signal - Sensor Ground (–) - Battery Supply Voltage - To MAP/IAT Sensor CIRCUIT DESCRIPTION: The TP (Throttle Position) sensor translates throttle position into a voltage signal. The TP sensor is basically a linear potentiometer. The ECM supplies 5 volts to the sensor and processes a returning voltage signal for operation of the fuel timing solenoid valve. The TP output voltage will vary through the range from idle to WOT. Also at closed throttle the Low Idle Switch (sometimes referred to as LGS) is activated. This confirms to the ECM that the TP is at the closed throttle position. As the throttle position changes the output increases, so that at WOT, the output voltage should be near 4.5 volts. By monitoring the output voltage from the TP sensor, the ECM can determine fuel delivery based on the throttle position (operator demand). If the TP circuit is open, the ECM will set a Scan Code P1515. If the TP circuit is shorted, the ECM will think the vessel is at WOT, and this code will be set. A problem in any of the TP circuits (e. g. Low Idle Switch) will set this same code. Once this trouble code is set, the ECM will use a default value for TP signal. NAME CKT PIN Page 5E-40 15 TP Sensor Signal 57 5 Volt Reference Signal 55 Sensor Ground (–) 65 Low Idle Switch (LGS) 1 ECM / Battery Ground (–) 90-860074--1 FEBRUARY 2002 EDI DIAGNOSIS SERVICE MANUAL NUMBER 22 TEST DESCRIPTION NOTE: Constant voltage may be observed at the very first part and the very last part of the TP’s rotation. Verify continuity between the following: ECM 68 PIN CONNECTOR 7 TERMINAL CONNECTOR 15 1 57 2 55 4 65 5 1 6 Verify supply voltage to TP sensor with the 7 terminal connector unplugged and key ON. Measure between terminals 2 and 4 of the harness side connector: CURRENT (VOLTS) MINIMUM / MAXIMUM MEASUREMENT 5 Verify the TP sensor potentiometer current flow between terminals 4 and 5 of the sensor with the 7 terminal connector plugged in and key ON: CURRENT (VOLTS) MINIMUM / MAXIMUM MEASUREMENT 5 With the key OFF and the 7 terminal connector unplugged, verify the TP sensor potentiometer resistance between terminals 1 and 4 of the sensor connector: CONDITION RESISTANCE (Ohm) MINIMUM / MAXIMUM MEASUREMENT TP at Idle Position 1050 ± 100 TP at WOT Position 1650 ± 100 DIAGNOSTIC HELP: Verify the following: • Open or short in the CKT Pin 2, CKT Pin 5 or CKT Pins 1. • Improper terminals or pins at the 7 terminal connector or ECM. • Defective TP sensor. • Defective ECM. Failure of the TP sensor influences engine performance as follows: • Any failure of the TP sensor or circuits (e. g. plausibility between TP sensor and low idle switch, TP out of operating range, LGS defective, TP voltage supply defective) will cause the engine to operate at 800 rpm maximum. 90-860074--1 FEBRUARY 2002 Page 5E-41 EDI DIAGNOSIS SERVICE MANUAL NUMBER 22 Battery Voltage Scan Code: P1600 Blink Code: 1233 Malfunction Indicator Lamp: OFF 72965 CIRCUIT DESCRIPTION: If battery voltage drops below 9 volts the Instrumented Injector (needle movement sensor) stops working. If the battery voltage drops below 6 - 9 volts the fuel quantity actuator begins to work improperly. The ECM stops working when the battery voltage drops below 6 volts. However, the diagnostic system will not recognize a low voltage problem. The only error recognized by the ECM is if the battery voltage is too high (above 20 volts). DIAGNOSTIC HELP: Verify the following: Page 5E-42 • Alternator drive belt or belt tension improper. • Open in the battery supply (+) or ground (–) circuits. • Defective alternator. 90-860074--1 FEBRUARY 2002 EDI DIAGNOSIS SERVICE MANUAL NUMBER 22 Battery (Switched K15) Scan Code: P1605 Blink Code: 1232 Malfunction Indicator Lamp: ON/OFF 75343 CIRCUIT DESCRIPTION: Battery voltage is supplied to the ECM through several circuits. The ignition switch terminal 15 (sometimes called K15) is energized when the key is switched to the ON / RUN position. However, the ignition switch is not monitored by the ECM. Instead, evaluation of the unverified terminal 15 is carried out by the ECM. If the ECM detects 0 volt at CKT Pin 38 it sets the trouble code. DIAGNOSTIC HELP: Verify the following: • Open in CKT Pin 38 from ignition switch. • Improper terminals or pins at the electrical box terminal connectors or ECM. • Defective ignition switch. • Internal ECM system failure. Defective ECM. Recognition by the ECM of a defective battery switched terminal 15 influences engine performance as follows: • No loss of power. 90-860074--1 FEBRUARY 2002 Page 5E-43 EDI DIAGNOSIS SERVICE MANUAL NUMBER 22 Microcontroller Fault Scan Code: P1615 Blink Code: 1311 Malfunction Indicator Lamp: OFF 75343 CIRCUIT DESCRIPTION: As part of self-diagnosis the ECM is capable of determining if failures have occurred to circuits within the ECM. If defects exists the ECM sets this code. DIAGNOSTIC HELP: Verify the following: • Replace the ECM. Recognition by the ECM of Microprocessor Fault influences engine performance as follows: • Page 5E-44 No loss of power. 90-860074--1 FEBRUARY 2002 EDI DIAGNOSIS SERVICE MANUAL NUMBER 22 ECM Reference Voltage (u_ref - 2.5v) Scan Code: P161A Blink Code: 1234 Malfunction Indicator Lamp: OFF 75343 CIRCUIT DESCRIPTION: As part of self-diagnosis the ECM is capable of determining if failures have occurred to the reference voltage circuits within the ECM. If defects exists the ECM sets a Scan Code 161A. DIAGNOSTIC HELP: Verify the following: • Replace the ECM. Recognition by the ECM of a Reference Voltage fault influences engine performance as follows: • No loss of power. 90-860074--1 FEBRUARY 2002 Page 5E-45 EDI DIAGNOSIS SERVICE MANUAL NUMBER 22 Main Relay Scan Code: P1625 Blink Code: 1231 Malfunction Indicator Lamp: OFF ECM b f c e d WHT/RED RED 42 g 23 h 75342 a b c d e f g h - Electrical box - Battery 12 Volt To Circuit Breaker - Circuit Breaker - Main Relay - 11 Terminal ECM Harness Connector on Electrical Box - 11 Terminal Connector - Ground (–) CKT Pin 42 for Relay - 12 Volt Power Supply to ECM CIRCUIT DESCRIPTION: The Main Relay test monitors whether the power supply was shut off too early or too late and the condition of the Fuel Shut Off Valve function. If a signal change from Battery (Switched K15) occurs and the main relay was shut off before the ECM had given the shut off command (After-Run not completely finished), then there has been a control unit defect. Over the defect validity check. The defect “main relay switched-off too early” is reported during the next control unit initialization. If a signal change from Battery (Switched K15) occurs and the functions for after-run test has ended with a complete error storage then the main relay is shut off and monitored for a specified length of time. If the main relay is shut off before the programmed time elapses then the main relay is functioning correctly. If not, then the defect “main relay turned off too late” is reported after the ECM does a defect validity check. This test may only be carried out if no system error exists. DIAGNOSTIC HELP: Verify the following: • Replace the ECM. Recognition by the ECM of a Main Relay fault influences engine performance as follows: • Page 5E-46 No loss of power. 90-860074--1 FEBRUARY 2002 EDI DIAGNOSIS SERVICE MANUAL NUMBER 22 THIS PAGE IS INTENTIONALLY BLANK 90-860074--1 FEBRUARY 2002 Page 5E-47 EDI DIAGNOSIS SERVICE MANUAL NUMBER 22 Timing Actuator (Timing Solenoid Valve) Scan Code: P1630 Blink Code: 1214 Malfunction Indicator Lamp: OFF ECM a BLU b 12 c a b c d e 2 d 51 RED 68 e RED 45 e RED 23 e 1 75409 - Fuel Injection Pump - Timing Solenoid Valve - Harness Connector - Sensor Ground (–) - Battery Supply Voltage (1 of 3) CIRCUIT DESCRIPTION: Determining the proper fuel injection point (timing) depends on the quantity of fuel, engine rpm and coolant temperature. The ECM controls the timing using the signal from the number one instrumented injector and corrects the timing to the nominal timing rate. Timing is changed by modulating (adjusting) the pressure in the upper (high pressure) chamber to injector opening pressure at the correct instant (timing). Adjustment of pressure is carried out by an electric Timing Solenoid Valve which the ECM operates. The solenoid valve is closed if power (12 volts) is removed. With the valve fully closed (no voltage - pressure increases) start of injection is advanced. With the solenoid valve permanently opened (voltage present - pressure reduction) start of injection is retarded. In the intermediate range, the on/off ratio (the ratio of solenoid valve open to solenoid valve closed - sometimes referred to as duty cycle) can be infinitely varied by the ECM. Excess pressure is discharged into the lower chamber. A failure in the Timing Fault circuit should set a Scan Code P1630. CKT PIN Page 5E-48 NAME 51 Solenoid 68 Battery Supply Voltage 45 Battery Supply Voltage 23 Battery Supply Voltage 90-860074--1 FEBRUARY 2002 EDI DIAGNOSIS SERVICE MANUAL NUMBER 22 TEST DESCRIPTION Verify continuity between the following: ECM 68 PIN CONNECTOR 2 TERMINAL CONNECTOR 23 / 45 / 68 1 51 2 Verify the solenoid valves resistance between terminals 1 and 2 of the connector: RESISTANCE (Ohm) MINIMUM / MAXIMUM MEASUREMENT 15 ± 0.0 Verify supply voltage to solenoid valve terminal connector with the connector unplugged and key ON. Measure between terminal1 and engine ground (–): CURRENT (VOLTS) MINIMUM / MAXIMUM MEASUREMENT 12 Battery Voltage DIAGNOSTIC HELP: Verify the following: • Open or short in the CKT Pins 23 / 45 / 68 or CKT Pin 51. • Improper terminals or pins at the 2 terminal connector or ECM. • Defective fuel injection pump. • Defective ECM. Failure of the timing governing solenoid valve influences engine performance as follows: • FUEL QUANTITY ACTUATION: Maximum engine rpm is 80% of the normal operating range (35% of fuel quantity reduction). • The engine becomes noisy. 90-860074--1 FEBRUARY 2002 Page 5E-49 EDI DIAGNOSIS SERVICE MANUAL NUMBER 22 Glow Plug Main Relay (Glow Plug Relay Actuator), If Equipped Scan Code: 1635 Blink Code: No recognition by ECM. Malfunction Indicator Lamp: OFF BRN BRN f b BLU/YEL 30 RED/YEL b c ECM BLK RED/YEL 86 87 85 85 30 86 d 87 BLU/YEL BRN 50 BLK/YEL 3 RED BLU/BLK a e a b c d e f 75476 - Engine Main Relay - Circuit Breakers - Glow Plug Main Relay - Glow Plug Auxiliary Relay - Engine Harness Connector - To Glow Plugs CIRCUIT DESCRIPTION: The Glow Plug Main Relay (or Actuator) and the Glow Plug Auxiliary Relay are inside the electrical box of the engine. The ECM determines if, when and for how long a period the glow plug relays should be activated based on coolant temperature information from the ECT. This processing by the ECM is done before, during and after the engine is started. It is the relay that controls the large amount of amperes needed by the glow plugs. Concurrent with supplying power to half of the engines glow plugs this relay actuates the Glow Plug Auxiliary Relay which handles current to the remaining glow plugs. A failure in the Glow Plug Main Relay circuit should set a Scan Code P1635. CKT PIN Page 5E-50 NAME 50 ECM controlled Glow Plug Relay Ground (–) 3 ECM controlled Ground (–) for dash panel Glow Plug Lamp 90-860074--1 FEBRUARY 2002 EDI DIAGNOSIS SERVICE MANUAL NUMBER 22 TEST DESCRIPTION NOTE: The relay terminal numbers can be found on the bottom of the relay. Verify continuity between the following: ECM 68 PIN CONNECTOR GLOW PLUG RELAY CONNECTOR / TERMINAL NUMBER 50 85 Verify continuity between the following: ECM 68 PIN CONNECTOR INSTRUMENT PANEL TERMINAL 3 BLK/YEL Wire at glow plug indicator lamp on the Engine Monitor Panel Verify supply voltage from circuit breakers to relays with relay connector unplugged and key ON. Measure: CURRENT (VOLTS) GLOW PLUG RELAY CONNECTOR NUMBER 12 30 12 86 DIAGNOSTIC HELP: Verify the following: • Open or short in the CKT Pin 50, or CKT Pins 1. • Improper terminals or pins at the electrical box, relay connector or ECM. • Defective circuit breaker. • Defective Relay. • Defective ECM. Failure of a Glow Plug Relay influences engine performance as follows: • Difficult or no starting. • May have white smoke on start up. 90-860074--1 FEBRUARY 2002 Page 5E-51 EDI DIAGNOSIS SERVICE MANUAL NUMBER 22 Glow Plug Auxiliary Relay, If Equipped Scan Code: P1640 Blink Code: No recognition by ECM. Malfunction Indicator Lamp: OFF BRN c g 30 86 87 85 87 85 30 86 d b BLU/TAN RED ECM BLK b RED BLU/YEL BRN f BRN BLU/YEL BLU/BRN a 87 BLU/BLK 50 BLK/YEL 3 85 e 75476 a b c d e f g - Engine Main Relay - Circuit Breaker - Glow Plug Main Relay - Glow Plug Auxiliary Relay - Engine Harness Connector - 16 Terminal Instrument Harness Connector - To Glow Plug Lamp CIRCUIT DESCRIPTION: The Glow Plug Main Relay (or Actuator) and the Glow Plug Auxiliary Relay are inside the electrical box of the engine. The ECM determines if, when and for how long a period the glow plugs (relays) should be activated based on coolant temperature information from the ECT. This processing by the ECM is done before, during and after the engine is started. It is the relay that controls the large amount of amperes needed by the glow plugs. Concurrent with supplying power to half of the glow plugs the Glow Plug Relay Actuator relay activates the Glow Plug Auxiliary Relay. The Auxiliary Relay’s coil is energized closing a switch which thereby supplies current to the remaining glow plugs. The ECM closes a ground path circuit for the Glow Plug Lamp whenever the system is operating. A failure in the Glow Plug Auxiliary Relay circuit should set a Scan Code P1640. CKT PIN Page 5E-52 NAME 50 ECM controlled Glow Plug Relay Ground (–) 3 ECM controlled Ground (–) for dash panel Glow Plug Lamp 90-860074--1 FEBRUARY 2002 EDI DIAGNOSIS SERVICE MANUAL NUMBER 22 TEST DESCRIPTION NOTE: The relay terminal numbers can be found on the bottom of the relay. Verify continuity between the following with relay connectors unplugged and key OFF. Measure: GLOW PLUG RELAY CONNECTOR / TERMINAL NUMBER GLOW PLUG AUXILIARY RELAY CONNECTOR / TERMINAL NUMBER 87 86 Verify supply voltage from circuit breaker to Glow Plug Auxiliary Relay with relay connector unplugged and key ON. Measure: CURRENT (VOLTS) GLOW PLUG AUXILIARY RELAY CONNECTOR NUMBER 12 30 Verify supply voltage from Glow Plug Relay Actuator with relay connector unplugged and key ON. Measure: CURRENT (VOLTS) GLOW PLUG AUXILIARY RELAY CONNECTOR NUMBER 12 86 DIAGNOSTIC HELP: Verify the following: • Open or short in wiring between glow plug relays. • Improper terminals or pins at the electrical box, relay connectors or ECM. • Defective circuit breaker. • Defective Glow Plug Relay Actuator and/or Glow Plug Auxiliary Relay. • Defective ECM. Failure of the Glow Plug Auxiliary Relay influences engine performance as follows: • Difficult or no starting. • May have white smoke on start up. 90-860074--1 FEBRUARY 2002 Page 5E-53 EDI DIAGNOSIS SERVICE MANUAL NUMBER 22 Glow Plug Lamp (Glow Plug Display) MODELS WITH EARLY (16 PIN) CONNECTOR NOTE: Functional only if the engine is equipped with a Glow Plug System. Scan Code: P1645 Blink Code: 1411 Malfunction Indicator Lamp: OFF e d a 75305 ECM BLK/YEL BLK/YEL b c BLK/YEL 3 75476 a b c d e f - Electrical Box - Pin 6 of Instrumentation Harness 16 Pin Connector - Pin 6 of ECM 11 Pin Harness Connector - Glow Plug Lamp - Instrument Panel - ECM Supplied Ground Circuit CIRCUIT DESCRIPTION: The Glow Plug Lamp (wait-to-start) is controlled by the ECM. The lamp is supplied 12 volts with the key in the ON/RUN position. A ground (–) path is closed when the ECM is operating the relays for the glow plugs and the lamp is illuminated. CKT PIN 3 Page 5E-54 NAME ECM controlled Ground (–) for dash panel Glow Plug Lamp 90-860074--1 FEBRUARY 2002 EDI DIAGNOSIS SERVICE MANUAL NUMBER 22 TEST DESCRIPTION Verify continuity between the following: ECM 68 PIN CONNECTOR GLOW PLUG BULB SOCKET WIRE AT DASH PANEL 3 BLK/YEL Verify supply voltage from key switch terminal 15 with key ON. Measure: CURRENT (VOLTS) GLOW PLUG BULB SOCKET WIRE AT DASH PANEL 12 PNK DIAGNOSTIC HELP: Verify the following: • Open or short in wiring between instrument panel and ECM. • Improper terminals or pins at the electrical box harness connectors or ECM. • Defective bulb. • Defective bulb socket. • Defective ECM. Failure of the Glow Plug Lamp circuit does not influence engine performance. 90-860074--1 FEBRUARY 2002 Page 5E-55 EDI DIAGNOSIS SERVICE MANUAL NUMBER 22 Glow Plug Lamp (Glow Plug Display) MODELS WITH LATE (21 PIN) CONNECTOR NOTE: Functional only if the engine is equipped with a Glow Plug System. Scan Code: P1645 Blink Code: 1411 Malfunction Indicator Lamp: OFF 1 a 2 3 PPL/YEL BLK ORN K ORN PPL d b e RED BLK GRY PPL TAN 75305 BLU/TAN BRN ECM RED YEL BLU/TAN YEL/RED PPL BLU/BLK PPL/YEL BLK 6 GRN RED c RED BLK BLK/YEL RED 3 f 75476 a b c d e f - Electrical Box - Pin K of Instrumentation Harness 21 Pin Connector - Pin 6 of ECM 12 Pin Harness Connector - Glow Plug Lamp - Instrument Panel - ECM Supplied Ground Circuit CIRCUIT DESCRIPTION: The Glow Plug Lamp is controlled by the ECM. The lamp is supplied 12 volts with the key in the ON/RUN position. A ground (–) path is closed when the ECM is operating the relays for the glow plugs and the lamp is illuminated. CKT PIN 3 Page 5E-56 NAME ECM controlled Ground (–) for dash panel Glow Plug Lamp 90-860074--1 FEBRUARY 2002 EDI DIAGNOSIS SERVICE MANUAL NUMBER 22 TEST DESCRIPTION Verify continuity between the following: ECM 68 PIN CONNECTOR GLOW PLUG BULB SOCKET WIRE AT DASH PANEL 3 BLU/TAN Verify supply voltage from key switch terminal 15 with key ON. Measure: CURRENT (VOLTS) GLOW PLUG BULB SOCKET WIRE AT DASH PANEL 12 PUR DIAGNOSTIC HELP: Verify the following: • Open or short in wiring between instrument panel and ECM. • Improper terminals or pins at the electrical box harness connectors or ECM. • Defective bulb. • Defective bulb socket. • Defective ECM. Failure of the Glow Plug Lamp circuit does not influence engine performance. 90-860074--1 FEBRUARY 2002 Page 5E-57 EDI DIAGNOSIS SERVICE MANUAL NUMBER 22 MIL [Malfunction Indicator Lamp (Diagnostic Lamp)] MODELS WITH EARLY (16 PIN) CONNECTOR Scan Code: P1650 Blink Code: 1242 Malfunction Indicator Lamp: OFF e d a 75305 BRN/WHT BRN/WHT ECM b c 26 BRN/WHT 75476 a b c d e f - Electrical Box - Pin 2 of Instrumentation Harness 16 Pin Connector - Pin 2 of ECM 11 Pin Harness Connector - MIL - Instrument Panel - ECM Supplied Ground Circuit CIRCUIT DESCRIPTION: The MIL (Malfunction Indicator Lamp) is controlled by the ECM. The lamp is supplied 12 volts with the key in the ON/RUN position. A ground (–) path is closed when the ECM determines that a malfunction (trouble code) has occurred. The lamp is illuminated. CKT PIN 26 Page 5E-58 NAME ECM controlled Ground (–) for dash panel MIL 90-860074--1 FEBRUARY 2002 EDI DIAGNOSIS SERVICE MANUAL NUMBER 22 TEST DESCRIPTION Verify continuity between the following: ECM 68 PIN CONNECTOR GLOW PLUG BULB SOCKET WIRE AT DASH PANEL 26 BRN/WHT Verify supply voltage from key switch terminal 15 with key ON. Measure: CURRENT (VOLTS) GLOW PLUG BULB SOCKET WIRE AT DASH PANEL 12 PNK DIAGNOSTIC HELP: Verify the following: • Open or short in wiring between instrument panel and ECM. • Improper terminals or pins at the electrical box harness connectors or ECM. • Defective bulb. • Defective bulb socket. • Defective ECM. Failure of the MIL circuit does not influence engine performance. 90-860074--1 FEBRUARY 2002 Page 5E-59 EDI DIAGNOSIS SERVICE MANUAL NUMBER 22 MIL [Malfunction Indicator Lamp (Diagnostic Lamp)] MODELS WITH LATE (21 PIN) CONNECTOR Scan Code: P1650 Blink Code: 1242 Malfunction Indicator Lamp: OFF 1 a 2 3 PPL/YEL M b BLK ORN d ORN PPL e RED BLK GRY PPL TAN 75305 YEL BRN ECM RED YEL 2 BLU/TAN YEL/RED PPL BLU/BLK PPL/YEL c GRN RED BLK RED BLK BRN/WHT 26 f RED 75476 a b c d e f - Electrical Box - Pin M of Instrumentation Harness 21 Pin Connector - Pin 2 of ECM 12 Pin Harness Connector - MIL - Instrument Panel - ECM Supplied Ground Circuit CIRCUIT DESCRIPTION: The MIL (Malfunction Indicator Lamp) is controlled by the ECM. The lamp is supplied 12 volts with the key in the ON/RUN position. A ground (–) path is closed when the ECM determines that a malfunction (trouble code) has occurred. The lamp is illuminated. CKT PIN 26 Page 5E-60 NAME ECM controlled Ground (–) for dash panel MIL 90-860074--1 FEBRUARY 2002 EDI DIAGNOSIS SERVICE MANUAL NUMBER 22 TEST DESCRIPTION Verify continuity between the following: ECM 68 PIN CONNECTOR GLOW PLUG BULB SOCKET WIRE AT DASH PANEL 26 BRN/WHT Verify supply voltage from key switch terminal 15 with key ON. Measure: CURRENT (VOLTS) GLOW PLUG BULB SOCKET WIRE AT DASH PANEL 12 PUR DIAGNOSTIC HELP: Verify the following: • Open or short in wiring between instrument panel and ECM. • Improper terminals or pins at the electrical box harness connectors or ECM. • Defective bulb. • Defective bulb socket. • Defective ECM. Failure of the MIL circuit does not influence engine performance. 90-860074--1 FEBRUARY 2002 Page 5E-61 EDI DIAGNOSIS SERVICE MANUAL NUMBER 22 Fuel Shut Off Valve [EAB (Electrical Shut Off)] Scan Code: P1660 Blink Code: 1221 Malfunction Indicator Lamp: ON ECM b a YEL 53 c 75409 a - Fuel Injection Pump b - Fuel Shut Off Valve c - ECM Controlled12 Volt Power Supply CIRCUIT DESCRIPTION: As a safety feature the engine is equipped with a Fuel Shut Off Valve (Electrical Shut Off). This valve is a redundant method of stopping the engine. In case of a defect in a part or parts of the EDI system, which would prevent the engine from stopping, the ECM can energize this valve to positively stop the flow of fuel. This valve is similar as on the previous Indirect Injection systems but is controlled by the ECM. A 12 volt current is supplied to CKT Pin 53 which energizes the valve and stops the flow of fuel to the injectors when required. A failure in the Fuel Shut Off Valve circuit should set a Scan Code P1660. NAME CKT PIN 53 Page 5E-62 Fuel Shut Off Valve 90-860074--1 FEBRUARY 2002 EDI DIAGNOSIS SERVICE MANUAL NUMBER 22 TEST DESCRIPTION Verify continuity between the following: ECM 68 PIN CONNECTOR DEVICE TERMINAL 53 Electrical Fuel Shut Off Verify supply voltage to fuel shut off valve terminal with the wire disconnected and key ON. Measure between the wire and the engine ground (–). Current should be present for the first 25 seconds only, and then cease, unless there is a failure. CURRENT (VOLTS) MINIMUM / MAXIMUM MEASUREMENT 12 Battery Voltage Verify the resistance between the terminal on the valve and ground (–): RESISTANCE (Ohm) MINIMUM / MAXIMUM MEASUREMENT 7.5 ± 0.5 DIAGNOSTIC HELP: Verify the following: • Open or short in the CKT Pin 53. • Improper terminals or pins at the device connection or ECM. • Defective fuel shut off valve. • Defective ECM. Failure of the fuel shut off valve or circuit influences engine performance as follows: • If the valve failed previously the engine will not start. • If there is a plausibility error, the engine may start but the ECM controls FUEL QUANTITY ACTUATION: Maximum engine rpm is 80% of the normal operating range. • If there was a previous failure in the Fuel Shut Off Valve circuit but it is no longer defective, or the defect memory has not been erased (error still in memory), the maximum engine rpm will be 80% of the normal operating range. Erase the defect from memory and retest. 90-860074--1 FEBRUARY 2002 Page 5E-63 EDI DIAGNOSIS SERVICE MANUAL NUMBER 22 EEPROM Fault (EEPROM and Configuration) Scan Code: P1680 Blink Code: 1313 Malfunction Indicator Lamp: OFF 75336 a - ECM (Engine Control Module) CIRCUIT DESCRIPTION The EEPROM Fault code may appear as a result of a calibration failure in the ECM. At startup the defect memory is read out from the EEPROM and interpreted. Thus a determination is made concerning how many entries are filed in the defect memory. Failures may include detected checksum errors, internal ECM communication errors, and even incorrect numbers stored in the EEPROM. A failure in the EEPROM circuits should set a Scan Code P1680. DIAGNOSTIC AIDS: An intermittent Code P1680 may be caused by a bad cell in the EEPROM that is sensitive to temperature changes. If the EEPROM failed more than once, but is intermittent, replace ECM. An intermittent problem may be caused by a poor or corroded connection, rubbed through wire connection, a wire that is broken inside the insulation, or a corroded wire. Any circuitry that is suspected as causing the intermittent complaint should be thoroughly checked for backed-out terminals, improper mating, broken locks, improperly formed or damaged terminals, poor terminal-to-wiring connections, corroded terminals and/or wiring, or physical damage to the wiring harness. After repairs, clear codes following “Clearing Codes” in “ECM Self-Diagnostics.” Failure to do so may result in codes not properly being cleared. Page 5E-64 90-860074--1 FEBRUARY 2002 EDI DIAGNOSIS SERVICE MANUAL NUMBER 22 THIS PAGE IS INTENTIONALLY BLANK 90-860074--1 FEBRUARY 2002 Page 5E-65 EDI DIAGNOSIS SERVICE MANUAL NUMBER 22 RPM Signal From Injector (Secondary Engine Speed Sensor) Scan Code: P1725 Blink Code: 3332 Malfunction Indicator Lamp: ON a 12 b 2 e ECM 1 BRN 11 d WHT 12 c 75339 a b c d e - Instrumented Injector (Needle Movement Sensor) - Harness Connector - Sensor ECM Signal - Sensor Ground (–) - Symbol for Shield Cable CIRCUIT DESCRIPTION: A secondary engine speed sensor signal called rpm Signal From Injector, is supplied to the ECM by way of the Instrumented Injector in the Number 1 Cylinder. When functioning for the ECM circuitry as the Secondary Speed Sensor, a failure in this circuit will set a Scan Code P1725. Display of this code indicates a failure in the sensor circuit, so proper diagnosis will lead to either repairing a wiring problem or replacing the sensor. CKT PIN Page 5E-66 NAME 11 Sensor Ground (–) 12 Instrumented Injector Sensor Signal 90-860074--1 FEBRUARY 2002 EDI DIAGNOSIS SERVICE MANUAL NUMBER 22 TEST DESCRIPTION Verify continuity between the following: ECM 68 PIN CONNECTOR 2 TERMINAL CONNECTOR 11 2 (is shield wire, also) 12 1 Verify the sensor resistance between terminals 1 and 2 of the sensor: RESISTANCE (Ohm) MINIMUM - MAXIMUM MEASUREMENT 100 90 - 110 DIAGNOSTIC HELP: Verify the following: • Open or short in the CKT Pin 11 or CKT Pin 12. • Defective sensor. • Defective ECM. • It is possible to have this failure when the two terminals in the Instrumented Injector connector are reversed. Failure of the rpm Signal From Injector influences engine performance as follows: • FUEL QUANTITY ACTUATION: Maximum engine rpm is 80% of the normal operating range (35% of fuel quantity reduction). • TIMING ADVANCE: Timing actuation is in open loop which means the engine may be slightly noisier. IMPORTANT: Torque the Instrumented Injector to specification when replacing. 90-860074--1 FEBRUARY 2002 Page 5E-67 EDI DIAGNOSIS SERVICE MANUAL NUMBER 22 Troubleshooting For EDI Systems Trouble Codes Code Number Page 5E-68 Code Description Scan Code Number Blink Code Number P0105 2222 MAP Sensor P0115 1113 ECT Sensor P0180 3333 Fuel Temp. Sensor P0725 1131 RPM Sensor P1105 1121 BARO Sensor P1110 1112 IAT Sensor P1201 1132 Instrumented Injector P1220 1223 Fuel Quantity Actuator P1225 1222 Fuel Quantity Sensor P1230 1321 Timing Fault P1515 1144 TP Sensor / Low Idle Switch P1600 1233 Battery Voltage P1605 1232 Battery (Switched K15) P1615 1311 Microcontroller Fault P161A 1234 ECM Reference Voltage P1625 1231 Main Relay P1635 None Glow Plug Main Relay, If Equipped P1640 None Glow Plug Auxiliary Relay, If Equipped P1645 None Glow Plug Lamp P1650 1242 MIL (Malfunction Indicator Lamp) P1660 1221 Fuel Shut Off Valve P1680 1313 EEPROM Fault P1725 3332 RPM Signal From Injector 90-860074--1 FEBRUARY 2002 EDI DIAGNOSIS SERVICE MANUAL NUMBER 22 Display Terminology In addition to displaying trouble codes and their description, the Scan Tool is capable of supplying Extended Information. This information is designed to assist the technician in more readily resolving the cause of a listed Trouble Code. Refer to “Diagnostic Circuit Check” information and procedures. Although not all displayed information needs further explanation (e.g., short circuit or open circuit) other less obvious terms used in the Extended Information display are explained as follows: Related to Scan Tool Code Displayed Extended Information As Shown On Scan Tool Explanation / Possible Cause P0105, P1515 PICK-UP SRC LOW EXCEEDED Check for open circuit in signal from ECM. P0105, P1515 PICK-UP SRC HIGH EXCEEDED Check for short circuit in signal from ECM. P0105, P1515 SUPPLY SRC LOW EXCEEDED Check for open circuit. P0105, P1515 SUPPLY SRC HIGH EXCEEDED Check for short circuit. P0105, P1515 PLAUSIBILITY WITH LDF/ADF The difference between the MAP and BARO sensor signals has exceeded a programmed amount. Check MAP and BARO circuits. P0115 OPERATING TEMPERATURE NOT ATTAINED P0725, P1725 OVERSPEED RECOGNITION 90-860074--1 FEBRUARY 2002 The engine did not reach operating temperature within a prescribed period of time. Check thermostats, or check the ECT sensor and circuit. The rpm sensor or instrumented injector has detected engine revolutions in excess of a predetermined amount given all conditions. Unlikely to occur in a Marine application, unless related to propeller or drive failure. Page 5E-69 EDI DIAGNOSIS SERVICE MANUAL NUMBER 22 Display Terminology (Continued) Related to Scan Tool Code Explanation / Possible Cause PLAUSIBILITY WITH LDF Problem most likely to be found in MAP circuit. Example: boost pressure equals atmospheric pressure but rpms are high.) Check wiring. P0725, P1725 DYNAMIC PLAUSIBILITY The rpm sensor or instrumented injector have indicated a fault while the engine was operating (that is, over a period of time). P0725, P1725 STATIC PLAUSIBILITY This fault occurs when the instrumented injector signal (speed) is more than a specified amount but the rpm sensor is less than a specific amount. Check both circuits. P0725 P1220 P1220 Page 5E-70 Displayed Extended Information As Shown On Scan Tool PERSISTENT NEGATIVE GOVERNOR DEVIATION (WARM) When the engine is warm and the monitored fuel quantity is greater at a preset engine speed than the real position of the fuel quantity actuator. Check wiring first. If connections are OK, the pump itself should be replaced. PERSISTENT POSITIVE GOVERNOR DEVIATION (WARM) When the engine is warm and the monitored fuel quantity is less at a preset engine speed than the real position of the fuel quantity actuator. Check wiring first. If connections are OK, the pump itself should be replaced. 90-860074--1 FEBRUARY 2002 EDI DIAGNOSIS SERVICE MANUAL NUMBER 22 Display Terminology (Continued) Related to Scan Tool Code P1220 P1220 P1225 P1225 90-860074--1 FEBRUARY 2002 Displayed Extended Information As Shown On Scan Tool Explanation / Possible Cause PERSISTENT NEGATIVE GOVERNOR DEVIATION (COLD) When the engine is cold and the monitored fuel quantity is greater at a preset engine speed than the real position of the fuel quantity actuator. Check wiring first. If connections are OK, the pump itself should be replaced. PERSISTENT POSITIVE GOVERNOR DEVIATION (COLD) When the engine is cold and the monitored fuel quantity is less at a preset engine speed than the real position of the fuel quantity actuator. Check wiring first. If connections are OK, the pump itself should be replaced. START POSITION NOT ATTAINED The fuel quantity sensor has indicated to the ECM that the fuel quantity actuator was not at the set point value during an ECM controlled start position test. Check wiring first. If connections are OK, the pump itself should be replaced. STOP POSITION NOT ATTAINED The fuel quantity sensor has indicated to the ECM that the fuel quantity actuator was not at the set point value during an ECM controlled stop position test. Check wiring first. If connections are OK, the pump itself should be replaced. Page 5E-71 EDI DIAGNOSIS SERVICE MANUAL NUMBER 22 Display Terminology (Continued) Related to Scan Tool Code Displayed Extended Information As Shown On Scan Tool Explanation / Possible Cause POSITIVE GOVERNOR DEVIATION Control of injection timing is occurring at a greater frequency than the programmed control values. Check the instrumented injector circuit and injection pump. NEGATIVE GOVERNOR DEVIATION Control of injection timing is occurring at a lesser frequency than the programmed control values. Check the instrumented injector circuit and injection pump. P1515 PWG PLAUSIBILITY WITH LGS A fault has been indicated in the TP sensor, most likely in the low idle switch circuit. Check these circuits. P1515 PWG PLAUSIBILITY WITH POTENTIOMETER A fault has been indicated in the TP sensor, most likely in the TP sensor circuit. Check these circuits. P1515 PWG PLAUSIBILITY WITH BRE Not applicable to marine EDI. Should not appear during testing. PWG PLAUSIBILITY GENERAL A fault has been indicated between the TP sensor and/or low idle switch signals. Check these circuits. PLAUSIBILITY AFTER START-UP A fault has been indicated in the key switched12 volt power supply (terminal 15). Check battery connections, key switch and/or wiring to and from the switch. P1230 P1230 P1515 P1605 Page 5E-72 90-860074--1 FEBRUARY 2002 EDI DIAGNOSIS SERVICE MANUAL NUMBER 22 Display Terminology (Continued) Related to Scan Tool Code Displayed Extended Information As Shown On Scan Tool P1615 RECOVERY HAS OCCURRED P1615 PREPARE ACTUATOR FOR GATE ARRAY FUEL QUANTITY STOP P1615 REDUNDANT OVERRUN MONITORING P1615 GATE ARRAY FUEL QUANTITY STOP P1615 GATE ARRAY MONITORING P1615 GATE ARRAY REPROGRAMMING Explanation / Possible Cause Clear the code(s) and start the engine. If the same fault occurs at each start, replace the ECM. SHUTS OFF TOO EARLY The main relay shut off BEFORE the ECM gave the shut off command. Replace the ECM. P1625 SHUTS OFF TOO LATE The main relay shut off AFTER the ECM gave the shut off command. Replace the ECM. P1635 GENERAL PLAUSIBILITY ERROR Not recognized by Marine ECM application. P1660 POWER STAGE DEFECT P1660 PLAUSIBILITY IN AFTER-RUN P1680 CHECKSUM ERROR IN CC212 VALUE A problem in the ECM converting fuel quantity sensor signal. An internal ECM problem. Replace the ECM. P1680 CHECKSUM ERROR An internal ECM problem. Replace the ECM. P1680 COMMUNICATION ERROR An internal ECM problem. Replace the ECM. P1680 WRONG EPROM NUMBER An internal ECM problem. Replace the ECM. P1680 WRONG CODE NUMBER An internal ECM problem. Replace the ECM. P1625 90-860074--1 FEBRUARY 2002 An error was saved at ignition OFF when the shut off valve circuit was tested. Check the circuit and valve. Page 5E-73 EDI DIAGNOSIS SERVICE MANUAL NUMBER 22 Troubleshooting Charts IMPORTANT PRELIMINARY CHECKS BEFORE USING THIS SECTION Before using this section you should have determined that: 1. The ECM is operating correctly. 2. There are no diagnostic trouble codes (DTC) stored. SYMPTOM Verify the customer complaint, and locate the correct symptom. Check the items indicated under that symptom. VISUAL/PHYSICAL CHECK Several of the symptom procedures call for a careful visual/physical check. The importance of this step cannot be stressed too strongly. It can lead to correcting a problem without further checks and can save valuable time. These checks should include: 1. ECM grounds and sensors for being clean, tight and in their proper locations. 2. Fuel lines or hoses for splits, kinks, and proper connections. Check thoroughly for any type of leak or restriction. 3. Air leaks at intake manifold sealing surfaces. 4. Wiring for proper connections, pinches and cuts. 5. Salt corrosion on electrical connections. 6. Ensure engine is in good mechanical condition. Page 5E-74 90-860074--1 FEBRUARY 2002 EDI DIAGNOSIS SERVICE MANUAL NUMBER 22 Troubleshooting Charts (Continued) INTERMITTENTS Definition: Problem occurs randomly. May or may not store a Diagnostic Trouble Code (DTC). Do NOT use the diagnostic trouble code charts for intermittent problems, unless instructed to do so. If a fault is intermittent, incorrect use of diagnostic trouble code charts may result in replacement of good parts. Most intermittent problems are caused by faulty electrical connections or wiring. Perform careful check of suspected circuits for: 1. Poor mating of the connector halves or terminals not fully seated in the connector body (loose). 2. Improperly formed or damaged terminals and or connectors. All connector terminals and connectors in problem circuit should be carefully reformed or replaced to insure proper contact tension. 3. Poor terminal to wire connection (crimping). An intermittent may be caused by: 1. Electrical system interference caused by a sharp electrical surge. Normally, the problem will occur when the faulty component is operated. 2. Improper installation of electrical options, such as lights, ship to shore radios, sonar, etc. 3. Improperly routed wires. Wires should be routed AWAY from charging system components. 4. Arching at part of internal circuitry shorted to ground such as in starters, relays and alternators. If a visual/physical check does not find the cause of the problem, the EDI system can be tested with a voltmeter or a scan tool connected while observing the suspected circuit. An abnormal reading, when the problem occurs, indicates the problem may be in that circuit. 90-860074--1 FEBRUARY 2002 Page 5E-75 EDI DIAGNOSIS SERVICE MANUAL NUMBER 22 Troubleshooting Charts (Continued) CONDITION POSSIBLE CAUSES 1. Starting motor operating, but not cranking the engine. 2. Crankshaft rotation restricted. 3. Starting circuit connections loose or corroded. 4. Neutral safety switch or starter relay inoperative. 5. Battery charge low. ENGINE WILL NOT CRANK OR 6. No voltage to starter CRANKS solenoid. SLOWLY 7. Solenoid or starter motor inoperative. CORRECTION 1. Remove the starter motor. Check for broken flywheel teeth or a broken starting motor spring. 2. Rotate the engine to check for rotational resistance. 3. Clean and tighten connections. Reapply Liquid Neoprene, when required. 4. Check starter relay supply voltage and proper operation of neutral safety switch (if equipped). Replace defective parts. 5. Check battery voltage. Replace battery if a charge cannot be held. 6. Check voltage to solenoid. If necessary, replace the solenoid. 7. Replace starter motor. Page 5E-76 90-860074--1 FEBRUARY 2002 EDI DIAGNOSIS SERVICE MANUAL NUMBER 22 Troubleshooting Charts (Continued) CONDITION POSSIBLE CAUSES 1. No fuel in supply tank. 1. kit fuel supply. 2. Fuel Shut Off Valve not operating. 2. Check for loose wires and verify that the fuel shutdown solenoid and fuel shutdown solenoid relay is functioning. 3. Air intake or exhaust plugged. 4. Fuel filter plugged. 5. Excessive fuel inlet restriction. ENGINE CRANKS BUT WILL NOT START NO SMOKE CORRECTION 6. Injection pump not getting fuel or fuel is aerated. 7. One or more injectors worn or not operating properly. 8. Worn or inoperative injection pump. 9. Camshaft out of time. 3. Remove the obstruction. 4. Drain fuel/water separator and replace fuel filter. 5. Check fuel inlet restriction. Correct cause. 6. Check fuel flow/bleed fuel system. 7. Check/replace bad or improperly operating injectors. 8. Visually check delivery with externally connected injector to one of the pump outlets. Repair or replace as needed after testing, if fuel is not being delivered. 9. Check/correct gear train timing alignment. 90-860074--1 FEBRUARY 2002 Page 5E-77 EDI DIAGNOSIS SERVICE MANUAL NUMBER 22 Troubleshooting Charts (Continued) CONDITION POSSIBLE CAUSES CORRECTION 1. Incorrect starting procedure. 2. 3. 4. 5. 6. ENGINE HARD TO START, OR WILL NOT START, SMOKE FROM EXHAUST. 7. 1. The fuel shutoff solenoid control must be in the run Cranking speed too slow. position. Ensure proper Glow Plug Actuating Relay or procedure is being used. Auxiliary Relay defective. 2. (A) Verify that the drive / One or more glow plugs transmission is not engaged. defective. (B) Check the battery, Insufficient intake air. starting motor and look for Air in fuel system or the fuel loose or corroded wiring supply is inadequate. connections. TP Sensor and/or Throttle 3. Scan / Verify system is cable loose or damaged. working. Repair / replace inoperative parts. 4. Verify glow plugs / system is working. Repair/replace inoperative parts. 5. Inspect or replace filter and check for obstruction to the air supply. 6. Check the flow through the filter and bleed the system. Locate and eliminate the air source. 7. Scan / Visually inspect the TP Sensor, throttle cable and mounting. Adjust/replace. Page 5E-78 90-860074--1 FEBRUARY 2002 EDI DIAGNOSIS SERVICE MANUAL NUMBER 22 Troubleshooting Charts (Continued) CONDITION POSSIBLE CAUSES 1. Contaminated fuel. 2. Fuel screen plugged. 3. One or more injectors worn or not operating properly. ENGINE HARD TO START, OR WILL NOT START, SMOKE FROM EXHAUST. 4. Malfunctioning, worn or inoperative injection pump. 5. Injection pump out of time or Timing Fault. 6. Engine compression low. CORRECTION 1. Verify by operating the engine with clean fuel from a temporary tank. Check for presence of gasoline. Drain and flush fuel supply tank. Replace fuel/water separator filter. 2. Check fuel screen. 3. Check/replace improperly operating injectors. 4. Scan / Repair / Replace components as needed. 5. Scan/Check/Time the pump. 6. Check compression to identify the problem. 1. If engine is cold, glow plug 1. Refer to troubleshooting for relay on glow plug(s) cylinder head heater plugs defective. (see Group, Fuel System). ROUGH IDLE (IRREGULARLY FIRING OR ENGINE SHAKING) 2. Idle speed / fuel quantity too 2. Adjust idle speed. low for the accessories. 3. Repair or replace mounts. 3. Engine mounts damaged or 4. Correct leaks in the high lose. pressure lines, fittings or 4. High pressure fuel leaks. delivery valves. 5. Air in the fuel system. 5. Bleed the fuel system and eliminate the source of the air. 6. Sticking needle valve in an injector. 6. Check and replace the injector with the sticking needle valve. 90-860074--1 FEBRUARY 2002 Page 5E-79 EDI DIAGNOSIS SERVICE MANUAL NUMBER 22 Troubleshooting Charts (Continued) CONDITION POSSIBLE CAUSES CORRECTION 1. Fuel injection lines leaking. 2. 3. 4. 5. 1. Correct leaks in the high pressure lines, fittings, Air in the fuel or the fuel supply injectors sealing washers or is inadequate. delivery valves. Contaminated fuel. 2. Check the flow through the Incorrect valve operation. filter and bleed the system. Locate and eliminate the air Injection pump timing source. incorrect. operating 3. Verify by operating the engine with clean fuel from a temporary supply tank. Check 7. Defective injection pump (fuel for presence of gasoline. quantity or solenoid valve). Replace fuel/water separator filter. 8. Camshaft out of time. 9. Damaged camshaft or 4. Check for a bent push rod or damaged roller lifter. Replace tappets. parts if necessary. 10. Automatic timing advance not 5. Check/time pump (refer to operating. Grouped Fuel System). 6. Improperly injectors. ENGINE OPERATES ROUGH 6. Replace inoperative injectors. 7. Scan, repair or injection pump. 8. Check/correct gear timing alignment. replace train 9. Inspect camshaft valve lift. Replace camshaft and tappets. 10. Check injection pump and instrumented injector at number 1 cylinder. Page 5E-80 90-860074--1 FEBRUARY 2002 EDI DIAGNOSIS SERVICE MANUAL NUMBER 22 Troubleshooting Charts (Continued) CONDITION POSSIBLE CAUSES CORRECTION 1. Glow plug relay(s) defective. 2. 3. 4. 5. 6. ENGINE STARTS, BUT 7. WILL NOT KEEP OPERATING 1. Verify system is working. Repair/replace inoperative One or more glow plugs parts. defective. 2. Verify system is working. Idle speed / fuel quantity too Repair/replace inoperative low for the accessories. parts. Intake air or exhaust system 3. Adjust the idle speed. restricted. 4. Visually check for exhaust Air in the fuel system, or the restriction and inspect the air fuel supply is inadequate. intake. Repair/replace Fuel waxing due to extremely restricting parts. cold weather. 5. Check flow through the filter Contaminated fuel. and bleed the system. Locate and eliminate the source. 6. Verify by inspecting the fuel filter. Clean the system and use climatized fuel. Replace fuel/water separator filter. Check fuel heater for properly operate if equipped. 7. Verify by operating the engine with clean fuel from a temporary supply to check for presence of gasoline. Replace fuel/water separator filter. 90-860074--1 FEBRUARY 2002 Page 5E-81 EDI DIAGNOSIS SERVICE MANUAL NUMBER 22 Troubleshooting Charts (Continued) CONDITION SURGING (SPEED CHANGE) POSSIBLE CAUSES CORRECTION 1. If the condition occurs at idle, 1. Adjust the idle speed. the idle speed is set too low for 2. Inspect/correct leaks in the the accessories. high pressure fines. Fittings 2. High pressure fuel leak. and delivery valve sealing washers. 3. One or more injectors worn or not operating properly. 3. Check/replace the inoperative injector 4. Improperly operating injection - pumps 4. Replace the injector pump. 1. Engine overload. 1. Verify high idle speed without load. Investigate operation to 2. Improperly operating ensure correct gear is being tachometer. used. 3. Throttle linkage worn or 2. Verify engine speed with hand incorrectly adjusted. tachometer, correct as 4. Inadequate fuel supply. required. 5. Air/fuel controls leak. ENGINE RPM WILL NOT REACH RATED SPEED 3. Adjust linkage for stop to stop fuel control lever travel. 6. Improperly operating injection Replace linkage if necessary. pump. 7. Incorrect ECM part number 4. Check the fuel flow through the system to locate the reason for inadequate fuel supply, correct as required. 5. Check and repair leak. Check AFC tubing for obstruction. 6. Repair or replace injection pump. 7. Ensure ECM part number is correct for your model; some derated ECMs are for dual installations in emission regulated countries Page 5E-82 90-860074--1 FEBRUARY 2002 EDI DIAGNOSIS SERVICE MANUAL NUMBER 22 Troubleshooting Charts (Continued) CONDITION POSSIBLE CAUSES CORRECTION 1. Throttle cable not moving to full throttle. 1. Check/correct for stop-to-stop travel. 2. High oil level. 2. Check/correct oil level. 3. Engine overloaded. 3. Check for added loading from accessories or driven units, brakes dragging and other changes in vehicle loading. Repair/replace as needed. 4. Slow throttle response caused by leaking or obstructed air control tube or improperly operating injection pump. 4. Check for leaks and obstructions. Tighter the 6. Inadequate fuel supply. Air in fittings. Repair or replace the the fuel. pump, if Scan/Check determines pump is not 7. Excessive exhaust functioning. restriction. 5. Inadequate intake air flow. 8. High fuel temperature. LOW POWER 9. Poor quality fuel or fuel contaminated with gasoline. 5. Inspect/replace air cleaner element. Look for other restrictions. 6. Check the flow through the filter to locate the source of the restriction. Check fuel pressure and inlet restriction. 7. Check/correct the restriction in the exhaust system. 8. Verify that fuel heater, if equipped is off when engine is warm. Check for restricted fuel return lines. Repair/replace as needed. 9. Verify by operating from a temporary tank with good fuel. Check for presence of gasoline. Replace fuel/water separator filter. 90-860074--1 FEBRUARY 2002 Page 5E-83 EDI DIAGNOSIS SERVICE MANUAL NUMBER 22 Troubleshooting Charts (Continued) CONDITION POSSIBLE CAUSES 1. Air leak between the turbocharger and the intercooler. 2. Exhaust leak at the manifold or turbocharger. 1. Check/correct leaks in hoses, gaskets, intercooler and around mounting capscrews or through holes in the cooler end covers. 4. Wastegate operation. 2. Check/correct leaks in the manifold or turbocharger gaskets. If manifold is cracked, replace manifold. 5. Valve not operating 3. Inspect/replace turbocharger. 3. Improperly operating turbocharger. LOW POWER (continued) CORRECTION 6. Worn or improperly operating 4. injectors. 5. 7. Incorrect injection pump timing. 8. Improperly operating injection pump. Check wastegate operation. Check for bent push rod,faulty hydraulic lifter, replace if necessary. 6. Check/replace injectors. 7. Scan/Verify injection pump timing. 8. Repair or replace injection pump. Page 5E-84 90-860074--1 FEBRUARY 2002 EDI DIAGNOSIS SERVICE MANUAL NUMBER 22 Troubleshooting Charts (Continued) CONDITION POSSIBLE CAUSES CORRECTION 1. Engine operating too cold 1. Refer to troubleshooting for (white smoke). coolant temperature below normal (refer to Cooling 2. Improper starting procedure System). Inspect glow plugs (white smoke). for proper operation. 3. Fuel supply inadequate. 2. Use proper starting 4. Injection pump timing. procedures. 5. inadequate intake air. 3. Check fuel supply pressure and inlet restriction. 6. Air leak between turbocharger and intake manifold. 4. Scan/Check pump timing. 7. Exhaust leak at the manifold 5. Inspect/change air filter. Look or turbocharger. for other restriction. Check charge air cooler for 8. Improperly operating obstructions. turbocharger. EXCESSIVE EXHAUST SMOKE operating 6. Check/correct leaks in the air crossover tube. hoses, gaskets, mounting capscrews 10. Improperly operating or over or through holes in the fueled injector pump. manifold cover. 11. Piston rings not sealing (blue 7. Check/correct leaks in the smoke). manifold or turbocharger gaskets. If cracked replace manifold. 9. Improperly injectors. 8. Inspect/replace turbocharger. 9. Check and replace inoperative injectors. 10. Repair or replace injection pump. 11. Perform compression / blow-by check. Correct as required. 90-860074--1 FEBRUARY 2002 Page 5E-85 EDI DIAGNOSIS SERVICE MANUAL NUMBER 22 Troubleshooting Charts (Continued) WARNING In case of engine runaway due to flammable fumes from gasoline spills or turbocharger oil leaks being sucked into the engine, shut off engine ignition switch first then use a C02 fire extinguisher and direct the spray near the engine air inlet to remove oxygen supply. The engine air inlet is on the port side on the flywheel end of the engine. The fire extinguisher must be directed at this location for emergency shutdown conditions. CONDITION ENGINE WILL NOT SHUT OFF Page 5E-86 POSSIBLE CAUSES CORRECTION 1. Fuel shutoff solenoid inoperative. 1. ChecK/replace fuel shutoff solenoid. 2. Engine operating on fumes drawn into the air intake. 2. Check the air intake ducts for the source of fumes. 3. Fuel injection pump and/or Fuel Shut Off Valve malfunction 3. Repair or replace fuel injection pump. 90-860074--1 FEBRUARY 2002 EDI DIAGNOSIS SERVICE MANUAL NUMBER 22 Troubleshooting Charts (Continued) CONDITION POSSIBLE CAUSES 1. Low coolant level. 2. Incorrect/improperly operating pressure cap. 3. Loose drive belt on water pump. 4. Improperly operating temperature sensor / gauge 5. Obstructed or restricted seawater pump inlet. 6. Improperly operating. incorrect or no thermostat. 7. Air in the cooling system. 8. Inoperative water pump. 9. Incorrect injection pump timing. COOLANT TEMPERATURE ABOVE NORMAL 10. Over fueled injection pump. 11. Plugged cooling passages in coolers/heat exchanger, head, head gasket or block. 12. Engine overloaded. CORRECTION 1. Check coolant level. Add coolant, if necessary. Locate and correct the source Off the coolant loss, (refer to Group, Cooling). 2. Replace cap with the correct rating for the system. 3. Check/replace belt or belt tensioner. 4. Verify that the gauge and temperature sensor are accurate. Replace gauge/sensor, if bad. 5. Remove obstruction / restriction. 6. Check and replace the thermostat. 7. (A) Make sure the fill rate is not being exceeded and the correct vented thermostat is installed. (B) Check for loose hose Camps. Tighten if loose. (C) If aeration continued, check for a compression leak through the head gasket. 8. Check and replace the water pump. 9. Verify pump timing marks are aligned. Check/time the injector pump (refer to Group, Fuel System). 10. Repair or replace the injection pump. 11. Flush the system and fill with clean coolant. 12. Verify that the engine load rating is not being exceeded. 90-860074--1 FEBRUARY 2002 Page 5E-87 EDI DIAGNOSIS SERVICE MANUAL NUMBER 22 Troubleshooting Charts (Continued) CONDITION POSSIBLE CAUSES CORRECTION 1. Incorrect thermostat or 1. Check and replace Contamination in thermostat. thermostat. COOLANT TEMPERATURE BELOW NORMAL 2. Temperature sensor or gauge inoperative. 3. Coolant not flowing by temperature sensor. 1. Low oil level. 2. Oil viscosity thin. diluted or wrong specification. 3. Improperly operating pressure switch/gauge. 4. Relief valve stuck open. 5. Plugged oil filter. 6. If cooler was replaced, snipping plugs remain in cooler. 7. Worn oil pump. LUBRICATING OIL PRESSURE LOW 8. Suction tube loose or seal leaking. 9. Loose main bearing cap. 10. Worn bearings or wrong bearings installed. 11. Oil jet under piston bad fit into main carrier. 2. Verify that the gauge and sensor are accurate. If not, replace gauge/sensor. 3. Check and clean coolant passages. 1. (A) Check and fill with clean engine oil. (B) Check for a severe external oil leak that could reduce the pressure. 2. Verify the correct oil is being used. Check for oil dilution. Refer to Contaminated Lube Oil (Engine Diagnosis Mechanical). 3. Verify the pressure switch is functioning correctly. If not, replace switch/gauge. 4. Check/replace valve. 5. Change oil filter. Oil filter change interval may need to be revised. 6. Check/remove shipping plugs. 7. Check and replace oil pump. 8. Check and replace seal. 9. Check and install new bearing and tighten cap to proper torque. 10. Inspect and replace connecting rod or main bearings. Check and replace piston cooling nozzles. 11. Check oil jet position. Page 5E-88 90-860074--1 FEBRUARY 2002 EDI DIAGNOSIS SERVICE MANUAL NUMBER 22 Troubleshooting Charts (Continued) CONDITION LUBRICATING OIL PRESSURE TOO HIGH POSSIBLE CAUSES CORRECTION 1. Pressure switch/gauge not 1. Verify the pressure switch is operating properly. functioning correctly. If not, replace switch/gauge. 2. Engine operating too cold. 2. Refer to “Coolant 3. Oil viscosity too thick. Temperature Below Normal.” 4. Oil pressure relief valve stuck 3. Make sure the Correct oil closed or binding. being used, (Refer to Group, Lubrication and Maintenance). 4. Check and replace valve. 1. External leaks. 2. Crankcase being overfilled. 3. Incorrect oil specification or viscosity. 4. Oil Cooler leak. 5. High blow-by forcing oil out the breather. 6. Turbocharger leaking oil to the air intake. LUBRICATING OIL LOSS 7. Piston rings not sealing (oil being consumed by the engine). 1. Visually inspect for oil leaks. Repair as required. 2. Verify that the correct dipstick and/or correctly marked dipstick is being used. 3. (A) Make sure the correct oil is being used. (B) Look for reduced viscosity from dilution with fuel. (C) Review/reduce the oil change intervals. 4. Check and replace the oil cooler. 5. Check the breather tube area for signs of oil loss. Perform the required repairs. 6. Inspect intercooler for evidence of oil transfer Repair as required. 7. Perform compression check. Repair as required. 90-860074--1 FEBRUARY 2002 Page 5E-89 EDI DIAGNOSIS SERVICE MANUAL NUMBER 22 Troubleshooting Charts (Continued) CONDITION POSSIBLE CAUSES 1. Air in the fuel system. COMPRESSION KNOCKS CORRECTION 1. Bleed the fuel system. 2. Poor quality fuel or 2. Verify by operating from a water/gasoline contaminated temporary tank with good fuel. fuel. Clean and flush the fuel supply tanks. Replace 3. Engine overloaded. fuel/water separator. 4. Incorrect injection pump 3. Verify the engine load rating timing. is not being exceeded. 5. Improperly operating 4. Scan / check injection pump injectors. timing. 5. Check and replace inoperative Injector. 1. Loose or broken engine mounts. 2. Damaged or improperly operating accessories. 3. Improperly operating vibration damper. EXCESSIVE VIBRATION 4. Worn or damaged alternator bearing. 5. Flywheel housing misaligned. Page 5E-90 1. Replace engine mounts. 2. Check and replace the vibrating components. 3. Inspect / replace the vibration damper. 4. Check/replace the alternator. 5. Check/correct flywheel alignment. 6. Loose or broken power component. 6. Inspect the crankshaft and rods for damage that causes an unbalance. repair/replace as required. 7. Worn or unbalanced drive line components. 7. Check/repair drive line components. 90-860074--1 FEBRUARY 2002 EDI DIAGNOSIS SERVICE MANUAL NUMBER 22 Troubleshooting Charts (Continued) CONDITION EXCESSIVE ENGINE NOISES POSSIBLE CAUSES CORRECTION 1. Drive belt squeal, insufficient 1. Inspect the drive belt. Check tension or abnormally high drive belt tension. loading. 2. Refer to Excessive Exhaust 2. Intake air or exhaust leaks. smoke (Engine Diagnosis Performance). 3. Excessive valve lash. 3. Make sure the push rods are 4. Turbocharger noise. not bent and rocker levers are 5. Gear train noise. not severely worn Replace Bent or severely worn pads. 6. Power function knock. 4. Check turbocharger impeller and turbine wheel for housing contact. Repair/replace as required. 5. Visually inspect and measure gear backlash. Replace gears as required. 6. Check/replace rod and main bearings. 1. Loose or corroded battery. ALTERNATOR NOT CHARGING OR INSUFFICIENT CHARGING 90-860074--1 FEBRUARY 2002 2. Alternator belt slipping. 3. Alternator pulley loose on shaft. 1. Clean/tighten battery connection. 2. Check/replace and adjust belt. 3. Tighten pulley. 4. Improperly operating alternator. 4. Check/replace alternator. Page 5E-91 EDI DIAGNOSIS SERVICE MANUAL NUMBER 22 THIS PAGE IS INTENTIONALLY BLANK Page 5E-92 90-860074--1 FEBRUARY 2002 EDI DIAGNOSIS SERVICE MANUAL NUMBER 22 Repair Procedures Service Precautions WARNING Electrical system components on this engine are not external ignition protected. Do NOT STORE OR UTILIZE GASOLINE ON BOATS EQUIPPED WITH THESE ENGINES, UNLESS PROVISIONS HAVE BEEN MADE TO EXCLUDE GASOLINE VAPORS FROM ENGINE COMPARTMENT (ref: 33 CFR). Failure to comply could result in fire, explosion and/or severe personal injury. WARNING Always disconnect battery cables from battery BEFORE working on fuel system to prevent fire. This eliminates the engine wiring as a potential source of ignition. WARNING FIRE HAZARD: Fuel leakage from any part of the fuel system can be a fire hazard which can cause serious bodily injury or death. Careful periodic inspection of entire fuel system is mandatory, particularly after storage. All fuel components including fuel tanks, whether plastic, metal or fiberglass, fuel lines, primers, fittings, and fuel filters should be inspected for leakage, softening, hardening, swelling or corrosion. Any sign of leakage or deterioration requires replacement before further engine operation. WARNING Be careful when changing fuel system components; diesel fuel is flammable. Ensure that ignition key is OFF. Do NOT smoke or allow sources of open flame in the area while changing fuel system components. Wipe up any spilled fuel immediately. Dispose of rags appropriately. Do NOT allow fuel to come into contact with any hot surface which may cause it to ignite. WARNING Dispose of fuel soaked rags, paper, etc. in an appropriate airtight, fire-retardant container. Fuel soaked items may spontaneously ignite and result in a fire hazard, which could cause serious bodily injury or death. 90-860074--1 FEBRUARY 2002 Page 5E-93 EDI DIAGNOSIS SERVICE MANUAL NUMBER 22 WARNING Make sure no fuel leaks exist, before closing engine hatch. CAUTION It is good practice to ventilate the engine compartment prior to servicing any engine components to remove any fuel vapors which may cause difficulty breathing or be an irritant. CAUTION Fuel pressure MUST BE relieved before servicing high pressure components in the fuel system. CAUTION Do NOT operate engine without cooling water being supplied to water pickup holes in gear housing, or water pump impeller will be damaged and subsequent overheating damage to engine may result. IMPORTANT: The following information MUST BE adhered to when working on the fuel system: • Always keep a dry chemical fire extinguisher at the work area. • Do NOT replace fuel pipe with fuel hose. • Do NOT attempt any repair to the fuel system until instructions and illustrations relating to that repair are thoroughly understood. • Observe all Precautions and Notes. Replacement Parts Warning WARNING Electrical and fuel system components on your Mercury MerCruiser are designed and manufactured to comply with U.S. Coast Guard Rules and Regulations to minimize risks of fire and explosion. Use of replacement electrical, ignition or fuel system components, which Do NOT comply with these rules and regulations, could result in a fire or explosion hazard and should be avoided. Page 5E-94 90-860074--1 FEBRUARY 2002 EDI DIAGNOSIS SERVICE MANUAL NUMBER 22 Torque Specifications NOTE: Securely tighten all fasteners not listed below. Description Nm lb-in. MAP / IAT Sensor 3.5 31 ECT Sensor Reducer Fitting To Cylinder Head 24.3 TP Sensor 6.7 60 ECM Bracket To Isolator Mounts 19 168 ECM To Bracket 8 72 6.7 60 RPM Sensor ECT Sensor To Reducer Fitting lb-ft 18 Tapered Threads, Tighten Securely Lubricants / Sealants / Adhesives Description Part Number Liquid Neoprene 92-25711-3 Loctite 567 PST Pipe Sealant 92-809822 Loctite 242 Thread Locker 92-809821 90-860074--1 FEBRUARY 2002 Page 5E-95 EDI DIAGNOSIS SERVICE MANUAL NUMBER 22 System Components 75340 75341 2 3 75339 1 4 75311 75301 16 5 14 75336 13 73911 15 75336 12 6 75395 11 7 8 10 9 75336 75395 Page 5E-96 90-860074--1 FEBRUARY 2002 SERVICE MANUAL NUMBER 22 EDI DIAGNOSIS System Component List 42 - Instrumented Injector (#1 Cylinder) 43 - MAP/IAT Sensor 44 - ECT Sensor 45 - Engine Speed Sensor 46 - Electrical Box 47 - Data Link Connector (DLC) 48 - Instrument Harness Connector 49 - Engine Harness Connector 50 - Main Relay 51 - Start Relay 52 - Circuit Breakers 53 - Glow Plug Relays (If Equipped) 54 - Electric Shut Off Solenoid 55 - Injection Pump 56 - ECM (Standard Calibration, Or Bodensee Complieant Calibration Available) 57 - TP Sensor 90-860074--1 FEBRUARY 2002 Page 5E-97 EDI DIAGNOSIS SERVICE MANUAL NUMBER 22 Fuel Injection Pump Repair The Robert Bosch Corporation has a network of authorized Bosch Service Dealers throughout the world to service their products. The pump and injectors must be sent to an authorized Bosch Service Center. When shipping an injection pump to a service center for adjustments or repairs, the fuel return line hollow bolt must accompany the unit. The hollow bolt incorporates a sized orifice (is calibrated) for proper pressure which is matched to the pump. The pump cannot be properly adjusted without the matched orifice. Contact the Bosch distributor nearest you for the location of an authorized Bosch Service Center. Page 5E-98 90-860074--1 FEBRUARY 2002 SERVICE MANUAL NUMBER 22 EDI DIAGNOSIS Wiring Harness Service GENERAL INFORMATION Marine engine control circuits contain many special design features not found in standard land vehicle wiring. Environmental protection is used extensively to protect electrical contacts. Proper splicing methods must be used when making repairs. The proper operation of low amperage input/output circuits depends upon good continuity between circuit connectors. It is important before component replacement and/or during normal troubleshooting procedures that a visual inspection of any questionable mating connector is performed. Mating surfaces should be properly formed, clean and likely to make proper contact. Some typical causes of connector problems are listed below. • Improperly formed contacts and/or connector housing. • Damaged contacts or housing due to improper engagement. • Corrosion, sealer or other contaminants on the contact mating surfaces. • Incomplete mating of the connector halves during assembly or during subsequent troubleshooting procedures. • Tendency for connectors to come apart due to vibration and/or temperature cycling. • Terminals not fully seated in the connector body. • Inadequate terminal crimps to the wire. Wire harnesses should be replaced with proper part number harnesses. When signal wires are spliced into a harness, use the same gauge wire with high temperature insulation only. With the low current and voltage levels found in the system, it is important that the best possible bond be made at all wire splices by soldering the splices, as shown in Wire Repair. Use care when probing a connector or replacing connector terminals. It is possible to short between opposite terminals. If this happens, certain components can be damaged. Always use jumper wires with the corresponding mating terminals between connectors for circuit checking. NEVER probe through connector seals, wire insulation, boots, nipples or covers. Microscopic damage or holes may result in eventual water intrusion, corrosion and/or component or circuit failure. 90-860074--1 FEBRUARY 2002 Page 5E-99 EDI DIAGNOSIS SERVICE MANUAL NUMBER 22 WIRE REPAIR 1. Locate damaged wire. 2. Remove insulation as required. 73048 3. Splice two wires together using a splice clip. Solder with rosin core solder. 73048 4. Cover splice with heat shrink sleeve to insulate from other wires. 73048 CONNECTOR SERVICE Most connectors in the engine compartment are protected against moisture and dirt which could create oxidation and deposits on the terminals. This protection is important because of the very low voltage and current levels found in the electronic system. The connectors have a lock which secures the male and female terminals together. A secondary lock holds the seal and terminal into the connector. When diagnosing, open circuits are often difficult to locate by sight because oxidation or terminal misalignment are hidden by the connectors. Merely wiggling a connector on a sensor or in the wiring harness may locate the open circuit condition. This should always be considered when an open circuit or failed sensor is indicated. Intermittent problems may also be caused by oxidized or loose connections. Before making a connector repair, be certain of the type of connector. Some connectors look similar but are serviced differently. Replacement connectors and terminals are listed in the Parts Catalog. NOTE: Replacement connectors for Mercury MerCruiser EDI engines may come with the wires already attached to the connector. Page 5E-100 90-860074--1 FEBRUARY 2002 EDI DIAGNOSIS SERVICE MANUAL NUMBER 22 HARNESS VIEWS a b K J L C M N G A H B U W V F X D E T P R S 75300 Instrument Harness And Connector a - Early model 16 Pin Standard Connector b - Late Model 21 Pin Deutscht Connector 75395 Engine Harness And Electrical Box 90-860074--1 FEBRUARY 2002 Page 5E-101 EDI DIAGNOSIS SERVICE MANUAL NUMBER 22 Relay, Module and Sensor Servicing (On-Board Service) Precautions WARNING BEFORE attempting to disconnect and remove any module or sensor, check to make sure that the engine ignition system is OFF. Then disconnect the negative (–) battery cable from the terminal. Do NOT reconnect the negative (–) battery cable until the module or sensor removed has been re-installed with secure connections. IMPORTANT: Modules and sensors are electrical devices easily damaged by contact with liquid cleaners or solvents. Clean with a dry cloth unless specifically directed to do otherwise. Main Relay REMOVAL 1. Remove electrical box cover. 2. Detach main relay from inside of electrical box. b a c 75395 a - Electrical Box b - Main Relay c - Main Relay Connector 3. Disconnect electrical connector and remove relay. Page 5E-102 90-860074--1 FEBRUARY 2002 SERVICE MANUAL NUMBER 22 EDI DIAGNOSIS CLEANING IMPORTANT: The main relay is an electrical component. Do NOT soak in any liquid cleaner or solvent; damage may result. 1. Clean exterior with a dry cloth. 2. Clean terminals with a suitable cleaner. INSPECTION 1. Look for evidence of any physical damage to base or connector surfaces of relay. 2. Visually inspect electrical pins of ECT for straightness and no corrosion. 3. Visually inspect connectors on the wiring harness for corrosion and for terminals that may have backed out of the harness. TESTING NOTE: The relay numbers can be found on the bottom of the relay. 1. The following information applies to operations/tests of this relay: • Terminal 30 is connected to battery voltage through a circuit breaker. • Terminal 87 is connected (a circuit is formed) to terminal 30 in the energized (ON) position. Terminal 87 then supplies battery voltage to two ECM pins. • Terminal 86 is connected to terminal 30. • Terminal 85 is grounded by the ECM, causing the relay to be energized. INSTALLATION 1. Insert electrical connector onto main relay. 2. Attach relay to electrical box. 90-860074--1 FEBRUARY 2002 Page 5E-103 EDI DIAGNOSIS SERVICE MANUAL NUMBER 22 ECM (Electronic Control Module) NOTICE Refer to Service Precautions, in Repair Procedures, BEFORE proceeding. IMPORTANT: The ECM is a sensitive electrical device, subject to electrostatic damage. Therefore, take care not to touch connector pins when removing, cleaning or installing the module. IMPORTANT: An ECM with derated calibration is used for the D4.2L D-tronic in order to meet Bodensee emission requirements in twin-installations. Ensure any replacement ECM is the correct part. REMOVAL 1. Slide the locking top of the connector aside and disconnect the 68 pin electrical connector from the engine control module (ECM). 2. Remove ECM from electrical bracket. Retain hardware. NOTE: A taller ECM bracket is used on D-Tronic engines with V-Drive Transmissions. c b a b 78385 75298 Typical a - Electrical Bracket b - ECM c - 68 Pin Electrical Connector CLEANING 1. Clean the exterior of the ECM with a dry cloth being careful to avoid contact with connector pins. 2. Clean ECM mountig bracket to assure ground (–) contact. Page 5E-104 90-860074--1 FEBRUARY 2002 EDI DIAGNOSIS SERVICE MANUAL NUMBER 22 INSPECTION NOTE: The ECM is a sealed electrical component. If a Scan check has shown it to be defective, replace the unit with another ECM having the same part number and service number as the original. 1. Inspect outer surfaces for any obvious damage 2. Visually inspect electrical pins of ECM for straightness and no corrosion. 3. Visually inspect connectors on the wiring harness for corrosion and terminals that may have backed of the harness. INSTALLATION 1. Mount new ECM to electrical bracket. Torque bolts and flanged nuts to specifications. 2. Connect and lock the 68 pin electrical connector to the ECM. c a b 75298 a - Electrical Bracket b - ECM c - 68 Pin Electrical Connector TESTING Refer to Diagnostic Circuit Checks for information and procedures. 90-860074--1 FEBRUARY 2002 Page 5E-105 EDI DIAGNOSIS SERVICE MANUAL NUMBER 22 ECT (Engine Coolant Temperature) Sensor NOTICE Refer to Service Precautions in Repair Procedures, BEFORE proceeding. REMOVAL NOTE: Handle the ECT carefully as any damage to it will affect operation of the EDI system. 1. Refer to SECTION 6B and drain coolant. 2. Disconnect electrical connector from ECT (Engine Coolant Temperature) sensor. NOTE: The ECT is mounted in a reducer fitting that is installed in the head. 3. Stabilize the reducer fitting with a separate tool and remove the ECT. b a c 75579 Typical a - Reducer Fitting b - ECT Sensor c - Connector CLEANING 1. Clean sensor with a dry cloth. 2. Remove sealing washer and clean the seating area. 3. Clean harness connector. Page 5E-106 90-860074--1 FEBRUARY 2002 EDI DIAGNOSIS SERVICE MANUAL NUMBER 22 INSPECTION 1. Look for evidence of any physical damage to base or connector surfaces of the ECT. 2. Visually inspect electrical pins of ECT for straightness and no corrosion. 3. Visually inspect connectors on the wiring harness for corrosion and terminals that may have backed of the harness. INSTALLATION 1. Install reducer fitting, if removed previously. Replace the sealing washer. Torque the reducer to specifications. 2. Apply Loctite 567 PST Pipe Sealant to the threads of ECT. Install the ECT and tighten securely. 3. Connect electrical connector to ECT. b a c d b c 75341 75579 Typical a - Reducer Fitting b - ECT Sensor c - Connector d - Sealing Washer 4. Refer to SECTION 6B and fill with coolant. TESTING Refer to Diagnostic Circuit Checks for information and procedures. 90-860074--1 FEBRUARY 2002 Page 5E-107 EDI DIAGNOSIS SERVICE MANUAL NUMBER 22 MAP (Manifold Absolute Pressure) / IAT (Intake Air Temperature) Sensor NOTICE Refer to Service Precautions, in Repair Procedures, BEFORE proceeding. REMOVAL 1. Disconnect electrical connector from the MAP / IAT sensor. 2. Remove screws from sensor and J-clip retaining coolant pipe. 3. Remove sensor from intercooler housing. d a c a b c d b 75582 - MAP/IAT Sensor - Electrical Connector - Intercooler - J-clip CLEANING 1. Clean sensor with a dry cloth. 2. Clean harness connector. INSPECTION 1. Look for evidence of any physical damage to base or connector surfaces of the sensor. 2. Visually inspect electrical pins of sensor for straightness and no corrosion. 3. Visually inspect connectors on the wiring harness for corrosion and terminals that may have backed out of the harness. 4. Inspect O-ring seal for damage. Page 5E-108 90-860074--1 FEBRUARY 2002 EDI DIAGNOSIS SERVICE MANUAL NUMBER 22 INSTALLATION 1. Install new O-ring on MAP/IAT sensor. b a 75408 a - O-ring b - MAP/IAT Sensor 2. Install MAP/IAT sensor to plenum using screws. Insert upper screw through J-clip for coolant pipe and then through the sensor to the intercooler. Torque screws to specifications. 3. Attach and lock the engine harness electrical connector to the MAP/IAT sensor. e d a b c 75582 75410 a b c d e - MAP/IAT Sensor - Electrical Connector - Lock - Screw - J-clip TESTING Refer to Diagnostic Circuit Checks for information and procedures. 90-860074--1 FEBRUARY 2002 Page 5E-109 EDI DIAGNOSIS SERVICE MANUAL NUMBER 22 Throttle Position (TP) Sensor NOTICE Refer to Service Precautions in Repair Procedures, BEFORE proceeding. REMOVAL 1. Disconnect throttle cable. 2. Disconnect TP electrical connector from engine harness. 3. Remove TP from ECM bracket. c a b c 75332 a - ECM Bracket b - TP Sensor c - Allen Head Screw and Flanged Nut (2 Required) CLEANING 1. Clean sensor with a dry cloth. 2. Clean harness connector. INSPECTION 1. Look for evidence of any physical damage to base or connector surfaces of the ECT. 2. Visually inspect electrical pins of ECT for straightness and no corrosion. 3. Visually inspect connectors on the wiring harness for corrosion and terminals that may have backed out of the harness. Page 5E-110 90-860074--1 FEBRUARY 2002 EDI DIAGNOSIS SERVICE MANUAL NUMBER 22 INSTALLATION 1. Install TP sensor to ECM bracket using allen head screws with flanged nuts. Torque screws to specifications. 2. Connect sensor to engine harness. 3. Install throttle cable. Refer to SECTION 2. 4. Tighten throttle cable locknuts until they bottom and loosen 1/2 turn. b a d c d e 75332 a b c d e - Throttle Cable End Guide - Cable Barrel - Anchor Stud - Flat Washer And Locknut - Spacer (If Required) 5. Connect the battery cables. Start the engine and check the TP sensor output voltage. It should be 0.4-0.8 V at idle and 4.5 V at WOT Refer to Testing Diagnostic Circuit Check. 90-860074--1 FEBRUARY 2002 Page 5E-111 EDI DIAGNOSIS SERVICE MANUAL NUMBER 22 Instrumented Injector Refer to SECTION 5C for information and procedures. Engine RPM Speed Sensor REMOVAL 1. Disconnect rpm Sensor from harness. 2. Remove screw retaining sensor to flywheel housing or adapter piece if equipped. 3. Withdraw sensor from housing. a b c d 75377 a b c d - Engine RPM Speed Sensor - Allen Head Screw - Adapter (If Equipped) - Flywheel Housing CLEANING 1. Clean sensor and connector with a dry cloth. 2. Clean harness connector. INSPECTION 1. Look for evidence of any physical damage to sensor surfaces and tip of sensor. 2. Visually inspect connectors for corrosion and terminals that may have backed out of the harness. 3. Inspect O-ring seal for damage. INSTALLATION 1. Install new O-ring on Engine rpm Speed sensor. 2. Install sensor to adapter piece using screw. Torque screw to specifications. 3. Attach and lock the engine harness electrical connector to the sensor. Page 5E-112 90-860074--1 FEBRUARY 2002 EDI DIAGNOSIS SERVICE MANUAL NUMBER 22 Idle Speed Setting Circuit 12 RED/ORN RED/ORN 77611 An electrical circuit, using two RED/ORANGE wires inside the electrical box, has been added to allow for a 100 rpm increase in the base idle speed signal from the ECM. This is called the Idle Speed Setting Circuit. Locate the RED/ORANGE wire male and female bullet connector ends. One wire end is from terminal 12 of the ECM / Fuel System Harness connector and the other is from terminal 87 of the Main Relay. When the wires are connected the engine idle speed should be 700 rpm. If the wires are disconnected the idle speed should be 600 rpm. Determine the best idle speed for the power package and application. Set the idle speed circuit accordingly. INSPECTION 1. Visually inspect connectors for corrosion, if wires are connected. 2. Visually inspect for terminals that may have backed out of the harnesses. CLEANING 1. Clean connectors with a suitable tool or solvent, if wires are connected. INSTALLATION 1. Connect the RED/ORANGE wire male and female bullet connector ends and the engine idle speed should be 700 rpm. NOTE: If the RED/ORANGE wire bullet connectors are disconnected the idle speed should be 600 rpm. 90-860074--1 FEBRUARY 2002 Page 5E-113 EDI DIAGNOSIS SERVICE MANUAL NUMBER 22 THIS PAGE IS INTENTIONALLY BLANK Page 5E-114 90-860074--1 FEBRUARY 2002 SEAWATER COOLING SYSTEM SERVICE MANUAL NUMBER 22 COOLING SYSTEM Section 6A - Seawater Cooling System Table of Contents Torque Specifications . . . . . . . . . . . . . . . . . . 6A-3 Lubricants / Sealants / Adhesives . . . . . . . 6A-3 Tools . . . . . . . . . . . . . . . . . . . . . . . . . . . . . . . . 6A-3 Seawater (Raw Water) System Specifications . . . . . . . . . . . . . . . . . . . . . . . . 6A-4 Seawater Pump Delivery Rates . . . . . . . 6A-4 Seawater Pickup Connections . . . . . . . . 6A-4 Precautions . . . . . . . . . . . . . . . . . . . . . . . . . . 6A-5 Seawater Pickup Connection . . . . . . . . . . . 6A-5 Seacock . . . . . . . . . . . . . . . . . . . . . . . . . . . . . 6A-6 Seawater Strainer . . . . . . . . . . . . . . . . . . . . . 6A-6 Exploded View - Seawater Pumps . . . . . . . 6A-7 D2.8L D-Tronic . . . . . . . . . . . . . . . . . . . . . 6A-7 D4.2L D-Tronic . . . . . . . . . . . . . . . . . . . . . 6A-8 Seawater Flow Diagram . . . . . . . . . . . . . . . 6A-10 Seawater Pump . . . . . . . . . . . . . . . . . . . . . . 6A-12 Removal . . . . . . . . . . . . . . . . . . . . . . . . . 6A-12 Disassembly . . . . . . . . . . . . . . . . . . . . . . 6A-13 Cleaning . . . . . . . . . . . . . . . . . . . . . . . . . 6A-17 Inspection . . . . . . . . . . . . . . . . . . . . . . . . Assembly . . . . . . . . . . . . . . . . . . . . . . . . . Installation . . . . . . . . . . . . . . . . . . . . . . . . Seawater Strainer . . . . . . . . . . . . . . . . . . . . Exploded View . . . . . . . . . . . . . . . . . . . . Removal . . . . . . . . . . . . . . . . . . . . . . . . . Installation . . . . . . . . . . . . . . . . . . . . . . . . Oil / Power Steering / Transmission Fluid Coolers . . . . . . . . . . . . . . . . . . . . . . . . General Information . . . . . . . . . . . . . . . . Exploded View . . . . . . . . . . . . . . . . . . . . Location of Coolers . . . . . . . . . . . . . . . . Inspection Before Removal . . . . . . . . . Cleaning Without Removal . . . . . . . . . . Engine Oil Cooler . . . . . . . . . . . . . . . . . . Power Steering . . . . . . . . . . . . . . . . . . . . Transmission Fluid Cooler . . . . . . . . . . Installation . . . . . . . . . . . . . . . . . . . . . . . . 6A-18 6A-19 6A-25 6A-27 6A-27 6A-28 6A-30 6A-31 6A-31 6A-32 6A-33 6A-34 6A-34 6A-35 6A-40 6A-42 6A-43 6 A 90-860074--1 FEBRUARY 2002 Page 6A-1 SEAWATER COOLING SYSTEM SERVICE MANUAL NUMBER 22 THIS PAGE IS INTENTIONALLY BLANK Page 6A-2 90-860074--1 FEBRUARY 2002 SEAWATER COOLING SYSTEM SERVICE MANUAL NUMBER 22 NOTICE For instructions on Cleaning Seawater Strainer, Flushing Seawater Cooling System or Draining Seawater Section refer to SECTION 1B. Torque Specifications Description Nm lb-in. Upper 14-15 120132 Lower 11 108120 lb-ft Heat Exchanger End Covers Port Heat Exchanger Bracket 30 22 J-clamp to Exhaust Manifold 32 24 Lubricants / Sealants / Adhesives Description Part Number Loctite Master Gasket 92-12564--1 U-joint and Gimbal Bearing Grease 92-802870A1 Petroleum Jelly Obtain Locally Loctite Pipe Sealant With Teflon Tools Schaefer Brush Manufacturing Company 117 West Walker Street Milwaukee, WI 53204 U.S.A. Description Heat Exchanger Cleaning Brush 90-860074--1 FEBRUARY 2002 Part Number 01299 Page 6A-3 SEAWATER COOLING SYSTEM SERVICE MANUAL NUMBER 22 Seawater (Raw Water) System Specifications Seawater Pump Delivery Rates Description Engine rpm Liters (U.S. Gallons) Per Minute 2000 60 (16) 3000 87 (23) 3800 109 (29) 2000 71 (19) 3000 98 (26) 3800 114-1/2 (30-1/2) D2.8L D-Tronic D4.2L D-Tronic Seawater Pickup Connections SEAWATER PICKUP HOSE Description D2.8L D-Tronic D4.2L D-Tronic Seawater Pickup Hose Diameter 38 mm (1-1/2 in.) Minimum SEACOCK (WATER INLET VALVE) Description D2.8L D-Tronic D4.2L D-Tronic Seacock Size (Internal Cross Sectional Area) 38 mm (1-1/2 in.) Minimum Description D2.8L D-Tronic D4.2L D-Tronic SEAWATER STRAINER Seawater Strainer Flow Requirement 150 liter (40 U.S. Gallons) Minimum Per Minute THROUGH THE HULL SEAWATER PICKUP Description Seawater Pickup Flow Requirement Page 6A-4 D2.8L D-Tronic D4.2L D-Tronic 150 liter (40 U.S. Gallons) Minimum Per Minute 90-860074--1 FEBRUARY 2002 SEAWATER COOLING SYSTEM SERVICE MANUAL NUMBER 22 Precautions IMPORTANT: If the possibility of freezing exists, seawater section, and associated heat exchangers, MUST BE drained to prevent freeze damage to cooling system and engine. Seawater section also should be drained if boat is to be stored for an extended period of time, to prevent corrosion damage. CAUTION Seawater cooling system MUST BE completely drained for storage, or trapped water may cause freeze and/or corrosion damage to engine and/or components. CAUTION If boat is in the water, seacock (if equipped) MUST remain closed until engine is to be restarted, to prevent water from flowing back into the cooling system. If boat is not fitted with a seacock, water inlet hose must remain disconnected and plugged to prevent water from flowing into cooling system and/or boat. As a precautionary measure, attach a tag to the ignition switch or steering wheel with the WARNING that the seacock must be opened or the water inlet hose reconnected prior to starting the engine. IMPORTANT: A wire should be repeatedly inserted into drain holes to ensure that foreign material is not obstructing the drain holes. IMPORTANT: To prevent threads from rusting out during storage, reinstall plugs using Perfect Seal on threads. NEVER leave drain plugs out after cleaning or during storage. Seawater Pickup Connection Water pickup must be large enough to permit sufficient water flow to engine seawater pickup pump for adequate engine cooling. IMPORTANT: Do NOT install water pickup directly in line with propeller, as pickup may create turbulence and allow air to flow into the propeller slipstream. This will cause propeller ventilation and will adversely affect boat performance. Pickup also must supply a positive head while underway. Water pickup should be located as close to seawater pickup pump inlet as possible and in an area where an uninterrupted, solid stream of water will flow past when boat is underway. Use only inner diameter wire reinforced hose of adequate wall thickness to prevent it from collapsing from pump suction. Secure hose connections with double hose clamps. Refer to Specifications. 90-860074--1 FEBRUARY 2002 Page 6A-5 SEAWATER COOLING SYSTEM SERVICE MANUAL NUMBER 22 Seacock If a seacock is being used, it must be installed between water pickup and seawater pickup pump (or seawater strainer), to allow operator to shut off the seawater in case of a leak or when boat is not in use. This will also allow the operator to flush or drain the engine, or clean the sea strainer while boat is in the water. Install seacock in an area where it will be easily accessible and support adequately to prevent hose fatigue. To prevent restricting water flow seacock used must have an internal cross-sectional area equal to or greater than hose. Refer to Specifications. a b c 70355 Through The Hull Components Shown - All Similar a - Wire Reinforced Hose b - Seacock c - Seawater Pickup Seawater Strainer The strainer, if equipped, must be of sufficient size to ensure that an adequate supply of water will be maintained for cooling engine. A minimum flow rate is required. Refer to Specifications. Page 6A-6 90-860074--1 FEBRUARY 2002 SEAWATER COOLING SYSTEM SERVICE MANUAL NUMBER 22 Exploded View - Seawater Pumps D2.8L D-Tronic 8 A 17 14 16 12 11 13 10 9 15 18 a 5 19 a 20 7 6 4 3 1 2 A 58 - Pump Housing 59 - Screw 60 - Housing Pin 61 - Ball Bearing 62 - Bearing Spacer 63 - Snap Ring 64 - Shaft 65 - Thrust Washer 66 - Lip Seal 67 - Slinger 68 - Spacer 69 - Primary Lip Seal 70 - Cam 71 - Impeller 72 - Spline Plug 73 - Gasket 74 - Cover 75 - Screw 76 - O-Ring 77 - Nut With Washer (4) (Washers Not Shown) Description A Loctite Master Gasket 90-860074--1 FEBRUARY 2002 Part Number 92-12564-2 Page 6A-7 SEAWATER COOLING SYSTEM SERVICE MANUAL NUMBER 22 D4.2L D-Tronic 7 8 9 10 11 A 15 6 5 4 3 17 16 14 2 13 1 12 A 73946 1 - Pump Housing 2 - Screw 3 - Cover 4 - Gasket 5 - Impeller and Spline Plug 6 - Cam (Apply Sealer Indicated to Back-Side) 7 - Thrust Washer (Align Notch with Housing Pin) 8 - Retaining Ring 9 - Spacer 10 - Seal 11 - Oil Seal 12 - Screw 13 - Sealed Ball Bearing 14 - Shaft 15 - O-ring 16 - Lockwasher (4) 17 - Nut (4) Description A Loctite Master Gasket Page 6A-8 Part Number 92-12564-2 90-860074--1 FEBRUARY 2002 SEAWATER COOLING SYSTEM SERVICE MANUAL NUMBER 22 THIS PAGE IS INTENTIONALLY BLANK 90-860074--1 FEBRUARY 2002 Page 6A-9 SEAWATER COOLING SYSTEM SERVICE MANUAL NUMBER 22 Seawater Flow Diagram 9 10 f 8 5 g a e d b c 2 6 7 1 4 3 Typical - All Engines Page 6A-10 90-860074--1 FEBRUARY 2002 75 SERVICE MANUAL NUMBER 22 SEAWATER COOLING SYSTEM Seawater Cooling Circuit (Raw Water) 1 - Seawater Inlet Through Drive - Sterndrive Through Hull - Inboard 2 - Seacock (If Equipped) 3 - Seawater Strainer 4 - Seawater Pump 5 - Intercooler 6 - Engine Oil Cooler 7 - Heat Exchanger 8 - Fluid Cooler Power Steering Fluid - Sterndrive Transmission Fluid - Inboard 9 - Exhaust Pipe Water Jacket 10 - Seawater Outlet (Exhaust) Engine Components a - Thermostat Housing and Thermostats b - Circulating Pump - Closed Coolant c - Engine Block - Upper Section of Liners d - Cylinder Heads e - Water Manifold f - Turbocharger g - Exhaust Manifold 90-860074--1 FEBRUARY 2002 Page 6A-11 SEAWATER COOLING SYSTEM SERVICE MANUAL NUMBER 22 Seawater Pump Removal CAUTION If boat is in water while working on seawater pump, when removing seawater inlet hose, close seacock, if equipped. If boat is not equipped with a seacock, remove and plug seawater inlet hose to prevent a siphoning action that may occur, allowing seawater to enter boat. 1. Close seacock if equipped, or remove and plug seawater pump inlet hose. 2. Loosen the 6 seawater pump cover screws to drain water into a suitable container. Remove outlet hose. cc d b a 75299 Typical a - Inlet Hose b - Connector Fitting c - Cover Screws (6) d - Outlet Hose 3. Remove the 4 hex nuts with lockwashers or flange nuts. Remove the pump. b a 70423 a - Location of Hex Nuts b - Pump Page 6A-12 90-860074--1 FEBRUARY 2002 SEAWATER COOLING SYSTEM SERVICE MANUAL NUMBER 22 Disassembly 1. Clamp the pump in a vise. 2. Remove the 6 cover screws. a 70625 Typical a - Cover Screws 3. Using 2 screwdrivers, carefully remove the impeller. 70626 4. On D2.8L D-Tronic pumps: Remove internal snap ring from pump body. a 70628 a - Snap Ring 90-860074--1 FEBRUARY 2002 Page 6A-13 SEAWATER COOLING SYSTEM SERVICE MANUAL NUMBER 22 5. On D4.2L D-Tronic pumps: a. Remove external retaining ring from pump shaft. a 70694 a - External Retaining Ring b. Remove spacer from shaft. a 70695 a - Spacer 6. Using a soft faced hammer, tap shaft and bearing assembly out of pump housing. b a 70638 Typical a - Shaft and Bearing Assembly b - Pump Housing Page 6A-14 90-860074--1 FEBRUARY 2002 SEAWATER COOLING SYSTEM SERVICE MANUAL NUMBER 22 IMPORTANT: Take note of factory markings on bearings (if visible), or suitably mark each bearing, to ensure installation in original position if reused. 7. On D2.8L D-Tronic pumps: Using an arbor press and suitable hardware, remove one bearing at a time from pump shaft to avoid damaging spacer. Press off toward splines of shaft and on inner race of bearings only. a c b 70635 a - Bearing(s) b - Spacer c - Pump Shaft 8. On D4.2L D-Tronic pumps: Using an arbor press and suitable hardware, remove one bearing at a time from pump shaft (spacer is machined as part of shaft). Press one bearing off toward splines of shaft and the other opposite. Press on inner race of bearings only. a a c b 70696 a - Bearing(s) b - Spacer (Is machined as part of shaft) c - Pump Shaft 90-860074--1 FEBRUARY 2002 Page 6A-15 SEAWATER COOLING SYSTEM SERVICE MANUAL NUMBER 22 9. Remove screw from between inlet and outlet to allow cam removal. b a 70638 70632 Typical Pump and Cam a - Screw b - Cam 10. Remove thrust washer from its position on locating pin in pump housing. a 70631 Typical Pump and Thrust Washer a - Thrust Washer 11. On D2.8L D-Tronic pumps: Using a suitable tool, remove two lipseals, one spacer, and one slinger ring from pump housing. Notice positioning. a b c d 70637 a b c d Page 6A-16 - Primary Lipseal - Spacer - Slinger Ring - Lipseal 90-860074--1 FEBRUARY 2002 SEAWATER COOLING SYSTEM SERVICE MANUAL NUMBER 22 12. On D4.2L D-Tronic pumps: a. Being careful not to gouge or nick pump housing, remove rear seal by inserting a screwdriver through holes in pump housing and carefully pry (push). c a b 70697 a - Screwdriver b - Rear Seal c - Pump Housing b. Using a suitable tool, press front seal assembly out front of pump housing from rear. NOTE: Although different in appearance the front seal will press out like a normal seal. a c b a - Front Seal b - Pump Housing c - Rear Seal Cleaning WARNING Always wear safety glasses when using compressed air. 1. Clean metal parts in solvent and dry with compressed air. 2. After cleaning, apply a coat of light engine oil to shaft and bearings to prevent rusting. 3. Clean all gasket material and sealer from sealing surfaces. 90-860074--1 FEBRUARY 2002 Page 6A-17 SEAWATER COOLING SYSTEM SERVICE MANUAL NUMBER 22 Inspection 1. Inspect bearing housing. Examine surfaces (where bearings contact housing) for evidence of bearing outer racers turning in housing. 2. Inspect bearings for worn or defective condition. Examine sealed bearings for evidence of loss of factory grease, or evidence of internal contamination by engine oil. 3. Inspect seals from bearing housing. 4. Inspect pump shaft for grooves in surface where seals contact shaft. 5. Inspect drive key on shaft. 6. Inspect surface, where bearings contact shaft for evidence of inner races turning on shaft. 7. Inspect impeller splines and shaft splines. 8. Inspect pump body. 9. Inspect cam for scratches or gouging. 10. Inspect pump impeller for wear on sides and tips of blades. 11. Inspect blades for cracks in area where blades flex. 12. Replace impeller, if blades have taken a set (remain in curved position). 13. Replace all parts that Do NOT conform to standards. Page 6A-18 90-860074--1 FEBRUARY 2002 SEAWATER COOLING SYSTEM SERVICE MANUAL NUMBER 22 Assembly 1. On D2.8L D-Tronic pumps: IMPORTANT: In the following steps press on inner races of bearings ONLY. Do NOT crush spacer. a. Using an arbor press, install first bearing against shoulder of pump shaft beginning from splined end. b. Install plastic spacer and press second bearing on shaft, in positions shown. b c a 70634 a - First Bearing b - Spacer (Plastic) c - Second Bearing 2. On D4.2L D-Tronic pumps: IMPORTANT: In the following steps press on inner races of bearings ONLY. a. Using an arbor press, install rear bearing against shoulder of spacer. Press from rear of shaft. b. Press front bearing against shoulder of spacer. Press from splined end. c b a 70443 a - Rear Bearing b - Spacer (Machined As Part of Shaft) c - Front Bearing 90-860074--1 FEBRUARY 2002 Page 6A-19 SEAWATER COOLING SYSTEM SERVICE MANUAL NUMBER 22 3. On D2.8L D-Tronic pumps: Install spacer into impeller side of housing. Using a suitable tool, install impeller primary lipseal (lip facing out - back of seal visible). a b 70629 a - Rubber Washer (Installed First, Not Shown In This View) b - Impeller Primary Seal 4. On D4.2L D-Tronic pumps: Install impeller primary seal assembly using a suitable tool. Plastic collar around lip MUST face impeller. a b a b 70630 a - Impeller Primary Seal b - Plastic Collar Around Lip Page 6A-20 90-860074--1 FEBRUARY 2002 SEAWATER COOLING SYSTEM SERVICE MANUAL NUMBER 22 5. On D2.8L D-Tronic pumps:Install slinger ring into bearing side of housing. Using a suitable tool, install rear seal (lip facing front of pump - back of seal visible). b a 70629 a - O-ring b - Rear Seal 6. On D4.2L D-Tronic pumps: Using a suitable tool, install rear seal (lip facing out - back of seal visible). a 70444 a - Rear Seal 7. Install thrust washer into pump housing. Align washer notch with pin in housing. c b a 70630 Typical Pump and Thrust Washer a - Thrust Washer b - Washer Notch c - Housing Pin 90-860074--1 FEBRUARY 2002 Page 6A-21 SEAWATER COOLING SYSTEM SERVICE MANUAL NUMBER 22 8. Coat backside of cam with Loctite Master Gasket sealant. 9. Install cam in housing as shown. Tighten screw securely. Remove excess sealant and allow to dry before continuing assembly. b c 70638 b 70633 Typical Pump and Cam a - Sealant b - Cam c - Screw 10. Coat lips of seals in pump housing with U-Joint and Gimbal Bearing Grease. 11. Install shaft and bearing assembly into housing as shown. 12. Tap lightly with soft faced hammer if needed to seat assembly. 70638 Typical Pump and Shaft With Bearings Page 6A-22 90-860074--1 FEBRUARY 2002 SEAWATER COOLING SYSTEM SERVICE MANUAL NUMBER 22 13. On D2.8L D-Tronic pumps: Install internal snap ring into pump body groove. a 70628 a - Snap Ring 14. On D4.2L D-Tronic pumps: a. Install spacer (washer) on shaft next to front seal assembly. b. Install external retaining ring into groove of shaft. c a b 70694 a - Front Seal Assembly b - Spacer (Washer) c - External Retaining Ring 15. Hold pump housing in soft-jaw vise. Install impeller into housing by turning clockwise while simultaneously pushing inward as shown. 70624 Typical Pump and Impeller 90-860074--1 FEBRUARY 2002 Page 6A-23 SEAWATER COOLING SYSTEM SERVICE MANUAL NUMBER 22 16. Push rubber button seal into end of impeller. a b 70627 a - Rubber Button Seal b - Impeller 17. Install gasket (wide surface on cam side) and cover. Tighten screws evenly in a diagonal pattern. Tighten securely. a b c b c a 70625 Typical Pump and Cover a - Cover b - Gasket (Wide Surface On Cam Side) c - Screws (6) 70625 Page 6A-24 90-860074--1 FEBRUARY 2002 SEAWATER COOLING SYSTEM SERVICE MANUAL NUMBER 22 Installation 1. Install O-ring on pump housing shoulder. a 70628 Typical Pump a - O-ring 2. Turn pump shaft in direction shown to align pump keyway with camshaft key. b a 70442 70628 Typical Pump and Camshaft End a - Pump Keyway b - Camshaft Key 90-860074--1 FEBRUARY 2002 Page 6A-25 SEAWATER COOLING SYSTEM SERVICE MANUAL NUMBER 22 3. Install pump on timing gear cover studs. Tighten hex nuts with washers securely. a b 23161 70423 Typical Pump Installation a - Studs b - Hex Nuts With Washers 4. Install seawater inlet and outlet hoses. Tighten hose clamps securely. c b a c 70636 Typical Pump and Hoses a - Inlet Hose b - Outlet Hose c - Hose Clamps 5. Open seacock, if equipped, or remove plug from seawater inlet hose and reconnect hose. Tighten hose clamps securely. 6. Start engine. 7. Check for leaks. Page 6A-26 90-860074--1 FEBRUARY 2002 SEAWATER COOLING SYSTEM SERVICE MANUAL NUMBER 22 Seawater Strainer Exploded View 7 h 6f 5 4 d c3 8 2 b a1 g 8 78157 Typical 1 - Drain Plug and Gasket 2 - Filter Housing 3 - Filter Element 4 - O-ring Seal 5 - Clear Lens 6 - Lens Cover 7 - Nozzle (2) 8 - Cover Screw with Washer 90-860074--1 FEBRUARY 2002 Page 6A-27 SEAWATER COOLING SYSTEM SERVICE MANUAL NUMBER 22 Removal CAUTION If boat is in water while working on seawater strainer, close seacock, if equipped. If boat is not equipped with a seacock, remove and plug seawater inlet hose to prevent a siphoning action that may occur, allowing seawater to flow from the drain holes or removed hoses and enter the boat. IMPORTANT: Be certain engine is OFF and cooling system is cold. 1. Models Equipped With A Seacock: a. Close seacock (seawater inlet valve), if equipped. a 70355 a - Seacock (Seawater inlet valve) (1.) Disconnect seawater inlet hose from seawater strainer. a b 50226 a - Seawater Inlet Hose b - Seawater Strainer Page 6A-28 90-860074--1 FEBRUARY 2002 SEAWATER COOLING SYSTEM SERVICE MANUAL NUMBER 22 2. Models Without A Seacock: a. If not equipped with seacock, disconnect seawater inlet hose, from seawater strainer inlet. b. Quickly plug seawater inlet hose. b a b c d c a d 70062 - Inlet Hose - Strainer - Strainer Inlet - Suitable Plug 3. Remove seawater outlet hose. Drain into a suitable container. a b 70062 a - Outlet Hose b - Strainer 4. Remove mounting bolts. 5. Remove strainer. 90-860074--1 FEBRUARY 2002 Page 6A-29 SEAWATER COOLING SYSTEM SERVICE MANUAL NUMBER 22 Installation IMPORTANT: Mount seawater strainer in a vibration-free location. Never mount it on the engine or transmission. Hoses must not be kinked or allowed to come in contact with hot or moving engine or transmission parts. 1. Mount seawater strainer. Ensure the following: • Arrow (flow direction) must point towards seawater pump. • Tighten mounting bolts securely. b a c c 50226 a - Strainer b - Arrow c - Mounting Bolt Hole 2. Install seawater inlet and outlet hoses. Use 2 hose clamps on each hose connection. Tighten clamps securely. c c a b 50226 a - Inlet Hose b - Strainer c - Hose Clamps (2 Each) 3. Check drain plug and lens cover bolts. Tighten securely. Do NOT overtighten cover bolts or cover may warp and leak water into boat. b a 50226 a - Drain Plug b - Lens Cover Bolt Page 6A-30 90-860074--1 FEBRUARY 2002 SERVICE MANUAL NUMBER 22 SEAWATER COOLING SYSTEM Oil / Power Steering / Transmission Fluid Coolers General Information Cooling efficiency of an engine and components is greatly dependent upon heat transfer through the tubes within the coolers (heat exchanger or exchangers, if equipped with more than one). During engine operation, contaminants within the seawater (such as salt, silt or lime) collect on the inside of the tubes, thus reducing heat transfer and greatly decreasing cooler (heat exchanger) efficiency. It is therefore, recommended that the seawater coolers be cleaned periodically according to Maintenance Schedules chart in SECTION 1B, or whenever decreased cooling efficiency is suspected. Additionally, inspect cooler hoses and clamps according to Maintenance Schedules chart in SECTION 1B. 90-860074--1 FEBRUARY 2002 Page 6A-31 SEAWATER COOLING SYSTEM SERVICE MANUAL NUMBER 22 Exploded View 1 2 3 78386 1 - D4.2L Inboard (MIE) Early Design 2 - D2.8L D-Tronic And D4.2L D-Tronic Sterndrive (MCM) Design 3 - D2.8L D-Tronic And D4.2L D-Tronic Inboard (MIE) Later Design Page 6A-32 90-860074--1 FEBRUARY 2002 SEAWATER COOLING SYSTEM SERVICE MANUAL NUMBER 22 Location of Coolers Refer to the following for location of oil, power steering and transmission fluid coolers. a b c 75393 75297 Typical Sterndrive (MCM) Model a - Fluid Cooler (D4.2L) b - Engine Oil Cooler c - Fluid Cooler (D2.8L) a 73522 b 75301 Typical Inboard (MIE) Model a - Fluid Cooler b - Engine Oil Cooler 90-860074--1 FEBRUARY 2002 Page 6A-33 SEAWATER COOLING SYSTEM SERVICE MANUAL NUMBER 22 Inspection Before Removal NOTICE Refer to Cold Weather or Extended Storage, Draining Instructions in SECTION 1B and Precautions in this section, BEFORE proceeding. 1. Drain the seawater system. 2. Remove hose clamp or end cover from INLET end of the appropriate coolers. Refer to Seawater Flow Diagrams. 3. Inspect the passages. Clean if needed. 4. Refit hose or end cover. Torque end cover to specification or securely tighten hose clamp. Cleaning Without Removal NOTICE Refer to Cold Weather or Extended Storage, Draining Instructions in SECTION 1B and Precautions in this section, BEFORE proceeding. 1. Drain the seawater system. 2. On coolers: a. Remove hoses from both ends of cooler to be cleaned. b. Temporarily attach a suitable hose to inlet end of cooler and place end of hose in a suitable container to catch water in the following. c. Attach a suitable adaptor to the outlet end of cooler to which a tap water hose may be connected. d. Open tap water faucet and backflush cooler until discharge water is clean. e. Remove temporary hose and adaptor. 3. On heat exchangers: a. Remove end covers from section to be cleaned. b. Open tap water faucet and backflush exchanger until discharge water is clean. c. Discontinue backflushing. Page 6A-34 90-860074--1 FEBRUARY 2002 SEAWATER COOLING SYSTEM SERVICE MANUAL NUMBER 22 Engine Oil Cooler REMOVAL NOTICE Refer to Cold Weather or Extended Storage, Draining Instructions in SECTION 1B and Precautions in this section, BEFORE proceeding. 1. Drain the seawater system. 2. Drain the closed cooling system. 3. Obtain clean, suitable devices and plug hoses in following instructions to avoid loss of engine oil. 4. Mark port and starboard oil hoses to aid in reassembly. 5. Disconnect oil lines from oil cooler fittings (near each end of oil cooler) on heat exchanger. Quickly plug the lines. NOTE: Components shown removed for visual clarity. a b c a - Engine Oil Cooler / Heat Exchanger b - Starboard Oil Line and Fitting c - Port Oil Line and Fitting 90-860074--1 FEBRUARY 2002 Page 6A-35 SEAWATER COOLING SYSTEM SERVICE MANUAL NUMBER 22 6. Disconnect seawater and closed cooling hoses as required to allow removal of heat exchanger and engine oil cooler. 7. Disconnect turbocharger coolant vent hose from fitting on upper-port side of heat exchanger expansion tank. 8. Remove the two large screw clamps retaining the heat exchanger to the port and starboard brackets. 9. Remove the heat exchanger and engine oil cooler. NOTE: If the oil cooler is to be replaced, it will be necessary to replace the complete heat exchanger assembly. b a a a b c a a 74484 Engine Oil Cooler / Heat Exchanger and Related Components a - Hoses b - Clamps c - Coolant Vent Hose Fitting Page 6A-36 90-860074--1 FEBRUARY 2002 SEAWATER COOLING SYSTEM SERVICE MANUAL NUMBER 22 INSTALLATION 1. Apply a small amount of petroleum jelly on the heat exchanger brackets and hose ends to ease installation. 1. Install the heat exchanger and engine oil cooler. 2. Make all necessary seawater and closed cooling hose connections. Tighten hose clamps securely. b a a a b a a 74484 Engine Oil Cooler / Heat Exchanger and Related Components a - Hoses b - Clamps 90-860074--1 FEBRUARY 2002 Page 6A-37 SEAWATER COOLING SYSTEM SERVICE MANUAL NUMBER 22 3. Unplug and install port and starboard oil lines, as marked upon disassembly, to fittings near each end of oil cooler. 4. Reconnect coolant recovery bottle hose. 5. Install the two large screw clamps retaining the heat exchanger to the port and starboard brackets. 6. Reconnect turbocharger coolant vent hose. e d d c 75297 f a c b 74487 Engine Oil Cooler / Heat Exchanger and Related a - Heat Exchanger / Oil Cooler b - Starboard Oil Line And Fitting c - Port Oil Line And Fitting d - Turbocharger Coolant Vent Hose e - Coolant Recovery Bottle Hose f - Large Screw Clamps Page 6A-38 90-860074--1 FEBRUARY 2002 SEAWATER COOLING SYSTEM SERVICE MANUAL NUMBER 22 7. Inspect cooler / exchanger passages. • If passages are clear: Reconnect seawater hoses and tighten hose clamps securely. IMPORTANT: Mercury MerCruiser does not recommend the immersion of oil/power steering/ transmission fluid coolers in cleaning solutions. If backflushing and/or wire brushing of the problem cooler does not satisfactorily clear the passages replacement of the cooler is recommended. • If passages are still obstructed: a. Clean tubes in heat exchanger and coolers by operating a suitable wire brush of the proper size through each tube. a 71724 a - Wire Brush, Sized to Fit Passages b. Rinse out heat exchanger and cooler tubes with tap water from a hose to remove loosened particles. c. Replace unit if it cannot be satisfactorily cleaned. Refer to the following section. 90-860074--1 FEBRUARY 2002 Page 6A-39 SEAWATER COOLING SYSTEM SERVICE MANUAL NUMBER 22 Power Steering REMOVAL NOTICE Refer to Cold Weather or Extended Storage, Draining Instructions in SECTION 1B-Maintenance and Precautions in this section, BEFORE proceeding. 1. Drain the seawater system. 2. Disconnect seawater hoses from fluid cooler. 3. Mark fore and aft fluid hoses to aid in reassembly. NOTE: Obtain two clean, suitable devices and plug hoses in following instructions to avoid loss of fluid. 4. Using a suitable container to catch excess fluid, disconnect fluid hoses. Plug hoses quickly. 5. Remove fasteners from clamps retaining cooler. 6. Remove cooler with J-clamp. e d a d c b e f 75393 75594 Typical Power Steering Cooler Installation a - D4.2L D-Tronic Cooler b - Forward Fluid Hose (From Reservoir) c - Aft Fluid Hose (To Pump) d - Seawater Hoses e - J-clamp And Nut f - D2.8L D-Tronic Cooler Page 6A-40 90-860074--1 FEBRUARY 2002 SEAWATER COOLING SYSTEM SERVICE MANUAL NUMBER 22 INSTALLATION 1. Install J-clamp and cooler onto exhaust manifold stud. Torque to 24 lb-ft (32 Nm). 2. Install connecting seawater hoses. Position fittings as shown and tighten seawater hose clamps. 3. Remove plugs from power steering fluid hoses and connect to fittings as marked on disassembly. Tighten fluid hose clamps securely. f e a d c b 75594 e g 75393 Typical Power Steering Cooler Installation a - D4.2L D-Tronic Cooler b - Forward Fluid Hose (From Reservoir) c - Aft Fluid Hose (To Pump) d - Seawater Hose From Heat Exchanger e - Seawater Hose To Exhaust Elbow Or Riser f - J-clamp And Nut g - D2.8L D-Tronic Cooler 4. Refer to SECTION 1B and refill power steering reservoir. 5. Open seacock, or unplug seawater inlet hose and reconnect. Tighten hose clamps securely. 6. Operate the engine briefly to fill the cooler. Check for leaks. 7. Stop the engine. 8. Refill power steering reservoir. 90-860074--1 FEBRUARY 2002 Page 6A-41 SEAWATER COOLING SYSTEM SERVICE MANUAL NUMBER 22 Transmission Fluid Cooler REMOVAL NOTICE Refer to Cold Weather or Extended Storage, Draining Instructions in SECTION 1B and Precautions in this section, BEFORE proceeding. 1. Drain the seawater system. 2. Disconnect seawater hoses from fluid cooler. 3. Mark fore and aft fluid hoses to aid in reassembly. NOTE: Obtain clean, suitable devices and plug hoses in following instructions to avoid loss of fluid. 4. Using a suitable container to catch excess fluid, disconnect fluid hoses. Plug hoses quickly. 5. Remove fasteners from clamps retaining cooler. 6. Remove transmission fluid cooler. 7. If cooler is to be replaced, note position of transmission fluid hose connectors. Remove and retain the connectors. NOTE: Some early model fluid hose connectors are 90 degree elbow connectors. Later models have straight connectors. a d d e b b f f c f 73522 Typical Transmission Fluid Cooler a - Fluid Cooler b - Seawater Hoses c - Fluid Hoses d - Retaining Clamps e - Fasteners f - Connectors (90 Degree Elbow Shown, Straight Not Shown Page 6A-42 90-860074--1 FEBRUARY 2002 SEAWATER COOLING SYSTEM SERVICE MANUAL NUMBER 22 Installation 1. Coat threads of fluid hose connectors with Loctite Pipe Sealant with Teflon and install on cooler in positions noted on disassembly. a b Typical Transmission Fluid Cooler Shown a - Transmission Fluid Cooler b - Connectors 2. Install transmission fluid cooler on intake/exhaust manifold or bracket. Secure with clamps and fasteners. Torque manifold nuts to 32 Nm (24 lb-ft). 3. Connect transmission fluid hoses to cooler in positions noted on disassembly. Tighten hose clamps securely. a d d b e f b f c 73522 Typical Transmission Fluid Cooler Installation Shown a - Fluid Cooler b - Seawater Hoses c - Fluid Hoses d - Retaining Clamps e - Hex Nut and Washer f - Connectors 90-860074--1 FEBRUARY 2002 Page 6A-43 SEAWATER COOLING SYSTEM SERVICE MANUAL NUMBER 22 4. Open seacock if equipped, or unplug seawater inlet hose and reconnect. Tighten hose clamps securely. 5. Start engine. Operate briefly to fill cooler. 6. Check for leaks. 7. Stop engine. IMPORTANT: Use only ATF (Automatic Transmission Fluid), such as Dexron III. 8. Quickly check transmission fluid level. Fluid should be between MIN and MAX marks on dipstick. 9. Fill transmission to proper level. Page 6A-44 90-860074--1 FEBRUARY 2002 SEAWATER COOLING SYSTEM SERVICE MANUAL NUMBER 22 THIS PAGE IS INTENTIONALLY BLANK 90-860074--1 FEBRUARY 2002 Page 6A-45 SEAWATER COOLING SYSTEM SERVICE MANUAL NUMBER 22 THIS PAGE IS INTENTIONALLY BLANK Page 6A-46 90-860074--1 FEBRUARY 2002 CLOSED COOLING SYSTEM SERVICE MANUAL NUMBER 22 COOLING SYSTEMS Section 6B - Closed Cooling System Table of Contents Specifications . . . . . . . . . . . . . . . . . . . . . . . . . 6B-4 Capacity . . . . . . . . . . . . . . . . . . . . . . . . . . . 6B-4 Thermostats . . . . . . . . . . . . . . . . . . . . . . . 6B-4 Pressure Cap . . . . . . . . . . . . . . . . . . . . . . 6B-4 Coolant . . . . . . . . . . . . . . . . . . . . . . . . . . . 6B-4 Torque Specifications . . . . . . . . . . . . . . . . . . 6B-5 Lubricants / Sealants / Adhesives . . . . . . . 6B-5 Tools . . . . . . . . . . . . . . . . . . . . . . . . . . . . . . . . 6B-5 Special Tools . . . . . . . . . . . . . . . . . . . . . . . 6B-5 Tools . . . . . . . . . . . . . . . . . . . . . . . . . . . . . . . . 6B-5 Diagrams and Exploded Views . . . . . . . . . . 6B-6 Coolant Flow Diagram . . . . . . . . . . . . . . . 6B-6 Heat Exchanger / Coolant Tank and Related Components . . . . . . . . . . . 6B-8 Engine Water Circulating Pump . . . . . . 6B-10 Checking Coolant Level . . . . . . . . . . . . . . . 6B-11 Testing Closed Cooling System . . . . . . . . 6B-12 Testing Coolant for Alkalinity . . . . . . . . 6B-12 Pressure Testing System . . . . . . . . . . . 6B-12 Testing for Cylinder Head Gasket Leak . . . . . . . . . . . . . . . . . . . . . . 6B-14 Testing Pressure Cap . . . . . . . . . . . . . . 6B-15 Coolant Change Interval . . . . . . . . . . . . . . 6B-17 Coolant Requirement . . . . . . . . . . . . . . . . . 6B-17 90-860074-1 FEBRUARY 2002 Draining Closed Cooling System . . . . . . . Cleaning Closed Cooling System . . . . . . . Using A Cleaner . . . . . . . . . . . . . . . . . . . Heat Exchanger and Cooler Cleaning Flushing The Closed Cooling System Filling The Closed Cooling System . . . . . Thermostats . . . . . . . . . . . . . . . . . . . . . . . . . Removal . . . . . . . . . . . . . . . . . . . . . . . . . Testing . . . . . . . . . . . . . . . . . . . . . . . . . . . Installation . . . . . . . . . . . . . . . . . . . . . . . . Heat Exchanger . . . . . . . . . . . . . . . . . . . . . . Testing . . . . . . . . . . . . . . . . . . . . . . . . . . . Repair . . . . . . . . . . . . . . . . . . . . . . . . . . . Removal . . . . . . . . . . . . . . . . . . . . . . . . . Cleaning and Inspection . . . . . . . . . . . . Installation . . . . . . . . . . . . . . . . . . . . . . . . Water Circulating Pump . . . . . . . . . . . . . . . Removal . . . . . . . . . . . . . . . . . . . . . . . . . Cleaning and Inspection . . . . . . . . . . . . Installation . . . . . . . . . . . . . . . . . . . . . . . . Coolant Manifold . . . . . . . . . . . . . . . . . . . . . Corrosion Protection . . . . . . . . . . . . . . . . . . Auxiliary Hot Water Heater Connections . 6B-17 6B-19 6B-19 6B-19 6B-20 6B-21 6B-22 6B-22 6B-23 6B-25 6B-26 6B-26 6B-26 6B-27 6B-28 6B-29 6B-31 6B-31 6B-31 6B-32 6B-33 6B-33 6B-33 Page 6B-1 6 B CLOSED COOLING SYSTEM SERVICE MANUAL NUMBER 22 THIS PAGE IS INTENTIONALLY BLANK Page 6B-2 90-860074--1 FEBRUARY 2002 CLOSED COOLING SYSTEM SERVICE MANUAL NUMBER 22 NOTICE For instructions on Cleaning Seawater Strainer, Flushing Seawater Cooling System or Draining Seawater Section refer to SECTION 1B - Maintenance. NOTICE For information on other heat exchangers cooled by seawater refer to SECTION 6A Seawater Cooling System, Oil / Power Steering / Transmission Fluid Coolers. NOTICE For information on Oil Filter Head and Oil Thermostat refer to SECTION 3A - Engine Mechanical, Oil Thermostat. 90-860074-1 FEBRUARY 2002 Page 6B-3 CLOSED COOLING SYSTEM SERVICE MANUAL NUMBER 22 Specifications Capacity Liters (U.S. Quarts) Approximate Description D2.8L D-Tronic 11 (11-2/3) D4.2L D-Tronic 13 (13-3/4) Thermostats Description Operating Temperature D2.8L D-Tronic 1 at 70 Degrees C (160 Degrees F), and 1 at 82 Degrees C (180 Degrees F) D4.2L D-Tronic IMPORTANT: It is not necessary to position either thermostat in a certain location within the thermostat housing. Ensure however, that one of each specified operating temperature is present. Pressure Cap Description Operating Pressure D2.8L D-Tronic 97 kPa (14 psi) 1 D4.2L D-Tronic 1 Must hold rated pressure for 30 seconds without going below 76 kPa (11 psi). Coolant IMPORTANT: Use only Mercury MerCruiser specified coolant. Use of other coolant may cause fouling of the heat exchangers, and overheating of the engine. These specified, premixed formulas require no mixing with water or other additives. The low silicate ethylene glycol, special additives, and purified water formulas prevent silicate gelling which can restrict engine cooling passages. They provide protection down to –38 degrees C (–33 degrees F). Part Number Description Page 6B-4 Premixed Marine Engine Coolant 92-813054A2 Fleetguard Compleat (Product 91-50663 with DCA4 additive) Obtain Locally 90-860074--1 FEBRUARY 2002 SERVICE MANUAL NUMBER 22 CLOSED COOLING SYSTEM Torque Specifications Description Nm lb-in. Engine Water Circulating Pump Screw 30 Thermostat Housing Cover 16 Heat Exchanger Bracket / Thermostat Housing 30 Water Pump Pulley Screw 8.5 72 Water Manifold 10 84 Upper Heat Exchanger End Cover Bolt 14-15 120 132 Lower Heat Exchanger End Cover Bolt 12-14 108 120 lb-ft 22 132 22 Lubricants / Sealants / Adhesives Description Part Number 2-4-C Marine Lubricant With Teflon 92-802859A! Special Lubricant 101 92-802865A1 Perfect Seal 92-34227--1 Loctite Master Gasket 92-12564--2 Loctite Pipe Sealant with Teflon Obtain Locally Description Part Number Tools Special Tools Cooling System Cleaner 91-814825 Fleetguard Restore - CC2610 Obtain Locally Description Part Number Pink Litmus Paper Obtain Locally Thermostat Tester Obtain Locally Heat Exchanger Cleaning Brush Obtain Locally Cooling System Pressure Tester Obtain Locally Tools 90-860074-1 FEBRUARY 2002 Page 6B-5 CLOSED COOLING SYSTEM SERVICE MANUAL NUMBER 22 Diagrams and Exploded Views Coolant Flow Diagram e d g f c b a h 75351 Closed Cooling Circuit (Fresh Water / Coolant) Page 6B-6 90-860074--1 FEBRUARY 2002 CLOSED COOLING SYSTEM SERVICE MANUAL NUMBER 22 Coolant Flow Diagram (continued) g h i j k l m n - Circulating Pump - Closed Coolant - Engine Block - Upper Section Of Liners - Cylinder Heads - Water Manifold - Turbocharger - Exhaust Manifold - Thermostat Housing And Thermostats - Heat Exchanger 90-860074-1 FEBRUARY 2002 Page 6B-7 CLOSED COOLING SYSTEM SERVICE MANUAL NUMBER 22 Heat Exchanger / Coolant Tank and Related Components B 17 16 2 14 13 18 B 1 15 3 4 13 11 12 10 11 9 3 5 11 6 19 A 7 11 20 A 8 10 28 27 78273 21 22 C 25 DEC AL 26 D 23 24 23 78387 Page 6B-8 90-860074--1 FEBRUARY 2002 CLOSED COOLING SYSTEM SERVICE MANUAL NUMBER 22 Heat Exchanger / Coolant Tank and Related Components (continued) 1 - Screw, M6x78 mm (5) 2 - Lockwasher (6) 3 - Hose Clamp 4 - Thermostat Housing To Heat Exchanger Hose 5 - Engine Lifting Eye 6 - Screw, M10 x 35 mm (1-3/8 in.) Long (3) 7 - Lockwasher (3) 8 - Port Side Heat Exchanger Bracket 9 - Water Circulating Pump Bypass Hose 10 - Thermostat Housing And Starboard Heat Exchanger Bracket 11 - Hose Clamp 12 - Gasket 13 - Thermostats - 2 Different Temperatures 14 - Thermostat Housing Cover 15 - Stud, M6 x 75 mm (3 in.) Long (1) 16 - Lockwasher 17 - Engine Cover Mount Threaded Spacer/ Nut (1) 18 - Thermostat Housing To Heat Exchanger Hose 19 - Screw with Lockwasher, M8 x 100 mm (3-15/16 in.) Long (2) 20 - Screw with Lockwasher, M8 x 60 mm x (2-23/64 in.) Long (2) 21 - Pressure Cap 22 - Heat Exchanger / Coolant Tank 23 - Hose Clamp (2) 24 - Circulating Pump-to-Heat Exchanger Hose 25 - Drain Screw and Sealing Washer 26 - Engine Model Decal 27 - Heat Exchanger To Bracket Clamps (2) 28 - Engine Water Circulating Pump Description Nm lb-in. A Heat Exchanger Bracket / Thermostat Housing Bolt 30 B Thermostat Housing Cover Bolt 16 132 22 C Heat Exchanger End Cover Bolt Upper 14-15 120 132 D Heat Exchanger End Cover Bolt Lower 12-14 108 120 90-860074-1 FEBRUARY 2002 lb-ft Page 6B-9 CLOSED COOLING SYSTEM SERVICE MANUAL NUMBER 22 Engine Water Circulating Pump 3 1 4 B 5 2 A 1 2 3 4 5 Page 6B-10 73948 - Water Circulating Pump - Screws With Washers - Gasket - Pulley - Screws With Washers Description Nm A Engine Water Circulating Pump Screw 30 B Water Pump Pulley Screw 8.5 lb-in. lb-ft 22 72 90-860074--1 FEBRUARY 2002 CLOSED COOLING SYSTEM SERVICE MANUAL NUMBER 22 Checking Coolant Level CAUTION Alcohol or methanol base antifreeze or plain water are not recommended for use in cooling system at any time. Before starting engine each day, check to ensure that coolant is visible in coolant recovery bottle. WARNING Do NOT remove coolant pressure cap when the engine is hot - coolant may discharge violently, causing severe burns. Let the engine cool before removing the pressure cap. CAUTION If the coolant should get extremely low and the engine very hot, let the engine cool for approximately 15 minutes before adding coolant; then, with the engine operating, add coolant slowly. Adding cold coolant to a hot engine may crack the cylinder head or crankcase. Never use only water in the closed coolant section. If coolant is not visible, check coolant (fresh water) section of cooling system, including coolant recovery system, for leaks and repair as necessary. Refill coolant section with required coolant solution. If coolant is visible, start engine and operate until it reaches normal operating temperature, then recheck coolant level in coolant recovery bottle. Coolant level MUST BE between the Add and Full marks (on front of bottle). If level is low, remove fill cap from coolant recovery bottle and add needed amount of required coolant. If frequent additions of coolant are required, check closed cooling section for leaks. Occasionally, check to ensure that coolant recovery system is functioning properly by removing pressure cap from heat exchanger and checking the coolant level. After engine has cooled down, turn pressure cap 1/4 turn to allow any pressure to escape slowly, then push down and turn cap all-the-way off. Coolant level should be up to bottom of heat exchanger filler neck. If low, inspect entire closed cooling coolant (fresh water) section (especially coolant recovery system) for leaks and repair, as necessary. IMPORTANT: When reinstalling pressure cap, tighten it until it contacts locking tabs on filler neck. 90-860074-1 FEBRUARY 2002 Page 6B-11 CLOSED COOLING SYSTEM SERVICE MANUAL NUMBER 22 Testing Closed Cooling System Testing Coolant for Alkalinity WARNING Allow engine to cool before removing pressure cap as sudden loss of pressure could cause hot coolant to boil and discharge violently. After engine has cooled, turn cap 1/4 turn to allow any pressure to escape slowly, then push down and turn cap all the way off. Coolant in closed cooling (fresh water) section should be changed every two years. Checked for alkalinity at least once between change intervals. To check coolant for alkalinity, proceed as follows: 1. Obtain pink litmus paper from a local supplier (drug store, pet shop, etc.). 2. Remove pressure cap from heat exchanger and insert one end of litmus paper into coolant. a. If pink litmus paper turns blue, coolant is alkaline and need not be replaced. b. If pink litmus paper remains pink, coolant is not alkaline and MUST BE REPLACED. Refer to Changing Coolant. Pressure Testing System WARNING Allow engine to cool before removing pressure cap. Sudden loss of pressure could cause hot coolant to boil and discharge violently. After engine has cooled, turn cap 1/4 turn to allow any pressure to escape slowly, then push down and turn cap all the way off. If coolant section of closed cooled system is suspected of leaking or not holding sufficient pressure, and no visible signs of leakage can be found, perform the following test: 1. Remove pressure cap from heat exchanger or reservoir. 2. Clean and inspect pressure cap to ensure that cap is maintaining proper pressure in system. Refer to Testing Pressure Cap. 3. Clean and inspect fill neck: a. Clean inside of filler neck to remove any deposits or debris. b. Examine lower inside sealing surface for nicks or other damage. Surface must be perfectly smooth to achieve a good seal between it and rubber seal on cap. c. Check locking cams on sides of filler neck to ensure that they are not bent or damaged. If locking cams are bent or damaged, pressure cap will not hold the proper pressure. 4. Adjust coolant level in fresh water section to 25 mm (1 in.) below filler neck. Page 6B-12 90-860074--1 FEBRUARY 2002 CLOSED COOLING SYSTEM SERVICE MANUAL NUMBER 22 5. Attach an automotive-type cooling system pressure tester to filler neck and pressurize closed cooling system to amount specified in following chart, based on pressure cap rating for your engine. Pressure Cap Rating Amount of Pressure Applied to Closed Cooling System 97 kPa (14 psi) 137 kPa (20 psi) 6. Observe gauge reading for approximately two minutes; pressure should not drop during this time. If pressure drops, proceed with the following steps until leakage is found. 7. While maintaining specified pressure on closed cooling system, visually inspect external portion of cooling system (hoses, gaskets, drain plugs, core plugs, circulating pump seal, etc.) for leakage. Also listen closely for bubbling or hissing, as they usually are a sure indication of a leak. 8. Refer to Testing Heat Exchanger in this section and test as outlined. 9. If no leakage could be found in above steps, engine is leaking internally, and it probably is due to one or more of the following: • Loose cylinder head bolts or damaged gasket • Loose turbocharger bolts or damaged gasket • Loose exhaust elbow or damaged gasket • Cracked or porous cylinder head or block • Cracked or porous exhaust manifold 10. Proceed as follows until location of internal leak is found: a. Start engine. Pressurize system to previously specified amount and observe pressure gauge on tester. If needle in gauge vibrates, compression or combustion is leaking into closed cooled section from a leak in the combustion chamber. Stop engine. b. Remove glow plugs (one at a time) from cylinders and examine for presence of coolant. A glow plug that is perfectly clean or milky appearing is a sure indication of a leak. c. Drain oil from engine and examine for presence of coolant. Oil usually will be milky if coolant is present. d. If coolant is present, remove engine from boat and remove the oil pan. With engine in the upright position, pressurize closed cooled section to previously specified amount and examine internal surfaces of engine to locate leak. e. If no leaks can be found in above steps, entire engine must be disassembled and inspected for leaks. 90-860074-1 FEBRUARY 2002 Page 6B-13 CLOSED COOLING SYSTEM SERVICE MANUAL NUMBER 22 Testing for Cylinder Head Gasket Leak A leaking head gasket will cause combustion gas to be forced into the cooling system. The mixture of coolant and tiny air bubbles is a poor heat conductor and will overheat an engine quickly. Compression tests or cooling system pressure check normally will not detect the leak because the test pressure is far below the combustion pressures which cause the leak. An effective test follows. IMPORTANT: Operate boat in lake for this test. It is best to operate the engine at or above cruising speed during this test. Usually a failed head gasket will not cause the engine to overheat below cruising speed. 1. Install a clear plastic hose between the reservoir and coolant recovery bottle. Use a 61-91 cm (2-3 ft) long hose for this test. 2. Route this hose so a U is formed. 3. Put enough coolant into hose to fill the center 10-13 cm (4 or 5 in.) of the U. 4. Start the engine and observe the U while the engine is operating. a. During Idle and Warm-Up: Some coolant and/or air will leave the reservoir. b. During Cruising Speed (2800 - 3200 rpm): Coolant and/or air leaving the reservoir should stop after approximately five minutes of operation at a steady rpm. A leaking head gasket will produce air bubbling through the U, going to the coolant recovery bottle. The frequency and size of the bubbles will depend on the size of the leak. c. At Higher Speeds (3200 - 3600 rpm): Normal operation is the same as described in b. above. A failed head gasket will cause the bubbles to come faster and may be accompanied by violent, intermittent bursts of coolant. It is important not to confuse normal warm-up expansion with a failed head gasket. Normal warm-up produces an intermittent flow of coolant which will stop within approximately five minutes at a steady rpm. A head gasket leak will not stop because the one thing that marks a failed head gasket is the continued passage of air. This may be accompanied by violent, intermittent bursts of coolant leaving the reservoir. If coolant continues to flow (not in violent, intermittent bursts) from the reservoir at cruising speed, something other than the head gasket is causing the engine to overheat. Page 6B-14 90-860074--1 FEBRUARY 2002 CLOSED COOLING SYSTEM SERVICE MANUAL NUMBER 22 Testing Pressure Cap Pressure cap is designed to maintain a pressure of approximately its rated capacity (refer to Specifications) in closed cooled section once engine has attained operating temperature. Cap should be cleaned, inspected and pressure-tested at regular tune-up intervals or whenever cap is suspected of maintaining improper pressure. WARNING Allow engine to cool before removing pressure cap. Sudden loss of pressure could cause hot coolant to boil and discharge violently. After engine has cooled, turn cap 1/4 turn to allow any pressure to escape slowly, then push down and turn cap all the way off. 1. Carefully remove pressure cap from reservoir or heat exchanger. 2. Wash cap with clean water to remove any deposits or debris from sealing surfaces. 3. Inspect gasket (if used) and rubber seal on cap for tears, cuts, cracks or other signs of deterioration. 4. Replace gasket, if damaged, or entire cap if rubber seal is damaged. a c b 72714 a - Rubber Seal b - Gasket c - Locking Tabs (1 Not Shown) 5. Ensure that locking tabs on cap are not bent or damaged. 90-860074-1 FEBRUARY 2002 Page 6B-15 CLOSED COOLING SYSTEM SERVICE MANUAL NUMBER 22 6. Examine lower inside sealing surface in filler neck to ensure that it is perfectly smooth and free of debris. Also, inspect cam lock flanges on sides of filler neck to ensure that they are not bent. a b 72715 a - Filler Neck b - Cam Lock Flange 7. Using a cooling system pressure tester similar to one shown, test cap to ensure that it releases at proper pressure and does not leak. Refer to instructions which accompany tester for correct test procedure. Cap must relieve pressure at 97 kPa (14 psi), and must hold rated pressure for 30 seconds without going below 76 kPa (11 psi). Replace cap if measured values are less than specified. 72716 Typical Pressure Cap Tester 8. Reinstall cap on heat exchanger. Page 6B-16 90-860074--1 FEBRUARY 2002 SERVICE MANUAL NUMBER 22 CLOSED COOLING SYSTEM Coolant Change Interval Refer to SECTION 1B. Coolant Requirement Refer to SECTION 1B. Draining Closed Cooling System IMPORTANT: Observe the following: w Insert a wire into drain holes to ensure that foreign material is not obstructing the drain holes. w Ensure that the engine is as level as possible to promote complete draining of cooling system. w If engine will be exposed to freezing temperatures, make sure closed cooling section is filled with an ethylene glycol antifreeze and water solution properly mixed to protect engine to lowest temperature to which it will be exposed. w Closed cooling section must be kept filled year round with required coolant. Do NOT use Propylene Glycol antifreeze in the closed cooling section of the engine. 90-860074-1 FEBRUARY 2002 Page 6B-17 CLOSED COOLING SYSTEM SERVICE MANUAL NUMBER 22 WARNING Allow engine to cool before removing pressure cap. Sudden loss of pressure could cause hot coolant to boil and discharge violently causing severe injury. 1. Allow engine to cool. After engine has cooled, turn pressure cap 1/4 turn to allow any pressure to escape slowly, then push down and turn cap all the way off of heat exchanger/coolant tank. 2. Drain coolant from intake/exhaust manifold by opening the drain valve. 3. Drain coolant from the engine block by opening the drain valve. 4. After coolant has drained completely, securely close drain valves. 5. Empty coolant recovery bottle. 6. If required, clean system. Refer to Cleaning Closed Cooling System. 7. Fill system with required coolant. a d 72520 c b 71364 76391 Typical Sterndrive (MCM) Shown, Inboard (MIE) Similar a - Pressure Cap b - Intake/Exhaust Manifold Drain Valve c - Engine Block Drain Valve d - Coolant Recovery Bottle Page 6B-18 90-860074--1 FEBRUARY 2002 CLOSED COOLING SYSTEM SERVICE MANUAL NUMBER 22 Cleaning Closed Cooling System The closed cooling section of the cooling system should be cleaned according to the Maintenance Schedules in SECTION 1B, or whenever decreased cooling efficiency is experienced. A good grade automotive cooling system cleaning solution may be used to remove rust, scale or other foreign material. Always follow manufacturer’s instructions for the cleaner. If closed cooling system is extremely dirty, a pressure flushing device may be used to flush out remaining deposits. Flushing should be done in direction opposite normal coolant flow to allow water to get behind deposits and force them out. Refer to instructions which accompany flushing device for proper hookup and flushing procedure. Using A Cleaner 1. Drain closed cooling system. NOTE: Properly dispose of old coolant. 2. Add one liter of Cooling System Cleaner (92-814825) or add Fleetgaurd Restore CC2610 to cooling system following the manufacturer’s instructions. 3. Fill the cooling system with tap water to within 13 - 19 mm (1/2 - 3/4 in.) of bottom of filler neck. 4. Install pressure cap. NOTE: During system cleaning leave auxiliary heater, if equipped, connected to engine. Otherwise, the engine will be contaminated when the heater is reconnected. 5. Operate the engine in open water at wide open throttle at normal operating temperature for a minimum of thirty minutes to circulate cleaner. 6. Stop the engine and after cool down, drain cleaner from closed cooling system. 7. Flush the closed cooling system. Refer to Flushing The Closed Cooling System. NOTE: Properly dispose of contaminated cleaner. Heat Exchanger and Cooler Cleaning 1. Clean tubes in heat exchanger and coolers by running a suitable wire brush through each tube. a 71724 a - Wire Brush, Sized to Fit Passages 2. Rinse out heat exchanger and cooler tubes with tap water from a hose to remove loosened particles. 3. Replace unit if it cannot be satisfactorily cleaned. 90-860074-1 FEBRUARY 2002 Page 6B-19 CLOSED COOLING SYSTEM SERVICE MANUAL NUMBER 22 Flushing The Closed Cooling System 1. Remove thermostat housing cover. 2. Remove the thermostats and temporarily install housing cover. Torque housing cover screws to 16 Nm (132 lb-in.). 3. Remove large hex plug from exhaust manifold rear cover. Then, install an adapter to this opening, suitable for connecting a tap water hose. NOTE: On engines equipped with auxiliary hot water heater, remove heater hose from fitting (in place of hex plug). 70192 Hex Plug Drain (Similar With Hot Water Connection) 4. Attach hose from water source to adapter. 5. On engines with Auxiliary Hot Water Heater: Proceed to step 7. 6. On engines without Auxiliary Hot Water Heater: Open cylinder block drain valves. 7. Run tap water through system until discharge water is clean. NOTE: Catch expelled water in a suitable container and dispose of properly. 8. Shut off water tap. 9. Remove tap water hose and adapter. 10. Install large hex plug, with new sealing washer, on intercooler, or reconnect heater hose. 11. Close cylinder block drain valves if previously opened. 12. Install thermostats in housing. 13. Position a new thermostat housing gasket on housing. Torque housing cover screws to 16 Nm (132 lb-in.). 14. Fill system with required coolant. NOTICE For instructions on Flushing Seawater Section refer to SECTION 1B - Maintenance. Page 6B-20 90-860074--1 FEBRUARY 2002 CLOSED COOLING SYSTEM SERVICE MANUAL NUMBER 22 Filling The Closed Cooling System 1. Remove pressure cap from heat exchanger and fill section with specified coolant until coolant level is 25 mm (1 in.) below filler neck. CAUTION Avoid seawater pickup pump impeller damage and subsequent overheating damage to sterndrive unit. DO NOT operate engine without water being supplied to seawater pickup pump. 2. With pressure cap off, start engine and operate at fast idle (1500-1800 rpm). Add recommended coolant solution to heat exchanger, as required, to maintain coolant level 25 mm (1 in.) below filler neck. 3. After engine has reached normal operating temperature (thermostats are fully open), and coolant level remains constant, fill heat exchanger to bottom of filler neck. 4. Observe engine temperature gauge to make sure that engine operating temperature is normal. IMPORTANT: If gauge indicates excessive temperature, stop engine immediately and examine for cause. 5. Install pressure cap on heat exchanger. 6. Remove cap from coolant recovery reservoir. Fill to FULL mark with recommended coolant solution. Reinstall cap. 7. With engine still operating, check hose connections, fittings and gaskets for leaks. Repeat Step 4. 90-860074-1 FEBRUARY 2002 Page 6B-21 CLOSED COOLING SYSTEM SERVICE MANUAL NUMBER 22 Thermostats Removal 1. Refer to Draining Instructions as previously outlined, and drain coolant. 2. Remove closed cooling system hose between thermostat housing and heat exchanger. 3. Remove thermostat housing cover screws and washers, including the cover spacer. NOTE: Components shown removed for visual clarity only. It is not necessary to remove the housing itself. f e c d b a 73973 a b c d e f - Hose and Clamps - Thermostat Housing Cover - Screws and Washers (5) - Stud - Washer - Spacer (For Engine Cover) 4. Remove housing cover. IMPORTANT: Do NOT allow old gasket material or debris inside, which might foul cooling system passages. 5. Remove old gasket. Page 6B-22 90-860074--1 FEBRUARY 2002 CLOSED COOLING SYSTEM SERVICE MANUAL NUMBER 22 6. Remove thermostats. a b d c 73973 a - Thermostat Housing Cover b - Thermostat(s) c - Gasket Testing 1. Clean thermostats in soap and water to remove any deposits or debris. 2. Inspect thermostats for corrosion or other visible damage. 3. If thermostats are suspected of producing insufficient engine temperature, check thermostats for leaks by holding them up to lighted background. Light leaking around the thermostat valve indicates that thermostat is not closing completely and should be replaced. A few light leaks at one or two points around the valve perimeter is acceptable. a 72717 a - Perimeter of Valve 90-860074-1 FEBRUARY 2002 Page 6B-23 CLOSED COOLING SYSTEM SERVICE MANUAL NUMBER 22 4. Following the manufacturers recommendations for usage, check opening and closing temperature. The thermostat opens when it drops off of thread using a tester. Thermostat must open at specified temperature stamped on thermostat. b a c 72675 Typical Thermostat Tester In Use a - Thermometer b - Nylon String c - Thermostat IMPORTANT: Refer to specifications and note that the two thermostats have different opening temperatures. 5. Continue to heat water until a temperature 14 degrees C (25 degrees F) above opening temperature is obtained. Thermostat valve must be completely OPEN at this temperature. 6. Unplug tester and allow water to cool to a temperature 5 degrees C (10 degrees F) below specified opening temperature. The thermostat must be completely CLOSED at this temperature. 7. Always replace a thermostat that fails to meet all of the preceding tests with one of the same temperature specification. Page 6B-24 90-860074--1 FEBRUARY 2002 CLOSED COOLING SYSTEM SERVICE MANUAL NUMBER 22 Installation NOTE: Always install the thermostats before the gasket. Regardless of position, ensure that 1 thermostat is a 70 degrees C (160 degrees F) thermostat and 1 is an 82 degrees C (180 degrees F) thermostat. 1. Install thermostats. NOTE: Always use a new thermostat housing gasket. 2. Apply Perfect Seal to both sides of the new thermostat housing gasket. 3. Install the new gasket. 4. Install thermostat housing cover. 5. Torque the housing cover screws and nut evenly to 16 Nm (132 lb-in.), in a diagonal pattern. e d a b A c b 78274 a b c d e - Housing Cover - Thermostat (2 Different Temperatures) - Gasket - Screw With Washer (5) - Engine Cover Mount Threaded Spacer/ Nut (1) 6. Connect hoses. 7. Fill the closed cooling system. 8. Open seacock if equipped, or unplug and reconnect seawater inlet hose. 9. Start and operate the engine. 10. Check for leaks. 11. Check for normal engine operating temperatures. 90-860074-1 FEBRUARY 2002 Page 6B-25 CLOSED COOLING SYSTEM SERVICE MANUAL NUMBER 22 Heat Exchanger NOTICE Refer to Cold Weather or Extended Storage, Draining Instructions in SECTION 1B and Precautions in this section, BEFORE proceeding. Testing INTERNAL LEAK An internal leak will cause coolant to go into the seawater system when pressure is put on the closed cooling circuit. 1. Remove top seawater (inlet) hose from the exchanger. Do NOT drain the exchanger. 2. Pressurize the closed cooling circuit to 137 kPa (20 psi) with a radiator tester. 3. If seawater begins to flow from the fitting there is a leak. BLOCKAGE IMPORTANT: Seawater flows THROUGH the tubes in the exchanger. Closed cooling coolant flows AROUND the tubes. 1. Remove end caps and inspect for any blockage in the seawater circuit (weeds, etc.). 2. Remove closed cooling circuit hoses and inspect the tubes just inside the fittings. Because the complete heat exchanger cannot be inspected, the heat exchanger should be replaced if blockage is suspected. Repair IMPORTANT: Braze with BCUP 2 rod or silver solder. Care must be taken not to melt other joints during repair. 1. Internal leaks can be repaired by brazing shut the ends of the leaking tube. This is only a temporary fix because usually another tube will start leaking after a short period of time and this also causes a reduction in cooling capacity. Do NOT close more than three tubes. 2. Fittings and drains that have been broken off the heat exchanger can be reattached by brazing. Page 6B-26 90-860074--1 FEBRUARY 2002 CLOSED COOLING SYSTEM SERVICE MANUAL NUMBER 22 Removal NOTICE Refer to Cold Weather or Extended Storage, Draining Instructions in SECTION 1B and Precautions in this section, BEFORE proceeding. 1. Drain the seawater system. 2. Drain the closed cooling system. NOTE: In the following instructions, obtain clean, suitable devices and plug hoses to avoid loss of engine oil. 3. Disconnect oil lines from oil cooler fittings near each end of oil cooler on heat exchanger. Quickly plug lines. NOTE: Components shown removed for visual clarity. c b a 75301 a - Heat Exchanger With Oil Cooler b - Starboard Oil Line And Fitting c - Port Oil Line And Fitting 4. Disconnect seawater and closed cooling hoses as required to allow removal of heat exchanger. 5. Disconnect turbocharger coolant vent hose from fitting on upper-port side of the heat exchanger. 6. Remove the two large screw clamps retaining the heat exchanger to the port and starboard brackets. 90-860074-1 FEBRUARY 2002 Page 6B-27 CLOSED COOLING SYSTEM SERVICE MANUAL NUMBER 22 7. Remove combination heat exchanger and engine oil cooler. b a a a b c a a 74484 Heat Exchanger / Engine Oil Cooler and Related Components a - Hoses b - Clamps c - Coolant Vent Hose Fitting 8. If either the closed cooling section or oil cooler portion of the heat exchanger are defective, it will be necessary to replace the complete assembly. Cleaning and Inspection 1. Clean water passages in heat exchanger by inserting a suitable sized wire brush on a proper length rod into each passage. 2. Put on safety glasses. 3. Blow loose particles out of, and from between, water passages using compressed air. 4. Provided the passages for seawater are acceptably clean and free of debris, clean the exterior of the heat exchanger with soap and water. Scrub gently with a brush as required. 5. Visually inspect all exterior surfaces and water passages for cracks or damage. Repair or replace as required. Page 6B-28 90-860074--1 FEBRUARY 2002 CLOSED COOLING SYSTEM SERVICE MANUAL NUMBER 22 Installation 1. Apply a small amount of petroleum jelly on the brackets and hose ends to ease installation. 2. Install the combination heat exchanger and engine oil cooler. 3. Make all necessary seawater and closed cooling hose connections. b a A a a b a a 74484 Engine Oil Cooler / Heat Exchanger and Related Components a - Hoses b - Clamps 4. Unplug and install port and starboard oil lines to fittings near each end of oil cooler. a c c a b b 75297 75301 a - Engine Oil Cooler b - Starboard Oil Line And Fitting c - Port Oil Line And Fitting 90-860074-1 FEBRUARY 2002 Page 6B-29 CLOSED COOLING SYSTEM SERVICE MANUAL NUMBER 22 5. Install the two large screw clamps retaining the heat exchanger to the port and starboard brackets. NOTE: There is a new style clamp to be used on the D2.8L D-Tronics that uses an automatic spring tensioner. This clamp will replace the earlier clamps. 6. Reconnect coolant recovery bottle hose. 7. Reconnect turbocharger coolant vent hose. c d b a a b c d 74487 - Heat Exchanger / Oil Cooler - Large Screw Clamps, Or Automatic Tension Clamps (Not Shown) - Coolant Recovery Bottle Hose - Turbocharger Coolant Vent Hose 8. Fill the closed cooling system. 9. Open seacock if equipped, or unplug and reconnect seawater inlet hose. 10. Pre-lube the turbocharger and engine. 11. Start the engine. Operate briefly to fill oil cooler 12. Check for leaks. 13. Stop the engine. 14. Check engine oil level. Fill to proper level with specified oil. Page 6B-30 90-860074--1 FEBRUARY 2002 CLOSED COOLING SYSTEM SERVICE MANUAL NUMBER 22 Water Circulating Pump NOTICE Refer to Cold Weather or Extended Storage, Draining Instructions in SECTION 1B and Precautions in this section, BEFORE proceeding. IMPORTANT: Water circulating pump on D4.2L engines is a larger volume pump and does NOT interchange with circulating pumps on D2.8L engines. Removal 1. Drain the seawater system. 2. Drain the closed cooling system. 3. Remove the heat exchanger. 4. Remove alternator drive belts. 5. Disconnect water circulating pump hoses. 6. Remove the pump. 7. Discard gasket. b a c 78273 Typical a - Water Circulating Pump b - Gasket c - Nuts Cleaning and Inspection 1. Remove all traces of old gasket material from water circulating pump body. 2. Remove all traces of old gasket material from engine block do NOT allow debris inside, which might foul cooling system passages. 3. Inspect pump for blockage, cracks, sand holes, corrosion or other damage. Inspect pump impeller for cracks and erosion. Replace complete pump, if any damage exists. 4. Check impeller shaft and bearings for excessive side play. If play can be felt, replace complete pump. 5. Inspect pump pulley for bends, cracks, corrosion, or other damage. Inspect pulley for runout. Replace complete pump, if pulley is damaged or untrue. 90-860074-1 FEBRUARY 2002 Page 6B-31 CLOSED COOLING SYSTEM SERVICE MANUAL NUMBER 22 Installation 1. Apply Loctite Master Gasket to both sides of new gasket and position on engine block. 2. Install water circulating pump. 3. Connect water circulating pump hoses. 4. Torque nuts evenly to 30 Nm (22 lb-ft), in a diagonal pattern. b a c 78273 Typical a - Water Circulating Pump b - Gasket c - Nuts 5. Install the heat exchanger. 6. Install and tension drive belts. NOTE: On all models, check belt tension by depressing upper strand of belt at center point between pulleys. Belt must not deflect more than 5 mm (3/16 in.). 7. Fill the closed cooling system. 8. Unplug and connect seawater inlet hose or open the seacock. 9. Ensure seawater pickup pump is supplied cooling water. 10. Start the engine. 11. Test the engine operation - observe temperature gauge and check for leaks. 12. Stop the engine. IMPORTANT: Use only specified coolant. 13. Check engine coolant level. Fill to proper level. Page 6B-32 90-860074--1 FEBRUARY 2002 CLOSED COOLING SYSTEM SERVICE MANUAL NUMBER 22 Coolant Manifold Refer to SECTION 3A. Corrosion Protection Refer to SECTION 1B. Auxiliary Hot Water Heater Connections d c b g h a 71898 f e j 72037 k i 72038 Auxiliary Hot Water Heater Adaptor Kit On A Typical Engine a - Allen Head Plug, Rear Cover b - Sealing Washer c - Hose Coupler Fitting d - Sealing Washer e - Plug, On Closed Coolant Tank/Heat Exchanger f - Sealing Washer g - Hose Coupler Fitting h - Sealing Washer i - Supply Hose j - Return Hose k - Heater 90-860074-1 FEBRUARY 2002 Page 6B-33 CLOSED COOLING SYSTEM SERVICE MANUAL NUMBER 22 THIS PAGE IS INTENTIONALLY BLANK Page 6B-34 90-860074--1 FEBRUARY 2002 INTERCOOLER SERVICE MANUAL NUMBER 22 INTAKE AND EXHAUST SYSTEM Section 7A - Intercooler Table of Contents Torque Specifications . . . . . . . . . . . . . . . . Lubricants / Sealants / Adhesives . . . . . Exploded Views . . . . . . . . . . . . . . . . . . . . . D2.8L Intercooler . . . . . . . . . . . . . . . . . D4.2L Intercooler . . . . . . . . . . . . . . . . . Intercooler . . . . . . . . . . . . . . . . . . . . . . . . . . 7A-3 7A-3 7A-4 7A-4 7A-6 7A-8 Removal . . . . . . . . . . . . . . . . . . . . . . . . Disassembly . . . . . . . . . . . . . . . . . . . . . Cleaning and Inspection . . . . . . . . . . . Assembly . . . . . . . . . . . . . . . . . . . . . . . . Installation . . . . . . . . . . . . . . . . . . . . . . . 7A-8 7A-11 7A-13 7A-14 7A-17 7 A 90-860074--1 FEBRUARY 2002 Page 7A-1 INTERCOOLER SERVICE MANUAL NUMBER 22 THIS PAGE IS INTENTIONALLY BLANK Page 7A-2 90-860074--1 FEBRUARY 2002 INTERCOOLER SERVICE MANUAL NUMBER 22 Torque Specifications Description Nm lb-in. Rear - (All Models) 10 84 Side (D21.8L D-Tronic Only) 10 84 lb-ft Intake Duct Screw End Cover Screw 40 Anode Plug 13 Intercooler Housing Nut 32 30 120 24 Lubricants / Sealants / Adhesives Description Part Number Loctite 514 92-75505-1 Perfect Seal 92-34227--1 90-860074--1 FEBRUARY 2002 Page 7A-3 INTERCOOLER SERVICE MANUAL NUMBER 22 Exploded Views D2.8L Intercooler A A 12 4 B A 15 c 3 14 C 11 9 1 A 7 8 7 6 10 16 b2 D B 7 15 13 5 75619 Page 7A-4 90-860074--1 FEBRUARY 2002 INTERCOOLER SERVICE MANUAL NUMBER 22 D2.8L Intercooler (continued) 1 - Radiator Insert (Heat Exchanger Core) 2 - Intercooler Housing 3 - Side Intake Duct 4 - Rear Intake Duct 5 - Front Cover 6 - Rear Cover 7 - O-ring (4 On Engines Equipped With Plate, 3 On Others) 8 - Plate (If Equipped) 9 - Anode 10 - Anode Plug With Sealing Washer 11 - Drain Plug With Sealing Washer 12 - Rear Intake Duct Screw and Washer 13 - Gasket 14 - Intake Duct Screw 15 - End Cover Screw 16 - Nut and Washer Description Part Number A Loctite 514 Obtain Locally Description Nm lb-in. Rear - (All Models) 10 84 Side (D21.8L D-Tronic Only) 10 84 lb-ft Intake Duct Screw A B End Cover Screw 40 C Anode Plug 13 D Intercooler Housing Nut 32 90-860074--1 FEBRUARY 2002 30 120 24 Page 7A-5 INTERCOOLER SERVICE MANUAL NUMBER 22 D4.2L Intercooler A 3 12 A 15 11 2 C 10 c 13 7 B 9 7 5 13 B Page 7A-6 8 7 6 16 1 14 4 D 70904 90-860074--1 FEBRUARY 2002 INTERCOOLER SERVICE MANUAL NUMBER 22 D4.2L Intercooler (continued) 1 - Radiator Insert (Heat Exchanger Core) 2 - Intercooler Housing 3 - Intake Duct 4 - Gasket (6) 5 - Front Cover 6 - Rear Cover 7 - O-ring (4 On Engines Equipped With Plate, 3 On Others) 8 - Plate (If Equipped) 9 - Anode 10 - Anode Plug With Sealing Washer 11 - Drain Plug With Sealing Washer (Not Shown In This View) 12 - Intake Duct Screw (4) 13 - Cover Screws 14 - Stud (2 Lengths) 15 - Engine Cover Spacer 16 - Intercooler Housing Nut LUBRICANT / SEALANTS / ADHESIVES Description Part Number A Loctite 514 Obtain Locally TORQUE Description Nm lb-in. Rear - (All Models) 10 84 Side (D21.8L D-Tronic Only) 10 84 lb-ft Intake Duct Screw A B End Cover Screw 40 C Anode Plug 13 D Intercooler Housing Nut 32 90-860074--1 FEBRUARY 2002 30 120 24 Page 7A-7 INTERCOOLER SERVICE MANUAL NUMBER 22 Intercooler Removal 14. Remove engine cover. 15. Drain the seawater system. 16. Disconnect MAP/IAT sensor. Remove J-clamp for coolant vent hose. b a 75582 a - MAP/IAT Sensor Connector b - J-clamp 17. On Sterndrive Engines: a. Remove sterndrive shift bracket. b. Remove engine lifting eye bracket from intercooler end cover. a b 75300 Sterndrive (MCM ) Engine a - Shift Bracket b - Engine Lifting Eye Bracket Page 7A-8 90-860074--1 FEBRUARY 2002 INTERCOOLER SERVICE MANUAL NUMBER 22 18. Remove drain plug and sealing washer from rear cover of intercooler. a b b c 70912 75621 Sterndrive Shown (Inboard Similar) a - Intercooler b - Rear Cover c - Drain Plug With Sealing Washer 19. Remove hollow bolt and sealing washers from wastegate valve pressure line. a a b b 73940 70916 Sterndrive Shown (Inboard Similar) a - Wastegate Valve Pressure Line b - Hollow Bolt With Sealing Washers 90-860074--1 FEBRUARY 2002 Page 7A-9 INTERCOOLER SERVICE MANUAL NUMBER 22 20. Loosen hose clamps and disconnect seawater hoses from intercooler-to-heat exchanger and from seawater pump-to-intercooler. b a 75298 a - Seawater Pump To Intercooler Hose b - Intercooler To Heat Exchanger Hose 21. Loosen hose clamp at turbocharger as shown. b a c 70918 Typical a - Hose b - Hose Clamp c - Turbocharger Page 7A-10 90-860074--1 FEBRUARY 2002 INTERCOOLER SERVICE MANUAL NUMBER 22 22. Remove hex nuts retaining intercooler housing flanges to exhaust / intake manifold studs. a a c c b 70916 70921 Typical a - Intercooler/Intercooler Housing b - Exhaust/Intake Manifold c - Hex Nuts CAUTION Remove ALL washers from studs BEFORE lifting off intercooler and intercooler housing. Do NOT drop anything into intake ports or severe engine damage could occur. 23. Using a magnet to remove all lockwashers from studs where hex nuts were removed. 24. Remove intercooler and housing. Disassembly CAUTION Whenever intercooler is disassembled or radiator insert removed from intercooler ALL O-ring seals must be replaced to prevent seawater from leaking into intake air duct and manifold which could result in severe engine damage. 1. Remove intake duct from rear of intercooler. a b 70931 D4.2L Shown (D2.8L Similar) a - Intercooler Housing (Side Intake Duct on D2.8L) b - Intake Duct 90-860074--1 FEBRUARY 2002 Page 7A-11 INTERCOOLER SERVICE MANUAL NUMBER 22 2. Remove rear cover. Note position of O-ring, and if equipped, plate and second O-ring position. a d b c 70906 Typical a - Intercooler Housing b - Rear Cover c - O-ring (Two - If Equipped) d - Plate 3. Remove front cover and O-ring. c a b 70907 a - Intercooler Housing b - Front Cover c - O-ring 4. Slide radiator insert out front of intercooler housing. Note position of O-ring. a b 70905 a - Radiator Insert b - O-Ring Page 7A-12 90-860074--1 FEBRUARY 2002 INTERCOOLER SERVICE MANUAL NUMBER 22 Cleaning and Inspection 1. Clean old gasket material and sealant from flanges. Do NOT nick or gouge the surfaces which would cause intake or water leaks. 2. On D2.8L Engines: Depending on service requirement and/or to allow for a complete cleaning and inspection, separate (remove) side intake duct from intercooler housing. Clean old gasket material and sealant from flanges. Do NOT nick or gouge the surfaces which would cause intake or water leaks. a b 75619 D2.8L Engine Intercooler Housing and Intake Duct a - Side Intake Duct b - Intercooler Housing 3. Use a 4.4 mm (11/64 in.) diameter by 610 mm (24 in.) long rod to clean out radiator insert tubes, or take to a radiator shop for cleaning. 4. Inspect each part for cracks or other damage which would render it unserviceable. 5. Refer to SECTION 1B - and check anodes. 6. Clean and paint exterior surfaces as required to prevent corrosion. IMPORTANT: Be careful not to drop anything into intake ports. 7. Clean old gasket material from manifold. 90-860074--1 FEBRUARY 2002 Page 7A-13 INTERCOOLER SERVICE MANUAL NUMBER 22 Assembly IMPORTANT: Do NOT roll or twist O-ring(s) when installing. 1. Install O-ring on radiator insert against front flange. a b 70925 Typical Radiator Insert Shown a - Radiator Insert (Front Flange) b - O-ring 2. Install radiator insert into intercooler housing. Align insert passages as shown. a a b b c c 70933 D4.2L D-Tronic 70926 D2.8L D-Tronic a - Housing b - Radiator Insert c - Alignment Reference Mark 3. Place O-ring into groove of front cover. Fasten to housing using 4 allen-head screws and wave washers. Torque to 40 Nm (30 lb-ft). b a a 70926 c 70908 Typical a - Front Cover b - O-ring c - Allen-Head Screws And Wave Washers Page 7A-14 90-860074--1 FEBRUARY 2002 INTERCOOLER SERVICE MANUAL NUMBER 22 IMPORTANT: Do NOT roll or twist O-ring(s) when installing. 4. Install O-ring on rear of intercooler housing. b 70927 a Typical a - O-ring b - Rear of Intercooler Housing 5. On intercoolers WITHOUT plate and second O-ring: Proceed to next step. 6. On intercoolers WITH plate and second O-ring: a. Install plate on rear of intercooler. b. Install second O-ring around radiator insert and against plate. a b 70928 Typical a - Plate b - O-ring (Second One Required) 7. Using the 4 allen-head screws and wave washers, install rear cover. Torque to 40 Nm (30 lb-ft). Install drain plug with new sealing washer. c a b 70912 Typical a - Rear Cover b - Drain Plug c - Allen-Head Screws And Wave Washers 90-860074--1 FEBRUARY 2002 Page 7A-15 INTERCOOLER SERVICE MANUAL NUMBER 22 8. Apply Loctite 514 sealer on intake duct-to-intercooler housing mating surface. On D2.8L D-Tronic engines apply sealer to side intake duct mating surface. 9. Using 4 allen-head screws and wave washers, install intake duct. Torque to 40 Nm (30 lb-ft). a b c 70929 D4.2L D-Tronic Shown (D2.8L D-Tronic Similar) a - Intercooler Housing (Side Intake Duct On D2.8L Engines) b - Intake Duct (Rear Intake Duct On D2.8L Engines) c - Allen-Head Screws and Wave Washers 10. On D2.8L D-Tronic Engines: a. If the side intake duct of the intercooler housing was removed for cleaning and inspection, apply Loctite 514 sealer on mating surfaces. b. Assemble using screws with washers. Torque screws to 10 Nm (84 lb-in.). d a c b 75619 D2.8L D-Tronic Engine Intercooler Housing and Intake Duct a - Intake Duct b - Intercooler Housing c - Mating Surface d - Allen-Head Screws With Wave Washers Page 7A-16 90-860074--1 FEBRUARY 2002 INTERCOOLER SERVICE MANUAL NUMBER 22 Installation 1. Install new intake port gaskets. c b a 70881 Typical a - Manifold b - Intake Ports c - Intake Port Gaskets 2. Install intercooler housing. 3. Install hex nuts with lockwashers and torque to 32 Nm (24 lb-ft). a a c c b 70916 70921 Typical a - Intercooler/Intercooler Housing b - Exhaust/Intake Manifold c - Hex Nuts 90-860074--1 FEBRUARY 2002 Page 7A-17 INTERCOOLER SERVICE MANUAL NUMBER 22 4. Securely tighten hose clamp at turbocharger-to-intake duct hose as shown. d b a c 70918 Typical a - Hose b - Hose Clamp c - Turbocharger d - Intake Duct 5. Connect wastegate valve pressure line using the hollow bolt with two new sealing washers as shown. Tighten securely. a a b b 73940 70916 Sterndrive Shown (Inboard Similar) a - Wastegate Valve Pressure Line b - Hollow Bolt With Sealing Washers Page 7A-18 90-860074--1 FEBRUARY 2002 INTERCOOLER SERVICE MANUAL NUMBER 22 6. Install seawater hoses from seawater pump-to-intercooler and from intercooler-to-heat exchanger. Tighten Hose clamps securely. b a 75298 a - Seawater Pump-to-Intercooler Hose b - Intercooler-to-Heat Exchanger Hose 7. On Sterndrive (MCM) Engines: a. Install sterndrive shift bracket onto side of intercooler. Tighten screws securely. b. Install engine lifting eye bracket onto intercooler end cover. Tighten screws securely. a b 75300 a - Shift Bracket b - Engine Lifting Eye Bracket 90-860074--1 FEBRUARY 2002 Page 7A-19 INTERCOOLER SERVICE MANUAL NUMBER 22 8. Install engine cover. CAUTION Do NOT operate an engine without water flowing through seawater pickup pump, as pump impeller may be damaged and subsequent overheating damage to engine, transmission or sterndrive unit may result. CAUTION Watch temperature gauge on dash to ensure that engine does not overheat. 9. Upon first operating engine, after repair or service of intake system and/or intercooler, observe temperature gauge for normal engine operating temperatures, and be certain to check for leaks. Stop engine IMMEDIATELY in the event of leaking or overheating, and repair as needed. Page 7A-20 90-860074--1 FEBRUARY 2002 INTERCOOLER SERVICE MANUAL NUMBER 22 THIS PAGE IS INTENTIONALLY BLANK 90-860074--1 FEBRUARY 2002 Page 7A-21 INTERCOOLER SERVICE MANUAL NUMBER 22 THIS PAGE IS INTENTIONALLY BLANK Page 7A-22 90-860074--1 FEBRUARY 2002 MANIFOLDS, ELBOWS AND RISERS SERVICE MANUAL NUMBER 22 INTAKE AND EXHAUST SYSTEM Section 7B - Manifolds, Elbows And Risers Table of Contents Torque . . . . . . . . . . . . . . . . . . . . . . . . . . . . . . . Lubricants / Sealants / Adhesives . . . . . . . Description . . . . . . . . . . . . . . . . . . . . . . . . . . . Exploded Views . . . . . . . . . . . . . . . . . . . . . . . Typical Intake / Exhaust Manifold . . . . . Sterndrive (MCM) Exhaust Systems . . . Inboard (MIE) Exhaust Systems . . . . . . Representative View of Complete Inboard Exhaust System . . . . . . . . . . . . Locating and Installing The Sterndrive (MCM) Exhaust System . . . . . . . . . . . . . . . 7B-3 7B-3 7B-3 7B-4 7B-4 7B-5 7B-6 7B-7 Locating And Installing The Inboard (MIE) Exhaust System . . . . . . . . . . . . . . . . . . . . . . 7B-9 Exhaust Pipe - Sterndrive (MCM) . . . . . . . 7B-11 Removal . . . . . . . . . . . . . . . . . . . . . . . . . 7B-11 Cleaning . . . . . . . . . . . . . . . . . . . . . . . . . 7B-11 Installation . . . . . . . . . . . . . . . . . . . . . . . . 7B-12 Intake / Exhaust Manifold . . . . . . . . . . . . . . 7B-13 Removal . . . . . . . . . . . . . . . . . . . . . . . . . 7B-13 Cleaning and Inspection . . . . . . . . . . . . 7B-14 Installation . . . . . . . . . . . . . . . . . . . . . . . . 7B-15 7B-8 7 B 90-860074--1 FEBRUARY 2002 Page 7B-1 MANIFOLDS, ELBOWS AND RISERS SERVICE MANUAL NUMBER 22 THIS PAGE IS INTENTIONALLY BLANK Page 7B-2 90-860074--1 FEBRUARY 2002 SERVICE MANUAL NUMBER 22 MANIFOLDS, ELBOWS AND RISERS Torque Description Nm lb-in. lb-ft Intake / Exhaust Manifold Nuts 32 24 Rear Cover Bolts 40 30 Water Temperature Switch/Sender 13 Exhaust Pipe Bolts (MCM) 30 120 23 Exhaust Elbow Clamp Nut Lubricants / Sealants / Adhesives Description Part Number Loctite 592 Pipe Sealant With Teflon Obtain Locally Description All diesel engines covered in this manual use an exhaust manifold which incorporates air passages for both intake and exhaust in a single unit. Fresh water from the closed cooling system is pumped by the engine water circulating pump through the combined intake and exhaust manifold when the engine is operating. When reference is made to the exhaust manifold, keep in mind that it includes the intake air passages (or intake manifold). Additionally, the engines exhaust manifold includes a flange for mounting a turbocharger wastegate and valve assembly. 90-860074--1 FEBRUARY 2002 Page 7B-3 MANIFOLDS, ELBOWS AND RISERS SERVICE MANUAL NUMBER 22 Exploded Views Typical Intake / Exhaust Manifold 12 1 4 11 3 11 13 5 4 7 2 10 8 9 6 28085 1 - Intake / Exhaust Manifold, With Wastegate Flange 2 - Stud 3 - Welch Plug 4 - Gasket(s) 5 - Drain Valve 6 - Plug With Washer 7 - Cover 8 - Plug With Washer, If Equipped 9 - Cover Screw With Lock Washer 10 - Nut 11 - Flange Nut 12 - Gasket 13 - Turbocharger Flange Nut Page 7B-4 90-860074--1 FEBRUARY 2002 MANIFOLDS, ELBOWS AND RISERS SERVICE MANUAL NUMBER 22 Sterndrive (MCM) Exhaust Systems 8 2 3 1 9 71704 4 5 4 6 7 73942 Typical 1 - Exhaust Riser 2 - Clamp 3 - Gasket 4 - Hose Clamps 5 - Exhaust Hose 6 - Round Exhaust Pipe For Exhaust Riser Equipped Engines (No Water Shutter Assembly) 7 - Screw And Lockwasher (4) 8 - Wastegate Exhaust Pipe And Gaskets 9 - Heat Shield Blanket 90-860074--1 FEBRUARY 2002 Page 7B-5 MANIFOLDS, ELBOWS AND RISERS SERVICE MANUAL NUMBER 22 Inboard (MIE) Exhaust Systems 11 10 3 12 2 6 4 12 5 7 6 9 7 8 1 6 70902 73942 1 - Exhaust Elbow (Design 1) 2 - Connector 3 - Plug 4 - Clamp 5 - Gasket 6 - Hose Clamps 7 - Short Exhaust Hose (If Equipped) 8 - Exhaust Pipe Oval-To-Round Adapter (If Equipped) 9 - Wastegate Exhaust Pipe, Gaskets And Hardware 10 - Exhaust Elbow (Design 2) 11 - Wastegate Exhaust Pipe, Gaskets And Hardware 12 - Heat Shield Blanket 13 - Exhaust Probe Hole 14 - Round To Round Adapter, If Equipped Page 7B-6 90-860074--1 FEBRUARY 2002 MANIFOLDS, ELBOWS AND RISERS SERVICE MANUAL NUMBER 22 Representative View of Complete Inboard Exhaust System NOTE: (Use diagrams for parts identification only.) a e b c e 70902 a b c b d 73942 Typical a - Exhaust Elbow With Gasket And Clamp b - Hose c - Outlet With Water Shutter And Flapper d - Water Lift Muffler e - Oval-To-Round Adapter (If Equipped) 90-860074--1 FEBRUARY 2002 Page 7B-7 MANIFOLDS, ELBOWS AND RISERS SERVICE MANUAL NUMBER 22 Locating and Installing The Sterndrive (MCM) Exhaust System IMPORTANT: It is the responsibility of the boat manufacturer, or installing dealer, to properly locate the engine and install the exhaust system. Improper installation may allow water to enter the exhaust manifolds and combustion chambers and severely damage the engine. Damage caused by water in the engine will not be covered by Mercury MerCruiser Warranty, unless this damage is the result of defective parts. Determine if an exhaust riser kit or a water lift muffler kit is required, by taking measurements “a” and “b”, with boat at rest in the water and maximum load aboard. Subtract “b” from “a” to find “c”. If “c” is less than specified in chart, an exhaust riser kit must be installed. The Sterndrive (MCM) engine is equipped with a factory installed exhaust riser. Verify that the riser provides the required dimension “c”, or a distance greater than “c”, as indicated. Model “c” = “a” Minus “b” All Models “c” Must Be 11 in. (279 mm) or More d d b b cc a 74298 Typical Sterndrive (MCM) Engine a - From Waterline To Top Of Transom b - From Highest Point On Exhaust Elbow To Top Of Transom c - From “a” Minus “b” d - Waterline At Rest Page 7B-8 90-860074--1 FEBRUARY 2002 MANIFOLDS, ELBOWS AND RISERS SERVICE MANUAL NUMBER 22 Locating And Installing The Inboard (MIE) Exhaust System IMPORTANT: It is the responsibility of the boat manufacturer, or installing dealer, to properly locate the engine and install the exhaust system. Improper installation may allow water to enter the exhaust manifolds and combustion chambers and severely damage the engine. Damage caused by water in the engine will not be covered by Mercury MerCruiser Warranty, unless this damage is the result of defective part(s). Determine if an exhaust riser kit or a water lift muffler kit is required, by taking measurements “a” and “b”, with boat at rest in the water and maximum load aboard. Subtract “b” from “a” to find “c”. If “c” is less than specified in chart, an exhaust riser kit or a water lift muffler kit must be installed. Model “c” = “a” Minus “b” All Models “c” Must Be 279 mm (11 in.) or More b d a c c 73592 Typical Inboard (MIE) Engine a - From Waterline To Top Of Transom b - From Highest Point On Exhaust Elbow To Top Of Transom c - From “a” minus “b” d - Waterline At Rest Additional information: 1. If an exhaust riser or a water lift muffler kit is NOT required: • The exhaust outlet (for routing exhaust to outside of boat) must be located so that a minimum of 13 mm (1/2 in.) per 305 mm (12 in.) downward pitch (drop) exists in the exhaust hose or pipe from the engine exhaust elbow to the outlet. • A minimum drop of 100 mm (4 in.) overall is required. (This is an American Boat and Yacht Council recommendation.) The drop must be constant so that a low spot does not exist at any point in the exhaust hose or pipe. 2. Exhaust outlet must be slightly above the water line with boat at rest in the water and a full load aboard. 3. Exhaust outlet should be equipped with an internal shutter to prevent seawater from running back into exhaust system. 4. The use of an exhaust flapper on each outlet also is recommended. 90-860074--1 FEBRUARY 2002 Page 7B-9 MANIFOLDS, ELBOWS AND RISERS SERVICE MANUAL NUMBER 22 5. System must not cause excessive back pressure when measured at exhaust elbow outlets. Back pressure MUST NOT exceed a 1000 mm (39-1/2 in.) water column, or 76 mm (3 in.) of mercury when measured with a mercury manometer [approximately 10.3 kPa (1-1/2 psi)]. Minimum exhaust hose size is 102 mm (4 in.). e dd c a f b g 71774 Typical Continuously Sloping Exhaust Line a - Exhaust Elbow b - Measurement - 379 mm (11 in.) Minimum c - Exhaust Hose Or Pipe (Slope to Specifications) d - Muffler e - Exhaust Outlet Internal Shutter f - Exhaust Flapper Valve g - Waterline b f a d c g ee 71775 Typical Waterlift Muffler Exhaust System a - Exhaust Elbow b - Vent Line [6 mm (1/4 in.)] c - Water Lift Muffler d - Exhaust Hose e - Drain Cock f - Transom g - Waterline 6. An oval-to-round exhaust adaptor (818184T) and tube (32-815529) is available to assist in exhaust connection from the oval turbocharger exhaust elbow to 102 mm (4 in.) round exhaust outlet pipes. Page 7B-10 90-860074--1 FEBRUARY 2002 MANIFOLDS, ELBOWS AND RISERS SERVICE MANUAL NUMBER 22 Exhaust Pipe - Sterndrive (MCM) Removal IMPORTANT: Engine must be removed to gain access to exhaust pipe. Refer to SECTION 2A for engine removal and installation. 1. Remove the 4 bolts and thick lockwashers retaining the exhaust pipe to the gimbal housing. 2. Remove the exhaust pipe. 3. Remove the O-ring seal and discard. b a a 24841 a - Bolts And Thick Lockwashers (4) b - Exhaust Pipe Cleaning IMPORTANT: Exhaust pipe and gimbal housing assembly mating surfaces must be clean and free of nicks and scratches. O-ring must be properly seated in groove, or water and exhaust may leak into boat. 1. Clean the mating surfaces of the exhaust pipe. 2. Clean the mating surfaces of the gimbal housing. 90-860074--1 FEBRUARY 2002 Page 7B-11 MANIFOLDS, ELBOWS AND RISERS SERVICE MANUAL NUMBER 22 Installation 1. Install new O-ring. Be certain it is seated properly in groove of gimbal housing. b a 22030 a - Mating Surface (Gimbal Housing, Exhaust Pipe Similar) b - O-ring 2. Hold exhaust pipe in position. Install the four thick washers and bolts. Torque evenly in a diagonal pattern to 30 Nm (23 lb-ft). 3. Lubricate the inside of large end of exhaust hose with a soap and water solution. Slide hose over exhaust pipe and install two hose clamps. Tighten hose clamps securely. c d a a 24841 a - Exhaust Pipe b - Bolts And Thick Lockwashers (4) c - Hose d - Hose Clamps (2) Page 7B-12 90-860074--1 FEBRUARY 2002 MANIFOLDS, ELBOWS AND RISERS SERVICE MANUAL NUMBER 22 Intake / Exhaust Manifold Removal NOTICE Refer to Cold Weather or Extended Storage, Draining Instructions in SECTION 1B and Precautions in this section, BEFORE proceeding. 1. Drain seawater cooling system. 2. Drain closed cooling system. 3. Remove heat exchanger assembly. 4. Remove intercooler housing. 5. Remove wastegate and valve. 6. Remove turbocharger. 7. Remove shift bracket, fluid cooler and hoses, if equipped. 8. Loosen hose clamp on rear cover to rear of water manifold strip hose. d c b 70882 b a 70881 Typical a - Exhaust Manifold b - Rear Cover c - Hose Clamp d - Hose, Rear Cover To Rear Of Water Manifold Strip 90-860074--1 FEBRUARY 2002 Page 7B-13 MANIFOLDS, ELBOWS AND RISERS SERVICE MANUAL NUMBER 22 9. Remove remaining intake / exhaust manifold flange nuts or nuts and lockwashers. a 70881 Typical a - Flange Nuts Or Nuts And Lockwashers Cleaning and Inspection 1. Clean gasket material from all surfaces and wash parts in solvent. 2. Inspect all parts carefully. Machined surfaces must be clean and free of all marks and deep scratches, or water and exhaust leaks may result. 3. Check water passages for foreign material. Passages must be clean for efficient cooling. 4. If more thorough inspection is desired, pipe plugs may be removed from exhaust manifold and exhaust elbow. IMPORTANT: If plugs are removed, coat threads with Perfect Seal before reinstalling. 5. Check for cracks. 6. Ensure mating surfaces of cylinder heads are clean and free of all old gasket material. 7. To test manifold body for leaks, block off plates, plugs, or short hoses with plugged ends must be used. One block off plate must have a threaded hole for attaching compressed air hose. Use new gaskets when installing block off plate(s). Apply 276 kPa (40 psi) of air pressure and submerge manifold in water. Air bubbles will indicate a leak. Page 7B-14 90-860074--1 FEBRUARY 2002 MANIFOLDS, ELBOWS AND RISERS SERVICE MANUAL NUMBER 22 Installation 1. Install new intake / exhaust manifold gaskets. a b 70883 Typical a - Manifold Studs b - Gaskets 2. Install intake / exhaust manifold on studs. 3. Position shift bracket, clamps and fluid cooler with hoses, where removed previously. 4. Install intake / exhaust manifold flange nuts or lockwashers and nuts. Torque nuts evenly in a diagonal pattern to 32 Nm (24 lb-ft). 5. Install hose clamp on rear cover-to-rear of manifold strip elbow hose. Tighten securely. e f b d c a b 70882 f 70881 Typical a - Exhaust Manifold b - Rear Cover c - Hose Clamp d - Hose, Rear Cover-To-Rear Manifold Strip e - Manifold Strip f - Flange Nuts or Nuts and Lockwashers 90-860074--1 FEBRUARY 2002 Page 7B-15 MANIFOLDS, ELBOWS AND RISERS SERVICE MANUAL NUMBER 22 6. Install turbocharger 7. Install wastegate and valve. 8. Install intercooler housing 9. Install heat exchanger assembly. 10. Fill closed cooling system. 11. Start engine. Check for leaks. Page 7B-16 90-860074--1 FEBRUARY 2002 SERVICE MANUAL NUMBER 22 MANIFOLDS, ELBOWS AND RISERS THIS PAGE IS INTENTIONALLY BLANK 90-860074--1 FEBRUARY 2002 Page 7B-17 MANIFOLDS, ELBOWS AND RISERS SERVICE MANUAL NUMBER 22 THIS PAGE IS INTENTIONALLY BLANK Page 7B-18 90-860074--1 FEBRUARY 2002 TURBOCHARGER SERVICE MANUAL NUMBER 22 INTAKE / EXHAUST SYSTEM Section 7C - Turbocharger Table of Contents Identification . . . . . . . . . . . . . . . . . . . . . . . . Turbocharger Specifications . . . . . . . . . . Torque Specifications . . . . . . . . . . . . . . . . Lubricants / Sealants / Adhesives . . . . . Description . . . . . . . . . . . . . . . . . . . . . . . . . Turbocharger . . . . . . . . . . . . . . . . . . . . Wastegate . . . . . . . . . . . . . . . . . . . . . . . Exploded Views . . . . . . . . . . . . . . . . . . . . . Turbocharger And Related Components . . . . . . . . . . . . . . . . . . . . Boost Pressure Control (Wastegate) Components . . . . . . . . . . . . . . . . . . . . Turbocharger . . . . . . . . . . . . . . . . . . . . . . . 7C-3 7C-3 7C-4 7C-4 7C-5 7C-5 7C-5 7C-6 7C-6 7C-8 7C-9 Testing Turbocharger Boost Pressure Checking Turbine Bearings (Assembled) . . . . . . . . . . . . . . . . . . . . . Removal . . . . . . . . . . . . . . . . . . . . . . . . Disassembly . . . . . . . . . . . . . . . . . . . . . Cleaning . . . . . . . . . . . . . . . . . . . . . . . . Inspection . . . . . . . . . . . . . . . . . . . . . . . Assembly . . . . . . . . . . . . . . . . . . . . . . . . Installation . . . . . . . . . . . . . . . . . . . . . . . Boost Pressure Control . . . . . . . . . . . . . . Exhaust Pipe . . . . . . . . . . . . . . . . . . . . . Valve . . . . . . . . . . . . . . . . . . . . . . . . . . . . Wastegate . . . . . . . . . . . . . . . . . . . . . . . 7C-9 7C-10 7C-11 7C-15 7C-17 7C-18 7C-19 7C-21 7C-28 7C-28 7C-31 7C-33 7 C 90-860074--1 FEBRUARY 2002 Page 7C-1 TURBOCHARGER SERVICE MANUAL NUMBER 22 THIS PAGE IS INTENTIONALLY BLANK Page 7C-2 90-860074--1 FEBRUARY 2002 TURBOCHARGER SERVICE MANUAL NUMBER 22 Identification a 70076 a - Identification Number Location Turbocharger Specifications Model Manufacturer Part Number KKK Quicksilver D2.8L D-Tronic D4.2L D-Tronic KKK - Kuhnle, Kopp and Kaush K24-2467GxA6.71 K26-2967MxA8.72 854212 854128 Maximum turbine shaft axial (end) play 0.15 mm (0.0059 in.) Maximum turbine shaft radial (side) play 0.42 mm (0.0165 in.) Maximum Boost Engine rpm when boost starts Wastegate 90-860074--1 FEBRUARY 2002 100 - 124 kPa (14.5 - 18 psi) 1600 - 1800 1500 - 1800 Equipped Equipped Page 7C-3 TURBOCHARGER SERVICE MANUAL NUMBER 22 Torque Specifications Description lb-ft Nm Turbocharger Mounting Nuts 18 24 Clamping Plate Nuts or Screws 22 30 Wastegate-to-Exhaust Manifold Mounting Nuts 18 24 Valve-to-Wastegate Screws Tighten Securely (Equally, in a diagonal pattern.) Lubricants / Sealants / Adhesives Description Page 7C-4 P/N Loctite 514 92-75505-1 Gasket Sealer 92-72592-1 90-860074--1 FEBRUARY 2002 SERVICE MANUAL NUMBER 22 TURBOCHARGER Description Turbocharger All diesel engines covered in this manual are equipped with a turbocharger to boost intake pressure resulting in increased horsepower. In one casing on the turbocharger housing exhaust gases are used to spin the turbine up to 100,000 rpm. The compressor, which is installed on the same shaft but in a separate casing, draws in filtered air, compresses it, and delivers it to the engine through an intake duct and intercooler. The turbo bearings are lubricated by engine oil. Coolant from the engine’s closed cooling system cools the turbocharger housing, while the exhaust elbow (or exhaust riser) is cooled by seawater flowing through it from the seawater system. Turbocharger pressure is limited by a boost pressure control valve (commonly called a wastegate) is mounted on the combined exhaust / intake manifold. Wastegate When used in combination with the turbocharger a higher torque output even at low engine speeds is obtained and allows the engine a wider operating speed range. The function of the wastegate is to limit the boost pressure generated by the turbocharger within a controlled tolerance band. When factory set boost pressure is exceeded, the valve opens and bypasses a part of the exhaust gas flow around the turbine. The resulting reduced mass-flow produces a lower power output. The compressor output is reduced in proportion and the boost pressure falls to the predetermined level. This control process is repeated for each change in engine load. This allows the use of a smaller turbocharger turbine which provides better acceleration and torque, as boost comes on more rapidly and turbo lag is reduced. 90-860074--1 FEBRUARY 2002 Page 7C-5 TURBOCHARGER SERVICE MANUAL NUMBER 22 Exploded Views Turbocharger And Related Components 14 13 9 6 3 17 15 19 11 20 19 5 2 18 1 16 4 10 20 7 12 8 21 22 12 7 24 23 73941 Page 7C-6 90-860074--1 FEBRUARY 2002 SERVICE MANUAL NUMBER 22 TURBOCHARGER Turbocharger And Related Components (continued) 15 - Turbocharger 16 - Gasket 17 - Stud (4 x M10x30 mm) 18 - Clamp 19 - Gasket 20 - Sterndrive (MCM) Exhaust Riser (If Equipped) 21 - Pipe Plug, 1/4 in. x 18 22 - Oil Drain Pipe 23 - Hollow Bolt with Sealing Washer 24 - Coolant Vent Pipe and Hose 25 - Fitting At Water Manifold 26 - Seawater Hose Fitting (Cast Into MCM Riser) 27 - Turbocharger-to-Intake Duct Hose 28 - Hose Clamps 29 - Oil Feed Pipe 30 - Gasket 31 - Spacer 32 - O-ring 33 - Connector 34 - Sealing Washer 35 - Turbocharger Support Bracket and Fasteners 36 - Plug 37 - Inboard (MIE) Exhaust Elbow (Design 1) 38 - Inboard (MIE) Exhaust Elbow (Design 2) 90-860074--1 FEBRUARY 2002 Page 7C-7 TURBOCHARGER SERVICE MANUAL NUMBER 22 Boost Pressure Control (Wastegate) Components 4 12 2 4 8 9 11 5 1 10 12 3 6 12 4 7 4 73940 1 - Wastegate 2 - Wastegate-to-Exhaust Manifold Gasket 3 - Typical Inboard Wastegate Exhaust Pipe 4 - Gasket (2) 5 - Hex Nut and Lockwasher (4) 6 - Heat Shield Blanket (For Exhaust Pipe) 7 - Boost Pressure Valve 8 - Boost Pressure Line 9 - Hollow Bolt and Sealing Washers (at Exhaust Manifold) 10 - Hollow Bolt and Sealing Washers (at Valve) 11 - Typical Sterndrive Wastegate Exhaust Pipe 12 - Stud, M8 x 20 mm Page 7C-8 90-860074--1 FEBRUARY 2002 TURBOCHARGER SERVICE MANUAL NUMBER 22 Turbocharger IMPORTANT: Before suspecting the turbocharger for engine operating problems, the fuel injection system and engine mechanicals (valves, camshaft, etc.) must be in good working order. Testing Turbocharger Boost Pressure CAUTION Safety glasses, gloves and protective clothing should be worn while testing turbocharger boost pressure, to protect against pressurized air being released by a leak or rupture of a hose which could cause injury. The following should be observed prior to testing: • Engine should be at normal operating temperature. • Engine air cleaner should be clean (or replaced if not clean). 1. Remove plug (screw with sealing washer) from intercooler housing as shown. a b 70904 73334 Typical a - Plug (Screw With Sealing Washer) b - Intercooler Housing 2. Install a 0-172.4 kPa (0-25 psi) pressure gauge into intercooler where plug was removed in Step 1. 3. Start engine and watch pressure gauge. • On All Engines: Maximum boost should be between 100 - 124 kPa (14.5 - 18 psi) at 3800 rpm. Readings LOWER than specified above indicate possible turbocharger problems or boost pressure control system problems, IF no engine problem exists, such as incorrect valve clearance or a blockage in the exhaust system. Refer to appropriate sections in this manual, including Troubleshooting. NO boost pressure would indicate a faulty turbocharger requiring replacement. 90-860074--1 FEBRUARY 2002 Page 7C-9 TURBOCHARGER SERVICE MANUAL NUMBER 22 Checking Turbine Bearings (Assembled) 1. Refer to the following pages for Turbocharger - Removal and remove exhaust elbow as outlined for your engine. 2. Rotate the turbine impeller by hand to see that it turns smoothly. If not, turbine bearings or impeller problems exist. 3. Using a feeler gauge as shown, check clearance between turbine blades and housing at two locations opposite one another. The difference in the two readings is the radial play. Maximum radial play is 0.42 mm (0.0165 in.). 70984 Checking Turbine Blade Clearance 4. Check if turbine blades are rubbing on housing, replace turbocharger as necessary. Page 7C-10 90-860074--1 FEBRUARY 2002 TURBOCHARGER SERVICE MANUAL NUMBER 22 Removal WARNING Always disconnect battery cables from battery before working around electrIcal system components to prevent injury to yourself or damage to electrical system. REMOVING EXHAUST ELBOW 1. Disconnect battery cables from battery terminals. 2. Loosen hose clamp and disconnect seawater hose at turbocharger exhaust elbow or riser. Drain seawater into a suitable container. a b 50665 Typical a - Hose Clamp b - Seawater Hose 3. Loosen exhaust elbow hose clamps as shown. b a c 74298 Sterndrive D4.2L With Riser Shown (All Similar) a - Hose Clamps b - Exhaust Elbow Or Riser c - Exhaust Hose 90-860074--1 FEBRUARY 2002 Page 7C-11 TURBOCHARGER SERVICE MANUAL NUMBER 22 4. Loosen spring retaining heat-shield blanket around wastegate exhaust pipe. 5. Remove fasteners and lockwashers retaining wastegate exhaust pipe to exhaust elbow. d c b a 70986 Typical a - Spring (Blanket Retainer) b - Heat-Shield Blanket c - Hex Nuts With Lockwashers d - Wastegate Exhaust Pipe 6. Make matching marks on exhaust elbow or riser and turbocharger housing, for alignment during reassembly. 7. Loosen exhaust elbow, or riser, clamp. Remove elbow gasket and clamp. b d a d c 73632 73941 70987 Typical Exhaust Elbow (Similar With Riser) a - Matching Marks b - Clamp c - Exhaust Elbow d - Exhaust Gasket Page 7C-12 90-860074--1 FEBRUARY 2002 TURBOCHARGER SERVICE MANUAL NUMBER 22 REMOVING TURBOCHARGER UNIT 1. Drain the closed cooling system. 2. Remove exhaust elbow or riser as previously outlined. 3. Remove lifting eye bracket. a b 70988 Typical a - Bracket, Lifting Eye b - Screws 4. Remove oil feed pipe and hollow bolt from coolant vent pipe at turbocharger as shown. Loosen air filter and turbocharger-to-intake duct hose clamps. a c b d 70989 Typical a - Intake Duct Hose Clamp b - Oil Feed Pipe c - Hollow Bolt, With Sealing Washers d - Air Filter Clamp 90-860074--1 FEBRUARY 2002 Page 7C-13 TURBOCHARGER SERVICE MANUAL NUMBER 22 5. Remove oil drain pipe on bottom of turbocharger as shown. a b 70990 a - Oil Drain Pipe b - Hex Nuts With Lockwashers 6. Follow instructions a. or b.: a. On D2.8L D-Tronic Engines: Remove intake duct from side of intercooler housing. (Refer to SECTION 7A - Intercooler, for instructions on removal.) b. On D4.2L D-Tronic Engines:To gain access to turbocharger mounting nuts, remove intake duct from rear of intercooler housing. (Refer to SECTION 7A - Intercooler.) IMPORTANT: In the event that turbocharger mounting nuts are corroded, or otherwise resist loosening in the following, it may become necessary to completely remove the intercooler housing to gain a more suitable access to mounting nuts. Refer to SECTION 7A - Intercooler, for instructions on removal and installation of the intercooler housing. 7. Remove four mounting nuts retaining turbocharger to exhaust manifold. a 70991 a - Mounting Nuts (4 Total, Two Not Shown) Page 7C-14 90-860074--1 FEBRUARY 2002 TURBOCHARGER SERVICE MANUAL NUMBER 22 8. Remove the two support bracket mounting screws as shown. Remove turbocharger unit. b a 70992 a - Support Bracket b - Screw With Washer (2) Disassembly 1. Make matching marks on the exhaust housing and bearing housing to aid alignment in reassembly. 2. Remove 6 hex nuts or hex screws and the 3 clamping plates shown. e d a b c 70993 a b c d e - Matching Marks - Hex Nuts or Hex Screws (6 Total - 2 Not Shown In This View) - Clamping Plates (3 Total - One Not Shown In This View) - Exhaust Housing - Bearing Housing 90-860074--1 FEBRUARY 2002 Page 7C-15 TURBOCHARGER SERVICE MANUAL NUMBER 22 NOTE: If the exhaust housing cannot easily be removed by hand, tap on it carefully all around using a plastic hammer and carefully remove it in the following. IMPORTANT: Be careful not to damage the turbine impeller when removing exhaust housing. 3. Remove exhaust housing as shown. c a b 70994 a - Exhaust Housing b - Bearing Housing c - Turbine Impeller 4. Inspect turbine blades. If blades are rubbing against housing, the bearings are worn. Replace turbocharger. a b 70994 a - Turbine b - Inspect (Edges of Blades) Page 7C-16 90-860074--1 FEBRUARY 2002 TURBOCHARGER SERVICE MANUAL NUMBER 22 Cleaning IMPORTANT: Never use a caustic cleaning solution, as it may attack aluminum. Also, never use a wire brush which could damage impeller or mating surfaces. 1. BEFORE cleaning, inspect the disassembled parts for burning, abrasion, carbon deposits, gas and oil leakage. CAUTION Always wear safety glasses when using compressed air to protect from hose rupturing or flying debris. WARNING When using compressed air to dry components, Do NOT spin turbine, or allow turbine to spin, since no oil is being provided to the bearings and could result in damage to the bearings. 2. Thoroughly clean all the parts with clean diesel fuel, using a soft brush. Dry with compressed air. 90-860074--1 FEBRUARY 2002 Page 7C-17 TURBOCHARGER SERVICE MANUAL NUMBER 22 Inspection IMPORTANT: If turbine shaft bearing axial or radial play is excessive, replace turbocharger. AXIAL (END) PLAY - MEASURING 1. With turbocharger held in vise, attach dial indicator as shown following. 2. Move turbine shaft in direction shown. Maximum axial play (end play) is 0.15 mm (0.0059 in.). 3. If measured value is greater than specified, replace the turbocharger. 70995 a. Measuring Axial (End) Play RADIAL (SIDE) PLAY - MEASURING 1. With turbocharger held in vise, attach dial indicator as shown in following. 2. Move turbine shaft in direction shown. Maximum radial (side) play is 0.42 mm (0.0165 in.). 3. If measured value is greater than specified, replace the turbocharger. 70996 a. Measuring Radial (Side) Play Page 7C-18 90-860074--1 FEBRUARY 2002 TURBOCHARGER SERVICE MANUAL NUMBER 22 Assembly IMPORTANT: When installing a new turbocharger, it may be necessary to turn intake, bearing, and/or exhaust housings to allow mounting bracket to be bolted to engine. 1. While aligning matching marks, assemble exhaust housing and bearing housing together. Install clamping plates and finger-tighten hex nuts or screws. Do NOT tighten securely at this time. c a d e a b c d e 70993 - Matching Marks - Exhaust Housing - Bearing Housing - Clamping Plates (3 Total - One Not Shown) - Hex Nuts or Hex Screws (6 Total - 2 Not Shown) 2. Follow instructions a. or b. : a. On Engines With Gasket Seals: (1.) Being certain surfaces are clean of old gasket material or debris, install a new gasket on bearing housing oil drain/spacer flange. (2.) Assemble spacer with bracket attached as shown. Tighten hex nuts finger-tight at this time. a b a d c c b a b c d 70997 - Gasket - Spacer - Support Bracket - Hex Nut 90-860074--1 FEBRUARY 2002 Page 7C-19 TURBOCHARGER SERVICE MANUAL NUMBER 22 b. On Engines With O-Ring Seals: (1.) Being certain surfaces are clean, install a new O-ring in groove of drain/spacer flange where it meets bearing housing of turbocharger. (2.) Assemble spacer with bracket attached as shown. Tighten hex nuts finger-tight at this time. a a b d c 70998 b a b c d - O-ring (Now Shown In Assembled View) - Spacer (Oil Drain) - Support Bracket - Hex Nut 3. Position exhaust housing and bearing housing (with intake housing) as shown. a b 70999 a - Exhaust Housing b - Bearing Housing (With Intake Housing) Page 7C-20 90-860074--1 FEBRUARY 2002 TURBOCHARGER SERVICE MANUAL NUMBER 22 Installation IMPORTANT: When installing turbocharger, it may be necessary to turn intake and exhaust housings to line up with intake air duct and exhaust manifolds on engine. 1. Using a new gasket, install turbocharger on exhaust manifold as shown. Tighten nuts to 24 Nm (18 lb-ft). a b 70991 a - Gasket, Exhaust Manifold-to-Turbocharger b - Nut (4 Total - 2 Not Shown) 2. Install support bracket screws with washers as shown. Tighten screws securely. b a 70992 a - Screws With Washers b - Support Bracket 3. Tighten the six hex nuts or hex screws (on D4.2L) on clamping plates of exhaust housing-to-bearing housing to 30 Nm (22 lb-ft). (Refer to Step “1” in Assembly section, for location.) 90-860074--1 FEBRUARY 2002 Page 7C-21 TURBOCHARGER SERVICE MANUAL NUMBER 22 4. On Engines With Gasket Seal: Remove hex nuts from spacer (previously installed finger-tight). Using a new gasket, install drain pipe. Tighten hex nuts securely. c a d c b 71000 a b c d - Spacer - Hex Nuts - Gasket - Oil Drain Pipe 5. On Engines With O-ring Seal: Remove hex nuts from spacer (previously installed finger-tight). Using a new O-ring positioned in spacer groove, install drain pipe. Tighten hex nuts with lockwashers securely. c a d b 70990 a b c d Page 7C-22 - Spacer - Hex Nuts - O-ring - Oil Drain Pipe 90-860074--1 FEBRUARY 2002 TURBOCHARGER SERVICE MANUAL NUMBER 22 6. Using new sealing washers on hollow bolt, install coolant vent line to turbocharger exhaust housing as shown. Tighten hollow bolt securely. 7. Clean sealing surfaces and using a new gasket, install oil feed pipe as shown. Tighten screws securely. 8. Install turbocharger-to-intake duct hose as shown. Tighten hose clamp at turbocharger securely. 9. Fit air filter to turbocharger and tighten clamp securely. c b a d f g e h i 70989 Typical (All Similar) a - Sealing Washers b - Hollow Bolt c - Coolant Vent Line d - Turbocharger Exhaust Housing e - Gasket f - Oil Feed Pipe g - Screw (2) h - Air Filter i - Hose Clamp 90-860074--1 FEBRUARY 2002 Page 7C-23 TURBOCHARGER SERVICE MANUAL NUMBER 22 IMPORTANT: If it became necessary to remove the entire intercooler housing from the intake/exhaust manifold during disassembly (to gain better access to turbocharger mounting nuts) refer to SECTION 7A - Intercooler, at this time for proper installation. 10. Clean sealing flanges of intercooler housing and intake duct. Do NOT nick or gouge the surfaces. a. Apply Loctite 514 sealer to intake duct flange on intercooler as shown. a c b 70931 D4.2L Shown (D2.8L Similar) a - Intercooler Housing b - Intake Duct c - Flange (Apply Sealer Here) 11. Install intake duct on intercooler as shown. Torque four allen-head screws with wave washers to 10 Nm (7 lb-ft). NOTE: Intercooler shown removed for visual clarity only. b a c 70929 a - Intake Duct b - Intercooler Housing c - Screw With Wave Washer Page 7C-24 90-860074--1 FEBRUARY 2002 TURBOCHARGER SERVICE MANUAL NUMBER 22 12. Install lifting eye bracket as shown. Tighten screws securely. a b 70988 Typical a - Bracket, Lifting Eye b - Screws With Washers 13. As shown, tighten turbocharger-to-intake duct hose clamp securely. d b a c 70918 Typical a - Hose b - Hose Clamp c - Turbocharger d - Intake Duct 14. Install exhaust elbow, or riser, using new gaskets on exhaust elbow and wastegate exhaust pipe flange as shown. Align studs on elbow, or riser, with holes in wastegate exhaust pipe. Simultaneously, align with exhaust pipe. Tighten exhaust elbow clamp securely. 90-860074--1 FEBRUARY 2002 Page 7C-25 TURBOCHARGER SERVICE MANUAL NUMBER 22 15. Install hex nuts and washers on wastegate exhaust pipe. Tighten fasteners securely and wrap with heat shield blanket. Fasten spring to retain blanket. e 73632 a d c 73941 f e b g d c h b c 71001 Typical Without Riser a - Gasket, Exhaust Elbow b - Gasket, Wastegate Exhaust Pipe To Elbow, Or Riser c - Exhaust Elbow d - Wastegate Exhaust Pipe e - Clamp, Exhaust Elbow f - Hex Nut g - Heat Shield Blanket h - Spring Page 7C-26 90-860074--1 FEBRUARY 2002 TURBOCHARGER SERVICE MANUAL NUMBER 22 16. Install seawater hose from fluid cooler-to-exhaust elbow, or riser if equipped. Tighten hose clamp securely. 17. Position exhaust hose as shown. Tighten hose clamps securely. a c b d e f 75297 Typical Riser Installation a - Exhaust Riser b - Seawater Hose From Fluid Cooler c - Clamp, Seawater Hose d - Exhaust Hose e - Clamp, Exhaust Hose f - Exhaust Pipe 18. Fill closed cooling system at this time according to instructions in SECTION 6B - Closed Cooling System, Filling Closed Cooling System. 19. Connect battery cables to battery by FIRST installing positive (+) battery cable end on positive (+) battery terminal. Tighten clamp securely. THEN install negative (–) battery cable end on negative (–) battery terminal. Tighten clamp securely. 20. Start engine and check for leaks. 21. Test turbocharger boost pressure as previously outlined. 90-860074--1 FEBRUARY 2002 Page 7C-27 TURBOCHARGER SERVICE MANUAL NUMBER 22 Boost Pressure Control WARNING Always disconnect battery cables from battery before working around electrical system components to prevent injury to yourself or damage to electrical system. Exhaust Pipe INSPECTION 1. Loosen spring retaining heat shield blanket around wastegate exhaust pipe as shown. b c d 71002 a Typical Assembly Shown a - Retaining Spring b - Blanket, Heat Shield c - Wastegate Exhaust Pipe d - Gasket 2. Visually examine pipe and convolutions for signs of cracking or leakage. Also, examine gaskets for signs of leakage. Repair as needed. (Refer to Removal if required.) Page 7C-28 90-860074--1 FEBRUARY 2002 TURBOCHARGER SERVICE MANUAL NUMBER 22 REMOVAL 1. Remove exhaust elbow. 2. Remove two remaining hex nuts, or screws and lockwashers on wastegate exhaust pipe as shown. c a b 71004 Typical Pipe Shown a - Hex Nut or Screws, With Lockwashers (2) b - Wastegate Exhaust Pipe c - Wastegate 3. Remove wastegate exhaust pipe. CLEANING 1. Clean old gasket material from wastegate mating surfaces and pipe (if to be reused), being careful not to distort pipe or crack it. Do NOT allow debris to enter wastegate opening. 90-860074--1 FEBRUARY 2002 Page 7C-29 TURBOCHARGER SERVICE MANUAL NUMBER 22 INSTALLATION 1. Install new gasket on wastegate flange. 2. Using hex nuts or screws, with lockwashers, install wastegate exhaust pipe. Tighten fasteners securely. c a b 71004 Typical a - Gasket b - Wastegate Exhaust Pipe c - Hex Nuts With Lockwashers 3. Install turbocharger exhaust elbow. Refer to Turbocharger - Installation as previously outlined, and accomplish appropriate instructions regarding installation of exhaust elbow or riser. Page 7C-30 90-860074--1 FEBRUARY 2002 TURBOCHARGER SERVICE MANUAL NUMBER 22 Valve REMOVAL 1. Remove the two hollow bolt with sealing washers from pressure line on bottom of intercooler housing as shown. 2. Remove the two hollow bolt with sealing washers from pressure line on valve as shown. 3. Remove pressure line. b c a d b e 70917 f 75297 Typical a - Hollow Bolts b - Sealing Washers (2 Each) c - Pressure Line d - Intercooler Housing e - Wastegate f - Valve 90-860074--1 FEBRUARY 2002 Page 7C-31 TURBOCHARGER SERVICE MANUAL NUMBER 22 4. Remove screws and washers retaining valve to wastegate. 5. Remove the valve. a 70983 Typical a - Screws With Washers (3 Total - Two Not Shown) b - Valve c - Wastegate INSTALLATION 1. Position pressure line fitting on valve toward front of engine and install on wastegate using allen-head screws and washers. In equal amounts, tighten screws securely. 2. Install pressure line on valve using hollow bolt with new sealing washers. Finger-tighten. 3. Install hollow bolt with new sealing washers on pressure line at exhaust manifold. Finger-tighten. 4. Tighten both hollow bolts securely. Do NOT overtighten. 5. Start engine and check for leaks. 6. Test turbocharger boost pressure as previously outlined. Page 7C-32 90-860074--1 FEBRUARY 2002 TURBOCHARGER SERVICE MANUAL NUMBER 22 Wastegate REMOVAL 1. Drain closed cooling system. 2. Remove the exhaust elbow. 3. Remove the wastegate exhaust pipe. 4. Remove the wastegate valve. 5. Remove the four fasteners with lockwashers retaining wastegate to exhaust manifold. c a b 71005 Typical a - Hex Nuts Or Screws, With Lockwashers (4) b - Wastegate c - Exhaust Manifold CLEANING 1. Clean all traces of old gasket material from exhaust manifold flange. 71006 2. Clean old gasket material from wastegate. 90-860074--1 FEBRUARY 2002 Page 7C-33 TURBOCHARGER SERVICE MANUAL NUMBER 22 INSTALLATION 1. Using a new gasket install wastegate on exhaust manifold as shown. Securely tighten the four fasteners with lockwashers. 2. Install the wastegate valve. 3. Install the wastegate exhaust pipe. 4. Install the exhaust elbow or riser. a b c 71005 Typical a - Wastegate b - Gasket c - Hex Nuts Or Screws, With Lockwashers (4) 5. Start the engine and check for leaks. 6. Test turbocharger boost pressure. Page 7C-34 90-860074--1 FEBRUARY 2002 TURBOCHARGER SERVICE MANUAL NUMBER 22 THIS PAGE IS INTENTIONALLY BLANK 90-860074--1 FEBRUARY 2002 Page 7C-35 TURBOCHARGER SERVICE MANUAL NUMBER 22 THIS PAGE IS INTENTIONALLY BLANK Page 7C-36 90-860074--1 FEBRUARY 2002 ZF / HURTH TRANSMISSIONS SERVICE MANUAL NUMBER 22 DRIVES Section 8A - ZF / Hurth Transmissions Table of Contents Identification . . . . . . . . . . . . . . . . . . . . . . . . . . Specifications . . . . . . . . . . . . . . . . . . . . . . . . . Operating Specifications . . . . . . . . . . . . . Ratios and Part Numbers . . . . . . . . . . . . Fluid Specifications . . . . . . . . . . . . . . . . . Torque . . . . . . . . . . . . . . . . . . . . . . . . . . . . . . . Tools . . . . . . . . . . . . . . . . . . . . . . . . . . . . . . . . Lubricants / Sealants / Adhesives . . . . . . . Important Information . . . . . . . . . . . . . . . . . . Engine . . . . . . . . . . . . . . . . . . . . . . . . . . . . Transmission . . . . . . . . . . . . . . . . . . . . . . . Propeller . . . . . . . . . . . . . . . . . . . . . . . . . . Transmission / Propeller Rotation . . . . . 8A-3 8A-4 8A-4 8A-4 8A-4 8A-5 8A-5 8A-5 8A-6 8A-6 8A-6 8A-6 8A-7 Transmission Fluid Level . . . . . . . . . . . . . . . 8A-8 Checking . . . . . . . . . . . . . . . . . . . . . . . . . . 8A-8 Filling . . . . . . . . . . . . . . . . . . . . . . . . . . . . . 8A-9 Changing . . . . . . . . . . . . . . . . . . . . . . . . . . 8A-9 Transmission Removal . . . . . . . . . . . . . . . . 8A-12 Transmission Inspection . . . . . . . . . . . . . . 8A-13 Transmission Installation . . . . . . . . . . . . . . 8A-13 Shift Control And Cables . . . . . . . . . . . . . . 8A-15 Transmission Shift Lever And Shift Cable Bracket . . . . . . . . . . . . . . . . . . . . 8A-15 Shift Cable Installation and Adjustment . . . . . . . . . . . . . . . . . . . . . . . 8A-16 Pressure And Temperature Tests . . . . . . . 8A-21 Transmission Repair . . . . . . . . . . . . . . . . . . 8A-21 8 A 90-860074--1 FEBRUARY 2002 Page 8A-1 ZF / HURTH TRASNSMISSIONS SERVICE MANUAL NUMBER 22 THIS PAGE IS INTENTIONALLY BLANK Page 8A-2 90-860074--1 FEBRUARY 2002 ZF / HURTH TRANSMISSIONS SERVICE MANUAL NUMBER 22 Identification The transmission identification plate is located on the top rear of the transmission. a 77626 72959 Typical ZF / Hurth Transmission Identification Plate a - Serial Number And Gear Ratio 90-860074--1 FEBRUARY 2002 Page 8A-3 ZF / HURTH TRASNSMISSIONS SERVICE MANUAL NUMBER 22 Specifications Operating Specifications Description Specification Shifting Pressure At 2000 rpm 21.5-23.5 bar (312-341 psi) Operating Temperature 54-79 degrees C (130-175 degrees F) Temperature Switch Settings + / – 10 degrees Open Close 87.8 degrees C (190 degrees F) 110 degrees C (230 degrees F) Ratios and Part Numbers 630A Ratio (Normal) ZF / Hurth Model Number 1.5:1 2.0:1 2.5:1 Mercury Marine Part Number 863744T2 863744T3 HSW630A 863744T4 2.7:1 863744T5 630V Ratio (Normal) ZF / Hurth Model Number 1.55:1 2.0:1 863745T2 863745T3 HSW630V 2.5:1 1Ratio Mercury Marine Part Number 863745T4 may be rounded off in some cases. Fluid Specifications NOTICE Unit Of Measurement: Liters (U.S. Quarts) All capacities are approximate fluid measures. NOTE: Use dipstick to determine fluid exact level. Model Page 8A-4 Capacity 630A 4.0 (4-1/2) 630V 4.0 (4-1/2) Fluid Type Dexron III Automatic Transmission Fluid 90-860074--1 FEBRUARY 2002 SERVICE MANUAL NUMBER 22 ZF / HURTH TRANSMISSIONS Torque Description Nm Transmission Housing Halves Bolts and Nuts 49 36 Control Block-To-Housing 25 18 Output Flange 18 14 61 45 Mounts Transmission To Flywheel Housing lb-in. lb-ft Tools Description Thermometer [(3/8-NPT, Thread -18 to -132°C (0-270°F)] Pressure Gauge (0-500 psi), (1/8-NPT) Part Number Obtain Locally Lubricants / Sealants / Adhesives Description Part Number Quicksilver Engine Coupler Spline Grease 92-816391A4 Quicksilver Liquid Neoprene Loctite Type A Loctite 515 90-860074--1 FEBRUARY 2002 92-25711--3 Obtain Locally Page 8A-5 ZF / HURTH TRASNSMISSIONS SERVICE MANUAL NUMBER 22 Important Information Engine All current production engines are left hand rotation. Engine rotation is described when observed from the rear of the engine (transmission end) looking forward (water pump end). Installed angle of Inboard (MIE) engine should not exceed a maximum of 18 degrees with respect to the water line. Transmission Transmission gear ratio is marked on transmission identification plate, which is located on the top of transmission. Transmission rotation is described when viewed from the rear of transmission. • Do NOT start or crank engine without fluid in transmission. • Use only recommended fluid in transmission. • Except in an emergency, never shift transmission at engine speeds above 1000 rpm. • Free wheeling of one propeller (in a twin engine boat) at trolling speeds will not cause damage to the transmission; however, boat operation above trolling speed should be avoided. Ensure that proper fluid level exists before free wheeling propeller. • Always replace fluid cooler and hoses after a transmission failure or prior to installing a new or rebuilt transmission. Metallic particles from a failure tend to collect in the cooler and hoses and will gradually flow back into the fluid system and damage transmission. • Always use specified fluid cooler, hoses and fittings. Propeller Propeller rotation is described when observed from the rear of the boat (stern) looking forward (bow end). The term left-hand (LH) refers to rotation in the counterclockwise (CCW) direction. The term right-hand (RH) refers to rotation in the clockwise (CW) direction. A LH propeller will move the boat forward when rotated counterclockwise. A RH propeller will move the boat forward when rotated clockwise. Page 8A-6 90-860074--1 FEBRUARY 2002 ZF / HURTH TRANSMISSIONS SERVICE MANUAL NUMBER 22 Transmission / Propeller Rotation The ZF / Hurth transmissions are full power reversing transmissions, allowing a standard LH rotation engine to be used for both propeller rotations. Propeller rotation is determined by shift cable attachment at the remote control. Use correct rotation propeller and shift cable hook up for direction desired. a d b b c e 25506 Hurth 630A or 800A - 8° Down-Angle Transmissions a b d b e c 72959 72959 Hurth 630V - V-Drive Transmissions a - Direction Of Shift Lever Engagement (Toward Flywheel) b - Engine/Transmission Input Shaft Rotation Direction (LH) c - Transmission Output/Propeller Shaft Rotation Direction (LH) d - Direction Of Shift Lever Engagement (Away From Flywheel) e - Transmission Output/Propeller Shaft Rotation Direction (RH) f - Transmission Output/Propeller Shaft Rotation Direction (LH As Viewed At Propeller) g - Transmission Output/Propeller Shaft Rotation Direction (RH As Viewed At The Propeller) 90-860074--1 FEBRUARY 2002 Page 8A-7 ZF / HURTH TRASNSMISSIONS SERVICE MANUAL NUMBER 22 Transmission Fluid IMPORTANT: Use only specified transmission fluid. IMPORTANT: The fluid level dipstick is located on the port side of transmission. Checking Level TRANSMISSION WARM The transmission should be at operating temperature 54-79 degrees C (130-175 degrees F) to get an accurate fluid level reading. Fluid will expand when heated. Fluid will drain back from the cooler. Expansion and drain-back can significantly affect fluid level. IMPORTANT: Fluid level must be checked immediately after engine shut-down to prevent an incorrect reading. Fluid drains back into the transmission from the cooler and cooler lines. 1. When the transmission is at operating temperature, place selector lever in NEUTRAL. 2. Shut off engine. 3. Remove dipstick and wipe clean. IMPORTANT: Do not screw dipstick in; press it firmly in and remove. 4. Immediately insert clean dipstick, remove and read fluid level. 5. Add or remove fluid as necessary until the fluid is at the required mark. TRANSMISSION COLD NOTE: For ease of checking the fluid prior to engine start-up, a cold fluid level mark can be made. To find the cold fluid level mark, the fluid level must first be set according to the warm fluid level checking procedure. 1. Let the boat sit overnight. Insert clean dipstick and read level. 2. Put a mark on the dipstick at the cold fluid level. NOTE: You can use the new mark to check the fluid level when cold. If fluid level adjustment is needed, add fluid to the new mark. Page 8A-8 90-860074--1 FEBRUARY 2002 ZF / HURTH TRANSMISSIONS SERVICE MANUAL NUMBER 22 Filling If transmission fluid level is low, fill with specified transmission fluid. 1. Remove dipstick. 2. Fill transmission through dipstick tube. 3. Replace dipstick and recheck level. a 77564 a - Dipstick Tube Changing 1. Clean the exterior of the transmission around the fluid filter assembly. 2. Use a 6 mm allen wrench and remove the fluid filter assembly from the transmission by turning counterclockwise and pulling at the same time. 27666 90-860074--1 FEBRUARY 2002 Page 8A-9 ZF / HURTH TRASNSMISSIONS SERVICE MANUAL NUMBER 22 3. 630V Only: Remove the drain plug from the transmission and allow the fluid to drain. Reinstall the drain plug and tighten securely. a 73013 a - Drain Plug (630V Only) 4. 630A Only: Push the hose of a suction pump through the suction pipe and down to the bottom of the housing and remove the fluid. NOTE: The maximum outside diameter of the suction hose is 16 mm (5/8 in.). 71043 5. Remove and discard the filter element and the O-rings. 6. Coat new O-rings with transmission fluid. 7. Install new O-rings and filter element. c a b 50975 a - Filter Element b - O-ring c - O-ring Page 8A-10 90-860074--1 FEBRUARY 2002 SERVICE MANUAL NUMBER 22 ZF / HURTH TRANSMISSIONS 8. Install the fluid filter assembly in the transmission cavity by turning clockwise and pushing at the same time. 27662 9. Fill the transmission with specified fluid. 10. Check the fluid level. 90-860074--1 FEBRUARY 2002 Page 8A-11 ZF / HURTH TRASNSMISSIONS SERVICE MANUAL NUMBER 22 Transmission Removal 1. Disconnect negative battery cable. 2. If required, drain transmission fluid. NOTE: Fluid cooler should be removed with transmission. 3. Disconnect seawater hoses from transmission fluid cooler. 4. Remove fluid cooler and lines from bracket. 5. Disconnect shift cable from transmission. 6. Disconnect wires from neutral start safety switch. 7. Disconnect wires from transmission fluid temperature switch. 8. Loosen trunnion clamping fasteners on engine mounts (port and starboard). 9. Remove coupling nuts and bolts and separate propeller shaft flange from transmission output flange. 10. Remove the four rear engine mount-to-engine bed fasteners and hardware. 11. Support rear part of engine using a suitable hoist or wooden blocks under flywheel housing. 12. Support transmission with a hoist or by other suitable means through the lifting eye on the transmission case. 13. Remove port and starboard rear mount brackets (with base and trunnion) from transmission. CAUTION Avoid damage to transmission input shaft or engine coupler. Make sure transmission is completely supported before removing hardware attaching transmission to flywheel housing. 14. Remove all hardware attaching transmission to flywheel housing. 15. Move transmission straight back and away from engine to completely disengage splines on input shaft. 16. Carefully lift out transmission. 17. Remove bolts and locknuts and remove transmission. Page 8A-12 90-860074--1 FEBRUARY 2002 ZF / HURTH TRANSMISSIONS SERVICE MANUAL NUMBER 22 Transmission Installation 1. Apply Engine Coupler Spline Grease to transmission input shaft splines and engine drive plate splines. a 71044 a - Input Shaft 2. Using a suitable hoist, position transmission in boat and align transmission splines with drive plate splines. 3. Slide transmission into place and secure with attaching hardware. Torque transmission to flywheel housing fasteners to 61 Nm (45 lb-ft). Remove hoist. 4. Install rear mount brackets to transmission. Torque fasteners and hardware to 61 Nm (45 lb-ft). 5. Using hoist, raise engine and transmission to remove blocks (if employed). Lower assembly to engine bed. Securely tighten the four rear engine mount to engine bed fasteners with hardware. Relieve hoist tension. a a 72720 a - Engine Mount To Engine Bed Fastener Location (4), 2 On Each Side 6. Install transmission fluid cooler and hoses. Torque hose fittings at cooler and transmission housing to 34 Nm (25 lb-ft). 90-860074--1 FEBRUARY 2002 Page 8A-13 ZF / HURTH TRASNSMISSIONS SERVICE MANUAL NUMBER 22 7. Connect seawater hoses to transmission fluid cooler and tighten hose clamps securely. 8. Connect wires to neutral safety switch and to audio warning temperature switch. Coat connections on neutral safety switch with Liquid Neoprene. 9. Connect wires to neutral start safety switch. 10. Connect wires to transmission fluid temperature switch. a b 50686 a - Neutral Safety Switch b - Audio Warning Temperature Switch CAUTION Improper shift cable connection and adjustment can cause premature clutch failure. 11. Connect and adjust shift cables. Refer to Shift Cable Installation And Adjustment. 12. Refer to SECTION 2B and check engine final alignment. 13. After final engine and coupler alignment has been properly set (with boat in the water), connect propeller shaft coupler-to-transmission output flange with bolts, lockwashers and nuts. Torque to 68 Nm (50 lb-ft). IMPORTANT: Be certain to torque trunnion clamping fasteners on engine mounts (port and starboard) which were loosened during removal. IMPORTANT: All coupler bolts must be Metric Grade 10.9 (SAE Grade 8) or better, with a shoulder (grip length) long enough to pass through the face mating plane of couplers. 14. Fill transmission. Refer to specifications and Filling. 15. Connect negative battery cable. Tighten clamp securely. 16. Check for leaks and check fluid level after first engine start-up. Page 8A-14 90-860074--1 FEBRUARY 2002 ZF / HURTH TRANSMISSIONS SERVICE MANUAL NUMBER 22 Shift Control And Cables Transmission Shift Lever And Shift Cable Bracket 1. The shift lever has two holes as illustrated. Ensure that the shift cable anchor stud is installed in the top hole when using Quicksilver Remote Control cables. b a 77520 a - Shift Lever b - Shift Cable Anchor Stud Location (For Quicksilver Shift Cables) 2. On bracket with two anchor location holes: Ensure that anchor stud is installed in the hole marked “630.” WARNING Avoid serious personal injury or property damage caused by improper shifting. Anchor stud for shift cable must be installed in the correct hole when using bracket with two anchor location holes. b b a c a c 71041 71020 Shift Cable Bracket - Anchor Stud Position Shown for 630 Transmission a - Shift Cable Bracket b - Shift Cable Anchor Stud c - Bracket To Transmission Fasteners 90-860074--1 FEBRUARY 2002 Page 8A-15 ZF / HURTH TRASNSMISSIONS SERVICE MANUAL NUMBER 22 Shift Cable Installation And Adjustment IMPORTANT: Ensure that shift lever is positioned approximately 10 degrees aft of vertical as shown when in the neutral detent position. Also, ensure that the distance between studs in the following is set at 181 mm (7-1/8 in.). If necessary, loosen clamping bolt and position lever so that dimension “c” is as shown when in the neutral detent position, and retighten clamping bolt. b 10o a c a d 72958 d 50228 Typical ZF / Hurth Transmission Shown a - Shift Lever b - Shift Lever In Neutral Detent c - Dimension Between Studs - 181 mm (7-1/8 In.) d - Clamping Bolt CAUTION Avoid severe transmission damage. All ZF / Hurth Transmissions require Standard Left-Hand rotation engines. NEVER connect a ZF / Hurth Transmission to a Right-Hand rotation engine. IMPORTANT: Transmission propeller rotation is determined by the shift cable installation in the remote control. • Right-hand Propeller Rotation - Control cable will have to be installed in remote control so that cable end will move in direction “A” when shift handle is placed in the forward position. • Left-hand Propeller Rotation - Control cable will have to be installed in remote control so that cable end will move in direction “B” when shift handle is placed in the forward position. A B 23242 Page 8A-16 90-860074--1 FEBRUARY 2002 ZF / HURTH TRANSMISSIONS SERVICE MANUAL NUMBER 22 IMPORTANT: When installing shift cables, ensure that cables are routed to avoid sharp bends and/or contact with moving parts. Do NOT fasten any items to shift cables. NOTE: On models with other than Quicksilver shift cables refer to the shift cable manufacturer’s instructions. 1. Place remote control shift lever and transmission shift lever in neutral position. 2. Remove nuts and washers from shift cable attaching studs. 3. Locate center of remote control and control shift cable play (backlash), as follows: a. Ensure that remote control is in neutral position. b. Push in on control cable end with enough pressure to remove play and mark position “a” on tube. c. Pull out on control cable end with enough effort to remove play and mark position “b” on tube. d. Measure distance between marks “a” and “b,” and mark position “c,” halfway between marks “a” and “b.” b c c a 22024 4. Center cable-end play, then adjust cable barrel to align holes in barrel and in cable end guide with attaching points on transmission. 5. Temporarily install shift cable. Do NOT secure at this time. IMPORTANT: Transmission is fully in gear when shift lever comes to a stop, in either direction. 90-860074--1 FEBRUARY 2002 Page 8A-17 ZF / HURTH TRASNSMISSIONS SERVICE MANUAL NUMBER 22 6. Place remote control shift lever in forward gear position. Ensure transmission is fully in gear, as follows: a. Hold shift lever in position. b. Carefully slide shift cable off of anchor points. c. Attempt to move shift lever further. d. Temporarily install shift cable. Do NOT secure at this time. 7. Place remote control shift lever in reverse gear position. Again ensure transmission is fully in gear as follows: a. Hold shift lever in position. b. Carefully slide shift cable off of anchor points. c. Attempt to move shift lever further. d. Temporarily install shift cable. Do NOT secure at this time. 8. Follow instructions a. or b. : a. If transmission shift lever will position properly in one gear, but not in the other, recheck shift cable adjustment. b. If transmission shift lever will not position properly in both gears, move transmission shift lever stud from top hole in shift lever to bottom hole and recheck for proper positioning. If proper positioning is still not obtained, the remote control does not provide sufficient shift cable travel and must be adjusted, repaired or replaced. Refer to manufacturer’s instructions. b c a 50228 a - Shift Lever Stud (In Bottom Hole, If Required) b - Lever, In Neutral Detent, Must Be Approximately 10 Degrees Of Vertical c - Shift Lever Top Hole 9. Install nut and washer to cable end guide stud. Tighten until contact, then loosen 1/2 turn. 10. Install nut and washer to cable barrel stud. Tighten until contact, then loosen 1/2 turn. Page 8A-18 90-860074--1 FEBRUARY 2002 ZF / HURTH TRANSMISSIONS SERVICE MANUAL NUMBER 22 NOTE: To change cable approach direction on single or dual station installations, only the spacer/bushings have to be switched to the opposite stud. The studs are identical. d e g c b h f a 72955 71210 b Typical Single Cable Installation - Forward Approach a - Cable End Guide b - Locknut and Washer c - Spacer (Fits Over Bushings) d - Bushing e - Cable Barrel f - Spacers (Fits Over Stud) g - Cable Barrel Stud h - Cable End Guide Stud f b g a e h d c 72957 50229 b Typical Single Cable Installation - Rear Approach a - Cable End Guide b - Locknut And Washer c - Spacer (Fits Over Bushings) d - Bushing e - Cable Barrel f - Cable Barrel Stud g - Cable End Guide Stud 90-860074--1 FEBRUARY 2002 Page 8A-19 ZF / HURTH TRASNSMISSIONS SERVICE MANUAL NUMBER 22 d e g b h c a 71211 72956 b Typical Dual Cable Installation- Forward Approach a - Cable End Guide a - Cable End Guide b - Locknut And Washer c - Spacer (Fits Over Bushings) d - Bushing e - Cable Barrel f - Spacers (Fits Over Stud) g - Cable Barrel Stud h - Cable End Guide Stud d g b e a h 50073 d 72960 b Typical Dual Cable Installation- Rear Approach a - Cable End Guide b - Locknut And Washer c - Spacer (Fits Over Bushings) d - Bushing e - Cable Barrel f - Spacers (Fits Over Stud) g - Cable Barrel Stud h - Cable End Guide Stud Page 8A-20 90-860074--1 FEBRUARY 2002 ZF / HURTH TRANSMISSIONS SERVICE MANUAL NUMBER 22 Pressure And Temperature Tests 1. Remove pressure service port plug from Port A. 2. Connect a pressure gauge to Port A. 3. Remove temperature sender and install thermocouple at Port B. b a 50686 a - Port A b - Port B 4. Ensure that fluid temperature and shifting pressure meet specification. 5. Check for leaks. Transmission Repair Mercury Marine stocks a limited number of replacement parts for these transmissions. ZF Marine has a network of distributors throughout the world to service their product. These distributors, in turn, have a dealer network to service the transmissions. Also, service manuals for each transmission can be obtained from ZF Marine. For the location of your closest distributor or service literature contact an Authorized Mercury MerCruiser dealer or: ZF Marine 3131 Southwest 42nd Street Fort Lauderdale, FL 33312 (954) 581-4040 90-860074--1 FEBRUARY 2002 Page 8A-21 ZF / HURTH TRASNSMISSIONS SERVICE MANUAL NUMBER 22 THIS PAGE IS INTENTIONALLY BLANK Page 8A-22 90-860074--1 FEBRUARY 2002 PROPELLER SHAFT MODELS SERVICE MANUAL NUMBER 22 DRIVE SYSTEMS Section 8B - Propeller Shaft Models Table of Contents Lubricants / Sealants / Adhesives . . . . . . . 8B-2 Checks Made with Boat In Water . . . . . 8B-3 Checks Made with Boat Out of Water and Shaft Installed . . . . . . . . . . . . . . . . . 8B-5 Checks Made with Propeller Shaft Removed from Boat . . . . . . . . . . . . . . . . 8B-7 Strut . . . . . . . . . . . . . . . . . . . . . . . . . . . . . . 8B-7 8 B 90-860074--1 FEBRUARY 2002 Page 8B-1 PROPELLER SHAFT MODELS SERVICE MANUAL NUMBER 22 Torque Specifications Description Nm Propeller Shaft Coupling to Coupling Housing (MIE) 68 Coupling Set Screws (If Equipped) lb-in. lb-ft 50 Securely (See NOTE.) NOTE: Safety wire set screws, if equipped. Lubricants / Sealants / Adhesives Page 8B-2 Description Part Number 2-4-C Marine Lubricant 92-86154A1 Engine Coupler Spline Grease 92-8166391A 4 Loctite 8831 92-823089--1 Loctite 290 Obtain Locally 90-860074--1 FEBRUARY 2002 PROPELLER SHAFT MODELS SERVICE MANUAL NUMBER 22 NOTICE The following information can be used as a guide for determining vibration problems on boats powered by inboard engines (MIE Engines). For installation, alignment and repairs to shafts,struts,shaft logs and rudders, refer to boat manufacturer’s service manual. If boat is equipped with V-Drive or a remote mounted V-Drive refer to boat manufacturer’s service manual. For MIE engine installation and alignment, refer to SECTION 2B. Checks Made with Boat In Water 1. Disconnect propeller shaft coupling from transmission coupling. 2. Check fit of coupling to propeller shaft following instructions a or b: a. Straight Bore Type: (1.) Loosen set screws. (2.) Try to move coupling by hand. The bore of the coupling should be a semi press fit to shaft. (3.) Check shaft for wear. If worn replacement of shaft may be necessary. If shaft is not worn try another coupling. b. Tapered Bore Type: (1.) Check nut on shaft for tightness. (2.) If nut was loose, remove coupling and check for damage to taper on shaft or in coupling. (3.) Replace worn parts. (4.) Always make sure key is not sticking out of coupling. (5.) Install coupling on shaft without the key. (6.) Mark the shaft (behind the coupling); then, remove the coupling. (7.) Now install the key and coupling. Make sure coupling still lines up with the mark. This ensures that the key is not oversize and holding the tapers apart. 90-860074--1 FEBRUARY 2002 Page 8B-3 PROPELLER SHAFT MODELS SERVICE MANUAL NUMBER 22 3. Check output coupling flange of transmission. Rotate at least one complete turn. Checking Coupling Outside Diameter Of A Typical Drive System Checking Coupling Face Of A Typical Drive System 4. If there is greater than 0.076 mm (0.003 in.) movement in Step 3, replace output coupling. 5. Replace damaged parts and realign engine as outlined. 6. Torque propeller shaft coupling and transmission coupling (output flange) to 68 Nm (50 lb-ft). 7. Tighten set screws securely. Safety wire set screws, if equipped. Page 8B-4 90-860074--1 FEBRUARY 2002 PROPELLER SHAFT MODELS SERVICE MANUAL NUMBER 22 Checks Made with Boat Out of Water and Shaft Installed Possible causes for vibration may be propeller shaft, propeller to shaft fit or propeller. All three can be checked by using the rudder, a strong metal straight edge and a C-clamp. 1. Check installation of propeller to shaft. a. Remove propeller. b. Check for chipped or cracked keyway in propeller on shaft without key. c. Install propeller on shaft without key. d. Mark the shaft (behind the propeller), then remove propeller. e. Install the key and propeller. Make sure propeller still lines up with mark. This ensures that key is not oversize and holding the tapers apart. Retighten propeller nut. f. Ensure key is not sticking out of propeller. 2. Check for propeller shaft being bent behind the strut. a b a - Metal Straight Edge (Held to Rudder with C-Clamp) - Position Corner of Straight Edge at Center of Shaft. Rotate Shaft One Complete Turn. If Shaft Wobbles, Replace Shaft. b - Rudder 3. Check the diameter of all propeller blades. If not the same, repair propeller. a b c a - Metal Straight Edge (Held to Rudder with C-clamp) b - Rudder c - Rotate Propeller One Complete Turn 90-860074--1 FEBRUARY 2002 Page 8B-5 PROPELLER SHAFT MODELS SERVICE MANUAL NUMBER 22 4. Ensure that all propeller blades are the same pitch and that propeller is properly seated on shaft. Rotate propeller at least one complete turn and check at three different points on blades. Repair or replace if necessary. NOTE: Hold metal straight edge to rudder with a C-clamp or equivalent. a b c a - Metal Straight Edge b - Rudder c - Propeller Blades Page 8B-6 90-860074--1 FEBRUARY 2002 PROPELLER SHAFT MODELS SERVICE MANUAL NUMBER 22 Checks Made with Propeller Shaft Removed from Boat 1. Check propeller shaft for straightness. Rotate at least one complete turn and check at three or four places. If dial indicator deflects over 0.1 mm (0.004 in.), replace shaft. b c a a - V-Blocks b - Dial Indicator c - Shaft 2. Ensure that bore of coupling is 90 degrees from coupling flange. Rotate at least one complete turn. Replace coupling if needle moves. d c a b a b c d - V-Blocks - Dial Indicator - Coupling Flange - Shaft Against Block to Prevent Fore and Aft Movement Strut Refer to boat manufacturer’s service manual for alignment and replacement. Normally, the shaft should be centered in the cutlass bearing. Shims (placed between the strut and hull) are used to align the strut to the shaft. 90-860074--1 FEBRUARY 2002 Page 8B-7 PROPELLER SHAFT MODELS SERVICE MANUAL NUMBER 22 THIS PAGE IS INTENTIONALLY BLANK Page 8B-8 90-860074--1 FEBRUARY 2002 PUMP AND RELATED COMPONENTS SERVICE MANUAL NUMBER 22 POWER STEERING SYSTEM Section 9A - Pump And Related Components Table of Contents Torque Specifications . . . . . . . . . . . . . . . . . . Lubricants / Sealants / Adhesives . . . . . . . Description . . . . . . . . . . . . . . . . . . . . . . . . . . . Exploded Views . . . . . . . . . . . . . . . . . . . . . . . Power Steering Pump . . . . . . . . . . . . . . . Related Components . . . . . . . . . . . . . . . . 9A-2 9A-2 9A-2 9A-3 9A-3 9A-4 Power Steering Pump . . . . . . . . . . . . . . . . . . Removal . . . . . . . . . . . . . . . . . . . . . . . . . . Installation . . . . . . . . . . . . . . . . . . . . . . . . . Checking Fluid Level . . . . . . . . . . . . . . . . . . Filling and Bleeding . . . . . . . . . . . . . . . . . . . . 9A-5 9A-5 9A-6 9A-8 9A-8 9 A 90-860074--1 FEBRUARY 2002 Page 9A-1 PUMP AND RELATED COMPONENTS SERVICE MANUAL NUMBER 22 Torque Specifications NOTE: Securely tighten all fasteners not listed below. Description Front bracket Rear Brace Mounting And Tensioning Bolt Nm lb-in. lb-ft 32 24 21 15 Lubricants / Sealants / Adhesives Description Part Number Quicksilver Power Trim and Steering Fluid 92-90100 Automatic Transmission Fluid - Dexron III Obtain Locally Description IMPORTANT: Power Steering Pumps are considered non-repairable units and are intended to be removed and replaced with new units. Page 9A-2 90-860074--1 FEBRUARY 2002 PUMP AND RELATED COMPONENTS SERVICE MANUAL NUMBER 22 Exploded Views Power Steering Pump 7 9 8 6 5 4 4 3 1 2 71035 1 2 3 4 5 6 7 8 9 - Pump - Pulley - Tensioning Bolt, Lockwasher And Flat Washer - Mounting Bolt - Bushing - Fluid Pressure Hose - Fluid Reservoir Hose - Hose Clamp - Bracket 90-860074--1 FEBRUARY 2002 Page 9A-3 PUMP AND RELATED COMPONENTS SERVICE MANUAL NUMBER 22 Related Components ALL ENGINES 9 8 3 7 1 2 6 4 78418 5 71034 1 2 3 4 5 6 7 8 9 Page 9A-4 - Fluid Reservoir Tank - Hose Clamp (2) - Fluid Reservoir Support - Bracket - Supply Hose - Pressure Hose - Return Hose (From Transom) - Return Hose (From Cooler) - Power Steering Fluid Cooler 90-860074--1 FEBRUARY 2002 PUMP AND RELATED COMPONENTS SERVICE MANUAL NUMBER 22 Power Steering Pump Removal CAUTION Disconnect Battery cables at battery to prevent engine rotation and injury while working on pump. 1. Remove vacuum pump belt, if equipped. 2. Remove and retain mounting and tensioning bolts and hardware. a b 70113 Typical a - Mounting Bolts (One With A Bushing Not Shown In This View) b - Tensioning Bolt, Lockwasher And Flat Washer 3. Lower pump down to gain access to hose connections. Remove hoses and adaptor as shown. Using clean, suitable plugs, quickly plug hoses to limit loss of fluid. NOTE: If possible lift pump above power steering reservoir and then remove hoses to minimize fluid loss. 4. Drain power steering fluid from pump into a suitable container. Do NOT reuse fluid. 5. Using a suitable puller remove pulley from pump shaft. Retain pulley for installation on new pump. 71035 Typical 6. Drain fluid from power steering reservoir into a suitable container. Do NOT reuse fluid. Dispose of fluid properly. 90-860074--1 FEBRUARY 2002 Page 9A-5 PUMP AND RELATED COMPONENTS SERVICE MANUAL NUMBER 22 Installation 1. Using a suitable screw, push (install) pulley onto shaft until pulley face is flush, as shown, with shaft end (screw head will bottom out). 74481 2. Install reservoir hose and pressure hose to pump as shown. Temporarily hand tighten only. a c e d b 78418 a b c d e Page 9A-6 - Reservoir Hose - Hose Clamp - Pressure Hose - O-ring - Fitting 90-860074--1 FEBRUARY 2002 PUMP AND RELATED COMPONENTS SERVICE MANUAL NUMBER 22 3. Place hoses appropriately between oil filter and pump mounting bracket, lift pump into place and attach with fasteners and hardware retained previously, as shown. a c a b 70113 a - Mounting Bolt With Washer (One Not Shown - Shown In Inset With Bushing) b - Tensioning Bolt, Lockwasher and Flat Washer c - Bushing 4. Tighten reservoir hose clamp securely. Tighten pressure hose fitting securely. Do NOT overtighten. 5. Position drive belt in pulley groove and tension belt. Belt must not deflect more than 5 mm (3/16 in.). Move or pry power steering pump to tension belt. Torque mounting bolts and tensioning bolt to 21 Nm (15 lb-ft). NOTE: On all models, power steering drive pulley is behind crankshaft front pulley. 6. If not already accomplished, drain fluid from power steering reservoir into a suitable container. Do NOT reuse old fluid. Dispose of properly. 7. Fill power steering reservoir with new fluid. 8. Connect battery cables at battery by FIRST installing Positive (+) battery cable to Positive (+) battery terminal and tighten clamp. THEN, install Negative (–) battery cable to Negative (–) battery terminal and tighten clamp. 9. Bleed air from power steering system following instructions in SECTION 1B. 90-860074--1 FEBRUARY 2002 Page 9A-7 PUMP AND RELATED COMPONENTS SERVICE MANUAL NUMBER 22 Checking Fluid Level Refer to SECTION 1B. Filling and Bleeding Refer to SECTION 1B. NOTICE For more information on power steering system and components refer to appropriate Mercury MerCruiser Sterndrive Service Manual. Page 9A-8 90-860074--1 FEBRUARY 2002 SERVICE MANUAL NUMBER 22 PUMP AND RELATED COMPONENTS THIS PAGE IS INTENTIONALLY BLANK 90-860074--1 FEBRUARY 2002 Page 9A-9 PUMP AND RELATED COMPONENTS Page 9A-10 SERVICE MANUAL NUMBER 22 90-860074--1 FEBRUARY 2002