Download Aastra Aastra 610d User`s guide

Transcript
Aastra Business Communication
Solution
Aastra 610d
User’s Guide
Supported platforms:
Aastra 415
Aastra 430
Aastra 470
This user's guide describes the functions, the configuration, and the use of the Aastra 600d.
eud-1290_en / 1.0 – R1.0 – © 01.2011
Operating and display elements
Operating elements
Key
2
1
Loudspeaker
2
LED indicator
3
Display
4
Side keys + / -
Press
In the state...
Description
LED as per Table in Chapter "Indicator LED signals", page 26
short
In a connection
Adjusting the volume
eud-1290/1.0 – R1.0 – 01.2011
Operating and display elements
5
Key
Press
In the state...
Description
Left
softkey/foxkey
short
• Idle state
• Menus
• Call up complete menu
• Executes displayed function
above key.
Middle
softkey/foxkey
short
• Idle state
• Menus
• Call up configured call number
• Executes displayed function
above key.
Right
softkey/foxkey
short
• Idle state
• Menus
• Call up configured call number
• Executes displayed function
above key.
approx. 2 seconds
each
Idle state
Configure key
6
Loudspeaker key short
• Idle state
• In a connection
• Activate/deactivate open listening
7
Correction key
short
• Editor
• Menu
• Delete the last character
• Scrolling back through the menu
8
Navigation key
top
• Idle state
• Lists
• Call up activated features
• Navigation
right
•
•
•
•
• Call up complete menu
• Goes forward one step in the
menu
• Navigate cursor
• Call up details
bottom
• Idle state
• Lists
• Call up phone book
• Navigation
left
•
•
•
•
• Call up profiles
• Scrolling back through the menu
• Navigate cursor
short
• Idle state
• Lists
9
Call key
eud-1290/1.0 – R1.0 – 01.2011
Idle state
Menu
Editor
Lists
Idle state
Menu
Editor
Lists
• Call up redial list
• Dial select call number
3
Operating and display elements
10
11
Key
Press
In the state...
Description
End key
short
• In a connection
• Menu
• Editor
• Ending a call
• Back to idle state
• Exit editor without changes.
long
Idle state
Activate/deactivate phone
Key block
short
• Idle state
• Editor
• Digit input
• Characters as per Table in Chapter
"Digit keys", page 22
Key 2
long
Idle state
Switching system
long
Idle state
Calling up the service menu
short
Idle state, Editor
* input
long
Idle state, for
incoming call
Activate/deactivate ring tone
short
Idle state, Editor
# input
long
Idle state
Activate keylock
Key 5
12
13
4
Asterisk key
Hash key
14
Headset connection
15
Microphone
eud-1290/1.0 – R1.0 – 01.2011
Operating and display elements
Display symbols
Radio link quality
Very good
Good
Disruption probable
Phone calls not possible
State of charge
Charge state 61-100 %
Charge state 31-60 %
Charge state 11-30 %
Charge state 6-10 %
Charge state 4-5 %
Charge state 0-3 % (flashing)
Notes:
• If the battery is completely discharged when the phone is placed in the charging
bay, there will be no display initially until the battery has reached a certain charge
level. This may take several minutes and does not mean there is a malfunction.
• Even when the phone is switched off, the battery will still slowly discharge.
• When the battery capacity is almost exhausted, a series of warning beeps sounds.
This warning can be disabled, see Chapter "Setting up a profile", page 71. If you
are making a call, you have approximately five minutes' talk time left before the
handset switches itself off.
• The state of charge is also available via the service menu: Press key 5 and hold it
down for a moment.
System registrations
Phone registered in system A, B, C, or D
and ready for use (only displayed when
phone is registered on more than one
system)
eud-1290/1.0 – R1.0 – 01.2011
5
Operating and display elements
Status information
Incoming call
Incoming call forwarded
Call forwarding activated
Call Forwarding on No Reply activated
Search mode
Entries in call list
More softkeys available
New voice mail
Voice mail retrieved
Voice mail greeting with possibility to
leave a voice message
Voice mail greeting without possibility
to leave a voice message
New text messages
Read text messages
Ringing tone deactivated
Activate discreet ringing
Call key activated
Loudspeaker/hands-free mode activated
Announcement
6
Room monitoring activated
Room monitoring is triggered
Headset mode activated
Microphone deactivated
Call parked
Keypad locked
Alarm
Appointment call
eud-1290/1.0 – R1.0 – 01.2011
Operating and display elements
Status information
About
Warning
Not permitted
Phone book
Name
Private phone number
Business phone number
Mobile phone number
Presence state
Available (default)
Absent
Meeting
Busy
Not available
eud-1290/1.0 – R1.0 – 01.2011
7
Safety
Safety Information
Failure to observe this information can be hazardous and infringe existing laws.
Medical equipment
The cordless phone must not be used near medical equipment, such as pacemakers or
hearing aids.
Availability of telephone connections
Do not rely on your cordless phone as your only means of communication in emergency
or critical situations. Availability cannot always be guaranteed.
The device will be inoperable when mains power of the communications system fails.
Risk of explosion through sparking
On premises subject to explosion hazards only use ATEX models specially approved for
that purpose.
Hands-free mode and Ringing tone
Do not hold the cordless phone up against your ear in hands-free operation and during
ringing tone, as the volume is then very high. The default setting for ringing loudness
meets regulatory requirements. It is recommended the default setting is retained.
Mains power
Use the original power supply only (ID: 23-00-1061-00). Connect the power supply only
to power sources that conform to the indications on the power supply.
Maintenance
Make sure all installation and repair work is carried out by a specially qualified technician. Do not touch the charging contacts with sharp, metallic, and/or greasy objects.
Always use a soft, moistened, or antistatic cloth to clean your device. Do not use chemicals or other chemical products.
1
5
20
Cost control and Data protection
You should protect your phone with a PIN so that no-one can make phone calls at your
expense. A code will also protect your personal settings. When carrying the handset
around, you should lock the keypad so it cannot be accidentally activated.
Ambient conditions
Do not operate the device outside the temperature range of +5 °C to approx. +40 °C.
Avoid direct sunlight and other sources of heat.
Protect your device against the wet, excessive dust, corrosive liquids and steam.
Do not expose your device to electromagnetic fields (electric motors, household appliances). The speech quality could be affected. To prevent interference, avoid placing your
handset in the immediate vicinity of computers, radios, TV sets, VCRs, and other telephone sets.
8
eud-1290/1.0 – R1.0 – 01.2011
Safety
Disposal
Be sure to dispose of your device, batteries and its packaging in an environmentally
compatible way. Electrical equipment does not belong in domestic waste. Deposit it at
a return centre.
Accessories
Use original accessories or specifically approved accessories only. The use of other
accessories may decrease performance or pose a risk to your health or safety.
Dealing with batteries
Please observe the following rules and regulations when dealing with batteries:
General rules when dealing with batteries
• Never tamper with or dismantle batteries.
• Never immerse the batteries in water or throw it into a fire.
• Do not expose the batteries to high temperatures.
When putting your cordless phone into operation
• Only use the battery pack supplied by the manufacturer.
• Take note of the instructions in Chapter "Battery", page 90 and follow the procedure described there.
• It takes two to three charging cycles for the batteries to reach their fully charged state.
• Only use the charging bay supplied by the manufacturer.
• For the charging bay only use the plug-in power adapter supplied by the manufacturer (ID: 23-00-106100). Otherwise the phone may be damaged.
When operating your cordless phone
• It is normal for the batteries to become warm when charging.
• Discharge the batteries from time to time to prolong their service life. To do so do not place the cordless
phone back into the charging bay until the batteries are completely or almost completely discharged.
To replace the batteries
• Switch off the cordless phone before removing the batteries.
• Only use original batteries and charging units approved by the manufacturer. To do so, contact your supplier or servicing agent.
To store the cordless phone or the batteries
• If you do not intend to use the phone for some time, switch off the phone and take out the battery pack.
• Store the batteries at room temperature. Above-average temperatures tend to reduce the service life of
batteries.
To dispose of the battery packs
Do not throw away the batteries with your domestic waste. Take the batteries to an appropriate collection
point for recycling.
eud-1290/1.0 – R1.0 – 01.2011
9
Safety
User information
Document portal:
www.aastra.com/docfinder
© The information, graphics and layouts featured in the user information are subject to copyright and may
not be duplicated, presented or processed without the written consent of Aastra Telecom Schweiz AG.
Your product is supplied with a Quick User’s Guide, safety information and, where
applicable, with other product-specific information.
These and all other user documents are available for download on the Aastra document portal: www.aastra.com/docfinder as individual documents or as a documentation set. It is your responsibility to keep up to date with the scope of functions, the
proper use and the operation of your product.
• Please make sure you have all the user documents required to operate your product efficiently and correctly.
• Make sure that the versions of the user documents comply with the software level
of the Aastra 400 products used and that you have the latest editions.
• Always read the user documents first before you put your product into operation.
• Store the user information within easy reach and refer to it whenever uncertainties
arise in connection with the use of the product.
• When handing over your product to others, make sure you enclose the relevant
user information.
10
eud-1290/1.0 – R1.0 – 01.2011
Safety
Purpose and function
This product is part of the Aastra 400 communication solution.
Aastra 400 is an open, modular and comprehensive communication solution for the
business sector with several communication servers of different output and expansion capacity, a comprehensive telephone portfolio and a multitude of expansions.
They include an application server for Unified Communications and multimedia services, an FMC (Fixed Mobile Conversion) controller for integrating mobile phones, an
open interface for application developers and a multitude of expansion cards and
modules.
The business communication solution with all its components was developed to
cover in full the communication requirements of businesses and organisations, in a
way that is both user- and maintenance-friendly. The individual products and components are coordinated and must not be used for other purposes or replaced by thirdparty products or components (unless it is to connect other approved networks,
applications and telephones to the interfaces certified specially for that purpose).
One number user concept:
Your system administrator can set up several phones for you that hold all the same
phone number (one number user concept). You have only one name and phone
number with which to identify yourself to your call partners, regardless of which of
the phone you make your calls. The advantage is that you can always be reached
under the same phone number, regardless of where you happen to be.
With Personal call routing and Ring Alone you can define where incoming calls shall
be routed to (see chapter "Activating personal call routing", page 55 and "Activating
ring alone", page 56). Your system administrator can set whether or not you are busy
for further incoming calls (Busy if busy). You are still able to make further outgoing
calls with the other terminals.
Call lists and contacts are available on all your phones and are automatically synchronised.
An announcement is signalled on all your phones which support announcement.
eud-1290/1.0 – R1.0 – 01.2011
11
Safety
Protection against listening in and recording
The Aastra 400 communication solution comprises features which allow calls to be
monitored and recorded without the call parties noticing. Please note that these features can only be used in compliance with national data protection provisions.
Disclaimer
All parts and components of the Aastra 400 communication solution are manufactured in accordance with ISO 9001 quality guidelines.
The relevant user information has been compiled with the utmost care. The functions
of the Aastra 400 products have been tested and approved after comprehensive conformity tests. Nonetheless errors cannot be entirely excluded. The manufacturers shall
not be liable for any direct or indirect damage that may be caused by incorrect handling, improper use, or any other faulty behaviour. Potential hazards are mentioned in
the relevant places in the user information. Liability for loss of profit shall be excluded
in any case.
Trademarks
Aastra® is a registered trademark of Aastra Technologies Limited.
Bluetooth® is a registered trademark of Bluetooth SIG, Inc. All other trademarks, product names and logos are trademarks or registered trademarks of their respective proprietors.
The designations used in this manual for software and hardware are registered trademarks and are thus subject to the relevant regulations.
Document information
•
•
•
•
•
•
12
Document number: eud-1290
Document version: 1.0
Valid as of: R1.0
Copyright © 01.2011 Aastra Technologies Limited
In PDF Viewer, click on this link to download the latest version of this document:
https://pbxweb.aastra.com/doc_finder/DocFinder/eud-1290_en.pdf?get&DNR=eud-1290
eud-1290/1.0 – R1.0 – 01.2011
Content
Operating and display elements . . . . . . . . . . . . . . . . . . . . . . . . . . . . . . . . . . . . . . . . . . . . 2
Safety . . . . . . . . . . . . . . . . . . . . . . . . . . . . . . . . . . . . . . . . . . . . . . . . . . . . . . . . . . . . . . . . . . . . 8
Dialling and phoning . . . . . . . . . . . . . . . . . . . . . . . . . . . . . . . . . . . . . . . . . . . . . . . . . . . . . 15
Answering calls . . . . . . . . . . . . . . . . . . . . . . . . . . . . . . . . . . . . . . . . . . . . . . . . . . . . . . . . . . . 16
Making calls. . . . . . . . . . . . . . . . . . . . . . . . . . . . . . . . . . . . . . . . . . . . . . . . . . . . . . . . . . . . . . . 17
Using the display and operating elements . . . . . . . . . . . . . . . . . . . . . . . . . . . . . . . . . 20
Keys . . . . . . . . . . . . . . . . . . . . . . . . . . . . . . . . . . . . . . . . . . . . . . . . . . . . . . . . . . . . . . . . . . . . . . 21
Input. . . . . . . . . . . . . . . . . . . . . . . . . . . . . . . . . . . . . . . . . . . . . . . . . . . . . . . . . . . . . . . . . . . . . . 22
Menu-guided navigation . . . . . . . . . . . . . . . . . . . . . . . . . . . . . . . . . . . . . . . . . . . . . . . . . . 24
Signals . . . . . . . . . . . . . . . . . . . . . . . . . . . . . . . . . . . . . . . . . . . . . . . . . . . . . . . . . . . . . . . . . . . . 26
Supplementary features . . . . . . . . . . . . . . . . . . . . . . . . . . . . . . . . . . . . . . . . . . . . . . . . . . 27
Making and answering calls. . . . . . . . . . . . . . . . . . . . . . . . . . . . . . . . . . . . . . . . . . . . . . . . 28
Using functions while in a call. . . . . . . . . . . . . . . . . . . . . . . . . . . . . . . . . . . . . . . . . . . . . . 37
Organising absences from the desk . . . . . . . . . . . . . . . . . . . . . . . . . . . . . . . . . . . . . . . . 41
Functions for special situations . . . . . . . . . . . . . . . . . . . . . . . . . . . . . . . . . . . . . . . . . . . . 47
Setting functions by remote control. . . . . . . . . . . . . . . . . . . . . . . . . . . . . . . . . . . . . . . . 61
Personalizing your phone . . . . . . . . . . . . . . . . . . . . . . . . . . . . . . . . . . . . . . . . . . . . . . . . . 62
Configuring cordless phone functions . . . . . . . . . . . . . . . . . . . . . . . . . . . . . . . . . . . . . 63
Display settings . . . . . . . . . . . . . . . . . . . . . . . . . . . . . . . . . . . . . . . . . . . . . . . . . . . . . . . . . . . 69
Setting the volume . . . . . . . . . . . . . . . . . . . . . . . . . . . . . . . . . . . . . . . . . . . . . . . . . . . . . . . . 70
Profile settings . . . . . . . . . . . . . . . . . . . . . . . . . . . . . . . . . . . . . . . . . . . . . . . . . . . . . . . . . . . . 71
Hands-free and headset settings . . . . . . . . . . . . . . . . . . . . . . . . . . . . . . . . . . . . . . . . . . . 73
General settings . . . . . . . . . . . . . . . . . . . . . . . . . . . . . . . . . . . . . . . . . . . . . . . . . . . . . . . . . . . 74
Protection settings . . . . . . . . . . . . . . . . . . . . . . . . . . . . . . . . . . . . . . . . . . . . . . . . . . . . . . . . 79
Managing your private contacts . . . . . . . . . . . . . . . . . . . . . . . . . . . . . . . . . . . . . . . . . . . 80
Configuring voice mail . . . . . . . . . . . . . . . . . . . . . . . . . . . . . . . . . . . . . . . . . . . . . . . . . . . . 82
Configure presence . . . . . . . . . . . . . . . . . . . . . . . . . . . . . . . . . . . . . . . . . . . . . . . . . . . . . . . 83
Configuring keys . . . . . . . . . . . . . . . . . . . . . . . . . . . . . . . . . . . . . . . . . . . . . . . . . . . . . . . . . . 84
Formulating functions . . . . . . . . . . . . . . . . . . . . . . . . . . . . . . . . . . . . . . . . . . . . . . . . . . . . . 85
Installation and first-time operation . . . . . . . . . . . . . . . . . . . . . . . . . . . . . . . . . . . . . . . 87
Equipment provided . . . . . . . . . . . . . . . . . . . . . . . . . . . . . . . . . . . . . . . . . . . . . . . . . . . . . . 88
eud-1290/1.0 – R1.0 – 01.2011
13
Options . . . . . . . . . . . . . . . . . . . . . . . . . . . . . . . . . . . . . . . . . . . . . . . . . . . . . . . . . . . . . . . . . . . 88
Connecting a cordless phone . . . . . . . . . . . . . . . . . . . . . . . . . . . . . . . . . . . . . . . . . . . . . . 89
Battery . . . . . . . . . . . . . . . . . . . . . . . . . . . . . . . . . . . . . . . . . . . . . . . . . . . . . . . . . . . . . . . . . . . . 90
Carry clip or swivel clip . . . . . . . . . . . . . . . . . . . . . . . . . . . . . . . . . . . . . . . . . . . . . . . . . . . . 91
Carry strap . . . . . . . . . . . . . . . . . . . . . . . . . . . . . . . . . . . . . . . . . . . . . . . . . . . . . . . . . . . . . . . . 92
Logging your phone on . . . . . . . . . . . . . . . . . . . . . . . . . . . . . . . . . . . . . . . . . . . . . . . . . . . 93
Further information . . . . . . . . . . . . . . . . . . . . . . . . . . . . . . . . . . . . . . . . . . . . . . . . . . . . . . 94
Troubleshooting . . . . . . . . . . . . . . . . . . . . . . . . . . . . . . . . . . . . . . . . . . . . . . . . . . . . . . . . . . 95
Technical data. . . . . . . . . . . . . . . . . . . . . . . . . . . . . . . . . . . . . . . . . . . . . . . . . . . . . . . . . . . . . 96
Index . . . . . . . . . . . . . . . . . . . . . . . . . . . . . . . . . . . . . . . . . . . . . . . . . . . . . . . . . . . . . . . . . . . . 97
14
eud-1290/1.0 – R1.0 – 01.2011
Dialling and phoning
The following sections explain how to make phone calls simply and the functions your phone offers you whenever you receive a call.
Answering calls. . . . . . . . . . . . . . . . . . . . . . . . . . . . . . . . . . . . . . . . . . . . . . . . . . . . . . . . . . . . . . . . . . . . . . . 16
Making calls. . . . . . . . . . . . . . . . . . . . . . . . . . . . . . . . . . . . . . . . . . . . . . . . . . . . . . . . . . . . . . . . . . . . . . . . . . 17
eud-1290/1.0 – R1.0 – 01.2011
15
Dialling and phoning
Answering calls
This section explains the procedure for answering a call.
Answering a call
Your phone is ringing and the indicator LED is flashing. To answer the call, proceed as
follows.
The volume of the ringing call can become very loud. Do not hold the sound aperture
up to your ear.
Press the Call key.
Notes:
• If the caller's phone number is received, it is shown on the display. If the
phone number is stored in the private phone book or in the system, the display also shows the corresponding name.
• To find out how to make phone calls with the headset, refer to the Chapter
"Using a headset", page 19.
• To find out how to activate the automatic hands-free mode, refer to the
Chapter "Using your phone in hands-free mode", page 18.
• To find out how to set Auto Answer, refer to Chapter "Setting up a profile",
page 71.
Ending a call
You want to end the call.
The call duration is displayed both during and after the call.
Call charges are also displayed after any external call which you initiated, provided
your provider supports this function.
Press the End key.
Notes:
• To find out how to make phone calls with the headset, refer to the Chapter
"Using a headset", page 19.
• To find out how to activate the automatic hands-free mode, refer to the
Chapter "Using your phone in hands-free mode", page 18.
16
eud-1290/1.0 – R1.0 – 01.2011
Dialling and phoning
Making calls
This section explains the different ways you can make a call with your phone.
Dialling with the phone number
You want to call someone and key in that person's phone number.
With call preparation you can enter a phone number without it being dialled automatically, so you have time to check the number and, if necessary, correct it. The
number is not dialled until you press the Call key.
For the communication system (communication server, OIP, Microsoft Outlook, TwixTel) to identify an external number it is recommended to enter the number in canonical format (+Country Code (Region Code) Phone Number). Press and hold down the
key to insert +.
<Phone number>
Enter a phone number in call preparation.
Press and hold down the key to enter +.
You can use the Correction key to delete any incorrect character.
Press the Call key.
➔The user is called.
Dialling with redial
You want to call a person you have already called.
In the last-number redial list your phone automatically stores the phone numbers of
the persons you have already called, complete with their names, where available. You
can now call the person in question using this last-number redial list.
The last-number redial list has a maximum of 10 entries.
Press the Call key.
➔Redial list is displayed.
To scroll through the call numbers last dialled, press the navigation key downwards.
Press the Call key.
➔The phone number displayed is dialled.
eud-1290/1.0 – R1.0 – 01.2011
17
Dialling and phoning
Using your phone in hands-free mode
You want other people to join the conversation or to have your hands free while making the call.
The hands-free mode function activates the loudspeaker and the microphone.
During a call:
Press the Loudspeaker key.
➔The hands-free mode is now activated,
is displayed.
Notes:
• Make sure the hands-free microphone is not obstructed.
• The sound quality is improved if you set the volume of your phone to a low
setting.
To continue the call without hands-free operation:
Press the Loudspeaker key.
➔The loudspeaker and hands-free microphone are now deactivated.
Notes:
• To end a call in open-listening mode, press the End call key.
• To find out how to make phone calls with the headset, refer to the Chapter
"Using a headset", page 19.
• To find out how to set Auto Answer, refer to Chapter "Setting up a profile",
page 71.
Muting the microphone
In the middle of a call you want to talk briefly with other persons in the room without
your call partner hearing your conversation.
You can switch the microphone on and off during a call.
18
Micro
Switching the microphone off:
Press the Micro softkey.
➔The microphone is deactivated,
Micro
Switching the microphone back on:
Press the Micro softkey once again.
is displayed.
eud-1290/1.0 – R1.0 – 01.2011
Dialling and phoning
Using a headset
To make a phone call with the headset.
If you answer a call in headset mode using the Call key or Loudspeaker key, the call is
provided on the headset.
Your phone is ringing. To answer the call, proceed as follows:
Press the Call key or Loudspeaker key.
➔The call is provided on your headset.
Press the Loudspeaker key.
➔The phone’s microphone is switched on and the headset microphone is
switched off.
Headset <--> Handset
You can use the Headset or Handset softkey to switch modes.
Ending a call:
Press the End key.
Notes:
• To find out how to activate the headset, refer to the Chapter "To activate
headset mode", page 73.
• To call a user, dial the user’s phone number and press the Call key or Loudspeaker key.
• For more information refer to your headset’s user’s guide.
eud-1290/1.0 – R1.0 – 01.2011
19
Using the display and operating elements
The following sections explain how to operate your phone quickly and simply.
Keys . . . . . . . . . . . . . . . . . . . . . . . . . . . . . . . . . . . . . . . . . . . . . . . . . . . . . . . . . . . . . . . . . . . . . . . . . . . . . . . . . . 21
Input . . . . . . . . . . . . . . . . . . . . . . . . . . . . . . . . . . . . . . . . . . . . . . . . . . . . . . . . . . . . . . . . . . . . . . . . . . . . . . . . . 22
Menu-guided navigation . . . . . . . . . . . . . . . . . . . . . . . . . . . . . . . . . . . . . . . . . . . . . . . . . . . . . . . . . . . . . 24
Signals . . . . . . . . . . . . . . . . . . . . . . . . . . . . . . . . . . . . . . . . . . . . . . . . . . . . . . . . . . . . . . . . . . . . . . . . . . . . . . . 26
20
eud-1290/1.0 – R1.0 – 01.2011
Using the display and operating elements
Keys
Using the softkey
The 3 softkeys have variable functions. These functions are displayed above the key.
You can also store phone numbers on a softkey (see Chapter "Store a phone number
under a key – number key", page 84).
<Setting value>
Press the softkey where the display shows the function you want.
<long>
Keep the softkey held down for a moment (about 2 seconds).
eud-1290/1.0 – R1.0 – 01.2011
21
Using the display and operating elements
Input
Digit keys
The characters are assigned to the digit keys as follows. Press the relevant digit key
repeatedly until the character you want is displayed.
-._?1!,:;’"¿¡
ABC2ÄÆÅÇ
abc2äæåàç
Press and hold down: Switching
system
DEF3É
def3éèê
GHI4
ghi4ì
JKL5
jkl5
Press and hold down: Calling up
the service menu
MNO6ÑÖØŒ
mno6ñöøóœ
PQRS7ߊ
pqrs7ßš
TUV8Ü
tuv8üù
WXYZ9ŸŽ
wxyzž9
+0
@*/()<=>%£$¥ª&§€
<Space> #
Enters digits
The digit keys are used to enter the digits 0 to 9.
22
eud-1290/1.0 – R1.0 – 01.2011
Using the display and operating elements
Enter the letters
You can also use the digit keys to enter letters and special characters. A number of letters and special characters are assigned to each key.
To enter letters using the digit keys, you need to be in text mode. The text mode is
activated automatically if the phone is expecting a text input. You can switch back
and forth between number mode and letter mode during your input.
abc-->123
Switching between number mode and letter mode during your input:
Press the abc-->123 or 123-->abc softkey.
Switching between upper and lower case
You want to switch between upper and lower case while making an input in text
mode.
Upper-case input is automatically activated when the first letter is entered. The text
mode then automatically switches to lower-case input. You can use the Softkey to
switch manually between upper-case and lower-case input.
a-->A
Switching between upper case and lower case in text mode:
Press the a-->A or A-->a softkey.
Correcting your input
You notice you have entered a wrong digit or character. You can either delete the
input one character at a time or cancel the entire input.
To delete the last character:
Press the Correction key of the Delete softkey.
Exit editor without changes:
Press the End key.
Moving the Cursor
You want to go to a certain character for an input or correction.
With the navigation key you can move the cursor to the left or right.
eud-1290/1.0 – R1.0 – 01.2011
23
Using the display and operating elements
Move the cursor with the horizontal navigation key.
Menu-guided navigation
Accessing the menu
The phone is in standby mode:
Press the navigation key to the right or the Menu softkey.
➔The first menu entry is displayed.
Use the vertical navigation key to scroll through the menu entries.
Select
Press the Select softkey.
➔Accessing the displayed menu.
Using the navigation key
You can retrieve a particular menu entry even more simply and efficiently using the
navigation key. You can scroll vertically and horizontally through the different menu
entries.
Navigation key in the idle state:
Left: Profiles
Right: Main menu
Top: Activated features
Bottom: Phone book
Horizontal navigation key:
Left: scrolls back through the menu.
Right: opens displayed menu, scrolls forward through the menu, retrieves
detailed information.
Vertical navigation key:
Top: scrolls upwards in the list.
Bottom: scrolls downwards in the list.
24
eud-1290/1.0 – R1.0 – 01.2011
Using the display and operating elements
Undoing actions
To cancel operating steps, proceed as follows:
Exit editor without changes:
Press the End key.
Scrolling back through the menu step by step:
Press the Correction key.
Back to the idle state in the menu:
Press the End key.
Activate/deactivate function
You can enable or disable a function or a menu entry by selecting the entry you want
and pressing the Select softkey.
Select
Activate/deactivate function:
Press the Select softkey.
Resetting activated features
You can deactivate again all the activated functions (e.g. Forwarding).
Press the navigation key up.
➔Activated features is opened.
Or:
Activated features are also available via the menu: Menu > Activated features.
Reset
eud-1290/1.0 – R1.0 – 01.2011
Press the Reset softkey to deactivate the function you want.
➔The function is now deactivated.
25
Using the display and operating elements
Signals
Indicator LED signals
Depending on the situation the indicator LEDs will flash or light up in different colours.
Colour
26
State
Description
Flashes fast
• Incoming call
• Callback
Lit
Hands-free on
Flashes slowly
New voice mail or new text message
Flashes fast
Outside the system’s service area
Flashes slowly
• Battery almost empty
• Not subscribed to any system
Flashes alternately
The phone is switched off
eud-1290/1.0 – R1.0 – 01.2011
Supplementary features
The following sections explain the supplementary features provided by your
phone for more efficient use.
Making and answering calls . . . . . . . . . . . . . . . . . . . . . . . . . . . . . . . . . . . . . . . . . . . . . . . . . . . . . . . . . . 28
Using functions while in a call . . . . . . . . . . . . . . . . . . . . . . . . . . . . . . . . . . . . . . . . . . . . . . . . . . . . . . . . 37
Organising absences from the desk . . . . . . . . . . . . . . . . . . . . . . . . . . . . . . . . . . . . . . . . . . . . . . . . . . . 41
Functions for special situations . . . . . . . . . . . . . . . . . . . . . . . . . . . . . . . . . . . . . . . . . . . . . . . . . . . . . . . 47
Setting functions by remote control. . . . . . . . . . . . . . . . . . . . . . . . . . . . . . . . . . . . . . . . . . . . . . . . . . . 61
eud-1290/1.0 – R1.0 – 01.2011
27
Supplementary features
Making and answering calls
This section explains some convenient features provided by your phone for
making a call.
Dialling by name (Quickdial)
You want to make a call by entering a name.
With Quickdial you only need to press the digit keys for each letter once, even though
each key is assigned several letters. An efficient algorithm provides quick search
results.
Requirement: The name and the corresponding call number have to be stored in one
of the system’s phone books.
The surname and first name have to be separated by a space (# key), for example
"no s" (6 6 # 7) for Noble Stephen. Ask your system administrator whether you should
start with the surname or the first name.
Note:
The response time may vary greatly depending on the size and the number of
phone books connected.
<Setting value>
ABC
Quickdial:
Press each of the corresponding digit keys once for the first few letters of the
name you are looking for.
➔For each letter, the display shows the corresponding digit, for example a "6"
for the letter "n".
Press the ABC softkey until the user or a list is displayed.
Or:
Phone book is also available via the menu: Menu > Phone book > Quickdial.
Scroll through the list until the user you want is displayed. Select the phone
number you want.
Note:
If the phone is unable to find a matching user, List empty will appear on the display.
Press the Call key.
➔The phone number displayed is dialled.
28
eud-1290/1.0 – R1.0 – 01.2011
Supplementary features
Dialling from the phone book
You want to search a user in one of the connected phone books.
The surname and first name have to be separated by a space, for example "no s" for
Noble Stephen. Ask your system administrator whether you should start with the surname or the first name.
To find out to create a new contact in your private phone book, refer to the Chapter
"Creating a new contact entry", page 80.
Press the navigation key down.
Or:
Phone book is also available via the menu: Menu > Phone book.
Alphasearch
Scroll to Alphasearch and press the Select softkey.
If required, enter the first few letters of the name you are looking for (first name
and surname separated by a space) until the user or a list is displayed.
Notes:
• Text mode is activated automatically.
• Use the # key to enter spaces.
Scroll through the list until the user you want is displayed. Select the phone
number you want.
Press the Call key.
➔The phone number displayed is dialled.
Notes:
• The search function is not affected by upper/lower case and special characters.
• If the phone is unable to find a matching user, List empty will appear on the
display.
eud-1290/1.0 – R1.0 – 01.2011
29
Supplementary features
Dialling from the call list of unanswered calls
You want to call someone who has previously tried to reach you.
Your phone automatically stores the phone number of this user in the call list and the
display shows Missed calls. You can now call the person back using this call list.
The call list of unanswered calls contains a maximum of 10 entries.
Show
Calling a user back:
Press the Show softkey.
➔The display shows a list of the last unanswered calls.
Scroll through the list until the user you want is displayed.
Press the Call key.
➔The phone number displayed is dialled. Once the call has been successfully
connected, the entry is deleted from the call list.
Close
Clearing the "Missed calls" display:
Press the Close softkey.
➔Deletes the display. The entry remains stored in the list of the last unanswered calls, is displayed.
Note:
The call list of unanswered calls can also be selected using the menu: Menu >
Call lists > Missed calls.
30
eud-1290/1.0 – R1.0 – 01.2011
Supplementary features
Dialling from the call list of answered calls
You want to call back someone whose call you answered.
Your phone automatically stores the phone number of this user in the call list. You can
now call the person back using this call list.
The list of answered calls contains a maximum of 10 entries.
Press the navigation key to the right or the Menu softkey.
Call lists
Scroll to Call lists and press the Select softkey.
Answered calls
Scroll to the Answered calls call list and press the Select softkey.
➔The display shows a list of the last answered calls.
Scroll through the list until the user you want is displayed.
Press the Call key.
➔The phone number displayed is dialled.
Dialling with redial
You want to call a person you have already called.
In the last-number redial list your phone automatically stores the phone numbers of
the persons you have already called, complete with their names, where available. You
can now call the person in question using this last-number redial list.
The last-number redial list has a maximum of 10 entries.
Press the Call key.
➔Redial list is displayed.
To scroll through the call numbers last dialled, press the navigation key downwards.
Press the Call key.
➔The phone number displayed is dialled.
Note:
Redial list can also be selected using the menu: Menu > Call lists > Redial list.
eud-1290/1.0 – R1.0 – 01.2011
31
Supplementary features
Dialling with configured softkey
You want to call someone whose phone number is stored under a softkey.
You can dial the person by pressing the corresponding softkey. To find out how to
configure a softkey, refer to the Chapter "Configuring keys", page 84.
<Setting value>
Press the configured softkey.
➔The key’s allocated phone number is shown on the display.
Press the Call key.
➔The phone number displayed is dialled.
Requesting a callback
You want to talk to a certain person. The person is busy or does not answer. You can
make callback requests to both internal and external users. Not all providers support
this function.
If the called party is busy, you can activate an automatic callback. In this case, your
phone will start ringing as soon as the party you are trying to reach goes on-hook.
Then when you press the Call key, the user is called directly.
If the called party does not answer, you can also request a callback. The user then
obtains a message indicating your callback request on his display.
You called someone and hear the busy tone or the ring-back tone.
Callback
Close
To activate a callback request:
Press the Callback softkey.
➔The display shows Call expected.
Back to the idle state:
Press the Close softkey.
➔Callback remains activated.
Note:
The callback is stored in Menu > Activated features as long as it was not
answered or cancelled by the system.
Reset
Reset callback:
Press the Reset softkey.
➔Callback is deactivated.
Note:
You can only have 1 callback activated at a time and only 1 callback can be
expected from you. Your callback request will automatically be cancelled by
the system after about half an hour.
32
eud-1290/1.0 – R1.0 – 01.2011
Supplementary features
To answer the callback request
Someone has asked you to call back. The display shows Callback requested.
Call
Delete
To answer the callback request:
Press the Call softkey.
➔The phone number is dialled.
Clear callback:
Press the Delete softkey.
➔Callback is deleted.
Note:
The callback can be changed via Menu > Activated features > Delete or Call as
long as it was not answered or cancelled by the system.
Call waiting on an internal user
You want to talk to an internal user. However, the person is busy.
As a result of your call waiting, the person hears a call waiting tone and your phone
number or name appears on his display. The user has the possibility of answering,
deflecting or rejecting your call.
Requirement: It is essential that the internal user has not barred the Call waiting function on his phone (for configuration see the Chapter "Activating protection against
call types", page 79).
Ask your system administrator whether the Call waiting function is enabled on the
system.
Call waiting
User is busy:
Press the Call waiting softkey.
➔You hear the dialling tone.
Note:
If the person rejects your call request or if call waiting is not possible, the call is,
depending on the system’s configuration, disconnected (busy tone) or forwarded to a preconfigured destination.
eud-1290/1.0 – R1.0 – 01.2011
33
Supplementary features
Answering call waiting
You are in a call and hear the call waiting tone. Another user is urgently trying to reach
you.
You can either answer, deflect or reject the call.
Answer
Answering the call:
Press the Answer softkey.
➔The first call party is put on hold. You are now connected with the party who
initiated the call waiting.
Note:
For more detailed information on how to broker between callers or set up a
conference, please refer to the Chapters "Brokering between an enquiry call
party and your call partner", page 38 and "Making a conference call", page 38
respectively.
Deflect
<Phone number>
Deflect call:
Press the Deflect softkey.
Enter the user’s phone number and confirm with the Ok softkey.
➔Call-waiting party is put through.
Note:
You can also find the call number of the user you want in the phone book or in
a call list.
34
Reject
Rejecting the call:
Press the Reject softkey or the End key.
➔You remain connected with your original call partner. Depending on the system configuration the call-waiting party hears the busy tone or he is forwarded to a preconfigured destination.
End call
Ending a current call:
Press the End call softkey.
➔The first call is terminated. You are now connected with the party who initiated the call waiting.
eud-1290/1.0 – R1.0 – 01.2011
Supplementary features
Starting an announcement
You want to address internal users directly via their loudspeaker – where available –,
without waiting for a reply (similar principle to that of an intercom system).
Requirement: It is essential that the internal user has not barred his phone against
announcement (for configuration see the Chapter "Activating protection against call
types", page 79).
<Phone number>
Announcement
Enter the call number and press the Announcement softkey.
➔The call number is displayed.
Note:
You can also find the call number of the user you want in the phone book or in
a call list.
Ok
eud-1290/1.0 – R1.0 – 01.2011
Confirm with the Ok softkey.
➔User is made aware of the announcement. You can now talk.
Or:
You can also start the announcement using Menu > Call features > Announcement > User/Group.
35
Supplementary features
Receiving an announcement
Your phone rings once and then automatically initiates the announcement. The display shows . You will be addressed via your loudspeaker.
You can listen to the announcement or stop it.
To continue the announcement as a phone call:
Press the Call key.
➔You are now connected to the person who initiated the announcement.
To stop the announcement:
Press the End key.
Private call with PIN
You want to make a private call on your phone or on a third-party phone.
With the aid of your PIN you can use any phone to make an external call with your
own personal settings, even if that phone is locked for external calls. The called party's
display shows your personal phone number and not the number of the phone from
which you are making your call. Any call charges incurred will be charged to you.
The call number dialled is not stored in the last-number redial list.
<Setting value>
1. Enter procedure #46 followed by your internal call number.
2. Enter your PIN.
3. Enter the external call number directly, without the exchange access digit.
Press the Call key.
➔The phone is now enabled. The external user is called.
Note:
The default PIN setting "0000" is not accepted. First change the PIN as
described in chapter "Changing the User PIN", page 75 or use */#
procedure *47 (see "User’s Guide */# Procedures" on the Aastra document
portal: www.aastra.com/docfinder). If you have forgotten your PIN, your system
administrator can reset it to the default setting.
36
eud-1290/1.0 – R1.0 – 01.2011
Supplementary features
Using functions while in a call
This section explains the different options provided by your phone while you are
in a call.
Enquiry call during a call
You want to call someone else briefly without losing your current call partner. Then
you want to resume your conversation with your original call partner.
With the Enquiry function you can call someone else in the middle of a call and put
your original call partner on hold. You can make enquiry calls to both internal and
external users.
Enquiry
<Phone number>
You are making/taking a call:
Press the Enquiry softkey.
Enter the phone number of the enquiry call party.
➔Enquiry call party is called; first call partner is on hold.
Note:
You can also find the call number of the user you want in the phone book or in
a call list.
End call
To end the enquiry call:
Press the End call softkey or the End key.
➔You are now back through to your original call partner.
Notes:
• If your enquiry call party hangs up and you also go on-hook by mistake, you
will hear a continuous ringing signal for 10 seconds to draw your attention
to the person still on hold. If you press the Call key during the continuous
ringing, you will be reconnected with your first call partner.
• If the other user does not answer, you can cancel the enquiry call with the
End call softkey and take back the first call.
eud-1290/1.0 – R1.0 – 01.2011
37
Supplementary features
Brokering between an enquiry call party and your call partner
You are talking with an enquiry call party and have your original call partner on hold.
You want to be able to switch back and forth between the two.
In an enquiry call you can use the brokering function to switch back and forth
between an enquiry call party and the party on hold. Brokering is possible with both
internal and external users. You can also broker between conference parties as a
group and an enquiry call party.
Brokering
End call
Brokering:
Press the Brokering softkey.
➔Your call partner changes. The other call party is put on hold.
To terminate the current connection:
Press the End call softkey.
➔Call party disconnected. Connected with the call party on hold.
Making a conference call
You are in a call and have a call party on hold at the same time. You want to include
the party on hold in the conversation and hold a conference call.
With the conference function you can include a call party on hold in the current conversation. From the conference call you can initiate an enquiry call to someone else.
You can broker between the parties of the conference and the enquiry call party.
Depending on the system, a conference call can consist of up to 6 conference participants. You can hold a conference call with internal and external users.
Conference
Add a caller on hold:
Press the Conference softkey.
➔The call party on hold is now included in the call.
Note:
Depending on the system’s configuration you may hear an attention tone.
Leaving a conference call:
Press the End key.
➔The other conference parties remain in the call.
38
eud-1290/1.0 – R1.0 – 01.2011
Supplementary features
Transferring a call partner
You want to put your call partner through to someone else.
With the Enquiry function you can connect your call partner with someone else. You
can connect internal and external users with one another.
Enquiry
<Phone number>
You are making/taking a call:
Press the Enquiry softkey.
Enter the phone number of the enquiry call party.
➔Enquiry call party is called; first call partner is on hold.
Note:
You can also find the call number of the user you want in the phone book or in
a call list.
Connecting with notification:
Wait until the person has answered the call. Announce the call party.
Connect
Press the Connect softkey or the End key.
➔Your first call partner and the other person are now connected with each
other.
Note:
If the other user does not answer, you can cancel the enquiry call with the End
call softkey and take back the first call.
Connecting without notification:
Wait for the first ringing tone, then press the End key.
➔The other party is then called directly by your first call partner.
Note:
Recall: If the other party does not answer, the call comes back to your phone.
eud-1290/1.0 – R1.0 – 01.2011
39
Supplementary features
Parking a call partner
You want to put your call partner on hold without using a phone line as a result.
You can park your call partner locally. A locally parked call partner can only be
retrieved by the phone from which the function was initially carried out.
You can also allocate the Park function to a freely configurable key (see Chapter "Configuring keys", page 84).
Park
Take back
Press the Park softkey.
➔Your call partner is now parked locally;
is displayed.
To retrieve a parked call party:
Press the Take back softkey.
Notes:
• With the End key the display returns to the idle state. As long as your call
partner does not hang up, he remains parked. You can retrieve your parked
call party using Menu > Activated features > Take back.
• The */# procedure for central parking can be found in the "User’s Guide */#
Procedures" on the Aastra document portal: www.aastra.com/docfinder.
40
eud-1290/1.0 – R1.0 – 01.2011
Supplementary features
Organising absences from the desk
This section explains the different options provided by your phone when you
want to leave your desk.
The Presence function lets you set your personal presence status quickly. It also
tells you directly whether the user you want is reachable or absent without you
having to call him. The information details depend on the type of telephone.
Presence state
You have a choice of 5 presence profiles for controlling your presence status:
Presence state
Available (default)
Absent
Meeting
Busy
Not available
You can call up the presence of the user you want in the following situations (providing the user has a phone with presence profiles).
• when you call an internal user;
• in the phone book or in a call list;
• during dialling by name;
Notes:
• You can only call up a user's presence if the user in question has a phone with presence profiles.
• External applications such as Open Interfaces Platform (OIP) can affect your presence status. Contact your system administrator for more information.
eud-1290/1.0 – R1.0 – 01.2011
41
Supplementary features
<Presence profile>
To activate the presence profile:
Select the profile you want and press the Select softkey.
➔The profile is activated.
Or:
Press the function key for<Presence>.
<Presence profile>
To deactivate the presence profile:
Select another profile and press the Select softkey.
➔The profile is deactivated.
Or:
Press the function key for<Presence>.
To check a user's presence:
Enter a complete internal name.
Or:
Select the user you want from the phone book or a call list.
➔Presence status is displayed.
Press the Call softkey.
➔The phone number is dialled.
42
eud-1290/1.0 – R1.0 – 01.2011
Supplementary features
Forwarding calls (Call forwarding)
You want to leave your desk. Calls for you are to be forwarded to a different destination (phone, voice mail).
With call forwarding you can forward incoming calls directly to a different destination.
Notes:
• A forwarding applies to all connected phones.
• Only one forwarding variant at a time is possible.
To activate forwarding:
Press the navigation key to the right or the Menu softkey.
Forwarding
Scroll to Forwarding and press the Select softkey.
Call Forwarding
Scroll to Call forwarding and confirm with the Ok softkey.
User
Scroll to User and confirm with the Ok softkey.
Enter the user’s phone number and confirm with the Ok softkey.
➔Forwarding is activated.
Note:
You can also find the call number of the user you are looking for in the redial
list.
To deactivate forwarding:
Press Menu > Activated features > Reset.
Notes:
• If a call is to be forwarded only when you are already in a call, select Forwarding busy.
• You can also forward to your Voice Mail (see Chapter "Forwarding to voice
mail", page 45) or to a Message (see Chapter "Forwarding to a message",
page 46).
• You can also activate forwarding by remote control, see Chapter "Setting
functions by remote control", page 61.
eud-1290/1.0 – R1.0 – 01.2011
43
Supplementary features
Forwarding a Call on No Reply (CFNR)
You want calls that you receive on your phone to be forwarded to another destination.
Both your own phone and the other destination will then start ringing. The system
configuration determines whether or not there is a ringing delay at the other destination. Whoever goes off-hook first, answers the call. Depending on the system configuration, Call Forwarding on No Reply can also be activated when your phone is busy.
Notes:
• A forwarding applies to all connected phones.
• Only one forwarding variant at a time is possible.
To activate forwarding:
Press the navigation key to the right or the Menu softkey.
Forwarding
Scroll to Forwarding and press the Select softkey.
Call Forwarding on No
Reply
User
Scroll to Forwarding on No Reply and confirm with the Ok softkey.
Scroll to User and confirm with the Ok softkey.
Enter the phone number of the destination to which your calls are to be forwarded and confirm with the Ok softkey.
➔Forwarding is activated.
Note:
You can also find the call number of the user you are looking for in the redial
list.
To deactivate forwarding:
Press Menu > Activated features > Reset.
Notes:
• You can also forward calls to your Voice Mail (see Chapter "Forwarding to
voice mail", page 45).
• You can also activate forwarding by remote control, see Chapter "Setting
functions by remote control", page 61.
44
eud-1290/1.0 – R1.0 – 01.2011
Supplementary features
Forwarding to voice mail
You cannot momentarily be reached on your phone. If you forward to your voice mail,
a user can leave you a voice message.
You can use the global greeting or your own greeting (see Chapter "Configuring voice
mail", page 82).
For further information on voice mail refer to the "User’s Guide Voice Mail Systems" on
the Aastra document portal: www.aastra.com/docfinder.
Notes:
• A forwarding applies to all connected phones.
• Only one forwarding variant at a time is possible.
To activate forwarding:
Press the navigation key to the right or the Menu softkey.
Forwarding
Scroll to Forwarding and press the Select softkey.
Call Forwarding
Scroll to Call forwarding and confirm with the Ok softkey.
Voice Mail
Scroll to Voice Mail and confirm with the Ok softkey.
➔Forwarding is activated.
To deactivate forwarding:
Press Menu > Activated features > Reset.
Notes:
• You can specify whether your voice mail should answer directly (Call forwarding) or with a delay (Forwarding on No Reply), or only if you are already
on the phone (Forwarding if busy).
• A new voice mail message is signalled with a text message on the display
and a red-flashing LED indicator in the idle state.
eud-1290/1.0 – R1.0 – 01.2011
45
Supplementary features
Forwarding to a message
You cannot be reached on your phone. You want any internal user who calls you to
get a text message. The user hears the busy tone and obtains a text message on his
display.
Requirement: The internal user must have a phone capable of receiving text messages. Users whose phone cannot receive text messages are put through to your
phone or rerouted to a destination predefined within the system.
Notes:
• A forwarding applies to all connected phones.
• Only one forwarding variant at a time is possible.
To activate forwarding:
Press the navigation key to the right or the Menu softkey.
Forwarding
Scroll to Forwarding and press the Select softkey.
Call Forwarding
Scroll to Call forwarding and confirm with the Ok softkey.
Message
Scroll to Message and confirm with the Ok softkey.
<Text>
Enter the text and confirm with the Ok softkey.
➔Forwarding is activated.
To deactivate forwarding:
Press Menu > Activated features > Reset.
Note:
If you activate another forwarding, your forwarding to message is deactivated.
46
eud-1290/1.0 – R1.0 – 01.2011
Supplementary features
Functions for special situations
This section explains the different options provided by your phone to deal with
special situations.
Function selection for configurable key
This section contains a list of all the functions you can store under a configurable key
via the menu. Contact your system administrator for more information.
More information on how to store functions under a configurable key using function
commands and */# procedures can be found in Chapter "Formulating functions",
page 85.
Function
Description
Call Forwarding Unconditional
With this function you forward incoming calls directly to a different destination. For further information refer to Chapter "Forwarding calls (Call forwarding)", page 43.
Forwarding if busy
With this function you forward incoming calls directly to a different destination if you are busy. For further information refer to Chapter "Forwarding
calls (Call forwarding)", page 43.
Call Forwarding on No
Reply
With this function you forward incoming calls you receive on your phone to
another destination. For further information refer to Chapter "Forwarding a
Call on No Reply (CFNR)", page 44.
Switch group
This function lets you route calls and functions via switch groups (with two
switch positions).
Relay
You can control external electric equipment or installations using relays. For
example you can use your phone to open and close electric gates or to
switch the lights on or off throughout a building.
Welcome announcement
Announcement service for incoming internal and external calls. If you do not
answer an external call after a set delay, the user who is calling will obtain an
announcement. After the announcement the caller will then hear the ringback tone again.
Lock
This function protects you against Call Waiting and Announcement. For further information refer to Chapter "Activating protection against call types",
page 79.
Remote control
This function lets you set remote maintenance access to your phone on a
one-off basis of permanently.
MCID
This function lets you track a malicious call. For further information refer to
Chapter "Tracking a malicious call", page 54.
ACD (Automatic Call Distribution)
The call routing of calls in the queue can be controlled using an ACD application.
eud-1290/1.0 – R1.0 – 01.2011
47
Supplementary features
Function
Description
User group
In the user group incoming and internal calls are routed to a group of internal destinations according to a preconfigured call distribution.
Home alone
If calls to a user group can only be answered by one user, the user in question
can activate Home Alone on the user group. Then if the user is already in a
call, all subsequent internal or external calls to the user group obtain a busy
tone.
configurable
You can use function commands to define a function to suit your personal
requirements. A function can consist of one or more function commands,
function codes, and the phone number. You can either carry out a function
directly or store it under a key. For further information refer to Chapter "Formulating functions", page 85.
CLIR
This function lets you prevent your call number from being displayed to the
caller. For further information refer to Chapter "Suppressing your call
number from your called party's terminal display", page 54.
Deflect
This function lets you deflect an incoming call to another user. For further
information refer to Chapter "Deflect a call during the ringing phase", page
49.
Park
With this function you put your call partner on hold without using a phone
line as a result. For further information refer to Chapter "Parking a call partner", page 40.
Do not disturb
With this function incoming calls are automatically forwarded to a specific
destination. For further information refer to Chapter "Activating protection
against call types", page 79.
Greeting
This function allows you to activate/deactivate the greeting you want. For
further information refer to Chapter "Managing personal greeting", page 82.
Ring alone
This function lets you specify which of your phones signals incoming calls
acoustically (as part of the one-number user concept). For further information refer to Chapter "Activating ring alone", page 56.
Personal call routing
This function lets you specify where incoming calls are routed to (as part of
the one-number user concept). For further information refer to Chapter
"Activating personal call routing", page 55.
Personal call routing menu
Menu for selecting the personal call routing. For further information refer to
Chapter "Activating personal call routing", page 55.
Fast take (Pick up a Call)
You can take an incoming call or an active call from another phone to your
phone.
Presence
Menu for selecting a presence profile. For further information refer to Chapter "Presence state", page 41.
Presence profile
Menu for selecting a presence profile. For further information refer to Chapter "Presence state", page 41.
48
eud-1290/1.0 – R1.0 – 01.2011
Supplementary features
Deflect a call during the ringing phase
You do not want to answer a call yourself but deflect it to another user.
With the function Deflect you can deflect calls to an internal or external user or to the
voice mail during the ringing phase.
Your phone is ringing and the indicator LED is flashing. To deflect the call, proceed as
follows.
Deflect
Press the Deflect softkey.
<Phone number>
Enter the phone number and confirm with the Ok softkey.
➔The call is deflected to the user you want.
Notes:
• You can also find the call number of the user you want in the phone book or
in a call list.
• If the user you want to deflect to is busy, the call will not be deflected. The
display shows Busy and your phone still rings.
Reject a call during the ringing phase
You do not want to answer a call.
You can reject a call already during the ringing phase.
Reject
eud-1290/1.0 – R1.0 – 01.2011
Press the Reject softkey or the End key.
➔The connection is rejected and, depending on the system configuration, the
caller obtains the busy tone or he is forwarded to a preconfigured destination.
49
Supplementary features
Listening to voice mail
Voice Mail from is displayed and the indicator LED is red-flashing.
Note:
Depending on the system configuration your system administrator can specify that
you are notified by e-mail whenever you receive a new voice mail (with the voice
mail attached). Contact your system administrator for more information.
Listen
Listening new messages:
Press the Listen softkey.
➔Message is played back.
Or:
Voice mail can also be selected using the menu: Menu > Voice Mail > Inbox > Listen.
Listening to all messages:
Listening to all messages is available via the menu: Menu > Voice Mail > Inbox >
Listen all.
Menu
To delete the message:
Press the navigation key to the right or the Menu softkey.
Voice Mail
Scroll to Voice Mail and press the Select softkey.
Inbox
Scroll to Inbox and press the Select softkey.
Delete
Press the Delete softkey.
➔Voice mail is deleted.
Notes:
• To find out how to configure call forwarding to your voice mail, refer to the
Chapter "Forwarding to voice mail", page 45.
• To find out how to configure a voice mail, refer to the Chapter "Configuring
voice mail", page 82 or in the "User’s Guide Voice Mail Systems" on the Aastra
document portal: www.aastra.com/docfinder.
50
eud-1290/1.0 – R1.0 – 01.2011
Supplementary features
Send text messages
You want to send a written message to an internal user.
You can send a text message to an internal user. The text message will appear on the
person's display.
Requirement: The internal user must have a phone capable of receiving text messages.
You can use one of the text messages stored in the system directly, modify it or create
a new text message.
Press the navigation key to the right or the Menu softkey.
Text message
Scroll to Text message and press the Select softkey.
New
Scroll to New and press the Select softkey.
<Text message>
Select one of the text messages stored in the system and press the Select
softkey.
<Text>
Adapt or expand the text and press the Send softkey.
<Destination>
Select the destination and press the Select softkey.
<Phone number>
For User and Group: Enter the call number and press the Send softkey.
➔The text message is sent.
Note:
If the display shows Not available, the text message could not be sent.
eud-1290/1.0 – R1.0 – 01.2011
51
Supplementary features
Read text messages
Your display shows New message received from and the envelope symbol. The LED
indicator is red-flashing.
Show
Show text message:
Press the Show softkey.
➔The display shows the sender and the date/time of the text message.
Read
Read text messages:
Select the text message you want and press the Read softkey.
➔If the text message runs over several lines, use the navigation key to scroll.
Delete
Delete text message:
Press the Delete softkey.
➔The text message is deleted; the next text message is retrieved from the
memory.
Or:
Press Menu > Text message > Inbox to select the text message and continue as
described above.
Note:
You can select and read a new text message even during an active call using
Text message > Inbox.
Picking up a call
You hear a phone ringing in your vicinity and want to pick up the call.
With the Pick up function you can pick up the call from the other phone on your own
phone.
Press the navigation key to the right or the Menu softkey.
Call features
Scroll to Call features and press the Select softkey.
Pick up
Scroll to Pick up and press the Select softkey.
<Phone number>
Enter the number of the phone from which you want to pick up the call and
confirm with the Ok softkey.
Note:
You can also find the call number of the user you want in the phone book or in
a call list.
52
eud-1290/1.0 – R1.0 – 01.2011
Supplementary features
Making a call on a third-party phone
You want to make a call on a third-party phone using your personal settings, for example on a colleague’s phone or in a meeting room.
You can activate a third-party phone to make an internal or external call using your
personal settings, even if the phone is locked for external calls.
You can activate the phone for a business or private call.
Once you have activated the phone using a */# procedure and your PIN, dialling by
your private phone book is available.
The called party's display shows your personal phone number and not the number of
the phone from which you are making your call.
Any call charges incurred will be charged to you.
<Setting value>
1.
2.
3.
4.
Enter procedure #36 for a business call.
Enter your internal phone number.
Enter your PIN.
Enter the internal or external phone number with the exchange access digit.
Press the Call key.
➔The phone number displayed is dialled.
Note:
When you hang up, dialling by name and your private phone book remain
available for a whole minute so you can make another call.
Or:
1. Enter procedure #46 for a private call.
2. Enter your internal phone number.
3. Enter your PIN.
4. Enter the external call number directly, without the exchange access digit.
5. Press the Call key.
➔The phone is now enabled; the external user is called.
Note:
The default PIN setting "0000" is not accepted. First change the PIN as
described in chapter "Changing the User PIN", page 75 or use */#
procedure *47 (see "User’s Guide */# Procedures" on the Aastra document
portal: www.aastra.com/docfinder). If you have forgotten your PIN, your system
administrator can reset it to the default setting.
eud-1290/1.0 – R1.0 – 01.2011
53
Supplementary features
Suppressing your call number from your called party's terminal display
You do not want your call number to appear on the terminal display of a called party
in the public network.
You have two possibilities:
• If you never want the phone number to be displayed, set CLIR Permanent.
• To suppress your call number display for certain calls only, select the function CLIR
Per call before dialling your party's call number.
This function must be stored under a function key (see chapter "Configuring keys",
page 84).
You can also execute the function with a */# procedure (see "User’s Guide */# Procedures" on the Aastra document portal: www.aastra.com/docfinder).
Before the call:
Press the function key for <CLIR>.
Notes:
• CLIR works only with external calls.
• This feature depends on the range of services offered by your provider.
Tracking a malicious call
Your are being threatened or molested by a call. You want to identify the caller.
Using the MCID (Malicious Call Identification) function the provider records the following call data: Your phone number, the caller’s phone number, and the date and
time of the call.
MCID has to be enabled by your provider. Your provider will inform you about accessing the recorded call data.
This function must be stored under a function key (see chapter "Configuring keys",
page 84).
During a call:
Press the function key for MCID.
After the call do not hang up: press the function key for MCID while you hear
the busy tone.
54
eud-1290/1.0 – R1.0 – 01.2011
Supplementary features
Activating personal call routing
You wan to specify which of your phone shall ring when you receive a call.
If your system administrator has set up a phone number with several phones for you
as well as the call routings, you can specify which of your phones shall signal a call by
using the personal call routing. Your system administrator can set up up to 5 call routings. You can only answer a call on phone where the call is signalled. Contact your system administrator for more information.
You can activate a call routing for all phones. If you have not configured a call routing,
the default setting (all phones are ringing) is used as standard.
This function can also be stored under a configurable key (see Chapter "Configuring
keys", page 84).
Activating personal call routing:
Press the navigation key to the right or the Menu softkey.
Settings
Scroll to Settings and press the Select softkey.
General
Scroll to General and press the Select softkey.
Personal call routing
Scroll to Personal call routing and press the Select softkey.
<Setting value>
Select the call routing you want and confirm with the Select softkey.
➔Personal call routing is activated.
To deactivate personal call routing:
Press Menu > Activated features > Reset.
Renaming personal call routing:
Press Menu > Settings > General > Personal call routing > Modify.
eud-1290/1.0 – R1.0 – 01.2011
55
Supplementary features
Activating ring alone
You want to specify which of your phones shall ring acoustically when you receive a
call.
When your system administrator has set up a phone number with several phones, you
can define on which phones a call shall acoustically be signalled using ring alone.
When you have activated ring alone on a phone, the acoustic ringing tone is deactivated for all other phones ( ). An incoming call is signalled in the display of all
phones. You can answer the call on each of your phones.
Note:
When you have activated ring alone but deactivated the personal call routing for a
phone in parallel, an incoming call is not acoustically but only visually signalled.
This function must be stored under a function key (see chapter "Configuring keys",
page 84).
In the idle state:
Press the function key for <Ring alone>.
➔Ring alone is activated/deactivated.
56
eud-1290/1.0 – R1.0 – 01.2011
Supplementary features
Activating / deactivating room monitoring (Baby surveillance)
You want to use your cordless phone to observe acoustic monitoring tasks, for example to monitor a toddler.
You can activate a room monitoring mode on your cordless phone. You can select
between active and passive room monitoring.
Activate the room monitoring on your cordless phone. The microphone for room
monitoring is activated after a delay of 10, 20 or 30 seconds. Use this time lag to position the cordless phone in the room where you want e.g. to monitor your child and
leave the room.
Active room monitoring:
As soon as the ambient noise level near the monitoring phone exceeds the configured level (noise sensitivity: Very low, Low, Medium, High) for more than 2 seconds, a
call is immediately triggered to an internal or external destination number you have
specified (destination phone). is displayed.
When the call is answered on the destination phone, a call is set up: one-way (connection only from the monitoring to the destination phone) or two-way (mutual call connection during 1 minute in hands-free mode). Provided the call connection is not previously terminated neither on the monitoring nor on the destination phone, the connection will automatically be terminated after 1 minute. The microphone for room
monitoring is reactivated after 1 minute and a call only triggered when the configured level is again exceeded.
When the destination phone is busy, the microphone for room monitoring is reactivated after 15 seconds. When the destination phone does not answer, the call is terminated and the microphone for room monitoring is reactivated after 1 minute. A call is
only triggered again when the configured level is again exceeded.
When the monitoring phone receives an internal or external call from another phone
as the destination phone, this call is only visually but not acoustically signalled. You
can answer the call on the monitoring phone. You can also make a call on the monitoring phone. Once the call has been terminated, the monitoring phone immediately
switches back to monitoring mode. Please note that room monitoring is deactivated
as long as the monitoring phone is called or is in a call connection. Avoid these monitoring gaps by activating a call forwarding on the monitoring phone. A verification
call of the destination phone is yet possible with call forwarding.
eud-1290/1.0 – R1.0 – 01.2011
57
Supplementary features
Room monitoring mode:
• Active room monitoring with one-way call connection.
• Active room monitoring with two-way call connection.
• Passive room monitoring (Listen only).
Notes:
• Room monitoring based on DECT technology cannot be 100% reliable.
• Extraneous noises in the monitored room call lead to false calls.
• Therefore no liability can be assumed for failed monitoring calls or for false calls.
Passive room monitoring:
You can also listen into the monitored room using a verification call. Call the monitoring phone from the destination phone. When the destination number is an external
call number, CLIP may not be suppressed. The monitoring phone answers the call
automatically and without acoustic signalling and sets up a one-way or two-way call
connection depending on the settings. This is possible even if a call forwarding is activated on the monitoring phone.
There is no time limit to the duration of a verification call, which must be terminated
on the destination phone or on the monitoring handset. Once the call has been
cleared down, the monitoring phone immediately switches back to monitoring mode.
Press the navigation key to the right or the Menu softkey.
Settings
Scroll to Settings and press the Select softkey.
Room monitoring
Scroll to Room monitoring and press the Select.
<Settings>
Settings:
1. Scroll to Mode, select the room monitoring mode you want and press the
Select softkey.
2. Scroll to Sensitivity, select the level you want and press the Select softkey.
3. Scroll to Activation delay, select the destination you want and press the
Select softkey.
4. Scroll to Destination number, enter the destination number and press the
Save softkey.
Note:
Test call destination > Select allows you to test the phone number you have
entered to make sure it is correct.
58
eud-1290/1.0 – R1.0 – 01.2011
Supplementary features
Enable room monitoring
Activating room monitoring:
Scroll to Enable room monitoring and press the Select softkey.
➔You hear the acknowledgement tone and the display shows the destination
number after 10 seconds. The symbol shows when the microphone for
room monitoring is activated.
Enable room monitoring
To deactivate room monitoring:
Press the Reset softkey.
Or:
Scroll to Enable room monitoring and press the Select softkey.
➔Room monitoring is now deactivated.
Silent intrusion
Silent intrusion is a variant of the Intrusion function and is used mainly in call centres.
Another user can intrude on your active call and listen in to your conversation without
you and your call party noticing. Unlike Intrusion you will receive neither a visual nor
an acoustic signal.
This means you cannot reject Silent intrusion. The third user's microphone remains
switched off. He can however intrude on the call at any time by enabling his microphone or pressing the Intrusion function key.
Your system administrator can allocate this function to a configurable key.
Notes:
• Silent intrusion has to be enabled. Contact your system administrator for more
information.
• Silent intrusion may infringe on your national data protection provisions or be
permitted only under certain circumstances.
• If you intend to use this function notify your call party in advance.
1. Enter the call number of the user you want.
2. Once the busy tone sounds, press key 4.
➔Silent intrusion is activated.
eud-1290/1.0 – R1.0 – 01.2011
59
Supplementary features
Free seating
You do not have your own workplace and share desk and phone with other employees.
Log in:
Free Seating lets you log in on a phone configured for that purpose. Once you are
logged in, your personal call lists, phone book and all your other personal settings and
Hotkeys are available to you immediately.
Notes:
• You can only log in to a phone if no other user has yet logged in to that phone for
free seating purposes.
• You can only log on once to a Free Seating phone. The moment you log in to
another free seating phone, you are automatically logged off the original phone.
Log out:
To free up a phone, you need to log off again. To ensure a phone is not blocked for
other users if you forget to log off, your system administrator can set up a logoff process with an automatic time limit:
• After a certain amount of time after login (e.g. after 6 hours and 30 minutes).
• At a certain time (e.g. 6.30 pm)
Notes:
• If no user is currently logged on to a Free Seating phone, depending on the system configuration only emergency calls can be made from that phone.
• As long as you do not have your own phone or are not logged on to a Free Seating
phone, your caller will obtain either the busy signal or be forwarded to a preconfigured destination, depending on the system configuration.
Free seating log in:
Log in free seating:
Press the Free seating log in softkey.
Or:
Free seating can also be selected using the menu: Menu > Settings > Free seating log in.
Enter phone number and PIN and confirm with the Ok softkey.
➔You are now logged in and can use the free seating phone with your personal settings.
60
eud-1290/1.0 – R1.0 – 01.2011
Supplementary features
Note:
The default PIN setting "0000" is not accepted. First change the PIN as
described in chapter "Changing the User PIN", page 75 or use */#
procedure *47 (see "User’s Guide */# Procedures" on the Aastra document
portal: www.aastra.com/docfinder). If you have forgotten your PIN, your system
administrator can reset it to the default setting.
Free seating log out:
Log out free seating:
Press the Free seating log out softkey.
➔The display with the call number is displayed.
Depending on the system configuration enter the PIN and confirm with the Ok
softkey.
➔You are now logged off; the free seating phone is now available again to
other users.
Note:
You are automatically logged off if your system administrator has set up an
automatic logoff process.
Setting functions by remote control
This section explains how you can alter your phone’s settings even if you are not
directly at your phone.
You are not at your desk and want to set various functions on your phone from a different phone.
You can activate/deactivate many of your phone's functions by remote control from a
different phone.
The remote control is initiated using a special */# procedure. You can then enter the
function commands and */# procedures.
<Setting value>
Using remote control from a third-party phone:
1. Enter procedure #36.
2. Enter your phone number.
3. Enter your PIN.
4. Enter the */# procedure for activating/deactivating the function you want.
Press the Call key.
➔Acknowledgement tone sounds; function is activated/deactivated.
Note:
The default PIN setting "0000" is not accepted. First change the PIN as
described in chapter "Changing the User PIN", page 75 or use */#
procedure *47 (see "User’s Guide */# Procedures" on the Aastra document
portal: www.aastra.com/docfinder). If you have forgotten your PIN, your system
administrator can reset it to the default setting.
eud-1290/1.0 – R1.0 – 01.2011
61
Personalizing your phone
These sections explain how to adapt the phone’s basic settings to suit your personal requirements.
Configuring cordless phone functions. . . . . . . . . . . . . . . . . . . . . . . . . . . . . . . . . . . . . . . . . . . . . . . . . 63
Display settings . . . . . . . . . . . . . . . . . . . . . . . . . . . . . . . . . . . . . . . . . . . . . . . . . . . . . . . . . . . . . . . . . . . . . . 69
Setting the volume . . . . . . . . . . . . . . . . . . . . . . . . . . . . . . . . . . . . . . . . . . . . . . . . . . . . . . . . . . . . . . . . . . . 70
Profile settings . . . . . . . . . . . . . . . . . . . . . . . . . . . . . . . . . . . . . . . . . . . . . . . . . . . . . . . . . . . . . . . . . . . . . . . 71
Hands-free and headset settings. . . . . . . . . . . . . . . . . . . . . . . . . . . . . . . . . . . . . . . . . . . . . . . . . . . . . . 73
General settings . . . . . . . . . . . . . . . . . . . . . . . . . . . . . . . . . . . . . . . . . . . . . . . . . . . . . . . . . . . . . . . . . . . . . . 74
Protection settings . . . . . . . . . . . . . . . . . . . . . . . . . . . . . . . . . . . . . . . . . . . . . . . . . . . . . . . . . . . . . . . . . . . 79
Managing your private contacts . . . . . . . . . . . . . . . . . . . . . . . . . . . . . . . . . . . . . . . . . . . . . . . . . . . . . . 80
Configuring voice mail . . . . . . . . . . . . . . . . . . . . . . . . . . . . . . . . . . . . . . . . . . . . . . . . . . . . . . . . . . . . . . . 82
Configure presence . . . . . . . . . . . . . . . . . . . . . . . . . . . . . . . . . . . . . . . . . . . . . . . . . . . . . . . . . . . . . . . . . . . 83
Configuring keys . . . . . . . . . . . . . . . . . . . . . . . . . . . . . . . . . . . . . . . . . . . . . . . . . . . . . . . . . . . . . . . . . . . . . 84
Formulating functions. . . . . . . . . . . . . . . . . . . . . . . . . . . . . . . . . . . . . . . . . . . . . . . . . . . . . . . . . . . . . . . . 85
eud-1290/1.0 – R1.0 – 01.2011
62
Personalizing your phone
Configuring cordless phone functions
This section explains the procedure for making settings on your cordless phone.
Switching the cordless phone on/off
You want to switch your phone on or off.
Switching the phone off:
Keep the End call key pressed down for approx. 2 seconds and answer Ok to
the safety prompt.
➔The phone is switched off.
Or:
Function is also available via the menu: Menu > Settings > General > Switch off.
Notes:
• You cannot switch the phone off in a call.
• When the phone is switched off, incoming calls are stored in the call list.
Switching the phone on:
Pick up the phone from the charging bay and keep the End call key pressed
down for approx. 2 seconds.
➔The phone is switched on.
Note:
If you cordless phone cannot find a system, the display shows "No system". You
can switch to an available system using Menu > Settings > System > System registrations.
eud-1290/1.0 – R1.0 – 01.2011
63
Personalizing your phone
Locking/unlocking the keypad
You leave your workstation and want to avoid accidentally pressing your phone keys.
You can lock the keypad against unintentional actuation. You can choose whether
you want the keypad to be unlocked automatically when you receive a call or whether
you prefer to unlock the keys manually in any case.
Locking the keypad:
Keep the hash key pressed down for approx. 2 seconds.
➔The keypad is locked.
Unlocking the keypad:
Press the Unlock softkey and the hash key.
➔The keypad is unlocked.
Unlocking the keypad automatically:
Enable the Auto key lock via Menu > Settings > General.
➔The keypad is locked automatically after approx. 10 seconds, is displayed.
The keypad is automatically unlocked when you receive a call. The lock is
reactivated immediately after the end of the call.
64
eud-1290/1.0 – R1.0 – 01.2011
Personalizing your phone
Locking your phone
You need to leave your desk and want to ensure that no-one can alter your phone's
settings, look at your private data, or make outside calls from your phone.
You can lock your phone with a PIN consisting of two to ten digits. You can change it
via menu (see the Chapter "Changing the User PIN", page 75) or with the function
code *47 (see "User’s Guide */# Procedures" on the Aastra document
portal: www.aastra.com/docfinder).
You can lock either just the configuration (Configuration locked) or the entire phone
(Phone locked). With Phone locked your private data cannot be viewed and external
calls can only be made from your phone in accordance with the system settings.
Press the navigation key to the right or the Menu softkey.
Settings
Scroll to Settings and press the Select softkey.
General
Scroll to General and press the Select softkey.
Lock
Scroll to Barring and press the Select softkey.
➔You are prompted to enter your PIN.
<PIN>
Enter the PIN and confirm with the Ok softkey.
<Setting value>
eud-1290/1.0 – R1.0 – 01.2011
Select the barring you want and enable with the Select softkey.
➔The phone is now locked; is displayed.
➔To lock all your phones, execute function code *33* <PIN> # (see "User’s
Guide */# Procedures" on the Aastra document
portal: www.aastra.com/docfinder).
65
Personalizing your phone
Unlocking your phone
You want to unlock your phone.
You can use the PIN to unlock your phone. If you have forgotten your PIN, your system
administrator can reset it to the default setting.
Press the navigation key to the right or the Menu softkey.
Activated features
Scroll to Activated features and press the Select softkey.
<Barring>
Select the barring you want and press the Reset softkey.
➔You are prompted to enter your PIN.
<PIN>
Enter the PIN and confirm with the Ok softkey.
Unlocked
66
Scroll to Free and confirm with the Select softkey.
➔The phone is unlocked.
➔To unlock all your phones, execute function code #33* <PIN> # (see "User’s
Guide */# Procedures" on the Aastra document
portal: www.aastra.com/docfinder).
eud-1290/1.0 – R1.0 – 01.2011
Personalizing your phone
Activating range alarm and system busy beep
You want to set the system parameters with your cordless phone.
The Range alarm indicates that the connection between your phone and the system is
weak. You can set the phone so that you receive a warning signal if you leave the coverage area
You are making a call and are getting near the limit of the radio area: A warning signal
sounds in the loudspeaker and the LED indicator is flashing red. If you leave the radio
area, the call is disconnected.
The System busy beep tells you that the system is overloaded – you need to wait until
the system is available again.
Press the navigation key to the right or the Menu softkey.
Settings
Scroll to Settings and press the Select softkey.
General
Scroll to General and press the Select softkey.
<Setting>
Select the setting you want and switch on or off with the Select softkey.
Setting the server alarm
Depending on the system’s settings, you can receive server alarms for specific situations. These settings are made by your system administrator in the system. Contact
your system administrator for more information.
When the server alarms are activated in the system, you can select from the alarm signalling as follows: Vibracall, Progressive ring tone, Suppress ring tone.
A list of all melodies is available.
Note:
Your settings for Vibra call and Suppress ring tone can be overruled by the alarm
server.
eud-1290/1.0 – R1.0 – 01.2011
67
Personalizing your phone
Press the navigation key to the right or the Menu softkey.
Settings
Scroll to Settings and press the Select softkey.
Server alarm
Scroll to Server alarm and press the Select softkey.
<Setting>
Select the setting you want and switch on or off with the Select softkey.
Logging a cordless phone on/off
See (also) the Chapter "Managing communication systems", page 77.
Linking the charging contact to direct call answer
You want to choose whether to answer a call simply by lifting the phone out of its
charging bay or whether you also need to press the Call key after lifting out the
phone.
You can specify that your cordless phone should behave like a fixed phone when you
answer a call. In this case you do not have to press the Call key when you lift the
phone out of its charging bay.
Press the navigation key to the right or the Menu softkey.
Settings
Scroll to Settings and press the Select softkey.
General
Scroll to General and press the Select softkey.
Direct call answer
68
Scroll to Direct call answer and press the Select softkey.
➔The setting is stored.
eud-1290/1.0 – R1.0 – 01.2011
Personalizing your phone
Display settings
This section explains how to set display properties.
Setting the display
You want to optimise the display settings.
You can activate or deactivate the following settings:
• Font size (Font)
• Backlight: Brightness, Idle timeout (Duration how long the display backlight remains
enabled after a keystroke), Charging bay timeout (Duration how long the display
backlight remains enabled when the cordless phone is placed in the charging bay),
Backlight during call (Enable function to leave the display dimmed during the entire
duration of a call).
Press the navigation key to the right or the Menu softkey.
Settings
Scroll to Settings and press the Select softkey.
Display
Scroll to Display and press the Select softkey.
<Display setting>
Scroll to the display setting you want and press the Select softkey.
<Setting value>
eud-1290/1.0 – R1.0 – 01.2011
Select the setting you want.
Note:
The Select softkey displays the colour scheme you want.
➔The setting is stored.
69
Personalizing your phone
Setting the LED indicator
You want the attention LED to inform you of any phone incidents.
You can activate or deactivate the following settings:
•
•
•
•
In Service: The phone is switched on.
Incoming call
Info
Appointment call: Function can only be set with a function code, see Chapter "*/#
Procedures", page 86)
• Hands-free operation
• Battery empty
Press the navigation key to the right or the Menu softkey.
Settings
Scroll to Settings and press the Select softkey.
LED indications
Scroll to LED indications and press the Select softkey.
<LED setting>
Scroll to the LED setting you want and confirm with the Select softkey.
Setting the volume
All the ring tone properties are set using the profiles, see Chapter "Profile settings", page 71.
Setting the volume during a call
You want to adjust the volume while in a call. You have to set the volume of handset
and loudspeaker separately.
The new volume will remain stored even after the call is ended.
Louder: Press top side key.
Quieter: Press bottom side key.
70
eud-1290/1.0 – R1.0 – 01.2011
Personalizing your phone
Profile settings
6There are five different application profiles to adapt the phones to any given
work situation, e.g. headset or conference mode.
Setting up a profile
All your phone’s ringing properties are stored in the profiles.
There are 3 preset default profiles: Normal, Meeting, Charging bay. You can set up to
6 profiles.
A profile comprises a set of ringing and phone settings, which you can specify individually for each profile. One profile is always active in telephone mode. The default profile is the Normal profile. Activate the appropriate profile depending on the situation
(e.g. before a meeting you can activate the Meeting profile). The Charging bay profile is
selected automatically whenever the phone is placed in the charging bay.
You can set the following profile properties:
•
•
•
•
•
•
•
•
•
•
Ringing volume
Ringing melody for Internal ring, External ring and Discreet ring
Vibracall
Discreet ring Phone only rings once.
Auto answer: Phone only rings once and then automatically answers the call without you having to press for example the call key on the headset. Disable this setting
when you do not make your calls using headset to avoid unnoticed listening by
callers.
Suppress ring tone: is displayed.
Progressive ring tone
Loud environment: In a loud environment the phone tries to improve the voice
transfer (not for connections with Bluetooth headset and in hands-free mode). It’s
recommended to create a "Loud environment" profile.
Confirmation tone: each keystroke is confirmed with a beep.
Battery warning: battery nearly run-down triggers a warning.
Press the navigation key to the left.
Or:
The profiles are also available via the menu: Menu > Settings > Profiles.
New
eud-1290/1.0 – R1.0 – 01.2011
Creating a new profile:
Press the New softkey.
71
Personalizing your phone
Modify
Setting up a profile:
1. Scroll to the profile you want and press the Modify softkey.
2. Scroll to the setting you want and confirm your choice of setting with the
Select softkey.
➔The setting is stored.
Note:
To listen to all the ring properties use the Test softkey.
Rename
Delete
Renaming a profile:
Scroll to the profile you want and press the Rename softkey.
➔The setting is stored.
Delete profile:
Scroll to the profile you want and press the Delete softkey.
➔The profile is deleted.
Activate profile
In your everyday phoning habits you want to adapt your phone’s ringing properties to
each situation.
The ringing properties are stored in different profiles. Select the profile you want from
the list of profiles.
The current profile is indicated on the display (except for Normal profile).
Press the navigation key to the left.
Or:
The profiles are also available via the menu: Menu > Settings > Profiles.
➔All the profiles are displayed.
Select
72
Select the profile you want and activate with the Select softkey.
➔The profile is activated.
eud-1290/1.0 – R1.0 – 01.2011
Personalizing your phone
Hands-free and headset settings
This section explains other ways in which you can make calls with your phone.
Connecting a headset
Connect your headset to the socket on the bottom left-hand side of your phone. The
headset mode is then automatically activated.
To activate headset mode
You have connected a headset and now want to activate the headset mode.
A headset can be connected in parallel with the handset.
If you answer a call in headset mode using the Call key or Loudspeaker key, the call is
provided on the headset.
Note:
To find out how to make phone calls with the headset, refer to the Chapter "Using a
headset", page 19.
eud-1290/1.0 – R1.0 – 01.2011
73
Personalizing your phone
General settings
This section explains other settings you can make on your phone.
Selecting the language
The display text is not in the language you want.
You can select a different language. The menu item under which you select your language is marked by an "*" in front of the word for "language" in the language of your
choice, e.g. "*Language" for English.
Press the navigation key to the right or the Menu softkey.
*Language
Scroll to *Language and press the Select softkey.
<Language>
Select the language you want and confirm with the Select softkey.
➔The display text appears in your selected language.
Configuring the DTMF mode
You want to be able to use your phone to control other equipment or to access certain
services, such as remote polling of an answering machine or telebanking. For these
services you need the DTMF mode.
In the DTMF mode each keystroke generates a tone. If for example you enter a call
number during a call, your call partner will hear the tone signals.
You can specify whether the DTMF mode should be generally activated or deactivated. DTMF is activated as the default dialling mode.
Press the navigation key to the right or the Menu softkey.
Settings
Scroll to Settings and press the Select softkey.
General
Scroll to General and press the Select softkey.
DTMF
74
Scroll to DTMF and activate or deactivate with the Select softkey.
➔The setting is stored.
eud-1290/1.0 – R1.0 – 01.2011
P e r s o n a liz in g y o u r p h o n e
Changing the User PIN
You want to change the PIN used to lock/unlock your phone (see Chapter "Locking
your phone", page 65 and "Unlocking your phone", page 66).
The digit combination "0000" is set as default. You can select any 2 to 10-digit combination for your new PIN.
If you have forgotten your PIN, your system administrator can reset it to the default
setting.
Notes:
• Your user PIN applies to all your phones.
• Do not confuse the User PIN with the Admin PIN (see chapter "Changing the
Admin PIN", page 76).
Press the navigation key to the right or the Menu softkey.
Settings
Scroll to Settings and press the Select softkey.
General
Scroll to General and press the Select softkey.
New user PIN
Scroll New user PIN and press the Select softkey.
➔The display shows User PIN.
<Old PIN>
Enter the old PIN and confirm with the Ok softkey.
➔The display shows New user PIN.
<New PIN>
Enter the new PIN and confirm with the Ok softkey.
➔The display shows Confirm user PIN.
<New PIN>
Enter the new PIN a second time and confirm with the Ok softkey.
➔The new PIN is stored.
Notes:
• For each digit entered, the display shows an "*".
• You can also change the PIN with */# procedure *47 (see "User’s Guide */#
Procedures" on the Aastra document portal: www.aastra.com/docfinder).
eud-1290/1.0 – R1.0 – 01.2011
75
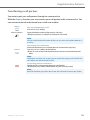
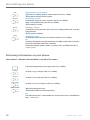
Personalizing your phone
Changing the Admin PIN
You want for example to protect the alarm settings against unauthorized or unintentional changes.
You can define and activate an Admin PIN. This means that, if the valid Admin PIN is
not entered, you can only view the alarm settings and not modify them. As long as
you have not defined the Admin PIN all alarm settings are freely accessible, without a
PIN prompt.
If you have forgotten your Admin PIN, your system administrator can reset it.
Note:
Do not confuse the Admin PIN with the User PIN (see chapter "Changing the User
PIN", page 75).
Press the navigation key to the right or the Menu softkey.
Settings
Scroll to Settings and press the Select softkey.
General
Scroll to General and press the Select softkey.
Administration
Scroll to Administration and press the Select softkey.
New admin PIN
1. Scroll to New admin PIN and press the Select softkey.
2. Enter the PIN you want and confirm with the Ok softkey.
➔The setting is stored.
Note:
Delete the current PIN if you prefer to enter your alarm settings without the
Admin PIN.
76
eud-1290/1.0 – R1.0 – 01.2011
Personalizing your phone
Enter the display text for the idle state
You want to change the text displayed by your phone in the idle state.
In addition to the date and time you can enter a personal text for the text displayed in
the idle state.
Press the navigation key to the right or the Menu softkey.
Settings
Scroll to Settings and press the Select softkey.
General
Scroll to General and press the Select softkey.
Idle text
Scroll to Idle text and press the Modify softkey.
<Text>
Enter the text and confirm with the Save softkey.
➔The text is stored.
Managing communication systems
This menu allows you to specify the active system for your phone and to manage registrations to different systems. Contact your system administrator for more information.
If your phone is registered with several systems, the name of the active system is
shown on the display.
The DECT-specific information is retrievable in the DECT identities menu.
For more information on the Download server refer to Chapter "Software", page 89.
Press the navigation key to the right or the Menu softkey.
Settings
Scroll to Settings and press the Select softkey.
System
Scroll to System and press the Select softkey.
System registrations
Scroll to System registrations and press the Select softkey.
eud-1290/1.0 – R1.0 – 01.2011
77
Personalizing your phone
New
Rename
Registering to a new system:
Press the New softkey, enter AC code, and press the Save softkey.
➔The phone searches for the system.
Renaming a system:
Scroll to the system you want and press the Rename softkey.
Enter a new number and press the Save softkey.
➔The setting is stored.
Delete
Deleting a system:
Scroll to the system you want, press the Delete softkey and answer Ok to the
safety prompt.
➔The system is deleted.
Select
Switching system:
Scroll to the system you want and confirm with the Select softkey.
Or:
Switching the phone manually to the next available system (with 2 systems):
Press key 2 and hold it down for a moment.
Choice of available systems (with 3-4 systems): Press and hold down key 2
>Select system.
Retrieving information on your phone
Your phone’s software-relevant data is stored in this menu.
Press the navigation key to the right or the Menu softkey.
Settings
Scroll to Settings and press the Select softkey.
General
Scroll to General and press the Select softkey.
Information
Scroll to Information and press the Select softkey.
<Information>
Select the setting you want.
➔The information can now be retrieved.
Or:
The software version is also available via service menu: Press and hold down
key 5 >SW version.
78
eud-1290/1.0 – R1.0 – 01.2011
Personalizing your phone
Protection settings
This section explains how you can protect yourself against certain types of call.
Activating protection against call types
You want to protect yourself against certain types of calls.
You can set the settings so that these functions are not allowed on your phone: Ask
your system administrator whether these functions are enabled on the system.
Ask your system administrator whether these functions are enabled on the system.
• Do not disturb: Incoming calls are automatically forwarded to a specific destination.
• Call waiting: You are already making/taking a call. You are notified by a waiting tone
and phone number or name in the display that someone else is trying to reach you.
You can either answer or reject this second call.
• Intrusion: A third participant can intrude into your active call and listen to your conversation.
• Announcement: You can address internal users directly via their loudspeaker –
where available –, without waiting for a reply (similar principle to that of an intercom system).
• Forwarding: Incoming calls are forwarded directly to your phone.
Press the navigation key to the right or the Menu softkey.
Settings
Scroll to Settings and press the Select softkey.
Protection
Scroll to Protection and press the Select softkey.
<Setting value>
Select the setting you want and switch on or off with the Select softkey.
➔The setting is stored.
Note:
You can deactivate an activated protection using Menu > Activated features >
Reset.
eud-1290/1.0 – R1.0 – 01.2011
79
Personalizing your phone
Managing your private contacts
This section explains how to manage your private contacts.
Creating a new contact entry
You want to store your own phone numbers. You can store your own phone numbers
as private contacts.
For each contact you have the possibility of making several call number entries (Business , Mobile , Private ). You can specify one of these numbers as the standard
call number, the one which is used whenever you do not make a particular selection.
Press the navigation key down.
Or:
The phone book is also available via the menu: Menu > Phone book.
Private contacts
Scroll to Private contacts and press the Select softkey.
New
Press the New softkey.
<Contact>
Default
80
Enter the user’s contact data (Name , Business , Mobile
Use the navigation key to scroll between the entries.
Confirm with the Save softkey.
➔The contact is now stored.
, Private
).
Specifying the default number:
1. Select the contact you want.
2. Use the right navigation key to open the contact and highlight the call
number you want.
3. Specify the selected phone number as default number using the Default
softkey.
eud-1290/1.0 – R1.0 – 01.2011
Personalizing your phone
Editing or deleting a contact
You want to edit a call number which you have stored in your private contacts.
Note:
You cannot modify entries in other phone books.
Press the navigation key down.
Or:
The phone book is also available via the menu: Menu > Phone book.
Private contacts
Scroll to Private contacts and press the Select softkey.
Edit
Delete
Changing an entry:
Select the entry you want and press the Edit softkey.
Modify the contact data and confirm with the Save softkey.
Deleting an entry:
Select the entry you want and press the Delete softkey.
➔The entry is now deleted.
Transferring a call number from the call list to the private contacts
You want to transfer a call number from one of the call lists to your private contacts.
You can add a phone number to an existing contact or create a new contact.
Press the navigation key to the right or the Menu softkey.
Call lists
Scroll to Call lists and press the Select softkey.
<Call list>
Select the call list and user you want and press the Save softkey.
Add to exist. contact
New contact
eud-1290/1.0 – R1.0 – 01.2011
Adding to existing contact:
Press the Add to existing contact softkey, select the contact and number type
you want, and confirm with the Save softkey.
Adding new contact:
Press the Add new contact softkey, select the number type you want, and confirm with the Save softkey.
81
Personalizing your phone
Configuring voice mail
This section explains how to set your voice mail.
Managing personal greeting
You have the possiblity to record up to two different greetings (e.g. for absence or holiday). Give each greeting the relevant name.
Depending on the system configuration a caller may or may not be able to leave a
message (for the symbols see Chapter "Display symbols", page 5).
If no personal greeting is activated or if none is available, the global greeting is activated automatically, provided it has been recorded. Contact your system administrator for more information.
Press the navigation key to the right or the Menu softkey.
Voice Mail>Greeting
Scroll to Voice Mail and press the Greeting softkey Select.
<Greeting>
Renaming greeting:
Select the greeting you want and press the Edit softkey.
➔Enter the appropriate name for your personal greeting.
<Greeting>
Recording a greeting:
Select the greeting you want and press the Record softkey.
➔Now record your personal greeting text.
<Greeting>
Listening to the greeting:
Select the greeting you want and press the Listen softkey.
➔You can monitor your personal greeting text and re-record it if necessary.
<Greeting>
Selecting the greeting:
Select the greeting you want and confirm with the Ok softkey.
➔ The announcement last recorded is automatically activated.
Notes:
• To find out how to configure call forwarding to your voice mail, refer to the
Chapter "Forwarding to voice mail", page 46.
• For further information on voice mail efer to the Chapter "Listening to voice
mail", page 50 or in the "User’s Guide Voice Mail Systems" on the Aastra document portal: www.aastra.com/docfinder.
82
eud-1290/1.0 – R1.0 – 01.2011
Personalizing your phone
Configure presence
You can to control your current presence status (see Chapter "Presence state", page
41).
You have a choice of 5 presence profiles for controlling your presence status. For each
of these presence profiles you can make the following settings:
• Description: Type in the text you want to be visible to other users as detailed information on your presence status (e.g. the name of your substitute).
• Personal call routing: Specify the phones on which a call is to be signalled (see
Chapter "Activating personal call routing", page 55). To apply the existing call routing, select Keep settings as is.
• Call Forwarding: Specify where you want a call to be forwarded to (see Chapter
"Forwarding calls (Call forwarding)", page 43). To apply the existing forwarding,
select Keep settings as is.
Open presence:
Press the navigation key to the right or the Menu softkey.
Settings
Scroll to Settings and press the Select softkey.
Presence
Scroll to Presence and press the Select softkey.
Or:
Press the function key for <Presence> (storing function key see the Chapter
"Storing a function on a key - function key", page 85).
Edit
eud-1290/1.0 – R1.0 – 01.2011
To change the presence profile:
1. Scroll to the profile you want and press the Modify softkey.
2. Make the setting you want and confirm with the Ok softkey.
➔The profile has been changed.
83
Personalizing your phone
Configuring keys
This section explains how to assign phone numbers and functions to a configurable key.
Available keys
You can store phone numbers and functions directly on a softkey that are only retrievable in the idle position.
You can assign each key with a specific type so you can trigger a particular action by
simply pressing that key. Choice available:
• Number key: To store the phone number;
• Function key: Activate/deactivate function.
Store a phone number under a key – number key
You want to retrieve a frequently used phone number with a single keystroke rather
than enter it digit by digit.
On each softkey you can store one call number and the associated name. The key
automatically becomes a number key.
The system administrator can disable any possibility of modifying the configuration of
a key that has already been configured.
84
<long>
Keep the key you want pressed down for approx. 2 seconds.
Or:
The keys are also available via the menu: Menu > Settings > Keys > Softkeys.
Or:
The keys are also available via the menu: Menu > Settings > Keys >
Softkeys/Hotkeys/Sidekeys.
New
Creating a new key assignment:
Press the New softkey or directly select the Number key, enter the name and
number, and confirm with the Save softkey.
➔The allocated function is stored.
Modify
Modify a key assignment:
Select the key you want and press the Modify softkey. Make the changes and
confirm with the Save softkey.
➔The allocated function is stored.
Delete
Deleting a key assignment:
Select the key you want and confirm with the Delete softkey.
➔The assignment is deleted.
eud-1290/1.0 – R1.0 – 01.2011
Personalizing your phone
Storing a function on a key - function key
You want to retrieve a frequently used function - for example "call forwarding on no
reply" - using a single keystroke rather than having to enter it by hand. Usually the
function is assigned so that you:
• activate the function with the first keystroke,
• and deactivate the command again with a second keystroke.
<long>
Keep the key you want pressed down for approx. 2 seconds.
Or:
The keys are also available via the menu: Menu > Settings > Keys > Softkeys.
Or:
The keys are also available via the menu: Menu > Settings > Keys >
Softkeys/Hotkeys/Sidekeys.
New
Creating a new key assignment:
Press the New softkey or directly select the Function key, select the function
and confirm with the Save softkey.
➔The allocated function is stored.
Modify
Modify a key assignment:
Select the key you want and press the Modify softkey. Make the changes and
confirm with the Save softkey.
➔The allocated function is stored.
Delete
Deleting a key assignment:
Select the key you want and confirm with the Delete softkey.
➔The assignment is deleted.
Note:
Besides the predefined functions you can also specify your own function. For
more information please refer to the Chapter "Function commands", page 85.
Formulating functions
This section explains how to activate an individual function, for example call forwarding, using function commands and how to assign it to a key.
Function commands
You can use function commands to define a function to suit your personal requirements. A function can consist of one or more function commands, function codes,
and the phone number.
You can either carry out a function directly or store it on a function key (select Configurable function).
eud-1290/1.0 – R1.0 – 01.2011
85
Personalizing your phone
Tab. 1
The following function commands are available:
"I"
Seize line
"X"
Disconnect
"P"
1Pause 1 second before the next operation
"N"
Use the phone number entered in call preparation
"."
Control key function (up-circuit system)
"Z"
Activate/deactivate DTMF mode
"R"
Use the phone number last dialled
"Y"
Disconnect and reseize the line
Tab. 2
Examples of how to define a function:
"IR"
Seize line ("I"),
Dial phone number last dialled ("R")
"I201"
Seize line ("I") and dial phone number 201
"I*21201X"
Seize line ("I"),
activate call forwarding unconditional ("*21") to phone number 201,
disconnect ("X")
Notes:
• Text mode has to be activated before you can enter function commands.
• Functions that are not available via the menu can be activated using */# procedures (see "User’s Guide */# Procedures" on the Aastra document
portal www.aastra.com/docfinder).
• You can either type in a */# procedure directly or store it under a key.
• You can only activate certain */# procedures if the same function cannot be
obtained via the menu.
• The availability of certain */# procedures may be restricted depending on
the system and software version.
*/# Procedures
A list with all the function codes can be found in the "User’s Guide */# Procedures" on
the Aastra document portal: www.aastra.com/docfinder.
86
eud-1290/1.0 – R1.0 – 01.2011
Installation and first-time operation
These sections explain the setup options available with your phone.
Equipment provided . . . . . . . . . . . . . . . . . . . . . . . . . . . . . . . . . . . . . . . . . . . . . . . . . . . . . . . . . . . . . . . . . . 88
Options . . . . . . . . . . . . . . . . . . . . . . . . . . . . . . . . . . . . . . . . . . . . . . . . . . . . . . . . . . . . . . . . . . . . . . . . . . . . . . 88
Connecting a cordless phone . . . . . . . . . . . . . . . . . . . . . . . . . . . . . . . . . . . . . . . . . . . . . . . . . . . . . . . . . 89
Battery . . . . . . . . . . . . . . . . . . . . . . . . . . . . . . . . . . . . . . . . . . . . . . . . . . . . . . . . . . . . . . . . . . . . . . . . . . . . . . . 90
Carry clip or swivel clip. . . . . . . . . . . . . . . . . . . . . . . . . . . . . . . . . . . . . . . . . . . . . . . . . . . . . . . . . . . . . . . . 91
Carry strap . . . . . . . . . . . . . . . . . . . . . . . . . . . . . . . . . . . . . . . . . . . . . . . . . . . . . . . . . . . . . . . . . . . . . . . . . . . 92
Logging your phone on . . . . . . . . . . . . . . . . . . . . . . . . . . . . . . . . . . . . . . . . . . . . . . . . . . . . . . . . . . . . . . . 93
87
eud-1290/1.0 – R1.0 – 01.2011
Installation and first-time operation
Equipment provided
Cordless phone
Battery
Quick User's Guide and safety
information
Screwed-on belt
Charging bay and plug-in power
supply unit with country-specific adapters
Options
Carry strap
88
Swivel belt clip
eud-1290/1.0 – R1.0 – 01.2011
Installation and first-time operation
Connecting a cordless phone
Connecting the charging bay
The phone can be operated without modifying the charging bay.
1. Plug the cable connector into the socket on the underside of the charging bay.
2. Feed the cable through the strain relief provided.
3. Plug the plug-in power adapter into an available socket outlet.
Note:
Plug designs vary from country to country.
Power supply / Plug-in power supply unit
The power supply unit is rated for 100 V to 240 V AC (50-60 Hz). It is supplied with four
interchangeable adapters, which means it can be used more or less worldwide. Where
necessary, fit the standard adapter head for your country to the power supply unit. As
the plug-in power supply unit comes in two variants, the assembly differs slightly:
• Variant 1: Set the switch on the power supply unit to OPEN and slide the existing
adapter head upwards and out. Next fit the new adapter head to the power supply
unit and lock it into place using the switch (LOCK).
• Variant 2: First remove any adapter head that may already be fitted by pressing
OPEN. Next fit the new adapter head onto the power supply unit at a slight angle
with the end marked TOP at the top. Press it down until it clicks into place.
Software
New device software can simply be updated during operation using automatic
firmware updates, reducing maintenance costs as a result.
eud-1290/1.0 – R1.0 – 01.2011
89
Installation and first-time operation
Battery
Take also note of the safety information on handling the battery set out in Chapter "Dealing with batteries", page 9.
Inserting the battery
1. Push the battery cover downwards until it is released from the lock, then take it off.
2. Insert the battery with the contacts downwards.
3. Replace the battery cover and push it upwards until it locks.
Charging the battery
The batteries are supplied uncharged. To charge the batteries, place the phone in the
charging bay.
It is only after the battery has been charged for the first time that your phone is ready
for use, that calls can be answered and that you can make calls from the phone.
Notes:
• It takes several charging cycles before a new battery reaches full capacity.
• The technical data can be found in the Chapter "Technical data", page 96.
• The descriptions of the display symbols can be found in the Chapter "Display symbols", page 5.
• Poor radio links (sizeable distance to the system’s radio station) will reduce the
phone’s standby and talk times. The standby and talk times are also reduced by
high loudspeaker or ring tone volumes, frequently used keypad and display backlighting, and activated vibra alarms.
90
eud-1290/1.0 – R1.0 – 01.2011
Installation and first-time operation
Carry clip or swivel clip
Fitting / removing the carry clip or swivel clip
The carry clip supplied with the phone is placed on the two openings at the top end
of the phone and pressed in until it snaps into place. To remove the carry clip, press
the small recesses on the edge of the strap and gently pull the strap apart.
The phone can also be equipped with a swivel clip accessory. The holding clip is also
placed on the two openings at the top end of the phone and pressed in until it snaps
into place. Next slide the clip onto the prominent button. To release the phone from
the clip, press the upper button.
eud-1290/1.0 – R1.0 – 01.2011
91
Installation and first-time operation
Carry strap
Securing the carry strap
The top part of the carry clip has two openings. You can feed the bottom end of the
carry strap through these openings (detach the carry clip first before fitting the strap).
Carry straps are optionally available.
92
eud-1290/1.0 – R1.0 – 01.2011
Installation and first-time operation
Logging your phone on
Registering your phone on the system
Your system administrator has to prepare the system before you can log on your
phone.
Your phone can be operated on a maximum of 4 different communication systems. To
do so, it must be registered on each system. As a rule your phone is registered with
the communication system by your system administrator. Contact your system
administrator for more information.
Once the phone is registered with one or more communications systems, you can
make and receive phone calls (see also Chapter "Managing communication systems",
page 77).
Registration
A registration is stored on the phone for each communication system with which your
phone is registered. A registration entry contains, among others, a system name
(e. g. A, B, C).
If your phone is registered with several systems, the name of the active system is
shown on the display.
eud-1290/1.0 – R1.0 – 01.2011
93
Further information
The following sections contain more useful information about your phone.
Troubleshooting. . . . . . . . . . . . . . . . . . . . . . . . . . . . . . . . . . . . . . . . . . . . . . . . . . . . . . . . . . . . . . . . . . . . . . 95
Technical data . . . . . . . . . . . . . . . . . . . . . . . . . . . . . . . . . . . . . . . . . . . . . . . . . . . . . . . . . . . . . . . . . . . . . . . 96
eud-1290/1.0 – R1.0 – 01.2011
94
Further information
Troubleshooting
This section contains a few tips on how to operate your phone if you encounter
any problems.
Malfunctions
Display reads: "System overload"
At the moment no connection can be set up via the current system base. The phone is trying to set up
a better radio connection with the same or a different system base. This message appears in standby
mode only.
Display reads: "No system"
You have moved out of the coverage area; the radio connection is interrupted. Move closer to a radio
station.
Leaving the coverage area
You are outside the coverage range. You can set the phone so that you receive a warning signal if you
leave the coverage area (see Chapter "Activating range alarm and system busy beep", page 67).
Display is working, but connection is not possible
Your phone may be locked. Unlock your phone (see Chapter "Locking/unlocking the keypad", page 64).
Freely configurable keys cannot be configured
The configuration may be locked. Unlock your phone (see Chapter "Unlocking your phone", page 66).
The key for a reconfiguration may be locked in the system. Contact your system administrator for more
information.
Insufficient display contrast
The setting for the display contrast is inadequate. Change the setting (see Chapter "Setting the display",
page 69).
Impaired sound quality during hands-free operation
The sound quality can be affected if the volume is too loud – turn down the volume. If the sound quality
fluctuates, contact your system administrator.
Phone calls can be made, but no names are displayed; the key configuration is missing, and the
phone does not respond to function commands
Restricted mode following a software update without update licence.
Note:
For all other messages, faults and questions you may have, contact your system administrator.
eud-1290/1.0 – R1.0 – 01.2011
95
Further information
Technical data
Operation
Standards
DECT, GAP
DECT encryption
supported
Frequency range
1880 MHz up to 1900 MHz
Transmitted power
10 mW (average power per channel)
Range
• up to 300 m outdoors
• up to 50 m in indoors
Interfaces
Headset
2,5 mm jack
Battery charge and usage times
Battery capacitance
850 mAh lithium-ion (Li-Ion)
Operating time, talk time
up to 12 hours
Operating time, standby
up to 100 hours
Charging time in the charging bay
2 hours for fully charged state
Ambient conditions
Operating temperature
5° C to 40° C
Storage temperature
-5° C to +45° C
Class of protection
IP 50 (dust-proof )
Noise
Ambient noise filter for loud environments
Hands-free operation
Full-duplex hands-free operation
Dimensions, weight and surface finish
96
Cordless phone with battery
Length x Width x Depth: 135 x 49 x 22.5 mm
120 g
Charging bay without mains adapter
Length x Width x Depth: 76 x 75 x 24 mm
40 g
Surface finish (sides and front)
Silicone treated
eud-1290/1.0 – R1.0 – 01.2011
Index
Symbols
*/# Procedures ................................................................86
A
Accessories (Safety information) ................................ 9
Activate profile ...............................................................72
Activate/deactivate function. ....................................25
Adjusting the volume ...................................................70
Alphasearch .....................................................................29
Ambient conditions ......................................................96
Ambient conditions (Safety information) ............... 8
Announcement
Protection setting ...................................................79
Announcement:
receiving .....................................................................36
starting ........................................................................35
Answering a call .............................................................16
Answering calls ...............................................................28
Asterisk key ........................................................................ 4
Auto answer .....................................................................71
Availability of telephone connections (Safety information) ................................................................................ 8
Available keys ..................................................................84
B
Baby surveillance ...........................................................57
Backlight ...........................................................................69
Batteries:
Dealing with ................................................................ 9
Battery charge and usage times ...............................96
Battery:
Charge state ................................................................ 5
Brokering ..........................................................................38
C
Call duration ....................................................................16
Call Forwarding on No Reply .....................................44
Call Forwarding Unconditional ......................... 43, 46
Call key ................................................................................. 3
Call list ........................................................................ 30, 31
Call routing .......................................................................55
Call waiting
Protection setting ...................................................79
Call waiting:
97
answering ..................................................................34
on an internal user ..................................................33
Callback:
answering ..................................................................33
requesting .................................................................32
Changing the PIN (Admin PIN) .................................76
Changing the PIN (User PIN) ......................................75
Charges .............................................................................16
Charging the battery ....................................................90
CLIP .....................................................................................54
CLIR .....................................................................................54
Conference call ...............................................................38
Configure presence .......................................................83
Configuring cordless phone functions ..................63
Configuring keys ............................................................84
Configuring the DTMF mode ....................................74
Configuring voice mail ................................................82
Connect .............................................................................39
Connecting a cordless phone ...................................89
Connecting the charging bay ...................................89
Contacts
Creating a new contact entry .............................80
deleting ......................................................................81
editing .........................................................................81
Managing your private contacts .......................80
Correcting your input ...................................................23
Correction key ................................................................... 3
Cost control (Safety information) .............................. 8
D
Data protection (Safety information) ....................... 8
Deflect ................................................................................49
Deflect a call during the ringing phase .................49
Dialling ..............................................................................15
Dialling by name .................................................... 28, 29
Dialling:
by name ......................................................................28
from call list of answered calls ...........................31
from call list of unanswered calls ......................30
from the phone book ............................................29
with phone number ...............................................17
with redial .......................................................... 17, 31
with softkey ...............................................................32
Digit keys ..........................................................................22
eud-1290/1.0 – R1.0 – 01.2011
Dimensions ......................................................................96
Disclaimer .........................................................................12
Display ...............................................................................69
Display:
Radio link quality ....................................................... 5
Symbols ........................................................................ 5
Disposal (Safety information) ...................................... 9
Do not disturb
Protection setting ...................................................79
Document information ................................................12
E
End key ................................................................................ 4
Ending a call .....................................................................16
Enquiry call during a call .............................................37
Enter the display text for the idle state ..................77
Enter the letters ..............................................................23
Enters digits .....................................................................22
Equipment provided ....................................................88
F
Firmware update ...........................................................89
First-time operation ......................................................87
Fitting / removing the carry clip ...............................91
Fitting / removing the swivel clip ............................91
Font .....................................................................................69
Formulating functions .................................................85
Forwarding
Protection setting ...................................................79
Forwarding:
Call Forwarding Unconditional ..........................43
Forwarding calls ......................................................44
to a message .............................................................46
to voice mail .............................................................45
Foxkey .................................................................................. 3
Free seating .....................................................................60
Function commands ....................................................85
Function key ....................................................................85
Function selection for configurable key ................47
H
Hands-free mode and Ringing tone (Safety information) ................................................................................ 8
Hands-free operation ...................................................18
Hash key .............................................................................. 4
Headset
Activate mode ..........................................................73
connect .......................................................................73
I
Inserting the battery ..................................................... 90
Installation ....................................................................... 87
Interfaces .......................................................................... 96
Intrusion
Protection setting ................................................... 79
K
Key block .............................................................................4
Key legend ..........................................................................2
Keypad ............................................................................... 64
L
LED
Indicator LED signals ............................................. 26
LED indicator ...............................................................2
Setting the LED indicator ..................................... 70
Linking the charging contact to direct call answer
68
Listening in ...................................................................... 12
Lock
Keypad ........................................................................ 64
Phone .......................................................................... 65
Logging a cordless phone on/off ............................ 68
Loudspeaker key ...............................................................3
M
Mains power (Safety information) ..............................8
Maintenance (Safety information) .............................8
Making a call on a third-party phone ..................... 53
Making a call:
in hands-free mode ................................................ 18
with headset ............................................................. 19
with supplementary features ............................. 27
Making calls ..................................................................... 28
Malfunctions .................................................................... 95
Managing communication systems ....................... 77
Managing personal greeting ..................................... 82
MCID ................................................................................... 54
Medical equipment (Safety information) ................8
Menu-guided navigation ............................................ 24
Moving the Cursor ........................................................ 23
Muting the microphone .............................................. 18
N
Navigation key ........................................................... 3, 24
Number key ..................................................................... 84
O
One number user concept ......................................... 11
eud-1290/1.0 – R1.0 – 01.2011
98
Operating elements ........................................................ 2
Operation ..........................................................................96
Options for equipment provided .............................88
Organizing absence ......................................................41
P
Parking a call partner ....................................................40
Personal call routing .....................................................55
Phone book ......................................................................29
Phoning .............................................................................15
Picking up a call ..............................................................52
Plug-in power adapter .................................................89
Power supply ...................................................................89
Presence ............................................................................41
Presence state .................................................................41
Private call with PIN ......................................................36
Protection settings ........................................................79
Purpose and function ...................................................11
Q
Quickdial ...........................................................................28
R
Range alarm .....................................................................67
Recording .........................................................................12
Redial .......................................................................... 17, 31
Registering your phone on the system ..................93
Registration ......................................................................93
Reject ..................................................................................49
Reject a call during the ringing phase ....................49
Remote control ...............................................................61
Resetting activated features ......................................25
Retrieving information on your phone ..................78
Ring alone .........................................................................56
Risk of explosion (Safety information) ..................... 8
Room monitoring ..........................................................57
Room monitoring:
Active ...........................................................................57
One-way connection .............................................57
Passive .........................................................................58
Two-way connection .............................................57
S
Safety Information ...................................................... 8, 9
Securing the carry strap ...............................................92
Selecting the language ................................................74
99
Set the ringing volume ................................................70
Setting the display ........................................................69
Setting the server alarm ..............................................67
Setting up a profile ........................................................71
Side keys ............................................................................. 2
Signals ................................................................................26
Silent intrusion ................................................................59
Softkey ................................................................................. 3
Software ............................................................................89
Store a function under a key .....................................85
Store a phone number under a key ........................84
Suppressing your call number ..................................54
Surface ...............................................................................96
Switching the cordless phone on/off .....................63
System busy beep .........................................................67
T
Technical data .................................................................96
Text message:
reading .......................................................................52
sending .......................................................................51
Text mode ........................................................................23
Third-party phone .........................................................53
Tracking a malicious call .............................................54
Trademarks ......................................................................12
Transferring a call number from the call list to the
private contacts ..............................................................81
Transferring a call partner ..........................................39
Troubleshooting ............................................................95
U
Undoing actions .............................................................25
Unlocking
Keypad ........................................................................64
Phone ..........................................................................66
Upper and lower case ..................................................23
User information ............................................................10
Using the display and operating elements ..........20
Using the softkey ...........................................................21
V
Voice mail .........................................................................45
W
Weight ...............................................................................96
eud-1290/1.0 – R1.0 – 01.2011
Declaration of Conformity
Aastra Telecom Schweiz AG hereby declares that
• the Aastra 400 products conform to the basic
requirements and other relevant stipulations of
Directive 1999/5/EC.
• all our products are manufactured in conformity
with RoHS and WEEE (2002/95/EC and
2002/96/EC).
The product-specific declarations of conformity can
be found on the Aastra document portal: www.aastra.com/docfinder.
Exclusion of Liability
Aastra® is a registered trademark of Aastra Technologies Limited. Technical modifications and
product availability subject to change without
notice.
Copyright © 2011 Aastra Technologies Limited