1
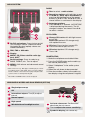
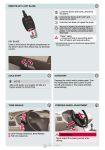
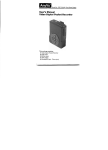
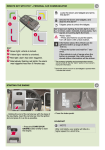
vOLVO C70
quick guide
WELCOME TO THE GLOBAL FAMILY OF VOLVO
OWNERS!
Getting to know your new vehicle is an exciting experience.
Please browse through this Quick Guide to get the full benefits from
your new Volvo. For detailed information, please refer to your Owner´s
Manual.
Warning texts and other important information are only provided in the
Owner’s Manual - not in this folder. The Owner’s Manual contains the
most up-to-date information.
For additional information, contact Customer Service:
U.S.A.: 1-800-458-1552 www.volvocars.us
CANADA: 1-800-663-8255 www.volvocanada.com
key & remote control
Locks the doors, trunk, cabin storage
compartments, ski hatch, and arms
the alarm. If the car is locked with
the remote control while the power
retractable hard top is down, the double
locking feature activates after approximately 30 seconds. The doors can then
not be opened from inside the car.
Unlocks the doors, trunk, cabin storage compartments, ski hatch, and
disarms the alarmA.
Unlocks the trunk. (Does not open the
trunk)
Approach lighting (30 secondsB)
illuminates lights in door mirrors, cabin,
footwells, license plates. Turn signals
and parking lights illuminate.
key blade
Used to lock/unlock the glove compartment or
the driver’s door if the vehicle has no electrical
current.
“Panic” alarm. Press and hold to
sound the alarm. Turn off alarm with
unlock button.
A.
Automatic relock occurs if no door/tailgate is
opened within 2 minutes after unlock.
B.
The time can be set to 30, 60, or 90 seconds.
To mechanically open the trunk.
cold START
note
After cold starts, your engine will idle at a
higher speed for a short time.
turn signals
A. Lane-change sequence, three flashes.
B. Full turn sequence.
AUTOSTART
Depress the clutch and/or brake pedal. Turn
the key/keyless drive start control to position III
and release it. The engine will start automatically.
Steering wheel adjustment
Adjust tilt and telescope.
WARNING! Never adjust the steering wheel
while driving.
Lighting panel
Automatic headlights. High beam
flash only.
Parking lights
Headlights: turn off when ignition is
switched off, high/low beams.
Display & instrument panel lighting
Front fog lights (option)
Rear fog light (driver’s side only)
A
High beam flash
B
Toggle between high/low beams,
home safe lighting.
REFUELING
Car care
We do not recommend washing your car in
an automatic wash during the first six months
because the paint will not have hardened
sufficiently.
Leather upholstery requires regular care. Treat
the leather with protectant cream, one to four
times a year as necessary. Consult your Volvo
retailer for leather care products.
Press this button to unlock the fuel filler door.
Hang the fuel filler cap on the hook while
refueling.
BLIS – BLIND SPOT INFORMATION
SYSTEM (option)
If the BLIS indicator lights illuminate occasionally even when there are no other vehicles in
the blind area, this may be caused by light reflected from a wet road surface, the vehicle’s
own shadow against a large, light, smooth
surface, or sunlight directly in the camera
when the sun is low on the horizon.
In the event of a fault, Blind spot syst. service required will be displayed.
automatic car wash
Remove the antenna, by turning it counterclockwise, before washing the car in an
automatic car wash.
audio system
RADIO
6 Turn to select a radio station.
10 Search for stations with left/right arrows
or SCAN (8). Store up to 20 stations by
pressing and holding one of the preset
buttons (7) 0–9 in FM1 and 0–9 in FM2. A
stored station is confirmed in the display.
Autostore stations
Press AUTO for 2 seconds. AUTOSTORE
is displayed during the search. The 10
strongest stations are stored. Press 0–9
to select a station.
CD playeRB
10 Change CD tracks with left/right arrows
or turn (6).
Select CD (optional CD changer only)
with up/down arrows.
1 On/Off and volume. Press to turn on/off.
Turn to adjust volume. Radio and Volvo
Navigation System (option) volume are
stored individually.
2 FM1, FM2 or AM radio
4 Display
5 MODE, CD, Sirius satellite radio (option), AUX A .
6 Sound settings. Press to select e.g.,
BASS, TREBLE, etc. Turn to adjust.
9 MENU. AUX volume and advanced sound
settings.
A.
AUX connector for e.g., MP3 player. Set MP3 player’s volume
to medium for best sound quality. The accessory iPod Music
Interface enables control of the music player using the audio
system controls or steering wheel keypad.
B.
Files in MP3 and WMA formats can also be played
3 CD eject. Press to eject current CD.
Press and hold to eject all CDs.
7 CD select (optional CD changer only).
Press 1–6.
BLUETOOTH®
1. Make the cell phone searchable/visible.
2. Press the PHONE button on the audio system control panel briefly.
3. Select ”Add phone” in the audio system
display.
4. Select the cell phone to be connected.
5. Enter the numbers shown in the audio system display using the cell phone’s keypad.
windshield wipers and rain sensor (option)
C
Single wiper sweep
0
Off
D
E
Intermittent wipers. Turn (B) to adjust
interval
Normal speed
F
High speed
G
Windshield and headlight washer
C
0
A
B
G
D
E
F
A
B
Activate rain sensor. Positions D-F
deactivate the rain sensor.
Turn to adjust rain sensor sensitivity.
Symbol in display (rain sensor on).
electronic climate control—Ecc (option)
AUTOMATIC CONTROL
In AUTO mode, ECC controls all functions
automatically and makes driving more pleasant
with optimal air quality.
MANUal control
Blower speed
Air distribution
1 Automatic mode
Defroster to quickly remove mist on the
windshield and side windows.
Recirculation
Air conditioning off/on.
Press AUTO to maintain cabin temperature
balanced airflow, and other settings.
2 Temperature
Press to individually adjust the left (L) or
right (R) side. Turn the dial to the desired
temperature, which is shown in the display.
Heated rear window and door mirrors. Timer functionA.
A.
Tire pressure monitoring system (TPMS)
Rear window 12 minutes. Mirrors 6 minutes.
cd storage
When a low tire pressure warning message
has been displayed and the tire pressure
warning light has come on, one or more tires
has low inflation pressure.
Stop the vehicle in a safe place and check
the inflation pressure of all four tires with a
tire pressure gauge.
The deep center storage compartment has
room for 10 CD jewel cases. These cases
must be inserted with their spines upward in
order to allow room for 10 CDs.
odometer and trip computer
Fuel
trip computer
1 Low fuel level indicator
When the symbol illuminates, refuel as
soon as possible.
2 Fuel gauge
The fuel filler door is on the right, as indicated by the arrow.
TRIP odometer
3 Press quickly to toggle between T1 &
T2. Press and hold to reset the displayed odometer.
4 The trip odometer display shows two
separate trip odometers, T1 & T2.
Display
5 Information display (trip computer
information, messages, clock and ambient temperature).
6 Press to erase a displayed message.
7 Turn to show trip computer information
such as MILES TO EMPTY TANK in the
information display.
8 Reset current function. A long press
resets all functions.
note
MILES TO EMPTY TANK is an approximation, based on recent average fuel consumption.
driver’s door control panel
automatic window function
When a door is opened or the power retractable hard top is operated, the windows open
automatically approximately 1 in. (2 cm). The
windows close again automatically.
L R
Adjusting the door mirrors. Select
L or R. Adjust with the control.
1
Open/close a window partially
2
Open/close a window fully
operating the power retractable hard top
6.5 ft
2.0 m
8 in
0.2 m
preparation
There should be no objects on the parcel shelf,
roof, or trunk lid.
• 6.5 ft (2 m) free height above the car, and
8 in. (0.2 m) behind.
• Flat ground.
• Ambient temperature above 14 ˚F (-10 ˚C).
• Trunk lid and trunk divider closed.
• The car must be at a standstill.
• Always have an unobstructed view of the
power retractable hard top when it is in
motion.
The windows open automatically approximately
1 in. (2 cm) when the power retractable hard top
is operated. They close automatically.
OPeration
1. Engine idling (car parked outdoors).
2. Press the brake pedal.
3. Hold down the button (see inset illustration
above) to open or pull up to close the convertible hard top. Hold until a tone is audible
and the message TOP FULLY UP/TOP
FULLY DOWN is displayed.
4. Release the button.
trunk divider
Load assistance
The trunk divider limits the amount of cargo
in the trunk to leave space for the power
retractable hard top.
1. Raise the divider when loading the trunk.
2. Close the divider completely (3) before
operating the hard top. See the decal on
the trunk divider.
Raise or lower the folded power retractable
hard top to facilitate loading.
Press the button and wait several seconds
for the hard top to rise slightly. Open the
trunk divider, load the cargo, and close the
trunk divider again.
Press the button again to lower the folded
power retractable hard top.
Adjusting the front seat
6
5 Forward/rearward
+
-
6
6 Access to rear seat & seat belt guide
Manual seat
A. Remove the seat belt from the guide.
B. Pull up the handle and move the seat forward.
1
2
3
4
Lumbar support
A. Remove the seat belt from the guide.
B. Pull up the handle and fold the backrest
down.
C. Press and hold the button while the seat
moves forward.
Backrest tilt
Raise/lower the seat
Raise/lower the front edge of the seat
cushion
Storage spaces, 12-volt socket & AUX connector (option)
The front and rear 12-volt sockets function in
ignition positions I or II. The 12 volt socket on
the right side of the trunk is always active.
AUX can be used to connect e.g., an MP3
player to the vehicle’s audio system. Use a
3.5 mm stereo mini plug.
The accessory iPod Music Interface enables
control of the music player using the audio
system controls or steering wheel keypad.
caution
Using the 12-volt socket in the trunk with the
engine switched off will drain the battery.
TP 10494 (USA & Canada) AT 0820. Printed in Sweden, Göteborg 2008, Copyright © 2000-2008 Volvo Car Corporation
Power seat (option)