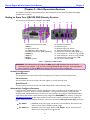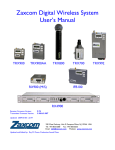
1
Zaxcom Digital Wireless System
QRX100 User‟s Manual
Updated: 2010-12-23 - 04:15
interstage
Phistersvej 31, 2900 Hellerup, Danmark
Telefon 3946 0000, fax 3946 0040
www.interstage.dk
- pro audio with a smile
230 West Parkway, Unit 9, Pompton Plains, NJ 07444 USA
Tel: 973-835-5000
Fax: 973-835-6633
Email: [email protected] Website: www.zaxcom.com
NOTE: All specifications in this manual are subject to change without notice.
Maintained by: Ray M. Owen, PSM
__________________________________________Zaxcom Digital Wireless System User’s Manual
Consumer Alert
Most users do not need a license to operate a wireless microphone system. Nevertheless, operating a
microphone system without a license is subject to certain restrictions:
the system may not cause harmful interference,
it must operate at a low power level (not in excess of 50 milliwatts),
it has no protection from interference received from any other device.
Purchasers should also be aware that the FCC is currently evaluating the use of wireless microphone
systems, and these rules are subject to change. For more information, call the FCC at 1-888-CALL-FCC
(TTY: 1-888-TELL-FCC) or visit the FCC‟s wireless microphone website at:
www.fcc.gov/cgb/wirelessmicrophones. To operate wireless microphone systems transmitting with
greater than 50mW of radiated power, you must qualify as a Part 74 user and be licensed.
NOTE: This alert does NOT apply to Part 74 users.
2
Zaxcom Digital Wireless System User’s Manual__________________________________________
Table of Contents
CONSUMER ALERT ................................................................................................................................................................................................ 2
TABLE OF FIGURES ............................................................................................................................................... 5
TABLE OF TABLES ................................................................................................................................................ 5
CHAPTER 1 – COMMON TOPICS ........................................................................................................................ 6
USER MANUAL CONVENTIONS........................................................................................................................................................................... 6
SYSTEM FEATURES ................................................................................................................................................................................................. 6
CONFIGURATION CHOICES ................................................................................................................................................................................ 6
WHAT‟S INCLUDED WITH THE QRX100 .......................................................................................................................................................... 6
Options.................................................................................................................................................................................................................................. 6
MENU SYSTEM ....................................................................................................................................................................................................... 7
EXTERNAL POWER................................................................................................................................................................................................ 7
OPERATING FREQUENCIES ................................................................................................................................................................................... 8
Audio ............................................................................................................................................................................................................................................ 8
Remote Control, Timecode and IFB Feed ........................................................................................................................................................................ 8
ANTENNA CABLE SELECTION ............................................................................................................................................................................. 8
ASSOCIATED PRODUCTS USER‟S MANUALS ...................................................................................................................................................... 8
PRODUCT SUPPORT.............................................................................................................................................................................................. 8
CHAPTER 2 – NEXT GENERATION RECEIVERS .............................................................................................. 9
GETTING TO KNOW YOUR QRX100 ENG DIVERSITY RECEIVER ................................................................................................................ 9
Available Configurations ........................................................................................................................................................................................................ 9
Mono Receiver .................................................................................................................................................................................................................... 9
Stereo Receiver ................................................................................................................................................................................................................... 9
Quad Receiver ..................................................................................................................................................................................................................... 9
Automatically Configured Parameter ................................................................................................................................................................................ 9
Device Interface .................................................................................................................................................................................................................... 10
PWR key ............................................................................................................................................................................................................................. 10
A/B key ................................................................................................................................................................................................................................ 10
A & B Receiver Status Indicators ................................................................................................................................................................................. 10
LED Channel Indicators .................................................................................................................................................................................................. 10
Connections ............................................................................................................................................................................................................................ 10
Audio Output Connectors ............................................................................................................................................................................................ 10
Mono Receiver ............................................................................................................................................................................................................ 11
Stereo Receiver ........................................................................................................................................................................................................... 11
Quad Receiver ............................................................................................................................................................................................................. 11
UHF Antenna Connectors ............................................................................................................................................................................................. 11
USB Connectors ............................................................................................................................................................................................................... 12
QRX100 Configuration Menus ........................................................................................................................................................................................ 13
QRX100 BOOTUP SEQUENCES........................................................................................................................................................................ 14
Standard Bootup Sequence ............................................................................................................................................................................................... 14
Extended Menu Bootup Sequence ................................................................................................................................................................................. 14
QRX100 STANDARD MENU............................................................................................................................................................................. 15
Pacifier page ........................................................................................................................................................................................................................... 15
UHF Frequency Select page .............................................................................................................................................................................................. 16
Test Tone page ..................................................................................................................................................................................................................... 16
UHF Frequency Scan page ................................................................................................................................................................................................ 16
Best Practice: Scanning for a Low Noise Frequency ............................................................................................................................................. 17
Best Practice: Finding the Quietest Frequencies for Multiple Transmitters ................................................................................................... 17
QRX100 EXTENDED MENU ............................................................................................................................................................................. 18
Entering the Extended Menu ........................................................................................................................................................................................... 18
Exiting the Extended Menu ............................................................................................................................................................................................... 18
Receiver Mode page ............................................................................................................................................................................................................ 18
AES Output Routing page .................................................................................................................................................................................................. 18
Analog Output Routing page (Single Receiver Mode ONLY) ................................................................................................................................ 18
Software Update page ........................................................................................................................................................................................................ 19
UHF Signal Format page ................................................................................................................................................................................................... 19
3
__________________________________________Zaxcom Digital Wireless System User’s Manual
IFB Option page .................................................................................................................................................................................................................... 19
Power Saver page ................................................................................................................................................................................................................. 19
Backlight Timer page .......................................................................................................................................................................................................... 20
LED Dimmer page ............................................................................................................................................................................................................... 20
LED Meter Mode page....................................................................................................................................................................................................... 20
Encryption Code page ......................................................................................................................................................................................................... 21
QRX100 FACTORY SETUP MENU .................................................................................................................................................................... 24
Entering the Factory Setup Menu ................................................................................................................................................................................... 24
Exiting the Factory Setup Menu ...................................................................................................................................................................................... 24
Software Update page ........................................................................................................................................................................................................ 24
Reception Error Counters page ........................................................................................................................................................................................ 24
VCO page ................................................................................................................................................................................................................................ 25
Mystery page ......................................................................................................................................................................................................................... 25
DBits page .............................................................................................................................................................................................................................. 25
AGC page ................................................................................................................................................................................................................................ 25
Tube Synth page (requires Mono mode) .................................................................................................................................................................... 25
CHAPTER 3 – NEW SYSTEM CAPABILITIES ................................................................................................... 28
INTRODUCTION .................................................................................................................................................................................................. 28
IMPROVEMENTS.................................................................................................................................................................................................... 28
KNOW FIRMWARE PROBLEMS ........................................................................................................................................................................... 28
Receivers .................................................................................................................................................................................................................................. 28
CHAPTER 4 – EQUIPMENT SPECIFICATIONS ............................................................................................... 29
QRX100 SPECIFICATIONS ................................................................................................................................................................................. 29
CHAPTER 5 – WIRING DIAGRAMS ................................................................................................................... 31
QRX100 CABLES ............................................................................................................................................................................................... 31
CHAPTER 6 – FIRMWARE INFORMATION ...................................................................................................... 32
FIRMWARE ............................................................................................................................................................................................................ 32
Advantages to Upgrading the Firmware ....................................................................................................................................................................... 32
Upgrading the Firmware in each QRX series unit ..................................................................................................................................................... 33
CHAPTER 7 – MENU SHEETS............................................................................................................................. 36
MENU SHEET FOR QRX100 .............................................................................................................................................................................. 36
CHAPTER 8 – DIGITAL WIRELESS SYSTEM QUICKSTART ......................................................................... 38
COMMON SETTINGS FOR ASSOCIATED TRANSMITTERS, RECEIVERS AND IFB ............................................................................................ 38
USING YOUR WIRELESS TRANSMITTERS AND RECEIVERS .............................................................................................................................. 39
Receiver Related Preparation............................................................................................................................................................................................ 39
Scan for an Open UHF Frequency ............................................................................................................................................................................... 39
Set the UHF Signal Format (Only required if changing to/from European Format) ..................................................................................... 39
Enter the Encryption Code ............................................................................................................................................................................................ 39
Transmitter Related Preparation ..................................................................................................................................................................................... 40
Power Switch ..................................................................................................................................................................................................................... 40
Enter the UHF Frequency .............................................................................................................................................................................................. 40
Set the UHF Signal Format (TRX900 ( / AA) w/ STAxxx)................................................................................................................................. 40
Set Where Analog to Digital Conversion is to be Performed ............................................................................................................................ 40
Set the UHF Transmitter Power (May 2008 and later models) ......................................................................................................................... 41
Enter the Encryption Code ............................................................................................................................................................................................ 41
REMOTELY CONTROLLING THE TRANSMITTERS AND SENDING IFB AUDIO .............................................................................................. 41
IFB100 Related Preparation ............................................................................................................................................................................................. 41
Enter the IFB Transmitter Frequency for Your Group ......................................................................................................................................... 41
Connect the Audio Source to the IFB transmitter ................................................................................................................................................. 41
Enter a Unique Group ID for Your Gear .................................................................................................................................................................. 41
Send Timecode from the TC Source to each Transmitter .................................................................................................................................. 42
Set the IFB Signal Format for Your Group ................................................................................................................................................................ 42
Cycle the IFB100‟s Power .............................................................................................................................................................................................. 42
TRX9xx Related Preparations .......................................................................................................................................................................................... 42
4
Zaxcom Digital Wireless System User’s Manual__________________________________________
Enable the Remote Control Capability on the Unit ............................................................................................................................................... 42
Set the IFB Format ........................................................................................................................................................................................................... 42
Enable the IFB Receiver .................................................................................................................................................................................................. 42
Enter Your Gear‟s Group ID ........................................................................................................................................................................................ 43
Assign a Unique Unit ID ................................................................................................................................................................................................. 43
Select the IFB Receiver‟s Frequency ........................................................................................................................................................................... 43
Select the Earpiece Source ............................................................................................................................................................................................ 43
Cycle the Power of Your Transmitter ....................................................................................................................................................................... 43
CHAPTER 9 – ZAXCOM WARRANTY POLICY AND LIMITATIONS........................................................... 44
Table of Figures
Figure 1-1
Figure 1-2
Figure 2-1
Figure 5-1
QRX100 keys ...................................................................................................................................................................................... 7
External Power Polarity ................................................................................................................................................................... 7
QRX100 Front & Rear Views ......................................................................................................................................................... 9
TA-5F to 2 XLR-3M Line-level Output Cable .......................................................................................................................... 31
Table of Tables
Table 1-1
Table 2-1
Table 2-2
Table 2-3
Table 2-4
Table 2-5
Table 2-6
Table 6-1
Table 6-2
Table 8-1
Table 8-2
Table 8-3
Audio Frequency Block Information .............................................................................................................................................. 8
Mono Receiver Audio Pin-outs ..................................................................................................................................................... 11
Stereo Receiver Audio Pin-outs .................................................................................................................................................... 11
Quad Receiver Audio Pin-outs ...................................................................................................................................................... 11
QRX100 Receiver Standard, Extended & Factory Setup Menus .......................................................................................... 13
Standard Bootup Sequence............................................................................................................................................................. 14
Extended Menu Bootup Sequence ................................................................................................................................................ 14
Software Compatibility List ............................................................................................................................................................ 32
QRX Firmware Load Process ........................................................................................................................................................ 34
Audio Settings that Must be Consistent ..................................................................................................................................... 38
IFB Settings that Must be Consistent ........................................................................................................................................... 38
Private Channel Settings that Must be Consistent ................................................................................................................... 38
5
Chapter 1_______________________________________Zaxcom Digital Wireless System User’s Manual
Chapter 1 – Common Topics
User Manual Conventions
Throughout this manual, the following conventions are used:
button
– refers to an on-screen (VIRTUAL) object that represents a parameter that can be
viewed and/or changed.
cycle the power
– refers to turning „OFF‟ the power to the unit, waiting a few seconds and then turning
it back „ON‟.
IFB ?
– IFB followed by transmitter or frequency refers to the IFB portion of the bodypack or
hand mic transmitter, or the IFB100 transmitter.
key
– refers to a PHYSICAL object on the unit for the Operator to change and/or view a
parameter or to navigate through the menus.
{p.##}
– refers to the page number where the referenced item is located.
starting value
– refers to a value that should be used for a particular parameter and for all of the
parameters when the Operator is having difficulty getting the unit to work correctly.
The value is highlighted.
UHF ?
– UHF followed by transmitter or frequency refers to the UHF portion of the bodypack
or hand mic transmitter
NOTE: A green NOTE is a helpful hint or bit of information.
IMPORTANT: A blue IMPORTANT note indicates something more important than a green NOTE.
CAUTION: A yellow CAUTION note indicates a situation that, if ignored, could cause a significant problem.
WARNING: A red WARNING note indicates a situation that, if ignored, could cause damage to you, your
equipment and/or your reputation.
System Features
Four channel UHF diversity audio receiver
Optional built-in IFB return channel transmitter / receiver
Optional SMPTE timecode reader / generator
Four channel side mounted LED meters (Pat. Pend.)
Backlit graphic liquid crystal display
Battery runtime:
o QRX100
– no internal batteries, always runs on external power
Size and weight:
(H x W x D – while looking at the screen)
o QRX100
– 1.25” x 3.28” x 5.03” –
32 mm x 83 mm x 128 mm
–
6.0 oz
–
170g
Configuration Choices
QRX100S – 2-channel ENG receiver (from a single stereo transmitter)
QRX100Q – 4-channel ENG receiver (from up to two stereo transmitters)
What’s included with the QRX100
2 – SMA „Whip‟ Antennas
1 – power connector
2 – TA-5F audio output connectors
1 – blue Zaxcom storage/carrying case
this user‟s manual on CD-ROM
Options
QIFB – Internal 2.4 GHz IFB audio, timecode and remote control transmitter / receiver (includes 2.4 GHz SMA
antenna)
Camera bracket & mounting hardware
A/C power supply
8 dB gain passive 50-ohm log-periodic (“Shark-fin”) antenna
6
Zaxcom Digital Wireless System User’s Manual_______________________________________Chapter 1
2.4 GHz, 6 dB gain, omni-directional antenna – Recommended for indoor or studio use where it can be placed
in the center of the studio.
2.4 GHz, 15 dB gain, directional antenna
– Recommended for positioning against a wall, or when a
directional transmission is desired.
10 foot cable (~3 meter) from the QRX100 to the 2.4 GHz antenna
Menu System
Figure 1-1 QRX100 keys
The user interface for each unit consists of a Liquid Crystal Display with at least the following keys:
MENU
– Each time the MENU key is pressed, the next page/field in the current menu is displayed
on the screen.
INC (up arrow)
– Increment the current parameter selected by the MENU key.
DEC (down arrow) – Decrement the current parameter selected by the MENU key.
Each menu has several pages allowing you to change configuration settings. All of these settings are stored in Flash
ROM immediately after making the change.
External Power
Some of the units can be powered from an external power source. The external power connection is a 2.5 mm
(0.1”) barrel connector. The center pin is positive. The connector for the receiver (Switchcraft 761K) is longer
than the connector for the STAxxx and IFB100 (Switchcraft 760K). The 760K will not work in any of the
receivers.
Figure 1-2 External Power Polarity
7
Chapter 1_______________________________________Zaxcom Digital Wireless System User’s Manual
Operating Frequencies
Audio
All audio transmitters and receivers operate on one of the following frequency blocks:
Block
20
21
22
23
24
25
26
Frequency
Range
518.0 to 542.0
536.0 to 572.0
560.0 to 590.0
590.0 to 614.0
614.0 to 644.0
638.0 to 668.0
662.0 to 692.0
TV
Channels
22 to 25
25 to 30
29 to 33
34 to 37
38 to 42
42 to 46
46 to 50
Antenna
Length
5.00”
4.48”
4.24”
4.01”
3.81”
3.81”
3.62”
Block
27
28
29
30
31
32
33
UK
Frequency
Range
686.0 to 722.0
722.0 to 746.0
740.0 to 770.0
764.0 to 794.0
794.0 to 818.0
818.0 to 842.0
860.0 to 872.0
606.0 to 636.0
TV
Channels
50 to 55
56 to 59
59 to 63
63 to 67
68 to 71
72 to 75
79 to 80
Antenna
Length
3.46”
3.31”
3.18”
3.08”
2.99”
2.92”
2.87”
3.91”
Table 1-1 Audio Frequency Block Information
IMPORTANT: As of 12 June 2009, the USA has phased out analog television. As a result, on 12 June 2010
frequencies between 698.0 and 806.0 MHz are no longer available for use in the USA.
NOTE: As currently scheduled, on 31 August 2011, Canada will phase out analog television. As a result, on that
day, frequencies between 698.0 and 806.0 MHz will no longer be available for use in Canada.
NOTE: Antenna length is measured from the base of the whip, where it is attached to the connector.
The length of the antenna varies with the frequency block. The actual length of the antenna is not as critical as
it might appear in the table. The antenna‟s usage bandwidth is +/- 50 MHz from the center frequency, so it is
acceptable to use an antenna from an adjacent block above or below the operating frequency.
IMPORTANT: Only the frequencies in one specific block are available to a particular transmitter and its
associated receiver. Coordinate with your dealer to determine which block(s) are the best to use in your
area(s).
Remote Control, Timecode and IFB Feed
In the QRX100, if the IFB option (QIFB) is installed, their worldwide frequency range is:
2.403 to 2.475 GHz
Antenna Cable Selection
When selecting a cable, it should be as short as possible. When using standard cable, the recommendation is to
not exceed 10 feet. However, if greater than 10 feet is needed, a very low loss cable should be used.
For maximum performance, use only high quality 50-ohm coax cable and the absolute minimum necessary to get
the job done. Otherwise, the receiver‟s sensitivity may suffer.
When installing cables permanently, use ½” Andrew heliax (http://awapps.commscope.com/catalog). Using
heliax cable, a run of 100 feet (~ 30.5 meters) can be achieved without significant power loss.
Associated Products User’s Manuals
Zaxcom Digital Wireless System, Transmitters – User‟s Manual
Zaxcom Digital Wireless System, Receivers – User‟s Manual
Zaxcom Digital Wireless System, IFB & Remote Control – User‟s Manual
Zaxcom Deva Recorders – User‟s Manual
Zaxcom Fusion Recorders – User‟s Manual
Product Support
Download the latest Firmware from:
Download the latest User Manuals from:
Register your new Zaxcom Product at:
Submit Technical Questions at:
Request an RMA # at:
http://www.zaxcom.com/support_software_updates.htm.
http://www.zaxcom.com/support_instructional_manuals.htm.
http://www.zaxcom.com/support_product_registration.htm.
http://www.zaxcom.com/support_submit_tech_questions.htm.
http://www.zaxcom.com/support_repair_services.htm
8
Zaxcom Digital Wireless System User’s Manual_______________________________________Chapter 2
Chapter 2 – Next Generation Receivers
This chapter is intended to quickly familiarize you with the functions of each of the Next Generation Digital
Wireless System receivers.
Getting to Know Your QRX100 ENG Diversity Receiver
This section was written based on firmware version 0.79.
1.
2.
6.
7.
1.
2.
3.
4.
5.
6.
7.
8.
9.
3.
4.
1.
8.
9.
5.
11.
10.
UHF Antenna Connectors (SMA)
INC key
Graphic LCD Screen
A & B Receiver Status Indicators
IFB Antenna Connector (SMA) (QIFB opt.)
MENU key
DEC key
A/B key
PWR key (Power)
12.
15.
10.
11.
12.
13.
14.
15.
16.
17.
18.
13.
16.
17.
14.
18.
LED Channel Indicators
DC Power Input
IFB Audio Input (1/8” stereo)
Timecode Input/Output (1/8” stereo)
IFB Antenna Connector (SMA) (QIFB opt.)
Audio Output {A = 1/3 or D = 1/2} (TA-5M)
Audio Output (A = 2/4 or D = 3/4} (TA-5M)
Serial Remote Control loop thru (USB)
(1/8” stereo) function TBD
Figure 2-1 QRX100 Front & Rear Views
WARNING: The USB connectors (#17 above) are NOT generic USB connectors that can be used as a
connection to any computer. They are used to exchange RS-422/RS-485 commands. A special peripheral
card is required to do this and NOT cause damage to the control board in the QRX100.
Available Configurations
Mono Receiver
The unit contains two mono receivers that work together as one receiver in receiver diversity mode.
Stereo Receiver
The unit contains two stereo receivers that work together in receiver diversity mode.
Quad Receiver
The unit contains two stereo receivers that work independently in antenna diversity mode.
Automatically Configured Parameter
In other receivers, both Zaxcom‟s and other manufacturers, when the wireless kit has the ability (if any) to be
configured as a mono or stereo, it was done MANUALLY. As long as the transmitter is configured with a
wideband mode, the QRX100 receiver can detect how the transmitter was configured and AUTOMATICALLY
adjust itself, as appropriate. If the transmitter is/was configured as EUROPEAN, it is necessary to change the
UHF Signal Format page {p.19}, as appropriate. The end result is one less parameter to be changed if the
receiver is being used for a different connection. The current transmitter UHF Signal Format page parameters
are:
US MONO
US MONO-R
– (Wideband mode, mono signal) This format is recommended for US customers and
other countries where a wideband channel is legal.
– (Wideband mode, mono signal) Similar to US MONO. This can be used with the
STAxxx to force the audio to the right channel.
9
Chapter 2_______________________________________Zaxcom Digital Wireless System User’s Manual
STEREO
EUROPEAN
– (Wideband mode, stereo signal) This format is recommended for US customers and
other countries where a wideband channel is legal.
– (Narrowband mode, mono signal) This format is recommended for European
customers and other countries where a wideband channel is NOT legal.
NOTE: Wideband mode = 200 KHz channel bandwidth. Narrowband mode = 120 KHz channel bandwidth.
Device Interface
PWR key
To turn „ON‟ the power, it is necessary to press the PWR key until the Boot-sequence begins.
To turn „OFF‟ the power, it is necessary to press the PWR key until the Power Down page displays POWER IS
OFF.
The receiver requires an external 12 VDC source. This power source can range from 7 to 18 VDC. The power
connector is described in External Power {p.7}.
A/B key
Some pages in the menu system require selecting which UHF receiver to adjust. This is carried-out by pressing the
A/B key.
A & B Receiver Status Indicators
They are located on the front panel, on the right side above the A/B key. They indicate:
Solid Red – that particular receiver is not receiving a valid signal. (Occurs for @ 15 seconds after any keypress.
It then reverts to the next indication, “Intermittent Red flashes”.)
Intermittent Red flashes – a reminder that the receiver is still not picking-up a transmitter.
Solid Green – that receiver is well … correctly receiving … the signal.
Solid Green with occasional Red flashes – that receiver saw a problem with the signal coming from one of the
antennas and switched to the other antenna. Watch the Pacifier page {p.15} to see this in action.
What exactly is a Valid Signal? First, obviously, the transmitter must be turned „ON‟. Next, the receiver has to be
tuned to the transmitter‟s frequency. Last, it has to have the same Encryption Code as the transmitter.
NOTE: What? Don‟t we have to set it for Stereo or Mono? One of the many advantages of the new receivers is
the UHF Signal Format is detected and the receiver is setup automatically.
LED Channel Indicators
As you are looking at the front panel, they are located on the bottom of the right side, in 4 groups of 3 LEDs. Go
to the Test Tone page {p.16}, and change it to CHAN-ID. This is the easy way to learn which LED group
displays each of the receiver‟s levels. Their brightness is controlled by the LED Dimmer page {p.20}.
Connections
This section describes the physical connectors on the receiver:
Audio Output Connectors
There are two TA-5M connectors on the back panel. How they are used varies based on the configuration
(Mono, Stereo, Quad) purchased.
Analog output is Line-level, with the signal output level at -2 dB. There is 20 dB of system headroom.
IMPORTANT: The Audio Output connectors can carry analog or digital signals. While sending digital output, it
IS NECESSARY that the unit on the other end (recorder, mixer, etc) have digital inputs with sample rate
convertors, as there is NO way to synchronize the output data with the recorder‟s digital input.
NOTE: All Fusions and Deva 16 have sample rate convertors on ALL digital inputs. Deva 5.8s have sample rate
convertors, if they have a REV C or later DSP board, as displayed in the About Deva page.
10
Zaxcom Digital Wireless System User’s Manual_______________________________________Chapter 2
Mono Receiver
Both connectors have the same signals. The digital output is duplicated to both connectors. The following
table describes the pin-outs:
Pin
Analog
Digital
1
Ground
Ground
2
Channel +
Channel 1/1 +
3
Channel -
Channel 1/1 -
4
N/C
N/C
5
N/C
N/C
Table 2-1 Mono Receiver Audio Pin-outs
Stereo Receiver
Each connector is attached to its own receiver channel. The left connector is for the left side of the stereo
pair and the right connector is for the right side of the stereo pair, also used by the private line functionality.
The digital outputs are duplicated to both connectors. The following table describes the pin-outs:
Pin
Analog
Digital
1
Ground
Ground
2
Channel +
Channel 1/2 +
3
Channel -
Channel 1/2 -
4
N/C
N/C
5
N/C
N/C
Table 2-2 Stereo Receiver Audio Pin-outs
Quad Receiver
Each connector is attached to both receivers (referred to as RXA and RXB in the menus). The left connector
has both left channels and the right connector has both right channels. The end result is if you are only using
a mono source, such as a bodypack transmitter, and are using the analog output, all you have to do is use the
left connector. That‟s the 1 and 3 in the table below. If you need the secondary (right) channels (i.e., for
private line functionality), attach the right connector. That‟s the 2 and 4 in the table below. Notice that if you
use the digital outputs, the left connector has both the left and right channels for the first (RXA) receiver and
the right connector has both channels for the second (RXB) receiver. The following table describes the pinouts:
Pin
Analog
Digital
1
Ground
Ground
2
Channel 1 (2) +
Channel 1/2 (3/4) +
3
Channel 1 (2) -
Channel 1/2 (3/4) -
4
Channel 3 (4) +
5
Channel 3 (4) Table 2-3 Quad Receiver Audio Pin-outs
UHF Antenna Connectors
The front of the receiver has two SMA connectors, intended to connect to external 50-ohm log-periodic (“Sharkfin”) or whip antennas. For best performance, keep any transmitters at least 10 feet (3 meters) away from the
antennas. This is because strong radio frequency sources reduce the receiver‟s sensitivity. The receiver is
optimized for properly tuned external log-periodic antennas. When whip antennas are used, there is a noticeable
reduction in the receiver‟s range. You should periodically check that the connector is still securely tightened.
11
Chapter 2_______________________________________Zaxcom Digital Wireless System User’s Manual
USB Connectors
This is for remote control from a computer with a purpose built software package. They provide a loop through
connection for additional unit(s). RS-422 and RS-485 communication protocols are supported at 115kb (3.3V).
The USB connectors are not currently functional.
12
Zaxcom Digital Wireless System User’s Manual_______________________________________Chapter 2
QRX100 Configuration Menus
There are four Standard, eleven Extended and seven Factory Setup menu pages, as follows:
Standard Menu
Pacifier page
Extended Menu
{p.15}
Factory Setup Menu
Receiver Mode page
{p.18}
UHF Frequency Select page {p.16}
AES Output Routing page
{p.18}
Test Tone page
{p.16}
Analog Output Routing page {p.18}
Software Update page
{p.24}
Reception Error Counters page
{p.24}
VCO page
{p.25}
UHF Frequency Scan page
{p.16}
Software Update page
{p.19}
Mystery page
{p.25}
UHF Signal Format page
{p.19}
DBits page
{p.25}
IFB Option page
{p.19}
AGC page
{p.25}
Power Saver page
{p.19}
Tube Synth page
{p.25}
Backlight Timer page
{p.20}
LED Dimmer page
{p.20}
LED Meter Mode page
{p.20}
Encryption Code page
{p.21}
Table 2-4 QRX100 Receiver Standard, Extended & Factory Setup Menus
Each time the MENU key is pressed, the next page in the current menu is displayed on the screen.
13
Chapter 2_______________________________________Zaxcom Digital Wireless System User’s Manual
QRX100 Bootup Sequences
Standard Bootup Sequence
VA-AAA PLD 54A5
RF TUNE FAILED
ZAXCOM
QRX100
VA-AAA
SNZZZZ
02 27 1E 00
06 37 00 00
A|
B|
|
|
(A–AAA – Indicates the currently installed firmware version.)
(OPTIONAL PAGE: If you get this, don‟t worry.)
(ZZZZ – Indicates the unit‟s serial number.)
(OPTIONAL PAGE: If you get this, don‟t worry.)
Table 2-5 Standard Bootup Sequence
Extended Menu Bootup Sequence
VA-AAA PLD 54A5
ZAXCOM
QRX100
VA_AAA
SNZZZZ
EXTENDED MENU
PRESS UP TO EXIT
Table 2-6 Extended Menu Bootup Sequence
14
Zaxcom Digital Wireless System User’s Manual_______________________________________Chapter 2
QRX100 Standard Menu
The Standard menu contains the most common pages that need to be worked-with/adjusted/reviewed on a daily
basis.
Pacifier page
Single Receiver Mode
A|
|
NO SIGNAL
A|
|
590.0
S
STOP>
Dual Receiver Mode
A|
B|
|
|
-
A|
B|
|
|
S
S
1.
2.
3.
4.
5.
6.
Page purpose: When you power up the unit, this page appears and displays the following information:
antenna being used,
• signal strength,
• audio level
receiver reception format
• transmitter recorder status
• transmitter battery capacity
Parameters:
Item (1) above – Indicates which receiver
A – is the left receiver.
B – is the right receiver.
NOTE: While the unit is in Single Receiver Mode it is operating in true {receiver} diversity. Even if you turn
„ON‟ a transmitter tuned to what was the right receiver‟s frequency, there is NO indication on the
QRX100 that this has happened. (see: Receiver Mode page {p.18}.)
Item (2) – Indicates the audio level at the receiver
The audio bars (one for each receiver), extends from the left to the right of this area, the right ending point
being 0dBFS. With no input signal, the left vertical bar is the origin of the level indicator. The next vertical bar
to the right is the -20dBFS mark.
Item (3) – Indicates transmitter’s battery level
A diagram of a battery is displayed, very similar to the same image on the transmitter‟s Pacifier page. A full
battery starts filling in with Green from the right side as it start running down. An empty battery is an outline.
The battery symbol starts blinking just before shutdown (maybe 10 mins).
Item (4) – Indicates transmitter’s recorder status
S (STOP)
It is STOPPED or does not have a card installed.
R (REC)
It is in RECORD.
P (PLAY)
It is in PLAYBACK.
– (NO SIGNAL) It is UNKNOWN. This occurs if the associated transmitter is turned “OFF”.
Item (5) – Indicates which receiver antenna is being used
< – Indicates the signal is being received by ANTENNA 1 (left antenna connector).
> – Indicates the signal is being received by ANTENNA 2 (right antenna connector).
Item (6) – Indicates RF signal strength
A staircase pattern with the lowest step (low signal strength) on the left and building up as it progresses to the
right (higher signal strength).
15
Chapter 2_______________________________________Zaxcom Digital Wireless System User’s Manual
UHF Frequency Select page
Single Receiver Mode
Dual Receiver Mode
CHA>560.0
MONO
CHA>560.0
CHB 561.0
CHA>560.0
ST
Page purpose: This page allows the Operator to change the frequency of each receiver.
512.0 to 752.0, value step: 0.1)
Parameters: (valid range:
An arrow (>) in character position 4 identifies which receiver is available to be modified.
Press the A/B key to change between the two receivers.
Press the INC key or DEC key to change the indicated receiver‟s frequency.
Test Tone page
TONE:
OFF
¦
¦
|
|
TONE:
-20dBFS
¦
¦
|
|
TONE:
CHAN-ID
¦
¦
|
|
TONE:
+0dBFS
¦
¦
|
|
Page purpose: This page allows the Operator to send a test tone from the receiver to set levels on the next
piece of equipment (usually a camera or a recorder). The level is also displayed on the LED Channel Indicators.
Parameters:
+0dBFS
CH-ID
-20dBFS
OFF
– this selection simultaneously sends tone to all 4 channels at 0dBFS.
– this selection sequentially sends a -20dBFS tone to each channel in turn and turns „ON‟ the
LED Channel Indicators for that channel.
– this selection simultaneously sends tone to all 4 channels at -20dBFS.
– the test tone is not output. Any audio being metered is being received live.
The left vertical bar is the origin of the level indicator, the right vertical bar is the -20dBFS mark and just short of
the right edge of the screen is 0dBFS.
UHF Frequency Scan page
PRESS ↑ TO SCAN
TO SCAN (RXA)
_________________
SCANNING 545.3
_________________
TAKE 585.4?
Page purpose: This page allows the Operator to scan an entire block and quickly choose the quietest frequency
to use.
Parameters:
16
Zaxcom Digital Wireless System User’s Manual_______________________________________Chapter 2
Selecting the Receiver Channel
The bottom line appears if the unit is in Dual Receiver Mode. The receiver channel selected in the UHF
Frequency Select page {p.16} is used initially. At this point, pressing the A/B key on the front panel changes
the choice.
Starting a Scan
Press the INC key to start a scan. The receiver searches every possible frequency.
A full scan takes less than 5 seconds. While the block is being scanned, the frequency being examined is
displayed in the bottom half of the screen. Once the scan has completed, a graphic of the block is displayed.
The low end of the block is on the left side and the high end is on the right. Wherever interference is found, a
vertical line (Interference Line) is drawn. It extends from the baseline up. The length of the Interference Line
indicates the level or strength of the interference at that frequency.
Finally, the function draws a vertical blinking line on the graphic to indicate where the first best suggestion (the
quietest frequency) occurs in the scan and displays the frequency number below the graphic as “TAKE nnn.n?”.
Accept the Current Suggestion
Press the INC key to load the selected frequency into the previously selected receiver channel.
Display the Next Suggestion
Press the A/B key to discard the currently selected frequency. The function removes the previous vertical
blinking line, looks up the next suggestion, inserts the next vertical blinking line at the appropriate position and
overwrites the previous suggested frequency number with the next suggested frequency number.
Re-scan the Block
Press the DEC key to perform another scan of the block.
NOTE: Currently, the Re-Scan process does NOT accumulate results from successive scans. Howy is planning
to add the capability at a future date.
Starting a New Scan
Repeatedly press the MENU key until you have stepped all the way around the menu back to the UHF
Frequency Scan page.
Best Practice: Scanning for a Low Noise Frequency
1. Repeatedly press the MENU key until SCAN is displayed.
2. Press the INC key to start the scanning process. Ensure the transmitter is „OFF‟ before starting the scan.
3. Press the INC key again to load the selected frequency into the receiver. The menu advances to the next page.
Best Practice: Finding the Quietest Frequencies for Multiple Transmitters
1.
2.
3.
4.
5.
6.
7.
Turn all transmitters „OFF‟.
Select the first receiver.
Perform a scan.
Accept the first (best) suggestion for a quiet channel by pressing the INC key.
Turn „ON‟ the transmitter associated with this receiver and tune it to the specified frequency.
Place the transmitter at least 20 feet (6 meters) away from the scanning receiver‟s antennas.
Go to the next receiver. Obviously, if you are selecting the frequency for a QRX100 while it‟s in Dual Receiver
mode, go back to the UHF Frequency Scan page {p.16} and press the A/B key to select the other receiver.
8. Repeat steps 3 thru 7 until all of the wireless links have been established.
NOTE: At any time in this page, the MENU key may be pressed to exit. This will not change the frequency.
Since the most recently selected frequency is now occupied, the next receiver to perform a scan finds the next
quietest frequency. Repeat this procedure for each additional transmitter. This procedure assumes that all of the
wireless links will be operating in the same block.
17
Chapter 2_______________________________________Zaxcom Digital Wireless System User’s Manual
QRX100 Extended Menu
EXTENDED MENU
PRESS ↑ TO EXIT
The Extended Menu contains pages that normally do not have to be changed on a regular basis.
Entering the Extended Menu
1. Go to the Pacifier page {p.15}.
2. Press and hold the DEC key until the Extended Menu page is displayed.
Exiting the Extended Menu
Hold down the MENU key to get back to this page and press the INC key.
OR
Press the PWR key.
NOTE: All changes are saved to Flash ROM as soon as they are committed.
Receiver Mode page
RX MODE:
DUAL
Page purpose: This page allows the Operator to control whether the unit will function as a single receiver or as
two independent receivers.
Parameters:
DUAL
SINGLE
– This configures the unit to operate as two independent stereo capable receivers.
– This configures the unit to operate as a single stereo capable receiver.
NOTE: Single mode (true diversity) enables both receivers to work together. This results in a 4 dB increase in
sensitivity over Dual mode, which is about a 30% increase in range. In addition, this mode is able to correct a
ton of reception errors.
Dual mode uses antenna switching diversity.
NOTE: If you are only using one transmitter, it is HIGHLY RECOMMENDED that you use SINGLE mode.
AES Output Routing page
AES-12:OFF
AES-34:OFF
Page purpose: This page allows the Operator to determine which channel pairs will be output as digital data.
Parameters: [OFF, OFF] / [ON, ON] / [OFF, ON] / [ON, OFF]
Analog Output Routing page (Single Receiver Mode ONLY)
OUTPUT ROUTING:
C1=L C2=R
Page purpose: This page allows the Operator to determine which analog audio is present at each connector.
Parameters: [C1=L
C2=R] / [C1=LR]
18
Zaxcom Digital Wireless System User’s Manual_______________________________________Chapter 2
Software Update page
PRESS ↑ TO
UPDATE SOFTWARE
UPDATE DISABLED
IN DUAL RX
Page purpose: This page sets up this receiver to have its program updated by over-the-air transmission from a
TRXxxx transmitter.
Parameters: N/A
See Upgrading the Firmware in each QRX series unit {p.33} for more information.
If the unit is currently in Dual Receiver mode, instead of seeing the normal page, you‟ll see the second one above.
NOTE: It is NOT possible to update the firmware while in Dual Receiver mode.
UHF Signal Format page
Single Receiver Mode
RXA FMT NORMAL
Dual Receiver Mode
RXA>FMT NORMAL
RXB FMT NORMAL
Page purpose: This page controls the ability to receive wideband vs. narrowband signals.
Parameters:
NARROW
NORMAL
– required to correctly receive from a transmitter that has its UHF Signal
Format page set to EUROPEAN.
– required to correctly receive from a transmitter that has its UHF Signal
Format page set to US MONO, US MONO-R or STEREO.
NOTE: About now, you might be saying to yourself “Why „narrow‟?”. EUROPEAN signal format uses 125 KHz
bandwidth, whereas the other formats {US MONO, US MONO-R and STEREO} use 200 KHz.
IMPORTANT: For the MAJORITY of users, this page will be kept set to NORMAL.
NOTE: While using a QUAD receiver, you CAN set the receivers differently, allowing the ability to receive one
transmitter set to US MONO and the other set to EUROPEAN.
IMPORTANT: Any change to this page REQUIRES a reboot before the new setting takes effect.
IFB Option page
IFB OPTION:
ON
Page purpose: This page enables/disables the IFB Transmitter/Receiver module and disables displaying the IFB
Option menu.
Parameters: [OFF] / [ON]
Power Saver page
POWER SAVER:
ON
Page purpose: This page enables/disables the QRX100‟s power saver function.
Parameters: [OFF] / [ON]
19
Chapter 2_______________________________________Zaxcom Digital Wireless System User’s Manual
Backlight Timer page
BACKLIGHT TIMER
ALWAYS ON
Page purpose: This page controls how long the LCD backlight stays illuminated.
Parameters:
ALWAYS ON
(valid range: 1 to 5 to 29 SECONDS, value step: 1)
OFF
LED Dimmer page
LED DIMMER:
OFF
Page purpose: This page maintains the intensity of the LED indicators on the side of the unit.
Parameters:
OFF
[1] / [2] / [3] / [4] / [5] / [6] / [7] / [8] / [12] / [16] / [20] / [24] / [28] / [32] / [36] / [40] / [44] /
[48] / [52] / [56] / [60]
[59] / [55] / [51] / [47] / [43] / [39] / [35] / [31] / [27] / [23] / [19] / [15] / [11] / [7] / [6] / [5]
/ [4] / [3] / [2] / [1]
BRIGHT
NOTE: Obvious, but, a reminder … If you will be using the unit where you will not benefit from seeing the level
lights on the side (i.e., on a cart or in a bag), set this page to OFF. Also, if you will be operating out of a bag
and/or running on batteries, turning Off the LEDs will dramatically reduce power consumption and heat.
IMPORTANT: While you are experimenting with your QRX100 channel lights within arms distance, it is
HIGHLY ADVISED to adjust their intensity to below 20. While not damaging to the eyes, they can be set
bright enough to cause pain from extended use. So be CAREFUL.
LED Meter Mode page
LED METER MODE:
OFF
Page purpose: This page controls the display of the signal present indicator.
Parameters:
BLUE FULL TIME – turns the right most LED Blue for each channel that is receiving a valid RF
BLUE PART TIME
OFF
signal. When the audio becomes loud enough to display a level for that
channel, it will continue to show Blue but with a tint of the overall color being
displayed in the rest of that channel‟s LEDs.
– turns the right most LED Blue for each channel that is receiving a valid RF
signal. Once the audio level has gotten to the point of displaying a level for that
channel, the Blue color is disabled and the lights in that channel are all displayed
in the same color.
– Disables the function.
20
Zaxcom Digital Wireless System User’s Manual_______________________________________Chapter 2
Encryption Code page
ID1:000 ID0:000
↑
Page purpose: This page maintains the code used to encrypt the audio transmitted to the receiver.
Parameters: (valid range:
000 to FFF, value step: 1)
To move to the next character, momentarily press the MENU key.
To change the designated character position, press the INC or DEC key.
To exit this page, press the MENU key for 1 second.
NOTE: Both of these codes should always be set to 000 for normal un-coded operation.
Encryption Code Part 1 (ID1) and Encryption Code Part 0 (ID0)
On this page, 2 three-digit numbers are entered. These two numbers are formed into a single six-digit encryption
code. This code is your encryption key for this unit. An identical code must be entered into the associated
receiver for the audio to be properly decoded.
Enabling this function is useful when sensitive information must not be made public. Standard FM wireless
transmitters can be picked up using scanners and other electronic devices. Unless a Zaxcom receiver is used, even
an uncoded transmitter signal cannot be picked up using a scanner.
The six-digit encryption code provides a total of 16,777,216 possible choices.
If a Zaxcom receiver has been programmed with an encryption code, it will also continue to receive an uncoded
transmitter (both ID#0 and ID#1 set to 000). Since the receiver has to check for two possible code situations, a
slight performance penalty may be incurred during long-range reception. To avoid this, it is highly recommended
that both the transmitter and receiver codes be set to 000:000 (uncoded) when high security communication is
not required.
21
Chapter 2_______________________________________Zaxcom Digital Wireless System User’s Manual
22
Zaxcom Digital Wireless System User’s Manual_______________________________________Chapter 2
23
Chapter 2_______________________________________Zaxcom Digital Wireless System User’s Manual
QRX100 Factory Setup Menu
FACTORY SETUP
PRESS ↑ TO EXIT
The Factory Setup Menu contains several pages that are infrequently changed, generally once per project, or less.
Entering the Factory Setup Menu
1. Go to the Pacifier page {p.15}.
2. Press and hold the DEC key until the Extended Menu page is displayed.
3. Press the DEC key until the Factory Setup Menu page is displayed.
Exiting the Factory Setup Menu
Hold down the MENU key to get back to this page and press the INC key.
OR
Press the PWR key.
NOTE: All changes are saved to Flash ROM as soon as they are committed.
Software Update page
PRESS ↑ TO
UPDATE SOFTWARE
Page purpose: This page sets up this receiver to have its program updated by over-the-air transmission from a
TRXxxx transmitter.
Parameters: N/A
See Upgrading the Firmware in each QRX series unit {p.33} for more information.
Reception Error Counters page
Single Receiver Mode
E000< 80 6.6 A2
B000> A 7.5 B2
1. 2.
3. 4.
5.
Dual Receiver Mode
E000< 80 0.0 A1
E206> 79 4.3 B1
6.
Page purpose: This page allows the Operator to diagnose reception problems.
Parameters:
Pressing the DEC key resets the error counts for both receivers.
1.) You will see an E as the first character indicating this is the Reception Error Counters page.
Dual Mode is indicated by an E at the beginning of both lines. Single Mode is indicated by an E at the
beginning of the first line and a B at the beginning of the second line
2.) The two 3-digit counters indicate the block errors (a block is 0.5 ms of audio), one for each receiver.
3.) The arrows (< or >), indicate which antenna is currently being used by each receiver.
4.) To the right of the top arrow is the 2-digit RF signal strength meter (dB). 80dB is about full scale and 30dB is
typically the lowest you should see with no antennas. Numbers beyond this range may indicate a hardware
problem.
Below the RF signal strength field is an alpha character that indicates the count of uncorrectable blocks that
made it through because both sides had an error at the same time. In Dual Mode this is where the 2-digit RF
signal strength meter for Channel B appears.
NOTE: In Dual Mode, if you get a block error the audio for that block is lost. In Single Mode, the audio is
lost only if both sides have an error at the same time.
24
Zaxcom Digital Wireless System User’s Manual_______________________________________Chapter 2
5.) To the right of the signal strength meters are floating-point numbers that indicate the decoded signal‟s quality.
The best is about 8.0 and the worst is 0.0. The typical range is 7.6 to 5.0.
6.) The right most Ax and Bx fields are antenna modes and they have no use at the moment and will probably
change to something useful.
In Dual Mode, the top line is for the left receiver (channel A) and the bottom line is for the right receiver (channel
B
VCO page
VCO:0.452 S4.5
M36-53
S5.5
Page purpose: This page is used to tune and debug the receiver‟s RF voltage controlled oscillator.
Parameters:
When receiving a signal, the VCO should typically be between 0.45 and 0.55. If not, the transmitter or receiver
may be out of tune.
Mystery page
02 26 1E
02 27 1E
00
00
Page purpose: This page is used to ????.
Parameters:
DBits page
0X00S:
Page purpose: This page is used for faster debugging.
Parameters: Unless told to change this by Zaxcom, this has to stay set to
0X00S.
AGC page
AGC A:80.7 E589
OFF B:80.9 E603
Page purpose: This page enables/disables the automatic gain control process.
Parameters: [OFF] / [ON]
Tube Synth page (requires Mono mode)
TUBE SYNTH:
0
Page purpose: This page controls a tube distortion effect that saturates and distorts like a tube amplifier.
Parameters: (valid range:
0 to 40, value step: 1)
This is designed for applications where vocals should sound loud when they are loud, instead of sounding perfect at
all levels. This will primarily used by the theater crowd.
NOTE: This page only operates on audio coming out of the LEFT audio connector.
25
Chapter 2_______________________________________Zaxcom Digital Wireless System User’s Manual
26
Zaxcom Digital Wireless System User’s Manual_______________________________________Chapter 2
27
Chapter 3_______________________________________Zaxcom Digital Wireless System User’s Manual
Chapter 3 – New System Capabilities
Introduction
Our Software Engineers make changes to the firmware to make it easier to use or to correct a problem that an
Operator has encountered. But, every once-in-a-while, they come up with some truly ground-breaking additions
to the system. This chapter is dedicated to letting all of you, the Owners and Operators, know about all of these
new capabilities. As part of that, I will do my best to explain how to use them.
Improvements
None at this time. The hardware and software are still being built up and out.
Know Firmware Problems
Receivers
NONE
28
Zaxcom Digital Wireless System User’s Manual_______________________________________Chapter 4
Chapter 4 – Equipment Specifications
QRX100 Specifications
Receiver
Receiver Type
RF Modulation
RF Frequency Range
RF Frequency Step
RF Bandwidth
Channel Separation
Sensitivity
Antenna Connector
True / antenna diversity (mono or stereo)
Proprietary digital method
518.0 to 872.0 MHz (blocks are 20 to 36 MHz)
100 KHz
US Mode:
200 KHz
Euro Mode: 125 KHz
500 KHz (700 KHz recommended)
-110 dBm
50-ohm SMA female
Receiver Audio - Analog Outputs
Channels
Audio Level
Dynamic Range
Distortion
DAC Bit-depth
DAC Rate
Connector
4
Line: -10 to 0 dBu active balanced
114 dB
0.001%
24 bit
48 kHz
TA-5M
Receiver Audio – Digital Outputs
Channels
Sample-rate
AES Reference
Connector
4
32 to 196 kHz
Wordclock and AES reference
TA-5M
IFB Transmitter/Receiver (optional)
Transmitter
RF Power Output
Emission Designator
FCC Part
50 mW
180 KV2E
CFR Title 47, Part 18
Receiver
Sensitivity
-96 dBm
Frequency Response
RF Modulation
RF Frequency Range
RF Frequency Step
RF Bandwidth
Channel Separation
Antenna Connector
20 Hz to 12 kHz
Digital Spread Spectrum
2.403 to 2.475 GHz
0.001 GHz (1 MHz)
1 MHz
2 MHz
50-ohm SMA female
Common
IFB Audio
ADC Bit-depth
ADC Rate
Dynamic range
Distortion
Frequency Response
Highpass Filter
System Group Delay
24 bit
48 kHz
103 dB
0.01%
20 Hz to 12 kHz
„OFF‟ or 30 to 220 Hz, step: 10 (6 dB per octave)
10 ms
IFB Audio Input
Connector
Type
Level
Impedance
1/8” Stereo (3.5 mm)
Balanced
-10 to +8 dBu
10 k ohms
29
Chapter 4_______________________________________Zaxcom Digital Wireless System User’s Manual
Timecode Input/Output (common connector)
Input
Level Range
1 to 5V, P-P
Output
Level Range
.2 to 3V, P-P
Common
Connector
Impedance
1/8” Stereo (3.5 mm)
10 k ohms
Timecode Reader/Generator
Clock Accuracy
Timecode Type
Timecode Frame-rates
1.54 PPM (1 frame out in 6 hours)
SMPTE
23.98, 24, 25, 29.97NDF, 29.97DF, 30NDF, 30DF
Video Sync Output
Connector
Level Range
Impedance
SMA female
1 to 5V, P-P
10 k ohms
AES/Wordclock Input
Connector
Level Range
Impedance
1/8” Stereo (3.5 mm)
1 to 5V, P-P
10 k ohms
Remote Control
Protocol
Connector (x 2)
RS-422, RS-485
USB
Physical
Weight
Dimensions (H x W x D)
External Power
Internal Power
Display
6.0 oz (170 grams)
1.25” x 3.25” x 5.25” (32mm x 83mm x 133mm)
8 to 18 VDC (270 mA @ 12 VDC – no side LEDs, 390 mA – w/ LEDs illuminated)
N/A
Graphic LCD panel
30
Zaxcom Digital Wireless System User’s Manual_______________________________________Chapter 5
Chapter 5 – Wiring Diagrams
NOTE: All of the diagrams in this chapter show the solder side of each connector.
QRX100 Cables
Left (Channel 1)
Right (Channel 2)
Figure 5-1 TA-5F to 2 XLR-3M Line-level Output Cable
31
Chapter 6_______________________________________Zaxcom Digital Wireless System User’s Manual
Chapter 6 – Firmware Information
Firmware
Each unit is shipped with the latest firmware version installed.
Each time a unit is powered up, the firmware version number is displayed briefly on the LCD screen. Pressing the
DEC key during the boot up will slow down the screen to allow easier viewing of the information.
For the RX900 (M / S) and RX4900, the unit must be returned to Zaxcom, to upgrade its firmware.
For the QRX100, as newer firmware becomes available, it can be downloaded from the Zaxcom website
(http://zaxcom.com/software_up dates.htm).
Software
Prefix
Compatible Units
Software Update
Instructions In:
TRX
TRX900, TRX900AA,
TRX900LT, TRX900LTS,
TRX992, TRX700, TRX800,
IFB100
Transmitter
User‟s Manual
ERX
ERX100
QRX
QRX100(S/Q)
IFB & Remote Control
User‟s Manual
BELOW
Table 6-1 Software Compatibility List
NOTE: To make the most of corrections and improvements brought about by a newer firmware version, it is
recommended that when you download a new QRX firmware version that you load all of your QRX100s at
the same time.
CAUTION: This SHOULD go without saying but, to be fair to the uninitiated …
To preclude being caught with your proverbial pants down, every time you download a new version of any
Zaxcom firmware, keep a safety copy somewhere. If, during testing, you discover a problem serious enough
to prevent using it, this will allow you to go back to the last good version and reload it.
Advantages to Upgrading the Firmware
By upgrading the software, the range and feature set have and will continue to dramatically increase over time.
Zaxcom has a reputation for constantly adding additional features and user suggestions during the product‟s
lifetime. This ensures that your wireless system will perform better and better, the longer you own it.
WARNING: This SHOULD go without saying but, to be fair to the uninitiated …
If you are getting ready to work on a project, it is HIGHLY RECOMMENDED that you use a version you
have had a chance to test thoroughly in advance of the project.
As with any Software/Firmware, Release Versions have been tested to the extent they can be before they are
released (a combination of lab testing and field testing by a few stalwart individuals). It is still POSSIBLE that
your use could exercise the firmware in a way not previously tested.
Therefore, check your newly installed firmware early and often!
32
Zaxcom Digital Wireless System User’s Manual_______________________________________Chapter 6
Upgrading the Firmware in each QRX series unit
NOTE: Version TRX-6.26A or greater is required in the TRX9xx (the “Programming Transmitter”) to perform
this process.
Perform the following:
1)
2)
3)
4)
5)
6)
Format a media card in the Programming Transmitter.
Delete the “DELETE.ME” file on the card.
Download the QRX software and load it into the card‟s root folder.
Insert the card into the Programming Transmitter.
Turn „ON‟ the Programming Transmitter and all QRXs.
At each QRX unit:
a. Verify the Receiver Mode page is set to SINGLE.
b. Set the UHF Frequency Select page to the same frequency as the Programming Transmitter.
c. If the receiver has a good connection, the LEDS for the A and B Status Indicators will be green.
If they are Red, check that the Programming Transmitter has zeros in the Encryption Code page,
and the UHF Signal Format pages in all units agree.
d. Go to the Software Update page and press the INC key 5 times.
e. The screen will display Waiting for Program. This indicates the receiver is ready to download
the new version. Be sure to do this to all of your units, so they will be updated at the same time.
f. Place each QRX within 10‟ and line-of-sight of the Programming Transmitter. All of the units should
remain TOTALLY motionless to insure they receive a strong and undisturbed signal, and minimize
the possibility of something going awry.
7) At the Programming Transmitter:
a. With it turned ‟OFF‟, press and hold the MENU key while starting it.
b. It will boot up into the Extended Menu.
c. Verify the Allow IFB Remote Control page is set to OFF.
d. Go to the Send QRX Program page.
e. Press the INC key.
f. It will indicate that it found the program on the card and has started sending it.
NOTE: This process will continue until manually stopped.
NOTE: A programming cycle takes less than 2 minutes.
8) Look at each QRX‟s screen. It should indicate it is receiving the program.
9) After 1 or 2 cycles, all of the receivers should be re-programmed. If there is a reception error, the affected
receiver automatically restarts the process with the start of the next download cycle.
10) For those receivers that have been reprogrammed, the screen will display SUCCESS.
11) On the Programming Transmitter:
a. Press the MENU key to stop the download process.
b. If appropriate, change the Allow IFB Remote Control page back to ON.
c. Cycle its power.
12) At each QRX unit:
a. Cycle the power
b. Verify the new firmware version number is displayed
c. As necessary, set the Receiver Mode page to DUAL.
WARNING: After each QRX unit has received its entire program, it will erase and burn its firmware into the
ROM (see the Yellow screens on the next page). During this process, which only takes a few seconds, you
MUST NOT turn „OFF‟ the unit.
If the program is never fully received, it is safe to cycle the power. In this case, turn „OFF‟ the Programming
Transmitter before power cycling the QRX unit.
33
Chapter 6_______________________________________________________________Zaxcom Digital Wireless System User’s Manual
The Programming
Transmitter screen
Comments about the
Programming Transmitter side
The QRX
screen
PRESS UP 5X TO
UPDATE SOFTWARE
PRESS ↑ TO SEND
QRX PROG FILE
Once started, everything that follows
happens automatically.
NO QRX-XXX.BIN
FILE ON SD CARD
This only appears if there is no card
installed or no QRX file on it, if it is.
FOUND
QRX-xxx.BIN
Identifies what version is about to be
transmitted.
SENDING ERASE
TEMP ROM COMMAND
This is the start of the loop. Once the last
item on this side is done, it returns here.
FOUND GOOD
SECT XXX OF YYY
SENDING BURN
ROM COMMAND
Comments about the
QRX side
Be sure to start this side first. The update
process will be completed faster.
WAITING FOR
PROGRAM
Displayed while sending the program.
XXX = current sector, YYY = total #.
Tells each QRX to replace the old version
with the new version.
ERASING TEMP
ROM XX
At this point the temporary buffer used to
store the new version is zeroed-out.
FOUND QRX-XXXX.
WAITING
Identifies what version is about to be
installed.
FOUND GOOD
SECTOR XXX:YYY
This is displayed while receiving program.
XXX = current sector, YYY = total valid
BAD SECTOR CHKSUM
ZZZ
This is displayed if a sector is received
incorrectly.
WAITING FOR
PROGRAM
If the signal is lost, even for a millisecond,
the unit resets and waits for the next cycle.
ERASING XX
To get here it has to be a good download.
Clear out the old stored firmware version.
BURNING ROM
NNNNNN BYTES
Copy the received firmware into the
permanent store.
SUCCESS_
REBOOT NOW
Process completed successfully. Next time
you start up, you‟re on the new version.
Table 6-2 QRX Firmware Load Process
34
Zaxcom Digital Wireless System User’s Manual_______________________________________Chapter 6
NOTE: If you receive either of the two errors (QRX side, in red), it is NOT necessary to power cycle the unit. The unit will
automatically restart the download process during the next programming cycle. Once the program has been successfully
received, the screens highlighted in Yellow CAN NOT be interrupted.
35
Chapter 7_______________________________________Zaxcom Digital Wireless System User’s Manual
Chapter 7 – Menu Sheets
Menu Sheet for QRX100
MENU SETTINGS
Standard Menu
i. (Pacifier page {p.15})
(Displays: antenna being used, signal strength, audio level, receiver reception format, transmitter
recorder status and transmitter battery capacity.)
ii. CHA>560.2: ________ (UHF Frequency Select page {p.16})
(Valid range 30 MHz in 518 to 872 MHz, value step: 100 KHz)
iii. Tone: ______ (Test Tone page {p.16})
[OFF] / [0dBFS] / [CH-ID] / [-20dBFS]
iv. PRESS ↑ TO SCAN: ________ (UHF Frequency Scan page {p.16})
Start a Scan: Press the INC key
Accept the Current Frequency Suggestion: Press the INC key
Display the Next Frequency Suggestion: Press the A/B key
Re-scan the Block: Press the DEC key
Start a New Scan: Press the MENU key
Extended Menu – to reach these, go to the Pacifier page {p.15}, press and hold the DEC key until the
Extended Menu page is displayed
i. RX MODE: ________ (Receiver Mode page {p.18})
([SINGLE] / [DUAL])
ii. AES-12: ________
AES-34: ________ (AES Output Routing page {p.18})
([OFF, OFF] / [OFF, ON] / [ON, OFF] / [ON, ON])
iii. OUTPUT ROUTING: ________ (Analog Output Routing page {p.18})
([C1=L C2=R] / [C1=LR])
iv. PRESS UP 5X TO: (Software Update page {p.19})
(See Upgrading the Firmware in each QRX series unit {p.33} for more information.)
v. RXA FMT: ________ (UHF Signal Format page {p.19})
([NORMAL] / [NARROW])
vi. IFB OPTION: ________ (IFB Option page {p.19})
([OFF] / [ON])
vii. POWER SAVER: ________ (Power Saver page {p.19})
([OFF] / [ON])
36
Zaxcom Digital Wireless System User’s Manual_______________________________________Chapter 7
viii. BACKLIGHT TIMER: ________ (Backlight Timer page {p.20})
([OFF] \ [valid range: -1 to 5 to 29 SECONDS, value step: 1] / [ALWAYS ON])
ix. LED DIMMER: ________ (LED Dimmer page {p.20})
([OFF] \ [valid range: 0 to 60] / [BRIGHT])
x. LED METER MODE: ________ (LED Meter Mode page {p.20})
([OFF] / [BLUE PART TIME] / [BLUE FULL TIME])
xi. ID1: ________ ID0: ________ (Encryption Code page {p.21})
(valid range: 000 to FFF, value step: 1, unless necessary, use 000)
Factory Setup Menu – to reach these, go to the Pacifier page {p.15}, press and hold the DEC key until the
Extended Menu page is displayed, press the DEC key to display the Factory Setup
Menu page
i. PRESS UP 5X TO: (Software Update page {p.24})
(See Upgrading the Firmware in each QRX series unit {p.33} for more information.)
ii. E000: (Reception Error Counters page {p.24})
iii. VCO: (VCO page {p.25})
iv. 02: (Mystery page {p.25})
v. 0X00S: ________ (DBits page {p.25})
vi. AGC: (AGC page {p.25})
([OFF] / [ON])
vii. TUBE SYNTH: ________ (Tube Synth page {p.25})
(valid range: 0 to 40, value step: 1)
37
Chapter 8_______________________________________Zaxcom Digital Wireless System User’s Manual
Chapter 8 – Digital Wireless System Quickstart
Common Settings for Associated Transmitters, Receivers and IFB
The following table identifies settings that must agree, to allow the associated UHF transmitters and receivers to
work together:
UHF Transmitter side
UHF Receiver side
Standard Menu
UHF Frequency page
Standard Menu
UHF Frequency Select page
Extended Menu
UHF Signal Format page
Encryption Code page
Extended Menu
UHF Signal Format page
Encryption Code page
Table 8-1 Audio Settings that Must be Consistent
The following table identifies settings that must agree, to allow the associated IFB transmitter and receivers to work
together:
IFB Receiver side
IFB Transmitter side
Extended Menu
Allow IFB Remote Control page
IFB Signal Format page
IFB Receiver Enable page
Group ID page
Extended Menu
IFB Signal Format page
Group ID page
Standard Menu
Remote Unit ID page
IFB Frequency page
Unit ID page
IFB Frequency page
Table 8-2 IFB Settings that Must be Consistent
The following table identifies settings that must agree, to allow the private channel to function:
UHF Transmitter side
UHF Receiver side
Extended Menu
Private Line Key Assignment page
Extended Menu
Private Line Function Enable page
Table 8-3 Private Channel Settings that Must be Consistent
NOTE: It should go without saying, for these units to function together, the same or compatible software
versions must have been installed in all of the units.
38
Zaxcom Digital Wireless System User’s Manual_______________________________________Chapter 8
Using Your Wireless Transmitters and Receivers
Receiver Related Preparation
Scan for an Open UHF Frequency
PRESS ↑ TO SCAN
TO SCAN (RXA)
1. Press the MENU key until the UHF Frequency Scan page appears.
PRESS ↑ TO SCAN
TO SCAN (RXB)
2. If appropriate, press the A/B key to change to the other receiver.
_________________
SCANNING 565.3
3. Press the INC key to start the scanning process.
_________________
TAKE 585.4?
4. Once the scan has finished, press the DEC key to accept the
suggested frequency.
IMPORTANT: The SAME frequency must be set in both the transmitter and its associated receiver.
Set the UHF Signal Format (Only required if changing to/from European Format)
EXTENDED MENU
PRESS ↑ TO EXIT
1. Press the DEC key while turning „ON‟ the receiver power to enter the
Extended Menu.
RXA>FMT NORMAL
RXB FMT NORMAL
2. Press the MENU key until the UHF Signal Format page appears.
RXA FMT NORMAL
RXB>FMT NORMAL
3. If appropriate, press the A/B key to change to the other receiver.
RXA FMT NORMAL
RXB>FMT NARROW
4. Press the INC or DEC key until the proper format appears.
Only use NARROW if the transmitter is set to European.
IMPORTANT:
After changing the signal format, you must cycle the power before the change becomes active.
Both the transmitter and receiver, FOR THE SAME LINK, must use the SAME FORMAT.
Enter the Encryption Code
If encryption is not required, leave all units set to “000”.
ID1:000 ID0:000
↑
1. Press the MENU key until the Encryption Code page appears.
ID1:000 ID0:002
↑
2. Press the INC or DEC key to change the current character position.
ID1:000 ID0:002
↑
3. Press the MENU key to move to the next character position.
IMPORTANT: Both the receiver and transmitter codes for a specific channel MUST MATCH, or the signal
cannot be decoded.
39
Chapter 8_______________________________________Zaxcom Digital Wireless System User’s Manual
Transmitter Related Preparation
Power Switch
Only when the TRX900 ( / AA) & STAxxx Stereo Adapter are combined
Power Switch „ON‟
TRX900 operates on internal battery.
Power Switch „OFF‟ TRX900 operates on power provided by the
STAxxx‟s external power connector.
All other transmitters and TRX900 ( / AA) w/o STAxxx
Power Switch „ON‟
Unit operates on internal battery.
Power Switch „OFF‟ Unit is „OFF‟.
Enter the UHF Frequency
TXFREQ 581.6
TXFREQ 569.3
1. Press the MENU key until the UHF Frequency page appears.
2. Press the INC or DEC key to enter the associated receiver‟s
frequency.
Set the UHF Signal Format (TRX900 ( / AA) w/ STAxxx)
EXTENDED MENU
1. Press the MENU key while turning „ON‟ the unit, to enter the
Extended Menu.
PRESS UP TO EXIT
TX FORMAT:
US MONO
2. Press the MENU key until the UHF Signal Format page appears.
(REBOOT)
STEREO
3. Press the INC or DEC key until it displays the appropriate value.
IMPORTANT:
“STEREO” will only be used when a TRX900 ( / AA) has an STAxxx attached.
After changing the signal format, you must cycle the power before the change becomes active.
Both the transmitter and receiver, FOR THE SAME LINK, must be set to the SAME FORMAT.
Set Where Analog to Digital Conversion is to be Performed
ADC: INTERNAL
1. Press the MENU key until the ADC Select page appears.
ADC: STA-150
2. Press the INC or DEC key until it displays the appropriate value.
NOTES:
Use STA-150 with the TRX900 ( / AA) w/ STA150 in stereo mode. (TA-5F)
Use STA-100 with the TRX900 ( / AA) w/ STA100 in stereo mode. (TA-5F)
Use INTERNAL with the TRX900 ( / AA) in mono mode. (micro-LEMO 3-pin mic input)
Use INTERNAL with all other units.
40
Zaxcom Digital Wireless System User’s Manual_______________________________________Chapter 8
Set the UHF Transmitter Power (May 2008 and later models)
TX POWER: 10MW
1. Press the MENU key until the UHF Transmitter Power page
appears.
TX POWER: 50MW
2. Press the INC or DEC key to raise or lower the Transmit Power.
NOTE: If this page does not appear, your transmitter is not equipped with this option.
Enter the Encryption Code
If encryption is not required, leave all units set to “000”.
ID1:000 ID0:000
↑
1. Press the MENU key until the Encryption Code page appears.
ID1:000 ID0:002
↑
2. Press the INC or DEC key to change the current character position.
ID1:000 ID0:002
↑
3. Press the MENU key to move to the next character position.
IMPORTANT: Both the receiver and transmitter codes for a specific channel MUST MATCH, or the signal
cannot be decoded.
Remotely Controlling the Transmitters and Sending IFB Audio
IFB100 Related Preparation
Enter the IFB Transmitter Frequency for Your Group
2.403
----
FREQ: 2.403
FREQ: 2.415
1. Press the MENU key until the IFB Frequency page appears.
2. Press the INC or DEC key to change the frequency.
Connect the Audio Source to the IFB transmitter
Enter a Unique Group ID for Your Gear
EXTENDED MENU
1. Press the MENU key while turning „ON‟ the unit, to enter the
Extended Menu.
PRESS UP TO EXIT
REMOTE CONTROL
GROUP ID=0
2. Press the MENU key until the Group ID page appears.
REMOTE CONTROL
GROUP ID=15
3. Press the INC or DEC key to change the Group number.
41
Chapter 8_______________________________________Zaxcom Digital Wireless System User’s Manual
Send Timecode from the TC Source to each Transmitter
TC SOURCE:
1. Press the MENU key until the Timecode Source page appears.
AUDIO INPUT
TC SOURCE:
SIDE CONNECTOR
2. Press the INC key until Side
Connector appears.
3. Attach a cable from your recorder‟s TC output to your IFB100‟s TCin connector.
Set the IFB Signal Format for Your Group
IFB FORMAT:
1. Press the MENU key until the IFB Signal Format page appears.
LOW Q
IFB FORMAT:
HIGH Q
2. Press the DEC key to change to HIGH
Q.
IMPORTANT: Both the transmitter and ALL receivers must be set to the SAME FORMAT.
Cycle the IFB100’s Power
TRX9xx Related Preparations
Enable the Remote Control Capability on the Unit
EXTENDED MENU
1. Press the MENU key while turning „ON‟ the unit, to enter the
Extended Menu.
PRESS UP TO EXIT
ALLOW IFB REMOTE
CONTROL: OFF
2. Press the MENU key until the Allow IFB Remote Control page
appears.
ALLOW IFB REMOTE
CONTROL: ON
3. Press the INC key to change to ON.
Set the IFB Format
IFB FORMAT:
LOW Q
IFB FORMAT:
HIGH Q
1. Press the MENU key until the IFB Signal Format page appears.
2. Press the DEC key to change to HIGH
Q.
IMPORTANT: Both the transmitter and ALL receivers must be set to the SAME FORMAT.
Enable the IFB Receiver
RXMODE=OFF
RXED BLOCKS 000
RXMODE=RX
RXED BLOCKS 000
1. Press the MENU key until the IFB Receiver Enable page appears.
2. Press the INC key to change to RX.
42
Zaxcom Digital Wireless System User’s Manual_______________________________________Chapter 8
Enter Your Gear’s Group ID
REMOTE CONTROL
1. Press the MENU key until the Group ID page appears.
GROUP ID=0
REMOTE CONTROL
GROUP ID=15
2. Press the INC or DEC key to change the Group number to the
number you assigned to the IFB100 on page 41.
Assign a Unique Unit ID
REMOTE CONTROL
UNIT ID=001
REMOTE CONTROL
UNIT ID=005
1. Press the MENU key until the Unit ID page appears.
2. Press the INC or DEC key to change the Unit number to the
appropriate number.
Select the IFB Receiver’s Frequency
FREQ: 2.403 RX
1. Press the MENU key until the IFB Frequency page appears.
SIGNAL: 01
.
FREQ: 2.415 RX
SIGNAL: 01
.
Select the Earpiece Source
569.3 ??H STOP
2. Press the INC or DEC key to change the frequency to the frequency
you assigned to the IFB100 on page 41.
1. Attach the EA100 to the unit.
IFB EARPIECE:
REC/PLAY
2. Press the MENU key until the Earpiece Source page appears.
IFB EARPIECE:
IFB RX AUDIO
3. Press the DEC key to change to IFB
Cycle the Power of Your Transmitter
43
RX AUDIO.
Chapter 9_______________________________________Zaxcom Digital Wireless System User’s Manual
Chapter 9 – Zaxcom Warranty Policy and Limitations
Zaxcom Inc. values your business and always attempts to provide you with the very best service.
No limited warranty is provided by Zaxcom unless your Zaxcom Digital Wireless System Component (“Product”) was purchased from an
authorized distributer or authorized reseller. Distributers may sell Product to resellers who then sell Product to end users. Please see below
for warranty information or obtaining service. No warranty service is provided unless the Product is returned to Zaxcom Inc. or a Zaxcom
dealer in the region where the Product was first shipped by Zaxcom.
Warranty Policy
The Product carries a Standard Warranty Period of one (1) year.
NOTE: The warranty period commences from the date of delivery from the Zaxcom dealer or reseller to the end user.
There are no warranties which extend beyond the face of the Zaxcom limited warranty. Zaxcom disclaims all other warranties, express or
implied, regarding the Product, including any implied warranties of merchantability, fitness for a particular purpose or non-infringement. In the
United States, some laws do not allow the exclusion of the implied warranties.
Return Material Authorization (RMA)
No Product may be returned directly to Zaxcom without first contacting Zaxcom for a Return Material Authorization (“RMA”) number. If it is
determined that the Product may be defective, you will be given an RMA number and instructions for Product return. An unauthorized return,
i.e. one for which an RMA number has not been issued, will be returned to you at your expense. Authorized returns are to be shipped prepaid
and insured to the address on the RMA in an approved shipping container. Your original box and packaging materials should be kept for storing
or shipping your Product. To request an RMA, please visit the Zaxcom Repair Services page (http://www.zaxcom.com/support_repair
_services.htm) and complete the form. You will receive an email or telephone call with the RMA #. Please write the RMA# on the front of
the package. If you don‟t have internet access, you may request an RMA # by telephone. Zaxcom will return the warranty repair via 2nd day
UPS or FedEx at their discretion. If overnight service is required, a FedEx or UPS account number must be provided to Zaxcom to cover
shipping expenses.
Warranty Limitations
Zaxcom‟s limited warranty provides that, subject to the following limitations, each Product will be free from defects in material and
workmanship and will conform to Zaxcom‟s specification for the particular Product.
Limitation of Remedies
Your exclusive remedy for any defective Product is limited to the repair or replacement of the defective Product.
Zaxcom may elect which remedy or combination of remedies to provide in its sole discretion. Zaxcom shall have a reasonable time after
determining that a defective Product exists to repair or replace a defective Product. Zaxcom‟s replacement Product under its limited warranty
will be manufactured from new and serviceable used parts. Zaxcom‟s warranty applies to repaired or replaced Product for the balance of the
applicable period of the original warranty or thirty days from the date of shipment of a repaired or replaced Product, whichever is longer.
Limitation of Damages
Zaxcom‟s entire liability for any defective Product shall, in no event, exceed the purchase price for the defective Product. This limitation
applies even if Zaxcom cannot or does not repair or replace any defective Product and your exclusive remedy fails of its essential purpose.
No Consequential or Other Damages
Zaxcom has no liability for general, consequential, incidental or special damages. These include loss of recorded data, the cost of recovery of
lost data, lost profits and the cost of the installation or removal of any Product, the installation of replacement Product, and any inspection,
testing or redesign caused by any defect or by the repair or replacement of Product arising from a defect in any Product.
In the United States, some states do not allow exclusion or limitation of incidental or consequential damages, so the limitations above may not
apply to you. This warranty gives you specific legal rights and you may also have other rights, which vary from state to state.
Your Use of the Product
Zaxcom will have no liability for any Product returned if Zaxcom determines that:
The Product was stolen.
The asserted defect:
1. Is not present,
2. Cannot reasonably be fixed because of damage occurring when the Product is in the possession of someone other than Zaxcom, or
3. Is attributable to misuse, improper installation, alteration, including removing or obliterating labels and opening or removing external
covers (unless authorized to do so by Zaxcom or an authorized Service Center), accident or mishandling while in the possession of
someone other than Zaxcom.
The Product was not sold to you as new.
Additional Limitations on Warranty
Zaxcom‟s warranty does not cover Product, which has been received improperly packaged, altered or physically abused.
interstage
Phistersvej 31, 2900 Hellerup, Danmark
Telefon 3946 0000, fax 3946 0040
www.interstage.dk
- pro audio with a smile
44