1
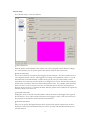
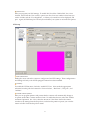
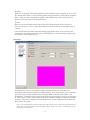
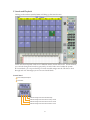
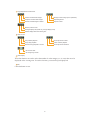
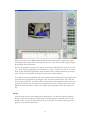
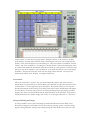
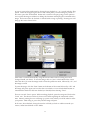
RAVS
Remote Access Video Surveillance
E-Series and I-Series
User Guide & Installation Manual
This document, as well as the so�ware described in it, is furnished under license
and may only be used or copied in accordance with the terms of such license. The
information in this document is furnished for informational use only, is subject
to change without notice, and should not be construed as a commitment by VCT
Vision, Inc. VCT Vision assumes no responsibility or liability for any errors or
inaccuracies that may appear in this book.
Except as permi�ed by license, no part of this publication may be reproduced,
stored in a retrieval system, or transmi�ed, in any form or by any means, electronic,
mechanical, recording, or otherwise, without the prior wri�en permission of VCT
Vision, Inc.
Microso�, Windows, Windows 95, Windows 98, Windows 2000, Windows Me,
Windows XP and Windows NT are registered trademarks of Microso� Corp. Elite
Series, SAVS, VCT-E, VCT-M, and VCT-I are trademarks of VCT Vision, Inc. All
other name brands are the property of their respective companies.
Table of Contents
I.
About Elite Series . . . . . . . . . . . . . . . . . . . . . . . . . . . . . . . . . . . . . . . . . . . . . . 4
General Information . . . . . . . . . . . . . . . . . . . . . . . . . . . . . . . . . . . . . . . . . . . . . . . . . . . . . . . . . . 4
Features . . . . . . . . . . . . . . . . . . . . . . . . . . . . . . . . . . . . . . . . . . . . . . . . . . . . . . . . . . . . . . . . . . 4-5
Primary Functions . . . . . . . . . . . . . . . . . . . . . . . . . . . . . . . . . . . . . . . . . . . . . . . . . . . . . . . . . . . 6
II. Installing Elite Series . . . . . . . . . . . . . . . . . . . . . . . . . . . . . . . . . . . . . . . . . . . 6
Before Beginning . . . . . . . . . . . . . . . . . . . . . . . . . . . . . . . . . . . . . . . . . . . . . . . . . . . . . . . . . . . . 6
Package Contents . . . . . . . . . . . . . . . . . . . . . . . . . . . . . . . . . . . . . . . . . . . . . . . . . . . . . . . . . . 6-7
System Layout . . . . . . . . . . . . . . . . . . . . . . . . . . . . . . . . . . . . . . . . . . . . . . . . . . . . . . . . . . . . . 7-8
Communications . . . . . . . . . . . . . . . . . . . . . . . . . . . . . . . . . . . . . . . . . . . . . . . . . . . . . . . . . . . . 8
III. Elite Series Configuration . . . . . . . . . . . . . . . . . . . . . . . . . . . . . . . . . . . . . . . 9
Control Panel . . . . . . . . . . . . . . . . . . . . . . . . . . . . . . . . . . . . . . . . . . . . . . . . . . . . . . . . . . . . . . . . 9
Logging In/Beginning Setup (System Configuration) . . . . . . . . . . . . . . . . . . . . . . . . . . . . 10
Auto Backup . . . . . . . . . . . . . . . . . . . . . . . . . . . . . . . . . . . . . . . . . . . . . . . . . . . . . . . . . . . . . . . 10
Camera Setup . . . . . . . . . . . . . . . . . . . . . . . . . . . . . . . . . . . . . . . . . . . . . . . . . . . . . . . . . . . 11-13
Color Setup . . . . . . . . . . . . . . . . . . . . . . . . . . . . . . . . . . . . . . . . . . . . . . . . . . . . . . . . . . . . . . . . 14
General Setup . . . . . . . . . . . . . . . . . . . . . . . . . . . . . . . . . . . . . . . . . . . . . . . . . . . . . . . . . . . 15-16
Digital I/O Setup . . . . . . . . . . . . . . . . . . . . . . . . . . . . . . . . . . . . . . . . . . . . . . . . . . . . . . . . . . . . 17
Motion Setup . . . . . . . . . . . . . . . . . . . . . . . . . . . . . . . . . . . . . . . . . . . . . . . . . . . . . . . . . . . . . . . 18
Notification Setup. . . . . . . . . . . . . . . . . . . . . . . . . . . . . . . . . . . . . . . . . . . . . . . . . . . . . . . . 19-20
POS Setup . . . . . . . . . . . . . . . . . . . . . . . . . . . . . . . . . . . . . . . . . . . . . . . . . . . . . . . . . . . . . . 20-21
PTZ Setup . . . . . . . . . . . . . . . . . . . . . . . . . . . . . . . . . . . . . . . . . . . . . . . . . . . . . . . . . . . . . . 21-22
User Setup . . . . . . . . . . . . . . . . . . . . . . . . . . . . . . . . . . . . . . . . . . . . . . . . . . . . . . . . . . . . . . . . . 22
IV. System Operation . . . . . . . . . . . . . . . . . . . . . . . . . . . . . . . . . . . . . . . . . . . . . 23
Controls . . . . . . . . . . . . . . . . . . . . . . . . . . . . . . . . . . . . . . . . . . . . . . . . . . . . . . . . . . . . . . . . . . . 23
V.
Search and Playback . . . . . . . . . . . . . . . . . . . . . . . . . . . . . . . . . . . . . . . . . . . 24
Control Panel . . . . . . . . . . . . . . . . . . . . . . . . . . . . . . . . . . . . . . . . . . . . . . . . . . . . . . . . . . . . 24-25
Search Mode . . . . . . . . . . . . . . . . . . . . . . . . . . . . . . . . . . . . . . . . . . . . . . . . . . . . . . . . . . . . 26-27
View Mode . . . . . . . . . . . . . . . . . . . . . . . . . . . . . . . . . . . . . . . . . . . . . . . . . . . . . . . . . . . . . . . . 28
Saving and Printing Still Images . . . . . . . . . . . . . . . . . . . . . . . . . . . . . . . . . . . . . . . . . . . 28-29
Quick Backup . . . . . . . . . . . . . . . . . . . . . . . . . . . . . . . . . . . . . . . . . . . . . . . . . . . . . . . . . . . . . . 30
POS Data . . . . . . . . . . . . . . . . . . . . . . . . . . . . . . . . . . . . . . . . . . . . . . . . . . . . . . . . . . . . . . . . . . 30
VI. Client So�ware (Remote Access. . . . . . . . . . . . . . . . . . . . . . . . . . . . . . . . . 31
General Information . . . . . . . . . . . . . . . . . . . . . . . . . . . . . . . . . . . . . . . . . . . . . . . . . . . . . . . . . 31
Installation and Setup . . . . . . . . . . . . . . . . . . . . . . . . . . . . . . . . . . . . . . . . . . . . . . . . . . . . 31-32
Monitored Video and PTZ Camera Controls . . . . . . . . . . . . . . . . . . . . . . . . . . . . . . . . . 32-33
Searching/Playing Recorded Video in Main Elite Series System . . . . . . . . . . . . . . . . 34-35
VII. Additional Product Information . . . . . . . . . . . . . . . . . . . . . . . . . . . . . . . . 36
Return Policy . . . . . . . . . . . . . . . . . . . . . . . . . . . . . . . . . . . . . . . . . . . . . . . . . . . . . . . . . . . . . . . 36
Warranties . . . . . . . . . . . . . . . . . . . . . . . . . . . . . . . . . . . . . . . . . . . . . . . . . . . . . . . . . . . . . . . . . 36
Shipping and Damage Claims . . . . . . . . . . . . . . . . . . . . . . . . . . . . . . . . . . . . . . . . . . . . . . . . 36
Technical Support . . . . . . . . . . . . . . . . . . . . . . . . . . . . . . . . . . . . . . . . . . . . . . . . . . . . . . . . . . . 52
I. About Elite Series
For years CCTV system operators have worked with transmission media such as coaxial cable,
fiber optics and microwave. Each of these is limited by distance and/or physical barriers and
can be very expensive to install and maintain. O�en, a long distance transmission system,
such as Elite Series, utilizing an internet or intranet connection is a simpler, more cost effective
alternative. The necessary lines are already in service so that there is virtually no limit on
where information can be sent.
By simply plugging a video transmission system into a TCP/IP network (Internet/Intranet), an
easy and practical video transmission can be effectively achieved between two locations. Some
examples include:
•
•
•
•
•
•
•
•
•
•
Restaurants
Convenience Stores
Retail Stores and Supermarkets
Utility Companies
Fast Food Chains
Car Dealerships
Gated Communities
Universities
Banks
Gas Station Chains
General Information
The Elite Series Remote Video Surveillance System is composed of a Plug&Play unit and the
Elite Series Receiver so�ware. The system was designed and pre-configured at the factory for
easy installation and operation.
The Elite Series unit captures real-time video images for local display (built-in multiplexer
function), local recording and playback (digitally records images on HDD thus eliminating the
need for VCRs/Time Lapse Recorders) and transmission to any PC equipped with the Receiver
so�ware. Additionally, the Elite Series unit has a real-time TV monitor.
The Receiver is a standard PC-compatible system equipped with the Receiver so�ware.
Installation of the Receiver unit consists of merely a so�ware installation and configuration of
the network se�ings.
This Elite Series unit is shipped with all of the necessary hardware and so�ware already
installed and configured. All you need to do is connect the video cameras, power, and
communications.
Depending on the model, there may be 4 or 16 video inputs. The four channel units are
functionally identical to the 16 channel units, except that the display modes are limited to one
or four images. The 16 channel units also have 9 and 16 image display modes.
Features
• Plug&Play unit
• High Speed Intel Processor
• 10/100/1000 LAN Connection
• Local real-time video output
4
•
•
•
•
•
•
•
•
•
•
•
•
•
•
Up to 16 video inputs
Simultaneous recording, display, and transmission
Alarm Inputs (optional)
Local Video Recording
Local Audio Recording
Local Video & Audio Playback
Motion Detection
Remote Viewing So�ware
Video File Management System (Local and Remote)
LAN or PSTN communications
P/T/Z and Focus control (Remote and Local)
Relay control (Remote and Local)
Time/Date Stamps
Password protection
Primary Functions
Digital Video Recorder
The Elite Series unit can be used simply as a Digital Video Recording System, effectively
replacing a multiplexer and Time Lapse Recorder. Images can be displayed on a monitor
in real time, or recorded onto HDD and recovered and played back later with the aid of a
powerful Video File Management System.
Business Surveillance System via Internet
The Elite Series Unit can be installed in a business office or store. By connecting into this unit
via internet or from a PC at any remote location, the owner is able to monitor their property,
business, and/or employees. If the Elite Series unit is connected to a permanent IP address, it
can be accessed from anywhere in the world through the Internet. Cable and DSL connections
are becoming more readily available at low cost, and it is now feasible to have a high-speed,
permanent Internet connection in the small business environment.
Alarm Verification System
When an installed alarm system is activated and communicates with a Security Office, it can
also be connected to an Elite Series unit and trigger a connection to any remote PC via TCP/IP
Network or modem connection. Thus, it can be programmed, for example, to call the store
owner’s PC, or to send images to the Security Company. This way, the Security Company
or business owner can verify if the alarm was genuine, and what is happening at the Elite
Series site. The Video Image Storage also allows verification of pre and post-alarm video,
and is recorded onto HDD for possible evidence. In addition, as the Elite Series Unit is small,
unobtrusive, and does not require any routine maintenance, it can be concealed from the sight
of any possible intruder.
Corporate Remote Management System
Elite Series units can be connected on a Corporate LAN/WAN and accessed by any PC
connected to the same network. Other units may be remote to the LAN/WAN, but be
accessible via the Internet. In this way, multiple sites can be monitored by multiple PC’s,
enabling the system to be used for remote management, surveillance, security, and other
functions.
5
II. Installing Elite Series
This guide explains how to install, configure, and troubleshoot the Elite Series Surveillance
Systems which includes the Elite Series and the Elite Series Client So�ware. Place the
installation CD in the CD drive and follow the installation directions.
Before Beginning
Before you begin the installation of the surveillance system, it is important that you note:
The Elite Series unit should be plugged into a UPS (Uninterruptible Power Supply) unit
however it will not only protect the Elite Series from power surges, but it will also supply
power to the unit for a period of time in the event of a power outage.
The following components are not part of the Elite Series package; however, they are required
for the surveillance system to operate.
• Video camera (at least one, up to four or sixteen depending on system model)
• Video cable for each camera
Installation of the Elite Series surveillance system does not require any special tools. However,
you need the following equipment to complete the installation:
• VGA Monitor or Security Television
• An Internet or Intranet connection with a registered, static IP address, or a modem
connection.
Package Contents (E-Series)
•
•
•
•
•
•
•
•
Elite Series Unit(4/16 channel)
Program CD
RAVS User manual
Keyboard & Mouse
Power cable
TCP/IP Cable
Modem Cable
Speakers
Note: The Elite Series unit should be removed carefully from its shipping case and inspected for any damage
caused in transit. Should any damage be found, your supplier and or shipper should be advised immediately so
that adequate insurance claims may be made.
Package Contents (I-Series)
•
•
•
•
•
•
•
I-Series Unit(16 channel)
Program CD
RAVS User manual
Keyboard & Mouse
Keys
Power cable
TCP/IP Cable
6
• Modem Cable
• Speakers
System Layouts
Front of 16 Channel E-Series Unit
1) On/Off Switch
2) Power LED
3) HDD LED
4) CD-RW/ DVD-RW(DVD-RW optional)
5) Card Reader / Floppy drive (optional,
drive not included)
6) 4-pin IEEE 1394 port
7) 4 x USB 2.0 port
8) Mic(top), Line-out(bo�om)
9) SPDIF
Rear of 16 channel E-Series Unit
1) Voltage Selection Switch(115/230v)
2) Video Output Connector
3) Video Input Connectors (1 thru 4 or 16)
4) AC Input
5) 6-pin IEEE 1394 port
6) Mouse (above)/Keyboard (below)
connectors
7) LAN/Ethernet (above) and USB
(below) connectors
8) VGA Connector
9) Parallel Port Connector
10) Digital Monitor Connector
11) Video Output(AV-out)
12) Line Out(Green)
13) Line In(Blue)
14) Microphone(Pink)
15) Serial Port(9 Pin)
Front of 4 Channel E-Series Unit
1) On/Off Switch
2) Power LED
3) HDD LED
4) CD-RW/ DVD-RW(DVD-RW optional)
5) Card Reader / Floppy drive(optional,
drive not included)
6) 4-pin IEEE 1394 port
7) 4 x USB 2.0 port
8) Line-in(top), Line-out(bo�om)
9) SPDIF
7
Rear of 4 Channel E-Series Unit
1) Voltage Selection Switch (115v/230v)
2) Serial Port
3) Video Output Connector
4) Video Input Connectors (1 thru 4)
5) AC Input
6) Mouse (above)/Keyboard (below)
7) LAN/Ethernet (above)/USB
Connectors (below)
8) VGA Connector
9) Parallel Port Connector
10) Line Out (Green)
11) Line In (Blue)
12) Microphone (Pink)
Front of I-Series Unit
Access to the front of the I-Series unit is by key.
Behind the panel you can access the power
switch, while with the panel closed, you view
a line of indicator lights. Only the top two are
used with this unit. The top light indicates
power, and the second light (when red or
flashing) indicates activity in the hard drive.
Rear of I-Series Unit
1) Power Switch
2) Video Output
3) Audio 1-8
4) Audio 9-16
5) Voltage Selection Switch
6) Power Cable Plug-in
7) Mouse(above)/Keyboard(below)
8) USB Ports(2)
9) Serial Port
10) Parallel Port
11) VGA
12) LAN/Ethernet (above)/USB
Ports (below)
13) Line Out (Green)/Line In (Blue)/
Microphone (Pink)
14) Relays(1-16)
15) Video Input(1-16)
Communications
The Elite Series can communicate over an Intranet or Internet connection from a DSL, Cable
connection with a static IP address, dynamic, local and URL forwarding service, or over a
standard modem connection. However, to connect the unit remotely over an IP Network,
there must be a registered, static IP address assigned to the Elite Series system.
8
III. Elite Series Configuration
Upon initial power up, if no cameras are connected, the following screen will appear for 4
channel units while 16 channel units display a 16 camera screen.
Note: If cameras have been connected, the video images will appear in place of the camera icons.
a
b
c
e
d
f
g
h
i
j
k
l
m
n
o
p q
r
s
t
u v
w
x
y
a Log Off Button
b Shows Current Image Box Status
c Day, Time, and Program Status Display
o If no video input, this image will occupy the
respective display window.
p Click to view a single video display
q Click to view a four-video display
r Click to view a six-video display
s Click to view a eight-video display
t Click to view a nine-video display
u Click to view a thirteen-video display
v Click to view a sixteen-video display
w Automatically switch video monitoring between
d Digital Output (DO) Controls – 1,2,3,4
e Manual Recording Button
f Auto Pan
g j Near/Far: Pan/Tilt focus controls for near/far
video
h Camera Light
i k Zoom in/out controls
l PTZ Power and Direction Keys. To have this
one, four, and eight videos.
x Guard Tour
y Pan/Tilt Camera Number: Selects the pan/tilt
function available, the “Enable PTZ” box must be
checked in the PTZ Setup.
m Takes you to the “Search”/ “Archives” screen
n Takes you to the “Setup” screen
capable camera you wish to control from the
bottom selection bar.
9
Logging in/Beginning Setup (System Configuration)
In order to begin system
configuration, click the Setup
icon. Doing so will bring up the
set up screen and a log in screen
as shown here.
In order to proceed, a user name
and password must be entered.
For installation purposes,
“admin” has been programmed
as the default user name and
“super” has been programmed
as the default password.
You will find ten main menu choices in the pull-down menu on the
le�:
1)
2)
3)
4)
5)
6)
7)
8)
9)
10)
Auto Backup . . . . . . . . . . . . . . . . . . . .
Camera Setup . . . . . . . . . . . . . . . . . . . .
Color Setup. . . . . . . . . . . . . . . . . . . . . .
General Setup. . . . . . . . . . . . . . . . . . . .
Digital I/O Setup . . . . . . . . . . . . . . . . .
Motion Setup . . . . . . . . . . . . . . . . . . . .
Notification Setup . . . . . . . . . . . . . . . .
POS Setup . . . . . . . . . . . . . . . . . . . . . . .
PTZ Setup . . . . . . . . . . . . . . . . . . . . . . .
User Setup . . . . . . . . . . . . . . . . . . . . . .
page 10
page 11
page 14
page 15
page 17
page 18
page 19
page 20
page 21
page 22
Each takes you to a separate screen enabling you to program detailed
se�ings and functions according to your specific preferences.
Auto Backup
This screen appears when the “Auto Backup” selection is chosen. Here you can set up the Elite
unit to automatically back up your video files on specific day(s)/time(s) and to a specific hard
drive.
Archiving
In this mode, you can select the hard drive you want the back up input to be saved to. To do
this, select the “Real Time Archiving” box. Next, select the hard drive you want to use from
the “Mapped Network Drive” pull-down menu.
10
FTP
Here, you can program the system to perform an FTP Backup. To do so, check the “FTP
Backup” box and fill in the desired server, user name, password and path. When finished, the
back up will automatically be saved to these chosen se�ings.
Note: The basic Elite units are furnished with one HDD only, although these can be
partitioned to give virtual HDDs. Also, special systems may be supplied with multiple drives,
or external drives can be used. CD-RW units may be used for back up.
Camera Setup
Choosing “Camera Setup” from the main menu will bring up this screen:
a
b
c
h
k
j
d
i
e
l
m
n
o
p
q
f
g
a Select Camera Mode
Select Camera Mode allows you to select specific cameras and program options into each one
separately. The hatch marks along the selection bar are in correlation to the cameras connected
to the system (1 through 16). Moving the cursor to a marked space selects that particular
camera and the se�ings you choose while that camera number is selected will be applied and
saved only to that camera. Should you choose to give all cameras the same se�ings you can do
so at once by clicking on the “All Cameras” box in the Default Se�ing Mode under this section.
This selects and programs all the cameras at once.
b Default Setting Mode
In “Default Se�ing Mode” you can enable/disable each camera. Checking the “Enable
Camera” box will enable all or the selected camera you chose in “Camera Se�ing Mode”. The
“Installation Location” box allows you to label or name the selected camera. It is this labeling
11
that will appear on the display screen if you selected the “Camera Location” option in the “On
Screen Display Mode” of Default Setup.
c Capture Setting Mode
Here you can choose the amount of frames to be captured and seen on screen and record onto
the HDD. “Capture Frame” refers to the number of frames that will be seen on the screen and
recorded. “Continuous Recording Frame” references the number of frames recorded on the
HDD only in continuous or manual record mode. The number in the “Continuous Recording
Frame” may not exceed the number in “Capture Frame” as you cannot record more frames
than are seen. If you want to record four frames per second on the HDD, then you must be
observing four frames per second on the screen. From the drop down menu, select the number
in accordance to the amount of frames you want captured in both cases.
Note: Motion Detection recording uses display mode.
d Record Setting Mode
Here you can select se�ings for resolution and quality of the recordings. The program
supports three resolution se�ings: Low (325x240), High (704x240), and Progressive (704x480).
The default resolution is Low (325x240). Note that the higher the resolution, the larger the
image files’ size. Consequently, the HDD usage is higher.
The recording quality can be set ranging from 0(low) to 9(high); the default se�ing is 5. As
with the resolution, the higher the quality se�ing selected, the larger the sizes of the file.
Additionally, when se�ing the resolution, do not select Progressive (704x480) unless you are
using a progressive scan camera. You will record interlaced video if using a regular camera
instead of the required Progressive CCTV cameras. Instead, if you want your video capture at
704x480, select High (704x240) and the unit will capture the video at this se�ing and display it
at 704x480 for playback.
e Audio Device Mode
An audio device is not a system requirement although one can be supported by the system
should you choose to use one. If using the E-Series unit, the default sound device should
remain selected from the dropdown menu. Hera boards are only used on 16 channel ISeries units; select this option if you are using sound on one of these machines. The second
dropdown menu labeled “save” gives you se�ing choices for the quality of the audio to be
transmi�ed by the system. Here the default se�ing is “full”. It is recommended that this
default se�ing be used permanently.
f Audio Setting Mode
Using this section of the menu, you can activate the audio option. If audio is to be used, check
the “enable audio” box to enable the se�ing. You can also have the system give an audible
notification through the computer’s internal speakers upon motion detection. To do so, check
the “Internal Speaker Notification with MD” box.
g Event Frame Setting Mode
In this mode, you can configure the se�ings for recording in the Sensor, Motion, or Motion &
Sensor modes. When an event is triggered in either mode, you have the option of recording
up to 8 frames before and a�er the event itself. Use the pull-down bars labeled “Pre Frame”
and “Post Frame” and select the number of frames you want recorded surrounding the event.
By using “Hold Event” you can select an amount of holding time between when the Sensor,
Motion, or Sensor & Motion modes are triggered, and when the recording begins. Use the
pull-down menu to select the appropriate amount of time in seconds.
12
h Camera Schedule Mode
Here you can enable different recording options or program a specific recording schedule.
1) Represents the days of the week from Sunday-Saturday (top to bo�om).
2) Grid boxes, when checked, correlate specific days and times in order to create a recording
schedule.
3) Represents the hours of the day from 12:00 a.m. to 11:00 p.m. (le� to right).
4) Suppress: If the “Suppress” box is checked, the camera will NOT be viewable locally
although the input WILL be recorded. If you log in remotely as a super user, the camera
will be viewable and recorded. This option is useful if the system administrator wishes to
record a hidden camera without the knowledge of the system operators.
5) Stop: (white bu�on) If this bu�on is
6) Continuous: (green bu�on) Images will be recorded continuously.
7) Sensor: (yellow bu�on) Records images when the Elite unit receives a signal from a DI
sensor.
8) Motion: (pink bu�on) Records images when motion is detected on any one of the areas
pre-programmed to activate upon motion detection.
9) Sensor & Motion: (purple bu�on) Records images when motion is detected in one of the
pre-programmed areas or when the Elite unit receives a signal from a DI sensor.
How to set up a recording schedule
Recording schedules can be unique to each specific camera. Before programming a schedule,
check the number of the camera you wish to program in the “Camera Se�ing Mode” above.
Also, one schedule can be created for all cameras; be sure the “A” bu�on is selected in “Camera
Se�ing Mode” meaning “all cameras.” Once you have chosen one or all of the cameras, you
can begin creating the schedule.
Start by choosing one of the commands (numbers 4-9) to select what kind of recording you
want the schedule to initiate.
Then, click on the box representing the day and time you want the se�ings to take place. Each
box represents one hour of time so to select a span of time, boxes for each hour of the time
spread need to be selected. For instance, to record from 1:00 p.m. to 5:00 p.m. on Mondays,
boxes 13, 14, 15, and 16 in row “M” would need to be selected. You will be able to see the
schedule come together on the grid; when you select a grid box to set a command, the box will
turn the same color as the command bu�on selected. For example, grid boxes selected under
“sensor” will turn purple when clicked. You can also have long spans of time with different
command se�ings. Say on Wednesdays you want the camera to record on “Continuous” from
midnight to 8:00 a.m., on “Sensor” from 8:00 a.m. to 2:00 p.m. and on “Stop” from 2:00 p.m. to
midnight. Begin by clicking on “Continuous” followed by clicking boxes 0, 1, 2, 3, 4, 5, 6, and 7
in row “W” creating a line of 8 green boxes.
Next, click on “Sensor” and then boxes 8, 9, 10, 11, 12, and 13 in row “W” creating a line of 6
yellow boxes. activated, video will not be recorded. Monitoring will continue as normal.
Last, click on “Stop” followed by grid boxes 14, 15, 16, 17, 18, 19, 20, 21, 22, and 23 in row “M”
completing the row with a line of 10 white boxes. With this, you can have each of your cameras
running on a schedule 24 hours a day, 7 days a week.
13
Color Setup
The following screen will appear upon selecting “Color Setup”.
a
b
a Select Camera Mode
This slide bar allows you to select the specific camera your se�ings will be programmed to.
Once selected, the changes to the se�ings can be seen/previewed on the screen below.
b Color Camera Mode
Here, the brightness, hue, and contrast can be adjusted for each camera. Use the slide bars to
program your desired se�ings. The screen below shows you what your se�ings will look like
as you make your choices.
14
General Setup
c
a
d
e
b
f
g
a Restart Mode
With the Restart function, you can program the system to automatically close, restart, and
resume functions at specific days and times. To do so, check the box(es) relative to the day(s)
and time that you want the program to restart.
Note: It is recommended that the system be set to restart at least once a week to restore/maintain memory and
functioning capabilities. In addition, the restart time(s) should be set when someone will be present to confirm
that the system restarts successfully and resumes proper functioning.
b Security Check Mode
Security Check Mode is a safety function that provides three different opportunities to require
a username and password before giving system commands.
Selecting “Enable active password request” will require the username and password upon
initial system activation. Selecting “Enable password on shutdown” will require the username
and password be entered before the system can be shut down. Selecting “Enable active
password request for archive will require a valid username and password be entered for
access to archives/archive controls. Choosing a time from the pull down bar next to the “Wait
Minute” option will have the system lock a�er that many minutes of operator inactivity (either
keyboard or mouse) and the username and password will be required to re-gain access to the
system.
Note: The username and password required would be the same ones used or changed to in the “Log in” process.
15
c OSD (On-Screen Display) Mode
In OSD mode, you can choose to display each camera’s location, number, and recording status
on their respective on-screen display in addition to the video image. To do so, check the box or
boxes for each detail you want displayed.
Note: Go to the “Camera Setup” screen to enter each camera location (i.e. front door, cash register). It is this
title that will be displayed should you select the “Camera Location” option here.
d Network Mode
Network mode allows for details involved in operating the system to be available through
remote access. To allow for remote access, check the “Enable Network” box.
e Guard Tour
To enable the Guard Tour function, select the camera delay time (in seconds) from the dropdown menu.
f Display Mode
This option is in regards to the Overlay Scale. According to the type(s) of camera(s) you have
connected to the system, select either “PAL” or “NTSC” from the drop-down menu as your
choice of appropriate image display.
g Start Mode
The “Display Start-up” option allows you to choose how many camera images are displayed
on the screen upon start up. For a sixteen-channel unit, you can have one, four, nine, or all
sixteen video images. Make the selection in the drop-down box—1, 4, 9, or 16. The four
channel unit is limited to one or four video images (1 or 4 in the drop-down box).
16
Digital I/O (Input/Output) Setup
You will see the following screen upon selecting the “Digital I/O” bu�on.
a
b
c
d
Note: While the Digital Input/Output setup screen is included in the so�ware for both the E-Series and R-Series,
the se�ings and changes made only work for the I-Series units. Do not choose se�ings on this screen if you are
using an E-Series unit as they will not be applicable.
a Sensor Select Mode
Pressing a numbered bu�on will activate that respective sensor and ready it for configuration.
Here you can activate and set details for each sensor. In order to use the selected sensor,
check the “Sensor Application” box.
• Enter the sensor name in the “Sensor Name” box.
• Enter the sensor location in the “Sensor Location” box.
• From the pull-down menu, you can specify the sensor type in your configuration as:
0: Low-active (1-0)
1: High-active (0-1)
b Camera Select Mode
Here, select the cameras from the bu�ons labeled 1 to 16 that you want to record images when
the sensor is triggered.
c DO (Digital Output) Number Select Mode
Pressing 1, 2, 3, or 4 will connect that DO to the above selected DI.
d Output Time Mode
You can also set a time for the DO sensors in the “Output Time” box by sliding the cursor to
the right and stopping at the desired time. The selected amount of time will be displayed in
seconds in the box to the le� of the cursor.
17
Motion Setup
The “Motion Setup” screen is as follows:
a
b
c
d
e
f
a Select Camera Mode
Slide the pointer to the number of the camera you want to program motion detector se�ings
for. Once selected, you can set the options that will be saved for that camera only.
b Select Sensitivity Mode
This controls the level of sensitivity that triggers motion detection. The most sensitive level is
1; the slightest motion at level 1 will trigger the recording of that particular camera. To avoid
false detection from small animals, curtains moving in the wind, or other similar, normal
movements, the sensitivity level should be set to a higher level. Know also that the sensitivity
level directly correlates to the size of the motion detection zone. For example, if the sensitivity
level is set at 1 for one of 10 zones on screen, it will be much more sensitive and responsive
than one large zone set at 1. With this in mind, slide the pointer to the number that couples the
sensitivity level you want to use.
c DO (Digital Output) Mode
Sliding the cursor on the le� of the DO bu�ons will set the time for the length of the signal to
the DO sensors. Now, when a motion detection event triggers a relay, it will close and stay in
that position for the amount of time selected in the slide bar.
d DO Number Select Mode
Here you can specify the Digital Outputs to be coupled with specific cameras upon motion
detection. Click on the DO numbers that you wish to associate with the Motion Detection of
selected cameras.
18
e Night Motion Mode
The “Night Motion Mode” allows for different Motion Detection sensitivity se�ings for night
use, as day se�ings may not be suitable.
Click the box on the le� to enable the night motion option. In the “From” pull-down bar, select
a start time, and select an end time in the “Till” box. Last, select a sensitivity level from the
“Sensitivity” pull-down bar. Now, that sensitivity se�ing will be active during the night time
hours set by you.
f Inserting MD (Motion Detection) Zones
The box below allows you to select each camera individually and insert motion detection
zones (specific areas within the video image to be triggered by motion). You can have up to 16
zones.
To do this, click on the “Insert Zone” box. An image of the area being recorded by the camera
number you selected in “Select Camera Number Mode” will show in the box that is the
shaded area above. From there, draw boxed zones into the image surrounding the area under
surveillance you choose to be motion sensitive.
Insert Entire Zone: Selecting this option sets the entire area as an MD Zone.
Clear Zone: This will remove the last motion detection zone you created.
Clear Entire Zone: This will clear the entire zone of motion detection.
Notification Setup
These se�ings will program the system to notify you via e-mail when certain events take place
within the system.
a
b
19
a Email Notification
To enable the function, click the “Enable Email Notification” box. Next, fill in the necessary
fields including email addresses, SMTP, User ID, and Password.
b Notification
Here you can make choices as to when the system sends you an e-mail notification. The
system can send a notification e-mail when it looses a camera signal, detects motion, or
both. Select either or both boxes per your preference. Next, the “Inactivity Timeout” pulldown menu controls the amount of time (in minutes) the system will wait before sending
the notification. For example, if it is set for 10 minutes, when the system looses a signal or
detects motion and it continues for 10 minutes, the system will then send a notification and
will continue sending a notification every 10 minutes until the motion stops or the signal
is fixed. The “Start Time” and “End Time” options allow you to program specific spans
of time (anywhere from 24hrs. strait, to a few hours at a time) by entering a “Start Time”
for the notification function to activate, and an “End Time” for the notification function to
discontinue.
POS Setup
If you have chosen a system that includes POS options, the drop down menu to the le� will
include a “POS Setup” option and will bring up the screen below.
a
b
a Select Camera (Camera Number & Terminal Number)
Slide the cursors to the right to select the desired camera and terminal numbers for
programming.
20
b POS Text Color
Here you program your POS se�ings. To enable POS, check the “Enable POS” box. Once
checked, select from the “Text overlay” option, text color, font size, number of text lines you
wish to include, and the “Text Alignment”, or where you want the text to be displayed, and
port.. Again, the POS Setup box will only be included if your system is one with POS options.
PTZ Setup
a
c
b
e
d
a Select Camera Mode
Sliding the cursor selects the camera to configure and use PTZ se�ings. These configurations
and se�ings will only work if PTZ equipped cameras have been installed.
b PTZ Setup
To enable the PTZ functions, check the “enable PTZ” box. Next, make the appropriate
selections from the pull down menus for “Protocol select”, “Baud rate”, “PTZ port”, and
“Address.”
c Automatic Camera Operation
Here you can program pa�erns and presets that the cameras will automatically change to
or operate under a�er a certain amount of time. To enable this function, select the “Enable
Automatic Operation” box. Next, select the amount of “Wait Time” before the camera
switches to the se�ings from the drop-down, and select the pa�ern or preset you want the
camera to follow from the drop-down menu.
21
d Patterns
Here you can program PTZ camera pa�erns for the cameras to follow regularly. To do so, click
the “Pa�ern Start” bu�on. Then, enter the pa�ern using the direction, zoom and focus bu�ons
below. When you have completed the pa�ern, click “Pa�ern Stop” followed by the “Save”
bu�on to save the pa�ern to the selected camera.
e Presets
Here you can add or delete presets which are pre-set directions/areas for the cameras to
focus on and record. To do so, place the selection its necessary field and click either “Add” or
“Delete.”
Once the selections have been made and se�ings programmed, they can be viewed on the
screen below the se�ing options and can be controlled by the control panel to the right using
the direction, zoom, and focus keys.
User Setup
User Setup allows you to create and/or modify multiple profiles each with their own
usernames, passwords and system accessibility se�ings. To create accounts, enter a username,
password, and password confirmation in the empty fields on the le�. Then, under “User
Permissions”, check the boxes to select the functions this user will have access to upon logging
in. When done, click the “Add” bu�on and that user and their se�ings will appear on the list
at the top of the screen. Repeat for each individual user. In this example, the user admin has
full access to the system.
Note: It is recommended that, a�er the initial system configuration/setup is complete, the system administrator
change their username and password from the default se�ings (“admin” and “super”) to something unique for
privacy and security purposes.
22
IV. System Operation
When the configuration is completed, click the “Exit”, and the following screen will appear.
If the cameras are connected and the unit properly configured, operation will commence
immediately.
a
b
c
e
d
f
g
h
i
j
k
l
m
n
o
p q
r
s
t
u v
w
x
y
Note: The above screen is what would appear if, in the Default Setup screen under “Start Mode”, the “Display
Start-up” pull down bar had been set to four. If sixteen had been chosen, sixteen images would be displayed on
the opening screen. In addition, the control panel shown on the right will only be displayed if the “Enable PTZ”
box was checked in “PTZ Mode” of Default Setup.
Controls
The following are the controls found on the main screen:
a Log Off Button
b Shows Current Image Box Status
c Day, Time, and Program Status Display
o If no video input, this image will occupy the
respective display window.
p Click to view a single video display
q Click to view a four-video display
r Click to view a six-video display
s Click to view a eight-video display
t Click to view a nine-video display
u Click to view a thirteen-video display
v Click to view a sixteen-video display
w Automatically switch video monitoring between
d Digital Output (DO) Controls – 1,2,3,4
e Manual Recording Button
f Auto Pan
g j Near/Far: Pan/Tilt focus controls for near/far
video
h Camera Light
i k Zoom in/out controls
l PTZ Power and Direction Keys. To have this
one, four, and eight videos.
x Guard Tour
y Pan/Tilt Camera Number: Selects the pan/tilt
function available, the “Enable PTZ” box must be
checked in the PTZ Setup.
m Takes you to the “Search”/ “Archives” screen
n Takes you to the “Setup” screen
capable camera you wish to control from the
bottom selection bar.
23
V. Search and Playback
Clicking on the archives (search) bu�on will bring up this search screen.
a
b
c
d
e
f
Search and View Playback works in two different modes: Search and Viewer. In Search Mode,
you can look through and watch any previously recorded video saved within the system.
In Viewer Mode, you can put a backup CD with recorded images into the CD drive to look
through and view the images just as if it were Search Mode.
Control Panel
a Controls Playback Speed
b Information
Indicates images were recorded “Manually”
Indicates images were recorded in “Always” mode
Indicates images were recorded in “Sensor” mode
Indicates images were recorded in “Motion” mode
24
c Image Adjustment / Enhancement
Softens recorded video images
Enlarges a video image up to 4x (200x200)
Sharpens recorded video images
Adjusts brightness
Resets recorded images to default
Adjusts contrast
Back to previous mode
Enlarges display size (works only in single display mode)
Default display size/normal viewing size
d Video Control
Play: Initiates playback
Frame by Frame: forward
Stop: Stops playback
Pause: Pauses playback
Reverse: Plays playback in reverse
Frame by Frame: backward
Go to end of video
Go to beginning of video
e Video Display
These four bu�ons are used to select the number of video images (1, 4, 9, or 16) that are to be
displayed in the viewing area. To use this function, you must first pause playback.
f Exit
Click this bu�on to exit.
25
Search Mode
A�er pressing the “Archives” bu�on, you will see the screen shown on
the previous page and will be in Search Mode. Here, Recorded images
can easily be searched for by date. If image data has been saved to your
hard drive for a particular date, its’ calendar square will be colored in
green with a red “B” in the corner.
Double clicking on a date will bring up the following screen listing
image boxes, the record se�ing (motion detection, sensor, manually, or
programmed to record continuously), start and end time of the recording,
and the image frames.
Choose the image box you wish to view and double click on it. A�er doing so, the boxes in
the grid below this screen matching the chosen image box’s camera numbers and times will
be highlighted. Double clicking the highlighted box representing the video you wish to view
will bring up a playback screen showing the first frame of the video you chose as shown on the
next page.
The hour blocks for each camera at the bo�om will indicate if images were recorded, which
camera(s) recorded images, and the time that these images were recorded by shading the
respective box(es). A�er selecting an hour block of recorded images, press “Play” and
playback will begin. From here, you can determine the exact time of the recording, and jump
to different times within the recording by using the time (minute) slide scale directly above the
camera/hour grid.
26
When you want to view a different time within the chosen hour block, simply press “pause”
and drag the time scale marker to the time you choose to view. Press “pause” again to begin
the playback at the chosen time.
You can also playback more than one camera. Be sure the video playback screen size is set to
“1X”. Next, select the appropriate screen division: 1 screen, 4 screen, 9 screen, or 16 screen.
Then, on the camera/hour grid below, select the boxes for the cameras and times you wish to
view. Use the vertical side bar in the grid to select more camera numbers.
If you finish viewing one playback and want to make another selection from the image box list,
you must first stop playback by clicking the “stop” key in the control panel. Next, click the
“back to previous mode” key and the above shown screen with image boxes listed will come
up again. From here, you can repeat the search/playback process as many times as you wish.
When you finish and want to return to the regular system operation screen, press the “exit”
key.
Backup
From the main search screen with the green shaded boxes, you have the option to perform
backups. Each day containing recorded video is shaded in green and has the red “B” in the
bo�om corner. If you want to perform a backup, click on the “B” and the following screen
appears on top of the search screen:
27
On this screen, you can choose a single camera, multiple cameras, or all cameras to include
in the backup. You then select the time frame containing the video you want included in the
backup. Next, select the drive to save the backup on. Last, two options are available: “Include
Viewer” and “Save as MPEG-2”. Checking the “Include Viewer” option will backup the video
in a manner that makes the information remotely accessible in “Viewer Mode” (to be discussed
below) on any other computer. “Save as MPEG-2” is an option that allows you to save images
as MPEGs. This function will only work with one single camera selected. Once you have
addressed each field, click “Backup” to complete the process.
Viewer Mode
When you click on the “archives” key, you are automatically taken to the search screen in
Search Mode. To get from there to Viewer Mode, place the back up CD in the drive first. Then,
click the black “V” on the right near the control panel. The system will do its’ own search to
find the information on the back up CD, and the same screen used in Search Mode will appear
for View Mode. From here, the process for searching the image boxes and playing recorded
images is the same as in Search Mode and the same directions can be followed. To get back to
Search Mode from View Mode, simply click on the “S” on the right where the “V” used to be.
Saving and Printing Still Images
It is also possible to save or print still images in both Search Mode and View Mode. First,
the frame or image you want needs to be on the screen by pressing “pause” when the image
appears during playback. (Keep in mind that pausing the video at the exact frame you want
28
to save or print can be made easier by slowing down playback to ¼ or ½ speed with the “Play
Speed” control in the upper right corner of the control panel.) Once the image is paused on
the screen, press the “Water Mark” bu�on and a window will open giving you the option to
save or print the image in addition to adding the date/time and keeping the watermark in the
image. The boxes need to be checked or cleared before saving or printing. Pressing save will
bring up the screen shown below.
A file name is created automatically using the date and time of the recording, but can be
changed should you choose. To save the image, click on “Save” at the bo�om of the screen.
Select the drive you want the image saved to from the pull-down menu, followed by “ok”, and
the image is saved.
To print the image, click the “Print” bu�on at the bo�om of the screen followed by “OK” and
the image will print. Again you have the choice to include or not to include the date/time or
watermark but the boxes must me checked (or cleared) before selecting “Print”.
There is a second “Print” option. While watching playback, pause the image and click on the
“Print” icon. This does not allow for choices to be made regarding the watermark or date/
time. Instead, pressing the icon will bring up a print screen where you will be asked to select
your printer. A�er doing so, press okay and the image will print.
In all cases, when finished, closing the window will take you back to whichever mode you
were in, either Search Mode or View Mode.
29
Quick Backup
The “Quick Backup” option is only available in Search Mode and allows you the option to
backup the video playback you watch. With the video on the screen, click “Pause” during the
playback followed by the “Quick Backup” icon. A screen will appear where you will select the
camera number, and the drive its’ images will be saved to. Clicking okay will conclude the
process and the quick backup is complete.
POS Data
As with the POS options mentioned in “Color Mode”, the “POS Data” icon will only be
available if you have a system that supports the POS functions. If not, the icon will not be
on the screen. The POS Data screen is accessed through the calendar. Click on a day with
information saved (indicated in green) and then click on the “POS Data” icon. A screen will
come up that lists the employee, shi� ID, Terminal number, date/time, and transaction (no sale,
sale, cancel, void, etc.). With this, you can keep track of each transaction that takes place and
use the information (date/time) to find the corresponding video playback. This allows you to
monitor activity two ways: through transactions and live video recordings.
30
VI. Client So�ware (Remote Access)
General Information
The remote program allows for monitoring videos and controlling PTZ cameras from a remote
site(s), saving monitored videos and playback in a remote site(s), as well as searching for
recorded videos in the main Elite Series site.
The remote program will only be able to connect to an Elite Series unit if the “Enable
Network” box in the “Default Setup Mode” screen in checked. Thus, before installing the
Remote Program, be sure the box is checked.
Installation and Setup
To install the Remote program on your system, simply click the “Client So�ware” bu�on on
the main menu of the VCT installation disk and follow the directions.
A�er installing, you will find this shortcut icon on your desktop. Double-clicking
the icon will bring up the viewing/login screen.
Click on “Add Site” to enter the required information into the open fields including viewing
location, username, password, and modem (if applicable). When finished entering the
information, click “Save” to save your logon information, than from “Location” select your
logon information and click on “Sign In” the connection automatically initiates. If the
connection is successful, the “Disconnect” icon will show up in the upper le� corner of the
screen and a video image will appear. You will then see this screen where you can access all
functions of the Client so�ware.
31
a
c
b
d
e
f
g
h
m
n
o
p
q
i
j
k
l
r
Monitored Video and PTZ Camera Controls
If you have installed a PTZ camera with your main Elite Series system, you can also control the
PTZ cameras remotely.
The following are the controls you can access found on the main screen:
a If the connection is not successful, the “Connect” icon will show in the upper left corner of the screen. Clicking it
will initiate the connection again.
b Shows Current Image Box Status
c Displays day, time at the server location, program status, and the day and time of your machine along the top of
the screen.
d Actual size/Double size: From a single screen display, pressing the “Double Size” button will change the image to
full screen. From there, pressing the “Actual Size” button reduces the image to its normal size.
e Digital Output (DO) Control: Selects the DO Control number by pressing the numbered button.
f Video Controls
Quick Previous: Rewinds the video playback.
Play and Forward: Begins video play. When stopped, pressing this button will move the
video forward frame by frame.
Stop: Stops video playback.
Quick Next: Fast forwards the video playback.
Forward frame by frame.
End: Stops the function and returns you to the previous screen.
Reverse frame by frame.
32
g Video Adjustment/Enhancement
Auto Pan: This option programs the device to pan automatically.
Near/Far: Pan/Tilt focus controls for near/far videos.
Softens recorded video images
Note: These options are only available if you have
installed a PTZ camera that supports these functions.
Zoom In
Near/Far: Pan/Tilt focus controls for near/far videos.
Zoom Out
h Speed and Direction Keys: controls Pan/Tilt movement. *
i From a different screen (such as “Archives”), clicking “Current” will take you back to the video in progress.
j If the location being monitored has audio, pressing the “listen” button will allow you to hear the audio. To do so,
you must be viewing that source’s video on a single screen display.
k If a microphone is connected to your computer, press the talk button, speak into the microphone, and it will be
heard at the location being monitored.
l If the location being monitored has audio, pressing the “listen” button will allow you to hear the audio. To do so,
you must be viewing that source’s video on a single screen display.
m If there is no video input, this image will occupy the respective display window.
n Click to view a single video display
o Click to view a four-video display
p Click to view a nine-video display
q Click to view a sixteen-video display
r Pan/Tilt Camera Number: Selects the pan/tilt capable camera you wish to control from the bottom selection bar.
33
Searching for and Playing Saved Video from the Main Elite Series System
To search image boxes for recorded video in the main Elite Series System, click on the
“Archive” bu�on. The system will display the image box information from the main system
on a screen that looks like this. Shaded boxes contain saved video, white boxes are empty.
Double click the date you wish to view and you will see this next screen:
34
This screen is a grid of the selected day. Separated into hours and minutes, each box
represents a specific time of the selected day during which video was recorded. As with the
calendar above, the shaded boxes contain video, white boxes are empty. Double click on the
box representing the time of the video you wish to view. The images will play on the viewing
screen and can be manipulated with the control panel on the right.
Controls function in the same way as the previous screen.
35
VII. Additional Product Information
Return Policy
Returned merchandise is subject to a 15% restocking charge. Merchandise must be
returned within ten days. Opened so�ware cannot be returned, unless defective. This
includes hardware items with bundled so�ware and/or drivers. Products that have become
discontinued may not be returned.
All return shipments must be in the original packaging and must include a Return
Merchandise Authorization (RMA) number clearly marked on the package or they will not be
accepted.
Defective merchandise is exempted from the restocking fee. A defective product is one
which has a manufacturing or media defect such that it does not perform as specified by the
manufacturer. In the event that products returned as defective are in working condition,
the return may be effused and the customer is responsible for both inbound and outbound
shipping charges.
An RMA number can be obtained by sending a communication via mail, fax, or e-mail
outlining the problem being sure to include the serial number of the product. You should
preferably use the RMA Request Form. The company will reply with an RMA number and a
return shipping address. Return shipping cost is the responsibility of the customer.
Warranties
All products supplied by the company are warranted to be free from manufacturing defects for
a period of one (1) year from the date of shipment, and any found to be defective within that
period will be repaired without charge under given circumstances:
The product was used as recommended and in accordance with approved installation and
operating practices.
The product’s failure resulted from a manufacturing defect and not from damage due to
misuse.
Wri�en notice of such defect is delivered to the company during such one (1) year period.
The product is returned to the company with shipping charges pre-paid.
This express warranty is in lieu of and excludes all other warranties, guarantees, or
representations expressed or implied. There are no implied warranties of merchantability or
of fitness for a particular purpose.
Shipping and Damage Claims
Any claims of damage to items during shipping should be reported to the respective shipping
carrier. It is the customer’s responsibility to handle all shipping damage claims with the
shipper. Any damages incurred during shipping will not be the responsibility of the company.
Technical Support
Tel: (909) 460-0123
E-mail: [email protected]
36
37