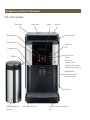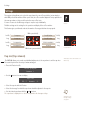
1
WMF 800 User Manual EN Type 03 0400 Introduction and General Information Parts of the machine Bean hopper Manual insert Beverage buttons Display Brewer lid Heated cup storage Hot water button on/off-button Timer Hot water spout Control buttons: C button Care button P button, Confirm Plus button, Aroma button Minus button, Aroma button Milk hose Height-adjustable All‑in‑One spout with integral milk foamer Water tank Refrigerated milk tank (optional) Coffee grounds container Removable drip tray with drip tray grid The power of innovation, the quality that WMF is known for, and years of experience have made WMF professional coffee machines so successful. Despite its compact size, the WMF 800 has all the important components of professional WMF coffee machines – the basis for perfect coffee enjoyment. The WMF 800 has an appealing, clean design. Its simple operation concept is an indication of technical superiority. This is what makes the WMF 800 so remarkable: • • • • • • WMF Touch Concept: A simple touch is enough Seven coffee specialities, warm milk, and water for tea Just one spout for everything: WMF All-In-One Original technology from WMF professional coffee machines Simple milk system rinsing: WMF Connect & Clean 24-month premium guarantee, with pick-up and delivery Introduction 4 Introduction and General Information 2 Parts of the machine Before you begin User manual signs and symbols 2 6 6 Start-up program 8 Unpacking and setting up Test the water hardness Prepare the water tank Insert the WMF water filter Fill the water tank Install the milk hose Connect the milk hose to the milk Fill the coffee bean hopper Start-up program Basic settings 8 8 8 8 9 10 10 11 11 12 Operation 16 Preparation of coffee beverages Beverage button overview Example: Prepare a cup of Cappuccino Increase coffee strength for the next beverage Coffee preparation using the manual insert Dispensing milk and milk foam Dispensing hot water General beverage preparation Cancel beverage preparation WMF All‑in‑One spout Adjusting the height Control buttons Switching the coffee machine on and off Switching on Switching off Switching the coffee machine on and off with the timer Setting the automatic switch-on time Display timer operation Manual switch-on for timer operation Manual switch-off for timer operation 16 16 17 18 18 19 20 20 20 21 21 22 23 23 23 24 24 24 24 24 Settings 26 Cup size (Cup volumes) Beverage settings Basic settings Read counters 26 27 30 32 Other settings Set the grinding degree Care Care overview General care programs Call up the care programs Warm-up rinse/Coffee system rinse WMF Connect & Clean milk system rinse Cleaning the machine - Cleaning program Replace water filter Descale coffee machine 33 33 35 35 36 36 37 37 38 40 41 Introduction Manual cleaning Cleaning the milk system Cleaning the brewing unit General cleaning Tips and Tricks for Perfect Coffee Beverages Tips and tricks International specialties at the touch of a button Messages and Tips Operating messages Empty coffee grounds container Refill water tank Water tank lid is missing Bean hopper is empty Insert coffee grounds Change filter Brewer lid is open Clean control panel Error messages and malfunctions Error messages on the display Errors with no malfunction display Safety Safety instructions Hazard instructions 43 43 45 47 48 48 51 52 52 52 52 52 53 53 53 54 54 55 55 57 60 60 62 Warranty/Guarantee 63 24 Month Premium Service Maintenance 64 WMF Service Center Service ticket WMF 800 64 66 Transport and disposal of the coffee machine 67 Accessories and Spare parts 68 Scope of supply Optional accessories and spare parts 68 68 Technical Data 69 Index 70 5 Introduction Before you begin Read this user manual before you begin dispensing coffee. Only then can you use all of the functions, operate the machine safely and spoil yourself with a wonderful cup of coffee. Additional components of the user manual: • Brief instruction for beverage dispensing / care User manual signs and symbols Hazard notices 6 Caution Risk to machine General hazard Caution Risk to user Caution Hot liquid Caution Hot surface Warning Risk of electrocution Caution Risk of hand injuries Tips and hints Instruction Cross reference Tip Always follow the safety instructions in the “Safety” chapter, page 60. Introduction Ready to operate display The descriptions in the user manual always assume that the coffee machine is ready to operate. your selection pls 08:15 25.08.2008 Glossary Term Declaration • Listings, selection options Individual actions, individual steps Description of coffee machine state and/or explanations of steps carried out automatically Combination coffee spout and milk foamer Automatic milk system rinsing Operator control panel with beverage buttons and operation buttons >> Text in italics WMF All‑in‑One spout WMF Connect & Clean Touch Concept 7 Start-up program Start-up program Unpacking and setting up >> Unpack coffee machine and set it up on a stable, horizontal surface You must protect a sensitive installation surface against damage using a waterproof, heat-resistant, non-slip mat. Regularly check the coffee machine and keep the installation surface dry. If liquid leaks regularly, this is a machine malfunction that must be checked immediately. Power cord connection Always follow the safety instructions in the “Safety” chapter, starting on page 60. >> Inspect the coffee machine for possible shipping damage >> Connect the included power cord to the machine (connection on the rear of the machine) >> Plug the cord into a grounded outlet >> Place the drip tray grid into the drip pan >> Place the drip tray in the machine 8 Test the water hardness Drip tray and drip tray grid >> Briefly dip a carbonate hardness test strip into water (approx. 1 second) >> One minute later, read the degree of hardness on the colour scale of the test strip package The water hardness is set during start-up. Prepare the water tank >> Lift the water tank slightly and remove from the coffee machine >> Remove all accessories from the water tank >> Rinse the water tank thoroughly with clear water Insert the WMF water filter The optional WMF water filter ensures the best coffee quality and protects the coffee machine from calcium deposits. For water hardness 0-4, do not use a water filter. Water tank Start-up program >> Remove the built-in filter from the front of the water tank [1] >> Pull up the latch on the cartridge adapter [2] >> Stick the cartridge adapter on the water outlet from the top [3] >> Push down the latch on the cartridge adapter [3] >> Unpack the water filter cartridge and place it on the cartridge adapter [4] The sieve and water filter sit very securely. 1 2 3 4 9 Fill the water tank >> Fill the water tank with cold tap water (max. 2.2 litres) Water can then be added, with the lid in place. >> Place the lid on the water tank The lid must be on the tank when it is put in place. >> Slowly slide the water tank back into the machine Fill the water tank only with fresh, cold water. Never use hot water, mineral water, milk or other liquids. Start-up program Install the milk hose The milk hose is already mounted on the All‑in‑One spout. • For refrigerated milk, use the brown milk nozzle (installed on delivery) • For non-refrigerated milk, use the transparent milk nozzle from the accessories box The nozzle fits very tightly in the hose. The easiest way to remove it is to pull while twisting. >> Remove the coffee grounds container >> Move the All‑in‑One spout to the lowest position [6] >> Insert the milk hose into the guide [7] [8] The milk hose must be in the lowest position without tension and must not run in front of the grounds container. 6 10 7 8 Connect the milk hose to the milk >> Place the refrigerated milk directly to the left of the machine >> Place the milk hose with the milk nozzle on it into the milk container The hose end with the milk nozzle should reach the bottom of the milk container. Milk is a very sensitive food. When handling milk, always ensure cleanliness. Only open packs with clean hands and utensils. Take care that no bacteria can be introduced into the milk. Start-up program Fill the coffee bean hopper > Open the lid of the bean hopper > Pour in the coffee beans (max. 320 g) > Close the lid Once roasted coffee beans have been unpacked, they lose their aromatic components within days. Therefore, only pour as many beans into the coffee bean hopper as you expect to use in the next few days; frequent topping off is better. Ensure that no foreign bodies land in the coffee bean hopper. Such foreign bodies can damage the grinders of the coffee mill. This damage is not covered under the warranty. Do not reach into the bean opening of the mill. Each coffee machine is thoroughly tested before shipment. Therefore, coffee grounds residue may remain in the grinder. Your coffee machine is not used. 11 Start-up program > Press the on/off button The start-up program begins. language: english OK: P change: -/+ > Press the + button to set the desired language > Confirm with the P button initial setup of your WMF 800 The machine is switched on, the start-up program leads you through the basic settings. Start-up program Basic settings >> Press the – and + buttons to set the desired values >> Press the P button to confirm the values and inputs After confirmation, the program jumps to the next point of the settings. The new values are saved when you exit the program. The set values can be changed in the “Basic Settings” program after start-up. See page 30 Time of day time hh:mm:ss OK: P change: -/+ Cancel operation >> Set the current time here with the – and + buttons hh= hour (two places) mm= minutes (two places) ss= seconds (two places) >> Press the P button to confirm the values After confirmation, the program jumps to the next point of the settings. Care button Select/confirm Page forward Increase value Page backward Reduce value Date The new values are saved when you exit the program. date dd:mm:yyyy OK: P change: -/+ 12 >> Set the current date here with the – and + buttons dd= day (two places) mm= month (two places) yyyy = year (four places) >> Press the P button to confirm the values After confirmation, the program jumps to the next point of the settings. Switch off time (in minutes after the last beverage preparation) sw. off time: 30 min OK: P change: -/+ Here you can set how many minutes after the last beverage preparation the coffee machine should switch off automatically. If set to “0 Minutes” the machine does not switch off. If timer operation is activated, the machine switches on again at the set switch-on time. Start-up program Water hardness water hardn.: 13-16 OK: P change: -/+ >> Set the result of the carbonate hardness test with the >> Confirm the value with the P button – and + buttons Carbonate hardness test See included accessories After confirmation, the program jumps to the next point of the settings. Water filter water filter: no OK: P change: -/+ >> Enter here with the and + buttons whether you are using a tank filter (recommended for water hardness 5 °dKH and higher) >> Press the P button to confirm the setting If “water filter” is set, then the filter should be rinsed now. – place 3L container under h. w. spout >> Set a container with approx. 3 litres capacity under the hot water spout When rinsing the filter, you will hear unusual noises. This is normal. The noises will stop during the filter rinse. >> Fill the water tank with cold tap water >> Place the lid on the water tank The lid must be on the tank when it is put in place. >> Slowly slide the water tank back into the machine The machine now heats up. heating up ... After the machine has heated up, there is a coffee system rinse. This warms up all the pipes. After each brewing cycle, in the heating up phase and during the care programs, so-called release water runs into the drip tray. >> Place a container for the rinse water (approx. 120 ml) under the All‑in‑One spout The coffee system rinse lasts approx. 40 seconds. 13 Rinse filter: Follow the display messages Insert water filter see Start up page 8 Change water filter see “Care” page 40 Start-up program At the end of the start-up program, a brewing test is carried out. The espresso button flashes. >> Place an appropriate cup under the All‑in‑One spout >> Press the flashing espresso button briefly The brewing test begins. The coffee grinder will be filled with coffee beans during the brewing test. Discard this first cup of coffee. After this, the machine is ready to operate. your selection pls 08:15 25.08.2008 Cancel operation Care button Select/confirm Page forward Increase value Page backward Reduce value The new values are saved when you exit the program. Start-up complete Start-up is now complete. All settings can be changed now, or at a later time. The following setting options are available: • • • • 14 Set cup size Beverage setting Basic settings Grinding degree setting For perfection in your preparation of coffee we have compiled a chapter of “Tips and Tricks”. Switching on and off Grinding degree setting Other settings see page 33 Tips and tricks see page 48 When switching the machine on and off, an automatic coffee system rinse starts automatically. This requires that sufficient water be in the tank at all times. Empty the drip tray regularly, since the rinse water (approx. 120 ml) runs into the drip tray through the All‑in‑One spout. You can place a container under the All‑in‑One spout to catch the rinse water. About the timer: Switching on and off The coffee machine automatically switches itself off at a pre-set time. In this circumstance also, the machine performs a coffee system rinse directly before switching off. Empty the drip tray regularly, since the rinse water (approx. 120 ml) runs into the drip tray through the All‑in‑One spout. You can place a container under the All‑in‑One spout to catch the rinse water. Setting automatic switch off time after last beverage dispensing Basic settings see page 31 Operation Operation This chapter explains all you need to know about simple preparation of coffee using the WMF 800. • Prepare coffee beverages • Prepare milk and milk foam • Dispense hot water • All‑in‑One spout • Control buttons • Operating and lighting concept • Switching on and off the coffee machine / timer operation Always observe the safety instructions to operate the WMF 800 safely. Safety see page 60 Caution. Burning and scalding hazard. • The All‑in‑One spout and the hot water spout can get very hot. • The beverages dispensed and the escaping steam are very hot. • Never touch the spouts during or directly after dispensing beverages. • Never touch the beverages, rinse and cleaning water or steam during or directly after dispensing beverages. Preparation of coffee beverages 16 The WMF 800 has an operator control panel with five beverage buttons. It covers seven international coffee specialities, as well as milk and milk foam. Each of the buttons is assigned to several beverages. Beverage button overview Milk button in the center: Milk = press briefly briefly 1x espresso 1x café crème briefly long 2x espresso 2x café crème long briefly 1x cappuccino 1x latte macchiato briefly long 2x cappuccino not used long Milk button in the center: Milk foam = press and hold Hot water button • Press briefly -> the symbol for the selected beverage lights up • Press long -> the symbol for the selected beverage blinks (not for milk or hot water) Set the height of the All‑in‑One spout see page 21 Coffee preparation using the manual insert see page 18 Preparing milk and milk foam see page 19 Operation Example: Prepare a cup of Cappuccino Here is a step-by-step description of how to prepare a cup of cappuccino. This description serves as an example for the preparation of all beverages. All steps are carried out for the preparation of the other beverages according to the example. >> If necessary, adjust the height of the All‑in‑One spout to the height of the cup The All‑in‑One spout must not be in the top position. >> Place an appropriate cup under the All‑in‑One spout >> Press the cappuccino button briefly See beverage button overview. The beverage button pressed lights up. The display indicates: 1x Cappuccino Depending on the setting, the coffee beans are ground appropriately for the selected beverage. The preparation occurs as specified in the beverage settings. The beverage is prepared and dispensed into the cups underneath the spout. The display indicates: your selection pls 08:15 25.08.2008 Dispense milk: The All‑in‑One spout is at the top position. Dispense milk foam : The All‑in‑One spout is not at the top position. If a beverage is selected and the All‑in‑One spout is not in the appropriate position, then a reminder is shown on the display. 17 Preparing milk and milk foam, see page 19 WMF All‑in‑One spout see page 21 Operation Increase coffee strength for the next beverage Before each coffee preparation, you can decide how strong you want the next coffee beverage to be. The following coffee strengths are available: • Mild (approximately 15 % weaker than the saved setting) • Normal (corresponds to your setting) • Strong (approximately 15 % stronger than the saved setting) > Place an appropriate cup under the All-in-One spout > Select the desired coffee strength with the – and + buttons > Select the beverage The beverage button selected lights up and the beverage name is indicated on the display. The selected beverage is prepared. Preparing beverages see page 17 Cancel beverage preparation see page 20 You can cancel the current beverage dispensing. Press the C button. Coffee preparation using the manual insert 18 In addition to the coffee bean hopper, you can use the manual insert to make second type of coffee, such as decaffeinated coffee. > Place an appropriate cup under the All-in-One spout > Remove the lid of the manual insert The display instructs: insert coff. grounds select beverage > Place the ground coffee for one brewing cycle in the manual insert > Close the lid > Select the beverage with the beverage buttons (one cup) This procedure can be cancelled with the C button. Always use ground coffee for the manual insert (max. 15 g per preparation). The coffee machine gets soiled inside if too much ground coffee is put in at once. Do not use water-soluble, freeze-dried instant coffee. Each brewing cycle using the manual insert is measured separately. Coffee ground too fine can cause malfunctions. Care > Cleaning brewing unit see page 45 Operation Dispensing milk and milk foam At the touch of a button, the WMF 800 also dispenses warm milk and milk foam. press briefly press and hold 1 cup milk Milk foam on request All‑in‑One spout in the top position All‑in‑One spout not all the way to the top If a beverage is selected and the All‑in‑One spout is not in the appropriate position, then a reminder is shown on the display. See WMF All‑in‑One spout page 21. Milk or milk foam can drip out a bit after dispensing. It is best to leave the cup under the All‑in‑One spout briefly after dispensing, or to place a small catch basin under the spout. Milk can also drip out if the tetrapak is full and the All-in-One spout is in a lower position. Slide the spout upward a little after dispensing a beverage. Cup of warm milk The All‑in‑One spout must be in the top position. >> Place an appropriate cup under the All‑in‑One spout >> Press the milk button 1x briefly 19 Another press of the milk button ends dispensing prematurely. After dispensing milk, the All‑in‑One spout should be slid downward slightly. The display prompts for this. Milk foam The All‑in‑One spout must not be in the top position. >> Place an appropriate cup under the All‑in‑One spout >> Press and hold the milk button Milk foam is dispensed as long as the button is pressed. Set cup size, see Settings chapter page 26 Operation Dispensing hot water With the hot water function, you can dispense hot water, for instance for tea. press briefly press and hold 1 glass hot water Hot water on request Hot water button Glass of hot water >> Place a suitable glass under the hot water spout >> Press the hot water button 1x briefly Another press of the hot water button ends dispensing prematurely. Dispensing any quantity of hot water >> Place a suitable glass under the hot water spout >> Press the hot water button until the desired quantity has been dispensed General beverage preparation 20 Caution. Burning and scalding hazard. • The All‑in‑One spout and the hot water spout can get very hot. • The beverages dispensed and the escaping steam are very hot. • Never touch the spouts during or directly after dispensing beverages. • Never touch the beverages, rinse and cleaning water or steam during or directly after dispensing beverages. Cancel beverage preparation You can cancel the current beverage dispensing. Completely cancel beverage preparation: >> Press the C button For beverages with more than one component, such as coffee and milk: For beverages with several components, active dispensing can be interrupted. The next component will continue to be dispensed. >> Press the beverage button again C button Operation WMF All‑in‑One spout The WMF 800 is fitted with a unique system that has been standard in our professional machines for many years: The All‑in‑One spout. It dispenses coffee and milk foam simultaneously, with variable height adjustment so that you can place anything from an espresso cup to a latte macchiato glass beneath it. The adjustment height ranges from 67-141 mm. The double milk foamer lets you prepare 2 portions of cappuccino at once: perfect coffee for two. Adjusting the height >> Hold the All‑in‑One spout firmly between your thumb and forefinger and move it to the desired height Milk position of WMF All‑in‑One spout Milk is dispensed at the top position of the All‑in‑One spout. The top position is intended solely for milk dipsensing. If the All‑in‑One spout is not at the top position when milk is selected: The following messages are displayed alternately: 1x mug of milk move spout up max. 1x mug of milk confirm beverage >> Slide the All‑in‑One spout all the way to the top >> Press the milk button again briefly Milk foam position of All‑in‑One spout Milk foam is dispensed at all positions of the All‑in‑One spout, except the top position. This also applies to coffee beverages that contain milk foam. After dispensing milk, the All‑in‑One spout should be slid downward slightly. The display prompts for this. If the All‑in‑One spout is in the top position when milk foam, or coffee beverages that contain milk foam, are selected: The following messages are displayed alternately: 1x Latte Macchiato lower spout into >> Slide the All‑in‑One spout all the way to the top >> Press the desired beverage button again 1x Latte Macchiato confirm beverage 21 Operation Control buttons Just a few buttons make it simple and uncomplicated to enjoy perfect coffee. on/off button • Switching on • Switching off • Timer operation (if activated) C button • Cancel operation • Back without changing Care button • Care menu P button/Program button 22 • Introduction to settings • Confirm a selection Plus button/aroma button Cancel operation • Page forwards • Increase coffee strength for the next beverage Care button Minus button/aroma button • Browse back through the programs with minus • Reduce coffee strength for the next beverage Operating and lighting concept The lighting system helps you with navigation. Only the available buttons are lighted. • Press briefly -> the symbol for the selected beverage lights up • Press long -> the symbol for the selected beverage blinks (not for milk or hot water) Select/confirm Page forwards Increase value Page backward Reduce value The new values are saved when you exit the program. Operation Switching the coffee machine on and off Switching on >> Press the on/off button The welcome display appears, then the coffee machine heats up. WELCOME WMF 800 heating up ... Time from switching on until ready to operate approx. 4 min. >> Place a container for the rinse water (approx. 120 ml) under the All‑in‑One spout After the machine is heated up, there is a coffee system rinse. This rinse warms up all the pipes. The coffee system rinse lasts approx. 40 seconds; after this, the machine is ready to operate. your selection pls 08:15 25.08.2008 The ready to operate display appears. Switching off 23 >> Press the on/off button for approx. 3 seconds >> Place a container for the rinse water (approx. 120 ml) under the All‑in‑One spout If beverages with milk, such as latte macchiato, were prepared, then you will be asked to perform a milk system rinse. A coffee system rinse begins after that. Follow the display messages. The machine switches off. Milk system rinse Care > Care programs see page 37 Operation Switching the coffee machine on and off with the timer Setting the automatic switch-on time To use the timer, the basic setting “Automatic switch-on time” must first be set to active. >> To switch off the machine with the timer press the on/off button briefly timer 06:30 OK:P change -/+ >> Use the – and + buttons to set the switch-on time >> Confirm with the P button Set automatic switch-on time to active Settings > Basic settings > Automatic switch-on time see page 31 If the machine is not operated within one hour after automatic switch-on, it switches off again. The display of time and date can be hidden. Settings > Basic settings see page 30 The machine rinses and then goes into Timer operation. The display indicates the switch-on time set, the current time and the date. The machine switches on automatically at the set time. The time of day is displayed, if this is activated in the basic settings. Display timer operation The display of time and date can be hidden. timer 06:30 08:15 25.08.2008 24 Settings > Basic settings see page 30 Manual switch-on for timer operation >> Press the on/off button briefly In timer operation, the machine switches on again immediately before the automatic switch-on time. Cancel operation Care button Manual switch-off for timer operation >> Press the on/off button for > 3 seconds The machine switches off and the timer is no longer active. Select/confirm Page forwards Increase value Page backward Reduce value The new values are saved when you exit the program. Settings Settings The cup size setting allows you to select the cup volume for your coffee specialties, just as simply as with WMF professional machines. When you do this, the coffee machine adjusts the recipe quantities to the new cup volume, so that you still receive the same coffee taste. You can of course use the Beverage settings to vary the recipe individually. The Basic settings are the settings for the operation and display of the coffee machine. The Counters give you information about the number of beverages that have been prepared. P button Milk = press briefly briefly 1x espresso 1x café crème briefly long 2x espresso 2x café crème long briefly 1x cappuccino 1x latte macchiato briefly long 2x cappuccino not used long Milk foam = press and hold Hot water button Cup size (Cup volumes) 26 The WMF 800 allows you to make easy individual adjustments to the cup volume to suit the cup sizes. The essential point is that the recipe remains unchanged. >> Press the P button briefly All beverage volumes are matched to the Barista cups. select program browse: + >> Use the + button to browse to display OK: P cup size browse: -/+ >> Select the cup size with the P button >> Select the beverage for which the cup volume should be adjusted to the cup size >> Set the desired cup volume with the – and + buttons The cup volume is displayed in %. 100 % corresponds to the beverage setting. Change the recipe Beverage settings see page 27 Settings >> If necessary the new setting can be tested by a preparation test cup volume: 100% OK: P Test:bev.btn. The taste and the composition of the beverage remains the same, only the volume is changed to your wishes and to match the cup size. >> As soon as the cup volume is set as desired, confirm the new value with the P button Beverage settings Here you can adjust the recipes of your coffee specialties according to your personal tastes. The following settings are available: • Water volume • Coffee strength • Milk volume* • Rest time for Latte Macchiato • Sequence of dispensing of milk and coffee* • Pre-brew (aroma development) * Option only available for beverages with milk or milk foam 27 Call up the beverage settings >> Press the P button briefly Cancel operation select program browse: + >> Use the + button to browse through to beverage settings OK: P change: -/+ >> Select the beverage setting program by pressing the P button >> Select the beverage for which the taste and composition should be changed Care button Select/confirm Page forward Increase value Page backward Reduce value The new values are saved when you exit the program. Settings Water volume >> Example: press the plus button until the water volume is increased to 37 ml water volume: 37ml OK: P Test:bev.btn. You can start a preparation test with the new values at any time. >> Place an appropriate cup under the All‑in‑One spout >> Press the beverage button again >> Test the beverage >> If the beverage is to your taste, confirm the settings by pressing the P button water volume: 37ml OK: P change: -/+ Coffee strength strength 100% 6,7s OK: P change: -/+ 28 The grinding quantity varies depending on the grinding degree setting, the type of coffee used, the humidity and various other factors. The factory setting for Espresso is about 8 grams. Determine the desired coffee strength with a preparation test. Milk volume In seconds, applies to beverages with milk or milk foam. milk volume: 28 sec. OK: P change: -/+ The milk amount value limits the amount of milk foam for the “milk foam on demand” preparation. Milk quantity depends on the milk used, the milk temperature and the milk nozzle selected. Determine the desired volume with a preparation test. The amount of milk foam may be smaller for the first beverage, since there is condensation in the chilled pipes. You should therefore press the milk button briefly before preparing the first beverage. See page 19 Settings Rest time for Latte Macchiato When making a Latte Macchiato, the separation between the milk and the espresso will work better if the pause between dispensing milk and dispensing milk foam is increased. The value can be set from 0 to 60 sec. rest period: 15sec. OK: P change: -/+ Sequence of dispensing of milk and coffee First milk then coffee / First coffee then milk / Milk and coffee together. The setting for the sequence of beverage dispensing is only offered for beverages with milk components. sequ.: coffee-milk OK: P change: -/+ Pre-brew Aroma development pre brew: on OK: P change: -/+ Pre-brew: Before brewing, the ground coffee is wetted with hot water. This causes the coffee grounds to swell up and the aroma of many types of coffee to develop. The pre-brew function is set to “on” at the factory for all coffee beverages except café crème. “Step by step” instructions for settings and testing, “Set water volume”, see page 31 29 Test: Each setting can be tested in the beverage settings menu. The settings are adjusted in relation to the factory setting. Cancel operation Care button Select/confirm Page forward Increase value Page backward Reduce value The new values are saved when you exit the program. Settings Basic settings • • • • • • • • • • • • Language* Time* Date* Date/time Switch-on time Switch off time* Water hardness* Water filter* Keypad beep Brewing temperature Factory settings Display contrast Description of the other basic settings, see Start-up chapter page 12 Cancel operation For a description of the basic settings marked with *, see the Start-up chapter. Care button Select/confirm Access Basic Settings Page forward Increase value >> Press the P button briefly Page backward Reduce value 30 select program browse: + >> Use the + button to browse through to basic settings OK: P browse: -/+ >> Select the basic settings program by pressing the P button Date/time Display of current date and time on the display. date / time: on OK: P change: -/+ You can switch the display of the current date and time on and off here. The new values are saved when you exit the program. Settings Automatic switch-on time switch-on time: on OK: P change: -/+ You can switch the automatic switch-on time for the coffee machine on or off; by doing this, you activate the possibility of timer operation. Setting the switch-on time, Switching on and off in timer operation see page 24 Keypad beep sound: on OK: P change: -/+ Here you can turn on and off the keypad beep that sounds when the operating and beverage buttons are pressed. Brewing temperature brewing t emp.:92°C OK: P change: -/+ You can set the temperature of the brewing water here. The default is 92 °C. Brewing temperature > Tips and tricks see page 48 31 Settings Factory settings factory sett.: no OK: P change: -/+ If you select “yes”, all basic settings and all beverage settings are reset to the factory settings. All individual settings are lost if you reset to the factory settings. Display contrast display contrast OK: P change: -/+ Here you can set the contrast of the display. Cancel operation Care button Read counters Select/confirm counters OK: P browse: -/+ 32 You can display the number of beverages prepared here. >> Use the plus button to browse through the individual beverages Example of espresso: Espresso 269 browse: -/+ As soon as all beverages have been displayed or the C button has been pressed, the message appears: reset all counters No: C Yes: P Keep counter settings: >> Press the C button Delete all counters: >> Press the P button Page forward Increase value Page backward Reduce value The new values are saved when you exit the program. Other settings Other settings Set the grinding degree With the infinitely adjustable grinders, you can tune your WMF 800 optimally for your type of coffee. If you change your type of coffee, you can adjust the grinding degree. Use the supplied multitool. > Open the lid of the bean hopper > Engage the multitool on the grinding degree setting knob > Start the coffee dispensing cycle, and wait until the grinder starts • Grinding should be finer: press the multitool down, and turn it counter-clockwise • Grinding should be coarser: press the multitool down, and turn it clockwise • The grinding degree can be set finer only if the grinders are running. • Never adjust by more than a quarter turn in one step. • Do not go past the stop with force. The factory setting for the grinding degree is designed for the properties of average coffee beans. The effect of a change in the grinding degree can be evaluated only after dispensing the second cup after the new setting has been made. The following limits apply to the adjustment: Grinding degree too fine: The dispensing stream is interrupted, and/or flow fault: –> the ground coffee is stopping up the brewing sieve. Grinding degree too coarse: The coffee flows too fast, the crème is too light and has too little body, the aroma is flat. Correct setting: Check your setting by making a double cup of espresso If the dispensing stream is interrupted, and/or a flow fault is indicated on the display, then set the grinding degree at least a quarter turn more coarse. 33 Care Care The care of your WMF 800 is very important, not least so that your coffee is always prepared perfectly. The display notifies you as soon as the WMF 800 must be rinsed, cleaned or descaled. The unique WMF Connect & Clean milk system rinse provides you with a very easy to maintain cleaning system for beverages with milk components. Care overview Care programs: • Warm-up rinse/Coffee system rinsing • Milk system rinse WMF Connect & Clean • Cleaning the machine - Cleaning program • Replace water filter • Descale machine Manual cleaning: • Cleaning the milk system • Cleaning the brewing unit • Cleaning the coffee grounds container • Cleaning the water tank • Cleaning the drip tray • Cleaning the bean hopper • Cleaning the machine casing Care programs see page 36 Manual cleaning see page 43 35 Care General care programs The automatic coffee system rinse requires that sufficient water be in the tank at all times. The rinse water (min. 120 ml) is caught in the drip tray. Empty the drip tray regularly or place a container under the All‑in‑One spout during the rinse. After each brewing cycle, in the heating up phase and during the care programs, so-called release water runs into the drip tray. This rinses any remaining coffee from the pipes. This is a completely normal procedure and not an error in the coffee machine. Run the care program regularly, and without delay when the request to do so appears in the display. WMF assumes no liability for damage due to lack of cleaning or descaling or due to the use of other cleaning or descaling agents than those provided by WMF. All guarantee and warranty claims are then void. Cleaning and descaling agents are irritants and during execution of the programs, they become very hot. Avoid any contact with these liquids. The plastic parts of the coffee machine, with the exception of the water tank, may not come into contact with the descaling agent. Follow the instructions on the packaging and in the Safety chapter. Call up the care programs 36 To select the care programs without a previous request on the display: >> Press the care button briefly select care program browse: -/+ >> Use the care button to browse to the desired program >> Select the displayed program with the P button Care button Cancel operation Care button Select/confirm Page forward Increase value Page backward Reduce value The new values are saved when you exit the program. Care Warm-up rinse/Coffee system rinse The coffee system rinse is automatically performed when the machine is switched on or off. A warm-up rinse can be called up on demand. warm up rinsing OK: P browse: -/+ >> Place an appropriate container under the All‑in‑One spout >> Start the rinse with the P button The pipes of the coffee machine are rinsed with hot water. Hot rinse water is emptied through the All‑in‑One spout. After the rinse, the ready to operate display appears. your selection pls 08:15 25.08.2008 WMF Connect & Clean milk system rinse The WMF Connect & Clean milk system rinse is unique world-wide; it allows you to easily maintain perfectly clean systems for beverages with milk components and thus maintain consistently enjoyable coffee. >> Slide the All‑in‑One spout to the top position Milk system rinse time approx. 30 seconds 37 milk system rinsing OK: P browse: -/+ >> Select the displayed program with the P button The display reports the individual activities that must be done before the rinse. >> Place an appropriate container under the All‑in‑One spout connect hose start: P >> Wipe off the outside of the milk hose with a clean, damp cloth >> Place the milk hose with the milk nozzle on the hot water spout and turn it clockwise to the stop >> Start the rinse with the P button Place the milk hose on the hot water spout and turn it clockwise to the stop Care The coffee machine’s milk system is rinsed with hot water. Hot rinse water is emptied through the All‑in‑One spout. The display prompts: lower spout into beverage position >> Slide the All‑in‑One spout downward, out of the top position The display indicates: your selection pls 08:15 25.08.2008 >> Turn the milk hose anticlockwise, disconnecting it from the hot water spout After the rinse, some hot water remains in the milk hose. Hold the open end of the milk hose over the drip tray so that the remaining rinse water can run out. 38 Follow manual milk system cleaning instructions. See Page 43 If beverages with milk were prepared, after 20 minutes or at the latest when switching off, the machine automatically requests a milk system rinse. Confirm with the P button and perform the milk system rinse. The All‑in‑One spout is cleaned by a pulse of steam at the same time. The milk rinse can be delayed with the C button. Cleaning the machine - Cleaning program Do not drink the cleaning solution that comes out of the spout during cleaning. machine cleaning OK: P browse: -/+ >> Confirm machine cleaning with the P button >> The individual steps appear on the display on request empty drip tray refill water tank Start the care program without request, see page 36 The cleaning program takes 6 minutes. Care place 3L container under spout > Place an appropriate container (min. 3 litres) under the All-in-One spout insert tablet into coffee grounds slot > Open the lid of the manual insert > Add a cleaning tablet together with the yellow sponge start: P > Confirm with the P button The cleaning program starts. A countdown timer indicates how long the cleaning will last. cleaning in progress time remain.: 6 min. After 6 minutes, the machine cleaning ends. The display calls for a manual milk system cleaning. This display is cleared when you press the C button. After 230 brewing cycles or 7 days, the request for machine cleaning appears on the display. The display clears after the first beverage is dispensed. Cleaning must take place within the next 50 brew cycles, however, at the latest, the next day. Otherwise, beverage dispensing will be blocked. The block will be cleared after a cleaning. The cleaning interval is increased for less than 25 brewing cycles per week. The next cleaning is due after 14 days. Set the cleaning for a specific time You can manually set the cleaning once for a desired day, for example, Sunday evening. From then on, each week on Sunday, the cleaning prompt will be displayed. A cleaning tablet consists of a white tablet and a yellow sponge. 39 Care Replace water filter filter exchange OK: P browse: -/+ >> Confirm with the P button remove water tank remove old filter place new filter >> Remove the old filter >> Insert a new filter >> Fill the water tank with cold tap water >> Place the lid on the water tank The lid must be on the tank when it is put in place. >> Slowly slide the water tank back into the machine >> After it is changed out, confirm by pressing the P button filter rinsing Call up care program see page 36. Remove milk foamer see Cleaning the milk system page 43 Change water filter Start-up program see page 13 For initial use of a water filter “Start-up” > “Insert water filter” see page 8 40 place 3L container under h.w. spout and “Start-up” > “Basic settings” see page 13 >> Place a 3 litre container under the hot water spout >> Start the filter rinse with the P button rinsing filter ... time remain.: 4 min. When rinsing the filter, you will hear unusual noises. This is normal. The noises will end during the filter rinse. During further operation, everything will sound normal again. After the rinse, the ready to operate display appears. your selection pls 08:15 25.08.2008 Depending on the water hardness and the water flow, but after 3 months at the latest, the request appears to change the water filter. The filter change can be delayed by pressing the C button. Use the filter change for a thorough tank cleaning. Cleaning the water tank see page 47. Care Descale coffee machine Do not drink the descaling solution that comes out of the spout during descaling. >> Remove the milk foamer >> Remove the red security seal from the milk nozzle by pressing lightly with your forefinger [1] [2] [3] 1 2 3 Remove milk foamer see cleaning the milk system page 43 The red seal on the milk nozzle must be removed for descaling. If the red seal is not removed, it can fall into the catch basin during descaling. Call up care program see page 36 Total duration of descaling approx. 37 minutes. The procedure may not be interrupted. machine descaling OK:P brwse.:care-bt 41 >> Press the care button >> Empty the drip tray >> Pull the water tank out of the machine towards the front >> Remove the filter cartridge if a water filter is used (important) >> Pour a whole bottle of WMF liquid descaling agent (750 ml) into the water tank >> Fill the water tank with water and close the lid >> Place an appropriate container (min. 3 litres) under the All‑in‑One spout >> Place another container (min. 1 litre) under the hot water spout >> Start the descaling with the care button The descaling starts. A countdown timer indicates how long until the descaling will last. descaling ... time remain: 37 min. After approx. 30 minutes, the following displays appear: empty water tank OK: P >> Empty the water tank and rinse thoroughly with clear water Place container underneath Tip: Instead of two containers, you can use a sufficiently large container which fits under both spouts. Care The remaining descaling solution must be emptied from the tank so that the coffee machine can then be rinsed with clear water and no descaling solution remains in the coffee machine. >> Confirm with the P button refill water tank OK: P >> Fill the water tank with cold tap water >> Place the lid on the water tank The lid must be on the tank when it is put in place. >> Slowly slide the water tank back into the machine >> Press the P button to continue descaling Change water filter Start-up program see page 13 For initial use of a water filter descaling ... time remain: 1 min. “Start-up” > “Insert water filter” see page 8 and >> Replace the filter cartridge >> Thoroughly clean the red milk nozzle security seal >> Replace the red security seal on the milk nozzle [4] [5] [6] >> Check that the security seal is properly seated 42 4 5 “Start-up” > “Basic settings” see page 13 6 >> Insert the milk foamer >> Fill up the water tank and replace it The machine now heats up. Steam and condensed water will escape during this process. Care program without request see page 36 The water hardness, the water flow and whether a tank filter is used determine the schedule for descaling. This time is calculated by the WMF 800, and a request for descaling appears. Descaling can be delayed by pressing the C button; however, it must be carried out within the next 50 brew cycles. Otherwise, beverage dispensing will be blocked. The blocking will be cleared after a descaling. Immediately following descaling, you will be prompted to clean the machine. Cleaning the machine - Cleaning program, see page 38. Care Manual cleaning All parts of the milk system must be cleaned thoroughly at least once a week. The milk system consists of: - All‑in‑One spout - milk hose - milk nozzle Cleaning the milk system >> Remove the grounds container from the coffee machine [1] >> Remove the hose from the milk container and the guide [2] [3] >> Slide the All‑in‑One spout upward [4] >> Operate the release on the back of the All‑in‑One spout [4] 1 2 3 4 43 >> Slide the milk foamer downward [5] [6] >> Release the milk hose from the milk foamer [7] >> Remove the milk nozzle from the milk hose [7] >> Twist out the air intake pipe >> Unscrew the black cap from the air intake pipe >> Separate the upper and lower parts of the milk foamer. To do this, press the milk foamer against a hard surface, with the spout pointing downward. [8] 5 6 7 8 Care >> Stir one measuring cap WMF milk system cleaner into 200 ml lukewarm water in a container >> Place all parts of the milk system [9] in the cleaning solution for 5 hours or overnight [10] >> Then rinse all parts thoroughly with running warm water [11] 9 10 11 With the brushes included with the machine, you can clean the narrow beverage spouts optimally. Accessories and Spare parts chapter see page 68 >> Assemble the upper and lower parts of the milk foamer >> Screw the plastic parts onto the air intake pipe >> Insert the milk nozzle into the milk hose >> Place the milk hose on the milk foamer [12] >> Insert the milk foamer from the bottom, and latch it in place [13] [14] [15] 12 13 14 15 18 19 44 >> Move the All‑in‑One spout to the lowest position [16] >> Insert the milk hose into the guide [17] [18] [19] >> Replace the water tank, with its lid in place 16 17 Care Cleaning the brewing unit The brewing unit must cool down before cleaning Clean the brewing unit regularly. > > > > > 1 Switch off the coffee machine with the on/off button and unplug the power cord Open the brewer lid [1] Grip the brewing unit at the top with the thumb and forefinger [2] Release the brewing unit catch with the forefinger [2] Remove the brewing unit by lifting it upwards [3] 2 3 If the brewer is difficult to remove, the O-rings must be greased. Grease O-rings see page 59 Use the multitool from the accessories. > Unscrew the thread on the brewing unit head [4] with the multitool [5] turning anticlockwise The wiper will fold out forward, and the brewing sieve is now visible > Clean the brewing filter under running water or with a cloth [6] > Rinse the brewing unit under running water [6] Never clean the brewing unit in a dishwasher and never use any cleaner additives. 4 5 6 45 Care > Dry the brewing unit with a cloth. Allow to dry completely before replacing in the coffee machine. > Remove the water tank and the grounds container > Remove coffee grounds in the chutes with a vacuum cleaner [8] [9] > Screw the brewing unit back on clockwise using the multitool until the scraper closes again [10] 8 9 10 Replace the brewing unit after it has been dried. > Insert the brewing unit until the lock snaps [11] > Close the brewer lid [12] 11 12 46 If the brewing unit cannot be inserted completely: Turn thread on the brewing unit head slightly to the left or right with the multitool until the brewing unit slides into the guide. Never use force. Care General cleaning Never clean the water tank, drip tray or the coffee grounds container in the dishwasher. Cleaning the coffee grounds container >> Empty the coffee grounds container and rinse with water The All‑in‑One spout must be in the lowest position and the milk hose must not run in front of the grounds container. Cleaning the water tank >> Empty the water tank >> Remove the filter cartridge and the adapter (if a filter is used) >> Remove debris in the tank and on the adapter with a scrub brush >> Rinse the water tank with water >> Fill the water tank with cold tap water >> Place the lid on the water tank The lid must be on the tank when it is put in place. >> Slowly slide the water tank back into the machine Heavy calcium deposits can be removed with the WMF descaling agent. After descaling, rinse the water tank thoroughly in order to remove the descaling debris. Clean the drip tray and drip tray grid >> Empty the drip tray and drip tray grid and rinse with water >> Replace the drip tray and drip tray grid Cleaning the bean hopper >> Switch off the machine, unplug the power cord >> Wipe out the bean hopper with a dry, lint-free cloth Machine casing cleaning/front panel cleaning >> Switch off the machine, unplug the power cord >> Clean the housing with a damp cloth 47 Tips and tricks Tips and Tricks for Perfect Coffee Beverages Tips and tricks 48 Water quality Programming the taste of the coffee Water quality is extremely important for preparing your coffee specialties. Excessive lime and chlorine will adversely affect the aroma. Prevent this by using the WMF water filter. Descaling also protects your WMF 800 from scale deposits. Change the water in the tank after long idle periods. Program the coffee strength and the amounts of water and milk individually to your taste for each coffee specialty. Cup preheating Pre-brew Your cups are pre-warmed on the cup storage tray, which is passively heated by the boiler. Your espresso and all other drinks will stay hot longer. We also recommend pre-warming them quickly with a little hot water. The pre-brew function is set at the factory for all coffee specialties except café crème. Activate this setting for café crème as well, if you prefer a stronger coffee aroma. If your espresso is too bitter, then deactivate this function. The right cups Brewing temperature Use espresso cups of thick porcelain, which retain the pre-warm heat better. Their maximum capacity is 60 ml - but they should only ever be filled two-thirds full - and they are tapered. If the cups are too large, they allow the espresso to cool down too quickly at the surface. The brewing temperature is factory set to 92 °C, which is ideal for coffee with 100 % Arabica beans. If you are using coffee with a proportion of Robusta beans, a reduction in brewing temperature to no less than 88 °C is recommended. Too high a brewing temperature can “burn” the coffee, causing it to taste bitter. Warm-up rinse Grinding degree setting Run a warm-up rinse on the machine after switching on and after pauses in use. This brings the WMF 800 up to its ideal operating temperature. For a good espresso it is particularly important that it is hot. Together with the quantity of ground coffee, the grinding degree influences the generation of the “body” or “richness” of the coffee, and the formation and persistence of the crème. The finer the coffee is ground, the more strongly its contents are released into the coffee. Adjust the grinding degree optimally for the type of coffee used. Preparing milk foam - see Operation chapter; Connecting milk - see Start-up chapter; Cleaning milk system - see Care chapter; Care programs - see Care chapter; Cleaning the bean hopper - see Care chapter; Preparing beverages - see Operation chapter. Tips and tricks Varieties of coffee Types of milk Coffee is assessed by its qualities such as acidity, aroma, body and fragrance. 100 % Arabica guarantees top quality. In the end, the choice of top-quality coffee that comes to your breakfast table is a matter of your individual taste. Milk foam comprises the protein elements in the milk. A high protein content in the milk increases the quality and stability of the milk foam. Quantity of coffee beans Refrigerate milk Once roasted coffee beans have been unpacked, they lose their aromatic components within days. Therefore, only pour as many beans into the coffee bean hopper as you expect to use in the next few days; frequent topping off is better. Milk is a very sensitive food. We recommend keeping milk in the refrigerator before use. Not long after taking from the refrigerator, return unused milk to the refrigerator, or use the milk cooler. Storage Hygiene For best preservation of the aroma, seal your coffee well and store it in a cool dry place, free of odours, since dampness and oxygen are the number one aroma killers. Take care to maintain absolute cleanliness when opening milk packaging and when handling the milk hose. Dirty hands and utensils can introduce harmful bacteria into the milk. Unopened UHT milk is generally free of harmful bacteria. Cleaning the bean hopper Care Coffee contains oils and fats which become deposited on the surfaces of the hopper. In the presence of oxygen, these oils oxidise and seriously affect the taste of the coffee. Therefore, regularly rub down the bean hopper - depending on usage - using a dry, lint-free cloth. The care of the WMF 800 is particularly important for perfectly prepared coffee. Therefore, run the appropriate care programs as requested on the display, and also regularly perform manual care. Preparing milk foam - see Operation chapter page 19; Connecting milk - see Start-up chapter page 10; Cleaning milk system - see Care chapter page 43; Care programs - see Care chapter page 36; Cleaning the bean hopper - see Care chapter; page 47; Preparing beverages - see Operation chapter page 16 49 Tips and tricks International specialties at the touch of a button Espresso Two espressi Latte macchiato The little black coffee with the strong aroma. Cognoscenti prize the characteristic crème. “Due espressi”. The Italian way of enjoying coffee - best with a friend. Or you can indulge in “un doppio“. The speckled milk with the characteristic of 3 layers: warm milk, espresso, milk foam. Café crème Two café crème Milk A balanced mixture of coffee. The special preparation technique generates the crème. Two cups, when you don‘t want to be alone when you enjoy your café. Warm milk or milk foam. Refined palates mix in a little cocoa powder. 51 Cappuccino Two cappuccini Espresso with milk and a cap of milk foam. It takes its name from the brown habit of the Capuchin monks. The perfect way to spend time with a friend. Prepare two cups at once. Hot water A cup of tea for a spare moment. Messages and Tips Messages and Tips Operating messages Empty coffee grounds container empty grounds cont. beverage sel. locked grounds cont.missing The coffee grounds container is full >> Remove the coffee grounds container, empty it and rinse it with water >> Wipe the coffee grounds container dry >> Replace the coffee grounds container >> Confirm with the P button Always have the coffee machine turned on when changing the coffee grounds container, so that the electronic counter registers the fact that it was emptied. Refill water tank beverage sel. locked refill water tank 52 beverage sel. locked water cont. missing The water tank is nearly empty The water tank will not be completely emptied, in order to prevent air from entering the coffee system. >> Lift the water tank slightly and remove it >> Empty the remaining water >> Fill the water tank with cold tap water Water can then be added, with the lid in place. >> Place the lid on the water tank The lid must be on the tank when it is put in place. >> Slowly slide the water tank back into the machine Water tank lid is missing tank lid missing? The lid is not in place, or is incorrectly seated? >> Place the lid on the water tank The machine is not ready to operate without the cover Messages and Tips Bean hopper is empty refill beans confirm beverage There are not enough coffee beans in the coffee bean hopper Grinding is interrupted. > Pour coffee beans into the bean hopper > Press the beverage button again The grinding process continues and the additional coffee required for the brewing cycle is ground. The selected beverage is then brewed. Insert coffee grounds insert coff. grounds select beverage The manual insert lid is open > Insert the ground coffee > Close the manual insert > Select the desired beverage with the beverage button This procedure can be cancelled with the C button. Ground coffee that has already been inserted is removed via the coffee grounds container. Change filter your selection pls replace water filter 53 The water filter must be changed > Change filter (see “Care” chapter) Messages and Tips Brewer lid is open beverage sel. locked lid open The coffee machine brewing unit lid is open >> Close the brewer lid Clean control panel clean control panel 54 Find the cause: Operator control panel is not clean, buttons do not respond. For the message: >> Press the on/off button and switch off the machine >> Clean the operator control panel with a damp cloth >> Switch on the machine again If the message continues to appear: >> Please call the service Messages and Tips Error messages and malfunctions Basic procedure in case of error messages or malfunctions: Switch coffee machine off and then on again after a few seconds. Repeat the process that caused the malfunction. In many cases, this eliminates the malfunction and you can continue to use your coffee machine. If this is not successful: Search in the error list for the error message and follow the instructions. If this is not successful, or the error displayed is not listed, please call the WMF service hotline. Some messages lead to blocking of individual functions. You will notice this by the fact that the beverage button light goes out. The beverage buttons that are still illuminated can continue to be served. WMF service hotline see page 64 The serial number is on the left, inside the machine. Remove the coffee grounds container in order to read it. Error messages on the display Error message Insert brewer Action Brewer is not inserted: >> Insert brewer Brewer limit switch Flow error (water tank is empty) Flow error (water tank is full) Brewer unit not inserted correctly: >> Insert brewing unit correctly Brewing unit stiff: >> Remove brewer, open brewing chamber with multitool, apply a thin layer of the grease from the accessories kit to the red gasket >> Fill the water tank >> Bleed machine: Dispense hot water until a constant stream of water comes out Air in the system, possibly associated with loud pump noise: >> Check whether the water tank is pushed in completely >> Bleed machine: Dispense hot water until a constant stream of water comes out Water filter or sieve stopped up >> Change filter, clean the sieve The check valve in the water tank spout is dirty >> Clean the water spout on the water tank from the back with a small brush 55 Messages and Tips Flow error (water tank is full) No hot water dispensing: > Remove water filter/dirt trap from tank, try again The O-ring on the water spout supports is defective or swollen > Replace the O-ring Cleaning halted Flow error EPROM Error Motor driver error 56 Grinder blocked See Page 59 Brewing unit stopped up: > Remove brewing unit, clean manually, insert and carry out cleaning program Grinding degree too fine: > Adjust the grinding degree by a quarter rotation > Vacuum out the grinder chute > Bleed machine: Dispense hot water until a constant stream of water comes out > Press the C button The cleaning continues. > Switch machine on/off If the error repeats, the malfunction must be corrected by the WMF Service Center. > Switch machine on/off If the error repeats, the malfunction must be corrected by the WMF Service Center. The grinder is blocked by foreign bodies: > Switch off the machine, unplug the power cord > Vacuum out the bean hopper > Turn grinders clockwise with the multitool in order to be able to remove foreign bodies > Switch machine on > Start the grinder by pressing the beverage button > When the grinder is clear again: Set the grinding degree again Grinding degree too fine: > Set grinding degree coarser Clean the brewing unit Care > brewing unit see page 45 Other settings > Set grinding degree, see page 33 WMF Service Hotline, see page 64 Grinding degree setting > Other settings see page 33 Messages and Tips Temperature sensor steam Temperature sensor water Timeout level See flow error >> Switch off coffee machine, allow to cool and switch on again If the error repeats, the malfunction must be corrected by the WMF Service Center. Air in the system, possibly associated with loud pump noise: >> Check whether the water tank is pushed in completely >> Take milk hose out of the milk container and press the milk foam button If hot water comes out instead of steam: >> Carry out descaling If steam comes out: >> Please call the hotline Errors with no malfunction display Error No milk foam/milk output, but milk in reservoir No milk foam, only warm milk Action >> Check the milk hose is not kinked or crimped >> Lay the milk hose again >> Clean the All‑in‑One spout >> Clean the steam nozzle >> Carry out milk system rinse If the problem continues: >> Cleaning the milk system All components must be clean, and the passages must be clear. Cleaning the milk system. See Page 43 If there is no steam: >> Clean steam nozzle Clean steam nozzle. See Page 59 Milk or milk foam is too cold Milk is too hot and there is too little, or milk foam has bubbles >> Check whether the correct milk nozzle is mounted (brown for refrigerated milk, transparent for unrefrigerated milk) Milk is too hot: >> Refrigerate milk >> Check that milk hose is not kinked or crimped, >> Route the milk hose again >> Ensure that the correct milk nozzle is on the milk hose (transparent for unrefrigerated milk) Leakage: >> Check all connections and seals of the All‑in‑One spout Care > Milk system cleaning see page 43 Clean steam nozzle see page 59 57 Messages and Tips 58 Water tank is difficult to >> Lightly smear O-rings on water spout supports with WMF gasket grease remove Brewing unit is difficult >> Lightly the smear O-rings on the brewer with WMF gasket grease to remove and replace Pump makes loud noises Water tank is not inserted correctly (air in the system). See also Flow Error. >> Push in water tank completely >> Bleed machine: Dispense hot water until a constant stream of water comes out Hint: it is normal if the water pump runs independently from time to time during operation; it fills the system automatically. Coffee has no crème • Unsuitable coffee mixture or coffee is not fresh • Quantity of ground coffee is set too low • Cups too cold: pre-warm • Grinding degree too coarse: Set grinding degree finer • Carry out warm-up rinse Brewing unit is not in the basic position Brewing unit can no longer be pulled out or >> The brewing unit can be adjusted using the multitool until the brewer inserted can be inserted >> Remove coffee grounds residue from the inside of the brewer Noticeably large amount >> Check grinding degree setting and set finer if necessary and very coarse ground coffee in brewer area Check whether the metal spring ring is missing from the brewer plunger: >> Remove the brewer and open it completely by turning it clockwise The brewer plunger on the bottom of the brewer is now visible. >> Install the metal ring Grease O-rings see page 59 Brewing temperature see Settings > Basic settings see page 30 Settings > Grinding degree setting see page 33 Messages and Tips Grease O-rings >> Use only WMF gasket grease The grease is specially matched to the material and is safe for food preparation equipment. O-ring for water tank tank spout support If the water tank is difficult to remove and replace. If a “flow fault” is displayed frequently. >> Lightly smear the O-rings on the water spout supports with WMF gasket grease O-rings in brewer If the brewer is difficult to remove and replace. If the O-rings are very dry. >> Lightly smear the O-rings on the brewer with WMF gasket grease 59 Clean steam nozzle Clean the steam nozzle in If no milk foam is produced, even after a milk system rinse. the All‑in‑One spout >> Remove the milk foamer >> Remove the red seal from the steam nozzle See descaling page 41 >> Clean the steam nozzle carefully with one of the small cleaning brushes provided Safety Safety Safety instructions At WMF, we pay the utmost attention to the product features, to ensure the machine is as safe as possible. The effectiveness of the built-in safety devices is, however, only guaranteed if the following points are observed: Carefully read through the user manual before operating the coffee machine. Disregarding the hazard instructions can cause serious injuries and can damage the machine. Caution. Health hazard. • This device is not designed for persons (including children) with limited physical, sensory or mental capabilities or who lack the required experience and/or knowledge, unless they are supervised by a person responsible for their safety or have received instructions from them about how the device should be used. • Children should be supervised to ensure that they do not play with the machine. The height of the installation surface above the floor is at least 850 mm. 60 Caution. Electric shock. • When the machine is not in use, and before starting manual cleaning, disconnect it from the power source (unplug it). • Do not operate the machine if the power cord or plug is damaged, or if a malfunction has developed in the machine or if the machine has been damaged in any other way. The machine must be returned for maintenance and repair to the WMF Service Center. • Do not allow the power cord to hang down over the edge of the table or work top. • Do not expose the machine to the effects of weather (frost, damp). Do not use the machine outdoors. • The unit is not intended to be located on a surface that is sprayed or cleaned with a water hose, steam jets, steam cleaner, or similar devices. Safety Caution. Burning and scalding hazard. Let the machine cool down before starting manual cleaning. The same applies when attaching or removing components and accessories. Caution. Risk of injury. • The unit must be placed on a level, flat, and sturdy surface. • Maintenance and repair work may be performed only by the WMF Service Center, using original spare parts. 61 Safety Hazard instructions Despite all safety devices, hazards remain with every machine if used incorrectly. Therefore, please observe the following instructions when using the machine so as to prevent injury and health hazards: Risk of injury. Do not reach into the coffee bean hopper when the machine is switched on and plugged in. The mechanical parts in the hopper can cause injuries. Caution. Health hazard. The beans hopper and manual insert may only be filled with materials for the use intended. Caution. Burning and scalding hazard. The All‑in‑One spout for hot beverages and milk foam, and the hot water spout become very hot during operation. The liquids that are dispensed and the steam from them are also very hot. Therefore do not touch the components and equipment surfaces in these areas, and do not allow hot liquids and steam to come into contact with you. 62 Caution. Electric shock. Do not allow liquids to enter the inside of the machine casing except within the intended containers. Do not clean the machine using running water, steam cleaners or steam jets. Do not unscrew the machine covers and do not reach into the innards of the machine, even using tools. Caution. Irritant. Health hazard. Cleaning and descaling media are irritants and become very hot during execution of the programs. • Avoid any contact with these liquids. • Keep away from children and unauthorised persons. • Do not ingest them, nor mix them with other chemicals. Also note: • Do not eat or drink whilst using them. • Ensure good ventilation whilst using them. • Thoroughly wash hands and face after using them, even during breaks. • Plastic parts of the coffee machine, with the exception of the water tank, may not come into contact with the descaling agent. • Take care that no adjacent objects and textiles, etc. come into contact with the descaling agent. • Use only WMF cleaning and descaling media. Warranty/Guarantee Warranty/Guarantee During the warranty period, WMF warrants that the product will be free from defects. The warranty period will expire after two years or 7,000 brewing cycles have been performed, whichever comes first. If used commercially (not in a private household), the warranty period is limited to one year. A maximum of 7,000 brew cycles may be performed during this time. The warranty period starts on the day the contract for sale of the product has been concluded. If, during the warranty period, any malfunction develops in the product, WMF shall be entitled to replace the product (or the defective part thereof) free of charge. Warranty claims are limited exclusively to this liability. Any other claims are excluded from warranty. To validate the claim under warranty, appropriate proof of purchase is required. Warranty claims are restricted to Germany. Within the warranty period your statutory rights as purchaser to subsequent performance, price reduction, cooling-off period and compensation for damages under §§ 437 ff BGB remain unaffected. Please observe our General Terms and Conditions. To activate the warranty, please return the enclosed warranty card to WMF. Of course, the statutory warranty rights of the buyer are not limited by this warranty declaration. Where the product is sold to an individual dealing as a consumer, the warranty entitlement in no way affects the purchaser’s statutory rights. The warranty period is only valid if the repairs to the product are carried out by WMF Service Center. The warranty period expires if repairs are performed other than by WMF Service Center. WMF shall bear no liability under the above warranty in respect of any defect arising from: • All parts that are subject to normal wear (including seals, etc. ) • Effects of weather, scale deposits, chemical, physical, electrochemical or electrical influences, which are not the fault of WMF; • Non-compliance with the instructions for handling, maintenance and care of the device according to the User Manual; • Use of any replacement parts other than WMF original replacement parts, or improper installation by the consumer or a third party, or improper or negligent handling; • Improper modifications or repair work carried out by the consumer or a third party without authorisation from WMF; • Unsuitable or improper use. It is considered improper use of the device if more than 7,000 brewing cycles have been carried out using the machine during the warranty period. 63 Service and Maintenance 24 Month Premium Service Maintenance WMF Service Center Have a question on the operation or function of your WMF 800 ? Call us on our WMF Service Hotline. Or send us an e-mail. The WMF Service Center is the first point of contact, along with your specialist dealer. In Germany: In Austria • Telephone: +49 (0)180-2963100 (6 cents per call in Germany) • [email protected] • Telephone: 0043-664-8146270 • Email: [email protected] This procedure applies only within Germany and Austria. We will pick up your coffee machine at your place, and repair it at the WMF Service Center. You will get your machine back after repairs. For warranty claims, this premium service is completely free of charge. Procedure 64 • The machine will be collected during the next working day. • You can advise the WMF Service Center of the time and place for the machine to be collected. • Prepare your WMF 800 for shipping, packed in the original carton, and have it ready for pick-up. Machines that are not in the original packaging cannot be taken for service. • Important. The completed service ticket and a copy of the proof of purchase should be available. Warranty conditions See page 66 Service/Maintenance/Repair at the WMF Service Center This procedure applies only within Germany and Austria. >> Coffee machine is inspected upon receipt >> If not covered under warranty, or if the warranty period has expired, you will receive a cost estimate >> Repair in our Service Center within 5 business days from receipt of the coffee machine and approval of the cost estimate >> After repair, your WMF 800 will be returned to you immediately by package carrier Name and address of the Warrantor: In Germany: In Austria WMF Württembergische Metallwarenfabrik Aktiengesellschaft Eberhardstraße 73309 Geislingen/Steige WMF Österreich GmbH Etrichgasse 1 6020 Innsbruck Warranty claims should be submitted to the above address. Warranty conditions See page 63 Service and Maintenance Service ticket WMF 800 Don’t forget to include the completed service ticket and a copy of the proof of purchase in your package. Attention: Handling of shipping of your WMF 800 occurs via the WMF Service Center. The package is collected from your premises. “Service procedure using the Service Center” see page 64 Sent from: Company/name: Address: Post code: Telephone: Fax: E-mail: Reason for return Cost estimate If no warranty is applicable. (Check where applicable) by letter by e-mail by fax Repair approval Repair approval up to an amount of Euro City, Date Signature Cut out this service ticket, or copy this page. 66 Transport and disposal Transport and disposal of the coffee machine • • • • • Keep the original packaging for use for transport. Please empty the water tank, drip tray, filter sets and bean hopper before transporting. Always ship or transport the machine in the original carton, with its styrofoam supports. Consult your local authority for options on disposal of the machine at the end of its working life. This device is subject to the directive on waste electrical and electronic equipment (WEEE/EU directive) and may not be disposed of as domestic waste. Further information can be obtained from your local recycling depot or from our WMF Service Center. WMF Service Hotline, see page 64 67 Accessories and Spare parts Accessories and Spare parts Scope of supply Designation • WMF Milk system cleaner (in the polystyrene section) • WMF 800 document set - User Manual - Care information - Quick reference - Carbonate hardness test - Warranty certificate • WMF Water filter cartridge with adapter and installation instructions (in the water tank) optional • WMF 800 accessories in a plastic bag, with: - Milk nozzle (transparent, for unrefrigerated milk) - Multitool - WMF cleaning tablets 68 - Small cleaning brushes - WMF gasket grease - Elastic seal for the milk nozzle Cleaning agents, cleaning solutions and descaling agents are irritants to people, textiles and plastic parts. Strictly comply with the safety instructions on the package. Optional accessories and spare parts You can obtain cleaning media, i.e., WMF milk system cleaner, WMF cleaning tablets, WMF descaler and WMF water filters from your specialist dealer. Your enjoyment of coffee will be perfect with the Barista set. The WMF brand stands not only for professional coffee machines, but for everything that constitutes the entire experience of drinking, eating and cooking. Therefore we have developed the right matching accessories for your WMF 800. In addition to the milk cooler, with active milk refrigeration, you will receive everything that makes for perfect enjoyment of coffee. Ask your specialist dealer for Barista. Technical Data Technical Data Power rating 1,7-2,3 kW Supplied power 1/N/PE ~ 50/60 Hz; 220/240 V On-site circuit protection maximum 16 A Daily capacity 35 cups Coffee bean hopper 250 g Variable brewing chamber 6 to 15 g Water tank capacity (without filter) 2.2 litres Coffee grounds container approx. 15 - 20 portions Height-adjustable All‑in‑One spout with milk nozzle 67 to 141 mm High-performance pump 15 bar Independent heating systems 2 External dimensions Width 305 mm Height 400 mm Depth 443 mm For maintenance and cleaning, there must be at least 250 mm space on the top side of the machine to dismantle the brewer. Weight empty approx. 16.0 kg Weight of brewer 1.2 kg Cable length approx. 1.0 m Continuous sound pressure level (Lpa) < 70 dB (A) Machinetype 03 0400 Manufacturer WMF Group 69 Index Index A Accessories and Spare parts 68 Adjusting the height 21 Adjusting the height of the All-in-One spout 21 All-in-One spout 19, 21 Amount of foam 28 Aroma button 22 Assemble the milk hose 10 Automatic switch-on time 24, 31 Coffee system rinse 37 Coffee system rinse, automatic Coffee system rinse 14 Coffee Taste 48 Composition of the beverage 27 Connect the milk hose to the milk 10 Control buttons 23 Cup preheating 48 Cups 48 Cup size 26 Cup volume 26 B D Basic settings 30 Bean hopper 2 Bean hopper is empty 53 Before you begin 6 Beverage button overview 16 Beverage buttons 16 Beverage settings 27 Beverage volume 26 Brewer lid is open 54 Brewing temperature 31, 48 Browse 22 Burning and scalding hazard 29, 61, 62 Date 12, 30 Date/time 30 Delete all counters 32 Descale 41 Descale coffee machine 41 Dispensing hot water 20 Display contrast 32 Display timer operation 24 Disposal 67 C 70 Call up the beverage settings 27 Call up the care programs 36 Cancel beverage dispensing 20 Cancel beverage preparation 20 Care 35, 49 Care button 22 Care overview 35 Care programs 35 Care programs without request 36 C button 22 Change filter 53 Change water filter 40 Check new setting 27 Cleaning 35, 47 Cleaning program 38 Cleaning the bean hopper 47, 49 Cleaning the brewing unit 45 Cleaning the coffee grounds container 47 Cleaning the machine 38 Cleaning the milk system 43 Cleaning the water tank 47 Clean steam nozzle 59 Clean the drip tray and drip tray grid 47 Coffee strength 28 Coffee strength for the next beverage 18 E Electric shock 60, 62 Electronics waste disposal law 67 Empty coffee grounds container 52 Error list 55 Error message 55 Error message display 55 Errors with no malfunction display 57 Example: Prepare a cup of Cappuccino 17 F Factory setting 29, 32 Fill the coffee bean hopper 11 Fill the water tank 8, 9 G Gasket grease 68 General beverage preparation 20 General care programs 36 Glossary 7 Grease O-rings 59 Grinding 33 Grinding degree 48 Grinding degree setting 33 Grinding degree too fine 54 H Hazard instructions 62 Health hazard 62 Hot water button 20 Hygiene 49 I Insert coffee grounds 53 Insert the WMF water filter 8 Instructions 52 Introduction and General Information 2 Introduction to settings 22 K Keep counter settings 32 Keypad beep 31 L Language 11, 30, 55 Lighting system 22 M Maintenance 64 Malfunctions 55 Manual cleaning 35, 43 Manual insert 18 Manual switch off for timer operation 24 Manual switch-on for timer operation 24 Messages 52 Milk and milk foam 17, 19 Milk system cleaner 68 Milk system rinse 37 Milk volume 28 Minus button 22 Multitool 68 O on/off button 22 Operating messages 52 Operation 16 Other settings 33 P Page forwards with the plus button 22 Parts of the machine 2 P button 22 Index Plus button 22 Premium Service 64 Premium Service Procedure 64 Preparation of coffee beverages 16 Preparation test 27 Program button 22 Q Quick reference 68 R Read counters 32 Ready to operate display 7 Refill water tank 52 Refrigerate milk 49 Rest time for Latte Macchiato 29 Rinse water filter 40 S Safety 60 Safety instructions 60 scope of delivery 68 Second type of coffee 18 Sequence of milk and coffee 29 Service ticket WMF 800 66 Settings 26 Settings (Basic settings) 12 Setting the automatic switch-on time 24 Setting up 8 Signs 6 Spare parts 68 Standby mode 24 Start-up 8 Start-up complete 14 Storage 49 Storing 49 Switching off 23 Switching on 23 Switching the coffee machine off with the timer 24 Switching the coffee machine on with the timer 24 Switch off the coffee machine 23 Switch-off time 12, 30 Switch on the coffee machine 11, 23 Switch-on time 24, 30 Symbols 6 T Technical Data 69 Test the water hardness 8 Time 12, 30 Tips and hints 6 Tips and tricks 48 Transport and disposal 67 Type of coffee 48, 49 Types of milk 49 U Unpacking 8 User manual signs and symbols 6 V Varieties of coffee 49 W Warm-up rinse 37, 48 Warrantor 64 Warranty/Guarantee 63 Warranty ticket 66 Water hardness 13 Water quality 48 Water tank lid is missing 52 Water volume 28 White symbols 22 WMF 800 Service Center 64 WMF Connect & Clean 37 WMF Service Hotline 64 © 2008-2009 WMF Aktiengesellschaft All rights, especially the rights of reproduction, publication and translation, are reserved. No part of this manual may be reproduced in any form or processed, duplicated or distributed using electronic systems without written consent. Subject to technical modification. Design and production/typesetting and print presentation: TecDoc GmbH; Geislingen, [email protected] Translated from the German original edition. Printed in Germany. 71 Introduction WMF800 Type 03 0400 BAL 12/09 - EN 72 07.12.2009