1
Basic Setup
6200 Digital Broadcast Delay
MIC PREAMP GAIN: Coarse preamp gain for each channel is set
in each channel’s setup menu. Fine gain is set within each channel’s
program menu. Separating the gain settings like this allows for coarse
gain (2 x line level settings and 2 x mic level settings) to be set as a
global parameter corresponding to the physical device(s) connected to
the 6200’s input(s). The coarse gain setting is not stored in the preset
programs. The fine gain setting is associated with its individual channel
and is stored in the preset programs. This allows one to set up the fine
gains which match specific users.
The dominant remote powering system in use today is the phantom
power system, which is compatible with both condenser and noncondenser microphones (dynamics, ribbons, etc.). If your microphone’s
specifications sheet claims that it requires phantom power, the
6200 can power it. The technical requirements for operation and/or
compatibility are:
1. The microphone must have a balanced, low-impedance output.
2. The balanced output must be floating with respect to ground. If
there is a center tap, it must not be grounded.
The 6200 offers 91.5 dB of overall gain (60 dB coarse gain plus 31.5
dB fine gain). Any mic output level is easy to accommodate with the
6200, regardless if it is the -60 dBV to -80 dBV levels common with
ribbon mics or the near line level (-10 dBV to +4 dBu) often delivered by
transformerless condenser mics. Input signals as high as +24 dBu can
by handled by the 6200.
In a nutshell, here are the do’s and don’ts of phantom powering:
DO:
Verify that your microphone can be phantom powered (if it is a
condenser mic).
Ensure that your microphone’s output is low impedance,
balanced and floating. This is especially important for
ribbon mics.
Turn the phantom power off when connecting vintage ribbon
microphones.
Mute your monitor speakers or headphones when turning the
phantom power on or off. If you don’t, there will be a loud,
nasty pop.
1.
Use the maximum allowable source level.
2.
Use only as much gain as necessary.
Mute your monitor speakers or headphones whenever you plug
in or unplug a phantom powered microphone. If you don’t,
there will be a loud, nasty pop.
The combination of the highest possible input levels with the lowest
possible gain always results in minimum noise and maximum
headroom. Remember, the best operating position for a gain control is
the minimum gain that delivers the required output level. SETTING MIC
PREAMP GAIN:
Both source level and preamp gain are directly related to the noise
floor, as well as to headroom at the output. The key to using the 6200
at its optimum performance level is to:
DON’T: Plug in an A-B powered microphone without a
suitable adapter.
Worry about your dynamic or ribbon microphones, as long as
they are wired so that the output is balanced and floating.
Enable phantom power when connecting line-level sources,
especially those that are transformerless.
Use the microphone input with unbalanced sources.
Use a direct box to feed an unbalanced source into the
microphone input.
Worry about your tube condenser mics. They are compatible
(although they cannot be phantom powered).
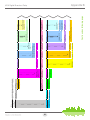
To set the coarse preamp gain:
1. Press the HOME button to ensure that we are starting
from the top.
2. Press the NEXT button once.
3. Turn the ADJUST knob clockwise until the display reads
“Section to Edit, - Setup Menu -”.
4. Press the NEXT button once.
5. Turn the ADJUST knob clockwise until the display reads
“- Setup Menu -, -- Channel 1 Input --”.
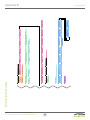
ENABLING PHANTOM POWER: If you have determined that the
microphone connected to ANALOG IN - CHAN 1 requires phantom
power, you now need to enable it for that input:
1.
6. Press the NEXT button once and the display should read “Channel
1 Gain, Hot Mic -36 dBu”, if it does not turn the ADJUST knob
clockwise or counter-clockwise until it does. This provides 40 dB of
gain which assumes a nominal input level of -36 dBu. This setting
should be sufficient for most microphones however, certain dynamic
microphones may require more.
Press the HOME button to ensure that we are starting from the top.
2. Press the NEXT button once.
3. Turn the ADJUST knob clockwise until the display reads “Section to
Edit, - Setup Menu -”.
7. Press the HOME button when finished.
4. Press the NEXT button once.
Provided that your monitoring path is turned on and set up properly,
you should now be able to speak into the microphone and get a basic
signal through the 6200. Talk into the microphone as loudly as you
think you will ever talk into it. If the audio distorts, you may need to turn
the gain down (try the -10 dBV setting). If the audio level is too weak,
turn the gain up (try the -56 dBu setting). If you adjust the gain, repeat
the process of speaking loudly into the mic and checking for distortion
or weak level. We’re looking for a ballpark level adjustment here. When
you find the most suitable coarse gain adjustment, move on to the fine
gain adjustment.
5. Turn the ADJUST knob clockwise until the display reads
“- Setup Menu -, -- Channel 1 Input --”.
6. Press the NEXT button three times and the display should read
“Channel 1 Phantom, Disabled”.
7. Turn the ADJUST knob clockwise until the display reads “Channel 1
Phantom, Enabled.”
8. Press the HOME button when finished.
9. Repeat for Channel 2 if necessary.
9