1
ANGLE
OSD
NAVI
VOICE
NU
LOUD
SYS TE
PU
SH
M
M
E
AS P S
SUB-W
SHUF
GPS
MODE
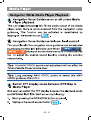
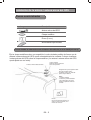
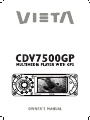
CDV7500GP
LOC
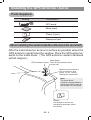
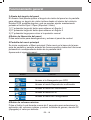
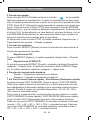
Important Safety Information
End user must read this section before operating this unit.
Operation of the unit is permitted only if traffic conditions are
suitable and you are absolutely sure that you, your passengers
or other motorists are not endangered, obstructed or inconveniienced.
In all cases, all applicable road traffic regulations must be
obeyed. DESTINATIONS MAY ONLY BE ENTERED WHEN
THE VEHICLE IS STATIONARY.
The navigation system is only an aid. Errors may occur in
individual data items / entries. At all times, the driver must
decide whether or not to heed the information provided. We do
not accept liability for erroneous data provided by the
navigation system.
Due to continual changes in traffic routing or deviations in the
data, it may occur that imprecise or erroneous information is
given. Therefore, actual road signs and traffic regulations must
always be observed. In particular, the navigation system can
not be used as an orientation aid at times of poor visibility.
The unit may only be used for its intended purpose. The volume
of the radio, navigation system should be adjusted so that
external noise is still audible.
Use the proper power supply, this product is designed to
operate with a 12 volt DC, negative ground battery system.
Protect the disc mechanism avoid inserting any foreign objects
into the slot of this player. Failure to follow this may cause
malfunction or permanent damage due to the precise
mechanism of this unit.
Incorrect installation may result in damage to the unit or to the
vehicle. Specialist knowledge and skills are required to install
the unit and its components. We strongly recommend that you
have the unit installed by a specialist workshop.
Risk of injury: Installing the components incorrectly may lead
to injuries in the event of a road traffic accident or render safety
devices ineffective. Please refer to the instructions provided by
the vehicle manufacturer.
BR - 2
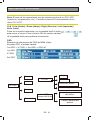
Connecting the System
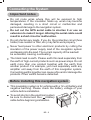
Important notes
Do not route wires where they will be exposed to high
temperatures. If the insulation heats up, wires may become
damaged, resulting in a short circuit or malfunction and
permanent damage to the navigation system.
Do not cut the GPS aerial cable to shorten it or use an
extension to make it longer. Altering the aerial cable could
result in a short circuit or malfunction.
Do not shorten any leads. If you do, the protection circuit (fuse
holder, fuse resister or filter, etc.) may fail to work properly.
Never feed power to other electronic products by cutting the
insulation of the power supply lead of the navigation system
and tapping into the lead. The current capacity of the lead will
be exceeded, causing overheating.
The black lead is earth. Please earth this lead separately from
the earth of high-current products such as power amps. Do not
earth more than one product together with the earth from
another product. For example, you must separately earth any
amplifier unit away from the earth of this navigation system.
Connecting earths together can cause a fire and/or damage the
products if their earths became detached.
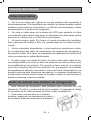
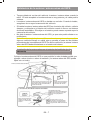
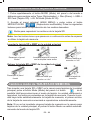
Before installing this navigation system
This navigation system is for vehicles with a 12-volt battery and
negative earthing. Please check the battery voltage of your
vehicle before installation.
To avoid shorts in the electrical system
be sure to disconnect the ( ) battery
cable before beginning installation.
BR - 3
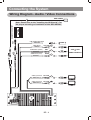
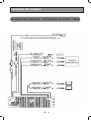
Connecting the System
Wiring Diagram - Audio / Video Connections
GPS AERIAL
BLUE
SUB
WOOFER
SUB-WOOFER OUTPUT
Note: Please refer to the "Installing the GPS Aerial". For
the proper mounting or installation of this GPS AERIAL.
USB CONNECTION CABLE
USB STICK
VIDEO INPUT
VIDEO IN
RED
AUDIO INPUT (LEFT)
AUDIO IN L
WHITE
VIDEO (1) OUTPUT
VIDEO OUT (1)
YELLOW
VIDEO (2) OUTPUT
VIDEO OUT (2)
YELLOW
SUB-W OUT
GPS AERIAL
AUDIO INPUT (RIGHT)
AUDIO IN R
USB
YELLOW
FUSE
BR - 4
VCR or DVD
or
GAME CONSOLE
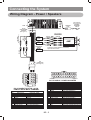
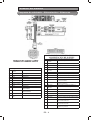
Connecting the System
Wiring Diagram - Power / Speakers
FUSE
(Not supplied)
ANTENNA
EXTENDER
CABLE
ANTENNA
JACK
BLACK
FRONT
CHANNEL
BLUE/WHITE
STRIPE
R-CH
L-CH
RED
AMP
Connect to power amplifier, If not used,
Tape bare end of wire.
RED
YELLOW
POWER
AMPLIFIER
REMOTE
RED
WHITE
L-CH
REAR
CHANNEL
(Not supplied)
RCA-TO-RCA
CABLES
WHITE
R-CH
GREY
(RED)
Ignition wire
(ACC)
(YELLOW)
Battery wire (B+)
20-PIN
AUDIO/POWER
HARNESS
(See Figure 1 )
ISO
CONNECTOR
(See Figure 2)
8
7
8
5
6
5
6
3
4
3
4
1
2
1
2
CONNECTOR A
CONNECTOR B
7
Figure 2
ISO CONNECTOR 4 PIN + 8 PIN
FEMALE WITH MALE TERMINAL
ISO CONNECTOR WIRING CHART
PIN
A4
A5
A7
A8
B1
B2
B3
B4
B5
B6
B7
B8
WIRE COLOR
YELLOW
BLUE
RED
BLACK
VIOLET
VIOLET / BLACK
GREY
GREY / BLACK
WHITE
WHITE / BLACK
GREEN
GREEN / BLACK
FUNCTION / LABEL
BATTERY(+)
POWER ANTENNA
IGNITION(ACC)
GROUND
RIGHT REAR SPEAKER (+)
RIGHT REAR SPEAKER ( )
RIGHT FRONT SPEAKER (+)
RIGHT FRONT SPEAKER ( )
LEFT FRONT SPEAKER (+)
LEFT FRONT SPEAKER ( )
LEFT REAR SPEAKER (+)
LEFT REAR SPEAKER ( )
1
2
3
4
5
6
7
8
9
10
11
12
13
14
15
16
17
18
19
20
Pin View
Figure 1
20 PIN AUDIO / POWER HARNESS
20 PIN HARNESS PIN CHART
PIN
1
2
3
4
5
6
7
8
9
10
11
12
13
14
15
16
17
18
19
20
BR - 5
WIRE COLOR
GREY / BLACK
GREY
VIOLET
VIOLET/BLACK
FUNCTION / LABEL
RIGHT FRONT SPEAKER ( )
RIGHT FRONT SPEAKER (+)
RIGHT REAR SPEAKER (+)
RIGHT REAR SPEAKER ( )
GREEN
GREEN / BLACK
RED
BLACK
RED
WHITE
WHITE / BLACK
BLUE/WHITE
BLUE
YELLOW
BLACK
WHITE
RED
BLACK
WHITE
LEFT REAR SPEAKER (+)
LEFT REAR SPEAKER ( )
IGNITION (ACC)
REAR PRE-AMPLIFIER LINE OUT COMMON
RIGHT REAR PRE-AMPLIFIER LINE OUT
LEFT FRONT SPEAKER (+)
LEFT FRONT SPEAKER ( )
POWER AMPLIFIER REMOTE (+)
POWER ANTENNA
BATTERY (+)
CHASSIS GROUND
LEFT FRONT PRE-AMPLIFIER LINE OUT
RIGHT FRONT PRE-AMPLIFIER LINE OUT
FRONT PRE-AMPLIFIER LINE OUT COMMON
LEFT REAR PRE-AMPLIFIER LINE OUT
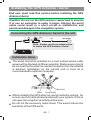
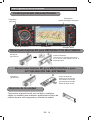
Installing the GPS Antenna / Aerial
Parts Supplied
Setting
Description
GPS aerial
Metal sheet
Clamp (5 pcs.)
Waterproof pad
When installing the aerial inside the vehicle (on the rear shelf)
Affix the metal sheet on as level a surface as possible where the
GPS antenna / aerial faces the window. Place the GPS antenna /
aerial on the metal sheet. (The GPS antenna / aerial is fastened
with its magnet.)
Metal Sheet
GPS anteanna / aerial Peel off the protective sheet
on the rear.
Make sure the surface is
free of moisture, dust,
grime, oil, etc., before
affixing the metal sheet.
Note:
The metal sheet
contains a strong adhesive
which may leave a mark on
the surface if it is removed.
Clamps
Use clamps to secure the
lead where necessary inside
the vehicle.
BR - 6
Installing the GPS Antenna / Aerial
End user must read this section before installing the GPS
Antenna / Aerial.
Caution: Do not cut the GPS antenna / aerial lead to shorten
it or use an extension to make it longer. Altering the aerial
cable could result in a short circuit or malfunction and
permanent damage to the navigation system.
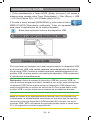
Connecting the GPS Antenna / Aerial to the unit
SCREW
5M
GPS AERIAL
GPS AERIAL
Note: Always use the provided screw
to fasten the GPS Antenna / Aerial.
FUSE
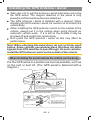
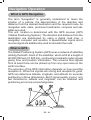
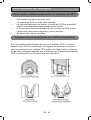
Installation Notes
The aerial should be installed on a level surface where radio
waves will be blocked as little as possible. Radio waves cannot
be received by the antenna / aerial if reception from the satellite
is blocked. Installation on the vehicle roof or boot lid is
recommended to optimism reception.
Boot lid
Roof
Rear shelf
When installing the GPS antenna / aerial inside the vehicle, be
sure to use the metal sheet provided with your system. If this is
not used, the reception sensitivity will be poor.
Do not cut the accessory metal sheet. This would reduce the
sensitivity of the GPS aerial.
BR - 7
Installing the GPS Antenna / Aerial
Take care not to pull the antenna / aerial lead when removing
the GPS aerial. The magnet attached to the aerial is very
powerful and the lead may become detached.
The GPS antenna / aerial is installed with a magnet. When
installing the GPS antena / aerial, be careful not to scratch the
vehicle body.
When installing the GPS antenna / aerial on the outside of the
vehicle, always put it in the vehicle when going through an
automatic vehicle wash. If it is left on the outside it may be
knocked off and scratch the vehicle body.
Don’t paint the GPS antenna / aerial, as this may affect its
performance.
Note: When attaching the metal sheet, do not cut it into small
pieces. Some vehicles use window glass that does not allow
signals from GPS satellites to pass through. On such vehicles,
install the GPS antenna / aerial on the outside of the vehicle.
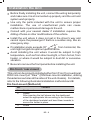
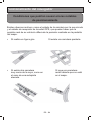
When installing the aerial outside the vehicle (on the body)
Put the GPS aerial in a position as level as possible, such as
on the roof or boot lid. (The GPS aerial is fastened with a
magnet.)
GPS antenna / aerial
When routing the lead in from the top of the door
Make a U-shaped loop in the lead
on the outside to prevent rain water
from flowing along the lead into the
interior of the vehicle.
Clamps
Use clamps to secure
the lead where
necessary inside the
vehicle.
When routing the lead in from inside the boot
Water proof pad
Make sure the water proofpad
contacts the top of the rubber
packing.
Clamps
Use clamps to secure the
lead where necessary inside
the vehicle.
Make a U-shaped loop in the
lead outside the rubber
packing to prevent rain water
from flowing along the lead
into the interior of the vehicle.
Rubber packing
BR - 8
Installation the Unit
Before finally installing the unit, connect the wiring temporarily
and make sure it is all connected up properly and the unit and
system work properly.
Use only the parts included with the unit to ensure proper
installation. The use of unauthorized parts can cause
malfunctions or permanent damage to the unit.
Consult with your nearest dealer if installation requires the
drilling of holes or other modifications of the vehicle.
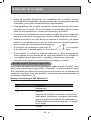
Install the unit where it does not get in the driver's way and
cannot injure the passenger if there is a sudden stop, like an
emergency stop.
30°
If installation angle exceeds 30°
from horizontal, the
unit might not give its optimum performance.
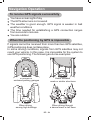
Avoid installing the unit where it would be subject to high
temperature, such as from direct sunlight, or from hot air, from
heater, or where it would be subject to dust dirt or excessive
vibration.
Be sure to remove the front panel before installing the unit.
Din front / rear-mount
This unit can be property installed either from“Front”(conventional
DIN Front-mount) or " Rear" (DIN Rear-mount installation, utilizing
threaded screw holes at the sides of the unit chassis). For details,
refer to the following illustrated installation methods A and B.
Din front-mount (Method A)
No.
1
2
3
Content
Dashboard
Holder
After inserting the half sleeve into the dashboard,
select the appropriate tab according to the thickness
of the dashboard material and bend them inwards to
secure the holder in place.
Screw
BR - 9
Installation the Unit
1
2
182
53
3
No.
1
2
3
4
5
6
7
Content
Dashboard
Nut (5mm)
Spring washer
Screw (4X12mm)
Screw
Support Strap
Be sure to use the support strap to secure the back
of the unit in place. The strap can be bent by hand to
the desired angle
Plain washer
1
6
7
4
2
5
3
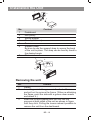
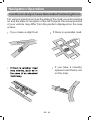
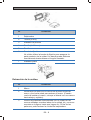
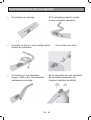
Removing the unit
No.
1
2
3
Content
Frame
Insert fingers into the groove in the front of frame
and pull out to remove the frame. (When re-attaching
the frame, point the side with a groove down wards
and attach it.)
Insert the levers supplied with the unit into the
grooves at both sides of the unit as shown in figure
until they click. Pulling the levers makes it possible to
remove the unit from the dashboard.
BR - 10
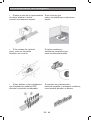
Installation the Unit
1
2
3
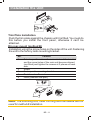
Trim Plate Installation
Push the trim plate against the chassis until it is fitted. You must do
this before you install the front panel, otherwise it can't be
attached.
Din rear-mount (method B)
Installation using the screw holes on the sides of the unit.Fastening
the unit to the factory radio mounting bracket.
No.
1
2
3
4
5
Content
Select a position where the screw holes of the bracket
and the screw holes of the main unit become aligned
(are fitted) and tighten the screws at 2 places on each
side.
Screw
Factory radio mounting bracket.
Dashboard or Console
Hook (Remove this part)
2
4
5
3
2
5
Note: The mounting box, outer trim ring and half-sleeve are not
used for method B installation.
BR - 11
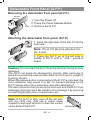
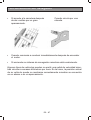
Detachable Front Panel (D.F.P.)
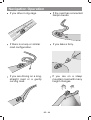
Removing the detachable front panel (D.F.P.).
RELEASE
BUTTON
D.F.P.
1. Turn the Power off.
2. Press the Panel Release Button.
3. Remove the D.F.P.
Attaching the detachable front panel (D.F.P.)
1. Insert the right side of the D.F.P. Into the
main unit.
1.
2.
PU
SH
T-Joint
Note: The D.F.P. Must be attached into
the T-Joint.
2. Press the D.F.P. on to the left side of
middle of D.F.P. until a " click" sound is
heard.
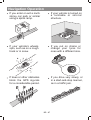
Caution: Do not insert the D.F.P from the left side. Doing so may
damage it.
The D.F.P can easily be damaged by shocks. After removing it,
place it in a protective case and be careful not to drop it or subject it
to strong shocks.
When the release button is pressed and the D.F.P is unlocked, the
car's vibrations may cause it to fall. To prevent damage to the
D.F.P, always store it in a protective case after detaching it.
The rear connector that connects the main unit and the D.F.P is an
extremely important part. Be careful not to damage it by pressing
on it with fingernails, pens, screwdrivers, etc.
Note: If the D.F.P is dirty, wipe off the dirt with
soft, dry cloth only. And use a cotton swab
soaked in isopropyl alcohol to clean the socket
on the back of the D.F.P.
BR - 12
Socket
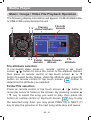
Panel Open / Close Operation
The unit is equipped with the most advanced full logic motorized
slide down system.You can enjoy the advance technology with a
single press of the " Eject / Open" button. Please read carefully
the following operation instruction before operating the unit.
Open / close the panel
Press the " Eject / Open" button to slide down (Eject / Open)
closed panel or to slide up (close) an opened panel.
Loading a CD
Panel in the slide down position, the disc slot become accessible.
Insert a CD through the disc slot, the CD will be automatically load
and the panel will also close automatically & playback will begin.
If no CD is inserted, press Open button again to slide up the panel.
Ejecting a CD
Press Open button to slide down the panel, if a CD is loaded, it will
be ejected automatically. No further key press is needed.
If the ejected CD is not being removed, after 10 seconds it will be
reloaded automatically. And the panel will automatically slide up
after disc has been reloaded.
Caution : If the ejected disc remains in the slot, the Open button
will not function, so closing the panel by using Open button is
prevented unless the disc is removed or reloaded.
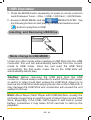
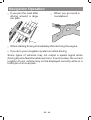
Panel angle Adjustment
End user can adjust the panel viewing angle of the display to
obtain the optimum viewing angle inside the vehicle. There are
TWO angles can be adjusted by Long pressing the panel Eject /
Open button:
1st long press to get into Angle 1
2nd long press to get into Angle 2
3rd long press to resume to the normal position.
Caution: Please always use the " OPEN" button to slide up/ down
the front panel. Please never try to slide up or down the front
panel manually, this will cause serious & permanent damage to
the slide down mechanism, and this will void the warranty.
Please do not try to detach / remove the front panel ( by pressing
the detach button ) or attach the front panel when the panel is in
the slide down position. This may cause serious & permanent
damage to the unit & panel. Only attach or detach the front panel
when the panel is in the slide up position.
BR - 13
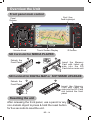
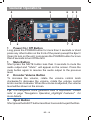
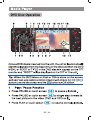
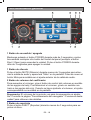
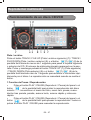
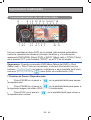
Overview the Unit
Front panel main control
Eject / Open
Panel Angle adjust
Panel
Release
ANGLE
DE
MO
OSD
NAVI
VOICE
AS PS
OPEN
RPT
LOUD
SUB-W
TA
SHUF
GPS
MODE
CDV7500GP
Volume Knob
AF
STO P
PTY
NU
SYS TE
PSU
H
M
M
E
REL
Touch Screen Display
BAND
LOC
IR Receiver
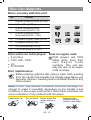
SD Card slot for MEDIA PLAYER
2
1
Detach the
Front Panel
Face
Up
Insert the Memory
Card with Label up
side into the SD
Card slot on main unit
SD Card slot for DIGITAL MAP or SOFTWARE UPGRADE
Detach the
Front Panel
1
2
Insert the Memory
Card with Label up
side into the SD Card
slot behind the front
panel
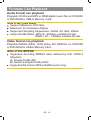
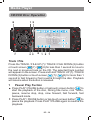
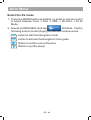
Resetting the unit
After releasing the front panel, use a pencil or any
non-metalic object to press & hold the reset button
for five seconds to reset the unit.
BR - 14
RE
SE
T
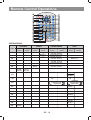
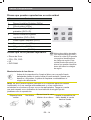
Disc Can Supports
Discs can play with this unit
No.
Content
1
Digital Versatile Discs (DVDs)
2
Video CDs (VCDs)
3
Digital Versatile Discs
Recordable(DVD+/-R)
4
Digital Versatile Discs
Rewritable(DVD+/-RW)
5
6
Compact Digital Video (VCD)
Compact Discs (Cds)
7
CD Recordable (CD-R)
8
CD Rewritable (CD-RW)
Discs which can not be played
8 cm Disc
CDV, CDI, CDG,
LD
DVD RAM
Note on region code
ALL
Disc maintenance
DVD players and DVD
Video discs have their
own Region Code
numbers. This unit can
play the disc of all region
code numbers.
Before playing, wipe the disc using a clean cloth, working
from the center hole towards the outside edge.Never use
benzene, thinners, cleaning luids or antistatic liquids or any
other solvent.
Note: A disc may become somewhat scratched (although not
enough to make it unusable) depending on you handle it and
conditions in the usage environment. Note these scratches are
not an indication of any problem with the player.
Label side Up
Do not bend
Never touch the
under side of a
disc
BR - 15
Wipe the disc
surface from the
center to the edge.
Formats Can Playback
Audio format can playback
Playback CD-DA and MP3 or WMA digital music file on CD-ROM
or DVD-ROM or USB or Memory Card.
Note of MP3 and WMA:
Support Maximum 2000 files.
Maximum 30 characters display.
Supported Sampling frequencies; 32kHz, 44.1kHz, 48kHz.
Supported Bit-Rates: MP3=8 ~320kbps variable bit rate;
WMA = 32 ~ 192kbps variable bit rate.
Video format can playback
2
Playback IMAGE JPEG, DVD Video, AVI, MPEG4. on CD-ROM
or DVD-ROM or USB or Memory Card.
Note of the MPEG4:
Supported decoding MPEG4 video defined by ISO 14496-2
Standard.
A) Simple Profile (SP)
B) Advance Simple Profile (ASP)
Supported file format: MP4 and M4A (audio only).
BR - 16
Remote Control Operations
9
12
M UT E
1
2
8
10
SRC
5
11
VOLUME
15
4
16
6
17
13
14
AUDIO
3
18
30
37
34
31
19
38
20
21
GOTO
35
39
22
24
36
32
25
7
AF
TA
LOUD
GPS
MODE
27
NAVI
VOICE
33
40
29
23
28
26
OPERATIONS:
SYSTEM
KEY
1
2
3
Short
Press
Long
Press
Mute
Power
Open
& Close
Audio
Menu
System
Menu
4
Source
5
Volume
Up
6
Volume
Down
7
Loud
TUNER
Short
Press
Angle
CD
MP3
DVD
Long
Press
Short
Press
Long
Press
Short
Press
Long
Press
Short
Press
Long
Press
Angle
Eject
Angle
Eject
Angle
Eject
Angle
AF
8
Tune
Up
Fast
Forward
Fast
Forward
Fast
Forward
9
Tune
Down
Fast
Backward
Fast
Backward
Fast
Backward
10
11
Left
Left
Left
Right
Right
Right
12
13
Up
Up
Up
Down
Down
Down
14
Seek
Up
Track
Up
File
Up
Next
15
Seek
Down
Track
Down
File
Down
Back
Ok
Ok
Ok
Pause
/Play
Pause
/Play
Pause
/Play
Stop
Stop
Stop
16
17
18
M1
Memory
1
Track NO. Access
File NO. Access
20
M2
Memory
2
Track NO. Access
File NO. Access
Numeric 2
21
M3
Memory
3
Track NO. Access
File NO. Access
Numeric 3
22
M4
Memory
4
Track NO. Access
File NO. Access
Numeric 4
19
BR - 17
Numeric 1
Remote Control Operations
9
12
M UT E
2
1
8
10
SRC
5
11
VOLUME
15
4
16
6
17
13
14
AUDIO
3
18
30
37
34
31
19
38
20
21
GOTO
35
39
22
24
36
32
25
7
AF
TA
LOUD
GPS
MODE
27
NAVI
VOICE
33
40
29
23
28
26
OPERATIONS:
SYSTEM
KEY
Short
Press
Long
Press
TUNER
Short
Press
23
M5
24
M6
Memory
5
Memory
6
25
26
27
28
29
Band
NAVI
Voice
Volume
DVD
CD/MP3/WMA
Long
Press
Short
Press
Long
Press
Track NO. Access
File NO. Access
Track NO. Access
File NO. Access
Track NO. Access
File NO. Access
Track NO. Access
File NO. Access
Track NO. Access
File NO. Access
Track NO. Access
File NO. Access
Short
Press
Long
Press
Numeric 5
Numeric 6
Numeric 7
Numeric 8
Numeric 9
Numeric 0
NAVI
Voice
On/Off
VCD: PBC
30
DVD:
DVD MENU
Set
Up
31
Repeat Off
Repeat Track
Repeat Disc
32
33
Set
Up
Repeat Off
Repeat Chapter
Repeat Title
Zoom
34
OSD
35
GoTo
36
Subtitle
37
Title
38
DVD
Audio
DVD
Angle
39
40
GPS
Mode
TA
BR - 18
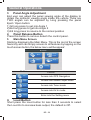
General Operations
6
5
4
9 3
ANGLE
Main Menu
NAVI
VOICE
AS PS
NU
GPS
Media
Player
Tuner
AV-In
STO P
RPT
Setting
SUB-W
GPS
MODE
CDV7500GP
1
LOUD
TA
SHUF
1
2
OPEN
AF
OSD
PTY
E
SYS TE
PU
SH
M
M
E
REL
D
MO
7
BAND
LOC
8
Power On / Off Button
Long press the POWER button for more than 3 seconds or short
press any other button on the front of the panel (except the Eject /
Open) to turn on the unit. Long press the POWER button for more
than 3 seconds to turn Off the unit.
1
Mute Button
Short press the MUTE button less than 3 seconds to mute the
audio output and " Mute" will appear on the screen. Press the
mute button again to resume the audio output to the previous
level.
2
Encoder Volume Button
To increase the volume, rotate the volume control knob
clockwise.To decrease the volume, rotate the volume control
knob counter clockwise. When the volume is adjusted, the volume
level will be shown on the screen.
Tip: The navigation voice guidance level is adjustable. Please
refer to page "Navigation Operation_Hightlight Features" for
more details.
3
Eject Button
Short press the EJECTbutton less than 3 seconds to eject the Disc.
BR - 19
General Operations
3
Panel Angle Adjustment
End user can adjust the panel viewing angle of the display to
obtain the optimum viewing angle inside the vehicle There are
TWO angles can be adjusted by Long pressing the panel
Eject / Open button:
1)1st long press to get into Angle 1
2)2nd long press to get into Angle 2
3)3rd long press to resume to the normal position
4
Panel Release Button
Press this button to remove detach the control panel.
5
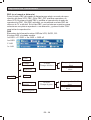
Main Menu Screen
Starts by displaying the Main Menu. This is the root of the screen
hierarchy and can simply access to all features by tapping on the
touch screen button, the below menu will be appear:
Main Menu
GPS
Media
Player
Tuner
AV-In
Setting
Button
6
Control
GPS
Access into GPS Navigation
Media
Player
Access into Media Player mode
Tuner
Access into Tuner mode
AV-In
Access into AV-In mode
Setting
Enter into the Setting menu
Loud Button
Short press the Loud button for less than 3 seconds to select
the Loud On to increase bass output, the default is Off.
BR - 20
General Operations
7
Sub-woofer
Short press the SUB-W button for less than 3 seconds to turn
on the Sub-woofer function. Press the SUB-W button again to
turn off the Sub-woofer function.
8
GPS Mode
End user can switch the TFT display between the playback mode
and GPS NAVIGATION / MAP screen by following:
1. Short pressing the GPS MODE button on panel.
2. Tapping on the touch screen button NAVI or
.
AF
FM1
10:30
am
Band
9
104.00
FMSELECT
87.50
90.00
98.00
106.00
108.00
87.50
Navi Voice
This unit will automacitally MUTE the audio output of the Media
player when there is announcement from the navigation voice
guidance. This function can be activated or deactivated by tapping
on the screen NAVI or
.
VOICE
The sound level of the navigation voice guidance can be adjusted
by pressing the NAVI VOICE button and When GPS Vol 26
/
GPS VOL : 34 display on screen there is around 10 seconds time
out to adjust the desired sound level by rotating the encoder
volume knob.
Button
Control
Navigation Voice guide on
Navigation Voice guide off
Tips: This NAVI VOICE sound level adjustment will not affect the
Tuner or Media Player volume level .
Long pressing NAVI VOICE button to switch this NAVI VOICE
guidance ON or OFF.
BR - 21
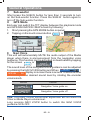
Tuner operations
3
3 6
5
9
ANGLE
NAVI
VOICE
AF
FM1
104.00
STO P
RPT
10:30
am
Band
90.00
2
4
Band Function
2
Tuning Up/Down
1
SUB-W
98.00
TA
106.00
108.00
87.50
CDV7500GP
1
LOUD
FMSELECT
87.50
SHUF
OPEN
AF
NU
SYSTE
PU
SH
M
M
E
OSD
AS PS
PTY
DE
MO
REL
4
Press panel BAND button or touch screen
between FM bands and AM(MW) bands.
2 7
Band
GPS
MODE
BAND
LOC
8 1
to change
Manual Tuning
Press & Hold the panel UP / DOWN Tuning button or tapping
touch screen button
to move the radio frequency
number up or down by one step.
Auto Seek Tuning
Press the panel UP / DOWN Tuning button or tapping touch
screen button
to move to next station automatically.
4
Preset Stations
Press the panel 6 numbered preset buttons or tap touch screen
button
to store and recall stations for each band.
5
Automatically store / preset scan (AS/PS)
Automatically select 6 strongest stations and store them in the
current band. Long press panel AS / PS button for more than 3
seconds, the new stations replace stations already stored in that
band.
Preset Scan
To Scan the stations already stored in the current band. Short
press panel AS / PS button for less than 3 seconds, the unit will
pause for 10 seconds at each preset station. Press panel AS / PS
button again to stop scanning when the desired station is reached.
BR - 22
Tuner operations
RDS Function
The unit is equipped with the following RDS function:
-
6
AF Alternative Frequencies
CT Clock Time
PI Program identifications
PS Program service name
PTY Program Type
REG Regional Change
TA Traffic Announcement
TP Traffic program
AF function
Short pressing panel AF button less than 3 seconds to select AF
ON / OFF. " AF" icon will light up on the screen. Under AF “On”
mode, if the tuned in station signal is getting weak, the unit will
automatically switches to a different frequency on the same
network with stronger signal.
Note: Factory default setting is " AF ON" .
8
TA Function
Short pressing panel GPS MODE / TA button less than 3 seconds,
to switch on TA standby mode. The TA icon will light up on the
screen. In the stand by mode, when a traffic announcement
broadcast starts, the traffic announcement broadcast will be
received as top priority regardless of the function mode. When a
traffic announcement starts, " TRAFFIC INFO" will show on the
screen, press the TA button can cancelled the broadcast
reception while a traffic announcement broadcast is being
received. The unit will go back to the previous mode and TA goes
into stand by mode again.
BR - 23
Tuner operations
7
PTY Function
Long press the SUB-W / PTY button for more than 3 seconds to
set into the PTY mode. And then press this button repeatedly to
different PTY group as listed below. Once the desired PTY is
shown on the preset memory M1 to M6, press this preset memory
number to activate the searching of this PTY, the PTY name will
appear on the 6 preset buttons.
POP M
ROCK M
EASY M
NEWS
AFFAIRS
INFO
LIGHT M
CLASSICS
OTHER M
SPORT
EDUCATE
DRAMA
GROUP-2
GROUP-1
CULTURE
SCIENCE
VARIED
SOCIAL
RELIGION
PHONE
WEATHER
FINANCE
CHILDREN
TRAVEL
LEISURE
DOCUMENT
GROUP-4
GROUP-3
JAZZ
COUNTRY
OLDIES
FOLK M
NATION M
GROUP-5
If no station with the selected PTY broadcast can be found for 5
seconds, the system then returns to the previous mode.
BR - 24
Media Player
This Multi-Media player unit can support the playback of CD Disc,
DVD disc, USB Host, SD Memory Card.
Note: For more details of this unit supporting playback disc and
format. Please see pages of "Disc Can support" & " Format can
playback" .
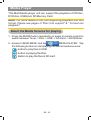
Select the Media Soruces for playing
1. Press the MODE button repeatedly on panel or remote control to
switch between Tuner -> Disc -> USB - > SD Card - > AV IN Mode.
Media
2. Aceess to MAIN MENU and tap
MEDIA PLAYER. Tap
Player
the following buttons to start playing the desired media sources:
button to play files in USB
button to playing the Disc
Button to play the files in SD card
BR - 25
Media Player
Note: If any media device is not avaiable in this unit, this media
souurce will not appear during Mode switch or on the touch
screen.
Note: This unit only can playback the SD Card which is inserted in
the main unit.
Please refere to the page "Overview of the unit" for more details of
the SD card slot for media player use.
Color setting during DVD video disc playback
Tapping touch screen button
to access into the DVD video
color setting. The below Set Up menu will appear:
RESET
X
COLOR
BRIGHTNESS
CONTRAST
HUE
COLOR
Change setting for Color
BRIGHTNESS
Change setting for Brightness
CONTRAST
Change setting for Contrast
HUE
Change setting for Hue
RESET
X
Reset to default setting
Exit Color configuration menu
BR - 26
BR - 27
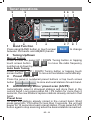
Media Player
CD/VCD Disc Operation
1 2
8
ANGLE
D
MO
E
OSD
NAVI
A S PS
NAVI
VOICE
NAVI
VOICE
OPEN
RPT
SUB-W
GPS
MODE
CDV7500GP
4 3
LOUD
TA
SHUF
7
AF
STO P
PTY
NU
SYS TE
PSU
H
M
M
E
REL
BAND
LOC
8 1 2 7
Track / File
Press the TRACK / FILE UP (7) / TRACK / FILE DOWN (8) button
or touch screen
(7) /
(8) for less than 1 second to move to
the next or previous track on the CD. The selected track number
will appear on the screen. Press and Hold TRACK UP (7) / TRACK
DOWN (8) button or touch screen
(7) /
(8) for more than 1
second to fast forward or fast reverse through the disc. Playback
will resume when the button is released.
1
Pause/ Play Fuction
Press PLAY / PAUSE button or tap touch screen button
to
start the playback of the disc, During title menu, root menu,
pause, resume stop, stop, slow forward, fast forward, fast
backward mode.
Press PLAY / PAUSE button or tap touch screen button
. to
pause the playback. Press PLAY / PAUSE again to resume the
playback.
BR - 28
Media Player
2
Stop Function
Press STOP button or tap touch screen button
to stop playing.When playback is stopped,the unit can keep the memory of
where the STOP was pressed. Press PLAY and the playback
will resume from this point. Press STOP button again, RESUME
function will be cancelled and the unit is now in full stop mode. If
PLAY button is pressed now, it will play from the beginning.
RESUME function is suitable for discs showing playing time
during playback.
Press STOP twice, state changes:play->resume stop->full stop.
3
Repeat Function
Press REPEAT button during playback to activate the repeat
play function.
CD Repeat:
Press REPEAT, state changes: repeat all -> repeat track
VCD/SVCD Repeat:
Short press REPEAT, state changes:repeat off -> repeat
track. Long press REPEAT, state changes: repeat off ->
repeat all.
4
Random function
Normal -> Random on repeat default.
Random -> Normal on repeat default.
7&8 Fast Forward / Fast Reverse
Press FAST FORWARD / FAST REVERSE button during playback, the disc will fast forward or backward in different times of
normal playing speed. There are 5 levels of speed available:
X2, X4, X8, X16, X32, means multiply with the normal speed.
To return back to normal play while in FAST FORWARD or
FAST BACKWARD mode, just press PLAY button on the panel
or the remote control.
Press FAST FORWARD, speed changes: normal speed -> X2 > X4 -> X8 -> X16 -> X32 -> normal speed.
Press FAST REVERSE, speed changes: normal speed -> X2 ->
X4 -> X8 -> X16 -> X32 -> normal speed.
BR - 29
Media Player
PBC ( On remote control )
Press PBC button on remote control to choose a VCD disc play
mode:PBC_ON or PBC_OFF,when you playing a VCD disc.
When pressing PBC button and the player change to PBC
_ON playing mode, a PBC list of the disc will be displayed on
TV or monitor. In PBC list, use number button to select a track
to play or direction press PLAY button to start to the playback.
OSD
VCD, SVCD, CD OSD information item:
Press OSD, state change:
1st OSD -> 2nd OSD -> 3rd OSD -> OSD off
1st OSD
2nd OSD
3rd OSD
Track
2nd OSD
Time
st
1 OSD
Disc Time
Current Disc Time
Remain Disc Time
Repeat
3rd OSD
PBC
Track Time
Play Mode
L/R Stereo
BR - 30
Current Track Time
Remain Track Time
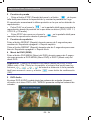
Media Player
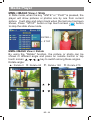
Music / Image / Video File Playback Operation
The following display information will appear, if a Multi-Media disc
or USB or SD is inserted into this unit.
1 2
8
File Info
Playing
statue domain domain
ANGLE
DE
MO
NAVI
VOICE
AS PS
OPEN
RPT
LOUD
SUB-W
TA
SHUF
GPS
MODE
CDV7500GP
7
AF
STO P
PTY
NU
SYSTE
PU
SH
M
M
E
REL
OSD
BAND
LOC
File
attribute
4 3 Folder Image browse
domain
domain
File attribute selection
ؿ
ؿ
In non-search state, press on remote control or tap touch
screen / button to move the cursor to file attribute domain,
then press on remote control or tap touch screen ؿor ف
button to select Audio, Image, Video file attribute and press OK
button on remote control or tap touch screen
button to
determine the attribute you selected.
ؿ
ؿ
Folder/File selection
Press on remote control or tap touch screen
/
button to
move the cursor to folder or file domain. By pressing number ؿ
/ فkey to select the song you want to play, then press OK
button on remote control or tap touch screen
key to play
the selected song. Also, you may press PREV (8) or NEXT (7)
key to play the previous or the next song while play and pause.
BR - 31
Media Player
Note: Other operation are the same as CD / VCD, like repeat,
program and so on. Please refer to the CD / VCD Disc
Operation section.
10&11 Up / Down / Right / Left / Enter
Press on remote control or tap touch screen
/
/
/
button to move the cursor.
Press OK button on remote control or tap touch screen button
to confirm the selection.
OSD
MMN Video OSD information item:
Press OSD, state change:
1st OSD -> 2nd OSD -> 3rd OSD -> OSD off
1st OSD
2nd OSD
3rd OSD
Folder
Audio
2nd OSD
File
Subtitle
Frame Size
st
1 OSD
Play mode
Time
3rd OSD
Title Time
Repeat
BR - 32
Current File Time
Remain File Time
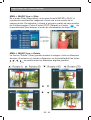
Media Player
MMN->IMAGE View-> Slide
In Slide mode, when the key " ENTE" or " PLAY" is pressed, the
player will show pictures or photos one by one from current
picture. It will stop and return back when the last one has been
shown, Press " STOP" button or tap touch screen
button
to stop the slide show mode.
ENTER->
<- STOP
ؿ
ؿ
BR - 33
ؿ
ف: Rotate 180
ؿ
ؿ
: Rotate 90
ؿ
ؿ
ؿ
ؿ: Rotate 0
ؿ
MMN->IMAGE View-> Rotate
By using the "Rotate" function, the picture or photo can be
shown in different angle and press on remote control or tap
touch screen ؿ, , , key to switch among these angles.
Rotate angle:
: Rotate 270
BR - 34
Media Player
2
Stop Function
Press STOP or touch screen button
to stop playback and
show the logo screen. The player will memorize the last position
where playback is stopped.
Press PLAY or touch screen
to resume playback from the
positon where playback is stopped ( DVD, VCD 1.1, VCD 2.0
and audio CD).
Pressing STOP twice or touch screen
to resume playback
from the beginning of the disc.
3
Repeat Function
Short press REPEAT button less than 3 seconds to change
from: repeat off -> repeat chapter.
Long press REPEAT button more than 3 seconds to change
from: repeat off -> repeat title.
4
DVD Menu ( RDM )
Press DVD MENU button less than 3 seconds to bring up the DVD
MENU or ROOT on the DVD disc.
Tip: When the DVD Menu or Root or Title is show on the screen,
end user can use remote control or tap touch screen
button to move the cursor and the
button as OK button.
5
DVD Audio
Press DVD AUDIO, you can choose audio streams, if the DVD
disc or AVI / MPEG4 has multi audio streams.
BR - 35
Media Player
7
Next Function
Press NEXT button or tap touch screen
button when playing
a disc, a chapter (DVD), a track (VCD / SVCD / CD), a song
(MP3 / WMA), a picture (JPEG) , or a video file (AVI / MPEG4 /
MPG/ DAT) is skipped forward accordingly.
8
PREV Function
Pressing PREV button or tap touch screen
button will play
the current chapter (DVD), current track(VCD / SVCD / CD),
current song (MP3 / WMA) or current video file (AVI /MPEG4 /
MPG / DAT) from the beginning if the already played time is
less than four seconds. If already played time is more than four
seconds, Pressing PREV button will skip a chapter (DVD), a
track ( VCD / SVCD / CD), a song (MP3 / WMA), a picture
(JPEG) or a video file (AVI / MPEG4 / MPG / DAT) backwardly.
7/8 Fast Forward & Fast Back Forward Function
Long press FAST FORWARD or touch screen
for more
than 3 seconds to fast forward through the disc. Each time the
button is pressed, a new speed (2X, 4X, 8X or 16X) will be
activated.
Press PLAY or touch screen button
to resume normal
playback.
Long press FAST BACKWARD or touch screen button
to
fast reverse through the disc. Each time the button is pressed,
a new speed (2X, 4X, 8X or 16X) will be activated.
Press PLAY or touch screen button
to resume normal
playback.
Number 0~9 (On Remote Control)
By pressing the Number (0, 1, 2, 3, 4, 5, 6, 7, 8, 9) button, End
user can access into the desired track or chapter. Also, it is
widely used in different search domain: title search, chapter
search, track search, time search and program function.
BR - 36
Media Player
Subtitle (On Remote Control)
Pressing the SUBTITLE button on remote control, End user
may select one of the subtitles language to show it on the
screen or to turn off the SUBTITLE. This function is invalid for
VCD / SVCD / CD, MP3 / WMA and JPEG.
9
DVD OSD ( D)
Short Press AS / PS button, once to display the amount of time
played and time remaining on the disc.
Short Press AS / PS button twice to display the disc type,
current chapter (DVD) or track (VCD / SVCD, Audio CD ) and
total number of chapters or tracks. Also displayed (for DVD
only) the current title, total number of titles, audio language /
type / # of channels, subtitle language, and angle selection.
9
DVD Set Up ( D )
Press the SET UP button on the remote control or long press the
AS / PS button for more than 3 seconds on the main unit to enter
into the Setup Menu mode.
The options included in General Setup menu are: "Language","
Display" , " Audio" , " Parental" .
BR - 37
Media Player
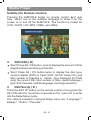
Language Setting
Press the or touch screen
buttons, move to the Language
button. The list of available language will appear:
Use the
Use the
buttons to select the setting.
buttons to change among the available language.
Press Ok or touch screen
to cycle through each possible
option or display a list of the available options.
OSD language
The OSD language setting provide the end user the selection of
preferred language for the OSD menu and messages. The
following options are available:
BR - 38
Media Player
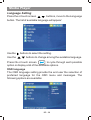
Subtitle
The Subtitle setting allows the end user to select a preferred
language and to change the subtitle language setup.
Audio
The Audio setting allows the user to select a preferred language
and to change the Audio language setup .
Disc
The Disc setting allows the user to select a preferred language
and to change the Disc menu language setup .
BR - 39
Media Player
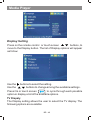
Display Setting
Press on the remote control or touch screen
buttons, to
move to the Display button. The list of Display options will appear
as follow:
Use the
Use the
buttons to select the setting.
buttons to change among the avaitable settings.
Press Ok or touch screen
to cycle through each possible
option or display a list of the available options.
TV Dispaly
The Display setting allows the user to select the TV display. The
following options are available:
BR - 40
Media Player
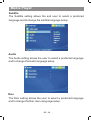
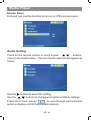
TV Type
The Display setting allows the user to select the TV type. The
following options are available:
Angle Mark
The Display setting allows the user to select the Angle mark on/off
mode.
BR - 41
Media Player
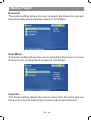
Screen Saver
End user can use this function to turn on or off the screen saver.
Audio Setting
Press on the remote control or touch screen
buttons,
move to the Audio button. The list of Audio optional will appear as
follow:
Use the
Use the
buttons to select the setting.
buttons to change among the avaitable settings.
Press Ok or touch screen
to cycle through each possible
option or display a list of the available options.
BR - 42
Media Player
Downmix
The Audio setting allows the user to select the Downmix and set
downmix setup stereo analog output of this Player.
Dual Mono
The Audio setting allows the user to select the Dual mono and set
dual mono(1+1) setup stereo output of this Player.
Dynamic
The Audio setting allows the user to select the Dynamic and set
the dynamic sound output high volume outputs are softened.
BR - 43
Media Player
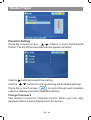
Parental Setting
Press the or touch screen
buttons, move to the Parental
button. The list of Parental optional will appear as follow:
Use the
Use the
buttons to select the setting.
buttons to change among the avaitable settings.
Press Ok or touch screen
to cycle through each possible
option or display a list of the available options.
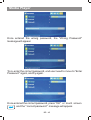
Change Password
This feature is used for Parental Control. Enter your four digit
password when a hint is displayed on the screen.
BR - 44
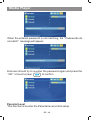
Media Player
Once entered the wrong password, the "Wrong Password"
message will appear.
To re-enter the correct password, end user need to move to "Enter
Password " again, and try again.
Once entered the correct password, press "OK" or touch screen
and the " correct password" message will appear.
BR - 45
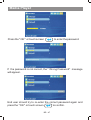
Media Player
When the entered password is not matching, the " Passwords do
no match" message will appear.
End user should try to re-enter the password again and press the
“ OK" or touch screen
to confirm.
Parental Level
This function is to enter the Parental level control setup.
BR - 46
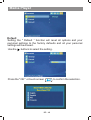
Media Player
Press the " OK" or touch screen
to enter the password.
If the password is not correct, the " Wrong Password" message
will appear.
End user should try to re-enter the correct password again and
press the " OK" or touch screen
to confirm.
BR - 47
Media Player
Default
Setting the " Default “ function will reset all options and your
personal settings to the factory defaults and all your personal
settings will be erased.
Use the
buttons to select the setting.
Press the " OK" or touch screen
BR - 48
to confirm the selection.
AV-In Mode
Select the AV mode
1. Press the MODE button repeatedly on panel or remote control
to switch between Tuner -> Disc -> USB - > SD Card - > AV IN
Mode.
AV-In
2. Aceess to MAIN MENU and tap
AV Mode. Tap the
following buttons to start playing the desired media sources:
NAVI button to start the Navigation mode
NAVI
button to activale the Navigation Voice guide
VOICE
Button to set the color preference
Button to quit the player
BR - 49
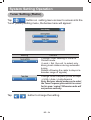
System Setting Operation
To adjust the system Settings of this unit, tap on the main menu
Setting
screen button
to enter into the setting menu, the below
menu will appear:
Settings
Sound Setting
Tap
button on setting menu screen to access into the
sound setting menu, the below menu will appear for selection.
Setting
Control
Balance
R 10
Left and Right Speaker Balance
Fader
F 10
Front and Rear Speaker Fader
Bass
+ 05
Bass Level
Treble
- 05
Treble Level
BR - 50
System Setting Operation
Tap
level .
button on the sound setting menu screen to select the
Tap
button to enter in the next page, the below menu will
appear for selection.
Note: Tap
button to be return to the previous page.
Setting
Control
Button Beep Tone
Sub-Woofer Output
Tap
bar on the sound setting menu screen to turn on
or off of these functions.
On
Tip: Tap
Off
button to exit the sound setting menu.
BR - 51
System Setting Operation
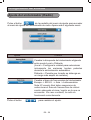
Display Setting
Tap
button on the setting menu screen to access into
the Display setting menu, the below menu will appear:
Display Setting
Brightness 06
Time Setting
Calibration
Setting
Control
Screen Brightness
Tap
level .
button on the Display Setting menu screen to select the
Date & Time Setting
Time Setting
Tap
bar on the Display Setting menu screen to
access into the Date & Time menu, the below menu will appear:
Time Setting
Hour
Time
Format
AM
11
Min
31
12 Hour Mode
Tap
button to select the Year/ Month/Day of the Date
mode and Hour/Min of the Time mode, then tap
button
to change the date & time.
BR - 52
System Setting Operation
Tap
12 Hour Mode
bar to change time format to 24 hours.
Calibration
Tap
bar on the Display Setting menu screen to start
the Calibration setting.
When the target moves to another position, tap and hold at the
center of the new target. Repeat each time to complete the
calibration process.
Once completed, tap anywhere on screen to go back to menu
screen.
Note: This Calibration is for the display touch screen. If found the
touch screen buttons sensitive became low, the re-calibration is
necessary.
BR - 53
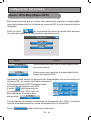
System Setting Operation
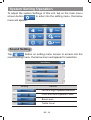
Tuner Setting (Radio)
Tap
button on setting menu screen to access into the
Tuner (Radio) setting menu, the below menu will appear:
Setting
Control
Change Tuner seeking in Local or
Distant mode.
( Local = Set the unit to select only
strong local stations during automatic
tuning
Distant=Allowing the radio to stop at a
broader range of signals)
Change Tuner FrequencyArea, Europe
-> USA->Asia -> LatinAmerica
Note: End user should make sure to select
the Tuner Frequency Area which is correct
for his area / region!! Otherwise radio will
not perform correctly.
Tap
button to change the setting.
BR - 54
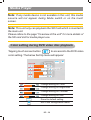
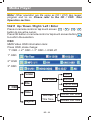
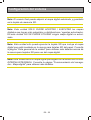
System Setting Operation
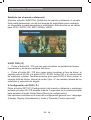
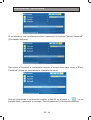
GPS Map Setting
This setting is for end user to select for run the digital Map which is
stored into SD memory card or in the built-in internal memory.
Tap
button on setting menu screen to access into the
GPS Map setting, the below menu will appear:
Setting
Control
Select to run Digital Map on internal
memory
Select to run Digital Map on SD
memory card
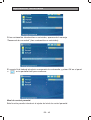
Important: To activates run the Digital Map on the SD Card. End
user must switch off the GPS Navigation.
Access to GPS Navigation_Main
Cockpit
Settings
Menu and tap
to switch off
No
GPS
the GPS Navigation. After switched signal
About
Map
off the GPS Navigation, end user 2005-05-27
then tap
.
Exit
Find & Go
12:05
This time re-entry to GPS Navigation the system is automatic
run the Map which stored on SD Card.
Tap
as the confirmation of the selection.
BR - 55
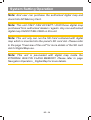
System Setting Operation
Note: End user can purchase the authorized digital map and
store it into SD Memory Card.
Note: This unit ONLY CAN ACCEPT / RUN those digital map
purchased from authorized dealers / agents. Any non-authorized
digital map CANNOT BE USED on this unit.
Note: This unit only can run the SD Card contained with digital
map which is inserted into the panel's SD card slot. Please refer
to the page "Overview of the unit" for more details of the SD card
slot for Digital Map use.
Note: This unit is pre-loaded with digital map inside the
INTERNAL BUILT-IN FLASH MEMORY. Please refer to page
Navigation Operation _ Digital Map for more details.
BR - 56
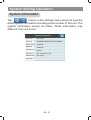
System Setting Operation
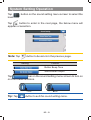
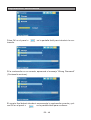
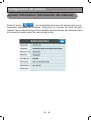
System Information
Tap
button on the settings menu screen to view the
detail system information including serial number of this unit. The
system information screen as follow. These information may
different from unit to unit.
System Information
OS Version
v06. 01. 20
Processor
SAMSUNG ARM 920T-S3C2443 400MHz
MemoryTotal
46752 KB
RAM free
29988 KB
Storage free
980 KB
SW Version
v01. 03. 00 08/07/08
RadioVersion
v01. 03. 03
Serial Num
BR - 57
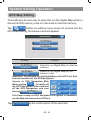
System Setting Operation
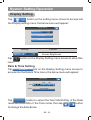
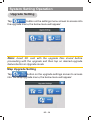
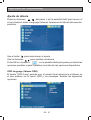
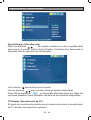
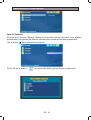
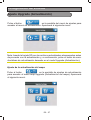
Upgrade Setting
Tap
button on the settings menu screen to access into
the upgrade menu, the below menu will appear:
Note: Insert SD card with the upgrade files stored before
proceeding with the upgrade and then tap on desired upgrade
feature button in Upgrade mode.
Map Upgrade Setting
Tap
button on the upgrade settings screen to access
into the Map upgrade menu, the below menu will appear:
Upgrade Settings
APP
MAP
APP
MAP
BR - 58
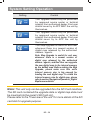
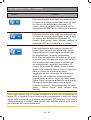
System Setting Operation
Setting
APP
MAP
APP
MAP
Control
This Upgrade should only be performed
by approved sevice center or techinal
support from authorized dealer. End user
should never try to APP MAP the unit by
themselves.
This Upgrade should only be performed
by approved sevice center or techinal
support from authorized dealer. End user
should never try to APP the unit by
themselves.
This Map Upgrade is useful for end user
whenever there is a newest version of
digital map released by the authorized
dealers / agents.
Note: Map Upgrade is useful for end user
whenever there is a newest version of
digital map released by the authorized
dealers / agents, and End User can upgrade
the new digital map to the internal memory
as the default map. Before making the Map
Upgrade, please make sure this unit's
internal memory size is big enough for
loading the new digital map. To check the
internal memory size for digital map, please
refertosection,NavigationOperation_Digital
Mapformoredetails.
Note: This unit only can be upgraded thru the SD Card interface.
The SD card contained the upgrade data or digital map data must
be inserted into the panel's SD Card slot .
Please refer to the "Overview of the unit" for more details of the SD
card slot for upgrade purpose.
BR - 59
System Setting Operation
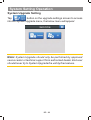
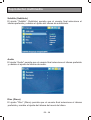
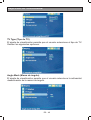
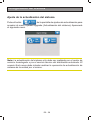
System Upgrade Setting
Tap
button on the upgrade settings screen to access
into the System upgrade menu, the below menu will appear:
Note: System Upgrade should only be performed by approved
sevice center or techinal support from authorized dealer. End user
should never try to System Upgrade the unit by themselves.
BR - 60
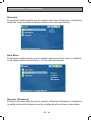
Memory Card Operation
1. Press the MODE button repeatedly on panel or remote control to
switch between Tuner -> Disc -> USB - > SD Card - > AV IN Mode.
Media
Player
2. Aceess to MAIN MENU and tap
MEDIA PLAYER. Tap
the following buttons to start the playback of the desired media
sources:
Button to play the files in SD card
Note: Please read below before you start the operation of
Memory Card.
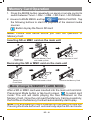
Inserting SD or MMC card on the main unit
2
1
3
Face
Up
Click
Detach the
Front Panel
Insert the Memory Card
with Label up side
Push in till heard a “click”
Removing the SD or MMC card on the main unit
1
2
3
Click
Detach the
Front Panel
Push in till heard a “click”
Remove the Memory Card
Mode change to MEMORY CARD MODE
After a SD or MMC card was inserted into the main unit card slot.
Press panel Mode button or tap touch screen
to select card
mode. The unit will starts playing the files contained on the
Memory Card. Once the unit read the Memory Card successfully,
the first file on the Memory Card will automatically start to play.
Note: If no any Memory Card is inserted into the main unit card slot.
Pressing the mode button will automatically skip the SD card mode.
BR - 61
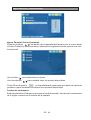
USB Operation
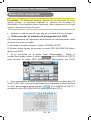
1. Press the MODE button repeatedly on panel or remote control to
switch between Tuner -> Disc -> USB - > SD Card - > AV IN Mode.
Media
Player
2. Aceess to MAIN MENU and tap
MEDIA PLAYER. Tap
the following buttons to start playing the desired media sources:
button to play files in USB
Inserting and Removing USB Drive
Mode change to USB MODE
Under any other mode while inserting a USB Stick into the USB
connector, this unit will automatically switches from the current
mode to USB mode. Once the unit read the USB Stick
successfully, the first audio music file on the USB stick will
automatically start to play.
Caution: Before removing the USB stick from the USB
connector. Please always remember to switch off the unit's power
or switch to other mode then unplug the USB Stick. Never try to
remove the USB Stick while playing music file on the USB stick. It
may damage the USB Stick and sometimes will caused the unit
system to lock up.
Note: About Music Flash Player with USB Interface, usually, the
unit takes longer time to read this kind of player than normal USB
Stick. Especially, if the USB / MP3 player is with built-in power
battery, sometimes it may takes 20-30 seconds to start up the
playback.
BR - 62
Navigation Operation
What is GPS Navigation
The term "navigation" is generally understood to mean the
location of a vehicle, the determination of the direction and
distance from the desired destination and the required route. As
navigation aids, stars, prominent landmarks, compass and satellites are used.
This unit, location is determined with the GPS receiver (GPS
=Global Positioning System). The direction and distance from the
destination are determined by using a digital road map, a
navigation computer and sensors. A speedometer signal and a
reverse signal are additionally used to calculate the route.
What is GPS
The Global Positioning System (GPS) uses a network of satellites
orbiting the Earth. Each of the satellites, which orbit at a height of
68 900 000 feet (21 000 km), continually broadcasts radio signals
giving time and position information. This ensures that signals
from at least three can be picked up from any open area on the
earth’s surface.
The accuracy of the GPS information depends on how good the
reception is. When the signals are strong and reception is good,
GPS can determine latitude, longitude, and altitude for accurate
positioning in three dimensions. But if signal quality is poor, only
two dimensions, latitude and longitude, can be obtained and
positioning errors are somewhat greater.
BR - 63
Navigation Operation
To receive GPS signals successfully
You have a clear sight of sky
The GPS antenna is not covered
The weather is good enough. GPS signal is weaker in bad
weather conditions
The time needed for establishing a GPS connection ranges
from seconds to minutes.
You are outdoor.
When the positioning by GPS is impossible
If signals cannot be received from more than two GPS satellites,
GPS positioning does not take place.
In some driving conditions, signals from GPS satellites may not
reach your vehicle. In this case, it is impossible for the system to
use GPS positioning. The following are some examples:
In tunnels or
enclosed parking garages
Under elevated
roads or similar structures
When driving
among high buildings
When driving through
a dense forest or tall trees
BR - 64
Navigation Operation
Conditions Likely to Cause Noticeable Positioning Errors
For various reasons such as the state of the road you are travelling
on and the state of reception of the GPS signal, the actual position
of your vehicle may differ from the position displayed on the map
screen.
If there is a parallel road.
If you make a slight turn.
If you take a recently
opened road that is not
on the map.
BR - 65
Navigation Operation
If you drive in zig-zags.
If the road has connected
hairpin bends.
If there is a loop or similar
road configuration.
If you take a ferry.
If you are driving on a long,
straight road or a gently
curving road.
If you are on a steep
mountain road with many
height changes.
BR - 66
Navigation Operation
If you enter or exit a multistorey car park or similar
using a spiral ramp.
If your vehicle is turned on
a turntable or simi-lar
structure.
If your vehicle’s wheels
spin, such as on a rough
track or in snow.
If you put on chains or
change your tyres for
ones with a different size.
If trees or other obstacles
block the GPS sig-nals
for a considerable period.
If you drive very slowly, or
in a start-and-stop manner,
as in a traffic jam.
BR - 67
Navigation Operation
If you join the road after
driving around a large
car park.
When you go round a
roundabout.
When starting driving immediately after start-ing the engine.
If you turn your navigation system on while driving.
Some types of vehicles may not output a speed signal while
driving at just a few kilometres per hour. In such a case, the current
location of your vehicle may not be displayed correctly while in a
traffic jam or in a car park.
BR - 68
Navigation Operation
Digital Map
This unit is pre-loaded with the below digital map marked with Yes
inside the INTERNAL BUILT-IN FLASH MEMORY:
Maps Pre-Loaded
Eastern Europe
Albania
Belarus
BosniaHrz
Bulgaria
Croatia.fbl
CzechRep
Estonia
Greece
Hungary
Latvia
Lithuania
Moldova
Poland
Romania
Serbia
Montenegro
Slovakia
Slovenia
Turkey
UKraine
Western Europe
Andorra
Austria
Belgium
Denmark
Finland
France
Germany
Italy
Luxembourg
Norway
Portugal
Republic of Ireland
San Marino
Spain
Sweden
Switzerland
The Netherlands
United Kingdom
Yes
Yes
Yes
Note: End ser can purchase the authorized digital map and
stored it into SD Memory Card. This unit ONLY CAN RUN THE
A U T H O R I Z E D D I G I TA L M A P P U R C H A S E D F R O M
AUTHORIZED AGE-NT OR DEALER on SD card.
Tips: Please refer to page SETTING _ Run GPS Map for details
on how to run the digital map on SD Card.
Note: This unit ONLY CAN ACCEPT / RUN those digital map
purchased from authorized dealers/agents.Any non-authorized
digital map is CANNOT BE USED on this unit.
BR - 69
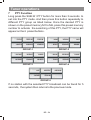
Navigation Operation
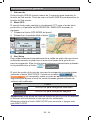
Start Navigation Mode
Caution: For safety reasons, you can not use some of navigation
functions while your vehicle is in motion.To enable these funcions,
you must stop in a safe place and apply the handbrake.
Park your vehicle in a safe place and apply the handbrake.
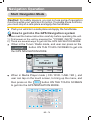
How to get into the GPS Navigation system
Please read the below instruction carefully before operating the unit.
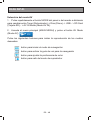
1) First power on the unit by pressing the " POWER / MUTE" button.
2) There are several ways to get into the GPS NAVIGATION MODE:
When in the Tuner / Radio mode, end user can press on the
button ON THE TOUCH SCREEN to get into
the GPS NAVIGATION MODE.
AF
FM1
104.00
FMSELECT
10:30
am
Band
87.50
90.00
98.00
106.00
108.00
87.50
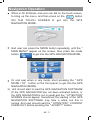
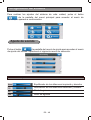
When in Media Player mode ( CD / DVD / USB / SD ), end
user can tap on the touch screen, to bring up the menu, and
then press on the NAVI button ON THE TOUCH SCREEN
to get into the GPS NAVIGATION MODE.
NAVI
NAVI
VOICE
BR - 70
Navigation Operation
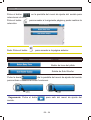
When in AV IN Mode, end user can tab on the touch screen,
to bring up the menu, and then press on the NAVI button
ON THE TOUCH SCREEN to get into the GPS
NAVIGATION MODE.
NAVI
NAVI
VOICE
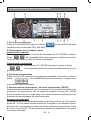
End user can press the MODE button repeatedly, until the "
MAIN MENU" appear on the screen, then press the mode
GPS
button
to get into the GPS NAVIGATION MODE.
Main Menu
GPS
Media
Player
Tuner
AV-In
Setting
Or end user when in any mode, short pressing the " GPS
MODE / TA" button on the front panel, to get into the GPS
NAVIGATION MODE.
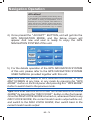
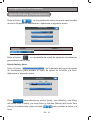
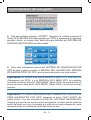
3) Unit should start to load the GPS NAVIGATION SOFTWARE
(If the GPS NAVIGATION has not been activated before, or
the GPS NAVIGATION is not in used),and the " ATTENTION"
SCREEN should appear. Sometimes the loading of the GPS
NAVIGATION SOFTWARE may take a while, but this is
normal. End user should read the " ATTENTION" CONTENT
CAREFULLY before pressing the " ACCEPT" button.
BR - 71
Navigation Operation
Attention!
If you are using the software product during driving
or transportation, we strongly advise you to direct all
your attention to driving or transportation, and to
Especially do not try to operate, enter data into or
obtain data from the software product while driving,
because such presents a life hazard, and the lack of
proper attention may cause death, injury or matertal
damge.
Accept
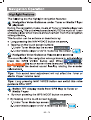
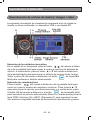
4) Once pressd the " ACCEPT" BUTTON, unit will get into the
GPS NAVIGATION MODE, and the below screen will
appear. And now end user is ready to enjoy the GPS
NAVIGATION SYSTEM of this unit.
No GPS
signal
Cockpit
Settings
Map
About
Find & Go
Exit
2005-05-27
12:05
5) For the details operation of the GPS NAVIGATION SYSTEM
of this unit, please refer to the GPS NAVIGATION SYSTEM
USER MANUAL provided together with this unit.
Tips: End user can switch to GPS NAVIGATION MODE, or GPS
MAP SCREEN at any time, in any mode by pressing the "GPS
MODE" button on the front panel. And pressing this " GPS MODE"
button to switch back to the previous mode.
Tips: End user can turn on or off the "GPS NAVIGATION VOICE
GUIDE" by pressing the "NAVI VOICE" button on the front panel.
Once this NAVI VOICE GUIDE is turned on, whenever there is any
NAVI VOICE GUIDE, the current mode's audio output will be cut,
and switch to the NAVI VOICE GUIDE, then switch back to the
current mode's audio output.
BR - 72
BR - 73
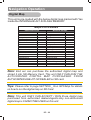
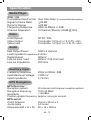
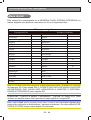
Specification
General
Operating Voltage
Grounding System
Fuse:
Operating Temperature:
Unit Mounting Angle
DC 11 -14.4V
Negative Ground
15-Amp Mini ATM Type
0°C to 50°C
< 30°
TFT Screen
Screen Size: 3.5(Measured Diagonally)
Screen Type: TFT Liquid Crystal Display active matrix
Resolution: 960 (W) x 324 (H)
Radio
FM
Frequency Range
Usable Sensitivity
Stereo Separation
S/N Ratio
87.5-108.0 MHz (50 kHz Space)
< 15dB at S/N 30 dB
25 dB at 1KHz
50 dB
AM or MW
Frequency Range
Usable Sensitivity
S/N Ratio
522-1620 Khz (9 kHz Space)
< 40dB at S/N 20dB
40 dB
BR - 74
Specification
Media Player
DVD / CD
Compatible Disc/Format
Signal to Noise Ratio
Dynamic Range
Frequency Response
Channel Separation
See “Disc Note” for more details description
> 90 dB
> 90 dB
20Hz to 20Khz +/-3dB
2 Channel (Stereo) >60dB @1khz
Video
Color System
Video Output
Video Input
NTSC / PAL
Composite 1.0 Vp-p (+/- 0.2) 75 - ohm
Composite 1.0 Vp-p (+/- 0.2) 75 - ohm
Audio
50W x 4 channel
Max Output Power
Load Impedance (speakers) 4 ohms
Digital Output
900mV
Line out level / load
400mV / 10k ohm load
Line out Impedance
200 ohm
Auxiliary Input
Frequency response
Input Maximum Voltage
Input Impedance
20Hz to 20KHz -3dB
1200 mV
4.7k ohm
GPS Navigation
GPS Receiver:
Reception system
Reception frequency
Sensitivity
Position update frequency
GPS aerial:
Patch Antenna
Aerial cable
Dimensions(W x H x D)
20-channel multi-channel reception system
1575.42 MHZ
–130 dBm
Approx. once per second
25mm x 25mm x 2
5.0 meter
40 x 16 x 50mm
BR - 75
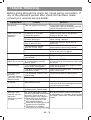
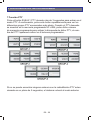
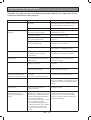
Trouble Shooting
Before going through the check list, check wiring connection. If
any of the problems persist after check list has been made,
consult your nearest service dealer.
Symptom
No power
Disc cannot be
loaded or
ejected
No sound
The operation
keys do not work
Sound skips.
Cause
Solution
The car ignition is not on.
If the power supply is properly
connected to the car accessory terminal,
switch the ignition key to “ACC”.
The fuse is blown.
Replace the fuse.
Presence of CD disc
inside the player.
Remove the disc in the player,
then put a new one.
Inserting the disc in
reverse direction.
Insert the compact disc with the
label facing upward.
Compact disc is extremely
dirty or defective disc.
Temperature inside
the car is too high.
Condensation.
Clean the disc or try to play a
new one.
Cool off or until the ambient
temperature returns to normal.
Leave the player to off for an
hour or so,then try again.
Adjust volume to a desired level.
Check wiring connection.
Volume is in minimum.
Wiring is not properly
connected.
The built-in microcomputer
is not operating properly
due to noise.
The installation angle is
more than 30 degrees.
The disc is extremely dirt
ordefective disc.
Press the RESET button.
Front panel is not properly fixed into
its place
Adjust the installation angle to less
than 30 degrees.
Clean the compact disc. Then try to
play a new one.
The radio does
not work.
The radio station
automatic selection
does not work.
The antenna cable is not
connected.
Insert the antenna cable firmly.
The signals are too weak.
Select a station manually.
ERROR
Mechanism Error
Press the eject button to correct the problem.
If the error code does not disappear, consult
your nearest service dealer.
Disc Error
Maybe disc dirty / disc
scratched/disc upside down.
The quality of signals from
the GPS satellites is poor,
causing reduced positioning
accuracy.Such a loss of
signal quality may happen
for the following reasons:
The GPS aerial is in an
unsuitable location.
Obstacles are blocking sign-als
signals from the satellites.
The position of satelites
rela-tive to your vehicle is bad.
Replace the disc.
You cannot
position.Your
vehicle on the
apor the
positioning error
is large.
Check the GPS signal reception
and the position of the GPS aerial
if necessary or continue driving until
reception improves. Keep the aerial
clear.
BR - 76
ANGLE
OSD
NAVI
VOICE
NU
LOUD
SYS TE
PU
SH
M
M
E
AS P S
SUB-W
SHUF
GPS
MODE
CDV7500GP
LOC
Información importante de seguridad
(OXVXDULR¿QDOGHEHOHHUHVWDVHFFLyQDQWHVGHXWLOL]DUHVWDXQLGDG
(OXVRGHODXQLGDGVyORHVWiSHUPLWLGRVLODVFRQGLFLRQHVGHWUi¿FR
son adecuadas y si está usted completamente seguro de que no pone
en peligro, obstruye ni resulta inconveniente para usted, sus pasajeros u
otros motoristas.
(QWRGRVORVFDVRVGHEHUiQFXPSOLUVHWRGDVODVOH\HVGHWUi¿FRHQ
carretera que resulten aplicables. LOS DESTINOS SÓLO SE PUEDEN
INTRODUCIR CUANDO EL VEHÍCULO ESTÁ ESTACIONADO.
El sistema de navegación sólo es una ayuda. Pueden producirse
errores en elementos/entradas de datos individuales. El conductor deberá
decidir en todo momento si hace caso o no de la información suministrada. No aceptamos ninguna responsabilidad derivada de datos erróneos
proporcionados por el sistema de navegación.
'HELGRDORVFRQWLQXRVFDPELRVHQODVUXWDVGHWUi¿FRRDODVGHVYLDciones en los datos, puede ocurrir que la información proporcionada resulte errónea o imprecisa. Por ello, siempre deben observarse las señales
GHWUi¿FRUHDOHV\FXPSOLUVHODVOH\HVGHWUi¿FR(QSDUWLFXODUHOVLVWHPD
de navegación no se puede utilizar como una ayuda para la orientación en
momentos con escasa visibilidad.
/DXQLGDGVyORSXHGHXWLOL]DUVHSDUDVX¿QDOLGDGSUHYLVWD(OYROXPHQ
de la radio del sistema de navegación debe ajustarse de forma que el
ruido exterior siga siendo audible.
Use la fuente de alimentación adecuada; este producto ha sido
diseñado para utilizarse con un sistema de batería de 12 voltios CC con
terminal a tierra negativo.
La protección del mecanismo del disco evita la introducción de objetos extraños en la ranura de este reproductor. En caso contrario, podría
producirse un fallo de funcionamiento o un daño permanente debido a la
gran precisión del mecanismo de esta unidad.
Una instalación incorrecta puede provocar daños en la unidad o en el
vehículo. La instalación de la unidad y de sus componentes requiere habiOLGDGHV\FRQRFLPLHQWRVHVSHFLDOL]DGRV3RUHOOROHUHFRPHQGDPRV¿UPHmente que lleve la unidad a un taller especializado para su instalación.
Riesgo de lesiones: la instalación incorrecta de los componentes
SXHGHSURYRFDUOHVLRQHVHQFDVRGHXQDFFLGHQWHGHWUi¿FRRSXHGHGHMDU
sin efecto los dispositivos de seguridad. Consulte las instrucciones suministradas por el fabricante del vehículo.
ES - 2
Conexión del sistema
Notas importantes
No lleve los cables por lugares en los que puedan estar expuestos a
altas temperaturas. Si el aislamiento se calienta, los cables pueden resultar
dañados, provocando un cortocircuito o un fallo de funcionamiento y daños
permanentes en el sistema de navegación.
No corte el cable aéreo de la antena del GPS para acortarlo ni utilice
una extensión para hacerlo más largo. La alteración del cable aéreo podría
provocar un cortocircuito o un fallo de funcionamiento.
No acorte ningún cable. Si lo hace, el circuito de protección (portafusiEOHVUHWHQHGRUGHIXVLEOHVR¿OWURHWFSXHGHGHMDUGHIXQFLRQDUFRUUHFWDmente.
Nunca suministre alimentación a otros productos electrónicos cortando el aislamiento del cable de alimentación del sistema de navegación y
derivando el cable. Si lo hace, se sobrepasará la capacidad de corriente del
cable, provocando un sobrecalentamiento.
El cable negro es el cable de tierra. Conecte a tierra este cable de forma independiente a la toma de tierra de productos de alta corriente como
ORV DPSOL¿FDGRUHV GH SRWHQFLD 1R FRQHFWH D WLHUUD PiV GH XQ SURGXFWR
junto con la toma de tierra de otro producto. Así, por ejemplo, las unidades
GHDPSOL¿FDFLyQGHEHUiQFRQHFWDUVHDWLHUUDGHIRUPDLQGHSHQGLHQWHDOD
puesta a tierra de este sistema de navegación. La conexión combinada de
varias tomas de tierra puede causar un incendio o daños a los productos si
dichas conexiones a tierra se sueltan.
Antes de instalar este sistema de navegación
Este sistema de navegación está pensado para vehículos con una
batería de 12 voltios y un terminal de tierra negativo. Compruebe el voltaje
de la batería de su vehículo antes de llevar a cabo la instalación.
Para evitar cortocircuitos en el sistema
HOpFWULFRDVHJ~UHVHGHGHVFRQHFWDUHOFDEOH
de la batería antes de comenzar la instalación.
ES - 3
Conexión del sistema
(VTXHPDGHFDEOHDGR&RQH[LRQHVGHDXGLRYtGHR
Nota: Consulte "Instalación de la antena aérea del GPS" para
un correcto montaje o instalación de esta ANTENA AÉREA DEL GPS.
ES - 4
Conexión del sistema
(VTXHPDGHFDEOHDGR$OLPHQWDFLyQ$OWDYRFHV
MAZO DE CABLES DE AUDIO /
ALIMENTACIÓN DE 20 PINES
CONECTOR ISO 4 PINES + 8 PINES
HEMBRA CON TERMINAL MACHO
ESQUEMA DE CABLEADO DEL CONECTOR ISO
ESQUEMA DEL MAZO DE CABLES DE 20 PINES
PIN
COLOR DEL
CABLE
FUNCIÓN / ETIQUETA
1
GRIS / NEGRO
ALTAVOZ DELANTERO DERECHO (-)
2
GRIS
ALTAVOZ DELANTERO DERECHO (+)
3
VIOLETA
ALTAVOZ TRASERO DERECHO (+)
4
VIOLETA /
NEGRO
ALTAVOZ TRASERO DERECHO (-)
ALTAVOZ TRASERO IZQUIERDO (+)
COLOR DEL
CABLE
FUNCIÓN / ETIQUETA
A4
AMARILLO
BATERÍA (+)
6
VERDE
A5
AZUL
ALIMENTACIÓN DE ANTENA
7
VERDE / NEGRO
ALTAVOZ TRASERO IZQUIERDO (-)
A7
ROJO
IGNICIÓN (ACC)
8
ROJO
IGNICIÓN (ACC)
A8
NEGRO
ALTAVOZ TRASERO DERECHO (-)
9
NEGRO
B1
VIOLETA
SALIDA DE LÍNEA COMÚN DEL PREAMPLIFICADOR TRASERO
B2
VERDE
ALTAVOZ TRASERO IZQUIERDO (+)
10
ROJO
B3
VERDE / NEGRO
ALTAVOZ TRASERO IZQUIERDO (-)
SALIDA DE LÍNEA DEL PREAMPLIFICADOR
TRASERO DERECHO
11
BLANCO
ALTAVOZ DELANTERO IZQUIERDO (+)
12
BLANCO /
NEGRO
ALTAVOZ DELANTERO IZQUIERDO (-)
13
AZUL / BLANCO
AMPLIFICADOR DE POTENCIA REMOTO (+)
PIN
5
B4
ROJO
IGNICIÓN (ACC)
B5
NEGRO
SALIDA DE LÍNEA COMÚN DEL PREAMPLIFICADOR TRASERO
B6
ROJO
SALIDA DE LÍNEA DEL PREAMPLIFICADOR
TRASERO DERECHO
14
AZUL
ALIMENTACIÓN DE ANTENA
B7
BLANCO
ALTAVOZ DELANTERO IZQUIERDO (+)
15
AMARILLO
BATERÍA (+)
B8
BLANCO / NEGRO
ALTAVOZ DELANTERO IZQUIERDO (-)
16
NEGRO
CONEXIÓN A TIERRA DEL CHASIS
17
BLANCO
SALIDA DE LÍNEA DEL PREAMPLIFICADOR
DELANTERO IZQUIERDO
18
ROJO
SALIDA DE LÍNEA DEL PREAMPLIFICADOR
DELANTERO DERECHO
19
NEGRO
SALIDA DE LÍNEA COMÚN DEL PREAMPLIFICADOR DELANTERO
20
BLANCO
SALIDA DE LÍNEA DEL PREAMPLIFICADOR
TRASERO IZQUIERDO
ES - 4
,QVWDODFLyQGHODDQWHQDDQWHQDDpUHDGHO*36
3LH]DVVXPLQLVWUDGDV
Imagen
Descripción
Antena aérea del GPS
Chapa metálica
3LQ]DXQV
Almohadilla impermeable
&XDQGRLQVWDOHODDQWHQDDpUHDHQHOLQWHULRUGHOYHKtFXORRHQODEDQGHMDWUDVHUD
)LMHODFKDSDPHWiOLFDVREUHXQDVXSHU¿FLHORPiVQLYHODGDSRVLEOHGHIRUPDTXHOD
antena / antena aérea del GPS quede orientada hacia la ventana. Coloque la antena
/ antena aérea del GPS sobre la chapa metálica. (La antena / antena aérea del GPS
TXHGD¿MDGDFRQVXLPiQ
Chapa metálica
Retire la lámina protectora
de la cara posterior.
Antena / antena aérea del GPS
$VHJ~UHVHGHTXHODVXSHU¿FLHHVWp
libre de humedad, polvo,
suciedad, aceite, etc. antes de
¿MDUODFKDSDPHWiOLFD
Nota:
La chapa metálica
contiene un potente adhesivo
que puede dejar una marca
VREUHODVXSHU¿FLHVLpVWDHV
retirada.
Pinzas
Use las pinzas para asegurar el
cable, en caso necesario, en el
interior del vehículo.
ES - 5
,QVWDODFLyQGHODDQWHQDDQWHQDDpUHDGHO*36
(OXVXDULR¿QDOGHEHOHHUHVWDVHFFLyQDQWHVGHLQVWDODUODDQWHQDDQ
WHQDDpUHDGHO*36
Precaución: No corte el cable de la antena aérea del GPS para acortarlo ni utilice una extensión para hacerlo más largo. La alteración
del cable aéreo podría provocar un cortocircuito o un fallo de funcionamiento y daños permanentes en el sistema de navegación.
&RQH[LyQGHODDQWHQDDQWHQDDpUHDGHO*36DODXQLGDG
Nota: Use siempre el tornillo suministrado
SDUD¿MDUODDQWHQDDQWHQDDpUHDGHO*36
Nota: Use siempre el tornillo suministrado
SDUD¿MDUODDQWHQDDQWHQDDpUHDGHO*36
RR
1RWDVVREUHLQVWDODFLyQ
1RWDVVREUHLQVWDODFLyQ
/D DQWHQD DpUHD GHEH LQVWDODUVH VREUH XQD VXSHU¿FLH QLYHODGD SDUD
minimizar al máximo el bloqueo de las ondas de radio. Las ondas de
radio no podrán ser recibidas por la antena / antena aérea si su recepción desde el satélite está bloqueada. Para que la recepción sea
óptima, se recomienda la instalación sobre el techo del vehículo o sobre
el maletero.
Si instala la antena / antena aérea del GPS en el interior del vehículo,
asegúrese de utilizar la placa metálica suministrada con su sistema. Si
no la utiliza, la sensibilidad de recepción se reducirá.
No corte la placa metálica accesoria, ya que podría reducir la sensibilidad de la antena aérea del GPS.
ES - 6
,QVWDODFLyQGHODDQWHQDDQWHQDDpUHDGHO*36
Tenga cuidado de no tirar del cable de la antena / antena aérea cuando la
retire. El imán acoplado a la antena aérea es muy potente y el cable podría
soltarse.
La antena / antena aérea del GPS se instala con un imán. Cuando la instale,
asegúrese de no rayar la carrocería del vehículo.
Si instala la antena / antena aérea del GPS en el exterior del vehículo, retírela
siempre y colóquela en el interior del vehículo cuando lo lleve a un sistema
de lavado automático. Si la deja en el exterior, puede caerse o puede rayar la
carrocería del vehículo.
No pinte la antena / antena aérea del GPS, ya que esto podría afectar a su
rendimiento.
Nota: Cuando acople la placa metálica, no la corte en partes más pequeñas.
Algunos vehículos llevan un cristal que no permite el paso de las señales
procedentes de los satélites del GPS. En dichos vehículos, la antena / antena
aérea del GPS deberá instalarse en el exterior del mismo.
,QVWDODFLyQGHODDQWHQDDpUHDHQHOH[WHULRUGHOYHKtFXORHQOD
,QVWDODFLyQGHODDQWHQDDpUHDHQHOH[WHULRUGHOYHKtFXORHQOD
FDUURFHUtD
Coloque la antena aérea del GPS en una posición lo más nivelada posible, por
ejemplo, sobre el techo o sobre el maletero. (La antena aérea del GPS queda
¿MDGDFRQXQLPiQ
Antena / antena aérea del GPS
3DUDOOHYDUHOFDEOHGHVGHODSDUWHVXSHULRUGHODSXHUWD
Haga un bucle en forma de U con el cable
por el exterior para evitar que el agua de
OOXYLDÀX\DDORODUJRGHOFDEOHKDVWDHO
interior del vehículo.
Pinzas
Use las pinzas para asegurar
el cable, en caso necesario,
en el interior del vehículo.
3DUDOOHYDUHOFDEOHGHVGHHOLQWHULRUGHOPDOHWHUR
Almohadilla impermeable
Asegúrese de que la almohadilla impermeable esté en contacto con la parte
superior de la empaquetadura
de goma.
Pinzas. Use las pinzas para
asegurar el cable, en caso
necesario, en el interior del
vehículo.
Haga un bucle en forma de U con el
cable por el exterior de la empaquetadura
de goma para evitar que el agua de lluvia
ÀX\DDORODUJRGHOFDEOHKDVWDHOLQWHULRUGHO
vehículo.
ES - 7
Instalación de la unidad
$QWHV GH SURFHGHU ¿QDOPHQWH D OD LQVWDODFLyQ GH OD XQLGDG FRQHFWH
temporalmente el cableado y asegúrese de que todo está perfectamente
conectado y de que la unidad funciona correctamente.
Para garantizar una correcta instalación, utilice únicamente las piezas
incluidas con la unidad. El uso de piezas no autorizadas puede causar
fallos de funcionamiento o daños permanentes a la unidad.
Consulte con su distribuidor más cercano en caso de que la instalación
UHTXLHUDHOWDODGUDGRGHDJXMHURVXRWUDVPRGL¿FDFLRQHVGHOYHKtFXOR
Instale la unidad en un lugar donde no moleste al conductor y no pueda
lastimar a los pasajeros en caso de producirse una parada repentina,
como puede ser una parada de emergencia.
Si el ángulo de instalación supera los 30°
con respecto
a la horizontal, la unidad puede no funcionar de forma óptima.
Evite instalar la unidad en lugares expuestos a altas temperaturas,
como lugares con luz directa del sol, bajo aire caliente de un calefactor,
o en lugares donde haya polvo, suciedad o vibraciones excesivas.
Asegúrese de extraer la carátula antes de instalar la unidad.
0RQWDMHIURQWDOSRVWHULRUVHJ~Q',1
Esta unidad se puede instalar correctamente desde la parte "Frontal" (monWDMHIURQWDOFRQYHQFLRQDOVHJ~Q',1R3RVWHULRUPRQWDMHSRVWHULRUVHJ~Q
',1XWLOL]DQGRORVRUL¿FLRVURVFDGRVTXHVHHQFXHQWUDQHQORVODWHUDOHVGHO
FKDVLVGHODXQLGDG3DUDPiVGHWDOOHVFRQVXOWHORVVLJXLHQWHVPpWRGRVGH
instalación ilustrados A y B.
0RQWDMHIURQWDOVHJ~Q',10pWRGR$
Nº
Contenido
1
Salpicadero
2
Soporte
Después de introducir la media carcasa en el
salpicadero, seleccione la pestaña adecuada
según el grosor del material del salpicadero y
dóblela hacia dentro para asegurar el soporte
en su lugar.
3
Tornillo
ES - 8
Instalación de la unidad
Nº
1
Contenido
Salpicadero
7XHUFDPP
3
Arandela de presión
7RUQLOOR[PP
5
Tornillo
%DQGDGH¿MDFLyQ
1RROYLGHXWLOL]DUODEDQGDGH¿MDFLyQSDUDDVHJXUDUOD
parte posterior de la unidad. La banda puede doblarse
manualmente hasta obtener el ángulo deseado.
7
Arandela plana
Extracción de la unidad
Nº
Contenido
1
Marco
2
Introduzca los dedos en la ranura de la parte frontal del
marco y tire hacia usted para extraer el marco. (Cuando
vuelva a instalar el marco, coloque el lateral con una ranura
KDFLDDEDMR\VXMpWHOR
Inserte las palancas suministradas con la unidad en las
ranuras situadas a ambos lados de la unidad, tal y como se
PXHVWUDHQOD¿JXUDKDVWDTXHKDJDQFOLF6LWLUDGHODV
palancas, podrá extraer la unidad del salpicadero.
3
ES - 9
Instalación de la unidad
Instalación de la placa decorativa
Empuje la placa decorativa contra el chasis hasta que quede encajada.
Debe hacerlo antes de instalar la carátula, de lo contrario no podrá colocarla.
0RQWDMHSRVWHULRUVHJ~Q',10pWRGR%
,QVWDODFLyQXWLOL]DQGRORVRUL¿FLRVURVFDGRVGHORVODWHUDOHVGHODXQLGDG
Fijación de la unidad al soporte de montaje para radio que viene de fábrica.
Nº
2
3
4
Contenido
6HOHFFLRQHXQDSRVLFLyQHQODTXHORVRUL¿FLRVURVFDGRVGHOVRSRUWH
\ORVRUL¿FLRVURVFDGRVGHODXQLGDGSULQFLSDOTXHGHQDOLQHDGRV
FRQORVWRUQLOORVFRORFDGRV\DSULHWHORVWRUQLOORVHQSXQWRVGH cada lado.
Tornillo
Soporte de montaje para radio de fábrica.
Salpicadero o consola
*DQFKRH[WUDHUHVWDSLH]D
Nota: La caja de montaje, el anillo de la placa y la media carcasa no se
utilizan en la instalación según el método B.
ES - 10
3DQHOIURQWDOH[WUDtEOH3)(
([WUDFFLyQGHOSDQHOIURQWDOH[WUDtEOH3)(
1. Desconecte la corriente.
2. Pulse el botón de liberación del panel.
3. Retire el P.F.E.
&RORFDFLyQGHOSDQHOIURQWDOH[WUDtEOH3)(
1. Inserte el lado derecho del P.F.E. en la
unidad principal.
Nota: El P.F.E. debe acoplarse en la junta en T.
2. Presione el P.F.E. por la parte central izquierda
del mismo hasta que escuche un clic.
Precaución: No inserte el P.F.E. por el lado izquierdo. Si lo hace, podría
dañarlo.
Los golpes pueden dañar fácilmente el P.F.E. Una vez extraído,
colóquelo en una caja protectora y tenga cuidado para no dejarlo caer ni
someterlo a fuertes golpes.
Cuando se presiona el botón de liberación y el P.F.E. se desbloquea, las
vibraciones del coche pueden provocar su caída. Para evitar daños en el
P.F.E., guárdelo siempre en una caja protectora después de desengancharlo.
El conector trasero que une la unidad principal al P.F.E. es una
pieza sumamente importante. Asegúrese de no dañarla presionándola
con las uñas, bolígrafos, destornilladores, etc.
Nota: Si el P.F.E. está sucio, límpielo únicamente con
un trapo suave y seco. Y utilice un bastoncillo de algodón
humedecido con isopropanol para limpiar el conector de
la parte posterior del P.F.E.
ES - 11
)XQFLyQGHDSHUWXUDFLHUUHGHOSDQHO
La unidad está equipada con el más avanzado sistema deslizable totalmente
lógico y monitorizado. Podrá disfrutar de la avanzada tecnología con sólo
SXOVDUHOERWyQ³(MHFW2SHQ´([SXOVDU$EULU/HDGHWHQLGDPHQWHODVVL
guientes instrucciones de funcionamiento antes de hacer funcionar la unidad.
$SHUWXUDFLHUUHGHOSDQHO
3XOVH HO ERWyQ ³(MHFW 2SHQ´ ([SXOVDU $EULU SDUD GHVOL]DU KDFLD DEDMR
(MHFW2SHQHOSDQHOFHUUDGRRSDUDGHVOL]DUKDFLDDUULEDFHUUDUHOSDQHO
abierto.
Carga de un CD
Con el panel en la posición inferior, se podrá acceder a la ranura para discos. Inserte un CD a través de la ranura para discos; el CD se cargará
automáticamente y el panel también se cerrará automáticamente, iniciándose la reproducción. Si no inserta ningún CD, pulse de nuevo el botón
2SHQ$EULUSDUDGHVOL]DUHOSDQHOKDFLDDUULED
Expulsión de un CD
3XOVH HO ERWyQ 2SHQ $EULU SDUD GHVOL]DU KDFLD DEDMR HO SDQHO VL KD\ XQ
CD cargado, éste se expulsará de forma automática. No es necesario pulsar ninguna otra tecla. Si el CD expulsado no se retira en el plazo de 10
segundos, volverá a cargarse de forma automática. Y el panel se deslizará
automáticamente hacia arriba después de que el disco se haya vuelto a
cargar.
Precaución: Si el disco expulsado permanece en la ranura, el botón Open
(Abrir) no funcionará; de esta manera, se impide el cierre del panel a menos
que el disco haya sido retirado o recargado.
Ajuste del ángulo del panel
(O XVXDULR ¿QDO SXHGH DMXVWDU HO iQJXOR GH YLVLyQ GHO SDQHO HQ OD SDQWD
lla para obtener un ángulo de visión óptimo desde el interior del vehículo.
Existen DOS posibles ángulos, que se pueden ajustar manteniendo pulsado
HOERWyQ(MHFW2SHQ([SXOVLyQ$SHUWXUD
1ª pulsación larga del botón para obtener el Ángulo 1
2ª pulsación larga del botón para obtener el Ángulo 2
3ª pulsación larga para volver a la posición normal.
Precaución: Use siempre el botón “OPEN” para deslizar el panel frontal
hacia arriba o hacia abajo. 1RLQWHQWHQXQFDGHVOL]DUHOSDQHOIURQWDOGH
forma manual, ya que provocaría daños graves y permanentes en el mecanismo de deslizamiento, y esto anularía la garantía. No intente desacoplar
UHWLUDUHOSDQHOIURQWDOSXOVDQGRHOERWyQGHGHVHQJDQFKHQLDFRSODUHO
panel frontal mientras el panel se encuentre en la posición deslizada hacia
abajo. Esto podría provocar daños graves y permanentes en la unidad y en
el panel. Acople o desacople el panel frontal únicamente cuando el panel se
encuentre en la posición deslizada hacia arriba.
ES - 12
Vista general de la unidad
Control principal del panel frontal
Eject/Open
Ajuste del ángulo del panel
Liberación
del panel
Botón de volumen
Pantalla táctil
Receptor de IR
5DQXUDSDUDWDUMHWDV6'SDUD5(352'8&72508/7,0(',$
Extraiga el
panel frontal
Inserte la tarjeta de
memoria con la etiqueta hacia arriba
en la ranura para tarjetas SD de la
unidad principal.
5DQXUDSDUDWDUMHWDV6'SDUD0$3$',*,7$/RSDUD
$&78$/,=$&,Ï1'(/62)7:$5(
Extraiga el
panel frontal
Inserte la tarjeta de
memoria con la etiqueta
hacia arriba en la ranura
para tarjetas SD situada
detrás del panel frontal
Reinicio de la unidad
Tras extraer el panel frontal, use un lápiz o cualquier
objeto no metálico para mantener presionado el botón de
reinicio durante cinco segundos y reiniciar la unidad.
ES - 13
'LVFRVFRPSDWLEOHV
Discos que pueden reproducirse en esta unidad
Nº
Contenido
'LVFRV9HUViWLOHV'LJLWDOHV'9'V
&'VGHYtGHR9&'V
3
Discos Versátiles Digitales
JUDEDEOHV'9'5
4
Discos Versátiles Digitales
UHJUDEDEOHV'9'5:
9tGHR'LJLWDO&RPSDFWR9&'
'LVFRVFRPSDFWRV&'V
&'JUDEDEOHV&'5
&'UHJUDEDEOHV&'5:
Discos que no se pueden reproducir
Discos de 8 cm.
CDV, CDI, CDG
LD
DVD RAM
Nota sobre código de región
Los reproductores de DVD y
discos de vídeo DVD poseen
VXVSURSLRVLGHQWL¿FDGRUHV
de código de región. Esta
unidad puede reproducir los
GLVFRVTXHSRVHDQLGHQWL¿FDdores de todos los códigos
de región.
Mantenimiento de los discos
Antes de la reproducción, limpie el disco con un paño limpio,
trabajando desde el centro hacia el borde exterior. Nunca use
benceno, diluyentes, líquidos de limpieza o antiestáticos ni
ningún otro disolvente.
Nota: 8QGLVFRSRGUtDUD\DUVHDXQTXHQRORVX¿FLHQWHSDUDTXHUHVXOWH
inutilizable) si no se maneja adecuadamente y si las condiciones
existentes en el entorno de uso no son las apropiadas. Tenga en cuenta
que este rayado no es indicativo de la existencia de ningún tipo de
problema con el reproductor.
Etiqueta hacia
arriba
No doblar
Nunca tocar la cara /LPSLDUODVXSHU¿FLHGHO
inferior de un disco disco desde el centro
hacia el borde
ES - 14
)RUPDWRVUHSURGXFLEOHV
)RUPDWRVGHDXGLRUHSURGXFLEOHV
Reproduce CD-DA y archivos de música digitales MP3 o WMA en un
CD-ROM o DVD-ROM o USB o tarjeta de memoria.
,QIRUPDFLyQVREUH03\:0$
Admite un máximo de 2000 archivos.
Muestra un máximo de 30 caracteres.
Frecuencias de muestreo admitidas: 32 kHz, 44.1kHz, 48 kHz.
Tasas de bits admitidas: MP3 = 8 ~320 kbps de tasa de bits variable;
WMA = 32 ~ 192 kbps de tasa de bits variable.
)RUPDWRVGHYtGHRUHSURGXFLEOHV
Reproduce IMAGE JPEG, Vídeo DVD, AVI, MPEG4 en CD-ROM o
DVD-ROM o USB o tarjeta de memoria.
,QIRUPDFLyQVREUH03(*
&RPSDWLEOHFRQODGHVFRGL¿FDFLyQGHYtGHR03(*GH¿QLGDVHJ~Q
la norma ISO 14496-2
$3HU¿O6LPSOH63
%3HU¿O6LPSOH$YDQ]DGR$63
)RUPDWRVGHDUFKLYRFRPSDWLEOHV03\0$VyORDXGLR
ES - 15
)XQFLRQDPLHQWRGHOPDQGRDGLVWDQFLD
SISTEMA
Pulsación
corta
Pulsación
larga
1
Silencio
Encendido
2
Abrir
y cerrar
Ángulo
3
Menú de
audio
Menú
del
sistema
4
Fuente
5
Subir
volumen
6
Bajar
volumen
7
Sonido
fuerte
SINTONIZADOR
Pulsación
corta
CD
MP3
DVD
Pulsación
larga
Pulsación
corta
Pulsación
larga
Pulsación
corta
Pulsación
larga
Pulsación
corta
Pulsación
larga
Ángulo
Expulsar
Ángulo
Expulsar
Ángulo
Expulsar
Ángulo
AF
8
Sintonizar
hacia
delante
Avance
rápido
Avance
rápido
Avance
rápido
9
Sintonizar
hacia
detrás
Retroceso
rápido
Retroceso
rápido
Retroceso
rápido
10
Izquierda
Izquierda
Izquierda
11
Derecha
Derecha
Derecha
12
Arriba
Arriba
Arriba
13
Abajo
Abajo
Abajo
14
Buscar
siguiente
Pista
siguiente
Archivo
siguiente
Siguiente
15
Buscar
anterior
Pista
anterior
Archivo
anterior
Atrás
16
OK
OK
OK
17
Pausa/Reproducción
Pausa/
Reproducción
Pausa/Reproducción
Parada
Parada
18
Parada
19
M1
Memoria 1
Acceso al nº de pista
Acceso al nº de archivo
Numérico 1
20
M2
Memoria 2
Acceso al nº de pista
Acceso al nº de archivo
Numérico 2
21
M3
Memoria 3
Acceso al nº de pista
Acceso al nº de archivo
Numérico 3
22
M4
Memoria 4
Acceso al nº de pista
Acceso al nº de archivo
Numérico 4
ES - 16
Funcionamiento del mando a distancia
BOTÓN
SISTEMA
Pulsación
corta
SINTONIZADOR
Pulsación
larga
CD/MP3/WMA
Pulsación
larga
Pulsación
corta
23
M5
Memoria 5
Acceso al nº de pista
Acceso al nº de archivo
Numérico 5
24
M6
Memoria 6
Acceso al nº de pista
Acceso al nº de archivo
Numérico 6
25
Acceso al nº de pista
Acceso al nº de archivo
Numérico 7
26
Acceso al nº de pista
Acceso al nº de archivo
Numérico 8
27
Acceso al nº de pista
Acceso al nº de archivo
Numérico 9
Acceso al nº de pista
Acceso al nº de archivo
Numérico 0
28
29
Frecuencia
NAVI
Voice
Volumen
Pulsación
larga
DVD
Pulsación
corta
Pulsación
corta
NAVI
Voice
On/Off
30
VCD: PBC
DVD:
MENÚ DEL
DVD
&RQ¿JXUDFLyQ
31
32
Repetición OFF
Repetir pista
Repetir disco
&RQ¿JXUDFLyQ
Repetición OFF
Repetir capítulo
Repetir título
33
Zoom
34
OSD
35
Ir a
36
Subtítulo
37
Título
38
DVD
Audio
39
DVD
Ángulo
40
Pulsación
larga
Modo de
GPS
TA
ES - 17
)XQFLRQDPLHQWRJHQHUDO
%RWyQGHHQFHQGLGRDSDJDGR
Mantenga pulsado el botón POWER durante más de 3 segundos o pulse
brevemente cualquier otro botón del frontal del panel (excepto el botón
(MHFW2SHQSDUDHQFHQGHUODXQLGDG3XOVHHOERWyQ32:(5GXUDQWH
más de 3 segundos para apagar la unidad.
1 Botón de silencio
3XOVHHOERWyQ087(6LOHQFLRGXUDQWHPHQRVGHVHJXQGRVSDUDVLOHQciar la salida de audio y aparecerá “Mute” en la pantalla. Pulse de nuevo el
botón Mute para restablecer el ajuste anterior de la salida de audio.
2 Botón de volumen GHOFRGL¿FDGRU
Para aumentar el volumen, gire el botón de control del volumen en sentido
de las agujas del reloj. Para disminuir el volumen, gírelo en sentido contrario a las agujas del reloj. Cuando se haya ajustado el volumen, el ajuste
correspondiente se mostrará en la pantalla.
Sugerencia: El volumen de la guía de voz para la navegación es ajustable. Consulte la página "Funcionamiento del navegador - Funciones destacadas" para obtener más detalles.
%RWyQGHH[SXOVLyQ
3XOVHHOERWyQ(-(&7([SXOVDUGXUDQWHPHQRVGHVHJXQGRVSDUDH[pulsar el disco.
ES - 18
)XQFLRQDPLHQWRJHQHUDO
$MXVWHGHOiQJXORGHOSDQHO
(OXVXDULR¿QDOSXHGHDMXVWDUHOiQJXORGHYLVLyQGHOSDQHOHQODSDQWDOOD
para obtener un ángulo de visión óptimo desde el interior del vehículo.
Existen DOS posibles ángulos, que se pueden ajustar manteniendo
SXOVDGRHOERWyQ(MHFW2SHQ([SXOVDU$EULU
SXOVDFLyQODUJDGHOERWyQSDUDREWHQHUHOÈQJXOR
SXOVDFLyQODUJDGHOERWyQSDUDREWHQHUHOÈQJXOR
SXOVDFLyQODUJDSDUDYROYHUDODSRVLFLyQQRUPDO
%RWyQGHOLEHUDFLyQGHOSDQHO
Pulse este botón para desenganchar y extraer el panel de control.
3DQWDOODGHOPHQ~SULQFLSDO
Se inicia mostrando el Menú principal. Este menú es la base de la jerarquía de pantalla y permite acceder de forma sencilla a todas las funciones
pulsando el correspondiente botón de la pantalla táctil.
Aparecerá el siguiente menú:
Botón
Control
Acceso a la Navegación por GPS
Acceso al modo Reproductor multimedia
Acceso al modo de Sintonizador
Acceso al modo AV-In
$FFHVRDOPHQ~GH&RQ¿JXUDFLyQ
%RWyQGHYROXPHQPi[LPR
Pulse el botón Loud durante menos de 3 segundos para seleccionar la
activación del volumen máximo y reducir la salida de graves, siendo Off
$SDJDGRHOYDORUSRUGHIHFWR
ES - 19
)XQFLRQDPLHQWRJHQHUDO
6XEZRRIHU
Pulse el botón SUB-W durante menos de 3 segundos para encender la
función de Sub-woofer. Pulse de nuevo el botón SUB-W para desactivar la
función de Sub-woofer.
8 Modo GPS
(OXVXDULR¿QDOSXHGHFDPELDUODYLVXDOL]DFLyQ7)7HQWUHHOPRGRGHUH
producción y la pantalla de NAVEGACIÓN / MAPA GPS haciendo lo
siguiente:
1. Pulsando el botón GPS MODE del paneO
2. Pulsando en la pantalla táctil el botón
o
9 Navi Voice
Esta unidad silenciará automáticamente la salida de audio del reproductor
multimedia cuando se produzca un anuncio a través de la guía de voz
para la navegación. Esta función puede activarse o desactivarse pulsando
en la pantalla sobre el botón
o
El nivel de sonido de la guía de voz para la navegación se puede ajustar
pulsando el botón NAVI VOICE. Cuando se muestra
/
en la pantalla, existe un plazo de aproximadamente 10
segundos para ajustar al nivel de sonido deseado girando el botón de
YROXPHQGHOFRGL¿FDGRU
Botón
Control
Guía de voz para navegación encendida
Guía de voz para navegación apagada
Sugerencias: Este ajuste del nivel de sonido del NAVI VOICE no afectará
al volumen del sintonizador ni del reproductor multimedia.
Mantenga pulsado el botón NAVI VOICE para encender o apagar esta
guía NAVI VOICE.
ES - 20
)XQFLRQDPLHQWRGHOVLQWRQL]DGRU
)XQFLyQGHIUHFXHQFLD
Pulse el botón BAND del panel o el botón
FDPELDUHQWUHIUHFXHQFLDV)0\$00:
de la pantalla táctil para
6LQWRQL]DFLyQKDFLDGHODQWHDWUiV
6LQWRQL]DFLyQPDQXDO
Pulse y mantenga pulsado el botón de sintonización UP / DOWN o pulse el
botón
de la pantalla táctil para aumentar o disminuir el número de la frecuencia de radio de forma escalonada.
6LQWRQL]DFLyQDXWRPiWLFD
Pulse el botón de sintonización UP / DOWN del panel o pulse el botón
de la pantalla táctil para pasar automáticamente a la siguiente emisora.
4 Emisoras programadas
Pulse uno de los 6 botones de programas numerados del panel o pulse el
botón
de la pantalla táctil para almacenar y recuperar las
emisoras de cada frecuencia.
$OPDFHQDPLHQWRDXWRPiWLFRHVFDQHRSURJUDPDGR$636
Selecciona automáticamente las 6 emisoras con una señal más fuerte y las
guarda en la frecuencia en uso. Al mantener pulsado el botón AS / PS del
panel durante más de 3 segundos, las nuevas emisoras sustituyen a las
emisoras ya almacenadas en esta frecuencia.
Escaneo programado
Escanea las emisoras ya almacenadas en la frecuencia en uso. Al pulsar el
botón AS / PS del panel durante menos de 3 segundos, la unidad se detendrá durante 10 segundos en cada una de las emisoras programadas. Pulse
de nuevo el botón AS / PS del panel para detener la exploración al llegar a
la emisora deseada.
ES - 21
)XQFLRQDPLHQWRGHOVLQWRQL]DGRU
)XQFLyQ5'6
La unidad está equipada con las siguientes funciones RDS:
- AF Alternative Frequencies (Frecuencias alternativas; búsqueda
DXWRPiWLFDGHOHPLVRUGHVHxDOPiVIXHUWH
&7&ORFN7LPH)HFKD\KRUD
3,3URJUDPLGHQWL¿FDWLRQV,GHQWL¿FDFLyQGHODUHGGHHPLVRUDV
363URJUDPVHUYLFHQDPH1RPEUHGHODUHGGHHPLVRUDV
37<3URJUDP7\SH7LSRGHSURJUDPD
5(*5HJLRQDO&KDQJH&DPELRGHUHJLyQ
7$7UDI¿F$QQRXQFHPHQW,GHQWL¿FDFLyQGHLQIRUPDFLyQVREUHHOWUi¿FR
737UDI¿FSURJUDP,GHQWL¿FDFLyQGHUHGFRQSURJUDPDVGHUDGLR
)XQFLyQ$)
Pulse el botón AF del panel durante menos de 3 segundos para seleccionar AF ON/OFF. El icono AF se iluminará en la pantalla. En el modo AF
“On”, si la señal de la emisora sintonizada se debilita, la unidad cambiará
automáticamente a una frecuencia diferente de la misma red con una
señal más fuerte.
Nota: El ajuste de fábrica es “AF ON".
)XQFLyQ7$
Pulse el botón GPS MODE / TA del panel durante menos de 3 segundos
para cambiar al modo de standby TA. El icono TA se iluminará en la patalla.
En el modo de standby, cuando se inicie la emisión de información sobre el
WUi¿FRGLFKDHPLVLyQGHLQIRUPDFLyQVHUHFLELUiFRPRPi[LPDSULRULGDGLQ
dependientemente del modo de funcionamiento. Cuando se inicie una
LQIRUPDFLyQGHWUi¿FRODLQGLFDFLyQ³75$)),&,1)2´DSDUHFHUiHQODSDQ
talla. Pulsando el botón TA se puede cancelar la recepción de la emisión
PLHQWUDVVHHVWiUHFLELHQGRODHPLVLyQGHXQDLQIRUPDFLyQGHWUi¿FR
La unidad volverá al modo anterior, y la función TA volverá de nuevo al
modo standby.
ES - 22
)XQFLRQDPLHQWRGHOVLQWRQL]DGRU
)XQFLyQ37<
Pulse el botón SUB-W / PTY durante más de 3 segundos para entrar en el
modo PTY. A continuación, pulse este botón repetidamente para ver los
diferentes grupos PTY enumerados más abajo. Cuando el PTY deseado
se muestre en la memoria programada M1 a M6, pulse dicho número
de memoria programada para activar la búsqueda de dicho PTY; el nombre del PTY aparecerá sobre los 6 botones programados.
Si no se puede encontrar ninguna emisora con la radiodifusión PTY seleccionada en un plazo de 5 segundos, el sistema volverá al modo anterior.
ES - 23
Reproductor multimedia
Este reproductor multimedia puede soportar la reproducción de discos
CD, discos DVD, dispositivos USB y tarjetas de memoria SD.
Nota: Para más detalles sobre los formatos y discos que puede reproducir
esta unidad, consulte las páginas “Discos compatibles” & “Formatos reproducibles”.
Selección de los medios a reproducir
1. Pulse repetidamente el botón MODE del panel o del mando a distancia
SDUDFDPELDUHQWUH7XQHU6LQWRQL]DGRU!'LVF'LVFR!86%!6'
&DUG7DUMHWD6'!$9,10RGH0RGR$9,1
$FFHGDDOPHQ~SULQFLSDO0$,10(18\SXOVHVREUHHOERWyQ
5HSURGXFWRUPXOWLPHGLD3XOVHORVVLJXLHQWHVERWRQHVSDUDLQLFLDUOD
reproducción de los medios deseados:
botón para reproducir archivos del dispositivo USB
botón para reproducir el disco
botón para reproducir los archivos de la tarjeta SD
ES - 24
Reproductor multimedia
Nota: Si alguno de los medios no está disponible en esta unidad, dicho
medio no aparecerá durante el cambio de modo ni en la pantalla táctil.
Nota: Esta unidad sólo puede reproducir la tarjeta SD que esté insertada
en la unidad principal.
Consulte la página “Vista general de la unidad" para obtener más detalles
acerca de la ranura para tarjetas SD para uso del reproductor multimedia.
$MXVWHGHOFRORUGXUDQWHODUHSURGXFFLyQGHXQGLVFRGHYtGHR'9'
Pulse el botón
de la pantalla táctil para acceder al ajuste de
FRORUGHOYtGHR'9'$SDUHFHUiHOVLJXLHQWHPHQ~GHFRQ¿JXUDFLyQ
Cambiar el ajuste de color
Cambiar el ajuste de brillo
Cambiar el ajuste de contraste
Cambiar el ajuste de tonalidad
Restaurar los ajustes por defecto
6DOLUGHOPHQ~GHFRQ¿JXUDFLyQGHOFRORU
ES - 25
Reproductor multimedia
1DYHJDFLyQPLHQWUDVHOUHSURGXFWRUPXOWLPHGLDHVWiHQ
funcionamiento
$FWLYDFLyQGHVDFWLYDFLyQGHODJXtDGHYR]SDUDODQDYH
JDFLyQPLHQWUDVHOUHSURGXFWRUPXOWLPHGLDHVWiHQIXQ
cionamiento
Esta unidad SILENCIARÁ automáticamente la salida de audio del reproductor multimedia cuando se produzca un anuncio a través de la guía
de voz para la navegación. Esta función puede activarse o desactivarse
pulsando sobre el botón de la pantalla
.
&RQWUROGHOYROXPHQGHODJXtDGHYR]SDUDODQDYHJDFLyQ
El nivel de sonido de la guía de voz para la navegación se puede ajustar
pulsando el botón NAVI VOICE. Cuando aparezca
/
en la pantalla, dispondrá de 10 segundos para ajustar al
QLYHOGHVRQLGRGHVHDGRJLUDQGRHOERWyQGHYROXPHQGHOFRGL¿FDGRU
Sugerencias: Este ajuste del nivel de sonido del NAVI VOICE no afectará al volumen del sintonizador ni del reproductor multimedia.
Sugerencias: Mantenga pulsado el botón NAVI VOICE para encender o
apagar esta guía NAVI VOICE.
&DPELRGHOPRGRGHYLVXDOL]DFLyQ7)7HQWUH0DSD*36\
Reproductor multimedia
(OXVXDULR¿QDOSXHGHFDPELDUODYLVXDOL]DFLyQ7)7HQWUHHOPRGRGH
reproducción y la pantalla de NAVEGACIÓN / MAPA GPS haciendo lo
siguiente:
1. Pulsando brevemente el botón GPS MODE del panel.
2. Pulsando en la pantalla táctil el botón
ES - 26
.
Reproductor multimedia
)XQFLRQDPLHQWRGHXQGLVFR&'9&'
3LVWDDUFKLYR
3XOVHHOERWyQ75$&.),/(833LVWDDUFKLYRVLJXLHQWH75$&.
),/('2:13LVWDDUFKLYRDQWHULRURHOERWyQGHOD
pantalla táctil durante menos de 1 segundo para pasar a la pista siguiente
o anterior del CD. El número de pista seleccionado aparecerá en la panWDOOD3XOVH\PDQWHQJDSXOVDGRHOERWyQ75$&.833LVWDVLJXLHQWH
75$&.'2:13LVWDDQWHULRURHOERWyQGHOD
pantalla táctil durante más de 1 segundo para avanzar o retroceder rápidamente por el disco. La reproducción se reanudará cuando se suelte el
botón.
)XQFLyQGH3DXVD5HSURGXFFLyQ
3XOVHHOERWyQ3/$<3$86(5HSURGXFLU3DXVDGHOSDQHORHO
botón
de la pantalla táctil para iniciar la reproducción del disco
mientras se encuentra en el menú de título, menú raíz, pausa, reanudación tras parada, parada, avance lento, avance rápido y retroceso
rápido.
3XOVHHOERWyQ3/$<3$86(5HSURGXFLU3DXVDGHOSDQHORHO
botón
de la pantalla táctil para pausar la reproducción. Vuelva a
pulsar el botón PLAY / PAUSE para reanudar la reproducción.
ES - 27
Reproductor multimedia
)XQFLyQGHSDUDGD
3XOVHHOERWyQ67233DUDGDGHOSDQHORHOERWyQGHODSDQWDOOD
táctil para detener la reproducción. Cuando la reproducción se haya detenido, la unidad podrá memorizar el punto en el que se ha pulsado el botón
67233XOVH3/$<5HSURGXFLUSDUDUHDQXGDUODUHSURGXFFLyQGHVGHHVH
punto. Pulse de nuevo el botón STOP para cancelar la función RESUME
5HDQXGDFLyQ\TXHODXQLGDGVHGHWHQJDFRPSOHWDPHQWH6LDKRUDSXOVD
el botón PLAY, la reproducción se hará desde el principio del disco. La funFLyQ5(680(5HDQXGDFLyQHVDGHFXDGDSDUDGLVFRVTXHPXHVWUHQHO
tiempo de reproducción mientras ésta se reproduce.
$OSXOVDUGRVYHFHVHOERWyQ6723HOHVWDGRFDPELDUi5HSURGXFFLyQ!
5HDQXGDFLyQWUDVSDUDGD!3DUDGDFRPSOHWD
)XQFLyQGHUHSHWLFLyQ
3XOVHHOERWyQ5(3($75HSHWLUGXUDQWHODUHSURGXFFLyQSDUDDFWLYDUOD
función de reproducción repetida.
Repetición de CD:
$OSXOVDU5(3($75HSHWLUHOHVWDGRFDPELDUi5HSHWLUWRGR!5HSHWLU
pista
5HSHWLFLyQGH9&'69&'
$OSXOVDUEUHYHPHQWH5(3($75HSHWLUHOHVWDGRFDPELDUi5HSHWLFLyQ
DSDJDGD!5HSHWLUSLVWD$OPDQWHQHUSXOVDGRHOERWyQ5(3($75HSHWLUHOHVWDGRFDPELDUiUHSHWLFLyQDSDJDGD!UHSHWLUWRGR
)XQFLyQGHUHSURGXFFLyQDOHDWRULD
1RUPDO!$OHDWRULDHQUHSHWLFLyQSRUGHIHFWR
$OHDWRULD!1RUPDOHQUHSHWLFLyQSRUGHIHFWR
)DVW)RUZDUG$YDQFHUiSLGR)DVW5HYHUVH5HWURFHVRUiSLGR
$OSXOVDUHOERWyQ)$67)25:$5'$YDQFHUiSLGR)$675(9(56(
5HWURFHVRUiSLGRGXUDQWHODUHSURGXFFLyQHOGLVFRDYDQ]DUiRUHWURFH
derá rápidamente a diferentes múltiplos de la velocidad normal de reproducción. Existen 5 niveles de velocidad disponibles: 2X, 4X, 8X, 16X y
32X veces la velocidad normal.
Para volver a la reproducción normal mientras se encuentra en el modo
)$67)25:$5'$YDQFHUiSLGR)$675(9(56(5HWURFHVRUiSLGR
SXOVHHOERWyQ3/$<5HSURGXFLUGHOSDQHORGHOPDQGRDGLVWDQFLD
Cada vez que pulse FAST FORWARD, la velocidad cambiará: velocidad
QRUPDO!;!;!;!;!;!YHORFLGDGQRUPDO&DGDYH]
TXHSXOVH)$675(9(56(ODYHORFLGDGFDPELDUiYHORFLGDGQRUPDO!
;!;!;!;!;!YHORFLGDGQRUPDO
ES - 28
Reproductor multimedia
3%&HQHOPDQGRDGLVWDQFLD
Pulse el botón PBC del mando a distancia para elegir un modo de reproducción del disco VCD: PBC_ON o PBC_OFF mientras reproduce un
disco VCD. Al pulsar el botón PBC y cambiar el reproductor al modo de
UHSURGXFFLyQ3%&B213%&DFWLYDGRVHYLVXDOL]DUiXQDOLVWD3%&GHO
disco en la TV o monitor. En la lista PBC, use los botones numéricos para
seleccionar una pista a reproducir o una dirección, y pulse el botón PLAY
para iniciar la reproducción.
OSD
Elementos de información sobre OSD de VCD, SVCD, CD:
Al pulsar OSD, el estado cambia:
HU26'!26'!HU26'!26'RII
1er OSD
2º OSD
3er OSD
Pista
Tiempo
2º OSD
Tiempo del disco
Repetición
1er OSD
Tiempo reproducido del
disco
Tiempo restante del
disco
PBC
Modo de reproducción
3er OSD
Tiempo de pista
Estéreo Izq./Der.
ES - 29
Tiempo reproducido del
disco
Tiempo restante del
disco
Reproductor multimedia
5HSURGXFFLyQGHDUFKLYRGHP~VLFDLPDJHQYtGHR
La siguiente información de visualización aparecerá si en la unidad se
inserta un disco multimedia, un dispositivo USB o una tarjeta SD.
6HOHFFLyQGHORVDWULEXWRVGHDUFKLYR
En un estado de no búsqueda, pulse el botón
del mando a distancia o de la pantalla táctil para mover el cursor al dominio de atributos de
DUFKLYR$FRQWLQXDFLyQSXOVHHOERWyQŸRźGHOPDQGRDGLVWDQFLDR
de la pantalla táctil para seleccionar el atributo de archivo Audio, Image,
Video y pulse OK del mando a distancia o el botón
de la pantalla
WiFWLOSDUDFRQ¿UPDUHODWULEXWRVHOHFFLRQDGR
6HOHFFLyQGHFDUSHWDDUFKLYR
Pulse el botón
del mando a distancia o de la pantalla táctil para
PRYHUHOFXUVRUDOGRPLQLRGHFDUSHWDVRDUFKLYRV3XOVHODWHFODŸź
para seleccionar la canción que desea escuchar y, a continuación, pulse
el botón OK del mando a distancia o el botón
de la pantalla táctil
para reproducir la canción seleccionada. Además, también puede pulsar la
WHFOD35(9$QWHULRUR1(;76LJXLHQWHSDUDUHSURGXFLUODFDQción anterior o siguiente mientras se encuentra en reproducción y pausa.
ES - 30
Reproductor multimedia
Nota: El resto de las operaciones son las mismas que las de un CD / VCD
(repetición, programación, etc.). Consulte la sección Funcionamiento de un
disco CD / VCD.
8S$UULED'RZQ$EDMR5LJKW'HUHFKD/HIW,]TXLHUGD
(QWHU,QWUR
Pulse en el mando a distancia o en la pantalla táctil el botón
para mover el cursor. Pulse el botón OK del mando a distancia o el botón
GHODSDQWDOODWiFWLOSDUDFRQ¿UPDUODVHOHFFLyQ
OSD
Elemento de información de OSD de MMN Video:
Al pulsar OSD, el estado cambia:
HU26'!26'!HU26'!26'RII
1er OSD
2º OSD
3er OSD
Audio
Carpeta
2º OSD
Subtítulo
Archivo
Tamaño de marco
1er OSD
Modo de reproducción
Tiempo
Repetición
3er OSD
Tiempo del título
Tiempo de reproducción
del arhivo
Tiempo restante del
archivo
ES - 31
Reproductor multimedia
001!,0$*(9LHZ!6OLGH
(QHOPRGR6OLGH'LDSRVLWLYDVLVHSXOVDODWHFOD(17(5R3/$<HO
reproductor mostrará las imágenes o fotos una a una a partir de la
imagen actual. Se detendrá y volverá al principio cuando se haya mostraGROD~OWLPDLPDJHQ3XOVHHOERWyQ67233DUDGDRHOERWyQGH
la pantalla táctil para detener el modo de visualización de diapositivas.
001!,0$*(9LHZ!5RWDWH
/DIXQFLyQ5RWDWH*LUDUSHUPLWHPRVWUDUODLPDJHQRIRWRHQGLIHUHQWHV
ángulos. Al pulsar en el mando a distancia o en la pantalla táctil las teclas
, se cambia entre los diferentes ángulos posibles.
Ángulo de giro:
ES - 32
Reproductor multimedia
)XQFLRQDPLHQWRGHXQGLVFR'9'
Una vez insertado el disco DVD en la unidad, ésta iniciará automáticamente la reproducción desde el principio del disco y, a continuación,
DSDUHFHUi'9'0(180HQ~'9'R52270HQ~UDt]R7,7/(7tWXOR
en el monitor TFT y se mostrará "ROOT" en el TFT de la unidad.
Sugerencia: Cuando se muestre DVD Menu (Menú del DVD) o Root
0HQ~UDt]R7LWOH7tWXORHQODSDQWDOODHOXVXDULR¿QDOSRGUiXVDUORV
botones
del mando a distancia o de la pantalla táctil para
PRYHUHOFXUVRU\HOERWyQFRPRERWyQGHFRQ¿UPDFLyQ2..
)XQFLyQGH3DXVD5HSURGXFFLyQ
Pulse PAUSE en el panel o
la reproducción.
en la pantalla táctil para pausar
Pulse PAUSE en el panel o
en la pantalla táctil para pasar a
ODVLJXLHQWHLPDJHQGHOYtGHR'9'\9&'~QLFDPHQWH
Pulse PLAY en el panel o
la reproducción normal.
en la pantalla táctil para volver a
ES - 33
Reproductor multimedia
)XQFLyQGHSDUDGD
3XOVHHOERWyQ67233DUDGDGHOSDQHORHOERWyQGHODSDQtalla táctil para detener la reproducción y mostrar la pantalla del logo.
El reproductor memorizará la última posición en la que se ha detenido la
reproducción.
Pulse PLAY en el panel o
en la pantalla táctil para reanudar la
reproducción desde la posición en la que ésta se detuvo (DVD, VCD 1.1,
9&'\&'DXGLR
Pulse STOP dos veces en el panel o
en la pantalla táctil para
reanudar la reproducción desde el principio del disco.
)XQFLyQGHUHSHWLFLyQ
3XOVHHOERWyQ5(3($75HSHWLUGXUDQWHPHQRVGHVHJXQGRVSDUD
FDPELDUGH5HSHWLFLyQDSDJDGD!5HSHWLUFDStWXOR
3XOVHHOERWyQ5(3($75HSHWLUGXUDQWHPiVGHVHJXQGRVSDUDFDPELDUGH5HSHWLFLyQDSDJDGD!5HSHWLUWtWXOR
0HQ~GHO'9'5'0
3XOVHHOERWyQ'9'0(180HQ~GHO'9'GXUDQWHPHQRVGHVHJXQGRVSDUDDFFHGHUD'9'0(180HQ~'9'R52270HQ~UDt]GHO
disco DVD.
Sugerencia: Cuando se muestre DVD Menu (Menú del DVD) o Root
0HQ~UDt]R7LWOH7tWXORHQODSDQWDOODHOXVXDULR¿QDOSRGUiXVDUORV
botones
del mando a distancia o de la pantalla
WiFWLOSDUDPRYHUHOFXUVRU\HOERWyQFRPRERWyQGHFRQ¿UPDFLyQ
2.
5 DVD Audio
$OSXOVDU'9'$8',2SRGUiHOHJLUODVFDGHQDVGHHQWUDGDVWUHDPV
de audio, si el disco DVD o AVI / MPEG4 presenta múltiples cadenas de
entrada.
ES - 34
Reproductor multimedia
)XQFLyQ1(;76LJXLHQWH
$OSXOVDUHOERWyQ1(;76LJXLHQWHGHOSDQHORHOERWyQGHOD
pantalla táctil mientras se reproduce un disco, se saltará al principio del
VLJXLHQWHFDStWXOR'9'SLVWD9&'69&'&'FDQFLyQ03:0$
LPDJHQ-3(*RDUFKLYRGHYtGHR$9,03(*03*'$7
)XQFLyQ35(9$QWHULRU
$OSXOVDUHOERWyQ35(9$QWHULRUGHOSDQHORHOERWyQGHODSDQWDOODWiFWLOVHUHSURGXFLUiHODFWXDOFDStWXOR'9'SLVWD9&'69&'
&'FDQFLyQ03:0$RDUFKLYRGHYtGHR$9,03(*03*'$7
desde el principio si el tiempo ya reproducido es inferior a 4 segundos.
Si el tiempo ya reproducido es superior a 4 segundos, al pulsar el botón
35(9$QWHULRUVHVDOWDUiDOSULQFLSLRGHODQWHULRUFDStWXOR'9'SLVWD
9&'69&'&'FDQFLyQ03:0$LPDJHQ-3(*RDUFKLYRGH
YtGHR$9,03(*03*'$7
7 & )XQFLyQ)DVW)RUZDUG$YDQFHUiSLGR)DVW5HYHUVH5HWUR
FHVRUiSLGR
0DQWHQJDSXOVDGRHOERWyQ)$67)25:$5'$YDQFHUiSLGRGHO
panel o el botón
de la pantalla táctil durante más de 3 segundos
para avanzar rápidamente por el disco. Cada vez que se pulse el botón,
VHDFWLYDUiXQDQXHYDYHORFLGDG;;;R;
Pulse PLAY en el panel o
en la pantalla táctil para volver a
la reproducción normal.
0DQWHQJDSXOVDGRHOERWyQ)$67%$&.:$5'5HWURFHVRUiSLGR
del panel o el botón
de la pantalla táctil para retroceder rápidamente por el disco. Cada vez que se pulse el botón, se activará una nueva
YHORFLGDG;;;R;
Pulse PLAY en el panel o
en la pantalla táctil para volver a
la reproducción normal.
1~PHURVaHQHOPDQGRDGLVWDQFLD
$OSXOVDUORVERWRQHVGHORVQ~PHURVHOXVXDULR
¿QDOSRGUiDFFHGHUDODSLVWDRFDStWXORGHVHDGR$GHPiVHVWRVERWRQHV
son muy utilizados en diferentes dominios de búsqueda: búsqueda de
título, búsqueda de capitulo, búsqueda de pista, búsqueda de tiempo y
función de programación.
ES - 35
Reproductor multimedia
6XEWtWXORHQHOPDQGRDGLVWDQFLD
$OSXOVDUHOERWyQ68%7,7/(6XEWtWXORGHOPDQGRDGLVWDQFLDHOXVXDULR
¿QDOSRGUiVHOHFFLRQDUXQRGHORVLGLRPDVGHVXEWLWXODGRSDUDPRVWUDUOR
en la pantalla o podrá desactivar el subtitulado. Esta función no es válida
para VCD / SVCD / CD, MP3 / WMA y JPEG.
'9'26''
Pulse el botón AS / PS una vez para visualizar la cantidad de tiempo
reproducido y de tiempo restante del disco.
Pulse el botón AS / PS dos veces para visualizar el tipo de disco, el
FDStWXORDFWXDO'9'RODSLVWD9&'69&'$XGLR&'\HOQ~PHURWRWDO
GHFDStWXORVRSLVWDV7DPELpQPXHVWUDVyORSDUD'9'HOWtWXORDFWXDOHO
número total de títulos, idioma de audio / tipo / nº de canales, idioma de los
subtítulos y selección de ángulo.
&RQ¿JXUDFLyQGHO'9''
3XOVHHOERWyQ6(783&RQ¿JXUDFLyQGHOPDQGRDGLVWDQFLDRPDQWHQJD
pulsado el botón AS / PS durante más de 3 segundos en la unidad principal
SDUDDFFHGHUDOPRGR6HWXS0HQX0HQ~GHFRQ¿JXUDFLyQ
/DVRSFLRQHVLQFOXLGDVHQHOPHQ~GHFRQ¿JXUDFLyQJHQHUDOVRQ/DQJXDJH
,GLRPD'LVSOD\9LVXDOL]DFLyQ$XGLR\3DUHQWDO&RQWUROSDUHQWDO
ES - 36
Reproductor multimedia
Ajuste de idioma
Pulse los botones
del panel o de la pantalla táctil para mover el
FXUVRUKDVWDHOERWyQ/DQJXDJH,GLRPD$SDUHFHUiODOLVWDGHLGLRPDVGLVponibles.
Use el botón
Use los botones
para seleccionar el ajuste.
para cambiar de idioma.
Pulse OK en el panel o
en la pantalla táctil para pasar por todas las
opciones posibles o para visualizar una lista de las opciones disponibles.
OSD language ,GLRPD26'
(ODMXVWH26'/DQJSHUPLWHTXHHOXVXDULR¿QDOVHOHFFLRQHHOLGLRPDHQ
HO TXH SUH¿HUH YHU HO PHQ~ 26' \ ORV PHQVDMHV ([LVWHQ ODV VLJXLHQWHV
opciones:
ES - 37
Reproductor multimedia
6XEWLWOH6XEWtWXOR
(O DMXVWH 6XEWLWOH 6XEWtWXOR SHUPLWH TXH HO XVXDULR ¿QDO VHOHFFLRQH HO
idioma preferido y cambie el ajuste del idioma de subtitulado.
Audio
(ODMXVWH$XGLRSHUPLWHTXHHOXVXDULR¿QDOVHOHFFLRQHHOLGLRPDSUHIHULGR
y cambie el ajuste del idioma de audio.
'LVF'LVFR
(O DMXVWH 'LVF 'LVFR SHUPLWH TXH HO XVXDULR ¿QDO VHOHFFLRQH HO LGLRPD
preferido y cambie el ajuste del idioma del menú del disco.
ES - 38
Reproductor multimedia
Ajuste Display (Visualización)
Pulse los botones
del mando a distancia o de la pantalla táctil
SDUDPRYHUHOFXUVRUKDVWDHOERWyQ'LVSOD\9LVXDOL]DFLyQ$SDUHFHUiOD
siguiente lista de opciones de visualización:
Use el botón
para seleccionar el ajuste.
Use los botones
para cambiar entre los ajustes disponibles.
Pulse OK en el panel o
en la pantalla táctil para pasar por todas las
opciones posibles o para visualizar una lista de las opciones disponibles.
79'LVSOD\9LVXDOL]DFLyQGH79
El ajuste de visualización permite que el usuario seleccione la visualización
de TV. Existen las siguientes opciones:
ES - 39
Reproductor multimedia
797\SH7LSRGH79
El ajuste de visualización permite que el usuario seleccione el tipo de TV.
Existen las siguientes opciones:
$QJOH0DUN0DUFDGHiQJXOR
El ajuste de visualización permite que el usuario seleccione la activación/
desactivación de la marca de ángulo.
ES - 40
Reproductor multimedia
6FUHHQ6DYHU6DOYDSDQWDOODV
(OXVXDULR¿QDOSXHGHXVDUHVWDIXQFLyQSDUDDFWLYDURGHVDFWLYDUHOVDOYDpantallas.
$MXVWH$XGLR
Pulse los botones
del mando a distancia o de la pantalla táctil para
mover el cursor hasta el botón Audio. Aparecerá la siguiente lista de
opciones de audio:
Use el botón
para seleccionar el ajuste.
Use los botones
para cambiar entre los ajustes disponibles.
Pulse OK en el panel o
en la pantalla táctil para pasar por todas las
opciones posibles o para visualizar una lista de las opciones disponibles.
ES - 41
Reproductor multimedia
'RZQPL[
El ajuste de audio permite que el usuario seleccione Downmix y establezca
downmix como la salida analógica estéreo de este reproductor.
Dual Mono
El ajuste de audio permite que el usuario seleccione Dual mono y establezFDODVDOLGDHVWpUHRGXDOPRQRGHHVWHUHSURGXFWRU
'\QDPLF'LQiPLFR
El ajuste de audio permite que el usuario seleccione Dynamic y establezca
la salida de sonido dinámica con las salidas de alto volumen suavizadas.
ES - 42
Reproductor multimedia
Ajuste Parental (Control parental)
Pulse los botones
del panel o de la pantalla táctil para mover el cursor hasta
HOERWyQ3DUHQWDO&RQWUROSDUHQWDO$SDUHFHUiODVLJXLHQWHOLVWDGHRSFLRQHVGHFRQtrol parental:
Use el botón
para seleccionar el ajuste.
Use los botones
para cambiar entre los ajustes disponibles.
Pulse OK en el panel o
en la pantalla táctil para pasar por todas las opciones
posibles o para visualizar una lista de las opciones disponibles.
&DPELRGHFRQWUDVHxD
(VWDFDUDFWHUtVWLFD&KDQJHVHXVDSDUDHOFRQWUROSDUHQWDO,QWURGX]FDVXFRQWUDVHxD
de 4 dígitos cuando así se solicite en la pantalla.
ES - 43
Reproductor multimedia
Si se introduce una contraseña errónea, aparecerá el mensaje "Wrong Password"
&RQWUDVHxDHUUyQHD
3DUDYROYHUDLQWURGXFLUODFRQWUDVHxDFRUUHFWDHOXVXDULR¿QDOGHEHYROYHUD(QWHU
3DVVZRUG,QWURGXFLUFRQWUDVHxDHLQWHQWDUORGHQXHYR
Una vez introducida la contraseña correcta, pulse OK en el panel o
en la
SDQWDOODWiFWLO\DSDUHFHUiHOPHQVDMH³&RUUHFWSDVVZRUG´&RQWUDVHxDFRUUHFWD
ES - 44
Reproductor multimedia
Si las contraseñas introducidas no coinciden, aparecerá el mensaje
³3DVVZRUGVGRQRPDWFK´/DVFRQWUDVHxDVQRFRLQFLGHQ
(OXVXDULR¿QDOGHEHUiLQWURGXFLUQXHYDPHQWHODFRQWUDVHxD\SXOVDU2.HQHOSDQHO
RHQODSDQWDOODWiFWLOSDUDFRQ¿UPDU
Nivel de control parental
Esta función permite introducir el ajuste del nivel de control parental.
ES - 45
Reproductor multimedia
Pulse OK en el panel o
traseña.
en la pantalla táctil para introducir la con-
Si la contraseña no es correcta, aparecerá el mensaje "Wrong Password"
&RQWUDVHxDHUUyQHD
(OXVXDULR¿QDOGHEHUiLQWURGXFLUQXHYDPHQWHODFRQWUDVHxDFRUUHFWD\SXOVDU2.HQHOSDQHORHQODSDQWDOODWiFWLOSDUDFRQ¿UPDU
ES - 46
Reproductor multimedia
'HIDXOW'HIHFWR
(ODMXVWHGHODIXQFLyQ'HIDXOW'HIHFWRUHLQLFLDUiWRGDVODVRSFLRQHV\VXVDMXVWHV
personales a los ajustes de fábrica, eliminándose todos sus ajustes personales.
Use el botón
para seleccionar el ajuste.
3XOVH2.HQHOSDQHORHQODSDQWDOODWiFWLOSDUDFRQ¿UPDUODVHOHFFLyQ
ES - 47
0RGR$9,Q
Selección del modo AV
1. Pulse repetidamente el botón MODE del panel o del mando a distancia
SDUDFDPELDUHQWUH7XQHU6LQWRQL]DGRU!'LVF'LVFR!86%!6'&DUG
7DUMHWD6'!$9,10RGH0RGR$9,1
$FFHGD DO PHQ~ SULQFLSDO 0$,1 0(18 \ SXOVH HO ERWyQ $9 0RGH
0RGR$9
Pulse los siguientes botones para iniciar la reproducción de los medios
deseados:
botón para iniciar el modo de navegación
botón para activar la guía de voz para la navegación
botón para ajustar la preferencia de color
botón para salir del modo de reproductor
ES - 48
&RQ¿JXUDFLyQGHOVLVWHPD
Para realizar los ajustes del sistema de esta unidad, pulse el botón
de la pantalla del menú principal para acceder al menú de
ajuste que aparece a continuación:
$MXVWHGHVRQLGR
Pulse el botón
en la pantalla del menú de ajuste para acceder al menú
de ajuste del sonido. Aparecerá el siguiente menú de selección.
Ajuste
Control
Equilibrado de los altavoces izquierdo y derecho
Atenuación de los altavoces delantero y trasero
Nivel de graves
Nivel de agudos
ES - 49
&RQ¿JXUDFLyQGHOVLVWHPD
Pulse el botón
seleccionar el nivel.
Pulse el botón
selección.
en la pantalla del menú de ajuste del sonido para
para acceder a la siguiente página y poder realizar la
Nota: Pulse el botón
para acceder a la página anterior.
Ajuste
Control
Botón de tono del pitido
Salida de Sub-Woofer
Pulse la barra
de la pantalla del menú de ajuste del sonido
para activar o desactivar estas funciones.
Sugerencia: Pulse el botón
sonido.
para salir del menú de ajuste del
ES - 50
&RQ¿JXUDFLyQGHOVLVWHPD
$MXVWH'LVSOD\ 9LVXDOL]DFLyQ
Pulse el botón
en la pantalla del menú de ajuste para acceder
al menú de ajuste de visualización. Aparecerá el siguiente menú.
Display Setting
Brightness 06
Time Setting
Calibration
Ajuste
Control
Brillo de la pantalla
Pulse el botón
en la pantalla del menú de ajuste de visualización
para seleccionar el nivel.
$MXVWHIHFKD\KRUD
Time Setting
Pulse el botón
de la pantalla del menú de ajuste
de visualización para acceder al menú de ajuste de la fecha y la hora.
Aparecerá el siguiente menú.
Time Setting
Hour
Time
Format
3XOVH
AM
Min
31
11
12 Hour Mode
SDUDVHOHFFLRQDUHODxR<HDUPHV0RQWK\GtD'D\
GHOPRGR'DWH)HFKD\ODKRUD+RXU\PLQXWRV0LQXWHGHOPRGR7LPH
+RUD$FRQWLQXDFLyQSXOVHHOERWyQSDUDFDPELDUODIHFKD\OD
hora.
ES - 51
&RQ¿JXUDFLyQGHOVLVWHPD
Pulse la barra
horas.
12 Hour Mode
para cambiar el formato de tiempo a 24
$MXVWHGHFDOLEUDWLRQ
Pulse la barra
de la pantalla del menú de ajuste de
visualización para iniciar el ajuste de calibración.
Cuando el objetivo se mueva a otra posición, pulse y mantenga pulsado
el cursor en el centro del nuevo objetivo. Repita esto cada vez hasta que
se complete el proceso de calibración. Una vez completado, pulse sobre
cualquier punto de la pantalla para volver a la pantalla del menú.
Nota: Esta calibración corresponde a la pantalla táctil de visualización. Si
disminuye la sensibilidad de los botones de la pantalla táctil, deberá realizar
una nueva calibración.
ES - 52
&RQ¿JXUDFLyQGHOVLVWHPD
$MXVWHGHOVLQWRQL]DGRU5DGLR
Pulse el botón
de la pantalla del menú de ajuste para acceder
al menú de ajuste del sintonizador de radio. Aparecerá el siguiente menú.
Ajuste
Control
Pulse el botón
Cambia la búsqueda del sintonizador eligiendo
entre modo Local o Distante.
/RFDO &RQ¿JXUDODXQLGDGSDUDVHOHFFLRQDU
únicamente las emisoras locales potentes
durante la sintonización automática.
Distante = Permite que la radio se detenga en
XQUDQJRPiVDPSOLRGHVHxDOHV
Cambia el área de frecuencias del sintonizador
(XURSD!((88!$VLD!/DWLQRDPpULFD
1RWD(OXVXDULR¿QDOGHEHDVHJXUDUVHGH
seleccionar el Área de frecuencias de sintonización adecuada al área / región en la que se
encuentra. En caso contrario, la radio no
funcionará correctamente.
para cambiar el ajuste.
ES - 53
&RQ¿JXUDFLyQGHOVLVWHPD
$MXVWH*360DS0DSD*36
(VWHDMXVWHSHUPLWHTXHHOXVXDULR¿QDOVHOHFFLRQHHMHFXWDUHOPDSDGLJLWDO
que está almacenado en la tarjeta de memoria SD o en la memoria interna
integrada.
Pulse el botón
en la pantalla del menú de ajuste para acceder
al ajuste del mapa GPS. Aparecerá el siguiente menú.
Ajuste
Control
Seleccionar para ejecutar el mapa digital de la
memoria interna
Seleccionar para ejecutar el mapa digital de la
tarjeta de memoria SD
Importante: para activar la ejecución del mapa digital que se encuentra en
ODWDUMHWD6'HOXVXDULR¿QDOGHEHGHVDFWLYDU
la Navegación por GPS. Acceda al menú
principal de navegación por GPS
y pulse
para desconectar
la navegación por GPS. Una vez
GHVFRQHFWDGDHOXVXDULR¿QDO
debe pulsar
.
A continuación, al acceder nuevamente a Navegación por GPS, el sistema
ejecuta automáticamente el mapa almacenado en la tarjeta SD.
3XOVHSDUDFRQ¿UPDUODVHOHFFLyQ
ES - 54
&RQ¿JXUDFLyQGHOVLVWHPD
Nota(OXVXDULR¿QDOSXHGHDGTXLULUHOPDSDGLJLWDODXWRUL]DGR\JXDUGDUOR
en la tarjeta de memoria SD.
Nota: Esta unidad SÓLO PUEDE ACEPTAR / EJECUTAR los mapas
digitales que hayan sido adquiridos a distribuidores / agentes autorizados.
En esta unidad NO SE PUEDE UTILIZAR ningún mapa digital no autorizado.
Nota: Esta unidad sólo puede ejecutar la tarjeta SD que incluye el mapa
digital que está insertada en la ranura para tarjetas SD del panel. Consulte
la página “Vista general de la unidad" para obtener más detalles acerca de
la ranura para tarjetas SD para uso del mapa digital.
Nota: Esta unidad lleva un mapa digital precargado en la MEMORIA FLASH
INTERNA INTEGRADA. Consulte la página "Funcionamiento del navegador - Mapa digital" para obtener más detalles.
ES - 55
&RQ¿JXUDFLyQGHOVLVWHPD
6\VWHP,QIRUPDWLRQ ,QIRUPDFLyQGHOVLVWHPD
Pulse el botón
de la pantalla del menú de ajuste para ver información detallada del sistema, incluyendo el número de serie de esta
unidad. Se mostrará la siguiente pantalla de información del sistema. Esta
información puede variar de una unidad a otra.
ES - 56
&RQ¿JXUDFLyQGHOVLVWHPD
$MXVWH8SJUDGH$FWXDOL]DFLyQ
Pulse el botón
en la pantalla del menú de ajustes para
acceder al menú de actualización. Aparecerá el siguiente menú.
Nota: Inserte la tarjeta SD con los archivos actualizados almacenados antes
de proceder con la actualización y, a continuación, pulse el botón de caraFWHUtVWLFDVGHDFWXDOL]DFLyQGHVHDGRHQHOPRGR8SJUDGH$FWXDOL]DFLyQ
$MXVWHGHODDFWXDOL]DFLyQGHOPDSD
Pulse el botón
en la pantalla de ajustes de actualización
SDUDDFFHGHUDOPHQ~0DS8SJUDGH$FWXDOL]DFLyQGHOPDSD$SDUHFHUi
el siguiente menú.
ES - 57
&RQ¿JXUDFLyQGHOVLVWHPD
Ajuste
Control
Esta actualización sólo debe ser realizada por
el centro de servicio homologado o por el servicio téc nico del distribuidor autorizado. El
XVXDULR¿QDOQXQFDGHEHLQWHQWDUUHDOL]DUOD
operación APP MAP de la unidad por sí mismo.
Esta actualización sólo debe ser realizada por
el centro de servicio homologado o por el servicio técnico del distribuidor autorizado. El
XVXDULR ¿QDO QXQFD GHEH LQWHQWDU UHDOL]DU OD
operación APP de la unidad por sí mismo.
Esta actualización del mapa es útil para el
XVXDULR¿QDOVLHPSUHTXHH[LVWDXQDYHUVLyQ
más moderna del mapa digital publicada por
los distribuidores / agentes autorizados.
Nota: Esta actualización del mapa es útil para
HOXVXDULR¿QDOVLHPSUHTXHH[LVWDXQDYHUVLyQ
más moderna del mapa digital publicada por
los distribuidores / agentes autorizados. El
XVXDULR¿QDOSXHGHDFWXDOL]DUHOQXHYRPDSD
digital en la memoria interna como el mapa por
defecto. Antes de actualizar el mapa,
asegúrese de que el tamaño de la memoria
LQWHUQDGHHVWDXQLGDGHVVX¿FLHQWHPHQWH
grande para permitir la carga del nuevo mapa
digital. Para comprobar el tamaño de la memoria interna disponible para el mapa digital,
consulte la sección "Funcionamiento del navegador - Mapa Digital" para obtener más
detalles.
Nota: Esta unidad sólo se puede actualizar a través de la interfaz de la
tarjeta SD. La tarjeta SD que incluye datos actualizados o datos del mapa
digital debe insertarse en la ranura para tarjetas SD del panel. Consulte la
“Vista general de la unidad" para obtener más detalles acerca de la ranura
para tarjetas SD para actualización.
ES - 58
&RQ¿JXUDFLyQGHOVLVWHPD
$MXVWHGHODDFWXDOL]DFLyQGHOVLVWHPD
Pulse el botón
de la pantalla de ajustes de actualización para
DFFHGHUDOPHQ~6\VWHP8SJUDGH$FWXDOL]DFLyQGHOVLVWHPD$SDUHFHUi
el siguiente menú.
Nota: La actualización del sistema sólo debe ser realizada por el centro de
servicio homologado o por el servicio técnico del distribuidor autorizado. El
XVXDULR¿QDOQXQFDGHEHLQWHQWDUUHDOL]DUODRSHUDFLyQGHDFWXDOL]DFLyQGH
sistema de la unidad por sí mismo.
ES - 59
)XQFLRQDPLHQWRGHODWDUMHWDGHPHPRULD
3XOVH UHSHWLGDPHQWH HO ERWyQ 02'( 0RGR GHO SDQHO R GHO PDQGR D
GLVWDQFLDSDUDFDPELDUHQWUH7XQHU6LQWRQL]DGRU!'LVF'LVFR!86%!
6'&DUG7DUMHWD6'!$9,10RGH0RGR$9,1
$FFHGD DO PHQ~ SULQFLSDO 0$,1 0(18 \ SXOVH VREUH HO ERWyQ
0(',$3/$<(55HSURGXFWRUPXOWLPHGLD3XOVHORVVLJXLHQWHV
botones para iniciar la reproducción de los medios deseados:
Botón para reproducir los archivos de la tarjeta SD
Nota: Lea las instrucciones que aparecen a continuación antes de empezar
a utilizar la tarjeta de memoria.
,QVHUWDUODWDUMHWD6'R00&HQODXQLGDGSULQFLSDO
Desacople el panel
frontal
Inserte la tarjeta de memoria
con la etiqueta hacia arriba
Presione hasta que
escuche un “clic”
([WUDHUODWDUMHWD6'R00&GHODXQLGDGSULQFLSDO
Desacople el panel
frontal
Presione hasta que
escuche un “clic”
Retire la tarjeta de
memoria
&DPELRDPRGRGH7$5-(7$'(0(025,$
Tras insertar una tarjeta SD o MMC en la ranura para tarjetas de la unidad
SULQFLSDOSXOVHHOERWyQ0RGH0RGRGHOSDQHORHOERWyQGHOD
pantalla táctil para seleccionar el modo de tarjeta. La unidad comenzará a
reproducir los archivos contenidos en la tarjeta de memoria. Cuando la unidad haya leído satisfactoriamente la tarjeta de memoria, el primer archivo
de la tarjeta de memoria comenzará a reproducirse automáticamente.
Nota: Si no se ha insertado ninguna tarjeta de memoria en la ranura para
tarjetas de la unidad principal, al pulsar el botón Mode se saldrá automáticamente del modo de tarjeta SD.
ES - 60
)XQFLRQDPLHQWRGHO86%
3XOVH UHSHWLGDPHQWH HO ERWyQ 02'( 0RGR GHO SDQHO R GHO PDQGR D
GLVWDQFLDSDUDFDPELDUHQWUH7XQHU6LQWRQL]DGRU!'LVF'LVFR!86%
!6'&DUG7DUMHWD6'!$9,10RGH0RGR$9,1
$FFHGDDOPHQ~SULQFLSDO0$,10(18\SXOVHVREUHHOERWyQ
0(',$ 3/$<(5 5HSURGXFWRU PXOWLPHGLD 3XOVH ORV VLJXLHQWHV ERWRQHV
para iniciar la reproducción de los medios deseados:
Botón para reproducir archivos del dispositivo USB
,QVHUWDU\H[WUDHUXQGLVSRVLWLYR86%
&DPELRDPRGR86%
Si se encuentra en cualquier otro modo cuando inserte un dispositivo USB
en el conector USB, esta unidad cambiará automáticamente del modo en
uso al modo USB. Cuando la unidad haya leído satisfactoriamente el dispositivo USB, el primer archivo de música del dispositivo USB comenzará
a reproducirse automáticamente.
Precaución: Antes de extraer el dispositivo USB del conector USB, recuerde siempre apagar la unidad o cambiar a otro modo para desconectar
la memoria USB. Nunca intente extraer el dispositivo USB mientras se
está reproduciendo un archivo de música en él. Esto puede dañar el dispositivo USB, e incluso hacer que el sistema de la unidad se bloquee.
Nota: En cuanto a los reproductores de música Flash con interfaz USB,
normalmente, la unidad tardará más tiempo en leer este tipo de reproductores que en leer los dispositivos USB normales.En concreto, los reproductores USB / MP3 con batería incorporada pueden tardar a veces entre
20 y 30 segundos en iniciar la reproducción.
ES - 61
)XQFLRQDPLHQWRGHOQDYHJDGRU
4XpHVOD1DYHJDFLyQSRU*36
El término navegación suele utilizarse como la forma de localizar un vehículo, la determinación de la dirección y distancia al destino deseado y la
ruta necesaria para llegar al destino. Como ayudas para la navegación se
usan estrellas, lugares destacados, brújulas y satélites.
En esta unidad, la ubicación se determina con el receptor GPS (GPS =
6LVWHPDGH3RVLFLRQDPLHQWR*OREDO/DGLUHFFLyQ\GLVWDQFLDDOGHVWLQRVH
determinan usando un mapa de carreteras digital, un ordenador de navegación y sensores. Para calcular la ruta se usa una señal de velocímetro y
una señal inversa.
4XpHV*36
(O6LVWHPDGH3RVLFLRQDPLHQWR*OREDO*36XVDXQDUHGGHVDWpOLWHVTXH
orbitan alrededor de la Tierra. Cada uno de los satélites, que orbitan a una
DOWXUDGHSLHVNPHPLWHVHxDOHVGHUDGLRGHIRUPD
continuada proporcionando información sobre tiempo y posición. Esto garantiza que se puedan recoger al menos 3 señales de cada zona abierta
GHODVXSHU¿FLHWHUUHVWUH
La precisión de la información del GPS depende de la calidad de la recepción. Cuando las señales son potentes y la recepción es buena, el
GPS puede determinar la latitud, longitud y altitud para conseguir un
posicionamiento preciso en tres dimensiones. Sin embargo, si la calidad
de las señales es mala, sólo se podrán obtener dos dimensiones (latitud y
ORQJLWXG\ORVHUURUHVGHSRVLFLRQDPLHQWRSXHGHQVHUGHFLHUWDLPSRUWDQcia.
ES - 62
)XQFLRQDPLHQWRGHOQDYHJDGRU
3DUDUHFLELUVDWLVIDFWRULDPHQWHODVVHxDOHVGHO*36
Debe tener una clara visión del cielo.
La antena del GPS no debe estar cubierta.
La meteorología debe ser buena. La señal del GPS es más débil
cuando las condiciones meteorológicas son malas.
El tiempo necesario para establecer una conexión al GPS puede
variar entre unos pocos segundos y varios minutos.
Se encuentra usted al aire libre.
&XDQGRHOSRVLFLRQDPLHQWRSRU*36HVLPSRVLEOH
Si no se pueden recibir señales de más de 2 satélites GPS, el posicionamiento por GPS no tendrá lugar. En algunas condiciones de conducción, las señales de los satélites GPS pueden no llegar hasta el vehículo.
En tal caso, resultará imposible que el sistema use el posicionamiento por
GPS. A continuación se muestran algunos ejemplos:
ES - 63
)XQFLRQDPLHQWRGHOQDYHJDGRU
&RQGLFLRQHVTXHSRGUtDQFDXVDUHUURUHVQRWDEOHV
de posicionamiento
Existen diversos motivos, como el estado de la carretera por la que circula
y el estado de recepción de la señal GPS, que pueden hacer que la
SRVLFLyQUHDOGHVXYHKtFXORGL¿HUDGHODSRVLFLyQPRVWUDGDHQODSDQWDOOD
del mapa.
Si realiza un ligero giro.
Si existe otra carretera
muy cerca de la suya, como en
el caso de una autopista
elevada.
Si existe una carretera paralela.
Si coge una carretera
recién abierta que no está
en el mapa.
ES - 64
)XQFLRQDPLHQWRGHOQDYHJDGRU
Si conduce en zig-zag.
6LH[LVWHXQEXFOHRXQDFRQ¿JXUDFLyQ
similar de carretera.
Si circula por una carretera
larga y recta o por una carretera
ligeramente curvada.
Si la carretera presenta varias
curvas cerradas seguidas.
6LVHVXEHDXQIHUU\
Si se encuentra en una carretera
de montaña empinada con
muchos cambios de altitud.
ES - 65
)XQFLRQDPLHQWRGHOQDYHJDGRU
Si entra o sale de un aparcamiento Si su vehículo gira
de varias plantas o similar
sobre una plataforma o estructura
usando una rampa en espiral.
similar.
Si las ruedas del vehículo
giran, como en una pista
forestal o en la nieve.
Si coloca cadenas o
cambia los neumáticos por
otros de diferente tamaño.
Si hay árboles u otros obstáculos
que bloquean las señales GPS
durante un periodo considerable.
Si conduce muy lentamente o
haciendo paradas y arranques continuos,
como sucede durante un atasco.
ES - 66
)XQFLRQDPLHQWRGHOQDYHJDGRU
Si accede a la carretera después
de dar vueltas por un gran
aparcamiento.
Cuando comienza a conducir inmediatamente después de encender
el motor.
Si enciende su sistema de navegación mientras está conduciendo.
Cuando circula por una
rotonda.
Algunos tipos de vehículos pueden no emitir una señal de velocidad mientras circulan a escasos kilómetros por hora. En tal caso, la posición actual
de su vehículo puede no mostrarse correctamente mientras se encuentra
en un atasco o en un aparcamiento.
ES - 67
)XQFLRQDPLHQWRGHOQDYHJDGRU
Mapa digital
Esta unidad lleva precargados en la MEMORIA FLASH INTERNA INTEGRADA los
mapas digitales que aparecen marcados con Sí en la siguiente tabla:
Mapas precargados
Europa del Este
Albania
Bielorrusia
Bosnia Herzegovina
Bulgaria
Croacia
Rep. Checa
Estonia
Grecia
Hungría
Letonia
Lituania
Moldavia
Polonia
Rumania
Serbia
Montenegro
Eslovaquia
Eslovenia
Turquía
Ucrania
Europa Occidental
Andorra
Sí
Austria
Bélgica
Dinamarca
Finlandia
Francia
Alemania
Italia
Luxemburgo
Noruega
Portugal
Sí
República de Irlanda
San Marino
España
Sí
Suecia
Suiza
Países Bajos
Reino Unido
1RWD(OXVXDULR¿QDOSXHGHDGTXLULUHOPDSDGLJLWDODXWRUL]DGR\JXDUGDUORHQODWDUMHWD
de memoria SD. Esta unidad SÓLO PUEDE EJECUTAR LOS MAPAS DIGITALES
AUTORIZADOS QUE HAYAN SIDO ADQUIRIDOS A AGENTES O DISTRIBUIDORES AUTORIZADOS como tarjetas SD.
6XJHUHQFLDV &RQVXOWH OD SiJLQD &RQ¿JXUDFLyQ (MHFXWDU XQ PDSD *36 SDUD
obtener los detalles sobre cómo ejecutar el mapa digital de la tarjeta SD.
Nota: Esta unidad SÓLO PUEDE ACEPTAR / EJECUTAR los mapas digitales que
hayan sido adquiridos a distribuidores / agentes autorizados. En esta unidad NO SE
PUEDE UTILIZAR ningún mapa digital no autorizado.
ES - 68
)XQFLRQDPLHQWRGHOQDYHJDGRU
Modo inicio navegación
Precaución: Por diferentes motivos, algunas de las funciones de navegación pueden no funcionar mientras su vehículo se encuentra en
movimiento. Para habilitar dichas funciones, debe detenerse en un lugar
seguro y accionar el freno de mano.
Aparque su vehículo en un lugar seguro y accione el freno de mano.
Cómo acceder al sistema de navegación por GPS
Lea detenidamente las siguientes instrucciones de funcionamiento antes
de hacer funcionar la unidad.
(QFLHQGDODXQLGDGSXOVDQGRHOERWyQ³32:(5087(´
([LVWHQ YDULDV IRUPDV GH DFFHGHU DO PRGR *36 1$9,*$7,21 1DYHJDFLyQSRU*36
6L VH HQFXHQWUD HQ HO PRGR 7XQHU 6LQWRQL]DGRU 5DGLR HO
XVXDULR ¿QDO SXHGH SXOVDU HO ERWyQ GH OD 3$17$//$ 7È&7,/
SDUD DFFHGHU DO PRGR *36 1$9,*$7,21 1DYHJDFLyQ SRU *36
6LVHHQFXHQWUDHQHOPRGR0HGLD3OD\HU5HSURGXFWRUPXOWLPHGLD&'
'9'86%6'HOXVXDULR¿QDOSXHGHWRFDUODSDQWDOODWiFWLOSDUDDFWLYDU
el menú, para después pulsar el botón
de la PANTALLA TÁCTIL y
DFFHGHUDOPRGR*361$9,*$7,211DYHJDFLyQSRU*36
ES - 69
)XQFLRQDPLHQWRGHOQDYHJDGRU
6LVHHQFXHQWUDHQHOPRGR$9,1HOXVXDULR¿QDOSXHGHWRFDUODSDQtalla táctil para activar el menú, para después pulsar el botón
de la
PANTALLA TÁCTIL y acceder al modo GPS NAVIGATION (Navegación por
*36
(O XVXDULR ¿QDO SXHGH SXOVDU UHSHWLGDPHQWH HO ERWyQ 02'( 0RGR
KDVWDTXHDSDUH]FD³0$,10(18´0HQ~SULQFLSDOHQODSDQWDOOD\DFRQtinuación, pulsar el botón de modo
para acceder al modo GPS
1$9,*$7,211DYHJDFLyQSRU*36
2FXDQGRVHHQFXHQWUDHQFXDOTXLHUPRGRHOXVXDULR¿QDOSXHGHSXOsar el botón “GPS MODE / TA” del panel frontal para acceder al modo GPS
1$9,*$7,211DYHJDFLyQSRU*36
/DXQLGDGGHEHLQLFLDUODFDUJDGHO62)7:$5('(1$9(*$&,Ï1325
GPS (si la navegación por GPS no ha sido activada con anterioridad, o si la
QDYHJDFLyQSRU*36QRVHHVWiXWLOL]DQGR\DSDUHFHUiOD3$17$//$³$77(17,21$WHQFLyQ(QDOJXQDVRFDVLRQHVODFDUJDGHO62)7:$5('(
NAVEGACIÓN POR GPS puede tardar un cierto tiempo, aunque esto entra
GHQWURGHODQRUPDOLGDG(OXVXDULR¿QDOGHEHOHHU'(7(1,'$0(17((/
&217(1,'2'(³$77(17,21$WHQFLyQDQWHVGHSXOVDUHOERWyQ³$&&(37´$FHSWDU
ES - 70
)XQFLRQDPLHQWRGHOQDYHJDGRU
8QDYH]SXOVDGRHOERWyQ³$&&(37´$FHSWDUODXQLGDGDFFHGHUiDO
PRGR*361$9,*$7,211DYHJDFLyQSRU*36\DSDUHFHUiODVLJXLHQWH
SDQWDOOD$KRUD HO XVXDULR ¿QDO HVWi OLVWR SDUD GLVIUXWDU GHO 6,67(0$ '(
NAVEGACIÓN POR GPS de esta unidad.
3DUD PiV LQIRUPDFLyQ DFHUFD GHO 6,67(0$ '( 1$9(*$&,Ï1 325
GPS de esta unidad, consulte el MANUAL DEL USUARIO DEL SISTEMA
DE NAVEGACIÓN POR GPS que se suministra junto con esta unidad.
Sugerencias: (OXVXDULR¿QDOSXHGHFDPELDUDOPRGR*361$9,*$7,21
(Navegación por GPS), o a la PANTALLA DEL MAPA GPS, en cualquier
momento pulsando el botón “GPS MODE” (Modo GPS) del panel frontal. Al
pulsar de nuevo este botón “GPS MODE” (Modo GPS), se volverá al modo
anterior.
Sugerencias: (OXVXDULR¿QDOSXHGHDFWLYDURGHVDFWLYDUOD³*8Ë$'(92=
PARA NAVEGACIÓN POR GPS” pulsando el botón “NAVI VOICE” del
SDQHO IURQWDO 8QD YH] DFWLYDGD OD *8Ë$ '( 92= 3$5$ 1$9(*$&,Ï1
siempre que exista una ayuda para la navegación, se silenciará la salida de
audio del modo en uso y se pasará a la guía de voz para navegación, para
después volver a la salida de audio del modo en uso.
ES - 71
)XQFLRQDPLHQWRGHOQDYHJDGRU
&DUDFWHUtVWLFDVGHVWDFDGDV
A continuación se detallan las características de navegación destacadas:
*XtDGHYR]SDUDODQDYHJDFLyQPLHQWUDVHOVLQWRQL]DGRURHO
UHSURGXFWRUPXOWLPHGLDHVWiQHQIXQFLRQDPLHQWR
Durante el modo de navegación, se puede seguir escuchando la música
del sintonizador o del reproductor multimedia. Esta unidad SILENCIARÁ
automáticamente la música del sintonizador o del reproductor multimedia
cuando se produzca un anuncio a través de la guía de voz para la navegación.
Esta función se puede activar o desactivar:
0DQWHQLHQGRSXOVDGRHOERWyQ*3602'(0RGR*36GHOSDQHO
Pulsando en la pantalla táctil los botones:
(QHOPRGR7XQHU6LQWRQL]DGRUSXOVHHOERWyQ
(Q HO PRGR 0HGLD SOD\HU 5HSURGXFWRU PXOWLPHGLD R $9 LQ SXOVH HO
botón
.
&RQWUROGHOYROXPHQGHODJXtDGHYR]SDUDODQDYHJDFLyQ
El nivel de sonido de la guía de voz para la navegación se puede ajustar
pulsando el botón NAVI VOICE. Cuando aparezca
/
en la pantalla, dispondrá de 10 segundos para ajustar
DO QLYHO GH VRQLGR GHVHDGR JLUDQGR HO ERWyQ GH YROXPHQ GHO FRGL¿FDGRU
Sugerencias: Este ajuste del nivel de sonido no afectará al volumen del
sintonizador ni del reproductor multimedia.
Sugerencias: Mantenga pulsado el botón NAVI VOICE para encender o
apagar esta guía NAVI VOICE.
&DPELRGHOPRGRGHYLVXDOL]DFLyQ7)7HQWUH0DSD*36\6LQWRQL
]DGRUR5HSURGXFWRUPXOWLPHGLD
Pulsando el botón GPS MODE del panel.
Pulsando en la pantalla táctil los botones:
(QHOPRGR7XQHU6LQWRQL]DGRUSXOVHHOERWyQGHODSDQWDOOD
(Q HO PRGR 0HGLD SOD\HU 5HSURGXFWRU PXOWLPHGLD R $9 LQ SXOVH HO
botón
de la pantalla.
ES - 72
(VSHFL¿FDFLRQHV
Generales
Voltaje de funcionamiento
Sistema de puesta a tierra
Fusible
Temperatura de funcionamiento
ÈQJXORGHPRQWDMHGHODXQLGDG
DC 11 -14,4V
Puesta a tierra negativa
15 amperios, tipo Mini ATM
0°C a 50°C
3DQWDOOD7)7
7DPDxRGHSDQWDOOD´PHGLGDHQGLDJRQDO
Tipo de pantalla TFT Pantalla de cristal líquido de matriz activa
5HVROXFLyQ$Q[$O
Radio
)0
5DQJRGHIUHFXHQFLD
6HQVLELOLGDG~WLO
Separación estéreo
Ratio S/N
$0R0:
5DQJRGHIUHFXHQFLD
6HQVLELOLGDG~WLO
Ratio S/N
0+]N+]HVSDFLR
G%D61G%
25 dB a 1KHz
50 dB
N+]N+]HVSDFLR
G%D61G%
40 dB
ES - 73
(VSHFL¿FDFLRQHV
Reproductor multimedia
'9'&'
Discos/formatos compatibles
Ver “Nota sobre discos” para una descripción
más detallada
5HODFLyQVHxDOUXLGR
5DQJRGLQiPLFR Respuesta de frecuencia
6HSDUDFLyQGHFDQDOHV G%
G%
20 Hz a 20 kHz +/-3 dB
FDQDOHVHVWpUHR!G%#N+]
9tGHR
Sistema de color
6DOLGDGHYtGHR
(QWUDGDGHYtGHR
NTSC / PAL
&RPSRVLWH9SSRKPLRV
&RPSRVLWH9SSRKPLRV
Audio
Potencia máx. de salida
50 W x 4 canales
,PSHGDQFLDGHFDUJDDOWDYRFHV RKPLRV
Salida digital
900 mV
Nivel / carga de salida de línea 400 mV / 10 k ohmios de carga
Impedancia de salida de línea
200 ohmios
Entrada auxiliar
Respuesta de frecuencia
Voltaje máximo de entrada
Impedancia de entrada
20 Hz a 20 kHz -3 dB
1200 mV
4,7 k ohmios
Navegación por GPS
Receptor GPS:
Sistema de recepción
Frecuencia de recepción
Sensibilidad
Frecuencia actualiz.posición
$QWHQDDpUHDGHO*36
Parche de antena
Cable aéreo
'LPHQVLRQHV$Q[$O[3U
Sistema de recepción multicanal de 20 canales
1575.42 MHz
–130 dBm
Aprox. una vez por segundo
25 mm x 25 mm x 2
5,0 metros
[[PP
ES - 74
5HVROXFLyQGHSUREOHPDV
$QWHVGHH[DPLQDUODOLVWDGHFRPSUREDFLRQHVYHUL¿TXHODVFRQH[LRQHVGHO
cableado. Si cualquiera de los problemas persiste después de comprobar la lista,
consulte al distribuidor más cercano.
Síntoma
No hay corriente.
Causa
Solución
El contacto del vehículo no está
encendido.
Si el suministro eléctrico está bien conectado
al terminal accesorio del vehículo, coloque la
llave de encendido en la posición “ACC”.
El fusible está quemado.
Sustituya el fusible.
Presencia de un disco CD
en el interior del reproductor.
Saque el disco del reproductor
e introduzca uno nuevo.
El disco se ha insertado en
la posición invertida.
Inserte el disco compacto con la
etiqueta mirando hacia arriba.
El disco compacto está muy
sucio o tiene algún defecto.
Limpie el disco o intente reproducir
uno nuevo.
La temperatura en el interior del
coche es demasiado alta.
Enfríelo o espere hasta que la temperatura
ambiente vuelva a ser normal.
Condensación.
Deje el reproductor apagado durante
aprox. una hora, e inténtelo de nuevo.
No se produce ningún sonido.
El volumen está al mínimo.
El cableado no está conectado
correctamente.
Ajuste el volumen al nivel deseado.
Compruebe las conexiones del cableado.
Las teclas de funcionamiento
no funcionan.
El microordenador incorporado
no está funcionando adecuadamente
debido al ruido.
El ángulo de instalación es
superior a 30 grados.
Pulse el botón RESET.
El panel frontal no está correctamente
insertado en su lugar.
Ajuste el ángulo de instalación a menos de
30 grados.
El disco compacto está extremadamente sucio o defectuoso.
Limpie el disco compacto. A continuación,
intente reproducir uno nuevo.
La radio no funciona.
La selección automática de
emisoras de radio no funciona.
El cable de la antena no está
conectado.
Las señales son demasiado débiles.
,QVHUWHHOFDEOHGHDQWHQD¿UPHPHQWH
Seleccione una emisora manualmente.
ERROR
Error en el mecanismo.
Pulse el botón "Eject" (Expulsar) para
corregir el problema. Si el código de error no
desaparece, consulte con el distribuidor más
cercano.
Error de disco
Puede que el disco esté sucio,
rayado o invertido.
Reemplace el disco.
No puede colocar su
vehículo en el mapa o el
error de posicionamiento es
grande.
La calidad de las señales de los
satélites GPS es mala, reduciendo la
precisión de posicionamiento. Dicha
pérdida de calidad puede producirse
por los siguientes motivos:
La antena aérea del GPS se encuentra en un lugar inadecuado.
Hay obstáculos bloqueando las
señales procedentes de los satélites.
La posición de los satélites con
respecto a su vehículo es inadecuada.
Compruebe la recepción de señales GPS
y la posición de la antena aérea del GPS
en caso necesario o continúe conduciendo
hasta que la recepción mejore. Mantenga la
antena aérea despejada.
El disco no se puede cargar ni
expulsar.
El sonido salta.
ES - 75