1
iQ 50
Operating Manual
Programming and diagnostic tool
Art.
W072210050 02/14
Originalbetriebsanleitung
Translation of the original operating instructions
Traduzione delle istruzioni di funzionamento originali
Traduction des instructions de service d’origine
Traducción del manual de instrucciones de servicio original
Vertaling van de originele gebruiksaanwijzing
Oversættelse af den originale betjeningsvejledning
Original driftsinstruks i oversettelse
DE
..............................
4 – 39
GB
.............................. 40 – 75
IT
.............................. 76 – 111
FR
.............................. 112 – 147
ES
.............................. 148 – 183
NL
.............................. 184 – 219
DK
.............................. 220 – 255
NO
.............................. 256 – 291
TR
.............................. 292 – 327
2
1
2
3
6
4
5
I
II
3
Contents
Device Overview [Fig. I]......................................5
2.7
Sensor Test ..........................................................24
2.7.1
Procedure .......................................................24
2.7.2
Sensor Test, Values OK .....................................25
2.7.3
Sensor Test, Values NOK ..................................25
2.7.4
Duplicate Sensor ID Found ................................26
2.7.5
Sensor Not Recognized ....................................26
2.7.6
Battery Voltage Low .........................................27
2.7.7
Overview of All Sensors ....................................27
2.8
Replace Sensor .....................................................28
2.8.1 Replace with EZ Sensor ....................................28
2.8.2 Replace with OE Sensor ..................................29
2.9
Program Sensor ....................................................29
2.9.1 Copy/Create Sensor ........................................29
Positioning [Fig. II] .............................................5
System Overview iQ 50 .....................................6
Device Data / Ambient Conditions ......................................6
Scope of Supply................................................................6
For Your Safety ..................................................7
Intended Use......................................................7
Warranty ...........................................................7
Notes on the Environment ..................................7
Charging Device .................................................8
Charging at Charger .........................................................8
Checking Battery Status .....................................................8
3.
Registration .......................................................9
4.
Help (Button 4) ..........................................31
Commissioning ................................................10
5.
Settings (Button 5) .....................................31
Language Selection .......................................................10
Select Pressure Format......................................................11
Select Temperature Format ................................................12
Select Sensor ID Format ...................................................12
Set Time .........................................................................13
Set Date .........................................................................13
6.
1.
iQ 50 - (Programming and Diagnostic Tool)14
1.1
1.2
1.3
1.4
1.5
1.6
2.
Operating Elements ...............................................14
Handling .............................................................14
Touchscreen .........................................................14
Status Bar ............................................................15
Main Menu (Home Screen) ....................................15
Navigation Bar .....................................................15
Vehicle Selection (Button 2)........................ 16
2.1
Quick Start or New Vehicle ....................................16
2.2
Manufacturer Selection ..........................................17
2.3
Model Selection ....................................................17
2.4
Production Year Selection .......................................18
2.4.1 Select Rim Type................................................18
2.4.2 Enter License Plate ............................................19
2.5
Start Menu for Programming and Diagnostics ...........20
2.5.1 Wheel Symbols (Meanings)...............................20
2.5.2 Wheel Sensor Context Menu .............................21
2.5.3 Start Menu Context Menu .................................21
2.6
Sensor Information ................................................22
2.6.1 Sensor OK ......................................................22
2.6.2 Sensor NOK ...................................................22
2.6.3 Sensor Details .................................................23
4
Vehicle Selection Last 100 (Button 3) ..........30
3.1
List of Last 100 Vehicles .........................................30
Quick Start ................................................32
6.1
6.2
Replace / Copy / Create Sensor ............................32
Teach in Sensor at the Vehicle ................................32
EU Declaration of Conformity ...........................33
WOW! Install Software ....................................36
Installation Procedure .......................................................36
WOW! Register Software.................................................36
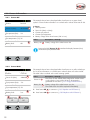
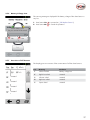
Device Overview [Fig. I]
1
Antenna range
2
LED power display
3
Touchscreen
4
Protective case
5
Power button
6
USB port
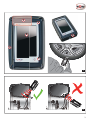
Positioning [Fig. II]
Device position on the tyre
Note
In order to ensure reliable data reception from the wheel sensor, the iQ 50 must be held at the right point on
the tyre.
Always position the iQ 50 on the sensor so that the transmit/receive antenna is facing towards the wheel
sensor. Never hold against the wheel rim – that impairs the transmission power.
The device must be held against the tyre very close to the area of the valve (the antenna area must be facing
towards the tyre). [see Fig. II]
If data transmission cannot be established, change the position by a few centimetres.
5
System Overview iQ 50
Device Data / Ambient Conditions
Article
W0722100050
Dimensions (incl. protective case)
approx. 165 x 106 x 41 mm
Weight
approx. 450 g
Max. operating time
approx. 9 hours (after complete charging)
approx. 150 programming operations of an EZ sensor
approx. 300 activation operations of a TPM sensor
Automatic shutdown
after 300 to 1800 sec., freely variable (300 sec. factory setting)
Storage temperature
-20°C to +60°C
Operating temperature
20°C to +60°C
Dust / water protection (operation)
IP52
Memory (internal)
Micro SD card, 8 GB, Class 10
Data interfaces
USB V2.0 / Bluetooth Class 1.5 / WiFi 2.4 GHz, 802.11 b g n
Bluetooth range
Air
Building
approx. 60 m
approx. 30 m
Scope of Supply
W072210050 iQ 50 without RDKS Snooper +
W072200050 iQ 50 with RDKS Snooper +
iQ 50 programming and diagnostic tool
iQ 50 programming and diagnostic tool
USB cable for iQ 50 for charging and data transfer
USB cable for iQ 50 for charging and data transfer
Power pack for iQ 50 with EU and UK adapters
Power pack for iQ 50 with EU and UK adapters
Quick-start guide for iQ 50
Quick-start guide for iQ 50
WOW! DVD software, manual, links
WOW! DVD software, manual, links
TPMS Snooper+
Snooper+ USB cable A-B
Manual Snooper+
6
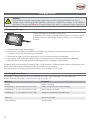
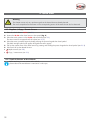
For Your Safety
"#
manual in a safe place for later use or for a new owner.
This manual can also be downloaded from www.portal.com.
Use only original WOW! accessories and spare parts.
The device must not be operated in a wet or damp environment. Do not expose the device to rain.
Intended Use
The iQ 50 is intended as a programming and diagnostic tool for wheel sensors using the WOW! original accessories.
The device is intended only for the applications described in the operating manual. Any other use is not permitted and can
lead to accidents or destruction of the device. Such uses will immediately void all the user’s guarantee and warranty claims
against the manufacturer.
The user is liable for all damage resulting from any unintended use.
Warranty
The iQ 50 must be handled with care, even though it has been designed for use in a workshop (collisions, shock, vibrations,
dust). For this WOW! device we offer a warranty in accordance with the statutory/national regulations from the date of
purchase (evidenced by invoice or delivery note).
Damage will be remedied by repair or substitute delivery. Damage caused by improper handling is not covered by the warranty. Complaints can only be acknowledged if the device is handed over in one piece to a WOW!-authorised customer
service station.
$"%"
Notes on the Environment
Electric tools, accessories and packagings should be recycled in an environmentally friendly manner.
For EU countries only:
Do not throw away the electric tool with the household waste.
In accordance with European Directive 2002/96/EC on waste electrical and electronic equipment and its
implementation in national law, electric tools which can no longer be used must be collected separately and
recycled in an environmentally friendly manner.
Batteries:
&''*'":*
disposed of in an environmentally friendly manner.
For EU countries only:
In accordance with Directive 2006/66/EC, defective or old batteries must be recycled. In Germany, equipment
and/or batteries which can no longer be used can be returned to WOW! for recycling.
7
Charging Device
Warning
Only the charger and USB charging cable supplied may be used for charging. The device can also be
charged using the USB charging cable supplied by connecting to a USB port of a computer. Use of a different
USB cable or charging of the iQ 50;$:<
Charging at Charger
Connect the charger to the USB port of the device.
If the device is not correctly connected to the charger, this can result in serious
damage to the device. All damage caused by misuse is not covered by the
warranty.
f The device can be used during charging.
f If the device is connected to an unstable power supply during charging, it is possible that the touchscreen does
not function. In this case, disconnect the power supply.
f If the Status LED lights up red, the charge state is too low and the device has to be recharged.
f If the battery is fully discharged and the charger is connected, the device cannot be switched on immediately.
Before the device can be used again, the empty battery has to be charged for a few minutes.
='"=>
device. If the battery becomes hotter than normal, the charger may stop charging.
If the charger does not charge correctly, please contact your local WOW! service partner.
Checking Battery Status
If the battery is charged while the device is switched off, the charge status is displayed only via the Status LED.
(Position of the LED, see chapter „Device Overview [Fig. I]“ on page 5).
LED Colour
Description
Red (lit)
Device is charging
?>@JX"\"^_"`"{{
Battery charge below 5% and not charging
?>@JX"}"^X"}"{{
Wrong charger connected
?>@J_"`"^_"`"{{
Temperature outside the permissible range
Green (lit)
Device fully charged
~?>@
Device starting
8
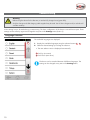
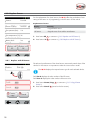
Registration
*'
manufacturer. We recommend that registration is carried out as quickly as possible in order to receive new
updates. For registration of the iQ 50, the WOW! software must be installed on a computer. See chapter
“Install software” on page <ÜS>.
Registration allows the database of the iQ 50 to be updated. The database
contains comprehensive information on manufacturers, vehicles and the corresponding sensor types. The manufacturer strives to keep the database up-todate at all times.
New updates available!
Please install the supplied
DVD and register.
1
Please update the database of your iQ 50 if you cannot test a sensor on a
particular vehicle.
1 Press button Later to skip the procedure
Later
A message is displayed when the licence has expired.
Please update your licence then to continue to receive updates for the database of your iQ 50.
Procedure
Licence expired!
Please update licence to use
further updates.
1
Cancel
Start the WOW! application on the PC.
Select Program settings -> Registration -> Shop. In the licence list, select the
following licence “W015000040 WSD 50 Basis Licence iQ 50 Subscription” and order.
After receipt of the enable, carry out an online update. Connect the iQ 50 to
the computer with the WOW! application open.
The new licence and any new update is automatically transferred to the
iQ 50.
1 Press button Cancel to skip the procedure
-
9
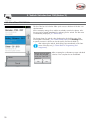
Commissioning
Warning
:*?&@"
Only the charger and USB charging cable supplied may be used. Use of other chargers and/or caboles will
void the warranty.
'"='"=
settings can be called up again and changed at any time in the Settings menu (button 5).
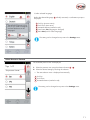
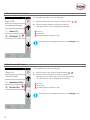
Language Selection
The available languages are displayed.
1
1. Display the available languages using the selection buttons 1 - 2 .
2. Select the desired setting by touching the selection.
f The next selection menu is displayed automatically.
1 Scroll up (not active)
2 Scroll down (next menu)
The device can be switched between 9 different languages. The
setting can be changed at any time in the Settings menu.
2
10
"
1
3
Before the selected language 3 *
displayed.
1 Scroll up (previous menu)
The selected language is Eng"&'
and start the device in this
language?
4
Yes
5
2 Scroll down (next menu)
3 Activated selection (marked in red)
4 Press button Yes (language is changed)
5 Button No (back to Select language)
No
The setting can be changed at any time in the Settings menu.
2
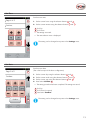
Select Pressure Format
The available pressure units are displayed.
1
Page 1 of 5
1. Select the pressure units using the selection buttons 1 - 2 .
2. Select the desired setting by touching the selection.
Set pressure format:
f The next selection menu is displayed automatically.
3
1 Scroll up
2 Scroll down
3 Activated selection (marked in red)
The setting can be changed at any time in the Settings menu.
2
11
Select Temperature Format
The available temperature units are displayed.
1
Page 2 of 5
1. Select the temperature units using the selection buttons 1 - 2 .
2. Select the desired setting by touching the selection.
Set temperature format:
f The next selection menu is displayed automatically.
1 Scroll up
2 Scroll down
3 Activated selection (marked in red)
3
The setting can be changed at any time in the Settings menu.
2
Select Sensor ID Format
The available sensor units are displayed.
1
Page 3 of 5
1. Select the sensor units using the selection buttons 1 - 2 .
2. Select the desired setting by touching the selection.
(The setting can be changed at any time during operation).
Sensor ID format
f The next selection menu is displayed automatically.
1 Scroll up
2 Scroll down
3
3 Activated selection (marked in red)
The setting can be changed at any time in the Settings menu.
2
12
Set Time
Set the current time.
Page 4 of 5
1
1. Set the current hours using the selection buttons + and - .
2. Set the current minutes using the selection buttons + and - .
Set time:
1 Scroll up
2 Scroll down
f The settings are saved.
f The next selection menu is displayed.
The setting can be changed at any time in the Settings menu.
2
Set Date
Page 5 of 5
1
Set the current date.
?=@
1. Set the current day using the selection buttons + and - .
Set date:
2. Set the current month using the selection buttons + and - .
3. Set the current year using the selection buttons + and - .
4. Press button 3 .
f The setting procedure has been completed. The settings are saved.
1 Scroll up
2 Scroll down (not active)
3 Press button
2
The setting can be changed at any time in the Settings menu.
13
1. iQ 50 -
(Programming and Diagnostic Tool)
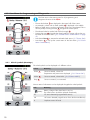
1.1 Operating Elements
Power button Function
Behaviour
ON / OFF
Press and hold
Reset
Press and hold for longer than 10 seconds.
Device is restarted if there was a malfunction.
Stand by
?>@
Switch display ON and OFF.
1.2 Handling
Never touch the area of the antennae [Fig. I] with your hand or cover with other objects.
This can interfere with the data transmission or shorten the battery life.
Position the iQ 50 on the wheel as shown in [Fig. II].
Note
Always position the iQ 50 on the sensor so that the transmit/receive antenna is facing towards the wheel
sensor. Never hold against the wheel rim – that impairs the transmission power.
1.3 Touchscreen
Warning
In order to avoid damage to the touchscreen, do not touch with pointed objects or apply too much pressure.
'"
f Do not bring the touchscreen into contact with other electrical devices. Electrostatic discharges can lead to mal-
functions of the touchscreen.
f Ensure that the touchscreen does not come into contact with water. The touchscreen may malfunction in a damp
atmosphere or on contact with water.
f If the touchscreen remains switched on for prolonged periods without being used, images may burn into the
screen. Switch off the touchscreen when the device is not being used.
f Swiping movements and other gestures are not supported by the iQ 50 hand-held terminal.
14
1.4 Status Bar
The status bar displays information on internal components such as bluetooth,
USB and WiFi. The current time is displayed on the right-hand side.
1
Status Displays
Display Meaning
Information and symbols in the status
bar are also subject to technical further
development. They can be expanded or
changed by future updates.
USB connection established
Bluetooth connection activated
Battery status display
Current time
1.5 Main Menu (Home Screen)
The Start screen is the starting point. All the functions of the device are called
up via this screen.
1
1 Status bar
2 Vehicle selection
see („Vehicle Selection (Button 2)“ on page 16)
3 Vehicle Selection Last 100
see („Vehicle Selection Last 100 (Button 3)“ on page 30)
4 Help
see („Help (Button 4)“ on page 31)
3
2
5 Settings
see („Settings (Button 5)“ on page 31)
6 Navigation bar
4
5
6
1.6 Navigation Bar
1
2
3
The navigation bar has 3 buttons:
1 Back (to the previous mask)
2 Home (to the Start screen)
3 Context
15
2. Vehicle Selection (Button 2)
Pressing this button calls up the “Vehicle selection” menu in which you select the vehicle to be tested and proceed to the
function “Test before touch”.
During general settings and/or preparatory work (e.g. selection of the vehicle), the iQ 50 can be left
anywhere.
During all actions where a sensor is to be activated, read out or programmed, the iQ 50 must be positioned
against the wheel [see Fig. II].
*
shown here is displayed
Clear all vehicle data?
Are you sure you want to delete
all data for this vehicle and start
again?
1
Yes
2
1. Press button Yes 1 to erase the device memory. A new programming and
diagnostic routine can be started.
No
2. Press button No 2 to cancel the operation. The data remain stored for
further use.
2.1 Quick Start or New Vehicle
With the iQ 50 there are two possibilities of starting the wheel sensor test.
1
Select New Vehicle
A new vehicle not yet tested is selected.
3
This comprehensive route is described after the menu, see („2.2 Manufacturer
Selection“).
Quick Start
If a certain vehicle has already been tested once, the database is stored in the
list of the last 100 vehicles.
A test on this vehicle can be called up immediately, see („3.1 List of Last 100
Vehicles“).
16
2.2 Manufacturer Selection
To create a new routine, the exact vehicle type has to be set.
1
1. Select the manufacturer using the selection buttons.
2. "
f The next menu is displayed automatically.
3
1 Scroll up
2 Scroll down
3 Activated selection (blue background)
Selected elements are displayed on a blue background.
2
2.3 Model Selection
All available vehicle models of the selected manufacturer are displayed.
1
1. Select the model using the selection buttons.
2. Activate the model by pressing.
f The next menu is displayed automatically.
3
1 Scroll up
2 Scroll down
3 Activated selection (blue background)
Selected elements are displayed on a blue background.
2
17
2.4 Production Year Selection
All possible production years of the selected model are displayed.
1
1. Select the production year using the selection buttons.
2. Activate the production year by pressing.
3
f The next menu is displayed automatically.
1 Scroll up
2 Scroll down
3 Activated selection (blue background)
=
differ from one another.
2
2.4.1
Please ensure that you select the production year of the vehicle here.
Select Rim Type
Select rim type.
Aluminium
1
1 Aluminium rim
2 Steel rim
Steel
18
2
2.4.2 Enter License Plate
Enter license plate.
1
Enter registration number:
2
The input of the license plate is optional. The input can be switched ON/OFF in
the Settings menu).
1 Enter license plate
2 Display of the input
3 Continue, the input is saved
='
the list of the last 100 vehicles if it is required again.
3
19
2.5 Start Menu for Programming and Diagnostics
The Start menu is the starting point for all programming and
diagnostic functions of the iQ 50.
1
3
4
2
2
2
2
5
4
4
— The set vehicle data 1 are displayed in the upper half of the screen.
— An exemplary vehicle with 4 wheel symbols 2 is displayed in the middle.
— :'*"=
> 4 alongside the wheel symbol.
— The selected wheel is marked with a black triangle 3 .
— Pressing the area 4 alongside the wheel symbol for longer calls up the context menu of the wheel sensor („2.5.2 Wheel Sensor Context Menu“ on page
21)
— Press button Test 5 to activate the selected wheel sensor („2.7 Sensor Test“)
— Press button 6 to call up the context menu of the Start menu („2.5.3 Start
Menu Context Menu“)
Test
6
2.5.1
Wheel Symbols (Meanings)
The wheel symbols can be displayed in 3 different colours:
Colour
Green 1
Sensor activated, values OK
Temperature and pressure are displayed. („2.6.1 Sensor OK“)
Yellow 2
Sensor activated, values NOK. („2.6.2 Sensor NOK“)
Grey 3
Sensor not tested / not activated.
2
1
Various items of information can be displayed alongside the wheel symbols:
3
D
EZ
Info
Meaning
Battery
Test
20
Meaning
Battery voltage of the wheel sensor very low
The wheel sensor should be replaced immediately .
EZ
EZ sensor detected (programmable sensor)
OE
OE sensor detected (original sensor from vehicle manufacturer)
D
Duplicate sensor ID found
2.5.2 Wheel Sensor Context Menu
Pressing the area 4 (see 2.5) alongside the wheel symbol for longer calls up
the context menu of the wheel sensor. The context menu offers fast access to
programming functions.
First line: Display of the momentary wheel position.
Tyre front right
1
Sensor test:
2
Replace sensor:
3
Copy/create sensor:
4
Clear tyre data:
1. Press button Sensor Test 1 to test the selected wheel sensor („2.7 Sensor
Test“).
2. Button Replace Sensor 2 („2.8 Replace Sensor“).
If the tested sensor is OK, this function cannot be called up.
3. Button Copy/Create Sensor 3 („2.9 Program Sensor“).
If there are no data in the database of the iQ 50 on this vehicle, this function cannot be called up („Registration“).
4. Taste Clear tyre data 4 deletes the current procedure.
5. Press button Cancel to cancel the operation.
In order keep the database of your device constantly up-to-date, connect your iQ 50 to the update server at regular intervals.
Cancel
2.5.3 Start Menu Context Menu
1
Overview:
2
Sensor details:
3
Vehicle details:
4
Teach-in/OBD:
The context menu of the Start menu offers fast access to a wide variety of
functions.
1. Overview: Display of pressure, temperature, sensor batteries.
2. Display of sensor information
3. Display of vehicle information
4. Teach-in / OBD
5. EZ sensor („2.9.1 Copy/Create Sensor“).
6. Clear vehicle data
7. Help menu
5
EZ sensor:
6
Clear vehicle data:
7
Help:
Cancel
21
2.6 Sensor Information
2.6.1
Sensor OK
The example shown here is displayed after a brief press on a green wheel
symbol. It shows further information on a wheel sensor whose values are all OK.
Position
front left
It shows:
28793896971
Sensor ID (Dec):
Tyre pressure (bar):
2.6
Tyre temperature (°C): 36
Battery level:
Wheel position
Sensor ID ((Dec) or (Hex))
Current tyre pressure
Current tyre temperature
Battery voltage of the wheel sensor (OK or Low)
Value
2
OK
Description / Remedy
Battery: OK 2
Battery voltage of the wheel sensor OK
Sensor ID 1 switches the display between (Dec)
decimal and (Hex) hexadecimal.
2.6.2 Sensor NOK
The example shown here is displayed after a brief press on a yellow wheel symbol. It shows information on a wheel sensor where at least one value is NOK.
The NOK value is marked with a small warning symbol.
Position:
Front left
Sensor ID (Hex):
ABA00001
Tyre pressure (bar):
2.6
1
Tyre temperature (°C): 36
Battery level:
22
low
2
3
4
Replace with
EZ
Replace with
OE
Value
Description / Remedy
Sensor ID 1
This sensor ID has already been assigned to another sensor
on the vehicle. A new sensor ID has to be entered or
generated for this sensor („2.9.1 Copy/Create Sensor“).
Battery low 2
Battery voltage of the wheel sensor very low
The wheel sensor should be replaced immediately.
1. Press button EZ 3 to continue to („2.8.1 Replace with EZ Sensor“).
2. Press button OE 4 to continue to („2.8.2 Replace with OE Sensor“).
2.6.3 Sensor Details
The example here shows details of a selected sensor.
It shows:
Sensor part number
=
Sensor part number
Service kit part number
Valve type
1. Pressing button 1 displays further sensor details
1
Service kit part number
Valve type
Metal valve
23
2.7 Sensor Test
2.7.1
Procedure
During the test, the data transmission of the wheel sensor is switched on and its
status read out.
Procedure:
1. Select the wheel sensor to be tested.
1
f A black triangle marks the selected wheel sensor.
2. Position the device at the wheel sensor [see Fig. II]
3. Press button Test 2 to start the test of the selected wheel sensor.
Test front left
4
2
Test
Cancel
3
A progress bar 3 is displayed during the
procedure.
Press button Cancel 4 to cancel the operation.
In some cases it is possible that the data transmission from the wheel
sensor cannot be stopped by pressing the Cancel 4 button. But the
iQ 50 does not receive any further data and the display of the device
is not refreshed.
4. The result of the test is displayed in the form of coloured wheel symbols
(„2.5.1 Wheel Symbols (Meanings)“).
The next wheel is automatically selected
24
2.7.2
Sensor Test, Values OK
The result of the test is displayed in the form of coloured wheel symbols 1
Colour
1
2
Meaning
Green
Sensor tested and activated, values OK
Yellow
Sensor tested and activated, values NOK
Grey
Sensor not yet tested
1. Continue with the test of the other wheels.
The next wheel 2 is automatically selected (in this case the right front
wheel).
A spare wheel 3 can also be tested.
3
Successfully completed
Test
4
5
2.7.3
The successful activation 4 is displayed for
approx. 2 seconds.
Pressing button 5 cancels the display again.
Cancel
Sensor Test, Values NOK
The example here shows an activated wheel sensor 1 with an NOK value.
The battery symbol alongside the wheel signals that the battery voltage of the
wheel sensor is very low.
1
This wheel sensor should be replaced immediately.
While the wheel sensor for this wheel is being replaced, the test of the
other wheel sensors can be continued.
1. Select and test the next wheel sensor.
f The selected wheel is marked by a black triangle.
2. Press button Test 2 to start the test of the selected wheel sensor.
22
Test
25
2.7.4
Duplicate Sensor ID Found
In the example here, the sensor could not be activated. A duplicate sensor ID
1 was found. This means that this sensor ID has already been assigned to
another wheel sensor on the vehicle.
1. Press button Yes 2 to proceed to the programming of the sensor („2.8
Replace Sensor“).
f A faulty result can be corrected.
Duplicate sensor ID! 1
&'
2. Press button No 3 to cancel the operation.
f The sensor is marked in yellow.
2
3
Yes
f Another wheel can be selected.
No
The problem does not have to be remedied immediately.
It is possible to carry out the test on this wheel again at any time.
Test
2.7.5
Sensor Not Recognized
This warning message is displayed if a wheel sensor is not recognised or a test
was not successful.
Possible causes
No valid sensor response!
Repeat sensor test?
Wrong position of the iQ 50 on the wheel [see Fig. II]
No sensor installed
Sensor defective
Battery discharged
1. Press button Yes 1 to repeat the attempt to activate the sensor.
1
Yes
2
Test
26
No
2. Press button No 2 to cancel the operation.
f The Start menu with the vehicle symbol is displayed
2.7.6
Battery Voltage Low
This warning message is displayed if the battery voltage of the wheel sensor is
very low.
1. Press button Yes 1 to proceed to („2.8 Replace Sensor“).
2. Press button No 2 to cancel the operation.
Sensor battery low!
&'
1
2 No
Yes
Test
2.7.7
Overview of All Sensors
This display gives an overview of the current status of all the wheel sensors.
Battery
Pos.
Low
Untested
Untested
Meaning
Condition
LF
Left front wheel
Battery voltage low
RF
Right front wheel
untested
LR
Left rear wheel
untested
RR
Right rear wheel
untested
SP
Spare wheel
untested
Untested
Untested
27
2.8 Replace Sensor
For the replacement of a wheel sensor, the iQ 50 offers the possibilities of activating an OE sensor or of programming a new EZ sensor for the vehicle.
Position:
Front left
Explanation of Terms
Sensor ID (Hex):
ABA00001
Tyre pressure (bar):
2.6
Tyre temperature (°C): 36
Battery level:
Replace with
EZ
2.8.1
low
Display
Meaning
EZ sensor
Programmable sensor
OE sensor
Original sensor from vehicle manufacturer
1. Press button EZ 1 to continue to („2.8.1 Replace with EZ Sensor“).
2. Press button OE 2 to continue to („2.8.2 Replace with OE Sensor“).
Replace with
OE
Replace with EZ Sensor
='
vehicle. For this reason it is important to select the correct sensor model.
Position:
Front right
The iQ 50 displays the required sensor type for each selected vehicle.
Field Cat.#: displays the order number of the EZ sensor
Field Serv.#: displays the order number of the service kit
Cat.#:
1. Press button Create/Copy 1 to continue to („2.9.1 Copy/Create
Sensor“).
2. Press button Cancel 2 (cancel to the last screen).
Serv.#:
1
28
Create/
copy
2 Cancel
2.8.2 Replace with OE Sensor
='
vehicle. For this reason it is important to select the correct sensor model.
Position:
Front right
The iQ 50 displays the required sensor type for each selected vehicle.
Field Cat.#: displays the order number of the OE sensor
Field Serv.#: displays the order number of the service kit
Cat.#:
1. Press button Cancel 1 to terminate the display.
f The Start menu with the vehicle symbol is displayed.
Serv.#:
2. Press button Cancel 2 (cancel to the last screen).
2 Cancel
1 Cancel
2.9 Program Sensor
2.9.1
Copy/Create Sensor
Copy/
Create
Tyre front right:
This menu is used to program and activate an EZ sensor.
During programming, the sensor is assigned a unique sensor ID and receives all
the necessary data on the vehicle and the data transmission.
1. Press button Generate ID 1 to generate a random sensor ID and to
3 .
2. Press button Set ID 2 to display a keyboard. This keyboard can be used
to enter a random sensor ID.
2
1
Generate ID
Enter ID
3. Field 3 shows the sensor ID.
4. Press button Start 4 to start the programming of the sensor.
3
Programming
front right
Test after programming
4
Start
4
3
A progress bar 3 is displayed during
programming.
The overview menu is then displayed with the vehicle symbol and the already activated sensors.
Cancel
29
3. Vehicle Selection Last 100 (Button 3)
3.1 List of Last 100 Vehicles
The list of the last 100 vehicles offers quick access to the data of the last 100
vehicles tested.
All the necessary settings for a vehicle are already stored in the device. A further test can be started immediately by selecting such a vehicle. The Test menu
is immediately displayed („2.7 Sensor Test“).
The license plate of a vehicle is also displayed in the list if the input of the
license plate is activated („2.4.2 Enter License Plate“) in the Settings menu.
"
After selecting the vehicle, the display jumps immediately to the Start
menu of the test, see („2.5 Start Menu for Programming and
Diagnostics“).
Are you sure you wish
to clear the complete
list of your "Last 100
vehicles"?
Delete:
Yes
Cancel
30
No
*
vehicles or the complete list can be deleted.
4. Help (Button 4)
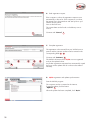
Press this button to call up the “Help” function of the iQ 50.
''
Introduction to TPM (Tyre Pressure Monitoring System)
Overview of TPM
TPM legislation
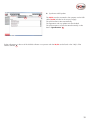
5. Settings (Button 5)
Press this button to call up the setting possibilities of the iQ 50.
The settings can be called up and changed at any time. Changes are saved automatically. Before saving changes with seri?""@*"
The following setting possibilities are available:
Settings iQ 50
Language selection
Audio
Display brightness
Reset to factory settings
Update software
Sleep mode
Automatic shutdown
Time
Date
Tyre pressure
Tyre temperature
Sensor ID format
Sensor part number
EZ sensor part number
Vehicle license plate
31
6. Quick Start
Warning
This chapter serves only as a quick-start guide to the device functions already learned.
The more comprehensive information in the corresponding section of the manual must also be observed.
6.1 Replace / Copy / Create Sensor
1. Enter the vehicle data in iQ 50 (see 2.1)
2. Position the iQ 50 at the wheel sensor to be copied [Fig. II]
3. Select the sensor position in the iQ 50 and start the test (see 2.5)
The sensor must be recognised with OK values (see 2.7.2)
4. $>'"
(The black triangle symbol must appear alongside this sensor again)
5. Call up the context menu of the wheel sensor by pressing and holding the space alongside the wheel symbol (see 2.5.2)
6. Select and call up the desired function
2 Replace sensor (see 2.8)
3 Copy / create sensor (see 2.9)
6.2 Teach in Sensor at the Vehicle
Before teaching in a new sensor at the vehicle,
please observe the manufacturer’s instructions on this topic.
32
EU Declaration of Conformity
2169/03.2014
Name of Manufacturer:
WOW! Würth Online World GmbH
For the product described below
Designation
iQ 50
Description
Art. No.:
Programming and diagnostic tool
W0272210050
%'
DIRECTIVE 2011/65/EU OF THE EUROPEAN PARLIAMENT AND OF THE COUNCIL of 8 June 2011
on the restriction of the use of certain hazardous substances in electrical and electronic equipment (revised version) - in short:
RoHS Directive
DIRECTIVE 1995/5/EC OF THE EUROPEAN PARLIAMENT AND OF THE COUNCIL of 9 March 1999
on radio and telecommunications terminal equipment and the mutual recognition of their conformity - in short: R&TTE
Directive
'
declared:
EN 60950-1:2006/A12:2011
Information technology equipment - Safety - Part 1: General Requirements
EN 62311:2008
2008-09
Assessment of electronic and electrical equipment related to human exposure
(0 Hz - 300 GHz)
EN 62479:2010
2010
Assessment of the compliance of low power electronic and electrical
equipment with the basic restrictions related to human exposure to
?_XXX~@
EN 301 489-1 V1.9.2
2011-09
Electromagnetic compatibility and radio spectrum matters (ERM) Electromagnetic compatibility (EMC) standard for radio equipment and
services Part 1: Common technical requirements
EN 301 489-3 V1.6.1
2013-08
Electromagnetic compatibility
and radio spectrum matters (ERM);
Electromagnetic compatibility (EMC)
standard for radio equipment and services;
$?$&@
frequencies between 9 kHz and 246 GHz
33
EN 301 489-14 V2.2.1
2003-05
Electromagnetic compatibility
and radio spectrum matters (ERM);
Electromagnetic compatibility (EMC)
standard for radio equipment and services;
_}$
and digital terrestrial TV broadcasting service transmitters
Sole responsibility for the issue of this Declaration of Conformity with respect to the compliance with the fundamental
demands and the production of the technical documents lies with the manufacturer.
Künzelsau, 27.02.2014
WOW! Würth Online World GmbH
Schliffenstraße Falkhof
D-74653 Künzelsau
34
Frank Schäfer
Head of Product Management
35
WOW! Install Software
In order to register the iQ 50 and to receive future updates for the device, the iQ 50 must be synchronised WOW! via the
software. The WOW! software must installed on a computer for this purpose.
Note! If you already have a valid WOW! software licence and have installed the software, you only need to register the
WSD 50 module. See also “WOW! Register Software”.
Installation Procedure
1. Place the CD “iQ 50 Utilities” included in the scope of supply into the drive of your computer.
2. The DVD starts automatically.
3. Select your language.
4. Select WOW!Install software
5. The installation starts after a few seconds.
6. The installation procedure is described in the installation program. Follow the prompts of the installation assistant.
7. After complete installation of the software, the WOW! software starts automatically.
WOW! Register Software
1. Login, registration
Click “Registration“ 1 .
Follow the prompts of the registration assistant.
1
2. Login, registration
Follow the prompts of the registration assistant.
1 “Continue“
1
36
3. Enter customer data.
'"
Your customer number can be found e.g. on the delivery
note or invoice.
User name and password are optional and the input is
prompted at the start of the program.
These can be freely selected; pay attention to the use of
capital and small letters.
1 “Continue“
1
4. Product selection
1
Minimum selection “WSD 50“ by clicking
on “Order“ 1 .
2 “Continue“
2
5. General Terms and Conditions
The GTC have to be accepted 1 before you can continue.
2 “Continue“
1
2
37
6. Send registration request.
If the computer is online, the registration request is sent
automatically to the server. If the computer is not online,
the request has to be printed out and sent by fax to your
WOW! service partner.
Print out the form here.
The contact data can be found on the delivery note or
invoice.
1
Continue with “Cancel“ 1
7. Complete registration
The registration code received from your WOW! service
partner and the customer number must be entered in the
1 - 6 .
2
1
6
4
3
7
5
Continue with “Activate“ 7 .
The WOW! software and the iQ 50 are now registered
and can be updated online.
Any further registrations requested are automatically copied
during an online update and do not have to be entered
manually.
8. iQ 50 registration and update synchronisation
1
Start the WOW! program.
The computer must be connected to the Internet.
To start the update, click the button
“Update“ 1 .
When the update has been completed, click “Quit“.
38
9. Synchronise iQ50 update
2
1
The iQ 50 must be connected to the computer via the USB
cable (iQ 50) included in the scope of supply.
The synchronisation starts automatically.
The registration and any updates are downloaded.
The synchronisation can also be started manually via the
button “Synchronise“ 1 .
Further information on the use of the WOW! software in conjunction with the iQ 50 can be found in the “Help” of the
WOW! software 2 .
39
WOW! Würth Online World GmbH
"#$
"%
&
'(()*%
(((*(()*%
WOW! Würth Online World GmbH
+
,
"%
&*
-/0,
1)
# content:
4546+,7
/%
8,%9)*),%
/%
1)
0
;
&)%,())0*
W072210050 -SL- 02/14
+
,
0
%
&
,&))*
40/%)%
()
%
C
),%,C
0(%)0D&*/%&0;%)*E))
%
)),%&,%,),*#F$(%
#&)
/
*5"
E%
,I
,
))&*