1
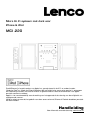
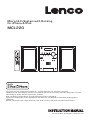
Micro Hi-Fi System with Docking
for iPhone & iPod
MCI-220
iPod & iPhone are trademarks of Apple Inc., registered in the U.S. and other countries.
“Made for iPod” and “Made for iPhone” mean that an electronic accessory has been designed to connect
specifically to iPod or iPhone respectively, and has
been certified by the developer to meet Apple performance standards.
Apple is not responsible for the operation of this device or its compliance with safety and regulatory
standards.
Please note that the use of this accessory with iPod or iPhone may affect wireless performance.
For information and support, www.lenco.eu
SAFETY PRECAUTIONS
To achieve the utmost in enjoyment and performance, please read this manual carefully before attempting to operate the unit
in order to became familiar with its features, and assure you years of faithful, trouble free performance and listening pleasure.
Important Safety instruction
Keep instructions the safety and operating instructions should be retained for future reference.
Avoid installing the unit in locations described below:
Places exposed to direct sunlight or close to heat radiating
appliances such as electric heaters. On top of other stereo equipment that radiate too much heat. Places lacking ventilation
or dusty places.
Places subject to constant vibration. Humid or moist places.
Make sure not to obstruct the ventilation openings.
Before turning on the power for the first time, make sure the power cord is properly installed.
Mains plug is used as the disconnect device and it shall remain readily operable completely.
The product shall not be exposed to dripping or splashing and that no objects filled with liquids, such as vases, shall be
placed on the product.
Clean only with dry cloth.
To be completely disconnect the power input, the mains plug of apparatus shall be disconnected from the mains.
When the stand-by LED gives no color, the apparatus is completely disconnected from mains.
Minimum distances10cm around the apparatus for sufficient ventilations.
Attention should be drawn to the environmental aspects of battery disposal.
The use of apparatus in moderate climates.
The mains plug should not be obstructed or should be easily accessed during intended use.
The ventilation should not be impeded by covering the ventilation openings with items such as newspaper, table-clothes,
curtains etc.
No naked flame sources such as lighted candles should be placed on the apparatus.
Battery shall not be exposed to excessive heat such as sunshine, fire or the like.
Do not defeat the safety purpose of the polarized or grounding-type plug. A polarized plug has two blades with one wider
than the other.
A grounding type plug has two blades and a third grounding prong. The wide blade or the third prong are provided for
your safety. If the
provided plug does not fit into your outlet. Consult an electrician for replacement of the obsolete outlet.
For safety reasons, do not remove any covers or attempt to gain access to the inside of the product. Refer any servicing
to qualified personnel. Do not attempt to remove any screws, or open the casing of the unit; there are no user
serviceable parts inside, refer all servicing to qualified service personnel.
CAUTION : TO REDUCE THE RISK OF ELECTRIC SHOCK DO NOT REMOVE COVER (OR BACK) , NO USER
SERVICEMAN LE PARTS INSIDE, REFER SERVICING TO QUALIFIED SERVICE PERSONNEL.
DANGEROUS VOLTAGE
Conductor dangerous voltage, that may be of sufficient magnitude to constitute a risk of electric shock to
persons is present within this products enclosure.
ATTENTION
The owners manual contains important operating and maintenance instructions, for your safety, it is necessary
to refer to the manual.
WARNING : TO PREVENT FIRE OR SHOCK HAZARD, DO NOT EXPOSE THIS APPLIANCE TO DRIPPING OR
SPLASHING.
Note:
This unit will become warm when used for a long period of time. This is normal and does not indicate a problem
with the unit.
The CD player includes micro-processors which may malfunction as a result of external electrical interference or noise.
If the CD player is not working properly, disconnect the power source and then reconnect it.
Excessive sound pressure from earphones and headphones can cause hearing loss.
If an unusual conditions occurs in the display window or key button, switch the unit off, then turn on the unit again.
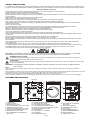
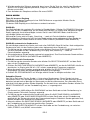
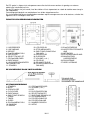
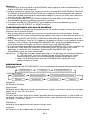
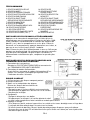
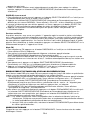
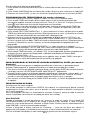
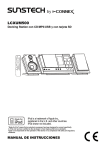
FEATURES AND CONTROLS
12 13 14
11
10
9
8
7
6
5
4
3
2
1
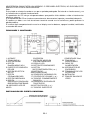
1. SPEAKER
2. LINE IN JACK
3. REPEAT BUTTON
4. iPod/ID3/MEM/C-ADJ. BUTTON
5. USB DEVICE IN PORT
6. SELECT/FM MO./ST. BUTTON
7. CD/iPod/USB/CARD BUTTON
8. DAB/FM/AUX BUTTON
9. PLAY/PAUSE/SCAN/ENTER
BUTTON
15
16
17
18
19
20
25
27
VI DE O OU T
26
24
ON
OF F
21
22
10.STANDBY LED INDICATOR
11. STANDBY BUTTON
12. LCD DISPLAY WINDOW
13.STOP/MENU/INFO BUTTON
14.SKIP/TUNE (UP or DOWN) BUTTON
15.OPEN/CLOSE BUTTON
16. IR SENSOR
17. VOLUME (+ or -) KNOB
18. CD DOOR
19. SD CARD IN SLOT
UK-1
23
AC
20.FOLDER(UP or DOWN)
BUTTON
21. iPod DOCK DOOR
22.HEADPHONES JACK
23.AC CORD
24.AC POWER SWITCH
25.SPEAKER TERMINALS
26.FM ANTENNA
27.VIDEO OUT JACK
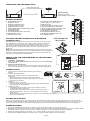
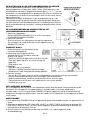
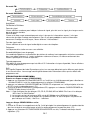
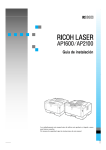
INSTALLING THE UNIVERSAL DOCK
Push dock door will
open the iPod dock door.
PUSH
PUSH
Universal Dock
adapter connection
(Dock adapter not included)
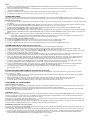
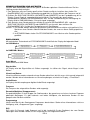
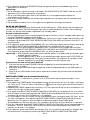
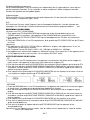
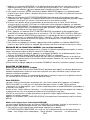
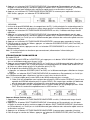
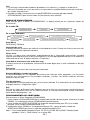
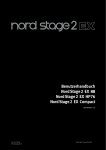
REMOTE CONTROL
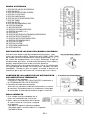
1. STANDBY BUTTON
2. MUTE BUTTON
3. OPEN/CLOSE BUTTON
4. CLOCK DISP BUTTON
5. DAB/FM/AUX BUTTON
6. SKIP/TUNE SEARCH DOWN BUTTON
7. TIMER BUTTON
8. SLEEP BUTTON
9. ID3/iPod/MEM/C-ADJ. BUTTON
10.RANDOM BUTTON
11.REPEAT BUTTON
1
2
3
4
5
6
12.CD/iPod/USB/CARD BUTTON
13.VOLUME (+ or -) BUTTON
14.EQ BUTTON
15.PLAY/PAUSE/SCAN BUTTON
16.SELECT/MONO/ST. BUTTON
17.SKIP/TUNE SEARCH UP BUTTON
18.STOP/MENU/INFO BUTTON
19.FOLDER UP BUTTON
20.FOLDER DOWN BUTTON
21.NUMBER SEARCH BUTTON
22.INTRO BUTTON
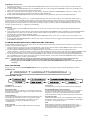
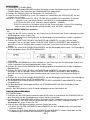
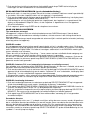
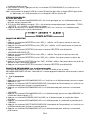
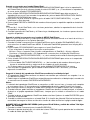
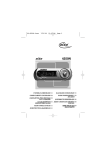
PUTTING THE BATTERIES INTO THE REMOTE
CONTROL UNIT
Press down the compartment cover, and slide the cover off to open
the compartment. Place the two (UM4), (AAA), (R03) batteries in
the remote control according to the polarity markings ("+" and " - ")
inside the compartment and on the batteries. Place the cover over
the compartment, press down lightly, and push it upward until it
snaps on.
Note: Remove the batteries from the remote control if not in use for
long period of the time. Do not mix normal batteries with rechargeable
batteries, when the batteries become weak, remote control will not
function and replace with new batteries.
12
13
14
15
16
17
18
19
20
7
8
9
10
21
11
**BATTERIES NOT
INCLUDED**
22
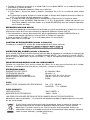
AC MAIN POWER SWITCH
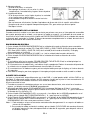
INSTALLING THE SPEAKER WIRE TO THE SPEAKER
TERMINALS
1. Speakers Connection
Extend the SPEAKER WIRES and connect them to the SPEAKER
TERMINALS.
2. Power Cord Connection
Before using , connect the AC Power Cord to the AC outlet .Then
turn on the main switch of the unit. Standby indicator will light on.
ON
OFF
AC CORD
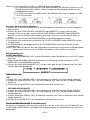
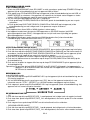
COMPACT DISC
1. Always use a compact discs bearing the mark as
shown.
2. Notes on handling discs
Removing the disc from its storage case and
loading it.
* Do not touch the reflective recorded surface.
* Do not stick paper or write anything on the surface.
* Do not bend the disc.
FROM THE CENTRE
3. Storage
TO THE EDGE
* Store the disc in its case.
* Do not expose discs to direct sunlight or high temperatures,
high humidity or dusty places.
4. Cleaning a disc
* Should the disc become soiled, wipe off dust, dirt and
fingerprints with a soft cloth.
* The disc should be cleaned from the center to the edge.
* Never use benzene, thinners, record cleaner fluid or anti
CORRECT
static spray.
* Be sure to close the CD door so the lens is not contaminated by dust.
* Do not touch the lens.
INCORRECT
OPERATING THE UNIT
When you first plug the unit into the AC outlet, then press the power switch on the rear of the unit, the unit will be
in standby mode, the black light of standby is red. You can now press the STANDBY/ON button on the unit or on the
remote control to switch the unit ON. Pull the AC plug out of the wall socket if you want to switch off completely.
POWER/STANDBY
1. Press the STANDBY/ON button on the unit or on the remote control to switch the unit on.
2. Select the sound source (CD, iPod, USB, CARD) and (DAB, TUNER, AUX) by pressing the (CD, iPod, USB, CARD)
and(DAB, FM, AUX) button on the unit (or remote control). The corresponding display will light up.
3. Adjust the volume with the VOLUME (+ or -) control knob on the unit (or remote control).
4. Press the STANDBY/ON button on the unit (or remote control) again to turn off the unit.
UK-2
Note:
1. If there is no signal under the CD/USB DEVICES/ SD CARD/ iPod mode, the main unit will be switched off
within 15 minutes automatically.
2. During in the iPod mode, if there is no iPod Player on the iPod deck bracket; the main unit will also turn off within
15 minutes automatically.
3. During in standby mode, press any button/key can make the display light for 10 seconds.
4. Please turn the main switch off to save energy, when you do not use the unit.
CLOCK SETTING
The clock will be automatically synchronized to the DAB clock if you can receive DAB signals in your location. If you
can only receive FM, then you have to set the clock manually. The manual clock setting must be done in standby mode.
Manual clock setting
1. When the unit is first connected to the AC mains outlet, it will be in standby mode, and the display will show “00:00:00”
and flash.
2. Press and hold the ID3/iPod/MEM/C-ADJ. button until the “24 Hour or 12 Hour” shows on the display and flash, then
press the SKIP/TUNE SEARCH(UP or DOWN) button to adjust 24-hour or 12-hour digit.
3. Press the ID3/iPod/MEM/C-ADJ. button again, the HOUR digit will flash on the display, press the SKIP/TUNE
SEARCH(UP or DOWN) button to adjust HOUR digit.
4. Press the ID3/iPod/MEM/C-ADJ. button once more, the MINUTE digit will flash on the display, press the SKIP/TUNE
SEARCH(UP or DOWN) button to adjust MINUTE digit. Press the ID3/iPod/MEM/C-ADJ. button again to confirm the
time.
Note: 1.Each enable state as shown above will be cleared if the key is not pushed in10 seconds.
2. Turn on the unit and press the CLOCK DISP button on the remote in any mode, the display will show the time
and disappear about 10 seconds, then return to the original condition.
Synchronise the clock to DAB local time
1. Press the STANDBY/ON button on the unit(or remote control) once to switch the unit on.
2. Press the DAB/FM/AUX button on the unit(or remote control) to select DAB mode.
3. Tune to a DAB station and the clock will be automatically synchronized to the DAB local time.
TIMER SETTING(on the remote control)
This function allows you to switch on and off the system at your desired time and mode:
1. Press the TIMER button on the remote control to toggle the timer function between on and off, the display will
show “Timer on” or “Timer Off”. The display will show “ ” to indicate timer function on.
2. To set the On Timer clock, press and hold the TIMER button on the remote control until the display shows “On Timer”
and the “hour” digit of the timer clock will flash.
3. Press the SKIP/TUNE SEARCH (UP or DOWN) button to set to the desired hour, then press the TIMER button on
the remote control to confirm, first set the hour and finally the minute, the On Timer clock is set.
4. T hen you will enter into the Off Timer clock setting, the display will show “Off Timer” and the “hour” digit will flash.
Press the SKIP/TUNE SEARCH (UP or DOWN) button to set to the desired hour, then press the TIMER button on
the remote control to confirm, first set the hour and finally the minute, the Off Timer clock is set.
5. Finally press the SKIP/TUNE SEARCH (UP or DOWN) button to select the timer on mode - FM, CD, iPod, USB,
CARD or DAB then press the TIMER button to confirm. The timer setting is now completed.
6. Press the TIMER button again, the timer "VOL 13” indicator appears on the display and flashes, adjust the timer
volume high or low by pressing the SKIP/TUNE SEARCH (UP or DOWN) button.
7. To check the timer setting, repeatedly press the TIMER button, until the display shows the on timer and
the off timer setting.
TO SET SLEEP FUNCTION (on the remote control)
This function allows you to program the system to switch off itself after a set period of time. You can set your sleep
time in power on mode:
1. To activate the sleep function, press the SLEEP button on the remote, the display will show “SLEEP-90,80,70,60,
50, 40,30,20,10,OFF” and flash.
2. When the display shows your desired sleep time, release the button, the sleep timer is now activated.
The display will show “Sleep 10” in which, When the sleep time counts to zero, the unit will go off.
3. To cancel sleep, press the SLEEP button once again, the sleep function will turn off.
LISTENING TO YOUR RADIO
Hints for better reception
This unit carries a single lead wire DAB/FM antenna, to obtain the best performance, you should fully extend the wire
antenna and adjust the position as well as the direction until you find the best reception.
For ideal DAB reception, always maintain the lead wire antenna in a vertical position (holding it upward or downward
behind the unit) is highly recommended.
DAB/DAB+ mode
When the unit is powered up for the first time, it will be in standby mode. Press the STANDBY/ON button on the unit (or
remote control) to turn the radio on, the display will show “Welcome to Digital Radio”, then it will automatically enter
into the DAB/DAB+ mode and perform full scan function.
During scan, the display will show “Searching …” together with a slide bar that indicates the progress of the scan and
the amount of stations that have been found so far.
Once the scan has finished, the radio will select the first alphanumerically found station. To explore the found stations,
Press the SKIP/TUNE SEARCH (UP or DOWN) button to your desired station.
DAB/DAB+ Autotune Full scan modes
Full scan will search for all DAB/DAB+ Band III channels. After the scan has finished, the first alphanumerically found
station will be automatically selected.
1. To activate autotune full scan, press the PLAY/PAUSE/SCAN/ENTER button on the unit (or remote control) once to
enter into the “Autotune Full scan” mode, the display will show “Searching...” and a slower progressing slide bar.
2. All the stations that have been found will be stored automatically, to explore the stations that have been found,
press the SKIP/TUNE SEARCH( UP or DOWN) button for selection.
UK-3
DAB/DAB+ manual tune
1. To select manual tune, press the SELECT/FM MONO/ST. button on the unit (or remote control) to enter into the
“Manual tune” mode.
2. Press the SKIP/TUNE SEARCH (UP or DOWN) button to scroll through the DAB/DAB+ channels, the display will
show “5A to 13F” and their associated frequencies.
3. W hen your desired frequency appears in the display, press the SELECT/FM MONO/ST. button to confirm. The
name of the station group (ensemble/multiplex) will be displayed.
4. Press the STOP/MENU/INFO button t o see what stations are present on the found ensemble/multiplex.
Secondary Services
On some occasions you will see a “>” symbol appeared after the name of the station, this indicates that there are
secondary services available to that station. These secondary services contain extra services that relate to the
primary station. E.g. a sports station may want to add extra commentaries. The secondary services are inserted
directly after the primary station. To select the secondary station, press the SELECT/FM MONO/ST. button on the
remote control when the “>” appears in the display.
FM mode
1. To select FM, press the DAB/FM/AUX button on the unit (or remote control), the display will show FM and the
frequency.
2. To activate frequency auto search, press and hold the SKIP/TUNE SEARCH (UP or DOWN) or PLAY/PAUSE/SCAN
/ENTER button on the unit (or remote control) until it starts to scan down or up the frequency band; it will stop
automatically once a station has been found.
3. You can also press the SKIP/TUNE SEARCH(UP or DOWN) button on the unit (or remote control) to select your
desired frequency.
4. Press the SELECT/FM MONO/ST. button on the unit (or remote control) to toggle select between the FM “STEREO”
and “MONO” reception.
STORING AND RECALLING STORED PRESET STATIONS
In either DAB or FM mode, you can store up to 30 stations to the favourite presets; this will enable you to get direct
access to your favourite stations.
1. To store a preset, first tune to your desired station, then press and hold the iPod/ID3/MEM/C-ADJ. button on the
remote control, the display will show frequency and the “#” fiash.
2. Press the SKIP/TUNE SEARCH ( UP or DOWN) button on the remote control until the display will show
“ Preset Empty # ” and the “#” fiash. to select your desired station preset number, then press the ID3/iPod/MEM/C-ADJ.
button on the remote control to confirm your selection; the display will show “Preset # stored” in DAB/FM mode.
3. To recall a preset station, press the ID3/iPod/MEM/C-ADJ. button once and then press the SKIP/TUNE SEARCH
(UP or DOWN) button to select the stations that you have stored, then press the ID3/iPod/MEM/C-ADJ. button on
the remote control to confirm your selection.
Note: 1. The stored stations will be saved into its memory and power off will not erase it. Storing a new
station into a preset location will erase the previously stored station in that location.
2 . During the unit in STANDBY mode, press and hold the STOP/MENU/INFO button to erase all preset
memory.
DISPLAY MODES
Every time you press the STOP/MENU/INFO button, the display will cycle through the following display modes:
In FM mode:
Signal strength
Frequency
Auto(Mono/Stereo)
In DAB/DAB+ mode:
Auto(Mono)
FM Stereo and FM Mono.
Frequency
The frequency of the present station will be displayed.
Signal strength
The display will show a slide bar to indicate the signal
strength, the stronger the signal, the longer the bar will
be from left to right.
Ensemble/Multiplex (Group name)
The Ensemble/Multiplex is a collection of radio stations
that are bundled and transmitted together in a single
frequency. There are national and local multiplexes,
local ones contain stations that are specific to that area.
Time and date
The time and date will be automatically updated by the
broadcasted information; there is no need to set the
clock manually. In the unlikely event that no clock
information is received, the display will show
“<Time/Date>”.
Audio bit rate
The display will show the digital audio bit rate being
received.
Programme type
This describes the style of the programme that is being
broadcast. If the information is not available, the display
will show “<Programme Type>”.
DLS
DLS stands for Dynamic Label Segment which is a
scrolling message that the broadcaster may include in
their transmissions. The message usually includes
information such as programme details …etc.
UK-4
CD/MP3/WMA OPERATION
Listening To Compact Disc (CD/MP3/WMA)
1. Press the CD/iPod/USB/CARD button on the unit (or remote control) is select to CD/MP3 mode. The unit will read
the CD/MP3/WMA disc automatically.
2. P ress the CD DOOR OPEN/CLOSE button on the main unit only, and then the CD door will open automatically. (F1)
3. Insert the CD/MP3 disc into the CD compartment, press the CD OPEN/CLOSE button to close the CD door.
Note: 1. This unit can play CD, CD-R, CD-RW, MP3 and WMA discs. It also play the "8 cm" and "Multi Section" of MP3
DISC.
2. The "Playback Transfer Bit Rate in MP3 is 32 - 320 kbps and WAM is 64 - 320 kbps.
3. The "Max Readable 99 folders and 999 tracks. If no disc or can not read the TCO, "NO DISC" will be
displayed.
Playing The Entire CD/MP3/WMA
- CD
1. Insert the CD disc into the CD compartment, the main unit will automatically read the total number of the folders
and tracks at the same time, the unit will play the first track automatically.(F2)
2. Press the PLAY/PAUSE/SCAN button once, the time elapsed indicator will flash.(F3)
3. Press the SKIP/TUNE SEARCH(UP or DOWN) button once to change Track NO., press and hold the SKIP/TUNE
SEARCH (UP or DOWN) button to skip fast forward or backward of each song.
4. Press the PLAY/PAUSE/SCAN/ENTER button once more to resume the playback. To stop by pressing the
STOP/MENU/INFO button.
F3
F1
F2
- MP3/WMA
1. Insert the MP3/WMA disc into the CD compartment, the main unit will automatically read the total number of the
folders and tracks at the same time, the unit will play the first track automatically.
2. Press the PLAY/PAUSE/SCAN/ENTER button once, the time elapsed indicator will flash.
3. Press the SKIP/TUNE SEARCH(UP or DOWN) button once to change Track NO., press and hold the SKIP/TUNE
SEARCH(UP or DOWN) button on the unit once (or remote control) to skip fast forward or backward of each song.
4. To resume playback, press the PLAY/PAUSE/SCAN/ENTER button once more again.
5. To change the ALBUM NO., press the FOLDER/ARROW (UP or DOWN) button on the remote control once.
6. To stop playback, press the STOP/MENU/ INFO button once on the unit (or remote control).
Note: If the main unit is not working properly, disconnect the power source and then reconnect it again.
USB/SD CARD OPERATION
During in the STANDBY mode
1. Insert the USB DEVICE or SD CARD, and then press the STANDBY/ON button on the unit (or remote control) to
power"ON" the unit.
2. Press the CD/iPod/USB/CARD button on the unit (or remote control) to select the USB or SD CARD mode. The
main unit will automatically read the total number of the folders and tracks at the same time. (F4,F5) The unit will
play the first track automatically.
3. If the USB memory device more than one folder.
a. Press the FOLDER(UP or DOWN) button on the remote control to select each folder.
b. Press the SKIP/TUNE SEARCH (UP or DOWN) button on the unit (or remote control) to select current track in
desired folder.
Note: 1. The main unit can play MP3 and WMA only in this mode.
2. This unit can support most of USB devices and SD/SDHC cards (up-to 32GB memory capacity for
SDHC). It cannot access (or, need longer time to access) those devices with big memory capacity.
3. The main unit does not support the WMA file which is protected by "DRM FILE". It just support USB version
1.1 and 2.0.
F5
F4
Playing The Entire flash disc
1. Press the PLAY/PAUSE/SCAN/ENTER button once, the time elapsed indicator will flash.
2. Press the SKIP/TUNE SEARCH(UP or DOWN) button once to change Track NO., press and hold the SKIP/TUNE
SEARCH(UP or DOWN) button on the unit once (or remote control) to skip fast forward or backward of each song.
3. To resume playback, press the PLAY/PAUSE/SCAN/ENTER button once more again.
4. To change the ALBUM NO., press the FOLDER(UP or DOWN) button on the remote control once.
5. To stop playback, press the STOP/MENU/ INFO button once on the unit (or remote control).
Note : In any time, the USB DEVICE or SD CARD must be fixed well under in the STANDBY mode to avoid the main
unit and USB DEVICE or SD CARD were damaged.
ID3 OPERATION
During in the MP3/WMA mode
1. Press the ID3/iPod/MEM/C-ADJ. Button on the unit (or remote control) once to open the ID3 function.
2. If the MP3/WMA file is written “ID3”, it will automatically search the information of “TITLE NAME”, “ARTIST NAME”
and “ALBUM NAME” indicated on the display .
3. Press the ID3/iPod/MEM/C-ADJ. button on the unit (or remote control) again. Then the unit will resume to play
normally.
UK-5
REPEAT PLAY FUNCTION
- CD
1. Press the REPEAT button once, REP_1 is displayed. CD will play the current track repeatedly.
2. Press the REPEAT button twice, REP_ ALL is displayed. CD will play all tracks repeatedly.
3. Press the REPEAT button once more again, REPEAT function will be off.
- MP3/WMA/USB/SD CARD
1. Press the REPEAT button once, then REP_1 is displayed. It will play the current track repeatedly.
2. Press the REPEAT button twice, REP_ ALL is displayed. It will play all tracks repeatedly.
3. Press the REPEAT button thrice, REP_ALBUM is displayed. It will play all tracks in the current folder repeatedly.
4. Press the REPEAT button once more again, then REPEAT function will be off.
PROGRAM FUNCTION (on the remote control)
User can make the program up to 32 tracks in CD mode or 64 tracks in MP3/WMA/USB/SD CARD mode in any
desired order. Program mode is activated while in stop mode.
1. How to play the program
- CD
1. Press the ID3/iPod/MEM/C-ADJ. button on the remote control, shift to MEMORY mode.(F6)
2. Press the SKIP/TUNE SEARCH(UP or DOWN) button on the unit (or remote control), the track number will be
changed.
3. Press the ID3/iPod/MEM/C-ADJ. button on the remote control to confirm the track number.
- MP3/WMA
1. Press the ID3/iPod/MEM/C-ADJ. button on the remote control, shift to MEMORY mode. The album number is
flashing. (F7)
2. Press the FOLDER(UP or DOWN) button on the remote control, the album number will be changed.
3. Press the ID3/iPod/MEM/C-ADJ. button on the remote control, the first track number will be displayed.(F8)
4. Press the SKIP/TUNE SEARCH(UP or DOWN) button on the unit (or remote control), the track number will be
changed.
5. Press the iPod/ID3/MEM/C-ADJ. button on the remote control to confirm the favorite track number.
F6
F7
F8
2. PROGRAM PLAY
Press the PLAY/PAUSE/SCAN/ENTER button on the unit (or remote control). The unit will play the first track of the
program. When all tracks have been played, the unit display will show the number of tracks and the playing time of the
CD/MP3/WMA songs.
3. CANCEL PROGRAM
Press the STOP/MENU/ INFO button on the unit (or remote control) twice, or open the CD tray door and close it
again that the memory will be erased. Set a new program, the existing one will be cleared
Note : During in the program mode.
1. Press the REPEAT button on the remote control once, the REP_1 indicator will light on the display. Then the unit will
repeat the current track.
2. Press the REPEAT button twice, the REP_ALL will light on the display. Then the unit will repeat all the total
number of tracks.
3. Press the REPEAT button once more again. The unit will return to play the program in normally.
RANDOM PLAY(on the remote control)
You can press the RANDOM button on the remote control to select the random play function:
1. During CD stop, press the RANDOM button once to select random play, the display will show “RANDOM”, one
track will be randomly selected and started playing.
2. During playback, first press the RANDOM button once, the display will show “RANDOM”, then press the
SKIP/TUNE SEARCH(UP or DOWN) button on the unit (or remote control), one track will be randomly selected and
started to play.
3. To resume normal playback, press the RANDOM button again.
INTRO PLAY(on the remote control)
1. Press the INTRO button once, and then INTRO is displayed. The main unit will play the first 10 seconds of each
track.(F9)
2. Press the INTRO button twice, and then resume to normal play.
F9
UK-6
iPod /iPhone OPERATION
During the unit in STANDBY mode:
1. Press the STANDBY/ON button on the unit or on remote control to switch the unit on.
2. P ress the CD/iPod/USB/CARD button on the unit (or remote control) to select the iPod mode.
3. Push the iPod door to open the iPod door. Insert the iPod/iPhone players in the iPod docking bracket ixedly, the
iPod indicator will appear on the main unit display. (F10)
F10
During the unit in iPhone/iPod mode:
1. Press the PLAY/PAUSE/SCAN/ENTER button once to start the iPhone/iPod playing. Adjust the volume
control by turning the VOLUME (+ or -) button. To stop the current playing, press the STOP/MENU/INFO button once.
2. Press the PLAY/PAUSE/SCAN/ENTER button once to pause the current track.
To resume the playback, press the PLAY/PAUSE/SCAN/ENTER button once again.
3. To skip forwards or backwards, press the SKIP/TUNE SEARCH (UP or DOWN) button to select the desired track.
4. Press the REPEAT or RANDOM button on the remote control to make the iPhone/iPod playing repeatedly or
randomly.
Note: 1. iPod touch version 1.1.4 or above can support REPEAT or RANDOM function.
2. When the iPod touch & iPhone screen has been locked, above operation are still available.
During the unit in iPod/iPhone MENU mode:
Note: iPod touch&iPhone series needs to manual into the music menu first, then proceeding the next operation.
1. During the unit in iPod/iPhone mode, press the ID3/iPod/MEM/C-ADJ. button once, the unit will enter to the
iPod/iPhone MENU mode. The iPod MENU indicator will appear on the unit display.
2. Press the STOP/MENU/INFO button return to the iPod/iPhone menu.
a. To select the current menu as belows :
Music > Extras > Photo Import (without this function display on the iPod Mini) > Settings >Shuffle Songs >
Backlight > Now Playing will show on the iPod/iPhone Player display.
b. Press the SKIP/TUNE SEARCH (UP or DOWN) button on the unit (or remote control) to search the current
menu.
3. Press the PLAY/PAUSE/SCAN/ENTER button enter to the desired menu folder.
a. Press the SKIP/TUNE SEARCH (UP or DOWN) button on the unit (or remote control) to search the current
content in the each desired menu folder.
b. If you want return to the iPod/iPhone menu, press the STOP/MENU/INFO button again.
4. To resume playback, press the iPod/ID3/MEM/C-ADJ. button once again, the unit will return to iPod mode.
Charging the iPod/iPhone Player battery through the main unit:
1. iPod/iPhone Player has a internal nonremovable battery, the battery may need to be charged that is not used for
a while.
2. You can charge the iPod/iPhone Player through the main unit automatically under the STANDBY or POWER ON
mode.
Notes:1. The iPod/iPhone Player battery is 80-percent charged in about an hour, and fully charged in about a few
hours. If you charge it while playing music, it may take longer.
2. It is not better to charge under the TUNER mode. It may interfere the reception.
3. In any time, you can control the iPod/iPhone player on the main unit, remote control or iPod/iPhone player
itself while the unit in the "iPod" mode.
4. In any time, the iPod/iPhone player must be fixed well under in the STANDBY mode to avoid the unit and
iPod/iPhone player were damaged.
5. During the unit in iPod mode. The video function of the iPod with ahnormal working normally. Update the
latest version of the iPod video function from the apple web-site.
VIDEO OUT SETTING (for i-Pod Video only and Video cable "RCA-type cable"
not included)
1. During the unit in the STANDBY mode : Connect the TV set with a videos cable (RCA-type cables) to the
VIDEO out jack on the back of the unit.
2. During the unit in the iPod mode : Press the "MENU" button on the iPod Click Wheel to set the video function.
3. To set iPod to display videos on a TV :
(a) Choose Videos > Video Settings, and then set TV Out to Ask or On.
(b) If you set TV Out to Ask, iPod gives you the option of showing videos on TV or on iPod while every time you
play a video.
Note :1. The Video mode only support that the iPod players have a Video function.
2. iPod classic 80/160GB, iPod nano 3rd & 4th & 5th & 6th generation(Video) screen and iPod touch screen
should be fixed well under in the STANDBY mode before operation of the Video function.
AUX IN PLAY
The AUX input is located at the left of the unit. Use a 3.5mm stereo jack cable to connect audio equipment through
the LINE IN jack.
1. To select the AUX input function, repeatedly press the DAB/FM/AUX button on the unit (or remote control) until the
AUX is indicated on the display.
2. Adjust the the VOLUME (+ or -) control knob to adjust the sound output level.
Note: LINE in cable not included.
EQ CONTROL (on the remote control)
When you press the EQ button, the sound tone changes as below:
UK-7
MUTE SETTING (on the remote control)
Press the MUTE button on the remote control to stop the sound from the speakers temporarily, the sound stops and
the display will show “MUTE”. To cancel mute, press the MUTE button again or press the VOLUME +/-, “MUTE”
disappears in the display and the sound is restored.
LISTEN TO THE MUSIC BY USING HEADPHONE
Plug your headphones (3.5mm mini-stereo plug) into the headphones jack on the light penal of the unit. The sound
will be heard through the headphones, not the speaker.
SPECIFICATION
POWER SUPPLY :
OUTPUT POWER :
UNIT DIMENSION :
SPEAKER BOX DIMENSION :
N. W. :
RADIO SECTION
FREQUENCY RANGE :
COMPACT DISC SECTION
OPTICAL PICKUP :
FREQUENCY RESPONSE :
AC 230-240V~50Hz
20 Watts x 2
152 (W) x 222 (D) x 218 (H) mm
140 (W) x 222 (D) x 218 (H) mm
5.45kg
FM 87.5 - 108 MHz
DAB/DAB+ 174 - 240 MHz
3 - BEAM LASER
100Hz - 16kHz
SPECIFICATION SUBJECT TO CHANGE WITHOUT FURTHER NOTICE.
Ventilation warning : " The normal ventilation of the product shall not be impeded for intended use."
If at any time in the future you should need to dispose of this product please
note that: Waste electrical products should not be disposed of with household waste.
Please recycle where facilities exist. Check with your Local Authority or retailer
for recycling advice. (Waste Electrical and Electronic Equipment Directive)
UK-8
Mikro Hi-Fi-System mit Dock für iPhone und iPod
MCI -220
iPod und iPhone sind Marken von Apple Inc., registriert in den USA und anderen Ländern.
„Made for iPod“ und „Made for iPhone“ bedeutet, dass ein elektronisches Zubehör speziell zum
Anschluss an iPod oder iPhone konzipiert ist und vom Entwickler zertifiziert wurde, den
Leistungsnormen von Apple zu entsprechen.
Apple ist für den Betrieb dieses Geräts oder seine Konformität mit Sicherheitsbestimmungen und
behördlichen Normen nicht verantwortlich.
Bitte beachten Sie, dass die Benutzung dieses Zubehörs mit iPod oder iPhone die Funkleistung
beeinträchtigen kann.
Bedienunganleitung
Zur Information und Unterstützung, www.lenco.eu
SICHERHEITSHINWEISE
Bitte lesen Sie die Bedienungsanleitung vor der Inbetriebnahme aufmerksam durch, um den meisten
Spaß und die beste Leistung aus dem Gerät zu erhalten und sich mit den Funktionen vertraut zu
machen. Wir garantieren viele Jahre problemlosen Betrieb und Freude an der Musik.
Wichtige Sicherheitshinweise
Bewahren Sie die Anleitung für künftiges Nachschlagen auf.
Installieren Sie das Gerät nicht an folgenden Standorten:
In direkter Sonneneinstrahlung oder in unmittelbarer Nähe von Wärme erzeugenden Geräten, wie
Heizkörpern. Auf anderen Geräten, die Wärme abstrahlen. Standorte ohne Ventilation oder staubige
Standorte.
An Standorten mit ständiger Vibration. Feuchte Standorte.
Blockieren Sie nicht die Ventilationsöffnungen.
Vergewissern Sie sich vor dem Einschalten des Geräts, dass das Netzkabel ordnungsgemäß
angeschlossen ist.
Der Netzstecker dient dem Abtrennen des Geräts vom Stromnetz und muss jederzeit frei zugänglich
sein.
Setzen Sie das Gerät nicht Spritzwasser oder Tropfwasser aus und stellen Sie keine mit Wasser
gefüllten Gegenstände (wie Vasen) auf dem Gerät ab.
Reinigen Sie das Gerät nur mit einem trockenen Tuch.
Der Netzstecker muss gezogen sein, damit das Gerät vollständig vom Strom abgetrennt ist.
Das Gerät ist vollständig vom Strom abgetrennt, wenn die LED erloschen ist.
Halten Sie rings um das Gerät mindestens 10 cm Abstand für ausreichende Ventilation.
Entsorgen Sie Batterien stets umweltgerecht.
Das Gerät ist zur Benutzung in moderatem Klima bestimmt.
Der Netzstecker muss jederzeit frei zugänglich sein.
Blockieren Sie nicht die Ventilation.
Stellen Sie keine offenen Flammen (wie Kerzen) auf dem Gerät ab.
Setzen Sie Batterien nicht übermäßiger Hitze, direkter Sonneneinstrahlung, Feuer oder dergleichen
aus.
Schließen Sie das Gerät nur an einer geerdeten Steckdose an.
Öffnen Sie das Gerät nicht. Es befinden sich keine vom Verbraucher wartbaren Teile im Gerät.
Überlassen Sie Reparaturen stets dem autorisierten Kundendienst.
VORSICHT: ZUR VERMEIDUNG VON STROMSCHLAG ÖFFNEN SIE DAS GERÄT NICHT, ES
BEFINDEN SICH KEINE VOM VERBRAUCHER WARTBAREN TEILE IM GERÄT. WENDEN SIE
SICH MIT REPARATUREN STETS AN DEN AUTORISIERTEN KUNDENDIENST.
HOCHSPANNUNG
Gefährliche Hochspannung im Gerät, die zu Stromschlag führen kann.
VORSICHT
Die Bedienungsanleitung enthält wichtige Betriebs- und Wartungsanleitungen.
WARNUNG: ZUR VERMEIDUNG VON FEUER UND STROMSCHLAG SETZEN SIE DAS GERÄT
NICHT SPRITZWASSER ODER TROPFWASSER AUS.
Hinweis:
Dieses Gerät erwärmt sich bei längerer Benutzung. Das ist völlig normal und stellt kein Problem dar.
Der CD-Player ist mit einem Mikroprozessor ausgestattet, der bei elektrischen Störungen zu
Fehlfunktionen führen kann.
Funktioniert der CD-Player nicht korrekt, so trennen Sie ihn vorübergehend vom Stromnetz ab.
Übermäßiger Schalldruck von Ohrhörern und Kopfhörern kann zu Hörschäden führen.
Bei ungewöhnlichen Anzeigen im Display trennen Sie das Gerät vorübergehend vom Stromnetz ab.
DE-1
BEDIENELEMENTE UND FUNKTIONEN
1. LAUTSPRECHER
2. LINE-IN-BUCHSE
3. WIEDERHOLUNG
4. iPod/ID3/SPEICHER
/UHREINSTELLUNG
5. USB-PORT
6. AUSWAHL/UKW
MONO/STEREO
7. CD/iPod/USB
/SPEICHERKARTE
8. DAB/UKW/AUX
9. WIEDERGABE
/PAUSE/SENDERSUCHLAF
/ENTER
10. STANDBY-LED
11. STANDBY
12. LCD-DISPLAY
13. STOPP/MENÜ/INFO
14. SKIP/SENDERWAHL
(AUFWÄRTS/ABWÄRTS)
15. LAUFWERK
ÖFFNEN/SCHLIEßEN
16. IR-SENSOR
17. LAUTSTÄRKE (+/-)
18. CD-LAUFWERK
19. SD-KARTENLESER
20. ORDNER
(AUFWÄRTS/ABWÄRTS)
21. iPod DOCK
22. OHRHÖRERBUCHSE
23. NETZKABEL
24. HAUPTSCHALTER
25. LAUTSPRECHERANSCHLÜSSE
26. UKW-ANTENNE
27. VIDEOAUSGANG
UNIVERSALDOCK INSTALLIEREN
FERNBEDIENUNG
1. STANDBY
2. STUMMSCHALTUNG
3. ÖFFNEN/SCHLIEßEN
4. UHRZEIT
5. DAB/UKW/AUX
6. SKIP/SENDERSUCHE ABWÄRTS
7. TIMER
8. SLEEPTIMER
9. iPod/ID3/SPEICHER
/UHREINSTELLUNG
10. ZUFALL
11. WIEDERHOLUNG
12. CD/iPod/USB/SPEICHERKARTE
13. LAUTSTÄRKE (+/-)
14. EQ
15. WIEDERGABE/PAUSE
/SENDERSUCHLAUF
16. AUSWAHL/MONO/STEREO
17. SKIP/
SENDERSUCHE AUFWÄRTS
18. STOPP/MENÜ/INFO
19. ORDNER AUFWÄRTS
20. ORDNER ABWÄRTS
21. ZIFFERNTASTEN
22. ANSPIELEN
DE-2
BATTERIEN IN DIE FERNBEDIENUNG EINSETZEN
Öffnen Sie das Batteriefach und setzen Sie zwei UM4/AAA/R03-Batterien
entsprechend der Markierungen für die Polarität in die Fernbedienung ein.
Schließen Sie das Batteriefach wieder.
Hinweis: Bei längerer Nichtbenutzung nehmen Sie bitte die Batterien aus
der Fernbedienung. Mischen Sie nicht Batterien mit Akkus. Lässt die
Reichweite der Fernbedienung nach, dann wechseln Sie bitte die
Batterien aus.
LAUTSPRECHERKABEL AN DEN LAUTSPRECHERANSCHLÜSSEN ANSCHLIEßEN
1. Lautsprecheranschluss
Wickeln Sie die LAUTSPRECHERKABEL vollständig ab und
schließen Sie sie an den LAUTSPRECHERANSCHLÜSSEN
an.
2. Netzanschluss
Stecken Sie den Netzstecker in die Steckdose, dann schalten
Sie das Gerät mit dem Hauptschalter ein. Die Standby-LED
leuchtet auf.
COMPACT DISCS
1. Benutzen Sie ausschließlich CDs mit dem
abgebildeten Logo.
2. Hinweise zur Handhabung von CDs
Nehmen Sie die CD aus dem Cover und legen
Sie sie in das Laufwerk ein.
* Berühren Sie nicht die Abspieloberfläche.
* Bringen Sie auf CDs keine Aufkleber an.
* Biegen Sie CDs nicht.
3. Lagerung
* Lagern Sie CDs in ihrem Cover.
* Setzen Sie CDs nicht direkter Sonneneinstrahlung,
hohen Temperaturen, Feuchtigkeit oder Staub aus.
4. CDs reinigen
* Wischen Sie Staub, Schmutz und Fingerabdrücke mit einem weichen Tuch ab.
* Reinigen Sie die CD von innen nach außen.
* Benutzen Sie keine Lösungsmittel, Schallplattenreiniger oder Anti-Statik-Sprays.
* Schließen Sie das CD-Laufwerk, um den Tonabnehmer vor Staub zu schützen.
* Berühren Sie die Tonabnehmerlinse nicht.
BEDIENUNGSHINWEISE
Nach dem Netzanschluss drücken Sie den Hauptschalter auf der Rückseite des Geräts, um es in den
Standby-Modus zu versetzen. Die Standby-LED leuchtet rot. Drücken Sie nun STANDBY/ON auf dem
Gerät oder auf der Fernbedienung, um das Gerät einzuschalten. Zum vollständigen Ausschalten
ziehen Sie den Netzstecker.
EIN/STANDBY
1. Drücken Sie STANDBY/ON auf dem Gerät oder auf der Fernbedienung, um das Gerät
einzuschalten.
2. Wählen Sie die Signalquelle (CD, iPod, USB, SPEICHERKARTE) und (DAB, UKW, AUX), indem Sie
(CD, iPod, USB, CARD) und (DAB, FM, AUX) auf dem Gerät oder auf der Fernbedienung drücken.
Das entsprechende Display leuchtet auf.
3. Mit VOLUME (+/-) stellen Sie die Lautstärke auf dem Gerät oder auf der Fernbedienung ein.
4. Drücken Sie erneut STANDBY/ON auf dem Gerät oder auf der Fernbedienung, um das Gerät
auszuschalten.
Hinweise:
1. Liegt im CD/USB/SD/iPod-Modus kein Signal an, schaltet sich das Gerät nach 15 Minuten
automatisch aus.
DE-3
2. Ist im iPod-Modus kein iPod am iPod-Dock angeschlossen, schaltet sich das Gerät nach 15 Minuten
automatisch aus.
3. Im Standby-Modus drücken Sie eine beliebige Taste, um das Display für 10 Sekunden zu
beleuchten.
4. Bei Nichtbenutzung des Geräts schalten Sie es bitte mit dem Hauptschalter aus.
UHRZEIT EINSTELLEN
Die Uhrzeit wird im DAB-Modus automatisch synchronisiert, wenn Sie einen DAB-Sender empfangen.
Empfangen Sie nur UKW, müssen Sie die Uhr manuell im Standby-Modus stellen.
Uhrzeit manuell einstellen
1. Bei Netzanschluss begibt sich das Gerät in den Standby-Modus und im Display blinkt „00:00:00“.
2. Halten Sie ID3/iPod/MEM/C-ADJ. gedrückt, bis „24 Hour“ oder „12 Hour“ im Display blinkt, dann
drücken Sie SKIP/TUNE SEARCH (AUFWÄRTS oder ABWÄRTS), um das 24- oder
12-Stundenformat zu wählen.
3. Drücken Sie erneut ID3/iPod/MEM/C-ADJ., die STUNDEN blinken im Display, dann stellen Sie die
Stunden mit SKIP/TUNE SEARCH (AUFWÄRTS oder ABWÄRTS) ein.
4. Drücken Sie erneut ID3/iPod/MEM/C-ADJ., die MINUTEN blinken im Display, drücken Sie
SKIP/TUNE SEARCH (AUFWÄRTS oder ABWÄRTS) zum Einstellen der Minuten. Drücken Sie
erneut ID3/iPod/MEM/C-ADJ., um die Uhrzeit zu bestätigen.
Hinweise: 1. Nach 10 Sekunden Untätigkeit begibt sich das Gerät in den vorherigen Modus zurück.
2. Schalten Sie das Gerät ein und drücken Sie CLOCK DISP auf der Fernbedienung, um für
ca. 10 Sekunden die Uhrzeit anzuzeigen. Danach begibt sich das Gerät in den vorherigen
Modus zurück.
Uhrzeit mit DAB synchronisieren
1. Drücken Sie STANDBY/ON auf dem Gerät oder auf der Fernbedienung, um das Gerät
einzuschalten.
2. Drücken Sie DAB/FM/AUX auf dem Gerät oder auf der Fernbedienung und wählen Sie DAB.
3. Stellen Sie einen DAB-Sender ein, damit wird die Uhrzeit automatisch synchronisiert.
TIMER EINSTELLEN (Fernbedienung)
Mit dieser Funktion schaltet sich das Gerät automatisch ein und aus:
1. Drücken Sie TIMER auf der Fernbedienung, um zwischen dem Einschalt- und Ausschalttimer
umzuschalten, im Display wird entsprechend „Timer on“ oder „Timer Off“ angezeigt. Die aktivierte
Timerfunktion wird im Display mit
angezeigt.
2. Zum Einstellen des Einschalttimers halten Sie TIMER auf der Fernbedienung gedrückt, bis „On
Timer“ angezeigt wird und die Stunden der Uhrzeit blinken.
3. Drücken Sie SKIP/TUNE SEARCH (AUFWÄRTS oder ABWÄRTS), um die gewünschten Stunden
einzustellen, dann drücken Sie TIMER auf der Fernbedienung zur Bestätigung. Anschließend stellen
Sie die Minuten ein.
4. Das Gerät navigiert nun zur Einstellung des Ausschalttimers, im Display wird „Off Timer“ angezeigt
und die Stunden blinken. Drücken Sie SKIP/TUNE SEARCH (AUFWÄRTS oder ABWÄRTS), um die
gewünschten Stunden einzustellen, dann drücken Sie TIMER auf der Fernbedienung zur
Bestätigung. Anschließend stellen Sie die Minuten ein.
5. Drücken Sie SKIP/TUNE SEARCH (AUFWÄRTS oder ABWÄRTS), um den Einschalttimer-Modus
einzustellen, FM, CD, iPod, USB, CARD oder DAB. Dann drücken Sie TIMER zur Bestätigung. Die
Timereinstellung ist abgeschlossen.
6. Drücken Sie erneut TIMER, „VOL 13“ wird angezeigt und blinkt. Stellen Sie die Timerlautstärke mit
SKIP/TUNE SEARCH (AUFWÄRTS oder ABWÄRTS) ein.
7. Zur Überprüfung der Timereinstellung drücken Sie mehrmals TIMER, bis die Einschalt- und
Ausschalttimereinstellungen angezeigt werden.
SLEEPTIMER EINSTELLEN (Fernbedienung)
Diese Funktion ermöglicht die Ausschaltung des Systems nach einem voreingestellten Zeitraum. Die
Einstellung muss bei eingeschaltetem Gerät erfolgen.
1. Zur Aktivierung der Sleeptimerfunktion halten Sie SLEEP auf der Fernbedienung gedrückt, im
Display blinken „SLEEP“ und 90, 80, 70, 60, 50, 40, 30, 20, 10 oder OFF.
DE-4
2. Wird der gewünschte Zeitraum angezeigt, dann lassen Sie die Taste los, damit ist der Sleeptimer
aktiviert. Das Display zeigt beispielsweise „Sleep 10“, was bedeutet, dass sich das Gerät in 10
Minuten ausschaltet.
3. Zum Aufheben des Sleeptimers drücken Sie erneut SLEEP.
RADIO HÖREN
Tipps für besseren Empfang
Das Gerät ist für besten Empfang mit einer DAB/FM-Antenne ausgestattet. Wickeln Sie die
Wurfantenne vollständig ab.
Für besten DAB-Empfang muss die Antenne senkrecht verlaufen.
DAB/DAB+
Das Gerät befindet sich nach dem Einschalten im Standby-Modus. Drücken Sie STANDBY/ON auf dem
Gerät oder auf der Fernbedienung, um das Radio einzuschalten, im Display wird „Welcome to Digital
Radio“ angezeigt. Anschließend begibt sich das Gerät in den DAB/DAB+ Modus und führt eine
vollständige Sendersuche durch.
Während der Suche wird im Display „Searching …“ sowie ein Fortschrittsbalken angezeigt.
Nach erfolgreicher Sendersuche stellt sich das Radio auf den ersten alphanumerischen Sender ein.
Zum Durchlaufen der Sender drücken Sie SKIP/TUNE SEARCH (AUFWÄRTS oder ABWÄRTS).
DAB/DAB+ automatische Sendersuche
Die vollständige automatische Suche sucht nach allen DAB/DAB+ Band III Kanälen. Nach erfolgreicher
Sendersuche stellt sich das Radio auf den ersten alphanumerischen Sender ein.
1. Zur Aktivierung der automatischen Sendersuche drücken Sie einmal PLAY/PAUSE/SCAN/ENTER
auf dem Gerät oder auf der Fernbedienung, im Display wird „Searching …“ sowie ein
Fortschrittsbalken angezeigt.
2. Alle aufgefundenen Sender werden automatisch gespeichert. Zum Durchlaufen der Sender drücken
Sie SKIP/TUNE SEARCH (AUFWÄRTS oder ABWÄRTS).
DAB/DAB+ manuelle Sendersuche
1. Zur Aktivierung der manuellen Sendersuche drücken Sie SELECT/FM MONO/ST. auf dem Gerät
oder auf der Fernbedienung.
2. Drücken Sie SKIP/TUNE SEARCH (AUFWÄRTS oder ABWÄRTS), um die die DAB/DAB+ Kanäle zu
durchlaufen, im Display wird „5A“ bis „13F“ mit den zugeordneten Frequenzen angezeigt.
3. Wenn die gewünschte Frequenz angezeigt wird, drücken Sie SELECT/FM MONO/ST. zur
Bestätigung. Der Name der Sendergruppe (Multiplex) wird angezeigt.
4. Drücken Sie STOP/MENU/INFO zur Anzeige, welche Sender im Multiplex enthalten sind.
Sekundäre Dienste
Von Zeit zu Zeit sehen Sie das Symbol „>“ hinter einem Sendernamen. Dieser Sender hat einen
sekundären Dienst. Der sekundäre Dienst umfasst Sonderdienste, die sich auf den primären Sender
beziehen, beispielsweise überträgt ein Sportsender zusätzliche Kommentare. Der sekundäre Dienst
wird direkt hinter dem primären Sender eingefügt. Zur Auswahl eines sekundären Senders drücken Sie
SELECT/FM MONO/ST. auf der Fernbedienung, wenn „>“ angezeigt wird.
UKW
1. Zur Auswahl von UKW drücken Sie DAB/FM/AUX auf dem Gerät oder auf der Fernbedienung, im
Display werden FM und die Frequenz angezeigt.
2. Zur Aktivierung der automatischen Sendersuche halten Sie SKIP/TUNE SEARCH (AUFWÄRTS
oder ABWÄRTS) oder PLAY/PAUSE/SCAN/ENTER auf dem Gerät oder auf der Fernbedienung
gedrückt, bis die Sendersuche durch das Frequenzband beginnt. Sobald ein Sender gefunden wird,
wird die Sendersuche automatisch unterbrochen.
3. Alternativ drücken Sie SKIP/TUNE SEARCH (AUFWÄRTS oder ABWÄRTS) auf dem Gerät oder auf
der Fernbedienung zur Auswahl der gewünschten Frequenz.
4. Drücken Sie SELECT/FM MONO/ST. auf dem Gerät oder auf der Fernbedienung, um zwischen
UKW „STEREO“ und „MONO“ umzuschalten.
DE-5
SENDER SPEICHERN UND AUFRUFEN
Im DAB- oder UKW-Modus können Sie jeweils 30 Sender speichern. Hierdurch können Sie Ihre
Lieblingssender direkt aufrufen.
1. Zum Speichern müssen Sie den gewünschten Sender zunächst einstellen, dann halten Sie
iPod/ID3/MEM/C-ADJ. auf der Fernbedienung gedrückt. Im Display blinken die Frequenz und „#“.
2. Drücken Sie SKIP/TUNE SEARCH (AUFWÄRTS oder ABWÄRTS) auf der Fernbedienung, bis im
Display „Preset Empty #“ angezeigt wird und „#“ blinkt. Zur Auswahl des gewünschten
Senderspeichers drücken Sie ID3/iPod/MEM/C-ADJ. auf der Fernbedienung zur Bestätigung. Im
Display wird im DAB/UKW-Modus „Preset # stored“ angezeigt.
3. Zum Aufrufen eines Senderspeichers drücken Sie einmal ID3/iPod/MEM/C-ADJ. und dann
SKIP/TUNE SEARCH (AUFWÄRTS oder ABWÄRTS) zur Auswahl, dann drücken Sie
ID3/iPod/MEM/C-ADJ. auf der the Fernbedienung zur Bestätigung.
Hinweis: 1. Die Sender werden dauerhaft gespeichert und nach dem Ausschalten nicht gelöscht. Das
Speichern eines Senders überschreibt den Sender, der zuvor an dieser Stelle gespeichert
war.
2. Im STANDBY-Modus halten Sie STOP/MENU/INFO zum Löschen aller Senderspeicher
gedrückt.
DISPLAYMODI
Mit mehrfachem Tastendruck auf STOP/MENU/INFO durchläuft das Display die folgenden Modi:
Im UKW-Modus:
Im DAB/DAB+ Modus:
Auto (Mono)
UKW Stereo und UKW Mono.
Signalstärke
Im Display wird die Signalstärke als Balken angezeigt. Je stärker das Signal, desto länger ist der
Balken.
Uhrzeit und Datum
Uhrzeit und Datum werden automatisch vom Sender aktualisiert, die Uhr muss nicht manuell eingestellt
werden. Werden keine Informationen zur Uhrzeit empfangen, erscheint im Display „<Time/Date>“.
Audio-Bitrate
Im Display wird die empfangene digitale Audio-Bitrate angezeigt.
Frequenz
Die Frequenz des eingestellten Senders wird angezeigt.
Ensemble/Multiplex (Gruppenname)
Ensemble/Multiplex ist eine Gruppe von Radiosendern, die gemeinsam auf einer einzelnen Frequenz
gebündelt übertragen. Es gibt nationale und lokale Multiplexe, die bestimmte Sender für den
geografischen Bereich enthalten.
Programmtyp
Hiermit wird die Art des übertragenen Programms beschrieben. Stehen diese Informationen nicht zur
Verfügung, wird „<Programme Type>“ angezeigt.
DLS
DLS steht für Dynamic Label Segment und ist die Laufschrift für den Radiotext, der vom Sender
übertragen wird. Hierbei handelt es sich hauptsächlich um Programmhinweise.
DE-6
CD/MP3/WMA
CD wiedergeben (CD/MP3/WMA)
1. Drücken Sie CD/iPod/USB/CARD auf dem Gerät oder auf der Fernbedienung zur Auswahl des
CD/MP3-Modus. Das Gerät liest die CD/MP3/WMA-Disc automatisch.
2. Drücken Sie OPEN/CLOSE zum Öffnen des CD-Laufwerks (F1).
3. Legen Sie eine CD/MP3-Disc in das CD-Laufwerk ein und drücken Sie OPEN/CLOSE, um das
Laufwerk zu schließen.
Hinweise: 1. Dieses Gerät kann CD, CD-R, CD-RW, MP3 und WMA-Discs abspielen. Es können
ebenfalls 8-cm- und „Multi-Sections“ von MP3-Discs wiedergegeben werden.
2. Die Bitrate für MP3 ist 32 - 320 kbit/s und für WMA 64 - 320 kbit/s.
3. Die Disc kann bis zu 99 Ordner mit bis zu 999 Tracks enthalten. Ist keine Disc eingelegt
oder sie kann vom Gerät nicht gelesen werden, wird „NO DISC“ angezeigt.
Gesamte CD/MP3/WMA-Disc abspielen
- CD
1. Legen Sie die CD in das Laufwerk ein, das Gerät liest die Gesamtzahl der Tracks und beginnt mit der
Wiedergabe des ersten Tracks (F2).
2. Drücken Sie einmal PLAY/PAUSE/SCAN, die Wiedergabe wird unterbrochen und die vergangene
Spielzeit blinkt (F3).
3. Drücken Sie SKIP/TUNE SEARCH (AUFWÄRTS oder ABWÄRTS), um zum nächsten oder
vorherigen Track zu springen. Halten Sie SKIP/TUNE SEARCH (AUFWÄRTS oder ABWÄRTS)
gedrückt, um schnell vorwärts oder rückwärts durch den Track nach einer bestimmten Stelle zu
suchen.
4. Drücken Sie erneut PLAY/PAUSE/SCAN/ENTER, um die Wiedergabe fortzusetzen. Zur Beendigung
der Wiedergabe drücken Sie STOP/MENU/INFO.
- MP3/WMA
1. Legen Sie die MP3/WMA-Disc in das Laufwerk ein, das Gerät liest die Gesamtzahl der Ordner und
Tracks und beginnt mit der Wiedergabe des ersten Tracks.
2. Drücken Sie einmal PLAY/PAUSE/SCAN, die Wiedergabe wird unterbrochen und die vergangene
Spielzeit blinkt.
3. Drücken Sie SKIP/TUNE SEARCH (AUFWÄRTS oder ABWÄRTS), um zum nächsten oder
vorherigen Track zu springen. Halten Sie SKIP/TUNE SEARCH (AUFWÄRTS oder ABWÄRTS)
gedrückt, um schnell vorwärts oder rückwärts durch den Track nach einer bestimmten Stelle zu
suchen.
4. Drücken Sie erneut PLAY/PAUSE/SCAN/ENTER, um die Wiedergabe fortzusetzen. Zur Beendigung
der Wiedergabe drücken Sie STOP/MENU/INFO.
5. Zur Auswahl eines anderen Albums drücken Sie FOLDER (AUFWÄRTS oder ABWÄRTS) auf der
Fernbedienung.
6. Zur Beendigung der Wiedergabe drücken Sie STOP/MENU/INFO auf dem Gerät oder auf der
Fernbedienung.
Hinweis: Bei Fehlfunktionen ziehen Sie bitte vorübergehend den Netzstecker ab.
USB/SD-SPEICHERKARTE
Im STANDBY-Modus:
1. Schließen Sie das USB-Speichermedium oder die SD-Karte an und drücken Sie STANDBY/ON auf
dem Gerät oder auf der Fernbedienung, um das Gerät einzuschalten.
2. Drücken Sie CD/iPod/USB/CARD auf dem Gerät oder auf der Fernbedienung zur Auswahl des USBoder SD-Modus. Das Gerät liest die Gesamtzahl der Ordner und Tracks und beginnt mit der
Wiedergabe des ersten Tracks (F4, F5).
3. Sind auf dem USB-Speichermedium mehrere Ordner vorhanden:
a. Drücken Sie FOLDER (AUFWÄRTS oder ABWÄRTS) auf der Fernbedienung zur Auswahl des
nächsten Ordners.
b. Drücken Sie SKIP/TUNE SEARCH (AUFWÄRTS oder ABWÄRTS) auf dem Gerät oder auf der
Fernbedienung zur Auswahl des Musiktitels in diesem Ordner.
DE-7
Hinweise: 1. Das Gerät kann nur MP3- und WMA-Dateien wiedergeben.
2. Das Gerät unterstützt die meisten USB-Speichermedien und SD/SDHC-Karten (bis zu 32
GB Speicherkapazität für SDHC). Geräte mit größerer Speicherkapazität können nicht
wiedergegeben werden.
3. Das Gerät unterstützt nicht WMA-Dateien, die DRM-geschützt sind. Es werden nur USB
1.1 und 2.0 unterstützt.
Gesamtes Speichermedium abspielen
1. Drücken Sie einmal PLAY/PAUSE/SCAN, die Wiedergabe wird unterbrochen und die vergangene
Spielzeit blinkt.
2. Drücken Sie SKIP/TUNE SEARCH (AUFWÄRTS oder ABWÄRTS), um zum nächsten oder
vorherigen Track zu springen. Halten Sie SKIP/TUNE SEARCH (AUFWÄRTS oder ABWÄRTS)
gedrückt, um schnell vorwärts oder rückwärts durch den Track nach einer bestimmten Stelle zu
suchen.
3. Drücken Sie erneut PLAY/PAUSE/SCAN/ENTER, um die Wiedergabe fortzusetzen.
4. Zur Auswahl eines anderen Albums drücken Sie FOLDER (AUFWÄRTS oder ABWÄRTS) auf der
Fernbedienung.
5. Zur Beendigung der Wiedergabe drücken Sie STOP/MENU/INFO auf dem Gerät oder auf der
Fernbedienung.
Hinweis: Bitte achten Sie darauf, dass das USB-Speichermedium bzw. die SD-Karte im Standby-Modus
korrekt angeschlossen wird, um Schäden am Medium und am Gerät zu vermeiden.
ID3-Informationen
Im MP3/WMA-Modus:
1. Drücken Sie ID3/iPod/MEM/C-ADJ. auf dem Gerät oder auf der Fernbedienung, um die ID3-Funktion
aufzurufen.
2. Stehen für die MP3/WMA-Datei ID3-Informationen zur Verfügung, werden automatisch TITEL,
INTERPRET und ALBUMNAME angezeigt.
3. Drücken Sie erneut ID3/iPod/MEM/C-ADJ. auf dem Gerät oder auf der Fernbedienung. Das Gerät
setzt die Normalwiedergabe fort.
WIEDERHOLUNG
- CD
1. Drücken Sie einmal REPEAT, REP_1 wird angezeigt. Der aktuelle Track wird ständig wiederholt.
2. Drücken Sie zweimal REPEAT, REP_ ALL wird angezeigt. Alle Tracks auf der CD werden ständig
wiederholt.
3. Drücken Sie erneut REPEAT, um die Wiederholungsfunktion zu verlassen.
- MP3/WMA/USB/SD-KARTE
1. Drücken Sie einmal REPEAT, REP_1 wird angezeigt. Der aktuelle Track wird ständig wiederholt.
2. Drücken Sie zweimal REPEAT, REP_ ALL wird angezeigt. Alle Tracks auf dem Medium werden
ständig wiederholt.
3. Drücken Sie dreimal REPEAT, REP_ALBUM wird angezeigt. Alle Tracks im aktuellen Ordner werden
ständig wiederholt.
4. Drücken Sie erneut REPEAT, um die Wiederholungsfunktion zu verlassen.
PROGRAMMWIEDERGABE (Fernbedienung)
Sie können ein Programm selbst zusammenstellen, es kann bis zu 32 Tracks einer CD oder 64 Tracks
im MP3/WMA/USB/SD-Modus in beliebiger Reihenfolge enthalten. Die Programmierung starten Sie im
Stoppmodus.
DE-8
1. Programm zusammenstellen
- CD
1. Drücken Sie ID3/iPod/MEM/C-ADJ. auf der Fernbedienung, um den MEMORY-Modus aufzurufen
(F6).
2. Drücken Sie SKIP/TUNE SEARCH (AUFWÄRTS oder ABWÄRTS) auf dem Gerät oder auf der
Fernbedienung, um den Track zu wählen.
3. Drücken Sie ID3/iPod/MEM/C-ADJ. auf der Fernbedienung zur Bestätigung.
- MP3/WMA
1. Drücken Sie ID3/iPod/MEM/C-ADJ. auf der Fernbedienung, um den MEMORY-Modus aufzurufen.
Die Albumnummer blinkt (F7).
2. Drücken Sie FOLDER (AUFWÄRTS oder ABWÄRTS) auf der Fernbedienung, um ein anderes
Album zu wählen.
3. Drücken Sie ID3/iPod/MEM/C-ADJ. auf der Fernbedienung, um den Track zu wählen (F8).
4. Drücken Sie SKIP/TUNE SEARCH (AUFWÄRTS oder ABWÄRTS) auf dem Gerät oder auf der
Fernbedienung, um einen anderen Track zu wählen.
5. Drücken Sie iPod/ID3/MEM/C-ADJ. auf der Fernbedienung zur Bestätigung.
2. PROGRAMMWIEDERGABE
Drücken Sie PLAY/PAUSE/SCAN/ENTER auf dem Gerät oder auf der Fernbedienung. Das Gerät gibt
den ersten Track Ihres Programms wieder. Nachdem alle Tracks wiedergegeben wurden, werden die
Gesamtzahl der Tracks und die Spielzeit angezeigt.
3. PROGRAMM LÖSCHEN
Drücken Sie zweimal STOP/MENU/INFO auf dem Gerät oder auf der Fernbedienung oder öffnen Sie
das Laufwerk, um den Programmspeicher zu löschen. Mit einem neuen Programm wird das alte
Programm überschrieben
Hinweise: Im Programmmodus:
1. Drücken Sie einmal REPEAT auf der Fernbedienung, REP_1 wird angezeigt. Der aktuelle Track wird
ständig wiederholt.
2. Drücken Sie zweimal REPEAT, REP_ALL wird angezeigt. Alle Tracks des Programms werden
ständig wiederholt.
3. Drücken Sie erneut REPEAT, um in die normale Programmwiedergabe zurückzukehren.
ZUFALLSWIEDERGABE (Fernbedienung)
Mit RANDOM auf der Fernbedienung rufen Sie die Zufallswiedergabe auf:
1. Im Stoppmodus drücken Sie einmal RANDOM, im Display wird „RANDOM“ angezeigt und ein
zufällig gewählter Musiktitel wird abgespielt.
2. Während der Wiedergabe drücken Sie zunächst einmal RANDOM, im Display wird
„RANDOM“ angezeigt. Dann drücken Sie SKIP/TUNE SEARCH (AUFWÄRTS oder ABWÄRTS) auf
dem Gerät oder auf der Fernbedienung und ein zufällig gewählter Musiktitel wird abgespielt.
3. Zur Rückkehr zur Normalwiedergabe drücken Sie erneut RANDOM.
ANSPIELEN (Fernbedienung)
1. Drücken Sie einmal INTRO, um die Anspielfunktion aufzurufen.
Das Gerät spielt die ersten 10 Sekunden aller Tracks an (F9).
2. Drücken Sie erneut INTRO, um zur Normalwiedergabe
zurückzukehren.
DE-9
iPod/iPhone
Im STANDBY-Modus:
1. Drücken Sie STANDBY/ON auf dem Gerät oder auf der Fernbedienung, um das Gerät
einzuschalten.
2. Drücken Sie CD/iPod/USB/CARD auf dem Gerät oder auf der Fernbedienung zur Auswahl des
iPod-Modus.
3. Öffnen Sie die Klappe des iPod-Docks. Schließen Sie Ihren
iPod/iPhone-Player am iPod-Dock an, im Display wird der iPod
angezeigt (F10).
Im iPhone/iPod-Modus:
1. Drücken Sie PLAY/PAUSE/SCAN/ENTER, um die iPhone/iPod-Wiedergabe zu starten. Stellen Sie
die Lautstärke mit VOLUME (+/-) ein. Zur Beendigung der Wiedergabe drücken Sie
STOP/MENU/INFO.
2. Drücken Sie PLAY/PAUSE/SCAN/ENTER, um die Wiedergabe zu unterbrechen.
Zum Fortsetzen der Wiedergabe drücken Sie erneut PLAY/PAUSE/SCAN/ENTER.
3. Drücken Sie SKIP/TUNE SEARCH (AUFWÄRTS oder ABWÄRTS), um vorwärts oder rückwärts zum
gewünschten Track zu springen.
4. Drücken Sie REPEAT oder RANDOM auf der Fernbedienung, um Tracks auf dem
iPhone/iPod-Player zu wiederholen oder in zufälliger Reihenfolge wiederzugeben.
Hinweise: 1. iPod touch Version 1.1.4 oder höher unterstützt REPEAT und RANDOM.
2. Bei ausgeschaltetem Bildschirm von iPod touch und iPhone stehen obige Funktionen
weiterhin zur Verfügung.
Im iPod/iPhone MENÜ-Modus:
Hinweis: iPod touch und iPhone müssen sich zunächst im Menümodus befinden.
1. Im iPod/iPhone-Modus drücken Sie ID3/iPod/MEM/C-ADJ., um den iPod/iPhone MENÜ-Modus
aufzurufen. Das iPod MENÜ wird im Display angezeigt.
2. Drücken Sie STOP/MENU/INFO, um in das iPod/iPhone-Menü zurückzukehren.
a. Wählen Sie das Menü wie folgt:
Musik > Extras > Foto Import (ohne Anzeige auf iPod Mini) > Einstellungen > Songs mischen >
Hintergrundbeleuchtung > Aktuelle Wiedergabe wird im Display des iPod/iPhone angezeigt.
b. Drücken Sie SKIP/TUNE SEARCH (AUFWÄRTS oder ABWÄRTS) auf dem Gerät oder auf der
Fernbedienung, um durch das Menü zu scrollen.
3. Drücken Sie PLAY/PAUSE/SCAN/ENTER zum Aufrufen des gewünschten Menüs.
a. Drücken Sie SKIP/TUNE SEARCH (AUFWÄRTS oder ABWÄRTS) auf dem Gerät oder auf der
Fernbedienung, um durch das jeweilige Menü zu scrollen.
b. Zur Rückkehr in das iPod/iPhone-Menü drücken Sie erneut STOP/MENU/INFO.
4. Um die Wiedergabe fortzusetzen, drücken Sie erneut iPod/ID3/MEM/C-ADJ., das Gerät kehrt in den
iPod-Modus zurück.
Akku des iPod/iPhone laden:
1. Ihr iPod/iPhone hat einen integrierten Akku, der gelegentlich geladen werden muss.
2. Sie können den iPod/iPhone-Player automatisch über dieses Gerät im Standby- oder
eingeschalteten Modus laden.
Hinweise:
1. Der Akku des iPod/iPhone-Players ist nach ca. 1 Stunde zu 80 % geladen, die vollständige Ladung
dauert etwas länger. Laden Sie bei gleichzeitiger Wiedergabe, so dauert das Laden ebenfalls
entsprechend länger.
2. Laden Sie möglichst nicht im TUNER-Modus, das kann den Empfang beeinträchtigen.
3. Der iPod/iPhone-Player kann über die Tasten am Gerät, die Fernbedienung oder iPod/iPhone selbst
im iPod-Modus gesteuert werden.
4. Bitte achten Sie auf einen korrekten Anschluss des iPod/iPhone-Players, um Schäden am Player
und an diesem Gerät zu vermeiden.
5. Haben Sie im iPod-Modus Fehlfunktionen bei der Videowiedergabe, so laden Sie die neueste
Version der Firmware von der Apple-Website herunter.
DE-10
EINSTELLUNGEN VIDEOAUSGANG (nur iPod video, RCA-Videokabel nicht
mitgeliefert)
1. Im STANDBY-Modus: Schließen Sie Ihren Fernseher über Videokabel am VIDEO-Ausgang auf der
Rückseite des Geräts an.
2. Im iPod-Modus: Drücken Sie MENÜ auf dem iPod Click Wheel, um die Videofunktion aufzurufen.
3. iPod zur Anzeige von Videos auf dem Fernseher einstellen:
(a) Wählen Sie Videos > Videoeinstellungen und stellen Sie den TV-Ausgang auf Fragen oder Ein
ein.
(b) Beim Einstellen des TV-Ausgangs auf Fragen gibt Ihnen der iPod die Option, Videos auf dem
Fernseher oder iPod anzuzeigen.
Hinweise:
1. Der Videomodus unterstützt nur iPod-Player mit Videofunktion.
2. iPod classic 80/160 GB, iPod nano 3., 4., 5. und 6. Generation (Video) und iPod touch müssen im
STANDBY-Modus korrekt angeschlossen werden, um die Videofunktion nutzen zu können.
AUX-EINGANG
Der AUX-Eingang befindet sich auf der linken Seite des Geräts. Schließen Sie hier ein externes
Audiogerät über ein 3,5 mm Stereokabel an.
1. Zum Aufrufen der AUX-Funktion drücken Sie mehrmals DAB/FM/AUX auf dem Gerät oder auf der
Fernbedienung, bis AUX im Display angezeigt wird.
2. Stellen Sie die Lautstärke mit VOLUME (+/-) ein.
Hinweis: Stereokabel nicht mitgeliefert.
EQ-STEUERUNG (Fernbedienung)
Drücken Sie mehrfach EQ zum Durchlaufen der EQ-Einstellungen wie folgt:
STUMMSCHALTUNG (Fernbedienung)
Drücken Sie MUTE auf der Fernbedienung, um den Ton stummzuschalten, im Display wird
„MUTE“ angezeigt. Zur Aufhebung der Stummschaltung drücken Sie erneut MUTE oder drücken Sie
VOLUME +/-, „MUTE“ erlischt im Display.
PRIVATER HÖRGENUSS ÜBER KOPFHÖRER
Schließen Sie Ihre Kopfhörer (3,5 mm Mini-Stereo-Klinke) an der Ohrhörerbuchse auf der rechten Seite
des Geräts an. Bei Kopfhöreranschluss werden die Lautsprecher automatisch stummgeschaltet.
SPEZIFIKATIONEN
NETZSPANNUNG:
AUSGANGSLEISTUNG:
ABMESSUNGEN:
ABMESSUNGEN LAUTSPRECHER:
GEWICHT (NETTO):
RADIO
FREQUENZBEREICH:
CD-PLAYER
OPTISCHER TONABNEHMER:
FREQUENZGANG:
AC 230-240 V~ 50 Hz
2 x 20 Watt
152 (B) x 222 (T) x 218 (H) mm
140 (B) x 222 (T) x 218 (H) mm
5,45 kg
UKW 87,5 - 108 MHz
DAB/DAB+ 174 - 240 MHz
3-FACH LASER
100 Hz – 16 kHz
ÄNDERUNG DER SPEZIFIKATIONEN VORBEHALTEN.
Warnung Belüftung: „Behindern Sie nicht die Belüftung des Geräts.“
Sollten Sie irgendwann zu späterer Zeit dieses Produkt entsorgen wollen, beachten Sie
bitte Folgendes: Elektroschrott sollte nicht mit dem Haushaltsmüll entsorgt werden. Bitte
recyceln Sie ihn, sofern Ihnen entsprechende Möglichkeiten zur Verfügung stehen.
Setzen Sie sich mit Ihren kommunalen Behörden oder Ihrem Einzelhändler in
Verbindung und fragen Sie diese um Rat bezüglich der Wiederverwertung. (Elektro- und
Elektronik-Altgeräte-Richtlinie (WEEE))
DE-11
Micro Hi -Fi systeem met dock voor
iPhone & iPod
MCI -220
iPod&iPhone zijn handelsmerken van Apple Inc., geregistreerd in de V.S. en andere landen.
“Made for iPod” en “Made for iPhone” betekent dat een elektrische accessoire speciaal is ontworpen
om verbinding te maken met iPod of iPhone en gecertificeerd is door de ontwikkelaar naar Apple
prestatie-normen te voldoen.
Apple is niet verantwoordelijk voor de werking van het apparaat of de naleving van de veiligheids- en
regelgevende normen.
Houd er rekening mee dat het gebruik van deze accessoire met iPhone of iPad de draadloze prestatie
kan beïnvloeden.
Handleiding
Voor informatie en ondersteuning, www.lenco.eu
VOORZORGSMAATREGELEN
Lees deze handleiding zorgvuldig vóór u het apparaat gebruikt, voor maximaal genot en maximale
prestaties en om bekend te raken met de mogelijkheden van het apparaat, wij garanderen jarenlange
trouwe, probleemvrije prestaties en luisterplezier.
Belangrijke veiligheidsinstructies
Bewaar de alle instructies, veiligheids- en bedieningsinstructies, voor toekomstige referentie.
Installeer het apparaat niet op plaatsen zoals hieronder beschreven:
Plaatsen waar het apparaat wordt blootgesteld aan direct zonlicht of in de buurt van verwarmers, zoals
elektrische kachels. Op andere stereo-apparatuur die teveel warmte afstraalt. Plaatsen met een gebrek
aan ventilatie of stoffige plaatsen.
Plaatsen onderhevig aan constante trillingen. Vochtige plaatsen.
Zorg ervoor dat u de ventilatie-openingen niet blokkeert.
Zorg er voordat u het apparaat voor het eerst inschakelt voor dat het netsnoer naar behoren is
geïnstalleerd.
De stekker van het apparaat wordt gebruikt om het apparaat van het lichtnet te ontkoppelen en moet
altijd bereikbaar blijven.
Het product mag niet worden blootgesteld aan druppend of spattend water en er mogen geen
voorwerpen gevuld met vloeistof, zoals vazen, worden geplaatst op het product.
Alleen schoonmaken met een droge doek.
Om de het apparaat volledig van het lichtnet te ontkoppelen moet de stekker van het apparaat uit het
stopcontact worden gehaald.
Als de standby-LED uit is, is het apparaat compleet van het lichtnet ontkoppeld.
Houd een minimumafstand van 10cm rond het apparaat vrij voor voldoende ventilatie.
Denk aan het milieu bij het weggooien van batterijen.
Gebruik het apparaat in gematigde klimaten.
De stekker moet niet worden geblokkeerd en moet tijdens het bedoelde gebruik eenvoudig bereikbaar
zijn.
De ventilatie moet niet worden belemmerd door de ventilatieopeningen te blokkeren met voorwerpen
zoals kranten, tafelkleden, gordijnen, etc.
Plaats geen voorwerpen met open vlam, zoals kaarsen, op het apparaat.
De batterij mag niet worden blootgesteld aan extreme warmte zoals zonlicht, vuur en dergelijke.
Omzeil de veiligheidsdoeleinden van de gepolariseerde of geaarde stekker niet. Een gepolariseerde
stekker is uitgerust met twee pinnen, een is breder dan de ander. Een geaarde stekker heeft twee
pinnen en een derde aarde pin. De brede pin of de derde pin is voor uw veiligheid. Als de geleverde
stekker niet in uw stopcontact past, moet u een elektricien raadplegen voor vervanging van het
verouderde stopcontact.
Verwijder om veiligheidsredenen niet de behuizing en probeer geen toegang te krijgen tot de
binnenkant van het product. Laat alle onderhoud over aan gekwalificeerd personeel. Probeer geen
schroeven te verwijderen of de behuizing van het apparaat te openen; er zitten geen door de gebruiker
te onderhouden onderdelen in het apparaat, laat alle onderhoud over aan gekwalificeerd
onderhoudspersoneel.
LET OP: VERWIJDER DE BEHUIZING (OF ACHTERKANT) NIET OM HET RISICO VAN
ELEKTRISCHE SCHOK TE VERMINDEREN, ER ZITTEN GEEN DOOR DE GEBRUIKER TE
ONDERHOUDEN PRODUCTEN IN HET APPARAAT, LAAT ONDERHOUD OVER AAN
GEKWALIFICEERD ONDERHOUDSPERSONEEL.
GEVAARLIJKE SPANNING
Gevaarlijke spanning die van voldoende omvang kan zijn om een risico van elektrische
schokken te vormen voor personen in contact komen met de binnenkant van de behuizing.
ATTENTIE
De handleiding bevat belangrijke bedienings- en onderhoudsinstructies voor uw veiligheid,
u moet de handleiding lezen.
WAARSCHUWING: OM BRAND- OF SCHOKGEVAAR TE VOORKOMEN, STEL HET APPARAAT
NIET BLOOT AAN DRUPPEND OF SPATTEND WATER.
Opmerking:
Dit apparaat wordt warm als het voor een lange periode wordt gebruikt. Dit is normaal en geeft niet aan
dat er een probleem met het apparaat is.
NL-1
De CD-speler is uitgerust et microprocessoren die slecht kunnen werken als gevolg van externe
elektrische interferentie of ruis.
Als de CD-speler niet juist werkt, haal de stekker uit het stopcontact en steek de stekker weer terug in
het stopcontact.
Overmatige geluidsdruk van oortelefoons kan leiden tot gehoorverlies.
Als zich ongebruikelijke omstandigheden voordoen op het weergavevenster of de toetsen, schakel het
apparaat uit en vervolgens weer aan.
FUNCTIES EN BEDIENINGSELEMENTEN
1. LUIDSPREKER
2. LINE INGANG
3. REPEAT
4. iPod/ID3/MEM/C-ADJ.
5. USB-POORT
6. SELECT/FM MO./ST.
7. CD/iPod/USB/CARD
8. DAB/FM/AUX
9. LAY/PAUSE/SCAN/ENTER
10.STANDBY-LED
11. STANDBY
12.LCD-DISPLAY
13.STOP/MENU/INFO
14.SKIP/TUNE (OMHOOG of
OMLAAG)
15.OPEN/CLOSE
16.IR-SENSOR
17.VOLUME (+ of -)
18.CD-DEUR
19.SD-KAART-SLEUF
20.FOLDER(OMHOOG of
OMLAAG)
DE UNIVERSELE DOCK INSTALLEREN
AFSTANDSBEDIENING
1. STANDBY
2. MUTE
3. OPEN/CLOSE
4. CLOCK DISP
5. DAB/FM/AUX
6. SKIP/TUNE SEARCH
DOWN
7. TIMER
8. SLEEP
9. ID3/iPod/MEM/C-ADJ.
10. RANDOM
11. REPEAT
12. CD/iPod/USB/CARD
13. VOLUME (+ of -)
14. EQ
15. PLAY/PAUSE/SCAN
16. SELECT/MONO/ST.
17. SKIP/TUNE SEARCH UP
18. STOP/MENU/INFO
19. FOLDER OMHOOG
20. FOLDER OMLAAG
21. NUMBER SEARCH
22. INTRO
NL-2
21.iPod DOCKDEUR
22.HOOFDTELEFOONUITG
ANG
23.NETSNOER
24.STROOMSCHAKELAAR
25.AANSLUITING
LUIDSPREKERS
26.FM-ANTENNE
27.VIDEO UITGANG
DE BATTERIJEN IN DE AFSTANDSBEDIENING PLAATSEN
Druk het batterijdeksel omlaag en schuif het deksel van het
batterijcompartiment. Plaats twee (UM4), (AAA), (R03) batterijen in de
afstandsbediening volgens de polariteitsmarkeringen ("+" en " - ") aan de
binnenkant van het compartiment en op de batterijen. Plaats het deksel op
het compartiment en druk het licht omlaag en druk het naar voren tot het
op zijn plaats klikt.
Opmerking: Verwijder de batterijen uit de afstandsbediening als u de
afstandsbediening niet gebruikt voor een lange tijdsperiode. Meng geen
normale batterijen met oplaadbare batterijen, als batterijen bijna leeg zijn,
zal de afstandsbediening niet werken, vervang de batterijen door nieuwe
batterijen.
DE LUIDSPREKERDRAAD AANSLUITEN OP DE
LUIDSPREKERAANSLUITINGEN
1. Aansluiten luidsprekers
Rol de LUIDSPREKERKABELS uit en sluit ze aan op de
LUIDSPREKERAANSLUITINGEN.
2. Aansluiten netsnoer
Sluit het netsnoer aan vóór gebruik aan op het stopcontact.
Zet vervolgens de hoofdschakelaar van het apparaat aan. De
Standby-LED licht op.
COMPACT DISCS
1. Gebruik altijd cd’s met de markering die
hieronder wordt getoond.
2. Opmerking over omgang met discs
Verwijder de disc uit zijn doosje en plaats
de disc in de speler.
* Raak het reflectieve oppervlak van de disc niet aan.
* Plak geen papier op discs en schrijf niets op het
oppervlak.
* Buig de disc niet.
3. Opbergen
* Berg discs op in hun doosje.
* Stel discs niet bloot aan direct zonlicht of hoge
temperaturen, hoge vochtigheid of stoffige plekken.
4. Een disc reinigen
* Als een disc vuil wordt, veeg het stof en vingerafdrukken van de disc met een zacht doekje.
* De disc moet worden gereinigd vanuit het midden naar de buitenkant.
* Gebruik nooit benzeen, verdunner, platenreiniger of anti-statische spray.
* Zorg ervoor dat u de CD-deur sluit, zodat de lens niet vuil kan worden.
* Raak de lens niet aan.
HET APPARAAT BEDIENEN
Als u het apparaat voor het eerst in het stopcontact steekt, druk dan op de stroomschakelaar op de
achterkant van het apparaat, het apparaat gaat in standby-modus, het lampje wordt rood in
standby-modus. U kunt nu op de knop STANDBY/ON op het apparaat of op de afstandsbediening
drukken om het apparaat AAN te zetten. Haal de stekker uit het stopcontact als het apparaat helemaal
uit wilt zetten.
AAN/STANDBY
1. Druk op de knop STANDBY/ON op het apparaat of op de afstandsbediening om het apparaat aan te
zetten.
2. Selecteer de geluidsbron (CD, iPod, USB, KAART) en (DAB, TUNER, AUX) door op de knop (CD,
iPod, USB, CARD) en (DAB, FM, AUX) op het apparaat (of de afstandsbediening) te drukken. De
corresponderende weergave licht op.
3. Stel het volume in met behulp van de knop VOLUME (+ of -) op het apparaat (of de
afstandsbediening).
NL-3
4. Druk nogmaals op de knop STANDBY/ON op het apparaat (of de afstandsbediening) om het
apparaat uit te schakelen.
Opmerking:
1. Als de radio geen signaal ontvangt in de modus CD/USB DEVICES/ SD CARD/ iPod, dan zal het
apparaat na 15 minuten automatisch uitschakelen.
2. Als er in de iPod-modus geen iPod in de iPod-dock zit, zal het apparaat ook automatisch
uitschakelen na 15 minuten.
3. Druk in de standby-modus op een willekeurige knop/toets om het display voor 10 seconden op te
laten lichten.
4. Zet de stroomschakelaar uit als u het apparaat niet gebruikt om energie te besparen.
DE KLOK INSTELLEN
De klok wordt automatisch gesynchroniseerd met de DAB-klok als u DAB-signalen kan ontvangen op
uw locatie. Als u alleen FM kunt ontvangen, dan moet u handmatig de klok instellen. Het handmatig
instellen van de klok moet worden uitgevoerd in de standby-modus.
De klok handmatig instellen
1. Als het apparaat voor het eerst wordt aangesloten op het lichtnet, zal het in standby-modus gaan, de
nummers “00:00:00” knipperen op het display.
2. Houd de knop ID3/iPod/MEM/C-ADJ. ingedrukt tot “24 Hour of 12 Hour” knippert op het display, druk
vervolgens op de knop SKIP/TUNE SEARCH(OMHOOG of OMLAAG) om te kiezen voor het 12- of
24-uursformaat.
3. Druk nogmaals op de knop ID3/iPod/MEM/C-ADJ, het UUR-cijfer knippert op het display, druk op de
knop SKIP/TUNE SEARCH(OMHOOG of OMLAAG) om het UUR-cijfer aan te passen.
4. Druk nog één keer op de knop ID3/iPod/MEM/C-ADJ., het MINUUT-cijfer knippert op het display,
druk op de knop KIP/TUNE SEARCH (OMHOOG of OMLAAG) om het MINUUT-cijfer aan te passen.
Druk nogmaals op de knop ID3/iPod/MEM/C-ADJ. om de tijd te bevestigen.
Opmerking: 1. Elke hierboven genoemde actie zal worden gewist als er gedurende 10 seconden geen
knoppen worden ingedrukt.
2. Zet het apparaat aan en druk in een willekeurige modus op de knop CLOCK DISP op
de afstandsbediening. Het display zal de tijd tonen. Na ongeveer 10 seconden zal de
tijd weer verdwijnen en het display terugkeren naar de originele staat.
Synchroniseer de klok met de lokale DAB-tijd
1. Druk één keer op de knop STANDBY/ON op het apparaat (of de afstandsbediening) om het
apparaat aan te zetten.
2. Druk op de knop DAB/FM/AUX op het apparaat (of de afstandsbediening) om de DAB-modus te
selecteren.
3. Stem af op een DAB-zender en de klok zal automatisch worden gesynchroniseerd met de lokale
DAB-tijd.
INSTELLEN TIMER (op de afstandsbediening)
Deze functie stelt u in staat om het systeem in en uit te schakelen op een gewenste tijd en in een
gewenste modus:
1. Druk op de knop TIMER op de afstandsbediening om de timerfunctie aan of uit te zetten, het display
zal “Timer on” of “Timer Off” tonen. Het display zal “ ” tonen om aan te geven dat die timerfunctie is
ingeschakeld.
2. Houd de knop TIMER ingedrukt tot het display “On Timer” toont om de tijd van de inschakeltimer in te
stellen. Het uur-cijfer van de timer knippert.
3. Druk op de knop SKIP/TUNE SEARCH (OMHOOG of OMLAAG) om het gewenste uur in te stellen,
druk vervolgens ter bevestiging op de knop TIMER op de afstandsbediening. Stel eerst de uren in en
vervolgens de minuten, de inschakeltimer is nu ingesteld.
4. U zult vervolgens naar het instellen van de uitschakeltimer gaan, het display toont “Off Timer” en het
uur-cijfer zal knipperen. Druk op de knop SKIP/TUNE SEARCH (OMHOOG of OMLAAG) om het
gewenste uur in te stellen en druk vervolgens ter bevestiging op de knop TIMER op de
afstandsbediening. Stel eerst de uren in en vervolgens de minuten, de uitschakeltimer is ingesteld.
5. Druk ten slotte op de knop SKIP/TUNE SEARCH (OMHOOG of OMLAAG) om de inschakelmodus te
selecteren - FM, CD, iPod, USB, CARD of DAB en druk ter bevestiging op de knop TIMER. Het
instellen van de timer is nu voltooid.
6. Druk nogmaals op de knop TIMER, de indicator "VOL 13” verschijnt op het display en knippert. Stel
het timervolume in met behulp van de knop SKIP/TUNE SEARCH (OMHOOG of OMLAAG).
NL-4
7. Druk om de timerinstelling te controleren herhaaldelijk op de knop TIMER tot het display de
instellingen van de inschakeltimer en uitschakeltimer toont.
DE SLAAPFUNCTIE INSTELLEN (op de afstandsbediening)
Deze functie stelt u in staat het systeem zichzelf uit te laten schakelen nadat een vooraf ingestelde tijd
is verstreken. U kunt de slaaptijd instellen als het apparaat is ingeschakeld:
1. Druk om de slaapfunctie te activeren op de knop SLEEP op de afstandsbediening, het display toont
knipperend“SLEEP-90,80,70,60,50, 40,30,20,10,OFF”.
2. Laat de knop los als het display de gewenste slaaptijd toont, de slaaptimer is nu geactiveerd. Het
display zal bijvoorbeeld “Sleep 10” tonen, als de slaaptimer is afgeteld tot nul zal het apparaat
zichzelf uitschakelen.
3. Druk nogmaals op de knop SLEEP om de slaaptimer te annuleren.
NAAR UW RADIO LUISTEREN
Tips voor betere ontvangst
Het apparaat is uitgerust met een enkele draadantenne voor DAB/FM-ontvangst. Voor de beste
prestaties moet u de draadantenne volledig uitstrekken, richt de antenne in de richting die de beste
ontvangst geeft.
Voor ideale DAB-ontvangst wordt aangeraden de antenne altijd in verticale positie te houden (omhoog
of omlaag achter het apparaat).
DAB/DAB+ modus
Als het apparaat voor de eerste keer wordt ingeschakeld, zal het in standby-modus staan. Druk op de
knop STANDBY/ON op het apparaat (of de afstandsbediening) om de radio in te schakelen, het display
toont “Welcome to Digital Radio”. De radio zal vervolgens automatisch in de DAB/DAB+ modus gaan
en een volledige scan uitvoeren.
Tijdens de scan zal het display “Searching …” tonen samen met een schuifbalk die de voortgang van
de scan aangeeft en het aantal zenders dat tot op dat moment is gevonden.
Als de scan is voltooid, zal de radio de eerst gevonden alfanumerieke zender selecteren. Druk om de
gevonden zenders te verkennen op de knop SKIP/TUNE SEARCH (OMHOOG of OMLAAG) tot u de
gewenste zender heeft gevonden.
DAB/DAB+ Autotune Full scan (automatisch afstemmen en volledig scannen)
Een volledige scan zal zoeken op alle DAB/DAB+ Band III kanalen. Als de scan is voltooid, zal de eerst
gevonden alfanumerieke zender automatisch worden geselecteerd.
1. Druk om de autotune full scan te activeren één keer op de knop PLAY/PAUSE/SCAN/ENTER op het
apparaat (of de afstandsbediening) om de modus “Autotune Full scan” te betreden, het display toont
“Searching...” en een schuifbalk die langzaam vooruit beweegt.
2. Alle gevonden zenders zullen automatisch worden opgeslagen. Druk om door de gevonden zenders
te bladeren en zenders te selecteren op de knop SKIP/TUNE SEARCH(OMHOOG of OMLAAG).
DAB/DAB+ handmatig afstemmen
1. Druk om handmatig afstemmen te selecteren op de knop SELECT/FM MONO/ST. op het apparaat
(of de afstandsbediening) om de modus “Handmatig afstemmen” te betreden.
2. Druk op de knop SKIP/TUNE SEARCH (OMHOOG of OMLAAG) om door de DAB/DAB+ kanalen te
scannen, het display toont “5A tot 13F” en de bijbehorende frequenties.
3. Druk als uw gewenste frequentie verschijnt op het display ter bevestiging op de knop SELECT/FM
MONO/ST.. De naam van de zendergroep (ensemble/multiplex) zal worden getoond.
4. Druk op de knop STOP/MENU/INFO om te zien welke zenders aanwezig zijn in het gevonden
ensemble/multiplex.
Secundaire diensten
In sommige gevallen ziet u een “>” symbool verschijnen achter de naam van een zender, dit geeft aan
dat er secundaire diensten beschikbaar zijn voor die zender. Deze secundaire diensten bevatten extra
diensten die betrekking hebben op de primaire zender. Bijv. Een sportzender kan extra commentaar
toevoegen. De secundaire diensten worden direct achter de primaire zender ingevoegd. Druk om de
secundaire zender te selecteren op de knop SELECT/FM MONO/ST. op de afstandsbediening als het
symbool “>” verschijnt op het display.
NL-5
FM-modus
1. Druk om FM te selecteren op de knop DAB/FM/AUX op het apparaat (of de afstandsbediening), het
display zal FM tonen en de frequentie.
2. Houd om automatisch zoeken naar zenders te activeren de knop SKIP/TUNE SEARCH (OMHOOG
of OMLAAG) of PLAY/PAUSE/SCAN /ENTER op het apparaat (of de afstandsbediening) ingedrukt
tot de radio omhoog of omlaag op de frequentieband begint te scannen; de radio stopt automatisch
als er een zender is gevonden.
3. U kunt ook op de knop SKIP/TUNE SEARCH(OMHOOG of OMLAAG) op het apparaat (of de
afstandsbediening) om een gewenste frequentie te selecteren.
4. Druk op de knop SELECT/FM MONO/ST. op het apparaat (of de afstandsbediening) om te
schakelen tussen FM “STEREO” en “MONO” ontvangst.
VOORKEURSZENDERS OPSLAAN EN OPROEPEN
U kunt in de DAB- en FM-modus tot 30 zenders opslaan als voorkeurszenders; hiermee kunt u direct
afstemmen op uw favoriete zenders.
1. Stem om een voorkeurszender op te slaan eerst af op de zender en houd vervolgens de knop
iPod/ID3/MEM/C-ADJ. op de afstandsbediening ingedrukt. Het display zal de frequentie tonen en “#”
knippert.
2. Druk op de knop SKIP/TUNE SEARCH (OMHOOG of OMLAAG) op de afstandsbediening tot het
display “ Preset Empty # ” toont en “#” knippert om het gewenste nummer van de voorkeurszender te
selecteren. Druk vervolgens op de knop ID3/iPod/MEM/C-ADJ. op de afstandsbediening om uw
keuze te bevestigen; Het display zal “Preset # stored” tonen in de DAB/FM-modus.
3. Druk om een zender op te roepen één keer op de knop ID3/iPod/MEM/C-ADJ. en druk vervolgens op
de knop SKIP/TUNE SEARCH (OMHOOG of OMLAAG) om een van de zenders die u heeft
opgeslagen te selecteren. Druk vervolgens op de knop ID3/iPod/MEM/C-ADJ. op de
afstandsbediening om uw keuze te bevestigen.
Opmerking: 1. De opgeslagen zenders worden opgeslagen in het geheugen en zullen bewaard blijven
als u de radio uitzet. U kunt een voorkeurszender overschrijven door een nieuwe
frequentie op het nummer van de desbetreffende voorkeurszender op te slaan.
2. Houd in de STANDBY-modus de knop STOP/MENU/INFO ingedrukt om alle
voorkeurszenders te wissen.
WEERGAVEMODI
Bij elke druk op de knop STOP/MENU/INFO zal het display door de volgende weergavemodi bladeren:
In FM-modus:
In DAB/DAB+ modus:
Auto(Mono)
FM Stereo en FM Mono.
Signaalsterkte
Het display zal een balk tonen om de signaalsterkte aan te geven, hoe sterker het signaal, hoe langer
de balk zal zijn (van links naar rechts).
Tijd en datum
De tijd en datum zullen automatisch worden geüpdatet door de uitzendinformatie, u hoeft de klok niet
handmatig in te stellen. In het onwaarschijnlijke geval dat er geen klokinformatie wordt ontvangen zal
het display “<Time/Date>” tonen.
Audio bitrate
Het display zal de digitale bitrate die wordt ontvangen tonen.
Frequentie
De frequentie van de huidige zender zal worden getoond.
NL-6
Ensemble/Multiplex (groepnaam)
Het Ensemble/Multiplex is een verzameling van radiozenders die zijn gebundeld en samen op een
enkele frequentie uitzenden. Er zijn nationale en lokale multiplexen, lokale multiplexen bevatten
zenders die specifiek voor dat gebied gelden.
Programmatype
Dit beschrijft de stijl van het programma dat wordt uitgezonden. Als de informatie niet beschikbaar is,
zal het display “<Programme Type>” tonen.
DLS
DLS staat voor Dynamic Label Segment, wat een bewegend tekstbericht is dat de uitzender kan
toevoegen aan uitzendingen. Het bericht bevat meestal informatie over programmadetails …etc.
BEDIENING CD/MP3/WMA
Luisteren naar CD’s (CD/MP3/WMA)
1. Druk op de knop CD/iPod/USB/CARD op het apparaat (of de afstandsbediening) om de
CD/MP3-modus te selecteren. Het apparaat zal de CD/MP3/WMA-disc automatisch lezen.
2. Druk op de knop CD DOOR OPEN/CLOSE op het hoofdapparaat, de CD-deur zal automatisch
openen. (F1)
3. Plaats de CD/MP3-disc in het CD-compartiment, druk op de knop CD OPEN/CLOSE om de CD-deur
te sluiten.
Opmerking:
1. Dit apparaat kan CD, CD-R, CD-RW, MP3 en WMA discs afspelen. Het apparaat kan "8 cm" en
"Multi Section" of MP3-discs afspelen.
2. De "Playback Transfer Bit Rate” in MP3 is 32 - 320 kbps en WAM is 64 - 320 kbps.
3. Het apparaat kan maximaal 99 mappen en 999 tracks inlezen. Als er geen disc in het apparaat zit of
als het apparaat de disc niet kan lezen, zal het display "NO DISC" tonen.
AFSPEELBEDIENING CD/MP3/WMA- CD
1. Plaats de CD in het CD-compartiment, het apparaat zal automatisch het totaal aantal mappen en
tracks inlezen. Het apparaat zal de eerste track automatisch afspelen.(F2)
2. Druk één keer op de knop PLAY/PAUSE/SCAN, de verstreken tijd zal knipperen op het display.(F3)
3. Druk één keer op de knop SKIP/TUNE SEARCH(OMHOOG of OMLAAG) om het tracknummer te
veranderen, houd de knop SKIP/TUNE SEARCH (OMHOOG of OMLAAG) ingedrukt om vooruit te
spoelen of terug te spoelen.
4. Druk nog één keer op de knop PLAY/PAUSE/SCAN/ENTER om het afspelen te hervatten. Druk om
het afspelen te stoppen op de knop STOP/MENU/INFO.
- MP3/WMA
1. Plaats de MP3/WMA-disc in het CD-compartiment, het apparaat zal automatisch het aantal mappen
en tracks lezen, het apparaat zal de eerste track automatisch afspelen.
2. Druk één keer op de knop PLAY/PAUSE/SCAN/ENTER, de verstreken tijd zal knipperen op het
display.
3. Druk één keer op de knop SKIP/TUNE SEARCH(OMHOOG of OMLAAG) om het tracknummer te
veranderen, houd de knop SKIP/TUNE SEARCH (OMHOOG of OMLAAG) ingedrukt om vooruit of
terug te spoelen.
4. Druk nog één keer op de knop PLAY/PAUSE/SCAN/ENTER om het afspelen te hervatten.
5. Druk om het albumnummer te veranderen op de knop FOLDER/ARROW (OMHOOG of OMLAAG)
op de afstandsbediening.
6. Druk om het afspelen te stoppen op de knop STOP/MENU/INFO op het apparaat (of de
afstandsbediening).
Opmerking: Als het apparaat niet juist werkt, haal de stekker uit het stopcontact en steek de stekker
weer in het stopcontact.
NL-7
BEDIENING USB/SD CARD
In de STANDBY-modus
1. Plaats het USB-APPARAAT of de SD-KAART en druk vervolgens op de knop STANDBY/ON op het
apparaat (of de afstandsbediening) om het apparaat AAN te zetten.
2. Druk op de knop CD/iPod/USB/CARD op het apparaat (of de afstandsbediening) om de USB- of
KAART-MODUS te selecteren. Het apparaat zal automatisch het totaal aantal mappen en tracks
inlezen. (F4,F5) Het apparaat speelt de eerste track automatisch af.
3. Als het USB-geheugenapparaat meer dan 1 map bevat.
a. Druk op de knop FOLDER(OMHOOG of OMLAAG) op de afstandsbediening om een map te
selecteren.
b. Druk op de knop SKIP/TUNE SEARCH (OMHOOG of OMLAAG) op het apparaat (of de
afstandsbediening) om de huidige track in de gewenste map te selecteren.
Opmerking:
1. Het apparaat kan alleen MP3 en WMA afspelen in deze modus.
2. Het apparaat ondersteunt de meeste USB-apparaten en SD/SDHC-kaarten (tot 32GB
geheugencapaciteit voor SDHC). Het apparaat kan niet (of heeft meer tijd nodig) om grotere
geheugenapparaten in te lezen.
3. Het apparaat biedt geen ondersteuning aan WMA-bestanden die zijn beschermd door
DRM-beveiliging. Het ondersteunt USB versie 1.1 en 2.0.
AFSPEELBEDIENING USB/SD-KAART
1. Druk één keer op de knop PLAY/PAUSE/SCAN/ENTER, de verstreken tijd knippert op het display.
2. Druk één keer op de knop SKIP/TUNE SEARCH(OMHOOG of OMLAAG) om het tracknummer te
veranderen, houd de knop SKIP/TUNE SEARCH(OMHOOG of OMLAAG) op het apparaat (of de
afstandsbediening) ingedrukt om vooruit of achteruit te spoelen.
3. Druk om het afspelen te hervatten nogmaals op de knop PLAY/PAUSE/SCAN/ENTER.
4. Druk om het albumnummer te veranderen op de knop FOLDER(OMHOOG of OMLAAG) op de
afstandsbediening.
5. Druk om het afspelen te stoppen één keer op de knop STOP/MENU/INFO op het apparaat (of de
afstandsbediening).
Opmerking: Zorg ervoor dat het USB-APPARAAT of de SD-KAART altijd goed in het apparaat zijn
geplaatst in de STANDBY-modus om schade aan het apparaat en het USB-APPARAAT of
de SD-kaart te voorkomen.
BEDIENING ID3
In de MP3/WMA-modus
1. Druk één keer op de knop ID3/iPod/MEM/C-ADJ. op het apparaat (of de afstandsbediening) om de
ID3-functie te openen.
2. Als het MP3/WMA-bestand is geschreven met “ID3”, dan zal het apparaat automatisch naar
informatie over de “TITEL”, “ARTIEST” en “ALBUM” worden weergegeven op het display.
3. Druk nogmaals op de knop ID3/iPod/MEM/C-ADJ. op het apparaat (of de afstandsbediening). Het
apparaat zal het normale afspelen hervatten.
DE HERHAALFUNCTIE
- CD
1. Druk één keer op de knop REPEAT, REP_1 wordt getoond, de huidige track zal worden herhaald.
2. Druk twee keer op de knop REPEAT, REP_ ALL wordt getoond, alle tracks op de CD zullen worden
herhaald.
3. Druk nog een keer op de knop REPEAT om de herhaalfunctie uit te schakelen.
- MP3/WMA/USB/SD-KAART
1. Druk één keer op de knop REPEAT REP_1 wordt getoond, de huidige track zal herhaald worden.
2. Druk twee keer op de knop REPEAT, REP_ ALL wordt getoond, alle tracks zullen worden herhaald.
NL-8
3. Druk drie keer op de knop REPEAT, REP_ALBUM wordt getoond. Alle tracks in de huidige map
zullen worden herhaald.
4. Druk nog een keer op de knop REPEAT om de herhaalfunctie uit te schakelen.
DE PROGRAMMAFUNCTIE (op de afstandsbediening)
U kunt tot 32 tracks in de CD-modus of 64 tracks in de MP3/WMA/USB/SD-KAART-modus in elke
volgorde programmeren. De programma-modus kan worden geactiveerd als het apparaat is gestopt
met afspelen.
1. Hoe het programma af te spelen
- CD
1. Druk op de knop ID3/iPod/MEM/C-ADJ. op de afstandsbediening om te schakelen naar de
GEHEUGEN-modus.(F6)
2. Druk op de knop SKIP/TUNE SEARCH(OMHOOG of OMLAAG) op het apparaat (of de
afstandsbediening), het tracknummer zal worden veranderd.
3. Druk op de knop ID3/iPod/MEM/C-ADJ. op de afstandsbediening om het tracknummer te
bevestigen.
- MP3/WMA
1. Druk op de knop ID3/iPod/MEM/C-ADJ. op de afstandsbediening om te schakelen naar de
GEHEUGEN-modus. Het albumnummer knippert. (F7)
2. Druk op de knop FOLDER(OMHOOG of OMLAAG) op de afstandsbediening, het albumnummer zal
worden veranderd.
3. Druk op de knop ID3/iPod/MEM/C-ADJ. op de afstandsbediening, het eerste tracknummer zal
worden getoond.(F8)
4. Druk op de knop SKIP/TUNE SEARCH(OMHOOG of OMLAAG) op het apparaat (of de
afstandsbediening), het tracknummer zal veranderen.
5. Druk op de knop iPod/ID3/MEM/C-ADJ. op de afstandsbediening om het favoriete tracknummer te
bevestigen.
2. PROGRAMMA AFSPELEN
Druk op de knop PLAY/PAUSE/SCAN/ENTER op het apparaat (of de afstandsbediening). Het apparaat
begint met het afspelen van de eerste track van het programma. Als alle tracks zijn afgespeeld zal het
display het aantal tracks en de speeltijd van de CD/MP3/WMA-liedjes tonen.
3. PROGRAMMA ANNULEREN
Druk twee keer op de knop STOP/MENU/ INFO op het apparaat (of de afstandsbediening) of open en
sluit de CD-deur, zodat het geheugen wordt gewist. Stel een nieuw programma in en het huidige
programma zal worden gewist.
Opmerking: In de programma-modus.
1. Druk één keer op de knop REPEAT REP_1 wordt getoond, de huidige track zal herhaald worden.
2. Druk twee keer op de knop REPEAT, REP_ ALL wordt getoond, alle tracks zullen worden herhaald.
3. Druk nog een keer op de knop REPEAT om de herhaalfunctie uit te schakelen. Het apparaat zal het
programma normaal afspelen.
IN WILLEKEURIGE VOLGORDE AFSPELEN (op afstandsbediening)
U kunt met behulp van de knop RANDOM op de afstandsbediening nummers in willekeurige volgorde
afspelen:
1. Druk als de CD is gestopt één keer op de knop RANDOM om nummers in willekeurige volgorde af te
spelen. Het display toont “RANDOM”, de tracks worden één voor één in willekeurige volgorde
afgespeeld.
2. Druk tijdens het afspelen één keer op RANDOM, het display toont “RANDOM”. Druk vervolgens op
de knop SKIP/TUNE SEARCH(OMHOOG of OMLAAG) op het apparaat (of de afstandsbediening),
er wordt willekeurig een track geselecteerd en afgespeeld.
NL-9
3. Druk om het normale afspelen te hervatten nogmaals op de knop RANDOM.
INTRO AFSPELEN (op de afstandsbediening)
1. Druk één keer op de knop INTRO, INTRO wordt getoond. Het
apparaat zal de eerste 10 seconden van elke track afspelen.(F9)
2. Druk twee keer op de knop INTRO om het normale afspelen te
hervatten.
BEDIENING iPod/iPhone
Als het apparaat in STANDBY-modus is:
1. Druk op de knop STANDBY/ON op het apparaat of de afstandsbediening om het apparaat in te
schakelen.
2. Druk op de knop CD/iPod/USB/CARD op het apparaat (of de afstandsbediening) om de iPod-modus
te selecteren.
3. Druk op de iPod-deur om de deur te openen. Plaats de
iPod/iPhone stevig in de iPod-dockbeugel, de iPod-indicator zal
op het display van het apparaat verschijnen. (F10)
In de iPhone/iPod-modus:
1. Druk één keer op de knop PLAY/PAUSE/SCAN/ENTER om het afspelen vanaf iPhone/iPod te
starten. Stel het volume in met behulp van de knop VOLUME (+ of -). Druk één keer op de knop
STOP/MENU/INFO om het afspelen te stoppen.
2. Druk één keer op de knop PLAY/PAUSE/SCAN/ENTER om het afspelen van de huidige track te
pauzeren. Druk om het afspelen te hervatten nogmaals op de knop PLAY/PAUSE/SCAN/ENTER.
3. Druk op de knop SKIP/TUNE SEARCH (OMHOOG of OMLAAG) om naar de volgende of vorige
track te gaan en de gewenste track te selecteren.
4. Druk op de knoppen REPEAT of RANDOM op de afstandsbediening om gebruik te maken van de
herhaal- en randomfunctie.
Opmerking:
1. iPod touch versie 1.1.4 of hoger bieden ondersteuning aan de herhaal- en randomfunctie.
2. Als het scherm van de iPod touch & iPhone is vergrendeld zijn de bovenstaande operaties nog
steeds beschikbaar.
In de iPod/iPhone menumodus:
Opmerking: De iPod touch & iPhone moeten eerst handmatig in het muziekmenu worden gezet om de
volgende operaties uit te voeren.
1. Druk, als het apparaat in iPod/iPhone-modus is, één keer op de knop ID3/iPod/MEM/C-ADJ. , het
apparaat gaat in de iPod/iPhone menumodus. De iPod MENU-indicator zal op het display
verschijnen.
2. Druk op de knop STOP/MENU/INFO om terug te keren naar het iPod/iPhone-menu.
a. U kunt de menu’s als volgt selecteren:
Muziek > Extra’s > Foto Import (deze functie wordt niet getoond bij de iPod Mini) > Instellingen
>Shuffle > Achtergrondverlichting > Now playing zal getoond worden op het display van de
iPod/iPhone.
b. Druk op de knop SKIP/TUNE SEARCH (OMHOOG of OMLAAG) op het apparaat (of de
afstandsbediening) om te zoeken in het huidige menu.
3. Druk op de knop PLAY/PAUSE/SCAN/ENTER om het gewenste menu te openen.
a. Druk op de knop SKIP/TUNE SEARCH (OMHOOG of OMLAAG) op het apparaat (of de
afstandsbediening) om de huidige content te zoeken in elke gewenste menumap.
b. Als u wilt terugkeren naar het iPod/iPhone-menu, druk nogmaals op de knop STOP/MENU/INFO.
4. Druk om het afspelen te hervatten nogmaals op de knop iPod/ID3/MEM/C-ADJ. , het apparaat keert
terug naar de iPod-modus.
De batterij van de iPod/iPhone opladen met behulp van de radio:
1. De iPod/iPhone heeft een interne niet-verwijderbare batterij, deze batterij moet soms worden
opgeladen als de speler een tijdje wordt gebruikt.
2. De batterij van de iPod/iPhone zal automatisch worden opgeladen als het apparaat is ingeschakeld
of in de STANDBY-modus staat.
NL-10
Opmerkingen :
1. De batterij van de iPod/iPhone kan in één uur voor ongeveer 80 procent worden opgeladen en kan
volledig worden opgeladen in een paar uur. Als u de batterij oplaadt tijdens het afspelen van muziek,
dan kan het opladen wat langer duren.
2. Er wordt aangeraden om niet op te laden in de TUNER-modus. Dit storen met de ontvangst.
3. U kunt de iPod/iPhone op elk moment bedienen op het apparaat, de afstandsbediening of de
iPod/iPhone zelf als het apparaat in de "iPod-modus" is.
4. Zorg ervoor dat u de iPod/iPhone altijd goed bevestigt in de STANDBY-modus om schade aan het
apparaat en de iPod/iPhone te voorkomen.
5. Als het apparaat in de iPod-modus is, is het mogelijk dat de videofunctie van de iPod niet normaal
werkt. Update naar de laatste versie van de iPod videofunctie op de Apple website.
INSTELLING VIDEO UITGANG (alleen voor iPod-video, RCA-kabel niet meegeleverd)
1. Sluit het apparaat als het in de STANDBY-modus staat aan op een TV met een videokabel
(RCA-kabel). Gebruik de kabel om de VIDEO uitgang op de achterkant van het apparaat te
verbinden met een geschikte video ingang op de TV.
2. Zet het apparaat in de iPod-modus en druk op de knop "MENU" op het iPod klikwiel om de
videofunctie te selecteren.
3. De iPod instellen om video’s op een TV te tonen:
(a) Selecteer “Videos > Video Settings”, en stel vervolgens “TV Out” in op “Ask” of “On”.
(b) Als u “TV Out” instelt op “Ask”, zal de iPod u de keuze geven om video’s op de iPod of de TV te
tonen, elke keer als u een video afspeelt.
Opmerking:
1. De video-modus ondersteunt alleen iPods die beschikken over een videofunctie.
2. De iPod classic 80/160GB, iPod nano 3e & 4e & 5e & 6e generatie(Video)scherm en iPod touch
moeten goed worden vastgezet in de STANDBY-modus voordat u gebruik maakt van de
videofunctie.
AFSPELEN MET BEHULP VAN DE AUX INGANG
De AUX ingang zit op de linkerkant van het apparaat. Gebruik een stereokabel met 3.5mm stekker om
de audio-apparatuur aan te sluiten op de LINE INGANG.
1. Druk om de AUX-modus te selecteren herhaaldelijk op de knop DAB/FM/AUX op het apparaat (of de
afstandsbediening) tot AUX wordt getoond op het display.
2. Stel het volume in met behulp van de knop VOLUME (+ of -).
Opmerking: LINE IN-kabel niet meegeleverd.
DE EQUALIZER BEDIENEN (op de afstandsbediening)
Als u op de knop EQ drukt, zullen de tonen van het geluid veranderen zoals hieronder:
MUTE INSTELLEN (op de afstandsbediening)
Druk op de knop MUTE op de afstandsbediening om de geluidsuitvoer van de luidsprekers tijdelijk te
dempen, het geluid stopt en het display zal “MUTE” tonen. Druk om mute te annuleren op nogmaals op
de knop MUTE of druk op de knop VOLUME +/-. De “MUTE” indicator zal verdwijnen van het display en
de geluidsweergave zal worden hervat.
NAAR MUZIEK LUISTEREN MET BEHULP VAN EEN HOOFDTELEFOON
Steek uw hoofdtelefoon (3.5mm mini-stereostekker) in de hoofdtelefoonuitgang op het apparaat. U kunt
nu luisteren door de hoofdtelefoon en de luidsprekers zullen worden uitgeschakeld.
NL-11
SPECIFICATIES
VOEDING :
VERMOGEN :
AFMETINGEN APPARAAT :
AFMETINGEN LUIDSPREKERS :
N. G. :
RADIO
FREQUENTIEBEREIK:
COMPACT DISC
OPTISCHE PICKUP :
FREQUENTIERESPONS :
AC 230-240V~50Hz
20 Watt x 2
152 (B) x 222 (D) x 218 (H) mm
140 (B) x 222 (D) x 218 (H) mm
5.45kg
FM 87.5 - 108 MHz
DAB/DAB+ 174 - 240 MHz
3 - laserstralen
100Hz - 16kHz
SPECIFICATIE ONDERHEVIG AAN VERANDERING ZONDER VOORAFGAANDE
BERICHTGEVING.
Ventilatiewaarschuwing: " De normale ventilatie van het product mag niet worden belemmerd voor het
beoogde gebruik."
Indien u zich in de toekomst van dit toestel wenst te ontdoen, let er dan op dat elektrisch
afvalmateriaal niet met het huishoudelijk afval mag worden verwijderd. Breng het toestel
naar een kringloopwinkel of anderevoorziening voor recycling. Neem contact op met uw
plaatselijke autoriteit of winkelier indien u meer informatie wenst over recycling. (Richtlijn
voor Afval van Elektrische en Elektronische Apparaten, AEEA).
NL-12
Système Micro Hi-fi avec station d’accueil
pour iPhone et iPod
MCI -220
iPhone et iPod sont des marques déposées de Apple Inc., enregistrées aux États-Unis et dans d’autres
pays.
“Conçu pour l’iPod” et “conçu pour l’iPhone” signifie qu'un accessoire électronique a été conçu pour
connecter spécifiquement des iPod et des iPhone respectivement, et qu’il a été certifié par les
standards de performance d’Apple.
Apple n’est pas responsable pour l’utilisation de cet appareil ou sa conformité avec les standards de
sécurité ou les standards légaux.
Veuillez noter que l’utilisation de cet accessoire avec un iPod ou un iPhone peut affecter la
performance sans-fil.
Manuel d'instruction
Pour information & support technique, www.lenco.eu
PRÉCAUTIONS DE SÉCURITÉ
Pour obtenir le maximum de confort et de performance, veuillez lire ce manuel soigneusement avant
d’utiliser l’unité afin de vous familiariser avec ses caractéristiques et de vous assurer des années de
performances fidèles et sans problème et de plaisir d’écoute.
Instructions importantes sur la sécurité
Gardez ces instructions de sécurité et d’utilisation et mémorisez-les pour références ultérieure.
Evitez d’installer l’unité dans les endroits décrits ci-dessous :
Endroits exposés à la lumière directe du soleil ou proche d’appareils de chauffage, comme des
chauffages électriques. Sur d’autres équipements stéréo qui produisent trop de chaleur. Endroits qui
manquent de ventilation ou trop poussiéreux.
Endroit sujets à des vibrations permanentes. Endroits humide ou renfermés.
Assurez-vous de ne pas obstruer les ouvertures de ventilation.
Avant d’allumer pour la première fois, assurez-vous que la cordon d’alimentation est correctement
installé.
La prise principale est utilisée comme le dispositif de débranchement et doit rester facilement
accessible.
L’appareil ne doit pas être exposé aux gouttes ou aux éclaboussements et les objets remplis de
liquides, tels que des vases, ne doivent pas être placés près de l'appareil.
Ne nettoyez qu’à l’aide d’un linge sec.
Pour déconnecter complètement l’alimentation, la prise principale de l’appareil doit être déconnectée
du secteur.
Lorsque la LED de veille n’est pas allumée, l’appareil est complètement déconnecté du secteur.
Une distance minimum de 10cm autour de l’appareil doit être préservée pour une ventilation suffisante.
Votre attention devrait se porter sur l’aspect écologique de l’élimination des piles.
Utilisez l’appareil dans une atmosphère modérée.
La prise principale ne doit pas être obstruée ou doit être facilement accessible durant l'utilisation.
La ventilation ne doit pas être empêchée du fait que les ouvertures de ventilation soient couvertes avec
des accessoires tels que journaux, serviettes de table, rideaux, etc.
Aucune source de flamme telle que des bougies allumées ne devraient être placée près de l'appareil.
Les batteries ne doivent pas être exposées à des chaleurs excessives telles que la lumière du soleil, le
feu ou autres.
Ne sous-estimez pas la visée de sécurité des prise polarisées ou de type terre. Une prise polarisée a
deux fiches dont l’une est plus large que l’autre.
Une prise de type terre a deux fiches plus une fiche supplémentaire de raccord à la terre. La fiche large
ou le raccord à la terre sont conçues pour votre sécurité. Si la prise fournie ne convient pas à votre
équipement, consultez un électricien pour remplacer votre ancien équipement.
Pour des raisons de sécurité, n’enlevez pas les protections ou n’essayez pas d’accéder à l’intérieur du
produit. Consultez du personnel de maintenance qualifié. N’essayez pas d’enlever des vis, ou d’ouvrir
le boitier de l’unité; il n’y a aucun élément utilisable pour l’utilisateur a l’intérieur, confiez tout entretien a
du personnel qualifié.
PRÉCAUTION : POUR RÉDUIRE LE RISQUE DE CHOC ÉLÉCTRIQUE, N’ENLEVEZ PAS LE
COUVERCLE (OU LA PLAQUE ARRIÈRE), L’UTILISATEUR NE DOIT PAS TOUCHER LES PARTIES
INTERNES, CONFIEZ CE SOIN À DU PERSONNEL QUALIFIÉ.
TENSION DANGEREUSE
Une tension dangereuse des conducteurs, d’ampleur suffisante pour constituer un risque de
choc électrique aux personnes, est présente dans ce produit.
ATTENTION
Le manuel de l’utilisateur contient des instructions importantes d’utilisation et d'entretien,
pour votre sécurité il est nécessaire de vous référer à ce manuel.
AVERTISSEMENT: POUR ÉVITER LES RISQUES D’INCENDIE OU DE CHOC ÉLÉCTRIQUE,
N’EXPOSEZ PAS CET APPAREIL AUX GOUTTEMENTS OU AUX ÉCLABOUSSURES.
FR-1
Note:
Cette unité deviendra chaude lorsqu’utilisée pendant une longue période. Cela est normal et ne signifie
pas un problème concernant l’unité.
Le lecteur Cd comporte des microprocesseurs qui peuvent mal fonctionner du fait d’interférences ou de
bruits extérieurs.
Si le lecteur CD ne fonctionne pas correctement, déconnectez l’alimentation puis reconnectez-la.
Une pression sonore excessive des casques ou des écouteurs peut entrainer une perte d’audition.
Si un phénomène inhabituel survient dans la fenêtre d’affichage ou sur les touches de commande,
éteignez l’unité, puis rallumez-la.
CARACTÉRISTIQUES ET COMMANDES
1. HAUT-PARLEUR
2. PRISE D’ENTRÉE
3. BOUTON RÉPÉTER
4. iPod/ID3/MEM/C-ADJ.
BOUTON
5. PORT ENTRÉE USB
6. BOUTON SELECT/FM
MO/ST
7. BOUTON
CD/iPod/USB/CARTE
8. BOUTON DAB/FM/AUX
9. BOUTON LECTURE/
PAUSE/SCAN/ENTRÉE
10. INDICATEUR LED DE VEILLE
11. BOUTON MISE EN VEILLE
FENÊTRE D’AFFICHAGE LCD
13. BOUTON STOP/MENU/INFO
14. BOUTON SAUT/TUNE (HAUT
ou BAS)
15. BOUTON OUVRIR/FERMER
16. CAPTEUR IR
17. MOLETTE DE VOLUME
(+ ou -)
18. TIROIR CD
19. FENTE ENTRÉE CARTE SD
20. BOUTON DOSSIER (HAUT ou
BAS)
INSTALLER LE VERROU UNIVERSEL
FR-2
21. TIROIR STATION iPod
22. PRISE ÉCOUTEURS
23. CORDON
D’ALIMENTATION AC
24. INTERRUPTEUR M/A
AC
25. TERMINAUX
HAUT-PARLEURS
26. ANTENNE FM
27. PRISE SORTIE VIDÉO
TÉLÉCOMMANDE
1. BOUTON MISE EN VEILLE
2. BOUTON MUET
3. BOUTON OUVRIR/FERMER
4. BOUTON AFFICHAGE HORLOGE
5. BOUTON DAB/FM/AUX
6. BOUTON SAUT/TUNE
RECHERCHE DESCENDANTE
7. BOUTON MINUTEUR
8. BOUTON SOMMEIL
9. BOUTON iPod/ID3/MEM/C-ADJ.
10. BOUTON ALÉATOIRE
11. BOUTON RÉPÉTER
12. BOUTON CD/iPod/USB/CARTE
13. BOUTON VOLUME (+ ou -)
14. BOUTON EQ
15. BOUTON LECTURE/
PAUSE/SCAN
16. BOUTON SELECT/FM
MONO/ST.
17. BOUTON SAUT/TUNE
RECHERCHE ASCENDANTE
18. BOUTON STOP/MENU/INFO
19. BOUTON FICHIER SUIVANT
20. BOUTON FICHIER
PRÉCÉDENT
21. BOUTON RECHERCHE DE
NUMÉRO
22. BOUTON INTRO
INSTALLER LES PILES DANS LA TÉLÉCOMMANDE
Appuyez sur le couvercle du compartiment, et faites glisser le
couvercle pour ouvrir le compartiment. Placez les des piles (UM4,
(AAA), R03 dans la télécommande en fonction des marques de
polarité (+ et -) dans le compartiment et sur les piles. Placez le
couvercle sur le compartiment, appuyez doucement vers le bas, et
poussez-le vers le haut jusqu'à ce qu’il s’emboite.
Note: Enlevez les piles de la télécommande si vous ne l’utilisez pas
pendant une longue période. Ne mélangez pas des piles normales
avec des piles rechargeable, lorsque les piles se videront, la
télécommande ne fonctionnera plus, remplacez-les par des piles
neuves.
INSTALLER LES FILS DES HAUT-PARLEURS AUX
TERMINAUX DES HAUT-PARLEURS
1. Connexion des haut-parleurs
Etendez les FILS DE HAUT-PARLEURS et connectez-les
aux TERMINAUX DES HAUT-PARLEURS.
2. Connexion du cordon d’alimentation
Avant d’utiliser, connectez le cordon d’alimentation AC au
secteur. Puis allumez l’interrupteur principal de l’unité.
L’indicateur de veille s’allumera.
DISQUE COMPACT
1. Utilisez toujours des disques compacts portant
la marque ci-dessous.
2. Notes sur la manipulation des disques
Enlever les disques de leurs boitiers de
rangement et les charger.
* Ne touchez pas la surface réfléchissante enregistrée.
* Ne collez pas de papier ou n’écrivez rien sur la surface.
* Ne pliez pas le disque.
3. Rangement
* Rangez le disque dans son boitier.
* N’exposez pas les disques à la lumière directe du soleil
ou à de hautes température, forte humidité ou endroits poussiéreux.
4. Nettoyer un disque
* Si le disque est taché, enlevez la poussière, les saletés et les traces de doigts avec un linge doux.
* Le disque doit être nettoyé depuis le centre vers les bords.
* N’utilisez jamais de benzène, diluant, liquide de nettoyant pour disque ou spray antistatique.
* Assurez-vous que le tiroir CD soit bien fermé afin que la lentille ne s’abime pas avec la poussière.
* Ne touchez pas la lentille.
FR-3
UTILISER L’UNITÉ
D’abord, branchez l'unité à la prise secteur, puis appuyez sur le bouton d’alimentation à l’arrière de
l’unité, l’unité sera en mode veille, la diode de veille est de couleur rouge. Vous pouvez alors appuyer
sur le bouton VEILLE/ALLUMÉ sur l’unité ou sur la télécommande pour allumer l’unité. Débranchez la
prise du secteur pour éteindre complètement.
MARCHE/VEILLE
1. Appuyez sur le bouton VEILLE/ALLUMÉ sur l’unité ou sur la télécommande pour allumer l’unité.
2. Sélectionnez la source sonore (CD, iPod, USB, CARTE) et (DAB, TUNER, AUX) en appuyant sur les
boutons respectifs (CD, iPod, USB, CARTE) et (DAB, TUNER, AUX) sur l’unité ou sur la
télécommande. L’affichage correspondent s’illuminera.
3. Réglez le volume avec la molette de contrôle de VOLUME (+ou-) sur l’unité (ou sur la
télécommande).
4. Appuyez sur le bouton VEILLE/ALLUMÉ sur l’unité (ou sur la télécommande) à nouveau pour
éteindre l’unité.
Note:
1. S’il n’y a pas de signal en mode CD/APPAREILS USB/ CARTE SD/iPod, l’unité principale s’éteindra
automatiquement au bout de 15 minutes.
2. En mode iPod, s’il n’y a pas d’iPod sur la station d’accueil, l’unité s’éteindra également
automatiquement au bout de 15 minutes.
3. En mode veille, appuyez sur n’importe quel bouton pour allumer l’écran pendant 10 secondes.
4. Veuillez éteindre l’alimentation principale pour économiser de l’énergie lorsque vous n’utilisez pas
l’unité.
RÉGLAGE DE L'HORLOGE
L’horloge se synchronisera automatiquement à l’horloge DAB si vous pouvez recevoir des signaux
DAB la ou vous êtes. Si vous ne pouvez recevoir que des signaux FM, alors vous devrez régler
l’horloge manuellement. Le réglage manuel de l’horloge doit être fait en mode veille.
Réglage manuel de l’horloge
1. Lorsque l’unité est connectée au secteur pour la première fois, elle sera en mode veille, et l’écran
affichera “00:00:00” en clignotant.
2. Maintenez le bouton ID3/iPod/MEM/C-ADJ appuyé jusqu'à ce que « 24 heures ou 12 heures »
apparaisse sur l’écran en clignotant, puis appuyez sur le bouton SAUT/TUNE/RECHERCHE
(Ascendante ou Descendante) pour régler l’horloge en mode 12 heures ou 24 heures.
3. Appuyez sur le bouton ID3/iPod/MEM/C-ADJ à nouveau, le chiffre de l’Heure clignotera sur l’écran,
appuyez sur le bouton SAUT/TUNE/RECHERCHE (Ascendante ou Descendante) pour régler les
heures.
4. Appuyez sur le bouton ID3/iPod/MEM/C-ADJ à nouveau, le chiffre des Minutes clignotera sur l’écran,
appuyez sur le bouton SAUT/TUNE/RECHERCHE (Ascendante ou Descendante) pour régler les
minutes. Appuyez sur le bouton ID3/iPod/MEM/C-ADJ à nouveau pour confirmer le réglage de
l’heure.
Note: 1. Chacune des étapes détaillées ci-dessus s’effaceront si aucun bouton n’est activé pendant 10
secondes.
2. Allumez l’unité et appuyez sur le bouton AFFICHAGE HORLOGE sur la télécommande dans
n’importe quel mode, l’écran affichera l’heure pendant 10 secondes avant de revenir à
l'affichage antérieur.
Synchroniser l’horloge à l’heure locale DAB
1. Appuyez sur le bouton VEILLE/ALLUMÉ sur l’unité (ou sur la télécommande) une fois pour allumer
l’unité.
2. Appuyez sur le bouton DAB/FM/AUX sur l’unité (ou sur la télécommande) pour sélectionner le mode
DAB.
3. Réglez sur une station DAB et l’horloge se synchronisera automatiquement à l’heure locale DAB.
RÉGLAGE DU MINUTEUR (sur la télécommande)
Cette fonction vous permet d’allumer ou d’éteindre le système à l'heure et dans le mode ou vous le
désirez.
FR-4
1. Appuyez sur le bouton MINUTEUR sur la télécommande pour positionner la fonction minuteur sur
allumée ou éteinte, l’écran affichera « minuteur de mise en marche » ou « minuteur de mise en
veille ». L’écran affichera “ ” pour indiquer que la fonction minuteur est allumé.
2. Pour régler le minuteur allumé, maintenez le bouton MINUTEUR appuyé sur la télécommande
jusqu'à ce que l’écran affiche « Minuteur de mise en marche » (On timer) et le chiffre de l’heure du
minuteur clignote.
3. Appuyez sur le bouton SAUT/TUNE/RECHERCHE (Ascendante ou Descendante) pour régler
l’heure désirée, puis appuyez sur le bouton MINUTEUR sur la télécommande pour confirmer, réglez
d’abord les heures puis les minutes, le minuteur de mise en marche est réglé.
4. Ensuite, vous pourrez entrer les paramètres de minuteur de mise en veille, l'écran affichera
"minuteur de mise en veille" (Off timer) et le chiffre des heures clignotera. Appuyez sur le bouton
SAUT/TUNE/RECHERCHE (Ascendante ou Descendante) pour régler l’heure désirée, puis appuyez
sur le bouton MINUTEUR sur la télécommande pour confirmer, réglez d’abord les heures puis les
minutes, le minuteur de mise en veille est réglé.
5. Enfin, appuyez sur le bouton SAUT/TUNE/RECHERCHE (Ascendante ou Descendante) pour
sélectionner le mode de minuteur de mise en marche - FM, CD, iPod, USB, CARTE ou DAB, puis
appuyez sur le bouton MINUTEUR pour confirmer. Le réglage du minuteur est à présent terminé.
6. Appuyez à nouveau sur le bouton MINUTEUR, l’indicateur « VOL13 » du minuteur apparait sur
l’écran, réglez le volume du minuteur en appuyant sur le bouton SAUT/TUNE/RECHERCHE
(Ascendante ou Descendante).
7. Pour vérifier les réglages du minuteur, appuyez de manière répétée sur le bouton MINUTEUR,
jusqu’à ce que l’écran affiche les réglages des minuteurs de mise en marche et de mise en veille.
RÉGLAGE DE LA FONCTION SOMMEIL (sur la télécommande)
Cette fonction vous permet de programmer le système à s’éteindre automatiquement après un certain
temps. Vous pouvez régler le délai de sommeil en mode allumé :
1. Pour activer la fonction sommeil, appuyez sur le bouton SOMMEIL sur la télécommande, l’écran
affichera “SOMMEIL-90,80,70,60,50, 40,30,20,10,ÉTEINT” en clignotant.
2. Lorsque l’écran affiche le délai de sommeil que vous désirez, relâchez le bouton, le minuteur de
sommeil est à présent activé. L’écran affichera par exemple “Sommeil 10", une fois que le délai sera
écoulé, l’unité s’éteindra.
3.Pour annuler le réglage, appuyez sur le bouton SOMMEIL à nouveau, la fonction sommeil s'annulera.
ÉCOUTER VOTRE RADIO
Conseils pour une meilleure réception
Cette unité est munie d’une antenne DAB/FM en fil de plomb, pour obtenir la meilleure performance,
étendez complètement l’antenne fil et ajustez la position ainsi que la direction jusqu'à ce que vous
trouviez la meilleure réception.
Pour une réception idéale, il est recommandé de toujours maintenir l’antenne fil en position verticale
(en l'accrochant vers le haut ou vers le bas derrière l'unité).
Mode DAB/DAB+
Lorsque l’unité est allumée pour la première fois, elle sera en mode veille. Appuyez sur le bouton
VEILLE/ALLUMÉ sur l’unité (ou sur la télécommande) pour allumer la radio, l’écran affichera
« bienvenue sur la radio digitale », puis il entrera automatiquement en mode DAB/DAB+ et procédera à
la fonction scan intégral.
Durant le scan, l’écran affichera “recherche…” en même temps qu’une barre de progression indiquant
la progression du scan et le nombre de station qui ont été trouvée jusqu'alors.
Une fois le scan termine, la radio sélectionnera la première station alphanumérique trouvée. Pour
explorer les stations trouvées.
Appuyez sur le bouton SAUT/TUNE/RECHERCHE (Ascendante ou Descendante) jusqu'à la station
désirée.
Modes scan intégral tuner automatique DAB/DAB+
Le scan intégral recherchera tous les canaux DAB/DAB+ et tri bandes. Une fois le scan termine, la
première station alphanumérique trouvée sera automatiquement sélectionnée.
1. Pour activer le scan intégral tuner automatique, appuyez sur le bouton
LECTURE/PAUSE/SCAN/ENTRÉE sur l’unité (ou sur la télécommande) une fois pour entrer en
mode « scan intégral tuner automatique », l’écran affichera « recherche… » et une barre de
FR-5
progression plus lente.
2. Toutes les stations trouvées seront automatiquement enregistrées, pour explorer les stations
trouvées, appuyez sur le bouton SAUT/TUNE/RECHERCHE (Ascendante ou Descendante) pour
sélectionner.
DAB/DAB+ tuner manuel
1. Pour sélectionner le tuner manuel, appuyez sur le bouton SELECT/FM MONO/ST sur l’unité (ou sur
la télécommande) pour entrer en mode « tuner manuel ».
2. Appuyez sur le bouton SAUT/TUNE/RECHERCHE (Ascendante ou Descendante) pour faire
dérouler tous les canaux DAB/DAB+, l’écran affichera « 5A a 13F » et leurs fréquences associées.
3. Lorsque la fréquence que vous désirez apparait sur l’écran, appuyez sur le bouton SELECT/FM
MONO/ST. pour confirmer. Le nom du groupe de station (ensemble/multiplexe) s’affichera.
4. Appuyez sur le bouton STOP/MENU/INFO pour voir quelles stations sont présentes sur
l’ensemble/multiplexe.
Services auxiliaires
A certaines occasion, vous verrez un symbole “>” apparaitre après le nom de la station, cela indique
qu’il y’a des services auxiliaires disponibles avec cette station. Ces services auxiliaires contiennent des
services supplémentaires liés à la station primaire, par exemple, une station sportive pourrait ajouter
des commentaires supplémentaires. Les services auxiliaires sont insérés directement après la station
primaire. Pour sélectionner la station secondaire, appuyez sur le bouton SELECT/FM MONO/ST sur la
télécommande lorsque le ">" apparait sur l'écran.
Mode FM
1. Pour sélectionner FM, appuyez sur le bouton DAB/FM/AUX sur l’unité (ou sur la télécommande),
l’écran affichera FM et la fréquence.
2. Pour activer le recherché automatique de fréquence, maintenez appuyé le bouton
SAUT/TUNE/RECHERCHE (Ascendante ou Descendante) ou bien
LECTURE/PAUSE/SCAN/ENTRÉE sur l’unité (ou sur la télécommande) jusqu'à ce que le scan de
fréquence démarre vers le haut ou vers le bas, il s’arrêtera automatiquement des qu’une station sera
trouvée.
3. Vous pouvez aussi appuyer sur le bouton SAUT/TUNE/RECHERCHE (Ascendante ou
Descendante) sur l’unité (ou sur la télécommande) pour sélectionner la fréquence désirée.
4. Appuyez sur le bouton SELECT/FM MONO/ST sur l’unité (ou sur la télécommande) pour
sélectionner le mode de réception FM « STÉRÉO » ou « MONO ».
ENREGISTRER ET EFFACER DES STATIONS EN PRÉSÉLECTION
Aussi bien en mode DAB qu’en mode FM, vous pouvez enregistrer jusqu’à 30 stations en présélection
favorite, cela vous permettra d’accéder directement à vos stations favorites.
1. Pour enregistrer une présélection, régler d’abord la station désirée, puis maintenez appuyé le bouton
iPod/ID3/MEM/C-ADJ sur la télécommande, l’écran affichera la fréquence et un « # » clignotant.
2. appuyez sur le bouton SAUT/TUNE/RECHERCHE (Ascendante ou Descendante) sur la
télécommande jusqu'à ce que l’écran affiche « présélection vide # » avec le « # » clignotant pour
sélectionner le numéro de station que vous désirez, appuyez alors sur le bouton
ID3/iPod/MEM/C-ADJ de la télécommande pour confirmer votre sélection, l’écran affichera
« présélection # enregistrée » en mode DAB/FM.
3. pour effacer une station présélectionnée, appuyez sur le bouton ID3/iPod/MEM/C-ADJ une fois puis
sur le bouton SAUT/TUNE/RECHERCHE (Ascendante ou Descendante) pour sélectionner les
stations que vous avez enregistrées, puis appuyez sur le bouton ID3/iPod/MEM/C-ADJ sur la
télécommande pour confirmer votre sélection.
Note: 1. Les stations enregistrées seront sauvegardées dans la mémoire et éteindre l’unité ne les
effacera pas. Enregistrer une nouvelle station dans un emplacement de présélection effacera
la station préalablement présélectionnée dans cet emplacement.
2. Lorsque l’unité est en mode veille, maintenez le bouton STOP/MENU/INFO pour effacer toutes
les stations présélectionnées.
MODES D’AFFICHAGE
Chaque fois que vous appuyez sur le bouton STOP/MENU/INFO, l’ecran circulera entre les modes
d’affichages suivants:
FR-6
En mode FM:
En mode DAB/DAB+:
Auto(Mono)
FM Stéréo et FM Mono.
Force du signal
L’écran affichera une barre pour indiquer la force du signal, plus fort sera le signal, plus longue sera la
barre de gauche à droite.
Heure et date
L’heure et la date seront automatiquement mises à jour par les informations reçues, il n’est pas
nécessaire de régler l’horloge manuellement. Dans le cas peu probable ou aucune information
concernant l’horloge ne serait reçue, l'écran affichera "<Heure/date>".
Taux de signal audio
L’écran affichera le taux de signal audio digital en cours de réception.
Fréquence
La fréquence de la station en cours sera affichée.
Ensemble/Multiplex (nom du groupe)
L’ensemble/multiplexe est une collection de stations de radio qui sont regroupées et émises ensembles
dans une même fréquence. Il y’a des multiplexes nationaux et locaux, les locaux contiennent des
stations spécifiques à la zone en question.
Type de programme
Cela décrit le style de programme qui est diffusé. Si l’information n’est pas disponible, l’écran affichera
“<type de programme>”.
DLS
DLS signifie Segment de Label Dynamique, qui est un message déroulant que le diffuseur peut ajouter
à ses transmissions. Le message contient généralement des informations telles que les détails des
programmes etc.
UTILISATION DU CD/MP3/WMA
Écouter un disque compact (CD/MP3/WMA)
1. Appuyez sur le bouton CD/iPod/USB/CARTE sur l’unité (ou sur la télécommande) pour sélectionner
le mode CD/MP3. L’unité lira automatiquement les disques CD/MP3/WMA.
2. appuyez sur le bouton OUVRIR/FERMER du TIROIR CD uniquement sur l’unité principale, et le tiroir
du CD s’ouvrira automatiquement. (F1)
3. Insérez le disque CD/MP3 dans le compartiment CD, appuyez sur le bouton OUVRIR/FERMER du
TIROIR CD pour fermer le tiroir CD.
Note: 1. Cette unité peut lire des disques CD, CD-R, CD-RW, MP3 et WMA. Elle lit aussi les disques
MP3 “8cm” et “Multi Section”.
2. Le taux de transfert de lecture en MP3 est de 32-320kbps et en WAM de 64-320 kbps.
3. Le nombre maximum est de 99 dossiers et 999 chansons. Si aucun disque n’est présent ou
que le disque est illisible, « No Disc » s’affichera.
Jouer un disque CD/MP3/WMA en entier
- CD
1. Insérez le CD dans le compartiment de Cd, l’unité principale lira automatiquement le nombre total de
dossiers et de piste en même temps qu’elle lira automatiquement la première piste. (F2)
2. Appuyez sur le bouton LECTURE/PAUSE/SCAN/ENTRÉE une fois, l’indicateur de temps écoulé
clignotera. (F3)
FR-7
3. Appuyez sur le bouton SAUT/TUNE/RECHERCHE (Ascendante ou Descendante) une fois pour
changer le numéro de piste, maintenez appuyé le bouton SAUT/TUNE/RECHERCHE (Ascendante
ou Descendante) pour effectuer des recherche rapide avant ou arrière dans une piste.
4. Appuyez sur le bouton LECTURE/PAUSE/SCAN /ENTRÉE à nouveau pour reprendre la lecture.
Pour arrêter, appuyez sur le bouton STOP/MENU/INFO.
- MP3/WMA
1. Insérez le disque MP3/WMA dans le compartiment de CD, l’unité principale lira automatiquement le
nombre total de dossiers et de piste en même temps qu’elle lira automatiquement la première piste.
2. Appuyez sur le bouton LECTURE/PAUSE/SCAN/ENTRÉE une fois, l’indicateur de temps écoulé
clignotera.
3. Appuyez sur le bouton SAUT/TUNE/RECHERCHE (Ascendante ou Descendante) une fois pour
changer le numéro de piste, maintenez appuyé le bouton SAUT/TUNE/RECHERCHE (Ascendante
ou Descendante) sur l’unité (ou sur la télécommande) pour effectuer des recherche rapide avant ou
arrière dans une piste.
4. Appuyez sur le bouton LECTURE/PAUSE/SCAN/ENTRÉE à nouveau pour reprendre la lecture.
5. Pour changer le numéro de l’Album, appuyez sur le bouton DOSSIER/FLÈCHE (HAUT ou BAS) sur
la télécommande une fois.
6. Pour arrêter la lecture, appuyez une fois sur le bouton STOP/MENU/INFO sur l’unité (ou sur la
télécommande).
Note: Si l’unité principale ne fonctionne pas correctement, déconnectez l’alimentation puis
reconnectez-la.
UTILISATION DE l’USB/CARTE SD
En mode VEILLE
1. Insérez le dispositif USB ou la CARTE SD, puis appuyez sur le bouton VEILLE/MARCHE sur l’unité
(ou sur la télécommande) pour allumer l’unité.
2. Appuyez sur le bouton CD/iPod/USB/CARTE sur l’unité (ou sur la télécommande) pour sélectionner
le mode USB ou CARTE SD. L’unité principale lira automatiquement le nombre total de dossiers et
de fichier en même temps qu'elle lira la première piste (F4, F5).
3. Si le dispositif de mémoire USB a plus d’un dossier.
a. Appuyez sur le bouton DOSSIER (HAUT ou BAS) sur la télécommande pour sélectionner chaque
fichier.
b. Appuyez sur le bouton SAUT/TUNE/RECHERCHE (Ascendante ou Descendante) sur l’unité (ou
sur la télécommande) pour sélectionner la piste en cours dans le dossier désiré.
Note: 1. L’unité principale peut lire des MP3 et des WMA seulement dans ce mode.
2. Cette unité est compatible avec la plupart des dispositifs USB et cartes SD/SDHC (jusqu'à une
capacité de 32GB de mémoire pour les cartes SDHC). Elle ne peut pas accéder (ou demande
plus de temps pour accéder) aux dispositifs avec de grosses capacités de mémoire.
3. L’unité principale n'est pas compatible avec les fichiers WMA qui sont protégés par des “DRM
FILE”. Elle est seulement compatible avec les USB version 1.1 et 2.0
Jouer un disque flash en entier
1. Appuyez sur le bouton LECTURE/PAUSE/SCAN/ENTRÉE une fois, l’indicateur de temps écoulé
clignotera.
2. Appuyez sur le bouton SAUT/TUNE/RECHERCHE (Ascendante ou Descendante) une fois pour
changer le numéro de piste, maintenez appuyé le bouton SAUT/TUNE/RECHERCHE (Ascendante
ou Descendante) sur l’unité (ou sur la télécommande) pour effectuer des recherche rapide avant ou
arrière dans une piste.
3. Appuyez sur le bouton LECTURE/PAUSE/SCAN/ENTRÉE à nouveau pour reprendre la lecture.
4. Pour changer le numéro de l’Album, appuyez sur le bouton DOSSIER/FLÈCHE (HAUT ou BAS) sur
FR-8
la télécommande une fois.
5. Pour arrêter la lecture, appuyez une fois sur le bouton STOP/MENU/INFO sur l’unité (ou sur la
télécommande).
Note: A tout moment le dispositif USB ou la carte SD doit être bien fixée en mode VEILLE pour éviter
les dommages sur l’unité principale et sur le dispositif USB ou la carte SD.
UTILISATION DU ID3
En mode MP3/WMA
1. Appuyez sur le bouton iPod/ID3/MEM/C-ADJ. Sur l’unité principale (ou sur la télécommande) une
fois pour activer la fonction ID3.
2. Si le fichier MP3/WMA est marqué « ID3 », elle cherchera automatiquement l’information « TITRE »,
« ARTISTE » et « ALBUM » et l’affichera sur l’écran.
3. Appuyez de nouveau sur le bouton ID3/iPod/MEM/C-ADJ sur l’unité (ou sur la télécommande).
L’unité se remettra alors à jouer normalement.
FONCTION RÉPÉTER
- CD
1. Appuyez sur le bouton RÉPÉTER une fois, REP_1 s’affiche. Le CD jouera la piste en cours de
manière répétée.
2. Appuyez sur le bouton RÉPÉTER une fois, REP_ALL s’affiche. Le CD jouera toutes les pistes de
manière répétée.
3. Appuyez sur le bouton RÉPÉTER à nouveau, la fonction RÉPÉTER sera désactivée.
- MP3/WMA/USB/CARTE SD
1. Appuyez sur le bouton RÉPÉTER une fois, REP_1 s’affiche. Cela jouera la piste en cours de
manière répétée.
2. Appuyez sur le bouton RÉPÉTER une fois, REP_ALL s’affiche. Cela jouera toutes les pistes de
manière répétée.
3. Appuyez sur le bouton RÉPÉTER trois fois, REP_ ALBUM s’affiche. Cela jouera toutes les pistes du
dossier en cours de manière répétée.
4. Appuyez sur le bouton RÉPÉTER à nouveau, la fonction RÉPÉTER sera désactivée.
FONCTION PROGRAMME (sur la télécommande)
L’utilisateur peut programmer jusqu’à 32 pistes en mode CD ou 64 pistes en mode
MP3/WMA/USB/CARTE SD dans l’ordre désiré. Le mode programme doit être activé lorsque la lecture
est arrêtée.
1. Lire le programme
- CD
1. Appuyez sur le bouton ID3/iPod/MEM/C-ADJ sur l’unité (ou sur la télécommande), passez en mode
MÉMOIRE. (F6)
2. Appuyez sur le bouton SAUT/TUNE/RECHERCHE (Ascendante ou Descendante) sur l’unité (ou sur
la télécommande) pour changer le numéro de piste.
3. Appuyez sur le bouton ID3/iPod/MEM/C-ADJ sur la télécommande pour confirmer le numéro de
piste.
- MP3/WMA
1. Appuyez sur le bouton ID3/iPod/MEM/C-ADJ sur la télécommande, passez en mode MÉMOIRE. Le
numéro de l’album clignote. (F7)
2. Appuyez sur le bouton DOSSIER (HAUT ou BAS) sur la télécommande, le numéro de l’album
changera.
3. Appuyez sur le bouton ID3/iPod/MEM/C-ADJ sur la télécommande, le numéro de la première piste
s’affichera.
4. Appuyez sur le bouton SAUT/TUNE/RECHERCHE (Ascendante ou Descendante) sur l’unité (ou sur
la télécommande) pour changer le numéro de piste.
5. Appuyez sur le bouton ID3/iPod/MEM/C-ADJ sur la télécommande pour confirmer le numéro de
piste favorite.
FR-9
2. LECTURE DE PROGRAMME
Appuyez sur le bouton LECTURE/PAUSE/SCAN/ENTRÉE sur l’unité (ou sur la télécommande). L’unité
jouera la première piste du programme. Lorsque toutes les pistes auront été jouées, l’unité affichera le
numéro des pistes et le temps de lecture des pistes CD/MP3/WMA.
3. ANNULER UN PROGRAMME
Appuyez sur le bouton STOP/MENU/INFO sur l’unité (ou sur la télécommande) deux fois, ou ouvrez le
tiroir CD et refermez-le, la mémoire sera effacée. Réglez un nouveau programme, le programme
existent sera effacée.
Note: Durant le mode programme
1. Appuyez sur le bouton RÉPÉTER une fois sur la télécommande, l’indicateur lumineux REP_1
s’illuminera sur l’écran. Puis l’unité répétera la piste en cours.
2. Appuyez sur le bouton RÉPÉTER deux fois, REP_ALL s’affichera sur l’écran. Puis l’unité répétera
toutes les pistes programmées.
3. Appuyez sur le bouton RÉPÉTER encore une fois. L’unité retournera à la lecture normale du
programme.
LECTURE ALÉATOIRE (sur la télécommande)
Vous pouvez appuyer sur le bouton ALÉATOIRE sur la télécommande pour sélectionner la fonction
lecture aléatoire :
1. Lorsque le disque est arrêté, appuyez sur le bouton ALÉATOIRE une fois pour sélectionner la lecture
aléatoire, l’écran affichera « ALÉATOIRE », une piste sera alors sélectionnée aléatoirement et
commencera à jouer.
2. Durant la lecture, appuyez d’abord sur le bouton ALÉATOIRE une fois, l’écran affichera
« ALÉATOIRE », puis appuyez sur le bouton SAUT/TUNE/RECHERCHE (Ascendante ou
Descendante) sur l’unité (ou sur la télécommande), une chanson sera sélectionnée aléatoirement et
commencera à jouer.
3. Pour reprendre la lecture normale, appuyez à nouveau sur le bouton ALÉATOIRE.
LECTURE INTRO (sur la télécommande)
1. Appuyez sur le bouton INTRO une fois, INTRO s’affiche.
L’unité principale jouera les 10 premières secondes de
chaque piste. (F9)
2. Appuyez sur le bouton INTRO deux fois, pour reprendre la
lecture normale.
UTILISATION D’iPod/iPhone
Lorsque l’unité est en mode VEILLE :
1. Appuyez sur le bouton VEILLE/ALLUMÉ sur l’unité ou sur la télécommande pour allumer l’unité.
2. Appuyez sur le bouton CD/iPod/USB/CARTE sur l’unité
(ou sur la télécommande) pour sélectionner le mode iPod.
3. Appuyez sur le tiroir d’accueil iPod pour ouvrir la station.
Insérez les lecteurs iPod/iPhone dans l’applique
correspondante, l’indicateur iPod apparaitra sur l’écran de
l’unité principale. (F10)
Lorsque l’unité est En mode iPhone/iPod:
1. Appuyez sur le bouton LECTURE/PAUSE/SCAN/ENTRÉE une fois pour démarrer la lecture de
l’iPhone/iPod. Ajustez le volume grâce à la molette de contrôle de VOLUME (+ou -). Pour arrêter la
lecture en cours, appuyez sur le bouton STOP/MENU/INFO une fois.
2. Appuyez sur le bouton LECTURE/PAUSE/SCAN/ENTRÉE une fois pour mettre en pause la lecture
de la piste en cours. Appuyez sur le bouton LECTURE/PAUSE/SCAN/ENTRÉE à nouveau pour
reprendre la lecture.
FR-10
3. Pour avancer ou reculer d'une piste, appuyez sur le bouton SAUT/TUNE/RECHERCHE
(Ascendante ou Descendante) pour sélectionner la piste désirée.
4. Appuyez sur le bouton RÉPÉTER ou ALÉATOIRE sur la télécommande pour que l'iPhone/iPod joue
les pistes de manière répétée ou aléatoire.
Note: 1. Les iPod Touch version 1.1.4 ou supérieure sont compatibles avec les fonctions RÉPÉTER ou
ALÉATOIRE.
2. Lorsque l’écran de l’iPod Touch ou de l’iPhone a été verrouillé, les opérations mentionnées
ci-dessus sont encore disponibles.
Lorsque l’unité est en mode MENU iPhone/iPod:
Note: Les séries iPod Touch et iPhone doivent être mise manuellement en mode musique d’abord
avant de procéder aux opérations suivantes.
1. Lorsque l'unité est en mode iPod/iPhone, appuyez sur le bouton ID3/iPod/MEM/C-ADJ une fois,
l’unité se mettra en mode Menu iPod/iPhone. L’indicateur de menu de l’iPod apparaitra sur l’écran de
l’unité.
2. Appuyez sur le bouton STOP/MENU/INFO pour retourner au menu iPod/iPhone.
a. Sélectionnez le menu en cours comme suit:
Musique > Extras > importer des photos (cette fonction ne s’affiche pas sur le iPod mini) >
réglages >chanson aléatoire > retro éclairage > lecture en cours s’afficheront sur l’écran du lecteur
iPod/iPhone.
b. Appuyez sur le bouton SAUT/TUNE/RECHERCHE (Ascendante ou Descendante) sur l’unité (ou
sur la télécommande) pour rechercher dans le menu en cours.
3. Appuyez sur le bouton LECTURE/PAUSE/SCAN/ENTRÉE une fois pour entrer dans le menu désiré.
a. Appuyez sur le bouton SAUT/TUNE/RECHERCHE (Ascendante ou Descendante) sur l’unité (ou
sur la télécommande) pour rechercher le contenu dans les menus de dossiers.
b. Si vous voulez revenir au menu iPod/iPhone, appuyez sur le bouton STOP/MENU/INFO à
nouveau.
4. Pour reprendre la lecture, appuyez sur le bouton iPod/ID3/MEM/C-ADJ à nouveau, l’unité se
remettra en mode iPod.
Charger le lecteur iPod/iPhone grâce à l’unité principale:
1. Le lecteur iPod/iPhone a une batterie interne non changeable, la batterie doit être rechargée sans
être utilisée pendant un moment.
2. Vous pouvez charger automatiquement le lecteur iPod/iPhone grâce à l’unité principale en mode
VEILLE ou ALLUMÉ.
Notes :
1. La batterie du lecteur iPod/iPhone est chargée à 80% en une heure environ, et entièrement chargée
au bout de quelques heures. Si vous la chargez tout en jouant de la musique, cela peut prendre plus
de temps.
2. Il est préférable de ne pas la charger en mode TUNER. Cela peut perturber la réception.
3. À tout moment, vous pouvez contrôler le lecteur iPod/iPhone sur l’unité principale, la télécommande
ou le lecteur iPod/iPhone lui-même lorsque l’unité est en mode « iPod ».
4. À tout moment, le lecteur iPod/iPhone peut être fixé en mode VEILLE pour éviter d’endommager
l’unité et le lecteur iPod/iPhone.
5. Lorsque l’unité est en mode iPod : La fonction vidéo de l’iPod peut fonctionner normalement. Mettez
à jour la dernière version de la fonction vidéo iPod depuis le site web d’Apple.
RÉGLAGES DE SORTIE VIDÉO (pour les vidéos iPod seulement, et avec un câble
vidéo RCA non inclus)
1. Lorsque l’unité est en mode VEILLE : Connectez le téléviseur avec un câble vidéo (de type RCA) à
la prise de sortie VIDÉO à l’arrière de l’unité.
2. Lorsque l’unité est en mode iPod : Appuyez sur le bouton “MENU” de la molette de sélection de
l'iPod pour sélectionner la fonction vidéo.
3. Régler l’iPod pour afficher des vidéos sur un téléviseur:
(a) Choisissez Vidéos > paramètres vidéo, et réglez Sortie TV sur Demander ou Activé.
(b) Si vous réglez Sortie TV sur Demander, l’iPod vous donne le choix d’afficher les vidéo sur la TV
FR-11
ou sur l’iPod à chaque fois que vous jouez une vidéo.
Note: 1. Le mode vidéo n’est compatible qu’avec les lecteurs iPod dotes de la fonction vidéo.
2. Les écrans (vidéo) des iPod Classic 80/160GB, iPod Nano 3e, 4e, 5e et 6e génération, et les
écran des iPod Touch doivent être fixés en mode VEILLE avant de pouvoir être utilisés avec la
fonction Vidéo
LECTURE ENTRÉE AUXILIAIRE
L’entrée AUX est située à gauche de l’unité. Utilisez un câble stéréo 3,5mm pour connecter les
équipements audio à la prise LINE IN.
1. Pour sélectionner la fonction entrée AUX, appuyez plusieurs fois sur le bouton DAB/FM/AUX sur
l’unité (ou sur la télécommande) jusqu'à ce qu’AUX s’affiche à l’écran.
2. Réglez la molette de contrôle de VOLUME (+ ou -) pour ajustez le volume sonore.
Note: Le câble LINE IN n’est pas inclus.
CONTROLE EQ (sur la télécommande)
Lorsque vous appuyez sur le bouton EQ, la tonalité des sons change comme suit :
MUET (sur la télécommande)
Appuyez sur le bouton MUET de la télécommande pour stopper le son des haut-parleurs de manière
temporaire, le son s’arrête et l’écran affichera « MUTE ». Pour annuler le mode Muet, appuyez à
nouveau sur le bouton MUET, ou appuyez sur VOLUME+/-, « MUTE » disparait de l’écran et le son est
restauré.
ÉCOUTER DE LA MUSIQUE AVEC UN CASQUE
Branchez vos écouteur (prise mini-stéréo 3,5mm) dans la prise pour écouteurs sur l’écran lumineux de
l’unité. Le son sera alors diffusé par les écouteurs au lieu des haut-parleurs.
CARACTÉRISTIQUES
ALIMENTATION
PUISSANCE DE SORTIE :
DIMENSIONS DE L’UNITÉ :
DIMENSION DES HAUT-PARLEURS :
POIDS NET :
SECTION RADIO
BANDE DE FRÉQUENCE :
SECTION DISQUE COMPACT
PORTÉE OPTIQUE :
RÉPONSE DE FRÉQUENCE :
AC 230-240V~50Hz
20 Watts x 2
152(L) x 222(L) x 218(H) mm
140(L) x 222(L) x 218(H) mm
5,45kg
FM 87.5 108 MHz
DAB/DAB+ 174 - 240 MHz
LASER 3 RAYON
100Hz - 16kHz
CARACTÉRISTIQUE SUJETTES A CHANGEMENTS SANS NOTIFICATION PRÉALABLE.
Avertissement concernant la ventilation : « La ventilation normale du produit ne doit pas être gênée
pendant l’utilisation. »
Si vous souhaitez vous débarrasser ultérieurement du produit, veuillez noter que : les
déchets électriques ne doivent pas être jetés avec les déchets domestiques. Veuillez les
faire déposer dans les centres de recyclage existants. Contactez les autorités locales ou
distributeurs pour obtenir de plus amples informations. (Directive de léquipement
électronique et des déchets électriques).
FR-12
Micro Sistema Hi -Fi con Puerto de
Conexión para iPhone y iPod
MCI -220
iPod y iPhone son marcas propiedad de Apple Inc., registradas en los EE.UU. y otros países.
“Made for iPod” y “Made for iPhone” significan que un accesorio electrónico ha sido diseñado para
conectarse de modo específico con un iPod o iPhone respectivamente, y ha sido acreditado por el
fabricante para cumplir con los estándares de Apple
Apple no se responsabiliza del funcionamiento de este aparato ni de su cumplimiento con los
estándares regulatorios y de seguridad.
Por favor, tenga en cuenta que el uso de este accesorio con un iPod o iPhone podría afectar a la
conexión inalámbrica.
Manual de instrucciones
Para obtener información y apoyo, www.lenco.eu
PRECAUCIONES DE SEGURIDAD
Para lograr el máximo disfrute y rendimiento, por favor, lea atentamente este manual antes de intentar
utilizar la unidad, para poder así familiarizarse con sus funciones, y garantizarle años de un servicio fiel
y libre de problemas, así como de una experiencia musical total.
Importantes instrucciones de seguridad
Conserve las instrucciones de seguridad y funcionamiento para futuras referencias.
Evite instalar la unidad en las siguientes ubicaciones:
Lugares expuestos a la luz solar directa o cercanos a aparatos que irradien calor, como estufas
eléctricas, sobre otros aparatos eléctricos que emitan demasiado calor, lugares mal ventilados o
polvorientos.
Lugares sujetos a vibraciones constantes, húmedos o mojados.
Asegúrese de que no obstruye las aberturas de ventilación.
Antes de encender el aparato por primera vez, asegúrese de haber enchufado correctamente el cable
de alimentación.
El enchufe de la red de suministro se emplea como elemento de desconexión, y deberá permanecer
accesible en todo momento.
No someta el producto a goteos ni salpicaduras, ni coloque objetos que contengan líquidos, como
jarrones, sobre este.
Límpielo sólo con un trapo seco.
Para desconectar del todo el producto, este deberá desenchufarse de la toma de corriente.
Cuando el indicador LED del modo en espera no esté iluminado, el aparato estará completamente
desconectado.
Deje una distancia mínima de 10 cm alrededor del aparato para una adecuada ventilación.
Tome conciencia de los aspectos medioambientales al deshacerse de las pilas del aparato.
Use este aparato en climas moderados.
El enchufe del cable de alimentación no deberá ser obstruido y deberá ser accesible durante su uso.
No impida la ventilación del aparato cubriendo sus aberturas de ventilación con elementos como
periódicos, manteles, cortinas, etc.
No coloque fuentes de llama viva, como velas encendidas, sobre el aparato.
No exponga la pila a un calor excesivo, como el de la luz solar, fuego, etc.
No ignore el propósito de seguridad del enchufe polarizado o del tipo de toma de tierra. Un enchufe
polarizado tiene dos hojas, siendo una más ancha que la otra.
Un enchufe del tipo de toma de tierra tiene dos hojas y una tercera clavija de toma de tierra. La hoja
ancha o la tercera clavija son elementos de seguridad. Si el enchufe del aparato no puede insertarse
en la toma de corriente, recurra a los servicios de un electricista para que le ayude a sustituir la toma
obsoleta.
Por razones de seguridad, no retire ninguna de las cubiertas del aparato ni intente acceder a su interior.
Encomiende cualquier reparación sólo a personal cualificado. No quite ninguno de los tornillos, ni abra
la carcasa del producto; en el interior del aparato no contiene partes que puedan ser reparadas por el
usuario. Para su reparación, acuda solamente a personal cualificado.
PRECAUCIÓN : PARA REDUCIR EL RIESGO DE DESCARGA ELÉCTRICA, NO RETIRE LA
CUBIERTA (O TAPA). NO CONTIENE PARTES REPARABLES POR EL USUARIO.
EXCLUSIVAMENTE PERSONAL CUALIFICADO PODRÁ HACERSE CARGO DE LAS LABORES DE
REPARACIÓN DEL APARATO.
VOLTAJE PELIGROSO
Voltaje peligroso en el interior del aparato, que podría ser de la suficiente magnitud como
para constituir un riesgo de descarga eléctrica.
ATENCIÓN
El manual del usuario contiene importantes instrucciones de funcionamiento y
mantenimiento que, por su seguridad, deberá consultar.
ES-1
ADVERTENCIA: PARA EVITAR UN INCENDIO O DESCARGA ELÉCTRICA, NO EXPONGA ESTE
APARATO A GOTEOS NI SALPICADURAS.
Nota:
Esta unidad se calentará cuando se use por un periodo prolongado. Se trata de un hecho normal, y no
es indicativo de un fallo de funcionamiento.
El reproductor de CD incluye microprocesadores que podrían fallar debido a ruido o interferencias
eléctricas externas.
Si el reproductor de CD no funcionara correctamente, desconecte el aparato y reconéctelo después.
Si somete sus oídos a un nivel de volumen excesivo cuando use los auriculares, podría provocar la
pérdida auditiva.
Si se diera algún comportamiento inusual en el display o en los botones, apague la unidad, volviéndola
a encender de nuevo.
FUNCIONES Y CONTROLES
1. ALTAVOZ
2. TOMA LINE IN
3. BOTÓN REPEAT
4. BOTÓN
iPod/ID3/MEM/C-ADJ.
5. PUERTO DE CONEXIÓN
DE USB
6. BOTÓN SELECT/FM
MO./ST.
7. BOTÓN
CD/iPod/USB/CARD
8. BOTÓN DAB/FM/AUX
9. BOTÓN
REPRODUCCIÓN/PAUSA/
BÚSQUEDA/CONFIRMAR
10. INDICADOR LED DE
MODO
EN ESPERA
11. BOTÓN DE MODO EN
ESPERA/ENCNEDIDO
12. DISPLAY LCD
13. BOTÓN STOP/MENU/INFO
14. BOTÓN
SALTO/SINTONIZACIÓN (+ o -)
15. BOTÓN DE
APERTURA/CIERRE
16. SENSOR DE INFRARROJOS
17. CONTROL DE VOLUME (+ o -)
18. TAPA DEL COMPARTIMENTO
PARA CDs
19. RANURA DE ENTRADA DE
TARJETAS SD
20. BOTÓN FOLDER (+ o -)
21. TAPA DEL PUERTO DE
INSTALACIÓN DEL PUERTO UNIVERSAL
ES-2
CONEXIÓN DE iPod
22. TOMA PARA
AURICULARES
23. CABLE DE
ALIMENTACIÓN
24. INTERRUPTOR DE
ENCENDIDO
25. TERMINALES DE LOS
ALTAVOCES
26. ANTENA FM
27. TOMA DE SALIDA DE
VÍDEO
MANDO A DISTANCIA
1. BOTÓN DEL MODO EN ESPERA
2. BOTÓN MUTE
3. BOTÓN DE APERTURA/CIERRE
4. BOTÓN CLOCK DISP
5. BOTÓN DAB/FM/AUX
6. BOTÓN SALTO/SINTONIZACIÓN 7. BOTÓN TIMER
8. BOTÓN SLEEP
9. BOTÓN ID3/iPod/MEM/C-ADJ.
10. BOTÓN RANDOM
11. BOTÓN REPEAT
12. BOTÓN CD/iPod/USB/CARD
13. BOTÓN VOLUME (+ o -)
14. BOTÓN EQ
15. BOTÓN REPRODUCCIÓN/PAUSA/BÚSQUEDA
16. BOTÓN SELECT/MONO/ST.
17. BOTÓN SALTO/SINTONIZACIÓN +
18. BOTÓN STOP/MENU/INFO
19. BOTÓN FOLDER +
20. BOTÓN FOLDER 21. BOTONES NUMÉRICOS
22. BOTÓN INTRO
INSTALACIÓN DE LAS PILAS DEL MANDO A DISTANCIA
Presione hacia abajo la tapa del compartimento para pilas, y des
lícela hacia fuera para abrirlo. Coloque dos pilas (UM4), (AAA), (R03)
del mando a distancia respetando las marcas de polaridad ("+" y " - ")
del interior del compartimento y en las pilas. Recoloque la tapa del
compartimento para pilas, presionando ligeramente hacia abajo y
después empujándola hacia arriba hasta que quede fija.
Nota: Saque las pilas del mando a distancia si no va a usarlo durante
un largo periodo de tiempo. No mezcle pilas normales con pilas
recargables. Cuando las pilas se agoten, el mando a distancia no
funcionará, por lo que será necesario sustituirlas por unas nuevas.
CONEXIÓN DE LOS CABLES DE LOS ALTAVOCES EN
SUS RESPECTIVOS TERMINALES
1. Conexión de los altavoces
Extienda los CABLES DE LOS ALTAVOCES y conéctelos a
los TERMINALES DE LOS ALTAVOCES.
2. Conexión del cable de alimentación
Antes del uso, conecte el cable de alimentación a una toma
de corriente. Encienda entonces la unidad con el interruptor
de encendido. El indicador del modo en espera s iluminará.
DISCO COMPACTO
1. Use siempre un disco compacto con la
marca en la dirección que se muestra.
2. Notas sobre la manipulación de los discos
Al sacar el disco de su estuche y cargarlo
en el aparato.
* No toque la superficie reflectora grabada.
* No pegue papel ni escriba nada en su superficie.
* No doble el disco.
ES-3
3. Almacenamiento
* Guarde el disco en su estuche.
* No exponga los discos a la luz solar ni a altas
temperaturas, humedad alta y lugares llenos de polvo.
4. Limpieza del disco
* Si el disco estuviera sucio, limpie el polvo, la suciedad
y las huellas con un paño suave.
* El disco deberá limpiarse desde el centro hacia los
bordes.
* No use benceno, disolventes, líquidos limpiadores de discos de vinilo ni espráis antiestáticos.
* Asegúrese de cerrar la tapa del compartimento para CDs, para evitar que entre el polvo.
* No toque la lente.
FUNCIONAMIENTO DE LA UNIDAD
Cuando enchufe la unidad a una toma de corriente por primera vez, puse el interruptor de encendido
de la parte posterior de la unidad, y esta pasará al modo en espera, y el indicador de este modo se
iluminará en rojo. Podrá ahora pulsar el botón de EN ESPERA/ENCENDIDO de la unidad o del mando
a distancia para encender la unidad. Si desea desconectar completamente la unidad, desenchufe el
cable de alimentación de la toma de corriente.
ENCENDIDO/EN ESPERA
1. Pulse el botón EN ESPERA/ENCENDIDO de la unidad o del mando a distancia para encenderla.
2. Seleccione la fuente de sonido (CD, iPod, USB, CARD) y (DAB, TUNER, AUX) pulsando los botones
(CD, iPod, USB, CARD) y (DAB, FM, AUX) de la unidad (o del mando a distancia). El display
correspondiente se iluminará.
3. Ajuste el volumen con el control VOLUME (+ o -) de la unidad (o del mando a distancia).
4. Pulse el botón EN ESPERA/ENCENDIDO de la unidad o del mando a distancia de nuevo
paraapagarla.
Nota:
1. Si no hubiera señal en los modos CD/USB DEVICES/ TARJETA SD/ iPod, la unidad principal se
apagará automáticamente transcurridos 15 minutos.
2. Si se encuentra en el modo iPod, y no hubiera ningún reproductor iPod en el conector del puerto de
la unidad, esta se apagará automáticamente transcurridos 15 minutos.
3. Si se encuentra en el modo en espera, pulse cualquier botón para que el display se ilumine durante
10 segundos.
4. Para ahorrar energía, por favor, apague el interruptor principal cuando no esté usando la unidad.
AJUSTE DE LA HORA
La hora se sincronizará automáticamente con la de DAB, si usted puede recibir señales DAB en su
localidad. Si sólo puede recibir señales de FM, entonces tendrá que ajustar la hora manualmente. El
ajuste manual de la hora deberá realizarse en el modo en espera.
Ajuste manual de la hora
1. Cuando se conecte la unidad por primera vez a una toma de corriente, esta estará en el modo en
espera, y el display mostrará “00:00:00” parpadeando.
2. Mantenga pulsado el botón ID3/iPod/MEM/C-ADJ. hasta que “24 Hour or 12 Hour” se muestre
parpadeante en el display, después pulse el botón SALTO/SINTONIZACIÓN ( o -) para seleccionar
el formato de 12 o 24 horas. 24
3. Pulse el botón ID3/iPod/MEM/C-ADJ. una vez más, y los dígitos de las HORAS parpadearán en el
display, pulse el botón SALTO/SINTONIZACIÓN ( o -) para ajustar las HORAS.
4. Pulse el botón ID3/iPod/MEM/C-ADJ. una vez más, y los dígitos de los MINUTOS parpadearán en el
display, pulse el botón SALTO/SINTONIZACIÓN ( o -) para ajustar los MINUTOS. Pulse el botón
ID3/iPod/MEM/C-ADJ. de nuevo para confirmar la hora.
Nota: 1. Cada estado en el que se encuentre mostrado arriba desaparecerá si no se pulsa el botón en
menos de 10 segundos.
2. Para cualquier modo, encienda la unidad y pulse el botón CLOCK DISP del mando a distancia,
y el display mostrará la hora, desapareciendo al cabo de 10 segundos, para después volver a
su condición original.
+
+
+
ES-4
Sincronización de la hora con la local de DAB
1. Pulse el botón EN ESPERA/ENCENDIDO de la unidad (o del mando a distancia) para encender la
unidad.
2. Pulse el botón DAB/FM/AUX de la unidad (o del mando a distancia) para seleccionar el modo DAB.
3. Sintonice una emisora DAB, y la hora se sincronizará automáticamente con la hora local de DAB.
PROGRAMACIÓN DEL TEMPORIZADOR (del mando a distancia)
Esta función le permitirá encender y apagar el sistema a la hora y en el modo deseados:
1. Pulse el botón TIMER del mando a distancia para alternar entre la función de temporizador
encendido o apagado, entonces el display mostrará “Timer on” o “Timer Off”. El display mostrará el
icono “ ” para indicar que la función de temporizador está encendida.
2. Para programar la hora de encendido con temporizador, mantenga pulsado el botón TIMER del
mando a distancia hasta que el display muestre “On Timer”, entonces los dígitos de la horas del
temporizador parpadearán.
3. Pulse el botón SALTO/SINTONIZACIÓN ( o -) para seleccionar las horas, después pulse el botón
TIMER del mando a distancia para confirmar. Seleccione primero las horas y finalmente los minutos,
entonces la hora del temporizador de encendido habrá sido programada.
4. Entonces entrará en la hora de apagado con temporizador, el display mostrará “Off Timer” y los
dígitos de la horas parpadearán. Pulse el botón SALTO/SINTONIZACIÓN ( o -) para seleccionar
las horas, después pulse el botón TIMER del mando a distancia para confirmar. Seleccione primero
las horas y finalmente los minutos, entonces la hora del temporizador de apagado habrá sido
programada.
5. Pulse finalmente el botón SALTO/SINTONIZACIÓN ( o -) para seleccionar el modo del
temporizador de encendido - FM, CD, iPod, USB, CARD o DAB, después pulse el botón TIMER para
confirmar. Los ajustes del temporizador podrán entonces darse por completados.
6. Pulse el botón TIMER de nuevo, y el indicador "VOL 13” del temporizador aparecerá parpadeante en
el display. Ajuste el volumen del temporizador, subiéndolo o bajándolo, pulsando el botón
SALTO/SINTONIZACIÓN ( o -).
7. Para comprobar los ajustes del temporizador, pulse repetidas veces el botón TIMER, hasta que el
display muestre el ajuste del temporizador de encendido y de apagado.
+
+
+
+
PARA PROGRAMAR LA FUNCIÓN DE APAGADO AUTOMÁTICO -SLEEP- (del mando a
distancia)
Esta función le permite programar el apagado automático del sistema tras un periodo de tiempo
prefijado. Podrá programar el apagado automático en el modo de encendido de la unidad:
1. Para activar la función de apagado automático (Sleep), pulse el botón SLEEP del mando a distancia,
y el display mostrará “SLEEP-90,80,70,60,50, 40,30,20,10,OFF” parpadeante.
2. Cuando el display muestre el tiempo de apagado automático que usted desee, suelte el botón, y el
temporizador de apagado automático quedará activado. El display mostrará “Sleep 10” en el que,
cuando la cuenta del temporizador de apagado automático llegue a cero, se apagará.
3. Para cancelar la función Sleep, pulse el botón SLEEP de nuevo, y la función de apagado automático
se apagará.
PARA ESCUCHAR SU RADIO
Consejos para una mejor recepción
Esta unidad incorpora un cable antena DAB/FM. Para obtener un funcionamiento óptimo, extienda
completamente la antena de cable y ajuste la posición, así como también la dirección, hasta que dé
con la mejor recepción.
Para una recepción DAB ideal, le recomendamos mantener siempre la antena de cable en posición
vertical (sujetándola hacia arriba o hacia abajo por detrás de la unidad).
Modo DAB/DAB+
Cuando se encienda la unidad por primera vez, estará en el modo en espera .Pulse el botón EN
ESPERA/ENCENDIDO de la unidad (o del mando a distancia) para encender la radio, el display
mostrará el mensaje de bienvenida “Welcome to Digital Radio”, entonces pasará automáticamente al
modo DAB/DAB+ y realizará una búsqueda completa.
Durante la búsqueda, el display mostrará the “Searching …” junto con una barra que indicará el
progreso de la búsqueda y la cantidad de emisoras que se hayan encontrado hasta ese momento.
Una vez finalizada la búsqueda, la radio seleccionará la primera emisora encontrada según la
ES-5
ordenación alfanumérica. Para ver las emisoras encontradas, pulse el botón SALTO/SINTONIZACIÓN
( o -) para seleccionar la emisora que desee.
+
Modos de búsqueda completa de sintonización automática de DAB/DAB+
Una búsqueda completa se hará por la totalidad de los canales DAB/DAB+ Band III. Tras la finalización
de la búsqueda, se seleccionará automáticamente la primera emisora encontrada según la ordenación
alfanumérica.
1. Para activar la búsqueda completa de sintonización automática, pulse el botón
REPRODUCCIÓN/PAUSA/BÚSQUEDA/CONFIRMAR de la unidad (o del mando a distancia) para
entrar en el modo “Autotune Full scan”, a continuación, el display mostrará “Searching...” y una barra
de progreso más lenta.
2.Todas las emisoras encontradas se almacenarán automáticamente. Para poder ver las emisoras
encontradas, pulse el botón SALTO/SINTONIZACIÓN ( o -) para su selección.
+
Sintonización manual de DAB/DAB+
1. Para seleccionar la sintonización manual, pulse el botón SELECT/FM MONO/ST. de la unidad (o del
mando a distancia) para entrar en el modo “Manual tune”.
2. Pulse el botón SALTO/SINTONIZACIÓN ( o -) para desplazarse por los canales DAB/DAB+, el
display mostrará “5A to 13F” y sus frecuencias asociadas.
3. Cuando en el display aparezca la frecuencia que le interese, pulse el botón SELECT/FM MONO/ST.
para confirmar. El nombre del grupo de emisoras (conjunto/multiplex) se mostrará en el display.
4. Pulse el botón STOP/MENU/INFO para ver las emisoras contenidas encontradas en el conjunto
/multiplex.
+
Servicios secundarios
En algunas ocasiones, podrá ver el símbolo “>”, que aparecerá detrás del nombre de la emisora. Esto
indica que hay una serie de servicios disponibles asociados a dicha emisora. Estos servicios
secundarios contienen servicios extra relacionados con la emisora primaria. Por ejemplo, una emisora
deportiva podría tener asociados comentarios añadidos. Los servicios secundarios están insertados
directamente tras la emisora primaria. Para seleccionar la emisora secundaria, pulse el botón
SELECT/FM MONO/ST. del mando a distancia cuando el símbolo “>” aparezca en el display.
Modo FM
1. Para seleccionar FM, pulse el botón DAB/FM/AUX de la unidad (o del mando a distancia), y el
display mostrará FM y la frecuencia.
2. Para activar la búsqueda automática de frecuencia, mantenga pulsado el botón
SALTO/SINTONIZACIÓN ( o -) o REPRODUCCIÓN /PAUSA /BÚSQUEDA /CONFIRMAR de la
unidad (o del mando a distancia) hasta que empiece a buscar hacia arriba o hacia abajo en la banda
de frecuencias; se detendrá automáticamente una vez se encuentre una emisora.
3. Podrá también pulsar el botón SALTO/SINTONIZACIÓN ( o -) de la unidad (o del mando a
distancia) para seleccionar la frecuencia que desee.
4. Pulse el botón SELECT/FM MONO/ST. de la unidad (o del mando a distancia) para alternar la
selección de la recepción FM “STEREO” y “MONO”.
+
+
GUARDAR Y RECUPERAR EMISORAS PRESINTONIZADAS
Tanto en el modo DAB como FM, podrá guardar hasta 30 emisoras presintonizadas en la memoria de
la unidad; esto le permitirá tener acceso directo a sus emisoras favoritas.
1. Para almacenar una emisora presintonía, primero sintonice la emisora que desee, después
mantenga pulsado el botón iPod/ID3/MEM/C-ADJ. del mando a distancia, y el display mostrará la
frecuencia y el símbolo “#” parpadeante.
2.Pulse el botón SALTO/SINTONIZACIÓN ( o -) del mando a distancia hasta que el display muestre
“ Preset Empty # ” y el símbolo “#” parpadeante. Seleccione el número de emisora presintonizada
deseada, y después pulse el botón ID3/iPod/MEM/C-ADJ. del mando a distancia para confirmar su
selección; el display mostrará “Preset # stored” en el modo DAB/FM.
3.Para recuperar una emisora presintonizada, pulse el botón ID3/iPod/MEM/C-ADJ. una vez, y
después pulse el botón SALTO/SINTONIZACIÓN ( o -) para seleccionar las emisoras que usted
haya almacenado, a continuación, pulse el botón ID3/iPod/MEM/C-ADJ. del mando a distancia para
confirmar su selección.
ES-6
+
+
Nota:
1. Las emisoras almacenadas quedarán guardadas en la memoria, y si apaga la unidad no las
eliminará. Si guarda una nueva emisora en una presintonía, automáticamente eliminará la emisora
que estaba asignada a ella.
2. Cuando la unidad se encuentre en el modo EN ESPERA, mantenga pulsado el botón
STOP/MENU/INFO para eliminar todas las presintonías de la memoria.
MODOS DE VISUALIZACIÓN
Cada vez que pulse el botón STOP/MENU/INFO, el display pasará por los siguientes modos de
visualización:
En el modo FM:
En el modo DAB/DAB+:
Auto (Mono)
FM Estéreo y FM Mono.
Intensidad de señal
El display mostrará una barra que indicará la intensidad de la señal. Cuanto más intensa sea esta, más
larga será la barra de izquierda a derecha.
Hora y fecha
La hora y la fecha serán actualizadas automáticamente por la información retransmitida; no habrá
ninguna necesidad de ajustar la hora manualmente. En el caso poco probable de que no se recibiera la
información de la hora, el display mostrará “<Time/Date>”.
Velocidad de transferencia de audio (bits/seg.)
El display mostrará la velocidad de transferencia de audio digital que se está recibiendo en bits por
segundo.
Frecuencia
Se mostrará la frecuencia de la emisora presintonizada.
Conjunto/Multiplex (nombre del grupo)
El Conjunto/Multiplex es una colección de emisoras de radio que están agrupadas y se transmiten
juntas en una sola frecuencia. Hay multiplex nacionales y locales. Los locales contienen emisoras
específicas de esa área.
Tipo de programa
Esto describe el estilo de programa que se está retransmitiendo. Si la información no está disponible,
el display mostrará “<Programme Type>”.
DLS
DLS son las siglas de Dynamic Label Segment, que no es más que un mensaje en movimiento que la
estación emisora podría incluir en sus retransmisiones. El mensaje normalmente incluye información
como detalles del programa... etc.
FUNCIONAMIENTO DE CD/MP3/WMA
Para escuchar un Disco Compacto (CD/MP3/WMA)
1. Pulse el botón CD/iPod/USB/CARD de la unidad (o del mando a distancia) para seleccionar el modo
CD/MP3. La unidad leerá el disco CD/MP3/WMA automáticamente.
2. Pulse el botón de APERTURA/CIERRE de la tapa del compartimento para CDs en la unidad
principal, y esta se abrirá automáticamente. (F1)
3. Introduzca el disco CD/MP3 en el compartimento para CDs, y pulse después el botón de
APERTURA/CIERRE para cerrar la tapa del compartimento para CDs.
Nota: 1. Esta unidad puede reproducir discos CD, CD-R, CD-RW, MP3 y WMA. También puede
reproducir "8 cm" y "Multi Section" en un disco MP3.
ES-7
2. La velocidad de transferencia de reproducción en MP3 es 32 - 320 kbps y en WAM es de 64 320 kbps.
3. La lectura máxima puede llegar hasta las 99 carpetas y 999 pistas. Si no hubiera ningún disco
introducido o no pudiera leerse el TCO, "NO DISC" se mostrará en el display.
Reproducción de un CD/MP3/WMA entero
- CD
1. Introduzca el CD en el compartimento para CDs. La unidad principal leerá automáticamente el
número total de carpetas y de pistas al mismo tiempo. La unidad reproducirá la primera pista
automáticamente. (F2)
2. Pulse el botón REPRODUCCIÓN/PAUSA/BÚSQUEDA, y el indicador de tiempo transcurrido
parpadeará.(F3)
3. Pulse el botón SALTO/SINTONIZACIÓN ( o -) para cambiar el número de pista. Mantenga pulsado
el botón SALTO/SINTONIZACIÓN ( o -) para avanzar o retroceder a velocidad rápida por cada
canción.
4. Pulse el botón REPRODUCCIÓN/PAUSA/BÚSQUEDA/CONFIRMAR una vez más para reanudar la
reproducción. Deténgala pulsando el botón STOP/MENU/INFO.
+
+
- MP3/WMA
1. Introduzca el disco MP3/WMA en el compartimento para discos. La unidad principal leerá
automáticamente el número total de carpetas y de pistas al mismo tiempo. La unidad reproducirá la
primera pista automáticamente.
2. Pulse el botón REPRODUCCIÓN/PAUSA/BÚSQUEDA, y el indicador de tiempo transcurrido
parpadeará.
3. Pulse el botón SALTO/SINTONIZACIÓN ( o -) para cambiar el número de pista. Mantenga pulsado
el botón SALTO/SINTONIZACIÓN ( o -) para avanzar o retroceder a velocidad rápida por cada
canción.
4. Para reanudar la reproducción, pulse el botón REPRODUCCIÓN /PAUSA /BÚSQUEDA /
CONFIRMAR una vez más.
5. Para cambiar el número de álbum, pulse el botón FOLDER/FLECHA (+ o -) del mando a distancia.
6. Para detener la reproducción, pulse el botón STOP/MENU/ INFO de la unidad (o del mando a
distancia).
Nota: Si la unidad principal no está funcionando correctamente, desconéctela de la toma de corriente,
para volver luego a conectarla.
+
+
FUNCIONAMIENTO DE USB/TARJETA SD
Cuando se encuentre en el modo EN ESPERA
1. Introduzca el dispositivo USB o la TARJETA SD y pulse el botón EN ESPERA/ENCENDIDO de la
unidad (o del mando a distancia) para encender la unidad.
2. Pulse el botón CD/iPod/USB/CARD de la unidad (o del mando a distancia) para seleccionar el modo
USB o TARJETA SD. LA unidad principal leerá automáticamente el número total de carpetas y pistas.
(F4,F5) La unidad reproducirá la primera pista automáticamente.
3. Si el dispositivo de memoria USB contiene más de una carpeta:
a. Pulse el botón FOLDER (+ o -) del mando a distancia para seleccionar cada carpeta.
b. Pulse el botón SALTO/SINTONIZACIÓN ( o -) de la unidad (o del mando a distancia) para
seleccionar la pista actual en la carpeta deseada.
Nota:
1. La unidad principal sólo podrá reproducir MP3 y WMA en este modo.
2. Esta unidad admite la mayoría de dispositivos USB y tarjetas SD/SDHC (hasta 32GB de memoria de
almacenamiento para las SDHC). No podrá acceder, sin embargo (o precisará más tiempo para
acceder) a aquellos dispositivos con gran capacidad de memoria.
3. La unidad principal no admite el formato de archivo WMA protegido por "DRM FILE". Sólo aceptará
las versiones de USB 1.1 y 2.0.
+
ES-8
Reproducción completa de la memoria USB
1. Pulse el botón REPRODUCCIÓN/PAUSA/BÚSQUEDA/CONFIRMAR, y el indicador de tiempo
transcurrido parpadeará.
2. Pulse el botón SALTO/SINTONIZACIÓN ( o -) para cambiar el número de pista. Mantenga pulsado
el botón SALTO/SINTONIZACIÓN ( o -) para avanzar o retroceder a velocidad rápida por cada
canción.
3. Para reanudar la reproducción, pulse el botón REPRODUCCIÓN /PAUSA /BÚSQUEDA /
CONFIRMAR una vez más.
4. Para cambiar el número de álbum, pulse el botón FOLDER/FLECHA (+ o -) del mando a distancia.
5. Para detener la reproducción, pulse el botón STOP/MENU/ INFO de la unidad (o del mando a
distancia).
Nota: En todo momento, el dispositivo USB o la TARJETA SD deben estar bien fijados en el modo EN
ESPERA, para evitar que la unidad principal y el dispositivo USB o la tarjeta SD resulten
dañados.
+
+
FUNCIONAMIENTO DE ID3
Cuando se encuentre en el modo MP3/WMA
1. Pulse el botón ID3/iPod/MEM/C-ADJ. de la unidad (o del mando a distancia) para abrir la función
ID3.
2. Si el archivo MP3/WMA está escrito como “ID3”, buscará automáticamente la información de “TITLE
NAME”, “ARTIST NAME” y “ALBUM NAME”
indicada en el display.
3. Pulse el botón ID3/iPod/MEM/C-ADJ. de la unidad (o del mando a distancia) de nuevo. Entonces la
unidad reanudará la reproducción normal.
FUNCIÓN DE REPETICIÓN DE LA REPRODUCCIÓN
- CD
1. Pulse el botón REPEAT una vez, y se mostrará REP_1. El CD reproducirá la pista actual
repetidamente.
2. Pulse el botón REPEAT dos veces, y se mostrará REP_ ALL. El CD reproducirá todas las pistas
repetidamente.
3. Pulse el botón REPEAT una vez más, y la función REPEAT quedará desactivada.
- MP3/WMA/USB/TARJETA SD
1. Pulse el botón REPEAT una vez, y se mostrará REP_1. La pista actual se repetirá repetidamente.
2. Pulse el botón REPEAT dos veces, y se mostrará REP_ ALL. Todas las pistas se reproducirán
repetidamente.
3. Pulse el botón REPEAT tres veces, y se mostrará REP_ALBUM. Se reproducirán todas las pistas de
la carpeta actual repetidamente.
4. Pulse el botón REPEAT una vez más, y la función REPEAT quedará desactivada.
FUNCIÓN DE PROGRAMACIÓN (en el mando a distancia)
El usuario podrá programar hasta 32 pistas en modo CD o 64 pistas en los modos
MP3/WMA/USB/TARJETA SD, en el orden que desee. El modo de programación se activará cuando
se encuentre en el modo de detención.
1. Cómo reproducir el programa
- CD
1. Pulse el botón ID3/iPod/MEM/C-ADJ. del mando a distancia, y pase al modo MEMORY. (F6)
2. Pulse el botón SALTO/SINTONIZACIÓN ( o -) de la unidad (o del mando a distancia) para cambiar
el número de la pista.
ES-9
+
3. Pulse el botón ID3/iPod/MEM/C-ADJ. del mando a distancia para confirmar el número de pista.
- MP3/WMA
1. Pulse el botón ID3/iPod/MEM/C-ADJ. del mando a distancia, y pase al modo MEMORY. El número
del álbum parpadeará. (F7)
2. Pulse el botón FOLDER (+ o -) del mando a distancia, y el número de álbum cambiará .
3. Pulse el botón ID3/iPod/MEM/C-ADJ. del mando a distancia, y se mostrará el primer número de
pista.(F8)
4. Pulse el botón SALTO/SINTONIZACIÓN ( o -) de la unidad (o del mando a distancia), y el número
de pista cambiará.
5. Pulse el botón iPod/ID3/MEM/C-ADJ. del mando a distancia para confirmar el número de pista
favorito.
+
2. REPRODUCCIÓN DEL PROGRAMA
Pulse el botón REPRODUCCIÓN/PAUSA/BÚSQUEDA/CONFIRMAR de la unidad (o del mando a
distancia). La unidad reproducirá la primera pista del programa. Cuando se hayan reproducido todas
las pistas, el display de la unidad mostrará el número de pistas y el tiempo de reproducción de las
canciones CD/MP3/WMA.
3. CANCELACIÓN DEL PROGRAMA
Pulse el botón STOP/MENU/ INFO de la unidad (o del mando a distancia) dos veces, o abra la tapa del
compartimento para CDs, cerrándola después, para eliminar los programas memorizados. Establezca
una nueva programación, y la existente quedará eliminada.
Nota: Durante el modo de programación
1. Pulse el botón REPEAT del mando a distancia una vez, y el indicador REP_1 se iluminará en el
display, entonces la unidad repetirá la pista en reproducción.
2. Pulse el botón REPEAT del mando a distancia dos veces, y el indicador REP_ALL se iluminará en el
display, entonces la unidad repetirá la totalidad de las pistas.
3. Pulse el botón REPEAT una vez más, y la unidad volverá al estado normal de reproducción.
REPRODUCCIÓN ALEATORIA (mando a distancia)
Podrá pulsar el botón RANDOM del mando a distancia para seleccionar la función de selección
aleatoria:
1. Durante la detención de un CD, pulse el botón RANDOM una vez para seleccionar la reproducción
aleatoria, entonces el display mostrará “RANDOM”, se seleccionará una pista aleatoriamente que
será reproducida.
2. Durante la reproducción, pulse primero el botón RANDOM, y el display mostrará “RANDOM”,
después pulse el botón SALTO/SINTONIZACIÓN ( o -) de la unidad (o del mando a distancia), y se
seleccionará una pista aleatoriamente que empezará a reproducirse.
3. Para reanudar la reproducción normal, pulse de nuevo el botón RANDOM.
+
REPRODUCCIÓN INTRODUCTORIA (mando a distancia)
1. Pulse el botón INTRO una vez, y se mostrará INTRO. La
unidad principal reproducirá los 10 primeros segundos de
cada pista (F9).
2. Pulse el botón INTRO dos veces, y se reanudará la
reproducción normal.
FUNCIONAMIENTO DE iPod/iPhone
Cuando la unidad se encuentre en el modo EN ESPERA:
1. Pulse el botón EN ESPERA/ENCENDIDO de la unidad o del mando a distancia para encender la
unidad.
2. Pulse el botón CD/iPod/USB/CARD de la unidad (o del
mando a distancia) para seleccionar el modo iPod.
3. Presione la tapa del del puerto para iPod para abrirla.
Conecte un reproductor iPod/iPhone en el soporte del
puerto para iPod, y el indicador de iPod aparecerá en el
display de la unidad principal. (F10)
ES-10
Cuando se encuentre en el modo iPhone/iPod:
1. Pulse el botón REPRODUCCIÓN/PAUSA/BÚSQUEDA/CONFIRMAR para iniciar la reproducción
del iPhone/iPod. Ajuste el volumen girando el control VOLUME (+ o -). Para detener la reproducción
en curso, pulse el botón STOP/MENU/INFO.
2. Pulse el botón REPRODUCCIÓN/PAUSA/BÚSQUEDA/CONFIRMAR para dejar en pausa la
reproducción en curso. Para reanudar la reproducción, pulse el botón REPRODUCCIÓN /PAUSA
/BÚSQUEDA/CONFIRMAR de nuevo.
3. para pasar a la pista anterior o siguiente, pulse el botón SALTO/SINTONIZACIÓN ( o -) para
seleccionar la pista deseada.
4. Pulse el botón REPEAT o RANDOM del mando a distancia para la repetición repetida o aleatoria del
iPhone/iPod.
Nota:
1. La versión 1.1.4 del iPod Touch, o las versiones posteriores, admiten la reproducción de la función
de repetición o aleatoria.
2. Cuando la pantalla del iPod Touch y el iPhone haya sido bloqueada, las funciones apenas descritas
seguirán disponibles.
+
Cuando la unidad se encuentre en el modo de MENÚ iPod/iPhone:
Nota: Las series de iPod Touch y iPhone precisan primero la entrada manual en el menú de música, a
continuación, podrá pasar a la siguiente operación.
1. Cuando la unidad se encuentre en el modo iPod/iPhone, pulse el botón ID3/iPod/MEM/C-ADJ., y
esta entrará en el modo iPod/iPhone MENU. El indicador iPod MENU aparecerá en el display de la
unidad.
2. Pulse el botón STOP/MENU/INFO para regresar al menú iPod/iPhone.
a. Para seleccionar el menú como se muestra a continuación:
Música > Extras > Importar Fotos (función no disponible en el iPod Mini) > Ajustes >Mezclar
Canciones > Retroiluminación > En Reproducción se mostrará en el display del iPod/iPhone.
b. Pulse el botón SALTO/SINTONIZACIÓN ( o -) de la unidad (o del mando a distancia)para buscar
el menú actual.
3. Pulse el botón REPRODUCCIÓN/PAUSA/BÚSQUEDA/CONFIRMAR para entrar en la carpeta de
menú deseada.
a. Pulse el botón SALTO/SINTONIZACIÓN ( o -) de la unidad (o del mando a distancia) para
buscar el contenido actual en cada una de las carpetas de menú deseadas.
b. Si desea regresar al menú iPod/iPhone, pulse el botón STOP/MENU/INFO de nuevo.
4. Para reanudar la reproducción, pulse el botón iPod/ID3/MEM/C-ADJ. de nuevo, y la unidad
regresará al modo iPod. .
+
+
Carga de la batería del reproductor iPod/iPhone mediante la unidad principal:
1. El reproductor iPod/iPhone contiene una batería no extraíble que necesitará ser cargada si no se
usa durante un tiempo.
2. Podrá cargar el reproductor iPod/iPhone automáticamente mediante la unidad principal, cuando esta
se encuentre en los modos EN ESPERA o ENCENDIDO.
Notas:
1. La batería del reproductor iPod/iPhone se cargará en un 80% en una hora, y la carga será completa
en unas pocas horas. Si lo carga durante la reproducción de música, podría llevarle más tiempo.
2. No será mejor realizar la carga en el modo SINTONIZADOR. Ello podría interferir con la recepción.
3. Cuando lo desee, podrá controlar el reproductor iPod/iPhone desde la unidad principal, el mando a
distancia o el propio reproductor iPod/iPhone, siempre que la unidad se encuentre en el modo
"iPod".
4. Cuando lo desee, el reproductor iPod/iPhone debe estar bien fijado en el modo EN ESPERA, para
evitar que resulte dañado.
5. Cuando la unidad se encuentre en el modo iPod. Si la función de vídeo del iPod no funcionara con
normalidad, descargue la última versión de la función de vídeo de iPod en la página web de Apple.
AJUSTE DE LA SALIDA DE VÍDEO (sólo para i-Pod Video y cable de vídeo "del tipo
RCA " no incluido)
1. Cuando la unidad se encuentre en el modo EN ESPERA:
Conecte el aparato de televisión a la salida de la toma VIDEO de la parte posterior de la unidad con
un cable de vídeo (del tipo RCA).
ES-11
2. Cuando la unidad se encuentre en el modo iPod: Pulse el botón"MENU" en la rueda del iPod para
seleccionar la función de vídeo.
3. Para que el iPod pueda reproducir vídeos en un televisor:
(a) Elija Vídeos > Ajustes de Vídeo, y después seleccione Ask u On en la salida de vídeo (Video
Out).
(b) Si selecciona la opción Ask para la salida de vídeo, el iPod le dará la opción de mostrar vídeos en
el TV o el iPod cada vez que reproduzca un vídeo.
Nota:1. El modo de vídeo sólo admite que los reproductores iPod incluyan la función de vídeo.
2. iPod Classic de 80/160GB, iPod Nano de 3ª, 4ª, 5ª y 6ª generación (Vídeo) con pantalla y el
iPod Touch deberán estar bien fijados en el modo EN ESPERA antes de cualquier operación
con la función de vídeo.
REPRODUCCIÓN CON AUX IN
La unidad está dotada de una entrada AUX localizada en la parte izquierda de la unidad. Use un cable
estéreo con clavija de 3,5 mm para conectar el equipo de audio por la toma LINE IN.
1. Para seleccionar la función de entrada AUX, pulse repetidamente el botón DAB/FM/AUX de la
unidad (o del mando a distancia) hasta que AUX se indique en la pantalla.
2. Ajuste el control VOLUME (+ o -) a un nivel adecuado a sus necesidades.
Nota: Cable LINE In no incluido.
CONTROL DE ECUALIZADOR (mando a distancia)
Cuando pulse el botón EQ, el tono del sonido cambiará de la forma siguiente:
SUPRESIÓN DEL SONIDO (mando a distancia)
Pulse el botón MUTE del mando a distancia para que deje de reproducirse sonido por los altavoces de
forma temporal. Cuando eso sea así, el display mostrará “MUTE”. Para cancelar la función "MUTE",
pulse de nuevo el botón MUTE o pulse VOLUME +/-, “MUTE” desaparecerá del display, y el sonido se
recuperará.
PARA ESCUCHAR MÚSICA CON LOS AURICULARES
Conecte sus auriculares (mini clavija estéreo de 3,5mm) en la toma para auriculares de la unidad.
Entonces, el sonido pasará a oírse por los auriculares, y no por los altavoces.
ESPECIFICACIONES
SUMINISTRO ELÉCTRICO :
POTENCIA DE SALIDA :
DIMENSIONES DE LA UNIDAD :
DIMENSIONES DE LOS ALTAVOCES :
PESO NETO :
RADIO
AMPLITUD DE LA BANDA DE FRECUENCIAS :
DISCO COMPACTO
LECTOR ÓPTICO :
RESPUESTA DE FRECUENCIA :
AC 230-240V~50Hz
20 Vatios x 2
152 (An) x 222 (Pr) x 218 (Al) mm
140 (W) x 222 (D) x 218 (H) mm
5,45kg
FM 87.5 - 108 MHz
DAB/DAB+ 174 - 240 MHz
RAYO LÁSER - 3
100Hz - 16kHz
LAS ESPECIFICACIONES ESTÁN SUJETAS A CAMBIOS SIN NOTIFICACIÓN PREVIA.
Advertencia sobre la ventilación : "La ventilación del producto no deberá impedirse para los usos para
los que fue diseñado".
Si en el futuro necesita deshacerse de este producto, tenga en cuenta lo siguiente: no
debe deshacerse de los residuos de productos eléctricos como si fueran residuos
domésticos. Por favor, recicle en los sitios en los que esto sea posible. Acuda a las
autoridades locales o al vendedor en busca de asesoramiento sobre reciclaje. (Directiva
sobre residuos eléctricos y equipos electrónicos).
ES-12