1
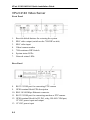
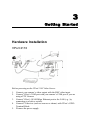
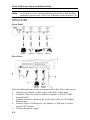
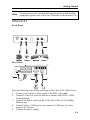
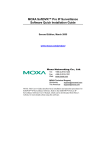
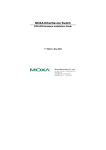
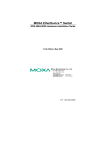
MOXA VPort 2110/2140/2141 Video Server Quick Installation Guide Third Edition, July 2006 MOXA Networking Co., Ltd. Tel: +886-2-2910-1230 Fax: +886-2-2910-1231 www.moxa.com [email protected] (Worldwide) [email protected] (The Americas) NOTE: This Quick Installation Guide describes basic installation procedures for VPort 2110/2140/2141 Video Servers. Please refer to the User’s Manual on the documentation CD for more detailed instructions about using these products. P/N: 1802021100200 MOXA VPort 2110/2140/2141 Video Server Quick Installation Guide The software described in this manual is furnished under a license agreement and may be used only in accordance with the terms of that agreement. Copyright Notice Copyright © 2006 MOXA Networking Co., Ltd. All rights reserved. Reproduction without permission is prohibited. Trademarks MOXA is a registered trademark of The Moxa Group. All other trademarks or registered marks in this manual belong to their respective manufacturers. Disclaimer Information in this document is subject to change without notice and does not represent a commitment on the part of Moxa. Moxa provides this document “as is,” without warranty of any kind, either expressed or implied, including, but not limited to, its particular purpose. Moxa reserves the right to make improvements and/or changes to this manual, or to the products and/or the programs described in this manual, at any time. Information provided in this manual is intended to be accurate and reliable. However, Moxa Technologies assumes no responsibility for its use, or for any infringements on the rights of third parties that may result from its use. This product might include unintentional technical or typographical errors. Changes are periodically made to the information herein to correct such errors, and these changes are incorporated into new editions of the publication 1 Chapter 1 Package Checklist VPort 2110 Video Server Standard Accessories y 1 VPort 2110 Video Server y Power adapter ¾ Input: 100 to 240 VAC ¾ Output: +12 VDC, 1.5A (UK Standard: +12 VDC, 1.25A) y PTZ Camera Control Cable y Null Modem Cable (Female DB9 to Female DB9) y I/O Terminal Block Kit for ¾ 1 DI, 1 Relay Output ¾ 1 RS-485 COM port y Quick Installation Guide y Software CD y Wrench and Pad y Warranty Card Optional Accessories (must be ordered separately) y DIN-Rail Mounting Kit DK-35A VPort 2110/2140/2141 Quick Installation Guide VPort 2140 Video Server Standard Accessories y 1 VPort 2140 Video Server y Power adapter ¾ Input: 100 to 240 VAC ¾ Output: +12 VDC, 1.5A (UK Standard: +12 VDC, 1.25A) y PTZ Camera Control Cable y Null Modem Cable (Female DB9 to Female DB9) y I/O Terminal Block Kit × 2 for ¾ 4 DI, 2 Relay Outputs ¾ 1 RS-485 COM port ¾ 1 12 VDC Power Output (Max. 500 mA) ¾ 1 External Power Input (12 VDC, Min. 1.5A) y Quick Installation Guide y Software CD y L-type Fixed Aluminum piece and 8 screws y Warranty Card VPort 2141 Video Server Standard Accessories y 1 VPort 2141 Video Server y Power adapter ¾ Input: 100 to 240 VAC ¾ Output: +12 VDC, 1.5A (UK Standard: +12 VDC, 1.25A) y PTZ Camera Control Cable y I/O Terminal Block Kit × 2 for ¾ 4 DI, 4 Relay Outputs ¾ 1 RS-485 COM port ¾ 1 12 VDC Power Output (Max. 500 mA) ¾ 1 External Power Input (12-15 VDC/VAC, Min. 1.5A) y Quick Installation Guide y Software CD y Panel Mounting Kit with 4 screws y Pad y Warranty Card Optional Accessories (must be ordered separately) y DIN-Rail Mounting Kit 1-2 DK-35A 2 Chapter 2 Product Description Panel Layout VPort 2110 Video Server Front Panel 1. BNC video input Rear Panel 2. 3. 4. 12 VDC power input Network and status LEDs GPIO terminal block for DI, DO, relay, and RS-485 COM port “Restore default setting” button RJ45 10/100 Mbps Ethernet connector RS-232 COM port 5. 6. 7. VPort 2110/2140/2141 Quick Installation Guide VPort 2140 Video Server Front Panel 1. Reset & default buttons for restoring the system 2. 3. 4. BNC video output (switch on the 75Ω DIP switch) BNC video input Video/camera number 5. 6. 7. 75Ω resistance DIP Switch System status LEDs Network status LEDs Rear Panel 8. 9. 10. 11. 12. RS-232 COM port for connecting PTZ camera GPIO terminal block PIN description RJ45 10/100 Mbps Ethernet connector RS-232 COM port for connecting modem or PTZ camera GPIO terminal block for DI, DO, relay, RS-485 COM port, 12 VDC power input and output 13. 12 VDC power input 2-2 Product Description VPort 2141 Video Server Front Panel 2 2 1 ACTIVE 2 3 POWER LINK CONNECT FDX SERIAL 4 OFF 75 RESET ON VIDEO 1 VIDEO 2 6 5 VIDEO 3 3 VIDEO 4 4 3 1 1. Reset button for restoring the default configuration 2. 3. BNC Video Input (switch off the 75Ω DIP switch) Video/Camera Number 4. 5. 6. 75Ω resistance DIP Switches System Status LEDs Network Status LEDs Rear Panel 1 2 3 4 5 6 7 8 9 10 11 12 13 Power OUT: 12 VDC NO 1 2 Power IN: 12-15V DC/AC 14 15 3 4 5 6 7 8 Relay 3 Relay 4 NO C NC NO C NC 16 DI 1 Relay 2 Relay 1 C NC NO C NC 17 18 19 20 21 9 10 DI 2 11 DI 3 22 23 12 DI 4 24 25 RS-485 13 RS-485 26 POWER IN 12 VDC 14 15 16 17 18 19 20 11 10 21 22 23 24 25 26 COM 1 (RS-232) 10/100 Mbps Ethernet 7 9 8 7. 8. 9. 10. RS-232 COM port for connecting PTZ camera GPIO Terminal Block PIN description RJ45 10/100 Mbps Ethernet connector GPIO Terminal Block for DI, DO, relay, RS-485 COM port, 12 VDC power input and output 11. 12 VDC Power Input 2-3 3 Chapter 3 Getting Started Hardware Installation VPort 2110 Before powering on the VPort 2110 Video Server: 1. 2. 3. 4. 5. Connect your camera’s video output with the BNC video input. Connect VPort’s COM port with your camera’s COM port if you are using a PTZ Camera. Connect VPort’s 10/100 Mbps Ethernet port to the LAN (e.g., by connecting to a hub or switch). Connect I/O devices (such as sensors or alarms) with VPort’s GPIO Terminal Block. Connect the power supply. VPort 2100 Series Quick Installation Guide Note To learn how to use a modem dial-up connection or null modem connection, please refer to the User’s Manual on the software CD. VPort 2140 Front Panel Rear Panel Take the following steps before powering on the VPort 2140 video server: 1. Connect your camera’s video output to the BNC video input. 2. Connect I/O devices (such as sensors or alarms) to VPort’s GPIO terminal block. 3. Connect the hub or switch on the LAN to the VPort’s 10/100 Mbps Ethernet port. 4. Connect VPort’s COM port to your camera’s COM port if you are using a PTZ Camera. 5. Connect the power supply. 3-2 Getting Started To learn how to use a modem dial-up connection or null modem connection, please refer to the User’s Manual on the software CD. Note VPort 2141 Front Panel 1 ACTIVE 2 POWER LINK CONNECT FDX SERIAL 3 4 OFF 75 RESET ON VIDEO 1 VIDEO 2 VIDEO 3 VIDEO 4 1 AF CCD POWER R RECEIVE Rear Panel 2 1 2 3 4 5 6 7 8 9 10 11 12 13 Power OUT: 12 VDC NO 1 2 Power IN: 12-15V DC/AC 14 15 3 16 DI 1 Relay 2 Relay 1 C NC NO C NC 4 5 6 7 8 Relay 3 Relay 4 NO C NC NO C NC 17 18 19 20 21 9 10 DI 2 11 DI 3 22 23 12 DI 4 24 25 RS-485 13 RS-485 26 POWER IN 12 VDC 14 15 16 17 18 19 20 21 22 23 24 25 26 COM 1 (RS-232) 10/100 Mbps Ethernet 5 4 3 Take the following steps before powering on the VPort 2141 Video Server: 1. Connect your camera’s video output to the BNC video input. 2. Connect I/O devices (such as sensors or alarms) with VPort’s GPIO Terminal Block. 3. Connect the hub or switch on the LAN to the VPort’s 10/100 Mbps Ethernet port. 4. Connect VPort’s COM port to your camera’s COM port if you are using a PTZ Camera. 5. Connect the power supply. 3-3 VPort 2100 Series Quick Installation Guide Assigning an IP Address to the VPort 2100 Series Video Server In a DHCP Server Networking Environment The VPort’s IP address is assigned by a DHCP server when the VPort is connected to a DHCP server network. In this case, use the DHCP Server’s IP address table or the MOXA VPort Installation Wizard utility to determine the IP address that was assigned by the DHCP Server. Note After powering on the VPort, wait a few seconds for the POST (Power On Self Test) to run. The IP address will be assigned when the CONNECT LED is lit. Using the VPort Installation Wizard 1. Install the VPort Installation Wizard, which is located on the Software CD. 2. Run the VPort Installation Wizard, which will automatically search for VPort products connected to the same LAN. You can also click the Search button on the VPort Installation Wizard window to initiate a new search. 3. When the wizard finishes searching, the MAC address, IP address, 3-4 Getting Started 4. 5. Assigned (IP assigned status), Model, and Auto IP (indicates whether or not this VPort has an auto IP assigned function) of the VPort will be listed in the VPort Installation Wizard window. Select the VPort by checking the box in front of the MAC address. Click the “Link to selected device” button to open the VPort’s web console via Internet Explorer. Note The IP assigned status will be listed as Yes if the VPort has been assigned an IP address. If it is No, please check if there is a problem with the DHCP network environment, or if the model you are using does not support the auto IP assigned function. In a Non-DHCP Server Networking Environment If your VPort is connected to a network that does not have a DHCP server, then you will need to configure the IP address manually. There are two ways to access the server: 1. If one VPort is connected to the network, open your web browser and type the default IP address in the browser’s address box. In this case, the default IP address is 192.168.0.99 and the default subnet mask is 255.255.255.0. Note that you may need to change your computer’s IP address and subnet mask so that the computer is on the same subnet as the VPort. 2. If two or more VPorts are connected to the network, the default IP addresses are 192.168.0.99, 192.168.0.100, etc. In this case, you can use the MOXA VPort Installation Wizard utility to determine the location of each VPort connected to the network. Since the VPort Installation Wizard searches by MAC address, the VPort and computer must be connected to the same Ethernet LAN for the VPort Installation Wizard to locate the VPort. Note VPort’s Network and Status LEDs can be used to determine if the VPort is transmitting and receiving data over the network. Refer to the User’s Manual to see how to interpret the Network and Status LEDs. Assigning the IP Address Manually To change the IP address of the VPort manually, access the VPort’s web server, and then navigate to the Configuration\ Network page to configure the IP address and other network settings. Uncheck the “Reset IP address at next boot” checkbox to ensure that the IP address you assign is not deleted each time the VPort is restarted. 3-5 VPort 2100 Series Quick Installation Guide Accessing VPort 2100 Video Servers 1. 2. Type the IP address in the web browser’s address input box and then press enter. A window will open asking you to enter the user name and password. For first time access, you must type root for user name, and the MAC address (without typing dashes) of that VPort for the password. Click on OK to continue. After entering the VPort configuration main page, the administrator can configure the user name and password for different users to access the VPort. 3. 3-6 A Security Warning message will appear next. Click on Yes to install the plug-in program. Getting Started 4. The main page of the VPort 2100 server you just installed will appear. Click on the function links to configure the server. Note Refer to User’s Manual on the documentation CD for more details about the functions accessible from the main page. 3-7 A Appendix A Service Information This appendix shows you how to contact Moxa for information about this and other products, and how to report problems. In this appendix, we cover the following topics. MOXA Internet Services Problem Report Form Product Return Procedure VPort 2100 Series Quick Installation Guide MOXA Internet Services Customer satisfaction is our number one concern, and to ensure that customers receive the full benefit of our products, Moxa Internet Services has been set up to provide technical support, driver updates, product information, and user’s manual updates. The following services are provided E-mail for technical support ...................................... [email protected] Website for product information:................................. http://www.moxa.com A-2 Service Information Problem Report Form MOXA VPort 2100 Series Customer name: Company: Tel: Fax: Email: Date: 1. Moxa Product: VPort 2110 VPort 2140 VPort 2141 2. Serial Number: _________________ Problem Description: Please describe the symptoms of the problem as clearly as possible, including any error messages you see. A clearly written description of the problem will allow us to reproduce the symptoms, and expedite the repair of your product. A-3 VPort 2100 Series Quick Installation Guide Product Return Procedure For product repair, exchange, or refund, the customer must: A-4 Provide evidence of original purchase. Obtain a Product Return Agreement (PRA) from the sales representative or dealer. Fill out the Problem Report Form (PRF). Include as much detail as possible for a shorter product repair time. Carefully pack the product in an anti-static package, and send it, pre-paid, to the dealer. The PRA should be visible on the outside of the package, and include a description of the problem, along with the return address and telephone number of a technical contact.