1
PERATOR'S
MAN
AL
MANUAL DEL OPERADOR
19.2 VOLT WET/DRY CANISTER VAC
ASPIRADORA PARA USO
EN SECO/HOMEDO,
19,2 V
Model No.
315.1 75980
NQmero de modelo
315.175980
WARNING:
Toreduoe
the
risk of injury, the user must read and
understand the operator's manual
before using this product.
ADVERTENCIA:
Para
BATTERIES
AND CHARGERS
SOLD SEPARATELY
reducir el riesgo de lesiones, el usuario
debe leer y comprender el manual del
operador antes de usar este producto.
Customer
LAS BATERJAS Y LOS
CARGADORES
SE VENDEN
POR SEPARADO
Help Line: 1-800-932-3188
Tel_fono de atenci6n al consumidor:
Sears Brands Management
1-800-932-3188
Corporation,
3333 Beverly Rd., Hoffman
Estates,
Visit the Craftsman web page: www.sears.com/craftsman
Visite el sitio web de Craftsman: www.sears.com/craftsman
Save this manual
987000-752
10-20-10 (REV:05)
Guarde
este manual
for future
para futuras
reference
consulta
IL 60179
USA
ESPANOL
ENGLISH
[]
Warranty ......................................................................
2
[]
Garant[a ......................................................................
2
[]
Introduction .................................................................
2
[]
Introducci6n ................................................................
2
[]
Important Safety Instructions .................................
3-4
[]
Instrucciones
[]
Symbols ......................................................................
5
[]
S[mbolos .....................................................................
5
[]
Features ......................................................................
6
[]
Caracter[sticas ............................................................
6
[]
Assembly ................................................................
6-7
[]
Armado ...................................................................
6-7
[]
Operation ................................................................
7-8
[]
Funcionamiento
7-9
[]
Maintenance .........................................................
9-10
[]
Mantenimiento ......................................................
[]
Accessories ...............................................................
10
[]
Accesorios ................................................................
11
[]
Illustrated Parts List ..................................................
11
[]
Figura numeras (ilustraciones) ..................................
i-ii
[]
Figure Numbers (Illustrations) ...................................
i-ii
[]
Pedidos de piezas/servicio
[]
Parts Ordering/Service ................................
CRAFTSMAN®
importantes de seguridad ................ 3-4
......................................................
9-11
................... P_g. posterior
Back Page
ONE YEAR LiMiTED WARRANTY
FOR ONE YEAR from the date of purchase, this product is warranted against any defects in material or workmanship. With
proof of purchase, defective product will be replaced free of charge.
For warranty coverage details to obtain free replacement,
visit the web site: www.craftsman.com.
This warranty does not cover the filters, which are expendable parts that can wear out from normal use within the warranty
period.
This warranty is void if this product is ever used while providing commercial services or if rented to another person.
This warranty gives you specific legal rights, and you may also have other rights which vary from state to state.
Sears Brands Management Corporation,
GARANT(A
LIMITADA
DE CRAFTSMAN
Hoffman Estates, IL 60179
POR UN ANO
Este producto tiene garant[a pot cualquier defecto en material o mano de obra DURANTE UN ANO desde la fecha de compra.
Los productos defectuosos se remplazar_n sin cargo si presenta un comprobante de pago.
Si desea conocer los detalles de la cobertura de la garantia para conseguir reparaciones o recambios, visite el sitio
Web: www.craftsman.com
Esta garantfa no cubre la filtros, que es una pieza fungible que puede desgastarse pot el uso normal durante el
perfodo de garantfa.
La garantfa pierde validez si este producto se utiliza mientras se prestan servicios comerciales o si se alquila a otra persona.
Esta garantfa le otorga derechos legales espedficos y tambi_n puede gozar de otros derechos que varfan seg0n el estado.
Sears Brands Management
Corporation,
Hoffman
Estates, IL 60179
This tool has many features for making its use more pleasan_ and enjoyable. Safety, performance,
have been given top priority in the design of this product making it easy to maintain and operate.
and dependability
Esta herramienta ofrece numerosas caracter[sticas para hacer m_s agradable y placentero su uso. En el disefio de
este producto se ha conferido prioridad a la seguridad, el desempefio y la fiabilidad, por Io cual se facilita su manejo y
mantenimiento.
SAVE THESE iNSTRUCTIONS
WARNING!
READ
AND
UNDER-
STAND ALL iNSTRUCTiONS.
Failure to follow
all instructions listed below, may result in electric
shock, fire and/or serious personal injury.
When using an electrical appliance, basic precautions
should always be followed, including the following:
READ ALL INSTRUCT(ONS
APPLIANCE
BEFORE
US(NG
THIS
A WARNING: Toreduce
therisk
ofelectricshock DO NOT expose to rain. Store indoors.
•
Dress properly. Do not wear loose clothing or
jewelry. Contain long hair. Keep your hair and
clothing away from moving parts. Loose clothes,
jewelry, or long hair can be caught in internal moving
parts.
• Turn off all controls before unplugging from or
plugging into an electrical outlet for charging.
•
Use extra care when using on stairs.
•
Do not use to pick up hard objects such as nails,
screws, coins, etc. Damage or injury could result.
•
Do not incinerate this appliance even if it is severely
damaged. The batteries can explode in a fire.
• Canister vac does not have to be plugged into an
electrical outlet, therefore it is always in operating
condition. Be aware of possible hazards when using
the canister vac or when changing accessories.
•
Remove battery when the vacuum is not in use and
before servicing.
•
Use only the charger recommended for your
canister vac. Do not substitute any other charger. Use
of another charger could cause batteries to explode
causing possible serious injury.
•
Do not overreach. Keep proper footing and balance
at all times. Proper footing and balance enables better
control of the canister vac in unexpected situations. Do
not use on a ladder or unstable support.
• Use battery only with charger listed.
For use with
19.2V nicke(-cadmium
and 19.2V (ithium-ion battery
packs, see tool/appliance/battery
pacWcharger correlation supplement 988000-272.
•
Use safety equipment.
appropriate conditions.
•
•
Always wear eye protection with side shields
marked to comply with ANSI Z87.1. Following this
rule will reduce the risk of serious personal injury.
Dust mask must be used for
Do not place canister vac or batteries
heat. They may explode.
near fire or
• The product should be charged in a location where the
temperature is more than 50°F but less than 100°F.
•
Do not allow children to operate canister vac or
play with canister vac as a toy. Close attention is
necessary when used near children.
•
Use this product ONLY for its intended use as
described in this manual. Use only the attachments
recommended in this manual.
•
If product is not working properly, has been
dropped, damaged, left outdoors, or dropped into
water, return to your nearest service center.
•
Do not handle charger plug or canister vac with wet
hands.
•
Do not put any objects in ventilation openings. Do
not use with any opening blocked. Keep openings free
of dust, lint, hair, and anything that may reduce air flow.
•
NEVER vacuum materials such as hot coals,
cigarette butts, matches, burning or smoking
ashes, etc.
•
DO NOT use to pick up flammable or combustible
liquids, such as gasoline, or use in areas where
they may be present.
•
Do not use without dust bowl or filter in place.
•
Under extreme usage or temperature conditions,
battery leakage may occur. If liquid comes in
contact with skin, wash at least 10 minutes then seek
immediate medical attention.
•
Batteries can explode in the presence of a source
of ignition, such as a pilot light. To reduce the risk of
serious personal injury, never use any cordless product
in the presence of an open flame. An exploded battery
can propel debris and chemicals. If exposed, flush with
water immediately.
•
Protect your lungs. Wear a face or dust mask if the
operation is dusty. Following this rule will reduce the
risk of serious personal injury.
• Check for misalignment or binding of moving parts,
breakage of parts, and any other condition that may
affect the product's operation. If damaged, have the
product serviced before using. Many accidents are
caused by poorly maintained products.
•
3 - English
Use only accessories that are recommended by the
manufacturer for your model. Accessories that may
be suitable for one canister vac may create a risk of
injury when used on another canister vac.
[] Product service must be performed only by
qualified repair personnel. Service or maintenance
performed by unqualified personnel could result in a
risk of injury.
[] When servicing product, use only identical
replacement parts. Follow instructions in the
Maintenance section of this manual. Use of
[] Do not crush, drop or damage battery pack. Do
not use a battery pack or charger that has been
dropped or received a sharp blow. A damaged
battery is subject to explosion. Properly dispose of a
dropped or damaged battery immediately.
[] Do not charge battery tool in a damp or wet location. Following this rule will reduce the risk of electric
shock.
unauthorized parts or failure to follow Maintenance
instructions may create a risk of electric shock or
injury.
[] When battery pack is not in use, keep it away from
other metal objects like paper clips, coins, keys,
nails, screws, or other small metal objects that can
make a connection from one terminal to another.
Shorting the battery terminals together may cause
burns or a fire.
[] Save these instructions.
Refer to them frequently and
use them to instruct others who may use this hand vac.
If you loan someone this hand vac, loan them these
instructions also to prevent misuse of the product and
possible injury.
4 - English
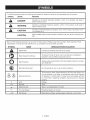
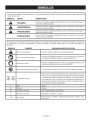
The following
SYMBOL
signal words and meanings
are intended
to explain the levels of risk associated
with this product.
SIGNAL
MEANING
_,
DANGER:
Indicates
an imminently
death or serious
injury. hazardous situation, which, if not avoided, will result in
,_
WARNING:
Indicates a potentially hazardous
death or serious injury.
,_
CAUTION:
Indicates a potentially
or moderate injury.
CAUTION:
(Without
age.
situation,
which,
if not avoided,
hazardous situation, which, if not avoided,
could result in
may result in minor
Safety Alert Symbol) Indicates a situation that may result in property
dam-
Some of the following symbols may be used on this product. Please study them and learn their meaning. Proper
interpretation of these symbols will allow you to operate the product better and safer.
SYMBOL
A
NAME
DESIGNATION/EXPLANATION
Safety Ale_
Read Operator's
Indicates a potential personal injury hazard.
Manual
To reduce the risk of injury, user must read and understand
operator's manual before using this product.
0
Eye Protection
Always wear eye protection with side shields marked to comply
with ANSI Z87.1.
@
Wet Conditions Alert
Do not expose to rain or use in damp locations.
Recycle Symbols
This product uses nickel-cadmium
(Ni-Cd) and lithium-ion
(Li-ion) batteries. Local, state, or federal laws may prohibit disposal
of batteries in ordinary trash. Consult your local waste authority
for information regarding available recycling and/or disposal
options.
Volts
Voltage
Minutes
Time
Direct Current
Type or a characteristic
No Load Speed
Rotational speed, at no load
Per Minute
Revolutions, strokes, surface speed, orbits etc., per minute
V
min
==-==_
no
.../min
5 - English
of current
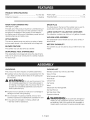
PRODUCT
SPECIFICATIONS
Motor ...............................................................
19.2 Volt DC
Collection Capacity ..............................................
KNOW
YOUR CANISTER
2 Gallons
VAC
The safe use of this product requires an understanding of
the information on the tool and in this operator's manual
as well as a knowledge of the project you are attempting. Before use of this product, familiarize yourself with all
operating features and safety rules.
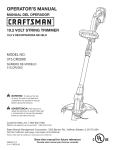
ATTACHMENTS
The vacuum attachments can perform a variety of tasks
and are easily stored in the detachable tool storage belt.
FEATURE
TOOL STORAGE
5 ft.
1-1/4 in.
PLUG
The drain plug on the back of the canister vac is used to
quickly drain liquids from the collection container.
LARGE CAPACITY
COLLECTION
CONTAINER
The collection container can hold up to 2 gallons of waste.
VACUUM
HOSE ASSEMBLY
The detachable hose is flexible and can use a variety of
attachments.
WET/DRY
CAPABILITY
The canister vac can be used to vacuum either wet or dry
waste.
The canister vac can also serve as a blower.
DETACHABLE
Hose Diameter ........................................................
DRAIN
See Figure 1, page L
BLOWER
Hose Length ..................................................................
BELT
This detachable tool storage belt stores the attachments
when not in use and can be secured in a variety of places
for ease of use.
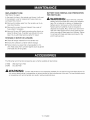
UNPACKING
PACKING
This product has been shipped completely assembled.
Wet/Dry Canister Vac with Dry User Filter
[] Carefully remove the tool and any accessories from the
box. Make sure that all items listed in the packing list
are included.
Vacuum Hose
WARNING:
DO not use this product if it is
not completely assembled or if any parts appear to
be missing or damaged. Use of a product that is not
properly and completely assembled could result in
serious personal injury.
LIST
Wide Nozzle with Squeegee
Floor Brush
Crevice Tool
Car Nozzle
Wand
Detachable Tool Storage Belt
Dry Use Filter (2)
[] Inspect the tool carefully to make sure no breakage or
damage occurred during shipping.
Wet Use Foam Filter
Operator's Manual
[] Do not discard the packing material until you have
carefully inspected and satisfactorily operated the tool.
[] If any parts are damaged or missing, please call
1-800-932-3188 for assistance.
WARNING:
anyparts
are
damaged
or
missing do not operate this product until the parts
are replaced. Use of this product with damaged or
missing parts could result in serious personal injury.
6 - English
WARNING:
WARNING: Toprevent accidental
startingthat could cause serious personal injury, always
Do not attempt to modify this
product or create accessories not recommended for
use with this product. Any such alteration or modification is misuse and could result in a hazardous
remove the battery pack from the product when assembling parts.
condition leading to possible serious personal injury.
WARNING:
DO not allow familiarity with
this product to make you careless. Remember that
a careless fraction of a second is sufficient to inflict
serious injury.
A
WARNING:
Always wear eye protection
with side shields marked to comply with ANSI Z87.1.
Following this rule will reduce the risk of eye injury.
For complete charging instructions, refer to the Operator's
Manual for the battery packs and chargers for your
models.
BATTERY
PROTECTION
FEATURES
Craftsman® 19.2 V lithium-ion batteries are designed with
features that protect the lithium-ion cells and maximize
battery life. Under some operating conditions, these builtin features may cause the battery and the tool it is powering to act differently from nickel-cadmium batteries.
During some applications, the battery electronics may
signal the battery to shut down, and cause the tool to stop
running. To reset the battery and tool, release the trigger
and resume normal operation.
APPLICATIONS
You may use this tool for the purposes listed below:
Vacuum Functions:
[] Light-duty vacuuming of wet or dry surfaces
IAHA_I_|
I kl f__.
,vv_rlJll_lJll|_ll%_,
Battery tools are always
in operating condition. Therefore, switch should
always be in the OFF ( O } position when not in use
or carrying at your side.
Blower Functions:
[] Clearing hard surfaces such as driveways and walkways
[] Keeping decks and driveways free from leaves and
pine needles
WARNING:
STARTING/STOPPING
Always remove battery
pack from your tool when you are assembling parts,
making adjustments, cleaning, or when not in use.
Removing battery pack will prevent accidental starting that could cause serious personal injury.
INSTALLING
BATTERY
[] To start the canister vac, place the power switch in the
ON (I) position.
[] To stop the canister vac, place the power switch in the
OFF (O) position.
HOSE ATTACHMENT
See Figure 4, page iL
[] Place the power switch in the OFF (O) position.
[] Place the battery pack in the canister vac.
[] Make sure the latches on each side of the battery pack
snap in place and that battery pack is secured in the
canister vac before beginning operation.
BATTERY
VAC
PACK
See Figures 2 - 3, page iL
REMOVING
THE CANISTER
See Figures 3, page ii.
PACK
[] To attach the hose, push tapered end of hose into
opening of the vacuum port.
[] To remove the hose, hold the tapered end and pull
hose from vacuum port.
USING
THE ATTACHMENTS
See Figures 2 - 3, page ii,
See Figure 5, page iL
[] Place the power switch in the OFF (O) position.
Vacuuming can be performed with either the hose alone
or the hose and vacuum attachments together.
[] Turn off the canister vac.
[] Locate latches on side of battery pack and depress
both sides to release battery pack.
[] Remove battery pack from the canister vac.
This product will accept Craftsman® 19.2 V lithium-ion
battery packs and Craftsman® 19.2 V nickel-cadmium
battery packs.
[] Insert the attachment into the front end of the hose,
making sure the attachment is firmly in place.
[] To remove, hold the attachment and pull from hose.
7 - English
Thevacuumattachments
aredesignedforthefollowing
applications:
[] Thewidenozzlewithsqueegeeis usedto vacuum
large,fiat,dry,or wetsurfaces.
[] Thefloorbrushis usedto vacuumcarpetedsurfaces.
[] Thewandis usedasa handleinvacmodeandasa
blowertubeinblowermode.Thewandcanalsofunctionasanextension
to anyofthecanistervacattachments.
[] Thecarnozzleis usedfor carinteriorsor forvacuumingsmallsurfaceareas.Thecarnozzlecanalsobe
usedwiththewandwhilethecanistervacis in blower
modeforwidenedairflow.
[] Thecrevicetool is usedtovacuumnarrow,hardto
reachplaces.
DETACHABLE
TOOL STORAGE BELT
See Figure 6, page iL
When not in use, the vacuum attachments provided
with the canister vac can be placed in the storage areas
located in the tool belt. The belt can also be attached and
secured in a variety of places for ease of use.
DRY VACUUMING
WARNING:
NEVE.
vacoom
mate.-
als such as hot coals, cigarette butts, matches,
burning or smoking ashes, etc.
Vacuum only items small enough to fit through the hose or
the attachment. When vacuuming, make sure that the dry
use filter stays in place. The performance of the canister
vac will decrease with a full collection container. Upon
emptying the collection container, check to see if the dry
use filter needs replacing.
NOTE: The canister vac is shipped ready for dry use
vacuuming. To equip the canister vac for wet use, see
Switching Filters in the MAINTENANCE section of this
manual.
NOTE: When wet vacuuming, it is necessary to change
the filter from the dry use filter to the included wet use
foam filter. To equip the canister vac for wet use, see
Switching Filters in the MAINTENANCE section of this
manual.
WARNING:
When vacuuming liquid,
make sure the canister vac does not get submerged or doused in liquid, which could cause
shock, vacuum failure, or personal injury.
USING THE CANISTER
VAC AS A BLOWER
See Figure 7, page ft.
WARNING:
Never use blower near
fires, fireplaces, hot ashes, barbecue pits, etc.,
which may cause fire to spread.
At all times, the canister vac blows air through the blower
port as part of the exhaust system. However, you can use
the canister vac as a blower by attaching the wand to the
blower port.
[]
Remove the battery pack from the canister vac.
[]
Remove the hose from the tank if attached.
[]
[]
Remove the detachable tool storage belt.
Remove the motor unit from the collection container
assembly by lifting the latches simultaneously.
[]
Remove the wand from the hose if attached.
[]
To attach the wand, push larger end of wand into the
opening of the blower port. For wider air flow, attach
the car nozzle to the end of the wand.
[] To remove the wand, pull wand from opening in blower
port.
To keep from scattering debris, blow around the outer
edges of a debris pile. Never blow directly into the center
of a pile.
WET VACUUMING
The canister vac can be used to vacuum small amounts
of liquid. However, use caution when vacuuming larger
amounts of liquid, as this could cause possible problems.
When wet or dry vacuuming, make sure the drain plug is
firmly in place.
When wet vacuuming, be aware that your canister vac
is equipped with a check ball inside the filter unit housing. This check ball is specially designed to work with
wet vacuuming applications to shut the suction off when
the collection container reaches full capacity. When the
suction shuts off due to a full collection container, turn the
canister vac OFF and empty the collection container as
shown in MAINTENANCE.
Use rakes and brooms to loosen debris before blowing. In
dusty conditions, slightly dampen surfaces when water is
available.
Watch out for children, pets, open windows, or freshly
washed cars, and blow debris safely away.
After using blowers or other equipment, CLEAN UP! Dispose of debris properly.
8 - English
A
WARNING:
identical replacement
When servicing, use only
parts. Use of any other parts
may create a hazard or cause product damage.
WARNING:
A,ways
wear
eye
protection []
with side shields marked to comply with ANSI Z87.1.
Failure to do so could result in objects being thrown
into your eyes resulting in possible serious injury.
WARNING:
Avoid using solvents when cleaning plastic parts. Most
plastics are susceptible to damage from various types of
commercial solvents and may be damaged by their use.
Use clean cloths to remove dirt, dust, oil, grease, etc.
[] Remove the battery pack from the canister vac.
[] Lift the tabs on the side of the canister vac. Pull the
collection container down and off to separate it from
the motor housing.
[] Remove filter unit from tank assembly.
[] Empty the collection container; wash out if necessary.
Before reattaching to the canister vac, make sure all
pieces are completely dry.
[] To reattach, snap the collection container into the slots
on the motor housing.
Do not at anytime let
brake fluids, gasoline, petroleum-based products,
penetrating oils, etc., come in contact with plastic
parts. Chemicals can damage, weaken or destroy
plastic which may result in serious personal injury.
REMOVING
LIQUID WASTE
See Figures 8 - 9, page ii.
Removing pick-up can be completed in two ways.
To remove liquid pick-up
container:
Only the parts shown on the parts list are intended to
be repaired or replaced by the customer. All other parts
should be replaced at an Authorized Service Center.
by removing
the collection
[] Lift the tabs on the side of the canister vac. Pull the
collection container down and off to separate it from
the motor housing.
THE FILTER
[] Empty the collection container; wash if necessary.
Before reattaching to the canister vac, make sure all
pieces are completely dry.
[] Remove the battery pack from the canister vac.
[] Lift the tabs on the side of the canister vac. Pull the
collection container down and off to separate it from
the motor housing.
[] Remove the filter unit.
To remove pick-up
using the drain plug:
[] Remove the battery pack from the canister vac.
[] Remove the filter by removing the retention band and
pulling filter off of the filter unit.
[] Shake or lightly brush any dust or dirt off the filter.
[] Remove the drain plug.
[] Tip canister vac to drain liquid.
[] Replace the drain plug.
[] Replace dry filter or switch to wet filter if needed.
To clean:
CAUTION:
[] To replace, slide new filter over filter unit and reattach
retention band.
[] Empty the filter, filter unit, and collection container;
wash if necessary. Before reattaching to the canister
vac, make sure all pieces are completely dry.
SWITCHING
DRY PICK-UP
The collection container should be checked, emptied, and
cleaned periodically to obtain maximum efficiency.
To avoid serious personal
REPLACING
AND CLEANING
See Figure 8, page ii.
Reattach retention band.
See Figure 8, page ii,
MAINTENANCE
WARNING:
new filter over filter unit.
REMOVING
injury, always remove the battery pack from the tool
when cleaning or performing any maintenance.
GENERAL
Remove the filter and filter unit.
[] Remove the filter by removing the retention band and
pulling filter off of the filter unit.
[] Replace wet or dry filter with appropriate one by sliding
[]
oo not allow liquid pick up
to remain in the collection container for extended
periods of time. Moisture can develop in the motor
compartment and shorten the life of the motor.
CAUTION:
Do not turn unit upside
down, as liquid may enter the motor unit.
FILTERS
See Figure 8, page iL
[] Remove the battery pack from the canister vac.
[] Lift the tabs on the side of the canister vac. Pull the
collection container down and off to separate it from
the motor housing.
9 - English
REPLACEMENTFUSE
BATTERY
See Figure 10, page ii.
FOR RECYCLING
In the event the fuse in the canister vac blows, it will need
to be replaced. Look for replacement fuses where you
purchased this product.
[] Remove the battery pack from the canister vac to access fuse housing.
[] Remove the current fuse and discard. Use a pair of
fuse pullers if necessary.
[] Use only 30 amp JAT blade type automotive fuse to replace the blown fuse. If canister vac still will not work,
take it to an authorized service center for repair.
STORAGE
(1 MONTH
PACK REMOVAL
WARNING:
AND
PREPARATION
Upon
removal, coverthe
battery pack's terminals with heavy-duty adhesive
tape. Do not attempt to destroy or disassemble
battery pack or remove any of its components.
Nickel-cadmium batteries must be recycled or
disposed of properly. Also, never touch both terminals with metal objects and/or body parts as short
circuit may result. Keep away from children. Failure
to comply with these warnings could result in fire
and/or serious injury.
OR LONGER)
[] Clean all foreign material from the canister vac.
[] Empty the collection container before storage.
[] Store indoors in a place that is inaccessible to children. Keep away from corrosive agents such as garden
chemicals and de-icing salts.
The following recommended
accessories are currently available at retail stores:
917888
Wet Use Foam Filter
916949
Dry Use Filter
-,,-WARNING:
Current attachments
and accessories
available for use with this tool are listed above. Do
not use any attachments or accessories not recommended by the manufacturer of this tool. The use of attachments
or accessories not recommended can result in serious personal injury.
10 - English
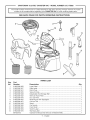
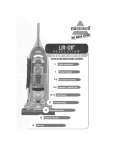
CRAFTSMAN
[
19.2 VOLT CANISTER
VAC - MODEL
NUMBER
315.175980
The model number will be found on a label attached to the motor housing. Always mention the model
number in all correspondence regarding your CANISTER VAC or when ordering repair parts.
SEE BACK
PAGE FOR PARTS ORDERING
]
J
iNSTRUCTiONS
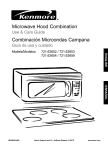
12
4
11
2
t
10
/
9
/
!
8
PARTS LiST
Key
No.
1
2
3
4
5
6
7
8
9
10
11
12
13
14
PaN
Number
019023001056
019023001057
019023001041
019023001045
019023001048
019023001042
019023001043
019023001052
019023001051
019023001049
019023001050
019023001055
019023001059
019023001075
987000752
Description
Qty.
Logo Label ......................................................................................................
Data Label .......................................................................................................
1
1
Drain Plug .......................................................................................................
Vacuum Hose ..................................................................................................
1
1
Detachable Tool Storage Belt .........................................................................
Wet Use Foam Filter ........................................................................................
Dry Use Filter ..................................................................................................
Wide Nozzle with Squeegee ...........................................................................
Crevice Tool ....................................................................................................
Wand ...............................................................................................................
Car Nozzle .......................................................................................................
Floor Brush .....................................................................................................
Switch Label ...................................................................................................
1
1
1
1
1
1
1
1
1
Warning Label .................................................................................................
Operator's Manual (Not Shown) (019023001068) ...........................................
1
1
11 - English
12- English
A
B
K
\
I
\
\
\
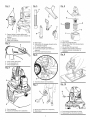
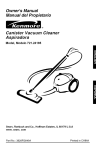
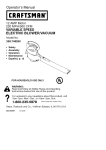
A - Vacuum hose(manguera de aspiradora)
B - Drain plug (tapon de drenaje)
C - Collection container (contenedor de captacion)
D - Detachabletool storage belt (cinturon desmontable del almacenaje
de herramientas)
E - Wet use foam filter (filtro de humedo)
i
F - Dry usefilter (filtro para seco)
G- Wide nozzlewith squeegee(boquilla ancha con limpiador de goma)
H - Floor brush (cepillo para pisos)
I - Crevicetool (boquilla para hendidurasangostas)
J - Car nozzle (boquilla para carros)
K- Wand (tubo)
A
A
/
C
B
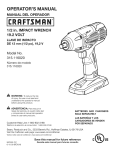
A - Depress latchesto releasebattery pack
(pulsar los pestillos para soltar el paquetede
baterias)
B - Latches (pestillos)
C - Battery pack (bateria)
A
DJ
!
A- Wand (tubo)
B - Wide nozzlewith squeegee(boquilla ancha
con limpiador de goma)
C - Car nozzle (boquilla para carros)
D - Crevicetool (boquilla para hendiduras
angostas)
E - Floor brush (cepillo para pisos)
_E
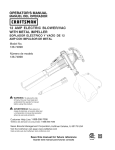
A- Tab(orejeta)
B - Filter unit (unidad del filtro)
C - Wet use foam filter (filtro de espumapara
humedo tubo)
D - Dry use filter (filtro para seco)
E - Retention band (banda de retencion)
F - Collection container (contenedor de
captacion)
A - Power switch (interruptor)
B- On (I) [encendido (I)]
C- Off (0) [apagado(0)]
A - Tool belt (cinturon de herramientas)
A
A
\
° \
B
A- Hose(manguera)
B - Vacuumport (aberturadela sopladora)
A - Blower port (aberturade la sopladora)
B- Wand (tubo)
A - Fusehousing (alojamiento del fusible)
B - Replacementfuse (fusible de repuesto)
GUARDE ESTAS INSTRUCCIONES
iADVERTENCIA!
LEA Y
COMPRENDA TODAS LAS INSTRUCCIONES.
El incumplimiento de las instrucciones se_aladas
enseguida puede causar descargas el_ctricas,
incendios y lesiones serias.
AI utilizar un aparato el_ctrico, deben seguirse ciertas
precauciones b_sicas, como las siguientes.
LEA TODAS LAS INSTRUCCIONES
DE USAR ESTE APARATO
A ADVERTENCIA:
ANTES
•
•
NO utilice la unidad para recoger liquidos
inflamables o combustibles, como gasolina, ni la
utilice en lugares donde dichos liquidos puedan
estar presentes.
•
No use la unidad sin que el colector de polvo y el
filtro se encuentren en su lugar.
•
Apague todos los controles antes de desenchufar
o enchufar la unidad en una toma de corriente para
cargarla.
•
Tenga cuidado extremo al utilizar la unidad en
escaleras.
•
No use la unidad para recoger objetos duros como
clavos, tornillos, monedas, etc. Pueden producirse
da_os o lesiones.
•
No incinere este aparato, incluso siesta dahado
seriamente. Las baterfas pueden estallar e
incendiarse.
•
La aspiradora no tiene que estar enchufada en una
toma de corriente, por Io tanto siempre esta en
condiciones de funcionamiento. Est_ consciente de
Para reducir el
riesgo de una descarga electrica NO exponga la
unidad a la Iluvia. Guarde la unidad en el interior.
•
•
Vistase de manera apropiada. No vista ropas
holgadas ni porte joyas. Rec6jase el cabello siesta
largo. Mantenga el cabello y la ropa alejados de las
piezas m6viles. Las ropas holgadas y las joyas, as[
como el cabello largo, pueden ser atrapados por las
piezas m6viles internas.
No se estire demasiado. Mantenga una postura
firme y buen equilibrio en todo momento. La postura
firme y el buen equilibrio permiten un mejor control de
la aspiradora en situaciones inesperadas. No utilice
la unidad al estar en una escalera o en un soporte
inestable.
Use equipo de seguridad. Se debe usar mascarilla
contra el polvo en las condiciones que asf Io requieran.
•
No permita que ningt_n ni_o utilice o juegue con
la aspiradora como si fuera un juguete. AI ser
usado este producto cerca de los ni_os, debe tenerse
extrema precauci6n.
•
Utilice este producto SOLAMENTE para los fines
especificados en este manual. Solamente utilice
accesorios recomendados en este manual.
•
Si el producto no esta funcionando
adecuadamente,
se dej6 caer, se daSo, se dej6 a la
intemperie, o se dej6 caer dentro del agua, regr_selo al
centro de servicio mas cercano.
•
No maneje con manos mojadas la clavija del
cargador o la aspiradora.
•
No ponga ningt_n objeto en las ventilas. No use la
unidad con ninguna abertura bloqueada. Mantenga las
aberturas libres de polvo, pelusa, pelo y cualquier cosa
que pueda reducir el flujo de aire.
•
NUNCA aspire materiales con brasas calientes,
colillas de cigarrillos, f6sforos, cenizas candentes o
humeantes, etc.
los posibles peligros cuando est_ usando la aspiradora
o cuando est_ cambiando los accesorios de la misma.
•
Cuando no est_ usandose la aspiradora y antes de
darsele servicio debe retirarse la bateria.
•
Solamente utilice el cargador recomendado
para la
aspiradora. No utilice ningOn otro cargador. El empleo
de cualquier otro cargador podrfa causar el estallido de
las baterias y posibles lesiones graves.
•
Cargue las baterias solamente con el cargador
indicado. Para utilizar con paquetes de baterias de
n[quel-cadmio de 19,2 V o de iones de litio de 19,2 V,
consulte el folleto de la herramienta/aparato/paquete
de
bater[as/cargador complementario 988000-272.
•
No coloque la aspiradora ni las baterias cerca del
fuego odel calor. Pueden explotar.
•
El producto
temperatura
•
En condiciones extremas de uso o temperatura es
posible que se derrame fluido de la bateria. Si el
liquido entra en contacto con la piel, lavese cuando
menos durante 10 minutos y busque atenci6n m_dica
de inmediato.
•
Las baterias pueden explotar en presencia de
fuentes de inflamaci6n, como los pilotos de gas.
Para reducir el riesgo de lesiones serias, nunca use
un producto inalambrico en presencia de llamas
expuestas. La explosi6n de una bateria puede lanzar
fragmentos y compuestos quimicos. Si ha estado
expuesto a la explosi6n de una bateria, lavese de
inmediato con agua.
3- Espa_ol
debe cargarse en un lugar donde la
est_ entre 10 y 38 °C (50 ylO0 °F).
•
Prot_jase los pulmones. Use una careta o
mascarilla contra el polvo si la operaci6n genera
mucho polvo. Con el cumplimiento de esta regla se
reduce el riesgo de lesiones corporales de gravedad.
•
Revise para vet si hay desalineaci6n
o atoramiento
de piezas moviles, ruptura de piezas o toda otra
condici6n que pueda afectar el funcionamiento
del producto. Si se daha el producto, haga que
le den mantenimiento
antes de volver a utilizarlo.
Numerosos accidentes son causados por productos
mal cuidados.
•
•
•
$61o utilice accesorios recomendados pot el
fabricante para cada modelo en particular.
Accesorios que pueden ser adecuados para una
aspiradora pueden significar un riesgo de lesiones si se
emplean con otra.
El servicio del producto s61o debe ser efectuado
por personal de reparacion calificado. Todo servicio
o mantenimiento efectuado por personal no calificado
puede significar un riesgo de lesiones.
AI dar servicio a la unidad, s61o utilice piezas
de repuesto identicas. Siga las instrucciones
sehaladas en la secci6n Mantenimiento de este
manual. El empleo de piezas no autorizadas o el
incumplimiento de las instrucciones de mantenimiento
puede significar un riesgo de descarga el_ctrica o de
lesiones.
• Cuando no se use el paquete de baterias
mant_ngalo alejada de otros objetos de metal
como clips para papel, monedas, Ilaves, clavos,
tornillos u otros objetos de metal pequeSos que
puedan realizar una conexion entre los terminales.
Realizar un cortacircuito en los terminales de la bateria
puede provocar quemaduras o un incendio.
•
No aplaste, deje caer o dahe el paquete de baterias.
No utilice el paquete de baterias ni el cargador si
ban sufrido una caida o un golpe contundente.
Las
baterfas da_adas pueden sufrir explosiones. Deseche
de inmediato toda baterfa que haya sufrido una ca(da o
que haya sido da_ada.
•
No cargue herramientas de baterias en lugares
mojados o ht_medos. Con el cumplimiento de esta
regla se reduce el riesgo de una descarga el_ctrica.
• Guarde estas instrucciones. Cons01telas con
frecuencia y empl_elas para instruir a otras personas
que puedan utilizar esta aspiradora de mano. Si presta
a alguien esta aspiradora de mano, facil[tele tambi_n
las instrucciones.
4- EspaSol
Lassiguientes
palabras
dese_alizaci6n
ysussignificados
tienenelobjetodeexplicarlosnivelesderiesgorelacionados
conesteproducto.
SiMBOLO SENAL
SIGNIFICADO
PELIGRO:
Indicaunasituaci6n
peligrosainminente,
la cual,si nose evita,causar_
la
muerte o lesiones serias.
ADVERTENClA:
Indica
una osituaci6n
la muerte
lesiones peligrosa
serias. posible, la cual, si no se evita, podrfa causar
PRECAUClON:
Indica
situaci6no peligrosa
posible, la cual, si no se evita, podrfa causar
lesionesunamenores
leves.
PRECAUClON"
(Sin el sfmbolo de alerta de seguridad) Indica una situaciOn que puede
producir da5os materiales.
Es posible que se empleen en este producto algunos de los siguientes sfmbolos. Le suplicamos estudiarlos y aprender
su significado. Una correcta interpretaci6n de estos sfmbolos le permitir_ utilizar mejor y de manera m_s segura el
producto.
SiMBOLO
A
NOMBRE
DENOMI NACIC) N/EXPLICACIC)N
Alerta de seguridad
Indica un peligro posible de lesiones personales.
Lea el manual del operador
Para reducir el riesgo de lesiones, el usuario debe leery comprender
el manual del operador antes de usar este producto.
0
Protecci6n ocular
Siempre p6ngase protecci6n ocular con protecci6n lateral con la
marca de cumplimiento de la norma ANSI Z87.1.
@
Alerta de condiciones
Symboles reciclar
V
h0medas
No exponga la unidad a la Iluvia ni la use en lugares h0medos.
Este producto contiene baterfas de nfquel-cadmio (Ni-Cd) o iones
de litio (Li-ion). Es posible que algunas leyes municipales, estatales
o federales prohfban desechar las baterfas de nfquel-cadmio
en la basura normal. Consulte alas autoridades reguladoras de
desechos para obtener informaci6n en relaci6n con las alternativas
de reciclado y desecho disponibles.
Volts
Voltaje
Minutos
Tiempo
m
===
Corriente continua
Tipo o caracterfstica
no
Velocidad en vacfo
Velocidad de rotaci6n, en vacfo
Por minuto
Revoluciones,
por minuto
min
.../min
5- Espa_ol
de corriente
carreras,
velocidad
superficial,
6rbitas,
etc.,
ESPECIFICACIONES
DEL PRODUCTO
Motor ..........................................................
18 V, corr. cont.
Longitud de la manguera ...................... 1,5 metros (5 pies)
Capacidad de captaci6n ........................... 7,5 L (2 galones)
Diametro de la manguera .................. 31,8 mm (1-1/4 pulg.)
FAMILIARJCESE
TAPON
CON SU ASPIRADORA
Vea la figura 1, pagina L
El uso seguro que este producto requiere la comprensi6n
de la informaci6n impresa en la herramienta y en el
manual del operador asf como ciertos conocimientos
sobre el proyecto a realizar. Antes de usar este
producto, familiadcese con todas las caracteristicas de
funcionamiento y normas de seguridad.
ADITAMENTOS
DE DRENAJE
El tap6n de drenaje en la parte trasera de la aspiradora
se utiliza para drenar rapidamente los liquidos del
contenedor de captaci6n.
CONTENEDOR
El contenedor de captaci6n tiene capacidad de hasta
7,5 L (2 galones) de desechos.
CONJUNTO
CARAOTERJSTIOA
CAPACIDAD
La aspiradora tambi_n puede servir como una sopladora.
ClNTUR()N
DESMONTABLE
DEL ALMACENAJE
DE GRANDE
CAPACIDAD
Los aditamentos de la aspiradora pueden Ilevar a cabo
una variedad de tareas y se almacenan facilmente en el
cintur6n desmontable del almacenaje de herramientas.
DE SOPLADORA
DE CAPTACION
DE LA MANGUERA
DE ASPIRADORA
La manguera desmontable es flexible y puede utilizar una
amplia variedad de aditamentos.
PARA USO EN SECO/HUMEDO
La aspiradora puede ser utilizada para aspirar desechos
secos o hOmedos.
DE HERRAMIENTAS
Almacena los aditamentos cuando no se estan utilizando
y puede ser sujeto en un amplia variedad de lugares para
facilidad de uso.
DESEMPAQUETADO
Este producto se empaca completamente
armado.
[] Extraiga cuidadosamente de la caja la herramienta y
los accesorios. Compruebe que est_n presentes todos
los art[culos enumerados en la lista de empaquetado.
ADVERTENCIA:
Nouseeste
[] Si hay piezas da_adas o faltantes, s[rvase Ilamar al
1-800-932-3188, donde le brindaremos la asistencia
necesaria.
LISTA DE EMPAQUETADO
Aspiradora para uso en seco/h0medo
Manguera de aspiradora
producto si no est_ totalmente ensamblado o
si alguna pieza falta o est_ daSada. Si utiliza un
producto que no se encuentra ensamblado de forma
correcta y completa, puede sufrir lesiones graves.
[] Inspeccione cuidadosamente la herramienta, para
verificar que no haya sufrido ninguna rotura o da_o
durante el transporte.
Boquilla ancha con limpiador de goma
Cepillo para pisos
Boquilla para hendiduras angostas
Boquilla para carros
Tubo
Cintur6n de herramientas desmontable
[] No deseche el material de empaquetado hasta que
haya inspeccionado la herramienta con cuidado y la
haya utilizado satisfactoriamente.
Filtro para seco (2)
Filtro de espuma para h0medo
Manual del operador
6- Espa_ol
con filtro para seco
ADVERTENCIA:
ADVERTENCIA:
s_ falta o est_
da_ada alguna pieza, no utilice este producto sin
haber reemplazado la pieza. Usar este producto con
partes da_adas o faltantes puede causar lesiones
serias al operador.
A
ADVERTENCIA:
Para evitar un
arranque accidental que puede causar lesiones
corporales graves, siempre desmonte de la
herramienta el paquete de bater[as al montarle
piezas a aqu_lla.
Nointente
modificar este producto ni hacer accesorios
no recomendados para la misma. Cualquier
alteraci6n o modificaci6n constituye maltrato el
cual puede causar una condici6n peligrosa, y como
consecuencia posibles lesiones corporales serias.
A
ADVERTENCIA: Nopermita que
su familarizaci6n con las herramientas Io vuelva
CARACTERiSTICAS
DE PROTECClON
DE LAS
BATERiAS
descuidado. Tenga presente que un descuido de un
instante es suficiente para causar una lesi6n grave.
Las bater[as de iones de litio Craftsman de 19,2 V est_n
diseSadas con caracter[sticas que protegen las celdas de
iones de litio y maximizan la duraci6n de las bater[as.
ADVERTENCIA:
Si la herramienta se detiene durante el uso, suelte el
gatillo para reiniciarla y reanude el funcionamiento. Si aun
as[ no funciona, se debe recargar la bater[a.
S empre
p6ngase protecci6n ocular con protecci6n lateral
con la marca de cumplimiento de la norma ANSI
Z87.1. Con el cumplimiento de esta regla se reduce
el riesgo de posibles lesiones oculares.
INSTALACION
DEL PAQUETE
DE BATERiAS
Vea la figuras 2 et 3, pagina ft.
[] Coloque el interruptor de corriente en la posici6n de
OFF (APAGADO) (0).
USOS
[] Coloque el paquete de bater[as en el aspiradora. Alinee
el saliente del paquete de bater[as respecto a la ranura
del recept_culo para bater[as del aspiradora.
Esta herramienta puede emplearse para los fines
enumerados abajo:
Funciones de aspirado:
[] Aseg0rese de que los pestillos a ambos lados del
paquete de bater[as calcen en su lugar con un
chasquido y que el paquete de bater[as quede firme en
el aspiradora antes de empezar a usarlo.
[] Limpieza liviana con aspiradora de superficies
hOmedas o secas
Funciones de sopladora:
[] Limpieza de superficies duras como los caminos de
entrada y aceras
REMOClON
[] Mantener terrazas y caminos de entrada libres de hojas
y agujas de pino
Este producto acepta los paquetes de bater[as Craftsman de
iones de litio de 19,2 V y los paquetes de bater[as Craftsman
de n[quel-cadmio de 19,2 V.
Para ver las instrucciones de carga completas, consulte
los manuales del operador para su bater[a y el cargador
modelos.
DEL PAQUETE
DE BATERiAS
Vea la figuras 2 et 3, pagina ii.
[] Coloque el interruptor de corriente en la posici6n de
OFF(O).
[] Localice los pestillos situados en el costado del
paquete de bater[as y opr[malos en ambos lados para
liberar _ste del aspiradora.
[] Retire del aspiradora el paquete de bater[as.
A ADVERTENCIA: Las
herramientas
de baterias siempre est_n en condiciones de
funcionamiento. Por Io tanto, siempre debe estar
asegurado el interruptor cuando no est_ us_ndose
o el operador Io lleve por un lado.
7- Espa_ol
ENCENDIDO
Y APAGADO
DE LA ASPIRADORA
ASPIRADO
Vea la figura 3, pagina ii.
• Para arrancar el aspiradora, coloque el interruptor de
corriente en la posiciOn de ON (ENCENDIDO) (I).
•
Para detener el aspiradora, coloque el interruptor de
corriente en la posici6n centro, o de OFF (APAGADO)
1o).
ADITAMENTO
DE MANGUERA
Vea la figura 4, pagina ii.
• Para acoplar la manguera, empuje el extremo c6nico
de la manguera en la abertura del conducto de
succi6n.
•
Para quitar la manguera, sujete el extremo c6nico y tire
de la manguera del conducto de succi6n.
EMPLEO
DE LOS ADITAMENTOS
Vea la figura 5, pagina ii.
•
•
Apague la aspiradora.
Introduzca el aditamento en el extremo delantero de
la manguera, asegurandose de que el primero haya
quedado firmemente en su lugar.
• Para quitar, sujete el aditamento y tire de la manguera.
Los aditamentos de la aspiradora estan diseSados para
las siguientes aplicaciones:
• La boquilla ancha con limpiador de goma se utiliza para
aspirar superficies hOmedas o secas, grandes y planas.
• El cepillo para pisos se utiliza para aspirar superficies
con alfombra.
•
•
•
El tubo se utiliza como un mango en el modo de
aspirado y como tubo de sopladora en el modo de
sopladora. El tubo puede servir tambi_n como una
extensi6n para cualquiera de los aditamentos de la
aspiradora.
La boquilla para hendiduras anchas se utiliza para el
aspirado en superficies pequeSas.
La boquilla para hendiduras angostas se utiliza para
aspirar en lugares angostos de dificil acceso.
ClNTURON
DESMONTABLE
A ADVERTENCIA:
Aspire solamente elementos Io suficientemente peque_os
para caber a trav_s de la manguera o el aditamento.
Aseg0rese que el filtro para seco est_ en su lugar al
momento de aspirar. El desempeSo de la aspiradora
disminuira al tener Ileno el contenedor de captaci6n.
Despu_s de vaciar el contenedor de captaci6n, revisar si
el filtro para seco necesita ser cambiado.
NOTA- La aspiradora se embarca lista para aspirar en
seco. Para preparar la aspiradora con dep6sito para
materiales hOmedos, consulte Cambiar interruptores
en
la secciOn MANTENIMIENTO de este manual.
DE SUPERFICIES
MOJADAS
La aspiradora puede utilizarse para aspirar pequeSas
cantidades de I[quido. No obstante, tenga precauci6n al
aspirar grandes cantidades de I[quido ya que puede causar
problemas posibles. Aseg0rese que el tap6n de drenaje
esta firmemente en su lugar al aspirar h0medo o seco.
AI aspirar h0medo, tenga presente que su aspiradora esta
equipara con una bola de retenci6n dentro del alojamiento
del filtro. Esta bola de retenci6n esta especialmente
diseSada para trabajar con las aplicaciones de aspirado
en h0medo, de tal manera que apaga la succi6n al
momento de que el contener de captaci6n esta Ileno.
Cuando la succi6n se apaga debido a que el contenedor
de captaci6n esta Ileno, apague (OFF) la aspiradora
y vac[e el contenedor como se muestra en la secci6n
MANTENIMIENTO.
NOTA: AI aspirar en h0medo, es necesario cambiar el
filtro para seco al filtro de espuma para h0medo incluido.
Para preparar la aspiradora con dep6sito para materiales
hOmedos, consulte Cambiar interruptores
en la secciOn
MANTENIMIENTO de este manual.
,ADVERTENCIA: A,aspirar
I[quidos, asegOrese que la aspiradora no se
sumerja o moje, Io que puede causar una
descarga, falla de la aspiradora o lesiones
personales.
DEL ALMAOENAJE
DE HERRAMIENTAS
Vea la figura 6, pagina ii.
Cuando no se est_n utilizando los aditamentos de
aspiradora proporcionados con _sta, pueden colocarse en
las zonas de almacenamiento ubicadas en el cintur6n de
herramientas. El cintur6n tambi_n puede ser acoplado y
sujetado en una amplia variedad de lugares para facilidad
de uso.
NUNOA
aspire materiales con brasas calientes, colillas
de cigarrillos, f6sforos, cenizas candentes o
humeantes, etc.
ASPIRADO
La aspiradora puede usarse ya sea s61o con la manguera
o con la manguera y los aditamentos para la aspiradora.
EN SECO
UTILIZACI()N
DE LA ASPIRADORA
COMO
SOPLADORA
Vea la figura 7, pagina ii.
ADVERTENCIA:
Nunca use
el soplador cerca de fuego, fogones, cenizas
calientes, parilla de barbacoa etc. ya que podr[a
causar que el fuego se propague.
8- EspaSol
Entodomomento,laaspiradora
soplaaireatrav_sde
laaberturadelasopladoracomopartedelsistemade
escape.Noobstante,puedeutilizarla aspiradora
como
sopladoraalacoplareltubode extensi6n
enlaabertura
delasopladora.
• Retiredelaaspiradora
el paquetede bater[as.
• Retirelamanguera
deltanque(sies necesario).
• Quiteel cintode almacenamiento
dela herramienta
desmontable.
• Retireelmotordelconjuntodelcontenedor
de
captaci6nlevantando
lospestillosalmismotiempo.
• Retireeltubodela manguera
(siesnecesario).
• Paraacoplareltubodeextensi6n,empujeel extremo
grandedeltuboenlaaberturadelasopladora.
• Paraquitareltubodeextensi6n,
tirede_stedela
aberturadelasopladora.
Paraevitarladispersi6ndelosdesechos,apuntela
sopladorahacialosbordesexteriores
de unapilamiento
dedesechos.Nuncaapuntelasopladoradirectamente
al
centrodeunabaterfadedesechos.
Utilicerastrillosy escobasparaaflojarlosdesechosantes
deutilizarlasopladora.
Encondiciones
polvorientas,
cuandohayaaguadisponible,humedezca
levemente
las
superficies.
Est_al pendientedenidos,mascotas,ventanasabiertas
o cochesreci_nlavados,y soplelabasurade manera
segura.
Despu_sdeutilizarsopladoreso cualquierotroequipo,
iLIMPIE!Desechedeformaadecuadalosdesechos.
A
Solamente las piezas enumeradas en la lista de piezas
pueden ser reparadas o cambiadas por el consumidor.
Todas las piezas restantes deben ser reemplazadas en un
centro de servicio autorizado.
ADVERTENCIA:
dar
serv ac o
la unidad, s61o utilice piezas de repuesto id_nticas.
El empleo de piezas diferentes puede causar un
peligro o dadar el producto.
A
ADVERTENCIA:
Siempre
•
•
Quite el filtro retirando la banda de retenci6n y tire del
filtro para que salga de la unidad del mismo..
•
Sacuda o cepille ligeramente el filtro para limpiarle el
polvo y demas desechos.
•
Reemplace el filtro para seco o cambie el filtro por el
de hOmedo si es necesario.
Para evitar
Evite el empleo de solventes al limpiar piezas de plastico.
La mayorfa de los plasticos son susceptibles a diferentes
tipos de solventes comerciales y pueden resultar
daSados. Utilice paSos limpios para eliminar la suciedad,
el polvo, el aceite, la grasa, etc.
.o permita
Retire de la aspiradora el paquete de baterfas.
Levante las lengOetas a los lados de la aspiradora. Tire
hacia abajo y afuera del contenedor de captaci6n y
separelo del alojamiento del motor.
• Retire la unidad del filtro.
GENERAL
ADVERTENCIA:
DEL FILTRO
•
lesiones corporales graves, siempre retire la bater[a
de la herramienta al limpiarla o darle mantenimiento.
MANTENIMIENTO
Y LIMPIEZA
Vea la figura 8, pagina iL
p6ngase protecci6n ocular con la marca de
cumplimiento de la norma ANSI Z87.1. Si no
cumple esta advertencia, los objetos que salen
despedidos pueden producirle lesiones serias en
los ojos.
ADVERTENCIA:
REEMPLAZO
en
ningOn momento que fiuidos para frenos, gasolina,
productos a base de petrOleo, aceites penetrantes,
etc., Ileguen a tocar las piezas de pl_stico. Las
sustancias qu[micas pueden da5ar, debilitar o
destruir el pl_stico, Io cual a su vez puede producir
lesiones corporales graves.
Para efectuar
•
la limpieza:
Para volver a colocar, deslice el nuevo filtro sobre
la unidad del mismo y vuelva a acoplar la banda de
retenci6n.
• Vade el filtro, la unidad del mismo y el colector de
captaci6n; lavelos si es necesario. Antes de volverlos
a instalar en la aspiradora, aseg0rese que todas las
piezas est_n completamente secas.
9- EspaSol
CAMBIODE FILTROS
EXTRACCION
DE DESECHOS
L(QUIDOS
Vea la figura 8, pagina ii.
Vea las figuras 8 et 9, pagina ii.
•
Retire de la aspiradora el paquete de baterfas.
La extracci6n de desechos puede Ilevarse a cabo de dos
•
Levante las lengOetas a los lados de la aspiradora. Tire
hacia abajo y afuera del contenedor de captaci6n y
separelo del alojamiento del motor.
•
Retire el filtro y la unidad del mismo.
•
Quite el filtro retirando la banda de retenci6n y tire del
filtro para que salga de la unidad del mismo.
•
Reemplace el filtro para hOmedo o seco, deslizando el
nuevo filtro (adecuado) sobre la unidad del mismo.
•
Volver a acoplar la banda de retenci6n.
EXTRACC(ON
DE DESECHOS
man eras,
Para quitar desechos liquidos
contenedor de captaci6n:
•
SECOS
del
Levante las leng0etas a los lados de la aspiradora. Tire
hacia abajo y afuera del contenedor de captaci6n y
separelo del alojamiento del motor.
• Vac{e el contenedor de captaci6n (lavelo si es
necesario). Antes de volverlos a instalar en la
aspiradora, asegL_rese que todas las piezas est_n
completamente secas.
Para quitar desechos
Vea la figura 8, pagina ii.
El colector de polvo debe revisarse, vaciarse y limpiarse
peri6dicamente para Iograr la maxima eficiencia.
con la extracci6n
utilizando
el tap6n de drenaje:
•
Retire de la aspiradora el paquete de bater[as.
•
Retire el tap6n de drenaje.
Incline la aspiradora para drenar el I(quido.
•
Retire de la aspiradora el paquete de bater{as.
•
•
Levante las leng0etas a los lados de la aspiradora. Tire
hacia abajo y afuera del contenedor de captaci6n y
separelo del alojamiento del motor.
• Vuelva a colocar el tap6n de drenaje.
•
Quite la unidad del filtro del conjunto del tanque.
PRECAUCION:
•
Vac{e el contenedor de captaci6n (lavelo si es
necesario). Antes de volverlos a instalar en la
aspiradora, asegL_rese que todas las piezas est_n
completamente secas.
desechos
captaci6n
Se puede
del motor
•
Para volver a acoplar, presione el contenedor en
las ranuras del alojamiento del motor hasta o[r un
chasquido.
Nopermita que
los
I(quidos permanezcan en el contenedor de
durante periodos de tiempo prolongados.
desarrollar humedad en el compartimiento
y acortar su vida de servicio.
A PRECAUCION: Novoltee
la
unidad, ya que el liquido puede entrar en el motor.
10-EspaSol
FUSIBLE
EXTRACCION
DE REPUESTO
Y PREPARACION
Vea la figura 10, pagina ii.
PARA SU RECICLADO
Si el fusible de la aspiradora con dep6sito estalla, deber_
reemplazarlo. Busque estos fusibles de repuesto donde
adquiri6 este producto.
A
[] Retire de la aspiradora el paquete de bater[as para
acceder al alojamiento de fusibles.
[] Extraiga el fusible actual y des_chelo. En caso de ser
necesario, utilice un par de quitafusibles.
[] Para reemplazar el fusible fundido utilice un fusible
automotriz de 30 A tipo JAT solamente. Si la aspiradora
con dep6sito sigue sin funcionar, deber_ Ilevarla a un
centro de servicio autorizado para repararla.
ALMACENAMIENTO
(UN MES O MAS)
ADVERTENCIA:
DE LA BATER(A
quitar
la
bater[a, cubra los terminales del paquete de
bater[as con cinta adhesiva reforzada. No intente
destruir o desarmar la bater[a, ni de desmontar o
extraer ninguno de sus componentes. Las bater[as
de n[quel cadmio deben reciclarse o desecharse
debidamente. De igual manera, nunca toque
ambas terminales con objetos met_licos y/o
partes del cuerpo, ya que puede producirse un
corto circuito. Mant_ngase fuera del alcance de
los ni_os. La inobservancia de estas advertencias
puede causar incendios y lesiones corporales
serias.
[] Limpie toda materia extra_a presente en la aspiradora.
[] Almacene la unidad bajo techo en un espacio
inaccesible a los ni_os. Evite que la unidad entre en
contacto con agentes corrosivos como las sustancias
qufmicas para el jard(n y las sales para derretir el hielo.
[] Vaciar el contenedor de captaci6n antes del
almacenamiento.
Los siguientes accesorios recomendados
917888
916949
se encuentran en las tiendas al menudeo:
Filtro para seco
Filtro de espuma para hOmedo
A ADVERTENCIA:
Arriba se seSalan los aditamentos y accesorios disponibles para usarse con esta
herramienta. No utilice ningOn aditamento o accesorio no recomendado por el fabricante de esta herramienta.
empleo de aditamentos o accesorios no recomendandos puede causar lesiones serias.
11 - EspaSol
El
www.sears.ca
® Registered
Trademark
/
TM
Trademark
/ SMService
Mark of Sears
® Marca Registrada / TM Marca de F&brica / SM Marca de Servicio
MC Marque de commerce / MD Marque d6pos6e de Sears Brands,
Brands,
LLC
de Sears Brands,
LLC
LLC
© Sears
Brands,
LLC