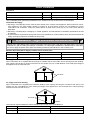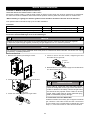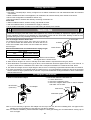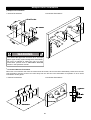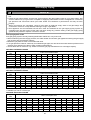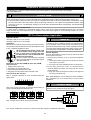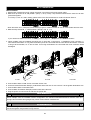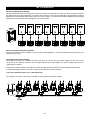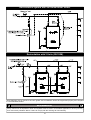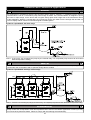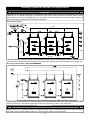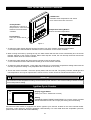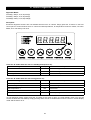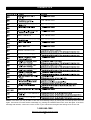
1
Installation ● Operation Manual Natural Gas (NG) - Factory Default Liquid Propane Gas (LPG) - Optional Orice Model GU145 (S) / 508(11,12,21,22)1145 (S) Model GU195 (S) / 508(11,12,21,22)1195 (S) Model GU195 (M) / 508(11,12,21,22)1195 (M) C Service Information Center: Call us first if you have any questions with this product. We can help you with questions about assembly and Water Heater operation or if there are any damaged or missing parts when you unpack this unit from the shipping box. Please call before returning to the store. 1-866-946-1096 8am-4pm CST, Monday through Friday IMPORTANT: ● Only specially trained and authorized personnel are permitted to service this water heater. ● NOTE TO ASSEMBLER / INSTALLER: Leave this manual with the consumer. ● NOTE TO CONSUMER: ● Keep this manual for future reference. RECORD YOUR SERIAL #________________ (see silver CSA label on Gas Water Heater) ! WARNING ! Read this Operator's Manual carefully and be sure your Water Heater is properly assembled, installed and maintained. Failure to follow these instructions exactly could result in re, explosion, serious bodily injury and/or property damage. Do not store or use gasoline or other ammable vapors and liquids in the vicinity of this or any other appliance. ! WARNING ! California Proposition 65 lists chemical substances known to the state to cause cancer, birth defects, death, serious illness or other reproductive harm. This product may contain such substances, be their origin from fuel combustion (gas, oil) or components of the product itself. ! WARNING ! Only a licensed professional can install Eternal units for safety and code compliance. Venting and plumbing codes can vary by location. Installation instructions and all applicable codes must be followed or property damage, severe injury, or death may result. Failure to use a licensed plumber or contractor, follow venting, plumbing, and building codes; or follow installation instructions may be unlawful and will void the product warranty. Grand Hall is not responsible for any costs incurred for repairing any problems resulting from failure to follow installation instructions or applicable codes. 157140081P Date 2014/02/13 1 Table of Contents Included & Optional Accessories P3 Specifications P4 Dimensions P5 Parts & Service Parts List P6~10 Pre-Installation Instructions for Your Safety P11 Installation Preparation P12 Condensate Disposal P13 Indoor & Outdoor Installation P14~15 Mobile Home Installation P16~18 Wall & Floor Mounting P19~20 Venting Intake & Exhaust Material P21 Venting Specification & EC Adapter Installation P22 Vertical & Horizontal Termination P23~24 Clearance Requirements from Vent Terminations to Building Openings P25 Multiple Units Termination P26 Common Venting Installationmon Vent Installation Concentric Vent Kit & Outdoor Vent Kit Installation P27 Vent Pipe Installation & Terminator Position P29 Gas Supply Piping P30 LP Conversion P31 Water Supply Connection P32 Condensate Piping P33 Temperature and Pressure Relief Valve & IPC For Recirculation Application P34 Electrical Connection P35 Optional Remote Controller Installation P36~37 MCU Installation P38~40 Plumbing Diagrams P41~43 Recovery Pump & Water Pipe Size P44 Operating Instructions P45 How To Use The Front Control Interface P46 How To Use the Remote Controller & Ignition Cycle Counter P47 Maintenance and Service P48 "D" button Diagnostic Function P49 Diagnostics P50~52 How To Check Gas Combustion P53~54 Wiring and Connection Diagram P55~56 Grand Hall Limited Warranty P57~59 2 P28 Included Accessories Optional Accessories Self Tapping Screw 5/32" x 5/8" : 2pcs Philips Head Screw M8x15 : 4pcs Stainless Steel Expansion Bolt : 4pcs 3 Eternal Hybrid Water Heater Technical Specications Model Name GU145 / GU145(S) 98% NG / 99% LP / 0.96 Energy Factor Thermal Efciency (*) / Energy Factor Installation Flue System GU195(S) / GU195(M) Indoor / Outdoor / Wall Hung / Floor Standing Sealed Combustion Direct Vent / Power Vent Convertible Vent Run 3" PVC Up to 100ft, 6 Elbows Max, 5ft Deduction Per Elbow Condensate Discharge Low Fire / Med Fire / High Fire 0.5GPH / 1.1GPH / 1.75GPH Condensate pH Level 4 pH Gas Type Pre-set for NG / LP Conversion Kit Included Unit Connections Gas and Water 3/4" Female NPT Electricity Dedicated 120VAC, 60Hz w/3 Pronged Power Cord Gas Input Rate Min / Max 26,000 BTU/Hr / 145,000 BTU/Hr 26,000 BTU/Hr / 195,000 BTU/Hr Gas Supply Pressure NG / LP 3.5" WC to 10.5" WC / 8" WC to 14" WC Manifold Pressure Time engineering NG (+) 0.1" W.C. NG (+) 0.1" W.C. (minimum) Serial # (G902367~G1101155) PG (+) 0.1" W.C. PG (+) 0.1" W.C. Time engineering NG (-) 0.02" W.C. NG (-) 0.02" W.C. PG (-) 0.02" W.C. PG (-) 0.02" W.C. Serial # (G1101156~G1111021) Honeywell NG (-) 0.01" W.C. NG (-) 0.01" W.C. Serial # (G1111022~) PG (-) 0.01" W.C. PG (-) 0.01" W.C. Ignition System Direct Electronic Ignition w/Automatic Flame Sensing Burner System Single Orice Premixed Fuel Injection Metal Fiber Infrared Gas Valve System Dual Stage Negative Pressure Full Modulation Air Ratio Internal Piping Material Stainless Steel Reserve Tank 2 Gallons Electrical Consumption Standby 8W, Max 45W Standby 8W, Max 85W Maximum Noise Level 40dB (a) 50dB (a) Remote Controller Up to 3 kits Multi Unit Capable Up to 2 in manifold, No Built - In MCU / M Option - MCU up to 8 Units GPM Capacity Range 0.1 to 14.5 GPM 0.1 to 19.5 GPM Temperature Sensing Tank, Cold Inlet, Hot Outlet, Air Thermistors Temperature Control Simulation Feed Forward and Feed Back, Computer Controlled Mixing Valve Flow Sensing Dual Flow Sensors w/Built-in GPM Monitor Temperature Settings Range 100°F to 180°F Factory Limited to 140°F in 5°F Steps Unit Dimensions (WxHxD) 16.9" x 29.1" x 13.8" Unit Weight Safety Devices 83Ibs / M Option - 85Ibs T&P Valve, Flame Rod, Thermal Fuse(306°F), Remaining Flame Detection, Fan RPM Check, Freeze Protection(-40°F), Vent Blockage Detection, Thermostat Switches(167°F / 194°F), Gas Valve Current Leak Detection, Ignition Prevention, Dipswitch Temperature Lock, GFCI w/2 x 5A Fuses. * GU145S and GU195S are for single or dual unit applications with no multi control unit. The GU195M is for multiple unit applications only and cannot be used for single unit applications. * Maximum manifold pressure is indicated on the rating label on right side of the unit. * Independent DOE tested. 4 Dimensions - GU145(S) / 508(11,12,21,22)1145(S) GU195(S,M) / 508(11,12,21,22)1195(S,M) 5 Parts Diagram for Model GU145(S) / 508(11,12,21,22)1145(S) GU195(S,M) / 508(11,12,21,22)1195(S,M) 6 Parts Diagram for Model GU145(S) / 508(11,12,21,22)1145(S) 7 Parts List for Model GU145(S) / 508(11,12,21,22)1145(S) KEY DESCRIPTION 1 Panel, Front Assembly 2 Panel, Top / Rear Assembly 3 Panel, Rear 4 Panel, Left Assembly 5 Panel, Right Assembly (GU145(S)) 6 Panel, Bottom 7 Mounting Bracket 8 Wall Bracket 9 Controller / Front 10 T&P Relief Valve (Cash Acme) 11 Vent Collar 12 Vent Collar Packing 13 Rubber Foot 14 Drain Valve Assembly 15 Main Power Cord 16 Handle 17 Condensing Nipple 18 Mesh Screen 19 Outdoor Venting Cap (Optional) 20 Trap Cleaner Assembly 21 Radial Blower Assembly 22 Gas Valve 23 Air Pressure Switch (GU145(S)) 24 Burner Assembly 25 Main Controller (GU145(S)) 26 Cold Water Tube Assembly (GU145(S)) 27 Hot Water Tube Assembly (GU145(S)) 28 Flexible Silencer Kit 29 Mixing Valve 30 EC Adapter 31 Floater Valve 8 Parts Diagram for Model GU195(S) / 508(11,12,21,22)1195(S) Parts Diagram for Model GU195(M) / 508(11,12,21,22)1195(M) 9 Parts List for Model GU195(S,M) / 508(11,12,21,22)1195(S,M) KEY DESCRIPTION 1 Panel, Front Assembly 2 Panel, Top / Rear Assembly 3 Panel, Rear 4 Panel, Left Assembly 5 Panel, Right Assembly (GU195(S,M)) 6 Panel, Bottom 7 Mounting Bracket 8 Wall Bracket 9 Controller / Front 10 T&P Relief Valve (Cash Acme) 11 Vent Collar 12 Vent Collar Packing 13 Rubber Foot 14 Drain Valve Assembly 15 Main Power Cord 16 Handle 17 Condensing Nipple 18 Mesh Screen 19 Outdoor Venting Cap (Optional) 20 Trap Cleaner Assembly 21 Radial Blower Assembly 22 Gas Valve 23 Air Pressure Switch (GU195(S,M)) 24 Burner Assembly 25 Main Controller (GU195(S,M)) 26 Cold Water Tube Assembly (GU195(S,M)) 27 Hot Water Tube Assembly (GU195(S,M)) 28 Flexible Silencer Kit 29 Mixing Valve 30 EC Adapter 31 Floater Valve 10 Pre-Installation Instructions for Your Safety ! WARNING ! If you do not follow these instructions exactly, a re or explosion could result causing property damage, personal injury or loss of life. Installation Codes □ The installation must conform with local codes or, in the absence of local codes, with National Fuel Gas Code, ANSI Z223.1/NFPA 54. □ Properly ground the unit in accordance with all local codes or in the absence of local codes, with the National Electrical Codes, ANSI/NFPA 70. Before Installation □ This water heater does not have a pilot. It is equipped with an ignition device that automatically lights the burner. Do not try to light the burner by hand. □ Smell all around the water heater area for evidence of leaking gas. Be sure to smell next to the oor because LP gas is heavier than air and will settle on the oor. □ Use only your hand to turn the manual gas valve knob. Never use tools. If the knob will not turn by hand, don't try to repair it. Call a qualied service technician. Force or attempted repair could result in a re or explosion. □ Do not use this water heater if any part has been under water. Immediately call a qualied service technician to inspect the water heater and to replace any damaged parts. ! WARNING ! WHAT TO DO IF YOU SMELL GAS □ Do not try to light any appliance. □ Do not touch any electrical switch; do not use any phone in your building. □ Immediately call your gas supplier from a neighbor's phone. Follow the gas supplier's instructions. □ If you cannot reach your gas supplier, call the re department. TO TURN OFF GAS TO WATER HEATER □ Turn off all electrical power to the water heater if service is to be performed. □ Turn the manual gas valve located on the outside of the unit clockwise to the off position. Vapors from ammable liquids will explode and catch re causing death or severe burns. Do not use or store ammable products such as gasoline, solvents or adhesives in the same room or area near the water heater. Keep ammable products □ Far away from water heater □ In approved containers □ Tightly closed □ Out of children's reach Vapors □ Cannot be seen □ Vapors are heavier than air □ Go a long way on the oor □ Can be carried from other rooms to the main burner by air currents ! WARNING ! Use this water heater at your own risk. The set outlet water temperature can cause severe burns instantly or death from scalds. Test the water before bathing or showering. Do not leave children or the inrm without supervision. ! NOTE ! Each Eternal is equipped with a computer controlled mixing valve to ensure precise temperature is being delivered. Modulation noise is normal and should not be of concern. 11 Installation Preparation Unpacking Your Eternal Water Heater □ Unpack the unit carefully and make sure that all accessories are put aside so they will not be lost. ● Operator's manual ● Warranty Registration Card ● Included Parts □ Inspect the water heater for possible shipping damages. Additional Safety Instructions □ Check the markings of the rating plate on the water heater to be certain the type of gas being furnished corresponds to what the water heater is equipped for. □ Do not connect this water heater to a fuel type not in accordance with the rating plate. ● Read the Safety guidelines in the beginning of this manual. ● The internal computer controlled regulator is preset by the manufacturer and should not be adjusted by user. ● Maintain proper space around the unit for servicing. Install the unit so that it can be connected or removed easily. ● The electrical connection requires a means for switching off the power supply. ● Avoid installing the unit in an area with high levels of dust, sand, or debris. These particles may clog the air vent or impair the function of the fan, leading to improper combustion. Regular maintenance is needed. ● Do not install the unit where the exhaust vent is pointing into any opening in a building or where the noise may disturb neighbors. WATER HEATER PLACEMENT □ Carefully choose the location for the new heater as placement is a very important consideration for the safety of the occupants in the building and for the most economical use of the appliance. □ Whether replacing an old water heater or putting the water heater in a new location, consider the following critical points: ● The location selected should be as close to the vent termination point as possible, and centered within the water piping system for best hot water delivery. All water heaters can leak. Do not install without adequate drainage provisions where water flow can cause property damage. ● If vented through an outside wall or through the roof using 3" vent piping the total vent run cannot exceed 95 feet with one 90° elbow. If more elbows are required the venting distance must be reduced 5 feet for every 90° elbow. ● Vent piping should slope downward towards the unit. Horizontal runs require adequate support at 3½ feet intervals and vertical runs supported at 5 feet intervals. ● Condensation may be created at times as the combustion gases exit the vent cap. Discoloration of surfaces in proximity to the vent cap may occur. ! CAUTION ! ! Before Commencing The Installation Check that it is in accordance with relevant building and mechanical codes, as well as any local, state or federal regulations. ! CAUTION ! The drain valve must be tightened by Hand ONLY, not by tools of any kind. WARNING ! □ The appliance should be located in an area where leakage of the tank or connections will not result in damage to the area adjacent to the appliance or to lower floors of the structure. When such locations cannot be avoided, it is recommended that a suitable drain pan be installed under the appliance. The pan must not restrict combustion air ow. □ The minimum inlet gas pressure must be within the value specied by the manufacturer and the minimum value listed is only for the purpose of input adjustment. □ If a water heater is installed in a closed water supply system, such as one having a backow preventer in the cold water supply line and a thermal expansion tank is required, contact the water supplier or local plumbing inspector on how to control this situation. □ The Temperature and Pressure (T&P) relief valve must be certied as meeting the requirement of the Standard for Relief Valves and Automatic Gas Shut-off Devices for Hot Water Supply Systems ANSI Z21.22/CAN14.4. The valve must be marked with a maximum set pressure not to exceed the marked hydrostatic working pressure of the water heater (150 psi) and a discharge capacity not less than the water heater input rate as marked on the rating plate. 12 Condensate Disposal CAUTION ! ! The condensate drain must be lled and unobstructed to allow ow of condensate. The condensate should not be subjected to conditions where freezing could occur. If the condensate is subjected to freezing or obstruction, it can leak, resulting in potential water damage to the unit and surrounding area. The condensate trap must be lled with water prior to using the water heater. □ Pour water down the exhaust collar until water visibly ows out of condensate drain before rst use. Figure 1. NOTE ! ! The drain line material must be a material approved by the authority having jurisdiction. In absence of such authority, PVC and CPVC piping must comply with ASTM D1785 or D2846. This pipe must be connected to the port at the side panel. The end of the pipe should drain to a laundry tub or to a oor drain. 1/2" PVC (SCH40, ASTM-D1785) or 3/4" CPVC (SDR11, ASTM-D2846) Figure 2. ! NOTE ! Eternal water heater will typically produce a condensate that is considered slightly acidic with a Ph content of approximately 3-4. Install a neutralizing lter if required by authority having jurisdiction (See gure 2). 1. Direct to drain from the unit. 2. Drain through neutralizer from the unit. 3. Drain to laundry tub from the unit, in this case the unit must be above the height of the laundry tub. 4. When installing a condensate pump, ensure the pump is approved for use with condensing appliance. The pump should be equipped with an overow switch to prevent property damage from potential condensate spillage. CLEANING OUT THE TRAP Over time, blockage of the trap by debris may occur; when the condensate cannot be released, the unit will go into error and will shut down. When this occurs, the trap must be cleaned. To Remove Trap 1. Gently pull trap body downwards to remove. 2. Remove clip securing trap to the nipple. 13 Figure 3. Indoor Installation Clearances From top of water heater 12 inches From front of unit 6 inches (*) From left side of unit (gas piping side) 6 inches From side wall ue or vent connector in any direction 6 inches From back of unit From right side of unit 0.6 inch 2 inches *For accessibility when performing maintenance, 24" clearance in front of the unit it is recommended. Combustion Air Supply □ GU145(S) / GU195(S,M) can be used as either Power-Vent or Direct-Vent appliance. When used as a PowerVent appliance, the water heater should be located in an area where enough air is available for proper combustion and ventilation. Follow the latest edition of ANSI Z223.1 and any of your local codes that are applicable. □ GU145(S) / GU195(S,M) is a Category IV vented appliance and manufacturer's ventilation specifications should be followed. □ In general these requirements specify that if the unit is installed in a confined space, there must be permanent air supply openings if Eternal isn't installed as Direct-Vent. ! WARNING - high elevation installations ! Natural gas in high altitude might contain less heating value than typical 1100 BTU/ cuft and therefore can cause improper air / gas mix leading to improper combustion. For natural gas installations in altitudes above 3,000 feet, be sure to apply the intake orice (P/N 152140230) provided by manufacturer in the accessory box. Minimum Recommended Air Supply To Water Heater as Power-Vent Model # Water Heater Capacity Outside Air Area Inside Air Area GU195 (S,M) Max. 195,000 Btu/hour 14 sq.in. 54 sq.in. GU145 (S) Max. 145,000 Btu/hour 10 sq.in. 40 sq.in. Air supply from outside building: When combustion air is supplied directly through an outside wall such as intake louver openings into the dwelling, each opening should give a minimum free area of one square inch per 15,000 Btu/hour of the total input ratings of all appliances in the enclosed area. Air Vents Heater Air supply from inside building: When combustion air is supplied from inside the building, each opening should give a minimum free area of one square inch per 3,750 Btu/hour of the total input ratings of all appliances in the enclosed area. These openings should never be less than 40 sq.in. Air Vents Heater The minimum required inside air volume should be 50 cu.ft per every 3,750 Btu/hour. Model # Water Heater Capacity Minimum Required Air Volume GU195 (S,M) Max. 195,000 Btu/hour 2649 cu.ft GU145 (S) Max. 145,000 Btu/hour 1932 cu.ft 14 Outdoor Installation Clearances From top of water heater 24 inches From back of unit From front of unit 24 inches From left side of unit (gas piping side) 6 inches From side wall ue or vent connector in any direction 6 inches From right side of unit 0.6 inch 2 inches If this unit is installed under an overhang, there must be a 24" clearance from the top of the unit to the overhang, and the surrounding area must be open in front and on the sides of the unit. Exhaust Ventilation □ For outdoor installation, do not remove the vent cap from the top of the appliance. Locate the water heater in an open, unroofed area, and maintain the above minimum clearances from combustible materials. ! WARNING ! Do not have the ue terminal pointing toward an opening into the building. Do not locate your heater in a pit or any location where gas and water can accumulate. ! WARNING ! Do not install the water heater where water, debris or ammable vapors may get into the ue terminal. This may cause damage to the water heater. Min. 4ft ! WARNING - high elevation installations ! □ Natural gas in high altitude might contain less heating value than typical 1100 BTU/ cuft and therefore can cause improper air / gas mix leading to improper combustion. For natural gas installations in altitudes above 3,000 feet, be sure to apply the intake orice (P/N 152140230) provided by manufacturer in the accessory box. □ Dipswitch setting for high altitude is different to sea level installation, Please call 1-866-946-1096 to speak to a service technican for proper conguration. 15 Mobile Home Installation WARNING ! ! Read and Review this entire Manual with special emphasis on combustion and ventilation for your safety. If you do not follow these instructions exactly, a re or explosion could result causing property damage, personal injury or loss of life. Eternal water heater must be used as a sealed combustion type (Direct Vent) where all the combustion air is supplied from the outdoors through the air intake and all combusted gas byproduct is vented directly to the outside by means of the vent termination. MOBILE HOME (Manufactured Home). This appliance must be installed in accordance with the Manufactured Home Construction And Safety Standard,(Title 24, CFR; Part 3280). In addition, install in accordance with the following instructions, the instructions supplied with the venting termination, local codes, utility company requirements for the installation of water heaters in manufactured homes (mobile homes). In the absence of such a standard, the water heater should be installed in accordance with the latest edition of the National Fuel Gas Code, ANSI Z223.1/NFPA 54 and ANSI A119.5/NFPA 501D. Wall mount the water heater with the brackets provided WARNING ! ! □ The water heater must be properly supported; if the wall is not strong enough, be sure to reinforce the wall. The unit must be mounted on a vertical wall and level to the ground. □ Wall mount may caused noises and vibration to magnify through the wall; carefully select where to mount the unit is important. In some cases, oor mount should be considered. Mounting Steps 1. Install mounting brackets with 6 screws on top and bottom back of the unit. Philips Head Screws 1/4"x3/8" Philips Head Screws 1/4"x3/8" 2. Select a location on the wall to mount the unit. The included wall bracket has been pre-drilled for easy installation on standard wall studs. If the framing is not standard or installing on an uneven surface, fasten 3/4" plywood to the stud wall and then attach the wall bracket. 1/4"x1 ½" Screws 3. Hang the unit on the mounted wall bracket and secure bottom of the unit to the wall with included wall anchors and wall screws. 1/4"x1 ½" Screws Wall Mounting For Commercial Food Service Per ANSI / NSF-5, the unit must be mounted at least 6" above the oor from the base of the unit. This mounting clearance provides access for clearing any possible debris or accumulated water seepage that can occur below the unit. 6" 16 Mobile Home Installation Proper material for Intake and Exhaust vent WARNING ! ! This water heater must be properly vented for removal of exhaust gases to the outside of the home. Correct installation of the vent pipe system is mandatory for the safe and efcient operation of this water heater and is an important factor in the life of the unit. Vent Pipe Material The appliance must be vented separately from all other appliances. The following type of non-metallic vent can be used: ● PVC (schedule 40, ASTM-D1785) ● CPVC (schedule 40, ASTM-D2846) ● PVC-DWV (ANSI/ASTM-D2665) ● ABS (schedule 40, ASTM-D2661) ● Polypropylene Pipe Single wall & Components (ULC-S636, UL-1738) Note : Do not use cellular foam core pipe. Cementing PVC, ABS or CPVC PIPE and FITTING All primers, cleaners and cements must meet all local codes and applicable standards of the American Society for Testing Materials (ASTM). Gas leak be conducted for supply pressures above 1/2psig. To install the proper venting for the water heater in a Mobile Home (Manufactured Home) Per code, water heaters must be installed with a sealed combustion design so as to separate the water heater's combustion and venting system from the interior atmosphere of the manufactured home. In accordance with code - water heaters must be direct vented. Please refer to direct venting instructions and diagrams on page 23-24. Horizontal Termination Vertical Termination Below diagrams are examples of vertical terminations. □ Through roof (Direct Vent) □ Through roof (Concentric Vent) Below diagrams are examples of vertical terminations. □ Side Wall (Direct Vent) □Side Wall (Power Vent) ! ! □ Through roof (Power Vent) WARNING ! The Grand Hall approved concentric kit is a unique pipe-in-pipe venting system designed for termination. Do not try to replicate or make your own. For more information, please refer to Concentric Vent Kit section in the Operation manual. □ Side Wall (Concentric Vent) An open tee is optional but recommended to use as a termination to alleviate and prevent back pressure in the venting system. ! WARNING WARNING ! The Grand Hall approved concentric kit is a unique pipein-pipe venting system designed f or t er min at ion. D o not t ry t o replicate or make your own. For more information, please refer to Concentric Vent Kit section in the Operation manual. An open tee is optional but recommended to use as a termination to alleviate and prevent back pressure in the venting system. For optimal results the open tee should be positioned vertically. ! □ Pipes must terminate a minimum o f t w el v e ( 1 2) in c h es a bo v e anticipated snow level. □ It cannot be connected to existing vent piping or chimney. □ The total vertical and horizontal runs cannot exceed the maximum length with a maximum number of 90 degree elbows as specied in the table of page 22. □ Eternal can be vented straight up and a horizontal section is not required for vertical terminations. ! WARNING ! □Once the vent terminal location has been determined, make a hole through the exterior wall to accommodate the vent pipe. Vent pipe must only exit exterior wall horizontally. □Place the 1/2" metal mesh screen inside the terminal tting and connect it as shown to the vent pipe on the exterior of the building. □Seal any opening around the vent pipe or ttings with mortar or silicone caulk "as shown" above. □Complete the rest of the vent pipe installation to the water heater's vent connector tting on the blower outlet. If necessary support horizontal run as previously mentioned. 17 Mobile Home Installation LOCATION for MOBILE HOME (Manufactured Home). "MUST BE INSTALLED UNDER DIRECT VENT ONLY" Placement of Water Heater: Locate the water heater as desired, make certain the minimum clearances are maintained. For indoor and outdoor installation follow entire Eternal operation manual, please see section above on mobile home. "When installing in a garage, the heater's ignition source should be elevated no less the 18" from the oor." This operation Manual should be kept by the unit after installation. Clearances From top of water heater 12 inches From back of unit From front of unit 6 inches (*) From left side of unit (gas piping side) From side wall ue or vent connector in any direction 6 inches From right side of unit *For accessibility when performing maintenance, 24" clearance in front of the unit it is recommended. 0.6 inch 6 inches 2 inches To convert a Unit from Natural gas to LP or LP to Natural gas NOTE ! ! Contact the local propane gas supplier for recommended sizing of piping, tanks and 100% lockup gas regulator. □ Adjust the propane supply regulator provided by the gas supplier for 13" w.c. maximum pressure. NOTE ! ! LP conversion kit (LP Orifice, PROPANE GAS Label) must be ordered from Grand Hall USA. Conversion can only be completed by a qualified professional. How to convert to LP 1. Remove front panel by loosening 5 screws. 4. Insert LP orifice into the nozzle, retighten gas tube and make sure no gas leak. LP Orice Gas Tube 5. Reassemble the front panel and apply the LP label which is in the accessory kit. Screws LP label 2. Locate the gas valve towards lower left of the unit. ! WARNING ! Prior to start up, ensure the unit is set to re propane. Check the rating label for the type of fuel. If there is a conict or doubt on the setup, remove the gas valve and check for the propane orice. Failure to ensure proper setup could result in severe personal injury, death or substantial property damage. Gas Valve 3. Loosen nut connecting gas tube to gas valve. To convert back from LP to Natural Gas All Eternal models come factory pre-congured as Natural gas, However if the water heater has been converted to LP and needs to be converted back to Natural gas, follow steps 1, 2, 3 and remove the LP orice and the LP Label. Nut 18 Wall Mounting WARNING ! ! □ The water heater must be properly supported; if the wall is not strong enough, be sure to reinforce the wall. The unit must be mounted on a vertical wall and level to the ground. □ Wall mount may caused noises and vibration to magnify through the wall; carefully select where to mount the unit is important. In some cases, oor mount should be considered. Mounting Steps 1. Install mounting brackets with 6 screws on top and bottom back of the unit. Philips Head Screws 1/4"x3/8" Philips Head Screws 1/4"x3/8" 2. Select a location on the wall to mount the unit. The included wall bracket has been pre-drilled for easy installation on standard wall studs. If the framing is not standard or installing on an uneven surface, fasten 3/4" plywood to the stud wall and then attach the wall bracket. 1/4"x1 ½" Screws 3. Hang the unit on the mounted wall bracket and secure bottom of the unit to the wall with included wall anchors and wall screws. 1/4"x1 ½" Screws Wall Mounting For Commercial Food Service Per ANSI / NSF-5, the unit must be mounted at least 6" above the oor from the base of the unit. This mounting clearance provides access for clearing any possible debris or accumulated water seepage that can occur below the unit. 6" 19 Floor Mounting Standing Installation □ GU145(S) / GU195(S,M) can be installed standing on combustible floor surface, or on a water heater stand. □ Be sure to use a suitable draining pan under the unit if leakage of the tank or connections will resuit in damage to the area adjacent to the appliance. Floor Standing Place unit directly on an even surface. Factory installed rubber feet can be adjusted if the surface is slightly uneven. Factory Installed Rubber Feet Earthquake Proong Secure the unit to the wall with included wall mount bracket. Be sure to install the wall mount bracket to the wall studs. Water Heater Stand For Commercial Food Service Per ANSI / NSF-5, floor standing directly on the hard surface is NOT an acceptable installation method. The unit must be elevated at least 6" off the floor. This mounting clearance provides access for clearing any possible debris or accumulated water seepage that can occur below the unit. Install the unit on Eternal Water Heater Stand (P/N 314080136) that raises the unit at least 6" above the floor. 6" min Philips Head Screws M8x15x4pcs ! CAUTION ! If local codes require the water heater to be raised 18" above oor, installing GU145(S) / GU195(S,M) on the optional Eternal Water Heater Stand (P/N 314080136) will satisfy code. In conjunction, the unit on stand raises the FVIR compliant igniter and burner at least 18" off the oor. Alternatively, raising the unit at least 6" off the oor will also satisfy code. 20 Venting Intake & Exhaust Material WARNING ! ! This water heater must be properly vented for removal of exhaust gases to the outside of the home. Correct installation of the vent pipe system is mandatory for the safe and efcient operation of this water heater and is an important factor in the life of the unit. Vent Pipe Material The appliance must be vented separately from all other appliances. The following type of non-metallic vent can be used: ● PVC (schedule 40, ASTM-D1785) ● CPVC (schedule 40, ASTM-D2846) ● PVC-DWV (ANSI/ASTM-D2665) ● ABS (schedule 40, ASTM-D2661) ● Polypropylene Pipe Single wall & Components (ULC-S636, UL-1738) Note : Do not use cellular foam core pipe. Cementing PVC, ABS or CPVC PIPE and FITTING All primers, cleaners and cements must meet all local codes and applicable standards of the American Society for Testing Materials (ASTM). ! NOTICE-VENTING GUIDELINES ! The following guidelines should be followed when installing the exhaust outlet piping: □ Venting should be as direct as possible with a minimum number of pipe ttings. □ Venting diameter must not be reduced unless specially noted in the installation instructions. □ Support all horizontal pipe runs every 3½ feet according to local codes. □ Vents running through unconditioned spaces where below freezing temperatures are expected should be properly insulated to prevent freezing. For horizontal runs, wrap the vent pipe with self-regulating 3 or 5 watt heat tape. The heat tape must be U.L. listed and installed per manufacturer's instructions. □ Do not connect this venting system with an existing vent or chimney. □ Do not connect common vent with the vent pipe of any other water heater or appliance. □ Do not use low prole wall termination. □ Do not use non return valve. □ Do not use bushing as reducer. ! WARNING NOTICE-VENTING GUIDELINES For installations in Canada, eld supplied plastic vent piping must comply with CAN/CGA-B149.1(latest edition) ! and be certied to the Standard For Type BH Gas Venting Systems,ULC S636 Components of this listed system shall not be interchanged with other vent systems or unlisted pipe/ttings. All plastic components and specied primers and glues of the certied vent system must be from a single system manufacturer and not intermixed with other system manfacturer's vent system parts. The supplied vent connectors are certied as part of the water heater. ! WARNING ! If the Eternal combustion air inlet is located in an area likely to cause or contain contamination, the combustion air must be repiped and terminated at another location. Contaminated combustion air will damage the unit and its burner system, resulting in possible severe personal injury, death or substantial property damage. Corrosive contaminatns and sources Areas likely to have contaminants Products to aviod Spray cans containing uorocarbons Permanent wave solutions Chlorinated waxes/cleaners Chlorine-based swimming pool chemicals Calcium chloride used for thawing Sodium chloride used for water softening Refrigerant leaks Paint or varnish removers Hydrochloric acid/muriatic acid Cements and glues Antistatic fabric softeners used in clothes dryers Chlorine-type bleaches, detergents, and cleaning solvents found in household laundry rooms Adhesives used to fasten building products and other similar products Dry cleaning/laundry areas and establishments Swimming pools Metal fabrication plants Beauty shops Refrigeration repair shops Photo processing plants Auto body shops Plastic manufacturing plants Furniture renishing areas and establishments News building construction Remodeling areas Garages and workshops 21 Venting Specication Direct Vent □ GU145(S) / GU195(S,M) is factory configured as a sealed combustion unit with dedicated intake and exhaust connections. □ When installed as a Direct Vent appliance, all combustion air is drawn directly from outside of the home. □ Direct Vent configuration is suitable for indoor only. □ Recommended for facilities with difficulty accessing combustion air. Power Vent □ When installed outdoors, outdoor venting cap should be used. □ Can be installed indoors, if combustion air supply is sufficient. □ Is not sealed combustion if intake is not used to bring air directly from outside. WARNING ! ! Insufcient air supply used with Power Vent appliance may cause the building to experience negative pressure inside. Negative pressure is not allowable by most building codes and can cause back drafting of cold air from outside through the unit potentially freezing the heat exchanger. How To Congure Unit For Power-Vent To configure the unit for power vent, insert a 6" section of 3" pvc and terminate the intake with a 90° elbow. Be sure to insert the included mesh screen into the intake hole before the PVC pipe. Maximum Allowable Vent and Combustion Air Piping Length 3" PVC Tube 3" Elbow 6" Mesh Screen 3 inch Piping Feet Max # of 90° elbows 100 6 ● Reduce the maximum allowable length for each elbow used as follows: - 45 degree elbow : Deduct 3 feet - 90 degree elbow : Deduct 5 feet ● Allow minimum length of 6" vent run vertically off the water heater is required before using any elbow. ● Some termination is considered as a type of elbow, correct deduction should be applied. Such as, a turn down 90˚ or an open T termination is considered 1x90˚ elbow and a candycane termination is considered as 2x90˚ elbow. ● The intake vent length can be of equal length or less; there is no balancing requirement between intake and exhaust. ● To avoid accumulation of condensate water in exhaust vent run, it recommended to position the start of the horizontal section lower then slope upwards with no less than 1/4 per foot towards the venting termination to allow condensation flow back into the unit. EC Adapter Installation □ How to install the EC Adapter M10 Screw (Test Hole) □ How to test exhaust combustion air 1. Loosen M10 screw. 2. Insert the combustion probe. 3. After test, retighten M10 screw on the EC Adapter and make sure no leak. EC Adapter M10 Screw O Ring combustion probe Note: It is not necessary to glue the EC Adaptor into the top of the unit, but when installing PVC vent pipe into EC Adaptor it is recommended you glue the PVC into the EC Adaptor. Note: For outdoor installation, please install EC Adapter to check gas setting prior to install outdoor venting cap or PVC vent pipe. 22 Vertical Termination Below diagrams are examples of vertical terminations. □ Through roof (Direct Vent) □ Through roof (Concentric Vent) WARNING ! ! The Grand Hall approved concentric kit is a unique pipe-in-pipe venting system designed for termination. Do not try to replicate or make your own. For more information, please refer to Concentric Vent Kit section in the Operation manual. □ Through roof (Power Vent) An open tee is optional but recommended to use as a termination to alleviate and prevent back pressure in the venting system. ! □ Pipes WARNING ! must terminate a minimum of twelve (12) inches above anticipated snow level. □ It cannot be connected to existing vent piping or chimney. □ The total vertical and horizontal runs cannot exceed the maximum length with a maximum number of 90 degree elbows as specied in the table of page 22. □ Eternal can be vented straight up and a horizontal section is not required for vertical terminations. 23 Horizontal Termination Below diagrams are examples of vertical terminations. □ Side Wall (Direct Vent) □ Side Wall (Power Vent) ! WARNING ! The Grand Hall approved concentric kit is a unique pipe-in-pipe venting system designed for termination. Do not try to replicate or make your own. For more information, please refer to Concentric Vent Kit section in the Operation manual. □ Side Wall (Concentric Vent) An open tee is optional but recommended to use as a termination to alleviate and prevent back pressure in the venting system. For optimal results the open tee should be positioned vertically. ! WARNING ! □ Once the vent terminal location has been determined, make a hole through the exterior wall to accommodate the vent pipe. Vent pipe must only exit exterior wall horizontally. □ Place the 1/2" metal mesh screen inside the terminal tting and connect it as shown to the vent pipe on the exterior of the building. □ Seal any opening around the vent pipe or ttings with mortar or silicone caulk "as shown" above. □ Complete the rest of the vent pipe installation to the water heater's vent connector tting on the blower outlet. If necessary support horizontal run as previously mentioned. 24 Clearance Requirements from Vent Terminations to Building Openings All clearance requirements are in accordance with ANSI Z21.10.3 and the National Fuel Gas Code, ANSI Z223.1 and in Canada, in accordance with NSCNGPIC. □ Vent Clearances When Heater is Installed Indoors Maintain the following clearances to any opening in any building: ● 4' below, 4' horizontally from, or 1' above any door, operable window, or gravity air inlet into any building. ● 3' above any forced air inlet within 10'. □ Vent Clearances When Heater is Installed Outdoors With a Vent Cap Maintain the following clearances to any opening in any building: ● From the unit: 4' below, 4' horizontally from, or 1' above any door, operable window, or gravity air inlet into any building. ● 3' above any forced air inlet within 10'. ● For outdoor installation, we recommend using the outdoor venting cap for rain protection. Outdoor Venting Cap ! WARNING ! For Installations in Canada, clearances are as follows: To windows, doors, & gravity air inlets: 36". To forced air inlets: 6'. These clearance requirements hold true for all of the above situations: Indoor, Outdoor w/vent cap. 25 Multiple Units Termination * Multiple unit Termination □ Vertical Terminations ! WARNING □ Horizontal Terminations ! The Grand Hall approved concentric kit is a unique pipe-in-pipe venting system designed for termination. Do not try to replicate or make your own. For more information, please refer to Concentric Vent Kit section in the Operation manual. * Concentric Multivent Termination When two or more direct vent units are vented near each other, each unit must be individually vented, but next unit vent ternination must be at least 12 inches away from the first unit. Vent termination is important so as to avoid recirculation of flue gases. □ Vertical Terminations □ Horizontal Terminations 26 Common Vent Installation Applicable Model GU195 (M) / 508 (11,12,21,22)1195 (M) Systems Common vent system is strictly applicable for GU195M model only. Only units that are connected by MCU wire with dipswitch set up on main controller board (PCB) to operate as one group can be common vented together. It is required for vent system to be perfectly impermeable to condensation and made out of corrosion resistant materials. The various funnel joints must be well sealed in order to avoid any leakage of flue gases and/or condensatewater. For more information on how to connect MCU wire or configure dipswitch setting please refer to MCU Installation section in the Operation Manual. Power Vent When common venting multiple units using the power vent setup for intake run, it is important to make sure the room is well ventilated, temperature steady and sufficient clean air can be supplied for combustion air. It may be necessary to use an air filter. For more detial on how to setup power vent for intake please refer to Venting Specification section in Operation Manual. Air lter Direct Vent(Sealed Vent) The direct venting system can use the same piping material for air intake as the power venting system. It's not required for intake and exhaust vent to be in same direction. The termination can be on either right or left side of the units. Exhaust Intake Dimensions Of Installation POWER VENTED Number of installing units 2 3 4 DIRECT VENTED Common vent section pipe size Maximum length of exhaust vent per unit Allowed number of 90º elbow per unit 4 inches 6 inches 6 inches 50 ft 60 ft 60 ft 3 5 5 Number of installing units Common vent section pipe size Maximum length of Exhaust vent / Air intake per unit Allowed number of 90° elbow on Exhaust vent / Air intake per unit 2 4 inches 20 ft 3 3 6 inches 30 ft 4 4 6 inches 30 ft 4 ● Reduce the maximum allowable length for each elbow used as follows: - 45 Degree elbow: Deduct 3 feet - 90 Degree elbow: Deduct 5 feet ● Example: when installing 2 units on 4" common vent, the maximum vent length per unit is 50'. If 3x90ْ elbows are used on unit #1 then the max run for unit #1 cannot exceed 35' but if only 2x90ْ elbows are used on unit #2, then max vent run for unit #2 can go up to 40'. Common vent section (L) 12" Condensate drain 17" min 1ft ● Allow minimum length of 6" vent run vertically off the water heater using 3" pipe is required before using any elbow or T-joint connection. 2" pipe is not allowed when using common vent system. ● To avoid accumulation of condensate water in exhaust vent run, it's recommended to start off the horizontal section lower then slope upwards with no less than 1/4 per foot towards the venting termination to allow condensation flow back into the unit. * Note: T-joint connection is considered as 1x90ْ elbow. ! WARNING ! Maximum only up to 4x GU195Ms can be common vented together. In the case of installing 8x GU195Ms, two set of isolated common vent system should be used. 27 Concentric Vent Kit WARNING ! ! Failure to comply with the following warning could result in product damage or improper operation, personal injury, death, substantial property and/or warranty will be voided. □ Do not use concentric kit which are not approved by Grand Hall. □ Do not operate the appliance with the rain cap removed or recirculation of combustion byproducts may occur. Water may also collect inside the larger combustion air pipe and ow to the burner enclosure. □ Do not make alternation to the approved Grand Hall concentric kit, such as length, downsize or any other part. □ Do not allow insulation or other materials to accumulate inside the pipe assembly when installing through the hole. Ensure termination height is above the roof surface or anticipated snow level (12 inches in USA or 18 inches in Canada). □ Do not use eld-supplied couplings to extend pipes. Airow restriction will occur and may caused intermittent operation. * Approved Grand Hall Concentric Kit 2 ½" DIA SDR-26 Pipe 4" DIA SDR-26 Pipe Rain Cap Intake Connection Exhaust Connection "Y" Concentric Fitting Note! When installing Horizontally, It's recommended to position the intake connection of the concentric kit to face upward to prevent rainfall/water accumulation flow through the intake pipe into the unit. ! WARNING ! When using the approved concentric kit, 3" pipe is required for the entire intake and exhaust vent run. The maximum intake or exhaust vent run cannot exceed more than 50ft on each side. Be sure to subtract 5' off your total vent run per 90° elbow or subtract 2.5' off total vent run per 45° elbow that will be used. Only up to 4x90° elbow or max 8x45° elbow is allowed for either side of intake or exhaust. ! NOTE ! Requirements for Installation in Canada □ Installations must be made with a vent pipe system certied to ULC-S636. □ The rst three (3) feet of plastic vent pipe from the appliance ue oulet must be readily accessible for visual inspection. □ The components of the certified vent system must not be interchanged with other vent systems or unlisted pipe/ ttings. The inner vent tube must be replaced with eld supplied certied vent material to comply with this requirement. Outdoor Vent Kit Installation Instructions: 1. Remove included 6 screws on the unit. 2. Install the 3" DIA PVC Pipe. 3. Install the Outdoor Vent Kit on the unit with included 6 screws. Philips Head Screw M4xL8x6pcs Intake louvers Exhaust The length of 5.75" PVC pipe included with the Vent Cap must be installed on the intake side. 28 3" DIA PVC Pipe Vent Pipe Installation & Terminator Position US Installations Description Canadian Installations Other than Direct Vent Direct Vent 1 foot 1 foot 1 foot 1 foot 3 feet A Clearance above grade, veranda, porch, deck, or balcony B Clearance to window or door that 4 feet below or to side of opening; may be opened 1 foot above opening C Clearance to permanently closed window * * * Vertical clearance to ventilated soffit located above the terminal D within a horizontal distance of 2 feet from the center line of the terminal * * * E Clearance to unventilated soft * * * F Clearance to outside corner * * * G Clearance to inside corner * * * Clearance to each side of center H l ine ex tend ed a bov e m eter / regulator assembly * * 3 feet within a height 15 feet a b ov e t h e me t er /r e g u l at o r assembly Clearance to service regulator vent outlet * * 3 feet Clearance to non-mechanical air supply inlet to the building or the 4 feet below or to side of opening; J 1 foot above opening combustion air inlet to any other appliance 1 foot 3 feet Clearance to a mechanical air 3 feet above if within 10 feet supply inlet horizontal 3 foot 6 feet 7 feet * 7 feet * * 1 foot I K Clearance above paved sidewalk L or a paved driveway located on public property M Clearance under veranda, porch, deck, or balcony *For clearances not specified in ANSI Z223.1 / NFPA 54 or CAN/CSA-B 149.1, please use clearances in accordance with local installation codes and the requirement of the gas supplier. 29 Gas Supply Piping NOTE ! ! NOTE □ This unit needs a manual gas control valve (shut-off valve) that must be connected to the unit before the gas line. □ Check the gas inlet pressure and the type of gas matching the rating plate located on your water heater. Also check to make sure your gas meter is capable of supplying sufcient BTU load to all appliances. Insufcient gas pressure and volume will cause your water heater to be deficient in performance and may not work properly. □ When connections are completed, check for gas leaks by applying soapy water to all gas fittings and connections. Presence of soap bubbles foaming is a sign of gas leaks. □ This appliance and its individual shut-off valve must be isolated from the gas supply piping system by unplugging the unit and turning off the main gas valve during any pressure testing of the gas supply piping system at test pressures equal to or less than 1/2 PSI. Gas Piping System Codes Size gas piping system correctly following ANSI Z223.1/NFPA 54, or by local code. □ When measuring the inlet supply pressure, the water heater and all other gas appliances sharing the gas supply line must be ring at maximum capacity. □ Maximum gas pressure must not exceed listed value. □ Low gas pressure could be caused by an undersized gas pipe; this will cause the water heater's performance to diminish and it would not be able to reach maximum performance. □ These tables are for reference only. Please consult the gas pipe manufacturer for actual pipe capacity. NATURAL GAS SUPPLY PIPING Pipe Cubic Feet of Natural Gas size Length 10’ 20’ 30’ 40’ 50’ 60’ 70’ 80’ 90’ 100’ 125’ 150’ 200’ 1/2" 172 118 95 81 72 65 60 56 52 50 44 40 34 3/4" 360 247 199 170 151 137 126 117 110 104 92 83 71 1" 678 466 374 320 284 257 237 220 207 195 173 157 134 1 1/4" 1390 967 768 657 583 528 486 452 424 400 355 322 275 1 1/2" 2090 1430 1150 985 873 791 728 677 635 600 532 482 412 2" 4020 2760 2220 1900 1680 1520 1400 1300 1220 1160 1020 928 794 Based on 0.60 specific gravity for natural gas at 0.5" W.C. pressure drop. DOE standard is 1000 BTU per cubic ft. of natural gas NATURAL GAS SUPPLY PIPING Pipe Cubic Feet of Natural Gas size Length 10’ 20’ 30’ 40’ 50’ 60’ 70’ 80’ 90’ 100’ 125’ 150’ 200’ 1/2" 454 312 250 214 190 172 158 147 138 131 116 105 90 3/4" 949 552 524 448 397 360 331 308 280 273 242 219 188 1" 1787 1228 986 844 748 678 624 580 544 514 456 413 353 1 1/4" 3669 2522 2025 1733 1536 1392 1280 1191 1118 1056 936 848 726 1 1/2" 5497 3778 3034 2597 2302 2085 1919 1785 1675 1582 1402 1270 1087 2" 10588 7277 5844 5001 4433 4016 3695 3437 3225 3046 2700 2446 2094 Based on 0.60 specific gravity for natural gas at 3.0" W.C. pressure drop; 8.0" W.C. or greater supply pressure. DOE standard is 1000 BTU per cubic ft. of natural gas PROPANE GAS SUPPLY PIPING Pipe KBTU of Propane Gas size Length 10’ 20’ 30’ 40’ 50’ 60’ 80’ 100’ 125’ 150’ 1/2" 291 200 160 137 122 110 101 94 89 84 3/4" 608 418 336 287 255 231 212 197 185 175 1" 1150 787 632 541 480 434 400 372 349 330 1 1/4" 2350 1620 1300 1110 985 892 821 763 716 677 1 1/2" 3520 2420 1940 1660 1480 1340 1230 1140 1070 1010 2" 6790 4660 3750 3210 2840 2570 2370 2200 2070 1950 Based on 1.50 specific gravity for propane gas at 0.5" W.C. pressure drop; 11" W.C. supply pressure 30 175' 74 155 292 600 899 1730 200’ 67 140 265 543 814 1570 LP Conversion NOTE ! ! Contact the local propane gas supplier for recommended sizing of piping, tanks and 100% lockup gas regulator. □ Adjust the propane supply regulator provided by the gas supplier for 13" w.c. maximum pressure. NOTE ! ! LP conversion kit (LP Orifice, PROPANE GAS Label) must be ordered from Grand Hall USA. Conversion can only be completed by a qualified professional. How to convert to LP 1. Remove front panel by loosening 5 screws. 4. Insert LP orifice into the nozzle, retighten gas tube and make sure no gas leak. LP Orice Gas Tube 5. Reassemble the front panel and apply the LP label which is in the accessory kit. Screws 2. Locate the gas valve towards lower left of the unit. LP label ! WARNING ! Prior to start up, ensure the unit is set to re propane. Check the rating label for the type of fuel. If there is a conict or doubt on the setup, remove the gas valve and check for the propane orice. Failure to ensure proper setup could result in severe personal injury, death or substantial property damage. Gas Valve 3. Loosen nut connecting gas tube to gas valve. To convert back from LP to Natural Gas All Eternal models come factory pre-configured as Natural gas, However if the water heater has been converted to LP and needs to be converted back to Natural gas, follow steps 1, 2, 3 and remove the LP orice and the LP Label. Nut 31 Water Supply Connection WATER SUPPLY CONNECT □ The water fittings on the Eternal water heater are 3/4" NPT. If the installation site has only 1/2" plumbing throughout the building, it is not necesssary to up size the water lines to 3/4" when installing a single unit. □ When installing more than one unit to supply higher volumes of hot water in residential applications, the number of Eternal water heaters required and the header pipe sizing needs to be properly sized to meet the total hot water demand. □ All pipes, pipe ttings, valves and other components including solder, must be approved for use in potable water systems. □ The use of unions and material shut off valves on both the cold water inlet and hot water outlet is recommended. □ The use of brass, stainless steel or copper unions/nipples is recommended for use with an Eternal water heater. □ Take measures to prevent water pipe from freezing is important. In the event of frozen water pipe, Eternal will not able to activate freeze protection function due to lose of water pressure and will be susceptible to freeze and cause serious unit damage. □ Do not install eternal water heater with iron or galvanized piping. ! WARNING ! □ Eternal is designed for full ow with low pressure loss. Without ow restriction, if Eternal is overdrawn due to demand exceeding unit(s)’s BTU recovery capacity, outlet temperature will not reach set point. However, full flow without diminished hot water pressure will continue to be delivered. It is important to make sure each job is properly sized to ensure hot water demand can be satised. □ Be careful not to reverse the hot water outlet and cold water supply line connections to the water heater. This will caused your water heater to operate dangerously and void warranty. Make sure the hot and cold lines are connected properly. FILLING THE WATER □ Close the water heater drain valve by turning the knob to the right. The drain valve is on the lower leftside of the water heater. □ Open the cold water supply valve to the water heater. □ To ensure complete lling of the tank, allow air to purge by opening the nearest hot water faucet. Allow water to run until a constant ow is obtained. □ Check all new water piping for leaks. Repair as needed. ! ! CAUTION □ Never use this water heater unless it is completely lled with water. □ Be certain there are no loose particles or dirt in the piping. Keep a copper pipe diameter at NPT 3/4 inch diameter to allow full ow. If the hot and cold connections are reversed, the heater will not work properly and could damage the unit. Be sure to connect them correctly. □ If water ow is low, check the lter by removing the draining valve. DRAINING THE WATER □ Close water supply shut-off valve to the unit rst. □ Connect garden hose to the draining valve located on the lower leftsider of the unit. □ Open the valve by using a at head screw driver to drain water with the hose. □ After draining the tank, turn the valve body to remove the draining valve from the unit and clean the lter. ! CAUTION ! Do not open the draining valve without connecting a hose so that water can be diverted to an area where water damage is not a problem. Do not remove the draining valve from the unit without rst draining the tank. ! WARNING ! The use of galvanized or dielectric unions & piping is prohibited for use with an Eternal water heater. Fail to comply with this warning will void warranty. 32 Condensate Piping CAUTION ! ! In order to drain the condensate, installing the condensate T tting in the accessory kit is required. Do not reduce the size of the tting or the drain pipe. The condensate T tting is designed to t on 1/2" PVC (schedule 40, ASTM-1785) or 3/4" CPVC (SDR11, ASTM-D2846) pipe. The end of the drain pipe must not be submerged in water or blocked in any way. Take measures to prevent the condensate drain lines from freezing is required (insulation, heat tape, electric heater, ect.) □ This water heater is a high efciency, fully condensing appliance which produces condensate during operation. The water heater incorporates a collection, neutralization, and removal system which must be properly drained in order to ensure proper operation of this appliance. □ Please use PVC or CPVC for the drain line. Do not use steel, black iron, or any other material which can corrode when placed into contact with condensate water. □ Keep the length of the drain pipe as short as possible. Long runs or applications where the nearest drain is above the water heater will require the use of a condensate pump. Size the pump to allow for a maximum condensate discharge of 2 GPH from the water heater. □ Horizontal runs must be sloped 1/4" per foot towards the drain or condensate pump. □ Be sure to check that condensate is freely flowing from the drain piping after the system has been installed. Condensate will begin owing out of the water heater within 15 minutes after operation has started. WARNING ! ! To ensure proper disposal of condensate do not install neutralizer vertically unless approved by the manufacturer. TYPICAL INSTALLATION Condensate piping to floor drain Condensate piping to Condensate pump Relief Valve Discharge Line Vent Vent stops vacuum air lock, and clean out for future if condensate line is clogged. Eternal Condensate Neutralizer Relief Valve Discharge Line Vent Eternal Condensate Neutralizer Condensate Pump 33 Temperature and Pressure Relief Valve The following 3/4", maximum 150psi valves are approved by CSA for use with GU145(S) / GU195(S,M) : - Cash Acme NCLX-5L ! ! CAUTION □ The temperature-pressure relief valve should be manually opened once a year. □ No one should be in front of or around the outlet of the temperature-pressure relief valve discharge line when in use. □ If after manually opening the valve and it fails to completely reset and continues to release water, immediately close the cold water inlet to the water heater, follow the draining instructions, and replace the temperature-pressure relief valve with a new one. The discharge capacity must be at least 195,000 BTU/HR for GU195(S,M), 145,000 BTU/HR for GU145(S). Troubleshooting Thermal Expansion If a water heater is installed in a closed water supply system, such as one having a backflow preventer in the cold water supply line then a thermal expansion tank is required, contact the water supplier or local plumbing inspector on how to control this situation. IPC For Recirculation Application Applicable Models: GU145(S) / 508 (11,12,21,22) 1145(S) GU195(S) / 508 (11,12,21,22) 1195(S) ! NOTE ! When setting unit temperature higher than 140°F for commerical use or sanitation purpose, it's recommended to use Aquastat control or timer for the recirculation system instead of using Internal Pump Control, Aquastat should be set 20°F below Eternal temperature setting. Pump control is required when using Eternal in recirculation application. Description: Eternal has an optional Internal Pump Control (IPC) which can provide enhanced efficiencies and eliminates the need to buy a separate aquastat or timer. We recommend this feature not be used on recirculation loops longer than 200 feet or when using storage tank with the Eternal and is not recommended for commercial applications. The IPC is easy to use and factory configured as a 3-pronged outlet for recirculation pumps utilizing less than 2A. How IPC Operates: The IPC will activate the pump and fire up the burner when timer expires each cycle. 1. Choice of pump cycle time. (5, 10, 15, 20 minutes by dipswitch setting) a. The set time will auto-reset when unit senses flow, demand of hot water or open fixture. b. For longer loop, shorter intermittent time is recommended. Pump Spec: No less than 2GPM, No more than 4 GPM. How to Connect: 1. Unplug power cord of unit. 2. Punch hole out on right side of unit. 3. Insert pump plug through hole on right. 4. Plug pump cord into pump socket on inside of unit. 2. As the loop gets warm, when unit reaches below minimum design btu output, the burner will turn off and restart the timer. a. Pump size should be designed according to the length and size of the recirculation loop. How to Activate IPC Function: Step 1. Congure dipswitch on main controller board like gure below. Note! Heat dissipation can be different at each installation site. Insulated loop is recommended to ensure better satisfaction. ! CAUTION ! If pump needs more than 2 amps, put additional relay between pump socket and pump like gure. Step 2. Set "Pump cycle time" by selection #2, #3 switch of group 2 like below gure.(Default 20 min) AC power source coil From unit pump socket Step 3. Pump and IPC timer will now be activated. Additional Relay To Recirculation pump (For unit with serial# prior to G1211761, please contact tech support for additional information) 34 Electrical Connection Installation Codes: Follow the requirements of the local authority having jurisdiction. In the absence of such requirements, follow the latest edition of the National Electrical Code ANSI/NFPA 70. Grounding and Surges □ Do not plug electrical power to the unit until all plumbing and gas piping is complete and the water heater has been lled with water. □ The use of a surge protector is recommended to protect from power surges. □ Do not connect 220-240V AC to this unit. It will damage the water heater and void the warranty. □ Do not disconnect the power supply when the unit is in normal operation. □ If there is a power failure in cold weather areas, the freeze prevention system in the water heater will not operate and may result in freezing of the unit. In cold weather areas where power failures are common, you must completely drain the unit to prevent damage if the power will be off for any extended period of time. Damage caused by freezing is not covered under warranty. □ A battery back-up may be used to supply hot water during periods of power outages. We recommend a computergrade UPS (uninterruptable power supply) with at least a 600VA rating for extened coverage. ! WARNING ! □ The water heater must be electrically grounded. □ Do not rely on the gas or water piping to ground the metal parts of the water heater, because plastic pipe may isolate the water heater electrically. Service and maintenance personnel who work on or around the water heater may be standing on wet oors, and could be electrocuted by an un-grounded water heater. The water heater requires an electrical power supply of 120 VAC/60Hz, and it must be properly grounded to function. □ A means for switching off the 120 VAC power supply must be provided. □ Wire the heater exactly as shown in the wiring diagram. □ Check all new water piping for leaks. Repair as needed. ! CAUTION ! Label all wires prior to disconnection when servicing controls. Wiring error can cause improper and dangerous operation. Verify proper operation after servicing. Please refer to the Wiring Diagram. Note: There is a copy located on the inside of the front panel of the appliance. Wiring Optional Remote Controller(s) □ Max 100ft Run. □ AWG #18 Wire. (wiring is not supplied in unit.) □ Parallel or Serial connection are allowed. Do not make short circuit by contacting the contacts between two wires during installation. ! WARNING ! All units come with a factory installed 3-pronged power (grounded) plug. It is required to run a dedicated electrical line to the water heater to prevent electrical interference. 35 Optional Remote Controller Installation Pre-Installation Preparation 1. Turn off the unit and unplug power cord from wall socket. 2. Remove front panel by loosening 5 screws. 3. Open one of the pre-cut holes on either side panels of the unit and insert the hole plug. Precut Hole Wiring Instructions 1. Open the main controller PCB cover by removing 1 screw. 2. Run wire from the PCB to where the remote display is to be mounted through the hole plug. 3. Attach wiring to the PCB by loosening 2 screws on the main controller. Note : Max. 100ft run Hole Plug Remote Controller 36 Optional Remote Controller Installation Configuring Multiple Remote Controllers Rear Side Remote Controller Selection Switch Setting Layout Kitchen 1 : Left 3 : N/A 2 : Left 4 : N/A Bathroom 1 1 : Right 3 : Left 2 : Left 4 : N/A Bathroom 2 1 : Right 3 : Right 2 : Left 4 : N/A Note : Max. 100ft run Remote Controller Bathroom 2 Remote Controller Hole Plug Bathroom 1 Remote Controller Kitchen Remote Display Mounting Instructions 1. Decide on the appropriate mounting location for the Remote Controller; consider higher positions so that the controller is out of reach for children. 2. Using a at head screw driver, or a penny, wedge the Remote Controller open to reveal mounting holes under the cover. 3. Using the template, mark two 1/4" holes in the dry wall. Be sure that the holes are level. 4. Drill two 1/4" holes on the dry wall and insert Wall Anchors. 5. Connect wiring to the back of the remote display by loosening 2 screws. 6. Secure the Remote controller to the Wall Anchors using the included Mounting Screw 2 pcs and replace the cover to hide the mounting hardware. Template 37 MCU Installation MCU Kit Components MCU Wire Female Termination Wire (F1/Blue) Male Termination Wire (M1/Yellow) Specifications and Features Applicable Models : GU195(M) / 508(11,12,21,22)1195(M) Description: MCU kit allows multiple units to be linked together in a parallel manifold configuration. Feature and Benefits □ High Tech CANBUS Protocol ensures good communication between units. □ Alternate Host Firing distributes wear and tear across all units every 24 hours. □ Redundancy program allows remaining units to work when a units breaks down. □ Synchronized temperature control changes settings on all units from any unit. □ Up to 8 Eternals can be networked. □ Automated staged firing allows one or all linked units to fire up as needed. □ Automated load balancing distributes the work across necessary units evenly. □ UL1998 Certified. □ Easy connection. ! WARNING ! Maximum only up to 4 GU195Ms can be common vented together. For more information on common vent, please refer to Common Vent Installation section in operation manual. 38 MCU Installation MCU Installation 1. With all taps closed and unit off, unplug the power cord of the unit from the power outlet. 2. Make sure dip switch #4 to ON position. (Group 1, No.4). Group 1 dip switches should be the same for all units connected together. *For Group 1, Nos. 6,7,and 8 setting, please refer to the Service Manual or contact Customer Service. * * * When this switch is on, CAN(Control Area Network) engine is enable and allow all units to communicate with each other. 3. Make sure dip switch #6, 7, 8 OFF position. (Group 2, No. 6, 7, 8) If you need more detail information ID setting, refer to page 40 “ Unique Unit Identification Number”. 4. When multiple units are installed, the MCU wire (Y wire with 3 connectors: 1. CANBUS to main controller 2. short female termination 3. long male termination) must be connected that the short female termination connects to long male termination, so on and so forth. If two long terminations are connected then main controller will be damaged! ....... F/Red F/Red M/Green M/Green F1/Blue 1st unit 5. 6. 7. 8 9. 2 nd unit M1/ Yellow Last unit Connect MCU Wire to CN6 of main controller of each unit. Connect Female Termination Wire(F1) to MCU Wire at the rst unit. Do not connect F1 to the ignition termination wire. Connect MCU Wire to next MCU Wire. Connect Male Termination Wire(M1) to MCU Wire at the last unit. Plug the power cord of the unit in and turn the power ON. ! WARNING ! When multiple units are installed in MCU configuration, the maximum allowable distance between each unit wiring is 3ft. Excessive wiring length may cause communication interferences. ! WARNING ! When cascading units into banks, Only use the MCU wiring harness between those units in a bank - do not connect the banks together using the MCU wiring Harness. 39 MCU Installation Unique Unit Identication Number All units networked need to be assigned a unique ID number. For example, if 3 units are used, the first unit should be assigned #1 by pushing Dipswitch 6,7 and 8 to OFF position. The second unit should be assigned #2 by pushing Dipswitch 6 to ON position while leaving the rest in OFF position. The third unit should be assigned #3 by pushing Dipswitch 7 to ON position while leaving the rest in OFF position. Remote Controller Installation with MCU Remote Controller must be installed on the unit which was assigned as #1 in the Dipswitch setup during the unit identification process. Power Supply Schematic Diagram Operating as a single unit, Eternal consumes less than 1A current, and the power supplied to the unit can be on as low as 2A capacity. However, when multiple Eternals are used together, the power supply requirement is significantly increased. Proper power supply design is important to ensure the safe operation of Eternal. When multiple units are used, the electrical supply needs to increase in capacity. Calculate by the below formula: # of units installed X 2A per unit = Total Amperage For example, for 8 units, 16A circuit is needed to supply power to the water heaters. 40 Recirculation System with an Eternal Water Heater Recirculation with 2 Units (GU195M) These diagrams are for reference as basic guides. Each installation should be engineered properly and compliant to Local and State Codes. ! WARNING ! Pump control such as aquastat or timer and aquastat must be used in recirculation application or short cycle may occur and cause premature failure. Failure to comply with this warning will void warranty. 41 Restaurant and Commercial Applications ! NOTE ! For restaurants or applications where rapid on/off hot water usage is frequent, i.e. handheld sprays, Eternal recommends the use of a recirculation pump with storage as buffer. This recommendation is designed to prime the units for rapid usage, as the burner will not ignite during rapid on/off usage due to the intermittent nature of the application. Without a constant flow, the unit will only supply hot water from the storage tank and will not recover rapidly without sufficient on-demand signal to sustain ignition. System for rapid ON/OFF hot water usage Note 1 : If the unit is not controlling the pump by the internal relay, use a Aquastat pump and set at 20°F below Eternal temperature setting. ! NOTE ! If there is a dishwasher that can consume a large amount of water in a very short time. For example, 6 gallons in 15 seconds, then recirculation and an optional storage tank is needed. System for rapid ON/OFF and large volume usage Note 1 : If the unit is not controlling the pump by the internal relay, use a Aquastat pump and set at 20°F below Eternal temperature setting. ! WARNING ! Pump control such as aquastat or timer and aquastat must be used in recirculation application or short cycle may occur and cause premature failure. Failure to comply with this warning will void warranty. 42 Plumbing System for Multiple Unit Applications ! NOTE ! This concept can be applied when two or more heaters are used in parallel, the inlet and outlet piping should be arranged in a way that an equal flow is received from each heater under all demand conditions. With a reverse return system it is easy to get parallel flow. The unit having its inlet closest to the cold water supply is piped so that its outlet will be farthest from the hot water supply line. Reverse return system In the above drawing, there is no “path of least resistance”, water ow will be adequate in each unit. Reverse return system maintains equal pressure drop throughout the entire piping system and ensures adequate ow to all the units. Non reverse return system - NOT RECOMMENDED In above drawing, the difference in water pressure will cause differential water flow. More water pressure, more variations in ow rate. In the above diagram the farthest unit might have no-ow or very scarce ow. ! WARNING ! Pump control such as aquastat or timer and aquastat must be used in recirculation application or short cycle may occur and cause premature failure. Failure to comply with this warning will void warranty. 43 Recovery Pump Size Pump size for commerical application when using Eternal as heat engine to recover storage tank. FOR GU195(S) ONLY Number of Eternal Minimum Pump Size Maximum Pump Size 1 5 GPM @25ft head 10 GPM @ 50ft head 2 10 GPM @25ft head 20 GPM @ 50ft head 3 15 GPM @25ft head 20 GPM @ 55ft head 4 15 GPM @30ft head 20 GPM @ 60ft head * For information regarding GU145S or more than 4 units application please contact our service information center. Note! EACH JOB SHOULD BE SIZED ACCORDING TO THE DESIRE OF DEMAND. NOTICE - Recovery Pump ! ! □ Pump must be controlled by aquastat set at least 20°F below eternal's setting temperature. □ To ensure faster recovery speed, S model is recommended rather than using M model to eliminate staging delay. WARNING - Aquastat ! ! When using aquastat as pump control in storage tank recovery application, temperature detection may be insensitive if the aquastat is positioned in a immersion well or sits on the pipe. It is important to check against eternal's inlet temperature by using eternal's diagnostic function to verify that the pump does shut off when "I" reached 20°F below the setting temperature and aquastat is setup properly. Water Pipe Size Pipe Size for Single / Multiple Unit(s) Installation Number of Eternal Recommended Pipe Size (mm) Recommended Pipe Size (inch) 1 20 3/4 2 32 1 1/4 3 40 1 1/2 4 50 2 5 50 2 6 50 2 7 65 2 1/2 8 65 2 1/2 Note! EACH JOB SHOULD BE SIZED ACCORDING TO THE DESIRE OF DEMAND. 44 Operating Instructions Before Starting The System □ This water heater does not have a pilot. It is equipped with an ignition device which automatically lights the burner. Do not try to light the burner manually. □ Before operating, make sure that a gas leak is not evident by smelling the area around the unit. Be sure to smell next to the oor because gas is heavier than air and will settle on the oor. □ Use only your hand to turn the manual gas valve knob. Never use tools. If the knob will not turn by hand, do not try to repair it, call a qualied service technician. Force or attempted repair could result in a re or explosion due to the gas leakage. □ Do not use this water heater if any part has been under water. Immediately call a qualied service technician to inspect the water heater and to replace any damaged parts. ! WARNING ! WHAT TO DO IF YOU SMELL GAS □ Do not try to light any appliance. □ Do not touch any electrical switch; Do not use any phone in your building. □ Immediately call your gas supplier from a neighbor's phone. Follow the gas supplier's instructions. □ If you cannot reach your gas supplier, call the re department. ! WARNING ! □ You must ll the unit completely with water and bleed out all the air before starting the unit up. □ Never use this hot water heater unless it is completely lled with water. STARTING UP □ Once the unit has been properly installed, check the gas and water connections for leaks. □ Check for proper ventilation and combustible air supply to the water heater. Purge the gas and water lines to remove debris; then follow these steps to turn on your unit. 1. Close the manual gas shut-off valve located on the gas line. 2. Fully open the manual water shut-off valve on the water supply line. 3. To ensure complete lling of the heat exchanger tank, allow air to exit by opening the nearest hot water faucet. Allow water to run until a constant ow is obtained. This will let air out of the water heater and piping. 4. Open a hot water tap to check that water will ow to that tap. Then close the hot water tap. 5. Fully open the manual shut-off gas valve. 6. Plug in the 120 VAC/60Hz power supply to the water heater and turn on the unit. ! CAUTION ! □ Failure to comply with this warning could result in severe personal injury, death, substantial property damage and/or warranty void. □ The tank must be lled with water. Water must ow from the hot water faucet before turning "ON" gas to the water heater. NORMAL OPERATION To turn on your water heater 1. Open a hot water tap. 2. Burner will ignite; the indicator will light on front controller. 3. Mix cold water to get the desired water temperature at tap. 4. Maximum temperature of hot outlet can be set by controller on the front of the unit. To turn off your water heater 1. Close the hot water tap and the water heater's burner will turn off automatically. 45 How To Use The Front Control Interface 1. To switch the water heater ON: From OFF condition Press the Power Button. □ The temperature selected will be indicated on the Digital Monitor. □ The ON Indicator will light up. 2. When running the water by opening the water tap, the water heater will start the burner automatically and the Digital Monitor will show the Burner ON indicator. 3. To switch the water heater OFF: Press the Power Button. □ The temperature selected on the Digital Monitor will go out. □ The ON Indicator will turn off. 4. To adjust water temperature: □ Press the "HOTTER" or "COOLER" Temperature Setting Button with unit ON. (Temperature setting is only adjustable when the burner is not in use.) □ The maximum water temperature setting can be limited by DIP switches. This manual setting overrides adjustable temperature settings on the front panel. Please call Grand Hall USA for DIP switch setting instructions if needed. CAUTION ! ! □ Per some state laws – water temperature should not be set higher than 120°F. Please check with your local codes to ensure temperature is properly set. DANGER ! ! □ Hot water heater temperature over 125°F can cause severe burns instantly or death from scalding. □ Children, disabled and elderly are at the highest risk of being scalded. □ Feel water temperature before bathing or showering. □ Temperature limiting valves are available; please ask a certied professional. Water Temperature 120°F 125°F 130°F 135°F 140°F 145°F 150°F 155°F BURN 46 Time to Produce a Serious Burn More than 5 minutes 1.5 to 2 minutes About 30 seconds About 10 seconds Less than 5 seconds Less than 3 seconds About 1.5 seconds About 1 second How To Use the Remote Controller LCD Monitor: Indicates water temperature and shows error code in the event of an error. Priority Button: Alternates the control of temperature selection between front and remote controller. Temperature Setting Button: Used to set water temperature. Power Button: Turns the heater ON or OFF. Figure 1. Figure 2. 1. To switch the water heater ON with Remote Controller, from OFF condition Press the Power Button. □ The temperature selected will be indicated on the LCD Monitor on the remote controller. 2. When running the water by opening the tap, the water heater will start the burner automatically and the burner indicator will light up the remote controller. When water taps are closed, the unit will stop the burner and burner indicator will be off on the remote controller. 3. To switch the water heater OFF with remote controller, press the power button. □ The LCD Monitor and the ON indicator should go off on the remote controller. 4. To adjust the water temperature : Press either the Hotter(up) or Cooler(down) temperature setting button with the unit ON ( temperature setting is only adjustable when the burner is not in use) 5. To lock the remote controller : Press the priority button with the unit ON. The priority indicator should light and now temperature can only be adjusted at the remote control; control cannot be transferred while burner is ON. ! NOTE ! The maximum water temperature setting can be limited by DIP switches. This manual setting overrides remote control temperature setting. Ignition Cycle Counter Display Toggle Button (Total cycle count / Total burner on time) Setting (WARNING! CANNOT RESET OR RESTORE. Do not touch unless consulted with the manufacturer first. Fail to comply the warning will void warranty) Each Eternal water heater is equipped with built-in Ignition Cycle Counter located on the main controller board. Excessive cycles caused by improper application voids warranty. For more detail about the acceptable cycle limit, please refer to the Grand Hall Limited Warranty. 47 Maintenance and Service ! WARNING ! Turn off the electrical power supply, the manual gas control valve, and the manual water control valve before servicing. SYSTEMS AND PARTS CHECK □ The unit should be checked once a year or as necessary by a certified and trained technician. If repairs are needed, the repairs should be done by a certied and trained technician. □ The following systems and parts should be checked at least once a year. 1. Venting system 2. Burner 3. Manual operation of the pressure relief valve to ensure correct operation 4. Periodic cleaning of the water strainer. 5. Remove the thermistor from unit and check for mineral coating - A mineral coating on the thermistor requires cleaning □ Physical Damage: If the water heater has been subjected to re, ood, or physical damage, turn off the manual gas shutoff valve and do not operate the water heater again until it has been checked by qualied personnel. □ Temperature Setting: Hotter water increases the risk of scalding injury. □ Venting System Inspection: A visual inspection should be made on the venting system at least once a year. ● Be sure the venting is properly connected to prevent escape of dangerous flue gases which could cause deadly asphyxiation. ● Obstructions could cause improper venting. The combustion and ventilation air ow must not be obstructed. ● Damage or deterioration which could cause improper venting or leakage of combustion byproducts. □ Clean Up: The ue outlet and the air intake hole on the top of the water heater should be checked. Clean as needed to prevent the entry of water, insects, rodents or other foreign materials such as fallen leaves and dust that could cause blockages. Do not obstruct the ow of combustion air and exhaust air ow. □ Water Strainer: The water strainer should be checked once a year. It protects valve from dirt and pipe scale. Self-clean by opening valve or hose connected to a blow-off outlet. □Sediment Build-up: Unlike a typical storage tank, this heater has a self cleaning system initiated by the ow of water. Build up of sediment in faucet aerators, shower heads and screens could impair water ow and cause the water heater to deliver less than its full output, or to shut down completely. Check any of these screens or shower heads on your faucets periodically and clean as necessary. □BURNER IGNITION: Water heater has automatic ignition system. Once you open a hot water tap, the computer electronically ignites the burners. You can see the burner ame via ame inspection hole. Flame Inspection Hole □ Clean out of Condensate Trap: Over time, blockage of the trap by debris may occur, when the condensate cannot be released, the unit will go into error and will shut down. When this occur, the condensate trap must be cleaned. □ Service & Cleaning Of The Burner: Only specially trained and authorized personnel are permitted to service the burner. 48 "D" button Diagnostic Function Applicable Model: GU145(S) / 508(11,12,21,22)1145(S) GU195(S) / 508(11,12,21,22)1195(S) GU195(M) / 508(11,12,21,22)1195(M) Description: Enhanced diagnostic functions are now available with the touch of a button. Simply press the “D” button on the front control panel to access features such as: inlet and outlet temperatures, air temperature inside the chassis, fan motor RPMs, error code history and more! Press the “D” button when the unit is in standby mode (burner off): Diagnostic Content Example Explanation Software Version for CPU A SA 01 CPU A running version 1 Software Version for CPU B SB 01 CPU B running version 1 E1 through E9 E2 13 Error 2 in history is code 13 Press the “D” button when the unit is firing (burner on): Diagnostic Content Example Explanation Outlet Temperature – O O 125 Outlet is 125°F Heat Exchanger Temperature – H H 135 Heat exchanger is 135°F Inlet Temperature – I I 65 Inlet is 65°F Air Temperature – A A 60 Air is 60°F Fan Motor RPM – P P5800 Fan is spinning at 5800 RPMs To exit diagnostic mode, simply press the "D" button at any time to return to normal display mode. You can still access the GPM flow rate data by simply pressing either the UP or DOWN button when the unit is in normal display mode and the burner is on. 49 DIAGNOSTICS Before calling for service, review the following diagnostic steps rst for saving time and money! 50 DIAGNOSTICS Self Monitoring This unit has the ability to check its own operation continuously. If an error occurs, a message will flash on the digital monitor of the front panel. This assists with diagnosing the error, and may enable you to overcome a problem without a service call. Please quote the code displayed when inquiring about service. 51 DIAGNOSTICS NOTE: In all cases you may be able to clear the Error Message simply by turning the hot water tap OFF, then ON again. If this does not clear the Error Message, try pushing the ON/OFF button OFF, then ON again. If the Error Message still remains, contact our service center or your nearest service agent and arrange for a service call. 1-866-946-1096 8am-4pm CST, Monday through Friday 52 How To Check Gas Combustion EC Adapter Cap NOTE ! ! Using a combustion analyzer is required for checking and tuning the gas valve. Analyzer Probe Gas Analyzer Gas / Air Ratio Valve Manifold pressure port Please loosen the 1/8" NPT screw and check Inlet pressure port the manifold pressure by using a manometer with 0.01" W.C. resolution. Please check the inlet pressure to ensure the incoming gas pressure is within unit's required specication. Min and Max inlet and manifold pressures are indicated on the Eternal OM and Rating label. Adjustment screw A (Tool: T40 trox bit) WARNING ! ! The combustion testing and adjustments must be performed by a qualied installer, service agency or the gas supplier. All combustion analyzer must be performed with calibrated equipment to ensure proper reading and accuracy. If the combustion levels are not within the range given in Table 1 for the ring rate, shut the unit and contact Eternal Engineering support team. Failure to comply with this requirement could result in severe personal injury, death or substantial property damage. After setting, the CO level should not exceed maximum 200 ppm for both Natural and Propane gas. Recommended Combustion Levels for low re Setting values O2 / CO2 Gas type Natural gas Model Propane gas O2 CO2 O2 CO2 GU145(S) 3.0 - 6.5% 8.0 - 10.0% 3.7 - 6.9% 9.0 - 11.0% GU195(S,M) 3.0 - 6.5% 8.0 - 10.0% 3.7 - 6.9% 9.0 - 11.0% (Table 1) 53 How To Check Gas Combustion Procedure for high ring Note : During this procedure you will only observe the reading and will not make any adjustment. Unscrew the EC adopter cap on vent collar (see to above diagram) and connect the ue gas analyzer. - Set to full load: with the unit at 130°F or higher, force the unit into high re by opening demand of at least 7 GPM water ow rate. - Wait 10 seconds for modulation to stabilize with the full-load fan speed, measure the CO level. It should not exceed 200 ppm for both natural and propane gas. - Check the ame through the sight glass which should be stable with a regular ame distribution. Setting procedure for low ring - Set to low load: Turn dipswitch #3 in group 3 to ON and throttle demand down to no more than 2 GPM water ow rate. - Wait at least 10 seconds for modulation to stabilize with the low-load fan speed, measure the O2/CO2 percentage and compare this to values in table 1. - If the values are not in accordance with the table then correct the gas/air ratio valve using the adjusting screw A on gas valve. - If the value is too low turn the adjusting screw A clockwise; this increases the gas rate - if the value is too high turn the screw anti clockwise which decrease the gas rate. - Flip dipswitch #3 in group 3 to OFF. - Cold ush the unit and let it take itself through at least 1 cycle on standby re for boot up diagnostics. - Check the ame through the sight glass which should be stable with a regular ame distribution. - Reinstall the ue stack cap when nished testing. ! NOTE ! Only make small adjustments of the adjusting screw maximum 1/8 turns at a time when setting O2/CO2. Ensure that the analyzing probe has a gas tight seal in the sampling point with the probe end in the centre of the ue duct. ! NOTE ! HOW TO CHECK GAS SUPPLY PRESSURE 1. Turn off power source and turn off gas supply to the unit. 2. Remove the front cover from the unit. 3. Loosen the gas supply pressure test port screw and connect manometer to this port; turn on the gas to the water heater. 4. Turn the water heater on and open multiple taps to force unit into high re; check gas supply pressure at the test port with a manometer with unit in high re. ! NOTE ! HOW TO CHECK MINIMUM MANIFOLD GAS PRESSURE 1. Turn the water heater ON with 2gpm of hot water owing. 2. Set the dip switch group 3 and number 3 ON. Check manometer reading of low re manifold pressure against unit combustion specications. ! WARNING □ Manifold Gas Pressure should only be adjusted on low re. □ If gas supply pressure drops below 3.5" WC unit will not have enough gas volume for max re! 54 ! Wiring and Connection Diagram Wiring Diagram MODEL : GU145(S) / 508(11,12,21,22)1145(S) GU195(S) / 508(11,12,21,22)1195(S) 55 Wiring and Connection Diagram Wiring Diagram MODEL : GU195(M) / 508(11,12,21,22)1195(M) 56 Grand Hall Limited Warranty General Terms of Limited Warranty for Product Grand Hall will warrant to the purchaser of this gas water heater at the ORIGINAL INSTALLED LOCATION that it will be free of defects in material, workmanship and performance when used with Potable Water* and when installed and used in strict compliance with Grand Hall’s specications, for the applicable period shown in Warranty Periods below. *See DEFINITIONS below. Warranty Exclusions This product warranty does not apply in the event of product failure or operating difculties due to accident, abuse, misuse, alteration, Misapplication,* Improper Installation,* vandalism, lack of maintenance or service, and Acts of God. See the Installation Operation Manual (“Manual”) for additional details. This warranty does not apply in the event of deterioration or damage due to severe weather or exposure to chemicals, either directly or in the atmosphere. *See DEFINITIONS below. This warranty applies only if the water heater is installed by a licensed contractor. This warranty does not apply if the water heater is purchased over the internet. This warranty does not apply if the water heater is re-installed to a location other than the original installed location. This warranty does not apply if the water heater is used outside of the United States of America. Environmental conditions outside of normal product specifications such as gas pressure, water quality, piping materials, pump sizing, wind level, and operating noise complaints are not covered by this warranty. See the Manual for additional details. Exclusive Remedy Your exclusive remedy for any defective product is limited to the repair or replacement, at Grand Hall’s option, of the product that proved to be defective under normal use utilizing potable water. The replacement product will carry out the remainder of the warranty from the originally installed product. Proof of Purchase Grand Hall will require reasonable proof of your purchase. Save your dated receipt in case it is required as proof of purchase. You may also show proof of purchase by registering within 30 days of purchasing the product at www. eternalwaterheater.com. Registration constitutes proof of purchase, but registration is not required in order to validate this warranty. Limitation of Damages Grand Hall’s entire liability for any defective product shall in no event exceed the purchase price for the defective product. This limitation applies even if Grand Hall cannot or does not repair or replace any defective product and your exclusive remedy fails of its intended purpose. No Consequential or Other Damages Notwithstanding anything else in this warranty or otherwise, Grand Hall will not be liable with respect to the product under any legal theory, including without limitation contract, negligence, strict liability or other legal or equitable theory (i) for any amount in excess of the purchase price for the defective product, or (ii) for any general, consequential, punitive, incidental or special damages. These include damages from interruption of use, lost prots, the cost of the installation or removal of any products, the cost of installation of replacement products, and any costs of inspection, testing, or redesign caused by any defect, or caused by the repair or replacement of other products arising from a defect in any this product. This section does not limit liability for bodily injury of a person. In the United States, some states do not allow the exclusion or limitation of incidental or consequential damages, so the above exclusion or limitation may not apply to you. This warranty gives you specic legal rights, and you may also have other rights which vary from state to state. Limitation on Implied Warranties There are no warranties which extend beyond the face of this Grand Hall Limited Warranty. Grand Hall disclaims all other warranties expressed or implied, regarding the product, including any implied warranties of merchantability, fitness for a particular purpose or non-infringement. In the United States, some states do not allow the exclusion of the implied warranties so the above exclusion may not apply to you. Some states do not allow limitations on how long an implied warranty lasts, so any such limitation may not apply to you. For additional warranty details, including procedures for obtaining warranty service, please consult the Warranty Service Policy. 57 Grand Hall Limited Warranty Limited Labor Allowance Grand Hall will provide a pre-set labor allowance as set forth in the following table, which shall be paid to the licensed contractor who obtains written authorization or a Work Order from Grand Hall in advance, strictly for repairs or replacements for warranty-covered defects occurring within one (1) year from the date of purchase. Contractor’s Authorization Level* Unregistered Installer F.A.C.T. Registered F.A.S.T. Registered *See DEFINITIONS below. Repair or Replacement Labor Allowance – Part Replacement Labor Allowance – Entire Unit $0 $75 $75 $150 $150 $300 All warranty work must be authorized by Grand Hall through a Work Order in order to be eligible for payment, as described in the Warranty Service Policy. What’s covered by the Limited Labor Allowance Covered: Labor incurred for the completed repair or replacement of a component or product that has failed due to a manufacturing defect in the component or product. What’s not covered by the Limited Labor Allowance Not covered: Corrections due to failure to follow installation instructions in the Manual; reset-able error codes not caused by a component or product failure; adjustments made on a product or component that should have been checked at time of installation, such as (but not limited to) insufcient or excessive gas pressure; repair or replacement resulting from misapplication of the product, such as (but not limited to) under-sizing, wrong gas type, use with non-potable water; and damages resulted from mishandling, transit, natural disasters, electrical surges and/or Acts of God. Grand Hall is not responsible for any labor charge incurred on non-warranty work performed by the contractor. Warranty Periods Warranty Periods for Heat Exchanger The warranty period for the Heat Exchanger expires upon the rst of the following events to occur: 1. 15 years for Residential use; 2. 5 years for Commercial use; 3. 365,000 total ignition cycles* 4. 12,000 total burner hours** * No more than 300 ignition cycles in any one day, which averages to about one cycle every 5 minutes. ** Average of 6 daily hours for commercial applications, or 2 daily hours for residential applications Note: GU100/GU120 models are solely for Residential use and the warranty is voided if used for Commercial use. See DEFINITIONS below for “Commercial” and “Residential.” ● Warranty Periods for other Components Product Warranty: The maximum term of the limited warranty on parts, other than the Heat Exchanger, is three (3) years from date of purchase. Grand Hall offers an extended warranty for parts, other than the Heat Exchanger, of two (2) additional years, free of charge, if the product is registered online at www.eternalwaterheater.com. ● Warranty Period for Labor Allowance Labor Allowance: The term of the limited labor allowance is one (1) year from date of purchase, paid through Work Orders issued to authorized contractors, as described in the Limited Warranty and Service Policies Guide. 58 Grand Hall Limited Warranty DEFINITIONS 1. F.A.C.T. (Factory Authorized Contractor Trained) – A licensed contractor who has been through the basic installation class held by either an Eternal Sales Representative or Grand Hall factory personnel, who has registered his/her company on the Eternal Dashboard system, and who has passed the authorization test. 2. F.A.S.T. (Factory Authorized Service Trained) – A licensed contractor who has already received his/her F.A.C.T. authorization and ID, who has elected to take the higher level training class provided by Grand Hall including a step-by-step product breakdown, and who has passed the authorization test. 3. Improper Installation – Product not installed in accordance with the instructions set forth in the Operator’s Manual, including but not limited to usage of non-approved materials or plumbing connections, use of dielectric unions, improper venting, failure to follow local codes, or improper gas supply. 4. Misapplication – Product installed on a job where the hot water usage is not in line with product’s primary intended function: to supply sufcient potable domestic hot water in accordance with the factory performance and installation specications set forth in the Operator’s Manual, including but not limited to: undersized system where product cannot meet peak demand, plumbed in manifold with another brand of water heater, disregarding Grand Hall sizing recommendations, power venting with air intake exposed to contaminated environment, closed-loop recirculation for heating applications where water is no longer potable, mismatching models of product in networked applications, and uncontrolled or improperly sized recirculation that causes excessive run times or short-cycling not in accordance with product lifecycle specications. 5. Residential Application – Product installed on a single family residence where no more than one family utilizes the installed product for domestic hot water supply (under 140°F). Residential recirculation is allowed and does not impact the heat exchanger warranty if an Internal Pump Control (IPC) or external aquastat, or timer and aquastat controls are used. 6. Commercial Application – Product installed for commercial or multi-family domestic hot water supply, space heating applications, recovery of storage tank applications, continuous recirculation with at least aquastat control, and sanitation purposes (above 140°F). 7. Potable Water – Public utility or well supplied drinkable water in compliance with EPA secondary maximum contaminant levels (40 CFR part 143.3), as follows: Contaminant Aluminum Chloride Copper pH Allowable Limits 0.2 mg/L 250 mg/L 1.0 mg/L 6.5 – 8.5 Contaminant Manganese Iron Fluoride Sulfate Allowable Limits 0.05 mg/L 0.3 mg/L 2.0 mg/L 250 mg/L Grand Hall will warrant the heat exchanger against leaks when used normally with water meeting the above EPA standard. In addition, Grand Hall will warrant against water hardness: Up to 15 grains per gallon (250ppm) for single family Residential Applications, and up to 7 grains per gallon (120ppm) for Commercial Applications. ● How to Obtain Warranty Service Please contact your licensed, authorized Eternal contractor to obtain diagnostics and warranty service for your water heater. You can nd authorized contractors at www.eternalwaterheater.com. Simply enter your zip code for a listing of nearby authorized contractors. Be sure to have your model number, serial number and the error code displayed on the front of the unit available for your contractor so that he/she may arrive at your location with the necessary tools and parts to remedy the situation. The contractor may contact our technical support department 24/7 toll-free at 1-866-946-1027 and we will help troubleshoot through the process. WARRANTY SERVICE WILL BE PROVIDED ONLY IF THE SERVICE POLICIES GUIDE IS FOLLOWED. US Contact: Grand Hall USA, Inc. 3838 W. Miller Rd., Garland, TX 75041 Toll-Free: 866-946-1096 Manufacturer: Grand Hall Enterprise Co., Ltd. 9th Floor, No 298, Rueiguang Rd. Neihu, Taipei Taiwan (114) 59