1
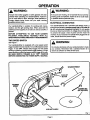
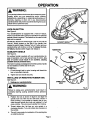
SE/ S
OWNER'S
MANUAL
MODEL NO.
31.5.115030
Caubon:
Read and Follow
CRRFTSMRN°
All Safety Rules
and Instructions
Before Operating
This Equipment.
6 Inch Electric
Sander/Polisher
Thank You for Buying A
Craftsman Sander/Polisher
Double Insulated
Rules For Safe Operation
Introduction and Warranty
Table of Contents
Operation
Maintenance
Repair Parts
Sold by SEARS, ROEBUCK AND CO. Hoffmsn Estates,
972000-136
8-00
®
IL 60179 U.S.A.
Printed In U.S,A.
RULES FOR SAFE OPERATION
DOUBLE INSULATION is a safety concept in electric power
tools, which eliminates the need for the usual three wire
grounded powercord and grounded supplysystem. Wherever
there is electric current in the tool there are two complete sets
of insulation to protect the user. All exposed metal parts are
isolated from internal metal motor components with protecting
insulation.
IMPORTANT -- Servicing of a tool with double insulation
requires extreme care and knowledge of the system and
should be performed only by a qualified service tecnhician.
For service we suggest you return the tool to your nearest
Sears Store for repair. Always use originalfactory replacement
parts when servicing.
WARNING:
WARNING:
The double insulated system is intended to protect the
user from shock resulting from a break in the tool's
internal wiring. Observe all normal safety precauhons
related to avoiding electrical shock.
Do not attempt to operate this tool until you have read
thoroughly and understand completely all instructions,
safety rules, etc. contained in this manual. Fa=lure to
comply can result in accidents involving fire, electdc
shock, or senous personal injury. Save owner's manual
and review frequently for continuing safe operation, and
instructing others who may use this tool.
READ ALL INSTRUCTIONS
1. KNOW YOUR POWER TOOL. Read owner's
manual carefully. Learn its applications and
lim!tationsas well as the specific potential hazards
related to this tool.
2.
3.
4.
GUARD AGAINST ELECTRICAL SHOCK by
preventing body contact with grounded surfaces.
For example: Pipes, radiators, ranges, refrigerator
enclosures.
KEEP GUARDS IN PLACE and in working order.
KEEP WORK AREA CLEAN. Cluttered areas
and benches invite accidents.
5.
AVOID DANGEROUS ENVIRONMENT, Don't use
power tool in damp or wet locations or expose to
rain. Keep work area well lit.
6. KEEP CHILDREN AND VISITORS AWAY. All
visitors should wear safety glasses and be kept a
safe distance from work area. Do not let visitors
contact tool or extension cord.
7.
STORE IDLE TOOLS. When not in use tools
should be stored in a dry, high or locked-up place
- out of the reach of children.
DON'T FORCE TOOL. It will do the job better and
safer at the rate for which it was designed.
9. USE RIGHT TOOL. Don't force small tool or
attachment to do the job of a heavy duty tool.
Don't use tool for purpose not intended - for
example - A circular saw should never be used for
cutting tree limbs or logs.
10. WEAR PROPER APPAREL. Do not wear loose
when working outdoors. Wear protective hair
covering to contain long hair and keep it from
being drawn into nearby air vents.
11.
ALWAYS
WEAR
SAFETY
GLASSES.
Everyday
eyeglasses have only impact-resistant lenses; they
are NOT safety glasses.
12.
PROTECT
YOUR
LUNGS.
Wear a face or dust
mask if operation is dusty.
13.
PROTECT
YOUR
HEARING.
protection during extended
Wear
hearing
periods of operation.
14.
DON'T ABUSE CORD. Never carry tool by cord
or yank it to disconnect from receptacle. Keep
cord from heat, oil and sharp edges.
15.
SECURE
work.
16.
WORK.
Use clamps or a vise to hold
Both hands are needed to operate the tool.
DON'T OVERREACH.
Keep proper footing and
balance at all times. Do not usa on a ladder or
unstable support.
17.
8.
MAINTAIN
TOOLS
WITH CARE.
Keep tools
sharp at all times, and clean for best and safest
performance.
Follow instructions for lubricating
and changing accessories.
18.
DISCONNECT
TOOLS.
When not in use, before
servicing, or when changing attachments, blades,
bits, cutters, etc., all tools should be disconnected
from power supply.
19. REMOVE
clothing or jewelry that can get caught in the tool's
moving parts and cause personal injury. Rubber
gloves and non-skid footwear are recommended
Page 2
ADJUSTING
KEYS AND WRENCHES.
Form habit of checking to see that keys and
adjusting wrenches are removed from tool before
turning it on.
RULES FOR SAFE OPERATION
(Continued)
20. AVOID ACCIDENTAL STARTING. Don't carry
plugged-in tools with finger on switch. Be sure
switch is off when plugging in.
• 21. MAKE SURE YOUR EXTENSION CORD IS IN
GOOD CONDITION. When using an extension
cord, be sure to use one heavy enough to carry
the current your product will draw. An undersized
cord will cause a drop in line voltage resulting in
loss of power and overheating. A wire gage size
(A.W.G.) of at least 16 is recommended for an
extension cord 100 feet or less in length. A cord
exceeding 100 feet is not recommended. If in
doubt, use the next heavier gage. The smaller the
gage number, the heavier the cord.
22. OUTDOOR USE EXTENSION CORDS. When tool
is used outdoors,use only extension cords suitable
for use outdoors. Outdoor approved cords are
marked with the suffix W-A, for example - SJTWA or SJOW-A.
23.
NEVER
USE THIS OR ANY POWER
SANDER
FOR WET SANDING. Failure to comply can result
in electrical shock causing serious injury or worse.
24.
KEEP HANDS
AWAY
FROM SANDING
AREA.
25. NEVER USE IN AN EXPLOSIVE ATMOSPHERE.
Normal sparking of the motor could ignite fumes.
26. INSPECT TOOL CORDS PERIODICALLY and if
damaged, have repaired at your nearest Sears
Repair Center. Stay constantly aware of cord
location.
27. INSPECT EXTENSION CORDS PERIODICALLY
and replace if damaged.
28. KEEP HANDLES DRY, CLEAN, AND FREE
FROM OIL AND GREASE. Always use a clean
cloth when cleaning. Never use brake fluids,
gasoline, petroleum-based products or any strong
solvents to clean your tool.
29. STAY ALERT. Watch what you are doing and
use common sense. Do not operate tool when
you are tired. Do not rush.
30. CHECK DAMAGED PARTS, Before further use
of the tool, a guard or other part that is damaged
should be carefully checked to determine that it
will operate properly and perform its intended
function. Check for alignment of moving parts,
binding of moving parts, breakage of pads,
mounting, and any other conditionsthat may affect
I
A
its operation. A guard orother part that is damaged
should be properly repaired or replaced by an
authorized service center unless indicated
elsewhere in this instruction manual.
31. DO NOT USE TOOL IF SWITCH DOES NOT
TURN IT ON AND OFF. Have defective switches
replaced by an authorized service center.
32. INSPECT FOR and remove all nails from lumber
before sanding.
33. DRUGS, ALCOHOL, MEDICATION.
Do not
operate tool while under the influence of drugs,
alcohol, or any medication.
34. WHEN SERVICING USE ONLY IDENTICAL
CRAFTSMAN REPLACEMENT PARTS.
35. pOLARIZED PLUGS.To reduce the dskof electdc
shock, this tool has a polarized plug (one blade is
wider than the other). This plugwill fit in a polarized
outlet only one way. If the plug does not fit fully in
the outlet, reverse the plug. If it still does not fit,
contact a qualified electrician to install the proper
outlet. Do not change the plug in any way.
36. SAVE THESE INSTRUCTIONS.
Review them
frequently and use them to instruct others who
may use this tool. If you loan someone this tool,
loan them these instructionsalso.
WARNING:
Some dust created by power sanding, sawing,
grinding, drilling, and other construction activities
contains chemicals known to cause cancer, birth
defects or other reproductive harm, Some examples of these chemicals are:
• lead from lead-based paints,
• crystalline silica from bricks and cement and other
masonry products, and
• arsenic and chromium from chemically-treated
lumber.
Your risk from these exposures varies, depending
on how often you do this type of work. To reduce
your exposure to these chemicals: work in a well
ventilated area, and work with approved safety
equipment, such as those dust masks that are specially designed to filter out microscopic particles.
Look for this symbol to point out important safety precautions.
It means
attention!t!
Your safety
Page 3
is involved.
I
I
I
INTRODUCTION
CONGRATULATIONS
AND THANK YOU FOR BUYING
THIS CRAFTSMAN
6 INCH ELECTRIC
SANDER/
POLISHER.
It has been dasignad, engineered and
manufactured to provide you with Sears high standard of
dependability, ease of operation, and operator safaty. Properly
cared for, it will give you years of rugged, trouble-free
_erformance.
SPECIFICATIONS:
Size of Sanding Disc
6 Inches
Size of Polishing Bonnet
6 Inches
Horsepower
Rating
CAUTION:
1/2
120 Volts, 60 Hz, AC only, 4.5 AMPS
Spindle Size
Carefully read through this entire owner's manual before
using your new sander/polisher. Pay close attention tothe
Rules for Safe Operation, Wamings and Cautions. if you
usa this tool propedy and only for what it is intended, you
will enjoy years of safe, reliable service.
FULL ONE YEAR WARRANTY
ON CRAFTSMAN
1/2 Inch - 20 TPI
No Load Speed
1,400 / 1,650 RPM
I
Your sandadpolisher has many features for making your
sanding-polishing operations more pleasant and enjoyable.
Safety, performance and dependability have been given top
priority in the design of this tool making iteasy to maintain and
operate.
SANDER/POLISHER
If this Craftsman Sander/Polisher fails to give complete satisfaction within oneyear from tha date of purchase,
RETURN IT TO THE NEAREST SEARS STORE IN THE UNITED STATES and Sears will repair it, free of charge.
Ifthis Craftsman Sander/Polisher is used for commercial or rental purposes this warranty applies for only 90 days from
the date of purchase.
This warranty gives you specific legal rights, and you may also have other rights which vary from state to state.
Sears, Roebuck and Co., Dept. 817 WA, Hoffman Estates,
IL 60179
TABLE OF CONTENTS
1.
Rules for Safe Operation ............................................................................
2-3
2.
Introduction and Product Specifications ........................................................
4
3.
Warranty and Table of Contents ....................................................................
4
4
Operation ....................................................................................................
5.
Maintenance
6.
Notes .........................................................................................
7.
Exploded View and Parts List .................................................................
12-13
8.
Parts Ordering / Service ...............................................................................
14
and Accessories .....................................................................
5-9
10
,.................. 11
WARNING:
The operation of any sander/polisher can result In foreign objects being thrown Into your
eyes, which can result in severe eye damage. Before beginning power tool operation,
always wear safety goggles or safety glasses with side shields and a full face shield
when needed. We recommend Wide Vision Safety Mask for use over eyeglasses or
standard safety glasses with side shields, available at Sears Retail Stores.
Page 4
OPERATION
WARNING:
WARNING:
If any parts are missing, do not operate this tool until the
missing parts are replaced. Failure to do so could result
in possible serious personal injury.
Always wear safety goggles or safety glasses with side
shields when operating your sander/polisher. Failure to
do so could result in dust, shavings, loose particles or
foreign objects being thrown into your eyes, causing
possible serious injury,
I
I
ELECTRICAL
CONNECTION
I
Your sander/polisher has a precision built electric motor. It
should be con nected to a power supply that Is 120 volts, 60
Hz, AC only (normal household current). Do not operate
this tool on direct current (DC). A voltage drop of more than
10 percent will cause a loss of power and the motor will
overheat. If your tool does not operate when plugged into an
outlet, double-check the power supply.
Your sander/polisher is suitable for sanding with coarse,
medium, and fine grit sanding discs. When used with the
polishing bonnet supplied, it can also be used as a buffer or
polisher.
BEFORE ATTEMPTING
TO USE YOUR SANDER/
POLISHER,
FAMILIARIZE
YOURSELF
WITH ALL
OPERATING FEATURES AND SAFETY REQUIREMENTS.
TWO SPEED SWITCH
WARNING:
See Figure 1.
Your sander/polisher is equipped with a two speed switch
trigger located in the rear handle. To turn ON, depress switch
trigger. To turn OFF, release switch trigger. For low speed
sanding or polishing, depress switch trigger halfway. For high
speed sanding or polishing depress switch trigger all the way.
BE SURE SWITCH TRIGGER IS IN "OFF" POSITION
BEFORE CONNECTING TO POWER SUPPLY SOURCE.
Do not allow familiarity with your sander/polisher to make
you careless. Remember that a careless fraction of a
second is sufficient to inflict severe injury.
SPANNERWRENCH
POLISHING
BONNET
SWITCHTRIGGER
;ANDINGDISC
(NOT INCLUDED)
AUXILIARYHANDLE
Fig. 1
d
Page 5
OPERATION
WARNING:
Your sander/polisher should never be connected to power
supply when you are assembling parts, making
adjustments, assembling or replacing sanding discs or
bonnets, cleaning, or when not in use. Disconnecting
sander/polisher will prevent accidental starting that could
cause serious personal injury.
LOCK-ON BUTTON
See Figure 2.
Your sander/polisher is equipped with a "lock-on" feature,
which isconvenient when continuous operation for extended
pedods of time is required. This feature can be used for both
high and low speeds.
To lock on, depress the switch tdgger, push in and hold the
"lock-on" button located on the side of the handle, then
release the switch trigger. Release "lock-on" button and your
sander/polisher will continue running. To release the lockon feature, depress switch trigger and release it.
AUXILIARY
RUBBERDISC
HANDLE
CLOCKWISE
See Figure 2.
An auxiliary handle is packed with your sander/polisher for
ease of operation and to help prevent loss of control. Any
Iou of control could result In an aocldent, causing
po_lble serious personal Injury.
The motor housings are designed so that the auxiliary handle
can be Installed on either side of the unit.
TO INSTALL:
1.
Fit bolt through hole in motor housing and thread into
hex nut provided internally.
2.
Tighten bolt and handle securely.
INSTALLING
OR REMOVING
See Figure3.
1. Unplug your sendedpolisher.
RUBBER
DISC
SPINDLELOCK
HOLE
WARNING:
Fig. 3
I
Failure to unplug your sander/polisher could result in
accidental starting causing possible serious personal
mjury.
i
I
2.
Position the tool as shown in figure 3 and align the
spindle lock hole with the two half-circle notches in
motor housing. Lock spindle by inserting the pin provided through spindle lock hole and trapping it in half
circle notches. This will prevent spindle from rotating.
3.
Thread rubber disc, flat face up, onto spindle in a
clockwise direction. Turn until rubber disc shoulders on
the spindle.
4.
The unit is now ready for installation of the sanding disc
or polishing bonnet.
Page 6
OPERATION
SANDING
DISC SELECTION
I
Selecting the correct size grit and type sanding disc is an
extremely important step in achieving a high quality sanded
finish. Aluminum oxide, silicon carbide, and other synthetic
abrasives are best for power sanding. Natural abrasives,
such as flint and garnet are too soft for economical use in
power sanding.
SPANNERWRENCH
SPANNERNUT
In general, coarse gritwill remove the most material and finer
grit will produce the best finish in all sanding operations. The
condition of the surface to be sanded will determine which grit
will do the job. If the surface is rough, start with a coarse grit
and sand until the surface is uniform. Medium grit may then
be used to remove scratches left by the coarser grit and finer
grit used for finishing of the surface.
SANDINGDISC
(NOTINCLUDED)
Always use the proper grit sanding disc, and not extra
pressure when sanding. Continue sanding with each grituntil
surface is uniform.
INSTALLING
PIN
OPTIONAL SANDING DISC
See Figure 4.
1.
Unplug your sandedpollsher.
RUBBERDISC
WARNING:
Failure to unplug your sander/polisher could result in
accidental starting causing possible serious personal
injury.
2.
Fig. 4
I
Position the tool as shown in figure 4 and align the
spindle lock hole with the two half-circle notches in
motor housing. Lock spindle by inserting the pin provided through spindle lock hole and trapping it in half
circle notches. This will prevent spindle from rotating.
3.
Center the sanding disc over the rubber disc and start
spanner nut onto threaded spindle in a clockwise direction.
4.
Securely tighten spanner nut with the spanner wrench
provided.
WARNING:
APPLICATIONS
(Use only for the purposes listed below)
I.
Sanding on wood surfaces.
2,
Removing rust from and sanding steel surfaces.
3.
Polishing and buffing.
WARNING:
Before connecting your sander/polisher to power supply
source, always check to be sure switch is not in 9ock-on"
position. Failure to do so could result in accidental starting
of your sander/polisher resulting in possible serious injury.
Remove pin before attempting to operate sander/polisher.
Failure to do so could cause pin to be thrown from the tool
6resulting in possible serious injury.
i
Page 7
OPERATION
PREPARING
FOR OPERATION
For ease of operation, this tool has a front auxiliary handle
and rear handle. See Figure 1. This provides for two-hand
operation, which is necessary in order to maintain proper
control and keep both hands clear of the sanding disc and
sanding area. When operating your sander/polisher, always
use both hands. Check the auxiliary handle before each use
and make sure the handle bolt is tight against the housing.
SANDING
Clamp or otherwise secure the work to prevent itfrom moving
under your sander/polisher. Secure small workpieces in a
vise or use clamps to secure them to a workbench.
Unsecured work could be thrown towards the operator
causing injury.
WARNING:
J
I
Hold the tool in front and away from you, keeping itclear ofthe
workpiece. Start the tool by depressing the switch trigger and
letting the motor build to its maximum speed. Gradually lower
sander/polisher to the workpiece at a slight 5 ° to 8 ° angle. See
Figure 5.
DO NOT ATrEMPT TO HOLD THE SANDING DISC FLAT
ON THE WORKPIECE.
Upon completion of a sanding operation,
from work surface before turning off.
Always keep the tool in motion moving overthe work, allowing
it to operate freely without unnecessary pressure. The weight
ofthe unit supplies adequate pressure, so let the sanding disc
and sander do the work. Applying additional pressure only
slows the motor, rapidly wears sanding discs and greatly
reduces sander speed. Excessive pressure will overload the
motor causing possible damage from motor overheating and
can result in inferior work. Any finish or resin on wood may
• soften from the frictional heat. Do not allow eandlng on one
spot too long. Sanding in one spot too long will cause
uneven sanding and gouging of the work.
WARNING:
Keep a firm grip on the tool with both hands at all times.
Failure to do so could result in loss of control leading to
possible serious injury.
Page 8
WARNING:
lift tool away
OPERATION
WARNING:
I
Do not wear loose clothing or jewelry when operating this
tool. They could get caught in moving parts causing
serious injury. Keep head away from sanderlpolisher and
sanding or polishing area. Hair could be drawn into
sanderlpolisher causing serious injury.
INSTALLING
POLISHING
BONNETS
See Figure 6.
1.
Unplug your sander/polisher.
allure to unplug your sander/polisher could result in
ccidental
starting causing possible serious personal
WARNING:
1
TUCK STRINGENDSAND
BOW UNDERNEATHBONNET
injury.
2.
If you have been using this tool as a sander, remove
spanner nut and sanding disc.
3.
Slip polishing bonnet over rubber disc, pull string ends
tight, and tie in a bow to secure bonnet.
4.
Tuck string ends and bow underneath bonnet.
Fig. 6
WARNING:
Failure to tuck string ends and bow underneath
bonnet could result in string ends coming loose and
hitting or grabbing foreign objects.
POLISHING
See Figure 7.
FOR BEST RESULTS, ALWAYS OPERATE AT LOW
SPEED WHEN POLISHING.
Hold the tool firmly, allowing it to operate freely without
unnecessary pressure. This tool was designed so that the
weight of the tool alone will provide adequate pressure for
polishing at top efficiency.
BONNETS MUST BE KEPT CLEAN AND FREE FROM
GRIT, DIRT, AND OTHER ABRASIVE PARTICLES.
When bonnets become dirty and clogged with polishing film,
wash in lukewarm water with a milddetergent. Allow bonnets
to dry throughly before reuse. Polish with a long sweeping
motion, back and forth, advancing along the surface to be
polished. Do not hold the tool in one spot or use a circular or
spiral pattern. This will cause swirls in the finish. Spread a
light coat of polish or wax over a small area. Polish with the
tool according to the manufacturer's instructions printed on
the label of the polish or wax container. NOTE: Some
polishes should be buffed while damp where others must be
allowed to dry; therefore always check the manufacturer's
label.
Tilt the tool so that the polishing bonnet is at a slight angle to
the work surface. Always start polishing at the top or highest
point and work down. This will prevent light dust or polishfilm
from being thrown upon completed section. It also eliminates
Fig. 7
pulling the tool's power cord over sections already polishec
particularly on automobiles.
Surfaces that have an old film of wax or polish, or that hav
not been polished or waxed for an extended period of tim(
may require a second application. This is especially true o
oxidized surfaces. Heavily oxidized surfaces should b
cleaned with a commercial paste or liquid cleaner befor
polishing or waxing.
WARNING:
Check polishing bonnets before each use. Make sure
i they are clean and free from any Loose particles or foreign
objects that may be embedded in the bonnet, Failuretodo
so could cause these particles or objects to be thrown
from the tool resulting in possible serious injury.
Page 9
MAINTENANCE
WARNING:
WARNING:
When servicing use only identical Craftsman replacement
parts. Use of any other parts may create a hazard or
cause product damage.
Always wear safety goggles, or safety glasses with side
shields dudng power tool operation or when blowing dust.
If operation is dusty, also wear a dust mask.
J
GENERAL
EXTENSION
Only the parts shown on parts list, page 13, are intended to
be repaired or replaced by the customer. All other parts
represent an important part of the double insulation system
and should be serviced only by a qualified Sears service
technician.
The use of any extension cord willcause some loss of power.
To keep the lossto a minimum and to prevent tool overheating,
use an extension cord that is heavy enough to carry the
current the tool will draw.
Avoid usingsolvents when cleaning plasticparts. Most plastics
are susceptible to vadous types of commercial solvents and
may be damaged by their use. Use clean cloths to remove
dirt, carbon dust, etc.
CORDS
A wire gauge size (A.W.G.) of at least 16 is recommended for
an extension cord 100 feet or less in length. When working
outdoors, use an extension cord that is suitable for outdoor
use. The cord's jacket will be marked WA.
CAUTION:
WARNING:
Keep extension cords away from the sanding area and
position the cord so that it will not get caught on lumber,
tools, etc., during sanding or polishing operation.
Do not at any time let brake fluids, gasoline, petroleumbased products, penetrating oils, etc. come in contact
with plastic parts. They contain chemicals that can
damage, weaken, or destroy plastic.
When electdc tools are used on fiberglass boats, sports cars,
wallboard, spackling compounds, or plaster, it has been
found that they are subject to accelerated wear and possible
premature failure, as the fiberglass chips and gdndings are
highly abrasive to bearings, brushes, commutators, etc.
Consequently itis not recommended that this tool be used for
extended work on any fiberglass material, wallboard, spackling
compounds, or plaster. Dudng any use on these matedals, it
is extremely important that the tool is cleaned frequently by
blowing with an air jet.
WARNING:
Check extension cords before each use. If damaged
replace immediately. Never use tool with a damaged cord
since touching the damaged area could cause electrical
shock resulting in serious injury.
LUBRICATION
All of the bearings in this tool are lubricated with a sufficient
amount of high grade lubricant for the life of the unit under
normal operating conditions. Therefore, no further lubrication
is required.
ACCESSORIES
THE FOLLOWING RECOMMENDED ACCESSORIES ARE
CURRENTLY AVAILABLE AT SEARS RETAIL STORES.
Polishing Bonnet
Assorted Sandlng Discs
150 Grit m Fine
100 Grlt -- Medium
60 Grlt -- Coarse
40 Grit -- Very Coarse
WARNING:
The use of attachments or accessories not listed above might be hazardous.
Page 10
NOTES
Page 11
CRAFTSMAN SANDER-POLISHER
m MODEL NUMBER 315.115030
SEE NOTE "A", Page 13
4
2
I
1
Page 12
CRAFTSMAN SANDER/POLISHER
I
-- MODEL NUMBER 315.115030
_--
in
allmodel
correspondence
your
CRAFTSMAN
or when
ordering
repair number
parts.
The
number will regarding
be found on
a plate
attached toSANDER/POUSHER
the motor housing. Always
mention
the model
SEE
BACK
PAGE
FOR
PARTS
ORDERING
I
i
INSTRUCTIONS
PARTS LIST
Key
No.
PaN
Number
Description
1
974892-001
Polishing Bonnet ........................................
1
2
612186-003
Spanner Nut ...............................................
1
_
Quan.
Sanding Disc
4
622322-001
Rubber Disc ...............................................
1
5
972812-001
Data Plate ..................................................
1
6
976491-001
Logo Plate ..................................................
1
7
972895-005
Auxiliary Handle .........................................
1
8
621984-000
Spanner Wrench ........................................
1
9
621230-000
Pin ..............................................................
1
972000-136
Owner's Manual
NOTE: "A" n The assembly shown represents an Important pert of the Double Insulated System. To avoid
the poselbllity of alteration or damage to the System, service should be performed by your nearest Sears
Repair Center. Contact your nearest Sears Ratall Store.
*** Sanding discs In aseorted grits for sanding both wood and metal may be obtained from your nearset Ssere
Retail Store.
Page 13
For repair of major brand appliances in your own home...
no matter who made it, no matter who sold it!
1-800-4-MY-HOME s" Anytime, day or night
(1-800-469-4663)
www.sears.com
To bring in products such as vacuums, lawn equipment and electronics
for repair, call for the location of your nearest Sears Parts & Repair Center.
1-800-488-1222
Anytime, day or night
www.sears.com
For the replacement parts, accessories and owner's manuals
that you need to do-it-yourself, call Sears PartsDirect sMt
1-800-366-PART
(1-800-366-7278)
6a.m.-11p.m.CST,
7 days a week
www.sears,com/partsdirect
To purchase or inquire about a Sears Service Agreement:
1-800-827-6655
7 a.m, - 5 p.m. CST, Mon.Para pedir servicio de reparacibn a domicilio,
y para ordenar piezas con entrega a domicilio:
1-888-SU-HOGAR
s.
(I-888-784-6427)
Sat.
Au Canada pour service en fran(;ais:
1-877-LE-FOYER
_"
(1-877-533-6937)
I=,.,]
HomeCentral=
® RegisteredTrademark / _ Trademarkof Sears,Roebuckand Co.
@Sesns,Roebuckand Co.
® Marca Regi_rade /
Mama de F6brtcade Sears, Roebuckand CO.