1
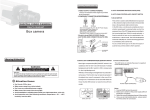
QSC13212D Hi-Resolution CCD Color Camera With 2.8 to 12MM Varifocal Lens And Built-in On Screen Display OPERATION MANUAL Product Manual Thank you for purchasing our products. Please read the manual carefully before using and keep it for future reference. WAR N I N G To reduce the danger of electric shock, and avoid lightning strikes, do not tamper with the wiring or connections to the camera’s circuit board, and make sure the unit is properly grounded. Unit should only be serviced by authorized repairmen. Contact Q-See for any needed repairs. Other Precautions: ☆ Please make sure the power adapter is consistent with product specifications, otherwise it might cause fire, electric shock or damage. ☆ Pay attention to polarity of the adapter, it might cause some accidents like fires. ☆ Please don’t connect multiple cameras with the same adapter at the same time; overloading of adapter capacity may cause fire. ☆ Power supply must be firmly fixed to prevent fires. ☆ If the device produces an abnormal smell or smoke, please stop using it immediately and contact our customer service dept. ☆ If the camera doesn’t work as usual, please do not dismantle it by yourself. Please contact our company to preserve warranty status. ☆ Please do not touch the camera lens or sensor. Notes 1. Avoid strong impact and stay away from strong electromagnetic interference and vibration. 2. There are some sophisticated parts inside the camera, therefore, during transportation and installation, please avoid damage caused by stress or severe vibration. For the sake of safety, please do not switch on power before completing all installation. 3. Please comply with all electrical safety standards during operation, camera or signal transmission cable should maintain a sufficient distance (50 meters, 165 feet) from high-voltage equipment or cables, precautions should also be taken to avoid lightening. 4. Please install the camera in well-ventilated environment. 5. Please do not position the camera facing direct sunlight or other strong light source; this could damage the lens and sensor. 6. The temperature range for the cameras are -20 ~ 50 °C (-4 to 122°F) 7. To avoid lightning strikes, please make sure the power supply ground line is in good condition. Directory 1. Features ·································································································· 1 2. Dimensions and Accessories ······························································ 2 3. Installation ················································································· 3 4. Circuit Board Layout ········································································10 5. OSD (On Screen Display) Operation ··············································· 11 5.1 Exposure ····················································································12 5.2 Color ························································································· 13 5.3 Day & Night Switch ···································································14 5.4 Function ·····················································································15 5.5 Motion Detection ······································································16 5.6 Privacy Zone ············································································ 16 5.7 Camera ID ·············································································· 17 5.8 Camera Settings ······································································· 17 5.9 Exit ·····························································································18 6. Technical Specifications ···································································19 7. FAQs ··································································································21 Contact Information ··········································································22 Product Warranty ···············································································23 Customer Information Card ······························································25 1. Features 1. New Generation SONY CCD Adopting the latest Second-generation high-sensitive CCD, it can receive clear and lucid images even with very low illumination. 2. Hi-resolution Video Resolution Color horizontal resolution can reach 550TVL, B/W horizontal resolution can reach 600TVL. 3. Day & Night Switch Day & Night cameras can switch automatically into color or B/W according to available light. 4. Digital Wide Dynamic Technology Built-in special digital wide dynamic technology enables camera to see all views inside and outside house even in strong or weak light. 5. DNR (Digital Noise Reduction) Technology Enhanced ability to handle signal noise ratio, this technology enables the camera to receive clearer and more vivid images even under low-light conditions. 6. Gamma Curve Variable gamma adjustment, there are four different curve options. 7. Multi-Zone Backlight Compensation Setting Backlight compensation can automatically adjust the light to achieve overall optimization of the image, even in high contrast environment such as between dark and strong light. 8. Multi-Zone Privacy Setting (PRIVACY) Privacy can be divided into different zones. 9. OSD (On Screen Display) Built-in OSD, the user can easily set the camera parameters through menu. 1 2. Dimensions and Accessories Dome Camera Dome Camera 2.2 Accessories Item Accessories Quantity Remark 1 Product Manual 1 PC Standard 2 Customer Info Card 1 PC Standard 3 Fixed Screws 1 Set Dome Camera 2 3. Installation 1. 2. Release screws to open the cover Use the pictured tool to take off the screws 3 3. Open the cover 4. Arrows point to the 3 holes for ceiling mount screws 4 5. Mounting the base to ceiling 6. Screws for changing the angle of the lens 5 7. Loosen the screws on both sides with a screwdriver 8. Twist the top to change the left/right angle of the lens 6 9. 10. Top screw adjusts focus, bottom screw adjusts lens size. Cover of cable pull out hole 7 11. You can remove the cover with a coin 12. Pull cable through the hole 8 13. Place cable in channel and through side hole 14. Cable through the hole 9 15. Connector for portable video tester if needed by the installer, the black button is for operating OSD (On Screen Display). 4. Circuit Board Layout QSC13212D Dome Camera Circuit Board 10 4.2 On Screen Display Switch ENTER Press to Enter or Exit the menu UP/DOWN Tilt toward UP and DOWN to move up and down in menu LEFT/RIGHT Tilt toward LEFT, RIGHT for modifying the menu parameters, press RIGHT to move to the next menu and modify the parameter. 5. OSD (On Screen Display) Operation Press the "OK" to enter main menu, if the button is not pressed for 90 seconds, the main menu will disappear automatically from the screen. 11 5.1 Exposure When the cursor stops on "exposure", press “Ok” button to enter "exposure" to set the parameters. Lens There are two kinds of options, automatic or manual; depending on the specific type of the lens. Lens Brightness User can adjust image brightness from 0 to 100, depending on the lightness of surroundings. The default value is 35. Electronic Shutter Electronic shutter is to set the camera shutter speed, that is, the video output per second (1 / 50, means the camera can output 25 pictures per second). User can set both slow and high-speed shutter. ( The speed can be set as auto, from 1 / 50 ~ 1 / 100000. The user can set the specific speed according to the specific surroundings. The default value is auto. ) AGC (Auto Gain Control) This function not only increases the brightness of camera images, but also increases the image noise, users can adjust it from 12DB-33DB or shut it down according to actual situation. Exit When the setup is complete, click "Up", "Down" to move the cursor to "return", then press "OK", "Exit" dialog will appear, select" Exit "(Exit menu, do not save the settings of parameters) or "factory original settings" (it means to reset to factory settings ) or "Save & Exit" (save the changes of parameters and then exit the menu) and then press "OK" to perform the corresponding return functions. Please refer to the above description to operate "exit". 12 5.2 Color Move the cursor to "RGB" icon, click "OK" to enter the White Balance menu to set relevant parameters. White Balance This is used to restore the authenticity of the color, affected by the change of color temperature. Users can choose white balance mode according to the actual situation: Auto White Balance / Auto-tracking White Balance / Lock White Balance / Manual White Balance respectively. Manual - Red Manual white balance can be adjusted, the default value is 100. Manual - Blue Manual white balance can be adjusted, the default value is 100. Red Gain Adjust the red value. Blue Gain Adjust the blue value. 13 5.3 Day & Night Switch Day & Night Switch is specially designed for different occasions. There are four kinds of modes as follows: automatic mode, color mode, B/W mode, and external switch. The user can set different modes according to the surroundings. Color Signal Set menu to display color or not Color to B/W Settings When the mode is "external control", user can’t adjust it. This is color to B/W accumulated light intensity, when it reaches “alternating light” state, camera could be damaged by frequent switching. It might cause it to not correctly judge the image and reduction of life span of the camera. B/W to Color Settings When the mode is "external control", user can’t adjust it. This is B/W to color accumulated light intensity, when it reaches “alternating light” state, camera could be damaged by frequent switching. It might cause it to not correctly judge the image and reduction of life span of the camera. Delay Time This means when the light begins to alternate between states, the system can make it delay a while ensuring the light is fully within this switching range. 14 CDS Control The filter switch will be controlled by the photocell, and it can work only in external control mode. 5.4 Function Mirror Left or Right Mirror can be set when turning on the mirror switch. Sharpness adjustment Adjust the image sharpness from 0-50. Peripheral Brightness Compensation If you need to compensate brightness, set switch to ON and move the cursor down to "Peripheral Brightness Compensation" and adjust the value from"0-50". Strong Light Reversion If you need to adjust for strong light, set switch to ON and move the cursor down to "Strong Light Reversion" and adjust the value from"0-50". Gamma Adjust the gamma value, there are several different mode options, different modes will give different ways of handling the bright and dark area of the image. The user should select appropriate mode to achieve the most optimized image for different situations. Value range is from 0.05-1.0, the default value is: 0.45. Backlight Compensation If there is backlighting in the external environment, you can use this function. First, set switch to "ON", move the cursor down to "Backlight Compensation" and adjust the value from"0-50". 15 Wide Dynamic Compensation This is digital wide dynamic function, you can adjust its value in order to achieve the best results, the values are: 60DB, 80DB, 100DB. 5.5 Motion Detection (This camera does not have this feature) Mainly used for setting the image motion detection and alarm linkage function. 5.6 Privacy Zone "Privacy Zone" is mainly used for special places or special surroundings, for this camera there are four zones set for privacy. The color of "Privacy Zone" can also be set as one kind of "red, blue, and black". First, in the area to choose whether to open "Privacy Zone", selecting "off" indicates that this zone does not participate in privacy, selecting "On" indicates that this zone participates in the privacy. Move the cursor to "Setting Zone", press "OK" to enter "Privacy Zone setting". Press "Left, Up" to set privacy position, after setting is finished, press "OK", then "Right, Down" to set the privacy position, after setting is finished, press "OK" to select the color. And click "Left, Right" to exit setting. 16 5.7 Camera ID (This camera does not use this feature) Used for setting the camera's address, communication protocol and baud rate. 5.8 Camera Settings Title Display The title can be set ON or OFF. Title Edit Move the cursor to "Title Edit", Click "OK" to enter the title setting. Up to16 letters, numbers & symbols can be used as "Title". 17 Move the cursor to the input column, press "OK"-the cursor will be moved to the above input character column, after selecting characters, press "OK", the cursor will be moved to the next input position. If you need additional settings, please refer to the above operation. After finished inputting, move cursor to "RETURN" click "OK" to return to the previous menu. Title Reset Restore the title setting, which is used to clear the previous title. Title Position Enter the title position to move the title up and down, after confirming the position click "OK" to exit the setting. Title Background Set the title background. Auto-completion-point Set the black point and white point as auto-completion-point numbers. Language Press "left, right" to select language. Chinese & English are currently available. 5.9 Exit When all settings are complete, press "Up", "Down" to move the cursor to "Return", then press "OK", "Exit" dialog will appear, select" Exit "(Exit menu, do not save the settings of parameters) or "factory original settings" (it means to return to factory settings ) or "Save & Exit" (save the changes to parameters and then exit the menu) and then press "OK" to perform the corresponding return functions. 18 6. Technical Specifications Function QSC13212D Dome Camera Imaging Sensor Sensor Area Lens Size Pixels Signal System Syn. System Shutter speed S/N Ratio Video Output Horizontal resolution Mini. Illumination General Functions IR Distance IR Leds 1 / 3" SUPER HAD ‖ hi-sensitivity CCD & DSP 4.9mm x 3.7mm 2.8mm to 12mm Manual Varifocal PAL: 752(H)×582(V);NTSC: 768(H)×494 (V) PAL or NTSC Power Synchronization / Internal Synchronization PAL:1/50~1/100000s; NTSC:1/60~1/100000s More than 58dB(AGC OFF) 1.0Vp-p, 75 ohms, negative sync Color 550TVL, B/W 600TVL Color:0.1Lux (F1.2, 50IRE, AGC ON), B/W:0.001Lux (F1.2, 50IRE, AGC ON) 25M(80ft) 30pcs ф5mm 850nm Wave length Special functions D/N Switch Auto/Color/B/W/External Control Brightness Switch Color to B/W & B/W to Color for option D/N Switching Time 3s~12s Optional Title setting 16 characters Title Position Any position on the Screen Image Brightness 0~100 adjustable AGC 0dB~33dB adjustable OSD Control English/Chinese OSD Peripheral Brightness Compensation (BLC) Strong Light Reversion Backlight Compensation Privacy Zone Privacy Zone Color On/Off,0~50 adjustable On/off, 0~50 adjustable 0~30 adjustable 1~4 Zones for setting privacy areas Black/Grey/Color. 1-6 Colors optional 19 Power & Other Parameters Wide dynamic compensation AWB Mirror Sharpness adjustment Gamma Correction CCD white Point Auto-detection Auto-completion point Menu Background Power Supply Power Consumption Operation Temperature Operation Humidity Storage Temperature Storage Humidity Weight (kg) 60dB, 80dB, 100dB optional Manual / Auto / Auto Tracking On/Off 0~50 adjustable 0.3~1.0 adjustable Not supported white and black points automatically added On/Off DC12V 300mA/AC24V(optional) 2.5W; 7W(IR) -200C~+500C (-4 to 122°F) 20~80% -400C~+600C (-40°F to 140°F) 20~95% 1.20 (42.33 oz) 20 7. FAQs 1. Q: No image after installation? A: a. Check the power supply connections, try plugging into different surge protector and a different power outlet. and whether the indicating led is always on or not; b. Check the video cable, make sure it is ok. c. Make sure the monitor is on. 2. Q: Image interference after installation? A: a. Check the output from the power supply, try plugging into different surge protector and a different power outlet. b. Check if electromagnetic interference exists in the area, please use some anti-interference devices. Try using insulated video cable. 3. Q: Camera image can’t switch into B/W at night? A: Open the camera menu to see if "Day/Night Switch" is set as AUTO, if not, please change it to AUTO. 4. Q: Noise is very obvious at night with low illumination. A: Make sure AGC is ON. 5. Q: The image color is abnormal? A: a. Make sure the white balance is correctly set as Auto White Balance. b. Enter the menu to restore factory settings. 6. Q: Image appears to be whiter than usual after installation? A: Check whether the lens aperture was adjusted too large, so that the image appears whiter. b. Check if the brightness of the monitor is set too high. 7. Q: On installation, image is not clear or has dark corners? A: a. Adjust focus and zoom of the lens. Make sure the focus is set properly b. Make sure the lens is clean. 21 Please contact us using the following methods with questions about your Q-See product. Q-See Products 8015 E. Crystal Dr. Anaheim, CA 92807 Email: Customer Service [email protected] Technical Support [email protected] Online Live Web Chat Visit: www.q-see.com Telephone: Customer Service 1.877.998.3440 x 538 Technical Support 1.877.998.3440 x 539 Fax: 1.714.998.3509 22 Q-See Product Warranty Thank you for choosing our products. All of our products users have a conditional free warranty repair service for hardware within 12 months starting from purchase date, and a free exchange service within one month (valid for manufacturing defects). Permanent upgrading service is provided for the software. Liability Exclusions: Any product malfunction, abnormalities in operation or damage caused by following reasons are not within the free service scope of our company. Please select payable service. (1) Equipment damage caused by improper operation (2) Improper environment and conditions in/on which the equipment operates, e.g., improper power, environment temperature, humidity and lightening strike etc. that cause equipment damage. (3) Damage caused by acts of nature: earthquake and fire etc. (4) Equipment damage caused by the maintenance of personnel not authorized by our company. (5) Product sold over 12 months ago. In order to provide various services to you, please complete registration procedure after you purchase the product. Cut off or copy User’s Information Card and fax or mail it to us after the card is filled in. You can also register the product by going to the www.q-see.com website and clicking on the Register link. 23 The material in this document is the intellectual property of our company. No part of this manual may be reproduced, copied, translated, transmitted, or published in any form or by any means without our company’s prior written permission. 1. Our products are under continual improvement and we reserve the right to make changes without notice. But no guarantee is given as to the correctness of its contents. 2. We do not accept any responsibility for any harm caused by using our product. 3. The product picture may differ from the actual product, which is only for your reference. The accessories will probably be different according to the different selling areas. For details of accessories, please refer to your local distributor. Copyright reserved 24 Customer Information Card User’s Name Mr./Mrs. Company Name Postal Address Postal code Phone Number E-mail Model Number of Product Serial Number of Product Purchase Date Distributor 25