1
RELIGHTING: Shut off all gas and wait 5 minutes before relighting pilot.
SHUTTING DOWN: To shut down urn completely, turn gas cock knob to "OFF" and main gas valve off.
Gas and thermostat adjustments are set at the factory, however, due to different gas conditions, it may be necessary to
make minor burner adjustments. The gas orifices are fixed and the proper flame adjustment is obtained by adjusting the
air shutters which are accessible from the opening in the bottom of the urn.
In case of prolonged power failure, turn gas cock valve to "pilot" position. When power
supply resumes, turn gas cock valve to "ON" position.
For all other adjustments and maintenance procedures, refer to the urn text.
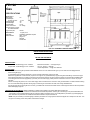
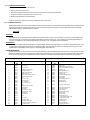
PARTS LIST FOR FE-100 GAS
Item No.
1
2
2a
3
4
4a
5
5a
6
7
8
FE-100 GAS URN
ILLUSTRATION 1
Description
Gas valve
Pressure regulator (nat. gas)
Pressure regulator (prop gas}
Thermostat
Nat. Pilot thermocouple set
Prop. Pilot thermocouple set
Nat. Orifice
Prop, Orifice
Burner
Manifold
Thermocouple
Part No.
F008A
L043A
L198A
L024A
F047A
F048A
F098A
F126A
G090Q
F044A
F002A
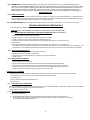
Correct Procedures for Brewing Coffee
As Recommended by the Coffee Brewing Center
1. Use fresh urn or drip grind coffee - - - spread evenly as an even coffee bed is important for proper extraction.
2. Urn should be connected to cold water supply and the water heated sufficiently to insure brewing temperatures of 195°-2050F.(900-96°C).
Leave cover on urn during brewing. Total contact time for urn grind should be approximately 4-6 minutes.
3. Remove grounds and filter basket immediately after water has dripped through.
4. If automatic agitation is not incorporated, mix brew by drawing off heavy coffee from bottom of batch and pouring back into brew.
Mix at least one gallon per pound of coffee used.
5. Never repour brewed coffee back through spent grounds.
6. Hold coffee at 185°-190°F (85°-88°C) for proper serving temperature. Brewed coffee should not be held for longer than one (1) hour; it
should never be reheated if allowed to cool, and it should never be boiled.
Par. 2. TIMER:
An electronic solid state timer is used to control the volume of water for brewing the coffee. The timers are pro-set at the factory to deliver Vh
gallons of water for each brewing cycle.
However, if other volumes of water are desired, or a correction is necessary, follow these instructions:
To increase the volume of water, turn the timer knob clockwise (see illustration 2). To decrease the volume of water, turn the knob counterclockwise. Run through a complete cycle for each setting. Note that the timer cannot be readjusted once it is activated. To terminate the cycle
if the liner overflows, simply activate the cycle stop switch at the bottom of the side box. If the maximum setting of the timer fails to deliver
enough water, check the water pump and spray head and follow instructions under maintenance.
Par. 2a. SPRAY ARM BY-PASS ADJUSTMENTS:
Urns equipped with an adjustable by-pass are delivered from the factory with the by-pass adjusted. If further by-pass adjustments are required
to correct local water conditions, proceed as follows:
Place the spray head over the center of the right coffee liner and activate the brew cycle switch. Insert a screwdriver in the by-pass adjustment
slot and turn it counter-clockwise to increase or clockwise to decrease by -pass flow. At the completion of the brewing cycle, measure the
volume of the water in the coffee liner. The timer may have to be re-adjusted to obtain the correct volume of water. The proper setting of the
by-pass will have to be determined by
the user.
3