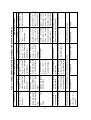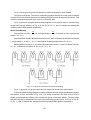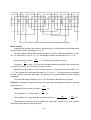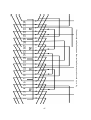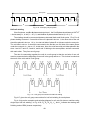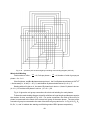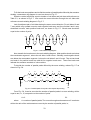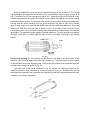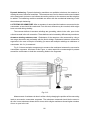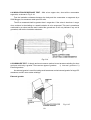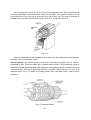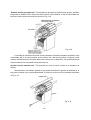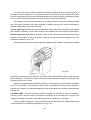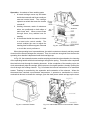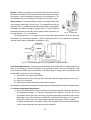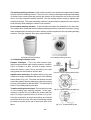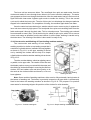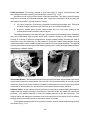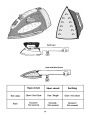
1
ELECTRICAL MACHINES AND
APPLIANCES
Theory
VOCATIONAL EDUCATION
Higher Secondary - Second Year
A Publication under
Government of Tamilnadu
Distribution of Free Textbook Programme
(NOT FOR SALE)
Untouchability is a Sin
Untouchability is a Crime
Untouchability is Inhuman
TAMIL NADU
TEXTBOOK CORPORATION
College Road, Chennai - 600 006.
Government of Tamilnadu
First Edition – 2011
CHAIRPERSON
Dr. J. KANAKARAJ
ASSOCIATE PROFESSOR
DEPT. OF ELECTRICAL & ELECTRONICS ENGINEERING
PSG COLLEGE OF TECHNOLOGY
COIMBATORE – 641 004
AUTHORS
Ms. A. Sumathi
Mr.R. Krishnakumar
Associate Professor
Dept. of Electrical & Electronics Engg.
PSG College of Technology
Coimbatore – 641 004
Assistant Professor(Senior Grade)
Dept. of Electrical & Electronics Engg.
PSG College of Technology
Coimbatore – 641 004
Mr P. Balasubramanian
Mr.K.S. Sampath Nagarajan
Vocational Instructor (Spl. Grade)
Municipal Boys Hr.Sec School
Pollachi - 642 001
Coimbatore District.
Vocational Instructor (Spl. Grade)
Govt. Hr.Sec School
Parava kottai - 614 015
Thiruvarur District.
This book has been prepared by the Directorate of School Education on behalf of the
Government of Tamilnadu
This book has been printed on 60 G.S.M. Paper
Printed by Offset of:
ii
HIGHER SECONDARY – VOCATIONAL COURSE
ELECTRICAL MACHINES AND APPLIANCES
SECOND YEAR – THEORY SYLLABUS
1. Winding Insulating Materials
Introduction – Electrical properties – Classification – Characteristics – Application areas insulation
materials – plastics – insulating varnishes - Types of Insulating varnishes
2. Winding Wire
Introduction – Properties – Characteristics – Choice of Conductor material – Enamelled wire –
Grades – Properties – Types & shapes of winding wires – Gauge plate
3. Details of winding
Coil details – shapes of slot – slot insulation – coil formation – Stator (stationary) winding –
Rotor (rotating) winding – DC Armature winding - Lap winding – wave winding – whole coil
winding – half coil winding – concentrated winding – distributed winding - single layer winding –
double layer winding – single phase winding – three phase winding – concentric winding –
chain winding.
4. Development of winding – AC machines
Single phase windings – Lap winding – wave winding – concentric winding – Three phase
winding – single layer winding – double layer winding.
5. Development of winding – DC machines
General procedure – Double Layer simplex Lap winding – Double layer duplex Lap winding –
Double Layer simplex wave winding.
6. Rewinding and Testing of Electric Motors
Methods of Rewinding – Testing the new winding – Testing of Armature – Insulation resistance
test - Growler test - Drop test.
7. Instruments and Testing
Introduction – Voltage tester screwdriver – Continuing Test – Insulation test – Measurement of
Power for DC & AC Circuits.
8. Electrical Cooking Appliances
Introduction – Types – Construction – Electric Toaster – Types – Automatic and Non-Automatic.
9. Electric Iron Box
Types – Non-Automatic – Automatic – Construction and Working – Comparision – Trouble
Shooting – Steam Iron Box.
iii
10. Water Heaters & Coffee makers
Water Heater – Function – Types – Electric Kettle – Immersion water heater – Construction
and working – storage water heaters – Non pressure type – pressure type – construction and
working – repairs & remedies – Coffee maker – types – construction and working of percolator
type.
11. Electric Mixer & Egg beaters
Electric Maker – Function – Construction – General Operating Instruction – Caution – Cleaning
– Repairs and Remedies – Egg beaters – Hand operated crank type – Electric type – Construction.
12. Vacuum Cleaner and washing machine
Vacuum Cleaner – Function – Principle – Main components – features – types - working –
accessories - Filters – Repairing.
Washing Machine – Function – Types – Semi and Fully Automatic – Top and Front loading –
washing technique – working cycle – construction and working of washing machine – comparison
of Top and front loading machines – Problems and Remedies.
13. Electric Fan & Hair Drier
Electric Fan – Function – Terminology – Construction and Working of Ceiling & table fans –
Exhaust Fan – General Fault and Remedy.
Hair Drier – Function – Types – Construction and working – safety features – repairs & remedies.
14. Centrifugal Pump :
Introduction – Constructional features – working – friction lead – static suction head – static
delivery lead –automatic operation of pump – Trouble shooting.
15. Maintenance of Rotating Machines
Introduction – Types of maintenance – preventive maintenance schedule – Fitting and removing
of a bearing - Maintenance of bearing – Balancing – Preventive maintenance of electric
equipments – General procedure for overhaul of motors – Maintenance of AC Motors ––
Insulation resistance of a motor - Defects in brushes, brush gear - Trouble shooting chart –
defects in commutator – Degreasing – Varnish application - Vacuum Impregnation.
16. Maintenance of Transformers :
Introduction – Action taken for rise in oil temperatures and falling of oil level – methods of drying
out of transformers – Time of drying out operation - Qualities for Transformer oil – methods of
purifying and drying out of transformer oil – Checking of dielectric strength of transformer oil –
action taken for transformer failure - periodical overhaul.
iv
CONTENTS
Page No.
1.
Winding Insulating Materials
1
2.
Winding wire
15
3.
Details of winding
24
4.
Development of Winding - AC machines
36
5.
Development of Winding - DC machines
64
6.
Rewinding and Testing of Electric motors
75
7.
Instruments and Testing
89
8.
Electrical Cooking Appliances
97
9.
Electric Iron Box
102
10. Water Heaters and Coffee Makers
109
11. Electric mixer and Egg Beaters
118
12. Vacuum cleaner and Washing machines
124
13. Electric Fan and Electric hair drier
138
14. Centrifugal Pump
152
15. Maintenance of Roatating machines
160
16. Maintenance of Transformers
179
v
1. WINDING INSULATING MATERIALS
1.1 INTRODUCTION
The Electrical insulating materials are defined as materials which offer a very large resistance
to flow of current, and for that reason they are used to keep the current in its proper path along
the conductor. This is evident when we touch an electric machine when it is under operation.
We don’t receive any electric shocks, because of the insulation. Breakdown of insulation results
in short circuiting of the coils, causing electric currents to flow in unintended paths. This may
also cause, electric shocks to humans operating the machinery and also damage the machines.
Requirements of a good insulating materials involve physical properties, reliability, cost,
availability, adaptability to machining operations etc. Electrical insulation and dielectric materials
includes various forms of materials that surround and protect electrical conductors and prevent
unwanted current flow, leakage. Electrical specifications include electrical resistivity, dielectric
strength, and dielectric constant.
1.2 ELECTRICAL PROPERTIES
Electrical Resistivity : It is the electrical resistance (ohm-cm) to the flow of current through it.
Its value should be very high. Resistivity is the inverse of conductivity.
Dielectric Strength : Dielectric strength is the maximum voltage gradient that the material can
withstand before electrical breakdown occurs. This value specified as ‘kV/mm’ should be very
high even for very thin films.
1.3 CLASSIFICATION OF INSULATING MATERIALS : The insulating materials are classified
in the following two ways : 1.
Classification according to substances and materials.
2.
Classification according to temperature.
Classification according to substances and materials :
(i) Solid Insulating Materials [Inorganic and organic]
Mica, wood, slate, glass, porcelain, rubber, cotton, silk, rayon, terylene, paper and
cellulose materials etc.
(ii) Liquid Insulating Materials [Oils and Varnishes]
Refined hydrocarbon minerals oils, Linseed oil, spirit and synthetic varnishes, etc.
(iii) Gaseous Insulating Materials
Dry air, carbon dioxide, argon, nitrogen, etc.
Classification according to temperature : The insulating materials are classified mainly based
on the thermal limit. The performance of the insulation depends on its operating temperature.
The higher the temperature, the higher will be the rate of its chemical degrading, and hence the
lower will be its useful life as shown in fig.1.1. If a reasonably long life of insulation is expected,
its operating temperature must be maintained low. Therefore, it is necessary to determine the
limits of temperature for the insulation, which will ensure safe operation over its expected life.
1
Thus the insulating materials are grouped into different classes Y, A, B, and C with
temperature limits of 900 C, 1050C and 1300C for the first three classes and no specific limit
Fig.1.1
fixed for class C. Class Y and A cover the various organic materials without and with impregnation
respectively, while classes B and C cover inorganic materials, respectively with and without a
binder. With the existence of newer insulating materials, namely, the plastics and silicones,
during the middle of this century, a need was felt to reorganize the classification of the insulating
materials. This calssification is shown in fig.1.2. This led IEC (International Electro technical
Commission) to come up with the new categories:
Class Y : 900 C: Paper, cotton, silk, natural rubber, polyvinyl chloride, etc. without impregnation.
(formerly O)
Class A : 1050C: Same as class Y but impregnated, plus nylon.
Class E : 1200C: Polyethylene terephthalate (terylene fibre, melinex film), cellulose triacetate,
polyvinyl acetate enamel.
Class B : 1300C: Mica, fiberglass (alkali free alumino borosilicate), bituminized asbestos,
bakelite, polyester enamel.
Class F : 1550 C: As class B but with alkyd and epoxy based resins, polyurethane.
Class H : 1800C: As class B with silicone resin binder, silicone rubber, aromatic polyamide
(nomex paper and fiber), polyamide film (enamel, varnish and film) and estermide
enamel.
Class C : Above 1800C: As class B but with suitable non-organic binders; (Teflon, Mica,
Micanite, Glass, Ceramics, Polytetrafluoroethylene).
2
In the above classification Non-impregnated, moisture absorbing materials of Y- class are
not generally used for motor winding insulation purposes. Since they easily absorb moisture,
their quality quickly degrades. C-class materials are generally brittle, so they too are not suited
for motors. Insulation materials of A and B class are being used for a long time for winding
insulation purposes. In recent times F and H class are being increasingly used for winding
insulation.
1.4 CHARACTERISTICS OF A GOOD INSULATING MATERIAL : A good insulating material
should possess the following characteristics.
I.
Very high insulation resistance.
II.
High dielectric strength.
III. Low thermal expansion.
IV. Non-inflammable when exposed to arcing.
V. Resistant to oils or liquids, gas fumes, acids and alkalies.
VI. Should have no deteriorating effect on the material, in contact with it.
VII. Good thermal conductivity.
VIII. High mechanical strength
IX. High thermal strength.
X. Should be resistant to thermal and chemical deterioration.
XI. Should be resistant to moisture absorption.
1.5 THERE ARE FOUR PRINCIPAL AREAS WHERE INSULATION
MUST BE APPLIED. They are
a) between conductor /coils and earth (phase-to-earth),
b) between conductor /coils of different phases (phase-to-phase),
c) between turns in a coil (inter-turn) and
d) between the coils of the same phase (inter-coil).
1.6 INSULATING MATERIALS - FORMS : Insulating materials are
available in different shapes and sizes. Insulating materials are available
as Tapes, rolls, sleeves, paper and cloth.
Insulation Tapes and sleeves : Insulation tapes are used cover the
windings(coils) on the overhang side. Shellac or varnish are applied over
this covering to prevent it from absorbing moisture and improve insulation
strength. Tapes are sold as rolls in required lengths. Different types of
Insulation tapes available are: Cotton tape, PVC tape, Silk tape, Polyester
tape, Asbestos tape, Glass Fiber tape, Empire cloth tape, Mica tape.
Fig.1.2
3
Insulation sleeves are used to cover the joints made at the coil ends and coil leads. It gives
physical protection to joints and also provides insulation. They come in rigid and flexible types.
They are available for standard wire sizes.
Insulation paper : A variety of insulating papers are available specifically designed for insulating
electrical circuits. In motors it is used to insulate the slots, in between coils. Following are the
most often used insulating materials: Leatheriod paper, Press pan paper, Manila or hemp paper,
Triflexil paper, Asbestos paper, Micanite paper
Insulation cloth : It is inserted between the coils after they are placed in slots. Sometimes it is
also used as slot liner. Empire cloth, Asbestos cloth, Glass cloth, Mica cloth, Micanite- cloth are
some of the types.
1.7. INSULATION MATERIALS:
Leathroid paper : These papers are pressed form of a non-woven fabric of fibres from good
and tough wood. It is available from 0.05mm thickness. It is sold as rolls in meters. Generally
used for low voltage machines. This A-grade insulating material is mainly used as insulation in
electrical appliances, machineries, and power equipments.
NOMEX : NOMEX is widely used in a majority of electrical equipments. It is used in almost
every known electrical sheet insulation application. Available in various thicknesses with a density
from 0.9 to 1.0, NOMEX is ideal choice to use as slot insulation in hand-wound motors and for
covering of coils, and is also used in other applications such as folded or punched parts. It is
also widely preferred as sheet insulation in fluid filled transformer applications due to its improved
impregnability. Dielectric strength of NOMEX ranges from 24 to 30 kV/mm. This is Insulation
class F (155 °C) materials.
The NOMEX sheet can be used with virtually all classes of electrical varnishes and adhesives
(polyimides, silicones, epoxies, polyesters, acrylics, phenolics, synthetic rubbers), Resins quickly
penetrate and pass through the sheet to form a cohesive bond between motor end turns. Due to
its stiff structure it can be quickly and easily inserted between coils. Mechanical toughness of
the sheet helps to keep the shape of the insulation intact during motor assembly. NOMEX is able
to maintain its insulation properties over a long period even if it is subjected to temperature
variations. This assures proper insulation between phases and gives good reliability for the
motors. NOMEX sheets can also be used with transformer fluids (mineral and silicone oils and
other synthetics) and with lubricating oils and refrigerants used in hermetic systems. Common
industrial solvents (alcohols, ketones, acetone, toluene, xylene) have a slight softening and
swelling effect on NOMEX paper, similar to that of water. These effects are largely reversible
when the solvent is removed. The Limiting Oxygen Index,LOI, (ASTM D-2863) of NOMEX paper
at room temperature ranges between 27 and 32% (depending on thickness and density).
Materials with LOI above 21% (ambient air) will not support combustion.
Triflexil : Combined flexible insulating material, this is Insulation class F (155 °C) material
conforms to IEC 626-1. The material consists of two or three layers: Inner layer: Polyester film,
Outer layers: Polyester non-woven fabric, esterimide-impregnated. Good adhesion between
4
impregnating or trickle resins. Smooth surface, therefore good machineability, Low moisture
absorption, good chemical resistance. Dielectric strength: 7 – 24 kV. Used widely as Slot
insulation, slot closure, layer insulation. Triflexil is available in sheets, rolls, strips, and in
thicknesses from 0.25 mm.
Film paper : Polyester film is a flexible, strong and durable film with right balance of properties
making it suitable for many industrial applications. It is Insulation class E (120 °C) material. In
motor applications, certain types of polyester film are used for ground insulation as slot liners
and wedges, as well as phase insulation. Polyester film is a tough general purpose film which is
semi-transparent with thickness ranging from 0.075 mm or above. Generally it has a tensile
strength of an average 210 MPa, highly resistant to moisture and most chemicals. It is able to
withstand temperatures ranging from extremes –70°C to150°C. Since it contains no plasticizers,
film does not brittle with age under normal conditions. Dielectric Strength is 2,5 to 20 kV/mm.
Melinex, Mylar, Teonex are some of the trade names of the films used.
Press Board : It is a mixture of cellulous and old cloth and is manufactured in short lengths. It is
also called as Fuller board. It is similar to a press pan paper. It is available from 0.1 to 0.8 mm
thickness of wire and 1 to 3 mm thickness of plates. Insulation class A (105 °C). Brown colour,
non-glazed (mat), glazed (polished) on both sides. Dielectric strength is 11 kV/mm. It is used as
slot insulation, Core insulation, Separator, Used under bamboo sticks.
Empire cloth : It is made by using cotton or silk cloth dipped in varnish. It is yellow or black in
colour. It cannot withstand high heat, but flexible and can withstand high moisture. It has good
mechanical and dielectric strength. Used as cover for armature winding, slot insulation along
with leathroid paper, Insulation paper between coils, in between small transformer windings.
Bamboo sticks : During running of motor, the coils may be come out from the slots due to
centrifugal force. This is avoided by inserting bamboo sticks at the top side of the slots. The
sticks are made to size depending on the slot size. Hard trees are used for making these sticks.
Paper : It is prepared from wood pulp and manila fibres beaten and rolled into sheets. Its dielectric
strength is 4 to 10 kV/mm thickness. It is moisture absorbent and so is particularly suitable for
impregnation. Electrical properties are quite good. It is rarely used in un impregnated condition
but can be used successfully under oil. It catches fire at 1250 C so that the temperature of any
paper insulated apparatus is limited to about 1000 C.
Wood : The dielectric constant of wood varies in the range 2.5 to 2.7. Dry resistivity is in the
order of 1010 to 1013Ω cm. It can withstand a voltage gradient of 40 kV/mm in service. These
properties vary over a wide range , depending on the type of wood, seasons of cutting, grain
direction, and especially the water content. Used for slot wedges, Papers, etc.,
Asbestos board : Its dielectric strength is 3 to 4.5 kV/mm thickness. It is highly moisture absorbent.
Its strength increases by impregnation but heat resistance and non-inflammability reduces. It
melts at 15000 C. It is neither mechanically strong nor flexible. Purified fibres with clay filler have
better electric strength. Asbestos electrical insulating paper is supplied in thickness of 0.2 to 1.0
mm and, depending on its thickness, has a minimum breakdown voltage from 0.9 to 2.4 kV. It is
5
manufactured by using zinc chloride solution with paper plate. It is in grey colour or yellow colour
After the coils are inserted in the slots, this is provided on the top of the slot as a protection to
coils and also used as insulated between coils. Other types of boards are
1.Hard board
2.Ivory board
3.Hylum sheet
Mica : It is a mineral consisting of silicate of aluminium with silicate of soda potash and magnesia.
It occurs in the form of crystals, can easily be split into very thin sheets. It is affected by oils. The
resistivity of mica at 250 C ranges from about 1012 to 106 Ω cm. The dielectric strength varies
from 40 to 150 kV /mm. It is least affected by heat but dehydrates at high temperatures. It has
high dielectric strength and low power loss. It is rigid, tough and strong. Moisture does not have
any affect on it. Its electrical properties are deteriorated in the presence of quartz and feldspar.
The Mica paper is not sufficiently strong or self supporting. Hence, it has to be given backing of
glass cloth or other binding material such as epoxy resin. Epoxy resin bonded mica paper is
extensively used in both low and high voltage machines. For non-epoxy system a varnish
impregnation is essential to fill the air pockets and also to act as a barrier against moisture and
chemicals present in the atmosphere. The varnish used should have the property of forming an
unbroken tight adhesive and reasonably flexible film.
Mica resists to a high degree the attack of gases such as combination products but is
attacked by warm hydrochloric acid potassium hydrate, warm alkaline carbonates, and water
containing carbon dioxide. Mica is used as insulation seperator for commutator segments,
washers, gaskets for core end bolts. It also used as composite tapes and sheets.
Micanite : Normally, mica is available in the form of very thin splitting. Hence it is bound to a
supporting sheet of electrical grade paper or glass cloth with a suitable binding agent. The
resulting mica sheets are known as micanite. Its dielectric strength is 30 kV/mm. It is used as
insulating sheets between coils of different phases.
Backelite : It is a type of phenol formaldehyde. Its dielectric strength is 6 to 15 kV/mm thickness.
It is hard thermosetting and dark coloured material. Used for making terminal boards, and slot
wedges.
Glass : It is a thermoplastic inorganic material comprising complex system of oxides. The volume
resistivity at 2000 C is extremely high , 1x10¹⁶ to 1x10¹⁸ Ω cm. Quartz glass is non-hygroscopic,
has very high chemical resistance, withstands temperature fluctuations, and has a low co-efficient
of linear expansion of 5.5x10⁻⁷ cm per 0 C. It is not subjected to thermal ageing. Glass has a very
high compression strength [6000 to 21000 kg/cm2 ] but a low tensile strength [ 100 to 300 kg/cm2]
and is extremely brittle. The dielectric constant varies from 3.8 to16.2. At room temperature it can
withstand a voltage gradient of about 8- 20 kV/mm. Toughened glass is used for insulation in EHV
lines, of voltages more than 100 kV. Glass fiber tapes, threads and sleeves are indispensible part
of a motor insulation.
Cotton or silk : Cotton is hygroscopic (absorbes moisture) and has low di electric strength, so
it must be impregnated with varnish or wax after winding. Cotton covered wire is extensively
used for winding of small magnet coils, armature windings of small and medium sized machines,
6
chokes and transformer coils etc. Silk is more expensive than cotton but takes up less space
and is therefore used for windings in fractional horse power machines.
Silk is less hygroscopic and has a higher dielectric strength than cotton, but like cotton it
requires impregnation. The operating temperature of cotton and silk is 1000 C and the material
may catch fire above this temperature.
Rubber : Rubber is obtained by vulcanizing raw rubber [natural or synthetic]. Ordinary electrical
insulating rubbers, have the following electrical characteristics under normal conditions :
The electric strength of organic rubbers strongly depends on the kind of current involved,
the degree of stretch, and the time during which the voltage remains applied. When left
unstretched and subjected to a short-time 50 Hz test voltage, rubber will have an electric strength
within the following limits, depending on the pure-rubber constant.
For a 20 to 25 % rubber content………..20 to 30 kV/mm
For a 30 to 35 % rubber content………..30 to 45 kV/mm
The di electric strength of rubber is 2 to 2.5 times the electric strength at 50 Hz.
Although rubber is practically water and gas tight its electrical characteristics are affected
by moisture, especially for rubbers compounded with considerable quantities of the substances
which increases the sensitivity to moisture. Only specially compounded rubbers can maintain
their electrical characteristics nearly unchanged when kept continuously in contact with moisture.
Normally used as seals, gaskets and washers.
For normal rubbers the maximum operating temperature is usually 550C, for rubbers of
great heat resistance it is 650C. For butyl rubbers the working temperature can be as high as
900C. Rubbers possess a limited post resilience and at sufficiently low temperatures become
brittle.
Silicon rubbers : They have high electrical insulating properties, heat resistance, frost resistance,
moisture resistance, as well as resistance to ozone and light. These rubbers can be produced
as adhesive tapes [lined with a layer of vulcanized rubber] suitable for insulating the windings of
high-voltage electrical machines. Those tapes also serve to insulate the terminal leads of electrical
machines designed for high temperature rise. Silicon rubbers retain their flexibility at temperature
as low as -100C. One of their drawbacks is relatively low mechanical strength, another is high
cost.
Insulating fabrics : Base materials for insulating fabrics include natural fibres such as cellulose,
cotton and silk; synthetic organic fibres of, for example cellulose derivatives, polyamides [nylon],
polyethylene tarepathalates; and inorganic fibres, chiefly glass and asbestos. Non-woven synthetic
organic fibres are usually bonded into a fabric by use of a bonding resin or by fusion. They find
electrical use chiefly as a base for resin-impregnated insulation.
Unimpregnated woven fabrics find some limited use in electrical insulation. The electric
strength of such fabrics generally does not exceed the breakdown strength of an equivalent air
gap and indeed be less. Their chief use, therefore, is to provide mechanical strength, abrasion
7
resistance, and mechanical spacing of conductors in low voltage applications. Often the properties
of such fabrics are upgraded by impregnation with a varnish after application. Better results are
generally obtained if the fabric is impregnated prior to application.
1.8 PLASTICS : A plastic in a broadest sense is defined as any non-metallic material that can
be moulded to shape. The most common definition for plastics is that they are natural or synthetic
resins, or their compounds which can be moulded, extruded, cast or used as films or coatings.
Most of the plastics are of organic nature composed of hydrogen, oxygen, carbon and nitrogen.
The synthetic plastic development dates from 1909 when Dr Bakeland announced the production
of phenol-formaldehyde. Since then several new plastics have been developed.
The plastics possess infinite variety of properties. Properties common to most of the plastics
are given below :
1.
Light weight.
2. Low thermal conductivity
4.
Resistance to deterioration by moisture
3. A wide range of colours
5. Low electrical conductivity
Plastics, most commonly, are classified as(1).Thermoplastic and (2) Thermosetting.
Thermoplastic materials are those which soften on the application of heat, with or without
pressure but they require cooling to set them to shape.
Thermosetting materials are those plastics which require heat and pressure to mould
them into shape.
Thermoplastic Materials:
Polyethylene or Polythene : Polythenes are obtainable as viscous liquids, gums and tough
flexible solids suitable for moulding. They have waxlike in appearance, semi-transparent, odourless
and one of the lightest plastics. Flexible over a wide temperature range. High resistivity and
dielectric strength. Chemically resistant. Do not absorb moisture. Dielectric losses and dielectric
constant are low. They are relatively cheaper in cost.
Polyvinyl chloride (PVC) : The vinyl chlorides are formed from hydrochloric acid, limestone,
and natural gas or coal. The forms of vinyl chloride are almost unlimited. PVC is used in electric
and electronic equipment such as circuit boards, cables, electrical boxes, computer housing,
insulation and adhesive tapes.
The flexible types are strong, tear resistant and have good ageing properties. The rigid
types have good dimensional stability and are water resistant. They are resistant to acids and
alkalies. It becomes soft beyond 800C. It is self extinguishing when ignited and the source of
flame is removed. It offers more resistance to oxygen, ozone and sunlight.
Softening temperature
..…….
1200C
Insulation resistance…
….…..
1012-1013
Dielectric strength [kV/mm] …….
30
For example PVC is difficult to ignite and in the absence of a powerful external flame will not
8
continue to burn. This is due to its chlorine compound. This makes it an ideal construction and
cable material. The incineration (burning) of PVC causes the release of toxic chemicals like
dioxins and other chemicals that are harmful to humans.
Thermosetting Plastics
Aminos
[a] Urea formaldehyde resins : They are derived from the reaction of urea with formal dehyde or its polymers. These resins cannot offer high resistance to heat.
[b] Melamines: When the resin is used with asbestos or glass fibre as filler material, its
heat resistance is in the range of 2000 C. It is highly resistant to chemicals. Possess
outstanding electric arc resistance. Excellent resistance to water. Available in full range
of transluscent or opaque colours. Boards are made from these material are used as
distributor heads, casings for electric devices, terminal boards.
Phenolics [Phenol formaldehyde resin]: They are made by a reaction between phenol and
formaldehyde. They are probably the most widely used and cheapest of thermosetting plastics.
Strong, rigid and dimensionally stable.
Heat and solvent resistant. Non-conductors of electricity. Used as Electrical appliance
handles, TV and Radio cabinets
1.9 INSULATING VARNISHES:
Varnish coating, also called Secondary Insulation, is an important component of the insulation
system of an electrical machine. Varnishes, of different types are used in the insulation system
of electrical machines for impregnation and finishing applications. Advantages of these coatings
are:
Increased mechanical bonding to the winding wires
Improved dielectric properties
Improved thermal conductivity
Protection to the winding against moisture and chemically corrosive environment.
Varnishes are classified based on: 1. Applications of varnish. 2. Type of (varnish) curing
method. 3. Based on main raw material used in varnish.
Insulating varnish based on applications:
1. Impregnating varnish
2. Finishing varnishes
4.
Bonding varnishes
3. Core plate varnishes
5. Special purpose varnishes
Insulating varnish based onCuring method : 1. Air drying type 2. Oven baking type
Main raw material used: Alkyd Phenolic, Alkyd, Polyurethane, Isophthalic Alkyd, Modified
polyester, Epoxyester Melamine, Polyestermide, Epoxy, Phenolic, Phenolic Melamine - based.
The above varnishes come in Solvent based and Solvent-less based.
9
Method of applying varnish:
Applying a coating with a paint brush
Vacuum pressure method
Dipping the specimen into varnish
Conveyorised dip method.
Impregnating varnish: The main function of impregnating varnish is not electrical insulation of
current-carrying conductors. but to fill the empty spaces in and around windings and to provide
mechanical reinforcement of the loose grouping of conductors, even at high temperatures. The
filling of empty spaces not only gives mechanical strength, but also hinders or prevents penetration
of unwanted substances from the environment. This gives the component improved resistance
to chemical attack, to moisture, thus extending its service life. They are applied by dipping the
component in the varnish, or less often by trickling process. These type of varnishes needs to
be cured(heated in a oven) at temperatures ranging from 100oc to 160oc for 2 to 12 hours time.
Finishing (coating) varnish : Finishing varnishe is used not to strengthen the windings, but to
protect the component from external attack by environment conditions. They are applied purely
as a surface coating, and are characterised by outstanding film forming properties. Often applied
by paint brush or sprayed, in repair shops after rewinding works. They are mostly air drying type.
It takes almost a day to completely cure.
Core plate varnish : This varnish is applied to electrical laminations used in electrical machines.
This acts as insulating layer between successive laminations. It is baked at high temperatures,
350o-450o c for about 5 min.
Binder varnish : This type of varnish is used as bonding agent between two insulating materials.
Mechanically weak materials when bonded show good rigidity. It is baked at temperatures of
about 120oc to 450oc for a duration of 3min. to 60 min, depending on the grade of the varnish.
Properties of Insulating varnish coating after curing : Varnish after application and after
under going required curing process at appropriate temperature forms into a uniform film on the
materials. The elastic varnish film has very good mechanical properties such as hardness,
flexibility, penetration, good adhesion and Bonding strength. The cured film is resistant to moisture,
dilute acid, alkalis, chemicals like benzene & Toluene, oils and tropical climate from 0ºC to 55ºC.
It has good dielectric behaviour and dielectric strength.
Applying Varnishes: For treating coils, windings, and insulating parts with insulating varnishes
the methods generally used are Vacuum impregnation, Hot dipping. Finishing varnishes are
usually applied by brush or spray. Mica sticking varnishes are applied by brush or sometimes by
machine[ by passing a roller which dips in the varnish]. Synthetic varnishes are frequently used
for impregnation by dipping and require baking to develop their properties fully.
1.10 TYPES OF INSULATING VARNISHES FOR VARIOUS APPLICATIONS
1. Clear baking varnish…………Armatures, field coils and instruments.
2.
Black baking varnishes…..…..Armatures, field coils and transformers when higher
electric strength and resistance to moisture, acids, and alkalies are wanted. They have
less resistance than those of clear.
10
3.
Sticking varnish…….Cementing cloth, paper, mica etc.
4.
Core-plate varnish[air drying, baking and flashing]………..Insulating armature and
transformer laminations. The air drying is not suitable for oil-immersed operation.
5.
Epoxy resin varnish [baking]……..All coil impregnation, internal curing, where superior
durability and chemical and moisture resistance are required.
6.
Silicone resin varnish [air drying and baking]………..Motor stators and rotors,
transformers, coils, for high temperatures and high-humidity service.
7.
Polyester resin varnishes [baking]…………Motor stators and rotors, transformers, coils,
for high temperature service not so severe as to require silicones.
8.
Phenolic varnishes [baking ]……….Hermetic motor coils and bonding of form wound
coils.
11
12
Bakalized fabric strip
or Epoxy fibre glass
strip or Bamboo strip
Bakelized fabric strip
or Epoxy fibre glass
strip or Bamboo strip
Alkyd varnished terylene or glass tape or sleeving
Alkyd phenolic
Slot closure (wedge)
Insulation for leads
Varnish
for
impregnation
treatment
Alkyd phenolic
No extra insulation because the phase-tophase insulation itself is sufficient
Nomex sheet
Mica alkyd bonded to
glass cloth
Melinex film bonded
to press board
Phase (or coil) to
earth insulation
Estermide or epoxy
Epoxy fibre glass
strip or Bamboo strip
Alkyd varnished
glass tape on coil
ends and alkyd
bonded mica sheet
between layers
Nomex sheet
Alkyd bonded mica
glass sheet or
Melinex film of
suitable thickness
Melinex film bonded
to press board
over-
Epoxy fibreglass strip
Alkyd-phenolic
Epoxy
Alkyd varnished glass tape
Bakalized fabric strip
Epoxy varnished
glass tape on coil
ends and alkyd
bonded mica glass
sheet between layers
Epoxy impregnated
mica paper foil or
tape on straight
portions of the coil.
On
hangs
Shellac or bitumen
bonded mica foil or
tape on straight
portions of the coils
Epoxy fibreglass
strips or Nomex
sheet of suitable
thickness
Bakelized fabric
strips or Melinex film
of suitable thickness
Bakelized fabric
strips or Melinex film
bonded to press
paper
Coil-to-coil
and
Inside and phase-to
the phase insulation
slots
Alkyd bonded fibre
glass (rectangular)
Phenolic bonded
fibre
glass
(rectangular)
Estermide enamel
(wire) or alkyd
bonded fibreglass
(rectangular)
Polyester enamel
(wire) or phenolic
bonded fiberglass
(rectangular)
Polyvinyl
acetal
enamel for both wire
and
rectangular
conductors.
Class F
Class B
Turn-to-turn
Insulation
Class F
High Voltage machines
Class B
Low voltage machines
Class E
Component
Table 1.1 TYPICAL MODERN INSULATING MATERIALS FOR ROTATING MACHINES
QUESTIONS
Part - A
Choose the Correct Answer
(1 Mark)
1)
Insulating materials are used between
A) Conducting materials and Non-conducting materials
B) Two non-conducting materials
C) Two conducting materials (both not part of current carrying circuit)
D) Two conducting materials (of which only one is part of current carrying circuit)
2)
Identify which one of the following is Liquid Insulating material
A) Rubber
B) varnish
C) Argon
D) paper
3)
Thermal Insulation class to which MICA belongs is
B) Class B (130oc)
A) Class A (105oc)
C) Class F (155oc)
D) Class C (>180oc)
4)
For which material insulating varnish coating should be applied compulsorily?
A) Mica tape
B) rubber tape
C) cotton tape
D) Plastic tape
5)
Which one of the following is used as slot liner in an electric motor?
A) silk tape
B) Micanite tape
C) Film paper
D) fibre board
wood as sticks is used as ———————in an electric motor.
A) Insulator
B) Support
C) Wedge
D) Conductor
6)
7)
The electrical devices coated with ————— varnish should be heated at about 100o c for
3 – 5 hours to attain good insulating property.
A) Laequer
B) bonding
C) Finishing varnish
D) Impregnating Varnish
8)
The Nitrogen gas is used as ————————— in electrical equipment.
A) Conductor
B) Insulator
C) Coolant
D) Lubricant
9)
——————— class of insulating material is not preferred in electric motor, because it is
brittle.
A) A
B) B
C) E
D) C
10) Higher operating —————————, is the main reason for the degradation of he insulating
material in an electrical device.
A) Voltage
B) Temperature
C) time
D) humidity
13
Part - B
Answer the following questions in one or two words
(1 Mark)
1.
What property should be more for the insulating material to be thinner?
2.
Which classes of insulating material can withstand temp.s of 155o C and 180o C
respectively?
3.
What is the insulation class of NOMEX material?
4.
In motor winding applications, where film paper is used?
5.
What is the name of the MICA splitting bonded to electrical grade paper?
6.
Which is called as secondary insulation in a motor?
7.
Give two examples of Thermoplastic material?
8.
Give two examples of Thermosetting plastic material?
9.
Which type of rubber can maintain its properties even at low temperature(eg.,0 - 5oC)?
10. Which type of varnish is mostly air drying type and more often applied by hand?
Part - C
Answer the following question briefly
(4 Marks)
1.
What are the areas in which insulating materials are used?
2.
List the classes in which insulating materials are classified based on Temperature?
3.
Give two examples of insulating materials in each of the above classes.
4.
List four important characteristics of a good insulating material.
5.
Classify the forms/shapes in which the insulating materials are used?
6.
List some of the insulation materials in which sleeves are made?
Part - D
Answer the following question in one page level
(10 Marks)
1.
Discuss about the properties of any four insulating materials used in coil winding of Electric
motors.
2.
What are differences between Thermoplastic and thermosetting plastics? Discuss the
properties of any two materials from each category.
14
2. WINDING WIRE
2.1 INTRODUCTION
Winding wire is solid wire, which, to allow closer winding when making electromagnetic
coils, is insulated only with varnish, rather than the thicker plastic or other insulation commonly
used on electrical wire. It is used for the winding of electric motors, transformers, inductors,
generators, speaker coils, etc.
A wire is a single, usually cylindrical or rectangular cross-section, length of metal. Wires
are used to carry electricity and telecommunications signals. Wire is generally formed by drawing
the metal through a hole in a die or draw plate. Standard sizes are determined by various wire
gauges. The term wire is also used more loosely to refer to a bundle of such strands, as in
‘multistranded wire’, which is more correctly termed a wire rope in mechanics, or a cable in
electricity.
The metals must in the first place be ductile and strong in tension, the quality on which the
utility of wire principally depends. The metals suitable for wire, possessing almost equal ductility,
are platinum, silver, iron, copper, aluminium and gold; and it is only from these and certain of
their alloys with other metals, principally brass and bronze, that wire is prepared. By careful
treatment extremely thin wire can be produced. Copper wires could be plated with other metals,
such as tin, nickel, and silver to handle different temperatures, provide lubrication, provide easier
stripping of rubber from copper. Wire used to carry electricity is made up of materials having
very low resistivity such as pure copper or aluminium.
2.2 PROPERTIES OF CONDUCTORS
Electrical Properties: 1) The conductivity must be good. 2) Electrical energy dissipated in
the form of heat must be low. 3) Resistivity must be low 4)Temperature resistance ratio must
be low.
Mechanical Properties: 1) Good Ductivity: It is that property of a material which allows it to be
drawn into a wire. 2) Solderability: The joint should have minimum contact resistance.
3) Resistance to corrosion: Should not get rusted when used outdoors. 4) Withstand stress
and strain. 5) Easy to fabricate.
Economical Factors: 1) Low cost
2) Easily available
3) Easy to manufacture
Characteristics of a Good Conductor Material: The conductor materials should have low
resistivity so that any amount of power can be transmitted without much loss in the conductor.
2.3 THE CHOICE OF A CONDUCTOR MATERIAL DEPENDS ON THE FOLLOWING
FACTORS: 1) Resistivity of the materials 2) Temperature coefficient of resistance 3)
Resistance against corrosion 4) Oxidation characteristics 5) Ease of soldering and welding
6) Ductility 7) Mechanical strength 8) Flexibility and abundance 9) Durability and low cost 10)
Resistance to chemicals and weather
Commonly Used Conductor Materials: Copper and Aluminium
Copper: 1) Pure copper is one of the best conductors of electricity and its conductivity is highly
15
sensitive to impurities. 2) It is reddish-brown in colour. 3) It is malleable and ductile.
4) It can be welded at red heat. 5) It is highly resistant to corrosion. 6) Melting point is 10840C
7) Specific gravity of copper is 8.9. 8) Electrical resistivity is 1.682 micro ohm cm. 9) Its tensile
strength varies from 3 to 4.7 tonnes/cm2. 10) It forms important alloys like bronze and
gun-metal.
Copper is very widely used in wires, cables, windings of generators and transformers,
overhead conductors, busbars. Hard (cold-drawn) copper conductor is mechanically strong
with tensile strength of 40 kg/mm2. It is obtained by drawing cold copper bars into conductor
length. It is used for overhead line conductors and busbars. Annealed copper(Soft Copper)
conductor is mechanically weak having a tensile strength of 20 kg/mm2. It can be easily shaped
into any form. Low-resistivity Hard Copper is used in power cables, windings, and coils as an
insulated conductor. It has high flexibility and high conductivity.
Aluminium : 1) Pure aluminium has silvery colour and polish. It offers high resistance to corrosion.
2) Its electrical conductivity is next only to that of copper. 3) It is ductile and malleable. 4) Its
Ω - cm (micro ohm- cm) at 200C 5) It is good conductor of heat
electrical resistivity is 2.669 µΩ
and electricity. 6) Its specific gravity is 2.7. 7) Its melting point is 6580C. 8) It forms useful alloys
with iron, copper, zinc and other metals. 9) It cannot be soldered or welded easily.
Aluminium is most often used as overhead transmission conductors, busbars, ACRS
conductors. Well suited for cold climate.
Comparison of Copper and Aluminium as conductors for Power Transmission Lines:
Copper
Aluminium
1.
Metal is costly
Metal is cheap
2.
100 per cent conductivity
75 per cent conductivity
3.
Good resistance to corrosion
Good resistance to corrosion
4.
Heavier as compared to aluminium
Lighter as compared to copper
5.
Good ductility and malleability
Good ductility and malleability
6.
Excellent soldering and welding capacity
Poor solderability and weldability
7.
Less suited for low temperature
Well suited to cold climate
8.
Very small cross-section can carry heavy Cross-section should be 50 percent
current
more to carry the same current as that of
copper.
9.
Because of softness and flexibility, it can
Due to brittleness, cannot be twisted.
easily be twisted repeatedly.
10. The wind pressure and weight of snow is The wind pressure and weight of snow is
less because of smaller cross-section.
more because of higher cross-section.
16
2.4 ENAMELLED WIRE: Enamelled wire is a wire coated with a very thin insulating layer. The
core material (‘wire’) is copper or aluminum, coated with a thin layer of a polyurethane, polyamide,
or polyester resin - called as “enamel”.
The thin layer of insulation coated on Enamelled wire, prevents the wire surfaces from
being in a short circuit when wound into coils. It is used mainly in the construction of motors,
electromagnets, transformers and inductors. For ease of manufacturing inductive components
like transformers and inductors, most new enamelled wire has enamel that acts as a flux when
burnt during soldering. This means that the electrical connections at the ends can be made
without stripping off the insulation first. Older enamelled copper wires normally require
sandpapering or scraping to remove the insulation before soldering.
Enamelled wires are classified by their diameter (as SWG number) or area (square
millimetres), temperature class and insulation class. Enameled wires are manufactured in both
round and rectangular shapes. Rectangular wire is used in larger machine windings to make
the most efficient use of available winding space.
Breakdown voltage depends on the thickness of the covering, which can be of 3 types:
Grade 1, Grade 2 and Grade 3. Higher grades have thicker insulation and thus higher breakdown
voltages. The temperature class indicates the temperature of the wire at which it can have a
20,000 hour service life. At lower temperatures the service life of the wire is longer (about a
factor 2 for every 10 °C lower temperature). Common temperature classes are 120, 155 and
180 °C.
Table 2.1 Standard wire gauge and equivalent sizes in mm and inch.
S. W. G.
Gauge
No.
Standard Wire Gauge S. W. G.
S. W. G.
Gauge
No.
Standard Wire Gauge S. W. G.
Inch
mm
26
0.018
0.457
Area
mm2
0.164
45.6
27
0.016
0.417
0.136
7.010
38.6
28
0.015
0.376
0.111
0.252
6.401
32.2
29
0.014
0.345
0.0937
4
0.232
5.893
27.3
30
0.012
0.315
0.0779
5
0.212
5.385
22.8
31
0.012
0.295
0.0682
6
0.192
4.877
18.7
32
0.011
0.274
0.0591
7
0.176
4.470
15.7
33
0.010
0.254
0.0507
8
0.160
4.064
13.0
34
0.009
0.234
0.0429
9
0.144
3.658
10.5
35
0.008
0.213
0.0357
10
0.128
3.251
8.3
36
0.008
0.193
0.0293
11
0.116
2.946
6.82
37
0.007
0.173
0.0234
12
0.104
2.642
5.48
38
0.006
0.152
0.0182
Inch
mm
0
0.324
8.230
Area
mm2
53.17
1
0.300
7.620
2
0.276
3
17
13
0.092
2.337
4.29
39
0.005
0.132
0.0137
14
0.080
2.032
3.24
40
0.005
0.122
0.0117
15
0.072
1.829
2.63
41
0.004
0.112
0.0098
16
0.064
1.626
2.07
42
0.004
0.102
0.0082
17
0.056
1.422
1.59
43
0.004
0.091
0.0065
18
0.048
1.219
1.17
44
0.003
0.081
0.0636
19
0.040
1.016
0.811
45
0.003
0.071
0.0557
20
0.036
0.914
0.657
46
0.002
0.061
0.0479
21
0.032
0.813
0.519
47
0.002
0.051
0.0400
22
0.028
0.711
0.397
48
0.002
0.041
0.0322
23
0.024
0.610
0.292
49
0.001
0.030
0.0236
24
0.022
0.559
0.245
50
0.001
0.025
0.0196
25
0.020
0.508
0.203
BASIS : IS 13730-0-1/IEC 317-0-1
2.5 GRADES OF COPPER ENAMELLED WINDING WIRES :
1. Solderable Polyurethane Enamelled Round Copper Wire, Class 130, with a Bonding
Layer
2.
Solderable polyurethane enamelled round copper wire. It has thermal capacity of 120°C,
130°C and 155°C. The diameter ranges from 0.08 mm to 1.00 mm and can be used in
Transformers, Meters, Electronic and Communication Devices.
3.
Polymide-imide enamelled round copper wire, Class 200
4.
Paper Covered Rectangular Copper Wire
5.
Polyesterimide enamelled rectangular copper wire. It has Thermal Capacity of 180°C.
This type of enamel wire are used in High Power Motors.
6.
Polyester or Polyesterimide Overcoated with Polyamide-imide Enamelled Copper Wire.
With thermal capacity of 200°C and diameter range from 0.1mm to 1.6mm , they are
used in Microwave oven, Transformer and Air-conditioning Motors.
7.
Polyester Enamelled Round Copper Wire, Class 155. Polyester Enamel wire can be
used in Motors for Household Application and Appliances.
8.
Glass-fibre Wound, Polyester or Polyesterimide Varnish-treated, Bare or enamelled
rectangular copper wire, temperature index 180
9.
Glass-fibre wound, polyester or polyesterimide varnish-treated, bare or enamelled
rectangular copper wire, temperature index 155
10. Glass-fibre wound, silicone varnish treated bare or enamelled rectangular copper wire,
temperature index 200
11. Polyester Enamelled Round Copper Wire, class 130 L
12. Glass-fibre braided, polyester or polyesterimide varnish-treated, bare or enamelled
rectangular copper wire, temperature index 180
13. Aromatic polymide tape wrapped round copper wires, Class 240
14. Aromatic polyimide tape wrapped rectangular Copper wire, Class 240
18
Table 2.2 showing increase in dimensions due to enamel (synthetic) covering
Grade of covering
Fine
Medium
Thick
Minimum increase (mm)
0.035
0.060
0.100
Maximum increase (mm)
0.060
0.100
0.150
2.6 PROPERTIES OF ENAMELLED WIRES : Excellent dielectric strength. Very low dissipation
factor, remaining reasonably constant at high frequencies or under humid conditions. No
mechanical or chemical stripping required. Adequate ventilation required when tinning or soldering.
Thermoplastic flow temperature not less than 320ºC, Smooth Glossy surface finish, Chemically
very stable, resists extraction with R22, methanol trichloroethylene and perchlorethylene. Usable
in hermetically sealed coils Excellent stability with a heat shock of not less than 205ºC. Good
resistance to abrasion. Good flexibility and adhesion to the conductor Smaller coefficient of
friction, Higher mechanical intensity, Excellent heat resistance. Good solderability.
Limitations : Insulation properties downgraded over 200ºC. Prone to hydrolysis if used in hermetic
systems or encapsulations when in the presence of cellulosic materials or moisture. Prolonged
contact with aggressive solvents (e.g. keytones, alcohol) may cause enamel softening.
2.7 TYPES AND SHAPES OF WINDING WIRES: The winding wires used in electrical motors
are classified as follows. 1) Round wires
2) Rectangular straps
3) Stranded wires
1. Round Wires: It has thin and thick conductors and are used in semi-closed slot type motors
and mush winding rotors. It is wounded in reels and available in Kilograms.
2. Rectangular straps: It is used in open type slot motors. These conductors are available as
long straps in meters. They are used in the following places. 1) Low voltage motor windings.
2) Used as conductor in high current motor. 3) Series field motor winding coils.
3. Stranded wires: Stranded wire is composed of a bundle of small-gauge wires to make a
larger conductor. Stranded wire is more flexible than solid wire of the same total cross-sectional
area. Stranded wire is used whenever ease of bending or repeated bending are required. Such
situations include connections between circuit boards in printed-circuit-board devices, where
the rigidity of solid wire would produce too much stress as a result of movement during assembly
or servicing; A.C. line cords for appliances; musical instrument cables; computer mouse cables;
welding electrode cables; control cables connecting moving machine parts; mining machine
cables; trailing machine cables; and numerous others. 1) Cotton covered insulating wire
2) Silk covered insulating wire 3) Paper insulated wire 4) Varnish coated glass paper covered
wire 5) Enamel coated round shaped wire.
Note: Usage of alternate sizes
1. If rewinding is done, use the existing winding wire gauge number for the new winding.
Sometimes if same gauge winding wire is not available then we can use the 2 runs of
wire each having half of the area of cross section of the original one.
19
Table 2.3 A sample of gauge No.s and its equivalent are given in the following table.
Standard
Gauge Number
2.
3.
4.
5.
Equivalent Gauge
Number and runs
Standard Gauge
Number
Equivalent Gauge
Number and runs
10
Two runs of 13 SWG
19
Two runs of 22 SWG
12
14
17
Two runs of 15 SWG
Two runs of 17 SWG
Two runs of 20 SWG
19
19
19
Two runs of 25 SWG
Two runs of 27 SWG
Two runs of 28 SWG
Area of Cross-section of one particular wire gauge number is two times more than that
of gauge number, when increased by three. For example area of cross-section for 17
gauge wire is approximately two times more than that of 20 gauge wires. If 17 gauge
wire is not available then we use two 20 gauge wires.
When 20 gauge and 17 gauge wires are used for particular length, then the weight of
17 gauge wire is double as that of the weight of the 20 gauge wire, because weight is
directly proportional to the area of cross-section of the wire.
Resistance of the winding wire is indirectly proportional to the cross-sectional area of
the wire. Therefore, the resistance of 17 gauge wire is half of the resistance value of 20
gauge wire.
Resistance of winding is measured in two methods.
(i)
By using multimeter, the resistance of the winding is directly measured in ohms
or kilo ohms.
(ii) 15 to 20% value of the rated voltage is applied by using auto transformer to each
phase of three phase winding. Then current in each phase is measured and then
the resistance of the winding is calculated.
Table 2.4 Resistance value of Copper and Aluminum wires
Cross
sectional
area mm2
Cross
sectional
area inch2
Approx
S.W.G
No.
Copper
wt.kgm
per km
Resistance Aluminum Resistance
ohm/ km.
weight
at 200C
at 200C
ohm/km
Kgm / km
1 mm2
0.00155
18
8.89
17.86
2.7
30.3
1.5 mm2
0.00230
17
13.34
11.91
4.04
20.2
2.5 mm2
0.0038
15
22.33
7.144
6.74
12.12
4 mm2
0.0062
13
35.56
4.46
10.8
7.575
2
0.0093
11
53.34
2.977
16.2
5.05
0.0155
9
88.90
1.786
27
3.03
6 mm
10 mm2
2.8 GAUGE PLATE: The sizes of wire are estimated by a device, called gauges, which consist
of plates of circular or oblong form having notches of different widths around their edges. Each
notch is stamped with a number, and the wire which just fits a given notch, is stated to be of,
say, No. 10, 11, 12, etc., of the wire gauge.
20
The circular forms of wire gauge measurement devices are the most popular, and are
generally 3 3/4 inch. (95 mm) in diameter, with thirty-six notches; may have the decimal
equivalents of the sizes stamped on the back. Oblong plates are similarly notched. Many gauges
are made with a wedge-like slot into which the wire is thrust; one edge being graduated, the
point at which the movement of the wire is arrested gives its size. The graduations are those of
standard wire, or in thousandths of an inch. In some cases both edges are graduated differently
to serve for comparison between two systems of measurement. A few gauges are made with
holes into which the wire has to be thrust. All gauges are hardened and ground to dimensions.
Fig. 2.1 - Gauge plate
In some applications wire sizes are specified as the cross sectional area of the wire, usually
in mm². Advantages of this system include the ability to readily calculate the physical dimensions
or weight of wire, ability to take account of non-circular wire, and ease of calculation of electrical
properties. This determines the amount of electric current a wire can safely carry, as well as its
electrical resistance and weight per unit of length. Wire gauge is applicable to both electrical
and non-electrical wires, mostly used in electrical wiring.
The basis being the mil. No. 7/0, the largest size, is 0.50 in. (500 mils or 12.7 mm) in
diameter, and the smallest, No. 50, is 0.001 in. (1 mil or about 25 µm) in diameter. Between
these, the diameter, or thickness, decreases by 10.557%, and the weight reduces by 20%. The
‘mil’ denotes one thousandth part of an inch (more commonly denoted as ‘thou’). The circular
mil is the equivalent area of a circle whose diameter is 0.001" (10-3) inch.
This can also be expressed as the diameter in thousandths of an inch raised to the power
2 and may or may not be rounded to the nearest ten. The circular mil is an old unit of cross
sectional area, used for denoting the cross-sectional size of an electrical conductor or cable.
21
QUESTIONS
Part - A
Choose the Correct Answer
1.
(1 Mark)
To transfer power without much loss of power, the conductor material should be
A) Very light
C) have very low resistance
2.
B) very strong
D) have very low weight.
Copper is very widely used in electrical wires because,
(i) It has high conductivity, (ii) it has high tensile strength, (iii) It is very flexible, (iv) it is good
conductor of heat.
A) (i) (iii) & (iv)
3.
4.
C) (ii), (iii)& (iv)
D) (i), (ii) & (iv)
Enameled wire has very thin coating of varnish over copper or aluminium wire. This
thin layer of coating acts as
A) protective coating against rusting
B) protective coating against heat
C) protective coating of insulation
D) coating to give good appearance
Enamel covering on the conductor wires cannot withstand for long the effects of
A) current
5.
B) (i),(ii),(iii)
B) voltage
C) moisture
D) certain solvents
Stranded wires are
A) thick wires
C) bundle of thin wires
B) thin wire
D) insulated cables.
Part - B
Answer the following questions in one or two words
(1 Mark)
1.
Which property allows the material to be drawn into thin wires?
2.
Which type of copper conductor is called hard copper?
3.
Where aluminmum conductors are widely used?
4.
Which one has higher resistivity for the given length. Copper or Aluminium?
5.
For a given amount of conductor length if the copper is said to have 100 % conductivity,
what would be conductivity of aluninium conductor of similar dimensions?
6.
What is the expected service life in hours of the wire for the given temperature class?
22
7.
Enamelled wires should not be used beyond this temperature. What it is?
8.
If during rewinding same gauge winding wire is not available then we can use several runs
of lesser gauge wire in place of previous one. Which parameter should be same in both
the cases?
9.
What is the equivalent size in mm for 1 mil?
10. What is the name of the plate which is used to find the size of wires?
Part - C
Answer the following question briefly
(4 Marks)
1. What is meant by conductor?
2. In which type of motors rectangle conductors are used?
3. What is meant by flexible wire?
4. What are the three types of enamel thickness?
Part - D
Answer the following question in one page level
(10 Marks)
1. What are the advantages of using copper as winding wire?
2. What are the properties needed for winding wire?
3. Explain the method to find the winding wire gauge number with the gauge plate.
4. State any ten properties of Enamel coating of the wires.
23
3. DETAILS OF WINDING
3.1 DETAILS ABOUT THE WINDING COIL
A length of wire lying in the magnetic field and in which an emf is induced is called a coil.
The coils used in windings are shown in Fig. 3.1.
Back end
side
B
C
Active sides
N
S
A
D
N
S
Front
end side
S
F
b) Multi turn coil
a) Single turn coil
Fig.3.1 - Winding Coil representation
Fig. 3.1 (a) represents a coil with only one turn in it. Each coil has active and inactive sides.
A coil can in general have any number of turns. A single turn/coil has two active sides, or
otherwise called as conductors. Similarly, a two turn coil has four conductors and a three turn
coil has 6 conductors. Generally, the total number of conductors per coil,
ZC = 2T
and, the total number of conductors for a given machine
3.1
Z = ZCC
where
3.2
ZC = total number of conductors per coil
C = number of coils
Z = total number of conductors
T = number of turns per coil
Fig, 3.1 (b) represents multi turn coil.
Active side of a coil : It is the part of a coil which lies in the slots under a magnetic poleand emf
is induced in this part only. In Fig. 3.1 (a), coil sides AB and CD are called as active sides. For
a double layer winding, one half portion of the coil drawn with solid line corresponds to the coil
side lying on the top of a slot, and the dotted line corresponds to the coil side lying in the bottom
layer of another slot. This type of representation is used for double layer winding. For a single
layer winding, the complete coil is represented by a solid line.
Inactive side of a coil : The inactive side of a coil consists of two portions, namely the front end
side and the back end side. In Fig. 3.1 (a), the portion of the conductor which joins the two active
sides and placed around the core, is called the back end side of the coil. The portions which are
used to connect other coils are called front end side. These ends have two leads called as
24
starting end S and finishing end F of a coil. In Fig. 3.1 (a), AD and BC represents the inactive
sides of a coil.
Coil Groups : One or more coils connected in series are called coil groups, as shown in Fig.
3.2. The number of coil groups is equal to the number of poles. In Fig. 3.2, there are four coil
groups, which are equal to four numbers of poles. For AC winding, the total number of coil
groups depends upon the number of poles and the number of phases.
∴ the total number of Coil groups = mP
3.3
Number of coil groups
=
Number of phases
Also, total number of coil groups/phase =
where
mP
m
3.4
m = number of phases
P = number of poles.
Example 3.1: Find the total number of coil groups for a 3 phase 6 pole machine.
Solution From equation 3.3, coil groups = mP = 3 x 6 = 18.
N
S
N
S
N
Fig.3.2 - Coil groups
Pole Pitch : It is the distance between the centres of two adjacent opposite poles. It is measured
in terms of slots.
Number of slots
One pole pitch = Number of Poles
where
S = number of slots
S
p
=
= 1800ed or 1800ε
3.5
ed = electrical degree
Example 3.2 : Calculate the pole pitch for a three phase 4 pole ac machine having 36 stator
slots.
S
36
Solution From equation 3.5, pole pitch = P = 4 = 9
Coil Span or coil pitch : It is the distance between the two active sides of the same coil under
adjacent opposite poles. It is expressed in terms of number of slots per pole or electrical degrees.
Full pitch coil : A coil having a coil span equal to 1800ed is called a full pitch coil, as shown in Fig. 3.3
(a).
Short pitch coil : A coil having a coil span less than 1800ed by an angle â, is called a short pitch
coil, or fractional pitch coil, as shown in Fig. 3.3 (b). It is also called a chorded coil.
á= 0 for full pitch winding
3.6
25
á = xâ for short pitch winding
3.7
Also â =
180
S/p
where
á = short pitch angle or an angle less than 1800ε
3.8
â = angle between adjacent slots
x = 1, 2, 3, . . . an integer
Example 3.3 : Find the angle between adjacent slots of a 3 phase, 6 pole motor having 36 slots.
Solution : Slots per pole =
36
180
= 6 From equation 3.8, â =
= 30oε
6
S/p
Pitch Factor or coil span factor or chording factor, KP: When the two sides of the same coil
are short pitched by an angle á, as shown in Fig. 3.3 (b), the emf induced in the two coil sides
have a phase angle difference of á 0. Due to phase angle difference, the actual emf is reduced
by a factor cos α and is called pitch factor or coil span factor or chording factor.
2
α
Kp = cos
3.9
2
Example 3.4 : Find the pitch factor for a 3 phase 4 pole ac machine wound in 36 slots with a coil
span of 1400ε.
Solution: From Fig. 3.3 (b), short pitch angle, á = 1800 – 1400 = 400ε. From equation 3.9,
KP =
1800ed
1800ed
α
0
180 ed-α
(a)
(b)
Fig.3.3 - Full Pitch and Short Pitch coils
Distribution Factor, Kd : It is defined as the ratio of phasor addition of emfs induced in all the
coils distributed in m slots under one pole region to their arithmetic addition of emfs induced in
all the coils distributed in m slots under one pole region.
3.10
Kd =
where
m = s = number of slots per pole per phase
3p
3.11
Example 3.5 : Compute the distribution factor for a 3 phase 4 pole ac machine wound in 36
slots with a coil span of 1400ε.
26
Solution :From equation 3.11, m =
180
â= s
36
= 3 From equation 3.8, angle between adjacent slots,
3x4
180
= 36 = 200. From equation 3.10, Kd = = 0.96
p
4
Winding Factor, KW : It is defined as the product of pitch factor and distribution factor.
KW = KPKd
3.12
Example 3.6 : Find the winding factor for the Example 3.5.
Solution : From equation 3.9, KP =
From equation 3.12, KW = KPKd = 0.96 x 0.94 = 0.902
Mechanical and Electrical degrees: Mechanical degree, θmd is used for accounting the
angle between two points on a circle/round object based on their mechanical or physical
placement. Fig. 3.4 (a) shows four points A, B, C, and D marked around a circle. Taking point
A as reference, ie., as 00, point C is located exactly opposite to point A and is marked as 180
mechanical degree or simply 1800 degrees. In between points A and C, points B and D are
marked as 900 and 2700 respectively. Point A is also marked as 3600, as it is the same point as
the reference point, reached after going around circle once.
D
N
N1
A
A
A
0
360
0
360
0
720
270
90
B
D
270
90
B
S2 D
540
180
180
180
360
C
C
C
S
N2
(b)
(c)
(a)
B S1
Fig.3.4 - Mechanical and Electrical Degrees
Electrical degree, qed is used for accounting the angle between two points in rotating electrical
machines. Since all electrical machines operate with the help of magnetic fields, the electrical
degree is used with reference to the polarity of the magnetic field. Consider a two pole machine,
as shown in Fig. 3.4 (b). Point A is exactly under the North pole field and is selected as reference
point with 00. Point C is under the South pole and magnetically opposite to North pole. It is
marked as 1800ed or 1800e. After one encircling, point A is reached and marked as 3600ed or
3600e. Fig. 3.4 (b) is identical to Fig. 3.4 (a), for a two pole machine.
27
Thus, mechanical degree in terms of poles
where
3.13
θmd = mechanical degree.
Mechanical degree in terms of slots
where
3.14
â m = mechanical degree between adjacent slots, S = number of slots
Consider a 4 pole machine, as shown in Fig. 3.4 (c). Point A is under North pole N1 and
marked as 00ε. Moving clockwise, point B is situated at 900md from point A. But point B is under
South pole S1, which is magnetically opposite to N1. Hence, point B is marked as 1800ε. Now,
point C is under N2, which is 1800md away from point A. Point C has the same magnetic polarity
as that of point A, hence it is marked as 3600ε. Point D under S2 is 2700md from point A, and
hence marked as 5400ε, ie., 3600ε +1800ε = 5400ε. After one complete encircling, point A is
reached again, and marked as 7200ε, ie., 5400ε + 1800ε = 7200ε.
The mechanical and electrical degrees defer one another from the point of reference. Thus,
mechanical and electrical degrees are related by the number of poles, P.
∴
3.15
where θed = electrical degree.
In terms of slots,
3.16
where â = electrical degree between adjacent slots.
Example 3.7: Find the mechanical and electrical degrees between adjacent poles for an 8 pole
machine.
Solution:
360
360
P
6
From equation 3.6, θmd = P = 8 = 45o
From equation 3.8, . θed = 2 θmd= 2 45o = 180oε
Example 3.8 : Find the mechanical and electrical degrees between adjacent slots for a 6 pole
machine having 54 slots.
Solution :
From equation 3.7, βm =360 = 360 = 10o
S
6
P
6
From equation 3.9, β = βm=
10 = 30oε
2
2
Numbering the coil sides in slots: For convenience in laying out the windings, for double layer
windings, the coil sides forming the top layers in the slot are given odd numbers and those
forming the bottom layers are given even numbers. The scheme of numbering the coil sides for
two different double layer windings in slots are shown in Fig. 3.5.
For single layer winding, coil sides are numbered as shown in Fig. 3.6.
28
Fig.3.5 - Double layer windings
Fig.3.6 - Single layer winding
3.2 DIFFERENT SHAPE OF SLOTS : There are different shapes of slots used for electrical
machines. The slots used in the stator of induction motors, may be completely open or semiclosed as shown in Fig. 3.7 (a).
(a) Semi-closed and open slots
(b) Types of rotor slots
(c) Semi-closed and open slots used in dc armatures
Fig.3.7 - Different shapes of slots
The types of rotor slots used for squirrel cage induction rotor may be either closed or semiclosed types as shown in Fig. 3.7 (b).
The slots used in the armature of dc machines, may be completely open or semi-closed
as shown in Fig. 3.7 (c).
29
3.3 SLOT INSULATION : Materials used for slot insulation are leatheroid, mica, glass cloth,
and flexible type of micanite. The type of slot insulation will vary according to the capacity of the
machine.
Slot Liner : The slot liner is an insulation sheet cut to the inner dimensions of the slots and
projected on either side of the slots. In some applications, the edges of the slot liner are folded
on either end to prevent them from sliding in the slots, as shown in Fig. 3.8.
Fig.3.8 - Slot Insulation
Coil Separator : When multilayer windings are used, to insulate the winding layers from each
other, coil separators are used, as shown in Fig. 3.8. They should be extended on either side of
the slot.
Packing Strip : The thick insulation paper used in between the slot liner and wedge is called a
packing strip, as shown in Fig. 3.8. This should extend beyond each end of the armature core.
Wedge : It is a solid insulation piece like bamboo or fibre used to prevent the conductors from
coming out of the slots. It should be tightly held in the slots, as shown in Fig. 3.8.
3.4 COIL FORMATION : The annealed copper conductors, normally in round shape, are used
for winding small and medium capacity electrical machines.
Field Coil Formation : Field coils are wound with insulated copper wire whose diameter and
number of turns depend on the exciting voltage and machine capacity. The wire can be wound
on a wooden former that consists of the inner dimensions of the coil.
Stator/rotor/armature Coil Formation : Diamond shaped wooden former is constructed to
the required dimensions, length and width of the coil. The coils are wound over the former with
the help of the coil winding machine. All coils are wound identically. The number of turns depends
on the voltage rating of the machine where as the conductor size depends on the current rating.
3.5 REVOLVING ( ROTOR) WINDING : The winding that rotates with either the rotor of an
induction machine or the armature of a dc machine, is called a revolving winding.
3.6 STATIONARY ( STATOR) WINDING : The winding wound either on the stator of an induction
machine or on the field system of a dc machine is called a stationary winding.
3.7 DC ARMATURE WINDINGS : There are two types of dc armature windings, namely the lap
and wave windings. For development of dc armature windings, few pitches related to the types
of dc armature windings are Back pitch, Front pitch and Winding pitch.
30
Back Pitch, Yb : It is the distance between the two active sides of the same coil under adjacent
opposite poles. For double layer winding,
3.17
where K = any integer or fraction, added or subtracted with
, that will give the value of
Yb an odd integer.
Front Pitch, Yf : It is the distance between two coil sides connected to the same commutator
segment. It should be an odd integer.
Winding Pitch or Coil Pitch, Y : It is the distance between starting ends of two consecutive
coils expressed in terms of coil sides.
For a double layer winding, winding pitch should be an even integer.
Y = + 2m
Y=
2C+2m
P
2
for lap winding
3.18
for wave winding
3.19
where m = 1, 2, 3 for simplex, duplex and triplex windings respectively, P = number of
poles, and C = number of coils. + sign indicates progressive winding and – sign indicates
retrogressive winding.
3.8 LAP WINDING : When the finishing end of the first coil is connected to the starting end of the
next coil which starts from the same pole, as shown in Fig. 3.9, where the first coil started is
called as lap winding.
Yb
N1
Y
S1
Yf
Commutator Segments
Fig.3.9 - Lap winding
From Fig. 3.9, for lap winding, the front pitch, Yf = Yb - Y
3.20
Example 3.9 : Determine the back and front pitches for a 4 pole lap winding with 24 slots.
Solution : P = 4, C = 24, winding type = lap
2×24
From equation 3.17, the back pitch, Yb = 2 C + K =
+ K = 12 + K = 11 or 13
4
P
(odd integer)
31
From equation 3.18 the winding pitch, Y =+ 2 = 2 (even integer)
From Fig. 3.9 or from equation 3.20, front pitch, Yf = 11 –2 = 9 or 13 – 2 = 11
(odd integer).
3.9 WAVE WINDING: When the finishing end of the first coil is connected to the starting end of
the next coil, as shown in Fig. 3.10, which starts from the next adjacent pole where the first coil
started is known as wave winding.
From Fig. 3.10, for wave winding, the front pitch, Yf = Y - Yb
3.21
Example 3.10 : Determine the back and front pitches for a 4 pole wave winding with 25 slots.
Yb
Yf
N1
S1
N2
Y
Commutator Segments
Fig.3.10 - Wave winding
Solution : P = 4, C = 25, winding type = wave
2×25
From equation 3.17, the back pitch, Y b = 2 C + K =
+ K = 12.5 + K = 13
4
P
(odd integer)
2C+2 2×25+2
=
From equation 3.19, the winding pitch, Y =
= 26 (even integer)
P
2
4
2
From Fig. 3.10 or from equation 3.21, front pitch, Yf = 26 – 13 = 13 (odd integer).
3.10 WHOLE COIL WINDING : A whole coil winding is one in which the number of coils per
phase is equal to the number of poles in the machines. In this type of winding, as shown in Fig.
3.11 (a), each slot contains two coil sides. It is not, however, strictly a double layer winding, as
the coil sides are places side by side and not one above the other.
3.11 HALF COIL WINDING : It is that winding in which the number of coils per phase is equal to
N
S
N
S
N
S
(a) Whole coil winding
N
S
N
S
(b) Half coil winding
Fig.3.11 - Representation of whole coil and half coil
32
half the number of poles in the machines, as shown in Fig. 3.11 (b). In this type, however, each
coil may have twice the number of turns of a whole coil winding or two coils under a north or
south pole of the latter type may be connected in series and taped together to form one coil. The
main difference between full coil and half coil windings is in the method of making the end
connections for the coils.
3.12 CONCENTRATED WINDING : If in any winding, the number of coils/pole/phase is one, then
the winding is known as concentrated winding. In this winding, each coil side occupies one slot.
3.13 DISTRIBUTED WINDING : In this winding, number of coils/pole/phase is more than one
arranged in different slots and is known as distributed winding. In this case, each coil has same
pole pitch.
Unabalanced winding : If each pole of the same phase has unequal number of coils, then the
winding is called as unbalanced winding.
One Slot winding : In this type of winding, the slot per pole per phase will be equal to one.
Example 3.11 : For a 3 phase, 18 slots, and 6 pole machine
Slots per pole per phase =
18
= 1.
3×6
Two slot winding : In this type of winding, the slots per pole per phase will be equal to two.
Example 3.12 : For a 3 phase, 48 slots, and 8 pole machine
Slots per pole per phase =
48
= 2.
3×8
3.14 SINGLE LAYER WINDING : In this type of winding, as shown in Fig. 3.12 (a), each slot
contains only one coil side. It means a coil occupies two complete slots. The number of coils in
the machine is equal to half the number of slots in the stator, or rotor and armature.
3.15 DOUBLE LAYER WINDING : In this type, as shown in Fig. 3.12 (b), each slot contains two
coil sides, housed one over the other. The number of coils is equal to the number of slots in the
stator and armature.
Fig.3.12 - Single layer and double layer winding
3.16 SINGLE PHASE WINDING : The winding has only one group of coils per pole, placed in
one slot or several slots depending upon whether or not the winding is concentrated or distributed.
3.17 THREE PHASE WINDING : For three phase windings, three single phase windings are
used, spaced 120 degrees apart.
33
3.18 CONCENTRIC WINDING : Concentric windings are single layer windings. This winding
has two or more than two coils in a group and the coils in each group have the same centre. In
each group, the coil pitch is not equal and therefore do not overlap each other, as shown in
Fig. 3.12. The coil span of the individual coils is different. The coil span is more than a pole pitch
while the span of others is equal to or less than the pole pitch. These windings are so designed
that the effective coil span of the winding is equal to that of a winding as a full pitch winding with
some of the coils having a span greater than a pole pitch, some with less than a pole pitch but
an effective span which makes the winding behave as if it had full pitched coils.
S1
N1
Fig.3.14 - Concentric Winding
3.19 CHAIN WINDING: In this winding, the number of coils/pole/phase is more than one having
different pitches and the coils overlap each other in the form of a chain.
QUESTIONS
Part - A
Choose the Correct Answer
(1 Mark)
1.
The back pitch for a 4 pole, 12 slot simplex lap connected dc machine is
A) 1, 0
B) 3, 1
C) 5, 3
D) 7, 5
2.
The slots per pole of a 4 pole 25 slot simplex wave connected dc machine is
A) 6
1
4
B) 24
1
C) 4 6
D) 6
3.
The coils under two adjacent poles forming one coil group and one coil group per pair of
poles is called as
A) distributed winding
B) mush winding C) chain winding D) concentric winding
4.
The product of pitch factor and distribution factor is
A) front pitch
B) winding factor
C) back pitch
5.
D) coil pitch
The mechanical degree between adjacent poles in a 6 pole electrical machine is
B) 1800
C) 600
D) 600ε
A) 1800ε
34
6.
The electrical degree between adjacent slots for a 4 pole machine having 36 stator slots is
A) 100
B) 100ε
C) 200
D) 200ε
7.
The short pitch angle, á, of a 4 pole 3 phase winding ac machine wound with a coil span
of 1400ε is
A) 400ε
B) 1800ε
C) 900ε
D) 600ε
8.
In three phase winding, three single phase windings are _____________ apart.
B) 1200ε
C) 900ε
D) 600ε
A) 1800ε
9.
If each pole of the same phase has unequal number of coils, then the winding is called as
A) balanced winding B) one slot winding C) unbalanced winding D) two slot winding
10. If the slots per pole per phase are equal to two, then the type of winding is called as
A) one slot winding B) balanced winding C) unbalanced winding D) two slot winding
Part - B
Answer the following questions in one or two words
1.
Name the two sides of a coil.
2.
Write the formulae for the total number of conductors of a given machine.
3.
When a coil is having a coil span equal to 1800ed, what is it called as?
4.
Name the two types of dc armature windings.
5.
What is the angle between the three phase windings?
(1 Mark)
Part - C
Answer the following questions briefly
(4 Marks)
1.
With a neat diagram, write the functions of each part of a single turn coil.
2.
What are called as whole coil windings?
3.
What are called as half coil windings?
4.
Determine the back and front pitches for a 4 pole lap winding with 24 slots.
5.
Determine the back and front pitches for a 4 pole wave winding with 25 slots.
Part - D
Answer the following questions in two page level
1. With a neat sketch, explain the different layers of insulation used in slots.
(20 Marks)
2.
Draw simple lap and wave winding diagrams with different type of pitches marked in it.
3.
Illustrate with neat diagrams, the placement of coils in a single layer and double layer windings
and the numbering of coil sides in each type of windings.
4.
Derive expressions for electrical and mechanical degrees in terms of poles and slots.
35
4. DEVELOPMENT OF WINDING - AC MACHINE
4.1 AC SINGLE PHASE WINDINGS
AC Lap Winding : Develop a single phase, single layer AC lap winding for a 4 pole AC machine
having 24 slots.
Solution : In single layer winding, the number of coil is equal to half the number of slots on
the stator, so that each slots contains only one coil side. Therefore, number of
coils, C = 12
Number of slots
From equation 3.5, the pole pitch = Number of Poles
per phase, m = 24/4x1 = 6
=
24
4 = 6; and slots per pole
Slots 1 to 6 and 13 to 18 lie under North pole regions N1 and N2 respectively. Similarly slots
7 to 12 and 19 to 24 lie under South pole regions S1 and S2 respectively. In other words, the
first pole pair covers slots 1 to 12 and the second pole pair covers slots from 13 to 24.
For full pitch winding, angle between the two sides of the same coil is 1800ed. 1800ed
corresponds to 6 slots.
Number of coils(or slots) per pole= 6.
The coil in slot no. 1 is to be connected to coil in slot no. (1 + slots per pole = 1 + 6 = ) 7 or
back pitch, Yb = 7, ie., if slot no. 1 is at the beginning of the first North Pole, N1, the slot no. 7 will
be at the beginning of the first South Pole, S1.
The winding pitch, Y = +2 (progressive winding)
Therefore, the front pitch, Yf = Yb – Y = 5.
Table 4.1 gives the complete winding table for 4 pole, 24 slot ac machine.
When the winding for one pole pair is completed then last coil side of this pair is connected
to the first coil side of the next pole pair, ie., coil in slot no. 12 is connected in series with the coil
in slot no. 13. Similarly, the winding for the second pole pair is completed.
Table 4.1 Single Phase AC Lap Winding Table
S.No.
-Yf
+ Yb
1
2
3
4
5
6
7
8
9
10
11
12
1
2
3
4
5
6
13
14
15
16
17
18
7
8
9
10
11
12
19
20
21
22
23
24
36
To draw the main winding diagram, solid lines of equal length and equal distance equal to
number of slots is drawn. Connect the coils as per the Winding Table 4.1.
Arbitrarily assume a particular current direction to the coil sides under the pole pairs. For
the coil sides under North Pole regions, assume downward current direction and vice versa for
the South Pole regions, as shown in Fig. 4.1.
1 2 3 4 5 6 7 8 9 10 11 12 13 14 15 16 17 18 19 20 21 22 23 24
N1
S1
S2
N2
Fig.4.1 - Single Phase AC Lap Main Winding Diagram
AC Wave Winding : Develop a single phase, single layer wave winding for a 4 pole, 24 slot ac
machine.
Solution : Number of coils, C = 12
Number of slots
From equation 3.5, the pole pitch = Number of Poles
6
phase, m = = 6
=
24
4
= 6; and slots per pole per
1
Slots 1 to 6 and 13 to 18 lie under North pole regions N1 and N2 respectively. Similarly slots
7 to 12 and 19 to 24 lie under South pole regions S1 and S2 respectively. In other words, the
first pole pair covers slots 1 to 12 and the second pole pair covers slots from 13 to 24.
For full pitch winding, angle between the two sides of the same coil is 1800ed. 1800ed
corresponds to 6 slots.
For ac wave winding, back pitch, Yb = number of coils(or slots) per pole= 6 = front pitch, Yf.
If one side of the coil is placed in slot no. 1, the other side of the coil should be placed in slot
no. (1 + slots per pole = 1 + 6 =) 7. The finishing end of the coil side at slot no. 7 is connected
to the starting end of the coil side at slot no. (7 + 6 =) 13. Now the other side of the coil side at
slot no. 13 is placed at slot no. (13 + 6 =) 19. Adding 6 to slot no. 19 gives 25, which is slot no.
1, ie., 25 – 24 = 1. But a coil side is already placed at slot no. 1. So add 1 and place the coil side
at slot no. 2. Similarly, add turn by turn back pitch and front pitch and at the end of each round
add Yb + 1. Table 4.2 gives the complete winding table for a 4 pole 24 slot ac wave wound
machine.
37
Table 4.2 Single Phase AC Wave Winding Table
S.No.
Yf
Yb
1
2
3
4
5
6
7
8
9
10
11
1
13
2
14
3
15
4
16
5
17
6
7
19
8
20
9
21
10
22
11
23
12
12
18
24
To draw the main winding diagram, solid lines of equal length and equal distance equal to
number of slots is drawn. Connect the coils as per the Winding Table 4.2.
Arbitrarily assume a particular current direction to the coil sides under the pole pairs. For
the coil sides under North Pole regions, assume downward current direction and vice versa for
the South Pole regions, as shown in Fig. 4.2.
1 2 3 4 5 6 7 8 9 10 11 12 13 14 15 16 17 18 19 20 21 22 23 24
S1
N1
N2
19 20 21 22 23
S2
2 3
4 5 6
Fig. 4.2 - Single phase AC Wave Main Winding Diagram
Spiral or Concentric Winding : Develop a single phase single layer concentric winding for a 4
pole AC Machine having 24 slots.
slots
24
Solution : From equation 3.5, pole pitch = Poles = 4 = 6
The pitch for larger coil = 6 – 1 = 5
The pitch for smallest coil = 1
Based on the rules, the winding is started from the starting end of the middle coil in the first
North Pole, ie., coil side 4. The back end of the coil side 4 is connected to the back end of the
38
coil side 9, ie., pitch for larger coil is added to coil side 4. The front end of the coil side 9 is
connected to front side of coil side 5 to form concentric winding. Following the above procedure,
Table 4.3 gives the complete winding table for 4 pole 24 slot AC Machine.
Table 4.3 Single Phase Concentric Winding Table
S.No
Front End Coil Side
Back End Coil side
1
4
4+5= 9
2
9–4=5
5+3= 8
3
8–2=6
6+1= 7
4
7 + 6 = 13
13 – 1 = 12
5
12 + 2 = 14
14 – 3 = 11
6
11 + 4 = 15
15 – 5 = 10
7
10 + 6 = 16
16 + 5 = 21
8
21 – 4 = 17
17 + 3 = 20
9
20 – 2 = 18
18 + 1 = 19
10
19 + 6 = 1
25 – 1 = 24
11
24 + 2 = 2
26 – 3 = 23
12
23 + 4 = 3
27 – 5 = 22
Draw 24 solid lines of equal length at equal distance. This represents the number of slots.
This also represents the number of coils, as this is a single layer winding. Then assign numbers
to the top side of the coils, as shown in Fig. 4.3. With reference to Table 4.3, complete the
winding diagram.
22
23
3
2
24 1 2 3 4 5 6 7 8 9 10 11 12 13 14 15 16 17 18 19 20 21 22 23 24
1
N1
S1
N2
S2
19
24
1
2
23
3
Fig.4.3 - Single Phase AC Concentric Main Winding Diagram
4.2 THREE PHASE WINDING
Single Layer Winding
Problem 1 : Develop a 3 phase, single layer concentric type of winding for a 2 pole ac machine
having 12 slots.
Solution : Slots per pole per phase =
12
=2
3×2
39
From equation 3.5, slots per pole = 12 = 6
2
180
180
From equation 3.8, angle between consecutive slots, â = slots per pole = 6 = 300.
The allotment of slots to the three phases for a pole pair is given in Fig. 4.4, and this
allotment repeats itself for other pole pairs. In this example, the number of pole pairs is one.
Pole pitch
1
2
R
3
4
B
Pole pitch
5
6
7
Y
8
R
9
10
11
B
12
Y
Fig.4.4 - Slots per pole per phase
Half coil winding
The coils comprising a pair of poles phase groups under adjacent poles are concentric.
These coils under two adjacent poles form one coil group and thus there is one coil group per
pair of poles.
If the first phase, say R or A phase starts at slot no.1, the Y or B phase should start at 1200/300
= 4 slots away ie., in slot (1 + 4 = ) 5, and the B or C phase should start at (5 + 4 =) 9.
The winding should be connected between alternate North and South poles. First, R or A
phase winding is started. If one side of the coil is placed in slot no. 1, the other side of the coil
should be placed in slot no. 8, ie., the last coil side of phase R or A phase under the next pole.
The coil side in slot no. 2 should be connected to the last but one coil side of the same phase
under the next pole, ie., slot no. 7, in this case.
Now, the two coils formed by coil sides placed in the slots 1, 8 and 2, 7 belong to the same
phase, and are concentric with each other. They form a coil group.
The rule for connecting together the coils in a coils group is that the end wire of one coil
must be connected to the beginning of the next coil in the group and so on. This is done in order
that the emfs of the coils in a coil group, add. The other coil groups for the remaining phases.
Fig. 4.5 - Coil group connections for half coil winding.
Fig. 4.5 gives the coil group connections for half coil winding for each phases.
40
Fig. 4.6 gives the complete main winding diagram for a 2 pole 12 slots ac machine using
single layer half coil winding. In Fig. 4.6, RS, RF, BS, BF, YS, and YF indicate the starting and
finishing ends of RBY phases respectively.
Fig.4.6 - 3 phase 2 pole single layer winding main winding main winding diagram (Half coil)
Whole Coil Winding
The whole coil winding has one coil group per pole for each phase.
6
12
Total number of coils = 2 = 6; Coils per phase = 3 = 2; Number of coils of groups per
phase = 3 x 2 = 6
In this example, a single coil is a coil group in itself.
The winding should be connected between alternate North and South poles. First, R or A
phase winding is started. Starting with coil in slot 2, the start of R phase lies in slot 2, that of Y
phase in slot (2 + 4 = ) 6 and that of B phase in slot (6 + 4 = ) 10.
Fig. 4.7 - Coil group connections for whole coil winding
Fig. 4.7 gives the coil group connections for whole coil winding for each phases.
41
To draw the main winding diagram, draw 12 solid lines of equal length and distance equal to
the number of slots, as shown in Fig. 4.8. For series connection, the finish of first coil of a phase
is connected to the finish of the second coil group of the same phase. The start of the second
coil group is connected to the start of the third coil group and so on. In Fig. 4.8, RS, RF, BS, BF, YS,
and YF indicate the starting and finishing ends of RBY phases respectively.
Fig.4.8 - 3 phase 2 pole single layer winding main winding diagram (Whole coil winding)
Mush winding
In drawing this winding, the slots are numbered from 1 to 12 and the long and short sides
are alternatively drawn, as shown in Fig. 4.9
Fig.4.9 - 3 phase 2 pole single layer winding main winding diagram (mush winding)
If the first phase, say R or A phase starts at slot no.1, the Y or B phase should start at 1200/
300 = 4 slots away ie., slot (1 + 4 = ) 5, and the B or C phase should start at (5 + 4 =) 9.
Slots per pole per phase =
12
= 2. Thus a phase group has 2 slots.
3x2
12
= 6 slots. This is an even number and hence winding is not possible
Coil span =
2
with a coil span of 6 slots. So a coil span of 5 slots is used.
Starting R phase in slot no. 2, the coil side in slot no. 2 is connected to the coil side (2 + 5
= ) 7. The coil side 8 is connected to coil side (8 + 5 = ) 13, ie., 1. The coil groups are connected
42
in such a manner that their emfs add. The windings of the other phases are also similarly
completed. The current directions marked in Fig. 4.9, is an arbitrary direction at any instant.
Problem 2 : Develop a 3 phase, single layer concentric type of winding for a 4 pole ac machine
having 24 slots.
24
24
Solution : Slots per pole per phase = 3x4 = 2 , From equation 3.5, slots per pole =
=6
4
180
180
From equation 3.8, angle between consecutive slots, â =
=
= 300.
slots per pole
6
The allotment of slots to the three phases for a pole pair is given in Fig. 4.10, and this
allotment repeats itself for other pole pairs.
Pole pitch
1
2
R
3
Pole pitch
4
B
5
6
7
Y
8
R
9
10
B
11
12
Y
Fig.4.10 - Slots per pole per phase
Half coil winding
If the first phase, say R or A phase starts at slot no.1, the Y or B phase should start at 1200/300
= 4 slots away ie., in slot (1 + 4 = ) 5, and the B or C phase should start at (5 + 4 =) 9.
The winding should be connected between alternate North and South poles. First, R or A
phase winding is started. If one side of the coil is placed in slot no. 1, the other side of the coil
should be placed in slot no. 8, ie., the last coil side of phase R or A phase under the next pole.
The coil side in slot no. 2 should be connected to the last but one coil side of the same phase
under the next pole, ie., slot no. 7, in this case. Now, the coils formed by coil sides placed in the
slots 1 and 8, and 2 and 7 belong to the same phase, and are concentric with each other.
Fig. 4.11 - Coil group connections for half coil winding
43
44
Fig. 4.12 - 3 phase 4 pole 24 slots single layer winding main diagram (half coil)
Fig. 4.11 gives the coil group connections for half coil winding for each phases.
They form a coil group. The rule for connecting together the coils in a coils group is that the
end wire of one coil must be connected to the beginning of next coil in the group and so on. This
is done in order that the emfs of the coils in a coil group, add.
Fig. 4.12 gives the complete main winding diagram for a 4 pole 24 slots ac machine using
single layer half coil winding. In Fig. 4.12, RS, RF, BS, BF, YS, and YF indicate the starting and
finishing ends of RBY phases respectively.
Whole Coil Winding
Total number of coils =
phase = 3 x 2 = 6
24
12
=
6;
Coils
per
phase
=
3 = 4; Number of coils of groups per
4
If the first phase, say R or A phase starts at slot no.1, the Y or B phase should start at 1200/300
= 4 slots away ie., in slot (1 + 4 = ) 5, and the B or C phase should start at (5 + 4 =) 9.
Starting with coil in slot no. 2, the start of R phase lies in slot no. 2, that of Y phase in slot no.
(2 + 4 = ) 6 and that of B phase in slot no. (6 + 4 = ) 10.
Fig. 4.13 - Coil group connections for whole coil winding
Fig. 4.13 gives the coil group connections for whole coil winding for each phases.
To draw the main winding diagram, draw 24 solid lines of equal length and distance equal to
the number of slots, as shown in Fig. 4.14. For series connection, the finish of first coil of a
phase is connected to the finish of the second coil group of the same phase. The start of the
second coil group is connected to the start of the third coil group and so on. In Fig. 4.14, RS, RF,
BS, BF, YS, and YF indicate the starting and finishing ends of RBY phases respectively.
45
Fig. 4.14 - 3 phase 4 pole 24 slots single layer winding diagram (whole coil)
Mush winding
In drawing this winding, the slots are numbered from 1 to 24 and the long and short sides
are alternatively drawn, as shown in Fig. 4.15
If the first phase, say R or A phase starts at slot no.2, the Y or B phase should start at 1200/
300 = 4 slots away ie., slot (2 + 4 = ) 6, and the B or C phase should start at (6 + 4 =) 10.
Slots per pole per phase =
24
3x4
= 2. Thus a phase group has 2 slots.
12
Coil span = 2 = 6 slots. This is an even number and hence winding is not possible with
a coil span of 6 slots. So a coil span of 5 slots is used.
Starting R phase in slot no. 2, the coil side in slot no. 2 is connected to the coil side (2 + 5
= ) 7. The coil side 8 is connected to coil side (8 + 5 = ) 13, ie., 1. The coil groups are connected
in such a manner that their emfs add. The windings of the other phases are also similarly
completed.
The current directions marked in Fig. 4.15, is an arbitrary direction at any instant.
Problem 3 : Develop a 3 phase, single layer concentric type of winding for a 2 pole ac machine
having 24 slots.
24
Solution : Slots per pole per phase =
=4
3x2
From equation 3.5, slots per pole =
24
2 = 12
From equation 3.8, angle between consecutive slots, â =
180
180
=
= 15 0.
slots per pole
12
The allotment of slots to the three phases for a pole pair is given in Fig. 4.16, and this
allotment repeats itself for other pole pairs.
46
47
Fig. 4.15 - 3 phase 4 pole 24 slots single layer winding main winding diagram (Mush winding)
Pole pitch
1
2
3
R
4
5
6
7
8
9
B
10
11
12
Y
Fig. 4.16 - Slots per pole per phase
Half coil winding
If the first phase, say R or A phase starts at slot no.1, the Y or B phase should start at 1200/150
= 8 slots away ie., in slot (1 + 8 = ) 9, and the B or C phase should start at (9 + 8 =) 17.
The winding should be connected between alternate North and South poles. First, R or A
phase winding is started. If one side of the coil is placed in slot no. 1, the other side of the coil
should be placed in slot no. 16, ie., the last coil side of phase R or A phase under the next pole.
The coil side in slot no. 2 should be connected to the last but one coil side of the same phase
under the next pole, ie., slot no. 15, in this case. Now, the coils formed by coil sides placed in the
slots 1 and 16, 2 and 15, 3 and 14, and 4 and 13 belong to the same phase, and are concentric
with each other. They form a coil group.
The rule for connecting together the coils in a coils group is that the end wire of one coil
must be connected to the beginning of next coil in the group and so on. This is done in order that
the emfs of the coils add in a coil group.
Fig. 4.17 - Coil group connections for half coil wnding
Fig.4.17 gives the coil group connections for half coil winding for each phase.
Fig. 4.18 gives the complete main winding diagram for a 2 pole 24 slots ac machine using
single layer half coil winding. In Fig. 4.20, RS, RF, BS, BF, YS, and YF indicate the starting and
finishing ends of RBY phases respectively.
48
Fig. 4.18 - 3 phase 2 pole 24 slots single layer winding main winding diagram (half coil)
Whole Coil Winding
12
24
Total number of coils =
= 6; Coils per phase =
= 4; Number of coils of groups per
3
4
phase = 3 x 2 = 6
If the first phase, say R or A phase starts at slot no.1, the Y or B phase should start at 1200/150
= 8 slots away ie., in slot (1 + 8 = ) 9, and the B or C phase should start at (9 + 8 =) 17.
Starting with coil in slot no. 4, the start of R phase lies in slot no. 4, that of Y phase in slot no.
(4 +8 = ) 12 and that of B phase in slot no. (12 + 8 = ) 20.
Fig. 4.19 gives the coil group connections for whole coil winding for each phases.
To draw the main winding diagram, draw 24 solid lines of equal length and distance equal to
the number of slots, as shown in Fig. 4.20. For series connection, the finish of first coil of a
phase is connected to the finish of the second coil group of the same phase. The start of the
second coil group is connected to the start of the third coil group and so on. In Fig. 4.20, RS, RF,
BS, BF, YS, and YF indicate the starting and finishing ends of RBY phases respectively.
49
Fig. 4.19 - Coil group connections for whole coil winding
Mush winding
In drawing this winding, the slots are numbered from 1 to 24 and the long and short sides
are alternatively drawn, as shown in Fig. 4.21.
If the first phase, say R or A phase starts at slot no.2, the Y or B phase should start at 1200/150
= 8 slots away ie., in slot (2 + 8 = ) 10, and the B or C phase should start at (10 + 8 =) 18.
Slots per pole per phase =
24
3x2
= 4. Thus a phase group has 4 slots.
24
Coil span = 2 = 12 slots. This is an even number and hence winding is not possible
with a coil span of 12 slots. So a coil span of 11 slots is used.
Starting R phase in slot no. 2, the coil side in slot no. 2 is connected to the coil side (2 + 11
= ) 13. The coil side 14 is connected to coil side (14 + 11 = ) 25, ie., 1. The coil groups are
connected in such a manner that their emfs add. The windings of the other phases are also
similarly completed.
The current directions marked in Fig. 4.21, is an arbitrary direction at any instant.
50
51
Fig. 4.20 - 3 phase 2 pole 24 slots single layer winding main winding diagram (whole coil)
52
Fig. 4.21 - 3 phase 2 pole 24 slots single layer winding main winding diagram (Mush winding)
Double layer windings
Lap winding
Problem 1 : Develop the layout of a lap winding for a 3 phase ac machine having 4 pole and 24
slots. There are 2 coil sides per slot.
Solution : Coil groups per phase = 3 x 4 = 12
Slots per pole per phase, m =
24
3x4
=2
180
Angle between adjacent slots, â = 24 = 300ε.
4
For full pitch coils, the coil span, á = 0, ie., angle between the two sides of the same coil is
1800e.
180
180
1800 corresponds to
=
= 6 slots.
â
30
There are 3 phase groups per pole, each comprising of 2 slots. The distribution of slots, of
phase sequence RYB or ABC, is shown in Table 4.4.
Table 4.4 Polar Groups
Poles
Phase
N1
S1
N2
S2
R
1,2
7,8
13,14
19,20
B
3,4
9,10
15,16
21,22
Y
5,6
11,12
17,18
23,24
The start of the phases must be displaced by 1200 and so must be finishes. If the start of
120
R or A phase lies in slot no. 1, the start of Y or B phase must be in slot no. (1 + 30 =) 5 and
120
that of B or C phase in slot no. (5 +
30 = ) 9. This makes the phase sequence RYB or
ABC.
The top coil side in slot no. 1 is to be connected to bottom coil side in slot no. (1 + 6 =) 7 or
back pitch, Yb = 13, in terms of coil sides, ie., if slot no. 1 is at the beginning of the first North
Pole, N1, the slot no. 7 will be at the beginning of the first South Pole, S1.
The winding pitch, Y = +2 (progressive winding).
The front pitch, Yf = Yb – Y = 13 – 2 = 11.
Now, coil sides 1 and 14 form a coil. Coil side 14 is connected to coil side (14 – Yf = ) 3, and
coil side 3 is connected to coil side (3 + Yb = ) 16. So coil sides 3 and 16 form the second and
the last coils of this pole phase groups.
53
Table 4.5 gives the winding table for RYB Phases.
Table 4.5 Winding Table for RYB Phases
S.No.
Top coil side (-Yf)
Bottom coil side (+Yb)
R or A phase per pole per phase
1
1
14
2
3
16
3
13
26
4
15
28
5
25
38
6
27
40
7
37
2
8
39
4
9
10
11
12
13
14
15
16
17
18
19
20
21
22
23
24
Y or B phase per pole per phase
9
22
11
24
21
34
23
36
33
46
35
48
45
10
47
12
B or C phase per pole per phase
5
18
7
20
17
30
19
32
29
42
31
44
41
6
43
8
Fig. 4.22 gives the complete main winding diagram for 3 phase 4 pole 24 slots double layer
lap winding.
Problem 2 : Develop the layout of a lap winding for a 3 phase ac machine having 2 pole and 24
slots. There are 2 coil sides per slot.
24
Solution : Coil groups per phase = 3 x 2 = 6. Slots per pole per phase, m =
=4
3x2
180
0
24 = 15 ε. For full pitch coils, the coil span, á = 0, ie.,
2
angle between the two sides of the same coil is 1800e.
Angle between adjacent slots, â =
54
55
Fig. 4.22 - 3phase double layer lap winding
180
180
=
= 12 slots.
1800 corresponds to
15
â
There are 3 phase groups per pole, each comprising of 4 slots. The distribution of slots, of
phase sequence RYB or ABC, is shown in Table 4.6.
Table 4.6 Polar Groups
Poles
North
South
R
1–4
13 - 16
B
5–8
17 – 20
Y
9 – 12
20 - 24
Phase
The start of the phases must be displaced by 1200 and so must be finishes. If the start of
R or A phase lies in slot no. 1, the start of Y or B phase must be in slot no. (1 +
that of B or C phase in slot no. (9 +
120
15
120
15
=) 9 and
= ) 17. This makes the phase sequence RYB or
ABC.
Full Pitch Winding : The top coil side in slot no. 1 is to be connected to bottom coil side in slot
no. (1 + 12 =) 13 or back pitch, Yb = 25, in terms of coil sides, ie., if slot no. 1 is at the beginning
of the first North Pole, N1, the slot no. 13 will be at the beginning of the first South Pole, S1.
The winding pitch, Y = +2 (progressive winding). The front pitch, Yf = Yb – Y = 25 – 2 = 23
in terms of coil sides. Table 4.7 gives the winding table for RYB or ABC Phases.
Table 4.7 Winding Table for RYB Phases
S.No.
1
2
3
4
5
6
7
8
Top coil side (-Yf)
Bottom coil side (+Yb)
R or A phase per pole per phase
1
26
3
28
5
30
7
32
Y or B phase per pole per phase
17
19
21
23
42
44
46
48
B or C phase per pole per phase
9
10
11
12
33
35
37
39
10
12
14
16
56
57
Fig. 4.23 - 3 phase double layer 2 pole 24 slot lap(full pitch) winding
Short Pitch Winding
It is assumed that the winding is short pitched by 1 slot.
Therefore, coil span = 11, in terms of slots, or Yb = 23 in terms of coil sides.
The winding pitch, Y = +2 (progressive winding).
The front pitch, Yf = Yb – Y = 23 – 2 = 21 in terms of coil sides.
Table 4.8 gives the winding table for RYB or ABC Phase, in terms of coil sides.
Table 4.8 Winding Table for RYB Phases in terms of coil sides
S.No.
R Phase in terms of coil sides
1
2
1
2
3
Start
24-21=
26 – 21 =
28 – 21 =
30 – 21 =
4
1
2
3
6 + 48 – 23 =
4 + 48 – 23 =
2 + 48 – 23 =
48 – 23 =
4
5
6
7
8
Start
40 – 21 =
42 – 21 =
44 – 21 =
46 – 21 =
9
10
11
12
22 + 48 – 23 =
20 + 48 – 23 =
18 + 48 – 23 =
16 + 48 – 23 =
1
2
3
4
5
Start
8 – 21 + 48 =
10 – 21 + 48 =
12 – 21 + 48 =
14 – 21 + 48 =
6
7
8
9
38 – 23 =
36 – 23 =
34 – 23 =
33 – 23 =
1
3
5
7
9
1 + 23 =
24
3+23=
26
5 + 23 =
28
7 + 23 =
30
This coil side belongs to other phase.
Therefore coil side 30 is connected to coil side 6.
31
31 – 48 + 21 =
4
29
29 – 48 + 21 =
2
27
27 + 21 =
48
25
Finish
Y Phase in terms of coil sides
17
17 + 23 =
40
19
19 + 23 =
42
21
21 + 23 =
44
23
23 + 23 =
46
25
This coil side belongs to other phase.
Therefore coil side 46 is connected to coil side 22.
47
47 – 48 + 21 =
20
45
45 – 48 + 21 =
18
43
43 - 48 + 21 =
16
41
Finish
B Phase in terms of coil sides
33
33 + 23 - 48 =
8
35
35 + 23 - 48 =
10
37
37 + 23 - 48 =
12
39
39 + 23 - 48 =
14
41
This coil side belongs to other phase.
Therefore coil side 41 is connected to coil side 38.
15
15 + 21 =
36
13
13 + 21 =
34
11
11 + 21 =
33
9
Finish
58
Fig. 4.24 - 3 phase double layer 2 pole 24 slot lap (short pitch) winding
Fig. 4.24 gives the main winding diagram for the 3 phase, 2 pole, 24 slot machine ac
machine.
59
Wave winding
Problem 3 : Develop the layout of a wave winding for a 3 phase having 4 pole ac machine and
24 slots. There are 2 coil sides per slot.
24
s
Solution : Coil groups per phase = 3 x 4 = 12 . Pole pitch = p = 4
=6
180
24
Slots per pole per phase, m =
= 2. Angle between adjacent slots, â = 24 = 300.
4
3x4
There are 3 phase groups per pole, each comprising of 2 slots. The distribution of slots, of
phase sequence RYB or ABC, is shown in Table 4.9.
Table 4.9 Polar Groups
Poles
Phase
R
Y
B
N1
S1
N2
S2
1,2
3,4
5,6
7,8
9,10
11,12
13,14
15,16
17,18
19,20
21,22
23,24
Back pitch, Yb =
in terms of coil sides. The winding
pitch used for a 3 phase wave connected ac machine, Y = 12m. Therefore, Y = 12 x 2 = 24, The
front pitch, Yf = 24 –13 = 11 in terms of coil sides. If the start of R or A phase lies in slot no. 1, the
start of Y or B phase must be in slot no. (1 +
(5 +
120
=) 5 and that of B or C phase in slot no.
30
120
30 = ) 9. This makes the phase sequence RYB. Half of the winding will be in clockwise
and the remaining half of the winding will be in anticlockwise. Phase R starts with coil side 1 in
slot 1. Table 4.10 gives the winding table for R or A Phase.
Table 4.10 Winding Table for R Phase
S.No.
1
Clockwise
Top coil Side
Bottom coil Side
(+Yf)
(+Yb)
1
14
2
25
38
3
3
16
4
27
40
Anticlockwise
5
4
39
6
28
15
7
2
37
8
26
13
Following the procedure given in the Table 4.10, the winding for the other two phases can
be obtained.
60
61
Fig. 4.25 - 3 phase double layer 4 pole 24 slot wave
Fig. 4.25 gives the complete main winding diagram for 3 phase 4 pole 24 slot double layer wave winding.
QUESTIONS
Part - A
Choose the Correct Answer
1.
(1 Mark)
In single layer winding, the number of coil is equal to ____________, so that each slots
contains only one coil side.
A) the number of slots on the stator
C) synchronous speed
2.
B) the number of poles
D) half the number of slots on the stator
Pole pitch is defined as
A) number of slots per pole
C) coil sides per slot
3.
For a 2 pole ac machine having 12 slots, the angle between consecutive slots, â is 300, and
if the first phase, say R or A phase starts at slot no.1, the Y or C phase should start at
A)
4.
9
B) 3
C) 7
D) 5
In mush winding, the coil groups are connected in such a manner that their emfs
A) become 1
5.
B) number of slots per pole phase
D) coil groups per phase
B) add
C) subtract
D) become zero
For full pitch winding, angle between the two sides of the same coil is
B) 600ε
C) 1800ε
D) 1200ε
A) 90 0ε
Part - B
Answer the following questions in one or two words
(1 Mark)
1.
When the number of coil is equal to half the number of slots on the stator, such that each
slots contains only one coil side. What is this type of winding called?
2.
For full pitch winding, what should be the angle between the two sides of the same coil?
3.
For short pitch winding, should the angle between the two sides of the same coil be 1800ε?
4.
What should be the winding sequence in a three phase winding?
5.
Write the formulae for finding the angle between the adjacent slots.
62
Part - C
Answer the following questions briefly
(4 Marks)
1.
Calculate the front, back and winding pitches for a single phase, single layer AC lap winding
for a 4 pole AC machine having 24 slots.
2.
Calculate the front, back and winding pitches for a single phase, single layer wave winding
for a 4 pole, 24 slot ac machine.
3.
Calculate the angle between the adjacent slots for a 3 phase, single layer concentric type
of winding for a 2 pole ac machine having 12 slots.
4.
Calculate the angle between the adjacent slots for a lap winding for a 3 phase ac machine
having 4 pole and 24 slots.
5.
Calculate the angle between the adjacent slots for a wave winding for a 3 phase having 6
pole ac machine and 24 slots.
Part - D
Answer the following questions in one page level
(10 Marks)
1.
Develop a winding table for a single phase, single layer AC lap winding for a 4 pole AC
machine having 24 slots.
2.
Develop a winding table for a single phase, single layer wave winding for a 4 pole, 24 slot ac
machine.
3.
Develop a winding table for a single phase single layer concentric winding for a 4 pole ac
machine having 24 slots.
4.
Develop the coil group connections using
A) half coil winding
B) whole coil winding
for a 3 phase, single layer concentric type of winding for a 2 pole ac machine having 12
slots.
5.
Develop the winding table for a lap winding for a 3 phase ac machine having 2 pole and 24
slots. There are 2 coil sides per slot.
6.
Develop the coil group connections using whole coil winding for a 3 phase, 4 pole, 24 slot
ac machine, with single layer concentric type of winding.
63
5. DEVELOPMENT OF WINDING - DC MACHINE
5.1 GENERAL PROCEDURE FOR DEVELOPMENT OF WINDING DIAGRAM
1. Calculate the number of coil sides for the main winding diagram.
2.
Calculate the back pitch, Yb, the winding pitch, Y, and the front pitch, Yf, using equations
3.17, 3.18, and 3.20 respectively.
3.
Form a winding table using the back pitch, Yb, and the front pitch, Yf.
4.
For drawing the main winding diagram, draw solid vertical lines of equal length at equal
distance equal to number of coils. These solid lines indicate the top layer coil sides.
5.
Draw dotted vertical lines of same length and distance close to the solid vertical lines
(equal to number of coils). These dotted lines indicate bottom layer coil sides.
6.
Assign odd numbers to the top left side of the solid lines and even number to the
bottom right side of the dotted lines.
7.
Complete the connection to the coil sides using the winding table, with solid lines for
top layer coil sides and dotted lines for bottom layer coil sides.
8.
Using the main winding diagram, draw solid vertical lines (equal to number of coils)
from the top mid-point of each front end connections.
9.
Represent commutator segments (equal to no. of coils) by rectangular boxes below
the front end connections.
10. Divide the coils by the number of poles. This gives the allocation of coil sides to pole
regions.
11. Find the current direction by applying Fleming’s right hand rule, when the mode of
operation is a generator and Fleming’s left hand rule, when the mode of operation is a
motor. Or the current direction to all coil sides can be arbitrarily assumed. Mark
downward current direction for the coil sides under the north pole regions and upward
current direction under south pole regions.
12. To fix the brush arm positions and to find the number of parallel paths offered by the
armature winding, draw the commutator ring diagram or equivalent end ring diagram.
13. To draw the commutator ring diagram or equivalent end ring diagram, draw vertical
solid lines equal to number of coil sides and join them with reference to winding table.
14. Also mark the current direction through the coil sides with reference to main winding
diagram.
5.2 DOUBLE LAYER SIMPLEX LAP WINDING DIAGRAM
Draw the winding diagram for a 2 pole, 6 slot simplex lap connected dc machine with
commutator having 6 segments. Indicate the position of brushes.
s 6
Solution : Slots per pole = =
= 3; Number of coils, C=number of commutator segments=6
p 2
Number of coil sides = 2C = 12 ; Therefore, coil sides per slot = 12 = 2
6
12
2
C
From equation 3.2, the back pitch, Y =
+K=
+ K = 6 + 1 = 7 (odd integer)
b
2
P
64
From equation 3.3, the winding Pitch, Y = +2 for progressive winding (even integer). From
equation 3.5, the front pitch, Yf = Yb – Y = 7 – 2 = 5 (odd integer). Starting with coil side 1 (back
end side), back pitch is added to obtain the bottom layer coil side, ie., 8 (back end side). To the
coil side 8 (front end side), front pitch is subtracted to obtain the top layer coil side, ie., 3 (front
end connection). Proceeding in similar way, all the coil sides are connected and a winding
table, as shown in Table 5.1.
Table 5.1 : Winding table for 2 pole, 6 slot simplex lap winding
Top coil Side
(-Yf)
1
3
5
7
9
11
S.No.
1
2
3
4
5
6
Bottom coil Side
(+Yb)
8
10
12
2
4
6
To draw the main winding diagram, first draw 6 solid vertical lines (equal to no. of coils) of
equal length and equal distance. Next, draw 6 dotted lines nearer to the solid lines of same
length and distance, as shown in Fig. 5.1.
Assign odd numbers to the top layer coil sides of the solid lines and even numbers to the
bottom layer coil sides of the dotted lines.
Give the back end and front end connections with reference to the Table 5.1. Then, draw
solid vertical lines (equal to no. of coils) from the top mid-point of each front end connections, as
shown in Fig. 5.1.
Represent commutator segments (equal to no. of coils) by rectangular boxes below the
front end connections, as shown in Fig. 5.1.
Divide the armature slots (or coils) by the number of poles. This gives the allocation of coil
sides to pole regions. In this example, the number of slots are 6 and number of poles are 2. So,
the north pole, N region, covers first 3 coils (say 1 to 6) in Fig. 5.1. The south pole, S covers coil
sides 7 to 12.
9
7
11
2
4
6
Back end
coil sides
1
3
7
5
2
9
Commutator
segments
11
S
N
Front end
coil sides
9
4
6
8
10
12
2
4
11
1
+
A
2
3
4
-
AA
65
5
6
Fig. 5.1- Main winding diagram
Find the current direction by applying Fleming’s right hand rule, when the mode of operation
is a generator and Fleming’s left hand rule, when the mode of operation is a motor. Or the
current direction to all coil sides can be arbitrarily assumed. Mark downward current direction
for the coil sides under the north pole regions and upward current direction under south pole
regions, as shown in Fig. 5.1.
To fix the brush arm positions and to find the number of parallel paths offered by the armature
winding, commutator ring diagram is used, as shown in Fig. 5.2.
3
1
8
12
10
9
7
5
2
11
4
1
6
-
+
Fig. 5.2 - Commutator ring diagram
Draw the vertical solid lines equal to number of coil sides and join them with reference to
Table 5.1, as shown in Fig. 5.2. Also mark the current direction through the coil sides with
reference to main winding diagram in Fig. 5.2.
Look for adjacent pair of coil sides having the same current direction. For coil sides 12 and
7 carry which carry upward currents, mark negative brush arm, and for coil sides 6 and 1 carry
downward currents, mark positive brush arm, as shown in Fig. 5.2. Brush arms should be
equal to the number of poles.
Now, transfer the brush arms to the main winding diagram in Fig 5.1. Mark positive brush
arm below the commutator segment 1, where the coil sides 1 and 6 meet. Similarily, mark
negative brush arm below the commutator segment 4, where the coil sides 2 and 12 meet. Tap
out two leads and mark A for positive brush arm and AA for negative brush arms. These two
leads now indicate the armature terminals of a dc machine.
To decide the number of parallel paths offered by the lap winding, redraw Fig. 5.2 as shown
in Fig. 5.3.
+
1
8
3
10
5
12
6
11
4
9
2
7
IA
IA
2
-
IA
A
AA
Fig. 5.3 - Paralled paths for 2 pole 6 slot simplex lap winding
66
From Fig. 5.3, it can be seen that the number of parallel paths in a lap winding, will be equal
to number of poles.
where
A=P
5.1
A = number of parallel paths;
P = number of poles
The current through each armature coil / conductor will be the ratio of the total armature
current by the number of parallel paths, ie.,
I
5.2
I= A
A
where
I = current through each armature conductor/coil; IA = total armature current
5.3 DOUBLE LAYER DUPLEX LAP WINDING DIAGRAM
Develop a winding diagram for a 4 pole, 12 slot duplex lap connected dc machine. Indicate
the position of brushes.
12
= 3; Number of coils, C = number of slots = 12
4
24
+ K=6+ K=7
Number of coil sides = 2C = 24; From equation 3.2, the back pitch, 2 C + K=
4
P
Solution : Slots per pole =
From equation 3.3, the winding Pitch, Y = +2m = +4 for progressive winding (m = 2 for duplex
winding); From equation 3.5, the front pitch, Yf = Yb – Y = 7 – 4 = 3
Combining two simplex lap windings gives duplex lap windings.
Starting with coil side 1 (back end side), back pitch is added to obtain the bottom layer coil
side, ie., 8 (back end side). To the coil side 8 (front end side), front pitch is subtracted to obtain
the top layer coil side, ie., 5 (front end connection). Proceeding in similar way, all the coil sides
are connected and a winding table, as shown in Table 5.2.
Table 5.2 Winding Table for 4 pole 12 slots duplex lap winding
To draw the main winding diagram, first draw 12 solid vertical lines (equal to no. of coils) of
1 Set of simplex winding
2 Set of simplex winding
Top coil Side (-Yf)
1
5
9
13
17
21
Bottom coil Side (+Yb)
Top coil Side (-Yf)
8
12
16
20
24
4
3
7
11
15
19
23
Bottom coil Side (+Yb)
10
14
18
22
2
6
equal length and equal distance. Next, draw 12 dotted lines nearer to the solid lines of same
length and distance, as shown in Fig. 5.4.
Assign odd numbers to the top layer coil sides of the solid lines and even numbers to the
bottom layer coil sides of the dotted lines.
Give the back end and front end connections with reference to the Table 5.2. Then, draw
solid vertical lines (equal to no. of coils) from the top mid-point of each front end connections, as
shown in Fig. 5.4.
67
19
21 23
3
1
5
7
9
N
23
11 13
15
S
17
19
21
4
6
8
10
12
1
2
3
4
5
-
-
+
2
14 16
18 20
22
24
6
7
8
9
10
11
12
+
-
-
+
+
AA
4
6
S
N
2
23
2
A
Fig. 5.4 - Main winding diagram
To fix the brush arm positions, commutator ring diagram is used, as shown in Fig. 5.5.
1
5
8
9
12
3
7
10
14
+
17
13
20
16
+
-
11
15
-
4
24
+
19
22
18
1
21
-
3
23
2
+
6
-
Fig. 5.5 - Commutator ring diagram
Now, transfer the brush arms to the main winding diagram. Tap out two leads and mark A
for positive brush arm and AA for negative brush arms. These two leads now indicate the
armature terminals of a dc machine.
5.4 DOUBLE LAYER SIMPLEX WAVE WINDING DIAGRAM
Problem 1 : Draw the winding diagram for a 2 pole, 6 slot double layer simplex wave connected
dc machine with commutator having 12 segments. Indicate the position of brushes.
Solution : Slots per pole =
= 3; Number of coils, C = number of commutator segments = 6
12
= 2; The back pitch,
6
2 C+12m 12
12
=
= 10
Yb = 2 C + K =
+ K = 6 –1 = 5 (odd integer); The winding pitch, Y =
P
2
2
P
2
Number of coil sides = 2C = 12; Therefore, coil sides per slot =
(even integer); Here m = 1 for simplex wave winding. The front pitch, Yf = Y – Yb =10 –5 = 5
(odd integer)
68
Starting with top layer of coil side 1 (back end side), back pitch is added to obtain the bottom
layer coil side, ie., 6 (back end side). To the coil side 11 (front end side), front pitch is added to
obtain the top layer coil side, ie., 4 (16-12) (front end connection). Proceeding in similar way, all
the coil sides are connected and Table 5.3 gives the winding table for 2 pole 6 slot simplex wave
winding.
Table 5.3 : Winding table for 2 pole, 6 slot simplex wave winding
S.No.
Top coil Side
(+Yf)
Bottom coil Side
(+Yb)
1
2
3
4
5
6
1
11
9
7
5
3
8
4
2
12
10
8
To draw the main winding diagram, first draw 8 solid vertical lines (equal to no. of coils) of
equal length and equal distance. Next, draw 8 dotted lines nearer to the solid lines of same
length and distance, as shown in Fig. 5.6.
Assign odd numbers to the top layer coil sides of the solid lines and even numbers to the
bottom layer coil sides of the dotted lines.
Give the back end and front end connections with reference to the Table 5.3. Divide the
armature slots (or coils) by the number of poles. This gives the allocation of coil sides to pole
regions. In this example, the number of slots are 6 and number of poles are 2. So, the north
pole, N region, covers first 3 coils (say 1 to 6) in Fig. 5.6. The south pole, S covers coil sides 7
to 12.
Find the current direction by applying Fleming’s right hand rule, when the mode of operation
is a generator and Fleming’s left hand rule, when the mode of operation is a motor. Or the
current direction to all coil sides can be arbitrarily assumed. Mark downward current direction
for the coil sides under the north pole regions and upward current direction under south pole
regions, as shown in Fig. 5.6.
Back end
coil sides
9
11
3
1
7
5
Commutator
segments
8
10
12
2
4
6
8
1
+
2
3
4
-
5
6
A
11
2
4
S
N
Front end
coil sides
9
10
12 1
3
5
AA
Fig. 5.6 - Main winding diagram for 2 pole 6 slot simplex wave machine
69
To fix the brush arm positions and to find the number of parallel paths offered by the armature
winding, commutator ring diagram is used, as shown in Fig. 5.7.
Draw the vertical solid lines equal to number of coil sides and join them with reference to
Table 5.3, as shown in Fig.5.7. Also mark the current direction through the coil sides with
reference to main winding diagram in Fig. 5.7.
Look for adjacent pair of coil sides having the same current direction. For coil sides 12 and
7 carry which carry upward currents, mark negative brush arm, and for coil sides 6 and 1 carry
downward currents, mark positive brush arm, as shown in Fig. 5.7. Brush arms should be
equal to the number of poles.
1
11
6
4
5
7
9
2
12
3
10
1
8
-
+
Fig. 5.7 - Commutator ring diagram
Now, transfer the brush arms to the main winding diagram. Mark positive brush arm below
the commutator segment 1, where the coil sides 1 and 6 meet. Similarily, mark negative brush
arm below the commutator segment 4, where the coil sides 2 and 12 meet. Tap out two leads
and mark A for positive brush arm and AA for negative brush arms. These two leads now
indicate the armature terminals of a dc machine.
To decide the number of parallel paths offered by the wave winding, redraw Fig. 5.7 as
shown in Fig. 5.8.
+
1
8
3
10
5
12
6
11
4
9
2
7
IA
-
2
IA
IA
A
AA
Fig. 5.8 - Parallel paths for 2 pole 6 slot simplex lap winding
From Fig. 5.8, it can be seen that the number of parallel paths in a wave winding, will be
equal to two, ie., 2, irrespective to the number of poles.
A=2
where
5.3
A = number of parallel paths; The current through each armature coil / conductor
will be the ratio of the total armature current by the number of parallel paths, ie.,
70
IA
A
I = current through each armature conductor/coil; IA = total armature current
I=
where
Problem 2 :
Develop a winding diagram for a 4 pole, 13 slot double layer simplex wave connected dc
machine with 13 commutator segments. Indicate the position of brushes.
Solution: Number of coils, C = number of commutator segments = 13; Number of coil
sides = 2C = 26; Therefore, coil sides per slot =
6.5 + 0.5 = 7 (odd integer); The winding pitch,Y =
= 2 ; The back pitch, Yb = 2 C + K= 26 + K =
4
P
2C+2m 26+2
=
=
14
(even
integer);
Here
m=1
P
2
2
for simplex wave winding. The front pitch, Yf = Y – Yb =14 – 7 = 7 (odd integer).
Table 5.4 gives the winding table for 4 pole 13 slot simplex wave winding.
Table 5.4: Winding table
To draw the main winding diagram, first draw 13 solid vertical lines (equal to no. of coils) of
S.No.
Top coil Side
(+Yf)
Bottom coil Side
(+Yb)
1
2
3
4
1
2
3
4
5
6
7
8
9
1
15
(29-26) 3
17
(31 – 26) 5
19
(33 - 26) 7
21
9
23
11
25
13
8
22
10
24
12
26
14
(28 – 26) 2
16
(30 – 26) 4
18
(32 – 26) 6
20
equal length and equal distance. Next, draw 13 dotted lines nearer to the solid lines of same
length and distance, as shown in Fig. 5.9.
Give the back end and front end connections with reference to the Table 5.4. Divide the
armature slots (or coils) by the number of poles. This gives the allocation of coil sides to pole
regions. In this example, the coil sides 13 and 14 lie in the interpolar region. So a ‘O’ is marked,
as shown in Fig. 5.9.
Find the current direction by applying Fleming’s right hand rule, when the mode of operation
is a generator and Fleming’s left hand rule, when the mode of operation is a motor. Or the
current direction to all coil sides can be arbitrarily assumed. Mark downward current direction
71
72
20
1
22 24
21 23 25
2
26
1
+
3
2
3
4
5
A
6
7
6
8
9
-
7
10
S1
11
8
12
13
9
14
+
11
12
-
13
22
24
20
25
16 18
21 23
S2
19
N2
17
10
AA
15
Fig. 5.9 - Main winding diagram for 4 pole 13 slot simplex wave winding
4
N1
5
26 1
2
3
4
5
6
7
for the coil sides under the north pole regions and upward current direction under south pole
regions, as shown in Fig. 5.9.
To fix the brush arm positions and to find the number of parallel paths offered by the armature
winding, commutator ring diagram is used, as shown in Fig. 5.10.
Look for adjacent pair of coil sides having the same current direction. For coil sides 26 and
7 carry which carry upward currents, mark negative brush arm, and for coil sides 20 and 1 carry
downward currents, mark positive brush arm, as shown in Fig. 5.10.
Now, transfer the brush arms to the main winding diagram. Mark positive brush arm below
1
15
8
3
22
17
10
19
5
24
26
12
21
7
2
14
-
23
9
11
4
16
25
1
13
18
6
-
20
+
+
Fig. 5.10 - Commutator ring diagram
the commutator segment 1, where the coil sides 1 and 6 meet. Similarily, mark negative brush
arm below the commutator segment 4, where the coil sides 2 and 12 meet. Tap out two leads
and mark A for positive brush arm and AA for negative brush arms. These two leads now
indicate the armature terminals of a dc machine.
To decide the number of parallel paths offered by the wave winding, redraw Fig. 5.10 as
shown in Fig.5.11.
1
15
8
22
3
17
10
5
24
19
12
26
-
+
20
7
13
14
-
+
1
6
25
18
11
4
23
16
9
2
21
AA
A
Fig. 5.11 - Parallel paths for 4 pole 13 slot simplex wave winding
From Fig. 5.11, it can be seen that the number of parallel paths in a wave winding, will be
equal to two, ie., 2, irrespective to the number of poles.
A=2
where
A = number of parallel paths.
73
QUESTIONS
Part - A
Choose the Correct Answer
(1 Mark)
1. The value of back pitch of a dc armature winding should be
A) a even integer
B) an odd integer
C) equal to one
D) a prime number
2. When a dc machine is operating as a generator, to find the current direction in the armature
winding ________________ is used.
A) Fleming’s left hand rule
B) Ohm’s law
C) Fleming’s right hand rule
D) Kirchhoff’s law
3. The number of parallel paths offered by the lap winding of a dc machine is
A) equal to 2
B) equal to P
C) equal to 2P
D) equal to P/2
4. The number of brush arms for a duplex lap winding for a 4 pole dc machine is
A) equal to 1
B) equal to 2
C) equal to P
D) equal to 2P
5. The number of parallel paths offered by the wave winding of a dc machine is
A) equal to 2
B) equal to P
C) equal to 2P
D) equal to P/2
Part - B
Answer the following questions in one or two words
(1 Mark)
1. What should be the value of back pitch of a dc armature?
2. What rule is used to find the current direction in the armature winding of a dc generator?
3. What is the number of parallel paths offered by the lap winding of a dc machine?
4. What is the number of parallel paths offered by the wave winding of a dc machine?
5. What is the number of brush arms of a duplex lap winding for a 2 pole dc machine?
Part - C
Answer the following questions briefly
(4 Marks)
1. Calculate the back, font and winding pitches for a 2 pole, 6 slot simplex lap connected dc
machine with commutator having 6 segments.
2. Calculate the back, font and winding pitches for a 4 pole, 12 slot duplex lap connected dc
machine.
3. Calculate the back, font and winding pitches for a 2 pole, 6 slot double layer simplex wave
connected dc machine with commutator having 12 segments.
4. Calculate the back, font and winding pitches for for a 4 pole, 13 slot double layer simplex
wave connected dc machine with 13 commutator segments.
Part - D
Answer the following questions in two page level
(20 Marks)
1. Draw the winding diagram for a 2 pole, 6 slot simplex lap connected dc machine with
commutator having 6 segments. Indicate the position of brushes.
2. Develop a winding diagram for a 4 pole, 12 slot duplex lap connected dc machine. Indicate
the position of brushes.
3. Draw the winding diagram for a 2 pole, 6 slot double layer simplex wave connected dc
machine with commutator having 12 segments. Indicate the position of brushes.
74
6. REWINDING AND TESTING OF ELECTRIC MOTORS
6.1 METHOD OF REWINDING
To start the armature winding, the armature is mounted on the winding stand as in Fig. 6.1,
then the shaft, armature core and slots are insulated as per the insulation scheme taken from
the data.
Fig. 6.1 - Armature on winding stand
6.2 WINDING METHODS: There are two methods of winding the armature 1) Hand winding
2) Formed coil winding
Hand winding: For hand winding, four numbers of slot feeders are laced in the two designated
slot at a distance from the coil pitch.
The required number of turns are wound into the slots, say slots Nos. 1 and 4 as in Fig. 6.2.
Enough tension is applied on the wire to make a tight winding without breaking the wire.
Fig. 6.2
75
A loop is made at the end of the first coil and the beginning of the second coil. The second
coil is started in the designated slot and the coil is wound with the same number of turns as in
coil 1. The span of coil 2, has to be equal to that of coil 1. When the second coil is finished, a loop
is made again and then the third coil is started. In this manner the winding is continued, until all
the coils have been wound. The end lead of the last coil is connected to the beginning lead of the
first coil. After the entire armature is wound, there will be two coil sides in each slot, in double
layer winding. It has to be ensured that all the coils have the same pitch and turns. The loops
made at the end of the coils will look as shown in Fig. 6.3, and have to be connected to the
commutator raisers. The procedure of making loops while winding, explained here, is for simplex
lap winding. This method is usually adopted for small armatures. For wave winding and multiplex
windings, connection for raisers shall be taken from the coil ends according to the winding
pattern.
Fig. 6.3
Formed coil winding: For this method, wooden formers are made to the dimensions of the
armature coils, similar to those of the field coils in section 3.4. The total number of coils required
for the armature are wound and kept ready. The inactive side of the coils is bound with tape and
tied with cotton strings as shown in Fig. 6.4.
The active side of the coil is spread as in Fig. 6.5 and the coil sides are inserted in the
respective armature slots, conductor by conductor as shown in Fig. 6.6. Similarly all the coils of
the armature are placed in the respective slots and the coil ends are looped and soldered to the
respective commutator segments.
Fig. 6.4
76
Lead swing : One of the most important operations in winding an armature is to lace the coil
leads in the proper commutator bars. Leads may be placed in the bars in any of the three
different positions, depending on the original location.
Fig. 6.5
Fig. 6.6
The following method is used in
determining the position of the leads in the
commutator.
Stretch a piece of cord or string through
the centre of a slot, as shown in Fig. 6.7, a,
b,& c. Note whether it is in alignment with
the commutator bar or with the mica between
the bars.
If the data call for a lead swing of the
three bars to the right, lace the lead of the
first coil three bars to the right, counting the
bar that lines u with the slot as no 1. All the
other leads follow in succession.
Fig. 6.7a
If the centre of the slot is in line with the
mica, consider the bar to the right of the mica
as bar No.1. Connection of winding ends with
the commutator segments.
After winding the armature, the end
leads of the armature conductors are laced
in the slits of the commutator raisers. (Raiser
slits should be properly cleaned and well
reared to receive the conductors.)
Fig. 6.7b
For secure and good electrical contact,
these conductors are well cleaned to remove
insulation and dirt. Then the conductor ends
are laced in the respective raiser slits and
soldered brazed or hot-stacked.
Fig. 6.7c
77
Soldering: For soldering, electric irons are generally used on small armatures and gas irons on
the larger ones. The size of the iron used depends on the size of the commutator. Leads are
soldered to the commutator by means of soldering iron or torch. The procedure of soldering is
as follows.
First the soldering flux is applied over the wires to be soldered and also the identified
commutator raiser. The wires are then laced in the respective raisers. Then the tip of the soldering
iron is kept on the commutator raiser as shown in Fig. 6.8, for sometime until the heat from the
iron is transferred to the area of the commutator raiser.
This heat transfer could be identified by the bubbling of the flux. When the commutator
raiser is sufficiently hot, the solder is placed on the commutator raiser, and the iron is kept over
it and the solder is allowed to flow entirely around the leads.
Fig. 6.8
To prevent the solder from flowing down the back of the commutator and thereby causing
short circuits, raise one end of the armature. To prevent the solder from flowing from one bar to
another, the iron is held as shown in Fig.6.9. Excess flux is wiped out after the soldering is
completed.
Fig. 6.9
78
Brazing: In the case of large armature windings, the armature winding lead ends are brazed
with the respective commutator raiser slits by means of a gas torch. Close inspection and care
should be exercised in the control of the flame.
Hot stacking : In the case of small DC armature conductors are kept in the commutator raiser
slits and spot welded. This is called hot stacking. A specially designed hot-stacking machine is
available for this purpose.
Banding the armature : A temporary banding is sometimes applied on the armature before the
permanent banding is done, to keep the coils in position and to facilitate shaping of the overhang.
Permanent bands are used on armatures to hold the armature end leads in position. A cord
band is used on small armatures to prevent the leads from flying out of the slots, while the
armature is rotating.
Large armatures have steel bands for the same purpose. For large armatures having
open-type slots, steel or tae bands are used to prevent the coil from flying out of the slots.
Cord bands : The procedure for making a cord band on an armature is shown in Fig. 6.10, and
the following directions should be observed. Use a proper size of banding cord heavy for larger
armatures, light for smaller armatures. Start at the end nearest the commutator and wind several
turns in layers, allowing about 150mm long cord at the beginning to be free. Bend the cord in the
form of a loop.
Fig. 6.10
79
After winding several turns over the loop, insert the last end of the cord band through the
loop, and then pull the free end of the loop. This will pull the end under the Core band and secure
it there. Then the pulled end of the cord can be cut off. Use enough pressure in winding so that
the band will be tight.
Steel bands : Steel bands are laced on the front and back ends of the coils. These bands are
up on the armature in a different manner than in the cord bands. The procedure is illustrated in
Fig. 6.11, and is as follows. Place the armature in a lathe and lace mica or paper insulation in the
band slot around the entire armature to insulate the band from the coil sides. Hold the insulation
in lace by tying a turn of cord around it.
Place small strips of tin or copper under the cord, equidistant around the armature, in order
to secure the band after it is wound. Use the same gauge steel band wire as is found in the
original band. Steel bands must be up on the armature with much more pressure than is needed
for cord bands. It is therefore, necessary to utilize a device called a wire clam to provide the
required pressure.
Fig. 6.11
This device consists of two pieces of fibre fastened together by means of two screws and
two wing nuts. The steel band wire is fed through this clam to the armature. The clam has to be
secured to a bench so that it can be held stationary while slowly turning the armature while
banding.
Take care not to up too much pressure on the wire, otherwise it will break. After the band is
laced on the coil, copper or tin strips are turned over and the entire bend is soldered. One by one
each band is completed in this manner.
Testing the new winding : After the rewinding and connections are completed, it is important
that both the winding and the connections are tested for shorts, grounds, open circuits and
correctness of connections. This must be done before varnishing the winding so that any defect
that is found may be corrected more readily.
80
Baking and varnishing : After the armature has been wound, soldered and banded and tested,
the next operation is varnishing. This process makes it moisture-roof and also prevents vibration
of the coils of wire in the slots. Vibration has a tendency to impair the insulation on the wires and
cause shorts. Moisture will also cause the insulation on the wires to deteriorate. Before varnishing
the armature, it must be reheated to drive cut the moisture on it. Armatures may be varnished by
either baking varnish or air-drying varnish. Air-drying is applied to the armature when baking is
undesirable or inconvenient. Baking varnish is more effective because the moisture can be
eliminated fully only by baking.
Balancing the armature: Armatures should be tested for mechanical balancing after they are
varnished. This is very important; otherwise undue vibration and unusual noises may be produced
due to the imbalance of the armature. Ultimately it may lead to repeated bearing problems,
loosening of nuts etc. Hence the armatures are balanced before assembly. Balancing of armature
is mainly done, using dynamic balancing machines. Anyhow for small armatures static balancing
can be done, when dynamic balancing machines are not available.
Static balancing: A balancer, similar to the balancing grinding wheel in machine shops, may be
used. These balancers are built in various sizes. The method of balancing an armature using
this type is as follows.
Place the armature on the balancing ways, as shown in Fig. 6.12 and roll the armature
gently. When the armature comes to a shop, the heavier portion of the armature will be at the
bottom. Mark this point (portion) with a chalk piece. With such successive rolling, if the armature
stops at different positions, the armature is balanced, and if it stop in a particular position, it is
necessary to counterbalance it with weights diagonally opposite to the heavy portion.
Fig. 6.12
This is accomplished by lacing a lead or a small metal piece on the banding of the armature.
In small armatures, this weight may be laced in the lace of the wedge, under the banding.
Experience will determine the amount of metal necessary to balance the armature. This method
of balancing is called’ static balancing’.
81
Dynamic balancing : Dynamic balancing machines are available to balance the armature or
rotating the arts of electrical machines. The armatures are fixed on those machines and rotated
at the rated seed. A pointer or an indicator shows the position on the armature and the weight to
be added. The balancing machines available are either with the mechanical balancing or with
the stroboscopic balancing.
6.3 TESTING OF ARMATURE: After an armature is wound and the leads are connected to the
commutator, a test should be conducted. From this test, defects may be revealed, which might
have occurred during winding.
The common defects in armature windings are grounding, shorts in the coils, open in the
coil and reversal in the coil connection. These defects can be located by different test procedures.
Armature winding resistance test : Resistance of the armature coils measured by using a
low range ohmmeter and preferably with the Kelvin bridge. Resistance between consecutive
segments in the case of simplex la winding (for wave and multiplex windings at a distance of
commutator itch Yc) is measured.
Fig. 6.13 shows a simple arrangement to measure the resistance between the successive
commutator segments. As shown in this Figure, a cotton tape with a counterweight is passed
around the commutator to hold the connecting leads to the segments.
Fig. 6.13
Measurement of resistance is done in all the coils by changing the position of the connecting
leads to successive commutator segments. The resistance measured should be the same in
all coils. Lower resistance shows short in turns, while a higher resistance shows higher numbers
of turn or open in the coil.
82
6.4 INSULATION RESISTANCE TEST : With a bar copper wire, short all the commutator
segments, as shown in Fig. 6.14.
Test the insulation resistance between the body and the commutator or segments by a
500V Megger, for armatures rated upto 250 volts.
The IR so measured shall be greater than 1 mega-ohm. If the value is less than 1 megaohm, moisture in the winding or a weak insulation is to be suspected. This test is sometimes
conducted by a series test lam and is called the ground test. It will only indicate if any coil is
grounded, and not the insulation resistance.
Fig. 6.14
6.5 GROWLER TEST : A simple and most common method to test armature winding for short
and open coils is by a growler. There are two types of growlers.
1) Internal growlers 2)
External growlers.
An external growler is used for testing small armatures and an internal growler for large DC
armatures and AC motor stator windings.
External growler
Fig. 6.15
83
An external growler shown in Fig. 6.15 is an electromagnetic device that is used to detect
and locate grounded, shorted and open coils in an armature. This growler consists of a coil
wound around an iron core and is connected to a 240 volt AC line. The core is generally H
shaped and cut out on to so that the armature will fit on it, as shown in Fig. 6.16.
Fig. 6.16
When an alternating current is applied to the growler coil, the voltage will be induced in the
armature coils by transformer action.
Internal growler : An internal growler, such as the one used for stators, may be used for
armatures as well. These are made with or without built-in feelers.The growler with a built-in
feeler has a flexible blade attached to the growler so that a hacksaw blade or similar instrument
is not necessary. This type is especially desirable in smaller stators that have no room for a
separate feeler. Fig. 6.17 shows an internal growler with a separate feeler, used for large
armatures.
Fig. 6.17 Internal Growler
84
Growler test for grounded coil : The armature to be tested is placed on the growler and then
the growler is switched ‘ON’. Place one lead of an AC milli-voltmeter on the to commutator bar
the other meter lead on the shaft, as shown in Fig. 6.18.
Fig. 6.18
If a reading is noticed on the meter, turn the armature so that the armature so that the next
commutator bar is in same position as the earlier one, and test as before. Continue in this
manner until all the bars are tested. Where the meter gives no deflection, it is an indication that
the grounded coil is connected to this particular bar.
Growler test for shorted coil : The procedure to test for short circuits in an armature as
follows.
The armature to be tested is placed on the growler and then the growler is switched on. A
thin piece of metal, such as a hacksaw blade, is held over to the slot of the armature as shown
in Fig. 6.19.
Fig. 6.19
85
In case of short in the winding, the blade will vibrate rapidly and create a growling noise. If
the blade remains stationary, it is an induction that no short exists in the coil under test. After
several to slots have been given the hacksaw blade test, turn the armature so that the few slots
are on to. Test as before and continue this procedure for the entire armature.
An armature having cross connections or equalizers cannot be given the hacksaw blade
test. This type of armature will cause the blade to vibrate at every slot, which would seem to
indicate that possibly every coil is shorted.
Test for open coil: Growlers are also provided with meters (milli-volt or ammeter) on the panel
with variable resistance. In this case an open in the armature coil can be found out as follows.
Growler test for an open coil: To locate an open coil with a growler, set up the armature on the
growler on the growler in the usual manner. Test the top two adjacent bars with an AC millivoltmeter as shown in Fig. 6.20.
Rotate the armature and continue testing the adjacent bars. When the millivoltmeter bridges
Fig. 6.20
the two bars connected to the open coil, the meter pointer will not deflect. All the other bars will
give a deflection. This test for an open coil can be made without the meter by shorting the two
tops bars with a piece of wire.
Absence of a spark indicates that the coil is open. The open may be either at the commutator
bar or in the coil itself. The procedure may be used to determine the location of the loads of a
shorted coil. However, the hacksaw blade test is the most satisfactory method of determining a
shorted coil.
6.6 DROP TEST: The most accurate method of testing the armature for correct resistance,
number of turns, short and open reversed coil connection is by the drop test. Connect a low
voltage DC supply across the commutator segments at a distance of pole pitch.
Insert a variable resistance in series with the circuit. Switch ‘ON’ the DC supply and connect
a milli-voltmeter to the adjacent segments as in Fig. 6.21.
86
Adjust the readings to a specified value, by using a variable rheostat. Record the millivoltmeter readings on the consequent commutator segments by rotating by rotating the armature
Fig. 6.21
in one direction. The position of the segments and the connection should be the same as in the
first set up. The result could be concluded as enumerated below.
1)
2)
3)
4)
If all the readings are the same, the winding is correct.
If the millimeter reads zero or low voltage, the coil connected to the segment is short.
If the milli-voltmeter reads high voltage, the coil connected to the segments is open.
If the milli-voltmeter deflects in the reverse direction as shown in fig, the coil connected
with the segments is reversed.
Generally armatures are tested as a routine for insulation resistance and for shorted coils.
Only when a fault in the armature winding is suspected, a drop test is conducted.
87
QUESTIONS
Part - A
Choose the Correct Answer
(1 Mark)
1. In double layer winding to ensure that all the coils have the same pitch and turns, there will
be ____________ coil side(s) in each slot
A) one
B) four
C) six
D) two
2. One of the most important operations in winding an armature is to lace the coil leads in the
proper
A) commutator bar
B) armature slot
C) brushes
D) poles
3. The size of the iron used for soldering depends on the size of the
A) brushes
B) poles
C) stator
D) commutator
4. Small DC armature conductors are kept in the commutator raiser slits and spot welded.
This is called
A) brazing
B) hot stacking
C) banding
D) soldering
5. To prevent the leads from flying out of the slots, while the armature is rotating, ________ is
used.
A) brazing
B) soldering
C) cord band
D) lead swing
Part - B
Answer the following questions in one or two words
(1 Mark)
1. Name the process which makes the coil moisture-roof and also prevents vibration of the
coils of wire in the slots.
2. Which has a tendency to impair the insulation on the wires and cause shorts?
3. Armatures should be tested for balancing after they are varnished. What is that balancing
called?
4. How are the resistance of the armature coils measured?
5. Name an electromagnetic device that is used to detect and locate grounded, shorted and
open coils in an armature.
Part - C
Answer the following questions briefly
(4 Marks)
1. Explain the different methods of winding.
2. What is meant by hot stacking?
3. Why is the armature banded? Explain.
4. What is the need for balancing the armature?
5. What is meant by static balancing?
6. What is meant by dynamic balancing?
7. Why is an armature tested after winding?
8. What are the different methods of testing?
9. What is meant by insulation resistance test?
10. What is growler’s test? What are the different methods of growler’s test?
Part - D
Answer the following questions in two page level
(20 Marks)
1. Explain with a neat sketch, the internal and external growler.
2. Explain the Growler test for A) a grounded coil and B) an open coil
88
7. INSTRUMENTS AND TESTING
7.1 INTRODUCTION
In this modern world, use of electricity everywhere is inevitable. As almost all industrial
machines, home appliances etc. are working on electrical energy, it is must to inspect and test
the electrical energy for its quality before energizing machines/appliances. Also if the machines/
appliances are not working on giving electrical energy, it is required to carry out some test to
identify the fault. So here we will see few basic testing instruments and their use.
7.2 VOLTAGE TESTER SCREWDRIVER:
A test light, test lamp, voltage tester, or mains tester is a very simple piece of electronic test
equipment used to determine the presence or absence of an electric voltage in a piece of
equipment under test. This is shown in Fig. 7.1
Fig.7.1 - Voltage tester
The test light is simply an electric lamp connected with one or two insulated wire leads.
Often, it takes the form of a screwdriver with the lamp connected between the tip of the screwdriver
and a single lead that projects out the back of the screwdriver. By connecting the flying lead to
an earth (ground) reference and touching the screwdriver tip to various points in the circuit, the
presence or absence of voltage at each point can be determined and simple faults detected and
traced to their root cause. For low voltage work (for example, in automobiles), the lamp used is
usually a small, low-voltage incandescent light bulb. These lamps usually are designed to operate
on approximately 12 V. For line voltage (mains) work, the lamp is usually a small neon lamp
connected in series with an appropriate ballast resistor. These lamps often can operate across
a wide range of voltages from 90 V up to several hundred volts. In some cases, several separate
lamps are used with resistive voltage dividers arranged to allow additional lamps to strike as the
applied voltage rises higher; with the lamps mounted in order from lowest voltage to highest,
this minimal bar graph provides a crude indication of voltage.
7.3 CONTIUNITY TEST :
Continuity refers to being part of a complete or connected whole. In electrical applications,
when an electrical circuit is capable of conducting current, it demonstrates electrical continuity.
It is also said to be “closed,” because the circuit is complete. In the case of a light switch, for
example, the circuit is closed and capable of conducting electricity when the switch is flipped to
“on.” The user can break the electrical continuity by flipping the switch to “off,” opening the
circuit and rendering it incapable of conducting electricity. In short, by performing continuity test,
we can determine the following
i) existence of continuity in the electrical wiring circuit
ii) existence of any open circuit in the circuit
iii) existence of any short circuit in the circuit
89
Multimeter/Continuity test
Continuity testers are simple devices designed to verify a complete electrical path through
an object or circuit. They are especially useful for checking fuses of all types, light-bulbs, and
wire paths.
This tester is usually comprised of:
1. Two leads
2. A small body where the leads meet and contain...
3. Some form of indicator
A number of devices are manufactured to assist consumers in testing electrical continuity,
ranging from multimeters as shown in Fig.7.2, which have a wide range of additional applications,
to simple electrical continuity testers that light up if electrical continuity is present. These devices
use two electrical probes, which form a complete circuit when touched together. Consumers
can test the device to ensure that it is working properly by turning it on and touching the probes
together – the meter should read zero, or the indicator light should turn on, indicating a closed
circuit. When the probes are not touching anything, the metered device will read infinity, showing
that the circuit is open.
Fig. 7.2b – Digital multimeter
Fig. 7.2a – Analog Multimeter
Open circuit test and Short circuit test: Multimeter can be used for this test. For this,
multimeter should be set in resistance mode of measurement. To check the existence of any
open circuit or short circuit between any two points in the wiring circuit, the electrical supply to
the circuit should be switched off first. Then put the multimeter probes between the two testing
points in the circuit. If multimeter reads ‘¥’ ohm, it indicates open circuit. If multimeter reads ‘0’
ohm, it indicates short circuit. This is shown in Fig.7.3 and 7.4.
7.4 INSULATION TESTING :
This testing is important, as insufficient insulating can result in leaking current. Leaking current
creates heat, which can cause a fire. The current can seep out and flow into another pathway,
90
like the water pipes in your kitchen or bathroom. This can cause electrical shock in the shower
or sink. Leaking current also results in higher electric bills. In addition, it can cause the ground
faults in your home to trip repeatedly and eventually overheat.
Fig.7.3 - Open circuit test
Fig.7.4 - Short circuit test
Causes of Insulating Material Deterioration include:
Excessive heat
Excessive cold
Moisture
Vibration
Dirt
Oil
Insulation Tester(Megger) : The tester applies DC voltage to the insulation system and
measures the current that results. The results of the test show if the insulation is working well,
or if it is allowing current to leak.
Fig.7.5 - Megger
Megger, the insulation tester is a combination of hand driven generator and a true ohmmeter
in same case as shown in Fig.7.5.The magneto generator produces 500 V dc (1000 V in other
design) and supplies to megohm meter section. The internal parts are shown in Fig.4.Two
permanent magnet bars with four iron pole shoes provide magnetic flux for both the generator
and ohmmeter setup. Pressure coil and current coil are placed at right angle to each other on
91
aluminum ‘C’ former of peculiar shape. The pressure coil is connected across the sourced
through resistor of 0.1 MW as shown in Fig. 7.6.
Fig. 7.6 - Inside a Megger
When the generator handle is rotated at a speed of 160 rpm, current flows through a pressure
coil (Electronic megger develops 1000 V with dry cell batteries without generator and handle)
and sets up magnetic field which tends to be plane of that of main magnetic field due to which
the pointer attached on the axis of moving system deflects on the ‘infinity’ (the high megohms).
The current coil completes its circuit, through series resistance and external resistance under
test and through the shunt which divides the current coil circuit to increase deflection for small
insulation resistance. A guard system is introduced to prevent surface leakage from high potential
lead within instrument and at the specimen. If there is current in external circuit due to imperfect
insulation resistance of the specimen, a current will flow through the current coil in such a
direction that it turns the moving system towards the right of zero scale. Thus the deflection of
pointer is dependent on external circuit resistance, and independent of magneto generator voltage,
as same voltage is fed both to the controlling pressure coil and the current cool. In certain
design of megger, the magneto generator is driven through a clutch arrangement controlled by
a centrifugal governor, so that voltage can not rise above a definite maximum, when the crank is
turned fast enough, a constant testing voltage is obtained.
Sample Insulation testing:
Fig. 7.8 - Insulation tests between phases
Fig. 7.7 - Insulation test to earth
Fig. 7.9 - Insulation test of floors and
walls for non-conducting location
92
Precaution while using Insulation tester (megger):
1.
Portable testers (meggers) come in 50, 100, 250, 500 or 1000 volts. It is important to
use the right tester for the right system. Low voltage testers are required for low voltage
systems, and high voltage testers for high voltage. Higher voltage is generally used for
commercial systems, motors or transformers. Some digital testers work over a range
of voltage and can be set for higher or lower volts.
2.
Before applying the tester, be sure to disconnect the power from the system being
tested.
3.
Disconnect all electronics. These can get damaged during the testing process. Double
check to be sure all electronics are disconnected prior to testing. This is a common
and very costly mistake.
7.5 MEASUREMENT OF POWER:
In a DC circuit: The power in DC circuit is given by P = V x I,
Where V = Voltage and I = current. The power can be measured practically with the help of just
voltmeter and Ammeter. The circuit diagram for measuring power in DC circuit is shown in Fig. 7.10.
Fig.7.10 - Voltmeter – Ammeter method
Total power (P) = Voltmeter meter reading x Ammeter reading
In 1-phase AC circuit:
Power in 1-phase AC circuit is given by P = VICosφ,
Where
V = Voltage, I = current and , Cosφ = power factor.
Wattmeter Wattmeter is used to measure power in AC circuits. The circuit diagram is
shown in Fig.7.11
Fig.7.11 - Power measurement in 1-phase AC circuit
Total power (P) = Wattmeter reading = VICosφ.
From this power factor can be calculated as follows
Cosφ = P/ VI
93
3-phase AC circuit: i) One wattmeter method :
Fig.7.12 - Single wattmether method of power measurement in 3-phase circuit
For balanced 3-phase load i.e. ZR = ZY = ZB, single wattmeter may be connected into any
one phase as shown in fig. 7.12. This wattmeter will indicate the power in that phase only. Since
the load is balanced, the total power in the 3-phae
circuit will be given by
Total power = 3 x Wattmeter reading
ii) Two-wattmeter method :
This is most the common method for
measuring power in a 3-phase, 3-wire system
since it can be used for both balanced (ZR = ZY =
Z B ) and unbalanced loads (Z R ≠ Z Y ≠ Z B
)connected in either star or delta. The current coils
are connected to any two of the lines, and the
voltage coils are connected to the other line, the
one without a current coil connection, as shown
in Fig.7.13.
Total power = W1 + W2
Fig.7.13 - Two wattmether method of power
measurement in 3-phase circuit
iii) Three-wattmeter method :
If the installation is 4-wire and the load is
unbalanced, then 3 wattmeters are necessary.
The wattmeter’s connection is shown in Fig. 7.14.
Each wattmeter measures the power in one
phase and the total power will be given by
Total power = W1 + W2+ W3
Fig. 7.14. - Three wattmether method of
power measurement in 3-phase circuit
94
QUESTIONS
Part - A
Choose the Correct Answer
1.
(1 Mark)
By performing continuity test, we can determine
i.
ii.
existence of any open circuit in the electrical network
existence of any short circuit in the electrical network
Choose the correct choice among the following.
A) i alone is correct
2.
B) ii alone is correct
D) both are wrong
While touching the two probes of multimeter together, the meter should read
A) zero ohm
B) infinite ohm
D) produce beep sound
3.
C) both are correct
C) any ohmic value between 0 and infinity
Megger is the instrument used to measure
A) conductor resistance B) insulation resistance
C) supply voltage
D) load current
4.
The number of wattmeters required to measure total power in 3-phase 4- wire system is
A) 1
5.
B) 2
C) 3
D) 4
Match the item in List I with with those of list II
List I
P. Ammeter
Q. Multimeter
R. Megger
S. Wattmeter
A) P-Y, Q-Z, R-W, S-X
C) P-X, Q-Y, R-Z, S-W
List II
W. continuity
X. power
Y. current
Z. Insulation resistance
B) P-Z, Q-W, R-X, S-Y
D) P-Y, Q-W, R-Z, S-X
Part - B
Answer the following questions in one or two words
(1 Mark)
1.
Name the instrument to test just the presence or absence of voltage at any point in an
electric circuit.
2.
While measuring resistance of the coil using multimeter, it reading indicates infinite
resistance. What does it mean?
3.
The power in 230 V, DC circuit is 1000 W. Find the circuit current.
95
4.
When is the 3-phase load said to be balanced?
5.
Two wattmeter method of power measurement can be used for 3-phase, 3-wire system for
both balanced and unbalanced loads. Say TRUE or FALSE.
Part - C
Answer the following questions briefly
(4 Marks)
1.
Explain briefly the construction and application voltage tester.
2.
Explain briefly the application of multimeter to perform open circuit and short circuit test.
3.
What is importance of insulation testing? State the causes of insulating material deterioration
4.
Explain with suitable circuit, the measurement of power in 1-phase AC circuit. Also deduce
an expression for power factor from the wattmeter reading.
5.
Distinguish between balanced and unbalanced load.
6.
Single wattmeter is sufficient to measure power for 3-phase balanced load. Justify this
statement.
Part - D
Answer the following questions in one page level
(10 Marks)
1.
Explain briefly the application of i) voltage tester and ii) multimeter
2.
Using relevant circuits, explain briefly the suitable method of power measurement for
i) 3-phase, 3 wire balanced load and ii) 3-phase, 3 wire unbalanced load.
96
8. ELECTRICAL COOKING APPLIANCES
8.1 INTRODUCTION
An electric stove converts electricity into heat to cook and bake.
The first technology used resistive heating coils which heated iron hotplates, on top of
which the pots were placed. In the 1970s, glass-ceramic cooktops started to appear. Glassceramic has very low thermal conductivity, but lets infrared radiation pass very well. Electrical
heating coils or infrared halogen lamps are used as heating elements. Because of its physical
characteristics, the cooktop heats more quickly, less afterheat remains, and only the plate heats
up while the adjacent surface remains cool. Also, these cooktops have a smooth surface and
are thus easier to clean, but they only work with flat-bottomed cookware and are markedly more
expensive. A third technology—developed first for professional kitchens, but today also entering
the domestic market—is induction stoves. These heat the cookware directly through
electromagnetic induction and thus require pots and pans with ferromagnetic bottoms. Induction
stoves also often have a glass-ceramic surface. Electric stoves are very popular today, especially
in urban and suburban areas.
8.2 TYPES
There are two types of electric stoves, namely Open type and Closed type. In open type,
the heating element is made of Nichrome wire. It possesses high resistivity, and withstands a
working temperature of about 9000C.
8.3 CONSTRUCTION
Heater Plate : A porcelain plate with a groove is made. It houses the Nichrome wire in a coil
form. The heater plate is made of porcelain. Porcelain withstands high temperature and remains
as a good insulator even at high temperatures. The coiled Nichrome heating element is housed
in the grooves. The grooves are designed with projections at various places, as shown in Fig.
8.1. The projections prevent the heating element from coming out of the grooves.
Body : A body is provided to house the heater plate in it. It is made of cast iron painted or
electroplated. The socket is fixed to the body, as shown in Fig. 8.2. An insulated handle is fixed
on the body for safe handling.
Fig. 8.1 - Heater Plate
Fig. 8.2 - Body
Connecting leads: The lead wires should have a larger cross-section made of bare copper,
insulated with porcelain beads or glass beads. The beads are connected to the socket terminals
and heater plate terminals, as shown in Fig. 8.3.
97
Fig. 8.3 - Connecting leads
Grill Stand : It is made of chromium/nickel plated MS rods and hinged to the body. It supports
the vessels kept on the heater and acts as a barrier between the exposed heater element and
the vessel, as shown in Fig. 8.4. For safety, this grill should have electrically continuity to the
body, and both must have earth connection. A properly earthed grill and body will enable the
fuse to blow in case of accidental contact of live parts with them, thereby avoiding shock to the
user.
Heater Socket : This is used for plugging the power supply appliance plug. The socket, shown
in Fig. 8.4 has two male terminals, one for the phase and the other for the neutral. However, for
safety, the heater body should be connected to the general mass of earth through the earth
continuity conductor. For this, the appliance plug, shown in Fig. 8.5, has two spring loaded,
metallic clips on either side of it which makes the contact with metallic enclosure of the socket
when plugged. As rusting prevents proper contact of these clips with the socket, for safety,
these clips and sockets are made of nickel plated brass.
Fig. 8.4 - Grill Stand
Fig. 8.5 - Heater Socket
8.4 ELECTRIC TOASTERS
Electric toaster as the name suggest is essentially a portable domestic appliance intended
for toasting bread and is operated electrically. The bread is inserted in the toaster, heated at
desired temperature till brown in color and a reasonable texture. That is the duration of the
toasting period is predetermined by setting of built in control device. Fig. 8.6 shows the basic
operation of a bread toaster.
98
Fig. 8.6 - Bread toaster
In Fig. 8.6,
1.
Electrical energy flows into the toaster from a wire plugged into the domestic electricity
supply.
2.
The electric current flows through a series of thin filaments connected together but
spaced widely enough apart to toast the whole bread surface.
3.
The filaments are so thin that they glow red hot when the electricity flows through them.
4.
Like a series of small radiators, the filaments beam heat toward the bread in the toaster.
5.
The steady supply of heat rapidly cooks the bread. There are filaments on each wall of
the toaster so the two sides of the bread cook at the same time.
Basically a toaster is made up of a rack to hold slices of bread and a heating element
located near the bread slices. The object is to heat the bread until it is toasted to a desired color.
The normal working temperature of a toaster varies from 850C to 10000C from the heating
element to the toasting zone.
8.5 TYPES OF ELECTRIC TOASTERS
Available in two types; namely; ordinary or non-automatic and automatic types. In
non-automatic toasters, the user must keep watching the bread, while it is being toasted so that
he can turn off the heat before it burns the bread. But an automatic toaster does all the necessary
operations itself.
Non Automatic Toaster : It consists of a metal shell containing a bread rack and a heating
element. The doors on either side are hinged at the bottom, and swing out from the top and
downward to a horizontal position. Bread is placed on the doors, which are then closed, thus
bringing one side of each slice of bread close to the heating element mounted in the centre of
the toaster shell. When one side is toasted, the door is opened manually, as shown in Fig. 8.7.
The bread is to be turned manually for toasting the other side. The doors are then closed. The
non-automatic toaster has neither switches nor thermostats.
Automatic Toasters : Automatic toasters are built in two and four slice sizes. They are often
referred to as automatic pop-up toasters and these toasters perform automatically the operation
required for toasting.
99
Operation : It consists of three working parts
1.
A bread carriage moves up and down
inside the toast well and it has usually an
external control knob. The carriage
operates a switch that turns the toaster
on and off.
2.
Heating elements, made of resistance
wires, are positioned on both sides of
each toast ‘well’. When current flows
through them, they radiate heat for
toasting.
3.
A thermostat inside the toaster is linked
to a toast color control outside. The
control enables the user to adjust the
toasting time for different types of breads
or to suit the user’s preference.
Fig. 8.7 - Non Automatic Toaster
When the operating lever is pressed down, the switch contacts are closed, and they remain
closed until the bread carriages are released. Thus, the units are energized from the time the
operating lever handle is depressed until the bread pops up.
In Fig. 8.8, the automatic toaster contains a spring-actuated clock mechanism, the lowering
of the operating handle with its bread carriage energies the spring. This action also completes
the electrical circuit through the heating elements. At the completion of the toasting cycle, the
clock automatically trips the carriage, which returns to its original position, thereby opening the
circuit through the heating element. Fig. 8.9 shows the internal mechanism of an automatic
toaster. Toasting is controlled by the expansion and contraction of the element. When the
thermostat has reached a preselected temperature, it operates a mechanical or electromechanical devices to release the carriage, open the main power switch and pop up the toast.
Fig. 8.8 - Automatic Toaster
Fig. 8.9 - Internal Mechanism of an Automatic Toaster
100
QUESTIONS
Part - A
Choose the Correct Answer
(1 Mark)
1. An / A _______________ converts electricity into heat to cook and bake.
A) electric toaster
B) electric stove
C) fridge
D) grinder
2. The heating element used in electric stove is made of ________ wire.
A) Nichrome
B) Copper
C) Aluminum
D) Lead
3. ________________ withstands high temperature and remains as a good insulator even at
high temperatures.
A) Copper
B) Aluminum
C) Nichrome
D) Porcelain
4. Grill Stand is made of ______________ plated MS rods and hinged to the body.
A) aluminum
B) porcelain
C) chromium/nickel D) copper
5. Heater Socket are made of ___________ plated brass.
A) aluminum
B) nickel
C) copper
D) lead
6. The normal working temperature of a toaster varies from ____________ from the heating
element to the toasting zone.
B) 5000C to 10000C C) 850C to 100000C D) 8500C to 10000C
A) 850C to 10000C
7. The / An _______________ toaster has neither switches nor thermostats.
A) non-automatic
B) automatic
8. A ____________________ inside the toaster is linked to a toast color control outside.
A) bread carriage
B) thermostat
C) heating element D) knob
9. At the completion of the toasting cycle, the ____________ automatically trips the carriage,
which returns to its original position, thereby opening the circuit through the heating element.
A) heating element
B) knob
C) clock
D) thermostat
10. When the ______________ has reached a preselected temperature, it operates a
mechanical or electro-mechanical devices to release the carriage, open the main power
switch and pop up the toast.
A) heating element
B) knob
C) clock
D) thermostat
Part - B
Answer the following questions in one or two words
(1 Mark)
1. Non automatic type toaster has neither switches or thermostats say TRUE OR FALUSE
2. Which part inside a toaster is linked to a toast colour control outside?
3. Grill stand is made of - plated MS rods
4. Name the part which automatically trips the carriage ofter completing toasting cycle to
open the circuit
5. What is the normal working range of electric toaster?
Part - C
Answer the following questions briefly
(4 Marks)
1. What is the function of electric stove? State the difference between open type and closed
type.
2. Brief the construction of heater plate in electric stove.
3. Distinguish between Non-automatic and automatic type electric toaster?
4. Brief the function of thermostate in automatic toaster
5. What is the function of grill stand in electric stove?
Part - D
Answer the following questions in two page level
(20 Marks)
1. Explain with neat sketches, the construction and working of an electric stove.
2. Explain with neat sketches, the construction and working of an electric toaster.
101
9. ELECTRIC IRON BOX
9.1 DEFINITION
An Electric Iron box is a heating device in which the electrical energy is converted into heat
energy. This heat energy is concentrated on a smooth, flat bottom surface which is pressed
over the cloth to be ironed.
9.2 TYPES OF IRON BOX: 1) Non-automatic Iron box 2) Automatic Iron box
3) Steam Iron box
9.3 NON-AUTOMATIC IRON BOX :
In non-automatic type, the temperature is not regulated. The user has to switch ON or OFF
the iron as per the heat requirement.
Constructional details: The principal parts of the iron box is shown in Fig. 9.1
Sole Plate: It is made up cast iron and it is generally chromium-plated. The transfer of heat
from the heating element to the material ironed is done through sole-plate.
Heating element: There are two types of heating elements. One is made of ribbon shaped
Nichrome (resistance) wire wound around a sheet of mica. This type of element is placed on
the top of the sole-plate as shown in Fig.9.2. Other type is made up of round resistance wire
coiled on a ceramic form and cast directly into the sole plate as shown in Fig.9.3. The flat type
element is replaceable whereas the cast type heating element has to be replaced along with the
sole-plate only. In this type of irons, a pressure plate is not necessary.
Terminals and power cord: The ends of the heating
elements are connected at the points called as terminals as
shown in Fig.9.4. The electric supply is given the coil terminals
through 3 core power cord.
Pressure plate: It is made of cast iron and the purpose
is to keep the heating element firmly against the sole-plate.
The pressure plate is insulated from heating element by
asbestos sheet of same shape. The asbestos sheet is placed
just above the heating element to prevent the heat developed
in the element traveling upward due to conduction and radiation.
Cover: It comes above the pressure plat. This part covers
the heating element’s internal connections of the iron. It also
serves as a shield to protect the user’s hands from the
generated heat and the electric terminals.
Handle: It is made of Bakelite or ebonite because it offers
high resistance to flow current and it can withstand more heat.
The indicator lamp and power socket are fixed in the handle.
Fig. 9.1 Parts of Iron Box
Heel plate: The purpose of the heel plate is to enable
the iron to stand when the iron is tilted back on the rear of its
handle.
102
Fig.9.2 - Heating element (type 1) Fig.9.3 - Heating element (type 2) Fig. 9.4 - Terminal and power cord
Working of iron box: When electric supply is given to the heating element using 3-core power
cord, the heat produced in the element will be transferred to the sole-plate which is then pressed
over the cloth to be ironed. Thus the iron converts the electricity into heat at the sole-plate. The
heat at the sole-plate is used to iron the clothes. In Non-automatic type irons, the temperature
is not regulated. As such the user has to switch ON or OFF the electric supply as per the heat
requirement.
9.4 AUTOMATIC IRON BOX:
Automatic Iron box is same as that of Non-automatic type except that it has additional
device called as thermostatic device to regulate the temperature. The simplest form of automatic
type is shown in Fig.9.5
Fig.9.5 - Simplest form of Automatic iron box
Construction: The main parts are 1) Bakelite handle 2) pilot lamp 3) steel cover 4) chrome
plated, cast iron sole plate 5) built in automatic heat adjustment 6) cord
Thermostats: A thermostat is a switch which can be designed to close or open a circuit at
predetermined temperature. One of the simplest and most dependable components in the modern
heating appliances is the BIMETAL THERMOSTAT.
Bimetal thermostat: The principle behind a bimetallic strip thermometer relies on the fact that
different metals expand at different rates as they warm up. By bonding two different metals
together, we can make a simple electric controller that can withstand fairly high temperatures.
The general layout is shown in Fig.9.6
In the thermostat there is a bimetal strip made of two strips of metal with different expansion
103
rates welded together. The metal strip expands when heated and contacts when cooled. One
metal in the bimetal strip has a high rate of expansion when heated and the other has a low rate.
When a bimetal strip is heated both the metals in the strip expand but the one at the bottom as
shown in Fig.9.7, with a high rate of expansion, expands faster and forces the upper half to curl
up or bend away from the contact point. The strip curls or bends enough to break the contact,
i.e. opening the circuit. As the strip cools, it straightens and restores contact with the stationary
point. The bending of the bimetal strip on heating is towards the side that has smaller expansion
rate. By adjusting the size of the gap between the strip and the contact, you control the
temperature. A simplified sketch of Adjustable Thermostat is shown in Fig.9.8
Fig.9.7 - A fixed bimetallic strip bends when it
is heated
Fig.9.6 - General layout of Bimetal Thermostat
Fig.9.8 - Simplified sketch of Adjustable Thermostat
Working: Automatic Irons are fitted with a thermostatic switch to regulate the heat to a specific
predetermined value. The thermostatic switch disconnects the supply when the predetermined
value is reached and reconnects the supply when iron cools down. A turning knob with a dial just
below the handle marked as a rayon, cotton, silk, wool, etc., can be operated to select the
preset temperature depending upon the particular fabric to be ironed. The kind of cloth and the
required heat are given in table I. A lamp fitted in the handle goes off when the desired temperature
is attained.
Cloth
Heat required in degree Centigrade
Nylon
70 o C to 90 o C
Rayon
100 o C to 120 o C
Silk
130 o C to 150 o C
Woolen
160 o C to 180 o C
Cotton
200 o C to 220 o C
Lynun
230 o C to 260 o C
104
Pilot lamp : It is used to indicate the flow of current. The lamp condition and its indication are
given in table II.
Indication
Lamp condition
Glowing
Not glowing
The temperature is within
predetermined value and the current
is flowing
The temperature is more than the
predetermined value and the current
is not flowing.
9.5 DIFFERENCES BETWEEN NON-AUTOMATIC AND AUTOMATIC IRON BOX:
Sl. No
Non-automatic type
Automatic type
1
It does not consist of thermostat
switch. So temperature is not
regulated
It consists of thermostat switch to regulate the
heat to a predetermined value.
2
User has to switch ON or OFF the
supply to iron box as per the heat
requirement.
The thermostat switch disconnects the supply
when predetermined value of temperature is
reached and reconnects the supply when the
iron cools down.
3
There is no pilot lamp to indicate the
temperature condition whether it is
within the limit or not
It has pilot lamp to indicate. It will glow if the
temperature is within predetermined value.
Otherwise not glow.
4
Cost is low
Cost is high
5
Overheat may burn the cloth. So
more care is required.
As the temperature is controlled automatically
by thermostatic switch, no such risk is involved.
9.6 STEAM IRON:
Electrically there is no difference between steam irons and dry irons. A steam iron has a
small reservoir mounted above the heating element. A control valve on this allows the water to
drip slowly into recess in the sole plate. Check valve prevents the water and steam going back
to reservoir. When the water drips on the hot sole-plate, it is converted into steam and goes out
through the holes in the bottom of the sole-plate. The heating element is concealed with the
sole-plate. The amount of steam can be controlled by the contact knob on the iron located on
the handle. Like automatic iron, a thermostat is also provided to control the temperature. Fig.9.9
shows the diagram of construction of typical steam iron.
105
Fig.9.9 - Outline of steam iron box
When the element is found to be defective, sole plate along with the sealed heating element
has to be replaced. Distilled water is recommended for filling into the tank. Ordinary water, if
used, may result in deposition of salts in the tank and clog the entry and exit ports. It is
recommended to flush the water in the tank by pressing the steam control knob fully for some
time before the iron is switched off keeping it till next use. Salt deposits can be removed by filling
the tank with water diluted vinegar and plugging the iron to supply. A number of attempts may be
made to flush to iron by pressing steam control knob.
9.7 TROUBLESHOOTING CHART (DRY IRON):
Trouble
No heat
Possible causes
Corrective action to be taken
No power at outlet.
Check outlet for power.
Defective cord or plug.
Repair or replace.
Loose terminal connections
Check and tighten the terminals.
Broken lead in iron.
Repair or replace lead.
Loose thermostat control knob.
Clean and tighten.
Defective thermostat
Replace thermostat.
Defective heater element.
Replace the element if separate. If
cast in, replace sole-plate assembly.
Open terminal fuse
Replace.
Low line voltage.
Check voltage at outlet.
Incorrect thermostat setting.
Adjust and recalibrate thermostat
Incorrect thermostat setting
Adjust and recalibrate thermostat or
replace.
Defective thermostat.
Replace thermostat.
Insufficient heat
Excessive heat
106
Trouble
Possible causes
Corrective action to be taken
Excessive heat
First repair the thermostat control.
Then replace or repair the sole-plate,
depending on its condition.
Tears clothes.
Rough spot, nick, scratch, burn on
sole-plate.
Remove these spots with fine emery
and polish the area with buff.
Iron cannot be
turned off
Thermostat switch contacts are
welded together.
Check the thermostat switch contact.
Open them by force. The contact
points should be in open condition at
off position of the control knob.
Loose connection.
Clean and tighten.
Broken wire.
Repair or replace.
Dirty sole-plate.
Clean.
Excessive starch in clothes.
Iron at a lower temperature. Use less
starch next time.
Wrong setting of the thermostat
knob.
Set the knob to correct temperature.
Iron too hot for fabric being ironed.
Lower the thermostat setting.
Disconnected earth connection.
Check earth connection and connect
properly.
Weak insulation of heating
element.
Check insulation resistance of heating
element; if necessary replace element.
Earth continuity with common
earth not available.
Check the main earth continuity and
connect properly.
Blisters
sole-plate
on
Power cord
Sticks to clothes
Iron gives shock
QUESTIONS
Part - A
Choose the Correct Answer
1. Pick the odd one out
A) Heating element
B) Nichrome
2.
3.
(1 Mark)
C) Sole plate
Heating element of electric iron box is made up of
A) copper
B) Chromium
C) Silver
D) Pressure plate
D) Aluminium
The upward traveling heat, developed in heating element of iron box, due to conduction and
radiation is prevented by
A) sole plate
B) pressure plate
C) Asbestos sheet
D) Heel plate
107
4. The purpose of thermostat in Automatic iron box is to
A) increase temperature
B) decrease temperature
C) regulate temperature
D) monitor temperature
5. In bimetallic thermostat,
i) one metal plate has a high rate of expansion when heated and the other has low rate
ii) both metal has same rate of expansion when heated
A) i alone is correct
B) ii alone is correct
C) both are correct
D) both are wrong
Part - B
Answer the following questions in one or two words
(1 Mark)
1.
Electric iron box converts electric energy into heat energy. Say TRUE or FALSE.
2.
Which part of electric iron is used to keep the heating element firmly against the sole-plate?
3.
Name the material used to make the heating element of electric iron box.
4.
What kind or water is recommended for filling into the tank in steam iron box?
5.
What are the possible causes if the heat produced in electric iron box is insufficient.
Part - C
Answer the following questions briefly
(4 Marks)
1.
Write the features of two forms of heating element used in electric iron box.
2.
State the function of i) sole plate and ii) pressure plate
3.
Distinguish between Non-automatic and Automatic Iron box
4.
What is the purpose of pilot lamp in Automatic iron box? What does it indicates when it is
i) glowing and ii) not glowing
5.
Ordinary water is not recommended in steam iron box. Why?
Part - D
Answer the following questions in two page level
(20 Marks)
1.
Explain the construction and working of Non-automatic iron box. Also discuss in what way
Automatic iron box differs from Non-automatic type.
2.
Stating the function of bimetallic thermostat, explain briefly the construction and working of
Automatic iron box.
108
10. WATER HEATERS AND COFFEE MAKERS
10.1 FUNCTION OF WATER HEATERS
It is used to heat small or bulk quantity of water. The heating element of water heaters
converts electric energy into heat by which water inside the heater gets heated due to convection.
10.2 TYPES OF WATER HEATERS
The water heaters are available in various forms. They are
i) Electric Kettle
ii) Immersion water heater iii) Storage water heater (Geyser)
10.3 ELECTRIC KETTLE
It is used to heat small quantity of water. The heating element is fixed inside the kettle. When
electric supply is given to the heating element, it gets heated and hence water inside the kettle gets
heated due to convection. Types of Electric Kettle: i) Swan neck type i) Saucepan type
Swan neck type: In this type, the heating element is of tubular immersion type as shown in
Fig.10.1. It is concealed inside a hollow tube and mineral insulated. The heating element is
made up of Nichrome coated around with magnesium oxide to ensure that the element does not
directly touch the wall of the kettle body. The heating element is fixed at the bottom of the kettle.
The simple form of Swan type kettle is shown in Fig. 10.2
Fig. 10.1 - Swan neck type water kettle
Fig. 10.2 - Kettle heating element
Precautions:
i)
Water level always should be above the heater element otherwise the element gets
overheated and may burst.
ii)
The kettle should not be switched ON with out water.
iii) The water should not be touched when the supply is ON.
Saucepan type: The heating element in this type is wound around a flat mica sheet as in iron
box. Here the heating element is placed in separate room i.e. outside bottom part of the heater
body and is covered by bottom cover. The construction of saucepan type is shown in Fig. 10.3
Heating element : The heating element made of Nichrome ribbon resistance wire wound over
flat mica sheet. This is place between tow circular sheets, so that the Nichrome wire may not
come in contact with any metallic part of the kettle. The two ends of the heating elements are
connected to the outlet socket terminals of the kettle through two brass strips.
109
1. Bolt, nut and washer holding bottom cover
2. Heating element
3. Asbestos sheet
4. Sole-plate
5. Pressure plate
6. Bottom cover
7. Handle
8. Top lid
9. Ebonite leg
10.Outlet socket
11. Brass strips
Fig.10.3 - Saucepan type Electric kettle
Asbestos sheet : This is placed below the heating element and mica insulation to serve as a
heat insulator. Also It reduces the heat loss in the kettle.
Sole plate : The sole plate is made of cast iron and is of flat surface. It is provided to keep the
heating element in closed contact with the container and to avoid deformation of the element
when heated.
Pressure plate : This is made of cast iron and is fitted on the middle bolt, by a nut. The pressure
plate holds the sole plate in position. If this pressure plate is loosely fitted, the sole plate and the
heating element become loose. This leads to expansion and contraction of the element during
working and the element will get damaged.
Bottom cover : The bottom cover is fitted to the central bolt of the body by a nut and washer. The
terminals and heating elements can be viewed or accessed on removal of the bottom cover.
Working : The working principle is same for both of water kettle. When electric supply is given
to the heating element of water kettle, the current that flows through high resistance heating coil
produces heat. Thus water kettle converts electrical energy into heat and the water inside the
kettle gets heated due to convection.
10.4 MERITS AND DEMERITS
Sl. No.
1
2
3
4
Swan Neck type
The heating element should not be heated without
water. The water lever always above the heater
element. Otherwise element gets overheated and may
burst.
Cool water should not be poured on heating element
when it is hot
As the heating element has direct contact with water,
possibility of heating element getting damaged is
high. So reduced life.
Saucepan type
No such fear. Without adequate water,
the heating element may be heated.
Heating time is less as the heating element is in
direct contact with water.
Heating time is more as the heating
element is in separate room.
110
As the heating element is in separate
room, the water can poured at any time.
As there is no direct contact with water,
heating element has long life.
10.5 IMMERSION WATER HEATERS:
An immersion water heater is a very simple appliance which heats a bucket of water in a 10 to
15 minutes. It consist of a heating coil has a chord similar to an electric iron as shown in Fig.10.4
Construction : The main parts are i) heating element and
ii) outer frame
Heating element : The heating element is made up of
Nichrome wire which produces heat while giving electric
supply. Its melting point is about 4200 oC. The coil type
heating element is normally used in this heater.
Outer frame : The outer frame is made up of chromed iron
brass pipe in which a heating element is placed. Inside wall
of the pipe is coated with magnesium oxide, which act as
insulation, so that the heating element may not touch the
pipe. The top portion of the outer frame is made up of bakelite
Fig.10.4 - Immersion water heater
insulator. The ends of the heating element coils are connected at the points called as a terminal
which is connected to the power chord. The scale is also provided to indicate the water lever to
be maintained.
Operation : To use immersion water heater, one simply fills a bucket of water and places the
immersion rod into the bucket either directly or with an aid like a clothes hanger. Then connect
the plug into the socket and switch ON. As the supply is given, the heating element gets heated
and is transferred to the water. So water gets heated.
Drawbacks:
i) It do not have auto off mechanism. This means, when the bucket is warm enough, the
system has to be manually switched off.
ii)
Operating immersion heaters without adequate water or no water will burn the coil and
render the device useless.
iii) One can use heated water from the bucket with a mug or external aid. This means
having hot shower is ruled out.
iv) It is required to transport this bucker of hot water from the place with electric connection
to the place of use.
Precaution
i) The heater should not be heated for a long time. Supply should be given only after
immersing the heater in bucket of sufficient water.
i)
After disconnecting the supply only, water should be taken out from the bucket.
ii)
In the bucket, water should be filled upto the level marked in the heating element.
iii) The heater should be operated with out adequate water otherwise it will burn the coil
and make the device useless.
111
10.6 STORAGE WATER HEATERS (GEYSERS)
These type of water heaters heat and store water in a tank so that hot water available to the
service point (e.g., home) at ay time. As hot water is drawn form the top of the tank, cold water
enters the bottom of the tank and is heated.
The Storage water heaters are further classified into two types.
i) Non-pressure type and ii) Pressure type
Non-pressure type: When hot water is required only at one service point, this type is used. It
holds water of low pressure and hence is called as Non-pressure type. Normally it is used in
home as the pressure of the residential water system is low, which is typically 50 to 100 pounds
per square inch (psi).
Construction: The constructional parts of this type of heater are shown in Fig. 10.5 and 10.6.
i)
Heavy inner steel tank that holds the hot water. Typically this tank holds 40 to 60
gallons of water. The steel tank normally has a bonded glass liner to keep rust out of the
water. The inner tank will be surrounded by lead outer tank. The space between the
tanks is filled with glass wool which prevents heat transfer from inner tank to outer tank.
This helps us to maintain the temperature of hot water for long duration.
Fig. 10.5 - Full view of storage water heater
Fig. 10.6 - Simple view of storage water
(Non-pressure type)
heater (Non-pressure type)
ii) A dip tube to let cold water into the tank. A dip tube is provided with shutoff value to
control water in.
iii) A outlet pipe to let the hot water out of the tank
iv) A thermostat to control the temperature of the water the tank.
v) Heating element to heat the water
112
vi) A drain value that allows us to drain the tank to replace the elements or move the tank
vii) A pressure relief valve to control the water pressure inside the tank and thus keeps
the tank form exploding.
viii)A sacrificial anode rod to help keep the steel tank form corroding.
Working : This water heater uses nothing more than the “heat rises” principle to separate hot
water from cold water in the tank. When electric supply is given to the heating element, it
produces heat and hence water gets heated. As cold water comes in, it remains at the bottom
of the tank because it is denser than hot water. The thermostat controls the temperature water
inside the tank. It is generally recommended to keep the temperature between 120 to 140 degrees
F (49 to 60o C) to prevent scalding and to save energy. The thermostatic switch disconnects the
supply when the predetermined value of temperature is reached and reconnects the supply
when temperature comes down. Normally the thermostat is underneath a cover plate and it has
a knob or a screw to set the temperature.
Pressure type : When hot water is required at more that one points (e.g, multi storied building)
this type is used. It holds water of high pressure, (more than 300 psi) it is called pressure type.
The construction of this type is shown in Fig.10.7
This type of heater gets its cold water
supply through a cistern which is connected
to the water main and supply to it is
controlled automatically with the help of a
float value as shown in fig. Similar to Nonpressure type, this also contains inner and
outer tank separated by glass wool which
prevents heat transfer from inner tank to
outer tank. The other parts are inlet pipe,
outlet pipe, heating element, thermostat,
vent pipe (similar to a pressure relief valve
in non pressure type) to control the water
pressure inside the tank and thus keeps the
tank form exploding. In this type, hot water
is collected at more that one service point.
So the outlet pipe is connected to various
service points through control valves.
Fig. 10.7 - Pressure type storage water heater
Working : The working principle of this type is same as that of non-pressure type except that
the cold water supply and hence the pressure is controlled automatically with the help of float
value. This heater is used to supply hot water to different floors of the building. In this, source
point (location of heater) and access point (service point) are at different places. So the users
have no control on the cold water in. Therefore, cold water will get in continuously and get mixed
with hot water. So when hot water is disposed regularly, the heat in the water gets decreased.
113
10.7 REPAIRS AND REMEDIES:
Complaint
No hot water
Causes
Remedies
1. No supply.
Check availability of supply at
3-pin socket
2. Blown fuse.
Replace fuse
3. Open circuit.
Check the wiring for broken
wire or loosed connection.
4. Heater element burnt out.
Check elements for burn-out
Insufficient quantity of hot 1. Thermostat setting too low.
water
Check the thermostat setting.
It Should be 60oC to 65oC
2. Lower value of heating
element.
Check the value of heating
element and replace
3. Capacity of tank is
insufficient for one’s needs.
Check the quantity of water
used. Identity if the tank
capacity is too small.
Constantly fuse blowing
1. Grounded heating element.
Check the heater element for
insulation resistance and
replace if necessary
Steam in hot water
2. Grounded lead wire.
1. Thermostat improperly
connected.
Check wiring for grounds
Check the circuit and correct
any improper connections.
2. Thermostat contacts welded
together.
Check the thermostat for its
operation.
3. Grounded heating element.
Check the unit for ground.
4. Thermostat set too high or
out of calibration.
Reset thermostat.
High consumption of power 1. Leaking faucets.
leading to increased
electricity bill
2. Excessively exposed hot
water pipes.
Replace washers in al leaking
faucets.
3. Thermostat setting too high.
Reset thermostat. Setting
Should be 60oC to 65oC
4. Grounded heating element.
Check element for ground
5. Scale deposit on the heating
units.
Dismantle the water heater and
remove the scale form the
element tube gently.
114
Hot water lines should be as
short as possible
Leaking tank
1. Leakage around thermostat.
2. Leakage around heating unit
flange.
3. Leakage at plumbing
connections.
Check all points for possible
leakage. Replace fibre
washers and use Teflon tapes
to seal the leaks.
4. Tank leak.
COFFEE MAKER
10.8 FUNCTION OF COFFEE MAKER : A coffee maker is a small heating appliance designed
for brewing coffee from ground coffee beans without having to boil water in a separate container.
10.9 TYPES : The different types of coffee makers are
i)
Percolator style coffee maker
ii)
Drip-brew or a drip coffee maker
iii) Electric or a automatic drip coffee maker
iv) Vacuum coffee maker
v)
Siphon Coffee maker and
vi) Pour-over or water displacement drip coffee maker
In this chapter, we will see the Percolator type and Automatic drip coffee makers.
Percolator Type: A coffee percolator is a type of pot that is used to brew coffee. The word
percolator is originated from the word “percolate” that means to allow water to pass through the
coffee grounds for extracting coffee that give its color, taste and aroma. Today, in the market,
one can find different types of percolators, depending on the source of heat.
Electric Coffee Percolator is the most common type. It is much more popular than its
counterparts, as it gives a more consistent brew by stopping automatically when the coffee is
done. It then switches to a warming mode when completed. An electric percolator has a built in
heating element that can be cordlessly used.
Construction: Percolator type coffee maker consists of a pot with a small chamber at the
bottom which is placed closest to the heat source. A vertical tube leads from this chamber to the
top of the percolator. Just below the upper end of this tube is a perforated chamber.
In the base of the coffee maker will find the resistive heating element (a wire coil that becomes
hot when electricity flows through it), which comes in direct contact with the bottom of the
warming plate. It is coated in thick, white grease that conducts heat, spreading it out evenly. The
resistive heating element is controlled by the on/off switch and, while it’s on, managed by sensors.
A simple percolator type is shown in Fig. 10.8
115
Operation of coffee maker:
The desired quantity of water is poured into
the water chamber of the pot and the desired
amount of a fairly coarse-ground coffee is placed
in the top chamber. It is important that the water
level be below the bottom of the coffee chamber.
When the supply is given to the heating
element, the temperature rises until the water in
the bottom chamber boils. While some models may
have a one-way aromalock valve at the bottom of
the tube which forces some of the boiling water up
the tube, most operate on the simple principle that
the rising bubbles will force the liquid up the tube.
The hot water is distributed at the top over the
perforated lid of the coffee chamber. This water then
seeps through the coffee grounds and leaves the
Fig.10.8 - Percolator type coffee maker
coffee chamber through the bottom, dropping back into the lower half of the pot. The rest of the
colder water at the bottom is meanwhile also forced up the tube, causing this whole cycle to
repeat continually.
As the brew continually seeps through the grounds, the overall temperature of the liquid
approaches boiling point, at which stage the “perking” action (the characteristic spurting sound
the pot makes) stops, and the coffee is ready for drinking.
Drip Coffee maker :
This type simulates the working of a manual drip coffee brew, where a filter containing the
grounded coffee is placed over a carafe and hot water is poured over the coffee ground and
then, passing through the filter, drips as coffee into the carafe. This can be done manually or by
using an electric or automatic drip coffee maker. An average size for a drip brew coffee maker
would be a 12 cup coffee maker.
Automatic drip coffee maker:
In automatic type, Water from a cold water reservoir passes through a flexible tube into a
heating chamber where the water is heated, a thermostat prevents that it is heated too much
and converted into steam. This heated water gets moved up towards a spray head from where
it drips down onto the ground coffee. This coffee is normally contained in a, paper or gold, filter
hold by a container, which is located below the spray head. The water passes through the filter,
the coffee and than drips into a glass or thermos carafe. When brewing more as 12 cups coffee
a more powerful heating element is necessary.
116
QUESTIONS
Part - A
Choose the Correct Answer
(1 Mark)
1. The type of heater used to heat the water contained in a plastic bucket is
A) electric kettle
B) immersion water heater
C) storage water heater
D) Any type
2. The heating time of water in Saucepan type electric kettle is more than Swan neck type
because
A) the size of kettle is big
B) quantity of water is large
C) heating element is not in direct contact with water
D) heating element is larger is size
3) To avoid direct touching of heating element to the wall of the kettle body in Ring type, the
heating element is coated with
A) nichrome
B) magnesium oxide C) chromium oxide D) lead oxide
4) A sacrificial anode rod, in storage water heater, is used to prevent the steel tank from
A) leaking
B) corroding
C) over heating
D) exploding
5) When hot water is required at more than one service point at any time, the type of water
heater used is
A) immersion water heater
B) non-pressure type storage water heater
C) pressure type storage water heater D) any kind of storage water heater
Part - B
Answer the following questions in one or two words
(1 Mark)
1. Having hot shower is ruled out while using immersion water heaters. Say TRUE or FALSE.
2. Name the material filled in the space between the tanks in storage water heaters to prevent
heat transfer from inner tank to outer tank.
3. What type of heater is preferred for multi storied building?
4. What is the use of a pressure relief valve in storage water heater?
5. What is coffee percolator?
Part - C
Answer the following questions briefly
(4 Marks)
1. Compare the Merits and Demerits of Swan Neck type Saucepan type electric kettle.
2. State the drawbacks of immersion water heater.
3. List the precautions to be followed while using immersion water heater.
4. Write the parts of storage water heaters. State its functions also.
5. What is function of coffee maker? State its various types.
Part - D
Answer the following questions in two page level
(20 Marks)
1. Explain the construction and working of Non-pressure type storage water heater. State its
area of application.
2. Explain the construction and working of pressure type storage water heater. State its area
of application
117
11. ELECTRIC MIXER AND EGG BEATERS
11.1 Function of Mixie
Mixer and Grinder is a kitchen appliances that facilitates task related with mixing and crushing
the food. These electric machines are very much helpful as they save time and energy. There
are number of attachment like blades, disc, jars etc. comes with these appliances to facilitate
different uses to make the food more full of flavor and yummy.
11.2 Construction : The various parts of Electic Mixie are shown in Fig.11.The importance
parts are explained as below.
Motor : The motor used in Mixie is Universal motor, which
is nothing but Series motor having both armature and
field. The special feature of this motor is that it can be
operated both in AC and DC supply. The armature core
is made of silicon steel alloy and laminated to avoid eddy
current and hysteresis losses. This motor provides a
very good torque and its speed is regulated either by
tapped field coils or tapped resistance in sereis. The
power rating of motor would be about 500 W, operates
on 220/204 V, 50 Hz AC supply. The no load speed would
be about 18000 rpm with a full load speed of about 10000
rpm. The motor is housed in base of mixie body.
Blender and Grinder: Normally each mixie is
associated with 3 kinds of jar of different capacity as
shown in Fig.11.2 The name and function of each jar is
given in Table I.
Fig.11.1 - Exploded view of a Food Mixer
Table I
Name of Jar
Sl.no.
According to their According to their
capacity
function
Material
used
Function
1
Big Jar
Blender
Transparent
This can make shakes, lassi or Plastic
other drinks or cocktails. It is also
used for blending and stirring. Liquid
can be filled upto ¾ of the blender
capacity. This jar also can be used for
butter churning, egg whipping, Mincing
meat, grating vegetables, nuts and
coconuts, crushing ice etc.
2
Medium jar
Grinder
Stainless
steel
3
Small Jar
(Chutney Jar)
This is used to grind small quantities
( according to jar capacity) of dry/wet
(depends according to the
manufacturer) substances like coffee
power, condiments, curry powder, nuts,
black pepper, chutneys, spices etc,
for day to day use.
118
Blades: Blades are made of good quality stainless steel and will
therefore give high life. Each jar will have its own blades accoring to
its purpose. Jars are designed to grind dry or wet substances. So
it is advisable not to interchange the blades from one jar to other.
Speed control: For speed control purpose, the tapped field coils
are normally employed in mixie motor. The tapped field coils as
shown in Fig.11.3, enables speed selection through a rotary switch
provided in the Mixie. Normally 3 speed levels (1, 2 and 3) will be
provided in the Mixie motor. By turning rotary switch clockwise, we
can get speeds 1, 2 or 3 as desired.
Fig.11.2 - Mixie jars
For inching purpose, it is required to turn rotary switch anti-clockwise for a few seconds
and release for momentary operation. (This is especially useful for wet grinding of chutneys,
mincing meat, grating vegetables, crushing ice, etc.).
Fig. 11.3 - Schematic diagram of a typical portable 5 speed Food Mixer
Auto Overload Protector: Almost all brands of Mixies will be fitted with a overload protector. In
case of overloading or severe fluctuation, the overload protector will trip automaticaly. This
ensures that the Mixie motor is protected. If the Mixie stops in usage, due to operation of the
Overload Protector, then do the following:
i) Switch OFF the supply to the Mixie.
ii) Decrease the load by removing some materials, which is being ground, from the Jar.
iii) Wait for 3-4 minutes.
iv) Press the overload relief putton and restart the Mixie.
Other features such as Jar mounting lock (fixing) and proper lid closing are included in the applicances.
11.3 General Operating Instructions:
1) Place the rubber sealing ring on the base of the blade assemble. Screw the blender in
the assemble until tight. 2) Place the ingredients in the blender. 3) Place the lid on
the blender. When the motor is running, only the centre stopper should be removed to
add water for the free circulation of materials. 4) Switch on the motor. 5) If a material
sticks to the sides of the Jar, stop the Mixie and stir using stirrer. Then run again.
6) When the operation is complete, Switch OFF the Mixie. Wait for few seconds till the
motor stops completely and then remove the blender.
119
11.4 Caution:
1. Do not run the motor without any load.
2.
The motor should not be run for more than the specifed time( prescribed by the
manufacturer)
3.
Do not operate unless Jar and Dome are in proper position.
4.
Do not grind hot ingredients in the Mixie.
5.
Do not add solid ingredients, when the Motor is running.
6.
Do not add big ice pieces while making cold drinks. Crush the ice and put into the
blender.
Note: Before using Mixie, read the opeation manual given by the manufacturer thoroughly.
11.5 Cleaning:
Body and Top Cap: Clean body and Top Cap with a damp cloth and wipe dry. Do not use
abrasives or water for cleaning.
Stainless Steel Jars and Blades: Fill in ½ litre of lukewarm water and a teaspoon of any
mild cleaning power. Run the unit on speed 1 for 30 Seconds. Rinse and dry. Always store Jars
in inverted position, to allow water to drian off.
11.6 Repairs and Remedies:
Sl.No.
Fault
Possible Reason
Remedy
1.
Motor is not running
1. No voltage or Low voltage
1. Check the supply voltage with
multimeter.
2. Either motor field or
armature coil may get open
circuited.
2. Do the continuity test. If there is
an open circuit fault, do the service.
Supply voltage is
Overload in the jar and
Press the overload relief button and
correct. But motor is
hence overload protector
remove some materials in the jar.
not running.
may get tripped
Now restart.
Motor rotates at
May be loose connections
Check and solder the wires at
same speed in all
in the regulator
regulator terminals.
1. May be any short circuit
1. Do the continuity test. If there is
in armature or field coils.
an short circuit fault, do the service.
2. There may be wear and
2. Check and put lubricating oil at
tear in the bearings.
bearings. If heat persists, replace
2.
3.
speed settings
4.
Excessive
produced
heat
it.
120
EGG BEATERS:
11.7 Function of Egg beaters:
An egg beater is used not just for beating eggs, but also for whipping up cream and other
ingredients. Even though there are fancy types available, sometimes a simple egg beater as
shown in Fig. will be sufficient to do the job. Egg beaters are available in two forms.
i) Hand Operated Crank type
ii) Hand Operated Electric type
11.8 Hand Operated Crank Type: Hand Beaters are used to beat a food item or food mixture,
to both mix it and introduce air. The most popular use is for beating egg whites and whipped
cream. They are powered by hand, making them more work than electric hand mixers, but less
work than using a Whisk or any other implement. A Hand Beater is generally about 9 inches (23
cm) tall. It has a handle on top, a crank in the middle, and beaters at the bottom, as shown in
Fig.11.4. We need two hands to operate it. One hand holds the top handle and directs the
beaters; the other turns the crank. The crank turns gears which in turn rotates the beaters. The
beaters are sometimes referred to as “blades” or “whisks.” The beaters are circular, dull-edged
blades that rotate in and out of each other, one turning clock-wise, the other turning counterclockwise. The swirling of blades beats the eggs or whips the cream.
11.9 Hand Operated Electric type: Hand Beaters can be used for all kinds of things, not just
eggs, but generally, people who have Hand Beaters tend to reach for electric hand mixers when
it’s a matter of mixing heavier ingredients, or for longer periods of time. The electrically powered
type consists of a handle mounted over a large enclosure containing the motor, as shown in
Fig.11.5, which drives one or two beaters. The motor used is Geared motor or Universal motor.
In case of geared motors, Gears translate the motor’s rotation to the opposing rotation of the
beaters. The power rating of motor would be about 100-150 W, operates on 220/240 V, 50 Hz,
AC supply. The beaters are immersed in the food to be mixed. When electric supply is given,
motor rotates which makes the blades of beater to swirl or rotate. The swirling of blades beats
the eggs or whips the cream.
Fig.11.4 - Crank type egg beater
Fig.11.5 - Electric egg beater
121
QUESTIONS
Part - A
Choose the Correct Answer
(1 Mark)
1.
The drive motor used in electric Mixie is
A) DC series motor
B) Induction motor
C) Universal motor
D) Synchronous motor
2.
The no load speed of electric mixie motor is about
A) 3000 rpm
B) 6000 rpm
C) 12000 rpm
D) 18000 rpm
The cutting blades of electric mixie are made up of
A) stainless steel
B) plastic
C) aluminium
D) silver
3.
4.
If the electric mixie is overloaded, the motor
A) will not run
B) will run continuously at specified speed
C) will run continuously at reduced speed
D) will run continuously at a speed more than specified speed
5.
The possible causes of a food mixie running hot at normal speed are
i) overload
ii) low supply voltage
iii) wear and tear in motor bearings
Choose the correct choice among the following.
A) i and ii alone are correct
B) ii and iii alone are correct
C) i and iii alone are correct
D) All are correct
Part - B
Answer the following questions in one or two words
(1 Mark)
1.
In what direction, the rotary switch in mixie is to be turned in for inching operation.
2.
For speed control of mixie motor, tapping is provided in armature coil. Say TRUE or FALSE.
3.
Name the jar used to make shakes, lassi and other cool drinks.
4.
State the possible cause(s) for the motor not running in electric mixie though the supply
voltage is correct.
5.
What is the special feature of Universal motor?
122
Part - C
Answer the following questions briefly
(4 Marks)
1.
What are the three kind of jars used in electric mixie. State the function of each.
2.
How to restart the mixie if it stops due to overload?
3.
How do you clean body of electric mixie, its jar and blades?
4.
State the possible cause(s) and remedies when i) mixie motor is not running and ii) Excessive
heat is produced
5.
How is speed control achieved in electric mixie motor?
Part - D
Answer the following questions in one page level
(10 Marks)
1.
Explain briefly the constructional details of electric mixie.
2.
What is egg beater? Explain briefly the construction and operation of hand operated crank
type egg beater.
3.
Explain briefly the function of following in electric mixie i) different jars ii) Auto-overload
protector
123
12. VACUUM CLEANER AND WASHING MACHINES
12.1 Function of Vacuum Cleaner
A vacuum cleaner is common household appliance used for cleaning purposes. A vacuum
cleaner cleans by creating suction. A pump creates a pressure difference inside the unit causing
atmospheric air to be forced up through a tubing system. Most vacuum cleaners utilize a rotating
brush at its entrance to help “sweep” dust and dirt into the suction path. Vacuumed particles are
finally deposited in some collecting container that can either be removed or emptied after use.
12.2 Principle of Vacuum cleaner:
When you drink through a straw, you are using a simple suction mechanism. Sucking the
liquid up causes pressure to drop between the bottom and the top of the straw. With greater
pressure at the bottom than the top, the drink is pushed up to your mouth. The same principle
happens in a vacuum cleaner.
12.3 Main Components:
There are six main components to a standard vacuum cleaner. They are
1.
3.
Intake port which may include attachments such as a brush
Electric motor
4. Fan
5. Porous bag or container
2. Exhaust port
6. Housing
12.4 Vacuum Cleaner Features:
1.
Weight – lighter vacuum cleaners can be more portable
2.
Wheels – most vacuum cleaners move along on wheels
3.
Power – although suction does not always depend on the power, a higher-powered
vacuum cleaner will clean more efficiently, although energy costs can be higher.
4.
Power settings – adjusts power according to surface and cleaning needs. Settings can
be fixed and/or variable
5.
Dust container/dust bag full indicator – tells you when to empty the dust container or
dust bag
6.
Cord length – the longer the cord, the further you can vacuum clean from the power
socket. This also means you don’t have to change power sockets
7.
Automatic cord rewind/storage – saves time, effort and space
12.5 Types of Vacuum Cleaner:
1.
Cylinder vacuum cleaner - usually more versatile, and are easier to store.
2.
Upright vacuum cleaner - ideal for cleaning carpets and large areas of the home, with
a handle at waist height making it easy to move along.
3.
Wet and dry vacuum cleaner - will wash surfaces and carpet as well as vacuum clean
them, but can be a little heavier.
Cylinder vacuum cleaner: The electric current makes the motor work. The motor is attached
to the fan, which has angled blades. As the fan blades turn, they force air forward, toward the
exhaust port. When air particles are driven forward, the density of particles (and therefore the air
124
pressure) increases in front of the fan and decreases behind the fan. This pressure drop behind
the fan is just like the pressure drop in a straw when you drink. The pressure level behind the fan
drops below the pressure level outside the vacuum cleaner. This creates suction, a partial
vacuum, inside the vacuum cleaner. The air pushes itself into the vacuum cleaner through the
intake port because the air pressure inside the vacuum cleaner is lower than the pressure
outside.
Cylinder vacuum cleaners have the following main uses:
1. For efficient, general purpose cleaning around the home and car interiors
2.
To vacuum areas that would be awkward to clean with an upright vacuum cleaner, like
stairs and under furniture
3.
To clean upholstery, crevices, curtain fabrics, car interiors and remove pet hair, when
used with a range of accessories.
With the motor and bag (if the cylinder vacuum cleaner is a bagged model) in a separate
unit connected to the hose, cylinder vacuum cleaners are ideal for cleaning floor spaces with
furniture and stairs, and reach far more places around the home than an upright vacuum cleaner.
Cylinder vacuum cleaners also beat upright vacuum cleaners on maneuverability, with long
floor heads that are lighter and easier to direct when vacuum cleaning.
Upright Vacuum Cleaner:
A vacuum cleaner operates by creating a low pressure area inside the machine causing for
air at atmospheric pressure to be forced or “sucked” into the system. Most commonly, the
electric motor uses a fan; spinning of the fan causes the low pressure region and therefore the
suction. A spinning brush is often used to help sweep up dust, dirt or other particles into the air
stream. Particles pass through the intake port and are deposited into some type of container. Air
is forced out through the exhaust port to allow for the continuous flow of air. Finally, dirt and dust
is removed by either removing the porous bag or emptying the removable container. Upright
vacuum cleaners are best used in the following ways:
Fig.12.1 - Cylinder vacuum cleaner
125
1. To clean large floor spaces
2. For homes with thick carpets
3. As an efficient means of picking up pet hair.
The traditional style of, the upright vacuum cleaner now incorporate many new features,
making them more versatile. Unlike cylinder vacuum cleaners, upright vacuum cleaners are
housed in an ‘all in one’ unit, and are pushed with handles that are conveniently at waist height.
Large areas can be cleaned effortlessly, without having to worry about dragging the vacuum
cleaner behind you.
Today’s upright vacuum cleaners from leading brands
offer a huge range of additional features, including stretch
hoses for stairs and upholstery, and on-board tools for
cleaning corners and hard to reach areas. Upright vacuum
cleaners also often use rotating mechanical beaters, or
brushes, to help shift the dust being vacuumed up, giving
them another advantage when compared to cylinder
vacuum cleaners.
Upright vacuum cleaners deliver improved suction
power – especially useful for homes with pets - and are
easy and compact to store when not in use. However, they
are often heavier to move around than most cylinder
vacuum cleaners, although there are exceptions.
Wet and Dry Vacuum Cleaner:
The basic design is simple: On its way through the
cleaner, the air stream passes through a wider area, which
is positioned over a bucket. When it reaches this larger
area, the air stream slows down, for the same reason that
the air speeds up when flowing through a narrow
attachment. This drop in speed effectively loosens the air’s
grip, so the liquid droplets and heavier dirt particles can
fall out of the air stream and into the bucket. After we’re
done vacuuming, we simply dump out whatever has
collected in this bucket.
Fig. 12.2 - Upright vacuum
Fig.12.3 Wet and Dry vacuum cleaner
Wet and dry vacuum cleaners have the following main uses:
1. For cleaning up wet spills on the floor and other areas around the home
2.
As a dry vacuum cleaner suitable for a similar range of uses as a conventional vacuum
cleaner
3. To both wash and vacuum clean a range of floor types and surfaces
While wet and dry vacuum cleaners’ capabilities vary according to size, model and brand,
they are used to clean both wet and dry areas. Carpets are washed as easily as they are
vacuumed.
126
We’ll usually need to add a cleaning solution to the wet and dry vacuum cleaner in order to
wash our carpet. The dirty water is held in a container that can be emptied. Higher capacity wet
containers allow for longer wash times between emptying.
12.6 Vacuum Cleaner Accessories: Vacuum cleaners usually come with a range of accessories
for a variety of uses. It’s worth finding out what accessories are available for our cleaning needs.
Tools for cleaning homes with pets, upholstery and special floor surfaces are often included
with vacuum cleaners, and we can also buy additional accessories.
12.7 Vacuum Cleaner Capacity : The larger the capacity of the vacuum cleaner, the more you
can clean before emptying the dust container or replacing the dust bag. While a larger capacity
can be useful, it will make the vacuum cleaner heavier and less compact. It’s worth noting that
handheld vacuum cleaners and robotic vacuum cleaners have a smaller capacity.
12.8 Vacuum Cleaner Filtration : Vacuum filters are essential for trapping harmful particles
and cleaning the air. Three types of vacuum filter are available;
1. Standard
2. HEPA/S-class
3. Lifetime.
Standard filters offer basic filtration, but HEPA and S-class filters can trap up to 100% of
allergens and over 99.7% of particles down to 1 micron, including dust mites, which makes
them ideal for allergy sufferers. Lifetime filters can be standard or HEPA/S-class, but don’t need
to be replaced. The better the filter, the more expensive the vacuum cleaner will be, but the
benefit is a cleaner, more hygienic house.
12.9 Repairing of Vacuum Cleaner
When a vacuum cleaner fails to clear the dirt effectively, we think of replacing it with a new
one. But troubleshooting a vacuum cleaner is not a so difficult task. When a vacuum cleaner
begins to perform ineffectively there are three main areas that need to be considered namely
poor suction, still brush and no power supply.
Other than these three areas, there are other parts of the vacuum cleaner which is worth
considering. These are the vacuum cleaner belt, clogging of the hose, vacuum filter etc. now
before you start troubleshooting your vacuum cleaner, it is very important to detect what actually is
wrong with your vacuum cleaner. Once we are aware about the faulty parts that are causing the
problem than repairing it is easy. As most of the vacuum cleaners problem are not problems at all.
Following are some steps that will guide us on troubleshoot/repair the vacuum cleaner:
1.
If the faulty is in the belt then we have no other choice rather than to replace it with a
new belt. It is not possible to repair a belt. Installing a new belt is not a difficult task. Turn
over the vacuum cleaner and unscrew the plate so that you face the brush. Remove
the old belt which connects the agitator brush and the drive shaft and install the new
one. 3
2.
Check the agitator brush for any thread or hair that could be tangled in the brush. Use
a scissor to cut them out. And make sure that it is spinning properly with ease. If the
brush is worn out then replace it with a new one.
127
3.
If your vacuum cleaner is not sucking up the dirt effectively then it could be due to a
clogged filter or hose or a moist bag. Cleaning the filter and the hose can increase the
cleaning efficiency of the cleaner. If required replace the filter that will enhance the
efficiency of the vacuum cleaner.
4.
If there is no power supply to the vacuum cleaner then check for any discontinuity along
the wire. Replace the breakers if required and mend and discontinuity along the line.
Another reason for no supply of power could be due to a burned out motor. In this case
we will have to replace the motor.
5.
Check the vacuum hose for any holes. A vacuum hose with a hole will face suction
problem. So if there is any hole on the hose than repair it by parting a tape on it.
WASHING MACHINE
12.10 Function of Washing Machine:
Washing machine is the electronic home appliance used to wash the various types of
clothes without applying any physical efforts. With washing machine we don’t have to rub the
clothes with hand or squeeze them to remove the water from them. The washing machine does
wash our clothes automatically without having to supervise its operation. All we have to do is put
the clothes in the machine and select the wash mode. The washing machine automatically
takes the required amount of water and detergent required. It also automatically sets the timer
for washing, rinsing and drying as per the selected mode of operation.
12.11 Types of Washing Machine
1) Semi-Automatic
2) Fully Automatic
Top loading washing machine
Front loading washing machine
Semi-automatic washing machine: This has separate tubs or vessels for the washer and the
drier. There are two separate timers that enable setting washing and drying times. The washing
tub operates at lower speed whereas the spin drier tub operates at a higher speed. To wash the
clothes, we have to put the clothes in the wash vessel, put sufficient quantity of the water and
detergent and then set the timer. After the specified time, the washing machine will stop. We
can remove the clothes and dry them in the sun or dry them partially in the drier vessel by setting
suitable time.
Fully automatic washing machine: In fully automatic washing machine there is only one tub
that serves as the washer, rinser as well as the drier. Depending on the number of clothes or the
weight of the clothes, the machine takes in the sufficient amount of water and detergent
automatically and sets the timer for wash and drying automatically. All we have to do is just
provide the water connection, put the detergent from time-to-time in its storage space and put
the clothes, the fully automatic washing machine does the rest of things automatically. Such a
fully automatic washing machine uses advanced Neuro-fuzzy logic technique for taking decisions
automatically. Machines with this technique uses micro programmer for their programming and
can make decisions about the type of washing to be used depending upon type of fabric and the
extent of dirt.
128
Top loading washing machine: In this washing machine the clothes are loaded and unloaded
from the top of the washing machine. There is a cover at the top that helps loading and unloading
of clothes in the round vessel that perform the function of the washer as well as the rinser and
drier in the fully automatic washing machine. The top loading machine employs agitator type
washing technique. This type of washing machine is preferred by the people who don’t want to
bend the body while loading the clothes in the machine.
Front loading washing machine: In this machine the clothes are loaded from the front side.
The studies have shown that the front loading washing machines consume less electric energy,
water and detergent and also give better washing results compared to the top loading washing
machine. This type employs drum type wash technique.
Top loading washing machine
Front loading washing machine
12.12 Washing technique used:
Pulsator Technique : This is the most common type,
used in semi-automatic type washing machine, shown in
Fig.12.4. Pulsator is a disc, concave in shape used to
rotate the cloths in water. Dirt is removed by the cloth
ruby against tub wall surfaces and the disc.
Agitator wash technique: An agitator which is long and
cylindrical in shape is installed at the centre of the washing
tub as shown in Fig.12.5. The water and clothes circulate
around the agitator, thereby undergoing a through cleaning
process. Not suitable for delicate fabric. This technique is
used in Top loading washing machine.
Tumbler washing tub technique: This technique is used
in Front loading type washing machine. In this type,
washing is carried out by tumbling the clothes with the
help of a simple cylindrical drum as shown in Fig.12.6.
Here the construction is simple and clothes are tumbled
around the drum by virtue of the drum itself being rotated
by means of a pulley at the rear or the friction drive of the
idlers.
129
Fig.12.4 - Pulsator washing arrangement
Fig.12.5 - Agitator washing arrangement
Fig.12.6 - Tumbling washing tub
12.13 Working cycle:
There are three cycles involved in washing process. i) Wash cycle ii) Rinse cycle and iii)
spin cycle
Wash cycle: This cycle involves thorough cleaning of the cloths i.e., removing dirt from cloths.
This is done by moving the cloths up, down, back and forth, by means of Agitator cylinder/
Tumbler washing tub, so that the cloths get mixed well with the detergents. This motion is
repeated for a determined period of time.
Rinse cycle: This cycle involves discharging the detergent particles trapped in the washed
fabric.
Spin cycle: This cycle involves removing out as much water as possible from the wet clothes.
12.14 Constructional details of semi-automatic washing machine:
Fig. 12.7 - Semi-automatic washing machine
1.
2.
3.
4.
5.
6.
7.
8.
9.
10.
11.
12.
13.
14.
15.
16.
Pulsator
Water Strainer
Wash Drum
Water Level Selector
Lint Filter
Wash Timer
Water Inlet Pipe
Drain Hose
Scrubber
Spin Drum
3 Pin Plug
Spin Drum Cover
Spin Timer
Agitator Direction Switch
Water Inlet - Outlet Knob
Water Inlet Knob for Spining
Pulsator: It is a disc, concave in shape used to rotate the cloths in water. Dirt is removed by the
cloth ruby against tub wall surfaces and the disc.
Wash and Spin drum: There are separate tubs or vessels for the washer and the drier. Normally
these tubs are made up of sheet steel coated with zinc to improve rust resistance.. The washing
tub operates at lower speed whereas the spin drier tub operates at a higher speed.
Wash and spin timer: There are two separate timers that enable setting washing and drying
times.
Water inlet control knob: Depending on the quantity of clothes to be washed, the amount of
water is to be filled upto the required water level mark. Near the water inlet point of the washing
there is water inlet control knob used to control inlet water.
Drain pump: Some of the washing machines have a pump for quick removal of water from the
drum for fast operation. This may either be gravity drain method or driven by means of a friction
pulley and lever from the main driver or a separate motor is attached to the same. A small sized
motor with a water pump are used in some washing machines.
130
Drive motor: The most popular type of motor used in a washing machine is a single phase, 230
V, 50 Hz, capacitor start and run squirrel cage induction motor. These motor may range from 1/
3 to 1/2 hp rating. These motors are normally protected from overload and overheating conditions
by means of a bimetallic overload relay or a thermal switch. The motor is located in such way
that water leakages do not fall on to these motors.
Working of semi-automatic washing machine: The semi-automatic type washing machines
are relatively simple in operation and construction. It consists of two separate tubs names as
wash tub and spin tub as shown in Fig.12.8. The washing cycle in such a type of machine would
consist of the user filling the wash tub with water upto the required water level. The water level
can be set, according to quantity of cloths, using water level selector. Soap and bleach are to be
added. Depending upon the types of the clothes to be washed, the ‘ON’ time or wash time of the
machine is to set and the machine is switched ‘ON’. Most machines have the agitator directly
driven with out any intermediate gears as shown in Fig. 12.8.
Fig. 12.8 - Twin tubs of semi-automatic washing machine
After the washing is completed as per set time, the water from the wash tub should be
drained out. Fresh water is to be filled for rinsing purpose to remove detergent form fabric.
Required time is to be set manually. The clothes after being rinsed are placed in the spin tub and
it is rotated at high speed. Due to the centrifugal action, the water from the clothes is removed
fully till it is just damp dry. The time duration for spin operation is to be set manually with the help
of spin timer. After spin cycle is over, take the clothes out and dry them in suitable place.
Advantages:
1) It is applicable for low and medium budget people as the cost is less by 30% to 50%
when compared to fully automatic washing machine.
2) The wash time can be set manually hence electric energy can be saved.
3) It is also suitable in places having no water tank and pipe line.
Disadvantages:
1) As the name indicates, partial work has to be done manually like pouring water, changing
clothes from one tub to another and expelling of water.
2) Very few models have in-built heater facility.
3) Should be handled carefully or else it may lead to leakage of water.
131
12.15 Basic Structure of Top loading washing machine:
The complete structure showing the inner parts of washing machine are shown in Fig.12.9
The following components have to be present in any type of washing machine, be it top-loading
or front-loading. Different models of machines differ only in the positioning of these parts. There
is a specific function assigned to each part.
1) Water inlet control valve: Near the water inlet point
of the washing there is water inlet control valve. When
we load the clothes in washing machine, this valve
gets opened automatically and it closes automatically
depending on the total quantity of the water required.
The water control valve is actually the solenoid valve.
2) Water pump: The water pump circulates water
through the washing machine. It works in two
directions, re-circulating the water during wash cycle
and draining the water during the spin cycle.
3) Tub: There are two types of tubs in the washing
machine, inner and outer. Normally these tubs are made
Fig.12.9 - Top loading washing machine
up of sheet steel coated with zinc to improve rust resistance. The clothes are loaded in the inner
tub, where the clothes are washed, rinsed and dried. The inner tub has small holes for draining
the water. The external tub covers the inner tub and supports it during various cycles of clothes
washing.
4) Agitator or rotating disc: An agitator is a plastic cylinder positioned at the center of the inner
tub. It is the important part of the washing machine that actually performs the cleaning operation
of the clothes. During the wash cycle the agitator rotates continuously and produces strong
rotating currents within the water due to which the clothes also rotate inside the tub. The rotation
of the clothes within water containing the detergent enables the removal of the dirt particles from
the fabric of the clothes. Thus the agitator produces most important function of rubbing the
clothes with each other as well as with water.
In some washing machines, instead of the long agitator, there is a disc that contains blades
on its upper side. The rotation of the disc and the blades produce strong currents within the
water and the rubbing of clothes that helps in removing the dirt from clothes.
5) Motor of the washing machine: The motor is coupled to the agitator or the disc and produces
it rotator motion. These are multispeed motors, whose speed can be changed as per the
requirement. In the fully automatic washing machine the speed of the motor i.e. the agitator
changes automatically as per the load on the washing machine. In fact, it is the motor which
accelerates the process of washing. Therefore, it is a very important component of a washing
machine. The most popular type of motor used in a washing machine is a single phase, 230 V,
50 Hz, capacitor start and run squirrel cage induction motor. These motor may range from 1/3
to 1/2 hp rating. These motors are normally protected from overload and overheating conditions
132
by means of a bimetallic overload relay or a thermal switch. The motor is located in such way
that water leakages do not fall on to these motors
6) Timer: The timer helps setting the wash time for the clothes manually. In the automatic mode
the time is set automatically depending upon the number of clothes inside the washing machine.
7) Controller: The controller comprises of the various electronic components and circuits,
which are programmed to perform in unique ways depending on the load conditions (the condition
and the amount of clothes loaded in the washing machine). They are sort of artificial intelligence
devices that sense the various external conditions and take the decisions accordingly. These
are also called as fuzzy logic systems. Thus the controller will calculate the total weight of the
clothes, and find out the quantity of water and detergent required, and the total time required for
washing the clothes. Then they will decide the time required for washing and rinsing.
8) Drain pipe: The drain pipe enables removing the dirty water from the washing that has been
used for the washing purpose.
Working of Top loading washing machine: The process of washing starts in the inner wash
tub. It involves the adding of water and detergent mixture to the clothes. The detergent contains
many enzymes that work on clothes to clean them. In the inner wash tub, the cloths are tumbled
and moved to all sides of the agitator.
Agitator enhances the action of enzymes on clothes. An agitator is a plastic cylinder positioned
at the center of the inner tub. Generally, an agitator is finned. Its finned structure aids it in its
function. The function of an agitator is to move the clothing up, down, back and forth so that the
clothing mixes well with the detergent. The inner wash tub also moves along with the agitator.
This motion is repeated for a determined period of time. The agitator ensures thorough cleaning
of the clothing. This cycle is known as the wash cycle.
The timer helps setting the wash time for the clothes manually. In the automatic mode the
time is set automatically depending upon the number of clothes inside the washing machine. In
the wash cycle, the agitator and the inner tub are moved rhythmically by a powerful electric
motor. In fact, it is the motor which accelerates the process of washing.
Fig.12.10 - Simple structure of Top loading washing machine
133
The inner tub has numerous holes. The centrifugal force pulls out wash water from the
clothes and makes it move through these holes to the outer tub which stationary. The water
gets pumped out from here through the drain tube. After the wash water has left, the inner tub is
again filled with clean water. Agitator again works to tumble the clothing. This is the second
cycle and is called the rinse cycle. The aim of this cycle is to discharge the detergent particles
trapped in the washed fabric. On completion of rinsing, the machine again drains out water.
Once the water has been drained out, another electric motor comes to play. It agitates the
inner tub at an extremely high speed. The centripetal force spins out remaining water from the
fabric and expels it through the drain tube. This is a timed process. The clothing gets reduced
from saturated to merely wet. This is the third cycle, called as spin cycle, which is is to remove
out as much water as possible from the wet clothes. In all the steps, draining is carried out by
the drain tubes. The cleaning of the fabric is done and it is ready to dry.
12.16 Construction and Working of Front loading washing machine:
The construction and working of front loading
washing machine is similar to top loading except that it
consists of a cylindrical drum, instead of the long agitator
as shown in Fig.12.11. In this type, washing is carried
out by tumbling the clothes with the help of a simple
cylindrical drum called as tumbler washing tub as shown
in Fig.12.12
The disc contains blades, called as agitating vanes
or paddle, on its upper side. The rotation of the disc and
the blades produce strong currents within the water and
the rubbing of clothes that helps in removing the dirt from
clothes. As Front loaders spin and allow gravity to do
the work as the clothes tumble and bounce, so do not
have agitators.
Fig. 12.11 - Inside a front loading
washing machine
Note: Some models of washing machines, either semi or fully automatic, having heater in
the bottom of washing tub. The heater is generally immersion rod type which is permanently
fixed in the bottom the washing machine as shown in Fig.12.13. The purpose is to produce
warm water for loosening stripper dirt particles of the clothes for quick cleaning.
Fig.12.13 - Simple washing machine with heater
Fig.12.12 - Tumbler washing tub
134
12.17 Comparison of Front load and Top load Washing machines:
Top load - includes a wider variety of available models, colors and features as they
have been on the market longer.
Cost is less initially, but is less energy-efficient.
Offers easier access to the wash tub.
Uses regular detergent
Heater facility and separate valve for hot water only on selected models
Front load - people are used to seeing front load washers in Laundromats, many brands
are now available for home use.
Can be stacked with a dryer on top to conserve space.
Spins clothes faster than a top-load, extracting more water. This saves energy
(and money), because it allows you to dry a load of clothes in a shorter amount
of time.
Uses less water, which lowers utility bills.
May require special detergent - model dependent
Initial cost is approximately 30% more than top load
Dryer and heater facility available.
Temperature of hot water can be set as per the requirement.
Additional facility to add fabric conditioner like blue, comfort etc., is available.
Water gets drained out if the door gets opened.
12.18 Washing Machine Problems and remedies:
Washing machine problems are of various types. However, there are certain common
washing machine problems which many people have to face. If the problem is a different one, it
is necessary to call the repairer, because diagnosing washing machine problems is not an easy
task. Washing machine troubleshooting is no child’s play. Let’s see the different problems with
washing machines and how we can deal with them.
The Washing Machine doesn’t Spin: This problem can occur if we stuff too many clothes at
one time. Remove some clothes out and then try the spin cycle again with a less number of
clothes. The other reasons can be broken lid switch and the tab on the lid, broken or loose belt
or control problem. If we are good at home repair, we can remove the switch or belt and replace
them if needed, otherwise we would need to call an expert.
Washing Machine doesn’t Drain: This problem may occur if the water pump is clogged, the
belt is loose or the drainage hose is kinked. We can replace the belt or call an appliance repair
person to deal with this problem.
The Washing Machine doesn’t fill with water: We might face this problem if the inlet hoses
are clogged, fault in the timer, and the lid switch or the water level switch which is located in the
control panel with a clear tube attached to it. With the VOM on Rx1(Volt-ohm-meter set on
resistance mode), examine the three terminals and all the optional pairings to see whether you
are getting a 0 reading on one and infinity reading on the others.
135
Washing Machine doesn’t Run: Recheck if the washing machine is plugged in (receiving
electrical power). If it is plugged in and still does not work, then check the outlet with the VOM for
the voltage and the power cord (if it is damaged). If all the devices are fine, then the lid switch or
timer may have a problem. Call the appliance repair person and replace the parts if necessary.
Leakage in washing machine : The leakage might take place due to damaged hoses or loose
connections. Check the water pump in case of a leakage.
The Washing Machine doesn’t Agitate: Check the lid switch, belt, timer or bad transmission
(spin solenoid). There is a possibility that any cloth must have got wrapped around the agitator
resulting in this problem.
The Washing Machine Makes Noise: This problem might occur due to unbalanced/heavy
load. Do not stuff too many clothes in the machine. Remove some of the clothes and try again.
If the problem does not get solved, then there might be a bad transmission or the agitator might
be broken. Call the home appliances repair person to get it repaired.
QUESTIONS
Part - A
Choose the Correct Answer
(1 Mark)
1.
The type of Vacuum cleaner used to clean stairs and under furniture is
A) cylinder type
B) upright type
C) Wet and dry type D) Any one
2.
Pick the odd one out
A) Standard
B) HEPA/S-class
C) Lifetime
D) Wet and dry
3.
Agitator wash technique is used in ——————— type of washing machine
A) semi-automatic
B) fully automatic
C) top loading
D) front loading
4.
Discharging the detergent particles trapped in the washed fabric is called as
A) wash cycle
B) rinse cycle
C) spin cycle
D) drain cycle
5.
The number of tub(s) in semi-automatic washing machine is
A) 1
B) 2
C) either 1 or 2
D) 3
Part-B
Answer in one or two words
(I mark)
1.
Name any two types of Vacuum cleaner.
2.
What is the need of vacuum filters in Vacuum cleaner?
3.
What are the two types of fully automatic washing machine?
4.
What kind of wash technique is used in semi-automatic washing machine?
5.
Name the type of drive motor is used in washing machine?
6.
Normally the tubs of washing machine are coated with zinc. Why?
136
Part - C
Answer the following questions briefly
(4 Marks)
1.
On what principle the vacuum cleaner works? Write the main components of standard
vacuum cleaner.
2.
Write the features usually found on vacuum cleaners.
3.
State the uses of different types of vacuum cleaner.
4.
What are the advantages and disadvantages of semi-automatic washing machine?
5.
Compare top loading and front loading washing machine.
6.
Brief the three working cycle in washing machine.
Part - D
Answer the following questions in two page level
(20 Marks)
1.
Explain briefly the working and uses of i) upright vacuum cleaner and ii) cylinder vacuum
cleaner.
2.
Explain briefly the construction and working of top loading washing machine. Also compare
top loading and front loading washing machines.
3.
Explain briefly the construction and working of semi - automatic washing machine
137
13. ELECTRIC FAN AND ELECTRIC HAIR DRIER
13.1 Function:
A ceiling fan is a device suspended from the ceiling of a room, which employs hub-mounted
rotating paddles to circulated air.
13.2 Terminology: The terminology mentioned in B.I.S. No. 555-1979, B.I.S. 1189-1969 and
21312-193 is reproduced here;
i)
ii)
iii)
iv)
v)
vi)
vii)
Ceiling/Table Type fan: A propeller bladed fan having two or more blades, directly
driven by an electric motor, and intended for use with free inlet and outlet. It may be a
ceiling or a table mounted fan for wall or ceiling mounting.
Blade Sweep: The diameter of the circle traced out by the extreme tips of the fan
blades.
Size of Fan: The blade sweep in millimeters.
Rating: The statement of the operating characteristics assigned to the fan by the
manufacturer when tested in accordance with B.I.S.
Rated Voltage range: The voltage range assigned to the fan by the manufacturer
expressed by its upper and lower limits and marked on it.
Rated Speed: The rotational speed specified by the manufacturer at which the fan
develops the specified output at the rated frequency and rated voltage.
Service Value: The air delivery in m3/min divided by the electrical power input to the
fan in Watts at the voltage and frequency specified for the test. In the event of the fan
comprising on oscillating mechanism, the electrical input in Watts is measured with
the fan under normal full speed conditions that is with oscillating mechanism in action,
whereas the air delivery is determined with the oscillating mechanism out of action.
13.3 Construction of Ceiling fan: The parts of the ceiling fan are shown in Fig.13.1 and 13.2.
The key components are the following;
Fig.13.1 - Internal Parts of ceiling fan
Fig.13.2 - External Parts of ceiling fan
1. Electric motor: Single phase capacitor start and run induction motor, rated at 230 V ± 10 %
at a frequency of 50 Hz, is normally used in ceiling fan. This motor has two parts namely stator
and rotor. The stator, made op laminated silicon steel, employs two windings called as starting
and running windings placed 90 degree electrical apart. The starting torque depends on sine of
138
angle between starting winding and running winding current. So Capacitor is used produce
required phase shift between these current and hence to produce high starting torque and will
be connected in series with starting winding. Normally in ceiling fan, an electrolytic capacitor of
2.5 mF±5% will be used. The capacitor and starting winding will be in circuit during running also
and hence improve the power factor. So this motor will also called as permanent capacitor
induction motor. Rotor employs 1-phase squirrel cage winding.
2. Blades: The blades are made of sheet steel or aluminum sheets. Aluminum blades are
lighter than steel sheet plates and also improve the efficiency of the fan. The ceiling fans normally
have 3 or 4 angular blades. The four blade fan gives more air circulation as compared to three
blade fans. The blades are 120o mechanically apart and may be curved at an angle of 10o.
3. Blade flanges: Alternatively called as blade irons, blade arms or blade holders. These are
metal arms which connect the blades to the motor.
4. Canopy/Switch Cup: There are two canopies top and bottom, made of metal cylinder,
placed along suspension rod. Top canopy is mounted such that it covers the hook, nut, and bolt.
Bottom canopy is mounted below and in the centre of the fan’s motor. This is used to conceal
and protect various components, which can include wires, capacitors and switches. On fans
that require oiling, the bottom canopy often conceals the oil reservoir which lubricates the bearings.
5. Ball bearing: Friction free and noise free movements of rotating parts are ensured by providing
ball bearing between rotating and stationary parts. The ceiling fan may have single or double ball
bearings. The bearings made of high quality steel are regularly greased with superior quality for
its long life and noise free operation.
6. Suspension rod/Down rod:
It is made of rigid galvanized steel pipe of appropriate length and diameter. This metal pipe
is used to suspend the fan from the ceiling. One end of the pipe is bolted or screwed at the place
specially made on the motor body to receive the suspension rod. The other end of the suspension
rod is attached to two plates, to from a “U” shaped joint, with the help of a nut and bolt (with
additional lock nut). The “V” shaped end of the rod is further attached with the ceiling hook with
the help of bolt and nut with additional lock nut and split pin to eliminate chances of disconnection
at any stage.
7. Speed regulator: It is used to control the
speed of the fan. The speed of the fan can be
varied by changing the applied voltage. The
most common method to vary the applied
voltage is i) by tapped field resistors and ii) by
tapped series inductors. Nowadays thyristor
based electronic type regulators mostly used
Fig.13.3 - Resistance type Fan regulator
compared to above mentioned electric types.
The electronic fan regulator is fault-free, has long life and more efficient as compared to electrical
fan regulators. The schematic diagram of a fan with resistance type regulator is shown in Fig.13.3
139
13.4 Working of ceiling fan:
The working of fan is that they do not actually reduce the temperature of the room but due
the circulation and wind motion they result in surface cooling and give a breezy feeling. Electricity
is used to empower the fan motors and due to the scientific design of fan blades we get the
breeze, a man made phenomenon, similar to wind creation. The fan blades create a draught
and the warmer air goes up. When that air is pushed down with a force, we get better air
circulation. There is set parameters that need to be taken into consideration before you install
the ceiling fan, care should be taken that it is not too close to the ceiling otherwise the draft will
not be proper and should be at a safer distance from the reach of the people in the house.
Technical data for ceiling fan:
No. of
Blades
Size of fan
(mm)
Speed
(rpm)
Power
consumption
(Watts)
Air delivery
(m3/h)
Area
covered
(m2)
3
900
400
60
145
8.5
1050
380
65
195
10.0
1200
330
65
220
14.0
1400
290
70
270
18.0
1200
330
65
220
14.0
4
13.5 Table Fan :
A propeller bladed fan having two or more blades is directly driven by an electric motor. It
may be a bracket mounted wall table fan, kitchen fan or a portable table fan. Four blades table
fans are also available to obtain more air delivery.
Parts of Table fan : The parts of the ceiling fan are shown in Fig.13.4 and 13.5. The key
components are the following;
1.
2.
3.
4.
5.
6.
7.
8.
9.
10.
11.
12.
13.
14.
15.
16.
17.
18.
19.
Fig.13.4 - Internal parts of table fan
140
Rubber Feet
Regulator Choke
Capacitor
Blade Bush Fixing Screw
Spindle
Front Cover
Stator
Oscillator Knob
Back Cover
Vertical Spindle
Gear Box
Back Cover Fixing Screw
Bush Bearing
Link Fixing Screw
Switch
Pivot Pin
Crank Lever
Wire Guard
Bottom Cover
Enclosure: The place where the fan motor is
mounted may be totally enclosed type or
ventilated type. The enclosure material is
generally cast iron.
Body and stand: The body of the table fan is
usually made of die cast iron or aluminum alloy.
The body is fitted or mounted to the heavy base
stand, made of die cast iron or aluminum.
Fig.13.5 - External parts of table fan
Motor: The table fan motor is mostly of a single phase capacitor start and run or rarely shaded
pole type motor. The operating voltage of the motor will be 230 V ± 10 % at a frequency of 50 Hz.
This motor has two parts namely stator and rotor. The stator, made op laminated silicon steel,
employs two windings called as starting and running windings placed 90 degree electrical apart.
The windings are placed in slots of laminated iron core. The starting torque depends on sine of
angle between starting winding and running winding current. So Capacitor is used produce
required phase shift between these current and hence to produce high starting torque and will
be connected in series with starting winding. Normally in table fan, an electrolytic capacitor of
1.5 mF. Rotor employs 1-phase squirrel cage winding.
Blades: The blades, 3 or 4 in number, are fabricated from Aluminum sheet foe light weight.
Modern table fans have molded blades of plastic material. The blades are fully balanced to
ensure proper and smooth air delivery. The sweep of the blade varies from 100 to 400 rpm. The
speed of the fan is limited to less than 1000 rpm. The blade assembly is fitted to the rotor shaft
with a grub screw.
Guard: The guard is provided for adequate protection against personal injury. The front and rear
of the fan guards are made out of wire mesh which covers the blade. It prevents the external
objects coming in contact with the blade thus preventing an accident. The front guard is normally
detachable and rear one will be permanently fixed to the body of the fan. The diameter of the
guard wire is normally not less than 1.6 mm and not more than 10 mm.
Bearing: Most of the fan motors use phosphor bronze sleeve bearings mounted in the bell
housings and use felt wick to supply oil to a small hole drilled through the bearing wall. The felt
wick receives oil from a hole in the bell housing. Most of the fan motors use an integral ball
bearing to locate the rotor. It is held in place by spring clips in the bell housing and is self-aligned.
Mounting: It means attaching the fan system (motor and blades) to its base. The mounting
may be rigid (change of direction is by turning the entire fan body) or semi-rigid (the direction of
draught can be altered without changing the direction of the base).
Oscillating mechanism: The oscillating unit mechanism consists of a worm gear or a motor
shaft that engages a gear on a short jack with the gear on the vertical shaft. A disc attached to
the lower end of the vertical shaft rotates at a very slow speed and by means of a strong crank
lever attached to the disk at one end and the motor at the other end, the fan is caused to
oscillate. This principle is employed in most oscillating units built into the gear mechanism with
141
a compression stud device. This design permits the fan to be used either as a stationary or an
oscillating model.
Supply cord: A 3 core, flexible sheathed conductor of length about 2 m is used which has an
earthing conductor along with other two conductors. A cord grip is also inserted at the entrance
point of cord into the body.
Fan regulator: It is built within the table fan. There are so many types of regulators i) Resistance
wire type ii) Choke or inductor type iii) Capacitor type and iv) electronic type. Generally coiled
resistance type regulator is used in table fan.
Working of Table fan: The working of fan is that they do not actually reduce the temperature of
the room but due the circulation and wind motion they result in surface cooling and give a breezy
feeling. Electricity is used to empower the fan motors and due to the scientific design of fan
blades we get the breeze, a man made phenomenon, similar to wind creation. The fan blades
create a draught and the warmer air goes in. When that air is pushed away with a force, we get
better air circulation.
13.6 Exhaust Fan :
An exhaust fan is a fan which is used to control the interior
environment by venting out unwanted odors, particulates,
smoke, moisture, and other contaminants which may be
present in the air. Exhaust fans can also be integrated into a
heating and cooling system. Common locations for exhaust
fans include bathrooms and kitchens, and these fans are
usually very easy to install, so they can be situated in many
other locations as well. The exhaust fans are also called fresh
air fans. The main parts such as motor, capacitor, cord are
same as that of table fans. The tests are also mostly identical.
The typical exhaust fan is shown in Fig.13.6
Fig.13.6 - Exhaust fan
A classic use for an exhaust fan is in an environment like a kitchen or a bathroom. These
locations tend to get filled with steam, and steam can promote the development of mold, which
is not desirable. An exhaust fan can be used to vent the warm, moist air to the outside, where it
can disperse harmlessly. Exhaust fans can also vent cooking odors outside so that they do not
linger indoors, and when people cook smoky foods, the fan can help keep the air in and around
the kitchen clear.
For temperature control, an exhaust fan can be used in the hot months to push warm air
outside, creating negative pressure inside the house. This promotes air flow by drawing in air
from the outside, and the outdoor air may be cooler, contributing to cooling in the house. Using
an exhaust fan can be an alternative to air conditioning, or a supplement to an air conditioning
system.
These fans can also be useful in garages and workshops to ventilate the space. Since
these areas can sometimes acquire strong smells and people may work with potentially
142
dangerous chemicals in them, exhaust fans can be used for comfort and safety. An exhaust fan
is especially important when people are working with things like solvents, which are not healthy
or safe to inhale. Likewise, it is important to vent fumes from paints, varnishes, and similar types
of treatments. The technical data of the fan is mentioned below.
Sl. No
Sweep
(mm)
Speed
(rpm)
Line
current
Power input
(Watts)
Air delivery
(m3/h)
1
230
1350
0.29
45
700
2
300
1400
0.37
82
1900
3
380
1400
0.7
150
3610
Exhaust fans for Kitchen/Bathrooms:
Sl.No
Kitchen/Bathroom
size(Length x width x height)
Recommended
fan size(mm)
1
2.5 m x 2.5 m x 2.7 m
230
2
3.0 x 3.0 x 3.5
300
3
Area beyond this size
400
13.7 General Fault and Remedy:
Fault
Noise
Low speed
Causes
Remedy
It is due to worn out bearings
and absence of lubricating oil
or grease.
The bearings must be
replaced if worn out; otherwise
lubricate with proper lubricant.
Humming or induction moise
is due to non-uniform air gap
owing to the displacement of
rotor.
Dismantle and reassemble
properly.
It is due to defective or leaky
capacitor.
Replace the capacitor with
one of the same value and
voltage.
Low voltage applied.
Check the voltage and adjust
if possible.
Jamming of rotor
It is due to misalignment.
143
Dismantle and assemble
properly
after
proper
lubrication.
Not starting
Check the voltage and adjust
if possible.
Low applied voltage
Supply failure
Condenser open or short.
Check the supply points at
switch, regulator ceiling rose
and the terminal of the fan.
Open in regulator resistor/
switch.
Check for the continuity of
auxillary and main winding.
Open in winding.
Check the capacitor with a
Megger.
Check for open or loose
contact in the resistor or
contacts.
HAIR DRYERS
13.8 Function:
We are all very familiar with the daily routine; we wash our hair and then automatically pick
up the hairdryer, flip the switch and there is the hot air to dry quickly and let us get on with the
day. There are good reasons for people to dry their hair with a hairdryer, going out with wet hair
especially in the winter can be bad for our health, and lead to catching colds and chills. A hair
dryer also called blow dryer is an electrical device which can be used for styling and drying the
hair by speeding up the evaporation of water from the hair’s surface.
13.9 Types of Hair Dryer:
i. Portable type hair dryer
ii. Saloon (Bonnet) type hair dryer
Both the hair dryers supply hot air to dry the wet hair on the common principle of blowers
with a heating element. A Bonnet type hair dryer model is shown in Fig.13.7
13.10 Constructional parts of Hair Dryer:
A hair dryer needs only two parts to
generate the blast of hot air that dries the hair:
a simple motor-driven fan
a heating element
But in additon to above parts, most basic
models will have have two switches, one to
turn them on and off and one to control the
rate of airflow. Some models have an extra
switch, called thermostat switch, used to
regulate the temperature of the airflow.
144
Fig.13.7 - Bonnet type hair dryer
The exploded view of Bonnet type Hair dryer is shown in Fig.13.8 below.
Fig.13.8 - Exploded view of Bonnet type Hair dryer
Motor driven fan: The fan should probably be called a blower; the blade is shaped like the
impeller on a vaccum cleaner and mounted in a housing which is connetcted to the outlet duct.
Most motors are of single speed, shaded pole motors particularly in the smaller models. Some
of the larger and more eleborate types have multiple speed motors or solid state control units on
Universal motor. Early hair dryers put out only about 100 watts of heat. But nowadays hair
dryers producing up to about 2,000 watts are available, drying hair considerably faster.The motors
will be designed to work on 230 V, 1-phase, 50 Hz AC supply. The small black fan sits atop the
motor as shown in Fig 13.9. The motor spins the fan. Air is drawn in through the openings on the
side of the hair dryer.
145
Heating element: The heating element in most hair dryers is a bare, coiled nichrome wire
that’s wrapped around insulating mica boards as shown in Fig. 13.10
Nichrome wire is an alloy of two metals, nickel and chromium. This alloy is used in heating
elements in a number of household products, from curling irons to toasters. Nichrome wire has
two features that make it a good producer of heat:
It’s a poor conductor of electricity compared to something like copper wire. This gives
the alloy enough resistance to get hot from all of the current flowing into it.
It doesn’t oxidize when heated. Other metals like iron rust pretty quickly at the
temperatures used in toasters and hair dryers.
The heating element is of the open wire type, wound on thin mica insulating board. Something
seen more often these days are hair dryers with a ceramic coating on the heating element.
Coming in a variety of different configurations, ceramic-coated heating elements are said to
heat more evenly and effectively. It’s also popular to infuse the ceramic with materials such as
crushed tourmaline, which is said to support the creation of ions and ideal heat flow.. The majority
of hair dryers seem to use a three-section heating element (low, medim and high heating element)
controlled by a selector switch.
Fig.13.9 - Hair dryer motor
Fig.13.10 - Heating element
Thermostat Switch : Each heating element has special thermostat stip mounted near the air
nozzle which senses the temperature of the air flow. The thermostat switch is normally closed
and is ipen if the hot air blown outside the heated circuit becomes too hot. A fuse may be found
connected in series btween the temperature control switch and the heater element.
Selector switch : As the majority of hair dryers seem to use a three-section heating element(low,
medim and high heating element) controlled by a selector switch, the switch will have three
positions – low, medium and high to select the heating element as per the requirment. The
selector switch will always be connected to the motor and then to the heater circuit so that the
heating element cannot be turned on unless the motor is running.
The diagram showing electrical connection of motor, selector switch and heating element
are shown in Fig. 13.11.
146
Fig.13.11 - Electrical wiring diagram of Hair dryer
13.11 Working of Hair Dryer :
The working of Hair dryer is much simpler and most of its mechanisms revolve around its
fan. When the dryer is switched on, the electricity moves to the windings of the motor of the fan.
And here the electrical energy is transformed to kinetic energy as it provides momentum to the
fan. The motor and the attached fan both spin. The centrifugal movement of the fan blades
draws air in through the small round air inlets in the side casing of the hair dryer. These holes
are covered by a safety screen that prevents other objects (such as strands of your hair) from
being sucked in as well.
The airflow thus generated by the fan is forced through the heating element by the shape of
the hair dryer casing. These coils are designed to get heated quickly using its electrical resistance
and electric current. When the air initially enters the barrel, it is much cooler than the nichrome
wire, so heat flows from the wire to the air, which becomes very hot. As the air is pushed along
by the fan and convection, it is replaced by cooler air and the cycle is repeated.The hot air
streams out the end of the barrel. The hot air thus emitted from a hair dryer increases the
temperature of the air surrounding each strand of hair. Since warm air can contain more moisture
than air at room temperature, more water can move from your hair into the air.
13.12 Hair Dryer Safety:
The basic idea behind hair dryers is pretty simple, but producing one for mass consumption
requires some hard thinking about safety features. Here are some other safety features hair
dryers commonly have:
Safety cut-off switch - Your scalp can be burned by temperatures more than 140
degrees Fahrenheit (approximately 60 degrees Celsius) To ensure that the air coming
out of the barrel never nears this temperature, hair dryers have some type of heat
sensor that trips the circuit and shuts off the motor when the temperature rises too
much. This hair dryer and many others rely on a simple bimetallic strip as a cut off
switch.
147
Bimetallic strip - Made out of sheets of two metals, both expand when heated but at
different rates. When the temperature rises inside the hair dryer, the strip heats up and
bends because one metal sheet has grown larger than the other. When it reaches a
certain point, it trips a switch that cuts off power to the hair dryer.
Thermal fuse - For further protection against overheating and catching fire, there is
often a thermal fuse included in the heating element circuit. This fuse will blow and
break the circuit if the temperature and current are excessively high.
Insulation - Without proper insulation, the outside of the hair dryer would become
extremely hot to the touch. If you grabbed it by the barrel after using it, it might seriously
burn your hand. To prevent this, hair dryers have a heat shield of insulating material
that lines the plastic barrel.
Protective screens - When air is drawn into the hair dryer as the fan blades turn,
other things outside the hair dryer are also pulled toward the air intake. This is why
you’ll find a wire screen covering the air holes on either side of the dryer. After you’ve
used a hair dryer for a while, you’ll find a large amount of lint building up on the outside
of the screen. If this were to build up inside the hair dryer, it would be scorched by the
heating element or might even clog the motor itself. Even with this screen in place,
you’ll need to periodically pick lint off the screen. Too much lint can block the airflow into
the dryer, and the hair dryer will overheat with less air carrying away the heat generated
by the nichrome coil or other type of heating element. Newer hair dryers have
incorporated some technology from the clothes dryer: a removable lint screen that’s
easier to clean.
Front grill - The end of the barrel of a hair dryer is covered by a grill made out of
material that can withstand the heat coming from the dryer. This screen makes it difficult
for small children (or other especially inquisitive people) to stick their fingers or other
objects down the barrel of the dryer, where they could be burned by contact with the
heating element.
13.13 Repairs and Remedies:
Problems
Unit gives no heat at
any position and/or
motor does not
operate
Causes
1.
2.
3.
4.
5.
6.
Blown of fuse
Broken wire/loose
connection in power
cord or in the circuit.
Defective switch.
Open
circuited
temperature control/
defective thermostat.
Open
circuted
windigs.
Short
circuited
windings.
1.
2.
3.
4.
5.
6.
148
Test & remedy
Replace with proper capacity
fuses.
Check all wiring connection and
cord set for its continuity. Solder
the broken wire or change the
cable/power cord.
Check the switch for proper
operation. If faulty, replace the
switch.
Check the temperature control/
thermostat. If faulty, replace it.
Solder the joints of the open
circuted end of the winding; if not
possible, rewind.
Rewind.
Unit operates
intermittently.
1.
Loose connections.
1.
2.
Intermittent switch
operation (that is it
turns one time and
refuses to operate
the next time)
2.
Unit gives no heat at
any position, but
motor runs.
1.
Motor does not run
but heater operates.
1.
2.
3.
2.
4.
5.
Leads of heater
open.
Open in heater
circuit.
1.
Defective switch.
Bent impeller/fan.
Defective
thermostat.
Open circuited
windings.
Improper
connections.
1.
2.
2.
3.
4.
5.
Appliance is noisy.
1.
2.
3.
4.
Improper mounting
Improper fitting of
impeller
Warped impeller/
fan blade
Loose parts in
blower
compartment.
149
1.
2.
3.
4.
If you find any such loose
connection, reconnect them.
Replace the temperature control
or thermostat if all connections
are tight and intermittent cycling
continues.
The easiest way to clean the
swithc is to spary a cleaning liquid
into the switch, work the switch
several time, then recheck the
switch. If it sill does nor work
properly, replace it.
Check the heater leads for porper
connections.
Check the heater contacts on
thermostat for contamination.
Check the fuse link and heater
element
continuity.
The
thermostat mut be in closed
position before a continuity check
can be made. Allow the hair dryer
to cool so that the contact could
be closed.
Change the switch.
Check the beaing and fan/
impeller for bent. Lubricate the
bearings, if required, with very
small of light oil.
Check the thermostat for proper
cut off. Also check the thermostat
or termperature contro for
continuity.
Solder the joints of the open
circuted winding. If it is not
possible, rewind.
See that the connections are
proper as per the connection
diagram.
Check the tightness of the motor
mounting.
Check and fit the impeller on the
shaft in proper position.
Check for a warped impeller or fan
blade. If faulty, repace it.
Re-fastern them.
QUESTIONS
Part - A
Choose the Correct Answer
(1 Mark)
1.
The diameter of the circle traced out by the extreme tips of the fan blades is called as
A) blade flange B) blade length
C) blade sweep
D) blade size
2.
The type of motor used in electric fan is
A) capacitor start induction motor
B) capacitor start and run induction motor
C) shaded pole induction motor
D) universal motor
3.
The fan used for venting out dusty foul air is called as
A) ceiling fan
B) table fan
C) pedestal fan
4.
D) exhaust fan
The protective screen in hair drier is to prevent hair drier from
A) over heating
B) sucking outside things
C) electric shock
D) sticking on hairs.
5. If there is open circuit in heating element of the hair drier,
A) the unit will not produce heat but motor will run.
B) the unit will produce heat but motor wont run
C) motor wont run and hence no heat is produced
D) motor will run but heating coil will burn
Part - B
Answer the following questions in one or two words
(1 Mark)
1.
State the function of electric fan.
2.
What type of capacitor is used in electric ceiling and table fan?
3.
The four blade fan gives more air circulation as compared to three blade fans. Say TRUE
or FALSE.
4.
What will happen if there is open or short in capacitor used in electric fan?
5.
What are the two basic parts of hair drier?
6.
What safety part makes it difficult for other objects down the barrel of the hair dryer?
150
Part - C
Answer the following questions briefly
(4 Marks)
1.
Define the following terminology used in electric fan. I) Blade sweep and ii) Service value
2.
Brief the construction of electric motor used in fan.
3.
How is the speed of the fan controlled? Draw the schematic diagram of a fan with resistance
type regulator.
4.
What is exhaust fan? List its any four applications.
5.
Explain briefly about the Oscillating mechanism of table fan.
6.
State the two features of Nichrome wire has that make it a good producer of heat.
7.
Brief the use of Safety cut-off switch in hair drier.
8.
Brief the role protective screen and front grill in hair drier.
Part - D
Answer the following questions in one page level
(10 Marks)
1.
Explain briefly the following with respect to ceiling fan i) Canopy ii) Suspension rod and iii)
speed regulator.
2.
Brief the various problems normally arise in electric fan and discuss their remedies.
3.
Explain briefly the constructional details Bonnet type hair drier.
4.
Discuss briefly the various safety features commonly emplyed in hair dryers.
5.
Brief the various problems normally arise in electric hair drier and discuss their remedies.
6.
Explain the construction of celing fan / Table fan with neat diagrams
7.
Explain the working of celing fan / Table fan with neat diagrams
151
14. CENTRIFUGAL PUMP
14. Introduction
A centrifugal pump is a machine that imparts energy to a fluid. This energy infusion can
cause a liquid to flow, rise to a higher level, or both. The centrifugal pump is an extremely simple
machine. It is a member of a family known as rotary machines and consists of two basic parts:
1) the rotary element or impeller and 2) the stationary element or casing (volute). The increased
popularity of centrifugal pumps is due largely to the development of high speed electric motors,
steam turbines, and internal combustion engines. In operation, a centrifugal pump slings liquid
out of the impeller via centrifugal force.
14.2 The Constructional Features of Centrifugal Pump
(i) Bed plate : This is usually made of cast iron or welded steel of rigid construction. It is
bolted to the foundation.
(ii) Pump casing (volute) : This is usually made of close-grained cast iron. It is split in the
vertical plane at the centre of the casing and the two halves held together by a number
of bolts and one or two locating pins and a gasket to make it leak proof. For easy
removal of the impeller an end cover is usually provided.
(iii) Impeller : This is usually of close-grained cast iron or cast steel, hydraulically and
dynamically balanced to avoid end-thrust and vibration. To eliminate possibility of rusting,
impellers are frequently made of gun-metal. Two types of impellers are widely used.
They are closed type and open type as shown in Fig.1.
(iv) Spindle : This is made of steel. Where corrosive liquids are to be handled, stainless
steel spindles may be fitted. The portion of the spindle which works inside the casing is
usually fitted with a renewable gun-metal sleeve so that it may be replaced when it gets
worn out and the spindle may have a long life.
(v) Stuffing box and gland packing : This serves two purposes: on the suction side it prevents
leakage of air and on the delivery side leakage of water under pressure. The packing
material consists of rings of soft, cotton, woven yarn, impregnated with graphite and
tallow. The gland bolts should only be tightened lightly, just enough to prevent leakage.
Water is admitted into the stuffing box either through an internal hole or by an external
connection. It is very important that a centrifugal pump should not be allowed to run dry,
as it may result in seizure of the spindle.
Modern pumps are often fitted with mechanical leak-proof seals. Basically it consists
of a mirror-finished, hard, flat surface against which a spring loaded ring of a softer
material like carbon, rubber, leather, or plastic is used. This combination permits free
rotation without allowing any leakage. The seal is kept cool by the liquid pumped.
(vi) Bearings : These may be of the ball, roller or sleeve type. Grease lubricators are provided
on the bearing housing. Fig. 2 and 3 clearly illustrates the parts of a pump.
152
Fig.14.1 - Impeller types
Fig.14.2 - Parts of a Pump
Fig.14.3 - Cut section of pump casing
14.3 Working of centrifugal pump
The pump is filled with liquid and the impeller is rotated. The heart of any centrifugal pump
is the impeller. Fluid enters the impeller through the “eye” as shown in Fig 14.4 and is “centrifuged”
(hence the name) to the impeller periphery, with assistance from the impeller vanes. Impeller
designs can be open or closed, with one or many vanes, or no vanes at all (a disc or a set of
discs-or a variation of a disc-like surface-sloping toward the higher radius).
153
The centrifugal pump converts energy of a prime mover (a electric motor or turbine) first
into velocity or kinetic energy and then into pressure energy of a fluid that is being pumped. The
energy changes occur due to two main parts of the pump, the impeller and the volute or casing.
The impeller is the rotating part that converts driver energy into the kinetic energy. The volute or
casing is the stationary part that converts the kinetic energy into pressure energy.
The energy created by the centrifugal force is kinetic energy. The amount of energy given
to the liquid is proportional to the velocity at the edge or vane tip of the impeller. The faster the
impeller rotates or the bigger the impeller is, then the higher will be the velocity of the liquid at the
vane tip and greater will be the energy imparted to the liquid. This kinetic energy of a liquid
coming out of an impeller is controlled by creating a resistance to the flow. The first resistance
is created by the pump volute (casing) that catches the liquid and slows it down. In the discharge
nozzle, the liquid further decelerates and its velocity is converted to pressure according to
Bernoulli’s principle. Therefore, the head (pressure in terms of height of liquid) developed is
approximately equal to the velocity energy at the periphery of the impeller.
14.4 Friction Head
As water moves through the pipe its contact with the pipe wall creates friction. As flow (or
velocity) increases, friction also increases. Thus the greater energy is required to push it through.
Friction or Friction Head is defined as the equivalent head in feet of liquid necessary to overcome
the friction caused by flow through a pipe and its associated fittings. The suction head allowable
for a pump is very limited and therefore every foot saved is precious. By providing a larger
diameter for the pipe the velocity of flow and therefore friction losses are reduced.
Fig.14.4 centrifugal Pump action
154
Suction Lift
Suction conditions are some of the most important factors affecting centrifugal pump
operation. A pump cannot pull or “suck” a liquid up its suction pipe because liquids do not have
tensile strength. When a pump creates suction, it is simply reducing local pressure by creating
a partial vacuum (Sucks out the air above the liquid). Atmospheric or some other external pressure
acting on the surface of the liquid pushes the liquid up the suction pipe into the pump.
In feet, the head is given as:
Head = PSI X 2.31 / Specific Gravity
For Water it is:
Head = 14.7 X 2.31 / 1.0 = 34 ft.
34 feet is the theoretical maximum suction lift for any pump pumping cold water. No pump
can attain a suction lift of 34 ft; however, well designed ones can reach 25 ft quite easily. From
the equation above, it is clear that specific gravity can have a major effect on suction lift. The
suction lift of a centrifugal pump also varies inversely with pump capacity.
14.6 Static suction head:
Static suction head is the vertical height through which the water has to be lifted from the
well or underground tank i.e., the height from the water level to the centre line of the pump. The
head is always the vertical height and not along the pipe line. It is from the water level to the
pump centre and not from the foot valve or the bottom of the well.
14.7 Static delivery head:
This is the vertical height through which the water is lifted. It is from the centre line of the
pump upto the level where the water is discharged into the over head tank. The head is always
the vertical height and not along the pipe line.
The friction head as much as possible in relation to the total head should be reduce from all
causes. This can be achieved by reducing the velocity or providing a larger diameter of pipe.
14.8 A centrifugal pump should never be allowed to run dry.
The pump gland packings are water lubricated and water cooled. Water also acts as a
barrier between the atmosphere and the interior of the pump. If the pump is allowed to run dry,
excessive heat will be generated resulting in possible seizure of the spindle and will result in
burn out of the motor. No pump should, therefore, be allowed to run dry or started unless it is
fully primed.
14.9 Priming of pump
Priming means filling the pump and the suction pipe completely with water so that all air is
expelled from the system. Not only should the pump be fully primed when it is started, but it
should remain fully primed through out the period it is running.
14.10 Self-priming pump
The self priming centrifugal pump is designed to lift water from some level below the pump
suction without having to fill the suction piping with liquid. It accomplishes this by creating a
partial vacuum at the pump suction which removes the air from the suction line. The pump then
releases the entraped air through it’s discharge while retaining the initial fill of water in the pump
155
case. This air / water separation is what makes the self primer different. Although the self
priming centrifugal pump will remove all air from its suction piping, it will not “dry prime”. The
pump case must be filled with water before starting. The foot valve, used at the bottom end of
suction pipe should withhold water in the suction pipe. The should be no leakage of water from
the foot valve. Also, there must be a way for the air to escape the discharge of the pump. If the
discharge piping is not open to atmosphere, an air release valve must be installed.
14.11 Automatic operation of a pump
A pumping installation can be easily wired for automatic control by installing a float switch
on the High Level storage tank. This ensures that the pump is started when the water level falls
down to, say, half the tank and automatically stopped when the tank becomes full. The only thing
to be ensured is that the pump is kept fully primed always. Therefore, the suction system and
the foot valve should be well maintained so that water is retained by the valve for long periods
and the pipe joints are air tight so that no air may leak in. One condition which should be always
ensured is that water level in the well should not fall below the foot valve. This can be taken care
by providing a low-level float switch in the well, arranged to cut off the power supply to the motor,
if the water level falls unduly in the well. Quite often pumps are unattended for long periods.
Where pumps are not working continuously and are likely to be off for long periods, it is best to
ensure priming of the pump before the pump is started.
14.12 Troubles Shooting
Troubles with centrifugal pumps and remedies
Maintaining case histories and statistical records of all installations will be very much useful
in trouble shooting. While investigating troubles, proceed from the most probable reason to the
least possible.
(a) Failure to start : Gland packing may be too tight. Check whether spindle is freely rotating.
Motor is not getting electric supply. Check voltage at the motor terminals and the mains.
Connections may not be tight (if starters used check relevant connections like star delta starters).
Check for loose connections.
(b) Failure to deliver water: Check if pump is properly primed and delivery valve/s is open.
Check suction valve if provided. Check if water level in the well is above the foot valve. Check
speed, it may be too low. Foot valve or suction line may be leaking. Foot valve strainer or impeller
may have become clogged up. If installation is new, the pump installed may not be the right one.
Note the suction and delivery gauge readings and check against the Maker’s characteristic
curves and installation data. If the pump is erected after overhaul one of the pipe joints may have
been improperly connected or wrongly connected.
(c) Rate of pumping is low : Check all points in item (b) above. The valves must be fully open.
Foot valve and impellers may have become clogged and neck rings badly worn out probably
due to working for a long time. Pump to be overhauled. Check for leaks on the delivery line.
156
(d) Pump stops delivering after running for sometime: Leaks in the suction side especially
joints. Check if sufficient water is in the well. Check motor control circuits and protection circuits.
(e) Pump vibrates badly : Check alignment, bed bolts not tightened properly, impellers not
properly balanced. Check for worn out bearings or bent shaft. Bearings may have excessive
clearances; shaft couplings are not properly assembled. Impeller may have been choked.
(f) Pump is noisy in operation : Check all points under item (e) above. The impeller may be
touching the casing. Air-bubbles may be passing through the pump. Cavitation effect due to bad
design.
(g) Pump motor getting overloaded and becoming hot : Voltage at the motor terminals may
be too low. Pump delivering water at reduced delivery head. Single phasing in case of 3-phase
motor. Check voltages on all three phases. In case of 3-phase motor, used after overhauling,
coil connections may not have been proper. Incorrect size of impeller. Excessively tight stuffing
box, seized spindle or insufficient seepage.
(h) Excessive corrosion : This may be due to presence of certain chemicals in the water.
Stainless steel may be used for certain parts of the pump.
(i) Excessive scoring of impeller parts. : Due to passage of sand or gritty matter. Due to
cavitation efforts, especially if at the tips.
(j) Cracked pipe flanges: Due to excessive strain on the flanges caused by improper method
of supporting the pipes, improper alignment of joint surfaces, and use of excessive force to
bring the flange holes to align when bolting. Due to water – hammer action. Due to excessive
vibration.
QUESTIONS
Part - A
Choose the Correct Answer
1.
The part due to which water gets the centrifugal force is called
A) Casing or volute
2.
3.
(1 Mark)
B) stuffing box
C) spindle
D) impeller
The purpose of the gland packing rope is to
A) Prevent impeller from coming out
B) Prevent leakage of water from
the casing near the spindle
C) Provide lubrication to the spindle
D) Prevent air leakage from the casing.
Impeller is generally made of
A) Galvanised steel
B) Bronze
C) Cast iron or gun metal
157
D) Copper alloy
4.
Velocity imparted by the impeller to the water is converted to pressure by the
A) Casing or volute
5.
7.
8.
9.
C) Spindle
D) Gland box
Maximum suction lift that is possible for water is
A) 24 ft
6.
B) Stuffing box
B) 28 ft
C) 34 ft
D) 38 ft
Packing ropes in a centrifugal motor is water lubricated and water cooled, so
A) only wet packing ropes to be used
B) water should be leaking near the
packing ropes
C) motor should never run dry
D) lubricating compound should be used
for packing ropes.
To ensure that the pump remains always primed it is necessary to have
A) valve on delivery side should be open
always
B) suction side should not have
any valve
C) foot valve that is not leaking
D) gland packing should not be leaking.
When using automatic operation of the pump, it should be ensured that
A) water level is always above the foot valve
B) delivery valve is closed at the time of
starting
C) suction side is not less than 20 ft.
D) water level is always below the foot
value.
Pressure developed by the centrifugal pump is always specified in
A) feet
B) feet/min
D) kg/cm2
C) litres
10. Static suction head and static delivery head is always
A) feet
B) Kg/cm2
C) vertical height
D) distance measured
along the pipes
Part - B
Answer the following questions in one or two words
1. Name the part on which impeller is mounted?
(1 Mark)
2.
What is packing rope made of?
3.
Which type of bearings is normally used in domestic pumps?
4.
In the centrifugal pump, kinetic energy of fluid is converted to which type of energy?
5.
Which parts of motor take part in this energy conversion?
6.
A pump cannot pull or suck a liquid up because liquids do not have this strength. What is it?
7.
A centrifugal should not be started without doing this. What is that?
158
Part - C
Answer the following questions briefly
(4 Marks)
1.
What is the function of gland packing in a pump?
2.
What is an impeller? State its types.
3.
State the functions of casing or volute.
4.
What is Friction head?
5.
Define suction head.
6.
Define Delivery head.
7.
What is priming of the pump?
Part - D
Answer the following questions in one page level
(10 Marks)
1.
explain the constructional details of a centrifugal pump.
2.
Explain the working of a centrifugal pump with necessary diagrams.
3.
Mention any four commonly occurring troubles in a centrifugal pump and ways to rectify it.
159
15. MAINTENANCE OF ROTATING MACHINES
15.1 Introduction
The key to minimizing motor problems is scheduled routine inspection and maintenance.
The frequency of routine maintenance varies widely between applications. Including the motors
in the maintenance schedule for the driven machine or general plant equipment is usually
sufficient. A motor may require additional or more frequent attention if a breakdown would cause
health or safety problems, severe loss of production, damage to expensive equipment or other
serious losses.
Written records indicating date, items inspected, service performed and motor condition
are important to an effective routine maintenance program. From such records, specific problems
in each application can be identified and solved routinely to avoid breakdowns and production
losses. The routine inspection and servicing can generally be done without disconnecting or
disassembling the motor.
All types of rotating machinery require regular inspections so to maintain their integrity and
availability. The maintenance becomes simple and effective with the use of minor and major
inspections categorized into levels representing the life of the product, be it running hours or
years of installation. For each level, a defined number of inspection points are determined which
can be undertaken within a specified time. The aim is not to lengthen the outages but to provide
an effective solution that can be accommodated within planned maintenance periods and provide
expert support when returning the equipment back on line.
15.2 Types of Maintenance
Breakdown maintenance : Breakdown maintenance is basically the “run it till it breaks”
type of maintenance mode. No actions or efforts are taken to maintain the equipment till its
design life is reached. Advantages are, Low cost, Less staff. Disadvantages are: Increased
cost due to unplanned downtime of equipment. Increased labor cost, especially if overtime is
needed. Cost involved in repair or replacement of equipment. Possible secondary equipment or
process, damage from equipment failure, inefficient use of staff.
Preventive maintenance: It is a daily maintenance procedure (cleaning, inspection, oiling and
re-tightening), designed to retain the healthy condition of equipment and prevent failure through
the prevention of deterioration, periodic inspection or equipment condition diagnosis by measuring
deterioration. Just like human life is extended by preventive medicine, the equipment service life
can be prolonged by doing preventive maintenance.
It is further divided into Periodic maintenance and Predictive maintenance.
a) Periodic maintenance ( Time based maintenance - TBM) : Time based maintenance
consists of periodically (at pre-determined intervals) inspecting, servicing and cleaning equipment
and replacing parts to prevent sudden failure and process problems.
b) Predictive maintenance: This is a method in which the service life of important part is
predicted based on inspection or diagnosis, (for Ex., by testing the condition of the lubricating oil
in a vehicle for its actual condition and lubrication properties in a good testing centre instead of
160
changing every 5000kM), This type of maintenance allows us to use the parts/equipment to the
limit of their service life. Compared to periodic maintenance, predictive maintenance is condition
based maintenance. Basically, predictive maintenance differs from preventive maintenance by
basing maintenance need on the actual condition of the machine rather than on some preset
schedule. It is possible to schedule maintenance activities to minimize or delete overtime cost.
Also, inventory and order parts can be minimized as required, well ahead of time to support the
downstream maintenance needs. It helps to optimize the operation of the equipment, saving
energy cost and increasing plant reliability.
Corrective maintenance : It improves equipment and its components so that preventive
maintenance can be carried out reliably. Equipment with design weakness must be redesigned
to improve reliability or improving maintainability
Maintenance prevention : It indicates the design of a new equipment. Weakness of current
machines are sufficiently studied (on site information leading to failure prevention, easier
maintenance and prevents of defects, safety and ease of manufacturing) and are incorporated
before commissioning a new equipment.
15.3 Preventive maintenance schedule
Preventive maintenance is the maintenance which has to be carried out to the equipment,
in a preplanned way before serious breakdown takes place. If a record is maintained for certain
measurable parameters like body and bearing temperature, insulation resistance, earth resistance
etc., it is possible from the scrutiny of this record to predict the occurrence of future trouble and
necessary steps can be taken to prevent the occurrence of serious breakdown.
The interval of doing various maintenance operations, depend upon the type of equipment,
ambient condition and other factors. It is difficult to laydown hard and fast rules covering all
conditions but for average normal industrial duty under-mentioned time schedule will serve as
guide. This can be modified to suit other conditions at site.
Daily maintenance : 1) Examine visually earth connections and motor leads. 2) Check motor
windings for overheating. 3) Examine control equipment. 4) Check condition of bearings.
6) Add oil, if necessary, 7) Check end play.
Weekly maintenance : 1) Check belt tension. In the case of sleeve bearing machines the air
gap between-rotor and stator should be checked. 2) Blow out dirt from the windings of protected
type motors situated in dusty locations. 3) Examine starting equipment for burnt contacts where
motor is started and stopped frequently. 4) Examine oil in the case of oil ring lubricated bearings
for contamination by dust, grit etc. (this can be roughly judged from the colour of the oil).
5) Check the intensity of vibrations during operation of the motor. 6) Clean filters where provided.
Monthly maintenance : 1) Overhaul controllers. 2) Inspect and clean oil circuit breakers.
3) Renew oil in high speed bearings in damp and dusty locations. 4) Wipe brush holders and
check bedding of brushes of slip-ring motors. 5) Check that the connections of temperature
detectors and space heaters, where provided, are proper and these are in working order.
161
Haly-Yearly Maintenance : 1) Clean windings of motors subjected to corrosive or other elements,
also bake and varnish them, if necessary. 2) In the case of slip-ring motors, check slip-rings for
grooving or unusual wear. 3) Check grease in ball and roller bearings and make it up where
necessary taking care to avoid overfilling. 4) Drain all oil bearings, wash with petrol to which a
few drops of oil have been added, flush with lubricating oil and refill with clean oil.
Annual Maintenance
1. Check all high speed bearings and renew, if necessary.
2. Blow out all motor windings thoroughly with clean dry air. Make sure that the pressure
is not so high as to damage the insulation.
3. Clean and varnish dirty and oily windings.
4. Overhaul motors which have been subjected to severe operating conditions.
5. Renew switch and fuse contacts if damaged.
6. Check oil for its dielectric strength.
7. Renew oil in starters subjected to damp or corrosive elements.
8. Check insulation resistance to earth and between phases of motor windings, control
gear and wiring.
9. Check resistance of earth connections.
10. Check air gaps.
11. Check condition of all fasteners.
The normal value of air gap: it’s measurement
Air gap depends upon the size of the motor. A.C. motors have much smaller air gap than
D.C. motors. The gap between the rotor and the stator varies from a 0.35 mm to few mm
(few mils to 50 mils) or more depending upon the size of the motor. The air gap is measured by
inserting long steel feeler-gauge leaves in the air gap between the rotor and the stator. The
maximum thickness of the feeler that can be passed is the value of air gap. At least four readings
should be taken at different points around the periphery of the motor, i.e. top, bottom, front and
back. When any new motor is installed, air gap readings should be clearly recorded in the motor
history sheet and filed for future reference. Later on, if the top air gap is found to be much higher
than at the sides and the bottom, it clearly shows that the bearings have worn down. Belt-driven
machines usually show greater wear on one side than on the other. Several manufactures of
motors provide suitable holes in the end covers so that a feeler-gauge may be inserted for
measuring the air gap.
15.4 Removing a Bearing
It is important to take great care during the bearing removal to ensure that the bearing, shaft
and housing are not damaged. Bearing removal is best accomplished by using a bearing puller
for standard outer and inner rings. When removing bearings that have a backing shoulder that
extends beyond the cone large rib, a puller that pulls through the rollers should be used. it is
recommended to use a three–arm puller rather than a two–arm one as the three–arm puller is
more stable. Whenever possible, apply the withdrawal force to the ring with the interference fit.
The inner rings of cylindrical roller bearings generally have a tight interference fit, which requires
high forces to remove. In such cases, using a puller can cause damage to the shaft and ring,
162
and can be hazardous to the operator. Using heating
equipment facilitates easy and quick removal while reducing
the risk of damage to the ring and shaft.
Removing bearings using hydraulic techniques.
Hydraulic pressure is another available method to
remove bearings. Pullers or wedges may be used to remove
the bearing after the hydraulic pressure has expanded the
race. Hot oil or heat may be used along with the pullers or
wedges. When the puller has been placed on the bearing
and pressure is applied, the bearing race should expand
and be easily removed. For own safety, do not strike the
bearing directly with any hard object such as a hammer or
chisel. Apply force to the part of bearing that has highest fit.
Fig.15.1 - Bearing removal using puller
15.5 Fitting Bearings
Ball and roller bearings are manufactured to very close tolerances and are therefore easily
damaged by careless handing and fitting. Hence, utmost care is required in fitting up and
maintaining them. The bearing housing and the shaft end over which the bearing fits, should be
thoroughly cleaned so that the bearing fits neatly and just push tight. Bearings should never be
driven tight, because it will distort the race and damage the bearing. Grease, of the best quality,
should be, lightly packed into the bearing itself and the bearing then fitted into position in its
housing. The inner race may be pressed on to the shaft but if this is not practicable; it can be
fitted into position by lightly tapping with a wooden mallet over a tube passing over the shaft end.
Care must be taken to ensure that the bearing is square on the shaft.
15.6 Maintenance of Bearings
Keep the bearings dirt-free, moisture free, and lubricated. Water will rust the bearings and
dirt will destroy the smoothness of the super finish on the bearing races, increasing friction.
Clean the bearings when they become dirty or noisy with the most environmentally friendly
cleaner that is suitable for dissolving oil, grease, and removing dirt from the steel, plastic and
rubber surfaces. To obtain a long service life of bearings, they must be relubricated periodically.
Used grease together with wear debris and any contamination should be removed from the
contact zone and be replaced by fresh grease. The frequency of relubrication is of decisive
importance for long service life and depends on many factors including
the magnitude of the load,
the type of load,
the angle of oscillation,
the frequency of oscillation,
the operating temperature
the sealing arrangement and
other environmental conditions.
Long service lives are possible when the following relubrication conditions are observed:
the same grease is used as originally applied;
the relubrication should be carried out at the operating temperature;
the bearing should be relubricated before a long interruption in operation occurs.
163
Frequency of Lubricating Oil Analysis
Lubrication
system
Inspection interval
Normal operating
conditions
Severe operating
conditions
Disk lubrication method
One year
6 months
Oil bath or splash lubrication
6 months
3 months
Circulating lubrication
9 months
1 to 3 months
Checking the alignment of a directly coupled motor
The alignment is easily checked by laying the edge
of a steel foot rule against the sides of the two flanges
and checking whether the steel edge sits fully against
the sides of the two flanges or if there is any gap. Any
variation in levels is corrected by suitable steel shims.
The alignment should not only be correct in the vertical
and horizontal planes but the axis of both the shafts
should be in the same line and not make an angle with
each other. This can be checked by measuring the gap
between the flanges faces at four points, i.e. top, bottom,
front and back. Fig-2 shows the two types of
misalignment, in an exaggerated way for clarity.
Fig.15.2 - Misalignment - 2 types
15.7 Balancing
However carefully constructed, a motor armature shaft will have some unequal distribution
of weights in its body, which results in its axis of gravity being slightly off centre and out of line
with the axis of rotation. Therefore, when the armature rotates, centrifugal forces are created
which set upon the bearings. This causes the whole machine to vibrate.
Its intensity varies
at different speeds and becomes maximum at some critical speeds due to the effects of
resonance. The amount of unbalance determines the degree of vibration. For smooth running
and long useful life, the rotating parts should be properly balanced. Balancing consists of readjusting the distribution of masses in the body in such a way as to bring the axis of gravity to
coincide with the axis of rotation. This is done by placing a counter-weight on or removing some
weight from some part of the armature in such a way that the unbalanced centrifugal force is
cancelled out. To do this it is necessary to determine precisely where the counter-weight is to be
placed or removed, and also the weight of material to be removed. Balancing consists of two
types. They are Static Balancing and Dynamic balancing.
Static balancing : In static balancing, the rotor is supported on a pair of perfectly horizontal
knife edges. If the armature is in perfect balance, the rotor should rest in any position. If, on the
other hand, the rotor is not well-balanced and has uneven distribution of weight, the rotor will
164
turn round and come to rest with the heaviest portion in the lowest position, and the hollower
portion will occupy the top position. Small counter-weights shall be fixed on the top part(lesser
weight portion) of the armature. The greater the distance from the centre, the smaller should be
the weight. An alternative method is to remove some weight from the heavier portion of the rotor
by drilling a hole in the end supports or by chipping, as found convenient. The operation should
be repeated until the rotor can come to rest equally well in all positions.
Dynamic balancing : This means carrying out the balancing operation when the rotor is actually
rotating. Although a body may appear well-balanced by the static test, any little unbalance becomes
prominent at high speeds. Special dynamic balancing machines are available by means of
which the exact amount of weight to be added (or removed) as well as its location can be
accurately determined. The rotor is mounted on a pair of pedestals carrying spring suspension
systems, and driven at any speed required. The machine consists of a visual indicator which
amplifies the vibration felt on the bearings due to the unbalance of the rotor. A suitable device is
also incorporated by means of which a counter-weight of the right value may be temporarily
inserted at the right place on the same shaft to which the armature is coupled, until all oscillations
are neutralized. After the weight of the counter-weight, the correct radial length and angle of
location are determined, the armature is removed and a permanent counter-weight fixed at the
correct point, and a test conducted once again to confirm the correction. When balanced in this
way, the armature will run very smoothly at all speeds without any vibration. Care must be taken
in fixing the counter-weights properly so that they do not fly off at high speeds.
For balancing large armatures which may not be possible to be moved easily, special
electronic equipment are available, so that the balancing operation may be performed ‘on site’
on the machine itself.
15.8 Preventive Maintenance of Electrical Equipments
Maintenance usually consists of regularly scheduled inspection, greasing, oiling and possibly
minor repairs. Most causes of failure of alternator and electrical equipment are poor maintenance
procedure, which involves flushing out oil wells, greases cups, and checking of rotor and slip
rings for concentricity. Shop overhaul is essential for all electrical equipment at least once in five
years.
To avoid major repairs:
Check all connections and wiring.
Make sure that moisture does not penetrate the winding insulation. Presence of moisture
lowers insulation resistance. Test insulation using a megger.
Remove the moisture by heating the windings using hot bulbs or applying low voltage
to winding to develop heat and dry. Do not allow the temperature to rise above 900C,
which may damage the insulation.
Dust in the machine should be removed by using a blower with low pressure of air.
Remove grease and oil using carbon tetrachloride(CTC). While using CTC the area
should be well ventilated to avoid fumes and toxics.
165
Check voltage of alternator at terminals and panel boards. If the generator is operating
satisfactory, load the alternator gradually for 2 to 4 hours to evaporate remaining moisture.
While testing it should be within 5% of rated voltage and 3 phases load should be well
balanced.
Always open bus bar switches and then stop the alternator. Be sure that all the switches
are in ‘off’ condition before working on the equipment.
Reversed coil connections of pole windings can be detected by passing Direct current
through winding and testing poles by soft iron strip or bar. If polarity is correct soft iron
piece will be held tightly. If not the bar will not be held in its place. Great care is to be
taken if D.C. exciter is to be removed for check up of main alternator itself.
Sliprings on rotor are made of Bronze or non ferrous metal which are polished by fine
sand paper or polishing stone. If the rings are worn-out excessively, the rotor should be
removed and the rings be reduced down in diameter on the lathe machine. Insulation
resistance is then measured by Megger, ring to ring and ring to shaft. Accumulation of
carbon or metal dust in the vicinity of rings should be cleaned thoroughly.
Before starting the motor or alternator – clean the motor/alternator surrounding area to
make sure that there is sufficient open space for air movement, also be sure of dry
windings.
Make sure from name plate data that type, design of the motor for that work and load.
Check that operating speed reaches in minimum time, if not there may be overload or
centrifugal switch or starting coil is defective. If motor is running in improper direction
check for the proper connections as per manufacturing data.
Check for unusual noises. Poor alignment of end plates, which causes the rotor core
to strike against the stator core. Bearing may be defective. If motor becomes overloaded
and begins smoking, there may be over loading or defective starting winding or switch.
Clean the commutator or reset brushes or adjust spring tension of brushes, if there is
sparking at brushes.
15.9 General procedure for overhaul of motors :
1) Disconnect the supply cables at the terminal box of the motor, uncouple the motor from
the driven machine, unfasten the foundation bolts or nuts and remove the motor to the
maintenance shop.
2) Remove the external fan covers, canopies, heat exchanger or other fitments.
3) Dismantle the motor without using the excessive force, and without the hammer blows.
Care should be taken to see that the rotor does not touch the stator winding overhangs.
If possible do not open cartridge bearing housings.
4) Clean dust, dirt, oil and grit from every part of the machine with the help of blower,
compressed air hose, bellows or brushes and then wash with petrol to which a few
drops of lubricating oil have been added. The windings may be cleaned by means of
carbon tetra-chloride. Care being taken to avoid its application to slip rings and brushes.
5) Carry out visual inspection of all parts for wear or damage, replace worn out or damaged
parts.
166
6) Measure insulation resistance. If low dry out the windings, until correct values are
obtained. If necessary re-enamel or re-varnish all the winding and internal parts except
the stator bore and rotor iron. Dry rotor and stator winding thoroughly.
7) Reassemble motor without using any excessive force. Make sure that machine leads
are on the correct terminals and everything is well tightened.
8) Check the concentricity of the air gap through the air gap holes. Ensure that rotor can
rotate freely. Any difficulty in rotating the rotor or unusual noise should be taken as sign
of interference between stationary and moving parts. Investigate this and eliminate the
cause of the trouble.
9) Check insulation resistance again.
10) Recommission the motor.
15.10 Maintenance of A.C. Motors
A.C. Motors are run for extremely long periods without repairs. If the bearings are properly
lubricated and air passages are kept clear, then most of the A.C. Motors do not have failure
problems, as the motors have no commutators which cause motor failure. There are few motors
which have commutators, such as universal motor, repulsion motors in single phase system.
Squirrel Cage Induction Motor : Overheating and shock may damage the squirrel cage rotor,
which may cause fractures in bars in the slots and end ring connections and joint in the rotor
cage. Satisfactory operation of motor is difficult with fractured rotor cage and end rings. In large
motors the bars are bolted or wedged in slots and can be tightened readily if these become
loose. Loose coils can be detected with the help of growler. If it is not possible to disassemble
the motor, connect an ammeter in in series with one phase and apply 25% of full voltage to one
of the stator phase winding and turn the rotor slowly by hand. If the ammeter reading varies in
excess of 3%, it can be assumed that there is loose bar in rotor.
Wound Rotor Motors : Working principle is same as 3 phase sq. cage rotor induction motor,
having better torque and speed. Wound rotor may have low speed with starter resistance cut off
from rotor circuit. If there are no openings in control and starter circuit, the rotor coils should be
tested for continuity. Growler test may reveal open are short circuit in the coils.There is also
possibility of brushes sticking in the holder or brushes may not have sufficient tension (sparking
and over heating at contact area).
Growler is an electromagnet having 110 V /240 V supply voltage and suitably shaped for
testing armature/ rotor, by placing the growler core (or rotary growler for testing stator winding)
and slowly moving on/in it shorted or broken coils can be detected by noting the change in the
humming noise of the growler.
Synchronous Motors : Construction is similar to d.c. generator(except commutator) or auto
synchronous motor. Centrifugal force has considerable effect on the leads, which should be
securely fastened to the shaft. Change in air gap caused by misalignment of frame or wear in
the bearings causes big troubles in the synchronous motors. Other points of care and
maintenance are similar to other ac motors.
167
Single Phase Motors: Centrifugal (CF) switch is one of the main cause of troubles in single
phase motors. If the springs of centrifugal switch become weak, the C.F. switch will operate
before reaching the full speed, which will cause motor to run at sub normal speed and stop. If
the switch sticks closed, the starting winding will remain in the circuit, overheat and damage the
starting winding. Commutator motors need almost same type of care and maintenance as in dc
motors.
15.11 The causes of low insulation resistance of electrical equipment and ways to rectify them
Low insulation is almost invariably the result of absorption of moisture by the insulated
windings, since most of the insulating materials employed are hygroscopic (moisture absorbent).
To maintain high insulation values, the following precautions should be taken.
a) Don’t allow dust to accumulate on the motor windings. Dust and dirt absorb and retain
moisture, leading to leakage of electricity which may finally result in a breakdown. Clean
up the motor windings periodically by blowing compressed air, and wipe the outer surface
of windings clean and bright by a dry cloth.
b) Oil and grease are equally bad; since they are much more difficult to remove once they
reach the windings and soak them, as a result of worn-out bearings, over-oiling, leaky
gaskets of oil level indicators, etc. Oil and grease not only make the equipment messy
but are good places for dust to settle in. This must be avoided.
c) Protect large motors, rotary convertors, etc. against inclement weather when they are
idle, by covering them over with a large tarpaulin and keeping the windings warm by
connecting up a few electric radiators or infra red lamps all round. Change over the
working and stand-by sets regularly to maintain both in good condition.
d) In spite of all precautions, sometimes motors do get submerged under water. Retrieve
them as soon as possible and blow the wet surfaces with compressed air. Dry out by
putting them in a hot chamber.
Dampness in windings can be removed by drying out the equipment thoroughly in a hot
chamber or in an impregnating plant, the inside of which is maintained at a temperature of 800C
to 1000C. The heating should be carried out for several hours and in the case of large equipment
for one or two days, if required until all the moisture has been driven out. This can be ascertained
by recording the insulation resistance readings at regular intervals of one or two hours.
Table 15.1 Winding insulation resistance at different temperatures
Megaohms resistance at
Winding voltage
66 KV and above
22 KV to 44 KV
6.6 KV to 19KV
Below 6.6 KV
200C
1200
1000
800
400
300C
600
500
400
200
168
400
300
250
200
100
500C
150
125
100
50
600C
75
65
50
25
The insulation resistance should be measured when motor is hot, whenever possible.
The reason is that even a damp winding will give a comparatively higher reading if taken when
cold and therefore such a reading is unreliable. The reading will be lower when taken ‘hot’. As
already stated, the resistance of any insulation falls as the temperature rises, which is directly
opposite to that of any metallic conductor the resistance of which rises as the temperature
rises. When recording insulation resistance of a winding, it is therefore very important to note
down the temperature of the winding by a thermometer. It is desirable to have a standard method
of recording the readings, say at 750C. All megger readings may then be converted to this
common base, by multiplying or dividing them by the appropriate conversion factor.
Measurement of insulation resistance of a motor
Insulation resistance should preferably be measured by an equipment which applies a
voltage above the normal voltage. A 400 volts equipment may be tested by a 1,000 volts megger
if possible. If such a megger is not available, a 500 volts megger could be used. One test is
usually sufficient, i.e. between line and earth with all the equipment in circuit. If it is very low, find
out the reason whether it is in the motor or the starter, or in the field circuit or the armature. In a
3-phase motor, if both ends of all the 3-phase windings have been brought out to the terminal
box, the insulation of each phase winding to earth and also between phase windings should be
taken. In taking line-to-line insulation resistance of starters, it should be remembered that,
contactor coils, voltmeter, etc. may have been connected across the lines and therefore, they
should be removed/disconnected before taking readings. When testing slip ring motors, the
rotor insulation should also be taken. The rotor voltage may be as high as 400 to 600 volts.
Sometimes the rotor circuit is intentionally earthed at the rotor starter. This should be kept in
mind while doing the tests. Many motors are fitted with condensers either for power factor
correction or for purposes of starting. When megger tests are taken in such cases, special
precautions should be taken. Otherwise the readings may be misleading.
The main types of ‘Morganite’ brushes used are described below:
H. M. Class: These are natural graphite brushes, used for rotary convertors and
alternator slip rings
I. M. Class: These are also natural graphite brushes of comparatively high contact
resistance and therefore they suppress sparking. They are usually used in small fractional
h.p. motors, and automobiles generators.
C. M. Class: They are made up of carbon and metals like copper in the form of extremely
fine powder. These are especially suitable for low voltage heavy current machines like
electroplating generators.
E. G. Class: These are called electro-graphite class. They are suitable for all types of
industrial motors and generators.
The normal brush tension
The brush tension should be roughly 0.140 to 0.175 kg per sq. cm (2 to 2½ lb. per sq. in.)
for ordinary brushes and about 0.246 kg per sq. cm (3½ lb. per sq. in. ) for brushes with metal
content. Brush tension is measured by a spring balance.
169
Care in fitting a new carbon brush
The surface of each carbon brush should be carefully ground to correspond to the curvature
of the commutator so that the brush makes contact over its full area, so as to be able to carry
the full load current. The correct curvature is ensured by drawing a strip of very smooth sand
paper under the brush and over the commutator or the slip ring. It should be moved to and fro in
close contact with the commutator surface. Simultaneously, pressure should be applied on the
brushes. The sand paper should preferably cut the carbons only in the forward direction. Sharp
edges of the carbons should then be slightly beveled and all carbon dust blown off. Emery
paper must never be used for grinding carbon brushes as the emery particles may get
embedded in the carbon. If this happens, the commutator surface would obviously be ruined.
15.12 The usual defects in brushes and brush gear areas are as follows:
(i)
Incorrect grade of brush and improper brush tension
(ii)
Improper bedding of brushes.
(iii)
Carbon brush chattering due to:
(a) Excessive clearance between
carbon brush and its holder.
Fit up correct size brush. It should be
good slide fit in its holder. Clearance
should not be more than 2 mils.
(b) Excessive overhang of brush
Normally, the clearance between the
bottom edge of brush holder and the
commutator should only be 1.5mm (1/
16 In. ) or less. The brush holders should
be properly reset and secured in position
so that the clearance is correct.
(iv)
Carbon brush too tight in holder
This is generally due to accumulation of
carbon dust. All carbon brushes should
be removed entirely out of the holders
once a month at least. Accumulated
carbon dust should be blown off by
compressed air and both the brush and
the holder cleaned thoroughly with dry
cloth. Carbon brushes must slide freely
inside the holder.
(v)
Brush tail connections
They should be secured properly. If the
tail connection improperly secured
strands are damaged, new brushes
should be fitted.
(vi)
Excessive wear of brush
Normally, carbon brushes should last for
several months. Excessive wear is
definite sign of poor commutation, it
requires detailed investigation. If the
worn-out brush is not replaced quickly,
the metallic pig tail connection imbedded
inside the carbon brush may damage the
commutator badly.
170
Table 15.2 Trouble Shooting chart - D.C. Machines
S. No
Symptom
Possible Cause of
Trouble
Remedy
1
Failure to build up of
voltage (dc generator)
Faulty Voltmeter, check
output voltage with separate
voltmeter. Open field
resistor.
Replace voltmeter. Replace
or repair resistor
Open field circuit. Check
coils for open circuit or
loose connections.
Replace defective coils,
tighten or solder loose
connections.
Absence of residual
magnetism in self excited
generator.
Flash the field. Connect
battery to field with correct
polarity Allow current
momentarily and cut off.
Field will resume residual
magnetism.
Dirty commutator, high
mica, brushes not having
good
contact
with
commutator.
Under cut mica, clean or
dress commutator.
New brushes seated but not
contacting sufficient area.
Replace or reseat brushes,
free if binding in holders.
Armature shorted internally
to ground.
Brush bedding and reseat
brushes. Remove, test and
repair or replace.
Grounded or shorted field
coil.Shorted
filtering
capacitor; open filter choke,
open ammeter shunt,
broken brush shunts.
Test, repair or replace.
2
Output voltage too low
(dc generator)
Prime mover
low(check speed)
speed
Brushes not seated
properly.Commutator dirty,
or film too heavy
171
Adjust governor on prime
mover. Reseat brushes.
Clean commutator with fine
sand paper. Replace
brushes with proper grade
set or Use complete new
set of brushes
Adjust properly. Connect
properly
3
Output voltage too
high (dc generator)
Field resistor not properly
adjusted
Reversed field coil or
armature coil connections
Adjust governing device.
Adjust or replace faulty
voltage regulator.
Check speed.
Prime mover speed too
high.
Faulty voltage regulator
Overloaded.
4
Armature too hot
Check meter readings
against name plate rating.
Excessive brush pressure.
Belt too tight, or coupling not
aligned.
End plate out of position.
Bent shaft.
Armature coil shorted
Armature striking poles.
Check bearing for play and
air gap for proper spacing,
shaft for bent condition.
Poor ventilation.Clogged air
passages.
Repeated changes in load
in bulk. Observe meter
readings.
5
Field coils hot
Shorted or grounded coils.
Poor ventilation.
Overload
(compound
generator) check meter
readings against name
plate data.
Reduce load.
Adjust pressure or replace
tension springs.
Adjust belt. Align units
properly.
Assemble correctly.
Straighten on lathe or
replace.
Repair or replace armature.
Replace
bearings.
Straighten shaft or replace
armature.
Clean
clogged
air
passages.
Provide
clearance. For circulation of
air around equipment.
Clean equipment.
Faulty design. Generator
should be used in steady
load application.
Replace shorted coils;
grounded coils may be
repaired.
Clean
clogged
passages.
Provide clearance for air
circulation
around
equipment.
Reduce load.
172
air
6
Sparking at brushes
Brushes off neutral plane.
Brushes not seated
properly. Dirty brushes and
commutator High mica,
Rough
or
eccentric
commutator. Open in
armature
Grounded, open or shorted
field winding
Lack of brush pressure;
brushes sticking in holder
Selective commutation
caused by unequal brush
tension
Open circuit
Rheostat
in
field
Set rigging so that brushes
are in proper plane.
Reset.
Clean.
Under cut; Resurface
commutator,
Repair/
replace armature.
Repair or replace defective
coil/coils.
Replace tension springs,
clean holders.
Adjust spring tension,
Replace brushes or shunts.
Replace or repair Rheostat.
15.13 Common defects in commutators
A good commutator will have a smooth polished surface dark chocolate brown in colour.
i)
Commutator surface pitted and rough : This is mostly the result of excessive sparking,
The surface may be smoothened with fine sand paper on a curved block and polished
with crocus cloth. Never use emery paper or cloth, as the fine emery particles may get
to the commutator.
ii)
Ridge formation on commutator : Ridges are formed if the brush holders on different
rocker arms are not properly staggered. Another possible cause in the case of large
armatures is, if the armature does not oscillate to the extent of about 1/8 in. axially on
either side of the core centre. The ridges may be filed off by a smooth file, or by means
of specially shaped commutator grinding stones, whose curvature corresponds to that
of the commutator. If it is a generator, remove all carbon brushes and run it up, If it is a
motor, run up to full speed, switch off the supply and quickly apply the grinding stone to
the surface of the commutator, while the armature is slowing down. Quite a lot of metal
can be removed this way if the work is properly done by a trained hand. After grinding is
over, finish off with smooth sand paper and crocus cloth.
If the commutator surface is very bad, then the armature should be put on a lathe and
skimmed, after checking the trueness of the shaft by a dial indicator. The cuts should
be the lightest possible. The final cut should preferably be by a diamond tipped tool with
fine cuts of the order of .0005 to .001 in. with a feed of 500 threads per in. Finally, mica
should be undercut as usual.
173
iii) Commutator is eccentric or having high bars and low bars : Excessive blackening or
burning of a few commutator bars only shows presence of high or low bars, mostly
caused by the bolts holding the commutator V-ring becoming slack. The bolts should
be tightened up fully, after the commutator has run in for some time and is fully warm.
After this is done, the commutator should be skimmed on a lathe. If only a portion of the
commutator surface shows signs of severe sparking, it is a clear sign of the commutator
being eccentric. No commutator should show a variation of more than 0.0254mm (.001
in.) when checked by a dial indicator, when mounted on its bearings on the motor.
iv) Protecting mica between bars : All commutators should have the mica between the
bars undercut to a depth of 0.8mm (1/32 in.) approximately. After grinding or turning of
the commutator, undercutting should invariably be done either manually or by a machine.
It is essential to round off the sharp edges of the bars, and remove all bars, as also to
thoroughly clean the mica slots and blow off all dust. Undercutting should also be done
periodically.
v)
Flashover of commutator: Flashover across commutator is frequently caused by heavy
accumulation of dust over the commutator surface or due to low-resistance leakage
path either in the commutator risers, or between the bars or at the sides of the
commutator. Such a flashover constitutes a dead short across the mains and before
the fault is isolated by the circuit-breaker, the heat generated may be so much as to
cause appreciable damage to the commutator surface and the surrounding area. The
dust and dirt should be cleaned by washing and brushing with petrol; all carbonized
matter, foreign particles and deposits should be scraped off. The inter-segment gaps
should be kept clean; otherwise they may get filled up with dirt or carbon causing sparking
and further carbonization.
15.14 De-greasing:
By ‘de-greasing’ is meant the removal of dirty grease and oily matter by means of a chemical
solvent, very similar in action to the well-known ‘dry cleaning’ of clothes. The solvent for degreasing is marketed under various trade names but they are all one form or the other of stabilized
tri-chloro-ethylene, which has a boiling point of 1880F. The de-greasing plant consists of a tank
half-filled with the de-greasing liquid, which is kept boiling by means of steam pipes immersed in
the liquid. The part to be degreased, whether a dirty armature or a field coil, is lowered into the
tank and supported above the liquid level in a suitable manner and the lid put on. The dirty
windings will then be exposed to the hot vapours, which will condense over the windings and
very soon all the dirty grease runs out and drops down into the tank. Within a very short time of
10 to 15 minutes, the windings can be removed out in a perfectly clean condition. It emerges dry,
requiring no further drying. The solvent and vapour have no adverse effect on the insulation of
the windings. The process is very quick and also economical in operation. Suitable provision is
made to prevent the vapour escaping out into the atmosphere; it is condensed and recovered
and could be used over and over again. All the muck and dirt which collect at the bottom of the
174
tank, are easily removed periodically from a drain outlet.
15.15 Applying insulating varnish on electrical coils and windings
Coils are made up of insulated wires, the covering consisting of cotton, silk or enamel, etc.
which are hygroscopic, i.e. they tend to absorb and retain moisture. The insulation provided
between layers as well as the space between turns in the interior of the coil contain considerable
amount of air spaces. If the coils are not covered by any insulating varnish, moisture tends to
accumulate in these air spaces. Not only will it lower the insulation strength, but may ultimately
lead to a breakdown and internal short-circuit. By covering the coils with a good insulating varnish,
the air spaces are filled up and sealed; the windings get protected against ingress of moisture
and thereby they will give much better service. This process of coating electrical windings with
insulating varnish is called ‘impregnation’. The right method of doing this is described below:
a) Before any insulating varnish is applied, it is absolutely necessary to ensure that the
surfaces of all coils, armatures etc. are perfectly clean and free of all dust, oily matter
and moisture.
b) Apply varnish with a brush, using air drying varnish. This is a quick method of protecting
the surface of coils during periodical overhauls, if they have already been properly
impregnated previously. The varnish is then allowed to dry up.
c) Hot dip: This is quite suitable for small coils and windings. The winding is heated up to
a temperature of 800to 1000C in an electrically heated chamber for one to two hours.
The hot winding is then completely immersed in insulating varnish (baking type) and
kept immersed for one to two hours, until all air bubbles cease. The coil is then removed
and after draining out all surplus varnish, the coil is again put back in the heating chamber
and kept there at a temperature of 1000 to 1100C for at least four hours, by which time
the varnish will get completely baked and hard set.
d) For best results, and also for large windings and armatures, transformer coils, etc.
vacuum impregnation should be used.
15.16 The Process of vacuum impregnation
Vacuum impregnation is very similar to the hot dip
method but is much more efficient. In the hot dip method,
one cannot be sure if all the air spaces inside the winding
are fully impregnated with the varnish. In vacuum
impregnation, all air is first removed out, which ensures
that the insulating varnish gets sucked in into the
innermost recesses. If the subsequent baking is
thorough, there will be no possibility of entry of humid
air from outside into the winding.
Fig.15.3 - Exploded view of Ball Bearing
175
QUESTIONS
Part - A
Choose the Correct Answer
(1 Mark)
1. The maintenance work carried out on the machine after it has failed to work is called
A) Breakdown maintenance
B) Preventive maintenance
C) Periodic maintenance
D) Predictive maintenance.
2.
If air gap shows variation in the top, bottom sides, it is due to
A) bent shaft
B) Lamination worn out
C) Worn out bearings
D) Rotor worn out.
3.
Best method of removing a bearing is by using a
A) Hammer
B) Chisel
C) Caliper
D) Bearing puller
4.
Withdrawal force, while removing a bearing, should be applied to
A) Outer ring
B) Inner ring
C) Outer side of shaft
D) Bearing cover
5.
Long service life of bearing depends mainly on
A) Type of load
B) Sealing arrangement
C) Operating temperature
D) Frequency of relubrication
6.
For proper alignment of motor coupled sets, the axis of both the shafts should be
A) at an angle
B) In the same line
C) Perpendicular
D) at an obtuse angle.
7.
Main reason for insulation failure in normally operating motor is
A) High temperature
B) Moisture absorption
C) High voltage fluctuations
D) Unbalanced load
8.
Moisture is the air is prevented from absorption in motor insulation by
A) laminating the windings
B) applying varnish
C) covering with plastic sheets
D) vacuum sealing
9.
Excessive wear of carbon brushes indicates
A) low spring tension
B) poor commutation
C) high spring tension
D) high speed of operation
10. Ridges are formed on commutator, if the different rocker arms are not properly .
A) staggered
B) aligned
C) insulated
D) connected
176
Part - B
Answer the following questions in one or two words
(1 Mark)
1.
Which type of maintenance is called as a daily maintenance procedure?
2.
What maintenance procedure is based on inspection or diagnosis?
3.
How the air gap is measured in electric motors?
4.
Which type of puller is more safe for bearing removal?
5.
What type of fit does the cylindrical roller bearings have?
6.
What is the inspection interval for Circulating lubrication system under normal operating
conditions?
7.
To get smooth running and long useful life, the rotating parts are subjected to this. What is it?
8.
What is the name of the balancing operation done when the rotor is rotating?
9.
What will happen to motor insulation due to presence of moisture?
10. What is the device used to measure Insulation?
11. Absence of which part makes the ac motor almost maintenance free?
12. What is the main trouble maker in single phase motors?
13. Which type of grinding paper should not be used for grinding carbon brushes?
14. What is name given for removal of dirty grease and oily matter by means of a chemical
solvent ?
15. Which type of varnish impregnation method gives best results?
Part - C
Answer the following questions briefly
1. What are the different types of maintenance practices?
(4 Marks)
2.
What are the drawbacks of Breakdown maintenance?
3.
In what intervals preventive maintenance operations are normally carried out?
4.
What is a puller? How it is used?
5.
What are the precautions to be taken while fitting the bearing?
6.
Name the steps to be taken ensure long service life of the bearings.
7.
What is Balancing? State its importance.
8.
Differentiate between static balancing and dynamic balancing?
9.
What are the basic preventive maintenance steps to be taken for uninterrupted operation of
motor?
10. What are the routine maintenance steps to be taken for proper operation of squirrel cage
induction motor?
177
Part - D
Answer the following questions in one page level
(10 Marks)
1.
What are the necessary actions to be taken during daily maintenance of motors?
2.
Explain how predictive maintenance is carried out?
3.
Explain the procedure for static balancing and dynamic balancing?
4.
Identify the causes for insulation value becoming lower. What are the steps needs to be
taken to avoid it?
5.
What is degreasing? How it is done?
6.
Briefly explain the procedure of applying varnish to the windings?
178
16. MAINTENANCE OF TRANSFORMERS
16.1 Introduction
The transformer is one of the most reliable items of electrical equipment, requiring relatively
little attention; yet often even the minimum of attention is not given, they also sometimes
breakdown because of neglect. The programme of inspection and maintenance is governed by
the size of the transformer, place of installation, whether indoors or outdoors, if in a substation is
it manned or unattended, the operating conditions and so on. The degree of attention required
depends greatly upon how heavily or lightly the transformer is loaded. The intervals of inspection
are indicated as : hourly, daily, weekly, monthly, 3 monthly and 6 monthly, yearly, two yearly and
five yearly. In major installations, using air blast cooling or water cooling a daily check should be
made of the ancillary installations like air blowers, water pumps and the connected protective
devices, on-load tap changers, etc.
16.2 Action to be taken if the oil temperature rises unduly :
Excessive oil temperature is the result of overloading or inadequate cooling. Switch on a
larger unit for operation or put another unit in parallel to share the load or take steps to reduce
the load on the transformer. Check whether all the cooling systems are working properly. Excessive
temperature reduces life and therefore, if oil temperature rises unduly for any reason the
transformer should be put out of service immediately, but the cooling fans, if any, should continue
to run until the oil temperature falls to normal.
16.3 Points to be checked if the oil level tends to fall down:
Transformer oil may leak at several points, i.e. oil level gauge, cork packing below the top
cover, oil conservator connection, drain cock, gasket, bolts where a cable box is bolted in, and
welded joints. Every oil leak should be traced to its source and remedial action taken to stop the
leak. If gasket leak cannot be stopped by tightening the bolts, the gaskets should be renewed.
The best material for gaskets is cork-rubber sheet of 5 mm thick. The surfaces between which
the gasket is provided should be quite flat and smooth, perfectly clean and free from scale, old
paint, remains of glue and old gasket, grease or oil. The bolt tightness should be checked
periodically. Sometimes slight oil leakage occurs at the welded joints. The exact point of leakage
outside the tank can be discovered first by cleaning the surface thoroughly with a grease solvent
or petrol or denatured alcohol, and then coating the surface with a thin a layer of chalk, cement
paste in water or white wash, and allowing it to dry. Leakage of oil is then readily revealed by the
dark patch it forms. Formation of a few drops over a period of time is not of any consequence
and occurs in most transformers. If it is bad, the cracked or spongy weld may be repaired by
welding in a metal patch. Take care to guard against any explosions. If a hole exists in a casting
it may be drilled and a tight brass plug driven in. It is no use using shellac as a filler as it shrinks
considerably when it dries. After completing the repairs, the oil level should be brought to required
level and a careful note made of the oil level for verification at the next inspection.
179
16.4 Different methods of drying out a transformer :
The main problem in drying out a transformer is not drying the oil- this is quite easily done
by passing it twice or thrice through a suitable filter- it is the removal of moisture absorbed by the
windings. This is quite a time consuming process in a new transformer to be commissioned for
the first time, and may last from a few days for a small transformer to 3 or 4 weeks for a large
unit. And throughout this period the temperature has to be maintained between 800 to 850 C
irrespective of surrounding air temperature variations. A vital condition to be ensured throughout
the period is that the oil temperature never exceeds the limit of 900C, as it may seriously damage
the insulation. Purification of the oil can be done while the transformer is in service on light load.
There are basically two methods of drying out, i.e. with the tank dry or with the tank filled
with oil.
(a)
With the tank dry, i.e. with the core and windings in position but without oil, the heat
required for drying may be produced in two ways :
(i) By blowing in hot air through the transformer tank.
The air is blown into the tank through a suitable opening at the bottom of the tank such
as the drain pipe or radiator pipe outlet. An air outlet should be left at the top by removing
the explosion vent or manhole cover. The inlet air should be at a temperature not less
than 850 nor more than 1000C. Heating elements of 15 KW capacity will be sufficient for
a tank capacity of 10 m3 (350 cu.ft.). The outlet air temperature should be not less than
650 to 750 C (1400 to 1670 F). This method is quite reliable and the drying time with
reasonably dry air and ambient temp., is about 4 days for an 11 kV unit and 15 days for
a large 220 kV unit. The advantage of this method is that the coil is not subjected to high
temperatures for long periods as in other methods. Moisture in the windings is quickly
removed because of low humidity of hot air.
(ii) By short circuiting the secondary winding and applying a reduced voltage on the primary,
as in the heat run test. The top cover should be kept open for free flow of air. This
method is not entirely satisfactory because the temperature distribution in the windings
will be uneven due to absence of oil, and is not recommended except for small
transformers and when there is no other means available for drying. However, this
method may be adopted in conjunction with method (i) above to reduce the burden on
the air heaters. The winding temp., by the resistance method should never be permitted
to exceed 900 C.
(b)
With the tank filled with oil, heat could be produced in three different ways:
i)
by short-circuit method as given in (a) (ii) above.
ii)
by circulating oil through a suitable purifying plant.
iii)
by connecting several immersion type heaters and letting them into the transformer
tank.
180
N.B.
Application of vacuum greatly accelerates the drying-out process. Vacuum may be
applied directly into the transformer tank by connecting a vacuum pump producing at
least 28 in. of vacuum, through a suitable outlet, provided that the tank is specially
designed to withstand the full air pressure (15lbs/sq. in.) on the exposed surfaces of
the tank. Alternatively vacuum type purifiers should be used.
16.5 Time of drying-out operation
Whatever be the method employed, the drying-out operation should be continued until the
transformer oil samples from the top and bottom of the tank show high di-electric strength and
the windings high insulation resistance. The actual time required depends upon many factors,
such as the condition of the windings, the amount of moisture it has absorbed, the type and size
of purifying plant, temperature of the oil which it can maintain etc., and may vary from about a
day for a small transformer to as much as a month for a large unit.
An important point to remember is that raising the temperature, will no doubt increase the
rate of drying, but simultaneously it also increases the thermal decomposition of the cellulose of
the paper insulation, which actually produces water vapour. Heating for longer time at temperatures
above 900C is harmful and should be avoided. It is in this context that drying-out under vacuum
is of great value, since it reduces the time required for drying. One test which confirms if the
drying-out has been well done is to allow the transformer to cool down and test a sample of the
oil after a week or fortnight. If its Breakdown Value (BDV) is high as also the insulation resistance,
after making due allowance for the temperature at which the tests are conducted, it is a clear
proof that the windings are quite dry.
16.6 The qualities required for good transformer oil :
The specifications for transformer oil are fully covered by IS : 335-1993. For instructions for
maintaining the insulating oil IS Code of Practice No. 1866 may be referred.
Briefly, the following characteristics are desired :
i)
Mineral oil grade B should be used.
ii)
It should have a high di-electric strength, i.e. not less than 40 kV in drums and 30 kV in
the transformer tank.
iii) It should contain negligible moisture content. A simple test which shows the presence
of moisture is the ‘crackle’ test. This could be done in two ways: Pour a small quantity
of oil sample into a test tube and heat up rapidly under a Bunsen burner. There should
be no cracking. Another method, a half inch iron rod heated to dull red heat is dipped
into a sample of oil kept in a clean vessel. Crackling shows presence of moisture.
iv) The oil should be perfectly clear and pale in colour. Cloudiness indicates presence of
moisture or impurities like sludge or rust, reddish tinge indicates presence of asphalt,
and green colour indicates presence of copper soaps.
v)
Acidity content should be very low, as it will cause precipitation of sludge and corrosion
181
of metal surfaces. If acidity content becomes excessive in service, the oil should be
replaced with new oil.
vi) ’Flash’ point and ‘Pour’ point should be as per specifications laid down.
vii) It should be chemically stable, i.e. it should not react to oxygen in the air even at high
temperatures.
16.7 Different methods of purifying and drying-out transformer oils :
There are primarily three types of oil purifiers in common use:
i)
Centrifugal purifiers such as the ‘De Laval’ type.
ii)
Filter pack type such as the ‘Streamline’ purifiers.
iii) Filters using activated earth media.
The purpose of oil purification is to remove from it, all contaminants such as water, carbon
deposits, dirt, sludge, dissolved moisture and gases. In transformer oils the most important
quality to be preserved is the di-electric strength. This is severely affected by the presence of
water either in the free state or as dissolved moisture. Transformer oils and the insulating materials
used in the transformer windings are hygroscopic, i.e. tend to absorb moisture, which may
enter into the transformer tank due to defective breathers, gaskets or by addition of untreated
make up oil. Circuit breaker and switch, oils get carbonised on account of the tremendous heat
produced in the electric arc before it is interrupted. Dissolved air and excessive heating (due to
arcing) cause oxidation of the oil and formation of heavy sludge deposits at the bottom of the
tank and on the surface of the windings. It is essential to remove all these impurities at least
once in two years by filtering the oil, in order to maintain the equipment in a healthy state.
16.8 Checking out dielectric strength for oil :
Dielectric breakdown strength of transformer oil is one of the most reliable tests for proving
the condition of the oil, and therefore good care is essential in conducting the test, since the
slightest trace of contamination or presence of moisture brings down the breakdown value very
sharply. For example, if finger tips are immersed for a moment or two into an oil cup containing
transformer oil which has been tested for a breakdown value of say 45 kV and test again, it is
astonishing to note that it may now breakdown at 20 kV or even less. So if low values are
recorded in a test, a probable cause may be careless handling. Unless staff are specially trained
and they fully appreciate the importance of perfect cleanliness at every stage of the test, the
results will be completely misleading.
Some of the points to be considered are detailed below :
i)
The breakdown values (BDV) given refer to the RMS voltage when tested as per IS
335:1993, using a standard test cell with two 13 mm dia. polished spheres, and a test
gap of 2.5 mm. The shape and spacing of the electrodes has a great influence on the
test values
182
ii)
The test should be conducted when the oil is cold and not when hot. The dielectric
strength varies with temperature as shown below :
Temperature 0C
30
40 50 60 70 80
BDV, kV
33
35 36
37 38 39
iii) Rubber is affected by oil. Therefore use plastic tubes for drawing out the sample.
Sampling bottles should have glass stoppers; cork absorbs moisture and may
contaminate the oil.
iv) The sample of oil should preferably be drawn from the bottom of the transformer tank.
As water is heavier than oil, it settles down at the bottom. The first sample or two may
be thrown away if it contains sludge or droplets of water; the next sample drawn will
surely not fail to reveal high moisture content if the oil has been exposed to drops of
water. The main difficulty in drawing samples from the bottom of the tank is when it is
not fitted with a drain cock but only with a drain plug. The sample may then be drawn by
siphoning off the conservator tank. In circuit breakers of good make special oil sampling
cocks are often fitted to facilitate drawing out a small quantity of oil for test purposes
without any spilling.
v)
The glass bottle into which oil is drawn should be perfectly clean, clear, transparent
and dry. It should then be thoroughly rinsed with oil known to be good. Collecting the oil
directly into the oil test cup may appear more convenient but is not recommended, to
avoid the possibility of damaging the cup by handling it unnecessarily, it is also
impracticable if a number of oil samples have to be tested. The sampling bottles should
have sufficient capacity to allow at least two tests. After collecting the oil, check up the
oil level in the transformer and make good if deficient. Every bottle should be clearly
labeled and dated.
vi) The oil testing set is best kept at the central maintenance depot and operated by trained
and intelligent staff. The testing equipment comprises:
a) A standard test cup, which can be readily removed for cleaning, fitted with two spheres
each 13 mm dia. with some means of adjusting the gap. This should be set at 4 mm
using the calibrated gauge, usually supplied with the equipment. The gap should be
checked every time the test set is used.
b) A fixed ratio transformer is used to step up the voltage. A small Variac connected to the
AC 230 volt supply permits application of variable voltage to the primary so that the HT
voltage applied to the test gaps may be raised gradually from zero to 40 kV or more. A
voltmeter is provided on the primary side but calibrated to show the secondary voltages
directly.
183
Fig.16.1 - Transformer oil testing kit
c) A circuit breaker to trip off the supply to the transformer, immediately if a sparkover
occurs.
(vii) The actual testing is done as follows :
a) The gap is first checked with gauge and the test cup and the electrode gap thoroughly
cleaned and washed with oil known to be good. The cup is then filled with the sample oil
to be tested upto about one cm above the electrodes. The cup top should then be
covered with a clean glass plate and allowed to rest for at least 5 minutes so that all air
bubbles may disappear. Any bubbles still standing on the surface may be removed with
a clean glass rod. Use thin rubber gloves if you can, so that the sweat on your fingers
may not cause any contamination of the oil.
b) After making sure that the test area is clear of all men and the voltage regulator is in the
zero position, switch on the supply. Raise the voltage gradually from zero so that the
full voltage is reached in about 20 to 30 seconds. It is quite possible that there may be
one or two sparkovers across the electrodes in the very early stage itself even when
the voltage is 20 kV or less. These should be ignored as they are usually due to some
extraneous matter like microscopic strands of cotton, dust, etc. which have a tendency
to get aligned along the strong electrostatic field in the spark gap. They get burnt out
and do not affect the test. The test should, therefore, be continued and the voltage
raised until there is positive and final breakdown of the oil accompanied by blackening
of the oil near the gap. The circuit breaker will also get tripped out. If it is closed once
again it will immediately trip. This is totally different from the spurious temporary
breakdown earlier, when re-closure will not cause tripping.
c) After emptying the oil cup the electrodes and the cup are once again thoroughly cleaned
and rinsed with good oil, after which they are ready for conducting another test. There
is no objection at all against conducting tests on two or more samples; the highest
value recorded should be taken as correct.
There are a number of environmental variables, such as temperature, precipitation, etc., to
184
consider before collecting a sample. The ideal situation for collecting a sample from an electrical
apparatus is 35°C (95°F) or higher, zero percent humidity and no wind. Cold conditions, or
conditions when relative humidity is in excess of 70 percent, should be avoided, as this will
increase moisture in the sample. Collecting a sample during windy conditions is also not
recommended because dust and debris enter the clean sample easily and disrupt accurate
particle counts. If sampling the oils is unavoidable when the outside temperatures are at or
below 0°C (32°F), it should not be tested for water content or any properties that are affected by
water such as dielectric breakdown voltage. Fluids with specific gravity greater then 1.0, such
as askarels, should be sampled from the top because free water will float. For fluids with a
specific gravity less than 1.0, such as mineral-based transformer oils, synthetic fluids and silicone
oils, the sample should be taken from the bottom since water will tend to drop to the bottom in
these fluids.
16.9 The breakdown value (BDV) for the oil :
Good oil for filling in of transformers should withstand at least 40 kV (in the above condition(via)) for one minute. If it is quite dry, the BDV could be as high as 50 kV or even 60 kV. When oil is
filled into a transformer tank and allowed to rest for several days, it will often be found that test
conducted on a sample subsequently drawn from the tank will give a much lower BDV than
before. This is because the dry oil which is filled in absorbs any moisture which may be present
inside the tank or the windings. If the BDV remains very nearly the same as before, it proves that
the windings are quite dry. As a general thumb rule, the minimum BDV for energizing any
transformer rated 33 kV or below is 30 kV. For higher voltages the minimum BDV is 40 kV. If it is
lower, it is necessary to dry out the transformer by one of the methods described earlier, until
BDV of 40 kV or more is obtained. For switch oil in circuit breakers or motor starters, etc. a
lower BDV is permissible but a minimum of 30 kV should be maintained.
16.10 Action to be taken if a transformer fails :
The action to be taken depends upon the size of the transformer, which protective relays
have operated, whether tripping is accompanied by loud noise, smoke or expulsion of oil from
the transformer, etc. Therefore, the first thing to do is to make a very careful note of the full
circumstances of the failure. The following brief notes may be of help:
i)
Go round the transformer and observe its external condition, look for any damage to
the bushings, leads or cable box and any evidence of squirting of oil. Note the temperature
of oil, at the earliest, and check if the level of oil in the conservator is right. Take megger
readings between primary and secondary and also of each to earth. If everything is
right, proceed as noted below.
ii)
The failure may possibly be due to sudden and heavy over-load or short-circuit. If a
HRC fuse provided for a small transformer has blown or a switch fuse has dropped
out, check if its ampere rating is right. If incorrect, replace by the correct size and
energise the transformer, after switching off the secondary circuit. If everything is all
right, close the secondary circuit ; if the fuse blows again, the fault is obviously in the
185
outgoing lines, which should be traced and rectified; if it does not blow the fault or
overload has apparently cleared itself. If,on the other hand, the primary circuit fuse
blows out, even when the load is disconnected, an internal fault or a fault in the connecting
cable is indicated. The above remarks also apply,if an over-current relay alone has
operated and tripped the breaker.
iii) If a differential relay operates when a transformer is first switched on, it may be due to
a switching surge. Check harmonic-restraint circuit. If, on the other hand, the relay
operates when the transformer is in service, it is a sure indication of an internal fault.
iv) Any tripping of the Bucholz relay requires to be carefully looked into. If the lower assembly
has tripped due to sudden evolution of large quantities of gas, a major internal fault is to
be inferred especially if either over-current or differential or earth fault relay has operated.
If, on the other hand, the upper assembly has tripped due to slow release of gas it is
necessary to find out its composition before any conclusions can be drawn. If it is air
only, there is no cause for worry, as air can enter into the transformer in many ways.
When a transformer is first commissioned it sometimes happens that the Bucholz
relay upper assembly trips, after a few hours of run, due to the release of air bubbles
entrapped within the windings, such as when hand filling is employed for filling oil into
the tank. To avoid this happening, it is best to fill the oil under vacuum, making use of a
pump.
If the a ccumulated gas is not air, an incipient fault is indicated. Analysis of the gas
would help in identifying the nature of the fault, and this should be done as a routine
measure. If the Bucholz relay has tripped, without any gas being given out, it may be
due to electrical fault in the wiring. To ensure that the relay does trip when there is
release of gas, it is necessary to conduct a test at the time of commissioning and also
periodically. This can be easily done by pumping in air through the pet cock by an
ordinary cycle pump. If the internal assembly is mechanically free, it will close the
electrical contacts, sound the alarm and trip the circuit breaker.
v)
Thorough checking is required if the Earth Fault relay has tripped or if there is any
evolution of smoke or oil, and also if the explosion vent provided in a large transformer
blows out. In such cases reclosure of supply should not be permitted as it may cause
further extensive damage. It will be necessary to lift the core out and make a detailed
inspection of the internal parts. Before doing so, however, it is necessary to take
measurements of the resistance of the windings and compare the figures with the
Maker’s test figures, which incidentally should be carefully preserved by every office. A
sample of oil should also be drawn out and its breakdown voltage tested.
vi) One way of finding an inner-layer or inter-coil short is to check the turns ratio by an
accurate ratiometer.
16.11 Points to be attended during periodical overhaul :
After lifting out the core and placing it on a trestle, the interior of the tank should be thoroughly
186
cleaned of all accumulated sludge, muck and dirt. Take care to clean up the drain plug, and
wash the interior of the tank as well as the cooling tubes, first with old oil and again with new oil.
If there are any cracked or badly welded joints they may be attended to. Thoroughly clean all the
gasket surfaces and keep new gaskets ready. Check acidity of oil, if excessive replace it by
fresh oil. Sludge to be removed from the core and coil assembly . The sludge should be scraped
off with fibre or wooden strips. Oil ventilation ducts should be specially cleared. By applying a jet
of oil under pressure the interior parts of the coil assembly could be flushed and all traces of
sludge removed.
Wedges which are usually provided to hold the coil assembly in position should be driven in
to take up any slackness. Large transformers are often equipped with adjustable screws bearing
on clamping rings placed on the outerside of the end coils, so that any slackness due to shrinking
of coils could be taken up. These screws should be tightened up. Shrinkage and settlement
usually takes place within the first few months of the commissioning of a transformer. If the coils
are not rigidly in position, it will lead to repeated movement of the coils as well as the layers and
turns, which in turn will cause abrasion and wear and ultimately breakdown of insulation. To
overcome this, modern transformer coils are often pre-shrunk. The first available opportunity
should be taken, preferably after six months or one year after commissioning, to drive in the
wedges and tighten up the pressure screws where they are provided. Core clamping bolts and
check nuts should be tightened, as also all bolted electrical joints. Attention should be given to
clean up the tap-changing switch contacts and mechanism. After a careful check the core
should be lifted and lowered into the tank, internal connections put back, fresh oil filled in and top
cover bolted in position. Before closing the cover, make sure that no spanners or tools are
inadvertently left inside. The oil may then be circulated through an oil purifier and the transformer
dried out until all moisture has been driven out. The transformer may then be subjected to as
many tests as feasible depending upon the test facilities available. A load test would be particularly
useful. Where an industry, railway or electric supply authority has a large number of transformers
to maintain, it is obviously desirable to make a periodical overhaul (POH) programme, maintaining
a few spare transformers of different capacities for being sent out to work in place of other
transformers to be brought into the central workshop one after another for POH. The work load
on the workshop will be uniform throughout the year and no transformer will be left neglected
for long periods until it breaks down.
QUESTIONS
Part - A
Choose the Correct Answer
(1 Mark)
1.
Abnormal rise in temperature of oil in transformer may be due to
A) Over voltage
B) Transformer losses
C) Overloading
D) Failure of circuit breaker.
2.
During drying process of transformer the temperature should not exceed
A) 500C
B) 900 C
C) 1200 C
D) 300 C
187
3.
Drying process can be quickened by applying
A) Heat
B) Hot air
C) High pressure
D) Vacuum.
4.
A simple and quick way of checking moisture in transformer oil is
A) Crackle test B) Di-electric test
C Break down test
D) Flash test
5.
A gap of ________________ mm is maintained between the spheres in the dielectric strength
testing kit.
A) 1 mm
B) 2.5 mm
C) 4 mm
D) 10 mm
6.
The dielectric strength of oil should be ________________ kV for 1 min. under normal
condition of oil.
A) 40
B) 100
C) 25
D) 32
7.
Which relay may some times operate causing triping circuit breaker during transformer
switch ON
A) over current relay
B) bucholz
C) differential relay
D) earth fault relay
8.
Tripping of __________________ relay requires careful investigation, since it is operated
by gas evolved within the transformer.
A) over current
B) under voltage
C) earth fault
D) bucholz
9.
Transformer oil needs to be replaced if _____________________ of oil is very high.
A) dielectric strength
B) moisture
C) acidity
D) density
10. __________________ of oil can be done even when transformer is in service.
A) changing
B) purification
C) draining
D) inclusion
Part - B
Answer the following questions in one or two words
1.
2.
3.
4.
5.
6.
7.
8.
9.
(1 Mark)
Which material is best suited for gaskets for Transformer?
What is time normally taken for drying out a large transformer?
Under what conditions drying of transformer can be done by blowing in hot air through the
transformer tank?
What should be inlet air temperature in the above case?
What is IS standard (No.) which gives the specifications for transformer oil?
What should be colour of a good quality Transformer oil?
What affects the di-electric strength of Transformer oil?
What are the two main causes of oxidation of the oil?
State whether the breakdown values (BDV) are given normally refer to the RMS voltage or
peak voltage?
188
10. What is the very important aspect to be observed while of conducting dielectric strength
test on transformer oil?
Part - C
Answer the following questions briefly
1.
2.
3.
4.
5.
6.
7.
8.
9.
10.
11.
12.
(4 Marks)
What may be the reason for rise in temperature of transformer oil?
State the causes for the drop in oil bud in a transformer?
What is drying of transformer?
What are the precautions to be observed during the drying out process?
What are the different methods used for drying of transformer?
What is meant by purification of transformer oil. State its necessity.
What are different oil purifier commonly used?
What are the components of oil testing set?
What is meant by Break down value of oil?
What should be the BDV of oil under normal operating conditions?
State few reasons for failure of transformer?
State the reasons for fall in dielectric strength of transformer oil?
Part - D
Answer the following questions in one page level
1.
2.
3.
4.
5.
6.
(10 Marks)
State the actions to be taken to rectify the problem of low insulation value?
Briefly explain, what is degreasing? How it is done?
State the remedial measures to be taken if transformer oil level falls?
What are desired qualities of good transformer oil?
State the precautions to be followed during testing of dielectric strength of transformer oil?
Briefly describe what are things to be done during overhauling of transformer?
189
HIGHER SECONDARY - VOCATIONAL
THEORY - ELECTRICAL MACHINES AND APPLIANCES
MODEL QUESTION PAPER
Time: 3Hrs
Max. Marks: 200
Part – I
Choose the Correct Answer
15x1=15 Marks
1.
Insulating materials are used between
A) Conducting materials and Non - conducting materials
B) Two non –conducting materials
C) Two-conducting materials (both not part of current carrying circuit)
D) Two conducting materials (of which only one is part of current carrying circuit)
2.
To transfer power without much loss of power<the conductor material should be
A) Very light B) very strong C) have very low resistance D) have very low weight
3.
The back pitch for a 4 pole, 12 slot simplex lap connected dc machine is
A) 1.0
B) 3.1
C) 5.3
D) 7.5
4.
In single layer winding, the number of coil is equal to ________________ so that
each slot contains only one coil side.
A) The number of slots on the stator B) the number of poles
C) Synchronous speed D) half the number of slots on the stator
5.
The value of back pitch of a dc armature winding should be
A) a even integer B) an odd integer C) equal to one D) a prime number
6.
In double layer winding to ensure that the coils have the same pitch and turns, there
will be___________coil side(s) in each slot
A) One B) four C) six D) two
7.
By performing continuity test, we can determine
i) Existence of any open circuit in the electrical network
ii) Existence of any short circuit in the electrical network
A) i alone is correct
B) ii alone is correct C) both are correct
D) both are wrong
8.
An / A____________ converts electricity into heat to cook and bake
A) Electric toaster
B) electric stove C) fridge D) grinder
9.
Pick the odd one out
A) Heating element B) Nichrome C) Sole plate D) Pressure plate
10.
The type of heater used to heat the water contained in a plastic buket is
A) Electric kettle B) immersion water heater C) storage water heater D) Any type
11.
The drive motor used in electric Mixie is
A) DC series motor B) induction motor C) Universal motor
12.
D) synchronous motor
T he type of Vacuum cleaner used to clean stairs and under furniture is
A) Cylinder type B) upright type C) Wet and dry type D) Any one
190
13.
The diameter of the circle traced out by the extreme tips of the fan blades is called as
A) Blade flange B) blade length C) blade sweep D) blade size
14.
The part due to wich water gets the centrifugal force is called
A) Casing or volute B) stuffing box C) spindle D) impeller
15.
The maintenance work carried out on the machine after it has failed to work is called
A) Breakdown maintenance
B) Preventive maintenance
C) Periodic maintenance
D) Predictive maintenance
Part – II
Answer all the questions in one or two words
15x1=15 Marks
16. Which classes of insulating material can withstand temp.s of 1550 C and 180 C respectively?
17. Which type of copper conductor is called hard copper?
18. Write the formulae for the total number of conductors of a given machine
19. For full pitch winding, what should be the angle between the two sides of the same coil?
20. What rule is used to find the current direction in the armature winding of a dc generator?
21. Which has a tendency to impair the insulation on the wires and cause shorts?
22. While measuring resistance of the coil using multimeter, it reading indicates infinite
resistance. What does it mean?
23. Which part inside a toaster is linked to a toast colour control outside?
24. Which part of electric iron is used to keep the heating element firmly against the sole –
plate?
25. Name the material filled in the space between the tanks in storage water heaters to prevent
heat transfer from inner tank to outer tank.
26. For speed control of mixie motor, tapping is provided in armature coil. Say True or False
27. What is the need of vacuum filters in Vacuum cleaner?
28. What type of capacitor is used in electric ceiling and table fan?
29. What is packing rope made of?
30. What maintenance procedure is based on inspection or diagnosis?
191
Part – III
Answer Any ten Questions in one or two sentences
10x4=40 Marks
31. Give two examples of insulating materials in each of the above classes.
32. What is meant by flexible wire?
33. What are called as half coil windings?
34. Calculate the angle between the adjacent slots for a 3 phase, single layer concentric type
of winding for a 2 pole ac machine having 12 slots.
35. Calculate the back, front and winding pitches for a 2 pole, 6 slot double layer simplex
wave connected dc machine with commutator having 12 segments.
36. Why is the armature banded? Explain.
37. What is importance of insulation testing? State the causes of insulating material
deterioration.
38. Distinguish between Non – automatic and automatic type electric toaster?
39. Distinguish between Non – automatic and automatic Iron box
40. List the precautions to be followed while using immersion water heater.
41. How do you clean body of electric mixie, its jar and blades?
42. State the uses of different types of vacuum cleaner.
Part – IV
Answer Any Five Questions Briefly
(5x10=50Marks)
43. What are the differences between Thermoplastic and thermosetting plastics? Discuss the
properties of any two materials from each category.
44. State any ten properties of Enamel coating of the wires.
45. Explain the procedure of lacing the steel bands.
46. Briefly explain the construction and operation of percolator type coffee maker
47. Explain briefly the function of following in electric mixie i) different jars ii) Auto – overload
protector.
48. Brief the various problems normally arise in washing machine and discuss their remedies
49. Discuss briefly the various safety features commonly employed in hair dryers.
192
Part – IV
Answer Any Four Questions Elaborately
4x20=80Marks
50. Derive expressions for electrical and mechanical degrees in terms of poles and slots.
51. Develop a 3 phase, single layer concentric type of winding for a 4 pole ac machine having
24 slots using a) Half coil winding OR b) whole coil winding OR c) mush winding
52. Develop a winding diagram for a 4 pole, 13 slot double layer simplex wave connected dc
machine with 1 commutator segments. Indicate the position of brushes.
53. With suitable circuits, explain briefly the method of 3 – phase power measurement using i)
single wattmeter ii) two wattmeters and iii) three wattmeters.
54. Explain with neat sketches, the construction and working of an electric toaster
55. Stating the function of bimetallic thermostat, explain briefly the construction and working of
Automatic Iron box.
193
194
1
15
15
Details of winding
Development of Winding - AC machines
Development of Winding - DC machines
Rewinding and Testing of Electric motors
Instruments and Testing
Electrical Cooking Appliances
Electric Iron Box
Water Heaters and Coffee Makers
Electric mixer and Egg Beaters
Vacuum cleaner and Washing machines
Electric Fan and Electric hair drier
Centrifugal Pump
Maintenance of Roatating machines
Maintenance of Transformers
TOTAL QUESTIONS TO BE ANSWERED
TOTAL MARKS - 200
3.
4.
5
6.
7.
8.
9.
10.
11.
12.
13.
14.
15.
16.
1
1
1
1
1
1
1
1
1
1
1
-
1
1
Winding wire
2.
1
Winding Insulating Materials
Contents
Choose the
correct
Answer
1 Mark
1.
Sl.No.
Answer in One
or Two words
1 Mark
15
15
1
1
1
1
1
1
1
1
1
1
1
1
1
-
1
1
Answer briefly
around five
lines
4 Markss
40
10
1
1
1
1
-
1
-
-
1
1
1
-
1
1
1
1
50
5
1
1
-
1
-
1
-
-
-
1
-
-
-
-
1
1
Answer in one
page level
10 Marks
BLUE PRINT FOR 12TH STANDARD ELECTRICAL MACHINES AND APPLIANCES - THEORY
80
4
-
-
-
-
1
-
1
1
-
-
1
1
-
1
-
-
Answer in two
page level
20 Marks