1
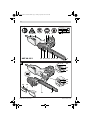
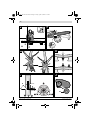
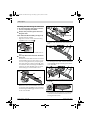
OBJ_BUCH-1238-001.book Page 30 Friday, April 30, 2010 9:39 AM
30 | English
Mounting and Tensioning the Chain Saw
17
18
f Do not connect the chain saw to mains before it is completely assembled.
f Always wear protective gloves when handling the chain.
21
Chain and Chain Bar Assembly (see figure A)
20
– Unpack all parts carefully.
– Align the 2 arrows on the chain-tensioning
ring 14 and the cover 16 ( ).
16
12
– Check if all parts are seated properly and
hold the chain bar and the chain in this position.
14
– Place the chain saw on any suitable flat surface.
f Use only chains with a drive link thickness
of 1.1 mm.
– Slide the saw chain 11 in the slot around the
chain bar 12. Ensure the saw chain is in the
correct running direction by comparing the
saw chain with the rotation symbol 17. Take
care that the chain tensioning catch 23 faces
outward. The saw chain 11 is slid on easier
when holding the chain bar 12 vertical.
– Fit the cover 16 exactly, check that arrows
are still aligned and take care that the chain
catch bolt 22 engages into the groove of the
cover plate 16.
11
23
12
17
– Fit the chain links around the drive sprocket
18 and mount the chain bar 12 in such a manner that the guide fins 20 in front and behind
the fastening bolt 21 engage into the keyway
of the chain bar 12.
16
22
– Lightly tighten the cover 16 with the locking
knob 15.
15
– The chain is not yet tensioned. The saw chain
is tensioned as described in section “Tensioning the Saw Chain”.
F 016 L70 667 | (30.4.10)
Bosch Power Tools