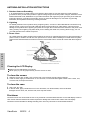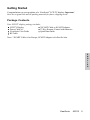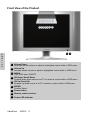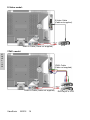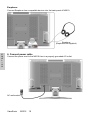
1
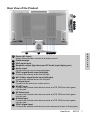
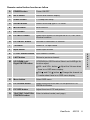
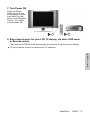
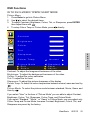
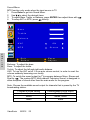
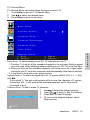
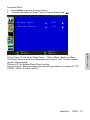
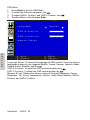
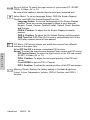
ViewSonic
®
N2010
LCD TV Display
- User Guide
- Guide de l’utilisateur
- Bedienungsanleitung
- Guía del usuario
- Guida dell’utente
- Användarhandbok
- Käyttöopas
- Руководство пользователя
ViewSonic
®
Contents
Product Registration.................................................................2
For Your Records.....................................................................2
Important Product Safety Instructions......................................3
Antenna Installation Instructions...............................................4
Cleaning the LCD Display.................................................4
Getting Started
Package Contents....................................................................5
Front View of the Product.........................................................6
Rear View of the Product..........................................................7
Remote Control.........................................................................8
Installation.................................................................................12
Basic Operation........................................................................18
OSD Functions
In TV/ AV/ S-Video/ YPbPr/ SCART Mode..............................19
In PC Mode...............................................................................25
Other Information
Specifications...........................................................................27
Troubleshooting........................................................................28
Customer Support....................................................................29
Limited Warranty......................................................................30
Appendix
Safety Guidelines.....................................................................31
CE Conformity for Europe......................................................31
ViewSonic
N2010 1
E
N
G
L
I
S
H
Copyright © ViewSonic Corporation, 2005. All rights reserved.
ViewSonic, the three birds logo, OnView, ViewMatch, and ViewMeter are registered trademarks of
ViewSonic Corporation.
Disclaimer: ViewSonic Corporation shall not be liable for technical or editorial errors or omissions
contained herein; nor for incidental or consequential damages resulting from furnishing this material,
or the performance or use of this product.
In the interest of continuing product improvement, ViewSonic Corporation reserves the right to
change product specifications without notice. Information in this document may change without
notice.
No part of this document may be copied, reproduced, or transmitted by any means, for any purpose
without prior written permission from ViewSonic Corporation.
Product Registration
To meet your future needs, and to receive any additional product information as it becomes
available, please register your product on the Internet at: www.viewsonic.com.
For Your Records
E
N
G
L
I
S
H
Product Name:
Model Number:
ViewSonic N2010
VS10563-2E
Serial Number:
Purchase Date:
Product disposal at end of product life
ViewSonic is concerned about the preservation of our environment. Please dispose of this product
properly at the end of its useful life. Your local waste disposal company may provide information
about proper disposal.
ViewSonic
N2010
2
IMPORTANT PRODUCT SAFETY INSTRUCTIONS
ATTENTION:
Follow and obey all warnings and instructions marked on your product and its operating instructions. For your safety,
please read all the safety and operating instructions before you operate this product follow its operating and keep this
user guide for future reference.
INSTALLATION
1. Grounding or Polarization
Your product may be equipped with a polarized alternating-current line plug (a plug having one blade wider than the
other). This plug will fit into the power outlet only one way. This is a safety feature.If you are unable to insert the
plug fully into the outlet, try reversing the plug. If the plug should still fail to fit, contact your electrician to replace your
obsolete outlet. Do not defeat the safety purpose of the polarized plug.
2. Overloading
Do not overload wall outlets, extension cords, or integral convenience receptacles as this can result in a risk of fire
or electric shock.
3. Power Cord Protection
Power supply cords should be routed so that they are not likely to be walked on or pinched by items placed upon or
against them, paying particular attention to cords at plugs, convenience receptacles, and the point where they exit
from the product.
4. Ventilation
Slots and openings around the cabinet are provided for ventilation.
To ensure reliable operation of the product and to protect it from overheating, these openings must not be
blocked or covered.
Do not block the openings by placing the product on a bed, sofa, rug or other similar surface.
Do not place the product in a built-in installation such as a bookcase or rack unless proper ventilation is provided or
the manufacturer's instructions have been adhered to.
5. Other Notices
Avoid exposure the N2010 to direct sunlight or high temperature.
Avoid exposure the N2010 to moisture or high humidity.
Do not attempt repair yourself. Your warranty does not cover repair or attempted repair by anyone not authorized
by ViewSonic.
If your N2010 will not be used for a long period of time, unplug the power cord and remove the batteries from the
remote control.
6. Precautions
Sit at least 20" from your LCD display.
Avoid touching the screen. Skin oils are difficult to remove.
Never remove the rear cover. Your LCD display contains high-voltage parts. You may be seriously injured if you
touch them.
Avoid exposing your LCD display to direct sunlight or another heat source. Orient your LCD display away from direct
sunlight to reduce glare.
Always handle your LCD display with care when moving it.
Place your LCD display in a well-ventilated area. Do not place anything on your LCD display that prevents heat
dissipation.
Ensure the area around the LCD display is clean and free of moisture.
Do not place heavy objects on the LCD display, video cable, or power cord.
If smoke, abnormal noise, or strange odor is present, immediately switch the LCD display off and call your dealer or
ViewSonic. It is dangerous to continue using the LCD display.
ViewSonic
N2010
3
E
N
G
L
I
S
H
ANTENNA INSTALLATION INSTRUCTIONS
1. Outdoor Antenna Grounding
If an outside antenna or cable system is connected to the product be sure the antenna or cable system is
grounded so as to provide some protection against voltage surges and built-up static charges, Article 810 of the
National Electrical Code, ANSI/NFPA 70, provides information with regard to proper grounding of the mast and
supporting structure, grounding of the lead-in wire to an antenna discharge unit, connection to grounding
electrodes, and requirements for the grounding electrode.
2. Lightning
For added protection for this product during a lightning storm, or when it is left unattended and unused for long
periods of time, unplug it from the wall outlet and disconnect the antenna or cable system. This will prevent
damage to the product due to lightning and power-line surges. Do not disconnect the antenna or the power cord
during a heavy storm lighting may strike while you are holding the cable cord, causing serious injury; turn off
you LCD and wait for the wether to improve.
3. Power Lines
An outside antenna system should not be located in the vicinity of overhead power lines or other electric light or
power circuits, or where it can fall into such power lines or circuits, When installing an outside antenna system,
extreme care should be taken to keep from touching such power lines or circuits as contact with them might be
fatal.
E
N
G
L
I
S
H
Cleaning the LCD Display
Make sure the LCD Display is turned off.
Never spray or pour any liquid directly onto the screen or case.
To clean the screen:
1 Wipe the screen with a clean, soft, lint-free cloth. This removes dust and other particles.
2 If still not clean, apply a small amount of non-ammonia, non-alcohol based glass cleaner onto a clean, soft,
lint-free cloth, and wipe the screen.
To clean the case:
1 Use a soft, dry cloth.
2 If still not clean, apply a small amount of a non-ammonia, non-alcohol based, mild non-abrasive
detergent onto a clean, soft, lint-free cloth, then wipe the surface.
Disclaimer
ViewSonic® does not recommend the use of any ammonia or alcohol-based cleaners on the LCD display screen or
case. Some chemical cleaners have been reported to damage the screen and/or case of the LCD display.
ViewSonic will not be liable for damage resulting from use of any ammonia or alcohol-based cleaners.
ViewSonic
N2010
4
Getting Started
Congratulations on your purchase of a ViewSonic® LCD TV display. Important!
Save the original box and all packing material for future shipping needs.
Package Contents
Your LCD TV display package includes:
LCD TV Display
Power Cable (s)
ViewSonic User Guide
RF Cable
*SCART Cable or SCART Adapter
37-Key Remote Control with batteries
Quick Start Guide
Note: * SCART Cable is for Europe, SCART Adapter is for Pacific Asia.
E
N
G
L
I
S
H
ViewSonic
N2010
5
Front View of the Product
1 2 34 5 6 7
E
N
G
L
I
S
H
8 9
1 Volume Down
Decrease sound volume or adjust a highlighted control while in OSD menu.
2 Volume Up
Increase sound volume or adjust a highlighted control while in OSD menu.
3 MENU
Turn OSD menu ON/OFF.
4 CH Down/ Scroll Down
Channel down when source is at TV or select a control while in OSD menu.
5 CH Up/ Scroll Up
Channel up when source is at TV or select a control while in OSD menu.
6 ENTER
Confirm Select.
7 Power button
8 Remote control receiver
9 Power LED indicator
ViewSonic
N2010
6
Rear View of the Product
H
I
J
K
L
A
B
C D E FG
E
N
G
L
I
S
H
A Power (AC input)
Using cable provided, connect to a power source.
B Cable manager
C VGA signal input
D Earphone output (light blue) and PC Audio input (light green)
E Audio output
Connect this port to your external speaker.
YPbPr signal Audio input (left/right)
Connect the external audio into this jack.
G AV/ S-Video signal Audio input (left/right)
Connect the external audio into this jack.
H TV signal input
Connect to the antenna or cable service.
I SCART input
Connect the external video devices such as VCR, DVD and video game
into this jack.
J AV Video input
Connect the external video devices such as VCR, DVD and video game
into this jack.
K S-Video input
Connect the external video devices such as VCR, DVD and video game
into this jack.
L YPbPr signal input
Connect the external video devices with component output to these jacks.
F
ViewSonic
N2010
7
Remote Control
E
N
G
L
I
S
H
ViewSonic
N2010
8
Remote control button function as follow
A
POWER button
Power ON/OFF
B
INFO button
Source and channel display
C
SLEEP button
TV Sleep time setup
D
SOUND button
Switch sound sap type in TV mode
E
MUTE button
Mute ON/OFF
F
EXIT button
OSD exit
G
PIP INPUT button
Select input source of sub-picture in PIP, PBP, Multi
Window condition
H
PIP ON/OFF button
Activate or inactivate PIP function
I
TV button
Switch to TV input mode
J
Input button
Select Input Source
K
0~100+ number button
Input channel number
L
LAST button
Return to previous channel
M
UP/ DOWN/ Left/
Right/ ENTER button
UP/DOWN for OSD function Select and Left/Right for
function adjust
VOL- and VOL+ button
E
N
G
L
I
S
H
Adjust the Volume when
there is no OSD menu display
CH-
and CH+
button
Change the channel on
TV mode when there is no OSD menu display
N
Menu button
Select OSD menu
O
PIP SOUND button
Select the sound from main or sub picture of PIP/
PBP/Multi Window
P
PIP SIZE button
Adjust the size of PIP sub-picture
Q
TELETEXT FUNCTION
CONTROL button
Enter to teletext mode (next page)
ViewSonic
N2010
9
Teletext function control button
TEXT/ MIX/ PICTURE button
In TV Mode: Press the TEXT/ MIX/ PICTURE button to enter the Teletext mode.
In TELETEXT Mode: Press the button again to superimpose a Teletext broadcast
onto the screen of current TV program (mixed Mode).
In MIXED Mode: Press the button again to return back to the normal TV screen
(current program).
Index button
E
N
G
L
I
S
H
Press the Index button to return to index page.
When you press this button in teletext mode, a CURSOR appears. This cursor
(rectangular box) contains a page number and you can select the desired page
simply by using the four colours.
RED button: Move cursor down.
GREEN button: Move cursor up.
YELLOW button: Change from current page to selected page.
BLUE button: Exit the CURSOR Mode.
List button
Press this button you force the Teletext to LIST Mode. It means that row 24 (bottom
row of Teletext) will not have transmitting information, only the pages that you have
previously stored in the memory.
Press LIST button again to exit from LIST Mode to teletext.
Size button
Selects double height text under Teletext mode for full screen.
Press this button to enlarge the top half of the page.
Press this button again to enlarge the bottom half of the page.
Press this button again to return to the normal display.
ViewSonic
N2010
10
Reveal button
Press this button to display concealed information, such as solutions of riddles or
puzzles.
Press this button again to remove the information from the display.
Hold button
Press this button to remove the information from the display and stop the automatic
page change which will occur if a teletext page consists of 2 or more sub pages.
To continue press this button again. The number of sub pages and the sub page
displayed is, usually, shown on the screen below the time. When this button is
pressed the stop symbol is displayed at the left-top corner of the screen and the
automatic changing is inhibited.
E
N
G
L
I
S
H
Store button
Store current pages in List mode.
Press the LIST button to change from FLOF system to LIST Mode.
Press a coloured button to correspond to the coloured brackets on the screen for
page number storage.
Enter the Teletext page number using the 0 ~ 9 digit buttons (enter three digits).
Press the STORE button to memorize the page numbers you require.
Subcode button
When a selected Teletext page with hidden sub pages or timed pages, these pages can
be seen by the following manner:
1. Press the subcode button. Screen will show « = = = = »
2. Enter 4 digits number button to correspond to the subpage desired. E.g. 0010 for sub
page number 10.
3. Wait until the page appears.
ViewSonic
N2010
11
Installation
1. Insert Remote Control Batteries
1 Remove the battery cover by pulling then lifting the knob on the cover.
2 Insert the batteries, corresponding to the (+) and (-) markings on the battery compartment.
3 Reattach the battery cover.
CAUTION
E
N
G
L
I
S
H
Only use the specified AAA batteries.
Do not mix new and old batteries. This may result in cracking or leakage,
which may pose a risk of fire or lead to personal injury.
Insert batteries according to (+) and (-) markings. Inserting the batteries incorrectly may result in cracking or leakage, which may pose a risk of fire or lead to
personal injury.
Dispose of the battery in accordance with local laws and regulations.
Keep the battery away from children and pets.
When the remote control will not to be used for an extended period, remove
the batteries.
2. Connecting with the antenna
Make sure the power is off before installing N2010.
Connect the LCD TV to TV antenna terminal or CATV box by 75-ohm coaxial cable.
RF Cable or Adapter
ViewSonic
N2010
12
3. Connect Audio Cable
Connect Video/Audio cables from compatible devices into the back panel of N2010.
OPTIONAL:
To connect an external amplifier,
connect the L/R RCA cable from
the TV AUDIO OUT port to the
appropriate AUDIO IN port on a
compatible amplifier as shown on
the right.
Audio Cable (Cable not supplied)
Stereo system
4. Connect AV, S-Video, YPbPr to Video Devices
E
N
G
L
I
S
H
Connect Video/Audio cables from compatible devices into the back panel of N2010.
AV model:
VCR
RCA A/V Cable (Cable not supplied)
ViewSonic
N2010
13
S-Video model:
S-Video Cable
(Cable not supplied)
Audio in Cable (Cable not supplied)
VCR
YPbPr model:
E
N
G
L
I
S
H
YPbPr Cable
(Cable not supplied)
Audio in Cable (Cable not supplied)
ViewSonic
N2010
14
DVD Palyer or VCR
5. Connect to the PC
VGA (15pin D-Sub):
Connect the VGA cable from VGA output of PC to the VGA terminal input of N2010.
PC up to 800 x 600, 640 x 480 is the preferred resolution.
Note:
PC must output
640 x 480 signal
only.
PC
E
N
G
L
I
S
H
VGA 15 Pin Cable
(Cable not supplied)
PC Audio in:
Connect the Audio In cable (green) from audio output of your PC to the audio input
terminal (green) of N2010.
PC
PC Audio in Cable
(Cable not supplied)
ViewSonic
N2010
15
Earphone:
Connect Earphone from compatible devices into the back panel of N2010.
Earphone
(Earphone not supplied)
E
N
G
L
I
S
H
6. Connect power cable
Connect the power cord to the N2010 then to a properly grounded AC outlet.
AC wall socket
ViewSonic
N2010
16
7. Turn Power ON
Press the Power
button on top of the
LCD display, or press
the Power On (red)
button on the Remote
Control. Turn Video
source power ON.
8. Select input source for your LCD TV display, via either OSD menu
or Remote control
The Enter key of N2010 is the shortcut key for selection of input source to display.
TV key of remote control is a shortcut for TV selection.
E
N
G
L
I
S
H
ViewSonic
N2010 17
Basic Operation
To adjust the function of your LCD TV, you may use the remote control or top panel
buttons above your LCD TV to select input source, change channels, or adjust LCD TV
volume.
Turning on the LCD TV
Before using the LCD TV:
1. Insert the power plug.
2. Connect external equipment properly.
3. Power On/Off:
Press the POWER button of the top of the LCD TV or press the POWER button on
your remote control to turn on/off the TV. The power LED indicator lights when the
LCD TV is on.
Volume Adjust
Press
or
vol-/+ to adjust the volume.
Volume
Adjust
E
N
G
L
I
S
H
Exit
Channel Select
Press CH+/- or number key to select your desired channel.
How to select the desired channel by using remote control?
Ex: If your desired channel is 8.
Press 0, and then 8.
(or you may press 8 only)
Ex: If your desired channel is 80.
Press 8, then press 0.
Favorite Channel Select
Display the current information, such as input source, channel number, sleep setting, and
sound mode.
The function only works when it is in TV mode. However, in PIP mode, it is unable to use.
Press INFO, and the current state will be displayed on the screen.
Using the OSD Menu
You can use the OSD Menu and options to adjust various settings by using your remote
control.
The basic operation is as following:
1. Display OSD Menu: press MENU.
2. Select the OSD page: use
.
3. Move the cursor bar up and down: use
.
4. Confirm the desired item: press ENTER.
5. Adjust the condition: use
.
6. Back to previous viewed page: press EXIT.
ViewSonic
N2010 18
OSD Functions
IN TV/ AV/ S-VIDEIO/ YPBPR/ SCART MODE
Picture Menu
1. Press Enter to get into Picture Menu.
2. Use
to select the desired items.
3. To adjust Constrast, Brightness, Colour, Tint, or Sharpness, press ENTER
then adjust them with
.
4. To setup Colour Temp or Picture Mode, press
directly.
Picture
Contrast
Brightness
Colour
Tint
E
N
G
L
I
S
H
Sharpness
Colour Temp
Normal
Picture Mode
Exit
Select
Standard
Enter
Adjust
Contrast: To adjust the foreground luminance of the video.
Brightness: To adjust the background luminance of the video.
Colour: To adjust the colour saturation.
Tint: To adjust the tint level.
Sharpness: To adjust the picture sharpness of the display.
Colour Temp: To select the colour temperature between normal, warm and cool by
.
Picture Mode: To select the picture mode between standard, Movie, Game, and
User by
.
If you select “User” in the item of “Picture Mode” you are able to adjust Contrast,
Brightness, Colour, Tint, Sharpness, Colour Temp, and Picture Mode.
If you select “Standard,” “Movie,“ or “Game” in Picture Mode, you may adjust only
Colour Temp and Picture Mode, because Contrast, Brightness, Colour, Tint, and
Sharpness are preset by the factory.
ViewSonic
N2010
19
Sound Menu
MTS function only works when the input source is TV.
1. Press Enter to get into Sound Menu.
2. Use
to select the desired items.
3. To adjust Bass, Treble, or Balance, press ENTER then adjust them with
4. To setup AVC or MTS, press
directly.
Sound
Bass
Treble
Balance
E
N
G
L
I
S
H
AVC
ON
MTS
Stereo
Exit
Select
Enter
Adjust
Balance: To adjust the bass.
Bass: To adjust the treble.
Treble: To adjust the left and right audio balance.
AVC: To turn the AVC on/off. It is an auto volume control, in order to avert the
volume suddenly becoming over loudly.
MTS: To switch the sound output for TV programs between Mono, Stereo and
Dual by
. The system-MTS, Multi-channel Television Sound, is designed to
allow reception of sound other than the main audio for the program.
Note: Choose the available sound output for channels that is preset by the TV
broadcasting station.
Program’s sound setting
dual
stereo
mono
ViewSonic
N2010
20
Exchangeable sound output
dual I, dual II
stereo, mono
mono
.
TV Channel Menu
TV Channel Menu only works when the input source is TV.
1. Press Enter to get into TV Channel Menu.
2. Use
to select the desired items.
3. Press Enter to get in to the items.
T V- C h a n n e l
Auto Scan
System Select
ALL
Channel Skip
Channel Exchange
Channel Copy
Fine Tune
Manual Store
Exit
Select
Enter
Adjust
Auto Scan: To automatically preset the TV channels into the TV.
1. Function: To look for all the viewable channels in the set area. Kindly suggest
you auto scan all the channels before watching your LCD TV for the first time.
2. After auto scan all the available channels, you need not to do it again when
turning on your TV next time, because it will automatically store them in memory.
3. If you want to stop auto scan, press any key.
System Select: To select the signal input of TV system (B/G/H, D/K, L, L’, I, ALL)
with
.
If you select “L,” the auto scan system will only scan the channels of L system.
If selecting “ALL,” it will scan all the available channels, and it takes much
more time to do it.
Channel Skip: To add or erase TV channels.
Channel Skip
CH
0:
Keep
1.
2.
3.
4.
Use
to select the desired channel.
Then use
to keep or skip the channel.
Press EXIT to leave the page.
To recover the skipped channel, select
Keep function.
Select
Adjust
ViewSonic
N2010 21
E
N
G
L
I
S
H
Channel Exchange: To make TV channels exchanged.
Channel Exchange
From
:
CH
0
To
:
CH
0
Store
: Save
Select
Adjust
For instance, if you expect to exchange
CH2 and CH10,
1. From: use
to select CH2.
2. To: use
to select CH10.
3. Store: press ENTER, it will show “Ok”
instead of “Save.”
4. Press EXIT to leave the page.
Channel Copy: To make a copy of TV channel.
Channel Copy
From
:
CH
0
To
:
CH
0
Store
E
N
G
L
I
S
H
Select
Adjust
: Save
For instance, if you expect to make a copy of
CH2 to replace CH10,
1. From: use
to select CH2.
2. To: use
to select CH10.
3. Store: press ENTER, it will show “Ok”
instead of “Save.”
4. Press EXIT to leave the page.
Fine Tune: Due to weak signal or wrong antenna configuration, the channels
may have the grainy picture. For the sake of tuning the channels precisely, you
are able to use Fine Tune to improve the problem.
Manual Store: The function is to give a minute search for possible existing
channels and store them in memory.
For instance, if you expect to search for posManual Store
sible channels nearby channel 1,
1. Move your cursor to “CH. NO.” Then press
Search:
45MHz
channel number keys to select channel 1.
System:
ALL
2.
a)
Search by channel frequency:
CH.NO:
0
Move your cursor to “Search.”
Store:
save
Press or to search the possible chanSelect
nels nearby channel 1.
Adjust
b) Search by System:
Move your cursor to “System.”
Press or to select the desired system
between B/G/H, D/K, L, L’, I, and ALL. At
this time, the channel frequency will change
with the system.
3. Once the channel is found, move your cursor to “Store,” then press ENTER to store
it. The stored channel will replace channel
1.
ViewSonic N2010 22
Function Menu
1.
2.
Press Enter to get into Function Menu.
To select the items for Sleep Timer or Source Select, use
.
Function
Sleep Timer
Source Select
Exit
Select
OFF
TV
Enter
Adjust
Sleep Timer: To set up the Sleep Timer -- 15min, 30min, 45min, or 60min.
The Sleep Timer is used to automatically shut off your LCD TV after a preset
period of time passed.
Choose OFF for disable Sleep Timer function.
Source Select: There are some input sources provided you to select-TV, PC,
SCART, YPbPr, S-Video, and AV.
ViewSonic
N2010 23
E
N
G
L
I
S
H
OSD Menu
1.
2.
3.
4.
Press Enter to get into OSD Menu.
To select the items for Language, use
.
To adjust OSD H. Position, and OSD V. Position, use
To setup Memory Recall, press Enter.
.
OSD
Language
English
OSD H.Position
OSD V.Position
Memory Recall
E
N
G
L
I
S
H
Exit
Select
Enter
Adjust
Language Select: To choose the language of OSD window. There are various
languages to place at your disposal-English, French, German, Spanish, Italian,
Finland, Dutch, Swedish, and Russian.
OSD H. Position: To adjust the OSD horizontal position by
.
OSD V. Position: To adjust the OSD vertical position by
.
Memory Recall: Restore the factory setting of Contrast, Brightness, Colour,
Sharpness, Tint, Colour Temperature, Volume, Treble, Bass, Balance, OSD H.
Position, and OSD V. Position.
ViewSonic
N2010 24
IN PC MODE
Note: PC Input is limited to 640 x 480 and 800 x 600 resolution only.
Main Menu
Main Menu
AUTO
Auto Adjust
Contrast/Brightness
Colour Adjust
i Information
Image Adjust
Source Select
? Setup Menu
PIP Menu
Memory Recall
SET
:Exit
:Select
Auto Adjust: To auto adjust the picture’s H./V. Position, Fine Tune and H.
Size.
Contrast: To adjust the foreground luminance of the video.
Press ENTER to get into Brightness adjustment.
Brightness: To adjust the background luminance of the video.
Colour Adjust: To select the preset colour temperature or user colour setting.
User Colour: To adjust the red, green, and blue colours of the video.
Information: To display current condition, including horizontal frequency,
vertical frequency, and resolution.
Image Adjust: To adjust the H./V. position, H. size, and fine tune of the
video.
Press Enter to confirm.
H. Position: To adjust the horizontal position of the video.
Press Enter to get into V. Position.
V. Position: To adjust the vertical position of the video.
H. Size: To adjust the delay time between horizontal synchronous
signal and video.
Fine Tune: To adjust the delay time.
ViewSonic N2010 25
E
N
G
L
I
S
H
Source Select: To select the input source of your screen-PC, SCART,
YPbPr, S-Video, AV, or TV.
Be sure all the cables of selected input source are connected well.
Setup Menu: To set up Language Select, OSD (On Screen Display)
Position, and OSD (On Screen Display)Time Out.
Language Select: To choose the language of On Screen Display
window. There are various languages to place at your disposalEnglish, French, German, Spanish, Italian, Finland, Dutch, Swedish,
and Russian.
OSD H. Position: To adjust the On Screen Display horizontal
position.
OSD V. Position: To adjust the On Screen Display vertical position.
OSD Time Out: OSD Time Out is used to automatically shut off the
OSD after a preset period of time passed.
E
N
G
L
I
S
H
PIP Menu: PIP function allows you watch two screens from different
sources at the same time.
Select PIP On/ Off to activate or inactivate PIP function.
Sound: To select the sound source between Main screen and PIP screen.
PIP Source Select: To select the input source of the PIP sub screenSCART, S-Video, AV, or TV.
PIP H. Position: To adjust the horizontal position of the PIP subscreen.
Press ENTER to get into PIP V. Position.
PIP V. Position: To adjust the vertical position of the PIP sub-screen.
Memory Recall: Restore the factory setting of Contrast, Brightness,
Colour, Colour Temperature, Volume, OSD H. Position, and OSD V.
Position.
ViewSonic
N2010 26
Other Information
Specifications
LCD
Type
20.1" TFT Active Matrix
Panel tilt
Input signal
UP: +15° , Down: 0°
RGB
RF
Video
Audio
RGB analog (0.7/1.0 Vp-p, 75 ohms)
Separate Sync,
fh:30-37.5 kHz, fv:50-75 Hz
TV system Antenna/ PAL/ SECAM
1 compsite RCA, 1 S-Video, 1YPbPr component
1 mini-stereo, 2 pairs of RCA (L/R) stereo
Compatibility
PC
Up to 800 x 600 Non-interlaced
PC Resolution
Recommended
and supported
640 x 480 @ 60, 75 Hz
800 x 600 @ 60 Hz
Speaker Output
5W x 2
Audio Output
1 pair of RCA (L/R) stereo jack
Power
Voltage
100-240 VAC, 50/60 Hz (auto switch)
Display area
Full Scan
408 mm (H) x 306 mm (V)
16.1" (H) x 12.0" (V)
Operating
conditions
Temperature
Humidity
Altitude
32° F to + 104° F (0° C to + 40° C)
10% to 90% (no condensation)
To 10,000 feet (3,000m)
Storage
conditions
Temperature
Humidity
Altitude
-4° F to + 140° F (-20° C to + 60° C)
10% to 90% (no condensation)
To 40,000 feet (12,000m)
Dimensions
Physical
608 mm (W) x 443 mm (H) x 250 mm (D)
23.9" (W) x 17.4" (H) x 9.8" (D)
Weight
Net
10.0 kg (22.0 lb)
Regulations
Power saving
modes
E
N
G
L
I
S
H
CE, CB, TÜV/GS
On
Active Off
<73W (green LED)
<5W (orange LED)
Preset Timing Mode (pre-adjusted to VESA 640 x 480 @ 60 Hz)
®
Warning: Do not set the graphics card in your computer to exceed these refresh rates; doing so may
result in permanent damage to the LCD display.
Note: Product Specification are subject to change without notice.
ViewSonic
N2010 27
Troubleshooting
No power
Make sure power button (or switch) is ON.
Make sure A/C power cord is securely connected to the LCD TV.
Plug another electrical device (like a radio) into the power outlet to verify that
the outlet is supplying proper voltage.
Power is ON but no screen image
Make sure the video cable supplied with the LCD TV is tightly secured to the video output port on
the back of the Video source. If the other end of the video cable was not attached permanently to the
LCD TV, tightly secure it to the LCD TV.
Adjust brightness and contrast.
Check Source settings.
Make sure the signal source is compative with the LCD TV.
Wrong or abnormal colours
If any colours (red, green, or blue) are missing, check the video cable to make sure it is securely
connected. Loose or broken pins in the cable connector could cause an improper connection.
Connect the LCD display to another Video source.
E
N
G
L
I
S
H
Control buttons do not work
Press only one button at a time.
Snow appears on screen
Check your antenna connection.
Check TV/CATV selection.
No Sound
Check your audio connection in accordance with Video source.
Press Mute again, so that Mute disappears from the screen.
Check you NICAM settings.
Press the Volume + key on your remote controller.
Remote control doesn’t work
Make sure batteries been inserted correctly.
Batteries could be weak, replace batteries.
NO picture in PC mode
Set PC to “640 x 480” or “800 x 600” @ 60 Hz signal timing.
NO SCART
Check your SCART settings for composite video input/ output, RGB inputs and stereo audio input/
output.
NO Teletext
Check your remote control button for Teletext function.
ViewSonic
N2010
28
Customer Support
For technical support or product service, see the table below or contact your reseller.
NOTE: You will need the product serial number.
Contry/ Region Web site
T = Telephone
F = FAX
United Kingdom
T: 00 44 (0) 800 833 648 [email protected]
F: 00 44 (0) 1475 657808
www.viewsonic.com/
support
Email
France
T: 00 33 (0) 1 414 74930
F: 00 33 (0) 1 47 99 75 30
German
T: 00 49 (0) 800 1717 430 [email protected]
Nordics
www.infocare.no/
eservice
All other
countries
www.viewsonic.com/
support
T: 00 47 628 24 100
F: 00 47 628 24 101
[email protected]
E
N
G
L
I
S
H
ViewSonic
N2010
29
Limited Warranty
VIEWSONIC LCD DISPLAY
E
N
G
L
I
S
H
What the warranty covers:
ViewSonic® warrants its products to be free from defects in material and workmanship during the
warranty period. If a product proves to be defective in material or workmanship during the warranty
period, ViewSonic will, at its sole option, repair or replace the product with a like product. Replacement
product or parts may include remanufactured or refurbished parts or components.
How long the warranty is effective:
ViewSonic N2010 is warranted for one (1) year for all parts including the light source and one (1) year
for all labor from the date of the first consumer purchase.
Who the warranty protects:
This warranty is valid only for the first consumer purchaser.
What the warranty does not cover:
1. Any product on which the serial number has been defaced, modified or removed.
2. Damage, deterioration or malfunction resulting from:
a. Accident, misuse, neglect, fire, water, lightning, or other acts of nature, unauthorized product
modification, or failure to follow instructions supplied with the product.
b. Repair or attempted repair by anyone not authorized by ViewSonic.
c. Any damage of the product due to shipment.
d. Removal or installation of the product.
e. Causes external to the product, such as electrical power fluctuations or failure.
f. Use of supplies or parts not meeting ViewSonic’s specifications.
g. Normal wear and tear.
h. Any other cause which does not relate to a product defect.
3. Removal, installation, and set-up service charges.
How to get service:
1. For information about receiving service under warranty, contact ViewSonic Customer Support.
You will need to provide your product's serial number.
2. To obtain service under warranty, you will be required to provide (a) the original dated sales slip, (b)
your name, (c) your address, (d) a description of the problem, and (e) the serial number of the product.
3. Take or ship the product freight prepaid in the original container to an authorized ViewSonic service
center or ViewSonic.
4. For additional information or the name of the nearest ViewSonic service center, contact ViewSonic.
Limitation of implied warranties:
THERE ARE NO WARRANTIES, EXPRESS OR IMPLIED, WHICH EXTEND BEYOND THE
DESCRIPTION CONTAINED HEREIN INCLUDING THE IMPLIED WARRANTY OF MERCHANTABILITY
AND FITNESS FOR A PARTICULAR PURPOSE.
Exclusion of damages:
VIEWSONIC'S LIABILITY IS LIMITED TO THE COST OF REPAIR OR REPLACEMENT OF THE
PRODUCT. VIEWSONIC SHALL NOT BE LIABLE FOR:
1. DAMAGE TO OTHER PROPERTY CAUSED BY ANY DEFECTS IN THE PRODUCT, DAMAGES
BASED UPON INCONVENIENCE, LOSS OF USE OF THE PRODUCT, LOSS OF TIME, LOSS OF
PROFITS, LOSS OF BUSINESS OPPORTUNITY, LOSS OF GOODWILL, INTERFERENCE WITH
BUSINESS RELATIONSHIPS, OR OTHER COMMERCIAL LOSS, EVEN IF ADVISED OF THE
POSSIBILITY OF SUCH DAMAGES.
2. ANY OTHER DAMAGES, WHETHER INCIDENTAL, CONSEQUENTIAL OR OTHERWISE.
3. ANY CLAIM AGAINST THE CUSTOMER BY ANY OTHER PARTY.
Effect of state law:
This warranty gives you specific legal rights, and you may also have other rights which vary from state
to state. Some states do not allow limitations on implied warranties and/or do not allow the exclusion of
incidental or consequential damages, so the above limitations and exclusions may not apply to you.
Sales outside the U.S.A. and Canada:
For warranty information and service on ViewSonic products sold outside of the U.S.A. and Canada,
contact ViewSonic or your local ViewSonic dealer.
ViewSonic LCD Warranty (V3.0)
ViewSonic
N2010 30
Release Date: 0 1- 29- 2002
Appendix
Safety Guidelines
For European Countries
In Europe you must use a cord set which is appropriate for the receptacles in your country. The cord set is
HAR-Certified, and a special mark that will appear on the outer sheath, or on the insulation of one of the
inner conductors.
AC PLUG CORD PRECAUTIONS FOR THE UNITED KINGDOM
FOR YOUR SAFETY PLEASE READ THE FOLLOWING TEXT CAREFULLY.
IF THE FITTED MOULDED PLUG IS UNSUITABLE FOR THE SOCKET OUTLET THEN THE PLUG SHOULD BE
CUT OFF AND DISPOSED OF SAFELY.
THERE IS A DANGER OF SEVERE ELECTRICAL SHOCK IF THE CUT OFF PLUG IS INSERTED INTO AN
APPROPRIATE SOCKET.
CE Conformity for Europe
The device complies with the requirements of the EEC directive 89/336/EEC as amended
by 92/31/EEC and 93/68/EEC Art.5 with regard to “Electromagnetic compatibility”, and
73/23/EEC as amended by 93/68/EEC Art.13 with regard to “Safety.”
E
N
G
L
I
S
H
ViewSonic
N2010
31
ViewSonic
®