1
®
1 VOLT CO DL
1 VOLT COR L
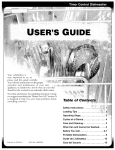
OWNER'S
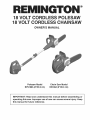
Polesaw Model
BPS188A (8"/20.3 cm)
P L SAW
C AI SAW
MANUAL
Chain Saw ModeJ
BS188A (8"/20.3 cm)
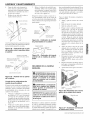
iMPORTANT: Read and understand
this manual before assembling
or
operating this saw. improper use of saw can cause severe injury. Keep
this manual for future reference.
DO NOT RETURN PRODUCT TO STORE.
CALL 1-800-626-2237 FOR TECHNICAL ASSISTANCE
For more information, visit www.remingtonpowertools.com
This manual is your guide to safe and proper operation of the saw.
SAVE THESE iNSTRUCTiONS.
Keep your purchase receipt for warranty coverage.
NO DEVUELVA EL PRODUCTO A LA TIENDA
Para mas informaci6n, www.remingtonpowertools.com
PARA AYUDA TI_CNICA LLANIE AL 1-800-626-2237
Este manual es su guia para utilizar esta sierra electrica de
manera adecuada y segura.
GUARDE ESTAS INSTRUCCIONES.
Guarde su recibo de compra para cobertura de ia garantia.
www. remingtonpowertoo/s,
com
2
iNTRODUCTiON
Your Remington Cordless Polesaw and Cordless Chainsaw may have been purchased together (as a 2-in-] polesaw/chainsaw) or
seperate (chainsaw only). If the chainsaw was purchased separately, the pole is available as an accessory and may be purchased by
visiting the "On-Line Outlet" at www.remingtonpowertools.com.
CONTENTS
iMPORTANT
SAFETY
iNFORMATiON
.......................................................................
Before Operating Saw ..........................................................................................................
While Operating Saw ...........................................................................................................
Kickback ...............................................................................................................................
Maintenance and Storage of Saw ........................................................................................
Polesaw Trimming Precautions ............................................................................................
UNPACKING
................................................................................................................
4
4
4
5
5
6
6
PRODUCT
IDENTIFICATION
......................................................................................
Chain Saw ............................................................................................................................
Polesaw ................................................................................................................................
7
7
7
CHAIN TERMS AND DEFINITIONS ............................................................................
8
RECHARGEABLE
9
BATTERY.
.....................................................................................
Protective Battery Terminal Cap ...........................................................................................
Safety Warnings ...................................................................................................................
Charging Battery ................................................................................................................
Important Charging Notes ..................................................................................................
CHAIN
SAW INFORMATION
.....................................................................................
Chain Saw Assembly .........................................................................................................
Saw Chain Tension .............................................................................................................
Oiling Chain ........................................................................................................................
Cutting with the Chain Saw ................................................................................................
Felling a Tree (Cutting Down a Tree) .................................................................................
Limbing a Tree ...................................................................................................................
Bucking A Log ....................................................................................................................
Trimming a Tree (Pruning) .................................................................................................
POLESAW
iNFORMATiON
.......................................................................................
Polesaw Assembly .............................................................................................................
Adjusting Pole Length ........................................................................................................
Cutting with the Polesaw ....................................................................................................
CLEANING
AND MAINTENANCE
.............................................................................
Cleaning Saw Body ............................................................................................................
Care of Guide Bar ..............................................................................................................
Sharpening Saw Chain ......................................................................................................
Replacing Saw Chain .........................................................................................................
STORAGE
..................................................................................................................
9
9
10
10
11
11
11
12
12
12
13
14
14
15
15
15
15
16
16
16
16
17
18
TECHNICAL SERVICE ..............................................................................................
18
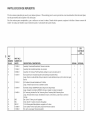
REPLACEMENT
18
PARTS AND ACCESSORIES .......................................................
REPAIR SERVICE .....................................................................................................
18
BATTERY RECYCLING .............................................................................................
18
TROUBLESHOOTING
19
WARRANTY
...............................................................................................
INFORMATION .....................................................................................
ILLUSTRATED
PARTS BREAKDOWN ....................................................................
PARTS CENTRALS ...................................................................................................
3
20
43
45
www. remingtonpowertoo/s,
com
iMPORTANT
SAFETY iNFORMATiON
READ ALL iNSTRUCTiONS.
Make sure you read and under=
stand all instructions in important
Safetylnformation. Improper use
of this chain saw can cause severe
inju ry or death from fire, electrical
shock, body contact with moving
chain, or failing wood.
A
DANGER: Serious injury or
death from electrocution if power
lines are contacted.
Never use
near any electrical source, wires,
or power lines.
/L
dBk WARNING: When using a battery operated
chain saw, basic
safety precautions should always
be followed
to reduce the risk of
fire and injury to persons, including the following:
411 WARNING:
For safe opera=
tion read and understand
owners manual.
Wear face shield
(and/or safety glasses) and hard
hat to protect against failing debris. Always have a clear work
area, retreat path, and be aware
of limb/branch IDeation to avoid
failing
limbs and debris.
Keep
bystanders 50 ft(Sm) away when
operating saw. Store indoors.
BEFORE
OPERATING
2.
Use Right Tool
Use saw tor cutting wood only.
° Do not use chain saw for purpose not
intended.
° Do not use for cutting non-wood
items.
Dress
1.
2.
Wear hair covering
hair.
to contain long
Bystanders,
and
1.
Only saw user should be in work
area. Keep bystanders 50 feet (15m)
away when operating saw.
2.
Do not let visitors contact chain saw.
Use Right Tool
I.
Do not use the polesaw to cut down
trees. Use the chain saw without
pole attachment and only if you are
trained or have expert help.
2.
Do not cut small brush and saplings
with the polesaw. Use the chain saw
only, with extreme care. Slender matter may catch in the chain and be
whipped toward you. This could also
pull you off balance.
Stay Alert
1.
Stay alert. Use common
operating saw.
sense while
2.
Grip chain saw firmly with both
hands. Never operate chain saw with
one hand. Never use hand guard as
handle.
3.
Grip polesaw securely. Place one
hand on the pole and the other on the
handle.
2.
Do not operate saw
° while under the influence of alcohol,
medication, or drugs
° while in a hurry
4.
Keep finger off trigger until ready to
make cut.
5.
Before starting saw, make sure chain
is not touching anything.
6.
To guard against electrical shock,
avoid body contact with grounded
objects such as pipes, fences, and
metal posts.
7.
Keep all parts of body away from
chain when saw is running.
8.
When cutting limb or tree trunk that
is under tension, use extreme caution.
Be alert tor wood springing back.
When wood tension is released, limb
could spring back and strike operator
causing severe iniury or death.
Do not operate saw
° if pole or saw is damaged, adjusted
wrong, or not fully and securely
assembled
° if trigger does not turn saw on and
off. Chain must stop moving when
you release trigger. Have faulty
switch replaced by authorized service center (see Teclmical Service).
com
Keep Children,
Animals Away
Watch what you ;=redoing. Use common sense. Do not operate saw when
you are tired.
Cluttered work areas invite injuries. Betore
cutting, always provide the following:
° clear work area
° secure footing
° planned retreat path from falling
tree
www. remingtonpowertoo/s,
Secure wood you are cutting by using
clamps or chocks.
1.
Check for Damage
Do not operate saw
° in rain or snow
° in damp or wet areas
° where highly flammable liquids or
gases are present
° while in a tree or on a ladder
° while on aerial booms, buckets, or
platforms
4.
Stay Alert
Keep Work Area Clean
1.
If two or more persons perform bucking and telling operations at the same
time, provide plenty of distance between operations. Provide distance of
at least twice the height of tree being
felled.
Gear
Wear the tollowing safety gear when operating saw:
° heavy-duty
gloves (wear rubber
gloves when working outdoors)
° steel-toed safety footwear with nonskid soles
° eye protection such as safety glasses,
goggles, or face screen
° safety hard hat
° ear mufflers or ear plugs
° face or dust mask (if working in
dusty areas)
Only well-instructed adults should operale
saw. Never allow children to operale saw.
Consider Work Area Environment
3.
Properly
Wear snug-fitting clothes when operating saw. Do not wear loose clothing
or jewelry. They can get caught in
moving saw chain.
Wear Safety
SAW
For safe operation read and understand this
owner's manual betore operating saw.
Inspect tree before trimming or cutting down. Make sure there are no
dead limbs or branches that may fall
on you. Make allowance for branches
to fall freely to the ground.
WHILE
OPERATING
SAW
Do Not Force
Keep Work Area Clean
1.
Keep work area clean. Cluttered
eas invite injuries.
2.
Do not use near power lines. Keep
at least 10 feet away from electrical
lines.
4
ar-
Saw While
Cutting
Apply light pressure. It will do the job better and safer at the rate for which it was
intended.
iMPORTANT
Carrying
Carry
SAFETY iNFORMATiON
Saw
saw from
one place
Kickback
Saw
Safety Devices On This
with saw stopped
with finger off trigger
with guide bar and chain to rear
Chain saw - by holding front handle
(never use hand guard as handle)
° Polesaw - with telescoping pole returned to shortest position
° Polesaw - by holding the pole at the
balance point (close to saw end)
° Remove battery and use scabbard
when transporting saw.
_IL WARNING: This product contains chemicals known to the State
of California to cause cancer or
birth defects, or other reproductive harm.
4BkWARNING: Some dust created
by power sanding, sawing, grinding, drilling, and other construction activities contains chemicals
known (to the state of California)
to cause cancer, birth defects, or
other reproductive harm. Some
examples of these chemicals are:
• lead from
lead-based
paints
• crystalline
silica
from
bricks
and cement and
other masonry products
• arsenic and chromium
from chemically-treated
lumber
Your risk from these exposures
varies, depending on how often
you do this type of work. To reduce
your exposure to these chemicals:
work in a well ventilated area, and
work with approved safety equip=
merit, such as those dust masks
that are specially designed to filter
out microscopic particles.
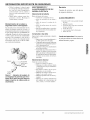
KICKBACK
WARNING: Kickback may occur
when the nose or tip of the guide
bar touches an object, or when the
wood closes in and pinches the saw
chain in the cut. Tip contact in some
cases may cause a lightning fast reverse reaction, kicking the guide bar
up and back towards the operator.
Pinching the saw chain along the
top of the guide bar may push the
guide bar rapidly back towards the
operator. Either of these reactions
may cause you to lose control of the
saw which could result in serious
injury to user.
and Kickback
Safety
to another
•
°
°
°
Saw Maintenance
This saw has a low-kickback chain and reduced kickback guide bar. Both items reduce
the chance of kickback. Low-kickback saw
chain is a chain which met the kickback
performance requirements of ANSI B 175.1.
Kickback can still occur with this saw.
Follow assembly instructions on page 11.Do
not remove front hand guard. Do not replace
front hand guard with substitute.
Follow maintenance
instructions
in this
manual. Proper cleaning of saw and chain and
guide bar maintenance can reduce chances
of kickback. Inspect and maintain saw after each use. This will increase the service
life of your saw. Note: Even with proper
sharpening, risk of kickback can increase
with each sharpening.
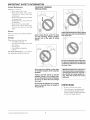
The following steps will reduce the risk of
kickback.
, Use both hands to grip saw while saw
is running:
For chain saw, use both hands to grip
saw while saw is running. Use firm
grip. Thumbs and fingers must wrap
around saw handles.
For polesaw, use
the handle and the
the pole. Use firm
fingers must wrap
handle.
one hand to
other hand to
grip. Thumbs
around pole
grip
grip
and
and
, Keep all safety items in place on saw.
Make sure they work properly.
, Chain saw - do not overreach or cut
above shoulder height.
, Polesaw - do not overreach or extend
arms above shoulder height.
, Keep solid footing and balance at all
times.
, Stand slightly to left side of saw. This
keeps your body from being in direct
line with chain.
, Do not let guide bar nose touch anything when chain is moving (see Figure
1).
, Never try cutting through two logs
at same time. Only cut one log at a
time.
, Do not bury guide bar nose or try
plunge cut (boring into wood using
guide bar nose).
, Watch for shifting of wood or other
forces that may pinch chain.
, Use extreme caution when reentering a
previous cut.
, Use low-kickback chain and guide bar
supplied with this chain saw. Only replace these parts with chains and guide
bars listed in this manual.
D rect ,-,n_on
_--_'i'_k\"
,._.DoNotLetGuide
ch Here
90°
Quadrant
t/2.)#
Figure I - Kickback Hazard Example:
Do Not Let Nose of Guide Bar Touch
Object While Chain is Moving
MAINTENANCE
AND
STORAGE OF SAW
Disconnect
Battery
Remove battery from saw
° when not in use
° before moving from one place to
another
° before tensioning saw chain
° before servicing
° before changing accessories or attachments, such as saw chain and
pole.
Check for Damage
Inspect saw before and after each use.
• Check saw closely if guard or other
part has been damaged.
• Check for any damage that may affect operator safety or operation of
saw.
• Check for alignment or binding of
moving parts.
• Check for broken or damaged parts.
Do not use saw if damage affects
safety or operation. Have damage repaired by authorized service
center.
, Never use dull or loose chain. Keep
chain sharp with proper tension.
5
www. remingtonpowertools,
com
iMPORTANT
SAFETY iNFORMATiON
General Maintenance
Maintain saw with care.
• Never expose saw to rain.
° Keep chain sharp, clean, and lubricated for better and safer
performance.
° Follow steps outlined in this manual
to sharpen chain.
° Keep handles dry, clean, and tree of
oil and grease.
° Keep all screws and nuts tight.
° Keep power cord on battery charger away from heat, oil, and sharp
edges.
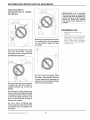
POLESAW TRiMMiNG
PRECAUTIONS
Service
When servicing, use only identical replacement parts.
Storage
When not in use, always store saw
° with battery removed
° in a high or locked place, out of children's reach
° in a dry place
° with scabbard over guide bar
• indoors
Never stand directly under the limb
you are trimming. Always position
yourself out of the path of falling
debris.
Keep other persons away from cutting
end of polesaw and at a safe distance
from work area.
Save these instructions.
It is your guide to
sate and proper operation of this saw.
Do not use polesaw near cable, electric power or telephone lines. Maintain
a minimum clearance of 10 feet from
all power lines.
Never stand on a ladder or other type
of unstable support while using the
polesaw.
Always use both hands to operate
polesaw. Keep a firm, steady pressure on the polesaw while cutting but
do not try to force the saw through
the wood.
Do not use the polesaw to cut limbs
larger in diameter than the length of
the guide bar.
www. remingtonpowertoo/s,
com
6
iMPORTANT: Read and understand
this manual before assembling
or
operating this chain saw. improper
use of saw can cause severe in=
jury. Keep this manual for future
reference.
UNPACKING
1.
Remove all items from carton.
2.
Check all items for any shipping damage. If you find any damage or if any
parts are missing,promptly inform dealer where you bought chain saw.
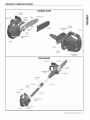
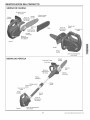
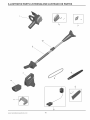
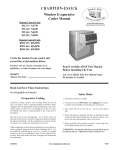
PRODUCT
iDENTiFiCATiON
CHAIN SAW
Front Hand
Guard
/,
Guide Bar Nose
Saw
Handle
Rear Handle
iiiiiiiiiZ
Chain
Release
Button
iiiiiiiiiii_
,\
iiii@
,i,i,i,i,i
¸
Guide
Bar
Trigger
Lockout
\
Scabbard
Sprocket
" Cover
Handle Release
Button
Trigger
_ .......
Power
...."Head
Battery Release
Button
/
J
i
Battery
Front "
Handle
Battery Release
Button
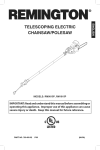
POLESAW
Saw Chain
Hand Guard
Bar
Handle Release
Button
.... Power Head
Clamping
Lever
\
\\
\
Outer Pole
Inner Pole
\
Trigger
Lockout
\
Trigger
Handle
Grip Area
Handle Release
Button
Batte/ry
Battery
Button
Release
7
www. remingtonpowertoo/s,
com
CHAIN SAW TERMS AND DEFiNITiONS
Bucking
Process of cutting a felled tree
or log into lengths.
Normal Cutting Position Stance used
while making bucking and telling cuts.
Sprocket
chain.
Felling
Notching
Cut Notch cut in tree that directs fall of tree.
Switch Device that completes or interrupts
Make this cut on opposite side of tree from
notching cut.
Outer
Front Handle
Power Head Chain saw without chain and
guide bar. Also known as saw body.
Switch Linkage
This device connects
switch to trigger. It moves switch when you
squeeze trigger.
Process of cutting down a tree.
Felling Cut Final cut when telling a tree.
Located
at front of saw
body.
Front Hand Guard
handle and guide
while using saw.
Shield between front
bar. Protects
left hand
Guide Bar Metal bar that extends from
saw body. The guide bar supports and
guides chain.
Guide
bar.
Bar
Nose
Tip or end of guide
inner Pole The moveable
section
to which the saw is attached.
of tubing
Kickback
Quick backward and upward
motion of guide bar. Kickback may occur
when tip of guide bar touches an object while
chain is moving. The guide bar will kick up
and back towards operator.
Limbing
Process of cutting limb(s) from
a felled tree.
Low-Kickback Chain Chain that reduces
chance of kickback as required by ANSI
B175.1.
www. remingtonpowertoo/s,
com
Pole
Retains the moveable
inner
pole.
Toothed
Trigger Lockout Device that reduces accidental starting of saw.
Rear Handle
Trimming (Pruning)
located at rear of
that drives
electrical circuit to motor of saw.
Pushback
(Kickback,
Pinch)
Rapid
pushback of chain saw. Pushback may occur
if chain along top of guide bar is pinched,
caught, or contacts a ti)reign object.
Handle
wheel
Trigger
Device that turns saw on and off.
Squeezing trigger turns saw on. Releasing
trigger turns saw off.
Process
of cutting
saw body.
limb(s) from a living tree.
Reduced Kickback
Guide Bar Guide
bar that reduces chance of kickback.
Undercut
An upward cut from underside
of log or limb. This is done while in normal cutting position and cutting with top
of guide bar.
Replacement
Chain Chain that complies
with ANSI B 175.1 when used with a specific
saw. It may not meet ANSI requirements
when used with other saws.
Saw Chain (Chain) Loop of chain having cutting teeth for cutting wood. The
motor drives chain. The guide bar supports
chain.
Spiked Bumper (Spike) Pointed teeth
at front of saw body beside guide bar. Keep
spiked bumper in contact with wood when
telling or bucking. It helps maintain position
of saw while cutting.
8
RECHARGEABLE
BATTERY
PROTECTIVE
BATTERY
TERMINAL
CAP
6.
_lb WARNING:
Do not store or
carry battery so that metal objects
can contact exposed
battery terminals. For example, do not place
battery in aprons,
pockets, tool
boxes, product kit boxes, drawers,
etc. with loose nails, screws, keys,
jewelry etc. without battery cap.
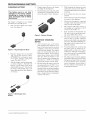
A protective battery terminal cap is provided
for use whenever the battery is out of the
tool or charger. Remove cap before placing
battery in charger or tool.
SAFETY
1.
2.
WARNINGS
This manual contains important safety and operating instructions.
Before using battery charger, read all
instructions and cautionary markings
on battery charger, battery pack, and
product using battery pack.
_, CAUTION: To reduce the risk
of injury, charge only Remington
brand batteries. Other types of bat=
teries may burst causing personal
injury and damage.
3.
Do not expose
charger
to rain or
snow,
4.
5.
Use of an attachment not recommended
or sold by Remington brand may result
in a risk of fire, electric shock, or injury
to persons.
To reduce risk of damage to electric
plug and cord, pull by plug rather than
cord when disconnecting charger.
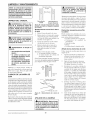
An extension cord should not be used
unless absolutely necessary. Use of
improper extension
cord could result in a risk of fire, electric shock or
electrocution.
a. Two-wire cords can be used with
2-wire or 3-wire extension cords.
Only round jacketed extension cords
should be used, and we recommend
that they be listed by Underwriters
Laboratories (U.L.). If the extension
is to be used outside, the cord must
be suitable tot outdoor use. Any cord
marked tk_r outdoor use can also be
used tk_r indoor work. The letters
"W" or "WA" on the cord jacket
indicate that the cord is suitable tk_r
outdoor use.
b. An extension cord must have adequate wire size (AWG or American
Wire Gauge) tk_r safety, and to prevent loss of power and overheating.
The smaller the gauge number of
the wire, the greater the capacity of
the cable; that is, 16 gauge has more
capacity than 18 gauge. When using
more than one extension to make up
the total length, be sure each extension contains at least the minimum
wire size.
(?HART FOR MINIMUM
WIRE SIZE
(AWG)
OF EXTENSION
CORDS
NAMEPLATE
RATING
AMPS - 0
- 10.0
Cord
Length
AWG Cord
Size
25 feet
18 AWG
50 feet
18 AWG
100 feet
16 AWG
150 feet
14 AWG
9
7.
Use only the supplied charger
(P/
N 121397-01)when
charging.
The
use of any other charger could damage the battery or create a hazardous
condition.
8.
Use only one charger when charging.
9.
Use only Remington
RBISV
RBEI8V
battery
packs with
product.
OR
this
10. Do not attempt to open the charger.
There are no customer serviceable parts
inside. If damaged, call DESA Power
Tools Technical Service.
11. DO NOT incinerate the battery pack
even if they are severely damaged or
completely worn out. The batteries can
explode in a fire.
12. A small leakage of liquid from the
battery pack cells may occur under
extreme usage, charging, or temperature conditions. This does not indicate
a failure. However, if the outer seal is
broken and this leakage gets on your
skin:
• Wash quickly with soap and water.
• Neutralize with a mild acid such as
lemon juice or vinegar.
• If the battery liquid gets in your eyes,
flush them with clean water for a
minimum of 10 minutes and seek
immediate medical attention.
MEDICAL NOTE: The liquid is a
25-35% solution of potassium
hydroxide.
www. remingtonpowertools,
com
RECHARGEABLE
CHARGING
BATTERY
BATTERY
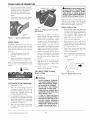
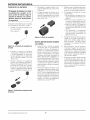
4.
Unplug charger. Remove the charger
by sliding off (See Figure 4).
5.
Place the battery pack in the tool and be
certain that it is inserted tully into the
tool cavity until it "clicks" into place.
The battery
pack is not fully
charged at the factory.
Before
attempting
to charge the battery
pack, thoroughly
read all Safety
instructions.
The charger is designed to use standard
household 120 volt 60 Hz power.
1.
Plug cord from charger
base. (See Figure 2)
into charger
3.
While charging, the charger may hum
and become warm to touch. This is a
normal condition and does not indicate
a problem.
4.
If the battery
properly
°
Check current at receptacle by plugging
in a lamp or other appliance.
°
Check to see if receptacle is connected
to a light switch which turns power off
when you turn out the lights.
°
Move charger and battery pack to a
surrounding air temperature of 40°F
(4,5°(?) to 105°F (40,5 °C)
°
If the receptacle and temperature are
OK, and you do not get proper charging contact DESA Power Tools.
5.
The battery pack should be recharged
when it fails to produce sufficient
power on jobs which were easily done
previously. DO NOT CONTINUE using product with its battery pack in a
depleted condition.
6.
To prolong battery life, avoid leaving
the battery pack on charger for extended periods of time (over 30 days
without use). Although overcharging is
not a safety concern, it can significantly
reduce overall battery life.
7.
The battery pack will reach optimum
perti_rmance at'ter being cycled 5 times
during normal usage. There is no need
to run the batteries down completely
before recharging. Normal usage is
the best method of discharging
and
recharging the batteries.
Figure 4 - Remove Charger
iMPORTANT
NOTES
1.
Figure 2 - Plug Charger into Base
2.
3.
Plug the charger into any standard
120 Volt 60 Hz electrical
outlet.
IMPORTANT" Do not charge by means
of an engine generator or DC power
source. Use only 120V AC.
Slide the charger onto the battery pack
as shown in Figure 3. The LED will
light up, Let the battery pack charge
until red LED turns off. At_ter the initial charge, under normal usage, your
battery pack should be tully charged in
3 to 9 hours.
2.
CHARGING
After normal usage, your battery
pack should be tully charged in 3 to 9
hours. If the battery pack is run-down
completely, it may take up to 9 hours
to become tully charged. Your battery
pack was sent from the factory in an
uncharged condition. For best performance charge battery until red LED
turns off. Allow the battery to cool
down 30 minutes before charging after
using the saw. NOTE: A hot battery
placed in the charger will not charge.
DO NOT charge the battery pack in an
air temperature below 40°F (4,5 °C) or
above 105°F (40,5 °C). This is important and will prevent serious damage to
the battery pack. Longest life and best
performance can be obtained if battery
pack is charged when air temperature
is about 75°F (24°(?).
Figure 3 - Slid Charger onto
Battery
www. remingtonpowertoo/s,
corn
10
pack does not charge
CHAIN SAW INFORMATION
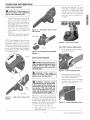
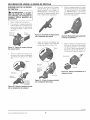
CHAIN SAW ASSEMBLY
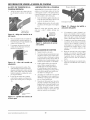
3.
_1= WARNING: Cutting edges on
chain are sharp. Use protective
gloves when handling chain.
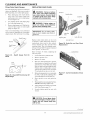
1.
Align rib on chain saw power head with
groove in main handle (see Figure 5).
2.
Slide power head into main handle until
units "snap" together (see Figure 6).
IMPORTANT."Both release buttons on
main handle must be fully engaged.
3.
Slide battery onto main handle until
release buttons "snap" together (see
Figure 7).
Note: Fully charge battery before using
for first time. See Charging BatteJy.
NOTE: Your Remington Cordless Polesaw
and Cordless Chainsaw may have been
purchased together (as a 2-in-I polesaw/
chainsaw) or seperate (chainsaw only). If
the chainsaw was purchased separately, the
pole is available as an accessory and may be
purchased by visiting the "On-Line Outlet"
at www.desatech.com.
Figure 6 - Assembled
Main Handle
Power
Pull chain with light force 1/8" away
from bottom of guide bar and release
(see Figure 8). If chain lightly snaps
back into place, tension is correct.
A slight sag (1/16" or less) between
chain and bottom of guide bar is
acceptable.
Head
Main Handle
Figure 8 - Check Chain Tension
Battery
Saw Chain
1.
Figure 7-Assemble
Handle
Battery onto Main
Tension
Adjustment
Loosen guide bar nuts before adjusting chain (see Figure 9).
Groove
SAW CHAIN
TENSION
_IL WARNING: Remove battery from
chain saw beforeadjusting
sawchain
tension.
Severe
injury or death
could occur from body contact with
moving chain.
Guide Bar Nuts
Figure
_k WARNING: Cutting edges on
chain are sharp. Use protective
gloves when handling chain.
J
Main
Handle
Power Head
Figure 5 - Align Power Head with
Handle
Note: The saw chain tension is properly set at
the factory. A new chain will stretch. Check
new chain tension frequently (after disconnecting battery) during the first 2 hours of
operation. Allow chain to cool down. Follow
steps below to check saw chain tension.
1.
2.
Guide
Bar Nuts
2.
Turn adjusting screw on front of
power head clockwise until slack is
out of chain (see Figure 10).
3.
Wearing protective gloves, pull down
on chain to check chain tension (See
Step 3 Saw Chain Tension).
Rib /
=I=
dl& WARNING:
Maintain
proper
chain tension always.AIoosechain
will increase the risk of kickback. A
loose chain may jump out of guide
bar groove.
This may injure operator and damage chain. A loose
chain will cause chain, guide bar,
and sprocket to wear rapidly.
9 - Loosen
Screw
Figure 10- Turning Adjusting
Screw
Remove battery from chain saw.
Place chain saw on a firm surface to
check chain tension.
11
www. remingtonpowertoo/s,
com
CHAIN SAW INFORMATION
4.
5.
Do not over-tension chain. Over-tensioning will cause excessive wear and
will reduce the life of the guide bar
and chain. Over-tensioning also reduces the amount of cuts per battery
charge.
After chain tension is correct, tighten
guide bar nuts firmly (see Figure 11).
Trigger
_IL WARNING: When felling a tree,
be aware of your surroundings. Do
not endanger any person, strike
utility lines, or cause property
damage. If tree strikes utility lines,
contact utility company at once.
Lockout
Felling is the process of cutting down a tree.
Make sure your ti)oting is firm. Keep feet
apart. Divide your weight evenly on both feet.
Follow directions below to tell a tree.
Trigger /
Before
Figure
13 - Trigger
ger Location
'i
Guide Bar
5.
Nuts
Figure 11 - Tighten
Guide Bar Nuts
OILING CHAIN
IMPORTANT" Applying oil to the
guide bar reduces friction and
wear. Improper oiling will cause
wear and reduce the life of the
chain and
excessive
excessive
chain and
guide bar.
6.
7.
1.
Fill included squeeze bottle with
SAE #30 or #40 motor oil or bar
chain oil.
2.
Apply several drops of oil between
chain and guide bar (see Figure 12.
Frequently
and
Trig-
When ready to make a cut, press in
trigger lockout with right thmnb and
squeeze trigger (see Figure 13). This
will turn saw on. Releasing trigger
will turn saw off. Always turn saw on
before contacting saw chain with log.
When starting a cut, place moving
chain against wood. Hold saw firmly
in place to avoid possible bouncing or
skating (sideways movement) of saw.
Guide saw using light pressure. Do not
force saw. The motor will overload and
can burn out. It will do the job better
and safer at the rate for which it was
intended.
8.
Remove saw from a cut with saw running. Stop saw by releasing trigger.
Make sure chain has stopped before
setting saw down.
9.
Practice
until you can maintain
steady, even cutting rate.
Note: Oil should be applied before each
use and every 5 minutes during continuous use.
Oil Chain
Lockout
FELLING A TREE (Cutting
Down a Tree)
_IL WARNING:
Figure 12 - Applying
CUTTING
WITH
Oil to Chain
THE CHAIN
SAW
I.
Attach battery to saw.
2.
Make sure section of log to be cut is
not laying on ground. This will keep
chain from touching ground as it cuts
through log. Touching ground with
moving chain will dull chain.
3.
Use both hands to grip saw. Always use
left hand to grip front handle and right
hand to grip rear handle. Use firm grip.
Thumbs and fingers must wrap around
saw handles (see Figure 13).
4.
Make sure your footing is firm. Keep
feet apart. Divide your weight evenly
on both feet.
www. remingtonpowertoo/s,
corn
1.
• Avoid kickback. Kickback
can result in severe injury or
death. See Kickback, page 5,
to avoid risk of kickback.
• Do not fell a tree without
ample skill or expert help.
• Keep children, animals, and
bystanders away from area
when felling a tree.
• If two or more persons
perform bucking and felling
operations at the same time,
provide ample distance
between operations. Provide
distance of at least twice the
height of tree being felled.
12
a
2.
3.
4.
5.
Felling
a Tree
Beti)re telling, inspect tree. Make sure
there are no dead limbs or branches that
may fall on you. Study natural lean of
tree, location of larger branches, and
wind direction. This will help you
judge which way tree will fall.
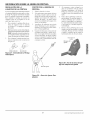
Clear work area around tree.
Plan and clear a retreat path before
telling. Make retreat path opposite to
planned direction of fall of tree and at
45 ° angle (see Figure 14).
Remove dirt, stones, loose bark, nails,
staples, and wire from tree where you
will make telling cuts.
Stay on uphill side when telling tree.
Tree could roll or slide downhill after
falling.
45_o_
=
" _R_etreat_at
....
h
Tree
Figure 14 - Retreat Path From Tree
CHAIN SAW INFORMATION
Felling
Procedure
B) Felling
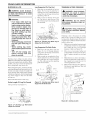
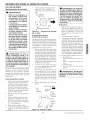
A) Felling Notch
A properly placed felling notch will determine direction tree will fall. Place felling
notch on side of tree in direction you want
tree to fall (see Figure 15).
Follow directions
notch.
1.
2.
below to create a felling
Make lower notch cut as close to
ground as possible. Hold saw so guide
bar is horizontal. Cut 1/3 the diameter
of tree trunk (see Figure 15). Note:
Always make this horizontal
lower
notch cut first. If you make this cut
second, tree can pinch chain or guide
bar.
2.
3.
Remove tree trunk wedge created by
notching cuts,
Direction
of Fall
3rd Cut -
Make felling cut two inches higher than
lower notch cut and on opposite side of
tree (see Figure 15). Keep telling cut
parallel to lower notch cut.
Cut towards notch.
As felling cut nears hinge, tree should begin to fall. Note: If needed, drive wedges
into felling cut to control direction of fall.
If tree settles back and pinches chain,
drive wedges into felling cut to remove
saw. Only use wedges made of wood,
plastic, or aluminum. Never use wedge
made of steel. This could cause kickback
and damage to chain.
4.
When tree begins to fall, quickly
• remove saw from telling cut
• release trigger to turn saw off
• put saw down
• exit area using retreat path
Start upper notch cut the same distance
above first cut as first cut is deep.
Example: If lower notch cut is eight
inches deep, start upper notch cut eight
inches above it. Cut downward at 45 °
angle. The upper notch cut should meet
end of lower notch cut (see Figure
15).
3.
1.
LIIVIBING A TREE
Cut
a'k
WARNING:
Do not cut all the
way through
tree. Leave about
two inches of tree diameter uncut
directly behind felling notch (see
Figure 15). This uncut portion acts
as a hinge. The hinge helps keep
tree from twisting
and falling
in
wrong direction.
Felling Cut
2" T
,'1 st Cut Lower
i Notch
]
2"
/
WARNING:
Avoid kickback.
Kickback can result in severe injury
or death. See Kickbackto avoid risk
of kickback.
iiiiiiiiiZ
iiiiiiiiiii i
_IL WARNING: When cutting limb
that is under tension, use extreme
caution. Be alert for wood springing back. When wood tension
is
released,
limb could spring back
and strike operator causing severe
injury or death.
Limbing is removing branches from a fallen
tree. Make sure your fk)oting is firm. Keep
feet apart. Divide your weight evenly on both
feet. Do not remove larger limbs under tree
that support log off ground. Remove each
limb with one cut (see Figure 16). Clear cut
limbs from work area often. This will help
maintain a sate work area.
Make sure you start your cut where limb
will not pinch saw during cutting. To avoid
pinching, start cut on freely hanging limbs
from above limb. Start cut on limbs under
tension from under limb. If pinch occurs, turn
saw off, lift limb, and remove saw.
_lb WARNING:
Be alert for failing
overhead limbs. Watch your footing
while exiting area.
/
Figure 15 - Felling A Tree
Figure 16- Limbing A Tree
13
www. remingtonpowertoo/s,
cam
iiii@
iiiiiiZll
¸
CHAIN SAW INFORMATION
BUCKING
A LOG
Log Supported
_I, WARNING: Avoid kickback.
Kickback can result in severe injury
or death. See Kickback to avoid
risk of kickback.
1.
2.
WARNING:
• If on slope, make sure log
will not roll down hill. Secure
log by using wooden stakes.
Drive wooden stakes into
ground on downhill side of
log. Stand on uphill side of
log while cutting. Log may
roll after cutting.
• Never try cutting through
two logs at same time. This
could increase the risk of
kickback.
• While cutting log, never hold
log with your hand, leg, or
foot.
• While cutting log, never
allow another person to hold
log.
• Turn off and unplug saw
before moving from one
place to another.
Bucking a log is ctuting a log inlo sections.
Make sure your footing is firm. Keep feet apart.
Divide your weight evenly on both feet. When
possible, raise log or section off ground. Do
this by using limbs, logs, chocks, etc.
On One End
TRIMMING
Make frst cut on underside of log (see
Figure 18). Use top of guide bar to
make this cut. Cut 1/3 through diameter
of log. This cut will keep section from
splintering when cut.
Make second cut directly above first
cut. Cut down to meet first cut. This
cut will keep log from pinching guide
bar and chain.
ATREE (PRUNING)
WARNING: Avoid kickback.
Kickback can result in severe
injury or death. See Kickback to
avoid risk of kickback.
arms above shoulders when usWARNING: Do not extend 1
ing polesaw.
CAUTION:
help if facing
your ability.
Figure 18 - Bucking Log When Log is
Supported On One End
Log Supported
1.
2.
On Both
Trimming a tree is the process of cutting
limbs from a living tree. Make sure your
tix)ting is firm. Keep feet apart. Divide your
weight evenly on both feet. Follow directions
below to trim a tree.
1.
Ends
Make first cut from above log (see
Figure 19). Cut 1/3 through diameter
of log. This cut will keep section from
splintering when cut.
Make second cut on underside of log,
directly under first cut. Use top of guide
bar to make this cut. Cut up to meet first
cut. This will keep log from pinching
guide bar and chain.
When cutting through log, maintain control by
reducing cutting pressure near end of cut. Do
not relax your grip on chain saw handles. Do
not let moving chain touch ground. Ground
will dull moving chain. After cutting through
log, release trigger to turn saw off before
moving saw.
Seek professional
conditions beyond
2.
Make first cut six inches from tree trunk
on underside of limb. Use top of guide
bar to make this cut. Cut 1/3 through
diameter of limb (see Figure 20).
Move two to four inches farther out
on limb. Make second cut from above
limb. Continue cut until you cut limb
off.
3.
Make third cut as close to tree trunk as
possible on underside of limb stub. Use
top of guide bar to make this cut. Cut
1/3 through diameter of stub.
4.
Make tk_urth cut directly above third cut.
Cut down to meet third cut. This will
remove limb stub.
2nd Cut - Pruning
4th Cut- Final
StubCut
Cut (toavoid
pinching)
Follow directions below to buck a log.
Entire Length Of Log On Ground
Cut log from top (see Figure 17).
Figure 19 - Bucking Log When Log Is
Supported On Both Ends
Id
t Stb
(to avoid splintering)
Figure 20 - Cutting A Limb
Figure 17- Bucking
Length On Ground
Log With Entire
www. remingtonpowertools,
corn
14
POLESAW
INFORMATION
POLESAW ASSEMBLY
Groove
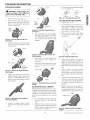
3.
To lock pole in position, tighten clamping
lever (see Figure 27).
_k WARNING: Cutting edges on
chain are sharp. Use protective
gloves when handling chain.
/
I.
2.
Remove battery from chain saw.
Buttons
Release
Button
Polesaw
Handle"-\
Adapter
Figure 21 - Separate
Powerhead.
3.
CUTTING WITH THE POLESAW
\,
I.
2.
Attach battery to saw.
Use both hands to grip polesaw. Use
only designated grip areas when operating polesaw (see Figure 28). Use firm
grip. Thumbs and fingers must wrap
around polesaw handle and pole.
3.
Make sure your ti_ofing is firm. Keep
feet apart. Divide your weight evenly
on both feet.
Main Hdhdle
Figure 24 =Align Main Handle wfh Ham
die Adapter
6.
Main Handle from
LOCK
Figure 27 - Extending TelescopicPole
\\\\\
Separate main handle from chain saw
power head by pressing both release
buttons on main handle and pulling
apart (see Figure 21).
Press
Release
UNLOCK
/
/
Rib/_
Slide main handle into handle adapter
until units "snap" together (see Figure
25). IMPORTANT: Both release buttons on main handle must be fully
engaged.
f
Align rib on chain saw power head with
groove in power head adapter on pole
(see Figure 22).
Groove
Figure 25 - Assembled Main Handle and
Handle Adapter
7.
Power
Head
"
Slide battery onto main handle until
release buttons "snap" together (see
Figure 26).
Figure 28= Designated
4.
When ready to make a cut, press in
trigger lockout and squeeze trigger (see
Figure 29). This will turn polesaw on.
Releasing trigger will turn polesaw off.
Make sure saw is running beti_re starting
a cut.
5.
When
chain
firmly
ing or
Note: Fully charge battery beti)re using
tk)r first time. See Charging Battery,
page 10
,,
Polesaw
Power Head
Adapter
Figure 22 =Align Power Head with Power
Head Adapter
4.
Slide power head into power head
adapter until units "snap" together (see
Figure 23). IMPORTANT" Both release
buttons on power head adapter must be
fully engaged.
ADJUSTING
Battery
Align rib on handle adapter on pole
with groove in main handle (see Figure
24).
POLE LENGTH
1.
To extend the pole, loosen the clamping
lever (see Figure 27). Pole will slide
freely.
2.
Pull inner pole section out to desired
length of extension. Note: Only extend
pole to minimum length required to
reach limb that is being cut.
15
6.
Guide polesaw using light pressure. Do
not ti_rce saw. The motor will overload
and can burn out. It will do the job better and safer at the rate for which it was
intended.
7.
Remove
running,
releasing
stopped
onto Main
The Remington brand polesaw has a telescoping pole assembly that will extend from
47 inches (fully retracted) to 83 inches (fully
extended). A cam levered collet is used to
hold the pole in position at any extended
length.
5.
starting a cut, place moving
against wood. Hold polesaw
in place to avoid possible bouncskating (sideways movement) of
saw.
Figure 26 - Assembled
Handle
Figure 23 - Assembled Power Head and
Power Head Adapter
Grip Areas
polesaw from a cut with saw
at full speed. Stop polesaw by
trigger. Make sure chain has
before setting polesaw down.
Trigger
Trigger Lockout
Figure 29- Polesaw Handle with Trigger
Lockout
www. remingtonpowertoo/s,
com
CLEANING
AND MAINTENANCE
NOTICE: Below are instructions
for servicing your chain saw. Any
servicing
not mentioned
below
should be done by an authorized
service
Normal
_, WARNING: Remove battery
from chain saw before servicing.
Severe injury or death could occur from body contact with mov=
ing chain.
_lb WARNING: Cutting edges on
chain are sharp. Use protective
gloves when handling chain.
Bar Maintenance
Sharpening
Cutters
1.
Remove guide bar from chain saw.
Use file guide tk_r 30° filing.
2.
Remove
sawdust
from guide bar
groove periodically. Use putty knife
or wire (see Figure 31 ).
1.
Adjust chain tier proper tension
Saw Chain Tension, page 11).
2.
3.
Clean oil slots after each day of use.
Clamp guide bar in vise to hold saw
steady. Note: Do not clamp chain.
4.
Remove burrs from sides of guide
bar. Use flat file to make side edges
square.
3.
Press 5/32" round file (attached to file
guide) into groove between top plate and
depth gauge on chain. File guide should
rest on both top plate and depth gauge
(see Figure 32). Note: File at midpoint
of guide bar.
center,
CLEANING SAW BODY
Guide
Replace guide bar when
• bar is bent or cracked
, inside groove of bar is badly worn
Note: When replacing
guide bar, see
Replacement
Parts" and Accessories
for
replacement in%rmafion. See Parrs"Lis %r
correct bar.
30 ° Guide Mark
..... _/_Filing
(see
Direction
....... File Guide
/32" Round
File
/ Burr
_, WARNING: When cleaning saw
body,
• do not submerge saw in
any liquids
• do not use products
that contain ammonia,
chlorine, or abrasives
• do not use chlorinated
cleaning solvents, carbon
tetrachloride,
kerosene,
or gasoline
FlatFile J'J
Guide
f
Bar
Cleaning Groove With
Putty Knife
Oil Slot
Note:This illustration shows file guide placement
and filing direction
for sharpening
cutters on left
side of chain.
Figure 32 - File and File Guide Placement on Chain
4.
Figure 31 - Guide Bar Maintenance
Keep saw body clean. Use a soft cloth dampened with a mild soap and water mixture.
Wipe saw body to clean.
CARE OF GUIDE BAR
Uneven bar wear causes most guide bar problems. Incorrect sharpening of chain cutter
and depth gauge settings often cause this.
When bar wears unevenly, it widens guide
bar groove (see Figure 30). This causes chain
clatter and rivet popping. Saw will not cut
straight. Replace guide bar if this occurs.
Inspect guide bar before sharpening chain.
A worn or damaged guide bar is unsafe. A
worn or damaged guide bar will damage
chain. It will also make cutting harder.
Guide Bar
Groove
\
/
SHARPENING
_lh WARNING: Remove battery
from chain saw before servicing.
Severe injury or death could occur from body contact with mov=
ing chain.
WARNING: Cutting edges on
chain are sharp. Use protective
gloves when handling chain.
Keep chain sharp. Your saw will cut faster
and more safely. A dull chain will cause
undue sprocket, guide bar, chain, and motor
wear. If you must force chain into wood and
cutting creates only sawdust with few large
chips, chain is dull.
items
Guide Bar
/
J
/
/
/
Normal Guide
Bar
Guide Bar With
Uneven Wear
Figure 30 - Guide Bar Cross Section
Showing Uneven Bar Wear
www. remingtonpowertoo/s,
corn
SAW CHAIN
Needed
to Sharpen
Chain
Purchase
these items from your local
dealer, hardware store, or chain saw supplies outlet.
° 5/32" round file
• Depth gauge tool
• File guide
• Vise
• Medium sized flat file
16
5.
Hold file guide level. Make sure 30 °
mark on file guide is parallel to center of guide bar (see Figure 33). This
will insure that you file cutters at 30 °
angle.
File from inside towards outside of
cutter until sharp. Only file in this one
direction (see Figure 33). Note: Two or
three strokes with file should sharpen
cutter.
6.
After each cutter is sharpened, move
chain R_rward to sharpen next cutter.
File all cutters on one side of chain.
7.
Move to other side of chain and repeat
process.
Depth Gauge (right
Depth Gauge (left
side of chain) ,,
Groove
side of chain)
Groove
..
Top Plate (left
side of chain)
",_ ......
\
Top Plate(right
sideof chain)
Right Side of Chain
Figure
33 - Chain
Part
Locations
CLEANING
Filing
Cutter
AND MAINTENANCE
Depth
REPLACING
Gauges
The cutter depth gauge clearance is reduced as
cutters are sharpened. After every second or
third sharpening, reset culter depth gauges.
1.
_IL WARNING: Remove battery
from chain saw before adjusting
saw chain tension. Severe injury
or death could occur from body
contact with moving chain.
Place depth gauge tool (.025") firmly
across top of two cutters. Make sure
depth gauge enters slot in depth gauge
tool (see Figure 34).
2.
Use medium flat file. File depth gauge
level with depth gauge tool.
3.
Remove depth gauge tool. With flat file.
round off front corner of cutter depth
gauge (see Figure 35).
After several hand filings, have authorized
service center or sharpening service machine
sharpen chain. This will insure even filing.
SAW CHAIN
Depth
Tool ....
IMPORTANT: Do not clamp chainsaw in vise to replace saw chain or
guide bar.
34 - Depth
Gauge
Tool On
Front
//
//'
Adjusting
Refer to Figure 36 while completing
following steps.
Figure
Chain
Guide Bar
_, WARNING: Cutting edges on
chain are sharp. Use protective
gloves when handJing chain.
Replace chain when cutters are too worn
to sharpen or when chain breaks. Only use
replacement chain noted in this manual.
Always include new drive sprocket when
replacing chain. This will maintain proper
driving of chain. Note:Forproperchain
and
drive sprocket, see Parrs"List.
Gauge
GuideBarBolts
SawChain
Depth Gauge
Flat File
Sprocket
the
I.
Loosen and remove guide bar nuts.
2.
3.
Remove sprocket cover.
Remove saw chain.
4.
Place new chain around drive sprocket,
along top groove of guide bar, and around
guide bar nose. Note: Make sure cutting
edges of chain are facing in right direction.
Position chain so cutting edges on top of
guide bar face guide bar nose (see Figure
37 and indicator on side cover of saw).
5.
Before placing sprocket cover onto guide
bin"bolts, verity that the adjusting nib is
in the adjusting hole on the guide bar.
6.
Place sprocket
bolts.
7.
Thread guide bar nuts onto guide bar bolts.
IMPORTANT: Finger tighten only.
8.
Adjust chain tension. Follow steps under
Saw Chain Tension, page 12).
9.
Securely
wrench.
.025"
Figure 35 - Round Off Front Corner Of
Depth Gauge
Adjusting
Hole
Nib
Guide Bar Nuts
Sprocket
Cover
Figure 36- Guide Bar and Saw Chain
Replacement
Cutting
Edges
Figure 37- Correct Installation
Chain
of Saw
cover onto guide bar
tighten guide bar nuts with
4Bk CAUTION: Do not pJace chain
on saw backwards. If chain is backwards, saw will vibrate badly and
will not cut.
Co1_:h_ued
17
www. remingtonpowertoo/s,
com
STORAGE
TECHNICAL SERVICE
REPAIR SERVICE
If storing saw for more than 30 days, follow
steps below.
You may have further questions about assembling, operating, or maintaining this product.
If so, you can visit our Technical Service web
site at www.remingtonpowertools.com
or
contact our Technical Service Department
at 1-800-626-2237 (English Only). You may
also write to:
Note: Only use original replacement parts.
This will protect your warranty coverage ti)r
parts replaced under warranty.
1.
Remove battery from chain saw.
2.
Charge battery completely. Note: It
could take up to 9 hours to completely charge the battery.
3.
When battery is completely charged,
remove from charger and put protective cap on battery terminals.
IMPORTANT."To prolong battery life,
avoid leaving battery on charger for
extended periods of time (over 30
days without use).
4.
Remove and clean guide bar and
chain. (?lean guide bar and chain by
soaking in petroleum based solvent
or mild soap and water mixture.
5.
6.
Dry guide bar and chain.
Place chain in container filled with
oil. This will prevent rust.
7.
Wipe a thin coating of oil over surface of guide bar.
8.
Wipe off outside of saw body. Do this
with soft cloth dampened with a mild
soap and water mixlure.
9.
Store chain saw and battery
* in a high or locked place, out of children' s reach
* in a dry place
* in a carrying case or with scabbard over
guide bar
DESA Power Tools
P.O. Box 90004
Bowling Green, KY 42102-9004
ATTN: Technical Service
When contacting DESA Power Tools, have
ready:
, Your Name
, Your Address
, Your Phone Number
, Model Number of Product
If product requires warranty service, return
it to nearest Authorized Service (?enter.
You must show proof of purchase. If faulty
materials or workmanship caused damage,
we will repair or replace product without
charge. Note: Normal wear, misuse, abuse,
neglect, or accidental damage is not covered
under warranty.
NON-WARRANTY
SERVICE
If product requires service, return it to nearest
Authorized Service (?enter. Repairs will be
billed to you at regular repair list prices.
For additional Service Center or warranty
information, call 1-800-626-2237
or visit
our Technical Service web site at www.
remingtonpowertools.com.
REPLACEMENT PARTS
AND ACCESSORIES
We reserve the right to amend these
specifications at any time without notice.
The only warranty applicable is our standard
written warranty.
We make no other
warranty, expressed or implied.
,A
4B& WARNING:
Use only replace=
merit parts and accessories
de=
scribed in this manual. Use of other
parts or accessories
could damage
saw or injure operator.
See pages 43 through 44 for an Illustrated
Parts List.
If you need additional referral information,
contact our Technical Service Department
(see TechMcal Service).
corn
SERVICE
, Date of Purchase (Include copy of receipt for written requests).
For original replacement parts and accessories, contact your nearest Authorized
Dealer or Authorized Service (?enter tier this
product. If they can not supply the part or
accessory, contact your nearest Parts Central
listed on page 45. Each Authorized Dealer,
Authorized Service Center, and Parts Central
is independently owned and operated. You
may also order parts from the "Online Outlet"
at www.remingtonpowertools.com.
www. remingtonpowertoo/s,
WARRANTY
18
BATTERY DISPOSAL
RECYCLING
AND
This product uses nickel-cadnium bateries.
Local, state, or federal laws may prohibit
disposal of nickel-cadnium
batteries in the
ordinary trash.
To help protect the environment and conserve natural resources, please dispose of
batteries properly. You may contact your
local recycling center for inti)rmation on
where to drop off the batteries.
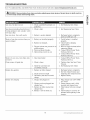
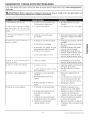
TROUBLESHOOTING
i
_ote. For additional help, v=slt DESA Power Tools' techmcal service web site at www.remingtonpowertools.com.
WARNING: Remove battery from chain saw before adjusting
cur from body contact with moving chain.
saw chain tension.
Severe
injury or death could
oc-
rrl
z
ffJ
r"
n
O;
"
D
'
'@
;
backwm'ds on
1. Chain assembled
guide bar,
Saw does not cut unless heavily forced.
Cutting produces only sawdust with
few large chips
I. Chain is dull,
I. See Sharpening
Saw runs slow. Saw stalls easily
1. Battery is nemly depleted
t. Recharge battery completely
until red LED turns oft.
Motor of saw does not run when you
squeeze trigger
1. Battery
1. Verify battery is installed
properly,
2, Check batteu charging
requirements.
3. Press in trigger lockout before
squeezing trigger,
4. Contact DESA Power Tools
Technical Service.
5, Contact DESA Power Tools
Technical Service.
not installed properly,
2. Battery not chaged,
3. Trigger lockout not pressed
release trigger,
4. Worn out motor brushes,
in to
5. Open wiring circuit on saw
1. See Replacing
3::
Saw runs. but does not cut
Saw Chain
Saw Chain
Motor of saw runs, but chain does
not move
1. Gear train failure
I. Contact DESA Power Tools
Technical Service.
Chain comes oft"guide bar
1. Chain is loose
1. Tighten chain. See Saw Chain
Tension
2. See Replacing Saw Chain
2. Guide bar and chain not
assembled correctly
Batter 3' dies quickly
I. Battery not fully charged
2. Chain tension too tight
3. Old battery that does not hold
charge.
Battery not charging
l. Charger
2. Charger
charger
3. Battery
charger
4. Battery
not plugged
in
cord not plugged into
base
not fully inserted into
base.
is too hot Iron] use.
19
1. Recharge battery completely
2. See Saw Chain Tension and
Adjusting Saw Chain Tension
3. Replace battery
1. Plug charger
AC source
into 120V 60HZ
2. Ensure charger cord is fully
inserted into charger base.
3. Slide battery fully into chm'ger
base
4. Allow battery to cool for 30
minutes before placing in the
charger.
www. rem/t)gtot)poweitools,
corn
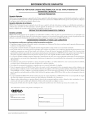
WARRANTY
REMINGTON
BRAND
iNFORMATiON
1BV CORDLESS
LiMiTED
POLESAW/CHAIN
SAW
WARRANTIES
NEW PRODUCTS
Standard Warranty
DESA Power Tools warrants
this new product
(2) years from the date of first purchase
DESA
Power Tools' warnings
Standard
DESA
Warranty
from
with DESA
to be free from
dealer provided
defects
the product
in material
and workmanship
has been maintained
and operated
fbr a period
in accordance
of two
with
and instructions.
Battery
Power Tools warrants
(6) months
and any parts thereof
from an authorized
this new battery
the date of first purchase
Power Tools' warnings
and any parts thereof
from an authorized
to be free from
dealer provided
defects
in material
the product
and workmanship
has been maintained
fbr a period
and operated
of six
in accordance
and instructions.
FACTORYRECONDITIONED PRODUCTS
Limited Warranty
DESA Power Tools warrants factory reconditioned products and any parts thereof to be free from detects in material and workmanship ti__r90 days from the
date of first purchase from an authorized dealer provided the product has been installed, maintained and operated in accordance with DESA Power Tools'
warnings and instructions.
TERMS
The fbllowing
" Always
terms
specify model
purchase
TO ALL WARRANTIES
number
when
contacting
the manufacturer.
To make a claim under
this warranty
the bill of sale or other proof of
must be presented.
- This warranty
is extended
- This warranty
covers the cost of part(s)
provided
and/or
COMMON
apply to all of the above warranties:
by a DESA
DESA
only to the original
retail purchaser
required
Power Tools Authorized
Power
to restore
Service
Tools who will provide
when purchased
this product
Center. Warranty
from
an authorized
to proper
operating
parts must be obtained
original
fhctory replacement
parts. Failure
material,
labor and incidental
costs associated
dealer.
condition
through
to use original
and an allowance
authorized
fbr labor when
dealers
of this product
f:actory replacement
parts voids this
warranty.
" Travel, handling,
this warranty,
" Excluded
from
tampering,
diagnostic,
this warranty
under
are products
from this warranty
- This is DESA
are products
Power Tools'exclusive
or implied,
written
fitness fbr a particular
from the date of first purchase.
DESA
Power Tools'liability
whatsoever
under
states
damages,
and are the responsibility
that f:ail or become
purchased
fbr commercial,
is limited
any circumstances
do not allow limitations
so the above limitation
Power Tools
including
or exclusion
about
industrial
six (6) months
no other warranties
price of the product,
indirect,
incidental,
on how long an implied
gives you specific legal rights,
this warranty
makes
to the purchase
For information
due to misuse,
POWER
repairs, unless expressly
accidents,
lack of proper
covered by
maintenance,
Model
Date Purchased
KY 42102-9004
www.remingtonpowertools.com
1-800-626-2237
(English
www. remingtonpowertools,
corn
warranties,
on battiers
regarding
and DESA
including
excludes
Only)
20
any and all other warranties,
warranties
and 90 days on fhctory
of merchantability
reconditioned
and
products
this product.
Power Tools shall not be liable fbr any other damages
damages.
lasts or the exclusion
and you may also have other rights
90004
Green,
usage.
or limitation
of incidental
may not apply to you.
contact:
TOOLS
or rental
or consequentiM
warranty
ESA
Bowling
damaged
of any and all implied
(2) years on new products,
" %fis warranty
P.O. Box
with warranty
of the owner.
and to the full extent allowed by law; this express warranty
or verbal and limits the duration
to two
" Some
or parts
warranty,
purpose
" DESA
this warranty
or alterations.
" Excluded
express
transportation,
are not reimbursable
which wiry from
state to state.
or consequential
REMI
®
Sierra de p_rtiga INALAMBRICA
Sierra de cadena INALAMBRICA
DE 18 VOLTIOS
DE 18 VOLTIOS
MANUAL PARA EL USUARIO
Sierra de cadena
BS188A (8"/20.3 cm)
Sierra de pertiga
BPS188A (8"/20.3 cm)
INIPORTANTE. Lea cuidadosamente este manual antes de armar
u operar esta sierra electrica. E! uso indebido de ia misma puede
provocar graves iesiones. Guarde este manual para consuitarlo
cuando io necesite.
21
INTRODUCCION
Su sierra de pErtiga y motosierra
inal_imbricas
motosierra).
Si la motosierra
fue comprada
"On-Line
Outlet"
pudieron
haberse comprado
juntas (como una pErtiga/motosierra
2 en l ) o por separado
(s61o
por separado,
la p£rtiga estd disponible
como un accesorio
y se la puede comprar
visitando
en www.remingtonpowertools.com.
EL CONTIENDO
INFORMACION
IMPORTANTE
DE SEGURIDAD
.............................................................
23
Antes de utilizar la sierra .....................................................................................................
AI utilizar la sierra ................................................................................................................
23
23
Contragotpes
Mantenimiento
Precauciones
.......................................................................................................................
y atmacenamiento
de su sierra electrica ....................................................
al recortar con la sierra de pertiga ...............................................................
24
25
26
DESEMBALAJE
...........................................................................................................
26
ENTIFICACI6N
DEL
27
PRODUCTO
..................................................................................
Sierra de cadena ...................................................................................................................................
Sierra de pertig ......................................................................................................................................
27
27
TC:RMINOS Y DEFINICIONES DE LA SIERRA DE CAENA .....................................
28
BATER|A RECARGABLE ..........................................................................................
29
Tapa protectora del terminal de la bateria .............................................................................................
Advertencias de Seguridad ...................................................................................................................
29
29
Carga de bateria ...................................................................................................................................
Notas importantes de cargado ..............................................................................................................
30
30
INFORMACI0N
SOBRE LA SIERRA DE CADENA .................................................
31
Ensamblado de la sierra de cadena ......................................................................................................
Tensi6n de la sierra de cadena .............................................................................................................
Lubricaci6n de la cadena ......................................................................................................................
Realizaci6n de cortes ............................................................................................................................
31
31
32
32
Tala de un &rbol (Derribamiento de un &rbol) ........................................................................................
Desmembramiento de un &rbol .............................................................................................................
Trozado de un tronco ............................................................................................................................
Poda de un &rbol ...................................................................................................................................
33
34
34
35
INFORMACl0N
SOBRE LA SIERRA DE PIeRTIGA ................................................
Ensamblado de la sierra de pertiga .......................................................................................................
Regulaci6n de la Iongitud de la sierra de pertiga ..................................................................................
Corte con la sierra de pertiga ................................................................................................................
LIMPIEZA
Y MANTENIMIENTO
......................................................................................
Limpieza del cabezal .............................................................................................................................
Cuidado de la barra de guia ..................................................................................................................
Afilado de la cadena ..............................................................................................................................
Recambio de la cadena serrada ...........................................................................................................
36
36
37
37
38
38
38
38
39
ALMACENAMIENTO
....................................................................................................
40
SERVICIO
.....................................................................................................
40
TI_CNICO
ACCESORIOS
SERVICIO
Y PIEZAS
DE REPUESTO
DE REPARACION
ELIMINACION
.........................................................................................
Y RECICLAJE
DIAGNOSTICO
Y RESOLUCION
INFORMACION
DE GARANT[A
DESGLOSE
CENTRAL
www. remingtonpowertoo/s,
corn
ILUSTRADO
DE PIEZAS
........................................................................
DE BATER[AS
.........................................................................
DE PROBLEMAS
........................................................
.....................................................................................
DE PARTES
...........................................................................
..................................................................................................
22
40
40
40
41
42
43
45
INFORIViACION
IMPORTANTE
LEA TODAS LAS INSTRUCCIONES
Asegurese de leer y entender todas
lae indicacionee
en Informaci6n
Importante
de Seguridad.
El uso
incorrecto de esta sierra de cadena
puede causar leeiones serias o la
muerte debido a incendio, electro=
choque, contacto del cuerpo con
i una cadena en movmiento,
o pot
madera que cae.
_1= PELiGRO: Serio dafio o muerte
por eiectrocuci6n si se tocan las lineas ei4ctricas. Nunca la use cerca
de ninguna fuente electrica, canes
o ineas electricas.
_,
ADVERTENCIA:
una sierra
de cadena
Cuando
a base
use
_,ADVERTENCIA:
Para una operaci6n segura lea y entienda el manual del propietario. Use m_scara
(y/o lentes de seguridad) y casco
para protegerse contra los desechos que caen. Tenga siempre un
_rea limpia de trabajo, un camino
de salida, y est4 alerta de la ubicaci6n de las ramas para evitar
las ramas y desechos que caen.
IVlantenga a los transe_ntes a 50
pies (15 m) de distancia.
ANTES DE UTILIZAR
SIERRA
Mantenga limpia el _rea de
trabajo
Las _ireasde trabajo sucias pueden provocar
lesiones. Anles de comenar a cortar, asegdrese de contar
on:
• zona de trabajo limpia;
• calzado firme;
• camino de retirada para el momento
de cafda del firbol.
Considere
LA
Para una operaci6n sin riesgo lea y entienda
este manual del propietario antes de usar
la sierra.
S6M un adult() bien instruido debe utilizar
la sierra. Nunca permita que ea utilizada
por nifios.
el entorno
de
_rea de trabajo
1. No utilice la sierra
• en la lluvia o la nieve;
° bajo la lluvia o en fireas hdmedas o
mojadas;
° en presencia de lfquidos
o gases altamente inflamables
° mientras estfi en un _irbol o una
escalera
° mientras estfi en plumas adreas, cubos o plataforma
2.
de
batedas, se debe siempre seguir
las precauciones
b_sicas de seguridad para reducir el riesgo de
incendio o lesidn a las personas,
incluyendo Io siguiente:
DE SEGURIDAD
][nspeccione el _irbol antes de talarlo.
Asegdrese de que no tenga ramas vfistagos secos que puedan caerle encima.
Deje que las ramas caigan al suelo
libremente
Use la herramienta
2.
No utilice la sierra
°
cuando se encuentre bajo la influencia de alcohol, medicamentos o
drogas;
•
cuando tenga prisa;
Compruebe
si hay dafio
No utilice la sierra
° si la pdrtiga o la sierra estfi dafiada,
mal calibrada, o no estfi montada en
forma segura y por completo
° si no es posible encenderla y apagarla mediante el gatillo. La cadena
debe dejar de moverse al soltar el
gatillo. Si el interruptor se encuentra
defectuoso, h_galo reemplazar en un
centro de servicios autorizado (consuite Servicio Tdcnico).
AL UTILIZAR
Mantenga
trabajo.
Mantenga limpia el firea detrabajo. Las
_ireas de trabajo sucias pueden provocar
lesiones.
2.
No la use cerca de lfneas eldctricas.
Mantdngala a por lo menos 10 pies de
distancia de las lfneas eldctricas.
3.
Si dos o m_s personas realizan tareas de
tala y trozado al mismo tiempo, cercidrese de clue haya una buena cantidad de
espacio entre ellos. El espacio que separa
a ambas personas debe ser por lo menos
igual al doble de la altura del _irbolque se
estfi talando.
4.
Asegure la madera que se ha de cortar
mediante mordazas o cutlas.
Use la ropa apropiada
1.
2.
AI utilizar la sierra, lleve ropa ajustada.
No utilice ropa ni lleve accesorios sueltos, ya cluedstos pueden quedar atrapados
en la cadena en movimiento.
Use proteccidn
el pelo largo
Use equipo
del pelo para contener
1.
Matenga lejos a los nifios,
alos curiosoa y a Iosanimales
de seguridad
Use el siguiente equipo de seguridad cuando
usa la sierra::
• guantes resistentes (utilice guantes
de goma para trabajar al aire libre);
• calzado resistente
con suelas no
resbaladizas;
• proteccidn ocular, tal como gafas de
seguridad o una pantalla facial;
• casco de seguridad;
• orejeras o tapones para los ofdos;
• m_scara contra el polvo (el trabajar
en zonas polvorientas).
Permanezca
limpia el _rea de
1.
correcta
Utilice la sierra sdlo para cortar madera.
• No la utilice con fines para
los que no ha sido disetada.
° No use para cortar artfculos
que no sean de madera
LA SIERRA
1.
Sdlo el que usa la sierra debe estar en
el _irea de trabajo. Mantenga a los curiosos a 50 pies (15 m) lejos de la sierra
en operacidn.
2.
No permita que los visitantes toquen la
sierra de cadena.
Use la herramienta
1.
No use la sierra de pdrtiga para talar
_irboles. Use la sierra de cadena sin
el aditamento de pdrtiga y sdlo si ha
sido capacitado o tiene ayuda de algdn
experto.
2.
No corte los matorrales bajos ni los
_irboles tiernos con la sierra de pErtiga. Use sdlo la sierra de cadena, con
muchfsimo cuidado. Los objetos delgados pueden atascarse en la cadena y
azotarle a usted. Esto podrfa tambidn
desequilibrarle.
alerta
Proceda con cautela. Utilice el sentido
comdn. No utilice la sierra cuando se
sienta cansado.
23
correcta
www. remingtonpowertoo/s,
com
INFORIViACION
IMPORTANTE
DE SEGURIDAD
Permanezca aierta
1.
Permanezca
comdn.
alerta. Utilice
el sentido
2.
Sujete la sierra firmemente con ambas
manos. Nunca utilice la sierra con una
sola mano. Nunca utilice el protector de
mano a manera de mango.
3.
Agarre la sierra de pdrtiga en forma
segura. Ponga una mano en la pdrtiga
y la otra en el asa.
4.
No coloque el dedo en el gatillo hasta
que estd listo para realizar el corte.
5.
Antes de activar la sierra, asegdrese de
que no se encuentre en contacto con
nada.
6.
Para protegerse de un shock eldctrico,
evite el contacto corporal con objetos
conectados a tierra tales como carlos,
vallas, cercas y postes de metal.
Mantenga todas las partes del cuerpo
aleiadas de la sierra mientras la cadena
estd en movimiento.
7.
8.
Proceda con sumo cuidado al cortar
ramas o vistagos de irboles que se
encuentran en tensidn. Estd preparado
para actuar en caso de contragolpe de
la madera. AI liberarse la tensidn de la
madera, la rama puede moverse hacia el
operario, golpearlo y provocarle lesiones graves y aun la muerte.
AI cortar, no aplique gra fuerza a la
sierra.
Para realizar el trabajo de manera mis segura, mejor yen la cantidad de tiempo para
la cual fue disefia da la sierra, basta aplicar
una ligera presidn sobre ella.
C6mo
Ilevar
la sierra
• piomo de las pinturas
hechas a base de piomo
• silicecristalinaproveniente
de ladrillos y cemento y
de otros
productos
de
albafiileria
• arsenico
y
cromo
provenientes de madera
tratada con substancias
quimicas
Su rieego debido a la expoeicibn a
eatoe elementoe varia de acuerdo a
cuan a menudo realiza eate tipo de
trabajo. Para reducir eu expoaicibn
a eatae aubetanciaa quimicae: trabaje en u na area bien ventilada y use
el equipo de seguridad aprobado
tales como aquellae maacarillae
contra el polvo diaefiadaa en forma
especial para filtrar laa particulaa
mieroacbpicaa.
CONTRAGOLPES
Lleve la sierra el6ctrica de un lugar a otro
* Cdmo llevar la sierra
* con el dedo fuera del gatillo;
* con la ban_ade gu/a y la cadena mNmdo
hacia alrds.
* Sierra de cadena- sosteniendo el asa
frontal (nunca use la proteccidn de
las manos como asa)
* Sierra de pdrtiga - con la pdrtiga
telescdpica regresada a su posicidn
mils corta
° Sierra de pdrtiga- sosteniendo la pdrtiga en su punto de equilibrio (cerca
del extremo de la sierra)
° Retire la baterla y use una vaina
cuando transporte la sierra
ducto contiene
substancias
qug
micas conocidas en el estado de
California como causas de c_ncer
_l_
Este oproo de ADVERTENCIA:
defectos al recien nacido
de
otros dafios de reproduccibn.
www. remingtonpowertoo/s,
_I_ADVERTENCIA: El polvo causado cuando se usan herramientas
motorizadas para lijar, cortar, esmedlar y taladra, a igual que otras
actividades de construccibn, contienen substancias quimicas conocidas (en el estado de California)
como causantes de c_ncer, defectos al recien nacido u otros dafios
a los 6rganos de reproduccidn.
Algunos ejemplos de estas substancias quimicas son:
corn
_lb ADVERTENCIA: Los contragob
pea pueden ocurrir cuando el extremo o lapuntade labarra de guiatoca
unobjetoocuandolamadera"eecierra" y presiona la cadena dentro del
torte. En algunoe caeoe, el contacto
de la puntade la barra puedeprovocar
una rapida reaccibn de contragNpe
y conducir la barra de guia repentinamente hacia arriba y hacia atrae,
en direccibn al operario. La compresibn de la cadena eerrada contra la
barra de guia puede lanzar la sierra
rbpidamentehacia atrba, tambien en
direccibn al operario.Cualquiera de
eatae reaccionee puedehacer que el
operariopierda el controlde la sierra
y provocarle lesionea graves.
24
Dispositivos
sierra contra
de seguridad
contragolpes
de esta
Esta sierra tiene una cadena de bajo contragolpe y una barra de gufa de reduccidn de
contragolpes. Ambas caracteristicas
reducen las probabilidades de contragolpe. Sin
embargo, adn pueden ocurrir contragolpes
con esta sierra.
Siga las Instrucciones de Ensamblado de la.
No retire el protector de mano frontal. No
1o reemplace con un sustituto.
Las siguienles medidas reducen el riesgo de
conlragolpe.
• Utilice ambas manos para sujetar
la sierra mientras se encuentre en
funcionamiento;
-- Para la sierra de cadena, utilice
ambas manos para sujetar la sierra
mientras se encuentre en funcionamiento. Sujdtela con firmeza: los
mangos de las sierra deben quedar
bien tamados en susdedos.
-- Para la sierra de pdrtiga, use una
mano para agarrar el asa y la otra
para agarrar la pdrtiga. Agarre
con firmeza. El pulgar y los dedos
debe cubrir la pdrtiga y el asa.
• Mantenga
todos los dispositivos
de seguridad
de la sierra en su
lugar. Asegdrese de que funcionen
correctalnente.
• Sierra de cadena - No se extienda por
demis ni realice cortes por encima
de la altura de sus hombros.
• Sierra de pdrtiga - no se extienda
mucho ni extienda los brazos por
sobre la altura de los hombros.
• Mantdngase en posicidn firme y con
buen equilibrio en todo momento.
• Permanezca ligeramente a la izquierda de la sierra. De esta manera,
su cuerpo no estarfi directamente
alineado con la cadena.
• No permita que el extremo de la
barra de gu;a toque nada mientras la
cadena se halle en movimiento (yea
la Figura 1).
• Nunca intente cortar dos troncos de
una sola vez. Corte uno por vez.
• No hunda el extremo de la barra
de gula ni intente realizar cortes
"de punta" (perforando
la madera
utilizando el extremo de la barra de
gufa).
° Mantdngase
alerta a los cambios
de posicidn de la madera y a otras
fuerzas que pueden provocar presidn
sobre la cadena.
° Proceda con suma cautela al reingresar
a un corte
realizado
previamente.
INFORIViACION
IMPORTANTE
• Utilice la cadena y la barra de guia
de contragolpe reducido suministrados con esta sierra. Reemplficelos
exclusivamente
con las cadenas y
barras de gu/a enmneradas en este
manual.
• Nunca utilice cadenas romas (desgastadas) o sueltas. Mantenga
la
cadena afilada y tensada.
IVlantenimiento de la cadena y
seguridad contra contragolpes
Siga las instrucciones de manlenimienlo de este
manual. La limpieza correcta de la sierra y el
manlenimienlo adeucado de la cadena y la barra
de gufa pueden reducir las probabilidades de
contragolpe. Despuds de cada uso, inspeccione
su sierra y realice las tareas de manlenimienlo
necesarias. Eslo prolongarfi la vida fitil de la
sierra. Nora: el riesgo de contragolpe puede
incrementar cada vez que se afila la cadena,
aun al afilarla debidamente.
DE SEGURIDAD
MANTENIMIENTO
Y
ALMACENAMIENTO
SIERRA ELECTRICA
Desconecte
Servicio
DE SU
la bater{a
Retire la bateria de la sierra
* cuando no se encuentre en us();
* antes de trasladarla de un lugar a
otro;
* antes de tensar la cadena de la
sierra
* antes de realizar tareas de servicio
en ella;
* anles de recambiar piezas o accesorios
de la misma, tales como la cadena serraday el protector.
Compruebe
Cuando d_ servicio, use sdlo piezas
de repuesto iddnticas.
ALMACENAMIENTO
Cuando no estd en uso, guarde siempre
la sierra
° quitada la bateria
° en un sitio alto o bajo llave, fuera del
alcance de nifios;
° en un sitio seco;
° con la funda sobre la barra gufa
° dentro decasa
si hay da_o
Inspeccione la cadena serrada antes y despuEs
de cada uso.
° Inspeccione la sierra detenidamenle si
se dafia el protector u otra parte
° Compruebe que no presenle dafios que
pueden atectar la seguridad del operario
o de la herramienta en s;.
° Verifique la alineacidn y la m-ticulacidn
de las piezas mdviles.
° Compruebe que no haya piezas rotas o
dafiadas. No utilice la sierra si presenta
dafios que afecmn su funcionamiento o
la seguridad del operario. Haga reparar
los dafios en un centro de servicios
autorizado.
Guarde es*asim*ru_viones.Estemanual es
su gufapara utilizar esta siestaeldctricade
maneraadecuaday segura.
Mantenimiento General
Direcci",,,_,
'," ' i:,,\2: :;'_1o permita
e guia
,
! ..............
-7 Eoqueaqul
Cuadrante
_
de 90°
Figura
1 - Ejemplo
del peligro
de
contragolpe:
No permita
que el extremo de la barra de guia toque el
objeto mientras
la cadena es# en
movimiento.
Cuide de su sierra eldctrica.
° Nunca la exponga a la lluvia
° Mantenga la cadena afilada, limpia
y lubricada para mayor rendimiento
y seguridad.
• Para afilar la cadena, siga los pasos
delineados en este manual.
° Manlenga los mangos siempre secos,
limpios y sin aceite o grasa.
° Mantenga ajustadas todas las mercas y
tomillos.
° Mantenga el corddn de alimentacidn
del cargador de la baterfa le]os del
calor, aceite y los bordes afilados.
25
www. remingtonpowertoo/s,
com
INFORIViACION
PRECAUCIONES
IMPORTANTE
DE SEGURIDAD
AL
RECORTAR
CON LA
DE PERTIGA
SIERRA
IMPORTANTE:
Lea y entienda
este manual antes de ensamblar
u operar eeta sierra de cadena. El
uso ineorrecto de la sierra puede
causar una lesibn seria. Guarde
este manual como referencia
en
el futuro.
DESEMBALAJE
1.
2.
Mantenga a la gente lejos del e×tremo cortante de la sierra de pertiga
y a una distancia segura del _rea
de trabajo.
Nunca se pare debajo de la rama
que est& recortando.
P6ngase
siempre fuera de la trayectoria de
los desechos que caen.
Nunca se pare sobre una escalera
ni ningen otro tipo de soporte in=
estable mientras usa la sierra de
pertiga.
No use la sierra de pertiga cerca
de cables, alimentaci6n electrica
o lineas telef6nicas. Mantenga un
espacio minimo de 10 pies de todas
las lineas de alimentaci6n.
Use siempre las dos manos para
operar la sierra de pertiga. Sostenga
una presi6n firme y continua sobre
la sierra de pertiga mientras corta
pero no trate de forzar la sierra a
traves de la madera.
No use la sierra de pertiga para
cortar ramas que scan m_s anchas
en all,metro que ia iongitud de ia
barra guia.
www. remingtonpowertoo/s,
corn
26
Retire todos los eiementos dei
embMaje.
Inspeccione todos k)s dementos para
asegurar que no se hayan producido
dafios durante el envlo. Si descubre
dafios o si fidtan piezas, comunlquese
inmediatamente con la tienda donde
compr6 la sierra.
IDENTIFICACION
DEL PRODUCTO
SIERRA DE CADENA
Protecci6n Frontal
de la Mano
Extremo frontal
barra de guia
/
Mango
Posterior
Bot6n de
desenganche
del mango
Cadena
serrada
Barra de
guia
Cubierta de la
rueda dentada
Vaina
Bot6n de
desenganche
del mango
Bloqueo del
gatillo
Interruptor de
Gatillo
...........
. Cabezal
motorizado
/
J
Bot6n de
desenganche
de la bateria
/
Bateria
Mango"
Frontal
Bot6n de desenganche
de la bateria
SIERRA
DE PI_RTIGA
Protecci6n Frontal
Cadena
serrada
de la Mano
Barra de
guia
Bot6n de
desenganche
del mango
...... Cabezal
motorizado
Palanca
sujetadora
\
\\
\
Pertiga
Interior
Pertiga exterior
Bloqueo del
\
gatillo
Interruptor de /
Gatillo
Mango
Posterior
/
/
agarre
Bot6n de
desenganche
del mango
/
Bateria "
\ Bot6n de desenganche
de la bateria
27
www. remingtonpowertoo/s,
com
TERMINOS
Y DEFINICIONES
DE LA SIERRA DE CADENA
Barra de guia Barra de metal que se
extiende hacia adelante desde el cabezal.
La barra de gufa sostiene y gufa la cadena
serrada.
Corte de muesca
Barra de gufa de contragolpe reducido Barra de gu/a que reduce las probabilidades de contragolpe.
realiza adoptando la posicidn de corte normal, pero utilizando la parte superior de la
barra de gufa.
Cabezal La sierra elEctrica sin la cadena
ni la barra de gufa.
Desmembramiento
Cadena de contragolpe reducido
Cadena que reduce las probabilidades decontragolpe segdn la norma ANSI B 175.1.
Dientes de fijaci6n
Protuberancias ("dientes") que se hallan en la seccidn frontal
cabezal, junto a la barra de gufa. Mantenga
estos dientes en contacto con la madera al
Cadena de repuesto Cadena que satisface la norma ANSI B175.1 cuando se la
utiliza con una sierra especffica. Puede no
satisfacer las exigencias de ANSI si se la
utiliza con otras sierras.
Cadena serrada (Cadena) Una cadena
cerrada que tiene eslabones dentados para
cortar madera. El motor impulsa la cadena
y la barra de gufa la sostiene.
Contragolpe
Movimiento r_pido hacia
arriba y hacia atr_s de la barra de gufa. Los
contragolpes pueden producirse cuando el
extreme de la barra de gufa toca algdn objeto
mientras la cadena se halla en movimiento.
Corte de muesca en un
normal
Postura uti-
Corte inferior Un corte hacia arriba desde
el lade inferior de un tronco o una rama. Se
Protector
El proceso
de cortar
ramas de un _irbol talado.
talar o trozar, ya que esto contribuye a mantener la posicidn de la sierra al cortar.
Extreme frontal de la barra
La punta de la barra de gufa.
de guia
GatiHo Dispositivo que enciende y apaga la
sierra. AI oprimiflo, la sierra se enciende. Al
soltarlo, se apaga.
Interrupter
Dispositivo que cierra o interrumpe el circuito eldctrico del motor de
la sierra.
Mango anterior Se encuentra en la parte
frontal de la sierra.
Mango posterior El mango que se halla
en la parte posterior del cabezal.
Control de lubricacibn
Sistema para
lubricar la cadena y la barra de gufa.
Podar
El proceso
_irbol con vida.
corn
de torte
lizada al realizar cortes para talar un _irbol.
La barra de gufa se sacude hacia arriba y
hacia atr_is, en direccidn al operario.
www. remingtonpowertoo/s,
Posicibn
firbol que sirve para dirigir su cafda.
28
de cortar ramas de un
de mane
frontal
Escudo
entre el mango frontal y la barra de gufa.
Protege la mane izquierda mientras se utiliza la sierra.
Retroceso
(Contragolpe,
Presibn)
Retroceso r_pido de la sierra elEctrica. Puede
ocurrir s ila parte de la cadena que se encuentra sobre la barra de gufa queda presionada,
atrapada o toca algdn objeto extrafio.
Rueda dentada
pulsa la cadena.
Rueda dentada que im-
Tala final El dltimo corte que se realiza
al talar un _rbol. Debe realizarse del lade
opuesto alas muescas.
BIoqueo del gatillo
y derribar un _rbol.
El proceso de cortar
Traba de seguridad
impide el accionamiento
sierra.
Dispositivo que
accidental de la
Trozar El proceso de cortar un _irbol talado
o un tronco en trozos.
Vinculo con el interrupter Este dispositivo conecta el interrupter con el gatillo. Al
oprimirse el gatillo, este vfnculo mueve el
interrupter.
BATERiA
RECARGABLE
a. Los cordones de dos conductores
pueden usarse con cordones de extensidn de 2 o 3 conductores. $61o
debe usarse cordones de extensidn
de forro redondo, y recomendamosque lleven la catalogacidn UL
(Underwriters
Laboratories).
Si la
extensidn se la va a usar a la internperle, esta debe ser adecuada para
este tin. Cualquier corddn marcado
para uso a la intemperie puede usarse
bajo techo. Las letras "W" 6 "WA"
impresas en el forro indican que el
cord6n es adecuado para usarse a la
intemperie.
b. Un cord6n de extensi6n debe tener
por seguridad el tamafio adecuado
(AWG 6 American Wire Gaugecalibre americano de cables) para
prevenir
pdrdida
de potencia
y
sobrecalentamiento.
Mientras mils
pequefio es el ntlmero del calibre del
conductor mayor es la capacidad del
cable; as/un calibre 16 tiene mayor
capacidad que el 18. Cuando use
mils de una extensi6n para ti_rmar
la kmgitud total, asegtlrese que cada
extension tiene al menos el tamafio
mfnimo del conductor.
TAPA PROTECTORA
DEL
TERMINAL
DE LA BATERiA
ADVERTENCIA:
No guarde ni
transporte
la bateria de forma que
objetos metgflicos puedan entrar
en contacto con los terminales
expuestos de la bateria. Pot ejemplo,
no coloque las baterias sin su tapa
en delantales, bolsillos,
cajas de
herramientas,
cajas de piezas de
productos, cajones, etc. mezclaalas con clavos, tomillos,
Ilaves,
etc. sueltos.
Se provee una tapa de proteccidn para el terminal de la baterfa para usarla siempre que
la baterfa estd fuera de la herramienta o del
cargador. Retire la tapa antes de colocar la
baterfa en el cargador o en la herramienta.
ADVERTENCIAS
DE
SEGURIDAD
I.
Este
manual
nes importantes
operacidn.
contiene
sobre
instruccioseguridad
y
2.
Antes de usar el cargador de la baterfa,
lea todas las instrucciones y sefiales de
precaucidn del cargador, paquete de
baterfa, y del producto que se usa con
este paquete.
3.
No exponga el cargador
nieve.
4.
El uso de un accesorio no recomendado o vendido por la marca Remington
puede representar un riesgo de incendio, sacudida eldctrica o lesiones a
personas.
PRECAUCION:
el
riesgo de una lesi6n, cargue sblo
baterias marca Remington. Otros
tipos de baterias pueden reventarse
causando lesiones personales y
dafios.
7.
8.
9.
5.
6.
Para reducir el riesgo de dafios al
enchufe y cable eldctricos, hale del
enchufe en lugar de hacerlo del cable
cuando desconecte el cargador.
No se deberfa usar un cable de extensidn a no ser que sea muy necesario. El
uso de un corddn de extensidn inadecuado puede representar un peligro de
incendio, sacudida eldctrica o lesidn.
NOTA IVII_DICA:El liquido es una
solucibn de hidrbxido de potasio
al 25=30%
LA TABLA DE TAMAlqOS (AWG)
MINIMOS
DE CONDUCTORES
PARA
CORDONES
DE
EXTENSION.
AMPERIOS
NOMINALES
DE LA PLACA DE
DATOS - 0 - 10.0
a la lluvia o
Para reducir
12. Puede haber un pequefio goteo de lfquido de las celdas del paquete de baterfas
bajo condiciones extremas de uso, recargo o temperatura. Esto no indica una
falla. Sin embargo, si el sello externo
estfi roto y este goteo hace contacto con
su piel:
° Lave r@idamente
con agua y
jabdn.
° Neutralice con ficido suave como
jugo de limdn o vinagre.
° Si el lfquido de la baterfa entra en
sus ojos, l_velos con flujo de agua
limpia por al menos 10 minutos y
busque atencidn mddica inmediata.
Longitud
del cable
Tarnafio AWG
del cable
25 Pies
18 AWG
50 Pies
18 AWG
100 Pies
16 AWG
150 Pies
14 AWG
Cuando cargue use s61o el cargador
provislo. El uso de otro cargador podrfa
dafiar la baterfa o crear una condicidn
peligrosa.
Cuando cargue use s61o un cargador.
Use solo paquetes de baterfaRemington
RBI8VI
o RBEISVI
con este
producto.
10. No trate de abrir el cargador. No hay
piezas alas que el cliente pueda darles servicio. Si est_ dafiada, llame al
Servicio Tdcnico de DESA Power
Tools
11. NO QUEME el paquete de baterfa
incluso si tiene mucho dafio o estfi
completamente inservible. Las balerfas
pueden explotar en el fuego.
29
www. remingtonpowertools,
com
BATER|A
CARGA
RECARGABLE
DE LA BATERiA
El paquete de baterias no viene
completamente
cargado de f_=
brica. Antes de intentar cargar el
paquete de batedas, lea completamente todas las instrucciones
4.
Desenchufe el cargador. Quite el cargador deslizfindolo hacia afuera (Vea
la Figura 4).
3.
Mientras carga, el cargador puede zumbar o volverse caliente al tacto. Esto es
normal y no indica ningdn problema.
5.
Coloque el paquete de baterfas en la
herramienta y estd seguro de haberlo
insertado completamente en la cavidad
de la herramienta hasta ponerlo en su
sitio con un "clic".
4.
Si el paquete de baterfas no se carga
correctamente:
* Revise que haya corriente en el enchute enchufando una klmpara u otro
artefacto.
° Revise y yea que el enchufe no estd
conectado a un interruptor que corta
la corriente cuando apaga las luces.
° Mueva el cargador y el paquete de
la baterfa donde la temperatura ambiente estd entre 40°F(4,5°C) y 105°F
(40,5°(?).
- Si el receptficulo y la temperatura
estfin bien y usted no consigue una
carga apropiada, comunfquese con
DESA Power Tools.
5.
El paquete de baterfas debe recargarse
cuando ya no produce suficiente energfa en los trabajos donde antes 1o
hacfa fficilmente. NO SIGA usando
el producto con su paquete de baterfas
envejecido.
6.
Para prolongar la vida de la baterfa,
evite dejar el paquete de la baterfa en
el cargador por mucho tiempo (m_s de
30 dfas sin uso). Aunque la sobrecarga
no sea una preocupacidn de seguridad,
puede reducir significativamente
la
vida total de la baterfa.
7.
El paquete de baterfas puede alcanzar
su desempefio dptimo luego de su 5ta
carga en funcionamiento
normal. No
hay necesidad de agotarla completamente antes de recargarla. El uso normal es el mejor m&odo de descarga y
carga de la baterfa.
de seguridad.
El cargador estfi disefiado para usar energfa
casera est_ndar de 120 voltios y 60 Hz.
1.
Enchufe el corddn del cargador
base del cargador.
en la
(Vea la figura 2)
Figura 4 =Quite el cargador
NOTAS
IMPORTANTES
SOBRE
LA CARGA
Figura 2 - Enchufe
la base
2.
3.
el cargador
en
1.
Enchufe el cargador
en cualquier
tomacorriente estfindar de 120 voltios
y 60 Hz. Importante: No cargue con
un moto-generador
ni con una fuente
de CC (corriente continua). Use sdlo
120V de CA.
Deslice el cargador en el paquete de
baterfas como se muestra en la figura 3.
Deie que el paquete de baterfas se cargue hasta que el LED rojo se apague.
Luego de la carga inicial, bajo uso
normal, su paquete de baterfas deberfa
estar completamente
cargado de 3 a 9
horas.
Figura 3- Deslizando
la bateria
2.
Luego de un uso normal, su paquete
de baterfas debe ser completamente
cargado en 3-9 horas. Si el paquete de
baterfas estfi completamente
agotado,
puede necesitar hasta 9 horas para
cargarse completamente.
Su paquete
de baterfas fue enviado descargado de
ffibrica. Para un meior rendimiento cargue la baterfa hasta que el LED rojo se
apague. Luego de usar la sierra y antes
de cargar la baterfa deie que la baterfa
se enfrfe unos 30 minutos. NOTA: Si
pone una baterfa caliente en el cargador
no se cargar_.
NO cargue el paquete de baterfas a una
temperatura ambiente por debajo de los
40°F (4,5 °C) o por encima de 105°F
(40,5°C). Esto es importante para evitar
graves dafios al paquete de baterfas. Se
pueden conseguir una vida mils larga y
el mejor rendimiento si el paquete de
baterfas se lo carga a una temperatura
ambiente de cerca de 75 ° (24°).
el cargardo sobre
www. remingtonpowertoo/s,
corn
30
INFORMACION
ENSAMBLADO
SOBRE LA SIERRA DE CADENA
DE LA SIERRA DE
Ranura
CADENA
2.
3.
Alinee el reborde del cabezal motriz de
la motosierra con la rannra del mango
principal (yea la figura 5).
Deslice el cabezal motriz en el mango
principal hasta qne las unidades "se
cierren a presidn" (yea la figura 6)
IMPORTANTE: los dos botones de desenganche del mango principal deben
estar completamente enganchados.
Deslice la bater/a en el mango principal
hasta qne los botones de desenganche
"se cierren a presidn" (yea la figura
7).
Nora: (:argue completamente la baterfa
antes de usar por primera vez. Vea
Carga de la bater/a,
p_gina 30).
DE LA SIERRA
DE
CADENA
ADVERTENCIA: Retire la bateda
de la motosierra antes de dar
servicio. Puede ocurrir una grave
lesi6n o la muerte si el cuerpo entra en contacto con la cadena en
movimiento.
_kADVERTENCIA:
Los bordes de
corte de la cadena son afilados. AI
manipular la cadena, utilice guam
tes de proteccibn.
1.
TENSION
4Bk ADVERTENCIA:
Los bordes de
corte de la cadena son afilados. AI
manipular la cadena, utilice guantes
de protecci6n.
Asa principal
....Cabezal
motorizado
Figura 5 - Alinee el cabezal motriz
con el mango
NOTA: Su sierra de pdrtiga y motosierra inaklmbricas pudieron haberse compradojnntas
(como nna pErtiga/motosierra 2 en 1) o por
separado (sdlo motosierra). Si la motosierra
fue comprada por separado, la pErtiga est_
disponible como un accesorio y se la pnede comprar visitando "On-Line Outlet" en
www.remingtonpowertools.com.
Figura 6 - Mango principal
triz ensamblado
del cabeza/ mo-
_IADVERTENCIA:
Siempre mantenga la cadena deNdamente tensionada. Si la cadena se encuentra
suelta, existe mayor riesgo de
contragolpes. Adem_s, la cadena
suelta puede salir despedida de
la ranura de la barra de guia. Esto
puede lesionar al operario y provocar dafios en la cadena. Si la
cadena est_ suelta, la cadena, la
rueda dentada y la barra de guia se
desgastar_n r_pidamente.
Nota: La tensidn de la cadena viene calibrada
correctamente de ffibrica. Una cadena nneva
se estirar_. Revise frecuentementelatensidn
de la nueva cadena (lnego de desconectar
la bater/a) durante las 2 primeras horas de
trabajo. Deje qne la cadena se entrie. Siga
los siguientes pasos para revisar la tensi6n
de la cadena de la sierra.
1. Retire la bateffa de la motosierra.
2.
3.
Asa
principal
CokNnela motosierra sobreuna superticie tirme para revisar la tensi6n de la
cadena.
Hale la cadena con una fuerza leve
hasta 118de pnlgada de la parte interior
de la barra gufa y sudltela (yea la tigura
8). Si la cadena se asienta con suavidad
en su lugar, la tensi6n est_ correcta.
Una ligera flojedad (1116 de pnlgada
o menos) entre la cadena y la parte
interior de la barra gufa es aceptable.
Bateria
Figura 7 -Mango principal
bezal motriz ensamblado
del ca-
Figura 8 - Compruebe
de la cadena
31
la tension
www. remingtonpowertoo/s,
com
INFORMACION
AJUSTE
CADENA
1.
SOBRE LA SIERRA DE CADENA
DE TENSION
DE LA
LUBRICACION
SERRADA
Afloje las tuercas de la barra gufa antes de regular la cadena (yea la figura
9).
DE LA CADENA
Figura 9 = Afloje
barra guia.
2.
3.
las tuercas
de la
1.
Llene la botella de apriete incluida con
aceite de motor SAE N°40 o N°30 o con
aceite de la cadena de la barra.
2.
Aplique algunas gotas de aceite entre
la cadena y la barra gufa (yea la figura
Note: El aceite debe aplicarse antes de
cada use y cada 5 minutes durante use
continue.
Enaceite la
cadena con
frecuencia
Gire en sentido horatio el tornillo de
regulaci6n de la parte frontal del cabezal hasta que no haya flojedad en la
cadena (yea la figura 10).
Figura 12-Aplicaci6n
a la cadena
Use guantes de protecci6n, hale la
cadena hacia abajo para revisar la
tensi6n (yea el paso 3).
REALIZACION
Sujete la baterfa a la sierra
ajuste
2.
Cercidrese de que la porcidn del tronco
que desee cortar no yazca sobre el suelo. De este modo, evitari que la cadena
toque el suelo al cortar a travds de dl. Si
la cadena toca el suelo mientras se encuentra en movimiento, se desatilarfi.
4.
5.
No tense demasiado la cadena. Una
sobre tensi6n provocarfi un excesivo
desgaste reduciendo la vida de la barra
gufa y de la cadena. Una sobre tensi6n
reducirfi tambiEn la cantidad de cortes
per carga de bater/a.
Luego que la tensi6n de la cadena
esti correcta, apriete con firmeza las
tuercas de la barra gu/a (yea la figura
11)
Tuercas
3.
Utilice ambas manos para sujetar la
sierra. Utilice siempre la mano izquierda para asir el mango anterior
y la derecha para tomar la posterior.
Sujdtela con firmeza: los mangos de la
sierra deben quedar bien tomados por
sus dedos (yea la figura 13).
4.
Asegdrese de mantener una pisada
tirme. Mantenga los pies separados y
distribuya su propio peso sobre ambos
pies en ti_rma equilibrada.
5.
Cuando estd listo para hacer un corte,
presione el bloqueo del gatillo con el
pulgar derecho y accione el gatillo (vea
la figura 13). Esto enciende la sierra.
Al soltar el gatillo la sierra se apaga.
Encienda siempre la sierra antes que
entre en contacto con el madero.
de la barra
de guia
Figura
11 - Apriete
la barra guia
las tuercas
www. remingtonpowertoo/s,
corn
de
32
de Gatillo
Figura 13 - BIoqueo
ubicaci6n del gatillo
del gatillo
y
6.
Al comenzar a cortar, coloque la cadena en movimiento sobre la madera.
Sujete la sierra tirmemente en su lugar
para evitar que la sierra rebote hacia
arriba y hacia abajo o hacia los lados.
7.
Conduzca la sierra ejerciendo una ligera presidn. No la someta a un esfuerzo
excesivo; de lo contrario, el motor se
sobrecargarfi y se quemari. La sierra
funcionarfi de manera mejor y mils
segura si se la utiliza segdn ha sido
disefiada.
8.
Retire la sierra del corte con la cadena
girando a la m_xima velocidad. Para
interrumpir el corte, suelte el gatillo.
Asegdrese de que la cadena haya dejado de moverse antes de asentar la
sierra.
9.
Ejercftese hasta que sea capaz de mantener una velocidad de corte estable y
pareja.
DE CORTES
1.
de
Interruptor
de aceite
Tornillo
de
Figura 10 - Giro del tornillo
regulaci6n.
del gatillo,,
IMPORTANTE: La aplicacidn de aceite a la
cadena y a la barra gufa reduce la friccidn
y el desgaste excesivo. Una aplicacidn incorrecta desgastarl en exceso y reducir_i la
vida de la cadena y de la barra gufa.
12).
Tuercas de la
barra de guia
Bloqueo
INFORMACION
TALA
DE UN ARBOL
'Derribamiento
_,
SOBRE LA SIERRA DE CADENA
5.
de un arbol)
ADVERTENCIA:
• Evite los contragolpes, ya
que pueden provocar lesi=
ones graves y aun la muer=
re. Para evitar el riesgo de
contragolpe, vea la seccibn
Contragolpes.
• osediepongaatalar un arbN ei
no ee dieetro o no cuenta con
ayuda confiable.
• AI talar un _rbol, mantenga a
los nifios, animales y curio=
sos alejados del _rea.
• Si dos o m_s personas reali=
zan tareas de tala y trozado
el mismo tiempo, cercibre=
se de que haya una buena
cantidad de espacio entre
ellos. El espacio que separa
a ambas personas debe ser
pot Io menos igual al done
de la altura del _rbol que se
est_ talando.
_,
ADVERTENCIA:
AI talar
\-\._eretirada
Direcci6n de
I.
2.
3.
4.
Procedimiento
A) Corte
de retirada
de tala
1.
2.
Haga el corte interior de la muesca tan
cerca del suelo como sea posible. Sujete
la sierra de modo que la barra de gufa se
encuentre en posicidn horizontal. Corte a
travds del tronco del firbol hasta atravesar
1/3 de su difimetro (yea la Figura 15).
Nora: Haga siempre este corte interior
horizontal en primer lugar. Si la hace en
segundo lugar, el firbol puede presionar
la cadena o la barra de gufa.
Comience el corte superior de la muesca a una distancia del corte interior
igual a la profundidad de dste.
Por ejemp/o: Si el corte interior tiene
una profundidad de 20 cm, comience
el corte superior 20 cm por encima de
aqudl. Corte en direccidn hacia abajo y
a un _ngulo de 45 °. El corte superior de
la muesca debe llegar y unirse al punto
fnal del corte interior (yea la Figura
Haga el torte de tala final 5 cm por encima del corte interior de la muesca y
sobre el lado opuesto del _irbol (vea la
Figura 15). Mantenga el corte de tala
final paralelo al corte interior de la
muesca.
Corte en direccidn a la muesca.
2.
de la muesca
La preparacidn correcta de una muesca determinarfi la direccidn en que caer_ el firbol. Corte
la muesca del lado del firbol correspondiente
a la direccidn en la cual desea que dste caiga
(yea la Figura 15). Siga las instrucciones a
continuacidn para cortar la muesca.
3.
A medida que el corte final se aproxime
al punlo de bisagra, el firbol comenzarfi a
caer. Nora: Si es necesario, inserte cutlas
dentro del corte de tala final para controlar la direccidn de la cafda. Si el firbol
se echa hacia atrfis y presiona la cadena,
inserte cutlas dentro del corte final para
extraer la sierra. Utilice siempre cutlas de
madera, plfistico o aluminio. Nunca utilice cutlas de metal, ya que podrfan provocar contragolpes y dafiar la cadena.
4.
Cuando el firbol comience a caer, proceda rfipidamente a
• retirar la sierra del corte de tala
final;
• soltar el gatillo para apagar la
sierra;
• asentar la sierra;
• salir del _irea por el trayecto de
retirada.
_i
ADVERTENCiA:
Mant6ngase
aierta a la caida de ramas del _rbol.
IVlantenga un paso firme al salir
del _rea.
15).
3.
Retire la curia creada pot los dos cortes de
muesca.
Direcci6n de caida
_oerrte:
Punto de !/_
Tala final
bisagra
i
'
/
i
"//
Planee y despeje un trayecto de ret!rada para el momento de la cafda.
Este debe ser en sentido contrario al
de la cafda del _irbol y a un _ingulo de
45 ° (yea la Figura 14).
Retire la tierra, piedras, corteza
suelta, clavos, grampas y alambres de
las partes del _irbol donde aplicar_i la
sierra.
1.
Trayecto de retirada
Figura
14 - Trayeacto
de un brbol
un _rbol
Anles de talar un firbol, inspeccidnelo.
Asegdrese de que no tenga ramas o
vfistagos secos que puedan caerle encima. Analice la inclinacidn natural
del firbol, la posicidn de sus ramas
m_s grandes y la direccidn del viento.
Todo eslo le ayudarfi a decidir hacia
qud lado derribar el drbol.
Despeie el _irea de trabajo alrededor
del firbol.
B) Tala final
Arbol
La tala es el proceso de derribar un firbol.
Asegdrese de contar con una pisada firme.
Mantenga los pies separados y distribuya
su propio peso sobre ambos pies de manera
equilibrada. Para talar un _irbol, siga estas
instrucciones:
Antes de derribar
_, ADVERTENCIA: No atraviese
el _rbol comNetamente. Deje al=
rededor de cinco cent_metros de
di_metro sin cortar, directamente
detr_s de la muesca (yea la Figura
15). Esta porcibn sin cortar fun=
ciona a manera de bisagra. La
bisagra ayuda a evitar que el _rboI
se tuerza y caiga en la direccibn
equivocada.
_'-\. Trayecto
un
arbol, mantengase
alerta a eu
entorno. No provoque dafioe ni
ponga a riesgo a ninguna persona
o linea de servicioe
publicoe. Si
el arbol cae eobre alguna linea de
un servicio publico, comuniquese
con la compafiia correepondiente
de inmediato.
Al talar el firbol, mantdngase cuesta
arriba de dl. Una vez derribado, el
_irbol puede rodar o deslizarse cuesta
abajo.
2"
Figura
b
_
_2do
; corte:
,_Muesca
superior
or e:
/ Muesca
15 - TaN de un brbol
33
www. remingtonpowertoo/s,
com
INFORMACION
SOBRE LA SIERRA DE CADENA
DESMEiVlBRAMiENTO
ARBOL
DE UN
TROZADO
_i, ADVERTENCIA: Evite los con=
tragolpes, l_stos pueden provocar
lesionesgraves y aun la muerte.Para
evitar el riesgo de contragolpes, lea
la seccibn Contragolpes.
ADVERTENCIA:
Proceda con
surno euidado al cortar ramas o
vastagos de arboles que se encuentran en tensibn.
Este preparado
para aetuar en caso de eontragolpe
de la madera. AI l iberarse la tensibn
de la madera, la rama puede tooverse haeia el operario, golpearlo
y provocarle lesiones graves y aun
la muerte.
Desmembrar un firbol significa retirar las
ramas de un firbol cafdo. Asegdrese de
tener una pisada firme. Mantenga los pies
separados y distribuya el peso de su cuerpo
sobre ambos pies en forma equilibrada. No
retire las ramas grandes que se encuentran
por debajo del tronco y separan a 6ste del
suelo. Retire cada rama con un solo corte
(yea la Figura 16). Retire las ramas cortadas del firea de trabajo con frecuencia para
mantener el _ireasegura.
Asegdrese de comenzar a cortar cada rama
en un punto donde la sierra no quedar_i
atrapada por presi6n durante el corte. Para
evitar el atrapamiento de la sierra, comience
por cortar las ramas que cuelgan libremente,
desde arriba hacia abajo. Para cortar ramas
en tensi6n, comience a cortarlas desde abajo.
Si la sierra queda atrapada por la presi6n de
la rama, ap_iguela, levante la rama y retire
la sierra.
DE UN TRONCO
Tronco
Contragolpes.
_lb ADVERTENCIA:
• Si se haila en una coiina,
aseg_rese de que el tronco
no vaya a rodar cuesta abajo.
Asegurelo con estacas de madera. Introduzca las estacas
en el suelo, del lado del tronco
_ue se encuentra cuesta abajo.
ermanezca en posicibn cuesta
arriba del tronco al cortar, ya
que este puede rodar despu_s
de reaHzarse un corte.
• Nunca intente cortar a trav6s de
dos troncos de una sola vez. De
Io contrario, puede aumentar el
riesgo de contragolpes.
• AI cortar un tronco, nunca Io
sostenga con la mano, la pierna
o el pie.
• AI cortar un tronco, no permita
que otra persona Io sostenga.
• Apague y desenchufe la sierra
antes de trasladarse de un lugar
a otto.
Trozar un tronco significa cortarlo en secclones. Asegdrese de tener una pisada firme.
Mantenga los pies separados y distribuya su
propio peso sobre ambos pies en forma equilibrada. Cuando sea posible, levante y separe
del piso el tronco o la secci6n por cortar,
utilizando ramas, troncos, cutlas, etc.
AI cortar el tronco, mantenga el control de
la operaci6n reduciendo la presi6n del corte
al aproximarse al final del corte. No relaje
los mdsculos de las manos ni deje que la
cadena en movimiento toque el suelo. Si
la cadena en movimiento toca el suelo, se
desafilarfi. AI terminar de cortar el tronco,
suelte el gatillo para apagar la sierra antes
de moverla.
Siga estas instrucciones
en un extremo
1.
Haga el primer corte del lado inferior
del tronco (vea la Figura 18). Utilice
la parte superior de la barra de gufa
para realizar este corte. Atraviese 1/3
del difimetro del tronco. Este corte
impedirfi la produccidn de astillas en
esta seccidn al completarse el corte.
2.
Haga el segundo corte directamente
encima del primer(). Corte hacia abajo
hasta unir ambos cortes. Este corte impedir_ que la barra de gufa y la cadena
queden alrapadas por la presidn del
tronco.
_, ADVER,TENCIA: Evite los contragolpes.
Estos pueden provocar
lesiones graves y aun la muerte. Para
evitar el riesgo de contragolpes,
lea
a seccibn
apoyado
Figura 18 - Trozado del tronco
apoyado sobre un solo extremo
Tronco apoyado
extremos
sobre ambos
Haga el primer corte del lado superior del tronco (yea la Figura 19).
Atraviese 1/3 del difimetro del tronco.
Este corte impedirfi la produccidn de
astillas en esta seccidn al completarse
el corte.
2.
Haga el segundo corte directamente
debajo del primer(). Utilice la parte
superior de la barra de gufa para realizar este corte. Corte hacia arriba
hasta unir ambos cortes. Este corte
impedirfi que la barra de gufa y la cadena queden atrapadas por la presidn
del tronco.
para trozar un
tronco.
La totalidad
suelo
del tronco sobre el
Corte eltronco comenzando )or arriba (yea
Figura 16 - Desmembramiento
un brbol
de
laFigural7).
_)_
!
Figura 17- Trozado del tronco completamente apoyado en el suelo
www. remingtonpowertoo/s,
corn
34
Figura 19 - Trozado de! tronco apoyado sobre ambos extremos
INFORMACION
PODADEUN
SOBRE LA SIERRA DE CADENA
ARBOL
_, ADVERTENCIA:
Evite los
contragolpes.
E_stos pueden
provocar lesiones graves y aun
la muerte. Para evitar el riesgo
de contragolpes, lea la secci6n
Contragolpes en la p_gina 24.
,_ ADVERTENCIA: No utilice la sierra electrica mientras se encuentre
• arriba de un _rbol;
• sobre una escalera o cualquier
otra superficie inestable;
• en cualquier posici6n inc6moda.
Puede perder el control de [a sierra
y provocar graves [esiones.
ADVERTENCIA: No e×tienda los [
brazos pot sobre los hombros cuando usa la sierra de pertiga.
J
_I, PRECAUCION: Si las condiclones del trabajo e×ceden sus
capacidades, busque asistencia
profesional.
Podar un firbol es el proceso de cortar ramas
de un firbol con vida. Asegdrese de contar
con una pisada firme. Mantenga los pies
separados y distribuya su peso sobre ambos
pies en forma equilibraa. Para podar un firbol,
siga estos pasos:
1. Haga el primer corte a quince cent/metros del tronco del firbol, del lado
interior de la rama. Utilice el lado
superior de la barra de gufa para realizar este corte. Atraviese la rama
hasta llegar a 113de su difimetro. (yea
la Figura 20).
2. Despklcese entre cinco y diez cent/metros hacia el extremo de la rama.
Haga el segundo corte desde la parte
superior de al misma. Atraviese la
rama completamente hasta cortarla.
3. Haga el tercer corte tan cerca del
tronco como sea posible, del lado inferior de la rama. Utilice la parte superior de la barra de gu/a. Atraviese
la rama hasta alcanzar 113de su
difimetro.
4.
2do corte: Poda preliminar
evitar
4to
torte:
!
Poda final
/
(para
la compresi6n
durante
/
poda final)
la
_2" t0 4"
Jo ,o
C2o7'or
Oearaevitar
astillas)
la formaci6n
7_
3er corte: Corte
(para evitar
de astillas)
inferior
la formaci6n
Figura 20- Poda de una rama
Haga el cuarto corte directamente encima del tercero. Corte hacia abajo hasta
unirse al tercer corte. De esta manera
conseguir_i retirar la base de la rama.
35
www. remingtonpowertoo/s,
com
INFORMACION
ENSAMBLADO
DE PERTIGA
SOBRE LA SIERRA DE PERTIGA
DE LA SIERRA
4.
_i, ADVERTENCIA:
Los bordes de corte de la cadena
son afilados. AI manipular
la
cadenaz
utilice
guantes
de
protecc=6n.
Deslice el cabezal motriz en el mango
principal hasta que las unidades "se
cierren a presidn" (yea la figura 23)
IMPORTANTE: Los dos botones de desenganche del mango principal deben
estar completamente enganchados.
6.
Deslice el mango principal en el adaptador del mango hasta que las unidades
"se cierren a presidn" (yea la figura
25). IMPORTANTE: Los dos botones
de desenganche
del mango principal
deben estar enganchados.
Retire la bateffa de la motosierra.
2.
Para separar el mango principal del
cabezal motriz de la motosierra presione ambos botones de desenganche
del mango principal y separe (yea la
figura 21).
Presione
los
Bot6n de
botones de
desengar
aflojamiento
Figura 23 - Ensamble el cabezal motriz
con el adaptador del cabezal
5.
Figura 21- Separe el mango
del cabezal motriz
3.
Alinee el reborde del adaptador del
mango de la pdrtiga con la ranura del
mango principal (yea la figura 24).
principal
Ranura
Alinee el reborde del cabezal de la
motosierra con la ranura del adaptador
del cabezal en la pdrtiga (yea la figura
22).
Figura 2 5-Mangoprincipaly
el mango ensamblados
7.
adaptador
Deslice la bateffa en el mango principal
hasta que los botones de desenganche
"se cierren a presidn" (yea la figura
26). Nora: (:argue completamente
la
bateffa antes de usar por primera vez.
Vea Carga de la Bawda, pdg, ina 30.
Asaprincipal
\
Ranura
/
/
/
Reborde_
\\\\\
Bateria
Adaptador
Gel asa de
la sierra de
pertiga
Figura 26 - Bateria ensamblada en el
mango principal
Reborde_
Cabezal
....
motorizado
....
Adaptador
del cabezal
de la sierra
de p&tiga
Figura 22 =Alinee
con el adaptador
Asa principal
Figura 24 - Alinee el mango
con el adaptador del mango
principal
el cabezal motriz
del cabezal
Co n tin zia
www. remingtonpowertoo/s,
corn
36
INFORMACION
REGULACION
LONGITUD
SOBRE LA SIERRA DE PERTIGA
DE LA
DE LA PI_-RTIGA
La sierra de pErtiga marca Remington tienen
el conjunto pErtigatelesc6pica que se extiende desde 47 pulgadas (totalmente retrafda)
hasta 83 pulgadas (totalmente extendida).
Para mantener la pErtiga en posici6n en
cualquier parte de su longitud se usa un
anillo que sujeta con leva.
1. Para extender la p6rtiga afloje la palanca de sujeci6n como se muestra
en la figura 27. La pErtiga se deslizari
libremente.
2.
3.
Hale haciatuera la _o:i6n de lapdrtigaintemahaslalalongitudde_ada deexlensi6n.
Nora: Solamente extienda la pdrtigahasta la longitud mfnima requerida para alcanzar la rama que estl siendo cortada.
Para bloquear la pErtiga apriete la palanca de suieci6n como se muestra en
la figura 27.
CORTi_ CON LA SIERRA
Pi_RTIGA
1.
2.
3.
4.
DE
Sujete la baterfa a la sierra.
Use ambas manos para agarrar la sierra
de pErtiga. Cuando opere la sierra de
pErtigause s61o las zonas de agarre designadas (yea la figura 28). Agarre con
firmeza. El pulgar y los dedos deben
envolverse alrededor del mango de la
sierra y de la pErtiga.
Asegdrese de mantener una pisada
firme. Mantenga los pies separados y
distribuya su propio peso sobre ambos
pies en tk)rma equilibrada.
Cuando estE listo para cortar, presione
el bloqueo del gatillo y apriete el gatillo (yea la figura 29). Esto encenderfi
la sierra de p6rtiga. AI aflojar el gatillo
la sierra se apagari. Asegdrese de que
la sierra estE ya tuncionando antes de
comenzar
5.
AI comenzar a cortar, coloque la cadena en movimiento sobre la madera.
Sostenga firmemente a la Sierra de
P&tiga en el sitio para evitar que rebole
o patine la sierra (movimienlo hacia un
lado).
6.
Gufe la Sierra de PErtiga usando una
presi6n ligera. No presione mucho a
la Sierra de Pdrtiga; de 1ocontrario, el
motor se sobrecargarfi y se quemarfi.
La sierra tuncionarfi de manera meior
y mils segura si se la utiliza segdn ha
sido disefiada.
7.
Retire la Sierra de PErtiga de un corte
cuando esta estE funcionando a su plena
velocidad. Detenga la Sierra soltando
el gatillo. Asegdrese que la cadena se
ha detenido antes de colocarla abajo.
Interruptor
de
Gatillo
a cortar.
Bloqueo del
gatillo
DESBLOQUEADO
BLOQUEADO
Figura 27 - Extendiendo
Telescopica
la Pertiga
Figura 29 - Asa de la sierra de per=
riga con bloqueo del gatillo
Area de agarm
Figura 28 - Areas de Agarre
ignadas
37
Des-
www. remingtonpowertoo/s,
com
LIMPIEZA
Y MANTENIMIENTO
Ranura de la barra
AVISO: A continuacibn encontrar_
instrucciones para la realizaci6n
de tareas de servicio en su sierra
electrica. Toda tarea de servicio que
no se encuentre incluida a continua=
cibn debe realizarse en un centro de
servicios autorizado.
LIMPIEZA
a de _ia
j
DEL CABEZAL
_tk
4BkADVERTENCIA: Los bordes de
corte de la cadena son afilados.
Utilice guantes de proteccibn al
manipular la cadena.
_1= ADVERTENCIA:
cabezal,
\'_..
Barra de guia
A
4BL ADVERTENCIA:
Retire la bateria de la motosierra
antes de
regular la tensi6n de la cadena de
la sierra. Puede ocurrir una grave
lesibn o la muerte si el cuerpo en=
tra en contacto con la cadena en
movimiento.
AI limpiar
el
• no sumerja la sierra en liquido
aiguno;
• no utilice productos
que
contengan amoniaco, cloro o
elementos abrasivos;
• no utilice solventes limpiadores ciorinados,
tetracioruro
de carbono, queros4n
o gasolina.
!
ADVERTENCIA:
Los bordes de_
corte de la cadena son afilados_
Utilice
guantes
de proteccibn
aq
manipular
la cadena.
|
Barra de guia con
normal
desgaste
desparejo
Figura 30 - Secci6n
de guia que ilustra
de la misma
transversal de la barra
el desgaste desparejo
Mantenimiento
normal
de la barra
de guia
1. Retire la barra de gufa de la sierra.
2.
Retire el polvo y la tierra de la ranura
de la barra de gufa en forma periddica. Para ello, utilice una esp_itula o un
alambre (yea la figura 31 ).
3.
Limpie las ranuras de aceite al final
de cada dfa de uso de la sierra.
4.
Retire la rebaba de los lados de la
barra de gufa. Utilice una escofina
plana para encuadrar los bordes
laterales.
Reemplace la barra de gufa cuando
• se encuentre doblada o rasgada;
• la ranura interior de la barra estd
smnamente desgastada;
Nora: Para reemplazar la barra de gufa, lea
la seccidn Aecesorios y piezas de repuesto
para adquirir la barra de gufa correcta.
:/z
///
_Rebaba
CUIDADO
DE LA BARRA
DE
:1:
GUiA
Inspeccione la barra de gufa anles de afilar la
cadena. Una barra de gufa desgastada o datiada
es insegura y datia la cadena. Tambidn dificulta
la realizacidn de cortes.
www. remingtonpowertoo/s,
corn
1.
Ajuste la tensidn de la cadena hasta
alcanzar la tensidn adecuada (yea la
seccidn AjusW de wnsidn de la cadena serrada.).
2.
Sujete la barra de gufa en la prensa
para mantener estable la sierra. Nora:
No aplique la prensa a la cadena.
Introduzca
la escofina redonda de
5/32 de pulgada (adherida a la gufa de
escofina) en la ranura entre la placa
superior y la medida de profundidad
de la cadena. La gufa de escofina debe
descansar tanto sobre la placa superior
como sobre la medida de profundidad
(yea la figura 32, en la p_igina 39).
Nota: AI limar, h_galo en el punto
medio de la barra de gufa.
/if
///
///
_--_
_ Barra de
guia
Limpieza de la ranura
4.
5L
_a
de aceite
Figura 31 - Mantenimiento
guia
AFILADO
de la barra de
DE LA CADENA
£k
411ADVERTENCIA:
Retire la bate=
da de la motosierra
antes de dar
servicio. Puede ocurrir una grave
lesibn o la muerte si el cuerpo entra en contacto con la cadena en
movimiento.
38
de torte
Utilice la gu/a de escofina para limar a un
_ingulo de 30 °.
//s
://
://
para afilar
Afilado de los elementos
://
Escofina
plana
necesarios
Puede comprar estos elementos en su concesionario, ferreterfa o tienda de accesorios
para sierras eldctricas cercanos.
• Escofina redonda de 5/32 pulgada
• Calibrador
de medida
de
profundidad
• Gufa de escofina
° Prensa
• Escofina plana de tamatio medio
:'/.g
///
,://
La mayoffa de los problemas de la barra de gufa
son producto de su desgasle desparejo. A menudo este desgaste se debe a errores en el afilado
de los elementos de corte de la cadena yen los
valores de medida de profundidad. Cuando la
barra se desgasta de manera despareja, la ranura
dela misma seensancha (vea la figura 30). Esto
causa el matraqueo de la cadena y la rotura y
expulsidn de los remaches. La sierra no cortarfi en lfnea recta. Si esto ocurre, reemplace
la barra de gufa.
Elementos
la cadena
3.
///
Mantenga el cabezal limpio. Utilice un
patio suave humedecido con una mezcla de
jabdn suave y agua. Frote este patio sobre
el cabezal para limpiarlo.
Mantenga la cadena afilada. La sierra cortarfi
de manera mils r@ida y segura. El uso de
una cadena desafilada provocarfi el desgaste
innecesario de la rueda dentada, la barra de
gufa y el motor. Si resulta necesario aplicar
fuerza para introducir la cadena en la madera,
y sial cortar sdlo obtiene viruta y algunos
trozos grandes, la cadena est_ desafilada.
5.
Sostenga la gufa de escofina a nivel.
Cercidrese de que la marca de 30 ° de la
gufa de escofina sea paralela al centro de
la barra de gufa (yea la figura 33 en la
pfigina 39). Esto asegurar_ que el afilado
de los elementos de corte se realice a un
_ingulo de 30 °.
Lime desde adentro hacia afuera del
elemento de corte hasta que quede afilado. Sdlo aplique la escofina en esta
direccidn (vea la Figura 33 en la p_igina
39). Nota: Bastarfin dos o tres pasadas
para afilar cada elemento de corte.
LIMPIEZA
6.
7.
Y MANTENIMIENTO
Luego de afilar cada elemento de
corte, mueva la cadena hacia adelante para afilar el siguiente elemento.
Afile todos los elementos de corte a
un lado de la cadena.
3.
Dir(iase al otro lado de la cadena y
repita el mismo proceso.
Despuds de afilar la cadena a mano en varias oportunidades, haga que un centro de
servicios autorizado o una mfiquina de afilar
afile la cadena. Esto asegurarfi que el limado
quede pareio.
_
Marca
_guia
de
de 30 °.
Direcci6n del limado
1
Retire el calibrador de medida de profundidad. Utilice una escofina plana
para redondear la esquina frontal de la
medida de profundidad del elemento
de corte (yea la figura 35).
Guia de escofina
I
Escofina
plana
./
Medida
/"
redonda
de
profundidad
Escofina
dena, cambie tambidn la rueda dentada. De ese
modo asegurarfi el correcto accionamiento de
la cadena. Nora: Para saber cufil es la cadena
y la rueda dentada adecuada a su modelo,
see Desglose Ilustrado de ParWs.
Vaya a la figura 36 mientras completa
siguientes pasos.
1.
Afloje y quite las tuercas
gufa.
2.
3.
Quite la tapa de la cadena dentada.
Quite la cadena de la sierra.
4.
Ponga la nueva cadena alrededor del
pifidn motriz, a lo largo de la ranura
superior de la barra gufa, y alrededor
del extremo de la barra gufa. Nota:
Asegdrese que los bordes cortantes de
la cadena estdn mirando en la direccidn
correcta. Ponga la cadena de manera
que los bordes cortantes en el tope de
la barra gufa miren hacia el extremo
de la barra gufa (yea la figura 37 y el
indicador en la cubierta lateral de la
sierra).
5.
Antes de situar la tapa de la rueda
dentada sobre los pernos de la barra
gufa, verifique que la punta de ajuste
estd en el agujero de ajuste sobre la
barra gufa.6. Place sprocket
cover
onto guide bar bolts.
Enrosque las tuercas de la barra gufa
sobre los pernos de la barra gufa.
IMPORTANTE:
Ajuste solo con los
dedos.
de
5/32 pulg
Calibrador
de
medida
de
•
/
-
profundldadj
_,_\
\\
/_"
_\\\
"//_/___
Ranu_a de medida
_/
de profundidad
Figura 34 = Calibrador de medida
de profundidad en la cadena
Not&" Esta Figura ilustra
la colocaci6n
de escofina y la direcci6n
del limado
dientes
del lado izquierdo
de la guia
para afilar los
de la cadena.
Figura 32 - Colocacion de la guia
de escofina y de la escofina sobre
la cadena
Medida
de profundidad
(lado derecho
Medida de profundidad
izquierdo
de la cadena)
(lado
de la cadena)
la cadena)
_do
,_f
8.
RECAMBIO
/i
/
Regule la tensidn de la cadena. Siga los
pasos que se encuentran en Tensidn de
la Cadena de la Sierra.
Ajuste bien la barra gufa con la llave.
Rueda
dentada
de la cadena)
Pernos de la barra
guia
de la cadena
de las partes
Limado de los calibradores
medida de profundidad
de
El espacio de la medida de profundidad del
elemento de corte se reduce al arilar dichos
elementos. Vuelva a establecer las medidas
de profundidad de los elementos de corte
cada dos o tres afiladas.
2.
9.
SERRADA
/
Figura 33 =Posicion
de la cadena
1.
DE LA CADENA
Placasuperior
de're-cho
• (._
Lado derecho
7.
de la barra
..__4.2_,_
............
,0c0 u o ,o j jY \
-_ _ '/
del #ngulo
de profun=
//>/
Ranura
(ladolzqulerdode
Figura 35 = Redondeo
anterior de la medida
didad
los
Coloque el calibrador de medida de
profundidad
(.635 mm) firmemente
a lo largo de dos elementos de corte.
Asegdrese de que la medida de profundidad penetra en la ranura del calibrador
de la medida de profundidad (yea la
tigura 34).
Utilice una escofina plana de tamafio
medio. Lime el nivel de medida de profudnidad con el calibrador de medida
de profundidad.
A
IIIADVERTENCIA:
Los bordes de
corte de la cadena son afilados.
Utilice guantes
de proteccibn
al
manipular
la cadena.
IMPORTANTE: No sujete la sierra de
cadena en el tornillo de banco para
reemplazar la cadena de la sierra o
la barra guia.
Reemplace la cadena cuando los elementos
de corte se encuentren demasiado gastados
para ser arilados o cuando se rompa la cadena. Utilice dnicamente la cadena de repuesto
indicada en este manual. Al reemplazar la ca39
Barra de
guia
ADVERTENCIA:
Retire la bateda de la motosierra
antes de dar
servicio. Puede ocurrir una grave
lesibn o la muerte si el cuerpo
entra en contacto
con la cadena
en movimiento
/
Cadena
serrada
/' Orificio
/'
deajuste
1
Punta de
ajuste
Tuercas de la Barra
de Guia
Tapa del Pirqdn
Figura 36- Reemplazo
de la barra
guia y de la cadena de la sierra
Borde de corte
Figura 37 = Instalacion
la cadena de la sierra
correcta
www. remingtonpowertoo/s,
de
com
SERVIClO
ALMACENAMIENTO
SERVlClO
If storing saw for more than 30 days, follow
steps below.
Usted puede tener mils preguntas sobre
cdmo ensamblar, utilizar o mantener este
1.
Quite la baterla de la sierra de
cadena.
producto. Si es as/, usted puede visitar
nuestro sitio Web de servicio t@nico en
2.
(?argue la bater/a por completo. Nora:
Puede llevar hast 9 horas poara cargar por completo la bater/a.
www.remingtonpowertools.com
o llamar
al departamento
de servicio tdcnico al 1800-626-2237 (sdlo en inglds). Usted puede
tambidn escribir a:
3.
Cuando la baterla estd cargada por
completo, qu/tela del cargador y ponga la tapa protectora sobre los terminales de la bater/a.
IMPORTANTE:PARk PROLONGAR LA
VIDA DE LA BATERfA,EVlTE DEJAR
LA BATERfAEN EL CARGADORPOR
PERfODOSLARGOSDE TIEMPO (MAS
DE30 DIAS SIN USARLA).
4.
Retire y limpie la barra de gufa y la
cadena. Para ello, sumdrjalas en un
solvente a base de petrdleo o en una
mezcla de agua y jabdn suave.
barra de gu/a y la cadena.
Ti_CNICO
DESA Power Tools
ATTN: Technical
Service
P.O. Box 90004
Bowling Green, KY 42102-9004
Cuando llame a DESA Power Tools
° Su nombre
° Su direccidn
• Su ntlmero de teldfono
° El ntlmero de modelo del producto
° Fecha de compra (incluya un copia del recibo para solicitudes por
escrito).
5.
Sequela
6.
Coloque la cadena en un contenedor
lleno de aceite. Esto impediril que se
oxide.
Especifique siempre el nthnero de modelo y
el nthnero de serie al escribir a la fibrica.
7.
Cubra la superficie de la barra de
gu/a con una fina lilmina de aceite.
DESA Power Tools se reserva el derecho
8.
Limpie la parte externa del cabezal
con un patio suave humedecido con
una mezcla de agua y jabdn suave.
9.
Store chain saw and battery
* en un sitio alto o b_tio llave, fuera del
alcance de nitios;
* en un sitio seco;
* en un estuche o con la barra de gu/a
cubierta pot una funda.
ACCESORIOS
Cada Centro Autorizado de Servicio
opera independientemente.
SERVIClO
es y
CON GARANT[A
Si el producto necesita servicio bajo garantla,
env/elo al centro de servicio autorizado mils
cercano a usted. Usted debe mostrar prueba de compra. Si el datio fue causado por
materiales imperfectos o por mano de obra,
repararemos o cambiaremos el producto sin
cobrarle a usted. Nora: Esta garantla no
cubre desgaste, mal uso, abuso, negligencia
o datio accidental.
SERVICIO
SIN GARANT[A
Si el producto necesita servicio, envfelo al
centro de servicio autorizado mils cercano a
usted. Se le enviarfin las facturas por reparacidn a los precios normales de reparacidn.
Para intormacidn adicional sobre centros de
servicio o de g_u'ant/a, llame al 1-800-626-2237
o visite nuestro sitio Web de servicio tdcnico en
www.remingtonpowertools.com.
Y PIEZAS
DE
REPUESTO
_,
ADVERTENCIA: UtHice _nica-
Para accesorios y piezas de repuesto originales
llame al Distribuidor Autorizado o al Centro
Autorizado de Servicio para este producto. Si
ellos no tienen la pieza o accesorio, llame a
la Central de Piezas mils cercana a usled que
se lista en la pigina 45. Cada Distribuidor
Autorizado, Centro Autorizado de Servicio
y Central de Piezas es y opera independientemente. Puede tambidn solicitar piezas en la
"tienda virtual" en www.remingtonpowertools.com.
Vea las pfiginas 43 pot 44 para una lista
ilustrada de piezas.
Si necesita referencia adicional informativa,
llame a nuestro departamento de servicio
tdcnico (yea Servicio Ticnico).
corn
Nota: Use s61o piezas de repuesto originales.
Esto protegeri la cobertura de su garantla de
las piezas repuestas bajo garantla.
de enmendar
estas especificaciones
en
cualquier momento sin previo aviso. La
tlnica garant/a aplicable es nuestra garantla
estindar escrita. No ofrecemos ninguna otra
garantla expresa o implfcita.
mente piezas y accesorios descritos en este manual. El uso de otras
piezas o accesorios puede dafiar la
sierra o lesionar a su operario.
www. remingtonpowertoo/s,
DE REPARACION
40
ELIMINA(:ION Y
RECICLAJE DE BATER[AS
Este producto utiliza baterfas de nfquel-cadmio. Las leyes locales, estatales o federales
pueden prohibit botar las baterlas de nfquel
cadmio en la basura regular. Para ayudar a
proteger el medioambiente y conservar los
recursos naturales por favor deseche las
baterlas en la forma apropiada. Usted puede
comunicarse con el centro local de reciclaje
para recibir inti_rmacidn sobre ddnde deiar
las baterlas.
DIAGNOSTICO
Y RESOLUCION
DE PROBLEMAS
Not& Para obtener mils ayuda, visite el sitio Web de servicio tecnico DESA Power Tools, www.remingtonpowertools.com.
_i, ADVERTENCIA: Retire la bateria de la motosierra antes de dar servicio. Puede ocurrir una grave lesibn o la
muerte si el cuerpo entra en contacto con la cadena en movimiento.
L,a sierra
fimciona,
pero
no corta
La _ierra no corta a menos que se apIique
gran fuerza sobre ella. AI cortar, s61o
produce viruta v unas pocos trozos
grandes
La sierra funciona lentamente v se atasca
con t:acilidad
1. La cadena se encuentra colocada sobre
la barra de _fia en sentido hwerso
1. La cadena estfi desafilada
1. Vea Recambio
Serrada.
de la Cadetza
1. La baterfa est,'i casi descargada
poc completo
1. Recargue la baterfa pot completo
hasta que se apague la luz LED
1. Vea d_Tado ,dekz atdem_ en la p_igina
roj a.
El motor de la sierra
oprimirse el gatillo
no funciona
al
l,
.?
La bateda no estfi bien instalada
La bateda
no estfi cargada
E1 bloqueo
del gatillo no estfi
presionado para soltar el gatillo.
4. Cepillos de motor gastados
D.
1. Veritique que la baterfa est6 bien
instalada
2. Revise los requisitos pm'a cargar
la baterfa
3. Presione e! bloqueo del gatillo
antes de activar el gatillo
4. Comunfquese con el Servicio
Tdcnico de DESA Power Tools
5. Circtfito interrumpido en ]a sierra
5. Comun/quese con el Selwicio
Tdcnico de DESA Power Tools
El motor de ]a sierra f'unciona pero la
cadena no se mueve
1. Fallo de transmisidn
1. Comuafquese
con el Servicio
Tdcnico de DESA Power Tools
La cadena _e sale de la barra de gu[a
[. La cadena estfi buelta
2. La barra de guilt y la cadena no esffm
bien ensambladas
I. Apriete la cadena. Vea TensicJn &
la Cademl de la Sierra.
2. Vea Recambio de la Cadena
Sermda.
l. La baterfa no est5 cm'_,adaepor
1. Recargue completamente la
La bateria se agota rfipidamente
completo
Hay demasiada
cadena
La baterfa no se estfi cargando
tensi6n en la
baterfa
2. Vea Tensi(m de la Cadem_ de la
Sierra y R_1_ulaciOn de la Ten
si(')ll de" ld Cdd#lla
(1# ld Sierra.
3. Baterfa vieja que no retiene la
carga
._. Reemplace
1. El cargador
I. Enclmfe el cargador
no estfi enchufado
2. El corddn del cargador no estfi
enchufado en la base del
cargador
3. La baterfa no estfi insertada por
completo en la base del cargador
4. La baterfa estfi demasiado
calieate debido a su uso
41
la baterfa
en una
fuente de CA de 120V 60HZ
2. Asegdrese de que el cord6n del
cargador estd insertado por
completo en la base de! cargador
3. Deslice la bater/a por completo
en la base del cargador
4. Deje que la bateria se enfr/e pot
30 minutos antes de poaerla en el
cargador.
WWW.lemll)gtol)povveftoo/s,
corn
rri
z_
O
r"
INFORMACION
SIERRA
DE PC:RTIGA/DE CADENA INALAMBRICA
DE 18V DE MARCA REMINGTON
GARANT[AS
LIMITADAS
NUEVOS
Garant[a
DE GARANTIA
PRODUCTOS
Est_ndar
DESA Power Tools garantiza, por un perfodo de dos (2) afios a partir de la fecha de la primera cornpra en un distribuidor autorizado y a condici6n
que el producto ha sido mantenido y operado siguiendo las advertencias e instrucciones de DESA Power Tools, que este nuevo producto y cuNquiera
de sus partes estfin sin defectos en material o mano de obra.
Garant[a
Est_ndar
de la Bater[a
DESA Power Tools garantiza, por un perfodo de seis (6) meses a partir de la fecha de la primera compra en un distribuidor autorizado y a
condicidn que el producto ha sido mantenido y operado siguiendo las advertencias e instrucciones de DESA Power Tools, que esta nueva
baterfa y cualquiera de sus partes estfin sin defectos en materiM o mano de obra.
PRODUCTOS
Garant[a
RECONDICIONADOS
EN FABRICA
Limitada
DESA Power Tools garantiza que los productos recondicionados en f:abrica y todas sus partes no presentan defectos en sus materiales ni en
su fhbricacidn durante 90 dfas a partir de la fecha de primera compra en un concesionario autorizado, siempre y cuando el producto haya sido
utilizado y mantenido debidamente de acuerdo con todas las advertencias e instrucciones de DESA Power Tools.
CONDICIONES
Las siguientes
condiciones
se aplican
COMUNES
a todas las garantias
A TODAS LAS GARANT[AS
susodichas:
- Especifique siempre el nQmero del modelo cuando se comunique con el f:abricante. Para hacer un reclamo segQn la garantfa debe presentarse
la f:actura o el cornprobante de compra.
" Esta garantfa se extiende solamente _flcomprador minorista origin_d cuando la compra se hizo en un concesionario autorizado.
" Esta garantfa cubre el costo de la(s) pieza(s) requerida(s) para restaurar este producto a sus condiciones adecuadas de funcionamiento y una
asignacidn monetaria pot mano de obra cuando asf lo ofrezca el Centro de Servicio Autorizado de DESA Power Tools. Las piezas bajo
garantfa deben obtenerse pot medio de concesionarios autorizados para este producto y/o DESA Power Tools quienes le proveerfm de piezas
de repuesto originales de f_ibrica. E1 uso de piezas de repuesto que no sean originales de f:,ibrica anula la wllidez de esta garantfa.
" Los costos de traslado, embalaje, transporte, diagndsticos, material, mano de obra y otros costos incidentales relacionados con las reparaciones
segQn la garantfa, a no set que estEn expresamente cubiertas pot esta garantfa, no son reembolsables bajo esta garantfa y son responsabilidad
del propietario.
" Se excluyen de esta garantfa los productos o piezas de repuesto que f:allan o se vuelven defectuosos como consecuencia del uso indebido,
accidentes, f:altade mantenimiento adecuado, modificacidn o alteracidn indebida.
" Se excluyen de esta garantfa los productos comprados para uso cornercial, industrial o de alquiler.
" Esta es la garantfa exclusiwl de DESA Power Tools, y de acuerdo a todo lo que permite la ley; esta garantfa expresa excluye cualquier otra
garantfa, expresa o irnplfcita, escrita o verbal y limita la duracidn de cualquiera y de todas las garantfas irnplfcitas, incluyendo las garantfas de
comerciabilidad o las que se adaptan a un propdsito particular a dos (2) afios para nuew_s productos, seis (6) meses para baterfas y 90 dfas
para los productos reacondicionados en f_ibrica desde la fecha de la primera compra. DESA Power Tools no ofrece otras garantfas sobre este
producto.
" La responsabilidad de DESA Power Tools' se limitarfi al precio de cornpra dd producto, y DESA Power Tools no serfi responsable de ningQn
otto dafio, bajo ninguna circunstancia, inclusive pot daflos indirectos, incidentales o de consecuencia.
- Algunos estados estadounidenses no permiten limitar la duracidn de una garantfa implfcita o excluir o limitar los daflos incidentales o de consecuencia, de modo que es posible que la limitacidn de dafios arriba enunciada no se aplique a su caso.
• Esta garantfa le brinda derechos especfficos legales, y usted puede tambiEn tenet otros derechos que wlrfan de un estado a otto.
Para inf)_rmacidn acerca de esta garantfa comunfquese con:
POWc_R
TOOLS
Bowling Green, KY 42102-9004
U.S.A.
1-800-626-2237
Modelo
(s01o en ingles)
www.remingtonpowertools.com
Fecha de compra
www. remingtonpowertoo/s,
corn
42
NOTES/NOTAS
43
www. remingtonpowertoo/s,
com
iLLUSTRATED
PARTS LIST/DESGLOSE
ILUSTRADO
DE PARTES
I
I
4
7
12
3
2
I
9
10
,O
5
I
11
I
6
www. remingtonpowertoo/s,
corn
44
PARTS LIST/LISTA
DE REPUESTOS
This list contains replaceable parts used in your chainsawipolesaw. When ordering parts, be sure to provide the correct model number (from the model plate),
then the part number and description of the desired part.
Esta lista contiene partes reemplazables y que se utilizan en su sierra de cadena. Cuando solicite repuestos, asegdrese de facilitar el ndmero correcto del
modelo (de la placa del modelo), luego el ndmero de parte y la descripci6n de la parte deseada.
QTY.
CANTIDAD
QT¢:
4_
O1
KEY
NO./
NOMERO
PART NO./
NOMERO DE
CLAVE
PARTE
DESCRIPTION
1
121363-01
Assembly, Powerhead/Ensamblado,
2
121364-01
Assembly, Main Handle/Ensamblado,
3
123299-01
Assembly, DC Chainsaw Pole!Ensamblado,
4
121373-01
Kit, Sprocket Cover (Includes Sprocket Cover, Bushings & Guide Bar Nuts)
Juego, Tapa de la rueda dentada (Incluye la tapa de la rueda dentada, los bujes y Perno de la barra guis
tuerca)
5
121374-01
Kit, Scabbard (Includes Scabbard and Oil Bottle)
Juego, Funda (Incluye la funda y la botella de aceite)
6
121397-01
7
121400-01
8
9
10
11
12
8SB
Kit, Battery Charger (500MAH)(Includes Charger and Charger Base)
Juego, Cargador de la bateria (500MAH) (Incluye el cargador y la base del cargador)
Kit, Tensioning (Includes: Bar Pad, Tensioning Screw, Tensioning Nib & Mounting Screw
Juego, Tensionamiento (Incluye: almohadilla de la barra, tornillo tensor, punta tensora y tornillo de
montaje
Bar, Guide 8" / Barra guia de 8 pulgadas
Chain, Saw (8") ! Cadena de la sierra (8 pi;gadas)
18 Volt Rechargable BatteryiBateria recargable de 18 voltios
Cover, battery Terminal Cap/Cubierta, tapa del terminal de la bateria
Kit, Latch Lever/Juego, Palanca del pestillor
8SC
RB18V1
121390-01
121560-01
/ DESCRIPClON
BS188A
Cabezal motorizado
Asa principal
BPS188A
1
1
1
1
1
pertiga de la sierra de cadena de CC
1
1
1
1
1
1
1
1
1
1
1
1
1
1
PARTS CENTRALS
Ray's
Portable
Heater
Service
3191 Myers Road
Camino, CA 95709-9550
530-644-7716
Baltimore Electric
5 Manila Drive
Hamden, CT 06514-0322
203-248-7553
1-800-397-7553
Service
West Long Branch, NJ 07764-1501
1-800-755-8809
Forrest Lyric and Sons, Inc.
740 West Galbraith Road
www.grainger.com
Cincinnati, OH 45231-6002
513-521 - 1464
Parts
342 North County Road 400 East
Valparaiso, IN 46383-9704
219-462-7441
1-800-362-6951
Bortz Chain Saw Shop
Road #2, Box 64A
Oley, PA 19547-9412
610-987-6452
www.portableheaterparts.com
sales @portableheaterparts.com
21057-9454
Motor
East Coast Energy
l0 East Route 36
Northbrook, IL 60062-5362
708-498-5900
1-800-323-0620
Glen Arm, MD
410-665-6500
1-800-333-5966
Service
1681 S. Wesleyan Blvd.
Rocky Mount, NC 27803
252-446-4203
Parts Company of America
1657 Shermer Road
Lyons & Lyons Sales Co. Inc.
Glen Arm Road
555 Hickory Hills Blvd.
Nashville, TN 37189-9244
615-299-8777
1-800-264-0225
Bowden Electric
4211 Highway Avenue
Jacksonville, FL 32254
904-384-4999
techservice @portableheaterparts.co
www. masterparts.net
www.aes-lawnparts.com
Tools & Fasteners
Heater
Hartsville, SC 29550-7704
843-332-0191
Kansas City, MO 64109-1716
816-531-9144
1-800-843-3546
Gainesville, FL 32609
352-375-1244
Portable
Grand Rapids, MI 49504-2672
616-791-0505
1-800-446-1446
Automotive Equipment
3117 Holmes
2322 NE Waldo Rd
Bernie's
Laportes
2444 N 5th Street
Plymouth, MN 55441-4556
763-559-2299
www.hanceco.com
Tools & Fasteners
21st Century
m
DE PIESAZ
Master Part Distributors
1251 Mound Avenue NW
Hance Distributors,
Inc.
12795 16th Avenue North
Eckley's Small Engine
31617 Spruce Drive
Eustis, FL 32726-9592
352-357-6764
Bernie's
/ CENTRAL
2950 Fretz Valley Road
Perkasie, PA 18944-4034
215-795-0400
1-800-325-4828
lyonsco @erol s.com
46
MTA Distributors
Webbs Appliance
Center
1519 Church Street
Nashville, TN 37203-3004
615-329-4079
1-800-899-4079
Industrial
Hardware
4109 B ainbridge
Blvd.
Chesapeake, VA 23324-1403
804-543-2232
1-800-788-0008
catatem @erol s.com
Mills Lawn and Garden
928 Commonwealth
Place
Virginia Beach, VA
757-361-9293
23464
www. mills-parts.corn
Tuco Industrial Products
5223 180th Street SW
Suite 4A- 1
Lynnwood, WA 98037-4506
425-743-9533
1-800-735-1268
www.tucoheat.com
121071-01
REV.B
4/08