1
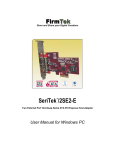
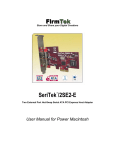
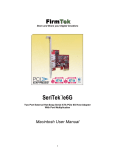
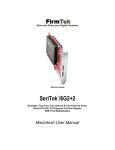
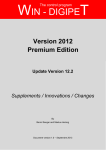
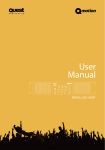
User
Manual
MODEL: QM 12MP
Contents
General Description. . . . . . . . . . . . . . . . . . . . . . . . . . . . .2
Features. . . . . . . . . . . . . . . . . . . . . . . . . . . . . . . . . . . . . .3
Connections. . . . . . . . . . . . . . . . . . . . . . . . . . . . . . . . . . .3
Getting the Most from your Quest QM 12MP Speakers. .4
Flying your system. . . . . . . . . . . . . . . . . . . . . . . . . . . . . .9
Using The Aero-Track . . . . . . . . . . . . . . . . . . . . . . . . . . .11
Specifications . . . . . . . . . . . . . . . . . . . . . . . . . . . . . . . . .12
QM 12MP
User Manual
Flying and installation of this
speaker cabinet must be carried
out by suitably qualified personnel
following the locally authorised
and approved safety standards.
Installation that allows direct
precipitation is not advised and
installation practise must prevent
liquids from entering the box.
Do not attempt to clean the
painted enclosure with solvents
or petrochemical based cleaners.
Touching up scratched scan be
done with polyester paint.
Do not stack the speaker cabinet
in a manner that could cause
injury should a cabinet become
dislodged.
Do not place sources of heat
on the speaker cabinet such as
lighting equipment or smoke
machines, and where possible
please keep out of direct
sunlight.
Attention
Register Your Product
Before connecting or operating
your new Quest Engineering
speaker, please study the
accompanying instruction manual
paying particular attention to the
operating precautions and wiring
procedure. Quest Engineering
will not assume responsibility for
incorrect installation or operation of
this product.
Thank you for choosing Quest. Please take
the time to complete your product registration
card which is included with the packaging.
1
Registering your Quest Engineering product
will:
• CONFIRM YOUR WARRANTY
• REGISTER YOUR PRODUCT
• PROTECT YOUR NEW PRODUCT
When your new boxes arrive…
You should visually inspect the outside of
the shipping carton and make note of any
damage on the shipping documentation. After
unpacking, if you find concealed damage to
the loudspeaker, save the packing materials
for the carrier’s inspection, notify the carrier
and supplier immediately and file a shipping
damage claim. Although Quest Engineering
will help in any way possible, it is always the
responsibility of the receiving party to file any
shipping damage claim. The carrier will know
how to prepare and file this claim.
Q Motion Series
QM 12MP
User Manual
QM 12MP
User Manual
General Description
The QM 12MP multi-purpose passive speaker
system is designed for the live sound touring
market. It is suited to high sound pressure
level on stage fold-back and short throw front
of house applications.
Built For Life On The Road.....
The QM series are designed for professional
mobile live sound and fixed installations.
Please read and become familiar with the
following installation manual to get the best
results from your Quest QM series speakers.
2
All Quest QM series speakers are designed
and built tuff for the professional live sound
industry. QM series speakers will stand up to
a hard life of mobile sound beyond the limits
of many of their competitors. However they
will perform better if they are installed and
operated within standard industry practice.
Pay particular attention to the section on
“Overhead installation and rigging” if you are
flying the speakers.
Product Overview
The QM 12MP is a high to mid powered
multi-purpose speaker primarily designed as
a compact concert level fold-back monitor. It
is has a provision for Aero-track (cargo-track)
rigging for vertical or horizontal flown
installation as well as a single 36mm speaker
pole mount.
With the attachment of the appropriate
aero-clip fittings, the QM 12MP can be
installed into a wide variety of installation
environments as a front-of-house speaker or
flown fold-back monitor.
The High frequency driver in the QM 12MP
consists of a high powered 3 inch diameter
voice coil diaphragm driver mated to a 1.4
inch bi-radial horn flare. The woofer is a 12”
mid-bass driver engineered to reproduce a
defined midrange frequency response with
flat bass response in a small enclosure.
The QM 12MP is sold in left and right hand
configurations (MPL and MPR) for ideal
positioning to deliver maximum foldback
User Manual
Q Motion Series
QM 12MP
level before feedback. Monitor engineers
will appreciate the convenient wedge profile
angles and very flat frequency response.
The QM 12MP needs only the minimum EQ
adjustment with a standard vocal microphone
to deliver very high sound pressure levels on
just about any type of stage environment.
With the attachment of the appropriate
aero-clip fittings, the QM 12MP can be
installed into a wide variety of installation
environments as a front-of-house speaker or
flown fold-back monitor.
The High frequency driver in the QM 12MP
consists of a high powered 3 inch diameter
voice coil diaphragm driver mated to a 1.4
inch bi-radial horn flare. The woofer is a 12”
mid-bass driver engineered to reproduce a
defined midrange frequency response with
flat bass response in a small enclosure.
The QM 12MP is sold in left and right hand
configurations (MPL and MPR) for ideal
positioning to deliver maximum foldback
level before feedback. Monitor engineers
will appreciate the convenient wedge profile
angles and very flat frequency response.
The QM 12MP needs only the minimum EQ
adjustment with a standard vocal microphone
to deliver very high sound pressure levels on
just about any type of stage environment.
QM 12MP
User Manual
Features
The QM 12MP has a number of features
designed to increase performance and
versatility for a professional mobile sound
environment. A great deal of attention was
paid to the details of the design to make
the QM 12MP both sonically excellent
and functionally suited to touring sound
reinforcement and also A/V rental markets.
High Powered Purpose Designed
Components
A very high powered three inch voice coil
high frequency driver is mounted in an impact
resistant frame support to the 1.5 inch high
frequency bi-radial CD horn. The result is
a very physically strong construction and
high fidelity high frequency response that
needs almost no EQ correction to achieve
high SPL fold-back. This achievement is
particularly impressive considering that no
specialized system processor is needed
to achieve high level vocal fold-back when
a standard dynamic vocal microphone
(commonly supplied by rental companies), is
used.
Functional Design
For maximum stage coverage effect, the
QM 12MP is manufactured in left and right
pairs. The recessed input panel is designed
to remove the problem of “strain induced
intermittent connections” that 90 degree
plug panels can cause on speaker leads.
Also the recessed connections remove
potential damage to connectors being
accidently trampled on a dark stage. Mirrored
patching inputs also mean short cable runs
when paralleling speaker boxes and a tidier
stage. Steel reinforced neoprene feet help
the QM 12MP “stick” to a stage and solve
the problem of fold-back wedges that “go
walking” on a vibrating timber stages.
truss or to fly as short throw, wide dispersion
front of house or delay speakers. Pole mount
is also possible with integrated 36mm pole
mount fitting.
Solid Build Construction
Built for a touring environment, the QM 12MP
is well suited to all professional applications.
The timber casing is reinforced birch ply with
a heavy gauge power-coated steel grill. Like
all QM series products, it is “built tough for a
tough world”.
QM 12MP Speakers As Fold-back
Monitors
If you use the loudspeaker on the floor as a
stage monitor, it is standard practice to use
at least a 12 dB per octave HPF (High Pass
Filter) set from 80 Hz to 95 Hz high pass.
This will allow more power for useful monitor
frequencies. Locating the wedge on the floor
will give a natural boost to bass frequencies
which can cause “muddiness” to the vocal
frequencies. If using a pair of wedges for a
single performer, locate the HF horns on the
outside of the pair to minimize interference
between the horns which can generate “HF
hot spots”.
3
Connections
Two Neutric Speakon model NL-4 connectors
are mounted in a recessed panel on the
rear surface of the box. This allows the
speaker box to be set flat against a wall
without physical interference to the speaker
connector.
• The connector input is wired pin 1+ and
pin 1-.
• Pin 2 is not connected.
Multiple Installation Options
Added versatility is provided by the addition
of aero-track rails on the QM 12MP to allow
stage techs to fly the boxes from lighting
Q Motion Series
QM 12MP
User Manual
QM 12MP
User Manual
Getting the Most from
your Quest QM 12MP
Speakers
It is true of all professional loudspeaker
systems; the performance of the loudspeaker
depends on an amplifier delivering an
adequate supply of clean power. There
are numerous opinions on the subject of
appropriate power amplifier wattage for a
given loudspeaker within the audio industry.
There is no single answer to the question
of what amplifier power you should use
for a particular loudspeaker that covers
all situations but there is a basic principle
that if applied sensibly will generally deliver
good results. These cover power ratings of
speakers, amplifier power capability, and
preventing loudspeaker damage.
Suitable Amplification
4
It is true of all professional loudspeaker
systems; the performance of the loudspeaker
depends on an amplifier delivering an
adequate supply of clean power. There
are numerous opinions on the subject of
appropriate power amplifier wattage for a
given loudspeaker within the audio industry.
There is no single answer to the question
of what amplifier power you should use
for a particular loudspeaker that covers all
situations but there is a basic principles
that if applied sensibly will generally deliver
good results. These cover power ratings of
speakers, amplifier power capability, and
preventing loudspeaker damage.
Power In The Right Hands Can Save
Your Speakers
If the loudspeakers are used for professional
application with competent operators, the
power principle is:
Where the full output capabilities of the
loudspeakers will be needed to achieve
maximum output levels, use amplifiers that
can sustain twice the wattage listed in the
loudspeaker specifications. A quality amplifier
will provide a clean peak voltage capability
User Manual
Q Motion Series
QM 12MP
of 6 dB above the maximum RMS power of
the speakers and even in the case of a lesser
quality amplifier you will avoid “clipping” or
distorted output from the amplifier under most
circumstances.
The thermal limits of the speaker are unlikely
to be exceeded with an undistorted signal.
While principle is consistent with the Quest
Engineering’s testing regime, it does not
completely guarantee trouble-free operation
under all conditions.
WARNING
The power amplifier sizes recommended by
the above principle capable of continuous
output levels that can cause damage to or
failure of the drivers. This is especially true
when reproducing recorded music. Many
recordings have very low peak to average
ratios such that much higher continuous
levels are possible before amplifier clipping.
Avoid Amplifier Clipping
Bearing in mind the above principle of
amplifier power higher than speaker power,
keep signal levels low enough so that neither
the Clip nor Limit Active indicators are
blinking frequently or are on continuously. If
they are, turn down the input signal level to
avoid overheating the amplifiers.
A low power amplifier that is clipping
continuously will kill a speaker way
faster than a high power amplifier with
clean signal at twice or three times the
speaker’s rated capability.
QM 12MP
User Manual
The Secret To Long Life
A competent audio system operator will
operate the loudspeaker within its limits and
capabilities.
Operation beyond the loudspeaker’s
capabilities usually includes, but is not limited
to, one or more of the following conditions:
1.   Amplifier clipping
2.   Peak voltage input in excess of twice
the specified voltage limit
3.   Noticeable distortion
4.   Mechanical noise (such as a cone
bottoming out)
5.   A suitable means for determining
these conditions is highly
recommended. At a minimum, the
operator should have a meter display
calibrated to indicate when the
loudspeaker’s maximum RMS voltage
limits will be exceeded. This assumes
amplifiers are not being driven into
clipping at these limits.
The QM 12MP is an 8 ohm enclosure and can
be connected as multiple parallel connections
to an amplifier channel that can operate
into speaker impedances of 4 ohms, (see
connections diagram).
Loudspeaker Wire Gauge
The proper conductor size (wire gauge) to use
for the loudspeaker cable is primarily a function
of the wire length. The general rule is that lower
resistance, in relation to the loudspeaker’s
impedance, is better. To achieve this, use larger
conductor sizes for longer lengths of cable and
for lower impedance loudspeaker loads.
For wiring cables to fold-back monitors, 1.5mm
16 Gauge would be the minimum for short cable
runs.
Standard AWG
14ga ... 0.6410” dia ->1.63mm dia 10.44ohm/km
16ga ... 0.0508” dia -> 1.29mm dia 13.17ohm/km
18ga ... 0.0403” dia -> 1.02mm dia 20.94ohm/km
Euro Standard Wire 1x1.00mm2 -> 18 ga AWG
1x1.50mm2 -> 16 ga AWG
1x2.50mm2 -> 14 ga AWG
5
1x4.00mm2 -> 12 ga AWG
A recommended power range per amplifier
channel is 1,000 watts RMS into a 4Ω load.
Higher power per channel is possible if the
power is undistorted. An ideal partner for
the QM 12MP is the Quest QA3004 amplifier.
Setting the QA amplifier’s high pass filter at
80Hz is recommended for clean high SPL
vocal applications.
Magnetic Fields And A/V Equipment
Loudspeakers generate magnetic fields,
unless specifically designed for audio-visual
applications where drivers are magnetically
shielded to limit the extent of the magnetic
field. Therefore, place a loudspeaker at
least 2ft (0.6 m) or more from any TV set or
computer monitor. If it causes distortion
or a change in the display color, move it
further away. Do not place any audio, video,
or computer magnetic media near the
loudspeaker as the loudspeaker’s magnetic
field may damage the data.
Q Motion Series
QM 12MP
User Manual
QM 12MP
User Manual
Speaker Placement for Maximum Stage Monitor Performance
The QM 12MP is primarily intended for use as a stage monitor in mirrored pairs or as single speaker
boxes. They can also be employed as single or small array front of house boxes for short throw
wide dispersion applications.
When two standard design fold-back monitors are placed in close proximity to each other and are
reproducing the same signal, “interference effect” between the speaker transducers will contribute
to uneven frequency response. This is called “comb filtering” and is impossible to correct with EQ
alone. The QM 12MP is designed to minimize this potential problem.
Figure 1
6
Two conventional monitors with top mounted HF horns. Regardless of where they are located,
the HF horns spill across each other and this causes “tangential interference” as the mid-high
Fig 1
frequency waves intersect and create both peaks and cancellations which will radically change the
frequency response in different areas of the sound field.
This is the source “hot zones” found as you move a microphone in an arc in front of a pair of
monitors.
The “mirror” design allows a monitor engineer to locate the HF horns at a greater distance apart
and lower the level of interference between the boxes.
Fig 2
FigureFig
21
If more low frequency output is required, moving the boxes closer
Fig 2 together will increase the total
potential
Fig 1 for more bass without causing excessive HF interference.
Technically, this box placement is called “coupling the bass drivers”. Placing two bass drivers next
to each other has the potential of increasing the low frequency response by at least 3dB.
Fig 2
User Manual
Q Motion Series
QM 12MP
Fig 3
QM 12MP
User Manual
Figure 3
2 12MP monitors, the frequency response of the monitor
Fig 3 pair can be partially
By moving theFig
QM
“flattened” and “hot zones” removed without losing gain with excessive EQ.
This is a common configuration for a guitar player/vocalist and leaves space for an effects board
and boom microphone stand.
10
10
5
5
35Hz
80Hz
HIGH PASS -A
Reducing low frequency output will make more
amplifier power available for clean vocal reproduction
1
1
1
OFF
Fig 3
2
OFF
35Hz
80Hz
STEREO PARALLEL BRIDGE
HIGH PASS -A
OFF
LINK A
PIN1:
PIN2:
PIN3:
80Hz
1.4V
MODE
32dB
26dB
GAIN
OUTPUT A
7
CAUTION
RISK OF ELECTRIC SHOCK
DO NOT OPEN
110Hz
LOW PASS -A
INPUT A
SIGNAL G N D
SIG N AL +
SIGNA L -
BRIDGE
MODEL:
OUTPUT ASSIGNMENT
PIN 1+ :
S IGN A L
PIN 1- :
GROUND
Push To Reset
HIGH PASS -B
OFF
35Hz
80Hz
LIMITER
LOW PASS -B
OFF
LINK B
Speaker 1
INPU T B
80Hz
110Hz
ON
GROUND
OFF
LIFT
GROUND
DESIGNED BY QUEST ENGINEERING,AUSTRALIA
OUTPUT B
~ 220
240V 10A 50/60Hz
Speaker 2
A recommended power range per amplifier channel is 1,000 watts RMS into a 4Ω load. Higher power per channel is
possible if the power is undistorted. An ideal partner for the QM 12MP is the Quest QA3004 amplifier. Setting the QA
amplifier’s high pass filter at 80Hz is recommended for clean high SPL vocal applications.
Q Motion Series
QM 12MP
User Manual
QM 12MP
User Manual
QM 12MP as Front of
House Speaker
The QM 12MP is also a very high fidelity
front of house speaker system. It can be pole
mounted on the 36mm top hat or flown with a
double stud aero track clip connected to the
cargo track on the speaker casing. For flying
pairs of speaker boxes, it is suggested you
read the section on “Arraying speakers” in
the Quest Engineering instant roadie course
at the end of this manual available on the
Quest web site http://www.questaudio.net/
downloads.php.
When Flying Speakers With
Aero-Track and Accessories
8
licensed Professional Engineer must approve
the placement and method of attachment to
the structure prior to the installation of any
overhead object.
HIGH TENSILE DOUBLE STUD
AERO-CLIPS ARE ESSENTIAL IF BEING
HUNG FROM A SINGLE CLIP! AND ARE
RECOMMENDED FOR ALL INSTALLATION
ENVIRONMENTS
Maintenance of Rigging
Suspension systems can degrade with
time, exposure to atmospheric conditions
and ware, they require regular inspection
and routine maintenance to insure the
speaker cluster and fittings are secure. The
installation must be inspected for fatigue at
least annually. The inspection must include a
survey of all load bearing surfaces including
those attached to the building for signs of
deterioration or any other condition that may
decrease the strength of the installation or
loudspeaker enclosure.
Quest Engineering or its distributors are not
responsible for the non legal application or
misuse and abuse of its products by installers
and product users.
Speaker Placement for Smooth
Frequency Response
Where a loudspeaker is placed in a room has
a great effect on its sonic performance. The
size and material surfaces of the acoustic
environment determine the type of reflections
and reverberation characteristics and no
amount of EQ or system processing can fix a
poor acoustic environment.
QM 12MP flying from a truss with aero-clips
Before suspending any speaker system
always inspect all components (enclosure,
rigging frames, eyebolts, track fittings, etc.)
for cracks, deformations, corrosion, missing,
loose or damaged parts that could reduce
strength and safety of the array.
Do not suspend the speaker system until the
correct preparation of the installation site
has been taken to avoid health risks during
and after the completion of the installation. A
User Manual
Q Motion Series
QM 12MP
However, you can improve your chances by
following a few simple rules.
1.   Make sure the HF horn of your
speaker boxes is over the heads
of your audience. People standing
in front of the speaker boxes will
absorb most of the high frequency
energy and reduce the clarity of the
system considerably.
2.   Try to angle your speaker system
down into the crowd, not just over
QM 12MP
User Manual
their heads. Sound bouncing off
the back wall and roof will add to
reflections and reverberation that
will reduce your systems intelligibility. This particularly applies if clear
spoken word is important.
3.   If setting up your speakers as an
array, (boxes places next to each
other to give more SPL or wider
coverage),
Speaker Cables
Speaker cable needs to be as heavy gauge
as conveniently possible for low-loss results.
Light gauge cable (below 1.5mm) will create
extra resistance and waste amplifier power.
This particularly applies to long speaker
runs. The amplifier’s damping factor statistic
(“punch” for the non technical) is greatly
diminished, so keep your speaker cables
short and as heavy gauge as practical.
Flying your system
Overhead Installation and Rigging
“Rigging” is used in this manual as a general
term referring to fixed mounting or hanging
suspension as well as the hardware used for
such mounting and suspension. It also applies
to temporary and permanent installation.
Mounting or rigging overhead suspension of
any speaker box load can result in serious
injury and equipment damage if not done
correctly. Rigging and installation personnel
must determine the mounting or suspension
method that takes into consideration all loads
that the speakers and rigging system will be
subjected to. All such work must be done
in accordance with and in compliance with
all government, state, and local regulations
governing such work.
NOTE: The user assumes all responsibility
and liability for the proper design, installation
and use of any rigging and mounting systems
for Quest Engineering loudspeakers.
enclosed documentation and carefully follow
all instructions and safety precautions.
Purchaser & Installer Responsibility
It is the responsibility of the purchaser and
end-user of Quest Engineering products to:
1.   Read the product instructions and
labels and follow them.
2.   Inspect the product immediately
upon receipt as well as before and
after each use.
3.   Receive training in the proper
installation and use of the
equipment. Proper training includes
safety procedures, limitations of
the equipment, inspection of the
equipment, and risk management. If
you are not competent in the use of a
product, do not use it.
4.   Determine if the product is suitable
for its intended use and that it meets
all applicable
5.   Standards and regulations.
6.   Use adequate back-up rigging safety
systems.
9
Rigging and Safety
Whether mobile sound or fixed installation, for
best and safest results your speakers need
to be installed and positioned correctly. Just
placing a mid-high on a sub bass and pointing
it at the crowd will not be a good show if it
vibrates off and falls onto a member of the
audience. The same goes for hanging a box
from a lighting bar with non rated hardware
and relying on luck for it to stay there.
So if you are going to use the Quest speakers
for anything other than a fold-back monitor….
Read the rigging part of this manual and
follow the instructions. There are many
books on the subject of overhead rigging
and it is recommended that any installer
is educated on this subject to a level of
thorough knowledge especially in the area of
load limits and weight ratings.
NOTE: Accessory items are available from
Quest engineering and aftermarket suppliers
to facilitate suspension, wall, ceiling, or other
rigging. When using these items, review all
Q Motion Series
QM 12MP
User Manual
QM 12MP
User Manual
DANGER
If there is any question about the integrity
or capability of any installation component
to perform its intended function when
used to suspend or mount a loudspeaker,
immediately remove it from service for repair
or replacement.
WARNING
Do not under any circumstances use a
loudspeaker’s handles to support the
weight of the loudspeaker except for their
intended use: hand carrying. The handles
are not rated to support the load of the
loudspeaker for temporary or permanent
installation.
10
Note: If you are not sure of the safety of
your loudspeaker rigging, consult a licensed,
qualified professional engineer or professional
rigger. All rigging work must be done in
accordance with and in compliance with all
applicable regulations governing such work.
The Basics Of Safe Rigging
Rigging a loudspeaker array requires
determining accurately:
1.   The rigging methods and hardware
that meet static, dynamic, and
any other load requirements for
supporting the loudspeaker from the
intended structure.
2.   The design limitations and capacities
for and the required WLL (Working
Load Limit) for this support.
The Design Factor for all working load limits is
a minimum of 8:1. In other words, the rigging
for a 100 KG speaker must be able to carry
800Kg.
User Manual
Q Motion Series
QM 12MP
Routine Inspections
Thoroughly inspect all rigging hardware
and components used to support the
loudspeaker. Do this on a regular periodic
basis, whether components are integral with
or external to the loudspeaker or whether
factory or user-supplied. The interval between
inspections and scope of the inspections will
depend on the installation and the conditions
of use. The rigging inspection interval must
not exceed 1 year.
Look for loose fasteners, cracked or corroded
fittings, frayed wirers and signs of strain or
ware on anything that could detach from the
speaker box or associated fittings.
QM 12MP
User Manual
Using The Aero-Track
Locking Pin
Locking Ring
Stud Legs
Pictured are the Aero-clip fittings that attach
to the Aero-track anchor rails on the QM
12MP speakers.
WARNING
It is important to install the correct aero-clip
for the type of box or array configuration to
minimize stress on the clips.
• A single stud clip is intended for a
vertical hang.
• If a sideways load in intended as in a
horizontal hang, use a purpose designed
double stud aero-clip.
IMPORTANT
Do not double hang the speaker boxes in
a vertical array. The lower anchor point is
intended for horizontal installation or for
tilt angling the speaker, not carrying the
load of multiple speakers.
Double stud Aero-clip
11
Q Motion Series
QM 12MP
User Manual
QM 12MP
User Manual
Specifications
Power Handling (Nominal)
500W RMS
Frequency Response +/- 3dB
65 - 19 KHz
Maximum SPL @1m
128dB
Impedance
8 ohms
Connections
Speakon NL4 x 2 In/out
Wiring
Pin1+ Pin -
Woofer
1 x Quest 12” High Powered Mid-bass Woofer
Tweeter
1 x Quest 3” Voice Coil 1.4” Exit HF Transducer
Horn Flare
CD Horn
Directivity (FOH mode)
90 x 60
Dimensions WxHxD mm
390X 340 x 600
Weight
23kg
12
User Manual
Q Motion Series
QM 12MP
QM 12MP
User Manual
13
Q Motion Series
QM 12MP
User Manual
Register Your Product
Thank you for choosing Quest. Please take the time
to complete your product registration card which is
included with the packaging.
Registering your Quest Engineering product will:
• CONFIRM YOUR WARRANTY
• REGISTER YOUR PRODUCT
• PROTECT YOUR NEW PRODUCT
REGISTER ONLINE:
www.questaudio.net/registration
www.questaudio.net