1
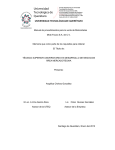
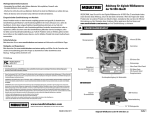
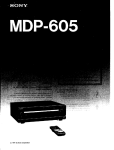
Instructions for M-550
Digital Game Camera
Important Battery lnformation
- Only use Alkaline or Lithium batteries. We recommend the use of Duracell or Energizer batteries.
- Do not mix old and new batteries. Always replace ALL the batteries at the same time.
- When the camera is not in use, please remove the batteries.
Moultrie Limited Warranty
This product has been thoroughly tested and inspected before shipment. It is guaranteed from
defects in material and workmanship from the date of purchase for 1 year. Under this limited
guarantee we agree to replace or repair free of charge any part or parts which have been found to
be defective in original material or workmanship. Should you require in-warranty service, call our
Customer Service Department. If your problem cannot be addressed over the telephone, we may
need you to send us your defective product plus proof of purchase.
You must register your camera at www.moultriefeeders.com/warranty to activate
your 1-year warranty.
THANK YOU for your purchase of the M-550 Digital Game Camera. Please read this
booklet before using the unit. If you should have any questions about this product or
any other Moultrie product, please contact us using the information on the back of
this booklet. Please register your camera at www.moultriefeeders.com/warranty
to activate your warranty.
I
CAMERA OVERVIEW
FRONT VIEW
Infrared LED Flash
Camera Lens
Status Indicator
OK/Select Button
FCC Statements
Navigation Buttons
Light Sensor
Moultrie Products, LLC
MCG-12630
Menu Button
OFF / IR AIM / ON
Note: changes and modifications not expressly approved by the party responsible could void the user’s authority to operate this device.
This device complies with Part 15 of the FCC Rules. Operation is subject to the following two conditions: (1) This device may not cause harmful
interference, and (2) this device must accept any interference received, including interference that may cause undesired operation.
SD Card Slot
Motion Sensor
LCD Display
NOTE: THE MANUFACTURER IS NOT RESPONSIBLE FOR ANY RADIO OR TV INTERFERENCE CAUSED BY UNAUTHORIZED MODIFICATIONS TO THIS
EQUIPMENT. SUCH MODIFICATIONS COULD VOID THE USER’S AUTHORITY TO OPERATE THE EQUIPMENT.
NOTE: This device complies with the limits for a Class B digital device, pursuant to Part 15 of the FCC Rules. These limits are designed to provide
reasonable protection against harmful interference in a residential installation. This device generates, uses, and can radiate radio frequency energy
and, if not installed and used in accordance with the instructions, may cause harmful interference to radio communications. However, there is no
guarantee that interference will not occur in a particular installation. If this device does cause harmful interference to radio or television reception,
which can be determined by turning the equipment off and on, the user is encouraged to try to correct the interference by one or more of the
following measures:
- Reorient or relocate the receiving antenna.
- lncrease the separation between the equipment and receiver.
- Connect the equipment into an outlet on a circuit different from that to which the receiver is connected.
- Consult the dealer or an experienced radio/TV technician for help.
Push Button Release for battery compartment
BOTTOM VIEW
External Power Port
USB Port
Battery Tray
Our Service Department will gladly answer any questions you
have. Call 800-653-3334, Monday - Friday, 8:00 AM to 5:00 PM CST.
www.moultriefeeders.com
1/4” 20 Mount
10042013 / MCG-12630
M-550 Digital Game Camera
Page 1
MOULTRIE M-550
DEFAULT
S CREEN
T . L . PRO G R AM # 2
S TO P TIM E
T .L . P R O GRAM # 2
S T AR T T IME
PHOT O OR
V IDE O
M U LT I-SH O T
D E T E C T I ON
DELAY
R E SE T OP T I ON S?
M OT IO N D ETECT
M A IN SCREEN
START MO TIO N
D ETECT CAPTURE
T .L. PROGRAM # 1
ST OP T IME
T . L . P R OG R A M # 1
ST A R T T I M E
T I M E L A P SE
P R OG R A M S/D A Y
T I M E L A P SE
INTERVAL
T I M E LAPSE
M A IN SCREEN
START TIME
LAPSE CAPTURE
M OTIO N + T. L.
M A IN SCREEN
START MO TIO N +
T. L. CAPTURE
PROGRAM
SE C U RI T Y C ODE
UP G R A D E
F I R M WA R E
E R A SE I M A G E S
( F OR M A T C A R D )
R E SE T T O
F A C T OR Y D E F A UL T S
G E N E R AL SETTIN G S
M A IN SCREEN
D ATE & TIME
PH O TO Q UALITY
AC C ONNE C T E D?
W I - F I SD C A R D ?
T E M P E R A T UR E
IMPRINT INFO
C A M ERA N AME
MO TIO N FREEZE
VID EO LEN G TH
DEFAULT SETTINGS
General
Page 2
DATE/TIME:
11/11/11 11:11pm
PHOTO QUALITY:
HIGH (4 MP)
VIDEO LENGTH:
10 SECONDS
MOTION FREEZE:
ON (FAST FLASH)
CAMERA NAME:
MOULTRIECAM
IMPRINT INFO:
YES
TEMPERATURE:
FAHRENHEIT
WI-FI SD CARD?:
NO
AC CONNECTED?:
NO
PROGRAM SECURITY CODE:
00000
ERASE IMAGES:
NO
RESET TO FACTORY DEFAULTS:
NO
M-550 Digital Game Camera
M-550 Digital Game Camera
Page 19
IX
MENU MAP
MOULTRIE ACCESSORIES (Sold Separately)
Using a Tree Mount
The camera can also be mounted directly to a
tree using a mounting bracket that attaches
directly to a tree or pole. Strap the tree mount
to the tree and secure, then attach the camera PHOT O OR
to the tree mount using the tree mount socket V IDE O
located on the back of the camera.
T . L . PRO G R AM # 2
S TO P TIM E
T .L . P R O GRAM # 2
S T AR T T IME
T .L. PROGRAM # 1
ST OP T IME
DEFAULT
S CREEN
M U LT I-SH O T
D E T E C T I ON
DELAY
R E SE T OP T I ON S?
M OT IO N D ETECT
M A IN SCREEN
START MO TIO N
D ETECT CAPTURE
T . L . P R OG R A M # 1
ST A R T T I M E
T I M E L A P SE
P R OG R A M S/D A Y
T I M E L A P SE
INTERVAL
T I M E LAPSE
M A IN SCREEN
START TIME
LAPSE CAPTURE
M OTIO N + T. L.
M A IN SCREEN
START MO TIO N +
T. L. CAPTURE
Using the Moultrie AC Adapter
Keep your Moultrie camera running in the field with
the constant power of an AC adapter. Plug into a
PROGRAM
standard 110-240VAC 50-60Hz electrical outlet and
SE C U RI T Y C ODE
then connect to the External Power Port on your
Moultrie camera.
Note: Leave internal batteries in the camera during
use. In the event of power loss to the outlet into which
the AC adapter is plugged, the internal batteries will
keep your camera running.
AC C ONNE C T E D?
UP G R A D E
F I R M WA R E
E R A SE I M A G E S
( F OR M A T C A R D )
R E SE T T O
F A C T OR Y D E F A UL T S
G E N E R AL SETTIN G S
M A IN SCREEN
D ATE & TIME
PH O TO Q UALITY
W I - F I SD C A R D ?
T E M P E R A T UR E
IMPRINT INFO
C A M ERA N AME
MO TIO N FREEZE
VID EO LEN G TH
Using the Moultrie Camera Power Panel
Place near the tree where the camera is mounted.
Place for best exposure to sun. To attach to a
tripod secure the power panel to the tripod
angled upward for best exposure. Plug the power
panel to the Power Panel Plug. This will extend the
life of your camera in the field.
Note: Leave internal batteries in the camera
during use. The Camera Power Panel needs
4 hours of sunlight to fully power the camera.
Using the Moultrie Battery Box
Motion Detect
Time Lapse
RESET OPTIONS?:
DO NOT RESET
TIME LAPSE INTERVAL:
10 SECONDS
DETECTION DELAY:
10 SECONDS
TIME LAPSE PROGAMS/DAY:
2 PROGRAM
MULTI-SHOT:
1 (OFF)
T.L. PROGRAM #1 START TIME:
6 AM
PHOTO OR VIDEO:
PHOTO
T.L. PROGRAM #1 STOP TIME:
9 AM
T.L. PROGRAM #2 START TIME:
4 PM
T.L. PROGRAM #2 STOP TIME:
7 PM
Extend the field life of your Moultrie camera with a
long-lasting, rechargeable external power source.
Place near the tree where the camera is mounted.
Plug the Battery Box to the Power Panel Plug.
This will extend the life of your camera in the field.
Page 18
M-550 Digital Game Camera
M-550 Digital Game Camera
Page 3
I
CAMERA OVERVIEW (cont.)
VIII
VIEWING TIME LAPSE (cont.)
OFF / IR AIM / ON
To turn photo sequences into Time Lapse Video
IR Aim - When IR Aim is ON and the PIR Motion Sensor detects motion, the Status Indicator’s red LED
on the front of the camera will come on and remain lit as long as motion is detected.
Reasons you may want to create a video with your images:
MENU BUTTON
The Menu Button selects Camera Setup or Main Screen. When camera mode is selected, the LEFT and
RIGHT buttons navigate through the menu options. The Menu Button is also used to wake-up the
camera and turn on the display when the camera is in power saving (or sleep) mode.
OK, UP/DOWN and LEFT/RIGHT BUTTONS
The OK button selects the item to be changed. The UP/DOWN and LEFT/RIGHT buttons are used
to step through and modify the menu options. Pressing the OK button again, selects the option
indicated on the display. The OK button is also used to manually take a picture.
BATTERY COMPARTMENT
The camera is powered by eight (8) AA alkaline or lithium batteries. Push the battery compartment
release button to eject the battery tray. Install batteries as indicated on the engravings on the battery
tray, taking care to note the correct polarity.
See Important Battery Information section on the back page of this manual.
SD CARD SLOT
Accepts up to a 32GB SD Card for photo and video storage.
NOTE: An SD Card must be installed for the camera to operate (sold separately).
• Makes it easier to e-mail your image sequences.
• Allows you to select the range of images you want included, to eliminate uninteresting images.
• Allows you to store the images as a video rather than a large number of images.
1. Download time lapse images to Time Lapse Software.
(see section on downloading images).
2. Click on File. You will see the screen image to the right.
3. Choose a starting image (frame) and an ending
image (frame). Note: The frame limit is 300.
4. Choose the frame rate. Options include 1, 5, 10, 20,
and 30 frames per second (fps).
Note: The frame rate says how many images of a video are displayed every second a video is
played. The higher frame rate a video has the smoother movement appears in the video. However,
a higher frame rate video will create a larger file and will require more memory.
5. Choose the video resolution:
Note: The higher the resolution, the sharper the image. However, higher resolutions create
a larger file and will require more memory. VGA (640x480) / 720p / 1080p
6. Choose frame filter: None, Low, Medium, or High.
7. Click on Save the Video As. Name the video and choose the location file folder you wish
to save it in.
8. Click Start Video Export. The program will start to convert the images to video based on the
settings chosen above. The green bars will advance until the conversion is complete.
Note: Click on Cancel to abort the transfer.
USB PORT
Download still pictures and video onto your computer by connecting a micro-B to USB cable
(not included) to the USB port.
EXTERNAL POWER PORT
Accepts the Moultrie PowerPanel, Moultrie AC Adapter or Moultrie Battery Box accessories
(sold separately) only. Refer to www.moultriefeeders.com for more information.
NOTE: The use of any other power source will void your warranty and possibly harm your camera.
Page 4
M-550 Digital Game Camera
To View Time Lapse Video
1. Find the video in the folder
you saved it into.
2. Click on the video.
3. The video will be open up
automatically in QuickTime
player. To install a free version
of QuickTime, follow the on screen
instructions at www.apple.com/quicktime/download.
4. Press play to view your time lapse video.
M-550 Digital Game Camera
Page 17
VIII
II
VIEWING TIME LAPSE
QUICK START INSTRUCTIONS
This easy-to-use software allows you to advance through the series of images a number of different ways:
Use the steps below as a guide to quickly set up your camera so it will function using the factory
default settings.
BEGIN/END
STEP 1
B
Goes toPLOTSTALKER
the first or last photo in the Plot File.
ACTIVITY
SEARCH
ACTIVITY SEARCH
The Search Feature will scan through your photos and automatically
look for changes in regions that you identify in Setup.
FRAME BY FRAME SEARCH
Individually
stepthe
forward
or backward
through
each
photo. the .mlt photo file, stops
In search
mode,
PlotStalker
software
scans
through
on a photo when changes are found in your identified region, and then highlights
the changes in blue. You can click anywhere in the video viewing area to remove
the blue highlights.
ACTIVITY
SEARCH SETUP
REWIND/PAUSE/PLAY
Play
photos
in sequence,
pause,
or play the photos in reverse order.
Click
the
Settings
button to
activate
functions
simulate asettings
video and are useful for manually searching
the These
Region
and Sensitivity
changes
in theSearch
photos. When a sequence is being played, press
for the
Activity
fast-forward or fast-rewind multiple times to increase speed. (1x-5x)
SEARCH
This function allows quick scanning of images foreword and back. The
scan pauses when the software detects a change in pixel content from
the lastSEARCH
photo viewed.
We detect change based on averages so it
DEFINE
REGION
will
not
be
as
accurate
as a manual
Provides the ability to search
for frame by frame search.
changes in the photo in a specific
region rather than the entire photo.
Search Region
Click on Set Search Region Button.
This allows you to define a specific search
rather
the Motion
whole photo.
Drag
the Button.
Click
on than
the Set
Search
Area
1 area,
red outline to the area you want to search.
This allows you to focus on a very precise area
Use the mouse to select and drag the red outline around the area you want to
2 if required.
search for movement. This allows you to focus on a very precise area if
required.
Search Steps
Click
OK
on the
Settings
Popup
3 This
allows
forbutton
even faster
scans
by skipping
window to confirm your settings and
the
selected
amount of images (1-50). The
exit
the menu.
higher this setting, the lower the search
results as it is ignoring selected photos. You
SENSITIVITY
may find this option helpful if you have a
Set
to High,
Medium
ortoLow
1 very
large
quantity
of photos
scan.- This sets the level of pixel change the program
will
detect.
Note;
a
pixel
change
will occur with a color, intensity, lighting or
Click OK.
movement so this setting is critical to obtain the desired results.
Click on Motion Search Advance button.
DEFAULT SETTINGS
Click on Default button to return to the default values for Search Area and
1
Page 16
Time Lapse Software
Sensitivity settings.
GPS Latitude - 000.000000 N
Open camera cover. Press the battery chamber release button. Install eight (8) AA size alkaline or
lithium batteries with polarities as indicated in the Battery Tray. Re-install the Battery Tray and insert
your
SD card.
We recommend
that
theofSD
card (ERASE
IMAGES)
insidetothe
camera
Slide
the UNLOCK
switch
onyou
theformat
bottom
Camera
and use
the knob
pull
the before
taking
pictures.
slide-out Battery Tray. Install or eight(8) AA size alkaline or lithium batteries
with2 polarities as indicated in the Battery Tray. Re-install the Battery Tray.
STEP
Insert
SD Memory
Card until
you hear Strap
an audible
click.the
Camera
will not
operate
Thread
the provided
Mounting
through
Eyelets
on the
backwithout
of the SD Card.
Slide the power switch to ON. Press the Menu button to switch the camera to Setup and set the
camera and secure to a tree or pole approximately 36" from the ground as shown.
time and date. (See details on page 7.)
Turn Camera on by sliding ON/OFF/IR TEST switch
STEP 3
to the
ON position.
Mount
camera
in desired location using a mounting
Eyelet
strap.
NOTE:
be attached
stable
Press
the Camera
MODEmust
button
one timetotoaget
to the
object
for
motion
detection
to
function
properly.
Camera Setup Menu. Set Time and Date by pressing
ENTER,
using UP/DOWN to adjust selected field,
STEP
4
LEFT/RIGHT
move
the next
field
and ENTER
Switch camera to IRto
Aim.
Aimto
camera
using
motion
when
done.
detection to determine target area. Walk in front of the
camera at the desired distance and the camera LED will
Press MODE button until MENU SELECTION
flash showing the covered area. Switch camera to ON.
screen is displayed. Use the UP/DOWN buttons
until
STEP
5 the MAIN SCREEN option is highlighted
Slide
the power
switch
to ON. Close cover. The camera
yellow.
Press
ENTER.
Mounting
Strap
will operate using Default settings. You may also
Your Camera
will ifnow
automatically take pictures
customize
the settings
desired.
whenever an animal is detected in range -based on
the default settings below.
Capture Mode
Photo Quality
Photo Delay after each photo is taken
TRAIL CAM (Still)
2.0 MP
5 SEC
Motion Freeze
Multi Shot Count
Video Resolution
Video Length
Video Audio
Camera Name
Temperature
Info Strip printed on photos
ON
OFF
VGA
5 SEC
ON
MOULTRIECAM
FAHRENHEIT
ON
15 SECONDS
3 HOUR
Plot Frequency
Plot Duration
GPS Longitude & Latitude:
Default Setting
Delete All?
000.000000 N / 000.000000 W
NOCamera
M-550 Digital Game
NO
Page 5
III
CAPTURE MODES
1 MOTION DETECT
Still photos or videos are taken when an animal is detected. The number of photos taken per
detection event and whether still photos or videos are taken is configurable in settings. Photos
and videos are stored in the DCIM/100MFCAM folder on the SD card.
VII
TIME LAPSE SOFTWARE
SOFTWARE INSTALLATION
Download your free Time Lapse software at www.moultriefeeders.com/timelapsesoftware
2 TIME LAPSE
The camera takes photos at specified interval(s) during the day. Time lapse mode can be set with up
to two (2) programs and configurable start and stop times for each program. During the set program
interval(s), the camera will take photos regularly based on the time lapse interval setting. The photos
are stored in the DCIM/100MFCAM folder on the SD card.
NOTE: See the section Setting Time Lapse Features for more information on setting up
Time Lapse Mode.
3 MOTION + TIME LAPSE
The camera operates in Time Lapse Mode during the programmed intervals and Motion Detect Mode
for the remainder of the day.
IV
SETUP AND PROGRAMMING
MOTIONDLY:00:29
B:99%
9999/9999
When the camera’s power is turned ON, the display will come on to the Default Screen. Moving
clockwise from the top left, information is displayed for capture type, delay countdown for capture,
image count/remaining capacity, and battery level. If no buttons are pressed within 30 seconds, the
LCD screen will enter sleep mode to conserve battery life and enter capture mode based on current
settings. To wake the camera manually, press and hold the menu button until you see the default
screen on the display.
MOTION
DETECT
<OPTIONSSTART>
Setup Selection Setting
From the Default Screen, pressing the Menu button will enter the current capture mode’s Main
Screen. Press the Down button 3 times to enter GENERAL SETTINGS. Press the Left button to move to
the next setting. Using this method you can customize your camera’s feature settings.
From this Main Screen, press OK to get to the Test Capture screen.
INTRODUCTION
In time lapse photography a series
of still photos are taken at regular
time intervals. The PlotStalker
Software allows you to load the
time lapse file that was captured
from your Moultrie Game Camera
and scroll backward and forward
through your photos, single step,
search for activity in a designated
area, and save the files.
SYSTEM REQUIREMENTS
Computer: Intel® Pentium® 4 or AMD Athlon® 64 processor or above; 1GB RAM minimum;
100 MB hard disk space minimum.
Operating System: Microsoft® Windows® 32 bit - XP with Service Pack 2 or later; Windows Vista®
Home Premium, Business, Ultimate, or Enterprise with Service Pack 1;
or Windows 7
NOTE: When installing this software, you must be logged in as an Administrator.
Download Images
1. Double-click on Time Lapse
Icon to open the software.
2. Click on File -> Open Photo Folder
3. Browse through your files to
the folder where the images you
wish to view are stored.
4. Once the folder is selected, click OK.
5. The images saved in the folder are
now available to view through
the Time Lapse Software.
Page 6
M-550 Digital Game Camera
M-550 Digital Game Camera
Page 15
VI
VIEWING YOUR IMAGES
There are a number of ways for you download and view
the pictures, videos in the field or at another location.
Removing the SD Card
To remove the SD Memory Card, open the camera cover
and push gently on the SD card and it will pop out slightly
allowing you to remove it. Load the SD card into the
player or card reader to view or move stored images to
another location.
Important
Make sure that the camera is in the OFF position before
removing SD card.
ln the Field
You can download the pictures, videos, and time lapse
pictures with the aid of external devices. To download,
use an external player or card reader that is
supported by 12V DC or Mini USB Jack.
At Home
Remove the entire camera and transport to another location to download images. To connect the
camera to a PC computer, turn the camera ON, press the MENU button once to change to SETUP
Mode. Connect the USB cord (not included) between the USB out port and the PC computer. The
computer will recognize the camera as a removable drive. The unit works with Windows XP/Vista/7 or
Mac OS X 10.1 or higher. Copy the images and videos from the camera onto your PC for further
editing or printing. When the USB cable is disconnected, the camera will go back to SETUP mode.
IV
SETUP AND PROGRAMMING (cont)
GENERAL
<SETTINGS >
Setting General Features
When you press the Right button from the General Settings screen, the LCD Display will automatically
start showing the different features within General Settings. Using the navigation process, set the
features you desire.
DATE
&
TIME
11/11/11
11:11pm
Setting Date and Time
Press the OK button. Use the Left/Right buttons to move from one value to the next and the
Up/Down buttons to adjust each value. Press the OK button to lock in selections. When all your
selections have been made, and the date and time has been set, press the Right button to move to
the next option.
PHOTO
QUALITY
HIGH
(4MP)
Setting Photo Quality
Press the OK button. Use the Up/Down buttons to choose between 4 image resolution settings.
1. Enhanced:
3048 x 2286
2. High:
2304 x 1728
1600 x 1200
3. Medium:
4. Low:
640 x 480
Press the OK button to confirm the selection. Press the Right button to move to the next option.
VIDEO
LENGTH
10
SECONDS
Setting Video Length
Press the OK button. Use the Up/Down buttons to choose between 5 video length settings
(5, 10, 30, 60 or 90 seconds). Press the OK button to confirm the selection. Press the Right button to
move to the next option.
MOTION
ON
See the full line of Moultrie camera accessories at www.moultriefeeders.com
Page 14
M-550 Digital Game Camera
FREEZE
(FAST
FLASH)
Setting Motion Freeze
This feature maximizes the image clarity during night photos. When this feature is on the camera
will adjust the exposure time to reduce blur associated with motion. Other adjustments are made to
increase the brightness and clarity of the photo. When this feature is turned off the camera will use a
maximum exposure time that will not reduce blur, but will increase the effective flash range and image
brightness of night photos. Press the OK button to confirm the selection. Press the Right button to
move to the next option.
M-550 Digital Game Camera
Page 7
CAMERA
NAME
MOULTRIECAM
Setting Camera Name
Press the OK button. Use theUp/Down and Left/Right buttons to select an identity for your
camera. For example, you can use a name or a location; the identity you wish to use is up to you.
Press the OK button to confirm the selection. Press the Right button to move to the next option.
IMPRINT
INFO?
YES
Imprint Info?
Use the Up/Down buttons to choose between:
YES - Camera Name, Time, etc, information will be imprinted at the bottom of the image/video
as an infromation bar
Note: Remember to input the camera name in the setup and set the clock accordingly.
NO - No information bar will be imprinted.
Press the OK button to confirm the selection. Press the Right button to move to the next option.
TEMPERATURE
FAHRENHEIT
Temperature
The temperature is imprinted on each photo and can be in degrees Fahrenheit or Celsius.
To change the temperature units, press the Up/Down buttons to highlight the desired setting.
Press the OK button to confirm the selection. Press the Right button to move to the next option.
V
CAMERA SPECIFICATIONS
Memory & Storage
Your camera supports external SD memory cards ONLY and will accept up to a 32GB card. Using large
memory cards can slow the camera response. The camera cannot capture any photo or video without
external memory. Please insert an SD memory card to operate camera. Estimates are based on the
most common types of memory cards that can be purchased at electronic stores, office supply stores,
or online. Estimates may vary based on camera settings or environmental conditions.
Important
Always turn the unit off when inserting or removing an SD memory card to avoid damage and ensure
that the camera properly updates the memory information.
Photo Mode
SD Card Size:
2 GB
16 GB
ENHANCED 3048 x 2286
840
6720
HIGH 2304 x 1728
1400
11200
MED 1600 x 1200
3000
24000
LOW 640 x 480
17950
143600
SD Card Size:
2 GB
16 GB
VGA 640 x 480 (based on 10 sec video)
90
720
Video Mode
Actual capacity will vary based on image properties.
WI-FI
SD
CARD?
NO
Wi-Fi SD Card
Select option when using a Wi-Fi enabled SD card. Turning this feature on will keep the SD port
powered for a set amount of time to allow the files to transfer off the card to the Wi-fi network set up.
Press the OK button to confirm the selection. Press the Right button to move to the next option.
NOTE: Moultrie does not offer technical support for Wi-Fi SD cards. Please contact your Wi-Fi card’s
manufacturer for support. Before use, you must setup your Wi-Fi SD card on your wireless network.
NOTE: Use of a Wi-Fi SD Card will decrease the battery life of the camera.
AC
CONNECTED?
NO
AC Connected
Press the OK button. When the camera is connected to an AC power supply and this option is
selected, the camera will remain on instead of going to a sleep state between detection and capture
sequences. This will greatly improve camera speed and performance and can be used in conjunction
with most external supplies, but is only recommended when connected to an AC power supply.
In the event this option is selected but no external supply is detected, it will default to the NO state.
Press the OK button to confirm the selection. Press the Right button to move to the next option.
Page 8
M-550 Digital Game Camera
Specifications
Operational Mode
Motion Detect / Time Lapse / Motion + Time Lapse
Resolution
7.0 MP
Still Resolutions
JPEG
Low 640 x 480, Med 1600 x 1200,
High 2304 x 1728, Enhanced 3048 x 2286
Video Resolutions
VGA- 640 x 480
SD Memory Card
Up to 32 GB SD card (not included)
Format
JPEG - Still pictures, AVI - Video clips
Power Supply
8 AA Alkaline or Lithium batteries (not included)
M-550 Digital Game Camera
Page 13
Setting Time Lapse Features
When you choose Time Lapse the LCD Display will automatically start showing the different features
within Time Lapse. Using the navigation process, set the features to your preference.
TIMELAPSE
INTERVAL
10
SEC
Interval Time Setting
Press the OK button. Use the Up/Down buttons to choose between 10, 30 seconds / 1, 5, 10, 15, or
30 minutes / 1, 2, 3, 6, 12 hours or 1 day. When your selection has been made, press the Left button
to go to the next option.
PROGRAM
SECURITY
CODE00000
Security Code
Press the OK button. Use the Up/Down and Left/Right buttons to select a 5 digit security code
for your camera. Press the OK button to confirm the selection. Press the Right button to move to the
next option.
NOTE: Please remember your security code. If the code is lost, you can contact Moultrie customer
support to reset the password (charges may apply). Also, use caution when navigating through
the Security Code option as not to set a code by mistake. For no Security Code, the setting should
remain as “00000”.
UPGRADE
T.L.
PER
PROGRAMS
DAY
4M550-130828
2
Setting Multi-Program
Press the OK button. Use the Up/Down buttons to choose between 2 available settings:
1 PROGRAM or 2 PROGRAM. This indicates the number of cycles the camera will operate within a
24 hour period. Press the OK button. Press Left button to go to the next option.
T.L.
PROGRAM
FIRMWARE
#1
START6AM
Setting Program Wake up
Press the OK button. Use the Up/Down buttons to choose between 24 different settings: any hour
from MlDNlGHT to 11 PM. This will determine what time the camera will wake up during the program
and begin its time lapse program. Press Left button to go to the next option.
NO
Upgrade Firmware
The firmware version is displayed. Press Up/Down to choose setting.
YES - To upgrade firmware.
NO - Keep current firmware.
Make sure that a SD card with the new firmware is inserted into the camera. Press the OK button to
make selection. Make sure the process is completed before pressing other buttons or powering the
camera Off. Press the Right button to move to the next option.
ERASE
ALL
IMAGES
NO
Erase Images
Press the OK button. Use the Up/Down buttons to choose between Yes - erase all images, or
No - does not change stored images. Press the OK button to select. When your selections has been
made, press the Right button to move to the next option.
NOTE: This will also format your SD card for use in your camera.
T.L.
PROGRAM
#1
STOP10AM
Setting Program Sleep
When wakeup time is set, the camera will automatically move to the Sleep option. Set the sleep time
after the wakeup time you already set. This will set the wake up and sleep during the time lapse
photography. Press the OK button. Press Left button to go to the next option.
NOTE: Repeat the above steps for each Program to be set.
RESET
TO
DEFAULTS?
FACTORY
NO
Reset to Default settings
You can reset your camera to the factory default settings. Press UP or DOWN to choose YES - all
setups restored to factory default or NO - keep custom settings. Press the OK button again to
make selection. Press the Right button to go to the Main Screen.
Press Left button to go to the Main Screen.
Page 12
M-550 Digital Game Camera
M-550 Digital Game Camera
Page 9
Camera Capture Modes
DETECTION
After programming and aiming the camera, according to your preferences. You will see one
of three status screen displays after you slide the lR Aim / Power Switch to the ON position.
After 30 seconds the camera will enter sleep mode and wake up when motion is detected.
Setting Capture Mode
Press the OK button. Use the Up/Down buttons to choose between operating modes.
This camera has 3 modes.
1. Motion Detect - Capture photo or video when
motion or heat is detected.
2. Time Lapse - Capture photo at periodic intervals
based on the Time Lapse program setting.
3. Motion + Time Lapse - Uses a combination of
Time Lapse and Motion Detect modes at different
times of the day. Press the OK button to lock in
selection. Press the (Right) button to move to start
motion capture.
MOTION
DETECT
10
<OPTIONSSTART>
MOTION+TIMELAPSE
<OPTIONSSTART>
SECONDS
Event Delay Setting
Detection Delay determines the number of minutes between pictures when an animal is detected and
remains in range. Press the OK button. Use the Up/Down buttons to choose between (5 sec, 10 sec,
30 sec, 1 min, 5min, 10min, or 30 min). Press OK to lock in your selection, then press Left button to go
to the next option.
MULTI-SHOT
<OPTIONSSTART>
TIMELAPSE
DELAY
1 (OFF)
Setting Multi-Shot
Press the OK button. Use the Up/Down buttons to choose between settings. Choose how many
pictures you would like captured in a sequence when the camera is triggered (1 or 3).
Available options are:
1 (OFF) - Single photo taken per event.
3 BURST - Three rapidly captured photos taken per event. All 3 photos are captured within one second.
NOTE: Burst mode is only capable of up to 4MP captures, regardless of your resolution setting.
NOTE: Options for Motion and Time Lapse
can be set in their respective option menus.
3 TRIGGERED - Up to three photos are captured per event with an approximate one second delay
between each capture. Each subsequent photo after the first requires an individual trigger. This
allows for multiple potential image captures of the same event while reducing the chance of empty
images if the subject moves out of the field of view after the first shot.
Setting Motion Detect Features
Press OK to lock in your selection, then press Left button to go to the next option.
When Motion Detect is on the LCD Display, press Left to begin adjusting features within Motion
Detect. Using the navigation process, set the features to your needs.
RESET
PHOTO
OPTIONS?
DO
NOT
RESET
Reset Options
Press the OK button. Use the Up/Down buttons to choose between a set of predefined configurations
for the motion detect capture mode to quickly configure your camera for certain levels of performance.
Press OK to lock in your selection, then press Left button to go to the next option. The configurations
of these presets are defined below.
OR
VIDEO
PHOTO
Setting Photo or Video
Press the OK button. Use the Up/Down buttons to choose between Photo or Video. Press the OK
button. Press Left button to go to the Main Screen.
RESET
OPTIONS?AFFECTED OPTIONS
SETTINGDETECTION DELAYMULTI-SHOT
PHOTO QUALITY
DO NOT RESET
RECOMMEND. SETUP
Default option; will not alter settings
10 Seconds
3 Triggered
Med
MAX BATTERY1 Minute1 (Off)Low
MAX PERFORMANCE
Page 10
5 Seconds
3 Burst
M-550 Digital Game Camera
High
M-550 Digital Game Camera
Page 11