1
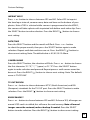
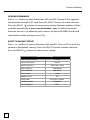
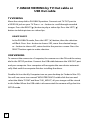
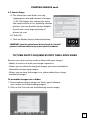
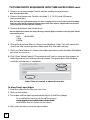
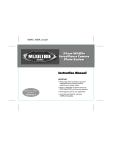
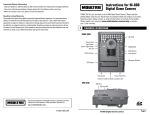
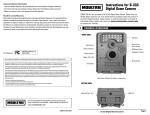
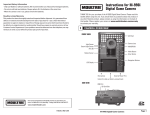
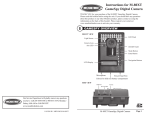
PlotStalker
Timelapse Camera
User Guide
www.moultriefeeders.com
Rev. 11/10
1. QUICK START GUIDE
The following steps outline the quickest way to begin using your camera. We
recommend that you scan the remainder of this user’s guide before using
your new camera.
1. Remove camera from packaging.
2. Insert four new AA batteries and an SD card.
3. Mount the camera so that it is level and aimed at your target.
Use viewfinder to insure accurate aim.
4. Set the Rotary Dial to SETUP and press the Power/Status button
to turn the camera ON.
5. Important: set the date and time before initial use.
6. Turn Rotary Dial to AUTO, close the door and secure the latches.
What Happens Then?
The camera will be in the AUTO Mode. After 10 seconds, the camera will
take its first photo or video and then enter a standby mode and begin to
count down a timelapse interval. At the end of each interval, the camera will
wake-up, take a photo or video, show status for 10 seconds, and then begin
to count down another interval. The camera will continue taking images until
either the memory is depleted or the batteries are drained.
1
2. DEFINITIONS
9
1
8
5
2
6
3
4
7
1. Power/Status button — Turns the unit ON or OFF.
• To turn ON you must press and hold the Power/Status button until the
LCD display activates.
• To turn OFF you must press and hold the Power/Status button until the
LCD display goes off.
• To see the status of the camera, click the power button quickly (warning:
if camera is within 15 seconds of taking its next photo or video, pressing
this button will reset the timelapse timer)
2. Rotary Dial — Depending on the position of the dial, there are 3 possible
functions: AUTO, SETUP and PLAYBACK.
3. LCD Display
2
Definitions
4. Function buttons
SELECT button
Used to confirm selections during SETUP and PLAYBACK modes.
+ or – button
• Used to change the setting values within the SETUP mode.
• Used to move forward or backward while reviewing pictures in
PLAYBACK mode.
LEFT ( ) button
• Used to choose previous settings in SETUP mode.
• Used to delete pictures or video in PLAYBACK mode.
RIGHT ( ) button
• Used to choose next settings in SETUP mode.
• Used to play video clips in PLAYBACK mode.
5. USB OUT port — To plug USB cable to connect to a computer.
6. TV OUT port — To connect to TV to review pictures or video clips.
7. SD MEMORY CARD port — To insert SD card for memory space. Note: The
metal contact of your card should be facing down when inserting.
8. Status/Standby Indicator — When the camera is in AUTO mode, it flashes
every 3 seconds to indicate that the camera is powered ON. To see the status
of the camera, click the power button quickly (note: if camera is within 15
seconds of taking its next photo or video, pressing this button will reset the
timelapse timer).
9. Viewfinder — When mounted on a tripod or tree bracket, the viewfinder
can be used to accurately set up the Plot Stalker’s viewing range.
3
3. THREE MODES
(change with Rotary Mode Switch)
SETUP
Turn the Rotary Dial to the SETUP position to change timelapse interval and
adjust other camera settings. Also use SETUP position when connecting
camera to computer via USB cord. See detailed instructions for SETUP menu
later in this guide.
AUTO
In the AUTO mode, the camera takes photos or videos according to the settings chosen in the SETUP menu. When the Rotary Mode Switch is turned to
AUTO, the camera status (Fig. 2 & 3) is displayed for 10 seconds, then the first
photo or video is captured (Fig. 4), then the camera enters STANDBY mode
(note: the display will turn off ) and the LCD display goes off, and begins
counting down its timelapse interval. The camera will wake up and capture
(Fig. 4) when it is ready to record a picture or video.
Note: for timelapse interval ‘ASAP’, the camera will not go into STANDBY mode
between shots (approx. 3-4 seconds delay between shots).
For time lapse interval ‘ASAP’ and ‘10 SEC’, if ‘VIDEO’ is selected, only a ‘LOW’
(640 x 480) picture will be taken.
Fig. 2
LCD display shows the camera status.
4
Three Modes
Fig. 3
LCD display shows the camera status (Estimated Battery Life).
Fig. 4
LCD display shows ‘’CAPTURING”
Then the camera returns to STANDBY mode again. The red LED indicator will
flash every 3 sec to indicate that the camera is powered ON, but is in a delay
interval.
To display the camera status when it is in STANDBY mode, press the Power/
Status button (Fig.1). It will not affect the delay interval unless the timer
is within 15 seconds of the next event. If the button is pressed within 15
seconds of the end of a delay interval, the status will display and the interval
will start over.
5
Three Modes
Memory Full
In the AUTO mode, if the LCD shows “MEMORY FULL”, it means that the
memory is full. The camera will shut down automatically. Please insert an
empty SD card.
Low Battery
In the AUTO mode, if the LCD shows “LOW BATTERY”, it means that the
battery is low. The camera will shut down automatically. Please replace
the batteries.
PLAYBACK
Use the PLAYBACK mode to view photos and video on a television. See
detailed instructions for television viewing later in this guide.
6
4. Mounting Suggestions
Because it will be used in a wide variety of applications, this camera was
designed to be extremely versatile with regard to mounting.
TRIPOD NUTS:
There are two standard tripod nuts embedded into the camera case, which
will attach to a standard tripod.
MOUNTING STRAP:
The included mounting strap can be attached to the mounting points on the
back of the camera and used to secure the camera directly to a tree.
7
5. Custom Settings
TURN POWER ON
Turn the rotary dial to the SETUP position. Press and hold the Power/Status
button. The SETUP MENU window will appear in the LCD display.
TURN POWER OFF
If you want to turn the unit off simply press and hold the Power/Status button
again until the LCD display goes off. Note: in SETUP and PLAYBACK modes,
if there is no activity for 2 minutes, the camera will automatically shut off to
conserve battery life.
SETUP MENU
The setup menu will start with TIME LAPSE INTERVAL.
TIME LAPSE INTERVAL
Press + or – button to choose between 12 different settings: ASAP, 10 SEC,
30 SEC, 1 MIN, 5 MIN, 10 MIN, 15 MIN, 30 MIN, 1 HOUR, 3 HOUR, 6 HOUR or 1
DAY. This determines the delay interval between each shot. (Note: Battery life
will be diminished when using ASAP and 30 sec. intervals.) Press the SELECT
button to make selection. Press the RIGHT ( ) button to choose next setting.
PHOTO OR VIDEO?
Press + or – button to choose between PHOTO and VIDEO. Press the SELECT
button to make selection. Press the RIGHT ( ) button to choose next setting.
PHOTO QUALITY
Press + or – button to choose between four different resolutions: LOW,
MEDIUM, HIGH or FINE. Press the SELECT button to make selection. Press the
RIGHT ( ) button to choose next setting.
Photo Quality
Quality
LOW
Resolution in pixels
640 x 480
MEDIUM
1280 x 720
HIGH
1920 x 1080
FINE
3264 x 2448
VIDEO
640 x 480
8
Custom Settings
MULTI-PROGRAM
Press + and - button to choose between four available settings: 1 PROGRAM,
2 PROGRAM, 3 PROGRAM or 4 PROGRAM. This indicates the number of cycles
the camera will operate within a 24-hour period. Press the SELECT button to
make selection. Press the RIGHT ( ) button to go set the operation time for
each program.
PROGRAM (1, 2, 3 or 4) WAKEUP (Take Pictures)
Press + and - button to choose between 24 different settings: any hour from
MIDNIGHT to 11 PM. This determines what time the camera will wake up
during the program and begin its time lapse program. Press the SELECT
button to make selection and then the menu go to the next screen to set up
the SLEEP time of this program.
PROGRAM (1, 2, 3 or 4) SLEEP (No Pictures)
Press + and - button to choose between different settings: any hour after
the WAKEUP time set in the last screen. Press the SELECT button to make
selection and then the menu go to the next screen to set up the WAKEUP time
of the next program if the MULTI-PROGRAM is set to 2 or more.
The above 2 processes will be continued until the selected number of
program has been setup accordingly. At the end of setting up all programs,
press the RIGHT ( ) button to choose next setting. Use the amount of
programs you need to get the desired hours of operation. Note longer
running times will result is shorter battery life.
Notes about MULTI-PROGRAM
• If Multi-program is selected, and the sleep time of the first program is
set at the next MIDNIGHT after the wake up. The camera will operate
in 1 PROGRAM per day, and you will not be able to set the next program.
9
• If daily awake time is the same or shorter than the time lapse interval,
camera will take images only one time.
Custom Settings
IMPRINT INFO?
Press + or - button to choose between YES and NO. Select YES to imprint
the time lapse interval, camera name, date and time on the bottom of your
photos. Note: if YES is selected while camera is programmed to take VIDEO,
the camera will take a photo with imprinted info before each video clip. Press
the SELECT button to make selection. Press the RIGHT ( ) button to choose
next setting.
DATE/TIME
Press the SELECT button and the month will flash. Press + or – button
to select the proper month, then press the SELECT button again to make
selection. Repeat until date and time are set. Press the RIGHT ( ) button to
choose next setting. Note: The default date is 01/01/99 12:00am.
CAMERA NAME
Press the SELECT button, the selection will flash. Press + or – button to choose
the first character: “0”-“9”, “-”, “ ” (space) or “A”-“Z”. Press the SELECT button
again to make selection and proceed. Repeat process until camera name has
been set. Press the RIGHT ( ) button to choose next setting. Note: The default
name is “PLOTCAM”.
TV OUT REGION
Press + or – button to choose betweens NTSC (North American) and PAL
(European) standards for the TV OUT port. Press the SELECT button to make
selection. Press the RIGHT ( ) button to choose next setting.
ERASE IMAGES?
Press + or – button to choose between YES and NO. If choose YES, all images are
erased. If SD card is installed, this will erase the card memory. Note: all erased
images cannot be restored, make a backup if needed. Press the SELECT
button to make selection. Press the RIGHT ( ) button to choose next setting.
10
Custom Settings
UPGRADE FIRMWARE
Press + or – button to choose between YES and NO. Choose YES to upgrade
the firmware through a SD-card. Press the SELECT button to make selection.
Press the RIGHT ( ) button to choose next setting. Firmware updates will be
available periodically at www.moultriefeeders.com. To determine which
firmware version is installed on your camera, set dial to PLAYBACK and hold
select button while turning camera ON.
RESET TO DEFAULT SETUP?
Press + or – button to choose betweens YES and NO. Choose YES to reset the
camera to the default settings. Press the SELECT button to make selection.
Press the RIGHT ( ) button to choose next setting.
Default Settings
TIME LAPSE INTERVAL:
1 HOUR
PHOTO OR VIDEO:
PHOTO
PHOTO QUALITY:
FINE 3264 x 2448
MULTI-SHOTS?:
1 PROGRAM
DAILY WAKEUP:
MIDNIGHT
DAILY SLEEP:
IMPRINT INFO:
DATE/TIME:
11
11 PM
NO
01/01/99 12:00am
CAMERA NAME:
PLOTCAM
TV OUT Region:
NTSC
Custom Settings
6. MEMORY STORAGE and CAPACITY
Your digital camera supports external SD memory card ONLY.
(NO internal memory available)
Memory Chart*
Resolution
Picture count stored with 2GB SD Card
LOW 640 x 480
10,994
MEDIUM 1280 x 720
3,206
HIGH 1920 x 1080
1,749
FINE 3264 x 2448
961
VIDEO 640 x 480
274**
*Estimates. Actual capacity will vary based on image properties. **10-second video clips.
IMPORTANT NOTES ABOUT SD MEMORY CARDS:
Always turn the unit off when inserting or removing an SD card to avoid
damage and ensure that the camera properly updates the memory
information.
12
7. IMAGE VIEWING by TV Out cable or
USB Out cable
TV VIEWING
Move the rotary dial to PLAYBACK position. Connect unit TV OUT port to
a VIDEO-IN jack on your TV. Press + or – button to scroll through recorded
images. Press the RIGHT ( ) button to play a video clip. Press the LEFT ( )
button to delete pictures or video clips.
DELETE PHOTO
In the PLAYBACK mode, Press the LEFT ( ) button, then the selection
will flash. Press the + button to choose YES, erase the selected image
or – button to choose NO, return back to the previous screen. Press the
SELECT button again to make selection.
USB VIEWING
To connect the camera to a Computer, the camera must be ON and the rotary
dial in the SETUP position. Connect the USB cable between the USB OUT port
and your computer. Your computer will recognize the new device automatically. Wait until the computer finishes installing the driver.
Double click on the My Computer icon on your desktop (or Finder in Mac OS).
You will see a new icon named “MOULTRIECAM”. Double click the icon and
select the folder “DCIM” and then “100_MDGC”, all your images will be stored
in this folder. When the USB cable is disconnected the camera will go back to
SETUP mode.
13
8. SPECIFICATIONS
Operational Modes:
AUTO – Automatic Timelapse operation
SETUP – Customize menu settings
PLAYBACK – output images on TV
Video:
(640 x 480) 10-second AVI clips
Picture Resolution:
LOW (640 x 480) / MEDIUM (1280 x 720) / HIGH (1920 x 1080) /
FINE (3264 x 2448)
Format:
JPEG-Still pictures, AVI-Video clips
External SD Memory:
Up to 16 GB SDHC - Class 2
Image Output:
TV OUT, USB OUT, SD Card
USB Output:
Requires PC with Windows 2000/ME/XP/Vista/7
Power Supply:
Standard or rechargeable 4 AA cell batteries.
Note: Lithium batteries will offer extended battery life.
Camera may also be powered by Moultrie external power panel
(9V - 12V DC 250mA).
Software CD:
Requires PC with Windows 2000/ME/XP(32-bit)/
Vista(32-bit)/7(32-bit)
MFH-PS
11032010 / MFH-PS
14
Plot Stalker Software Instructions
INTRODUCTION
In time-lapse photography a series of still images is taken at regular time intervals
and then played back faster - giving the illusion that time is passing quickly. This
instruction manual provides you with the general information you need to start
using the Time Lapse Software to view and assemble images into a video.
For more detailed instructions relative the operation of your camera, please refer
to the instruction manual.
System Requirements
OS: (32 bit only)
Hard disk space: CPU: Memory: Connection: Microsoft® Windows® XP with Service Pack 2
(Service Pack 3 recommended); Windows Vista®
Home Premium, Business, Ultimate, or Enterprise
with Service Pack 1; or Windows 7
100MB or above
Intel® Pentium® 4 or AMD Athlon® 64 processor or above
1GB of RAM
Internet
Downloading Software
1. Insert the software CD into your computer.
2. After a few minutes, a main window will appear on the
screen for installing the software.
3. Install the Time Lapse Imaging Software.
4. There will be several window prompts. Click the desired default
setting options to finish the installation.
MAIN SCREEN DESCRIPTION
MAIN SCREEN DESCRIPTION
1
2
3
4
5
6
7
15
2
1. File
2. Search Settings
3. Help
4. About
8
9
5. Image Screen
6. Status Indicator
7. Begin/End
8. Frame Advance
10
11
9. Rewind/Pause/Play
10. Preview Search
11. Zoom In/Out
DOWNLOADING IMAGES
IMAGES
1. Double click on (TimeDOWNLOADING
Lapse Software) to
open the software.
2. Click on File.
1. Double click on (Time Lapse Software) to open the software.
2. Click on File.
3. Browse through your files to the folder where the time lapse images
3. Browse throughyou
your
folder where the time lapse images
wish files
to opento
arethe
stored.
4. Onceare
the stored.
file is selected, click OK.
you wish to open
5. The images saved in the file are now available to view through the
4. Once the file is selected,
click OK.
Time Lapse Software.
Note: Before opening the time lapse images with the software, the images
5. The images saved
incopied
thetofile
are innow
available
toAccessing
view the
through the
should be
a location
your local
hard disk first.
images directly from the SD card or from the camera will slow down the
Time Lapse
3 Software.
operation of your computer.
Note: Before opening the time lapse images with the software, the images should be copied to a location in your
local hard disk first. Accessing the images directly from the SD card or from the camera will slow down the operation of
your computer.
VIEWING IMAGES
This easy-to-use software allows you to advance through the series of images
a number of different ways:
1. Begin/End
When viewing pictures, clicking on these buttons will
take you directly to the beginning or to the end,
as you prefer.
2. Manual View
Click and drag moves the scroll bar to either view the image series
or to go quickly to a specific frame (frame 125, for example).
3. Frame by Frame Search
Frame Advance will allow you to view each image
in turn, one image at a time. Ideal for precise viewing.
4. Speed Search
Rewind/Pause/Play button’s allow you to “play”
images in sequence as well as to pause the play
or rewind. Simulates a video to help spot changes.
Note you can set speeds 1 to 8X by clicking the arrows. Speed indicated on the side.
16
VIEWING IMAGES cont.
header
5. Preview Search
Click the Search button to do an automatic
Preview scan of your images. The scan pauses
when the software detects a change in pixel
content from the last photo viewed. Detection is
based on averaging picture changes so this mode will skip some
images and should only be used to preview a set of images quickly.
The frame counter on the slider bar turns black when searching.
Note: this is the least precise of the viewing modes but it is automatic, quick and easy.
IMPORTANT- The accuracy of this search is determined by the Sensitivity, Region and Step
settings you select. The use of all three settings can maximize your results.
5.1 Sensitivity
Set to High, Medium or Low This sets the level of pixel change the
program will detect. Note: a pixel
change will occur with a color, intensity,
lighting or movement so this setting
is critical to obtain the desired results.
5.2 Search Region
A. Click on (Set Search Region) Button.
B. Minimize Search Settings screen.
C. This allows you to define a specific
search area, rather than the whole
photo. Just Drag the red outline to
the area you want to search. This
allows you to focus on a very precise
area if required.
D. Click (OK) to confirm your settings
and exit the menu.
IMPORTANT- This setting will increase the
sensitivity settings and could produce erratic
results. Use with caution.
17
VIEWING IMAGES cont.
5.3 Search Steps
A. This allows for even faster scans by
skipping the selected amount of images
(1-50). The higher this setting, the lower
the search results as it is ignoring selected
photos. You may find this option helpful
if you have a very large quantity of
photos to scan.
B. Click (OK).
C. Click on Motion Search Advance button.
IMPORTANT- Since this option forces the Easy Search to “overlook”
pictures it will lower the accuracy of your search if set above 1.
TO TURN PHOTO SEQUENCES INTO TIME LAPSE VIDEO
Reasons you may want to create a video with your images:
• Makes it easier to e-mail your image sequences
• Allows you to select the range of images you want included to
eliminate uninteresting images
• Allows you to store the images as a video rather than a large
number of images.
To assemble images into a Video
1. Download time lapse images to Time Lapse Software.
(see section on Downloading Images).
2. Click on File. You will see the following screen image.
18
TO TURN PHOTO SEQUENCES INTO TIME LAPSE VIDEO cont.
3. Choose a starting image (frame) and an ending image (frame).
Note: The frame limit is 300.
4. Choose the frame rate. Options include 1, 5, 10, 20, and 30 frames
per second (fps).
Note: The frame rate says how many images of a video are displayed every second a video is played. The higher
frame rate a video has the smoother movement appears in the video. However, a higher frame rate video will
create a larger file and will require more memory.
5. Choose the frame size (resolution):
Note: the higher the resolution, the sharper the image. However, higher resolutions create a larger file and will
require more memory.
VGA
(640x480)
720p
1080p
6. Chose Dark picture filter to: None, Low, Medium, High. This will cause the
search to skip certain pictures that meet the selected settings.
7. Click on (Save Video As). Name the video and choose the location file folder
you wish to save it in.
8. Click (Start Video Export). The program will start to convert the images to
video based on the settings chosen above. The green bars will advance
until the conversion is complete.
Note: Click on (cancel) to abort the transfer.
To View Time Lapse Video
1. Find the video in the file you save it to.
2. Click on the video.
3. The video will be open up automatically in QuickTime player.
To install a free version of QuickTime, go to
www.apple.com/quicktime/download
and follow the on-screen instructions.
4. Press play to view your time lapse video.
19