1
Instructionsfor
forM-880
M-880
Instructions
Digital Game
Camera
GameSpy
Digital
Camera
Important Battery lnformation
- Only use Alkaline or Lithium batteries. We recommend the use of Duracell or Energizer batteries.
- Do not mix old and new batteries. Always replace ALL the batteries at the same time.
- When the camera is not in use, please remove the batteries.
Moultrie Limited Warranty
This product has been thoroughly tested and inspected before shipment. It is guaranteed from
defects in material and workmanship from the date of purchase for 1 year. Under this limited
guarantee we agree to replace or repair free of charge any part or parts which have been found to
be defective in original material or workmanship. Should you require in-warranty service, call our
Customer Service Department. If your problem cannot be addressed over the telephone, we may
need you to send us your defective product plus proof of purchase.
THANK
YOU
for your
purchase
the M-880
GameSpy
Digital
THANK YOU
for your
purchase
of the of
M-880
Digital Game
Camera.
PleaseCamera.
read thisPlease
read
this
booklet
before
using
the
unit.
If
you
should
have
any
questions
about
booklet before using the unit. Should have any questions about this product or any
otherthis
product
or
any
other
Moultrie
product,
please
contact
us
using
the
information
Moultrie product, please contact us using the information on the back of this booklet. on
Please register your camera at www.moultriefeeders.com/warranty to activate
your 1-year warranty.
I
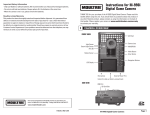
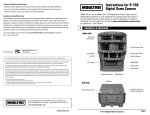
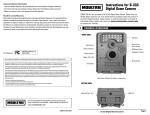
CAMERA OVERVIEW
FRONT VIEW
LED Flash
Camera Lens
Light Sensor
Second Light Sensor
Aim LED
AIM/OFF/ON
Mode Button
Enter Button
Motion Sensor
Navigation Buttons
LCD Display
Microphone
Power Panel Port
Unlock for slide-out battery compartment
SIDE VIEW
USB Port
SD Card Slot
Our Service Department will gladly answer any questions you have.
Call 800-653-3334, Monday - Friday, 8:00 AM to 5:00 PM CST.
www.moultriefeeders.com
01112013 / MCG-12594
11012011R1/ MCA-DGS-M880
M-880 Digital Game Camera
Page 1
I
CAMERA OVERVIEW (cont.)
ON
/ AIM
ON/ OFF
/ OFF
/ IR TEST
IR- TestWhen
IR Test
is ON
and the
detects
the red
AIM
When (default
AIM is ONOff)
and the
PIR sensor
detects
motion,
thePIR
red sensor
LED on the
frontmotion,
of the camera
will
come
forthe
2 seconds
shut off.
LEDonon
front ofand
thethen
camera
will come on for 2 sec and then shut off.
MODE BUTTON
The Mode Button selects Camera Setup or Main Screen. When camera mode is selected,
The
Button
selects buttons
Camera Setup
or Main
Screen.the
When
camera
mode The
is selected,
UP and
theMode
UP and
DOWN
navigate
through
menu
options.
Modethe
Button
is
DOWN buttons navigate through the menu options. The Mode Button is also used to wake-up the
also
used
to
wake-up
the
camera
and
turn
on
the
display
when
the
camera
is
in
a
power
camera and turn on the display when the camera is in power saving (or sleep) mode.
saving mode.
MODE BUTTON
ENTER,
UP/DOWN
andand
LEFT/RIGHT
BUTTONS
ENTER,
UP/DOWN
LEFT/RIGHT
BUTTONS
The
ENTER
button
thetoitem
to be changed.
The UP/DOWN
andbuttons
LEFT/RIGHT
The
ENTER
button
selectsselects
the item
be changed.
The UP/DOWN
and LEFT/RIGHT
are used
tobuttons
step through
the menu
options.
Pressing
the ENTER
button
again selects
the option
indicated
on
are used
to step
through
the menu
options.
Pressing
the ENTER
button
again,
the
display.
The
ENTERindicated
button is also
useddisplay.
to manually
a picture.
selects
the
option
on the
Thetake
ENTER
button is also used to
manually take a picture.
SAVE FILE
C
PLOTSTALKER
SAVE FILE
C PLOTSTALKER
SAVING FILES OVERVIEW
Use the Save
File features
of the PlotStalker
SAVING
FILES
OVERVIEW
software
to create
single photo,
the
Use
the Save
Fileafeatures
of thereduce
PlotStalker
overall size
the .mlt
file, exclude
software
toofcreate
a single
photo,unwanted
reduce the
photos in
theoffront,
or create
video that
can
overall
size
the .mlt
file, aexclude
unwanted
be viewed using a standard media player.
photos in the front, or create a video that can
be viewed using a standard media player.
EXPORTING AN IMAGE/PHOTO
1. On the main screen, choose a starting image/
EXPORTING
AN
IMAGE/PHOTO
photo (frame) by
using
the scroll bar on the
the display
orchoose
the frame-by-frame
On theofmain
screen,
a starting image/
1 bottom
search
photofeature.
(frame) by using the scroll bar on the
bottom
of thebutton.
display or the frame-by-frame
2. Press
the SAVE
search feature.
3. Select
Pressthe
theCurrent
SAVEImage
button(*.jpg) radio button.
2
Select
the Current
Image
(*.jpg) radio
4. Press
Change...
to enter
the directory
and button
3
BATTERY COMPARTMENT
BATTERY COMPARTMENT
The camera is powered by eight (8) AA alkaline or lithium batteries. Slide the Unlock switch to the
The Camera is powered by eight(8) AA size alkaline or lithium batteries. Slide the
right and grab the small handle under the switch to slide-out the battery compartment tray.
Unlock switch to the right and grab the small handle under the switch to slide-out the
NOTE:
It iscompartment
recommended tray.
to use lithium batteries for best performance (do not mix battery types).
battery
NOTE: It is recommended to use lithium batteries for best performance.
SD
CARD
SLOT
(Do
not mix
battery types)
Accepts
up to aSLOT
32GB SD Card for photo and video storage.
SD CARD
NOTE:
An SD
beSD
installed
camera
operate
(sold separately). For best results,
Accepts
upCard
to a must
32GB
Cardfor
forthe
photo
andtovideo
storage.
weNote:
recommend
youmust
format
SD cardfor
inside
camera
taking
We also
An SDthat
Card
be the
installed
the the
camera
to before
operate
(soldpictures.
separately).
recommend that the SD card be Class 4 or Class 10 for HD video recording.
USB PORT
Download
USB
PORT still pictures and video onto your computer by connecting a USB to
Mini-USB
(sold
Download stillcable
pictures
andseparately).
video onto your computer by connecting a USB cable (sold separately)
to save thetoimage.
Press Change...
enter the directory and
4 filename
filename to save the image
Press Export to save the file
5. Press Export to save the file.
5
EXPORTING
MLT
EXPORTING MLT
FILEFILE
Select
appropriate
50, or
100,
200 images
video
radio button.
1
1. Select
thethe
appropriate
50, 100,
200or
images
video clip
radioclip
button;
this
willwill
create
a MLTaformat
fromfile
the starting
frame
plus the
This
create
MLT file
format
from the
starting
frame plus the
next
50,50,
100,100,
or 200
next
or frames.
200 frames.
Select
the
Change
button
to select
the desired
location
thefile.
export file.
2
2. Select the Change button
to choose
the desired
location
to saveto
thesave
export
3 Enter the directory and filename to save the file
3. Enter the directory and filename to save the file.
4 Select the Export button to save the file. These files are viewable with
Plotthe
Stalker
4. Select
ExportSoftware.
button to save the file. These files are viewable with
Plot Stalker Software.
EXPORTING WMV FILE
toPOWERPANEL
the USB port.
PORT
EXPORTING
FILE
Select theWMV
appropriate
1
Accepts the Moultrie PowerPanel or Moultrie Battery Box accessories only (sold separately).
Refer to www.moultriefeeders.com for more information.
Enter
directory
filename
save location
the file to save the export file.
3
2. Select
thethe
Change
buttonand
to choose
theto
desired
Accepts the Moultrie PowerPanel accessory (sold separately) only. Refer to
EXTERNAL
POWER PORT for more information.
www.moultriefeeders.com
NOTE: The use of any other power source will void your warranty and possibly harm your camera.
50, 100, or 200 images video clip radio button. This will
1. Select
the aappropriate
50, 100,
video
clip plus
radiothe
button;
create
a .wmv
format
create
.wmv format
fileorof200
theimages
starting
frame
nextthis
50,will
100,
or 200
frames.
file
of
the
starting
frame
plus
the
next
50,
100,
or
200
frames.
Select the Change button to select the desired location to save the export file.
2
Select the Export button to save the file. The program will convert the images
to video based on the chosen settings. The .wmv file can be viewed using a
4. Select
the Export
button
to save the file. The program will convert the images to video based on
standard
media
player.
4
3. Enter the directory and filename to save the file.
the chosen settings. The .wmv file can be viewed using a standard media player and is great for
Great for
internet or emailing.
uploading
to uploading
the internetto
or the
emailing.
Page22
Page
M-880 GameSpy Digital Camera
M-880 Digital Game Camera
PlotStalker Software
Plot Stalker Software
Page
15 15
Page
ACTIVITY SEARCH
Search Feature will
scan through
your photos and automatically
ACTIVITY
SEARCH
BThePLOTSTALKER
PLOTSTALKER
ACTIVITY
SEARCH
PLOTSTALKER
ACTIVITY
look for changes in regions that you identify inSEARCH
Setup.
B
PLOTSTALKER ACTIVITY SEARCH
BSEARCH
ACTIVITY
ACTIVITY
SEARCH
II
Slide the UNLOCK switch on the bottom of
slide-out Battery Tray. Install or eight(8) AA
QUICK START INSTRUCTIONS
with polarities as indicated in the Battery Tr
STEP 1 Slide
Slidethe
theUNLOCK
UNLOCK switch
on on
thethe
bottom
of Camera
and use
knob
pull the
slide-out
switch
bottom
of
Camera
andtheuse
use
thetoknob
knob
to pull
pull
the throug
Slide
the Tray.
UNLOCK
switch
on
the
bottom
of
Camera
and
the
to
the
Thread
the
provided
Mounting
Strap
Battery
Install
eight
(8)
AA
size
alkaline
or
lithium
batteries
with
polarities
as
ACTIVITY
SEARCH
In
search
mode,
the
PlotStalker
software
scans
through
the
.mlt
photo
file,
stops
slide-out
Battery
Tray.
Install
or
eight(8)
AA
size
alkaline
or
lithium
batteries
TheThe
Search
Feature
will scan
your photos
automatically
slide-out
Tray. Install
oron
eight(8)
AA size
alkaline
or lithium
batteries
The
Search
Feature
willthrough
scan through
through
yourand
photos
and automatically
automatically
indicated
in the
Battery
Tray.
Re-install
Battery
Tray
and insert
your
SDor
card.
Slide Battery
the
UNLOCK
switch
thethe
bottom
Camera
and
the
knob
to pull
the
Search
Feature
will
scan
your
photos
and
camera
andofRe-install
secure
to
ause
tree
pole
approxim
SEARCH
with
polarities
as that
indicated
in the
the
Battery
Tray.
the
Battery
Tray.
look
forACTIVITY
changes
in regions
that
you
identify
in Setup.
on
a
photo
when
changes
are
found
in
your
identified
region,
and
then
highlights
Weslide-out
recommend
you
format
the
SD
card
inside
the
camera
before
taking
pictures.
with
polarities
as
indicated
in
Battery
Tray.
Re-install
the
Battery
Tray.
look
for
changes
in
regions
that
you
identify
in
Setup.
Battery
Tray.
Install
or
eight(8)
AA
size
alkaline
or
lithium
batteries
lookThe
for Search
changesFeature
in regions
that
you
identify
in
Setup.
will scan through your photos and automatically
withthe
polarities
asMounting
indicatedStrap
in
thethrough
Battery
Re-install
Battery
Tray.
the
changes
in PlotStalker
blue.
Youthat
can
click
in
viewing
remove
Thread
the
provided
Mounting
Strap
through
the
Eyelets
on
the of
back
of
the and
Turn
Camera
on
bytheon
sliding
ON/OFF/IR
TE
In search
mode,
the
PlotStalker
software
scans
the
photo
file,the
stopsvideo
on
a photo
when area to STEP
provided
Mounting
Strap
through
the
Eyelets
the
back
of
the
look
for
changes
in
regions
youthrough
identify
in.MLT
Setup.
Thread
the
provided
theTray.
Eyelets
on
back
the
camera
2 Thread
In
search
mode,
the
software
scansanywhere
through
the .mlt
.mlt
photo
file,
stops
In search
mode,in the
PlotStalker
software
scans
through
the
photo
file,
stops
changes
are
found
your
identified
region,
and
then
highlights
the
changes
in
blue.
You
can
click
camera
and
secure
to
a
tree
or
pole
approximately
36"
from
the
ground
as
shown.
secure
to
a
tree
or
pole
approximately
36”
from
the
ground
as
shown.
the
blue
highlights.
camera
and the
secure
to a tree
or pole
36"
the on
ground
as shown.
toapproximately
the ON
position.
on
photo
when
changes are
are found in
in your
your identified
identified region,
region, and then
then highlights
highlights
Thread
provided
Mounting
Strap
through
the from
Eyelets
the back
of the
on
aaInphoto
changes
search
mode,
the PlotStalker
software
scans
through theand
.mlt photo
file, stops
anywhere
in thewhen
video
viewing
area found
to remove
the blue
highlights.
the
changes
in
blue.
You
can
click
anywhere
in
the
video
viewing
area
to
remove
camera
and
secure
to
a
tree
or
pole
approximately
36"
from
the
ground
as
shown.
Turn
Camera
on
by
sliding
ON/OFF/IR
TEST
switch
the changes
in blue.
can click
anywhere
in identified
the video viewing
areathen
to remove
on by
bysliding
sliding
ON/OFF/IR
TEST
switch
TurnCamera
camera on
ON/OFF/AIM
switch
to the
ON position.
on a photo
whenYou
changes
are found
in your
region, and
highlights
STEP 3 Turn
Press
the
MODE
button
one
time
to get to t
the
blue
highlights.
ACTIVITY
SEARCH
SETUP
to
the
ON
position.
the blue
highlights.
to the
ONCamera
position.
Eyelet
the changes
in blue. You can click anywhere in the video viewing area to remove
Turn
on by sliding ON/OFF/IR TEST switch Eyelet
Press the MODE button one time to
get
to
the
Main
Selection
ACTIVITY
SEARCH
SETUP
STEP
4
Camera
Setup Menu. Set Time and Date by
Click
the SEARCH
Settings
button to activate
the blue
highlights.
tothe
theselect
ON position.
Press
the
MODE
button
one and
time
to get
get
to the
the
ACTIVITY
SETUP
Screen,
Setup.
Set Time
Date
by pressing
ENTER,
Eyelet
Press
MODE
button
one
time
to
to
Click
the SettingsSEARCH
button to activate
ACTIVITY
SETUP
ENTER,
using
UP/DOWN
to adjust selecte
Camera
Setup
Menu.
Set
Time
and
Date
by
pressing
using
UP/DOWN
to
adjust
selected
field,
LEFT/RIGHT
to
move
the
Region
and
Sensitivity
settings
Click
the
Settings
button
to
activate
the
Region
and
Sensitivity
settings
Camera
Setup
Menu.
Set
Time
and
Date
by
pressing
Click
the SettingsSEARCH
button to activate
Press the MODE button one time to get to the
ACTIVITY
SETUP
to
the
next
field
and
ENTER
when
done.
ENTER, using
using UP/DOWN
UP/DOWN to
to adjust
adjust
selected field,
field, to move to the next field and
forthe
theRegion
Activity
Search
the
Region
and
Sensitivity
settings
LEFT/RIGHT
ENTER,
selected
and
Sensitivity
settings
for
the the
Activity
Search
Camera Setup
Menu. Set Time
and
Date by pressing
Click
Settings
button
to activate
LEFT/RIGHT
to
move
to
the
next
field
and
ENTER
for
the
Activity
Search
LEFT/RIGHT
to
move
to
the
next
field
and
ENTER
for the
Search
ENTER,
to
adjustdone.
selected
MODE using
buttonUP/DOWN
until MENU SELECTION
screen is field,
the Activity
Region and
Sensitivity settings
when
STEP 5 Press
when
done. Use the UP/DOWN buttons until the MAIN
when
done.
displayed.
LEFT/RIGHT
to move to the next field and ENTER
for the Activity Search
SCREEN
option
is highlighted
yellow.
PressMODE
ENTER.
when
done.
Press
button
until MENU SELECT
Press
MODE
button
until MENU
MENU
SELECTION
Mounting
Press
MODE
button
until
SELECTION
Mounting
screen
is
displayed.
Use
the
UP/DOWN
buttons
Strapthe UP/DOWN bu
Switch
to Aim.
Aimuntil
camera
usingSELECTION
motion
iscamera
displayed.
Use
the
UP/DOWN
buttons
screen
is
displayed. Use
STEP 6 screen
Press
MODE
button
MENU
Strap
Mounting
until
the MAIN
MAIN
SCREEN
option
is
highlighted
detection
to displayed.
determine
target
area.
Walk
in front buttons
of the
until
the
SCREEN
option
is
highlighted
screen
is
Use
theuntil
UP/DOWN
the MAIN
option is highlig
Strap
camera Press
at the ENTER.
desired distance and the camera
LED will SCREEN
yellow.
Press
ENTER.
DEFINE SEARCH
SEARCH REGION
REGION
yellow.
DEFINE
until
the MAIN
SCREEN
option is highlighted
flash
showing
the
covered
area.
yellow. Press ENTER.
DEFINE
SEARCH
Provides
the ability
ability
to search
searchREGION
for
Provides
the
to
for
DEFINE
SEARCH
REGION
Youryellow.
CameraPress
will ENTER.
now automatically
automatically take
take pictures
pictures
Your
Camera
will
now
DEFINE
SEARCH
REGION
changes
in
the
photo
in
a
specific
Provides
the
ability
to search
changes
in the
photo
in atospecific
Switch camera
to ON.isYour
camerainwill
now -based
automatically
STEP 7 whenever
Provides
the
ability
search
for for
whenever
an animal
animal
detected
range
onwill now automatically take p
an
is
detected
in
range
-based
on
Provides
the
ability
to
search
for
Your
Camera
Your
Camera
will now
automatically
take
pictures
region rather
rather than
than the
entire photo.
photo.
pictures
whenever
an animal
is detected
in range,
region
entire
changes
in the
photo
in ain
specific
changes
theinthe
photo
a specific
thetake
default
settings
below.
changes
in the in
photo
a specific
the
default
settings
below.
whenever
an animal
is detected
in range -based
on
based
on the default
settings
below.
whenever
an animal
is detected in range -b
region
rather
thephoto.
entire
photo.photo.
region
ratherrather
than
thethan
entire
region
than
the
entire
the default settings below.
Click
on the
the
Set Search
Motion
Search
Area Button.
Button.
1 on
1. Click
the Set
Motion
Area
Button.
Click
on
Set
Motion
Search
Area
1
1
III
DEFAULT SETTINGS the default settings below.
Click on the Set Motion Search Area Button.
2. Use
mouse
to selectto
dragand
the drag
red outline
around
thearound
area youthe
want
to search
for to
Use
the mouse
mouse
toand
select
and
drag
the red
red
outline
around
the
area
you want
want
to
2 the
Use
the
select
the
outline
area
you
2
Click
on
the
Set
Motion
Search
Area
Button.
movement.
This
allows
you
to
focus
on
a
very
precise
area
if
required.
1 search
search
for
movement.
This
allows
you
to
focus
on
a
very
precise
area
if
for movement. This allows you to focus on a very precise area if
Capture Mode
Mode
Capture
Photo
QualityMode
Capture
Photo
Quality
Photo
Delay
after each
each photo
photo is
is taken
taken
Photo
Delay
after
Photo
Quality
Capture
Mode
Photo Quality
TRAIL CAM
CAM (Still)
(Still)
TRAIL
MOTION
DETECT
2.0
MP
2.0 MP
TRAIL CAM (Still)
HIGH
(4.0 MP)
SEC
55 SEC
2.0 MP
Capture Mode
Photo
Delay
after each photo is taken
5 SECONDS
Motion
Freeze
ON
Use the mouse to select and drag the red outline around the area you want to
Motion
Freeze
ON
Photo
Delay after each photo is taken
5 SEC
required.
required.
Motion
FreezeCount
ON
Photo Quality
searchonfor
This
allowstoyou
to focus
on a very
if
MultiMotion
Shot
OFF
Multi
Shot
Count
OFF
3. Click OK button
themovement.
Settings Popup
window
confirm
your settings
andprecise
exit the area
menu.
Freeze
ON
Shot
Count
OFF
required.
the mouse to select and drag the red outline around the area you want to Multi
Video
Resolution
VGA
2 Use
Photo Delay
after each photo is taken
Video
Resolution
VGA
Multi
Shot Count
OFF
Click OK
OK button
button on
on the
the Settings
Settings Popup
Popup window
window to
to confirm
confirm your
your settings
settings and
and
3 Click
3
Video
Resolution
VGA
Video
Length
5
SEC
search
for
movement.
This
allows
you
to
focus
on
a
very
precise
area
if
Video
Length
5 SEC
Video
Resolution
VGA
exit the
the menu.
menu.
Motion Freeze
exit
Click
OK button on the Settings Popup window to confirm your settings and
3
Video
Audio
ON
Video
Length
10 SECONDS
Video
Audio
ON
Video
Length
5 SEC
required.
exit the menu.
Multi Shot
Count
MOULTRIECAM
Camera
Name
SENSITIVITY
Video
Audio
ON
MOULTRIECAM
Camera
Name
SENSITIVITY
Video
Audio
ON
SENSITIVITY
Temperature
FAHRENHEIT
Set
to
High,
Medium
or
Low
This
sets
the
level
of
pixel
change
the
program
Camera
Name
MOULTRIECAM
Video
Resolution
1to SENSITIVITY
Temperature
FAHRENHEIT
Set1
High,
Medium
or
Low
This
sets
the
level
of
pixel
change
the
program
will
detect.
MOULTRIECAM
Camera Name
Set
to High,
Medium
or Lowthe
- This sets the level
of pixel
changeto
theconfirm
program your settings and
Click
OK
button
Popup
window
3 will
Info Temperature
Strip printed
printed on
on photos
photos
ON
detect.
Note;
pixelon
change Settings
will occur
occur with
with
color,
intensity,
lighting or
or
Info
Strip
Temperature
FAHRENHEIT
ON
FAHRENHEIT
will Set
detect.
Note;
aa pixel
change
aa color,
intensity,
lighting
to High,
Medium
or
Low
-color,
Thisintensity,
sets the lighting
level
oforpixel
change
the program
Video Length
Note: A1pixel
change
occurs
when
a change
in will
movement
is detected,
so
exit
the
movement
somenu.
this
setting
is to
critical
to obtain
obtain the
the desired
desired results.
results.
PlotStrip
Frequency
15
SECONDS
Info
printed
photoson photos
ONSECONDS
movement
so
this
setting
is
critical
to
Plot
Frequency
15
Info
Stripon
printed
ON
this setting
iswill
critical
to
be
able
to ajump
the desired
detect.
Note;
pixel
change
willframes.
occur with
a color, intensity, lighting or
Video Audio
Plot Lapse
Duration
330HOUR
HOUR
Time
Frequency
SECONDS
Plot
Duration
3
movement
so
this
setting
is
critical
to
obtain
the
desired
results.
Plot
Frequency
15
SECONDS
DEFAULT
SETTINGS
DEFAULT SETTINGS
000.000000 N
N // 000.000000
000.000000 W
W
GPSLapse
Longitude
&
Latitude:
Camera
Name
SENSITIVITY
000.000000
GPS
Longitude
&
Latitude:
Time
Duration
3
HOUR
Plot Duration
3 HOUR
Click
on Default
Default
button to
to return
return to
to the
the default
default values
values for
for Search
Search Area
Area and
and
DEFAULT
SETTINGS
1 DEFAULT
SETTINGS
Click
on
button
1
NO
Default
Setting
NO
000.000000
N / 000.000000
GPS
Longitude
& Latitude:& Latitude:
000.000000
N / 000.000000
W W
Click1on Default
button
to return
to the default
for
Search sets
Area and
settings.
Default
Temperature
GPSSetting
Longitude
Sensitivity
settings.
Set
toonHigh,
Medium
or values
Low
- This
theSensitivity
of
pixel
settings.
Click
Default
button to return
to the
default values
forlevel
Search
Area
andchange the program
1Sensitivity
NO
Delete
All?
NO
Delete
All?
NO
GPS
Latitude
000.000000
N
Delete
All?
NO
Default
Setting
GPS
Latitude
- settings.
000.000000
Info Strip printed on photos
Sensitivity
will
detect.
Note; aNpixel
change will occur with a color, intensity, lighting or
Security
Code
00000
GPS Longitude
Longitude -- 000.000000
000.000000 W
W
Default
Setting
NO NO
Security
Code
00000
Delete
All?
GPS
GPS
Latitude
000.000000
N
movement so this setting is critical to obtain the desired results.
Plot
Frequency
Security
Code Code
00000
Security
00000
GPS Longitude - 000.000000 W
2
Page
14
PlotStalker Software
Software
DEFAULT
SETTINGS
Page
14
PlotStalker
Plot
Stalker
Software
on DefaultPlotStalker
button toSoftware
return to the default values for Search Area and
Page 14
14
1PageClick
PlotDigital
Duration
M-880 GameSpy
GameSpy
Camera
M-880
Digital Camera
GPS
Longitude
& Latitude:
M-880
Digital
Game
Camera
M-880 GameSpy Digital Camera
Page 33
Page
Page 3
Page 3
A
CAPTURE
MODES
eSpy offers
four capture modes
as described below.
ult capture mode is Trail Cam.
PLOTSTALKER SOFTWARE INTRO
INTRODUCTION
In time-lapse photography a series
The GameSpy offers four capture modes as described below.
INTRODUCTION
CAPTURE
MODES
PLOTSTALKER
of still photos
are
taken at regular SOFTWARE INTRO
IV
APLOTSTALKER
The CAPTURE
default capture modeMODES
is Trail Cam.
In time-lapse
photography a series SOFTWARE INTRO
AIL CAM MODE
time intervals.
The
PlotStalker
of still photos are taken at regular
photos
are
taken
when
an
animal
is
detected.
The
number
of
photos
taken
Software
allows
you
toPlotStalker
load the
SOFTWARE
INSTALLATION
The
offers
four
capture
modes
as described
TRAIL
MODE
INTRODUCTION
time
intervals. The
The GameSpy
M-880
offersCAM
four capture
modes as
described
below. Thebelow.
default capture mode is Motion Detect.
Download
your
free
Plot Stalker
n anThe
animal
detected
is
configurable
in Settings.
Photos
stored
timeInlapse
file allows
that
was
default
captureare
mode
is when
Trail Cam.
Stillisphotos
taken
an animal
is detected.
Theare
number
of in
photos taken
time-lapse
photography
a series
Software
youcaptured
to load
thesoftware at www.moultriefeeders.com/plotsoftware
n the DCIM/100MFCAM
folder onis the
SD card. in Settings. Photos are stored in
fromofyour
Moultrie
Game
still photos
are
taken
regular
whenCAPTURE
an animal is detected
configurable
time
lapse
file
that
wasatCamera
captured
PLOTSTALKER
SOFTWARE INTRO
MODES
MOTION
DETECT
MODE
TRAIL
CAM
MODE
intervals.
The and
PlotStalker
the in
the
DCIM/100MFCAM
folder on the SD card.
and time
scroll
backward
forward
from
your Moultrie
Game
Camera
Still photos
are taken
animal
detected.
number
of photos
taken
when an
animal is
INTRODUCTION
Still
photos
arewhen
takenanwhen
anisanimal
is The
detected.
The
number
of photos
taken
Software
allows
yousingle
toand
loadstep,
the
OT CAM
MODE
and
scroll
backward
forward
through
your
photos,
detected
is
configurable
in
Settings.
Photos
are
stored
in
the
DCIM/100MFCAM
folder
on
the SD card.
The
GameSpy
offers
four
capture
modes
as
described
below.
INTRODUCTION
Inlapse
time-lapse
photography
a series
when
an
animal
is
detected
is
configurable
in
Settings.
Photos
are
stored
in
time
file
that
was
captured
PLOT
CAM
MODE
through
your
photos,
single
step,
camera takes
photoscapture
at a specified
interval
during the day and combines
search for
activity
in
ataken
designated
The
default
mode
is
Trail
Cam.
of
still
photos
are
at
regular
In
time-lapse
photography
a series
the
in
the
DCIM/100MFCAM
folder
on
the
SD
card.
from
your
Moultrie
Game
Camera
The
camera
takes
photos
at
a
specified
interval
during
the
day
and
combines
search
for
activity
in
a
designated
m together to create a Plot Video (*.MLT file) which can be viewed on the
area, and
save
the
files.
time
intervals.
The PlotStalker
of
still
photos
are
taken
at
regular
and
scroll
and forward
them Plot
together
to create
a Plot The
Video
(*.MLT
file)awhich
can be viewed
area,
andbackward
save
theyou
files.
plied Moultrie
Stalker
software.
camera
takes
Plot Video
twice on the
Software
allows
to load
the
TRAIL
CAMPlot
MODE
time
intervals.
The
PlotStalker
PLOT
CAM
MODE
through
your
photos,
single
supplied
Moultrie
Stalker
software.
The
camera
takes
a
Plot
Video
twice
SYSTEM
REQUIREMENTS
time
lapseREQUIREMENTS
fileallows
captured
by step,
your
TIME
LAPSE
MODE
y; once
inThe
thecamera
morning
and
once
in
the
evening.
The
morning
Plot
Video
SYSTEM
Still
photos
are
taken
when
an
animal
is
detected.
The
number
of
photos
taken
Software
you
to
load the
takes
at aand
specified
duringThe
the day
and combines
search
for activity
in a designated
a day;takes
oncephotos
in thephotos
once during
ininterval
the the
evening.
morning
Plot
Videoto
Moultrie
Game
Camera
and scroll 4 or AMD Athlon® 64 processor or above; 1GB
Themin
camera
atmorning
aThe
specified
interval
day
and
combines
them
together
Computer:
Intel®
Pentium®
>
ns 15
before
sunrise.
evening
Plot
Video
ends
15
min
after
when
an
animal
is
detected
is
configurable
in
Settings.
Photos
are
stored
in
time
lapse
file
that
was
captured
Intel®
Pentium® 4 or AMD Athlon® 64 processor or above; 1GB
together
to before
create
Plotwhich
Video
(*.MLT
file)
can
beMoultrie
viewed
on
the
>backward
area,
andComputer:
saveand
theforward
files.
begins
15 min
The
evening
Plot
Video
ends
15 minPlot
after
through
createthem
a Time
Lapse
Video
(*.MLTasunrise.
file)
can
be viewed
onwhich
the
supplied
Stalker
RAM
minimum;
100
MB
hard
disk
the
in the
DCIM/100MFCAM
folder
on
the
SD
card.
et. See
chart
below
as
a
reference.
The
length
of
each
Plot
Video
is
from
your
Moultrie
Game
Camera
RAM
minimum;
100
MB
hard
diskspace
spaceminimum.
minimum.
supplied
Moultrie
Plot
Stalker
software.
The
camera
takes
a
Plot
Video
twice
sunset.
See
chart
below
as
a
reference.
The
length
of
each
Plot
Video
is
your
photos,
search
for
activity
software. The camera takes a Time Lapse Video twice a day; once in the morning and once in the
SYSTEM
REQUIREMENTS
Operating
System:
Microsoft®
Windows®
withService
ServicePack
Pack2 or
2 or
>
and
scroll
backward
and
forward
rmined
by
the
Duration
setting
in once
the
camera
menu.
The
camera
will
Operatingarea,
System:
32bit
bit -- XP
XP with
adetermined
day;
once
inbythe
and
in15the
evening.
The
morning
PlotTime
Video
>in a designated
and Microsoft® Windows®32
evening.
ThePlot
morning
Time
Lapse
Video
begins
min
before
sunrise.
TheThe
evening
Lapse Video
themorning
Plot
Duration
setting
in
the
camera
menu.
camera
will
PLOT
CAM
MODE
through
your
photos,
single
step,
Computer:
Intel®
Pentium®
4
or
AMD
Athlon®
64
processor
or
above;
1GB
later;
Windows
Vista®
Home
Premium,
Business,
Ultimate,
or
Enterprise
with
>
save later;
the files.
begins
15
before
sunrise.
The
Video
15
min
after
Windows Vista® Home Premium, Business, Ultimate, or Enterprise with
ct the
correct
and
sunset
times
and adjust
itself
ends
15
minsunrise
after
sunset.
See
chart
below
asautomatically
aevening
reference.
The length
ofends
each
Time
Lapse
Video is
detect
themin
correct
sunrise
and
sunset
timesPlot
automatically
and
adjust
itself
The
camera
takes
photos
at
a
specified
interval
during
the
day
and
combines
search
for
activity
in
a
designated
RAM
minimum;
100
MB
hard
disk
space
minimum.
Service
PackPack
1; or1;Windows
7 7
determined
bySee
the
Time
Duration
setting
in the
camera
menu.
The
camera
will
the
sunset.
chart
below
as a in:
reference.
The
length
of on
each
Plot
is card.
Service
or Windows
rdingly.
The
Plot
Videos
are
stored
DCIM/PLOT
folder
the
SD
card.
accordingly.
TheLapse
Plot
Videos
are
stored
in:
DCIM/PLOT
folder
onVideo
thedetect
SD
A
A
them
together
toDuration
create
a Plot
Video
(*.MLT
file)
which
can
be viewed
on the
correct
sunrise
andby
sunset
times
automatically
and
itself accordingly.
Time
Lapse
determined
the Plot
setting
inadjust
the
camera
menu.
TheThe
camera
will Videos
are
stored
in
the
DCIM/PLOT
folder
on
the
SD
card.
supplied
Moultrie
Plot
Stalker
software.
The
camera
takes
a
Plot
Video
IMPORTANT:
It
will
take
the
camera
24hrs
to
properly
adjust
to
the
correct
ORTANT:
It will
take the
camera
properly
adjust to and
the adjust
correctitself twice
detect
the correct
sunrise
and24hrs
sunsettotimes
automatically
>
Operating
System:
Microsoft® Windows® 32 bit - XP with Service Pack 2 or
area, and save
the files.
SYSTEM
REQUIREMENTS
SOFTWARE
INSTALLATION
SOFTWARE
INSTALLATION
later; Windows
Vista® Home Premium, Business, Ultimate, or Enterprise with
SYSTEM REQUIREMENTS
{
{
{
{
atimes.
day;
in
the
morning
and once
in
the
evening.
The
morning
Service
Pack
1;
or Windows
7your
sunrise
and once
sunset
As
a default
the
camera
will
start
the
morning
PlotVideo
Insert
the
PlotStalker
into
your
computer
andorfollow
follow
instructions.
Intel®
Pentium®
4CD
orinto
AMD
Athlon®
64 processor
above; on-screen
1GB
RAM minimum;
accordingly.
Videos
are
stored
in:
DCIM/PLOT
folder
on
the
SDPlot
card.
>Computer:
ise and
sunset
AsPlot
a times.
default
the
camera
will
start
thecorrect
morning
Plot
Insert
the Computer:
PlotStalker
CD
computer
and
on-screen
instructions.
IMPORTANT:
It will The
take
the
camera
24hrs
to properly
adjust
to the
sunrise
and
sunset
times. >
Intel®
Pentium®
4 or AMD Athlon® 64 processor or above; 1GB
>
begins
15
min
before
sunrise.
The
evening
Plot
Video
ends
15
min
after
Video
at
5:45am
and
end
the
evening
video
at
6:15pm.
To
reset
the
sunrise
100
MB
hard
disk
space
minimum.
eo at As
5:45am
and
thewill
evening
atTime
6:15pm.
To reset
the and
sunrise
a default,
theend
camera
start thevideo
morning
Lapse Video
at 5:45am
end the evening video
SOFTWARE
INSTALLATION
RAM
minimum;
IMPORTANT:
It back
will
take
thedefault
camera
24hrsuse
to properly
adjust
to thePlot
correct
LOADING
PLOT
FILES 100 MB hard disk space minimum.
sunset.
See
chart
as
a reference.
length
each
Video
and To
sunset
times
tobelow
the
times,
the
Default
Settings
option
in is
LOADING
PLOT
FILES
at 6:15pm.
reset
the
sunrise
and
sunset
times
backDefault
to theThe
default
times,of
use
the Default
Settings
sunset
times
back
to
the
default
times,
use
the
Settings
option
in
Operating
System:
Microsoft®
32 bit
- XP
Service
Pack
2 Home
or
sunrise
and
sunset
times.
As
a
default
the
camera
will
start
the
morning
Plot
Operating
System:
Microsoft®
bitWindows®
-File
XP with
Service
2Computer),
orwith
later;
Windows
Vista®
>
Insert
the
PlotStalker
CD Windows®
into
your 32
computer
and
follow
on-screen
instructions.
>
determined
by
the
Plot
Duration
setting
in
the
camera
menu.
The
camera
will
Using
standard
Microsoft
utilities
(ex.
Explorer
–Pack
My
the
menu.
1
in the menu.
Using
standardWindows
Microsoft
utilities
(ex.Premium,
File
– My
Computer),
menu.option
1
Premium,
Business,
or Explorer
Enterprise
with
Service
Pack
or Windowswith
7
Videodetect
at 5:45am
and endsunrise
the evening
video at
6:15pm.
To reset the
Vista®
Home
Business,
Ultimate,
or1;the
Enterprise
the correct
and sunset
times
automatically
andsunrise
adjust itself
copy later;
the PlotFiles
(extension
isUltimate,
.MLT)
from
the
PLOT
directory
on
LOADING
PLOT
FILES
copy SD
thecard
PlotFiles
(extension
is .MLT)
the PLOT
directory
the
and sunset
times back
theVideos
default are
times,
usein:
theDCIM/PLOT
Default Settings
option
in SD card.
Service
Pack
1;disk
or Windows
7 from
accordingly.
ThetoPlot
stored
folder
on the
to the
hard
drive
in your
computer.
Note the
locationon
stored
LOADING
PLOT
FILES
SD
card
to
the
hard
disk
drive
in
your
computer.
Note
the
location
stored
Using
standard
Microsoft
utilities
(ex.
File
Explorer
–
My
Computer),
the menu.
1
onstandard
the hard
disk drive.
Using
Microsoft
utilities (ex. File Explorer – My Computer), copy the PlotFiles (extension is .MLT)
SOFTWARE
INSTALLATION
IMPORTANT: It will take the camera 24hrs to properly adjust to the correct
copy
thethe
PlotFiles
(extension
is .MLT) from the
PLOT
directoryStart
on the
on
the
hard
disk
drive.
2from
Open
PlotStalker
software
from
theinWindows
Button
the PLOT directory
on the
SD cardapplication
to the hard disk
drive
your computer.
Note
the location
sunrise and sunset times. As a default the camera will start the morning Plot
Insert
the
PlotStalker
CD
into
your
computer
and
follow
on-screen
instructions.
SD
card
to
the
hard
disk
drive
in
your
computer.
Note
the
location
stored
>
2
Open
the
PlotStalker
software
application
fromonthe
Start
Button
menu.
Once
the
PlotStalker
software, click
theWindows
File Button
Morning Time Lapse Video
Evening Time Lapse Video
stored
on the
hard in
disk
drive.
Video at 5:45am and end the evening video at 6:15pm. To reset the sunrise
on
the
hard
disk
drive.
3
Browse
in which
you have
saved
menu.
Once to
in the
thelocation
PlotStalker
software,
click
on the
the Plot
Filefile(s)
Button
Morning Time Lapse Video
Evening Time Lapse Video
LOADING
PLOT
FILES
Open
thethe
PlotStalker
software
application
from the
Windows
Start Button
menu.
can
still
triggered
tounder
take
a photo
under Settings
certain
settings
and The
sunset
times
back
to be
thetake
default
times,
use
the Default
option
in
Open
PlotStalker
software
application
from
the Windows
Start
Button
NOTE: NOTE:
The camera
cancamera
still
be triggered
to
a photo
certain
settings
while
in Time
Lapse
(.MLT)
in
step
1
above,
select
the
file
of
interest
and
click
Open.
3 2 Browse
to the
location
in which
you
savedBrowse
the Plot
file(s)
Once
in the
PlotStalker
software,
clicksoftware,
on
thehave
Fileclick
Button
toButton
the
location
while
in
plot
mode.
Please
see
the
"Plot
Frequency"
settings
in
the
camera
Using
standard
Microsoft
utilities
(ex.
File
Explorer
–
My
Computer),
the
menu.
menu.
Once
in
the
PlotStalker
on
the
File
Morning
Time
Lapse
Video
Evening
Time
Lapse
Video
1
mode.
Please
see
the
“Time
Lapse
Frequency”
settings
in
the
camera
setup
section.
TE: The camera can still be triggered to take a photo under certain settings
(.MLT)
stepthe
1saved
above,
the(.MLT)
file
of
interest
and
click
in whichin
you
the select
file(s)
step
1 from
above,
select
theOpen.
file
of
setup section.
3BEGIN/END
copy
PlotFiles
(extension
is in
.MLT)
the
PLOT
directory
on the
Browse
tohave
the location
inPlot
which
you have
saved
the Plot
file(s)
le in plotNOTE:
mode.
Please
see the
in the
camera
interest, and click Open.
The camera
can"Plot
still beFrequency"
triggered to settings
take a photo
under
certain settings
SD
card
to
the
hard
disk
drive
in
your
computer.
Note
the
location
stored
(.MLT)
in
step
1
above,
select
the
file
of
interest
and
click
Open.
Goes
to
the
first
or
last
photo
in
the
Plot
File.
HYBRID
p section.while
BEGIN/END
in plotCAM
mode.MODE
Please see the "Plot Frequency" settings in the camera
on
the
hard
disk
drive.
Camera
operates in Plot Cam mode during the day and Trail Cam Mode during
Goes
to the 2firstOpen
or last
photo in the Plot File.
setup
section.
BEGIN/END
HYBRID
CAM
MODE
BRID
CAM
MODE
the PlotStalker software application from the Windows Start Button
{
{
{
{
the night. Thirty minutes after dusk the camera will enter the Trail Cam mode
FRAME
BY FRAME SEARCH
BEGIN/END
Goes
to the first
or last
photo
inbackward
the Plot File.
Camera
operates
in Cam
TimeMODE
Lapse
mode
during
dayand
and Motion
Detect
ModeTime
during
theVideo
night.
mera operates
in
Plot
mode
during
thethesensor
day
Trail Cam
Mode
during
menu.
Once
inor
the
software,
on the File Button
HYBRID
CAM
Morning
Time
Lapse
Video
Evening
Lapse
Individually
step
forward
through
eachclick
photo.
Goes to the
first or
last photo
inPlotStalker
the Plot File.
and
take
night
photos
when
theenter
PIR
is triggered.
ThirtyCamera
minutes
after
dusk
the
camera
will
the
Motion
Detect
Mode
and
take
night
photos
FRAME
BY
FRAME
SEARCH
3
operates
in Plot
during
daythe
andTrail
TrailCam
Cam mode
Mode during
Browse to the location in which you have saved the Plot file(s)
night. Thirty minutes
after
duskCam
the mode
camera
will the
enter
when the PIRNOTE:
sensor isThe
triggered.
camera
candusk
still the
be triggered
to take
photo
under
FRAME
BY
FRAME
step
forward
or backward
through
eachofphoto.
the
night. MODE
Thirty
minutes
camera will
entera the
Trail
Camcertain
mode settings Individually
(.MLT)
inSEARCH
step
1 above, select
the file
interest and click Open.
REWIND/PAUSE/PLAY
take night
photos
when
themode.
PIRafter
sensor
is triggered.
FRAME
BY
FRAME
SEARCH
VIDEO
while
in plot
Please see
the "Plot Frequency" settings in the camera
4 and take night photos when the PIR sensor is triggered.
Camera records a video when an animal is detected by the motion sensor.
Individually
forward
orpause,
backward
through
each photo.
Play
photosstep
instep
sequence,
or play
the photos
in reverse order.
Individually
forward or
backward
through
each photo.
setup section.
BEGIN/END
REWIND/PAUSE/PLAY
These
functions
simulate
a
video
and
are
useful
for
manually searching
During daylight hours the camera will record a video 5, 15 or 30 seconds in
DEO MODE
REWIND/PAUSE/PLAY
Goes
to
the
first orWhen
last photo
in the is
Plot
File.played, press
HYBRID
CAM
MODE
VIDEO
MODE
VIDEO
MODE
REWIND/PAUSE/PLAY
changes
in
the
photos.
a
sequence
being
Play
photos
in
sequence,
pause,
or
play
the
photos
in
reverse order.
During
night
camera
will record
a the
video
with asensor.
maximum length
4 length.
mera records
a video
when
an the
animal
isis detected
detected
by
motion
Play
photos
in sequence,
pause,
ororplay
the
photos
inreverse
reverse
order.
Camera
records
a video
when
anin
animal
by
the motion
sensor.
During
daylight
hours
the These
Play
photos
in
sequence,
pause,
play
the
photos
in
order.
Camera
records
a
video
when
an
animal
is
detected
by
the
motion
sensor.
Camera
operates
Plot
Cam
mode
during
the
day
and
Trail
Cam
Mode
during
fast-forward
or
fast-rewind
multiple
times
to
increase
speed.
(1x-5x)
functions
simulate
a avideo
and
are useful
usefulfor
formanually
manually
searching
ofwill
10
seconds.
The5,video
length
isseconds
configurable
inor
SETTINGS.
ing daylight
hours
the
camera
will
record
a
video
5,
15
30
seconds
in
These
functions
simulate
video
and
are
searching
FRAME
BY
FRAME
SEARCH
camera
record
a
video
15,
30,
60
or
90
in
length.
During
the
night,
the
camera
will
These
functions
simulate
a
video
and
are
useful
for
manually
searching
Duringthe
daylight
hours the
camera
willdusk
record
video 5,
15enter
or 30the
seconds
in mode changes in the photos. When a sequence is being played, press
night. Thirty
minutes
after
the acamera
will
Trail Cam
changes
in the
photos.
a sequence
isisbeing
played,
press
Individually
stepWhen
forward
or backward
through
each
photo.
th. During
the
will
record
aseconds.
video
with
aismaximum
lengthlength
record
anight
video
with
acamera
maximum
length
of will
20the
The
video
length
is configurable
in SETTINGS.
changes
in the
photos.
When
a sequence
being
played,
press
length.
During
night the
camera
record
a video
with
a maximum
and
take
photos
when
PIR sensor
triggered.
fast-forward
or or
fast-rewind
multiple
times
toincrease
increase
speed.
(1x-5x)
fast-forward
or
fast-rewind
multiple
times
to
speed.
(1x-5x)
fast-forward
fast-rewind
multiple
times
to
increase
speed.
(1x-5x)
4of The
M-880
GameSpy
Digital
Camera
PlotStalker
Software
Page 13
0 Page
seconds.
video
length
is
configurable
in
SETTINGS.
10 seconds. The video length is configurable in SETTINGS.
REWIND/PAUSE/PLAY
4 VIDEO MODE
Play photos in sequence, pause, or play the photos in reverse order.
CameraGameSpy
records
a video
whenCamera
an animal
is detected by the motion sensor.
Page 4
M-880
GameSpy
Digital
Camera
PlotStalker
13 13
M-880
Digital
PlotStalker
Software
These functions simulate
a video andSoftware
are useful for manually searchingPagePage
the Digital
camera Game
will record
a video 5, 15 or 30 seconds in
Page 4 During daylight hours
Page 13
M-880
Camera
Plot
Stalker
Software
changes in the photos. When a sequence is being played, press
length. During night the camera will record a video with a maximum length
VII
V
CAMERA SPECIFICATIONS
Photo Quality
0.5 MP
940 x 560
2.0 MP
1920 x 1080
4.0 MP
2688 x 1512
8.0 MP
3840 x 2160
Video Quality
HD
1280 x 720 @ 24fps
VGA
848 x 480 @ 24fps
Approximate photos stored 4 GB SD card
0.5 MP
10,000
2.0 MP
4,000
4.0 MP
2,000
8.0 MP
1,200
Approximate video time stored 4GB SD card
HD
45 minutes
VGA
75 minutes
SD Memory Card
32 GB Max
Optical Field of View
50 degrees
Batteries
8 Alkaline or Lithium AA-cells
Approximate Detection Range
40 +/-5 feet
SETUP AND PROGRAMMING
Setup Menu
The UP/DOWN buttons are used to navigate through the available setting choices. UP/DOWN moves
to the next menu item, and ENTER selects the item to be changed. Additional menu choices are
available by hitting the UP/DOWN button when either the first or the last option is highlighted.
setup
DATE/TIME
MM/DD/YY HH:MMAM
Date/Time
Set Date /Time - on the SETUP DATE/TIME screen use the UP/DOWN buttons to modify the month.
Press LEFT/RIGHT buttons to move to the next field. Press the ENTER button again to save your
selections. The Time and Date is retained between battery changes. Time is not automatically
adjusted for daylight savings.
CAPTURE MODE
motion detect
Capture Mode
Press the UP/DOWN buttons to highlight the desired mode. Press the ENTER button to save the mode
and return to the Camera Setup Menu. There are four capture mode settings: MOTION DETECT, TIME
LAPSE, HYBRID CAM or VIDEO. Refer to the CAPTURE MODE section of this manual for details.
PHOTO QUALITY
(high)4.O MP
Photo Quality
The higher the quality of the photo/image the more memory and battery life it consumes. However,
higher quality images have higher resolution which results in clearer images – especially when
zooming in. There are four photo/image quality settings -0.5 MP, 2.0 MP, 4.0 MP and 8.0 MP. Press the
UP/DOWN buttons to highlight the desired setting. Press the ENTER button to save the setting and
return to the Camera Setup Menu. Refer to SPECIFICATIONS section of this document for details on
number of images stored based on Photo Quality.
PHOTO DELAY
5 SEC
Photo Delay
The photo delay determines the number of minutes between pictures when an animal is detected
and remains in range. To change the delay time press the UP/DOWN buttons to highlight the desired
setting. Press the ENTER button to save the setting and return to the Camera Setup Menu. Additional
menu choices are available by hitting the UP/DOWN button when the first/last option is highlighted.
Photo Delay can be set to 5, 15 and 30 seconds; as well as 1, 5, 10, 30 and 60 minutes.
Page 12
M-880 Digital Game Camera
M-880 Digital Game Camera
Page 5
V
SETUP AND PROGRAMMING (cont)
MOTION FREEZE
ON
Motion Freeze
This feature maximizes the image clarity during night photos. When this feature is on the camera
will use a maximum exposure time of 1/20sec for the night photos. Other adjustments are made to
increase the brightness and clarity of the photo. When this feature is turned off the camera will use a
maximum exposure time of 1/8sec for the night photos.
VI
ADVANCED INFORMATION
Viewing Pictures on Computer via USB
1. Plug USB cable (sold separately) into the USB port on your Windows 7/Vista/XP computer.
2. Plug other end of USB cable into the camera’s USB port.
3. To access JPG pictures and AVI movie files navigate to “My Computer” and double click the
“Moultrie CAM” drive. Picture files will be stored in theDCIM/100MFCAM directory; video files
are located in the DCIM directory.
VI
ADVANCED INFORMATION (cont.)
VI
4. To exit USB mode follow Windows’ instructions for properly disconnecting a removable drive
ADVANCED INFORMATION (cont.)
and then unplug.
MULTI-SHOT
PHOTO
DELAY
DELAY
O F FPHOTO
5 SEC
1 MIN
Multi-Shot
When the camera is configured for MOTION DETECT in the capture mode screen, the camera can take
- (default
5 seconds)
photo
delay
determines
number
of of
2 shot Photo
standard
3 Shot
standard,
2 Shot-The
Fast,-The
3 photo
Shot
Fast,
and 4 determines
Shot
Fast eachthe
time
an animal
is
Photo
DelayDelay
-or(default
1 minute)
delay
the
number
minutes
pictures3-4
when
an delay
animal
is detected
and
remains
in range.
detected.
There between
is an approximate
second
between
pictures
when
the 2 shot
standard or
minutes
between
pictures
when antheanimal
is detected
and remains
in range.
3 ShotTo
standard
setting
is selected.
Fast, 3 Shot
Fast, and
4 Shot setting
selected,
change
the delay
time,When
press the2 Shot
UP/DOWN
buttons
to highlight
the isdesired
Tothechange
the
delay
time,
press
the
UP/DOWN
buttons
to
highlight
the
desired
camera
will
take
the
selected
amount
of
photos
within
1-2
seconds.
To
choose
the
desired
setting
setting. Press the ENTER button to save the setting and return to the Camera
Setup
press the
ENTER
button
to
enter
the
Multi
Shot
settings.
Press
UP
or
DOWN
to
select
the
desired
setting.
Press
the
ENTER
button
to
save
the
setting
and
return
to
the
Camera
Menu. Additional menu choices are available by hitting the UP/DOWN button Setup
number
of photos.
Then
press
ENTER
return Photo
to theby
camera
setup
menu.
Menu.
Additional
menu
choices
aretoavailable
hitting
UP/DOWN
button
when
the first/last
option
isagain
highlighted.
Delays
canthe
be
set to 5, 15 and
30 seconds,
5, 10, 30
60 minutes.Photo Delays can be set to 5, 15 and
when the
first/last1,option
is and
highlighted.
V I D E O1, R
SO
U T60
I Ominutes.
N
30 seconds,
5,E10,
30Land
VGA
MOTION FREEZE
Video Resolution
ON can
Video
resolution
be set to VGA or HD. The higher the quality of the video, the more memory it
MOTION
FREEZE
consumes. However, higher quality videos have higher resolution.
Motion
- (default
VGA:Freeze
848 x 480
@ 24fps ON) - This feature maximizes the image clarity during
1280 xWhen
720 @ 24fps
nightHD:
photos.
this feature is on the camera will use a maximum exposure
Press the
UP/DOWN
buttons
highlight
the desired
setting.
Press the are
ENTER
button
to save the
time
of
1/20sec
for
the
night-photos.
Other
adjustments
to increase
the
Motion Freeze - (defaultto ON)
This
feature
maximizes
themade
image
clarity
during
settingbrightness
and return and
to the
Camera
Setup
Menu.
clarity of the photo. When this feature is turned off the camera will
ON
night photos. When this feature is on the camera will use a maximum exposure
use a maximum exposure time of 1/8sec for the night photos.
time of 1/20sec for the night photos. Other adjustments are made to increase the
V I D E and
O l
e n goft the
h photo. When this feature is turned off the camera will
brightness
clarity
s e c exposure time of 1/8sec for the night photos.
use1a0maximum
INFORMATION
ON PICTURE
INFORMATION
ON PICTURE
Information on Picture
The info
strip
below
will
appearwill
at the
bottom
thebottom
photo/video:
The
info
strip
below
appear
atofthe
of the photo/video:
The info strip below will appear at the bottom of the photo/video:
75oF
Temperature
Temp.
01/01/13 12:00 AM
Moon
Moon
Date
Date
Phase
Temp.
Moon
MOULTRIECAM
Time
Time
Date
Camera
Camera
Name
Time
Name
Camera Nam
Moon Phase
The icons
for the
moon phase are as follows:
Moon
Phase
Moon Phase
The icons for the moon phase are as follows:
The icons for the moon phase are as follows:
01
12
New
New
Moon
Moon
Waxing
Waxing
Crescent
Crescet
23
34
First
Waxing
First
Waxing
Quarter
Gibbons
Quarter
Gibbons
45
Full
Full
Moon
Moon
56
67
Waning
Last
Waning
Last
Gibbons
Quarter
Gibbons
Quarter
78
Waning
Waning
Crescent
Crescet
MULTI SHOT
Video Length
OFF
When the Game Spy Camera is configured for VIDEO in the Capture Mode screen the camera will
record video for a designated amount of time each time an animal is detected. To change the amount
- (default
OFF) buttons
- Whentothe
Game the
Spydesired
Camera
is configured
for button
of timeMulti-Shot
recorded press
the UP/DOWN
highlight
setting.
Press the ENTER
to saveTRAIL
the setting
andcapture
return tomode
the Camera
Setup
The
maximum
videostandard
length foror
a nighttime
in the
screen,
the Menu.
camera
can
take 2 shot
3
IR video
is 20standard,
seconds. 2 Shot Fast, 3 Shot Fast, and 4 Shot Fast each time an animal is
Shot
MULTI SHOT
OFF
detected. There is an approximate 3-4 second delay between pictures when the 2
Multi-Shot
- (default
- Whensetting
the Game
Spy Camera
shot standard
or 3 OFF)
Shot standard
is selected.
When theis2configured
Shot Fast, 3 for
Shot
andcapture
4 Shot setting
selected,the
thecamera
camera can
will take
selected
amountorof3 Shot
TRAILFast,
in the
modeisscreen,
takethe
2 shot
standard
Pagephotos
6 2 Shot
within
1-2 3seconds.
To choose
desired
setting
press an
theanimal
ENTERisbutton
standard,
Fast,
Shot
Fast,
and 4the
Shot
Fast
each time
M-880
Digital
Game
Camera
to
enter
the
Multi
Shot
settings.
Press
UP
or
DOWN
to
select
the
desired
number
detected. There is an approximate 3-4 second delay between pictures when
the 2
M-880 Digital Game Camera
Page 11
V
SETUP AND PROGRAMMING (cont)
security code
00000
Security Code
This feature prevents unauthorized use of the camera, should it become lost or stolen, by requiring a
5-digit security code be entered to unlock the camera. The security code is 5 digits, each digit being a
number 0-9. The default code is “00000”. Once the code is changed from the default code the camera
will prompt you to enter the correct code whenever:
The camera is turned on
The camera is woken up from sleep mode
The camera is connected to USB
V
SETUP AND PROGRAMMING (cont)
VIDEO audio
on
Video Audio
This option allows the user to turn the audio during video recording ON or OFF. When selected and the
Game Spy Camera is configured for VIDEO in the Capture Mode screen, the camera will record audio
along with the video each time an animal is detected. Press the LEFT/RIGHT buttons to highlight the
desired setting. Press the ENTER button to save the setting and return to the Camera Setup Menu.
camera name
moultriecam
Camera Name
The Camera Name is imprinted on the photos and provides a point of reference when multiple
cameras are used. To change the Camera Name use the LEFT/RIGHT buttons to highlight the
character to be modified. Press the UP/DOWN button to select the desired character (A to Z, 0 to 9,
or space). Press LEFT/RIGHT to move to the next character. Press the ENTER button to save the new
camera name and return to the Camera Setup Menu.
FCC Statements
Moultrie Products, LLC
MCG-12594
temperature
fahrenheit
Note: Changes and modifications not expressly approved by the party responsible could void the user’s authority to operate this device.
This device complies with Part 15 of the FCC Rules. Operation is subject to the following two conditions: (1) This device may not cause harmful
interference, and (2) this device must accept any interference received, including interference that may cause undesired operation.
NOTE: THE MANUFACTURER IS NOT RESPONSIBLE FOR ANY RADIO OR TV INTERFERENCE CAUSED BY UNAUTHORIZED MODIFICATIONS TO THIS
EQUIPMENT. SUCH MODIFICATIONS COULD VOID THE USER’S AUTHORITY TO OPERATE THE EQUIPMENT.
NOTE: This device complies with the limits for a Class B digital device, pursuant to Part 15 of the FCC Rules. These limits are designed to provide
reasonable protection against harmful interference in a residential installation. This device generates, uses, and can radiate radio frequency energy
and, if not installed and used in accordance with the instructions, may cause harmful interference to radio communications. However, there is no
guarantee that interference will not occur in a particular installation. If this device does cause harmful interference to radio or television reception,
which can be determined by turning the equipment off and on, the user is encouraged to try to correct the interference by one or more of the
following measures:
- Reorient or relocate the receiving antenna.
- lncrease the separation between the equipment and receiver.
- Connect the equipment into an outlet on a circuit different from that to which the receiver is connected.
- Consult the dealer or an experienced radio/TV technician for help.
Page 10
M-880 Digital Game Camera
Temperature
The temperature is imprinted on each photo and can be in degrees Fahrenheit or Celsius. To change
the temperature units press the UP/DOWN buttons to highlight the desired setting. Press the ENTER
button to save the setting and return to the Camera Setup Menu.
info strip
on
Info Strip
When the Info Strip is turned ON the information strip, as described in the Advanced Setup section
of this manual, is imprinted on the photos. The Temperature, Moon phase, Date, Time, Camera Name,
& Moultrie logo are imprinted on the bottom of each picture. When the Info Strip is turned OFF the
photo contains no information strip. To change the Info Strip setting press the LEFT/RIGHT buttons
to highlight the desired setting. Press the ENTER button to save the setting and return to the
Camera Setup Menu.
M-880 Digital Game Camera
Page 7
V
SETUP AND PROGRAMMING (cont)
TIME frequency
30 seconds
Time Frequency
Used to set the time frequency between each photo in plot mode. To change the time lapse
frequency press the UP/DOWN buttons to highlight the desired setting. Press the ENTER button to
save the setting and return to the Camera Setup Menu. Time lapse frequency can be set to 5, 10, 15,
30, 60 seconds or 2 or 5 minutes.
NOTE: Increasing the Time Lapse Frequency will decrease the battery life of the camera.
It is recommended to use lithium batteries for taking time lapse videos.
NOTE: When the Time Lapse Frequency is set to 60 seconds, 2 minutes or 5 minutes, the
cameras motion sensor can still be activated in between photos. When this occurs,
a photo will be taken and added to the time lapse video.
TIME duration
3 hours
Time Duration
Time Duration is used to limit the time periods that the camera will be active. To change the time
lapse duration, press the UP/DOWN buttons to highlight the desired setting. Press the ENTER button
to save the setting and return to the Camera Setup Menu.
Plot duration can be set to All Day, 1, 2, 3, or 4 hours.
All Day – Camera takes photos all day
1 Hour – Camera takes photos for 1 hour twice a day.
2 Hour – Camera takes photos for 2 hours twice a day.
3 Hour – Camera takes photos for 3 hours twice a day.
4 Hour – Camera takes photos for 4 hours twice a day.
NOTE: Increasing the Time Lapse Duration will decrease the battery life of the camera.
battery life
205 days
Battery Life
This feature provides an estimated battery life of the camera. The battery life is expressed as “###
Days”. Pressing the MODE button will return to the Camera Setup menu. NOTE: The number of days
shown is based on using 8 AA alkaline batteries with 5 day and 5 night photos per day. Actual battery
life will vary depending on type of battery, weather conditions and camera usage. It is recommended
to use lithium batteries for best performance.
Page 8
M-880 Digital Game Camera
V
SETUP AND PROGRAMMING (cont)
ATTENTION: Use extreme caution when enabling GEOTAGGING within your camera and uploading photographs
to the internet. This information could give someone the exact location of your camera.
Your use of the geotagging features of this camera is at your own risk. Neither Moultrie nor any person associated with Moultrie
makes any warranty or representation with respect to security of any data linked to photographs uploaded to the Internet. In no event
will Moultrie or its affiliates be liable for damages of any kind arising out of or in connection with your use of the camera,
the geotagging feature or any other features associated with this camera.
gps latitude
000.000000 n
GPS Latitude
This GPS function allows the user to manually enter their location from 000.000000 N or S to
179.999999 N or S for better and more stratigic game tracking. This information will imprint in the
EXIF data of the photo taken. To enter the location use the UP or DOWN navigation keys to populate
the field and use the RIGHT or LEFT navigation keys to select the desired field.
gps longitude
000.000000 w
GPS Longitude
This GPS function allows the user to manually enter their location from 000.000000 E or W to
179.999999 E or W for better and more stratigic game tracking. This information will imprint in the
EXIF data of the photo taken. To enter the location use the UP or DOWN navigation keys to populate
the field and use the RIGHT or LEFT navigation keys to select the desired field.
default settings
no
Default Settings
To restore all the settings back to the factory default press the LEFT/RIGHT buttons to highlight
the YES setting. Press the ENTER button to restore the default settings and return to the Camera
Setup Menu.
delete all
NO
Delete All Photos
To remove all content on the SD card press the LEFT/RIGHT buttons to highlight the YES setting.
Press the ENTER button to erase photos and return to the Camera Setup Menu.
M-880 Digital Game Camera
Page 9