1
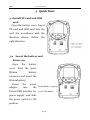
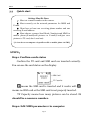
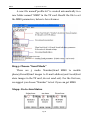
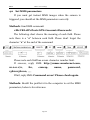
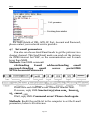
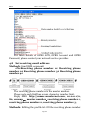
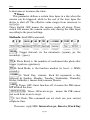
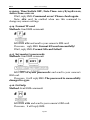
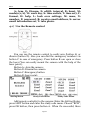
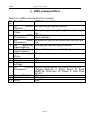
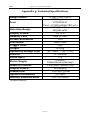
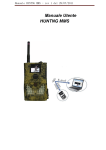
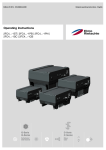
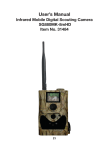
MMS Security Camera User’s Manual BG30 Series For Model:BG30K/BG30L Content 1 Product Feature ............................................................................................. 1 1.1 General Description ............................................................................... 1 1.2 Camera Body Interfaces ....................................................................... 1 1.3 Shooting Information Display ........................................................... 2 1.4 Product Feature ....................................................................................... 3 2 3 Cautions.............................................................................................................. 5 Quick Start......................................................................................................... 6 3.1 Install TF card and SIM card .............................................................. 6 3.2 Insert the battery and Power on........................................................ 6 3.3 Quick start .................................................................................................. 7 4 Basic use and settings ................................................................................. 10 4.1 Mount the camera ................................................................................. 10 4.2 Three camera status ............................................................................. 10 4.3 User authorization................................................................................ 11 4.4 Set master number ............................................................................... 11 4.5 Set normal users .................................................................................... 12 4.6 Set MMS parameters............................................................................ 13 4.7 Set email parameters ........................................................................... 14 4.8 Set receiving email address............................................................... 15 4.9 Get on spot photo................................................................................... 16 4.10 Arm.............................................................................................................. 16 4.11 Disarm........................................................................................................ 16 4.12 Check camera settings ......................................................................... 17 4.13 Set camera parameters ....................................................................... 17 4.14 Format TF card....................................................................................... 20 4.15 Set master’s passwords....................................................................... 20 4.16 Get help...................................................................................................... 20 4.17 Use the Remote control....................................................................... 21 4.18 Load and remove a wireless sensor ............................................... 22 5 SMS command list........................................................................................ 23 AppendixⅠ: Technical Specifications......................................................... 24 AppendixⅡ: Parts List ....................................................................................... 25 BG30 1 Instruction 1 Product Feature 1.1 General Description The BG30 is a mini GSM MMS Alarm system, based on GSM GPRS MMS (Multimedia Massage Service), GSM SMS (Short Message Service) and GSM Voice Technologies. When it activated, will send MMS(Pictures) alerts to your cellphone or Email and send Text Alerts by SMS to your mobile phone immediately. Also, you can let the GSM MMS Alarm System BG30 send pictures to you in fixed time. The BG30 can monitor your home, office, shop, store, warehouse or factory by your mobile phone from everywhere and any time. The GSM MMS Alarm System BG30 can be programmed by PC programmer tool through TF card, USB cables or SMS command. This is a new solution in the worldwide 1.2 Camera Body Interfaces The camera has a LCD display for easily setting up and has the following I/O interfaces: Power/USB connector, TF-card slot, and SIM-card slot. Take a few moments to familiarize with the camera controls and displays. It is helpful to bookmark this section and refer to it when read through the rest of the manual. Page 1 BG30 1 Instruction 1.3 Shooting Information Display When the camera is turned on (the power switch is slid to ON position), the camera setting information will be displayed in the monitor. Page 2 BG30 1 Instruction 1.4Product Feature 1. This product can use TF card (Micro-SD card) to store images. Page 3 BG30 1 Instruction 2. It can send MMS images to the Mobile phone or to an e-mail address. 3. Integrated PIR detector to provide precise and timely alarm. 4. Built-in CMOS camera and infrared LED. Even in dark environment, camera can get clear images. 5. SMS remote control: User can control the camera by SMS command or calling. 6. Listen in the monitoring area: Call the device number to listen in monitoring area. 7. Multimode alarm: Camera can send alarm messages by SMS, MMS, E-mail. 8. Schedule monitor: User can set the camera working as the preset schedule. 9. Built-in Lithium battery: Rechargeable battery ensures operation in case of external power failure. 10. Easy installation: Wireless connection. It can be installed at any place you want. 1.5 BG30K and BG30L BG30K is designed for indoor security use. It’s particular suitable for living room, bedroom and hall . It uses 940nm IR LEDs which is invisible at night. And BG30K’s detection range is 6-9m. BG30L is designed for outdoor security use. It’s particular suitable for eaves, corridor and yard. It’s detection range is up to 22m. Page 4 BG30 series 2 Cautions 2 Cautions Please use this product according to the law. Respect one another’s privacy. Neither monitor another’s home nor private. We hold no responsibility for the illegal use of this product. We don’t guarantee for the document veracity, reliability or any content except regulate in proper laws. Including no guarantee for product suitable market or suitable area promise. We hold no responsibility for any loss of data or income; or any special, incidental, consequential or indirect damages howsoever caused. The contents of this document are provided “as is”. Except as required by applicable law, no warranties of any kind, either expressed or implied, including, but not limited to the accuracy, reliability or contents of this document. We reserve the right to revise this document or withdraw it at any time without prior notice. Page 5 BG30 3 Quick Introductions 3 Quick Start 3.1 Install TF card and SIM card Open the battery cover. Insert TF card and SIM card into the card slot accordance with the direction shown. Follow the right direction 3.2 Insert the battery and Power on Open the battery cover. Find the spare lithium battery connector and insert the lithium battery. Insert adapter the into power the Power/USB interface for power supply, and slide the power switch to ON position. Page 6 BG30 3.3 3 Quick Introductions Quick start Settings Must Be Done 1 Must set a master number to the camera. 2 Must correctly set the network parameters for MMS and E-mail. 3 Must have at least one receiving phone number and one receiving E-mail address. 4 Must choose a proper Send Mode: Number(send MMS to mobile phone),E-mail(send pictures to E-mail),Local(just save pictures to TF card, don’t send out). *[1-4 can be set on computer via profile.txt file or mobile phone via SMS] STEPS: Step1: Confirm cards status Confirm the TF card and SIM card are inserted correctly. You can see the card status on the display. means the SIM card is inserted and it works well. means no SIM card or the SIM card is not properly inserted. TF Capacity means how many pictures can be stored. It should be a nonzero number. Step2: Edit MMS parameters via computer Page 7 BG30 3 Quick Introductions A new file named”profile.txt” is created automatically in a new folder named “MMS” in the TF card. Reedit the file to set the MMS parameters, below is for reference: Step3: Choose “Send Mode” There are 3 mode: Number(Send MMS to mobile phone),E-mail(Send images to E-mail address),and Local(Just store images in the TF card, do not send out). For the first use, we suggest you choose “Number” to test if you can get MMS. Step4: Go to Arm Status Page 8 BG30 3 Quick Introductions Arm status is the work status. If you are in Setting Status, there are two methods to go to Arm Status: 1 Do not press any key and wait for 1 minute, the camera will automatically switch to Arm Status; 2 Use the remote control, press “A”, then it will go to Arm Status immediately. After going to Arm Status, if the camera is triggered it will automatically work. There are 3 ways the camera will react when it’s triggered: Only insert TF card: After take photos and it just stores the images in the TF card but doesn’t send out. Only insert SIM card: After take photos and it just sends out via MMS or email but doesn’t store in the TF card. Both insert TF and SIM card: take photos, store in the TF card and send out to your phone or your email. Step5: Check setting parameters If you can’t get MMS or the camera is not working correctly, you can Press “OK” button in Setting status. Then it will show you your MMS settings, Email settings or Camera settings according to your Send Mode. Step6: Get on spot images via SMS When the camera is armed and the Send Mode is Number, you can send a text message “#T#” to your camera’s SIM card number to get an on spot image. Page 9 BG30 4 Basic use and settings 4 Basic use and settings 4.1 Mount the camera Camera can be mounted on a wall or put down on any suitable horizontal surface. 1)According to base board installing hole space, make holes on the wall with a power drill. 2)Fix base board with the host by connecting screw hole. 3)Press “ ”button to open the laser pointer for helping positioning. 4.2 Three camera status From the basic operations of the camera in previous chapter, we know that the camera has three basic operation status: Setting Status: You can change or check camera settings in this status. You can also But via SMS, you can change or check settings in any status. Arm Status: It’s the work status. When there is a motion trigger, the camera will take photo and send the picture to your phone or mailbox. (There are 3 ways the camera will react when it’s triggered: Only insert TF card: After take photos and it just stores the images in the TF card but doesn’t send out. Page10 BG30 4 Basic use and settings Only insert SIM card: After take photos and it just sends out via MMS or email but doesn’t store in the TF card. Both insert TF and SIM card: take photos, store in the TF card and send out to your phone or your email.) Disarm Status: The camera will not be triggered in disarm status. 4.3 User authorization There are two users: Master and normal users. Each user has a different authorization level: Functions User Level Set master number Only Master’s password Set master ‘s password Master Set camera parameters Master Set normal user Master Receive emergency calling Master, normal user Send SMS for on spot picture Master, normal user Call the camera to listen in live voice Master, normal user Receive MMS when triggered Master, normal user Check camera status Master, normal user Get help information Master, normal user 4.4 Set master number You should set a master number when you first use this camera. Page11 BG30 4 Basic use and settings Method1: Send SMS command: Send #BG30#5555#your phone number# to your camera’s SIM card. Here 5555 is the original master’s password. Please note all the SMS commands should begin and end with “#”. For example, if you phone number is 13800138000,you can edit #BG30#5555#13800138000# to set your phone number as the master number. If success, reply SMS: Supper user is:13800138000. If fail, reply SMS: Please check the password. Method2: Editing the profile.txt: Edit MasterNum=13800138000; 4.5 Set normal users You can set at most 3 normal users. And the normal users should be set by the Master. Method1: Send SMS command: #N#13800138001#13800138002#13800138003# Reply SMS: http://mmsc.monternet.com, 10.0.0.172, 80, cmwap,,, master number, PhoneNum2, PhoneNum3, PhoneNum4 Method2: Editing the profile.txt: PhoneNum2=xxx,PhoneNum3=xxx,PhoneNum4=xxx . Page12 BG30 4 Basic use and settings 4.6 Set MMS parameters If you want get instant MMS images when the camera is triggered, you should set the MMS parameters correctly. Method1: Send SMS command: #M#URL#IP#Port#APN#Account#Password# The following chart shows the meaning of each field. Please note there is a “#” between each field. Please don’t forget the character “#” at the end of the command. Please note each field has a max. character number limit. If success, reply SMS: http://mmsc.monternet.com, 10.0.0.172, 80, cmwap, name, password, 13800138000, , , , If fail, reply SMS: Command error! Please check again. Method2: Reedit the profile.txt in the computer to set the MMS parameters, below is for reference: Page13 BG30 4 Basic use and settings For more details of URL, APN, IP, Port, Account and Password, please contact your network service provider. 4.7 Set email parameters You also can choose Send Email mode to get the pictures via a cheaper channel. This Send Email mode can send out the pictures via GPRS internet but WAP, so the communication cost is much lower than MMS. Method1: Send SMS command: #S#Sending E-mail address#Sending email password#Sending email server port#GPRS APNt#Account#Password# Please note each field has a max. character number limit. If success, reply SMS: [email protected],bmc123, 25,cmnet,,,, , If fail, reply SMS: Command error! Please check again. Method2: Reedit the profile.txt in the computer to set the E-mail parameters, below is for reference: Page14 BG30 4 Basic use and settings For more details of GPRS APN, GPRS Account and GPRS Password, please contact your network service provider. 4.8 Set receiving email address Method1: Send SMS command: #N#Receiving phone number 1# Receiving phone number 2# Receiving phone number 3# Receiving phone number 4# The receiving phone number1 is the master number. Please note each field has a max. character number limit. Reply SMS: http://mmsc.monternet.com, 10.0.0.172, 80, cmwap,,,master number,receiving phone number 1, receiving phone number 2, receiving phone number 3, Method2: Editing the profile.txt: fill the receiving phone number Page15 BG30 4 Basic use and settings field. 4.9 Get on spot photo Method: Send SMS command: Edit SMS #T# send to your camera’s SIM card. If fail, reply SMS: Photo error:xx , Settings error:xx , MMS error:xx or Time out! If success, the camera will take an on-spot picture and send to your mobile phone. 4.10 Arm Method1: Send SMS command: Edit SMS #A# and send to your camera’s SIM card. If success, reply SMS: Enable detection zone! If fail, reply SMS: Command error! Please check again. Method2: Use the remote control Use the remote control, press the button “A” to arm the camera; 4.11 Disarm Method1: Send SMS command: Edit SMS #D# and send to your camera’s SIM card. If success, reply SMS: Disable detection zone! Page16 BG30 4 Basic use and settings If fail, reply SMS: Command error! Please check again. Method2: Use the remote control Use the remote control, press the button “C” to disarm the camera; 4.12 Check camera settings Method1: Send SMS command: Edit SMS #L# and send to your camera’s SIM card. If success, reply SMS: Email address, password, port, protocol, email1,email2, email3,email4, mms serve net address,server ip,port, protocol,Number1,Number2, Number3 , Number4 , Alarm:on/off, Interval 0m:0s,photo Burst 1, Send Mode: Local/Number/Email, Work Day 1111111, Timer: off/on 09h00m:17h00m, Date Time:2011/7/12 18:12:12,Active Zone:0111111 Method2: Via operation button: When you are in setting status, press OK 4.13 Set camera parameters Method1: Via Setting menu To view the camera settings menu, press MENU in the TEST mode. The settings menu will be shown on the LCD. Setting Description Default Options Items Set Set camera date and time. Enter Clock Format the SD-card. All images Format Enter and videos in the SD-card will be deleted. Choose how long the camera will 0–59 PIR 1 stop functioning after each seconds, Interval Minute 1-60 triggering. The camera’s PIR will Page17 BG30 4 Basic use and settings minutes be disabled during this interval. Photo Choose the continuous shooting 1 Photo 2 -9Photo Burst numbers after each triggering. Number: Send MMS to preset phone number; Email: Send Send Number Email\Local picture to preset email address; Mode Local: Just take pictures, don’t send out. Sunday\Mo Choose which day the camera works. nday\ Tuesday\W Work All ednesday\ Day Thursday\F riday\Satur day The camera will be awoken up at Timer certain time duration in a day. In Off On Switch the rest of the time the camera is shut off. This password is used to lock or Passwo Off ON, set unlock the camera’s control rd panel. Default Restore customer settings to Set default values. Explanation of items: ▼Photo Burst It means Continuous Capturing Number. This parameter affects the number of pictures taken for each triggering in Camera mode. It has nine values: “1 Photo” to “9 Photos”. ▼PIR Interval This parameter means that how long the PIR (Passive Infrared motion sensor) will be disabled after each triggering in ON mode. During this time the PIR of the device will not react to the motion of human (or animals). The minimum interval is 0 second, it means the PIR works all the time. The maximum interval is 1 hour, it means the PIR will be disabled for 1 hour after each triggering. The default value is 1 minute. Press “◄” and “►” Page18 BG30 4 Basic use and settings to decreases or increases the value. ▼Timer This parameter defines a certain time lapse in a day when the camera can be triggered, while in the rest of the time lapse the device is shut off. The effective value ranges from 00:00:00 to 23:59:59. Timer Switch OFF means the camera works all along; Timer switch ON means the camera works only during the time lapse according to the preset settings. Method2: Send SMS command: I: Trigger Interval; 10: the minutes(0~59min); 30: the seconds(0~59sec); B: Photo Burst; 2: the numbers of continuous take photo after trigger (1 picture~9pictures); M: Send Mode; 2: the function number (0: local ; 1: MMS; 2:email;); D: Work Day; 1110001: Each bit represents a day, followed by Sunday, Monday, Tuesday, Wednesday, Thursday, Friday, Saturday; 1 means Arm;0 means Disarm. S: Timer; OFF: timer function off, it means the PIR sensor will work all the time. S: Timer; ON10:20-16:30: means the PIR sensor just work from 10:20 to 16:30. T: Set Clock; This command can set clock use your current cellphone time. If success,reply SMS: Interval 10:30, Burst 2, Work Day Page19 BG30 4 Basic use and settings 1110001, Time Switch OFF, Date Time: 2011/8/2418:12:12, Active Zone: 0111111 If fail, reply SMS: Command error! Please check again. Note: #E# can’t be omitted when use this command to change any camera settings. 4.14 Format TF card Method1: Send SMS command: Edit SMS #F# and send to your camera’s SIM card. If success,reply SMS: Format SD card successfully! If fail, reply SMS: Format SD card failed! 4.15 Set master’s passwords Method1: Send SMS command: Edit SMS #P#your password# and send to your camera’s SIM card. If success,it will reply SMS: The password is successfully changed to 4321. 4.16 Get help Method: Send SMS command: Edit SMS #H# and send to your camera’s SIM card. If success,it will reply SMS: Page20 BG30 4 Basic use and settings A: Arm, D: Disarm, E: edit(I: interval, B: burst, M: mode(0/1/2), W: work day, S: time switch, T: time set), F: format, H: help, L: look over settings, M: mms, N: number, P: password, R: receive email address, S: server email information set, T: take photo. 4.17 Use the Remote control You can use the remote control to easily arm (button A) or disarm (button D). Also you can dial the emergency numbers via button C in case of emergency. Press button B can open or close the laser (You can easily mount the camera with the help of the laser point.). Button A : Arm the camera; Button D :Disarm the camera Button C :Emergency button Button B :Laser point; Setting Status Study Code Menu Study Code Menu Add remote control(s) to the camera: Enter the Setting Status, press LEFT button and enter the study code menu. Choose ”RCH”, press OK button, then press button A . When it's successful, there Page21 BG30 4 Basic use and settings will be a "*”before RCH; 4.18 Load and remove a wireless sensor Any 433MHz wireless sensor, such as infrared body sensor, wireless door magnet, wireless smoke detector etc. can be set as an alarm sensor of the camera. Method to load or remove a wireless sensor: 1. Power on the wireless sensor; 2. Enter the Setting Status, press LEFT button and enter the study code menu. Choose Zone1 or Zone2,press OK button, then trigger the wireless sensor to check if the sensor is loaded successfully . When it's successful, there will be a "*”before zone1 or zone2 Setting Status Study Code Menu Study Code Menu 3. When you want to remove the wireless sensor. Please enter the study code menu, press LEFT button to cancel the “*”. If there is not a “*” before the zone, it means the sensor has been removed from the camera. Page22 BG30 4 Basic use and settings 5 SMS command list Below is a SMS command list for example. N o. 1 Function Set Master Number 2 Set Normal Users 2 Set MMS Parameters 3 Set Email Parameters 4 Set Receiving Email address 5 Set Receiving Email Address 6 Get on spot Photo 7 Arm 8 Disarm 9 Check camera settings 10 Set Camera Parameters 11 12 13 Format TF Card Set Password Help SMS Command #BG30#1234#13800138000# #N#13800138001#13800138002#138001380 03# #M#http://mmsc.monternet.com#10.0.0.172 #80#cmwap# #S#[email protected]#bmc123#25#cmn et# #N#12345678901#12345678902# #R#[email protected] # [email protected]# #T# #A# #D# #L# #E#I10:30#B2#M2#W1110001#TOFF#D# (Trigger Interval: I; Photo Burst: B; Send Mode: M; Work day: W; Timer: T; Date Time Set: D;) #F# #P#4321# #H# Page23 BG30 AppendixⅠ: Technical Specifications AppendixⅠ: Technical Specifications Image Sensor Lens Detection Range Display Screen Memory Card Picture Resolution PIR Sensor Trigger Time Weight * Operation/Storage Tem. Interval Photo Burst Power Supply Stand-by Current Display Screen Dimensions Operation Humidity Security authentication *without battery 0.3MP Color CMOS F/NO=3.1mm FOV(Field of View)=55°(BG30K)80°(BG30L) BG30L:22M; BG30K:12M; 1.4” LCD 2GB TF card VGA Multi Zone 0.3s 0.15 kg -20 - +60°C / -30 - +70°C 1s – 60 min. 1–9 5V2A DC; Lithium battery(backup) < 0.25 mA (<6mAh/Day) LCD display 105x 65x 35 mm 5% - 90% FCC, CE, RoHS Page 24 BG30 Appendix Ⅱ: Parts List AppendixⅡ: Parts List Part Name Security camera Remote control Power adaptor Lithium battery USB cable Universal mounting kit Adhesive tape User Manual Warranty Card 2G TF Card 433M Wireless sensor Page 25 Quantity One Two One One One One One One One One (Option)