1
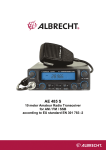
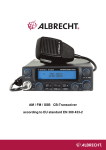
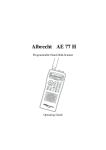
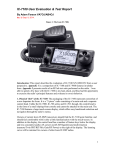
AE69-2H
Scanning Receiver
1
AE69-2H
Controls and Display
Antenna
(See “Connecting the
Antenna” on Page 12)
Headphone Jack
Squelch
Volume
Display
Keypad
DC socket
6V
Power
2
Contents
AE69-2H Controls and Display .......................... 2
Introduction ............................................................. 4
Precautions ............................................................. 4
Earphone Warning ................................................. 4
Safety Warning ....................................................... 4
Legal notes: ............................................................ 4
Feature Highlights .................................................. 6
About this Manual .................................................. 7
Understanding Scanning ....................................... 7
What is Scanning? ................................................. 7
What is Searching? ................................................ 7
Conventional Scanning .......................................... 7
Simplex Operation.................................................. 8
Repeater Operation ............................................... 8
Where to obtain more Information ........................ 8
Included with Your Scanner................................... 9
Setting Up Your Scanner ....................................... 9
Using different kind of Internal Batteries .............. 9
Using Non-Rechargeable Batteries ...................... 9
Using Rechargeable Batteries ............................ 10
Using AC Power ....................................................11
Attaching the Belt Clip ......................................... 12
Connecting the Antenna ...................................... 12
Connecting an optional or outdoor Antenna ...... 12
Connecting an Earphone/ ext. Speaker ............. 13
Connecting an Extension Speaker ..................... 13
About Your Scanner ............................................. 13
A Look at the Keypad ........................................... 14
A Look at the Display ........................................... 16
Operation .............................................................. 17
Turning the scanner on and setting squelch...... 17
Storing known Frequencies into Channels ........ 17
Scanning the Stored Channels ........................... 17
Manually Selecting a Channel ............................ 18
Searching for active Frequencies ....................... 18
Frequency Chain Search ..................................... 18
Chain Search Mode ............................................. 19
Chain Search Hold Mode .................................... 19
Storing Frequencies Found During Chain Search
into Channel Memory........................................... 19
Setting the Search Range ................................... 20
Search Skip Memory............................................ 20
Delay ..................................................................... 21
Locking Out Channels ......................................... 21
Priority ................................................................... 22
Using Keylock ....................................................... 22
Using the Display Backlight................................. 23
Troubleshooting .................................................... 23
Resetting the Scanner ......................................... 24
Care and Maintenance ........................................ 24
Birdies ................................................................... 25
Specifications ........................................................ 25
European 2 years warranty ................................. 26
3
Where to find service hints and documentation 27
Optional Accessories ........................................... 27
CE-Declaration of Conformity ................................ 28
Introduction
Thank you for purchasing an Albrecht AE69-2H handheld
Scanner. The scanner is versatile, compact, and easy to use.
You can program up to 80 frequencies into the scanner's
memory. The scanner lets you scan transmissions and is
preprogrammed with search ranges for your convenience. You
can quickly search those frequencies most commonly used by
Amateurs, commercial radio stations, CB, PMR 446 without
tedious and complicated programming.
Precautions
Before you use this scanner, please read and observe the
following.
Earphone Warning
Use only a recommended Albrecht earphone. An incorrect
earphone may be hazardous to your hearing.
Turn down volume before connecting the earphone and then
adjust volume to suit.
Safety Warning
Albrecht does not declare this unit to be waterproof. To reduce
the risk of fire or electrical shock, do not expose this unit to rain
or moisture.
Trademarks used throughout this manual are the property of
their respective holders.
Legal notes:
Depending on national regulations, it can be restricted to listen
to certain public or private radio services. All users are
requested to gather the necessary information about radio
services and their protections and privacy. In some countries
unauthorized monitoring of transmissions may be even regarded
and prosecuted as a crime.
4
This table lists the frequency ranges, default frequency step
and type of transmissions you can hear for each range. The
scanner has 3 Band Plans, which are useful for major regions in
Europe. Band Plan 2 is optimized for Germany.
Frequency ranges Band Plan 1
Frequency Range MHz Steps
Radio Service
25.0000 - 29.9950 5 kHz
CB, 10 m
30.0000 - 79.9875 12.5 kHz VHF Low Band
80.0000 - 82.9900 10 kHz
VHF Low Band
83.0000 - 87.2625 12.5 kHz VHF Low Band
138.0000 - 157.9875 12.5 kHz 2 m Band
158.0000 - 160.5900 10 kHz
VHF High Band
160.6000 - 162.5875 12.5 kHz VHF High Band
162.6000 - 173.9900 10 kHz
VHF High Band
406.0000 - 439.99375 6.25 kHz 70 cm Band
440.0000 - 465.9950 5 kHz
UHF PMR Band
466.0000 - 469.9900 10 kHz
UHF PMR Band
470.0000 - 512.0000 6.25 kHz UHF “T” Band
Frequency ranges Band Plan 2
Frequency Range MHz Steps
Radio Service
25.0000 - 84.0100 5 kHz
CB, 10 m, 6m Bands
84.0150 - 87.2550 20 kHz
4 m Band BOS
137.0000 - 143.9950 5 kHz
Military VHF radio
144.0000 - 145.9875 12.5 kHz 2m Amateur Band
146.0000 - 155.9900 10 kHz
VHF PMR Band
156.0000 - 162.0250 12.5 kHz VHF Marine Band
162.0300 - 173.9900 10 kHz
VHF PMR Band
406.0000 - 439.99375 6.25 kHz 70 cm Band
440.0000 - 449.99375 6.25 kHz PMR incl. PMR 446
450.0000 - 469.9900 10 kHz
UHF Band PMR
470.0000 - 512.0000 6.25 kHz UHF High Band
Frequency ranges Band Plan 3
Frequency Range MHz
Steps
Radio Service
25.0000 - 29.9950
5 kHz
CB, 10 m
30.0000 - 79.99375
6.25 kHz VHF Low Band
80.0000 - 82.99375
6.25 kHz VHF Low Band
83.0000 - 87.26250
6.25 kHz VHF Low Band
138.0000 - 157.99375 6.25 kHz 2 m Band
158.0000 - 160.59375 6.25 kHz VHF High Band
160.6000 - 162.59375 6.25 kHz VHF High Band
162.6000 - 173.99375 6.25 kHz VHF High Band
406.0000 - 439.99375 6.25 kHz 70 cm Band
440.0000 - 465.99375 6.25 kHz UHF PMR Band
466.0000 - 469.99375 6.25 kHz UHF PMR Band
470.0000 - 512.0000
6.25 kHz UHF “T” Band
To switch the band plan between 1,2 and 3:
5
•
•
Make sure the power is turned off.
While holding down 1, 2 or 3 key, turn on the scanner.
Note: Please carry out a memory initialization (Reset, see page
23 after band plan was changed.
Feature Highlights
Chain Search - lets you enter personal search bands in 5
locations and search all locations in a chain of frequency bands.
Triple-Conversion Circuitry - virtually eliminates any
interference from IF (intermediate frequency) images, so you
hear only the selected frequency.
Two-Second Scan Delay - delays scanning for about 2
seconds before moving to another channel, so you can hear
more replies that are made on the same channel.
Lock-Out Function - lets you set your scanner to skip over
specified channels or frequencies when scanning or searching.
Priority Channel - lets you program one channel and then have
the scanner check that channel every 2 seconds while it scans,
so you do not miss transmissions on this channel.
Key Lock - lets you lock the scanner's keys to help prevent
accidental changes to the scanner's programming.
Direct Access - lets you directly access any channel.
Display Backlight - makes the scanner easy to read in low-light
situations.
Flexible Antenna with BNC Connector – provides adequate
reception in strong signal areas and is designed to help prevent
antenna breakage. Or, you can connect an external antenna for
better reception.
Memory Backup - keeps the frequencies stored in memory for
an extended time if the scanner loses power.
Key Confirmation Tones - the scanner sounds a tone when
you perform an operation correctly, and an error tone if you
make an error.
Battery Low Alert - warns you when battery power gets low.
Charge and ext. DC -connector for external 230 V power supply
(and charger if NiMH batteries are in use).
6
About this Manual
The screen displays used in this manual are representations of
what might appear when you use your scanner. Since what you
see depends on the frequencies for your area and the settings
you select, you might notice some differences between what is
in this manual and what appears on your scanner.
To get the most from this manual, review the contents to become
familiar with the basic functions available. If you are new to
scanning, be sure to read the next chapter for a quick
background on the technology behind the hobby. The first thing
you’ll need to do is install batteries in the scanner. Then you
need to connect the included antenna to the scanner. See
“Using different kind of Batteries” and “Using rechargeable
Batteries” on page 9 /10 and “Connecting the Antenna” on page
11 if you need any help doing this.
Understanding Scanning
This section provides you with background on how scanning
works. You don’t really need to know all of this to use your
scanner, but some background knowledge will help you get the
most from your AE69-2H.
What is Scanning?
Unlike standard AM or FM radio stations, most two way
communications do not transmit continuously. Your AE69-2H
scans programmed channels until it finds an active frequency,
then stops on that frequency and remains on that channel as
long as the transmission continues. When the transmission ends,
the scanning cycle resumes until the scanner receives another
transmission.
What is Searching?
The AE69-2H can search for active frequencies. This is different
from scanning because you are searching for frequencies that
have not been programmed into the scanner. When you select
frequency bands to search, the scanner searches for any active
frequency within the lower and upper limits you specify. When
the scanner finds an active frequency, it stops on that frequency
as long as the transmission lasts. If you think the frequency is
interesting, you can program it into one of the memories. If not,
you can continue to search.
Conventional Scanning
Conventional scanning is a relatively simple concept. Each
group of users in a conventional system is assigned a single
frequency (for simplex systems) or two frequencies (for repeater
systems). Any time one of them transmits, their transmission
always goes out on the same frequency. Up until the late 1980’s
this was the primary way that radio systems operated.
Even today, there are many 2-way radio users who operate
using a conventional system:
•
•
•
Aircraft (not to be received with this scanner model)
Amateur radio
PMR users
7
•
•
Broadcast AM/FM/TV stations (not to be received with
this scanner model)
Many other business radio users
When you want to store a conventional system, all you need to
know is the frequencies they operate on. When you are
scanning a conventional system, the scanner stops very briefly
on each channel to see if there is activity. If there isn’t, the
scanner quickly moves to the next channel. If there is, then the
scanner pauses on the transmission until it is over.
Simplex Operation
Simplex systems use a single frequency for both transmit and
receive. Most radios using this type of operation are limited to
line-of-sight operation. This type of radio is frequently used at
construction job sites, and with inexpensive consumer radios
such as PMR radios. The range is typically 1.5-12 km,
depending upon the terrain and many other factors.
Repeater Operation
Repeater systems use two frequencies: one transmits from the
radio to a central repeater; the other transmits from the repeater
to other radios in the system. With a repeater-based system, the
repeater is located on top of a tall building or on a radio tower
that provides great visibility to the area of operation. When a
user transmits (on an input frequency), the signal is picked up by
the repeater and retransmitted (on an output frequency). The
user’s radios always listen for activity on the output frequency
and transmit on the input frequency. Since the repeater is
located very high, there is a very large line of sight. Typical
repeater systems provide coverage out to about a 40 km radius
from the repeater location.
Where to obtain more Information
By itself, this manual really only provides part of what you need
to know to have fun scanning-how to program and use the
scanner.
Information on the Internet
The Internet is a great source for current frequencies and
information about scanning.
Many web sites have lists of frequencies for your area. You can
use a search engine to find and use them.
Make a list of the agencies you want to listen to, then look up the
frequencies and systems used by those agencies.
8
Included with Your Scanner
・
・
・
Owner’s Manual
Scanner and Antenna
Belt Clip (with 2 screws)
Note: If any of these items are missing or damaged, contact
your place of purchase.
Batteries are not included.
Setting Up Your Scanner
These guidelines will help you install and use your new scanner:
•
•
•
•
•
If your scanner receives interference or electrical noise,
move the scanner or its antenna away from the
source.
To improve the scanner’s reception, use an optional
external antenna designed for multiband coverage.
(You can purchase this type of antenna at a local
electronics store). If the optional antenna has no cable,
use 50 Ohm coaxial cable for lead-in. A mating plug
might be necessary for the optional antennas.
Use an optional mono earphone or mono headset with
proper impedance for private listening. Read the
precautions on the inside front cover of this Owners
Manual.
Do not use the scanner in high-moisture environments
such as the kitchen or bathroom.
Avoid placing the scanner in direct sunlight or near
heating elements or vents.
Using different kind of Internal Batteries
You can power your scanner using 2 pcs of Alkaline (standard,
non rechargeable), or NiMH (rechargeable) batteries. The size is
“Mignon” or “AA”, such batteries are available from almost any
shop.
Using Non-Rechargeable Batteries
1. Make sure the power is turned off.
2. Slide the battery compartment cover.
3. Install two fresh batteries in the compartment as indicated by
the polarity symbols (+ and -) marked inside.
9
Cautions:
•
•
•
•
Use only fresh batteries of the required size and
recommended type.
Always remove old or weak batteries. Batteries can
leak chemicals that destroy electronic circuits.
When
flashes and a beep can be heard every
15 seconds, the battery is empty and you should
replace both batteries.
Do not mix old and new batteries, different types of
batteries (standard, alkaline, or rechargeable), or
rechargeable batteries of different capacities.
4. Replace the cover.
Using Rechargeable Batteries
Before you use NiMH batteries the first time, you must charge
them. The scanner has a built-in circuit that lets you recharge
NiMH batteries while they are inserted in the scanner. Before
you can charge such batteries, you must remove the sticker in
the battery compartment and move the switch to Ni-MH BATT.
position. (The default setting of the switch is for regular alkaline
batteries REG.ALK.BATT). Then install the batteries in the
scanner and connect an optional external AC adapter to the
scanner’s 6 V socket.
Charge new NiMH batteries, if You use them for the first time,
10
about 14 hrs to bring them to a full charge.
WARNING!
Do not connect any AC adapter to the scanner if
non-rechargeable standard batteries are installed and the switch
is still in NI-MH BATT position or if you are not sure in which
position the switch is. Please make sure that for
non-rechargeable batteries the only allowed switch position is
REG.ALK.BATT. Non rechargeable batteries will get hot and
can even burst if you should try to charge them.
Notes:
•
•
•
•
NiMH batteries last longer and deliver more power if
you occasionally let them fully discharge. To do this,
simply use the scanner until it beeps every 15 seconds
and
flashes.
Do not charge NiMH batteries at temperatures above
45 °C or below 4 °C.
If you connect an external power source to the scanner
please check the switch position of the battery switch.
If the switch is set to REG.ALK.BATT., the scanner
does not charge the batteries. Rechargeable batteries
are only recharged in the NI-MH BATT.. position of the
switch.
For longer operation, You can also use high capacity
NiMH batteries with 2000 mAh or more. Such batteries
may need longer charging time. It is very convenient to
buy such batteries with a charger as a set, most of
them are sold with 4 batteries. So You have always 2
batteries in reserve, and if You need, You can also
charge your batteries faster in the external charger.
Using AC Power
You can power the scanner using an optional 6 V DC, 500 mA
wall adapter AD-671 or equivalent (center pin positive).
Adapters, which do not meet these specifications can damage
your scanner, the adapter or even the batteries.
Plug the AC adapter into the DC 6 V socket and the AC side into
a 230 V wall outlet. If rechargeable batteries are inserted and
the battery switch is in NI-MH BATT. Position, the adapter
powers the scanner and can recharge the batteries at the same
time.
11
Attaching the Belt Clip
To make your scanner easier to carry when you are on the go,
use the supplied belt clip. Use a Phillips screwdriver and the
supplied screws to attach the clip to the scanner.
Connecting the Antenna
To attach the supplied flexible antenna to the connector on the
top of your scanner, align the slots around the antenna's
connector with the tabs on the scanner's BNC connector. Then
slide the antenna's connector down over the scanner's
connector and rotate the antenna connector's outer ring
clockwise until it locks into place.
Connecting an optional or outdoor Antenna
The scanner's BNC connector makes it easy to connect a
variety of optional antennas, including an external mobile
antenna or outdoor base station antenna.
Note: Always use 50-ohm, RG-58, or RG-8, coaxial cable to
connect an outdoor antenna. If the antenna is over 15 m from
12
the scanner, use RG-213/U or “air cell” type low loss coaxial
cable. You can get a BNC adapter at your local electronics
store.
Connecting an Earphone/ ext. Speaker
For private listening, you can plug a 3.5 mm mini plug earphone
or mono or stereo headphones (not supplied) into the
headphone jack on top of your scanner. This automatically
disconnects the internal speaker.
Connecting an Extension Speaker
In a noisy area, an optional extension speaker, positioned in the
right place, might provide more comfortable listening. Plug the
speaker cable's 3.5- mm mini-plug into your scanner's jack. For
larger audio power, active speakers (like used for PC’s) are
recommended.
WARNING!
If you connect an external speaker to the scanner's headphone
jack, never connect one of the audio output wires to a power
supply and /or ground. This might damage the scanner.
About Your Scanner
We use a few simple terms in this manual to explain the features
of the scanner. Familiarize yourself with these terms and the
scanner's features, and you can put the scanner to work for you
right away. Simply determine the type of communications you
want to receive, then set the scanner to scan those
communications.
A frequency, expressed in kHz or MHz, is the tuning location of a
station. To find active frequencies, you use the search function
or refer to a frequency reference.
Besides searching within factory pre-programmed frequency
ranges, you can also program Your own frequency ranges and
search there. The factory pre-programmed ranges are preset to
groups of commonly used frequencies depending on the type of
services.
When you search and find a desired frequency, you can store it
into a programmable memory location called a channel.
13
A Look at the Keypad
Your scanner's keys have various functions labeled on the key
tops and below the keys.
To select the function labeled on a key, simply press the key. To
select the function labeled below a key:
•
First press Func then release it. F appears on the
display.
Then press the next key in the function key sequence
while F appears.
F appears or disappears as you press Func.
•
•
If your scanner's keys seem confusing at first, the following
information should help you understand each key's function.
Key Name
Description
Hold
Hold – Holds the scan or the frequency
search. Press and hold Hold to increment
channels continuously.
Scan/Src
Scan – Scans the stored channels.
Func + Src – Starts chain search or
resumes searching.
/
turns the display backlight on or
off.
Func +
/
the keypad.
Func
locks and unlocks
Lets you use various functions by
pressing this key in combination with
other keys.
Press and hold for more than 2 seconds
to turn the scanner on or off.
1/Pri
1 – Enters “1”.
Func + Pri – Sets and turns the priority
function on or off.
14
2/
2 – Enters “2”.
Func +
– Selects the search
direction.
3
3 – Enters “3”.
4
4 – Enters “4”.
5/Dly
5 – Enters “5”.
Func + Dly – Sets and turns the delay
function on or off.
6/PSrc
6 – Enters “6”.
Func + PSrc – Sets and turns program
band select mode on or off.
7
7 – Enters “7”.
8/
8 – Enters “8”.
Func +
– Selects the search
direction.
9
9 - Enters “9”.
●/Clr
●– Enters a decimal point “.”
Clr – Clears a frequency you entered by
mistake.
0/L/O
0 – Enters “0”.
Func + L/O – Lets you lock out a selected
channel or skip a specified frequency.
E/Pgm
E – Enters frequencies into channels.
Func + Pgm – Lets you program the
frequency.
15
A Look at the Display
The display has indicators that show the scanner's current
operating status. The display information helps you
understand how your scanner operates.
BANK
(1-5).
(search band number) appears with numbers
appears when you lock the keypad.
F
appears only when the function mode is on.
PGM
appears while you store a frequency into a
channel.
SRCH
appears during search mode.
or
appears during search mode.
alerts you when the battery power gets
low.
P
appears when you select a priority
channel.
SCN
appears when you scan channels.
HOLD
appears during scan hold mode and search
hold mode.
L/O
appears when you manually select a channel
you locked out or a skip frequency.
DLY
appears when you select a delay.
PRI
appears when the priority feature is turned
on.
16
Operation
Turning the scanner on and setting squelch
Note: Make sure the scanner's antenna is connected before
you turn it on.
•
•
•
•
Turn Squelch fully counterclockwise.
Press and hold
for about 2 seconds to turn the
scanner on.
Then turn Volume clockwise until you hear a hissing
sound.
If the scanner is scanning, press Hold to stop
scanning, then turn Squelch clockwise until the
hissing stops.
Storing known Frequencies into Channels
•
•
•
(1) Press Hold. Then enter the channel number
where you want to store a frequency, then press
Func and Pgm. The channel number appears.
(2) Use the number keys and ●/Clr to enter the
frequency (including the decimal point) you want to
store.
(3) Press E to store the frequency into the channel.
Notes:
•
If you entered an invalid frequency, Error appears and
the scanner beeps three times. Enter a valid
frequency.
•
The scanner automatically rounds the entered number
to the nearest valid frequency. For example, if you
enter 28.473 (MHz), your scanner accepts it as 28.475.
•
When you enter a frequency into a channel, the
scanner automatically turns on the delay function and
DLY appears. When delay is turned on, the scanner
automatically pauses scanning 2 seconds after the end
of a transmission before scanning proceeds to the next
channel.
•
To turn the function off or on, press Func + Dly.
•
If you enter a frequency that has already been entered
elsewhere, the scanner sounds an error tone and
displays the channel that was duplicated. If you
entered the frequency by mistake, press Clr then enter
the correct frequency. To enter the frequency anyway,
press E to accept.
•
To program the next channel in sequence, press
E/ Pgm and repeat Steps (2) and (3) above.
Scanning the Stored Channels
To begin scanning channels, press Scan. The scanner scans
through all non-locked channels. When the scanner finds a
transmission, it stops on it. When the transmission ends, the
scanner resumes scanning.
17
Notes:
• If you have not stored frequencies into any channels, the
scanner does not scan.
• If the scanner picks up unwanted partial, or very weak
transmissions, turn Squelch clockwise to decrease the
scanner's sensitivity to these signals. To listen to a weak
or distant station, turn Squelch counterclockwise.
• To ensure proper scanning, adjust Squelch until the
audio mutes.
Manually Selecting a Channel
You can continuously monitor a single channel without
scanning. This is useful if you hear an emergency broadcast
on a channel and do not want to miss any details - even
though there might be periods of silence - or if you want to
monitor a specific channel.
• To manually select a channel, press Hold, enter the
channel number then press Hold again.
Or, during scanning, if the radio stops at a channel you want
to listen to, press Hold once. (Repeatedly pressing Hold at
this time causes the scanner to step through the channels.)
Press Scan to resume automatic scanning.
Searching for active Frequencies
If you do not have a reference to frequencies in your area, use
a search to find a transmission.
Note: When the scanner starts searching, it automatically
turns on the delay function. To turn delay on or off, press
Func + Dly.
To make the searching process more easy, we have
preprogrammed 5 frequency ranges (sometimes called
“Search banks”), which can be searched in a “chain” behind
each other or “alone” (by excluding ranges from the search).
Frequency Chain Search
This feature lets you search through preset frequency ranges.
You can also change each range to a range you set. There
are three modes within this feature: chain search mode,
chain search hold mode, and program band select mode.
The preset frequency ranges are:
1
2
3
4
5
5 Search Bands Band Plan 1
Frequency Range MHz
Steps
30.0000 - 79.9875
12.5 kHz
83.0000 - 87.2625
12.5 kHz
160.6000 - 162.5875
12.5 kHz
440.0000 - 465.9950
5 kHz
466.0000 - 469.9900
10 kHz
18
1
2
3
4
5
5 Search Bands Band Plan 2
Frequency Range MHz
Steps
84.0150 - 87.2550
20 kHz
144.0000 - 145.9875
12.5 kHz
156.0000 - 162.0250
12.5 kHz
162.0300 - 173.9900
10 kHz
406.0000 - 439.99375
6.25 kHz
1
2
3
4
5
5 Search Bands Band Plan 3
Frequency Range MHz
Steps
25.0000 - 29.9950
5 kHz
160.6000 - 162.59375
6.25 kHz
162.6000 - 173.99375
6.25 kHz
440.0000 - 465.99375
6.25 kHz
466.0000 - 469.99375
6.25 kHz
To switch the band plan between 1, 2 and 3:
•
•
Make sure the power is turned off.
While holding down 1, 2, or 3, turn on the scanner.
Note: Please carry out a memory initialization (Reset) after
band plan was changed. We recommend to change the band
plan setting immediately for the correct country setting before
first use of the scanner, later, in most cases, changing will be
no more necessary.
Chain Search Mode
Press Func + Src to start chain search mode. SRCH, the
enabled search bank number, and or (indicating the search
direction) appear. The search bank number being searched
flashes.
Press 1- 5 to enable or disable the search bank number being
searched in this mode. Enabled bank numbers appear, while
disabled bank numbers disappear.
At least one search bank must be enabled. (The scanner
sounds an error tone if you try to disable all the search banks).
The search bank and the frequency where chain search starts
depends on how the scanner was set before you selected
chain search mode.
Chain Search Hold Mode
To start chain search hold mode, press Hold in chain search
mode. The scanner stops searching and HOLD appears.
•
In this mode, pressing Func + changes the search
direction downward and pressing Func +
changes the search direction upward.
•
or
appears according to the current search
direction.
Storing Frequencies Found During Chain Search into
Channel Memory
You can store frequencies you find in chain search mode or
19
chain search hold mode.
• Press Func + Pgm in chain search mode or chain search
hold mode. The lowest blank channel appears.
• Press E + Pgm to store the frequency into the blank
channel. To select another channel, press Func +
or Func + before you press E / Pgm.
If you try to save a frequency that is already stored, the
scanner sounds an error tone and displays the channel that
was duplicated.
• If you entered the frequency by mistake, press ●/Clr.
• To enter the frequency anyway, press E to accept.
The scanner sets itself to program mode after you store a
frequency.
Setting the Search Range
You can use this mode to define the search range used during
a search in each search bank.
• To change a search range, press Func and PSrc. In the
display SRCH appears.
• Then select a search bank. When you select the search
bank, the lower limit and upper limit frequency assigned
in the search bank alternate on the display.
• To select another search bank, press Func + PSrc or
Func +
to increase the search bank number or Func
+
to decrease it.
or Func +
for about 1 second
• Hold down Func +
to quickly move through the search bank numbers.
After choosing the search bank, follow these steps to set the
lower limit and upper limit frequency.
• Enter the lower limit frequency by using the 0-9 and ●
/Clr keys.
• Press E to select the lower limit frequency.
• Enter the upper limit frequency by using the 0-9 and ●
/Clr keys.
• Press E to select the upper limit frequency.
Search Skip Memory
You can skip up to 50 specified frequencies during a search.
This lets you avoid unwanted frequencies or those already
stored in a channel.
• To skip a frequency, press Func and L/O when the
20
scanner stops on the frequency during a search or a
search hold.
• The scanner stores the frequency in memory and
automatically resumes the search if it is not in hold.
Follow these steps to clear a single frequency from skip
memory so the scanner stops on it during a search.
• Press Hold to stop the search.
• Press Func +
or Func +
to select the frequency.
L/O appears.
• Press Func + L/O. The L/O icon disappears.
To clear all the skip frequencies at once while searching or
search hold, press Func then press and hold L/O until the
scanner beeps.
Notes:
• If you selected all frequencies to be skipped within the
search range, the scanner beeps 3 times and does not
search.
• If you select more than 50 frequencies to skip, each new
frequency replaces a frequency previously stored,
beginning with the first stored frequency.
• Press Func +
or Func +
to select a skipped
frequency while HOLD appears. L/O appears when you
select a skipped frequency.
Delay
Sometimes a user might pause before replying to a
transmission. To avoid missing a reply on a specific channel,
you can program a 2-second delay into any channel or
frequency. The scanner continues to monitor the channel
frequency for an additional 2 seconds after the transmission
stops before resuming scanning or searching. The scanner
automatically sets a delay when you store frequencies into
channels or when you search frequencies. When the delay
feature is on, DLY appears. If it is off, follow one of these
steps to program a delay depending on how the scanner is
operating.
• If the scanner is scanning and stops on an active channel
where you want to store a delay, quickly press Func +
Dly before it continues scanning again. DLY appears.
• If the desired channel is not selected, manually select the
channel, then press Func + Dly. DLY appears.
• If the scanner is searching, press Func + Dly while the
scanner is searching. DLY appears and the scanner
automatically adds a 2-second delay to every frequency it
stops on in that band.
• To turn off the 2-second delay, press Func + Dly while
the scanner is monitoring a channel, scanning, or
searching. DLY disappears.
Locking Out Channels
You can increase the scanning speed by locking out channels
21
that have a continuous transmission.
• To lock out a channel, manually select the channel, then
press Func + L/O. In the display L/O appears.
Note: You can still manually select locked-out channels.
• To remove the lockout from a channel, manually select
the channel, then press Func + L/O. Now L/O will
disappear.
• To unlock all channels, press Hold to stop scanning, then
press Func and press and hold L/O until the scanner
beeps twice.
Priority
The priority feature lets you scan through the channels and
still not miss important or interesting calls on specific channels.
You can program one of the stored channels as priority
channel.
If the priority feature is turned on, as the scanner scans the
memory, it checks the priority channel for activity every 2
seconds. The scanner automatically designates the first
channel as priority channel.
Follow these steps to select a different channel as the priority
channel.
• Manually select the channel you want to select as the
priority channel.
• Press Func + PGM, then press Func + Pri. P appears to
the left of the selected channel number.
• To turn on the priority feature, press Func + Pri during
scanning. PRI appears.
Then the scanner checks the designated priority channel
every 2 seconds.
• To turn off the priority feature, press Func + Pri. PRI
disappears.
Using Keylock
Use the scanner's keylock to protect it from accidental
program changes. When the scanner's keys are locked, the
only controls that operate are
Scan, Func, Hold,
,
and
.
To turn on keylock, press Func +
.
appears.
To turn off keylock, press Func +
.
disappears.
Note: Using keylock does not prevent the scanner from
scanning channels.
22
Using the Display Backlight
• To turn on the display light for easy viewing at night,
press
.
The display lights for 15 seconds.
• To turn off the light sooner, press
again.
Troubleshooting
If your AE69-2H is not performing properly, try the following
steps.
Problem
The
scanner
doesn’t
work.
Possible
cause
The scanner
might not get
any power.
Improper
reception.
The
scanner’s
antenna
might need
to be
adjusted.
Scan won’t
stop.
The squelch
might need
to be
adjusted.
The antenna
might need
to be
adjusted.
One or more
channels
might be
locked out.
The
channel’s
frequency
might not be
stored in
memory.
The channel
might not be
active.
You must
press Scan
to scan.
Scan won’t
start.
Suggestion
Check the batteries. Correct
polarity? Clean contacts?
Make sure that the AC adapter (if
used) is connected correctly to
the wall outlet and the scanner.
Make sure that 230 V AC power
is available at the wall outlet.
Check the antenna connection or
move or reposition the antenna.
Move the scanner.
You might be in a remote area
that could require an optional
multi-band antenna. Check with
your dealer or local electronics
store.
Adjust the squelch threshold.
See “Turning On The Scanner
and Setting Squelch”
Check the antenna connection.
Make sure the channels you
want to scan are not
locked out.
Make sure the channel’s
frequency is stored in the
scanner’s memory.
Wait for a transmission on the
channel.
Press Scan.
23
The squelch
might need
to be
adjusted.
One or more
channels
might be
locked out.
The antenna
might need
to be
adjusted.
Adjust the squelch threshold.
See“Turning On The
Scanner and Setting Squelch”.
Make sure the channels you
want to scan are not
locked out.
Check the antenna connection.
Resetting the Scanner
If the scanner's display locks up or stops operating properly,
you might need to reset the scanner.
Caution: This procedure clears all the information you have
stored in the scanner. Before you reset the scanner, try
turning it off and on to see if it begins working properly. Reset
the scanner only when you are sure it is not working properly.
After a reset, only the band plan information and the
preprogrammed search bands are still memorized in the
scanner!
To reset the scanner:
•
•
Turn of the scanner.
While holding down 2, 9, and Hold, turn on the
scanner. It takes about 3 seconds to initialize and
CLEAr appears.
Care and Maintenance
Keep the scanner dry. If it gets wet, wipe it dry immediately.
Use and store the scanner only in normal temperature
environments. Handle the scanner carefully: do not drop it.
Keep the scanner away from dust and dirt, and wipe it with a
damp cloth occasionally to keep it looking new.
General Use
• Turn the scanner off before disconnecting the power.
• Always write down the programmed frequencies in the
event of memory loss.
• If memory is lost, simply reprogram each channel. The
display shows 000.000 in all channels when there has
been a memory loss.
• Always press each button firmly until you hear the entry
tone for that key entry.
Locations, environment
• Do not use the scanner in high-moisture environments
such as in bathroom or outdoor if it is raining.
• Avoid placing the unit in direct sunlight or near heating
elements or vents.
• If the scanner receives strong interference or electrical
24
noise, move it or its antenna away from the source of the
noise. If possible, a higher elevation might provide better
reception.
• Also try changing the height or angle of the antenna.
Cleaning
• Switch off the unit and take out batteries before cleaning.
• Clean the outside of the scanner with a mild detergent.
• To prevent scratches, do not use abrasive cleaners or
solvents. Be careful not to rub the LCD window.
• Do not use excessive amounts of water.
Repairs
Do not attempt any repair. The scanner contains no user
serviceable parts. Contact the ALAN Customer Service
Center phone (+49) (0)6103 9481 30, send an e-mail to
[email protected] or take the scanner to a qualified
and authorized repair technician.
Birdies
All radios can receive “birdies” (undesired signals). If your
scanner stops during Scan mode and no sound is heard, it
might be receiving a birdie. Birdies are internally generated
signals inherent in the electronics of the receiver.
Press L/O to lock out the channel, then press Scan to resume
scanning.
If you still cannot get satisfactory results while using your
scanner or if you want additional information, please contact
the ALAN technical hotline. The address and phone number
are listed in the warranty chapter at the end of this manual.
Specifications
Channels:...............................................................80
Frequency Range (in MHz) : see Band Plans
Channel Steps..5, 6.25, 10, 12.5 and 20 kHz, see page 5
Typical Receiver Sensitivity (SINAD 12 dB)
25.005 MHz (FM) ............................................. 0.3 µV
54.050 MHz (FM) ..............................................0.3 µV
86.275 MHz (FM) ..............................................0.3 µV
138.150 MHz (FM)........................................ ....0.3 µV
162.400 MHz (FM) ....................................... ....0.3 µV
173.220 MHz (FM) ....................................... ....0.3 µV
406.875 MHz (FM)............................................ 0.4 µV
453.250 MHz (FM) ........................................... 0.4 µV
511.9125 MHz (FM) ......................................... 0.4 µV
Operating Temperature:
Normal .............................................. –20°C to +60°C
Scan Rate: ................. 50 channels per second (max)
Search Rate
Normal ..............................60 steps per second (max)
Hyper Search.................. 180 steps per second (max)
Priority Sampling ........................................ 2 seconds
Scan Delay: ................................................ 2 seconds
IF Rejection (at 162.4 MHz) .............................. 90 dB
25
IF Frequencies
1st IF (25-173.995 MHz)…….......380.6050-380.7000 MHz
1st IF (406-512 MHz) ...……......380.60625-380.7000 MHz
2nd IF .........................……................................. 21.3 MHz
3rd IF ..........................……................................... 450 kHz
Audio Output ...............….…................. 400 mW maximum
Built-in Speaker ........……...........32 mm diameter, 8 Ohms
....................................……......................... (dynamic type)
Current Drain
Squelched .....................……............................. 90 mA
Full Output .....................……........................ 290 mA
Power Requirements:
2 AA Alkaline Batteries (3V DC),
or 2 AA Rechargeable Ni-MH Batteries (2.4V DC),
or AC 230 V Adapter (6 V DC, 500 mA)
Antenna: .............................…….......50 ohms (Impedance)
External Antenna:..........……....... Antenna Jack BNC Type
Ext. Speaker Jack .................……............................3.5 mm
Size: ...........……......68mm (W) x 31.5mm (D) x 115mm (H)
Weight: ..............................……...................................165 g
Features, specifications, and availability of optional
accessories are all subject to change without notice.
European 2 years warranty
The distributor, dealer or retail shop warrants to the original
retail purchaser of this product that should this product or any
part of it, under normal use and conditions, be proven
defective in material or workmanship within 2 years from the
date of original purchase, such defect(s) will be repaired or
replaced with new or reconditioned product (at the company's
option) without charge for parts and repair labor. To obtain
repair or replacement within the terms of this warranty, the
product is to be delivered with proof of warranty coverage (e.g.
dated bill of sale), specification of defect(s), to the distributor,
dealer or his authorized repair center.
The Company disclaims liability for communications range of
this product. The warranty does not apply to any product or
part there of which, in the opinion of the company, has
suffered or been damaged through alteration, improper
installation, mishandling, misuse, neglect, accident, or by
removal or defacement of the factory serial number/bar code
label(s). The warranty does not apply to accessory parts or
problems caused through not authorized or not
recommended accessories like of the units like batteries,
external power supplies, external antennas, earphone,
speakers, and over voltage caused through external power
supplies, light bulbs, broken antennas, broken swivel belt
clips, broken or damaged acrylic glass windows and cabinet
parts.
Please contact the dealer or person where you have
purchased your Albrecht Scanner.
26
Where to find service hints and documentation
The complete technical documentation is updated regularly. You
can download the latest versions of user manuals, technical
documents and conformity declaration, as well as service hints or
FAQ’s any time from our server under
http://www.hobbyradio.de
If You should have a problem, please have a look to the service
hints or frequently asked questions (FAQ) before you send your
Scanner back to the service center.
Optional Accessories
Albrecht recommends to use following accessories. These are
only examples, You will find our whole range of accessory
items in our catalogue.
Order No.
Accessory item
6158
Scanner Antenna Albrecht Miniscan
6156
Scanner Antenna Albrecht Maxiscan
61700
Station Antenna Albrecht Allband
7120
Extension Speaker CB 20
71450
Earphone
AD-671
AC Adapter 230 V to 6 V DC, 500 mA
This product is conform to the new European RoHS Directive
(2002/95/EC) about the restriction of hazardous substances in
electronic items.
Recycling of Electronic Items
European regulations request that electronic items
must be recycled at the end of their life cycle. Please
do not dispose this scanner into normal household
trash. If You should once do not need Your scanner
any more, please give it to the local electronics waste
collection station. The industry will recycle electronic
items – so You can help to improve our environment.
© Alan Electronics 2006
Daimlerstr. 1 k
D- 63303 Dreieich
Dovenkamp 11
D-22952 Lütjensee
www.albrecht-online.de
www.alan-electronics.de
Service:
Repair inquiries
(+49) 6103 9481 22
Fax
(+49) 6103 9481 60
e-mail
[email protected]
Download server
www.hobbyradio.de
27
CE-Declaration of Conformity
CE Konformitätserklärung/ Declaration of Conformity
Hiermit wird erklärt, dass unser Produkt / herewith we declare
that our product
Empfangsgerät für Funkanwendungen (Scanner)
AE69-2H
den folgenden europäischen Normen entspricht: / is in
conformity to following European Standards
EU-Richtlinien / EU directives 73/23/EEC (LVD); 89/336
EEC (EMC) and 99/5/EEC (R&TTE)
EN 301 489-1, EN 301 489-5, EN 301 489-15 (EMC)
EN 300 086-2 (PMR Radio)
EN 301 783-2 (Amateur Radio)
EN 60 950 (Electrical Safety)
Lütjensee, 17.11.2006
...................................
(Unterschrift/signature)
Wolfgang Schnorrenberg
Alan Electronics GmbH
UBZZ01349AZ (0)
Printed in P.R.C.
28