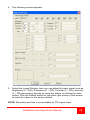
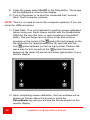
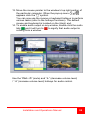
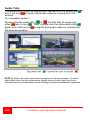
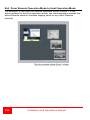
1
QuadraVista HDMI Installation and Operations Manual 10707 Stancliff Road Houston, Texas 77099 800-333-9343 www.rose.com LIMITED WARRANTY Rose Electronics® warrants the QuadraVista™ HDMI to be in good working order for one year from the date of purchase from Rose Electronics or an authorized dealer. Should this product fail to be in good working order at any time during this one-year warranty period, Rose Electronics will, at its option, repair or replace the Unit as set forth below. Repair parts and replacement units will be either reconditioned or new. All replaced parts become the property of Rose Electronics. This limited warranty does not include service to repair damage to the Unit resulting from accident, disaster, abuse, or unauthorized modification of the Unit, including static discharge and power surges. Limited Warranty service may be obtained by delivering this unit during the one-year warranty period to Rose Electronics or an authorized repair center providing a proof of purchase date. If this Unit is delivered by mail, you agree to insure the Unit or assume the risk of loss or damage in transit, to prepay shipping charges to the warranty service location, and to use the original shipping container or its equivalent. You must call for a return authorization number first. Under no circumstances will a unit be accepted without a return authorization number. Contact an authorized repair center or Rose Electronics for further information. ALL EXPRESS AND IMPLIED WARRANTIES FOR THIS PRODUCT INCLUDING THE WARRANTIES OF MERCHANTABILITY AND FITNESS FOR A PARTICULAR PURPOSE, ARE LIMITED IN DURATION TO A PERIOD OF ONE YEAR FROM THE DATE OF PURCHASE, AND NO WARRANTIES, WHETHER EXPRESS OR IMPLIED, WILL APPLY AFTER THIS PERIOD. SOME STATES DO NOT ALLOW LIMITATIONS ON HOW LONG AN IMPLIED WARRANTY LASTS, SO THE ABOVE LIMITATION MAY NOT APPLY TO YOU. IF THIS PRODUCT IS NOT IN GOOD WORKING ORDER AS WARRANTIED ABOVE, YOUR SOLE REMEDY SHALL BE REPLACEMENT OR REPAIR AS PROVIDED ABOVE. IN NO EVENT WILL ROSE ELECTRONICS BE LIABLE TO YOU FOR ANY DAMAGES INCLUDING ANY LOST PROFITS, LOST SAVINGS OR OTHER INCIDENTAL OR CONSEQUENTIAL DAMAGES ARISING OUT OF THE USE OF OR THE INABILITY TO USE SUCH PRODUCT, EVEN IF ROSE ELECTRONICS OR AN AUTHORIZED DEALER HAS BEEN ADVISED OF THE POSSIBILITY OF SUCH DAMAGES, OR FOR ANY CLAIM BY ANY OTHER PARTY. SOME STATES DO NOT ALLOW THE EXCLUSION OR LIMITATION OF INCIDENTAL OR CONSEQUENTIAL DAMAGES FOR CONSUMER PRODUCTS, SO THE ABOVE MAY NOT APPLY TO YOU. THIS WARRANTY GIVES YOU SPECIFIC LEGAL RIGHTS AND YOU MAY ALSO HAVE OTHER RIGHTS WHICH MAY VARY FROM STATE TO STATE. NOTE: This equipment has been tested and found to comply with the limits for a Class B digital device, pursuant to Part 15 of the FCC Rules. These limits are designed to provide reasonable protection against harmful interference when the equipment is operated in a commercial environment. This equipment generates, uses, and can radiate radio frequency energy and, if not installed and used in accordance with the instruction manual, may cause harmful interference to radio communications. Operation of this equipment in a residential area is likely to cause harmful interference in which case the user will be required to correct the interference at his own expense. IBM, AT, and PS/2 are trademarks of International Business Machines Corp. Microsoft and Microsoft Windows are registered trademarks of Microsoft Corp. Any other trademarks mentioned in this manual are acknowledged to be the property of the trademark owner. Copyright Rose Electronics 2013. All rights reserved. No part of this manual may be reproduced, stored in a retrieval system, or transcribed in any form or any means, electronic or mechanical, including photocopying and recording, without the prior written permission of Rose Electronics. Rose Electronics Part # MAN-QVHDMI Printed In the United States of America – Revision 1.4 FCC Communications Commission (FCC) Statement This equipment has been tested and found to comply with the limits for a Class B digital device, pursuant to Part 15 of the FCC Rules. These limits are designed to provide reasonable protection against harmful interference when the equipment is operated in a commercial environment. This equipment generates, uses, and can radiate radio frequency energy and, if not installed and used in accordance with the instruction manual, may cause harmful interference to radio communications. Operation of this equipment in a residential area is likely to cause harmful interference, in which case the user will be required to correct the interference at his own expense. Properly shielded and grounded cables and connectors must be used in order to meet FCC emission limits. Rose Electronics is not responsible for any radio or television interference caused by using other than recommended cables and connectors or by unauthorized changes or modifications to this equipment. Unauthorized changes or modifications could void the user's authority to operate the equipment. Operation is subject to the following two conditions: (1) this device may not cause harmful interference, and (2) this device must accept any interference received, including interference that may cause undesired operation. European Union CE Marking and Compliance Notices Statements of Compliance English This product follows the provisions of the European Directive 1999/5/EC. Australia and New Zealand C-Tick Marking and Compliance Notice Statement of Compliance This product complies with Australia and New Zealand's standards for radio interference. TABLE of CONTENTS Contents Page # System Introduction ........................................................................................ 1 Package Contents .......................................................................................... 2 About this Manual ........................................................................................... 2 Features ......................................................................................................... 2 Rose Electronics Web Site ............................................................................. 3 Front panel ..................................................................................................... 4 Rear View ....................................................................................................... 5 Operating Modes ............................................................................................ 6 Setting Up Static IP ........................................................................................ 7 Installing the QVConfig Configuration Software ........................................... 10 Installing the QuadraVista HDMI .................................................................. 13 Rear Panel Connectivity ............................................................................... 14 Front panel connectivity ............................................................................... 15 Basic Features.............................................................................................. 20 QVConfig software features ......................................................................... 25 QuadraVista HDMI Properties ...................................................................... 35 Help Menu .................................................................................................... 44 Quick Keys – ................................................................................................ 51 Window Layout ............................................................................................. 52 Arranging Windows ...................................................................................... 54 ASCII Protocol .............................................................................................. 79 ASCII Z Command Format ........................................................................... 85 Specifications ............................................................................................... 92 Touchscreen Monitor Display ....................................................................... 94 Audio Tally .................................................................................................. 100 Move / Resize Window ............................................................................... 101 Exit From Remote Operation Mode to Host Operation Mode ................... 102 Switch Control (Cycle) Between Windows ................................................. 104 INTRODUCTION System Introduction Congratulations on purchasing an Rose Electronics QuadraVista HDMI. The QuadraVista HDMI is a highly innovative device, integrating the functions of a mouse/keyboard switching function, microphone / audio / speaker, and multi-viewer into one enclosure, providing solutions for individual and corporate users in an effective, multiple system environment. With just a keyboard or mouse, you can easily control or switch between four computers, as well as adjust input video to any size and position on the output display. The QuadraVista HDMI is compatible with the following operating systems: Windows OS: 98 Special Edition, 2000 Professional, XP, Vista, Server 2003, Server 2008, Windows 7 NOTE: Windows NT is currently not supported. Linux OS: Fedora 10, Ubuntu 8.1, Scientific 5.2, RedHat, Mint 6.0, Debian 5.0, PC Linux OS 2009, SUSE 11.1, Mandriva 2009, CentOS 5.2 Mac OS Installation and Operations Manual 1 Package Contents QuadraVista HDMI unit as ordered 12V DC Power Adapter Power cord USB A/B cable (Sold separate) All-In-One cable (Sold separate) Optional DVI to HDMI adapter HDMImm cable (Sold separate) (See part number table for cable part numbers) About this Manual This manual contains comprehensive information about your Rose Electronics QuadraVista HDMI. Throughout the manual, the following conventions are used to distinguish elements of text. NOTE: provides additional hints or information that requires special attention. CAUTION: identifies important information which, if not followed, may result in loss of data or damage to your device. Any name of a menu, command, icon or button that you can see on the screen is shown in a bold typeset. For example: On the Start menu, select Settings. Features Simultaneous support for HDMI and DVI (via optional DVI-to-HDMI adapter) output Provides LED indicators for the status of the computer on-line (Active and Standby state), mode (Host and Remote), and power Control up to four computers Automatic detection of PS-2 / USB interface when connected with computer Hot-pluggable (add / remove computers without powering down the devices) Two embedded speakers Accepts analog stereo audio input on each video window Accepts embedded / analog / AES audio (right / left channel per source) Firmware upgradeable HDCP-compliant 2 Installation and Operations Manual Rose Electronics Web Site Visit our web site at www.rose.com for additional information on the QuadraVista HDMI and other products that are designed for data center applications, classroom environments and other system management applications. Installation and Operations Manual 3 MODEL Front panel Figure 1. Front View 1 Stereo Speaker Audio from the selected computer 2 Indicators PWR Green - unit is ON MODE Green – Local keyboard/mouse control Yellow – Remote computer control 1,2,3,4 Green – Computer operated remotely Yellow – Computer in Standby state Yellow Blinking – Computer powered off or rebooting 3 Microphone For connecting a microphone 4 Headphone For connecting a headset 5 USB HID For connecting a keyboard and mouse 6 USB to remote computer For controlling with a remote computer 7 USB 2.0 ports For a USB 2.0 hub, USB flash disk, etc. 4 Installation and Operations Manual Rear View Figure 2. Rear View 1 HD15 connector to computers Connects to 4 computers’ USB, PS/2, and audio using special all-in-one cable 2 IP Connector Ethernet connector for IP control; up to two remote computers via router. 3 Dip Switches For updating the USB Host controller firmware, as well as resetting the unit to the factory default settings. 4 HDMI Output Connect the monitor display’s HDMI / DVI signal cable. 5 HDMI Inputs HDMI connectors for HDMI / DVI (YPbPr) inputs from computers. 6 Power Connector Connects to the power adapter. 7 On / Off switch Turns the unit’s power ON and OFF. Installation and Operations Manual 5 Operating Modes Two operating modes are available: Host operation mode Remote operation mode Host Operation Mode When the QuadraVista HDMI is in Host operation mode, a keyboard and mouse connected to the Unit are used to control the QuadraVista itself. A larger mouse cursor is displayed, and actions such as changing the size and position of up to four remote computer windows are enabled. NOTE: Upon re-connecting the keyboard or mouse, the cursor may disappear in Host operation mode (press the Pause/Break key to solve this problem). Remote Operation Mode When the Unit is in Remote operation mode, the keyboard and mouse are used to control a specific computer connected to the QuadraVista HDMI. Special functions are available in both Host and Remote operation modes: When Host operation mode is active, use the mouse connected to the Unit to re-size and re-position any windows on the output display. When Remote operation mode is active, operate a single computer system displayed as a window on the screen using the mouse and keyboard connected to the Unit. Switch from host mode to remote mode by moving the Host cursor into a specific computer window on the display and double-clicking the left mouse button, or by clicking the “enter” icon in that window. To switch operation back to the Host use the keyboard hotkeys. The host cursor will reappear. In Remote mode, you can control a computer with up to four windows shown simultaneously on the display, or you can resize the computer’s window to fill the display. When in Remote operation mode, the unit automatically transfers the mouse / keyboard input signal to the specific computer. 6 Installation and Operations Manual SET-UP for QVConfig Software Setting Up Static IP The QuadraVista HDMI’s configuration is controlled with an external computer running the QVConfig program. Prior to running the program for the first time, the computer’s LAN connection will need to be changed to a static IP address with a similar range to the QuadraVista HDMI’s factory default IP address of 210.100.100.151. Change the IP Address of the Controlling Computer On your computer, display the Local Area Connection Properties and highlight “Internet Protocol (TCP/IP)” and click on the Properties tab. When the next screen appears, click the radio button to select Use the following IP address: and then enter the IP address 210 . 100 . 100 . x (where x is any value from 1 – 253), and Subnet mask: 255 . 255 . 255 . 0. Installation and Operations Manual 7 Click OK to exit. Pinging the QuadraVista HDMI Connect a standard network cable between the computer and the ethernet connector on the rear panel of QuadraVista HDMI. Make sure you can ping the QuadraVista HDMI at “210.100.100.151” by starting the “Command Prompt” and typing: ping 210.100.100.151 <Enter>. You should see a Reply text line in the Command Prompt window if the ping is successful. Type Exit to close the command prompt window. Changing the IP Address of the QuadraVista HDMI You can change the Quadravista’s IP address from the factory default to one compatible with your local network by running the QVConfig software (refer to the next section “Starting the QVConfig Configuration Software”). 8 Installation and Operations Manual When the QVConfig software screen appears, click Settings, then Module Parameter. Click IP Address. (See Below) When the following screen appears, enter the new IP address, Subnet mask, and Gateway. Then click OK Installation and Operations Manual 9 QVConfig software installation Installing the QVConfig Configuration Software To start the QVConfig configuration software, perform the following steps: 1. Copy the “QVConfig-V31x.exe” file to your designated computer. 2. Run the QVConfig software by double-clicking the “QVConfig-V31x.exe” file. When the following screen appears, under IP, select User Define if you know the IP address assigned to your QuadraVista HDMI, or select Automatically Search. NOTE: Before click OK (next step), you can press the Ctrl + Esc keys on your keyboard to make sure that you are not in the Host mode (MKC – mouse/keyboard controller). 3. Click OK. Your computer will automatically start to search for your QuadraVista HDMI. 4. Upon detection of your device, the following screen will appear to confirm connection to your QuadraVista HDMI. 5. Click OK and the following windows appear: QVConfig control and Option. 10 Installation and Operations Manual The control window is for creating and configuring the screen layout. The option window is for window / label setup, save/load file, adjust image, window size / position setting, monitor audio, and fader control. 6. Right-click the mouse on the control window title bar to access the Group Layout menu. Select from 2×2 up to 7×7 as possible grid positions on the monitor display. Installation and Operations Manual 11 NOTE: The layout size available for your particular model will depend on the monitor display’s resolution as well as the smallest window size limitation. An 8x8 grid position is possible when the OSD is turned off. 12 Installation and Operations Manual Installation Installing the QuadraVista HDMI The following figure shows a typical installation connected to four computer systems. Installation and Operations Manual 13 Rear Panel Connectivity Using one of the all-in-one cables, connect one end to the Source1 connector on the rear panel. Connect the other end to computer #1’s USB or PS/2 connectors and the audio ports. The connectors on the all-in-one cable have color connector to match the appropriate ports on the computer. Connect computer #2, #3, and #4 in the same manor. It is recommended that the USB connection to the computers be used instead of the PS/2 connection. If a PS/2 connection must be made apply power to the QuadraVista HDMI unit first before turning on the computers. If your operating system is Windows 2000, you may need to perform the onscreen steps before the USB device will work. Next connect a HDMI cable from each of the four HDMI In ports on the rear panel to the four computer’s HDMI output ports. If the computer has a DVI connector, a DVI to HDMI converter can be used. 14 Installation and Operations Manual Front panel connectivity The front panel connections are shown below. Connect a USB keyboard and USB mouse to the USB connections on the front panel. A microphone, headset, and other USB peripherals can be connected if needed as shown. Secure the 12V DC power adapter to the power port on the rear panel by turning the head to screw it on securely. Press the power switch to turn the unit on. The connected computer’s images will display on the connected monitor. If you are using the PS/2 connections instead of the USB connections, turn on the computer power or re-boot the connected computers to recognize the PS/2 keyboard and mouse. Installation and Operations Manual 15 Move the mouse, or press the Pause/Break key and you will see the mouse pointer on the monitor display. Move the mouse pointer to the window’s top right portion of the particular appears, click the “ ” symbol. computer. When the pop-up menu You can now use the mouse or keyboard hotkeys to perform various tasks (refer to the next chapter for a description of the hotkeys functions). The default mouse and keyboard is located on the QuadraVista HDMI (Host) end. In the bottom right corner of each screen is an audio select box. The selection box is red is audio is selected from this computer, green if not selected. Double-click on the selection box will select that computer’s audio and change the box to red. Ctrl + O will mute the audio and the left and right arrow keys will increase or decrease the volume level. 16 Installation and Operations Manual IMPORTANT (when using the QuadraVista HDMI with Mac O/S): Before using the QuadraVista HDMI you need to enable the following – System Preference (System) Universal Access Enable access for assistive devices. Otherwise, only the mouse will function properly; the keyboard may not work. We also recommend that you enable the following: System Preference (Hardware) Keyboard Use all F1, F2, etc. keys as standard function keys. So that the function of F1, F2 ... F12 will have their intended function. If not enabled, then pressing these keys will have no effect. Another solution will be to press the Fn key before pressing F1, F2 ... F12. Installing the Rose Electronics QVLink Software The QuadraVista HDMI QVLink software is designed for use on the remote computer to control the computers connected to a QuadraVista HDMI. This program requires a one-time installation only. To install the QVLink software, perform the following steps: 1. Connect the USB B-type connector end of the included USB-A to USB-B cable to the USB B-type connector on the QuadraVista HDMI’s front panel. Connect the cable’s USB A-type connector end to the remote computer’s USB port (make sure that the mouse and keyboard devices are connected properly to the remote computer). 2. Copy the file “Setup.exe” to your remote computer’s local hard drive. Double-click the file “Setup.exe” and the Setup Wizard screen will appear. Click Next to continue. 3. Follow the on-screen installation instructions and click finish when completed. The installation follows a standard windows installation process. Installation and Operations Manual 17 To activate the QVLink software, click on the Windows Start button, then Rose Electronics, then QVLink. The QVLink icon will appear in the Windows® system tray and the QVLink window will appear signifying that you can begin using the software. Click on “Option” and select Startup option and the below window will display. Select the startup method, then click OK. Use your preferred method (double-click the mouse or place the mouse pointer over the QVLink window) to start the QVLink software. The following screen will appear. 18 Installation and Operations Manual Left-click the icon or click Mouse Speed if you need to change the Mouse response, Speed (Slow / Fast). The system will remember the setting the next time you reboot the computer. NOTE: If you do not quit the QVLink software, then the controlling computer will retain the QVLink software interface. Commands sent to the unit will continue to work, but commands to the computer will have no effect. There are three ways to exit the QVLink software: 1. Right-click the QVLink icon and click Exit on the dropdown box 2. Click on the Option tab and click on Exit 3. Click on the in the top right corner of the window Installation and Operations Manual 19 Basic Features This section familiarizes you with using the mouse and keyboard hotkeys to operate your QuadraVista HDMI. Pop-up selections Move the host cursor to the top right corner of a particular window to access the following pop-up selections. On a computer window: On a video window: On a computer window in full screen mode: On a video window in full screen mode: : swap window : enter and control a computer : full screen : return from full screen Using the Mouse NOTE: 20 If you are a left-handed user, you may want to configure the mouse to suit your needs. You can swap the two buttons so that you can use the right button as the left button and vice versa. Installation and Operations Manual You can double-click the corresponding window to control a specific computer. The following table lists the basic operations you can perform using the mouse. Function Action Window resizing Drag the border of a window to a desired size. Window repositioning Drag a window to a new position Window position swapping Move the host cursor to the top right corner of a window and select the capital letter S. Move the host cursor (still a capital letter S) to the destination window and click the left button. Full screen window Move the host cursor to the top right corner of a window and select to maximize to full screen mode. To exit out of full screen mode, move the host cursor to the top right corner of the window and select Access a remote computer Method 1: Move the host cursor to the top right corner of a computer window and select Method 2: Double-click the mouse when the host cursor is on a remote computer window. The remote system that was just exited will be displayed in the window previously occupied by the newly switched remote system. From then on all the mouse and keyboard inputs will be directed to that particular remote computer. Lock / unlock window layout Move the host cursor to the top left corner of the display until the mouse pointer becomes a capital letter L, then click the left button and the window layout will be locked. Repeat the steps to return from window layout locked mode. Installation and Operations Manual 21 Using the Keyboard The next two tables list the basic operations you can perform using the keyboard. Use the following hotkeys in the Host operation mode only. Input letter is not case sensitive. Keys Alt + F# Alt + F Alt + L Ctrl + Esc Ctrl + L Ctrl + O Ctrl + P Ctrl + R Ctrl + S Ctrl + Y Ctrl + Z F# Function Load the user-created preset file (where F# is the function key and can be F1 up to F12 – maximum up to 12 via QVConfig software Option menu’s Save File button). Toggle a particular window’s full screen mode on / off where the host cursor is currently residing. Toggle lock / unlock window layout. Exit the QuadraVista HDMI operation to perform setup using the QVConfig software. Toggle lock / unlock keyboard and mouse while user is away. The keyboard and mouse will become inoperable when locked. Toggle muting the audio output on / off (mute). Toggle a window on and off. Where P is the window number Ctrl + 1 will turn on / off Source 1 window; Ctrl + 2 will turn on / off the Source 2 window; Ctrl + 3 will turn on / off the Source 3 window; Ctrl + 4 will turn on / off the Source 4 window. Toggle the lock window aspect ratio of 4:3, 16:9, and no lock for the window where the Host cursor is currently on. Save the latest preset to flash memory so that on the next bootup the latest preset will be loaded. Redo up to ten previously “undone” actions. Undo up to ten previous actions. Access a remote system (where F# is the function key and can be F1, F2, F3, or F4). F1 will correspond to the Source 1 window, F2 will correspond to the Source 2 window, F3 will correspond to the Source 3 window, while F4 will correspond to the Source 4 window. The newly switched remote system will be displayed on the editing window. The remote system that was just exited will be displayed in the window previously occupied by the newly switched remote system. You can only access a remote system from the screen where it is displayed. NOTE: You can also double-click the mouse for the same effect. 22 Installation and Operations Manual Keys Page Up / Page Down Shift + F# Access a remote system (where F# is the function key and can be F1, F2, F3, or F4). F1 will correspond to the Source 1 window, F2 will correspond to the Source 2 window, F3 will correspond to the Source 3 window, while F4 will correspond to the Source 4 window. You can only access a remote system from the screen where it is displayed. NOTE: You can also hold Shift and double-click the mouse for the same effect. Switch the audio input source between HDMI IN and SOURCE ports (the audio tally will signify that audio output is coming from a particular window). Switch the audio output between the unit’s speakers and the HDMI OUT port to monitor display’s speakers. Shift + I Shift + O Shift + left arrow / Shift + right arrow Tab Left arrow Right arrow Up arrow Down arrow NOTE: Function Switch between the three factory-default presets. NOTE: This function is not available when connecting the QuadraVista HDMI’s HDMI OUT connector to the monitor display via a DVI-to-HDMI converter. Due to video / image processing delays one could achieve audio / video sync by adjusting audio delay. QuadraVista HDMI provides up to 170 milliseconds audio delay adjustment by using Shift and left (decrease) and right (increase) arrow keys. Move the host cursor from one screen to the other. Decrease the volume level (10 levels including mute). Increase the volume level (10 levels including mute). Load the previous user-created (via QVConfig software Option menu’s Save File button) preset file. Load the next user-created (via QVConfig software Option menu’s Save File button) preset file. Pressing Ctrl + Esc hotkeys as well as the “Load Preset” action will clear the undo (Ctrl + Z) / redo (Ctrl + Y) list in memory. Installation and Operations Manual 23 You can use the following hotkeys in the Remote operation mode. Keys Pause Break Ctrl + Esc Ctrl + Shift + Alt + V Function Exit from the Remote operation mode to the Host operation mode. Exit the QuadraVista HDMI operation to perform setup using the QVConfig software. Run the Microsoft® Notepad program, and then press Ctrl + Shift + Alt + V to read the QuadraVista HDMI firmware version. NOTE: This function is available only if the computer and QuadraVista HDMI is connected via the all-in-one cable’s USB port. Ctrl + Pause Switch control (cycle) from window 1 to window 2 to Break window 3 to window 4 to window 1, and so forth. NOTE: The controlling function is available only if the computer and QuadraVista HDMI is connected via the allin-one cable. Example 1: If the QuadraVista HDMI is connected to four (4) computers via the all-in-one cables, then hotkey switching would be from computer 1 to computer 2 to computer 3 to computer 4 to computer 1, and so forth. Example 2: If Source 1 and Source 3 connectors are connected to two (2) computers via the all-in-one cables, Source 2 and HDMI IN 2 connectors has no connection, and Source 4 connector has no connection but HDMI IN 4 connector is connected to a DVD player, then hotkey switching would be from computer 1 to blank window 2 (mouse cursor will not be shown) to computer 3 DVD player input source (mouse cursor will not be shown and no control is possible in this Remote mode) to computer 1, and so forth. CAUTION: Make sure to press Ctrl key first because Pause/Break key would cause system to exit from Remote operation mode to Host operation mode. Shift + Pause Switch control backward (cycle) from window 1 to window Break 4 to window 3 to window 2 to window 1, and so forth. NOTE: The controlling function is available only if the computer and QuadraVista HDMI is connected via the allin-one cable. NOTE: When using a MacBook, use “control + option (Alt) + shift + k” to perform Host / Remote mode switch in place of the “Pause/Break” key. 24 Installation and Operations Manual Using QVConfig Software QVConfig software features This chapter introduces you to the QVConfig software for configuring the features of the QuadraVista HDMI. The QVLink configuration software contains the following two main windows: QVLink control window and Option window. NOTE: Some menus on the QVLink software may not be available (and will be grayed-out). QVLink Control Window Select Menu Open Option Menu This toggles the Option window display on / off. Dock Option Menu This returns the Option window display to its default position on the right side of the QVLink control window. This option is not available (grayed-out) if the previous item Open Option Menu is disabled. Installation and Operations Manual 25 Settings Menu Set Output Mode By default, the QuadraVista HDMI will automatically detect the optimum display resolution, so this item will be disabled (grayed-out). When using the QuadraVista HDMI for the first time or after resetting the device to its factory-default setting, it will automatically detect the optimum display resolution. Use the QVLink software to disable this feature by performing the following steps (the QuadraVista HDMI series default output resolution is 1024×768 / 60 Hz): 1. Click Settings then Module Parameter. 2. Click to unselect (remove the checkmark) the Detect Display Resolution option. 26 Installation and Operations Manual NOTE: • When the monitor display is unable to provide the EDID signal, it will display at 1024×768 / 60 Hz. The extended display identification data (EDID) is a data structure provided by a computer display to describe its capabilities to a graphics card. • When the Detect Display Resolution option is selected (with checkmark), all the presets will be displayed in the optimum resolution. • When the Detect Display Resolution option is unselected (without checkmark) and you have set the desired resolution using the Set Output Mode, all the presets will be displayed in the desired resolution that you have set. Installation and Operations Manual 27 Click Settings, and then click Set Output Mode. NOTE: When the Detect Display Resolution option is not turned off, the Set Output Mode function is disabled (grayed-out). When the following screen appears, set the output resolution to match the monitor display’s resolution. Select the Refresh Frequency, select the Mode from the drop-down menu, and then click OK. You will notice that the selected resolution is displayed on the title bar of your QVConfig software. 28 Installation and Operations Manual Flashing Window Border When the Flashing Window Border option is enabled (with checkmark), the border of the window where the mouse cursor just resided will blink twice to notify you of its location. Reconnect (Network) When you have unplugged the IP cable and re-connected it, click Reconnect (Network) to continue the configuration process. Installation and Operations Manual 29 System Parameter Upon clicking System Parameter, the menu appears as shown below (refer to the later section for a description of the items appearing on the System Parameter menu). Module Parameter Upon clicking Module Parameter, the menu appears as shown below (refer to the later section for a description of the items appearing on the Module Parameter menu). 30 Installation and Operations Manual Importing / Exporting Label This allows you to import a label from / export label to Microsoft® Office Excel or Notepad to be edited externally. Installation and Operations Manual 31 NOTE: BMP Label (Unicode) may not be available on your model. The most convenient way is to export the file (label) as a BMP Label (Unicode) or Label (ANSI) “txt” file. Assign a filename when the next screen appears. 32 Installation and Operations Manual Using Microsoft® Notepad, edit the text in the file. When you are done editing the label (highlighted in red as shown below), save the “txt” file and import it. The on-screen labels will then be updated. System Parameter The following are the items which appear under System Parameter. Save System Files to Flash This allows you to save all configuration settings to flash memory. If the system configuration has been changed, save the changes first before continuing the other configuration settings. The save progress will be displayed. Installation and Operations Manual 33 Advanced Upon clicking Advanced, the following screen appears: • Use Broadcast Load File For loading presets / switching resolution / group reset. When this option is enabled (with checkmark), the QVConfig software will broadcast the command, allowing for simultaneous execution of the command. NOTE: This feature should always be enabled. • Automatically Backup Files to Hard Drive When enabled (with checkmark), the QVConfig software will save all backup files to the computer hard drive’s “c:\Rose Electronics_VCC\Backup\” folder. You may change this by clicking Browse to select a different location to save the backup information. • No Signal Size Refer to When the window is unable to detect a signal, this setting will serve as the basis for the QVConfig software to adjust the window size. NTSC: maximum window size is 816×465. PAL: maximum window size is 816×560. 34 Installation and Operations Manual QuadraVista HDMI Properties Upon clicking QuadraVista HDMI Properties, the following screen appears: Installation and Operations Manual 35 1. The Active Window Border feature allows you to set the border color of the active window. Each pixel / line can be set to have a different color, and all lines can be set to be the same color (All Lines) by clicking the radio button to select the Line #. Then click Select Color to choose the color. There are eight options for choosing the 3D border. Click the radio button for one of the 3D borders to select it. 2. To swap the two mouse buttons so that you can use the right button as the left button, click the checkbox to enable Switch primary and secondary buttons. 3. If the item Transfer control to This Computer is enabled (with checkmark), mouse / keyboard control will transfer to the particular window (computer) that has just entered full screen mode. NOTE: Default setting is disabled (mouse / keyboard control does not transfer to a particular computer that enters full screen mode). 4. Click the radio button for Return to previous layout when pressing Pause/ Break key under the item When Returning From Full Screen to Host Mode if you wish to return the display to the previous layout upon pressing the Pause/Break key. NOTE: Default setting is Remain Full Screen when pressing Pause/Break key. 5. When the item Swap with Active Window is enabled (with checkmark) – the action of entering a computer window (other than the current active window) will cause both active and newly entered windows to swap position. 36 Installation and Operations Manual NOTE: Default setting is enabled for this item. 6. Click Select Color to change the background color of the pop-up selections (default color is dark blue). 7. The Audio Status feature allows you to set the color indicator showing whether audio is turned On / Off for a window (only one window can output audio at a time). There are eight colors for choosing the audio status. Click the On radio button, and then click one of the color boxes to select. Do the same for the Off radio button. You can also turn on (with checkmark) / off the Audio Indicators. 8. Click OK when finished and exit the QuadraVista HDMI Properties window. The QVConfig software still retains the settings until the next time you change the settings in the QuadraVista HDMI Properties window or return the system to the factory-default state. Module Parameter The following are the items appearing under Module Parameter. Reset This allows you to refresh the module (the current settings on the QVConfig software will be the same as for the module). Detect Display Resolution The QuadraVista HDMI can automatically detect the display’s optimum resolution. To enable or disable this feature, click Detect Display Resolution to toggle between on (with checkmark) or off. NOTE: When the Detect Display Resolution option is set to On, all the presets will be displayed in the optimum resolution. Installation and Operations Manual 37 Output Timing There are two output timings: Normal and VESA. Normal output timing is designed for some brands of monitor displays that do not support the VESA standard. The default setting for output timing is Normal. Turning On / Off All Labels To turn on / off all labels for all the windows, click ON / OFF. Label NOTE: Make sure to turn on all labels (see previous item) before setting the label properties. This allows you to adjust the Font Color, B-G (background) Color, and font Size for all labels in the group. NOTE: Keep in mind that each window supports one line of text (up to 30 characters). BMP Label support may not be available on your model. 38 Installation and Operations Manual Setting Border Properties Borders are turned on by default. To turn off borders, perform the following steps: 1. Upon clicking Border, the following screen appears. Change the Border Width to 0. 2. You can also change the border color. Each pixel / line can have a different color Installation and Operations Manual 39 3D border 40 Installation and Operations Manual Setting Alarm Properties This allows you to set up the notification when a signal is missing. To set the alarm properties, click Alarm and the following screen appears. By clicking Module Alarm Switch, you will set the Process / Video Alarm Switch and adjust the No Video’s Response Time. OSD This allows you to turn on (with checkmark) or off your QuadraVista HDMI’s OSD (on screen display) feature. Click on the item to toggle between on / off. Installation and Operations Manual 41 Window Size There are three sizes that can display all the windows in a group: 4:3, 16:9, or Lock Aspect Ratio. When changing the width of the window, the height will automatically adjust to match the aspect ratio. When Lock Aspect Ratio is set to On, the aspect ratio of the video display will be maintained, even if the window is stretched. If the image is 4:3 and it is stretched to 16:9, the results are two vertical black bars appearing on either side of the display. If the image is 16:9 and it is scaled down to 4:3, then it will have a letterbox effect. Background Picture This allows you to turn on (with checkmark) or off your QuadraVista HDMI’s display of background picture on monitor display. Click on the item to toggle between on / off. IP Address This allows you to change to an IP address different from the default one. 42 Installation and Operations Manual GUI View Menu This allows you to set the QVConfig control window’s display size. For example, when the resolution under Set Output Mode is 800×600, the GUI View set at 50 % would give you a 400×300 QVConfig control window display size, while a GUI View set at 25 % would give you a 200×150 QVConfig control window display size. Special Screen Layout Menu Some special screen layouts are available for the QuadraVista HDMI: • • Layout 1 (Default 2×2) – quad split mode Layout 2 (Briefing) – cycle between presets for a slideshow effect Installation and Operations Manual 43 Help Menu Read BIOS Version To find out the QuadraVista HDMI’s firmware version, perform the following steps: 1. Click Help, and then click Read BIOS Version. 2. When the following screen appears, click Export. 44 Installation and Operations Manual 3. Assign a filename and click Save to save the data. Update Signal Type / Format To update signal type / format, click Update Signal Type / Format. The following sample screen shows the entire image’s signal type / format. Installation and Operations Manual 45 Backing Up Presets To back up a preset, perform the following steps: 1. Click Help, and then click Backup All Information. 2. The following warning message will appear. Click OK to continue. 3. The following warning message will appear when back-up is successful. Click OK to continue. 46 Installation and Operations Manual Restoring Presets To manually restore a preset, perform the following steps: 1. Set the QuadraVista HDMI to the factory-default value (refer to Appendix A Resetting to the Factory-Default State for details). 2. copy the backup data “xxxx#_#” into the “c:\RoseElectronics_VCC\Backup\IPxxx.xxx.xxx.xxx\” location. 3. Run the QVConfig software and select Yes when prompted whether to restore the QuadraVista HDMI using the backup data. 4. Click Help, and then click Restore Module Information. You should see a progress bar showing the preset being loaded into the QuadraVista HDMI . 5. When the following screen appears, the checking result has confirmed that everything is normal. If that is the case, click Cancel to exit the restoring of preset(s). You may skip steps 6 and 7 Installation and Operations Manual 47 NOTE: You can click to enable the Forces checkbox (located on the upper right corner) that allows the backup information to be written to the module’s flash memory. The Restore button will then be enabled so you can click on it. If the checking results shows an Abnormal report, confirm if the backup Path is correct. Then click Restore. NOTE: You can click to enable the Forces checkbox (located on the upper right corner) that allows the backup information to be written to the module’s flash memory. The progress of the restore process will be shown. If the backup Path is incorrect, click Browse on the previous screen to select the correct location. Then click OK on the next screen to continue. 48 Installation and Operations Manual 6. Click OK to continue when the next screen appears. 7. Click OK when the next screen appears to restart the QVConfig software. NOTE: If, upon clicking Restore Module Information on the Help menu, the following error message appears, click OK. On the next screen, click Browse. Installation and Operations Manual 49 On the next screen, click Browse again to specify the correct backup Path. 50 Installation and Operations Manual Read QVConfig Information Click Help, and then click About. You should see a pop-up box showing the QVConfig software information Quick Keys – Change Window to / from Full Screen Mode; Swap Window Contents Two quick keys are available that allow you to quickly bring a window to / from full screen mode as well as swap the contents from one window to another by performing the following steps: 1. To change to full screen mode, double-click the mouse on a window. Double-click again to return from full screen mode. 2. To access the swap window quick key, move your cursor to the bottom left hand corner of a window until a capital letter S appears. 3. Click on the capital letter S to select the source window and then click again at a destination window where you want to swap the contents from the source. This will swap all the contents and properties of the source window to the destination window. Installation and Operations Manual 51 Window Layout Using the Default Window Layouts Three default window layouts are available: Layout1.GP1 Layout2.GP1 52 Installation and Operations Manual Layour3.GP1 NOTE: To switch between the three factory-default presets, use the Page Up / Page Down keys. Refer to Chapter 2 on “Using the Keyboard” for more details. Installation and Operations Manual 53 Arranging Windows To quickly set up the layout for your video windows, right-click the mouse on the title bar to access the Group Layout menu. Select from 2×2 up to 7×7 as possible grid positions on the monitor display. NOTE: • The layout size available for your particular model will depend on the monitor display’s resolution as well as the smallest window size limitation. • An 8×8 grid position is possible when the OSD (on screen display) is turned off. Repositioning an Individual Window To reposition a window, perform the following steps: 1. Drag the center of a window and drop to a new position and it will update on the monitor display. Or, 54 Installation and Operations Manual Option Window 2. Use the Position Fine Adjustment menu to adjust the position of any window on a pixel by pixel basis. Keep in mind that the width increases in 16 pixel increments and the height in 1 pixel increments. Installation and Operations Manual 55 Mouse Right-click Menu To change the properties of an individual window, right-click the mouse on the particular window to access the window’s menu. 56 Installation and Operations Manual Resizing Window To resize a single window to one of the preset sizes, perform the following steps: 1. Right-click the mouse on a particular window and select Size, followed by the desired preset size selection. Alternatively, resize a window by dragging the border of a window to the desired size. Keep in mind that there is a scaling limitation for each window that limits the maximum scaleable size to 816×465 pixels for NTSC video and 816×560 for PAL video. Another option is to use the Size Fine Adjustment menu to adjust each window on a pixel by pixel basis. Keep in mind that the width increases in 16 pixel increments and the height in 1 pixel increments. Installation and Operations Manual 57 On a particular window select Full Screen to maximize the image and fill up the whole screen. 58 Installation and Operations Manual Setting Label Properties Right-click the mouse on a window and select Label to enter text. Keep in mind that each window supports one line of text (up to 30 characters). Installation and Operations Manual 59 BMP Label: Allows you to activate the Universal fonts for labels by performing the following steps: 1. Click to enable the BMP Label checkbox (with checkmark). 2. Click the BMP Label Font Type button. 3. When the Font window appears, set the Font, Font style, and Size. Then click OK. 4. On the Line 1 window enter a label in the desired language by first selecting the language on the Windows taskbar. 4. Repeat the above steps for all the other windows. NOTE: BMP Label feature may not yet be available on your model. 60 Installation and Operations Manual Setting Border Properties Borders are turned on by default. To turn off the border, perform the following steps: 1. Upon clicking Border, the following screen appears. 2. 3. Change the Border Width to 0. You can also change the border color. Each pixel / line can have a different color Installation and Operations Manual 61 3D border 62 Installation and Operations Manual Set Alarm Upon right-clicking a particular window, select Set Alarm and the following screen will appear. • • • Module / Process Alarm Switch: to turn on the alarm setting, make sure that both options are enabled (with checkmark). Video Alarm Switch: to turn on / off the “no video” signal. Response Time (Second): to set the “no video” alarm response time from 0 to 23 seconds. Installation and Operations Manual 63 Check Signal To determine if the video signal is being fed into the selected window, rightclick the mouse on a particular window and click Check Signal. The following screens will appear. Sample DVI-I Input Sample HDMI IN Input Quick Cropping an Image on a Window This allows you to crop an image on a particular window. Upon clicking Quick Crop Image Box Size, press the left mouse button to create a starting point and then drag to the desired location. Let go of the left mouse button to set the end point. A cropped out image of the former window will be created. NOTE: The smallest allowed size of crop area is 96×80 pixels, based on the QuadraVista HDMI’s output resolution (not based on the “source” resolution). 64 Installation and Operations Manual Specifying the Size of a Cropped Image This allows you to set the specific size of the crop (cut-out) image on a particular window. Freely adjust the horizontal (Left and Right) and vertical (Top and Bottom) markers, or enter the numerical value to set the size of the cropped image. Then click the Update button. A cropped-out image of the former window will be created. Restore This allows you to undo the previous cropping action and restore the image prior to cropping (1:1). Then adjust (enlarge) the window size manually by dragging on the sides / corners. Pan Image This allows you to use the mouse to pan (see the NOTE below) the cropped image window (zoom in area) by clicking the Pan Image item. Click the Pan Image item again to disable this function. Installation and Operations Manual 65 NOTE: To pan is to move the image around in the image window, usually when the image is larger than its window. Panning changes the image view in the same way that scrolling moves the image up, down, to the left, or to the right in the image window. When the entire image is not displayed, you can quickly pan to see parts of he image that were previously hidden. Aspect Auto Detect This allows you to set the input signal’s aspect ratio for a particular window. If the input signal is of a different aspect ratio than the monitor in which it is displayed, you may change the monitor’s aspect ratio to display the signal without deformation. 1. Right-click the mouse on a particular window and click Aspect Auto Detect. When the next screen appears, click the mouse to select Enable and then select the desired aspect ratio. 2. Click Update, and the click OK 66 Installation and Operations Manual Turning On / Off the Window / Label 1. The Option window has two checkboxes that can be used to close an image window (W) or turn off the label (L) for each window. 2. To turn off a window or label, find the checkbox that represents the selected window and check to enable or un-check to disable the Window or Label. Saving to a Flash File There are two instances for which you will need to use the save to flash feature: • After creating the master layout and you want the QuadraVista HDMI to load it again when the unit is power cycled (shutdown and restart). • After you are done saving presets and you want to save all the presets that were created (up to 22) into the internal flash memory of the QuadraVista HDMI. If this action is skipped, the QuadraVista HDMI will lose all the presets that were created. Installation and Operations Manual 67 To save to flash, perform the following steps: 1. Click Save File in the Option window. 68 Installation and Operations Manual 2. Click Update to Module Flash, and then click OK. Alternatively, close the QVConfig software and select Yes when prompted to save. Saving a Preset All the presets you create (up to 22) are stored in the QuadraVista HDMI itself, not in the computer that is running the QVConfig software. In order to write all the presets into the internal flash memory of the QuadraVista HDMI after creating it, you will need to save to flash. To save a preset, perform the following steps: 1. Configure the layout you want the QuadraVista HDMI to display. Installation and Operations Manual 69 2. Click Save File on the Option window. 70 Installation and Operations Manual 3. When the next screen appears, enter a unique filename for the preset, and select OK to save. The file extension “GP#” will be automatically added to the file name. 4. Repeat the above steps for each additional preset. 5. After you are done creating presets, load the file that you want to be the master layout, which gets loaded when the module is powered on. 6. Close the QVConfig software and select “Yes” when prompted to save to flash. Installation and Operations Manual 71 Loading File 1. In the Option menu, click Load File. 72 Installation and Operations Manual 2. Select a saved file, and then click OK to load the preset. NOTE: • When saving your preset do not use the same filename as the system’s default preset filename (e.g., layout1.GP1 / layout2.GP1 / layout3.GP1). • The sequence for loading the preset file when using the hotkeys ( / ¯ arrow keys) is based on the time when the preset file was first created and saved. Subsequent modification and saves will not affect this sequence (order). • The hotkey Ctrl + S can save the latest preset to flash memory so that on the next boot-up the preset will be loaded. Installation and Operations Manual 73 Making Adjustments 1. In the Option menu, click Adjustment. 74 Installation and Operations Manual 2. The following screen appears. 3. Select the Image Window, then you can adjust the input signal such as, Brightness (0 – 255), Saturation (0 – 255), Contrast (0 – 255), and Hue (0 – 255) parameters directly by using the sliders or clicking the radio button. Click the Default button on the lower right portion of the screen to reset the values to the factory-default. NOTE: Saturation and Hue is not available for DVI signal input. Installation and Operations Manual 75 Audio Delay 1. In the Option menu, click Check Audio. 2. When the following screen appears, click the audio Check option. 76 Installation and Operations Manual 3. 4. 5. 6. 7. Select the Process window on the drop-down menu. Select the correct Input Source. Select the desired Output channel. Use the slider to set the Audio Delay time (Millisecond). Use the slider to select the desired Volume level. Click the Mute checkbox to quickly turn off the volume. 8. Use the slider to set the Audio Fade-in time (Second). 9. Click the Update button and click OK to exit. Control Video Fade This allows you to set the speed that an overlapping window will fade into the background when another window becomes the active window. 1. In the Option menu, click Fader Control. Installation and Operations Manual 77 2. The following screen appears. 3. Adjust the Fading Speed directly by using the slider to select Slow (1) – Fast (10). Then click OK. 78 Installation and Operations Manual ASCII Protocol The QuadraVista HDMI series supports the ASCII command prompt interface. You can use HyperTerminal to control your QuadraVista HDMI series. The RJ-45 port (IP) on the QuadraVista HDMI series can also be used to interface with a third-party controller for control over IP. This chapter familiarizes you with using the Rose Electronics ASCII Protocol (AAP) of the QuadraVista HDMI series via Microsoft® Windows HyperTerminal function as an example. Entering the ASCII Z Command Interface To startup the ASCII Z command interface, perform the following steps: 1. Make sure you have a binary file editing program installed in your computer. 2. Run the binary file editing program and use the following command syntax to create and save the sample binary file– unsigned char 0x55,0xAA; unsigned char 0xF8,~0xF8; unsigned char strlen(prompt$)+ 2,~(strlen(prompt$)+2); //command head //command ID //commandlength unsigned char FunctionID; unsigned char prompt$[]; unsigned char 0x00; //must be 0x07 //must end by 0x00 !!! //command tail Using the below binary text string as an example– 0x55 0xAA 0xF8 0x07 0x0B 0xF4 0x07 “ZA 000000” 0x00 Execute “ZA 000000” = arranges all windows to its proper size and position NOTE: The double-quote “” of sample string “ZA 000000” is just for string expression, there are no quote characters (0x22) in the command contents (actual memory dump of command). Installation and Operations Manual 79 Going back to the sample binary text string listed above– 0x55 0xAA 0xF8 0x07 0x0B 0xF4 0x07 “ZA 000000” 0x00 It is therefore composed of the following parts (follow the color coding)– 0x55 0xAA 0xF8 0x07 0x0B 0xF4 0x07 0x5A 0x41 0x20 0x30 0x30 0x30 0x30 0x30 0x30 0x00(End of string) 0x00(command tail) 3. Connect the HyperTerminal’s RJ-45 port (computer) to the QuadraVista HDMI series IP port. 4. On your computer, click Start, All Programs, Accessories, Communications, HyperTerminal. The following screen will appear. 80 Installation and Operations Manual 5. Click the Properties icon. 6. The following screen will appear. Select TCP/IP (Winsock). Installation and Operations Manual 81 7. Enter “210.100.100.151” for Host address and “20036” for Port number. Then click OK to continue. 8. Make sure to press Ctrl + Esc hotkeys first in order to exit the MKC (mouse keyboard controller) mode. 82 Installation and Operations Manual 9. Click the Call icon. 10. When the next screen appears, assign a Name to the connection. Then click OK. Installation and Operations Manual 83 11. Click Transfer Send Text File. 12. When the next screen appears select the binary file and then click Open. 84 Installation and Operations Manual 13. After sending the text file, click the Disconnect button to end the call. ASCII Z Command Format The ASCII Z command is comprised of the following parts: Header Group/Module/Window Assignment Parameter 1 Parameter 2 ... The following is a list of rules to follow when entering the ASCII Z command: • It is acceptable to enter commands in small or capital letters, and the five columns are separated by a space. • Header = z + command character Installation and Operations Manual 85 • • • • • • Group/Module/Window Assignment (GGMMPP) = is comprised of six Arabic numerals. This is used in designating the device’s Group/Module/Window Assignment. Group = is comprised of the first two numbers, “00” is the fixed value. Module = is comprised of the middle two numbers, “00” is the fixed value. Window Assignment = is comprised of the last two numbers (01 – 04), “00” is used to pertain to all window assignments. Parameter 1 of color assignment (RRRGGGBBB) = is comprised of nine Arabic numerals, this is used to designate the color. Parameter 2 of on / off switch = “1” signifies ON while “0” signifies OFF. The following is a list of available ASCII Z commands: ZA Format: Function: Examples: ZA GGMMPP [NByN(2,3,……)] [Nth(1,2,……)] to set the automatic arrangement of windows. ZA 000000 2 1 Set all windows to a 2×2 map position 1,2,3,4 (quad). ZA 000002 3 2 Place window 2 to a 3×3 map position 2. ZA 000000 6 13 Place all windows to a 6×6 map position 13,14,15,16. ZA 000000 Automatically arrange all windows to the optimum size and position. ZC Format: ZC GGMMPP B[order]/L[abel] RRRGGGBBB (red ratio 000 – 255, green ratio 000- 255, blue ratio 000 - 255) (NoDimColor) Function: to set the border of the window (with / without dimming effect) and label’s background color. Description: B[order] to signify the border of the window. L[abel] to signify the label’s background color. [NoDimColor] to signify the border’s dimming effect. You can add [NoDimColor] to remove the border’s dimming effect. Just enter NDC to signify NoDimColor. 86 Installation and Operations Manual Examples: ZF Format: Function: Examples: ZL Format: ZC 000001 B 000255000 sets the border color of window 1 as dim green. ZC 000002 B 255000000 ndc sets the border color of window 2, as pure red. ZC 000003 L 000000255 sets the label’s background color of window 3, as dim blue. ZF GGMMPP 1 (on) / 0 (off) to turn on / off the video window’s full screen mode. ZF 000004 1 sets window 4 to full screen mode display. ZF 000004 0 disables full screen mode for window 4 and reverts it back to its former display size. ZL GGMMPP 000000000 (text color RRRGGGBBB) 000000000 (label color RRRGGGBBB) "TEXT" (always center-aligned, label text string 32 ASCII characters maximum but it will depend on the font size. For example, upon entering label text "0123456789" at font size 3, QuadraVista HDMI will just show "012345678"). NOTE: QuadraVista HDMI series do not support transparency. Function: to set the label’s text and text color. Examples: ZL GGMMPP 0 255000000 000000255 "CNN News Station" sets GGMMPP text color red, label color blue, with text "CNN News Station. " Installation and Operations Manual 87 ZM Format: ZM GGMMPP ## (resolution number) NoAuto arrangement Function: to change the output resolution, the resolution number refers to the list of resolutions that QuadraVista HDMI series supports. Description: Vertical Frequency Resolution 800 × 600 1024 × 768 1280 × 720 1280 × 768 1280 × 1024 1360 × 768 1400 × 1050 1440 × 900 1600 × 1200 1680 × 1050 1920 × 1080 1920 × 1200 252: VESA timing 255: normal timing 50 Hz 42 31 30 32 29 38 34 46 39 41 28 37 60 Hz 1 2 15 22 9 20 35 45 10 40 26 36 75 Hz 47 11 48 49 12 21 50 51 52 53 N/A N/A Examples: ZM 000000 10 set to display at 1600×1200 resolution at 60 Hz vertical frequency, and automatically arrange all windows to the proper size and position. ZM 000000 9 NA sets all the windows to have a 1280×1024 resolution at 60 Hz vertical frequency with no automatic arrangement. 88 Installation and Operations Manual ZN Format: Function: Examples: NOTE: ZO Format: Function: Description: display’s Examples: ZN GGMMPP option (O[SD]/B[order]/L[abel]/W[indow]) 1 ( on) / 0 (off) to turn on / off various options. ZN 000000 O 0 turns off the OSD (on screen display) of all windows. ZN 000001 O 1 Turns on the OSD of window 1. ZN 000002 B 0 turns off the border of window 2. ZN 000003 L 1 turns on the label of window 3. ZN 000000 W 0 turns off all the windows. The image window will be positioned at (0,0) and be 1/16 of display size upon turning on a closed image window. ZO GGMMPP [1 (on) / 0 (off)] / [In 0 (analog) / 1 (digital) / Out 0 (analog) / 1 (digital)] / [volume 0 ~ 9 where 0 is mute] / [delay 0 ~ 9 where 0 is no delay] set the audio output. Volume control is not available for audio signal from the HDMI OUT port of your QuadraVista HDMI to the monitor speakers. Due to video / image processing delays one could achieve audio / video sync by adjusting audio delay. ZO 000001 1 turns on the audio of window 1 ZO 000002 1 1 1 5 9 turns on the audio of window 2, digital input signal, digital output signal, volume set at level 5, and audio delay set at level 9. ZO 010102 0 turns off the audio of window 2 in module 1 in group 1. Installation and Operations Manual 89 ZP Format: Function: Description: Examples: ZR Format: Function: Examples: 90 ZP GGMMPP L[oad] / S[ave] “filename.GP#” ZP GGMM (for listing presets) load a previously saved preset or save current layout to a preset, as well as list presets. If the filename includes space(s), use double quotation marks to signify the complete filename. If the filename is not specified when saving the file, system will backup the file into flash memory. ZP 010000 L “Group 1.GP1” sets all the windows in group 1 to load the previously saved Group 1.GP1 preset file ZP 010000 S “Group 2.GP1” saves the current layout of all windows in group 1 to a preset file Group 2.GP1 ZP 000000 S saves the file of all the windows into flash memory. ZR GGMMPP HD (width ratio) HD (height ratio) to lock and adjust the video ratio. ZR GGMM01 4 3 sets GGMM window 1’s HD video ratio as 4:3. ZR 000000 16 9 sets all windows’ HD video ratio as 16:9. ZR GGMMPP 7 12 sets GGMMPP’s HD video ratio as 7:12. ZR GGMMPP 0 0 disables the function by setting the width ratio or height ratio = 0. Installation and Operations Manual ZW Format: ZW GGMMPP X position Y position W(idth) H(eight) ZW GGMMPP C[rop] 1 (on) / 0 (off) X (width) Y (height) Function: to set the window’s position and size, appear as the topmost window, and crop. When cropping, the width and height are calculated using the output display size. For example, if the output display timing is 1280×1024 at 60 Hz, and you just want to display the right bottom quarter of the input image: Crop X = 1280 / 2 = 640 (crop width = 1280 / 2 = 640) Crop Y = 1024 / 2 = 512 (crop height = 1024 / 2 = 512) There is no need to take into consideration the input image size and position, or the size of the window. When cropping it is always assumed that the input image size is equal to the output display size. Examples: ZW 000001 sets window 1 as the top window. ZW 000001 100 200 300 400 sets window 1 at (100,200) top-left position and (400,600) bottom-right position. ZW 000001 0 0 0 0 turns window 1 off by setting the width or height to be 0. ZW 000002 C 1 100 100 320 240 crop window 2. ZW 000004 C 0 disables crop on window 4. ZX Format: ZX GGMMPP "label text" (supports ASCII characters only – include the quotation marks) # (font size 1 – 4) Function: to change the label text and font size. Description: Include the quotation marks when entering the label text. The label will appear center-aligned on the window, maximum of 32 characters for each label. The width of the label’s background is fixed (follow the window’s width). Examples: ZX 000000 "Input 1" Input 1 will appear as the label for all the windows. ZX 000000 3 sets all window’s label font size to 3. Installation and Operations Manual 91 SPECIFICATIONS Specifications Input 1 × USB-B (for remote computer’s mouse, keyboard control) 1 × USB-A (for direct mouse control) 1 × USB-A (for direct keyboard control) 1 × analog audio (microphone) Rear panel 4 × DB-15 (for USB / PS-2 / audio inputs from computer) 1 × RJ-45 (Ethernet) 4 HDMI / DVI (via optional DVI-to-HDMI adapter) HDMI (480i, 480p, 576i, 576p, 720p, 1080i, 1080p) DVI-in (resolution up to 1920×1200) Automatic sensing of input signals HDCP-compliant Output Front panel 1 × analog audio (stereo, headphone) 2 × speakers (stereo, embedded) Rear panel 1 × HDMI (customer-configurable) Resolution up to 1920×1200 (WUXGA) at 50 / 60 Hz or 1600×1200 (UXGA) at 75 Hz Peripheral Sharing 2 × USB-A (for USB 2.0 hub) CPU connections Up to 4 units (maximum) LED indicators PC1 / PC2 / PC3 / PC4 Indicates when computer 1 / 2 / 3 / 4 connection is in Active or Standby mode MODE Indicates when QuadraVista HDMI is in Host or Remote mode PWR Indicates when QuadraVista HDMI is on Port switching method Using keyboard hotkeys Using mouse combination keys Via OSD (pop-up menu) Power supply Input: 100 – 240 V, 50 / 60 Hz, Output: 12 V DC, 5 A, 60 watt Power consumption 25 watt Dimension (L×W×H) 260.6×174×44 mm (10.3×6.9×1.7 inch) Weight 1.26 kg (2.8 lb) Housing Metal Environment Temperature Operating: 0°C (32°F) to 40°C (104°F) Storage: –10 °C (–4 °F) to 50 °C (122 °F) Humidity 0 % to 80 % relative, non-condensing Safety regulations FCC / CE / C-Tick / Class B 92 Front panel Installation and Operations Manual Cable Part Numbers QUARDVISTA HMDI CABLE P/N Description CAB-QVHAXX005 CAB-QVHXPX005 CAB-QVHXXU005 Audio only PS/2 only USB ony CAB-QVHAPX005 CAB-QVHAXU005 PS/2 w/Audio USB w/Audio CAB-QVHAPU005 PS/2, USB w/Audio CAB-QVHAXX010 CAB-QVHXPX010 CAB-QVHXXU010 Audio only PS/2 only USB ony CAB-QVHAPX010 CAB-QVHAXU010 PS/2 w/Audio USB w/Audio CAB-QVHAPU010 PS/2, USB w/Audio Installation and Operations Manual 93 TOUCHSCREEN Touchscreen Monitor Display The following figure shows a typical setup with QuadraVista HDMI unit connected to four computer systems and a touch screen monitor display via a USB hub 94 Installation and Operations Manual To set up the QuadraVista HDMI with four computer systems, perform the following steps by referencing the previous figure: WARNING: DO NOT place any objects on the top or side panels of the QuadraVista HDMI to avoid affecting its internal components heat dissipation process. 1. Connect one end of the all-in-one cable to the SOURCE 1 connector on the rear panel. Connect the other end to the first computer system’s USB / PS-2 and audio ports by matching the colors of the respective connectors. 2. Connect another all-in-one cable to the SOURCE 2 connector on the rear panel and the other end to the second computer system’s USB / PS-2 and audio ports. 3. Connect another all-in-one cable to the SOURCE 3 connector on the rear panel and the other end to the third computer system’s USB / PS-2, and audio ports. 4. Connect another all-in-one cable to the SOURCE 4 connector on the rear panel and the other end to the fourth computer system’s USB / PS-2, and audio ports. Installation and Operations Manual 95 IMPORTANT: We highly recommend using a USB connection instead of a PS-2 connection when available. In case no USB connection is available and you must use a PS-2 connection, make sure to first power to the QuadraVista HDMI (refer to a later step), then turn on your computer system afterwards. (For Windows 2000 users) Upon connecting the USB device for the first time on your computer system, you may be required to perform the on-screen steps to be able to use the USB device. 5. Connect the touch screen monitor display’s DVI / HDMI signal cable (a DVI-to-HDMI converter may be required) to the HDMI OUT connector on the rear panel. 96 Installation and Operations Manual 6. Connect a USB hub to the mouse or keyboard USB ports located on the front panel. Then connect the touch screen monitor display to the USB hub. 7. Connect the mouse and keyboard devices to the USB hub. 8. Connect one end of the 12 V DC power adapter to the power jack by turning the head to screw it on securely. NOTE (for USA customers only): Connect one end of the included AC power cord to the 12 V DC power adapter and the other end to a power outlet (make sure that power is available). Installation and Operations Manual 97 9. Press the power switch On/Off to the ON position. The image will be displayed on the monitor display. 10. Turn on the power or re-boot the connected first / second / third / fourth computer systems NOTE: There is no need to re-boot the computer system(s) if you are using the USB connection. 11. Press Ctrl + T on your keyboard to perform screen calibration (when using your touch screen monitor with the QuadraVista HDMI for the very first time, or upon resetting to the default state). Use your finger tip or a stylus to tap and continue pressing on the center of the symbol that will appear on the top left portion for approximately five (5) seconds until the next symbol appears on the top right portion. Perform the same step for this, as well as the symbol that would appear on the lower left portion and lower right portion of your monitor display. 12. Upon completing screen calibration, the four windows will re- appear on screen. Move the mouse or press the Pause/Break key and you will see the mouse pointer on the monitor display. 98 Installation and Operations Manual 13. Move the mouse pointer to the window’s top right portion of the particular computer. When the pop-up menu appears click the “” symbol. You can now use the mouse or keyboard hotkeys to perform various tasks (refer to the hotkeys functions). The default mouse and keyboard is located on the (Host) end. 14. To enable audio output on any window, double-click the audio tally and it will turn to to signify that audio output is coming from a window. Use the “Ctrl + O” (mute) and “” (decrease volume level) / “” (increase volume level) hotkeys for audio control. Installation and Operations Manual 99 Audio Tally To enable audio output on any window, tap twice on the audio tally to signify that audio output is coming from the and it will turn window. For cascaded system – or ) the first time to cause any Double-click the audio tally ( other tally to turn . Then, double-click the same audio tally again and it will turn to to signify that audio output is coming from the selected window. NOTE: By default, the audio output would correspond to the active window. To enable audio output other than the active window, disable the item Audio Output from Active Window (remove checkmark) under Settings System Parameter Properties 100 Installation and Operations Manual Move / Resize Window To move a window, tap anywhere near the center of a particular window and symbol appears, drag the window to a new position. when the To resize a window, tap anywhere near the edge of a particular window and when the desired direction arrow appears, drag the border of a window to a desired size. Installation and Operations Manual 101 Exit From Remote Operation Mode to Host Operation Mode For example, to exit from the Remote operation mode (Source 1 is the active window) to the Host operation mode, tap twice anywhere outside the active Remote window (includes tapping twice on any other Remote window) 102 Installation and Operations Manual To exit from the Remote operation mode (when in full screen mode) to the Host operation mode, tap and continue pressing (approximately 1.5 second) the upper or lower areas indicated by the red rectangles below Installation and Operations Manual 103 Switch Control (Cycle) Between Windows For example, to switch control from window 1 window 2 (equivalent to pressing the F2 key or Shift + F2 key when using the keyboard for control), tap and continue pressing (Approximately 0.5 seconds) anywhere on window 2. 104 Installation and Operations Manual NOTE: Window swapping when switching control between windows is only possible when the item Swap with Active Window is enabled (with checkmark – default setting). Installation and Operations Manual 105 To switch control (cycle – when in full screen mode) from window 1 window2 window 3 window 4 window 1 (equivalent to pressing the Ctrl + Pause/Break keys when using the keyboard for control), or switching control backward (cycle) from window 1 window 4 window 3 window 2 window 1 (equivalent to pressing the Shift + Pause/Break keys when using the keyboard for control), tap and continue pressing (approximately 1.5 second) the left or right areas indicated by the red rectangles below. 106 Installation and Operations Manual 10707 Stancliff Road Houston, Texas 77099 Phone: (281) 933-7673 www.rose.com