1
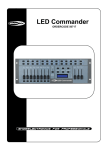
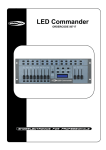
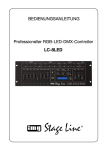
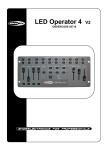
Description of the device
Features
The LED Operator is a light controller from Showtec and features:
Easy to use
8 RGB fixtures
Free patchable RGB and dimmer channels
- 1,25 A
LCD display
One Chase can contain a max. of 1740 steps
total of 1740 steps
512: 16 individual DMX channels per fixture
128 individual DMX total
-512: XLR 3 pole
Individual RGB Channel Faders
Grand Master Fader
Record Function to Record Colors and Chases
Speed & Fade faders for Chase control
NOTE:
Knowledge of DMX is required to fully utilize this unit.
Overview
Fig. 1
5
Controller Front
Fig. 2
1) Fixture buttons and LED indicators 1-8: Use Fixture button 1-8 to select a fixture.
2) Scenes buttons and LED indicators 1-8: Push a scene button to activate a scene.
3) Chase buttons and LED indicators 1-8: Push a chase button to activate a chase.
4) Aux Buttons: AUX 1 and AUX 2
5) Red Fader: Use the fader to manually set the intensity of the color red.
6) Green Fader: Use the fader to manually set the intensity of the color green.
7) Blue Fader: Use the fader to manually set the intensity of the color blue.
8) Color Fader
9) Strobe Fader
10) Sound Fader
11) Dimmer Fader
12) MASTER Fader: Use the Master fader to manually control overall intensity.
13) Flash buttons 1-8
14) Page button + Page 1/2 LED indicators : When the Page 1 indicator is lit, scenes 1-8 and chases 1-8
are active. When the Page 2 indicator is lit, scenes 9-16 and chases 9-16 are active.
15) Record button: Use the Record button to enter Record Mode.
16) TAP SYNC button
17) LCD Display
18) Black Out button: Press the Black Out button to cut all output.
19) Mode/Up button incl Auto/Music/Manual LED
20) Midi Button
21) Patch/Down button
22) AUDIO Fader: Use the Audio fader to set the audio sensitivity in Music Mode.
23) SPEED Fader: Use the Speed fader to manually set the chase speed during playback.
24) FADE TIME Fader: Use the Fade Time fader to manually set the Fade Time during playback.
Controller Backside
Fig. 3
25) DMX OUT
26) DMX Polarity Switch
27) USB Light
28) Audio Input: This jack accepts a line level audio input signal ranged from 100 mV to 1Vpp.
29) MIDI Thru: MIDI port for connection to a sequencer or MIDI device.
30) MIDI Out: MIDI port for connection to a sequencer or MIDI device.
31) MIDI In: MIDI port for connection to a sequencer or MIDI device.
32) DC power DC 9-12V 800mA
33) ON/OFF
Installation
Remove all packing materials from the LED Commander. Check that all foam and plastic padding is
removed. Connect all cables.
Always disconnect from electric mains power supply before cleaning or servicing.
Damages caused by non-observance are not subject to warranty.
Set Up and Operation
Before plugging the unit in, always make sure that the power supply matches the product specification
voltage. Do not attempt to operate a 120V specification product on 230V power, or vice versa.
Operation
For more information about working with the LED Commander, you can also view:
Link: http://www.youtube.com/showteclight
Channel Assignment
1) Press and hold the Patch/Down button (21) for 3 seconds. The Patch LED will light up red.
2) Choose channel range with the SPEED fader (23). Example: 1, 17, 33, 49, etc.
Range 17: Start at 17 and stop at 32.
3) Choose a DMX channel with the FADE fader (24).
4) Press the fixture button (1) you desire. The Fixture LED will light up blue. You can choose 8 different
fixtures.
5) Now press and release the flash button (13) from the fader you want to patch the DMX channel to.
Example:
This figure shows that DMX channel 49 is patched to the RED fader (5) of fixture 1.
6) Press Patch button for 3 seconds to exit Patch mode.
Factory Reset
1) First turn off the device.
2) Now press and hold the Record (15) button + Tap Sync (16) together.
3) Now switch on the device.
4) The display will show:
5) After 2 seconds the Fixture LEDs 4 and 8 will flash once, indicating the LED Commander is back to
factory default settings.
After the factory reset, the fixture is auto patched:
Fixture 1
Red CH1
Green CH2
Blue CH3
Color CH4
Strobe CH5
Sound CH6
Dimmer CH7
Master CH8
Fixture 2
Red CH9
Green CH10
Blue CH11
Color CH12
Strobe CH13
Sound CH14
Dimmer CH15
Master CH16
Fixture 3
Red CH17
Green CH18
Blue CH19
Color CH20
Strobe CH21
Sound CH22
Dimmer CH23
Master CH24
Fixture 8
Red CH57
Green CH58
Blue CH59
Color CH60
Strobe CH61
Sound CH62
Dimmer CH63
Master CH64
Unpatch Channels
1) Press and hold the Patch/Down button (21) for 3 seconds. The Patch LED will light up red.
2) Deselect the fixture. No LEDs should be lit.
3) Use the Speed and Fade faders (23+24). to select the DMX channel you want to unpatch.
4) Press the flash button corresponding to the channel name to unpatch the channel.
Example
If you want to unpatch a certain DMX channel, first deselect all fixture buttons.
Then use the Speed and Fade faders (23+24), until the display shows:
Then press the flash button Red (13).
The display will now show:
Enter Program Mode
1) Press and hold the Record button for 3 seconds. The LED next to to button will light up red.
Exit Program Mode
1) Press and hold the Record button for 3 seconds. The LED next to to button will dim.
Record a Scene
1) Press and hold the Record button (15) for 3 seconds to enter Program Mode.
2) Select the fixture you want to program by pressing the desired Fixture button (1).
3) Set the faders to the desired values.
4) Set the proper page by pressing the Page button. You can choose Page 1 or Page 2 (14).
5) Press the Record button (15) and then press the desired Scene button you want to record.
All LEDs will flash.
6) Press and hold the Record button (15) for 3 seconds to exit Program Mode.
The existing scenes will be overwritten
Play a Scene
1) Deselect all fixtures. All LEDs next to the 8 fixture buttons must be OFF.
2) Select the proper Page by pressing the Page button.
3) To select the desired scene press the Scene button.
4) Scenes can be stored on 2 pages. Each page contains 8 scenes.
Multiple scenes can be mixed together
Scenes will react to the Fade fader (24)
Be sure to use the page button (14).
As an overview you are immediately able to view which scenes are still active on which page.
The LEDs, from the scene or chase that is still active, are on.
Delete a Scene / Overwrite a Scene
1) Press and hold the Record button (15) for 3 seconds to enter Record Mode.
2) Select the fixture you want to program by pressing the desired Fixture button.
3) Set the faders to the desired values.
4) Set the proper page by pressing the Page button (14). You can choose Page 1 or Page 2.
5) Press the Record button (15) and then press the desired Scene button you want to overwrite.
All LEDs will flash.
6) Press and hold the Record button (15) for 3 seconds to exit Program Mode.
Patch more than one channel to AUX
1) Press and hold the Patch/Down button (21) for 3 seconds. The Patch LED will light up red.
2) Use the Speed and Fade faders (23+24) to select the DMX channel you want to patch.
3) Assign the DMX Channel by pressing the AUX1 or AUX2 button (4).
4) Now select the next DMX channel and patch the AUX button (4) again.
Repeat steps 2 and 3 as much as you desire.
Aux channels will fade when the Fade time is set on the Fade fader (24)
The Speed Fader (23) will have no effect on the AUX channels.
Patch more than one channel to Fixture faders
1) Press and hold the Patch/Down button (21) for 3 seconds. The Patch LED will light up red.
2) Use the Speed and Fade faders (23+24) to select the DMX channel you want to patch.
3) Assign the DMX Channel by pressing the channel flash button (13).
4) Now select the next DMX channel and push the same flash button to also assign this channel to that
fader. Repeat steps 2 and 3 as much as you desire.
MIDI function
1) Press and hold the MIDI button (20) for 3 seconds to enter Midi Mode.
2) Use the Speed fader (23) to set the MIDI channel. You can choose CH 1-16.
3) Press and hold the MIDI button (20) for 3 seconds to exit Midi Mode.
The MIDI function can be used to link two LED Commanders together or use a MIDI keyboard to control
the playback of the LED Commander.
AUX function
In patch mode, the AUX button (4)can be patched to the DMX channels.
In program and playback mode, press the AUX button (4) to override the programmed AUX setting.
When you want to change back to the programmed setting, press the MIDI button (4) to change back
to the programmed setting.
The AUX button setting can be programmed into the steps of the chases.
Speed, Fade function.
The speed and fade time of each step of the chase can be set separately.
If you want to override the programmed speed or fade time in playback mode. You can use the Speed
and Fade faders (23+24) to override the programmed speed and fade time.
If you want to return to the programmed speed and fade time, after you have manually overriden the
speed and fade time, jst press the Record button (15) to do so.
Record a Chase
1) Enter Record Mode by pressing the Record button (15).
2) Select the proper Page by pressing the Page button (14).
3) Select the desired chase by pressing Chase button 1-8 (3).
4) Select the desired fixture by pressing Fixture 1-8 (1).
5) Set the faders to the desired values.
6) Press the Record button (15). All LEDs will flash 3 times, indicating your operation has been successful.
7) The display will
, meaning Step 1 in your chase has been recorded.
8) For further steps repeat 5, 6 and 7, until you have completed all the desired steps in your entire chase.
9) Exit Record Mode.
More than 1 fixture can be programmed/selected when creating steps in chases
Play a Chase
1) Deselect all fixtures. All LEDs next to the 8 fixture buttons must be OFF.
2) Select your desired chase by pressing the Chase button.
Delete a Chase
1) Deselect all fixtures, scenes and chases.
2) Enter Record Mode by pressing the Record button (15).
3) Select the proper Page by pressing the Page button (14).
4) Press and hold the Tap Sync button (16). Now press the corresponding Chase button (3), that you want
to delete.
5) Exit Record Mode by pressing the Record button (15).
Add an extra Step to an existing Chase
1) Enter Record Mode by pressing the Record button (15).
2) Select the chase you want to add a step to.
3) Use the Mode/Up and Patch/Down buttons to scroll through the chase. The display will show the
current step.
4) Select the fixture you want to program by pressing the desired Fixture button (1).
5) Set the faders to the desired values.
6) Press the Record button (15) to save a new step. All LEDs will flash 3 times, indicating your operation
has been successful. The new step will be added after the selected one.
7) If you want to add additional steps repeat 4, 5 and 6, until you have added all the desired steps in your
entire chase.
8) Exit Record Mode by pressing the Record button (15).
One Chase can contain a max. of 1740 steps
16 chases can contain a total of 1740 steps
Delete a Step from an existing Chase
1) Enter Record Mode by pressing the Record button (15).
2) Select the chase from which you want to delete a step.
3) Use the Mode/Up (19) and Patch/Down buttons (21) to scroll through the chase and select the step
you want to delete.
4) Push the Tap Sync button (16) to delete the step.
All LEDs will flash 3 times, indicating the step has been successfully deleted.
5) Continue this procedure (steps 2, 3 and 4) if you want to delete multiple steps.
If you are finished deleting the steps, press the Record button (15) to exit Record Mode.
Auto / Music /Manual Mode
Auto
1) Press the Mode button (19) until the LED in front of Auto lights up green.
2) You can control the Speed and Fade Time by adjusting the Speed and Fade Time fader (23+24).
Music
1) Press the Mode button (19) until the LED in front of Music lights up green.
2) You can control the Audio sensitivity by adjusting the Audio fader (22).
Fade Time is available in Music Mode
Manual
1) Press the Mode button (19) until the LED in front of Manual lights up green.
2) With Tap Sync you can manually go through the chase steps.
Fade Time (16) is available in Manual Mode
The LED Commander can be used as a plug-and-play device with the following Showtec products:
42431 Par 64 Short, RGB LED
42432 Par 64 Short, RGB LED
42421 Par 56 Short, RGB LED
42422 Par 56 Short, RGB LED
42400 LED Pinspot
42401 LED Pinspot
42410 Par 36 Short, RGB LED
42411 Par 36 Short, RGB LED
42460 LED RGB Par 64 High Power 18 x 3W
42461 LED RGB Par 64 High Power 18 x 3W
42435 LED Par 64, 24 x 1W
42436 LED Par 64, 24 x 1W
Maintenance
The Showtec LED Commander requires almost no maintenance. However, you should keep the unit
clean. Disconnect the mains power supply, and then wipe the cover with a damp cloth. Do not immerse
in liquid. Do not use alcohol or solvents.
Keep connections clean. Disconnect electric power, and then wipe the DMX and audio connections
with a damp cloth. Make sure connections are thoroughly dry before linking equipment or supplying
electric power.
Troubleshooting
Showtec LED Commander
This troubleshooting guide is meant to help solve simple problems. If a problem occurs, carry out the steps
below in sequence until a solution is found. Once the unit operates properly, do not carry out following
steps.
1. Fixture does not respond to controller: Check the DMX-address of the fixture and the controller.
Make sure they match. Make sure the connections are correct.
2. Interference between chases; If the same channel is assigned to different running chases, the one
with the highest channel value will be put out.
3. If the device does not operate properly, unplug the device.
4. Check power from the wall, all cables, the settings, etc.
5. If all of the above appears to be O.K., plug the unit in again.
6. If nothing happens after 30 seconds, unplug the device.
7. Return the device to your Showtec dealer.
Product Specification
Model: Showtec LED Commander
Adapter Power supply: AC 12V- 1,25 A
DC input LED Commander: DC 9-12V 800mA min.
Power consumption: 20 Watt
Power connector: Adapter (included)
Easy to use
Control 8 RGB fixtures
Adjustable Speed control
Adjustable fade time
Free patchable RGB and dimmer channels
16 chases
One Chase can contain a max. of 1740 steps
16 chases can contain a total of 1740 steps
Total DMX Channels: 512:
16 individual DMX channels per fixture
128 individual DMX total
16 Scenes
2 Auxiliary channels
Fixtures: 8
DMX-512: XLR 3 pole
Strobe Function
Individual RGB Channel Faders
Grand Master Fader
Record Function to Record Colors and Chases
Speed & Fade faders for Chase control
Dimensions : 482 x 156 x 75 mm (LxWxH)
Weight : 2,48 kg
Design and product specifications are subject to change without prior notice.
Website: www.Showtec.info
Email: [email protected]