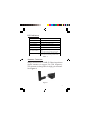
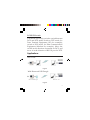
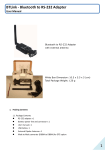
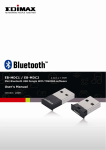
Download SIIG RS-232 to Bluetooth Installation guide

Transcript
RS-232 Serial to Bluetooth
Adapter
Quick Installation Guide
Introduction
The RS-232 to Bluetooth Converter is designed to
allow any RS-232 device to communicate
wirelessly. It supports baud rate of up to 921Kb/
s, wireless transmission up to 300 feet and features
auto pairing and selectable Master or Slave mode.
Key Features and Benefits
•
Full Bluetooth 2.0 + EDR compliant
•
Selectable as Slave or Master mode
•
Bluetooth Class 1- 100M (300 feet)
•
Baud rate: up to 921.6Kb/s
•
Frequency: 2.400 to 2.4835 GHz
System Requirements
•
04-0775B
Windows 8 (32-/64-bit) / 7 (32-/64-bit) /
Vista (32-/64-bit) / XP (32-/64-bit) / Server
2003 & 2008 (32-/64-bit) / Server 2008 R2
/ 2000
1
Package Contents
RS-232 Serial to Bluetooth Adapter
•
•
External Dipole Antenna
•
USB Cable
•
Battery power line and connector
•
Quick installation guide
Layout
RS-232 Serial Port
Power LED
Status LED
S (slave) / M (master)
Group (G/NG)
Reset
USB Connector
DCE/DTE
Power source
switch
switch
Power line
connector
Antenna
Connector
Figure 1
2
LED Indicators
LED status
Description
Power LED off
No power supply
Power LED on
Power input is equal or larger than 3.5 Volt
Power LED blinking
Power input is lower than 3.5 Volt
Status LED off
No pairing established
Status LED on
Connection established
Status LED fast blinking
In 0.1 sec interval: Pairing (in either slave or master
mode)
In 0.3 sec interval: Discoverable (in slave mode)
Status LED slow blinking
In 0.9 sec interval: Inquring (in master mode)
In 1.2 sec interval: Connecting (in master mode)
Table 1
Antenna Connector
Simply connect it to a 2.0dBi, 50 Ohms impedance
dipole antenna to support 2.4 GHz frequency.
The Antenna is changeable for high gain Antenna.
See Figure 2.
Figure2
3
RS-232 Serial Port
Connect the RS-232 port into any computer or
serial device.
Reset Button
Use a tip of a pen or other sharp object to access
the reset button.
•
•
To restore to factory default settings: press
and hold down the reset button for over 3
seconds to get back to the default settings:
- Baud rate: 19200 bps
- Data bit: 8
- Parity: none
- Stop bit: 1
- Flow control: none
- Bluetooth PIN code is "1234"
To disconnect and reconnect the wireless
connection: press the reset button quickly.
USB Connector
Connect USB connector with your PC by using
the included USB cable for external power supply.
4
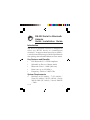
DCE/DTE Switch
Use the DCE/DTE dip switch to switch between
DCE and DTE mode. Switch to DTE mode, for
Data Terminal Equipment (PCs for example);
switch to DCE mode, for Data Communication
Equipment (Modem for example). Move the
switch in the direction of antenna for DCE, and
move it in the direction of RS-232 port for DTE.
Applications
One to one
Bluetooth - master
Bluetooth - slave
Figure3
With Bluetooth USB Dongle
Bluetooth- slave
Bluetooth USB Dongle
Figure4
5
Hardware Installation
1.
2.
3.
Fasten the antenna to the Adapter.
Connect the Adapter to the serial port of
your PC or serial device.
Follow one method below to connect to an
external power source:
A - Use the included USB cable to connect
the Adapter's mini USB connector to a USB
port of your PC.
B - Use a Powered DB9 connector (Pin 9) as
the power supply. This is often used in POS
system.
C - Connect the included battery power line
to the Adapter's Power Line Connector,
and connect the other end of the power line
to batteries (three A / AA / AAA batteries,
or one 3~3.7VDC Li-Polymer battery). See
Figure 5.
Figure5
6
4.
5.
Switch the Power Source Switch to "USB/
Battery" when powering up the Adapter
through USB or Battery.
Switch the Power Source Switch to "DB9Pin9 (5V)" when powering up the Adapter
through powered DB9.
The Power LED shows steady red light
indicating the power is on. Once power is
confirmed, go to the next section for COM
port configuration and connection.
COM Port Configuration
1.
Configure the parameters of the COM port
through HyperTerminal or other terminal
software. To configure the adapter,
initiate HyperTerminal from the Start Menu.
Note: The configuration windows below
come from software HyperTerminal. For
other terminal software, the windows may
be slightly different.
2.
Type in "Name", then click OK. See Figure
6.
7
Name
OK
Figure 6
3.
Scroll to choose the COM port you are using
to connect with the Adapter, and click OK.
Select the COM port
OK
Figure 7
4.
8
Confirm the parameters as the following,
then click OK. To pair two devices for an
exclusive connection between them.
Baud rate: 19200 bps
Data bit: 8
Parity: none
Stop bit: 1
Flow control: None
Figure 8
4.
5.
Follow the instructions in the next section:
"Master/Slave Mode Setup" to set the
Adapter mode.
Enable the bluetooth function of the PC,
search the Serial Adapter and make a
connection to it.
Master/Slave Mode Setup
Set the Adapter to be in "Master" mode or "Slave"
mode through terminal software- ROLE
command or DIP command.
Note: Slave mode is the default setting.
9
ROLE Command
1.
Type ROLE=M to set the Adapter to the
master role. (Type ROLE=S to set back to
the default.)
Figure9
2.
Press Enter to see "OK". This means the
setup is successful.
Figure10
DIP Command
1.
The default is DIP=N. Type DIP=Y to turn
on the function of the DIP switch, then you
can manually adjust the S/M switch to
change it to master or slave mode.
Figure 11
10
Group Mode Setup
The adapter is in N/G mode by default. The
adapter can be set to G mode if you have more
than two RS-232 Serial to Bluetooth Adapters,
meaning this adapter is able to perform single to
multiple transmission.
Follow the steps to set the adapter to Group mode
by terminal software:
Type DIP=Y to turn on the function of the DIP
switch.
After the function of DIP switch has turned on,
you can adjust the switch to "G".
11
Setup commands reference table
Refer to the following table for more applications:
Note: Use all capital or all lowercase letters, do
not mix, when typing the commands.
Command
Value
Description
<<<
Set the local adapter change the data mode into command
mode.
<<<
Switch the data mode to the command.
The time interval between each character will be more than the
time: [500ms] "<" [500ms] "<" [500ms] "<" [1500ms]
<<<=
?
Inquire the current setting.
(Default)
Y
Turn on the "<<<" command
N
Turn off the "<<<" command
Set the remote adapter change the data mode into command
mode from the local adapter in connecting status. The
command is available after 500 ms when data transferring
finished.
>>>
Switch the remote adapter from the data mode to the command.
The time interval between each character will be more than the
time: [1 sec] ">" [1 sec] ">" [1 sec] ">" [2 sec]
>>>
>>>=
?
Inquire the setting status of the ">>>" command.
(Default)
Y
Turn on the ">>>" command
N
Turn off the ">>>" command
12
ADDRESS=
Used to display the Bluetooth address of t he local adapter.
?
Inquire the Bluetooth address of the local adapter.
AT
Check the connection status between control terminal and the
RS-232 adapter. Response: "ERROR" when the connection is not
correct.
AT
Test the RS-232 status when first connect the adapter with the
controller.
AUTO=
Used to enable/disable auto-connection feature. It's available
only when the adapter is in master mode.
The command is available when DIP=N. The system will not
restart after the change.
(Default)
Y
The Master role adapter will connect the latest paired Bluetooth
device automatically.
N
The user will connect the Bluetooth device manually.
?
Inquire the current setting.
Used to specify the baud rate of COM port. The command will
have 200ms delay.
BAUD=
(Default)
1200
1200 bps
2400
2400 bps
4800
4800 bps
9600
9600 bps
19200
19200 bps
38400
38400 bps
57600
57600 bps
115200
115200 bps
230400
230400 bps
460800
460800 bps
921600
921600 bps
R
Restore the default settings. (Baud rate= 19200bps)
?
Inquire the current baud rate.
13
CONNECT=
Used to establish a connection manually. It is available only
when the adapter is in the master mode.
DEVICE
Connect the adapter to a specified Bluetooth manually. It's
available only when "DEVICE=xxxxxxxxxxxx" is executed.
1~8
Connect the adapter to a Bluetooth device in the Environment
which found by "SEARCH=?"
xxxxxxxxxxxx
Connect the remote adapter by typing the MAC address directly
without searching.
?
Display the MAC address of the latest paired device.
Y
Recover the latest connection in the command mode.
N
Disconnect the two adapters in the command mode.
P
Connect the previous connected adapter.
Used to detect the Voltage of the power supply and set the alert
value of low power.
DEFAULT=
Y
Used to detect the Voltage of the power supply and set the alert
value of low power.
DETECT=
(Default)
N
Disable the Voltage detection.
Y
Enable the Voltage detection.
R
Restore the default value (3.5 Volt)
xx
Setup the range of Voltage detection from 3.0 to 3.7 Volt. The
"X" indicates the number.
?
Inquire the setting status.
For security purpose, this command is used to specify a unique
remote Bluetooth serial adapter to be connected. In the master
role, the adapter pairs and connects with the designated remote
slave address. If the adapter is in the slave mode, this command
is a filter used to accept the inquiry of the master device.
DEVICE=
xxxxxxxxxxxx
14
Restore the default settings (e.g. 19200bps)
The command will restart the system for 1 second.
"xxxxxxxxxxxx" is a string of 12 hexadecimal digits.
R
Restore the status in which the adapter can connect with any
remote address.
?
Inquiry the designated address that can be paired and connected.
?
Inquire the setting status of the DIP switch function.
Y
Turn on the function of the DIP switch. The "ROLE" and "AUTO"
command are not available to set the "Master" or "Slave".
N
Turn off the function of the DIP switch. The "ROLE" and "AUTO"
command are available when the DIP=N.
DIP=
(Default)
Set the DIP switch function.
Used to specify whether the adapter can be discovered or
connected by remote devices.
This command is available only when the adapter is in the slave
role.
DISCOVER=
(Default)
N
The adapter enters the undiscoverable mode. If a pair has been
made, the original connection can be resumed. But other remote
master device cannot discover this adapter.
Y
The adapter enters the discoverable mode.
?
ECHO=
(Default)
N
Command characters received from the UART are not echoed
back to the DTE/DCE.
Y
Command characters received from the UART are echoed back to
the DTE/DCE.
?
Inquire the current setting.
This command enable or disable flow control signals (CTS/RTS)
of the UART port. Note: the setting is not affected by DEFAULT.
The command will need 1 second delay.
FLOW=
(Default)
Inquire the current setting.
This command is used to specify whether the adapter echoes
characters received from the UART back to the DTE/DCE.
N
Disable flow control.
Y
Enable flow control.
?
Inquire the current setting
15
Used to specify a name for the adapter.
You can specify a friendly name using 0 to 9, A to Z, a to z,
space and -, which are all valid characters. (Note: Using Space or
- as first or last space isn't permitted.) The default name is "Serial
Adapter".
NAME=
(Default)
Serial
Adapter
Default device name
xx....xx
"xx...xx" is a character string with the length from 2 to 30.
R
Restore the default settings name="Serial Adapter".
?
Inquire the name of the local adapter.
This command is used to specify parity bit setting of COM port.
The command will need 200 ms delay.
PARITY=
(Default)
N
None parity bit
O
Odd parity
E
Even parity
?
Inquire the current setting.
Used to designate a PIN. The default PIN is "1234". Paired
adapters should have the same PIN. This command is used to
designate a PIN. The default PIN is "1234" and the digits should
not be less than 4. Paired adapters should have the same PIN.
The PIN can be set up with combinations of numbers, English
characters or both.
PIN=
(Default)
PROMPT=
16
1234
xx....xx
"xx....xx" is a 4~16 digit string or English character (with capital
or lower case characters)
N
Cancel authentication by PIN.
R
Restore the default settings PIN="1234".
?
Inquire the current PIN.
Used to decide whether result messages are prompted when
Setup commands are executed. The result messages are:
OK/ERROR for command execution, or
CONNECT/DISCONNECT/Try Connect Device for connection
status.
(Default)
Y
Prompt result messages.
N
Don't prompt result messages.
?
Inquire the current setting.
RECONNECT=
Used to re-connect the lost link for the Master adapter.
?
(Default)
Re-connect is disable
Y
Re-connect is Enable
Used to specify whether the adapter is in the master or slave
role. If the device role is changed, the adapter will reboot and
all paired addresses will be cleared. The command is available
when the adapter is in DIP=N status. The command will have
1 second delay.
ROLE=
(Default)
Inquire the current setting.
N
M
Set the adapter to the master role.
S
Set the adapter to the slave role.
?
Inquire the current role of the adapter.
?
Display the strength of signal received in command mode
when connected.
1. Strong: RSSI>-9
2. Medium:-9>RSSI>-20
3.Weak:RSSI<-20
RSSI=
Received signal strength indication.
Used to search for any Bluetooth device in the environment
within one minute. If any device is found, its name and its 12digit-address will be listed. The search ends with a message
"Inquiry ends. xx device(s) found." This command is available
only when the adaptor is in the master role by manual.
SEARCH=
?
Inquire Bluetooth devices in the environment, listing 8 devices
maximum
Y
Inquire the inner temperature of the IC in centigrade
?
Display the current setting of the adapter
STATUS=
Inquire all the current setting of the adapter.
17
Used to specify one or two stop bits of COM port. (Will have
200ms delay.)
STOP=
(Default)
1
One stop bit.
2
Two stop bits.
?
Inquire the current setting.
?
Inquire the version codes.
VERSION=
Used to inquire the firmware version.
Command is not available under following status:
1
ROLE=S
SEARCH=? , CONNECT=?, CONNECT=P ,
CONNECT=xxxxxxxxxxxx , CONNECT=DEVICE
2
AUTO=Y
SEARCH=? , CONNECT=? , CONNECT=P ,
CONNECT=xxxxxxxxxxxx , CONNECT=DEVICE
3
DIP=Y
ROLE=M, ROLE=S , AUTO=Y , AUTO=N
,DISCOVER=Y,DISCOVER=N
4
<<<
SEARCH=? , CONNECT=? , CONNECT=P ,
CONNECT=xxxxxxxxxxxx , CONNECT=DEVICE
5
>>>
SEARCH=? , CONNECT=? , CONNECT=P ,
CONNECT=xxxxxxxxxxxx , CONNECT=DEVICE
6
Not connection
RSSI=? , CONNECT=Y , CONNECT=N
Pin Assignment
18
Pin Signal
DTE
DCE
Direction Direction
Description
1
CD
Input
Output
Not connected
2
TxD
Output
Input
Transmitting data
3
RxD
Input
Output
Receiving data
4
DSR
Input
Output
Contact manufacturer for set up
5
GND
N/A
N/A
Signal ground
6
DTR
Output
Input
Contact manufacturer for set up
7
CTS
Input
Output
Clear to send
8
RTS
Output
Input
Request to send (Default)
9
Vcc
Input
Input
Power supply (5VDC, 1.5A Max.)
DSR/DTR Connection
19
FAQ
Q:
A:
20
My RS-232 device is not connecting to the
Bluetooth adapter.
Follow the steps below to check if the
connections between 2 PCs work well or
not. One PC should be equipped with
Bluetooth function, and another one needs
one available RS-232 port.
(1) Connect the Serial to Bluetooth Adapter to
the PC with RS-232 port. Configure the
parameters of RS-232 Serial to Bluetooth
Adapter as following: Role=Slave, Dip
switch=DCE(F). Baud rate, parity, stop bits
values should be set to the same values as
your RS-232 device.
(2) After the connection between the 2 PCs
are established, PC with bluetooth will show
2 COM ports. Only one of the COM port
can work normally.
(3) If the connection between 2 PCs works
well, change the connection to your RS-232
devices. (Note: Please don't forget to change
Adapter back to DTE)
Blank Page
21
Blank Page
22
Technical Support and Warranty
QUESTIONS? SIIG’ s Online Support has answers! Simply visit our web site at
www.siig.com and click Support. Our online support database is updated daily with
new drivers and solutions. Answers to your questions could be just a few clicks away.
You can also submit questions online and a technical support analyst will promptly
respond.
SIIG offers a three-year manufacturer warranty with this product. This warranty covers
the original purchaser and guarantees the product to be free of any defects in materials
or workmanship for three(3) years from the date of purchase of the product.
SIIG will, at our discretion, repair or replace (with an identical product or product
having similar features and functionality) the product if defective in materials or
workmanship. This warranty gives you specific legal rights, and you may also have other
rights which vary from state to state. Please see our web site for more warranty details.
If you encounter any problems with this product, please follow the procedures below.
A) If it is within the store's return policy period, please return the product to the store
where you purchased from.
B) If your purchase has passed the store's return policy period, please follow the steps
below to have the product repaired or replaced.
Step 1: Submit your RMA request.
Go to www.siig.com, click Support, then REQUEST A PRODUCT REPLACEMENT
to submit a request to SIIG RMA or fax a request to 510-657-5962. Your RMA request
will be processed, if the product is determined to be defective, an RMA number will
be issued.
Step 2: After obtaining an RMA number, ship the product.
•
Properly pack the product for shipping. All accessories that came with the
original package must be included.
•
Clearly write your RMA number on the top of the returned package. SIIG will
refuse to accept any shipping package, and will not be responsible for a product
returned without an RMA number posted on the outside of the shipping
carton.
•
You are responsible for the cost of shipping to SIIG. Ship the product to the
following address:
SIIG, Inc.
6078 Stewart Avenue
Fremont, CA 94538-3152, USA
RMA #:
•
SIIG will ship the repaired or replaced product via Ground in the U.S. and
International Economy outside of the U.S. at no cost to the customer.
23
About SIIG, Inc.
Founded in 1985, SIIG, Inc. is a leading manufacturer of IT connectivity solutions
(including Serial ATA and Ultra ATA Controllers, FireWire, USB, and legacy I/
O adapters) that bridge the connection between Desktop/Notebook systems and
external peripherals. SIIG continues to grow by adding A/V and Digital
Signage connectivity solutions to our extensive portfolio.
SIIG products offer comprehensive user manuals, many user-friendly features,
and are backed by an extensive manufacturer warranty. High quality control
standards are evident by the overall ease of installation and compatibility of
our products, as well as one of the lowest defective return rates in the industry.
SIIG products can be found in computer retail stores, mail order catalogs,
through major distributors, system integrators, and VARs in the Americas and
the UK, and through e-commerce sites.
PRODUCT NAME
RS-232 Serial to Bluetooth Adapter
FCC RULES: TESTED TO COMPLY WITH FCC PART 15, CLASS B
OPERATING ENVIRONMENT: FOR HOME OR OFFICE USE
FCC COMPLIANCE STATEMENT:
This device complies with part 15 of the FCC Rules. Operation is subject
to the following two conditions: (1) This device may not cause harmful
interference, and (2) this device must accept any interference received,
including interference that may cause undesired operation.
THE PARTY RESPONSIBLE FOR PRODUCT COMPLIANCE
SIIG, Inc.
6078 Stewart Avenue
Fremont, CA 94538-3152, USA
Phone: 510-657-8688
RS-232 Serial to Bluetooth Adapter is a trademark of SIIG, Inc. SIIG and the SIIG logo are
registered trademarks of SIIG, Inc. All other names used in this publication are for identification
only and may be trademarks of their respective owners.
March, 2013
Copyright © 2013 by SIIG, Inc. All rights reserved