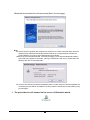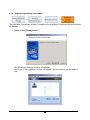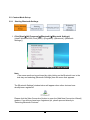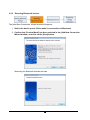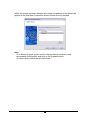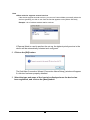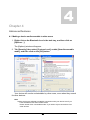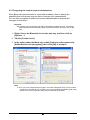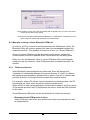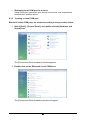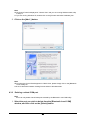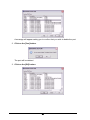
1
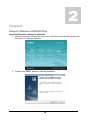
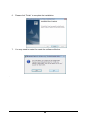
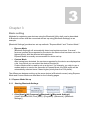
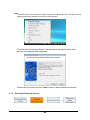
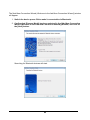
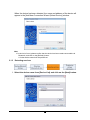
Index
CHAPTER 1
Supported profiles
Supported languages
Supported operating systems
Limitations
2
3
3
3
CHAPTER 2
Setup for Windows 2000/XP/Vista
4
CHAPTER 3
Basic setting
Express Mode Set-up
Custom Mode Set-up
7
7
13
CHAPTER 4
Advanced features
Encrypting the content of your transmissions
Manually creating a virtual Bluetooth COM port
20
21
22
Federal Communication Commission Interference Statement
1
Chapter1
Supported profiles
(a) Dial-Up Network (DUN)
(b) Fax profile (FAX)
(c) Local Access Profile (LAP)
(d) Serial Port Profile (SPP)
(e) Human Interface Devices (HID)
(f) Hard Copy Replacement Profile (HCRP)
(g) File Transfer Profile (FTP)
(h) Object Push Profile (OPP)
(i) Headset Profile (HSP)
(j) Personal Area Network (PAN)
(k) Basic Imaging Profile (BIP)
(l) Advanced Audio Distribution Profile (A2DP)
(m) A/V Remote Control Profile (AVRCP)
(n) Generic Audio Video Distribution Profile (GAVDP)
2
Supported languages
The Bluetooth Stack for Windows supports the following languages.
Chinese (Traditional)
Chinese (Simplified)
Danish
Dutch
English
French
German
Greek
Italian
Japanese
Korean
Norwegian
Polish
Portuguese (Brazil)
Russian
Spanish
Swedish
Russian
Supported operating systems
The Bluetooth Stack for Windows supports the following operating systems.
Windows 2000 Professional (Service Pack 3 or above)
Windows XP Professional (Service Pack 1 or above)
Windows XP Home (Service Pack 1 or above)
Windows XP Tablet PC Edition
Windows XP Media Center Edition
Windows XP Professional x64 Edition
Windows Vista Starter Edition
Windows Vista Home Basic
Windows Vista Home Premium
Windows Vista Ultimate
Windows Vista Business
Windows Vista Enterprise
Limitations
(a) On Swedish Windows XP, an error message (error code = 633) may be seen during
dial-up. Please update the operating system to Windows XP Service Pack 2 or refer to
Microsoft knowledge base #831717.
(b) Windows XP fast user switch is not supported. When switching to another user, the
Bluetooth Manager is not launched. Please log off before switching to another user.
3
2
Chapter2
Setup for Windows 2000/XP/Vista
Installing Bluetooth software for Windows
1. Insert the software CD and the setup menu will launch automatically, please tab
the option to install the software
2.
Please click “NEXT” button to start the installation
4
3.
When the License Agreement screen is displayed, read the License Agreement,
then clicks the radio button to the left of "I accept the terms in the license
agreement" and then clicks the “Next“button.
4.
Please click “install” to begin the installation.
5.
During the installation, the system will try to detect your Bluetooth device, please
plug in your Bluetooth device and then click on the “OK” button.
5
6.
Please click “Finish” to complete the installation.
7.
You may need to restart for made the software effective.
.
6
3
Chapter 3
Basic setting
Methods for registering new devices using the Bluetooth Utility shall now be described.
A Bluetooth mouse shall be connected and set up using [Bluetooth Settings] as an
example.
[Bluetooth Settings] provides two set-up methods: "Express Mode" and "Custom Mode."
•
Express Mode
[Bluetooth Settings] will automatically detect and register services. If several
services (profiles) are supported by the device the service that has been set to the
highest priority shall be selected and registered.
Express Mode is normally recommended for device set-up.
•
Custom Mode
After having been detected, the services supported by the device are displayed as
a list, from which you can select the desired function(s).
Custom Mode must be used to set up a device if, for example, you wish to use a
modem station to send a fax (because in Express Mode, the DUN profile will be
automatically selected since it has a higher priority than the FAX profile).
The differences between setting up the same device (a Bluetooth mouse) using Express
Mode and Custom Mode are described on the following pages.
3.1 Express Mode Set-up
3.1.1
Starting Bluetooth Settings
1. Click [Start]Æ[All Programs]Æ[Bluetooth]Æ[Bluetooth Settings].
(Under Windows 2000, click [Start]→[Programs]→[Bluetooth]→[Bluetooth
Settings].)
Note
The same result can be achieved by right-clicking on the Bluetooth icon in the task tray and
selecting [Bluetooth Settings] from the menu that appears.
The [Add new Connection Wizard ] window below will appear when other
devices have already been registered.
Please click the mode and click “Next” button to detect Bluetooth devices."
3.1.2
Detecting Bluetooth devices
8
The [Add New Connection Wizard (Welcome to the Add New Connection Wizard)] window
will appear.
1. Switch the device power ON to make it connectable via Bluetooth.
2. Confirm that [Express Mode] has been selected in the [Add New Connection
Wizard (Welcome to the Add New Connection Wizard)] window, and click on
the [Next] button.
Searching for Bluetooth devices will start.
9
When the device has been detected, the name and address of the device will
appear in the [Add New Connection Wizard (Select Device)] window.
Note
If no device is found, please confirm that the device has been made connectable via
Bluetooth, and click on the [Refresh] button.
A further device search will be performed.
3.1.3
Detecting services
1. Select the device name from [Device List] and click on the [Next] button.
10
Bluetooth device detection will commence(See it on next page).
Note
●If several services (profiles) are supported by the device, the service that has been set to the
highest priority shall be automatically selected and set up in Express Mode. Please use
Custom Mode if you wish to select desired services manually.
•When a service has been detected, a window prompting you to enter the Bluetooth passkey
(PIN code) may appear.(for example , pairing a mobile phone with a PC). Please enter the
passkey and click on the [OK] button.
●If you have not entered your Bluetooth passkey after a certain amount of time has passed, the
connection process will be cancelled for security reasons. Please perform the passkey entry
process again.
2. The paired device will showed on the screen of Bluetooth wizard.
11
3.1.4
Registering settings information
The [Add New Connection Wizard (Completing the Add New Connection Wizard)] window
will appear.
1. Click on the [Finish] button
The [Bluetooth Settings] window will appear.
The icons of the registered devices will appear, and the devices will be ready to
use.
12
3.2 Custom Mode Set-up
3.2.1
Starting Bluetooth Settings
1. Click [Start]Æ[All Programs]Æ[Bluetooth]Æ[Bluetooth Settings].
(Under Windows 2000, click [Start]→[Programs]→[Bluetooth]→[Bluetooth
Settings].)
Note
●The same result can be achieved by right-clicking on the Bluetooth icon in the
task tray and selecting [Bluetooth Settings] from the menu that appears.
The [Bluetooth Settings] window below will appear when other devices have
already been registered.
Please click the [New Connection] button to open the [Add New Connection Wizard]
window. If no devices have been registered yet, please proceed directly to
"Detecting Bluetooth Devices."
13
3.2.2
Detecting Bluetooth devices
The [Add New Connection Wizard window will appear.
1. Switch the device power ON to make it connectable via Bluetooth.
2. Confirm that [Custom Mode] has been selected in the [Add New Connection
Wizard window, and click on the [Next] button.
Searching for Bluetooth devices will start.
14
When the device has been detected, the name and address of the device will
appear in the [Add New Connection Wizard (Select Device)] window.
Note
●If no device is found, please confirm that the device has been made
connectable via Bluetooth, and click on the [Update] button.
●A further device search will be performed.
15
3.2.3
Detecting services
1. Select the device name from [Device List] and click on the [Next] button.
Note
● When a service has been detected, a window prompting you to enter the Bluetooth
passkey (PIN code) may appear. Please enter the passkey and click on the [OK] button.
● If you have not entered your Bluetooth passkey after a certain amount of time has passed,
the connection process will be cancelled for security reasons. Please perform the
passkey entry process again.
The services supported by the device will be displayed.
Note
●When a device supports several services
If the device supports several services, you can use Custom Mode to manually select the
services (profiles) you wish to use from the list that appears under [Select Services].
Example: List of wireless modem station services
If Express Mode is used to perform the set-up, the highest-priority service in the
device will be automatically selected and configured.
2. Click on the [OK] button.
The [Add New Connection Wizard (Connection Name Setup)] window will appear
if a service has been properly detected.
3. Select the type and name of the icon to be displayed once the device has
been registered, and click on the [Next] button.
17
Note
● If you wish to change the icon, please click on the [Change Icon] button and select your
preferred icon from the list that appears.
18
3.2.4
Registering settings information
The [Add New Connection Wizard (Completing the Add New Connection Wizard)]
window will appear.
Click on the [Finish] button
The [Bluetooth Settings] window will appear.
The icons of the registered devices will appear, and the devices will be ready
to use.
19
4
Chapter 4
Advanced features
4.1 Making a device undiscoverable to other users
1. Right-click on the Bluetooth icon in the task tray, and then click on
[Options…].
The [Options] window will appear.
2. Tab [Security], then select [Custom Level], enable [Non-discoverable
mode], and then click on the [OK] button.
Your device will now be undetectable by other users, even when they search
for other devices.
Note
●Other devices are still able to establish connections with your device even if you
have enabled the Non-discoverable mode.
Please enable "Non-connectable mode" if you wish to reject connections from
other devices.
20
4.2 Encrypting the content of your transmissions
Since Bluetooth communication is conducted wirelessly, there is always the
possibility that a third party may be able to intercept your transmissions.
You can use encryption to render the content indecipherable to anyone who
manages to intercept it.
Important
●Encrypting your transmissions will still not guarantee complete security. Accordingly,
please be aware that transmitting data is conducted with an element of risk for the
user.
1. Right-click on the Bluetooth icon in the task tray, and then click on
[Options…].
2. Tab the [Custom Level]
3. In the option under the Mode tab, enable [Link level enforced security
[Authentication and encryption] ] then click [OK] to accept it.
Note
● Once you have configured the encryption, a window will appear when you first make a
connection to another device, prompting you to enter a Bluetooth passkey (PIN code).
Please click on the [OK] button after you have entered the passkey.
21
●The window in which you enter the passkey will not appear once you have connected
more than two times to the device.
●if the device with that software was the Bluetooth 2.1+EDR device, sometimes you can
pair the devices without PIN codes (such as HID devices).
4.3 Manually creating a virtual Bluetooth COM port
In order for a PC to connect to and communicate with a Bluetooth device, the
Bluetooth Utility will create a gateway for data to be exchanged between the
respective devices. This gateway is known as a "port" (or "virtual COM port").
Since one virtual COM port will be allocated to each device, trouble-free
communication will still be possible even if several devices are being used.
When you use the Bluetooth Utility, a virtual COM port will be automatically
created on set-up; however, virtual COM ports can be created manually if so
needed.
4.3.1
Clients and servers
When Bluetooth communications are performed, there will always be a
"client/server" relationship between the various devices. A "client" is a device
that sends certain requests to another device, while a "server" is a device that
provides a service on receipt of such requests from another device.
For example, when a PC issues a print command to a wireless printer, the PC
functions as the client, while the printer functions as the server.
When a PDA or other device attempts to receive files located on a PC by means
of file transfer protocol, the PC functions as the server, while the PDA functions
as the client.
Virtual Bluetooth COM ports can be created both for clients and servers.
•
Bluetooth virtual COM port for a client
Virtual COM port used when your device is the client, and requests are sent
to another device.
22
•
4.3.2
Bluetooth virtual COM port for a server
Virtual COM port used when your device is the server, and requests are
received from another device.
Creating a virtual COM port
Bluetooth virtual COM ports are created according to the procedure below:
1. Select [Start]→[Control Panel], and double-click the [Hardware and
Sound] icon.
The [Printers and Other Hardware] window appears.
2. Double-click on the [Bluetooth Local COM] icon.
The [Printers and Other Hardware] window will appear.
23
Note
●If the Control Panel is displayed in "Classic View" and you are running Windows 2000, skip
to Step 2.
● If you are running Windows XP, double-click on the [Printers and Other Hardware] icon.
3. Click on the [Add...] button.
Note
●Even when the Control Panel appears in Classic view, please simply click on the [Bluetooth
Local COM] icon.
● No such distinction between viewing formats exists in Windows 2000.
4.3.3 Deleting a virtual COM port
Note
●You can only delete virtual COM ports created by the Bluetooth Local COM utility.
1. Select the port you wish to delete from the [Bluetooth Local COM]
window, and then click on the [Delete] button.
24
A message will appear asking you to confirm that you wish to delete the port.
2. Click on the [Yes] button.
The port will be deleted.
3. Click on the [OK] button.
25
Federal Communication Commission Interference Statement
This equipment has been tested and found to comply with the limits for a Class B
digital device, pursuant to Part 15 of the FCC Rules. These limits are designed to
provide reasonable protection against harmful interference in a residential
installation. This equipment generates, uses and can radiate radio frequency energy
and, if not installed and used in accordance with the instructions, may cause harmful
interference to radio communications. However, there is no guarantee that
interference will not occur in a particular installation. If this equipment does cause
harmful interference to radio or
television reception, which can be determined by turning the equipment off and on,
the user is encouraged to try to correct the interference by one of the following
measures:
- Reorient or relocate the receiving antenna.
- Increase the separation between the equipment and receiver.
- Connect the equipment into an outlet on a circuit different from that to which the
receiver is connected.
- Consult the dealer or an experienced radio/TV technician for help.
FCC Caution: Any changes or modifications not expressly approved by the party
responsible for compliance could void the user's authority to operate this equipment.
This device complies with Part 15 of the FCC Rules. Operation is subject to the
following two conditions: (1) This device may not cause harmful interference, and (2)
this device must accept any interference received, including interference that may
cause undesired operation.
The antenna(s) used for this transmitter must not be co-located or operating in
conjunction with any other antenna or transmitter.
This device is intended only for OEM integrators under the following
conditions:
1) The antenna must be installed such that 20 cm is maintained between the
antenna and users, and
2) The transmitter module may not be co-located with any other transmitter or
antenna. As long as 2 conditions above are met, further transmitter test will not be
required. However, the OEM integrator is still responsible for testing their
end-product for any additional compliance requirements required with this module
installed (for example, digital device emissions, PC peripheral requirements, etc.).
IMPORTANT NOTE:
In the event that these conditions can not be met (for example certain laptop
configurations or co-location with another transmitter), then the FCC authorization is
no longer considered valid and the FCC ID can not be used on the final product. In
these circumstances, the OEM integrator will be responsible for re-evaluating the
end product (including the transmitter) and obtaining a separate FCC authorization.
26
27