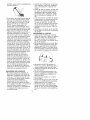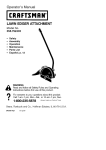
1
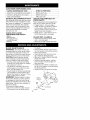
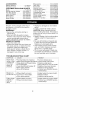
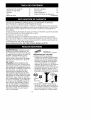
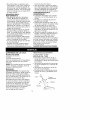
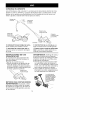
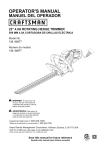
Operator's
Manual
CRRFTSMRN_
/
/
/
3.0 H.P.
ELECTRIC
Model
EDGER
No.
358.796480
@
Read
and follow all Safety Rules and Operating
WARNING:
Instructions
before first use of this product.
i_
•
Sears,
530087447
For
your questions
about this product,
call answers
7am-7pm, to Mon.-Sat.,
or lOam-7pm,
Sun.
1-800-235-5878
Roebuck
01/16/98
and Co., Hoffman
(Hours
listed are Central Time)
Estates,
IL 60179
USA
Warranty Statement
Safety Rules
Assembly
Operation
Maintenance
2
2
5
6
8
Service & Adjustments
Storage
Troubleshooting
Chart
Spanish
Parts Ordering
8
9
9
10
Back Cover
FULL TWO YEAR WARRANTY ON CRAFTSMAN ELECTRIC EDGER
If this Craftsman Electric Edger fails to perform properly due to a defect in material
or workmanship within (2) two years from the date of purchase, Sears will repair
or replace it, free of charge.
If this edger is used for commercial purposes, this warranty applies for only 90
days from the date of purchase.
If this edger is used for rental purposes, this warranty applies for only 30 days
from the date of purchase.
This warranty does not cover the blade.
WARRANTY SERVICE IS AVAILABLE BY RETURNING THE CRAFTSMAN ELECTRIC
EDGER TO THE NEAREST SEARS STORE IN THE UNITED STATES.
This warranty gives you specific legal rights, and you may also have other rights
which vary from state to state.
Sears, Roebuck and Co. D/817WA Hoffman Estates, IL 60179
when operating, or performing maintenance on your unit. (Safety glasses
are available.) Always wear face or
dust mask if operation is dusty. Always wear heavy, long pants, long
sleeves, boots, and gloves. Do not
go barefoot or wear sandals.
WARNING:
When using electric edgers, basic safety precautions should
always be followed to reduce the risk
of fire, electric shock, and personal
injury. Read all instructions and safety
information throughout this manual.
DANGER;
THIS POWER TOOL CAN BE
DANGEROUS! This unit can cause serious injury including amputation or blindness to the operator and others. The
warnings and safety instructions in this
manual must be followed to provide reasonable safety and efficiency in using
this unit. The operator is responsible for
following warnings and instructions in
this manual and on unit. Read entire
Objects
Safety
Glasses B_o_s
Thrown
• Secure hair above shoulder length.
Secure or remove loose clothing and
jewelry or clothing with loosely hanging ties, straps, tassels, etc. They
can be caught in moving parts.
• Being fully covered also helps protect you from debris and pieces of
toxic plants thrown by the blade.
• Stay alert. Do not operate unit when
you are tired, ill, or under influence of
alcohol, drugs, or medication. Watch
what you are doing; use common
sense.
• Avoid unintentional starting of the
unit. Never carry the unit with your
Operator's Manual before assembling
and using this unit! Restrict use of this
power tool to persons who read, understand, and follow warnings and instructions in this manual and on the unit.
Safety Labels on unit
OPERATOR SAFETY
• Dress properly. Always wear safety
glasses or similar eye protection
2
finger
ontheswitch.
Besurethe
If there is any damage, do not use
switch
isnotintheonposition
when until damage is repaired by your
connecting
theextension
cord.
Sears Service Center/Department.
DANGER:
RISK
OFCUTKEEP
HANDS• Inspect extension cords before each
AND
FEET
AWAY
FROM
BLADE
AND
CUT- use and replace if damaged.
TiNG
AREA.
Donotattempt
toclear
away • Don't abuse cord. Never carry unit
cutmaterial
when
theblade
isinmotion. by the cord or yank extension cord to
Make
sure
switch
isintheoffposition
and disconnect unit.
thepower
source
isdisconnected
when • To reduce the possibility of the exremoving
jammed
material
fromthecut- tension cord disconnecting from the
tingblade.
Donotgrab
orholdunitbythe unit during operation, tie the power
cord on the unit to the extension cord
cutting
blade.
as shown in the Extension Cord section. Insert cord socket on the unit
®
CAUTION:
Blade rotates momentarily
after the switch is released.
ELECTRICAL
SAFETY
• Use only a 120 A.C. voltage supply
as shown on the nameplate of unit.
• Avoid dangerous situations. Do not
use in the presence of flammable liquids or gases to avoid creating a fire
or explosion and/or causing damage
to unit.
WARNING:
Avoid a dangerous
environment.
To reduce the risk of
electrical shock, do not use in rain, in
damp or wet locations, or around
swimming pools, hot tubs, etc. Do not
expose to snow, rain, or water to avoid
the possibility of electrical shock.
WARNING:
To reduce the risk of
electrical shock, use extension cords
specifically marked as suitable for outdoor appliances having an electrical
rating not less than the rating of the
unit. The cord must be marked with the
suffix "W-A." Use a polarized cord.
Make sure your extension cord is in
good condition. Replace damaged
cords. An undersized extension cord
will cause a drop in line voltage resulting in loss of power and overheating. If
in doubt, use the next heavier gauge.
The smaller the gauge number the
heavier the cord (NOTE: The chart in
the Extension Cord section shows correct size to be used depending on cord
length).
• Do not attempt to repair unit. Inspect
insulation and connectors on unit
and appliance cord before each use.
into the extension cord receptacle.
• Do not use unit if the switch does not
turn the unit on and off properly. Repairs to the switch must be made by
your Sears Service Center.
• Keep extension cord clear of operator, unit, and obstacles at all times.
Do not expose the cord to heat, oil,
water, or sharp edges.
• Avoid any body contact with any
grounded conductor, such as metal
pipes or wire fences, to avoid the
possibility of electric shock.
• Ground Fault Circuit Interrupter (GPOI)
protection should be provided on the
circuit or outlet to be used for this
unit. Receptacles are available having built-in GFCI protection and may
be used for this measure of safety.
• To reduce the risk of electric shock,
this unit has a polarized plug (one
blade is wider than the other) and will
require the use of a polarized extension cord. This plug will fit into a polarized extension cord only one way.
If the plug does not fitfully into the
extension cord, reverse the plug. If it
still does not fit, obtain a correct polarized extension cord.
A polarized extension cord will require the use of a polarized wall outlet. This plug will fit into the polarized
wall outlet only one way. If the plug
does not fit into the wall outlet, reverse the plug. If it still does not fit,
contact
aqualified
electrician
to
install
theproper
walloutlet.
Donot
change
theequipment
plug,
extensioncordreceptacle,
orextension
cordpluginanyway.
UNIT SAFETY
• Do not attempt to repair unit. Inspect
entire unit and extension cord before
each use. Have damaged parts repaired or replaced by your Sears
Service Center. Make sure all fasteners, handles, and guards are in place
and securely fastened. A guard or
other part that is damaged should be
properly repaired or replaced by a
Sears Service Center.
• Replace blades that are bent,
warped, cracked, broken, or damaged in any other way.
• Before using your unit, have your
Sears Service Center repair or replace
parts that are cracked, chipped, broken, or damaged in any other way.
• Use only genuine Craftsman replacement blades and accessories
as recommended
for this unit. Never
use wire, rope, string, etc. Use of any
other accessory or attachment may
increase the risk of injury or cause
damage to the unit.
• Keep blade guard in place and in
good working order.
EDGING
SAFETY
• Inspect the area to be edged before
each use. Remove objects (rocks,
broken glass, nails, wire, string, etc.)
which can be thrown by blade or can
wrap around blade shaft.
• Keep children away. Keep others including children, animals, bystanders
and helpers outside the 100 foot (30
meter) Hazard Zone. Stop the unit
immediately if you are approached.
• Always keep unit in front of your body.
Keep hands and feet away from cutting area.
• Hold the unit firmly with both hands.
• Do not overreach
or use from unsta-
ble support. Keep firm footing and
balance at all times.
• Keep wheels in contact with ground.
• Do not raise the unit above the
ground. The blade can come dangerously close to your body.
• Always push unit slowly over ground.
Stay alert for uneven sidewalks,
holes in terrain, large roots, etc.
• Do not force the unit; it will do the job
better and with less likelihood of a risk
of injury at the rate for which it was designed. Use the right appliance. Use
only for jobs explained in this manual.
MAINTENANCE
SAFETY
• Maintain unit with care. Maintain unit
according to recommended procedures. Follow instructions for changing
blades in the SERVICE AND ADJUST-
•
•
•
•
MENTS section. Keep blade and blade
guard clean to reduce the risk of injury.
Never start unit with blade guard removed; blade can fly off or can throw
objects and cause serious injury.
Disconnect unit from the power
source before performing maintenance or changing blades.
Use only genuine Craftsman replacement parts as recommended.
Have all maintenance and service
not explained in this manual performed by a Sears Service Center.
• Never douse or squirt the unit with
water or any other liquid. Clean the
unit and labels with a damp sponge.
Keep handles dry, clean, and free
from oil and grease.
TRANSPORTING
& STORAGE
• Transport unit with motor stopped
and the blade away from your body.
• Do not grasp or hold exposed blade.
• Unplug unit before storing; secure
unit when transporting it in a vehicle.
• Store unit so the blade cannot accidentally cause injury. The unit can be
hung by the handle.
• Store unit indoors. Store unit unplugged in a high, dry place out of
reach of children.
If situations occur which are not covered in this manual, use care and
good judgment. If you need assistance, contact your nearest Sears Service Center or call 1-800-235-5878.
SAVE THESE
INSTRUCTIONS
CARTON
CONTENTS
Model358.796480
Edger
Screws
Locknuts
Examine
parts
fordamage.
Donotuse
damaged
parts.
NOTE:
Ifyouneedassistance
orfind
thatparts
aremissing
ordamaged,
call
1-800-235-5878.
ASSEMBLY
WARNING:
Ifreceived
assembled,
repeat
allstepstoensure
yourunitis
properly
assembled
andallfasteners
aresecure.
ThisOperator's
Manual
hasbeendeveloped
tohelpyouassemble
theunit
andtoprovide
itssafeoperation.
Itis
important
thatyoureadtheentire
manualtobecome
familiar
withtheunitbe-
• Heavy enough to carry current from
the power source the full length of the
extension cord to the unit. Otherwise,
loss of power and overheating can occur causing damage to unit. Refer to
chart for minimum wire gauge recommendations. The cord must be
marked with the proper wire gauge.
(Appropriate extension cords are available.) Do not use multiple cords.
• In good condition. Cord insulation
must be intact with no cracks or
deterioration. Plug connectors
be undamaged.
must
MINIMUM WIRE GAUGE
RECOMMENDATIONS
*American
Wire
Gauge
fore you begin assembly.
Secure extension
Read your Operator's
Tools you will need:
• Phillips Screwdriver
• Tie the power plug on the unit to the
extension cord as shown.
• Insert plug into cord socket.
Manual
TUBE ASSEMBLY
Power Plug on
• Insert tube into motor housing as
shown. Align the screw holes.
• Insert Iocknuts into the pockets in the
motor housing.
• Insert screws through aligned holes.
• Thread screws into Iocknuts; tighten.
Extension
Cord
DOUBLE INSULATION CONSTRUCTION
This unit is Double Insulated to help
protect against electric shock. Double
insulation construction consists of two
Locknuts
J
separate "layers" of electrical insulation instead of grounding.
Tools and appliances built with a
double insulation system are not intended to be grounded. No grounding
means is provided on this unit, nor
should a means of grounding be added to this unit. As a result, the extension cord used with your unit can be
plugged into any standard 120 volt
electrical outlet.
Safety precautions must be observed
when operating any electrical tool. The
double insulation system only provides
added protection against injury resulting from an internal electrical insulation
failure.
!
Screws
EXTENSION
cord to unit:
CORD
Use only a 120 A.C. voltage supply as
shown on nameplate of the unit to
power your edger.
The extension cord used to reach the
power source must be:
• Specifically marked as suitable for
outdoor use. The cord must be
marked with the suffix "W-A."
5
WARNING:
Allelectrical
repairs
to
thisunit,including
housing,
switch,
motor,
etc., must be diagnosed and re-
DOUBLE iNSULATiON or DOUBLE INSULATED. The symbol [] (square within a
square) may also be marked on the
appliance. Failure to have the unit repaired by Sears service personnel can
cause the double insulation construction to become ineffective and result in
paired by qualified service personnel.
Replacement parts for a double insulated appliance must be identical to the
parts they replace. A double insulated
appliance is marked with the words
serious
injury.
KNOW YOUR EDGER
READ THIS OPERATOR'S MANUAL AND SAFETY RULES BEFORE OPERATING YOUR
UNIT. Compare the illustrations to your unit to familiarize yourself with the location
of the various controls and adjustments. Save this manual for future reference.
Control Handle
Trigger
Switch
\
Pivot Locking
Lever
Blade Guard
Blade
The TRIGGER SWITCH is used to activate the motor.
The PIVOT LOCKING LEVER is en-
The
tion
The
you
gaged to reposition the cutting angle.
The BLADE is designed to cut grass.
OPERATING
INSTRUCTIONS
OPERATING
POSITION
Your unit has two operating positions,
one for edging, one for beveling.
To set operating position:
• Move pivot locking lever toward handle and hold. Pivot motor to desired
position. Release pivot locking lever,
making sure motor locks into position.
BLADE GUARD provides protecfrom the spinning blade.
DEPTH ADJUSTMENT KNOB allows
to adjust blade to the desired depth.
EDGING
METHODS
WARNING:
The operator or others
must not try to clear away cut material
with the motor running or the blade
turning to avoid serious injury.
WARNING:
Stop motor and blade
and disconnect unit from power source
before removing materials wrapped
around blade shaft to avoid injury.
• Allow the motor to reach full speed
before entering the material to be
cut. The blade has maximum cutting
power at full speed and is less likely
to bind or stall.
• If blade does not turn when switch is
activated, make sure it is not stuck or
bound by debris.
Pivot
Locking Lever
6
Blade rotates momentarily after the
switch is released.
Stop rotating
blade by contact
with cut material.
/
• Always release the switch and allow
motor to stop when not cutting.
• To stop the motor, release the switch;
allow blade to stop turning before removing it from the cut.
As you become familiar with your
edger, you will be able to determine
your own operating pace. Conditions
such as depth of cut, angle of cut, and
material being cut will regulate the
speed and time required for your edging job.
EDGING
!
!
EDGING--yields
precise, close cutting
around sidewalks, driveways, patios,
etc.
BEVELING--provides
a wider cut or
trench around sidewalks, driveways, patios, etc. Beveling removes more material and therefore increases motor load.
Be careful to cut slowly to avoid motor
stalling or overload, which may damage
motor. The width of the bevel cut can be
changed by adjusting the depth of the
front wheel (see Depth Adjustment).
BEVELING
DEPTH ADJUSTMENT
The front wheel can be adjusted to allow
for a deeper or shallower cut. Move the
wheel up for a deeper cut, down for a
shallower cut. When the wheel is adjusted all the way down (travel position),
the blade is lifted clear of the ground.
Adjust as follows:
• Loosen the knob on the front wheel
assembly.
• Adjust the wheel to set the blade
depth. Use a higher wheel setting for
deep edging, a lower wheel setting
for shallow edging and trenching.
• Tighten knob securely.
Depth
Adjustment
._
/f
_._"_
_
//_7-/
/
Knob ----___
Edge Guide
OPERATING TIPS
• Allow the blade to reach full speed
before placing the blade in the cut.
Be careful to cut slowly to avoid motor stalling or overload, which may
damage the motor.
• Keep your edging path straight by
keeping the edge guide in contact with
the edge of the walkway.
• Always work going away from people
and solid objects such as walls, large
stones, trees, automobiles, etc.
• Be careful when edging near trees or
valuable plants. The high speed metal blade may cut roots and cause
damage to the plants.
• Always keep blade area clean. Stop
the unit, make sure blade has completely stopped turning, and disconnect unit from the power source before cleaning.
• If blade stalls, immediately raise the
blade from the cut by lowering the
handle. If blade continues to stall
when raised, stop the unit, disconnect the power source, and inspect
the blade area for blockage or damage. Clean the blade area of debris.
CUSTOMER
RESPONSIBILITIES
CARE & MAINTENANCE
Check for Loose fasteners
TASK
WHEN TO PERFORM
Before each use
and parts
Before each use
Check for damaged or worn parts
Clean unit and labels
After each use
GENERALRECOMMENDATIONS
The warranty on this unit does not cover
items that have been subjected to operator abuse or negligence, To receive full
value from the warranty, the operator
must maintain unit as instructed in this
CHECK
WORN
FOR DAMAGED
PARTS
OR
Refer replacement of damaged/worn
parts to your Sears Service Center,
• Trigger Switch - Ensure trigger
switch functions properly by releasing the switch. Make sure motor
stops and blade stops turning; then
restart motor and continue.
• Blade Guard - Discontinue use of
manual. Various adjustments will need
to be made periodically to properly
maintain your unit.
CHECK
FOR LOOSE
FASTENERS
AND PARTS
• Blade
• Blade guard
• Housing Screws
• Handle Screws
• Wheels
unit if blade guard is damaged.
CLEAN
UNIT & LABELS
• Clean the unit using a damp cloth
with a mild detergent.
• Wipe off unit with a clean dry cloth.
the blade.
BLADE
MAINTENANCE
WARNING:
The blade will spin momentarily after the motor stops. Make
sure blade has stopped turning and
disconnect unit from the power source
before performing work on the blade.
CAUTION: Wear protective gloves
when handling or performing maintenance on blade to help avoid injury.
• Use the proper replacement blade.
Contact your Sears store for replacement blade #71-85718.
• The blade is reversible. When the
• Using another wrench remove hex
nut, cup washer, and spring washer.
• Remove the blade.
• Clean all parts and check for damage. Replace damaged parts.
• Reverse or replace blade. Reinstall
blade onto shaft.
• Install the spring washer, making
sure the outer, notched edge contacts the blade.
• Install the cup washer, making sure
the lip of the washer is facing toward
the spring washer.
• Install the hex nut; tighten securely.
cutting edge on one side becomes
worn, turn the blade over.
• Check blade for flatness periodically.
Lay the blade on a flat surface and
inspect the blade for flatness. Throw
away a blade that is not flat.
WARNING:
Always replace a blade
that is bent, warped, cracked, broken,
or damaged in any other way. Never
attempt to straighten and reuse a damaged blade. Use only the specified replacement blade.
To reverse or replace blade:
• Disconnect unit from power source.
• Fit a wrench onto the shaft behind
\, \
Spring
Washer
Hex X
Nut
\
Cup Washer
Loosen_€
8
Tighten
ACCESSORIES
Safety Glasses ...........
71-85707
Extension Cord ...........
71-5702
CUSTOMER SERVICEABLE
PARTS
Blade ...................
71-85718
Spring washer (blade) .. 530-402971
Hex Nut (blade) .......
530-402954
Lock Nut (tube) ........
530-403094
Rear wheel ...........
530-095088
Front wheel ...........
530-095087
Blade Guard ..........
530-402859
Prepare unit for storage at the end of
the season or if it will not be used for
30 days or more.
WARNING:
• Secure tile unit before storing or
transporting.
• Store unit with all guards in place.
Position unit so that any sharp object
cannot accidentally cause injury.
• Store unit well out of reach of children.
EDGER STORAGE
• Clean the entire unit.
• Inspect the blade area and clean any
dirt, grass, leaves, or debris that has
collected. Inspect the blade and
blade guard; replace a blade that is
bent, warped, cracked, broken, or
damaged in any other way.
TROUBLESHOOTING
SYMPTOM
Blade stops
under a load
or does not
turn when
switch is
pressed.
530-402865
530-403071
530-402875
530-403136
530-016276
530-016245
530-016255
530-403109
530-016227
530-402888
530-402887
• Replace a damaged or worn blade
guard.
• Lightly oil external metal surfaces.
CAUTION: Wear protective gloves
when handling the blade. The blade is
sharp and can cut you even when it is
not moving.
• Apply a coating of oil to entire surface
of blade; wrap it in heavy paper or
cloth.
• Be sure all handles and guards are
in place and are securely fastened.
Replace any damaged parts.
• Check entire unit for loose screws,
nuts, and bolts. Replace any damaged, worn, or broken parts.
• Do not cover with plastic. Plastic cannot breathe and will induce condensation and eventual rust or corrosion.
CHART
CAUSE
REMEDY
• Forcing blade into material.
• Blade guard clogged with debris
• Edge guide bent toward blade.
• Unit unplugged.
• Fuse blown/circuit breaker off.
• Worn spring washer.
• None of the above.
Blade turns
•Wheel depth incorrect.
but will not cut • Incorrect or worn blade.
Edger drags
ground or
cuts too
deep.
Edge guide ...........
Rear axle .............
Front axle ............
Washer (axle) .........
Cup Washer (axle) .....
Locknut (axle) .........
Lockwasher (axle) .....
Spacer (axle) .........
Screw (edge guide) ....
Screw (tube) ..........
Washer (T-handle) .....
• Cut at a slower pace.
• Clean blade guard area.
• Replace edge guide.
• Plug unit into a 120 volt outlet.
• Replace fuse/reset breaker.
• Replace spring washer.
• Contact your SEARS Service
Center/Dept.
•Adjust wheel to proper depth.
• Replace blade.
• Worn spring washer.
• Replace
•Wheel
•Wheel
•Adjust wheel for proper depth.
•Contact your SEARS Service
Center/Dept.
depth incorrect.
mount(s) broken.
spring washer.
Declaraci6n
deGarantia
Reglas
deSeguridad
Montaje
Use
Mantenimiento
10
10
13
15
17
Servicio
yAjustes
17
AImacenaje
18
Tabla
Diagn6stica
19
Pedido
dePiezas
deRepuesto
Contratapa
UNAI_O
DEGARANTIA
COMPLETA
ENLACORTADORA
DEBORDES
ELECTRICA
DELAMARCA
CRAFTSMAN
DESEARS
Siestacortadora
debordes
electrica
Craftsman
<!:'
dejara
defuncionar
apropiadamente
dadoadefectos
enmaterial
omano
deobra,
dentro
dela(1)unaSo,
contados
desde
lafecha
original
decompra,
Sears
lareparar_t
oreemplazar&
sin
costoalguno.
SiestaCortadora
deBordes
esusada
confinescomerciales,
lagarantia
aplicar&
pot90diasapartir
delafecha
orignial
decompra.
Esta
garantia
noincluye
lacuchilla.
SEOFRECERA
SERVlCIO
DEGARANTtA
DEVOLVIENDO
LACORTADORA
DEBORDES
ELECTRICA
CRAFTSMAN
ALATIENDA
SEARS
MAS
CERCANA
ENLOS
ESTADOS
UNIDOS.
Esta
garantia
leconfiere
erechos
juridicos
especificos,
adem&s
usted
puede
tenerotrosderechos
quevarian
entre
estados.
Sears, Roebuck
and Co. D/817WA
Hoffman
ADVERTENClA:
Siempre que use
cortadoras de bordes el6ctricas, deben observarse precauciones basicas
de seguridad para reducir el riesgo de
incendio, choque el6ctrico y accidentes a personas. Lea todas las
instrucciones e informaci6n de seguridad que se encuentran a Io largo de
este manual.
Estates,
IL 60179
Etiquetas de
Seguridad en el aparato
SEGURIDAD DEL USUARIO
• Vistase de forma apropiada.
Siempre use anteojos de seguridad
o protecci6n de ojos similar al usar y
efectuar servicio de mantenimiento
al aparato. (Anteojos de seguridad
vienen disponibles).
Use siempre
m&scara de protecci6n o de filtraci6n
cuando trabaje con el aparato en
ambientes polvorientos. Use siempre
pantalones largos y gruesos, mangas largas, botas y guantes. No use
el aparato descalzo ni con sandalias.
PELIGRO:
iESTE APARATO DE
FUERZA PUEDE SER PELIGROSO!
Este aparato puede causar graves heridas incluyendo la amputaci6n de miembros del cuerpo o ceguera al usuario y a
otras personas. Las advertencias e
instrucciones de seguridad en este
manual deben seguirse para proveer
seguridad razonable y eficiencia al usar
este aparato. El usuario tiene la responsabilidad de seguir todas las advertencias e instrucciones tanto en este manual come en el aparato, iLea el Manual
de Usuario en su totalidad antes de armar y de usar este aparato! Limite el
use de este aparato a aquellas personas que hayan leido, comprendido y
que vayan a seguir las advertencias e
instrucciones tanto en este manual
como en el aparato.
_tos
Botas
• Mantenga el cabello arriba de los
hombros, at&ndolo para tal efecto si
es necesario. Asegure o remueva la
ropa suelta y joyas o ropa con tiras,
boflas, corbatas, etc. Estas pueden
10
enredarse
enlaspiezas
enmovi• ADVERTENClA:
Evite ambientes
miento.
peligrosos. Para reducir el riesgo de
• Elestar
completamente
cubierto,
le
choque electrico, use cables de
protegerR
encontra
depedazos
de
extensi6n que vengan
plantas
t6xicas
ydesechos
quepue- espec[ficamente marcados como
danserarrojados
alaireporlalinea apropiados para aparatos de uso
girante.
exterior y que tengan una
• Mant_ngase
alerta.
Nouseesteapa- clasificaci6n el6ctrica no menor que
ratocuando
estecansado,
enfermo la del aparato. El cable deberR venir
obajolainfiuencia
delalcohol,
de
marcado con el sufijo "W-A." Use un
drogas
uotrosmedicamentos.
Vigile cable polarizado. AsegQrese de que el
bienIoqueestR
haciendo;
useel
cable de extensi6n est6 en buenas
sentido
com_n.
condiciones. Reemplace el cable de
• Evitelosarranques
nointencionales extensi6n si 6ste se encuentra
delaparato.
Nunca
cargue
elapara- daSado. Los cables de extensi6n
toconeldedoenelinterrupter.
demasiados finos causarRn una baja
AsegQrese
dequeelinterruptor
no
en el voltaje de la I[nea, Io que
seencuentre
enlaposici6n
"on"al
provocara falta de potencia y
conectar
elcable
deextensi6n.
recalentamiento. En caso de duda
PELIGRO:
RIESGO
DECORTADURA
entre dos cables, use el mRs gruesco.
MANTENGA
I_AS
MANOS
YLOS
PiES
ALE- Cuanto mrs pequeSo es el nOmero
JADOS
DELAS
CUCHILLA
YDEL
AREA
de clasificaci6n, mrs grueso es el
DECORTE
- Nointente
recoger
elmate- cable. (AVISO: La tabla en la secci6n
del Cabvle de Extensi6n, muestra el
rialyacortado
mientras
lascuchillas
se
encuentren
enmovimiento.
AsegOrese tamaSo correcto a ser usado
quelacuchilla
sehaya
detenido
yel
dependiendo del largo del cable).
aparato
estedesconectado
antes
dere- • No intente reparar el aparato. Inmover
elmaterial
quesehaya
atascado speccione el aislamiento y los conenlacuchilla
decorte.
Nosostenga
ni
ectores en el aparato yen el cable
agarre
elaparato
porlacuchilla
de
del aparato antes de cada uso. Si
corte.
encuentra cualquier da_o, no use el
®
PRECAUCION:
La cuchilla gira momentRneamente
despu6s de haber soltado el interruptor.
SEGURIDAD
ELEOTRIOA
• Use exclusivamente
suministro de
voltaje de 120 A.C. como se muestra
en la placa del aparato.
• Evite situaciones peligrosas. No use
el aparato en presencia de gases o
liquidos infiamables para evitar incendios, explosiones y/o daSos al
aparato.
• ADVERTENOIA:
Evite ambientes
peligrosos. Para reducir el riesgo de
choque el6ctrico, no use el aparato
bajo la Iluvia o en lugares hOmedos
o mojados, ni cerca de piscinas,
tinas calientes, etc. No Io exponga a
la nieve, a la Iluvia ni al agua para
evitar la posibilidad de choque
el_ctrico.
•
•
•
•
•
aparato hasta despues de haber
sido reparado por de Centre de Servicio Sears.
Inspeccione el cable de extensi6n
antes de cada uso y cambielo si este
se encuentra daSado.
Para reducir la posibilidad de que el
cable de extensi6n se desconecte
del aparato durante el uso, ate el
cable del aparato al cable de extensi6n como se muestra en la secci6n
de Cable de Extensi6n. Conecte el
cable de extensi6n al enchufe embutido en el cable del aparato.
No use el aparato si el interrupter no
Io enciende o apaga correctamente.
Todas las reparaciones
al interrupter
deberan ser provistas por de Centro
de Servicio Sears.
Mantenga el cable de extensi6n alejado del usuario, de el aparato, y de
obstRculos en todo momento. No exponga los cables al calor, al aceite,
al agua o a bordes con filo.
Evite todo contacto del cuerpo con
los conductores a tierra, tales como
tuberias de metal o cercas de
alambre,
paraevitar
Ioposibilidad
de
choque
el_ctrico.
• Cambie las cuchillas que se encuentren dobladas, deformes, astilladas,
rotas o daSadas de cualquier otro
modo.
• Antes de usar su aparato, permita que
un Centro de Servicio Sears repare o
reemplace todas las piezas que se
encuentren rotas, quebradas, astilladas o dai]adas de cualquier otro forma.
Onicamente cuchillas de repues• Elcircuito
oeltomacorriente
quese • toUsegenuinas
y los accesorios que se
useconesteaparato
deber&
estar
para este aparato.
provisto
conprotecci6n
deInterrup- recomiendan
Nunca use alambre, cuerda, hilo,
terdeFallas
enelCircuito
aTierra
etc. El uso de cualquier otro acceso(Ground
FaultCircuit
Interrupter
rio podria incrementar el riesgo de
GFCI).
Vienen
disponibles,
reaccidente o podria causar dahos al
cept&culos
conlaprotecci6n
GFCI
incorporada
y6stos
pueden
serusa- aparato.
Mantenga el protector de la cuchilla
dosparaestamedida
deseguridad. • en
su lugar yen buenas condiciones
• Parareducir
elriesgo
dechoque
de trabajo.
el6ctrico,
esteequipo
cuenta
conun
SI=GURIDAD AL CORTAR
enchufe
polarizado
(una
aleta
es
m&sancha
quelaotra)yrequerir&
el • Inspeccione el &rea a set cortada
usodeuncable
deextensi6n
polari- antes de cada uso. Retire los objetos
zado.
Esteenchufe
entrar&
sola(piedras, vidrio roto, alambre, hilo,
mente
enunaposici6n
enelenchufe etc.) que pueden ser arrojados al
polarizado
delcabledeextensi6n.
Si aire por la cuchilla o se pueden enreesteenchufe
noentrara
completa- dar en el aparato.
mente
dentro
delenchufe
delcable • Mantenga alejados a los niSos. Mandeextensi6n,
invierta
elenchufe.
Si
tenga a otros incluyendo niSos, anicontin0a
sinentrar,
obtenga
elcable males, espectadores y ayudantes
deextensi6n
polarizado
correcto.
El
alejados 30 metros (100 pies) de la
Zona de Peligro. Detenga el aparato
enchufe
polarizado
delcable
deextensi6n
requerir&
elusodeuntoma- de inmediato si alguien se le acerca.
corriente
depared
polarizado.
Elenchufe
polarizado
delcable
de
extensi6n
entrar&
eneltomacorriente
deunasolafarina.
Sielenchufe
noentracompletamente
enel
tomacorriente
depared,
invierta
el
enchufe.
Sicontin0a
sinentrar,
contacteunelectricista
autorizado
para
queinstale
eltomacorriente
apropiado.Nocambie
elequipo
delen• Mantenga
siempre el aparato en
chufe,
elrecept&culo
del
cable
de
ffente a su cuerpo. Mantenga
pies y
extensi6n
oelenchufe
del
cable
de
manos alejados del firea de corte.
extensi6n
deninguna
manera.
• Sostenga
el aparato firmemente
con
las dos manos.
SI=GURIDAD
DI=L
APARATO
• No se incline excesivamente
ni se
• Nointente
reparar
suaparato.
Inpare en superficies inestables. Manspeccione
elaparato
y el cable de
tenga el equilibria y el balance en
todo momenta.
extensi6n completamente
antes de
cada uso. Permita que sea de Centro de Servicio Sears quien repare o
cambie las piezas daSadas.
AsegOrese de que todos los fijadores, mangos y protectores esten
en su lugar y bien fijos. Un Centro de
Servicio Sears deber& reparar o
cambiar el protector, si est& daSado,
o cualquier otra pieza que se encuentre daSada.
• Mantenga las ruedas en contacto
con el suelo.
• No levante el aparato m&s arriba del
suelo. La cuchilla podria acercarse
peligrosamente
a su cuerpo.
• Siempre empuje el aparato lentamente sobre el suelo. Mant6ngase
alerta en caso de aceras desiguales,
hoyos en el terreno, raices grandes,
etc.
12
Centro de Servicio Sears.
• Nosobrecargue
suaparato;
ser&
m&sefectivo
yconmenor
riesgo
de • Nun ca sumerja o riegue con agua o
accidentes
simaneja
elaparato
al
con ning0n otto liquido. Limpie el aparitmoparaelcualfuedise_ado.
Use
rato y sus etiquetas con una esponja
elaparato
correcto.
Use0nicamente h0meda. Mantenga los mangos separalostrabajos
queseespecifican cos, limpios y libres de aceite y grasa.
enestemanual.
TRANSPORTACION
Y
SEGURIDAD
EN EL
MANTENIMIENTO
• Mantenga su aparato cuidadosamente. Mantenga su aparato de
acuerdo con los procedimientos
recomendados.
Siga las instrucciones
para cambiar las cuchillas bajo la
secci6n de SERVlCIO Y AJUSTES.
Mantenga la cuchilla y su protector
limpios todo el tiempo para evitar el
riesgo de accidentes.
• Nunca ponga en marcha su aparato
sin tenet unido el protector de la cuchilla. La cuchilla podria salir despedida o podria arrojar objetos al aire causando accidentes graves.
• Desconecte el aparato del tomacorriente antes de efectuar mantenimiento o al cambiar las cuchillas.
• Use 0nicamente piezas de reemplazo recomendadas.
• Permita que todo mantenimiento
y
servicio no especificado
en este
manual sea desempe_ado
por un de
ALMACENAJE
• Transporte el aparato con el motor
detenido y la cuchilla alejada de su
cuerpo.
• No agarre o sostenga la parte expuesta de la cuchilla.
• Desenchufe el aparato antes de almacenario; asegure el aparato antes
de transportado en un vehiculo.
• Guarde el aparato de modo que la
cuchilla no pueda causar heridas accidentales. El aparato puede ser colgado por el mango.
• Guarde el aparato al abrigo de la interperie. Guarde el aparato desconnectado en un lugar alto, seco y
fuera del alcance de los ni_os.
Si acontecen situaciones no previstas
en este manual, proceda con cuidado
y use buen criterio. Si necesita ayuda,
Ilame al de Centro de Servicio Sears
m_ts cercano o al nOmero
1-800-235-5878.
GUARDE ESTAS INSTRUCCIONES
CONTENIDO
DE LA CAJA
Modelo 358.796490
Cortadora de Bordes
Tornillos
Tuercas Aseguradoras
Examine las piezas por si hay alguna
que viene da_ada. No use piezas
da_adas.
Herramienta que necesitara:
• Destornillador Phillips
MONTAJE DEL TUBO
• Introduzca el tubo dentro de la cubierta del unidad como se ilustra a
continuaci6n.
Alinee los huecos para
los tomillos.
• Introduzca las tuercas de cierre dentro de los bolsillos en la cubierta del
unidad.
• Introduzca los tornillos a trav6s de
los huecos ya lineados.
• Enrosque los tornillos dentro de las
tuercas de cierre y aprietelas firmemente.
AVlSO: Si necesita ayuda o encuentra
piezas da_adas o perdidas, Ilame al
n0mero 1-800-235-5878.
MONTAJE
ADVERTENCIA:
Si el aparato fue
entregado ya armado, repita todos los
pasos en esta secci6n para asegurarse de que el montaje haya sido hecho correctamente
y que todos los sujetadores se encuentren fijos.
Este Manual del Usuario fue elaborado para ayudarle a armar el aparato y
a usarlo en conformidad con las precauciones de seguridad. Es importante que lea el manual en su totalidad
para familiarizarse con el aparato
antes de comenzar a armarlo.
Lea su Manual del Usuario.
Tubo _xx_,
Tuercas
_
_-
13
._f"As egurado ras
_
Cubierta
CABLE DE EXTENSION
Use 0nicamente suministro de voltaje
de 120 A.C. como se muestra en la
placa del aparato.
El cable de extensi6n utilizado para
alcanzar el recurso de energia debe:
• Estar marcado especificamente
para
use exterior. El cable debe estar
marcado con el sufijo "W-A."
• Tener la fuerza suficiente para transportar la energia desde el tomacorriente todo Io largo del cable hasta
Ilegar al aparato. De otra manera,
p@rdida de energia y recalentamiento podrian occurir, causando daro al
aparato. Vea la tabla para las recomendaciones minimas de calibre del
cable. (Cables de extensi6n apropiados [email protected] disponibles). No utilice
cables m_ltiples.
• Estar en buena condici6n. El aislamiento del cable debe estar intacto
sin grietas y sin deterioro. Los enchufes no deben tener ninguna
serial de daflo.
CONSTRUCCION
DOBLE
Este aparato cuenta con doble aislamiento para ayudar a protegerio en
contra de cheques el@ctricos. La
construcci6n de doble aislamiento
consiste en dos "capas" separadas de
aislamiento el@ctrico en lugar de tener
toma de tierra.
Herramientas y aparatos construidos
con este sistema, no ban sido diseflados para que tomen tierra. No se ha
provisto para esta m_.quina ningOn
medic para la toma de tierra y tampoco se deber_.n afladir medics para la
toma de tierra a la misma. Como resultado, el cable de extensi6n usado con
su aparato, puede ser enchufado en
cualquier tomacorriente
el@ctrico normal de 120 voltios.
Precauciones
de seguridad [email protected]
set observadas cuando se use cualquier herramienta el@ctrica. El sistema de
doble aislamiento s61o provee protecci6n adicional en contra de accidentes
causados per suspenso intemo de aislamiento el@ctrico.
RECOMENDACIONES PARA
CALIBRE MINIMO DE CABLE
*Calibre
de Cable
ADVERTENCIA:
Toda reparaci6n
el@ctrica hecha a este aparato, incluyendo la caja, el interruptor, el motor, etc., debe ser diagnosticada
y reparada per personal de servicio
cualificado. Las piezas de reemplazo
en productos de doble aislamiento deben ser id@nticas alas piezas que se
[email protected].
Los aparatos de
doble aislamiento, vienen marcados
con las palabras DOBLE AISLAMIENTO O AISLADO DOBLEMENTE.
El
simbolol [] (cuadrado dentro de otro
cuadrado) puede tambi@n aparecer en
el aparato. Todo aparato deber@, set
reparado por personal de Centro de
Servicio Sears, de Io contrario, la
construcci6n de doble aislamiento
podria anularse y causar graves accidentes.
Amerieano
Amarre el cable de extensi6n al aparato:
• Ate el enchufe del aparato al cable
de extensi6n como se ilustra a continuaci6n.
• Introduzca el enchufe del aparato
dentro del receptor del cable de extensi6n.
Enchufe del
Aparato
DE AISLAMIENTO
Cable de
Extensi6n
14
CONOZCASU
APARATO
LEA ESTE MANUAL DEL USUARIO Y LAS REGLAS DE SEGURIDAD ANTES DE COMENZAR A USAR SU APARATO. Compare las ilustraciones a continuaci6n con las
piezas de su aparato para familiarizarse con la Iocalizaci6n de los varios controles y ajustes. Guarde este manual para uso futuro.
Mango de
Control
Interruptor
en forma
de Gatilio
Palanca de
Ajuste del Eje
Perilla de
Ajuste de
_
Cubierta
Protectora
la Cuchilla
./-_
de
Profun_
Cuchilla
El INTERRUPTOR EN FORMA DE GATILLO es usado para actibar el motor.
La PALANOA DE AJUSTE DEL EJE se
El PROTECTOR DE LA CUCHILLA protege al usuario de la cuchilla girante.
La PERILLA DE AJUSTE DE PROFUNDI-
usa para porter en posici6n
de corte.
DAD le permite a usted ajustar la cuchilla la profundidad deseada.
el &ngulo
INSTRUCCIONES
DE USO
POSICION DE USO
Su aparato tiene dos posiciones de
uso, una para cortar los hordes y la
otra para biselar.
Para fijar la posici6n de uso:
• Mueva la palanca de ajuste del eje
hacia el mango. Gire el motor a la
posici6n deseada. Suelte la palanca
de ajuste del eje, asegur&ndose
que
el motor quede en posici6n.
",.\ _-.
Palanca de
_"\_
/
Ajuste del Eje
ADVERTENClA:
Detenga el motor y
la cuchilla y desconecte el aparato
antes de remover el material envuelto
alrededor del eje de la cuchilla, para
evitar serios accidentes.
• Permita que el motor alcance m&xima velocidad antes de empezar a
cortar. La cuchilla tiene m&ximo poder de corte a la m&s alta velocidad y
set& menos propensa a calarse.
• Si la cuchilla no marcha cuando el
interruptor se activa, asegOrese que
no est_ atascada con desechos.
La cuchilla girara
momentaneamente
,l'_'%
"_
_
!k _
_,_,
METODOS PARA CORTAR BORDES
ADVERTENCIA:
El usuario u otras
personas no deben tratar de recoger
el material ya cortado con el motor en
marcha y la cuchilla girando, para evitar accidentes.
_cortado.
15
_.
_
_,
despues de soltar el
interruptor.
Detenga
la cuchilla girante
haciendo
contacto
con el material ya
• Siempre suelte el interruptor y deje
que el motor se detenga cuando no
este cortando.
• Para detener el motor, suelte el interruptor; permita que la cuchilla se detenga antes de removeda de la zona
de corte.
AI familiarizarse con su cortadora,
usted podr_t determinar su propio ritmo
de trabajo. Condiciones como Io son la
profundidad de corte, &ngulo de carte
y material a cortar regular&n la velocidad y el tiempo requerido para su trabajo.
menor profundidad. Cuando la rueda
es ajustada al m&ximo hacia abajo
(posici6n de corte), la cuchilla se levanta par completo del suelo.
• Afloje la perilla en el montaje de la
rueda delantera.
• Ajuste la rueda para fijar la profundidad de la cuchilla. Fije la rueda m&s
alta para mayor profundidad de corte
y fije la rueda m&s baja para un corte
menos profundo o para hacer zanjas.
• Apriete la perilla firmemente.
Perilla de
j,._i
Ajuste d.e
_
//_//
Profun_
BORDES
CORTAR
!
Guia para hater Bordes
CONSEJOS DE USO
• Permita que la cuchilla alcance la
velocidad m&xima antes de empezar
a cortar. Sea cuidadoso y corte lentamente para evitar que el aparato
se sobrecaugue
o se cale, Io que
puede causar que el motor se daSe.
• Mantenga un ritmo de corte de sendero recto, dirigiendo la guia de
PARA HACER BORDES al costado
de la acera, patio, camino de entrada, etc.
• Trabaje siempre alejado de personas, de objetos s61idos coma son
paredes, piedras grandes, &rboles,
autom6viles,
etc.
• Sea cuidadoso cuando corte cerca
de &rboles o plantas valiosas. La cuchilla de metal a alta velocidad
podria cortar las raices o causar
daSo a las plantas.
• Mantenga siempre el &tea de la cuchilla limpia. Detenga el aparato,
asegQrese de que la cuchilla est6
completamente
detenida, y desconnecte el aparato del tomacorriente,
antes de limpiar.
• Si la cuchilla se cala, de inmediato
levante la cuchilla del &rea de corte
hacienda bajar el mango. Si la cuchilla continua cal&ndose al levantarla, detenga el aparato, descon6ctelo
del tomacorriente e inspeccione el
&rea de la cuchilla en caso de bloqueo o algQn dat_o. Limpie el &rea
de la cuchilla de desechos que puedan haberse acumulado.
!
CORTAR BORDES-produce
un preciso, corte cercano alrededor de aceras,
caminos de entrada, patios, etc.
BISELAR__
L
BISELAR - provee un corte m&s ancho o hace zanjas alrededor de aceras, caminos de entrada, patios, etc. AI
biselar, usted remover& m&s material,
por Io tanto incrementar& la carga del
motor, Sea cuidadoso y corte lentamente para evitar que el motor se sobrecargue o se cale, Io que puede
daiiar el motor,
AJUST; = DE PROFUNDIDAD
La rueda delantera puede ser ajustada
para permitir un corte m&s o menos
profundo. Mueva la rueda hacia arriba
para un corte m&s profundo, o mueva
la rueda hacia abajo para un corte con
16
RESPONSIBILIDAD
TAREA DE CUIDADO
DEL CLIENTE
Y MANTENIMIENTO
Verificar
que no haya fijadores
Verificar
que no haya
QUANDO
flojoe ni piezae sueltas
piezas daSadas
o gastadae
Limpiar el aparato y sus placas
HACER
Antes de cada uso
Antes de cada uso
Despu_s
de cada uso
RECOMEN DAClON ES GENERALES
La garantia en este aparato no aplica
al los articulos eometidoe al abuso o a
la negligencia del usuario. Para recibir
el valor completo de la garantia, el
usuario deber& mantener el aparato
seg0n las instrucciones en este
manual. Ser& necesario hacer varios
ajustes peri6dicamente
para mantener
el aparato debidamente.
El mantenimiento incorrecto puede causar dai7os al
aparato y posibles accidentes al usuario o a espectadores.
VERIFIQUE QUE NO HAYA
FIJADORES FLOJOS
NI PIEZAS SUELTAS
• Cuchilla
• Protector de la Cuchilla
• Tornillos de la Caja
• Tornillos del Mango
• Ruedas
VERIFIQUE
QUE NO HAYA PIEZAS
DAI_IADAS O GASTADAS
Su de Centro de Servicio Sears ser& el
que deber& efectuar todo tipo de cambio de piezas daSadas o gastadas.
• Interrupter en forma de Gatillo Aseg0erse que el interruptor en forma de gatillo funciona apropiadamente soltando el interruptor.
AsegOres que el motor se detenga y
la cuchilla pare de girar; entonces
vuelva a poner en marcha el motor y
continOe.
• Protector de la Cuchilla - No use su
aparato si el protector de la cuchilla
est& daSado.
MANTENIMIENTO
astillada, rata o daSada de cualquier
otro modo. Nunca trate de enderezar y
reusar la cuchilla si se encuentra daSada. Use Qnicamente la cuchilla de reemplaza especificada en este manual.
Para volver al rev6s la cuchilla o para
cambiada:
• Desconecte el aparato del tomacorriente.
• Ajuste una Ilave en el eje que se encuentra detr&s de la cuchilla.
• Usando otra Ilave, remueva la tuerca
hexagonal, la arandela en forma de
copa, y la arandela semi-abierta.
• Remueva la cuchilla.
• Limpie todas las piezas y verifique
daiTos. Cambie todas las piezas
dat_adas.
• Vuelva la cuchilla del rev6s o c&mbiela; luego, vu61vala a montar en el eje.
• Instale la arandela asegur&ndose la
parte de afuera, con bordes en muescas, haga contacto con la cuchilla.
• Instale la arandela en farina de
copa, asegur&ndose
de que el borde
de la misma quede mirado hacia la
arandela tipo muelle.
LIMPIE EL APARATO Y SUS PLACAS
• Limpie el aparato usando un trapo
h0medo con detergente suave.
• Sequelo con un trapo limpio y seco.
DE LA CUCHILLA
ADVERTENCIA:
La cuchilla girarA
moment&neamente
despu6s que el
motor se detiene. Aseg0rese que la
cuchilla haya parado de girar y desconnecte el aparato de] tomacorriente
antes de hacer cualquier tipo de trabajo en la cuchilla.
PRECAUClON:
Use guantes protectores cuando maneje o efectOe mantenimiento a la cuchilla para asi ayudar a evitar accidentes.
• Use la cuchilla de reemplazo apropiada. Contacte su tienda para la cuchilla de repuesto #71-85718.
• La cuchilla es reversible. Cuando un
lado de la cuchilla se gaste a] cortar
bordes, vu61vala de] reves.
• Verifique peri6dicamente
el estado
de la cuchilla. Ponga la cuchilla en
una superficie liana y verifique que la
cuchilla est6 completamente
plana.
Deseche la cuchilla siesta no se encuentra completamente
plana.
ADVERTENCIA:
Siempre reemp]ace
la cuchilla que est6 doblada, deforme,
17
• Instale
latuerca
hexagonale
y
apri6te
lafirmemente.
PIEZAS DE SERVIClO PARA EL
CLIENTE
Cuchilla .................
71-85718
Arandela Semi-abierta (cuchilla)
......................
530-402971
Tuerca Hexagonal (cuchilla)
......................
530-402954
Tuerca Aseguradora (tubo) 530-403094
Rueda Trasera ........
530-095088
Rueda Delantera
......
530-095087
Protector de la Cuchilla . 530-402859
Guia para Cortar Bordes 530-402865
Eje Trasero ...........
530-403071
Eje Delantero
.........
530-402875
Arandela (eje) .........
530-403136
Arandela in Forma de Copa
......................
530-016276
Tuerca Aseguradora
(eje) 530-016245
Arandela de cierre (eje).
530-016255
Espaciador (eje) .......
530-403109
Tornillo (guia de bordes)
530-016227
Tornillo (tubo) .........
530-402888
Arandela (mango en forma de T)
......................
530-402887
Arandela
Semi-abierta
Tuerca
Hexagonal
Arandela en
Afloja-r"-'_
_ _'_
ApretarF°rma de Copa
ACCESORIOS
Anteojos de Seguridad
....
Cable de Extensi6n .......
71-85707
71-5702
est& daSado o gastado.
• Levemente, aplique aceite en las superficies exteriores de metal.
Prepare el aparato para el almacenaje
al final de la temporada o siva a estar
sin usar por m&s de 30 dias.
ADVERTENCIA:
• Asegure el aparato antes de transportado o almacenarlo.
• Guarde el aparato con todos sus
protectores en su lugar. Coloque el
aparato en una posici6n tal que no
pueda causar ning0n accidente.
• Guarde el aparato completamente
fuera del alcance de los niSos.
ALMACENAJE
DE LA CORTADORA
DE BORDES
• Limpie el aparato par completo.
• Inspeccione el &tea de la cuchilla y
limpie la suciedad, hierba, hojas, o desechos que se hayan acumulado. Inspeccione la cuchilla y su protector;
cambie la cuchilla que se encuentre
doblada, deforme, astillada, rata o
daSada de cualquier otro modo.
• Cambie el protector de la cuchilla si
PRECAUClON:
Use gantes protectores al manejar la cuchilla. La cuchilla
tiene file y le puede causar cortaduras
a0n sin estar en movimiento.
• Aplique una capa de aceite a la superficie entera de la cuchilla. Envu_lvala con papel grueso o en tela.
• AsegOrese que el mango y los protectores se encuentren en su lugar y
seguramente fijos. Cambie las pieza
daSadas.
• Examine todo el aparato y verifique
que no haya ningOn tornillo, tuerca, o
perno suelto. Cambie las piezas que
se encuentren daSadas, rotas o gastadas.
• No cubra con pl&stico. El pl&stico no
respira y puede causar condensaci6n y eventualmente
corrosi6n o enmohecimiento.
18
TABLA
DIAGNOSTICA
PROBLEMA
La cuchilla se
detiene bajo
carga o no
gira cuando
el interruptor
se enciende.
CAUSA
SOLUCION
• Forzar la cuchilla en el material a
cortar.
• Corte a un ritmo mAs lento.
• El protector de la cuchilla se
encuentra atascado con desechos.
• La guia de corte de bordes esta
doblada hacia la cuchilla.
• Limpie el Area del protector
la cuchiila
• Cambie la guia para cortar
bordes.
• Aparato desconectado.
• Enchufe el aparato en un
tomacorriente
de 120 voltios.
• El fusible esta quemado/el interruptor
automAtico se encuentra apagado.
• La arandela semi-abierta
esta
gastada.
• Ninguna de la anteriores.
• Cambie el fusible/vuelva
a fijar
el interruptor automatico.
• Cambie la arandela semi-abierta.
La cuchiila
gira pero no
corta
• Cuchilla incorrecta o gastada.
• La arandela semi-abierta esta
da_ada.
• Cambie la cuchilla
• Cambie la arandela semi-abierta.
La cortadora
de bordes
arrastra
tierra o corta
muy profundo.
• La montur(s)
rotas.
• Contacte
Sears.
de la rueda estAn
19
de
• Contacte de Centro de Servicio
Sears.
de Centro de Servicio
For in-home
major brand repair service:
Call 24 hours a day, 7 days a week
1-800-4-MY-HOME (1-800-469-4663)
TM
Para pedir servicio
de reparacidn
a domicilio
-- 1-800-676-5811
In Canada for all your service and parts needs call
Au Canada pour tout le service ou les pieces -- 1-800-665-4455
For the repair or replacement
parts you need:
Call 6 am - 11 pm CST, 7 days a week
PartsDirect
1-800-366-PART
Para ordenar
TM
(1-800-366-7278)
pieza8 con entrega
a domicilio
-- 1-800-659-7084
For the location of a Sears Parts and Repair Center in your area:
Call 24 hours a day, 7 days a week
1-800-488-1222
For information
on purchasing
a Sears Maintenance
or to inquire about an existing Agreement:
Call 9 am - 5 pm, Monday - Saturday
1-800-827-6655
SEARS
HomeCentrar °
20
Agreement