1
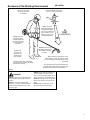
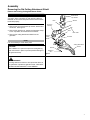
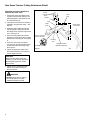
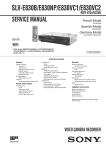
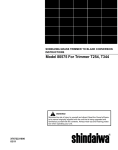
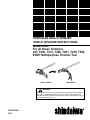
SHINDAIWA GRASS TRIMMER
SHIELD UPGRADE INSTRUCTIONS
Model 80561
For all Grass Trimmers
22T, T230, T231, T260, T261, T270, T350,
65001 Multipurpose Trimmer Tool
EARLY SHIELD
NEW SHIELD
WARNING!
Minimize the risk of injury to yourself and others! Read the Owner's/Operator's manual originally supplied with the unit that is being upgraded and
familiarize yourself with the contents. Always wear eye and hearing protection when operating your unit.
X7502235600
07/10
Introduction
These are instructions to convert a grass trimmer to a blade capable unit. This is not an Owner's/Operator's manual. Information on how to operate and maintain the unit can be found in the Owner's/Operator's manual for the unit you are converting. Note this kit is supplied with a cutting attachment shield that has been redesigned to provide better visibility and a larger
cutting swath when used as a grass trimmer.
IMPORTANT!
IMPORTANT!
If the cutting attachment shield has been removed from
your unit, or the unit was manufactured prior to October
2001, an additional clamp kit will be required to complete
this installation. The clamp kit required is Shindaiwa part
number 80292.
The information contained in these instructions describes
the product available at the time of publication.
Echo, Inc. reserves the right to make changes to products
without prior notice, and without obligation to make alterations to units previously manufactured.
Contents
PAGE
PAGE
Attention Statements........................ 2
Kit Contents.......................................6
General Safety Instructions.............. 3
Assembly.......................................... 8
Safety Labels.................................... 3
Attention Statements
Throughout this manual are special “attention statements”.
WARNING!
A statement preceded by the triangular attention symbol and the word “WARNING” contains information that should be
acted upon to prevent serious bodily injury.
CAUTION!
A statement preceded by the word “CAUTION” contains
information that should be acted upon to prevent mechanical
damage.
IMPORTANT!
A statement preceded by the word “IMPORTANT” is one that
possesses special significance.
NOTE:
Read and follow this
manual.Failure to do
so could result in
serious injury.
Wear eye and hearing
protection at all times
during the operation
of this unit.
Keep bystanders
at least 50 feet (15 m)
away during operation.
A statement preceded by the word “NOTE” contains information
that is handy to know and may make your job easier.
Beware of thrown or
ricocheted objects.
IMPORTANT!
Do not operate this
unit with a blade.
The instructions described in this manual are intended to help
you get the most from your Shindaiwa power tool as well as
to protect you and others from harm. These procedures are
guidelines for safe operation under most conditions, and are
not intended to replace any safety rules and/or laws that may
be in force in your area. If you have questions regarding your
Shindaiwa power tool, or if you do not understand something in
these instructions, your Shindaiwa dealer will be glad to assist
you. You may also contact Shindaiwa at the address printed on
the back of this instructional manual.
2
General Safety Instructions
Work Safely
Stay Alert
Trimmers operate at very high speeds and can do serious dam- You must be physically and mentally fit to operate this unit
age or injury if they are misused or abused.
safely.
WARNING!
Use only authorized Shindaiwa parts and accessories
with your Shindaiwa trimmer. Do not make modifications to this unit without the written approval of Echo,
Inc.
WARNING!
Never operate power equipment of any kind if you
are tired or if you are under the influence of alcohol,
drugs, medication or any other substance that could
affect your ability or judgement.
WARNING!
Minimize the Risk of Fire
NEVER smoke or light fires near the unit.
ALWAYS stop the engine and allow it to cool before
refueling. Avoid overfilling and wipe off any fuel that may
have spilled.
ALWAYS inspect the unit for fuel leaks before each
use. During each refill, check that no fuel leaks from
around the fuel cap and/or fuel tank. If fuel leaks are
evident, stop using the unit immediately. Fuel leaks
must be repaired before using the unit.
ALWAYS move the unit to a place well away from a fuel
storage area or other readily flammable materials before
starting the engine.
NEVER place flammable material close to the engine
muffler.
NEVER run the engine without the spark arrester
screen in place.
Safety Labels
WARNING!
Use Good Judgment
NEVER operate the engine when transporting the unit.
NEVER operate the engine indoors! Make sure there is
always good ventilation. Fumes from engine exhaust can
cause serious injury or death.
ALWAYS use the proper cutting tool for the job.
ALWAYS stop the unit immediate-ly if it suddenly begins
to vibrate or shake. Inspect for broken, missing or improperly installed parts or attachments.
NEVER extend trimming line beyond the length specified
for your unit.
ALWAYS keep the unit as clean as practical. Keep it free
of loose vegetation, mud, etc.
ALWAYS hold the unit firmly with both hands when cutting or
trimming, and maintain control at all times.
ALWAYS keep the handles clean.
ALWAYS disconnect the spark plug wire before performing any maintenance work.
TSU03
T230
Figure 1
IMPORTANT!
Safety and Operation Information Labels: Make sure all information labels
are undamaged and readable. Immediately replace damaged or missing
information labels. A new label is
provided in this kit and additional
labels are available from your local
authorized Shindaiwa dealer. Prior to
installing the new label, Remove old
label and clean the outer tube with
rubbing alcohol or similar cleaner.
3
The Properly Equipped Operator
Wear close-fitting clothing to
protect legs and arms. Gloves
offer added protection and are
strongly recommended. Do not
wear clothing or jewelry that
could get caught in machinery
or underbrush. Secure long
hair so that it is above
shoulder level.
NEVER wear shorts!
Wear hearing protection devices
and a broad-brimmed hat or helmet.
Always wear eye protection
such as goggles or safety
glasses to shield against
thrown objects.
Always operate with both
hands firmly gripping the
unit.
Keep a proper
footing and do not
overreach. Maintain your balance
at all times during
operation.
Always make sure
the appropriate cutting
attachment shield is
correctly installed and in
good condition.
TSU02
Wear appropriate footwear (non-skid
boots or shoes): do not wear opentoed shoes or sandals. Never work
barefooted!
Figure 2
4
Keep away from the rotating cutting attachment at all times, and
never lift a moving attachment
above waist-high.
Be Aware of the Working Environment
Make sure bystanders or observers outside the 50-foot “danger zone” wear eye protection.
Avoid long-term operation in very hot or very
cold weather.
Reduce the risk of
bystanders being struck
by flying debris. Make
sure no one is within 50
feet (15 meters)—that’s
about 16 paces—of an
operating attachment.
Always clear your
work area of brush
or hidden debris that
could be thrown back
at you or toward a
bystander.
Be extremely
careful of slippery terrain, especially during
rainy weather.
Figure 3
WARNING!
ALWAYS make sure the cutting attachment is
properly installed and firmly tightened before
operation.
NEVER use a cracked or warped cutting
attachment: If a properly installed attachment
vibrates, replace the attachment with a new
one and re-check.
50
FEET
(15 METERS)
Always make sure the
appropriate cutting attachment shield is correctly
installed.
TSU04
If contact is made with a hard object,
stop the engine and inspect the cutting
attachment for damage.
(all units)
When operating in rocky terrain or near
electric wires or fences, use extreme caution
to avoid contacting such items with the cutting
attachment.
Be constantly alert for objects and debris that
could be thrown either from the rotating cutting
attachment or bounced from a hard surface.
ALWAYS stop the engine immediately and
check for damage if you strike a foreign
object or if the unit becomes tangled. Do not
operate with broken or damaged equipment.
NEVER allow the engine to run at high RPM
without a load. Doing so could damage the
engine.
NEVER operate a unit with worn or damaged fasteners or attachment holders.
5
Kit Contents
2
1
4
8
5
10
6
9
7
12
13
15
16
11
3
14
FITS MODELS
#
1
2
3
4
5
6
7
8
9
10
11
12
13
14
15
16
6
Description
Warning Label
Debris Shield
Debris Shield Clamp
Bolt
Debris Shield Upper
Clamp
Cutting Attachment
Shield Mounting Plate
24 mm (small)
Outer Tube Shim
24 mm (thick)
Clamp Bolt (small)
D-Washer (small)
Flat Washer (small)
Retaining Nut (small)
Cutting Attachment
Shield Mounting Plate
26 mm (large)
Outer Tube Shim
26 mm (thin)
Clamp Bolt (large)
D-Washer (large)
Flat Washer (large)
Retaining Nut (large)
1
1
T230, T231,
T260, T261,
65001, 22T
X
X
4
X
X
1
X
X
1
X
2
X
1
1
1
1
X
X
X
X
Qty
T270, T350
X
X
1
X
2
X
1
1
1
1
X
X
X
X
Assembly
Removing the Old Cutting Attachment Shield
Remove the Existing Cutting Attachment Shield.
IMPORTANT!
IMPORTANT!
Socket-Head
Cap Screws
You must know the model designation of the unit before
you begin. Some units have an outer tube of a different
diameter so the correct size parts must be used to secure
the shield properly.
1. Remove the four socket-head cap screws, bracket and
two shims. See Figure 4.
Shim
Gearcase
Housing
2. Remove the retaining nut, washer and gearcase clamp
screw. If possible, do not disturb the D-washer.
3. Remove the cutting attachment shield from the
gearcase.
Bracket
Shim
Gearcase
Clamp
Screw
Outer Tube
D-washer
NOTE:
It is not necessary to retain these parts.
CAUTION!
The D-Washer is a spacer that prevents overtightening
and must remain in place to prevent possible damage to
the gearcase clamp.
Cutting Attachment
Shield
Washer
Retaining
Nut
TSU05
Figure 4
WARNING!
A cutting attachment shield or other protective device is
no guarantee of protection against ricochet. YOU MUST
ALWAYS GUARD AGAINST FLYING DEBRIS!
7
New Grass Trimmer Cutting Attachment Shield
Assemble the Cutting Attachment
Shield to the Outer Tube.
SocketHead Cap
Screw
1. Choose the shims and shield mounting plate hardware that matches your
model designation. See Contents List
for model references.
Outer
Tube
Bracket
Shim
2. Take special care that the D-washer is
installed in the gearcase clamp. See
Figure 5.
Clamp
Screw
Cutting Attachment Shield
3. Install the cutting attachment shield
mounting plate to the gearcase with
the clamp screw only finger tight at this
time. See Figure 5.
4. Insert the cutting attachment shield
between the outer tube and the cutting
attachment mounting plate. See Figure
5.
5. Fit the two shims and the bracket
over the outer tube and install the four
socket-head cap screws finger tight.
See Figure 5.
6. Tighten the gearcase clamp screw,
then install the washer and retaining
nut and tighten securely.
CAUTION!
Make sure the clamp screw and
retaining nut are securely tightened
before tightening the four socket
head screws.
7. Tighten the four socket-head cap
screws to secure the cutting attachment shield.
WARNING!
NEVER operate the unit without
the cutting attachment shield
installed and tightly secured!
8
Shim
Make sure D-washer
is correctly installed.
Retaining
Nut
D-Washer
Figure 5
TSU07
Cutting Attachment
Shield Mounting Plate
NOTES
9
NOTES
10
NOTES
11
Consumer Product Support
If you require assistance or have questions concerning the application, operation or maintenance of this product you
may call the Shindaiwa Consumer Product Support Department at 1-877-986-7783 from 8:30 am to 4:30 pm (Central
Standard Time) Monday through Friday. Before calling, please know the model and serial number of your unit.
ECHO Incorporated.
400 Oakwood Road
Lake Zurich, IL 60047-1564 U.S.A.
Telephone: 1-877-986-7783
Fax: 1-847-540-8416
www.shindaiwa.com
Copyright© 2010 By Echo, Incorporated
All Rights Reserved.
Yamabiko Corporation
7-2 Suehirocho 1-Chome, Ohme,
Tokyo, 198-8760, Japan
Phone: 81-428-32-6118
Fax: 81-428-32-6145