1
2
CONTENTS
1. Precautions Before Using Scale ................. 7
2. Installation .......................................................... 8
A. Package Contents ................................................. 8
B. Overall View ......................................................... 8
3. Explanation Of Display Symbols.............. 9
4. Keypad Functions...........................................11
5. Connection Description............................... 12
A. Remote port......................................................... 12
B. Extra display/Control box port ....................... 12
C. RS-232 output port ............................................ 15
6. Operations......................................................... 16
A. Switch on & off ................................................... 16
B. Zero the scale....................................................... 17
C. Sampling before counting................................. 17
D. Counting by using reduction unit weight...... 20
E. Storing PLU(Product Look UP) to Memory 21
F. Subtract container’s weight .............................. 31
G. Weight / Quantity accumulation ..................... 34
H. Preset counting check range ............................ 36
I. Preset weight check range.................................. 38
J. Change platform ................................................. 40
3
7. User Programming Functions ..................42
A. Auto. Shut off time span ....................................42
B. Backlight type ......................................................43
C. Change unit of measure from kg/g to Pound44
D. Unit weight recomputing ..................................45
E. Transmit method setting....................................46
F. Baud Rate setting.................................................47
G. Label format setting
(available when a label printer is connected.) 48
H. Check alarm type ...............................................49
I. Cancel Tare setting...............................................52
J. Remote platform setting.....................................53
K. Three section control signal ..............................54
L. Transmit method of extra display ...................55
M. Baud rate setting of extra display...................56
N. Zero Tracking Range .........................................57
O. Zero display Range ............................................58
P. Stable class Range................................................59
Q. Stable class Rate..................................................60
8. Calibration(can only be done in kg/lb).61
9. Power supply & battery operation .......63
10. RS-232 Output .......................................64
11. Error Codes ............................................71
12. Technical Data ........................................72
4
PRECAUTIONS
5
PRECAUTIONS
6
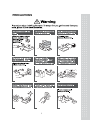
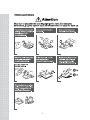
1. Precautions Before Using The Scale
Environment
The scale should always be used in an environment, which is free from excessive
air currents, corrosives, vibration, and temperature or humidity extremes.
These factors will affect displayed weight reading.
DO NOT install the scale:
●
●
●
●
●
●
●
Next to open windows or doors causing drafts or rapid temperature changes.
Near air conditioning or heating vents.
Near vibrating, rotating or reciprocating equipment.
Near magnetic fields or equipment that generates magnetic fields.
On an unstable work surface
In a dusty environment
In direct sunlight.
Leveling the Scale
The scale is equipped with a level indicator on the back side, right bottom of the
front panel and four adjustable leveling feet. Adjust the leveling feet until the
bubble appears in the center circle of the indicator.
Turn on Scale
Do not turn on scale with anything on the platform.
Press the “ON/OFF” switch located on the right side of the bottom of the scale
to turn on the scale.
The scale will start to count down from nine to zero. The scale is then ready for use.
Give a warm-up for 15~30 minutes before use.
※ Attention ※
There is a dust protection cover as standard.
Before turning on the scale, the dust protection cover should be attached on the body
with using an adhesive tape so that the cover does not touch the pan. If the cover
touches the pan, a weight value can be wrong.
7
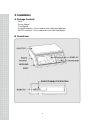
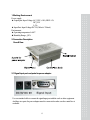
2. Installation
A. Package Contents
- Scale
- Power Adapter
- User Manual
- Loadcell connector : Use to connect scale with remote platform.
- RS-232 connector : Use to connect the scale with extra display.
B. Overall view
LEVELING
FOOT
8
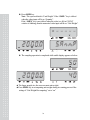
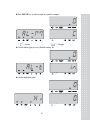
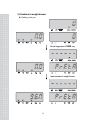
3. Explanation Of Display Symbols
■ US Version
■ International Version
Display Windows
●
Weight Display
Total 6 digits for weight accumulated or being measured on the pan.
●
Unit Weight Display
Total 6 digits for unit weight or times of weight accumulated.
●
Count Display
Total 6 digits for number accumulated or being counted on the pan.
9
Indicated Symbols
Symbols
NET
Specification
Scale is in TARE mode.
Scale is in ZERO mode.
Scale is in ACCUMULATION mode.
The display reading is in STABLE condition.
Lack of Sample Weight
If the total sample weight on the pan is less than 10 display
divisions, a triangular indicator will appear to remind the user
to add more samples until the indicator disappears.
g
Lack of Unit Weight
If the unit weight is less than 1/10 display divisions,
a triangular indicator will appear to remind the user that the
displayed unit weight is too small for getting accurate quantity
calculations.
Low Voltage
HI,LO,OK Check alarm function indication.
Kg/Ib
Current weighing unit.
Negative
Count
The scale is in negative counting mode.
Remote
Remote platform is used.
10
4. Keypad Functions
Keys
0~9
Specification
Numeric keys
Decimal point key
C
ZERO
TARE
SMPL
U.WT
ALARM
Use this key to clear out the displayed numeric
readings.
Use this key to exit from setting mode.
If there is a minor weight displayed without anything on
the pan, Press the zero key to clear the display.
Use this key to preset the known tare value when
nothing on the pan.
Use this key to subtract container’s weight.
Use this key to input sample size.
Use this key to input the known unit weight of item to be
counted.
Use this key to input the HIGH & LOW weight/quantity
limit for check function.
ADD
Use this key to accumulate weight/quantity measured.
TOTAL
Use this key to recall total weight, count & accumulation
times.
REMOTE
SET
ENTER/UNIT
MOVE
MEMORY
GROSS
Use this key to change remote platform.
Use this key to enter into User Programming Functions.
Use this key to confirm the parameter setting.
Use this key to change weighing unit kg/Ib.
Use this key to move the parameter value in Set Mode.
Shortcut key of “10” for sampling in counting mode.
Long press to enter into memory mode.
Press this key twice to recall stored information.
Use this key to display gross weight.
11
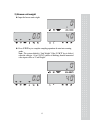
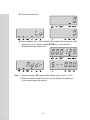
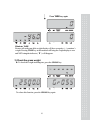
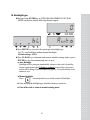
5. Connection Description
A. Remote connector
B. Extra display / Control box port
Control box :
Pin1
Pin2
Pin3
Pin4
Pin5
HI
OK
LO
VCC(5V)
GND
Pin6
Pin7
Pin8
Pin9
GND
RXD
TXD
Extra display:
12
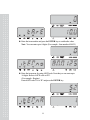
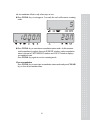
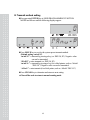
1.Working Environment
Power supply:
★ Output port :Input Voltage AC≤250V ±10%,50HZ ±1%
DC≤30V
I ≤2A
★ Input Port :Input Voltage DC 9V/(300mA~700mA)
Environment:
★ Operating temperature:0~40℃
★ Humidity Range: ≤85%
2.Connection Description
Overall View
2.1 Signal Input port and ports for power adaptor.
Use our standard cable to connect the signal input port with the scale or other equipment.
And these two ports for power adaptor must be connected to make sure the control box is
workable.
13
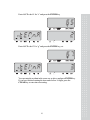
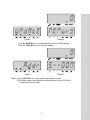
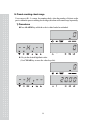
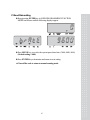
2.2 Signal Output port
There are three section controllers, (C1A、C1B),(C2A、C2B),(C3A、C3B),
Each of them has two wire connectors. They work respectively.
The signal output port can be connected to a lamp, beeper, annunciator, etc.
Note : (C1A, C1B)= LO, (C2A, C2B)=OK, (C3A, C3B)=HI
Appendix:Electric Schematic of Out-put
When it is connected with 3 color Annunciator, please use a cable to parallel
C1A, C2A and C3A.
And use other three cables to connect C1B, C2B, C3B with Annunciator.
14
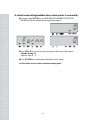
C. RS-232 output port
Rx
Rx
Tx
Tx
GND
GND
Connect EC-II and Printer using same cable. [male(EC-II) – female(DLP-50)]
15
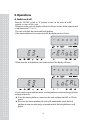
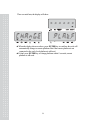
6. Operations
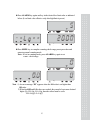
A. Switch on & off
Push the ON/OFF switch to “I” position to turn on the scale & to “O”
position to turn off the scale.
When turn on the scale, the display will show software version, all the segments and
count down from” 9” to “0 “.
The scale will check the remote and local platform.
If the remote platform is not connected well, the display shows as below :
While when the local platform is not connected well, the display will show :
If you want to remote platform, make sure that platform is connected properly before
turning on the scale.
★ To use the remote platform, connect it to the scale and then turn OFF or ON the
power.
★ Not to use the remote platform, the scale will automatically check the local
platform in some seconds and go to normal mode if the local platform is well
placed.
16
B. Zero the scale
Press ZERO key to return the display to zero in case there is any zero drifting
while unloaded.
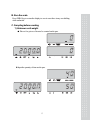
C. Sampling before counting
1) Unknown unit weight
●
Place a few pieces of item to be counted on the pan.
Input the quantity of item on the pan.
17
Press SMPL key
Note : The system default is “Unit Weight”. If the “SMPL” key is clicked
when the value input will be as “Quantity”.
If the “SMPL” key is not clicked when the value (ex.:40) in COUNT
window is blinking, then the numerical value input will be as “Unit Weight”.
The sampling operation is completed while stable display appears as below:
★ The larger sample size, the more accurate unit weight.
★ Press SMPL key to recomputing unit weight during in counting process if the
setting of “Unit Weight Recomputing” set to “on”
18
2) Known unit weight
Input the known unit weight.
Press U.WT key to complete sampling operation & enter into counting
mode.
Note : The system default is “Unit Weight”. If the “U.WT” key is clicked
when the value(ex : 0) in COUNT window is blinking, then the numerical
value input will be as “Unit Weight”.
19
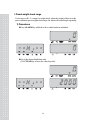
D. Counting by using reduction unit weight
Place samples on the platter.
Press TARE key.
Remove some samples from the platter.
20
Enter the number of samples which are removed and press the SAMPLE
key. The unit weight appears and negative counting is performed.
• Release the reduction unit weight
Remove samples from the platter, press TARE and CLEAR keys.
E. Storing PLU(Product Look Up) to Memory
1) How to store unit weight in memory cells
Give a long press of MEMORY to enter into Memory mode, and obtain
unit weight by inputting the known value(ex. 35g) or by sampling operation
mentioned before. Press the ENTER key to confirm the value.
Note : Press the “MOVE” key to change the value when a wrong value
entered.
Keyed in the unit weight value.
If sample operation is done before entering this mode, unit weight window
will automatically show the unit weight.
Enter the tare value(ex. 10g) and press the ENTER key to confirm the value.
21
Enter the item number and press the ENTER key to confirm the value.
Note : You can enter up to 6 digits. (For example : Item number-800125)
Enter the item name by using ASCII code. Note that you can enter up to
16 digits. Refer to ASCII code on P23.
(For example : Register)
Enter ASCII code 52 for “R” and press the ENTER key
22
Enter ASCII code 65 for “e” and press the ENTER key
Enter ASCII code 67 for “g” and press the ENTER key, etc.
You can enter the rest data in the same way as above and press ENTER key.
If you have finished entering the item name before 16 digits, press the
CLEAR key to enter into next setting.
23
ASCII code :
HIGH ORDER
LOW ORDER
2
0
3
4
5
6
7
0
@
P
‘
p
1
!
1
A
Q
a
q
2
˝
2
B
R
b
r
3
#
3
C
S
c
s
4
$
4
D
T
d
t
5
%
5
E
U
e
u
6
&
6
F
V
f
v
7
´
7
G
W
g
w
8
(
8
H
X
h
x
9
)
9
I
Y
i
y
A
*
:
J
Z
j
z
B
+
;
K
[
k
{
C
,
<
L
\
l
|
D
-
=
M
]
m
}
E
.
>
N
^
n
~
F
/
?
O
_
o
△
Keys for item name programming
7
8
9
4
5
6
1
2
3
0
.
CLEAR
A
B
C
MOVE/+10
ENTER
MEMORY
F
D
E
* MEMORY
You can follow a set method as below
(Unit weight -> Tare -> Item No. -> Item Name -> Comparison Mode-> PLU Address)
24
Press MOVE key to select weight or count for compare.
“
” = Count
“
Set the alarm type.(in, out). (Default setting : In)
Set the high limit value
25
” = Weight
Set the low limit value.
Enter a address cell (1~200, total 200 cells available) by pressing any of the
numeric keys (0~9), then press the ENTER key to store the above
information into the address cell.
Note : 1) An error massage “E4” appears if the address code is out of “1~200”.
2) When the address number has been used, the display will remind you
if you want to update the memory.
26
Update
Memory
Press the ENTER key to confirm, then the memory will be updated.
Press the CLEAR key to enter the new address.
Address
Number
Note : 1) Press CLEAR key to clear out the current keyed in value.
2) When the current value displayed is the default one, Press CLEAR key
to exit from memory mode.
27
2) How to recall the data stored
Press the numeric key with stored data & keep pressing MEMORY key
twice. You will see the unit weight and tare on the display.
Place the sample on the pan, weight window shows the net weight.
Note : 1) Press the CLEAR key to exit recalling memory mode.
2) Press the U.WT key during recall memory mode
(Ex. Address number 100) to check the item number.
28
Remark : When the alarm setting is set during in the recall memory mode, the
item number and PLU number can not be recalled.
When the recalled tare value is over the max.capacity, the display will
show :
When the high limit for weight is larger than the max.capacity, the display will
show :
29
Three seconds later, the display will show :
★ When the display shows as above, press ENTER key to confirm, the scale will
automatically change to remote platform. But if the remote platform is not
connected to the scale, local platform is still used.
★ If don’t press ENTER key to change platform within 3 seconds, current
platform is still used.
30
F. Subtract container’s weight
1) weight unknown
Place a container on the pan.
Press TARE key
The scale will enter into counting mode while stable display appears as
below.
31
2) Container’s weight known
Nothing on the pan
Give a long press of TARE key
Input container’s weight known
32
Press TARE key again
Eliminate TARE
Remove all on the pan & the weight display will show a negative ( - ) container’s
weight. Pressing TARE key at this moment will bring the weight display to zero
and NET triangular indicator ( ▼ ) will disappear.
3) Check the gross weight
To check the weight including tare, press the GROSS key.
To release this function, press the GROSS key again.
33
G. Weight/Quantity accumulation
Place item to be weighed / counted on the pan.
Press ADD key.
Display readings to be stable as below.
34
★ Accumulation effective only when stays at zero.
Press TOTAL key or wait approx. 2 seconds, the scale will return to counting
mode.
Press TOTAL key to enter into accumulation status mode. At this moment,
total accumulated weight is shown in WEIGHT window, total accumulation
times is shown in UNIT WEIGHT window and COUNT window displays
accumulated count.
Press TOTAL key again to revert to counting mode.
Clear accumulation
Press TOTAL key to enter into accumulation status mode and press CLEAR
key to clear all accumulated data.
35
H. Preset counting check range
Users can set a Hi – Lo range for counting check, when the number of objects on the
pan is within the preset counting check range, the alarm will sound beeps repeatedly.
1) Procedures
Press ALARM key while the scale is either loaded or unloaded.
Key in the desired high limit value.
(Use CLEAR key to erase the value keyed in)
36
Press ALARM key again and key in the desired low limit value as indicated
below. (Low limit value effective only after high limit is preset)
Press SMPL key to complete counting check range preset procedure and
return to normal counting mode.
Note : If it is in counting mode, press ALARM key again to set
count – check range.
Note : 1) An error massage “E5” appears when the LO value is set higher than
HI value.
2) When both HI and LO values are needed, they must be kept same decimal
digits. (Ex. HI=10g, LO=9.8g, then the values must be set as
“HI=10.0g, LO=9.8g”)
37
I. Preset weight check range
Users can set a Hi – Lo range for weight check, when the weight of objects on the
pan is within the preset weight check range, the alarm will sound beeps repeatedly.
1) Procedures
Press ALARM key while the scale is either loaded or unloaded.
Key in the desired high limit value.
(Use CLEAR key to erase the value keyed in)
38
Press ALARM key again and key in the desired low limit value as indicated
below. (★ Low limit value effective only after high limit is preset)
Press U.WT key to complete weight check range preset procedure and return
to normal counting mode.
Note : If it is in weighing mode, press ALARM key again to set weight – check
range.
Note : 1) An error massage “E5” appears when the LO value is set higher than
HI value.
2) When both HI and LO values are needed, they must be kept same
decimal digits. (Ex. HI=10g, LO=9.8g, then the values must be set as
“HI=10.0g, LO=9.8g”)
39
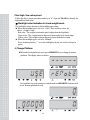
Clear high / low value preset
Follow the above preset procedures and key in “0” or press CLEAR key directly for
high and low limit value.
※ Backlight color indication in check-weight/count.
The backlight color is depent on the backlight type setting.
★ When the backlight type is set to be “Auto”, there are three colors for
check – weight / count.
Red color : The weight/count on the pan is higher than the high limit.
Green color : The weight/count on the pan is between the hi-lo check range.
Yellow color : The weight/count on the pan is lower then the low limit.
★ When the backlight type is set to be “Manual”
Press decimal point key “.” to set the backlight to be on , the color is always in
green.
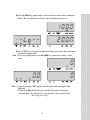
J. Change Platform
When the local platform is used, press REMOTE key to change to remote
platform. The display shows as below:
3seconds later, the scale returns to normal mode and REMOTE indicator will
be on. Remote platform is used.
40
When the remote platform is used, press REMOTE key to change to local
platform. The display shows as below:
3seconds later, the scale returns to normal mode and REMOTE indicator will
be off.
41
7. User Programming Functions
In counting mode, press SET key to enter into USER PROGRAMMING
FUNCTION MODE. After pressing “SET” key, the display shows “PASS WORD”
to prompt to key in a pass word “101010”, then press “Enter” key to confirm the
pass word.
If the pass word is wrong, then the scale can not to enter into User Programming
Function Mode.
★ The display shows “error” to prompt the mistake when the pass word is wrong.
★ If wrong pass word is entered for two times, then the scale will return to counting
mode automatically.
A. Auto. Shut off time span
When enter into “User Programming Functions” mode, the displays will
indicate as below eventually.
Press MOVE key to revolve the system-preset time span
(2 min., 5 min., 8 min., and OFF),
(Default setting : OFF)
Press CLEAR key to determine and return to normal counting mode or
press ENTER key for determination and move to next.
★ Turn off the scale to return to normal counting mode.
42
B. Backlight type
Keep pressing ENTER key in USER PROGRAMMING FUNCTION
MODE and release until the following displays appear.
Press MOVE key to revolve the system-preset backlight type
(AUTo – auto.backlight, mManu-manual backlight)
(Default setting : AUTo)
Press CLEAR key to determine and return to normal counting mode or press
ENTER key for determination and move to next.
- Auto. Backlight
Backlight will be going on automatically whenever the scale is loaded by
objects weigh greater then 9 display resolution or any of keys is pressed.
And it will be going off also automatically approx. 5 seconds after the scale
returns to zero.
- Manual backlight
Press
(decimal point) key to switch on and off backlight.
★ Scale will keep the backlight type selected in memory for next use.
★ Turn off the scale to return to normal counting mode.
43
C. Change unit of measure from kg to pound
Keep pressing ENTER key in USER PROGRAMMING FUNCTION
MODE and release until the following displays appear.
Press MOVE key to revolve the system-preset units of measure (ON, OFF)
(Default setting : ON)
Press CLEAR key to determine and return to normal counting mode or press
ENTER key for determination and move to next.
★ Turn off the scale to return to normal counting mode.
44
d. Unit weight recomputing
Keep pressing ENTER key in USER PROGRAMMING FUNCTION
MODE and release until the following displays appear.
Press MOVE key to revolve the system-preset recomputing mode.
(Default setting : ON)
off – disable recomputing function
on – enable recomputing function
Press CLEAR key to determine and return to normal counting mode or press
ENTER key for determination and move to next.
★ The unit weight will be averaged again if you add the remaining quantity,
gradually, by several lots. This will help eliminate errors caused by the
possible weight variation among each object and lead to more accurate
results.
When adding objects to the pan (The weight value should not be less than
10 display divisions.), be sure that the quantity is LESS THAN those
already on the pan. The alarm will sound a beep when the unit weight is
averaged again.
★ Recomputing function effective only after sampling operation is done.
★ Turn off the scale to return to normal counting mode.
45
E. Transmit method setting
Keep pressing ENTER key in USER PROGRAMMING FUNCTION
MODE and release until the following displays appear.
Press MOVE key to revolve the system-preset transmit method.
(Default setting : mAnU-P)
“mAnU-P” = transmit by pressing a key (ex. DEP-50, PC). Negative value
can not be transmited.
“SEriES” = series transmit (ex. DEP-50, PC).
“mAnU-L” = transmit by pressing a key (for a label printer, such as : Model
“DLP-50”). Negative value can not be transmited.
“AUto-L” = auto-transmit (for a label printer, such as : Model “DLP-50”)
Press CLEAR key to determine and return to next setting.
★ Turn off the scale to return to normal counting mode.
46
F. Baud Rate setting
Keep pressing ENTER key in USER PROGRAMMING FUNCTION
MODE and release until the following displays appear.
Press MOVE key to revolve the system-preset baud rate. (2400, 4800, 9600)
(Default setting : 9600)
Press ENTER key to determine and return to next setting.
★ Turn off the scale to return to normal counting mode.
47
G. Label format setting(available when a label printer is connected.)
Keep pressing ENTER key in USER PROGRAMMING FUNCTION
MODE and release until the following displays appear.
Press MOVE key to revolve the system-preset file name of the format.
(Default setting : 0)
Options : form 0 ~ 9
Press ENTER key to determine and return to next setting.
★ Turn off the scale to return to normal counting mode.
48
H. Check alarm type
Keep pressing ENTER key in USER PROGRAMMING FUNCTION
MODE and release until the following displays appear.
Press MOVE key to revolve the system-preset check alarm types.
(Default setting : in)
in – Inside type,
out – Outside type
Press CLEAR key to determine and return to normal counting mode or press
ENTER key for determination and move to next.
49
1) Inside type
The alarm sounds beeps only when either total weight or total count falls
inside the set range.
Ex 1. Counting check alarms (Quantity in COUNT window blinks).
Ex 2. Weight check alarms (Weight in WEIGHT window blinks).
50
2) Outside type
The alarm sounds beeps only when either total weight or total count falls
outside the set range.
Ex 1. Counting check alarms
Ex 2. Weight check alarms
★ Turn off the scale to return to normal counting mode.
51
I. Cancel Tare setting
Keep pressing ENTER key in USER PROGRAMMING FUNCTION
MODE and release until the following displays appear.
Press MOVE key to revolve the system-preset Cancel tare mode..
(Default setting : SEriES)
“SEriES” = The tare weight can be canceled continuously.
“onE” = The tare weight must be canceled for one time only.
(Note : If the canceled tare is not the value tared, then the buzzer
will tweet for three times to indicate the error. Remove all the
weight from the pan and then press TARE key or turn off and turn
on the scale to solve the error.)
Press CLEAR key to determine and return to normal counting mode or press
ENTER key for determination and move to next.
★ Turn off the scale to return to normal counting mode.
52
J. Remote platform setting
Keep pressing ENTER key in USER PROGRAMMING FUNCTION
MODE and release until the following displays appear.
Press MOVE key to revolve the system-preset remote platform( ON, OFF )
(Default setting : ON)
If this setting is set to be “off”, the platform can’t be changed.
Press CLEAR key to determine and return to normal counting mode or press
ENTER key for determination and move to next.
53
K. Three section control signal
Keep pressing ENTER key in USER PROGRAMMING FUNCTION
MODE and release until the following displays appear.
Press MOVE key to revolve the system-preset three section control signal.
( ON, OFF )
(Default setting : ON)
If it is set to be “off”, the scale can’t transmit control signals.
Press CLEAR key to determine and return to normal counting mode or press
ENTER key for determination and move to next.
54
L. Transmit method of extra display
Keep pressing ENTER key in USER PROGRAMMING FUNCTION
MODE and release until the following displays appear.
Press MOVE key to revolve the system-preset the transmit method of extra
display (StAbLE, SEriES)
(Default setting : StAbLE)
“SEriES” = Series transmit
“StAbLE” = Stable transmit
Press CLEAR key to determine and return to normal counting mode or press
ENTER key for determination and move to the next.
★ If the weight value is negative, the extra display shows ‘ - - - - - -’
★ If the external resolution is set to 1/30,000
Weight equal to 15kg / 15lb do not show on the extra display.
55
M. Baud rate setting of extra display
Keep pressing ENTER key in USER PROGRAMMING FUNCTION
MODE and release until the following displays appear.
Press MOVE key to revolve the system-preset baud rate of extra display.
(2400, 4800, 9600)
(Default setting : 9600)
Press CLEAR key to determine and return to normal counting mode or press
ENTER key for determination and move to the next.
56
N. Zero Tracking Range
Keep pressing ENTER key in USER PROGRAMMING FUNCTION
MODE and release until the following displays appear.
Press MOVE key to revolve the system-preset zero tracking range.
The larger number selected, the wider range
(0=off, 1=0.5d, 2=1d, 3=2d, 4=3d).
(Default setting : 2)
Press CLEAR key to determine and return to normal counting mode or press
ENTER key for determination and move to next.
★ Turn off the scale to return to normal counting mode.
57
O. Zero Display Range
Keep pressing ENTER key in USER PROGRAMMING FUNCTION
MODE and release until the following displays appear.
Press MOVE key to revolve the system-preset zero display range
(0=off, 1=0.5d, 2=1d, 3=2d, 4=3d).
(Default setting : 2)
The larger number selected the wider range.
Press CLEAR key to determine and return to normal counting mode or press
ENTER key for determination and move to next.
★ Turn off the scale to return to normal counting mode.
58
P. Stable Class Range
Keep pressing ENTER key in USER PROGRAMMING FUNCTION
MODE and release until the following displays appear.
Press MOVE key to revolve the system-preset stable class range.
The smaller number selected, the shorter time for display stability
(0=off, 1=0.05d, 2=0.15d, 3=0.25d, 4=0.35d, 5=0.45d).
(Default setting : 1)
Press CLEAR key to determine and return to normal counting mode or press
ENTER key for determination and move to next.
★ Turn off the scale to return to normal counting mode.
59
Q. Stable Class Rate
Keep pressing ENTER key in USER PROGRAMMING FUNCTION
MODE and release until the following displays appear.
Press MOVE key to revolve the system-preset stable rate range.
The larger number selected, the more stable zero point
(level : 0, 1, 2, 3, 4, 5).
(Default setting : 1)
Press CLEAR key to determine and return to normal counting mode or press
ENTER key for determination and move to next.
★ Turn off the scale to return to normal counting mode.
60
8. Calibration
●
Turn on the scale, and key in “000419” during counting down(self-check)
to zero to enter into Simple Calibration mode.
The displays will indicate as below.
Press MOVE key to choose the taget platform(local or remote).
Then press ENTER key for determination and enter into unit selection.
●
Press MOVE key to choose the unit for calibration (kg/g or lb).
Then press ENTER key for determination and enter into calibration mode.
Note : The weighing unit for local platform is g or lb, while the unit for remote
platform is kg or lb.
61
●
The default setting is 1/3 capacity.(Take 6kg scale for instance)
●
Put a weight on the pan same as what exactly shown in the
UNIT WEIGHT window, then press the ENTER key to confirm the
operation.
The displayed reading in the UNIT WEIGHT window starts blinking.
The scale will stop blinking and return to normal counting mode.
Calibration is now completed.
Note :
★ Press CLEAR key to escape from calibration mode at any time.
★ Change calibration value
After entering the third step, press MOVE key. Use numeric keys to input a
calibration value r(0.80000 ~ 1.20000). Press ENTER key to confirm, then
the calibration is finished.
※ r = Mass weight/Display weight
★ This calibration instruction is not for us matket.
62
9. Power supply & battery operation
POWER SUPPLY
(1) AC Adaptor
(2) DC 12V/800mA
BATTERY OPERATION
The scale can be operated from the battery if desired. The battery life is
approximately 80 hours.
When the battery needs charging a symbol “
” on the COUNT display will
turn on. The scale can keep operating for about 10 hours when the symbol appears.
The scale will automatically, a prompt words “Lobat off” will be shown three times
to indicate the scale switch off due to battery empty.
To charge the battery, connect the power adapter, and turn on the switch on the right
side of the scale.
The battery should be charged for 12 hours for full capacity.
There is an LED to indicate the status of battery charging on the display. If the LED is
Green the battery has been charged. If it is Red the battery is nearly discharged and
Yellow indicates the battery is increasing the charge level.
As the battery is used it may fail to hold a full charge. If the battery life becomes
unacceptable then contact your distributor.
Note : The battery should be recharged every 3 months if the scale is not used for
long time.
63
10. RS-232 Output
The scale can be ordered with as standard RS-232 output.
1. Mode E1A-RS 232C’s UART signal
2. Format :
Baud rate: 9600 BPS
Data bits: 8
BITS
Stop bit: 1
BIT
Code ASCll
Connector:9 Pin Socket
Pin2 Input
Pin3 Output
Pin5 Signal Ground
Data digit
12345
6
7 8 9 10 11 12 13
14 15 16
17 18
st
title
space
data
unit
CR
nd
title
space
data
unit
CR
rd
title
space
data
CR(14 15)
th
title
space
data
weight
th
OA
specification
1 row: Net weight-Data
2 row: Unit weight-data
3 row: Quantity-data
4 row: Tare weight-data
4 row data.
NET=stable Net Weight
PCS=stable Quantity
Tare=Tare Value
CR: OD OA
CR
net= unstable Net Weight
pcs= unstable Quantity
U/W=Unit Weight
Gross=Gross Value
Note : The new line demands “OA” will appear when the total data has been transmitted.
64
3. Data Format of Series transmit :
When scale is in stable mode :
NET: 2.0000 kg
U/W:
10 g
PCS:
200
Tare:
0.0800 kg
Gross: 2.0800 kg
When scale is in unstable mode :
net : 2.0000 kg
U/W:
10 g
pcs:
200
Tare:
0.0800 kg
Gross: 2.0800 kg
net=unstable Net Weight
pcs= unstable Quantity
U/W=Unit Weight
Gross=Gross Value
NET= stable Net Weight
PCS= stable Quantity
Tare=Tare Value
4. Transmit Format, when it is in Accumulation model and transmit by pressing “ADD”
key and “TOTAL” key. At the same time, Item number is stored in memory.
Press the ADD key
PLU 100
No. 800125
I.N. Register
Record#01
Net :
2.0000
U/W :
10
PCS :
kg
g
200
Tare : 0.0350
kg
65
Press the ADD key again
PLU 100
No. 800125
I.N. Register
Record#02
Net
3.0000
kg
U/W
10
g
PCS
300
Tare
0.0350
g
Press the TOTAL key
TOTAL
PLU 100
No. 800125
I.N. Register
Net
PCS
5.0000
kg
500
NET=stable Net Weight
PCS=stable Quantity
U/W=Unit Weight
Tare: Tare Value
Note : When it is in normal counting mode (without accumulation operation), press the
“TOTAL” key to print the data, the transmit format is as below :
When scale is in stable mode :
TOTAL
NET
5.0000
kg
U/W
10
g
PCS
500
Tare
0.8000
kg
66
When scale is in unstable mode :
TOTAL
net
5.0000
kg
U/W
10
g
pcs
500
Tare
0.8000
kg
net=unstable Net Weight
pcs= unstable Quantity
U/W=Unit Weight
NET= stable Net Weight
PCS= stable Quantity
Tare= Tare Value
Gross= Gross Value
Note : If the unit weight information is recalled from the memory, PLU code, Item
Number and Item name should be printed out.
Accumulation mode :
67
5. Variables (The prompt character) used in scale also in label printer
Variable Name
Specifications
Size
SER
Accumulated times (Weight)
2 byte
NWA
Net weight (with dot “.”)
7 byte
NWB
Net weight (no dot)
6 byte
NWC
Net weight (with comma “,”)
7 byte
TWA
Tare weight (with dot “.”)
7 byte
TWB
Tare weight (no dot)
6 byte
TWC
Tare weight (with comma “,”)
7 byte
GWA
Gross weight (with dot “.”)
7 byte
GWB
Gross weight (no dot)
6 byte
GWC
Gross weight (with comma “,”)
7 byte
TNA
Total net weight (with dot “.”)
7 byte
TNB
Total net weight (no dot)
6 byte
TNC
Total net weight (with comma “,”)
7 byte
UWA
Unit weight (with dot “.”)
7 byte
UWB
Unit weight (no dot)
6 byte
UWC
Unit weight (with comma “,”)
7 byte
QUA
Quantity (with dot “.”)
7 byte
QUB
Quantity (no dot)
6 byte
QUC
Quantity (with comma “,”)
7 byte
TQA
Total Quantity (with dot “.”)
7 byte
TQB
Total Quantity (no dot)
6 byte
TQC
Total Quantity (with comma “,”)
7 byte
UNT
Weighing Unit
2 byte
AN
Address number
3 byte
IN
Item number
6 byte
Item name
16 byte
INA
Note : 1) Capital Letters are allowed for the Variable Name only.
2) A value “0” will be given when the value exceeds the display range.
68
6. Command (PC -> Scale), by Transmit method setting is set “PAnu-P”
Command(1 byte)
Weighing Mode
Char.
HEX
1
0X31
Same as numerical key 1
2
0X32
Same as numerical key 2
3
0X33
Same as numerical key 3
4
0X34
Same as numerical key 4
5
0X35
Same as numerical key 5
6
0X36
Same as numerical key 6
7
0X37
Same as numerical key 7
8
0X38
Same as numerical key 8
9
0X39
Same as numerical key 9
0
0X30
Same as numerical key 0
.
0X2E
Same as numerical key “.”
S(s)
C(c)
O(o)
M(m)
U(u)
A(a)
E(e)
R(r)
0X53
0X73
0X43
0X63
0X4F
0X6F
0X4D
0X6D
0X55
0X75
0X41
0X61
0X45
0X65
0X52
0X72
Same as SAMPLE key
Same as C key
Same as SET key
Same as MOVE key
Same as U.W key
Same as ALARM key
Same as ENTER key
Same as MEMORY key
69
Command(1 byte)
Char.
G(g)
N(n)
Z(z)
T(t)
D(d)
L(l)
F(f)
Weighing Mode
HEX
0X50
0X70
0X4E
0X6E
0X5A
0X7A
0X54
0X74
0X44
0X74
0X4C
0X6C
0X46
0X66
Same as GROSS key
Same as ADD key
Same as ZERO key
Same as TARE key
Same as TOTAL key
Same as long press MEMORY key
Same as REMOTE key
70
11. Error codes
During the initial power-on testing it is possible the scale may show error message.
The meaning of the error messages is described below.
ERROR CODE
POSSIBLE CAUSE
HANDLING
E1
The scale hasn’t be calibrated
Before or calibration data lost.
Calibrate the scale.
E2
EPROM data lost.
Recalibrate the scale.
Remote platform is not well
connected with the scale when
powers on.
Connect the remote platform
properly and switch on again.
E3
.
1. Local platform is not placed well.
2. There are something heavy
touch the pan.
1. Place the pan well and
switch on again.
2. Remove the weight and
switch on again.
E4
Address code of Unit Weight is out
of “1 ~ 200”.
Correct the operation.
E5
In alarm setting, the LO value is set
higher than HI value.
Correct the operation.
OL
Overload
Take off the weight
immediately.
Low battery
Charge the battery.
If the error message is still shown after above ways, please recalibrate. If the problem still
Can not be solved then contact your dealer for further support.
71
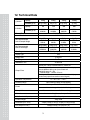
12. Technical Data
g Version
Capacity
Readability (e=d)
Capacity
lb Version
3000g
6000g
15000g
30000g
0.1g / 0.05g
0.2g / 0.1g
0.5g / 0.2g
1g / 0.5g
15Ib
30Ib
6Ib
External Resolution
0.0005Ib /
0.001Ib /
0.0002lb
0.0005lb
1/30,000 ~ 1/60,000
Internal Resolution
1/600,000
Readability (e=d)
Min Recommended
Lack of Sample Weight
Min Recommended
Lack of Unit Weight
0.0002Ib /
0.0001lb
60Ib
0.002Ib /
0.001lb
1g / 0.5g
0.002Ib /
0.001lb
2g / 1g
0.005Ib /
0.002lb
5g / 2g
0.01Ib /
0.005lb
10g / 5g
0.02Ib /
0.01lb
0.01g / 0.005g
0.02g / 0.01g
0.05g / 0.02g
0.1g / 0.05g
0.00002Ib /
0.00001lb
0.00005Ib /
0.00002lb
0.0001Ib /
0.0005lb
0.0002Ib /
0.0001lb
Tare Range
Full Capacity by subtraction
Display Type
LCD
Weight Units
g / kg or lb
Zero Range
±2%
Stabilization Time
≤2 seconds
RS232 port : Can be connected with PC, Printer, etc.
Output Ports
Remote port : Can be connected to a extra display or
remote platform with up to 4 pcs of load cell
(weighing range 0 ~ 10t)
※Remote Spec : 1.0mv/v~3.3mv/v
Serial port : Can be connected to an extra display or
control box(output three section control signal)
Operation Temperature
0℃ ~ 40℃ /32℉ ~ 104 ℉
Humidity Range
≤90% relative humidity, non-condensing
AC Adaptor DC 12V/1A or 12V/800mA
Power
Internal rechargeable sealed acid battery
Battery Life
80 hours continuous use with 12 hour recharge time
Calibration
Automatic external with kg/Ib mass, factory calibration recovery
Safe Overload Capacity
120% of capacity
Product weight
Dimension(mm / inch)
4.5kg / 9.9Ib
330(W) x 346(D) x 107(H) / 12.9(W) x 13.6(D) x 4.2(H)
Pan Size(mm / inch)
306(W) x 222(D) / 12.0 (W) x 8.7 (D)
72
MEMO
73
MEMO
74
MEMO
75
76
77