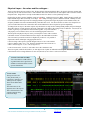
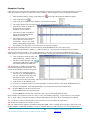
1
CAN Primer: Creating Your Own Network ARM® Keil™ MDK™ toolkit featuring Simulator, Serial Wire Viewer and ETM Trace For the STMicroelectronics STM32F4 Cortex™-M4 V 2.0 Robert Boys [email protected] Hands-on using the Keil Simulator or the STM32F4 Discovery Board The latest version of this document is here: For a general lab on the STM32F4 Discovery: www.keil.com/appnotes/docs/apnt_236.asp www.keil.com/appnotes/docs/apnt_230.asp Introduction: CAN is extensively used in automotive but it has found applications everywhere. There are many “application” layers available for CAN such as ISO 15765 (cars), J1939 (trucks), DeviceNET and CANopen (both are for factory automation) but it is very easy to develop your own protocol that will fit and simplify your needs. Modern CAN transceivers provide a stable and reliable CAN physical environment without the need for expensive coaxial cables. Nearly all of the mystery of CAN has dissipated over the years. There is plenty of example CAN software to help you develop your own network. Many think CAN is just for automotive, but this is not true. CAN has become the standard for vehicle networks, but it has been adopted in most other fields. As you find out in these pages, there are no attributes in the Bosch CAN specification that are automotive related. It is completely generic. You can easily implement your own protocol on top of CAN. A CAN controller is a sophisticated device. Nearly all the features of the CAN protocol described here are automatically handled by the controller with almost no intervention by the host processor. All you need to do in practice is to configure the controller by writing to its registers, write data to the controller and the controller then does all the housekeeping work to get your message on the bus. The controller will read any frames it sees on the bus and hold them in a small FIFO memory. It will notify the host processor that this data is available which it then reads from the controller. The controller also contains a hardware filter mechanism that can be programmed to ignore and discard those CAN frames you do not want passed to the processor. This saves on processor overhead. STMicroelectronics STM32F4 Discovery MDK provides sample CAN examples for many ARM processors which you can practice with. This document provides hands-on exercises with both the Keil simulator or with the Discovery board. Modern bus transceiver chips have made the physical CAN bus much less “finicky” and easier to construct and maintain. The techniques discussed can be applied to many other microprocessors. We use ARM Keil MDK toolkit for the examples. There is no charge for the evaluation version: MDK-Lite™. You can use MDK-Lite for all the CAN examples used here. There are many other CAN examples in MDK for many boards using ARM processors. Keil provides a CAN stack as part of MDK-Professional™. Details are on www.keil.com/rl-arm/rl-can.asp Keil products are listed on the last page of this document. See forums.arm.com for more ARM information. Evaluation boards using STM32 that support CAN: This document uses the STM32F4 Discovery board but you can adapt the source code to any board with a CAN node. 1 CAN: Controller Area Network Lab using ST STM32 Cortex-M processors. Copyright © 2013 ARM Ltd. All rights reserved www.keil.com How CAN works: Introduction: 1 Main Features of CAN: 3 CAN System Layout: 3 CAN Node Schematic: 4 A Tiny CAN Network with no Transceiver ICs: 4 Physical Layer: the wires and voltages: a real waveform with oscilloscope: 5 The CAN Frame: the Programming Model: 6 Other Bit Fields: Bit Stuffing, Bus loading, Bus Speed: 7 Bus Errors, Bus Faults: 8 Is NOT CAN but useful: Multiple CAN frames, Types of Frames and Time-outs: 9 Sequence of Transmitting CAN Data: 10 Sequence of Receiving CAN Data: 11 CAN FD: A new CAN protocol: 12 CAN Controllers and their Errata Sheets: 13 Test Tools and Software: 13 Keil CAN demonstration software: 14 STMicroelectronics CAN Controller: 14 CAN Demonstration hands-on Example (using the free Keil Simulator): 15 How the Keil CAN Demonstration software works: 15-17 Viewing Program Flow with Instruction Trace: 17 Viewing CAN Frames Graphically, Code Coverage, Performance Analysis, Execution Profiler: 18-19 Experimenting with the CAN Software exercises: changing the CAN fields: 20 Getting a CAN Network to run on a real board (Discovery STM32F4): 21 Running the Example CAN Program on the Discovery: 22 Serial Wire Viewer (SWV) Exception (including Interrupts) Tracing: 23 SWV Data Write Tracing: 24 CAN Waveform obtained on the Discovery: 25 A practical debugging example with SWV Data Write Tracing: 25 Watchpoints: 26 PC Samples, Watch and Memory Windows: 27 Experimenting with the CAN Software exercises: changing the CAN fields: 28 More Useful Information: How to Determine the CAN Frequency: 29 Four Newbie CAN Mistakes YOU can avoid: 29 Useful Documents: 29 How can I learn more about CAN ? 29 How can trace help me find problems? 30 Serial Wire Viewer and ETM Trace Summary: 30 Keil Products and Contact Information: 31 2 CAN: Controller Area Network Lab using ST STM32 Cortex-M processors. Copyright © 2013 ARM Ltd. All rights reserved www.keil.com Main Features of CAN: For the purposes of this article; we will assume a CAN network consists of the physical layer (the voltages and the wires), a frame consisting of an ID and a varying number of data bytes all with the following general attributes: 1. 11 or 29 bit ID and from zero to 8 data bytes. TIP: These attributes can be dynamically changed “on the fly”. 2. Peer to Peer network. Every node can see all messages from all other nodes but it normally can’t see its own. 3. Nodes are really easy to add. Just attach one to the network with two wires plus a ground. 4. Higher priority messages are sent first depending on the value of the ID. The lower ID has a higher priority. 5. Automatic retransmission of defective frames. A node will “bus-off” if it causes too many errors. 6. Speeds from approximately 10 Kbps to 1 Mbps. TIP: All nodes must operate at the same frequency. 7. The twisted differential pair provides excellent noise immunity and some decent bus fault protection. 8. The CAN system will work with the ground connection at different DC levels. TIP: Or no ground at all. The Ground: This is a contentious issue. A CAN system, especially in vehicles, sometimes must endure large ground loops or corrosion that can compromise signal integrity. CAN is designed using its differential pair to ignore ground voltage differences of many volts. The differential pair also cancels out incoming common mode interference and cancels potential outgoing EMI. This means that if the ground wire is cut or doesn’t exist, as long as CAN-Hi and CAN-Lo are intact, the system will perform at high performance capabilities. CAN, depending on the transceiver chip, can handle various bus problems such as open or shorted lines. This capability is lost without the ground. Therefore, it is recommended to always include a ground in your system design. If the ground is made through a chassis connection or negative power supply rail, any shielded CAN cables must have the ground connected at one end only to minimize ground loop problems. The CAN System Layout: A CAN network consists of at least two nodes connected together with a twisted pair of wires as shown below. A ground wire can be included with the twisted pair or separately as part of the chassis. One twist per inch (or more) will suffice and the integrity of the ground is not important for normal operation as described above. As in any differential systems; the important signal is the voltage levels between the wire pair and not their values to ground or a voltage supply. The maximum length of the network is dependent on the frequency, number of nodes and propagation speed of the wire. It is relatively easy to have a 20 node (or more), 500 Kbps system running 30 or 40 feet (or more). TIP: The drops should be less than 3 feet and randomly spaced to reduce standing waves. These issues all become more important at higher bus speeds i.e. 500Kbps and higher. CAN is completely described in ISO 11898. Since the twisted pair is a transmission line, 120 ohm termination resistors are needed at both ends of the backbone. Do not put any resistors at the nodes unless a node is at the end of the backbone. Sometimes the resistors are not at the end of a backbone but very close and this seems to work. Resistors are often installed inside an end node chassis or module. TIP: Your total resistance value as measured between the two twisted wires will therefore be 60 ohms. 10% is good enough. CAN is a broadcast system. Any node can “broadcast” a message using a CAN frame on a bus that is in idle mode. Idle is at least 11 successive recessive bit times (“1” or ~0 volts CAN Hi to CAN Lo). Multiple controllers tend to start their messages at the same time. Every node will see this message. A “message” can be considered the same as a CAN frame until you need to use more than one frame to send a long message. In this case, you would use some sort of a multi-packet protocol. TIP: It is up to a receiving node if it must keep or ignore a frame. This can be handled in either your processor software and/or by configuring the CAN controller acceptance filters. The main CAN backbone and drops are comprised of a twisted pair of wires. a b drops Node 1 Node 2 Node 3 Node 4 Node 5 a,b = 120 Ω ½ watt termination resistors. Drops use the same twisted pair of wires as the backbone. 3 CAN: Controller Area Network Lab using ST STM32 Cortex-M processors. Copyright © 2013 ARM Ltd. All rights reserved www.keil.com Node 6 A Node Schematic: This is the schematic diagram from the Keil MCBSTM32E™ evaluation board. IC1 is a Texas Instruments CAN transceiver which performs the conversion between the single-ended CAN controller CAN Tx and CAN Rx signals to the bi-directional differential pair of the CAN bus called CAN Hi and CAN Lo (High and Low). This schematic is complete. The STM32 CAN I/O is TTL, CMOS and 5 volt tolerant, all at the same time making it exceptionally easy to design the interface. This transceiver IC1 connects to the STM32 microprocessor IC2 which contains an integral CAN controller via two pins: D (Driver input) and R (Receiver output). The corresponding nomenclature on the STM32 is CAN Rx and CAN Tx. CAN Tx connects to D. CAN Rx connects to R. It is that simple. Some processors have multiple CAN controllers. These are usually used in routers, gateways or to create more receiver FIFO memory for intentionally slowed down CPUs (for EMI reasons). For general use a node normally needs only one controller. If it had at least two, it could talk to itself. RS on IC1 (slope control) is used to adjust the rise and fall times of the output edges to limit EMI from the twisted pair. Note R4, the 120 ohm termination resistor. This evaluation board is meant to be used with one other board as a small test network. If this board is used as a node, and is not at one of the ends, this resistor should be removed and external resistors used. P17 corresponds to a generally accepted standard for CAN on DB9 connectors. P17 Pin 7 is the CAN Hi bus line and pin 6 is CAN Lo. TIP: If the CAN Hi and CAN Lo wires are reversed, the network will not operate. The MCBSTM32E board has one CAN controller. Since there must always be two CAN nodes for a network, you need another board with a CAN node. Most CAN analyzers can act as the 2nd node. MCBSTM32C and STM32F4 Discovery boards have two CAN nodes. Many other boards, including those from STMicroelectronics, contain two CAN nodes. A Tiny Network without Transceiver ICs: Sometimes you have a CAN equipped processor on a low cost board but it has no CAN transceiver chips. Here is a method that can be used to create a small experimental network with such a board. There will be no noise immunity and you might have to lower the speed….but many experimenters have made this work satisfactorily. Use a signal diode similar to 1N914 or 1N4148. Power supply diodes usually do not have a fast enough recovery time for CAN to function. The processor on the STM32F4 Discovery board has two CAN controllers but it has has no transceiver chips. How to install this on the Discovery board is detailed in the section on “Running a CAN network…” on page 21. A three node CAN network. Uses two CAN nodes on STM32F107 (Keil MCBSTM32C™) and another on a STM32F407 Cortex-M4 (MCBSTM32F400™). Termination is on the boards. This can be disconnected on the MCBSTM32F400 with a jumper. CAN Transceiver chips are used. These boards can be connected to any Hi-Sped network. This network works perfectly even though the wires are a bit sloppy and are hardly a twisted pair. This is because of the network’s small size and robustness of CAN in general: even at 500 Kbps. 4 CAN: Controller Area Network Lab using ST STM32 Cortex-M processors. Copyright © 2013 ARM Ltd. All rights reserved www.keil.com Physical Layer: the wires and the voltages… There are three physical layers used in CAN: Hi-Speed, Fault Tolerant and Single Wire. Hi-Speed is the most common and is the only one we will use in this article. Fault Tolerant offers more robustness as its name implies and is used more often in European autos. Single Wire is used by General Motors and a few others as a low speed body network. Hi-Speed in cars has a speed of 500 Kbps, trucks are 250 Kbps. CANopen runs up to 1 Mbps. Fault Tolerant is usually 125 Kbps and GM Single Wire is normally 33.33 Kbps. TIP: 1 Mbps in a large system is difficult to handle. 500Kbps is easier to use and maintain and will present fewer design problems. In general, the longer the physical wires and more nodes, the frequency should be lowered to maintain stability and reduce bus errors. You do not need to use these exact frequencies in your own nodes that will not be connected to other nodes and therefore do not require bus speed compatibility. To change from one layer to the other requires only the transceiver chip need be exchanged and probably the speed changed. These three flavors of CAN cannot be physically connected to each other as the voltage levels are different. You need to use a router or gateway to join different CAN networks together. Any CAN controller will properly service all three flavors of CAN with the appropriate transceiver. The Hi-speed CAN physical layer is merely a twisted pair of wires with a 120 ohm termination resistor at each end and twisted wire drops to the individual CAN nodes. You can connect your node’s transceiver chip directly to the bus. It is possible to implement isolation techniques using appropriate devices. CAN Hi voltage with respect to ground changes between 2.5 to 4 volts nominal. CAN Lo changes from 2.5 to 1 volt. Therefore the difference between the two is either 0 volts (is logical “1”) or 2 volts (is logical “0”). 0 volts is known as the “recessive” state and 2 volts is the “dominant” state. These two signals, CAN Hi and CAN Lo, are 180 degrees out of phase as indicated in this diagram. Bus idle is when the CAN Hi and CAN Lo voltage difference is near zero (Recessive) for at least 11 successive bit times. A 2 node CAN cable assembly: Two wires and two 120 Ω resistors. A ground connection is preferred. It facilitates certain bus defects such as open or shorted lines A CAN frame: The top two traces are CAN_Hi and CAN_Lo respectively. Note they are 180 degrees out of phase. These are the differential signals. The bottom trace is the algebraic sum of the top two. This is from the Keil CAN example program using transceiver chips. 5 CAN: Controller Area Network Lab using ST STM32 Cortex-M processors. Copyright © 2013 ARM Ltd. All rights reserved www.keil.com The CAN Frame: The CAN frame has many fields but we can simplify this to a Programming Model as shown. These fields are accessed by your software through the CAN controller registers. The CAN Frame Programming Model configuration registers are not included here. IDE (1 bit) IDE: Identifier Extension: 1 bit - specifies if the ID field to be transmitted is 11 or 29 bits: If IDE = 0, then the ID is 11 bits. If IDE = 1, then the ID is 29 bits. 11 bit ID if IDE = 0 29 bit ID if IDE = 1 ID: Identifier: 11 or 29 bits as set by the IDE field. This part of the CAN frame sets the priority. DLC: Data Length Code: 4 bits - specifies number of data bytes in the frame from 0 through 8. Data Bytes: 0 through 8 bytes. DLC (4 bits) DLC = 0 through 8 and specifies # of data bytes Data Bytes: 0, 1, 2, 3, 4, 5, 6, 7 or 8 bytes (up to 64 bits) TIP: A CAN frame with an ID field of either 11 or 29 bits and with zero data bytes is valid and useful. TIP: You tell the transmitter size of ID and number of data bytes. The receiver tells you these values when it gets a frame. ID: Identifier: 11 or 29 bits The Identifier can be used for any purpose. It is often used as a node address or to identify requests and responses. CAN does not specify any mandatory ID values. 11 bit is often called Standard CAN and 29 bit is often called Extended CAN. 1. If two or more CAN messages are put on the bus at the same time; the one with the highest priority (the lowest value) ID will immediately get through. The others will be delayed and will be resent at the next bus idle time. 2. An ID of 0 has the highest priority and will always get through. When the first 11 bits of an 11 and 29 bit ID are the same, the 11 bit ID has priority over the 29 bit ID. This is because the IDE bit = 0 for 11 bits and wins arbitration. 3. You can have any mixture of 11 and 29 bit IDs on the bus. The controller can easily sort this out. 4. Messages tend to start transmitting at the same time. A CAN node is not allowed to start transmitting a frame in the middle of another node’s frame. This will cause a bus error. Can controllers will not make this mistake. 5. CAN controllers can be configured to pass only certain received messages to its host processor. Choose your ID values carefully to take advantage of this if needed. This will reduce the workload of a node’s CPU. This is why some systems use 29 bit IDs even though they do not need that many addresses. This facilitates grouping of IDs for easier filtering since acceptance filters usually do not usually have a very fine granularity. 6. You can use the ID for data, node addressing, commands and request/response sequences. Commercial protocols use any of these in practice. You can create your own method if that best suits your purpose. TIP: Make sure two nodes will never send the same ID value at the same time. It is illegal but possible to do this. If two messages sent at the same time are completely identical, they will be seen on the bus as one. If the data bytes are different, a bus error will result and the frames will be resent continuously and havoc is created on the bus for a short time until a bus-off. Data Bytes: You can select from 0 to 8 data bytes using the 4 bit DLC field. A valid DLC is returned when a frame is received. 1. You can have any number of data bytes in frames on the CAN bus. The controller can easily sort this out. 2. If you always use only one number of data bytes, your software will be much simpler to write and debug. 3. The data bytes can contain anything. It is not prioritized like the ID is. CAN does not specify mandatory data. 4. Protocols such as J1939 specify these for data as well as control bits for multi-frame transmission schemes. Remote Frames: These are not used much anymore but are worth mentioning. A remote frame is a quick method of getting a response from another node(s). It is a request for data. The requesting node sends out a shortened CAN frame with only a user specified ID number and the number of data bytes it expects to receive (the DLC is set). No data field is sent. The responding node(s) sees this frame, recognizes that it has the desired information and sends back a standard CAN frame with the same ID, DLC and with data bytes attached. All of this (except that the response node recognizes the ID and DLC) is implemented in the CAN controller hardware. Everything else must be configured by the user software. 6 CAN: Controller Area Network Lab using ST STM32 Cortex-M processors. Copyright © 2013 ARM Ltd. All rights reserved www.keil.com Other Bit Fields: Only the ACK bit will be mentioned in this document: ACK: This is a one bit field in the CAN frame created by the transmitting node but set by all the other nodes. TIP: The number 1 reason people can’t get their CAN node working is you need at least two nodes to work. When a node puts a message on the bus, it will wait for the ACK bit to be asserted by any other node that has seen the message and determined it to be valid. If so, the transmitting node finishes the message and goes into the idle state or sends its next message. If not, it will immediately resend the message forever until the ACK is asserted or the controller is RESET. This transmitting node will never go into bus-off mode while re-transmitting this message. Note that a standard CAN test tool will usually act as a second node by providing the ACK signal unless its controller has the ACK feature disabled. TIP: This presents an excellent opportunity to provide an easy test situation to confirm you are sending out CAN frames. It won’t tell you the frequency, ID or data bytes values, but it will tell you if you are putting out something. 1. Connect a termination resistor to your single CAN node with a transceiver connected to the CAN controller. If you do not have a transceiver connected, join the TXD and RXD of the controller together. No resister is then needed. 2. Do not connect any other node or test tool. Just one node running by itself. 3. Connect an oscilloscope hot lead to CAN Hi and ground to CAN Lo. The scope ground must be isolated from the CAN ground. You do not need a high speed scope – almost any will suffice. You can also connect a scope to the CAN controller output pin and ground for a very clean signal. 4. Configure your CAN controller and write the IDE, ID, DLC and any data bytes into the appropriate registers. 5. A CAN frame will now be continuously displayed on the scope. RESET the processor to start over. TIP: You can measure the CAN frequency with the method described at the bottom of this page. Bit Stuffing: The CAN protocol states that when there are 5 consecutive bits of the same polarity, one bit of opposite polarity will be inserted to prevent sync loss. These bits make the CAN frame longer and are very common. These bits are inserted and removed automatically by the CAN controller and are only visible when an oscilloscope is attached to the bus. TIP: When bits are added (or not) to the CAN frame as various messages are sent on the bus, the changing frame length will look like jitter on the bus. It is not jitter of course: CAN just works this way. Just something else to be aware of. Bus Loading: Many CAN networks work on a bus loading from 15 to 35 % and this is increasing in some applications. A higher bus loading can cause lower priority messages to be delayed but these messages will still usually get through in a timely fashion. It is quite difficult to achieve 100% bus loading but one can come close. System performance does not drop greatly at high bus loading. Recall the message with the highest priority (lowest ID #) goes straight through with no time delay. TIP: It is possible to get very high bus loads in a short period of time in a CAN network. CAN does not automatically space out messages. It is possible to get a series of back-to-back messages that will equal nearly 100 % bus loading. You should be prepared for this. One solution is to select only those messages needed by a node by programming its acceptance filter. Another is to have your software space out the messages. This transitory problem is quite hard to detect and diagnose. TIP: It is possible that on a highly loaded bus, low priority messages will never get transmitted or be delayed by higher ones. Bus Speed: Bus speed in a system is a balancing act between things such as propagation delays (from bus length) and EMI emissions versus desired data throughput. Run your network as fast as possible for stable operation and with enough throughput. Do not run it much faster than it needs to be, but make some room for later expansion. Choose standard bus speeds. TIP: If your network is not stable: make sure you have two good termination resistors at each end of the network. Try slowing the CAN speed down to see if this helps. Resistors can be 120 ohm ½ watt and their value is not critical. Try adjusting the BTR0 and BTR1 timing registers to obtain the most stable operating parameters. TIP: How to determine the bus frequency of a CAN signal: This is the best and sometimes only way to determine this. 1. Connect an oscilloscope to CAN Hi or CAN Lo and ground. You do not need a high speed scope – almost any will suffice. You can also connect a scope to the CAN controller Tx output pin and ground for a very clean signal. 2. Display a trace. You might need a storage scope to see just one trace due to the non-repetitive nature of CAN. 3. Pick the smallest width signal pulse and measure its time period in seconds as accurately as you can. 4. Invert this value (divide into 1) and you have the CAN speed in bits per second. i.e. 2 µsec = 500 Kbps. 7 CAN: Controller Area Network Lab using ST STM32 Cortex-M processors. Copyright © 2013 ARM Ltd. All rights reserved www.keil.com Bus Errors: Recall we said that all nodes (including the transmitting node) check each CAN frame for errors. If an error is detected, here is what happens: 1. All the nodes will signify this fact by driving the bus to logical 0 (dominant state) for at least 6 CAN bits. 2. This violates the Bit Stuffing rule (never > than 5 bits the same polarity) so every node sees this as an error. 3. This so called “Error Frame” signals to all nodes a serious error has occurred if they don’t already know it. 4. The transmitting bus abandons the current frame and adds 4 to its 8 bit TEC register. (Transmit Error Counter) 5. IF this TEC equals 0xFF, the transmitting node goes BUS OFF and takes itself off the bus. (TEC normally = 0) 6. IF not, it attempts to retransmit its message which has to go through the priority process again with other messages. 7. All other nodes abandon reading the current frame, and add 4 to their own REC register. (Receive Error Counter) 8. Any nodes that have messages queued up will transmit them now. All others start listening to the bus. 9. Hopefully, this time the message will be broadcast and received error free. Each time a frame is transmitted and/or received successfully, the corresponding TEC and REC registers are decremented (usually by only 1) Super TIP: Error Counters ? These are two 8 bit registers in every CAN controller and you can read these with your software. This is a good idea because it gives some indication of general bus health and stability. In a good CAN network, TEC and REC will equal 0. If it starts having higher values, something has happened to your network. The usual suspect is bad hardware. The problem is usually in either the wires, the transceiver chip or the termination resistors. TIP: Don’t forget that if something happens to the integrity of your twisted pair, such as CAN Lo disconnected; it might still work but with greatly reduced noise immunity (that is what differential signals do best). If your network is in a very noisy environment, there might be more transient bus errors. This is very tricky to debug without knowledge of the REC and TEC contents. Read TEC and REC with your software and report it to your diagnostic routines. In a general sense, TEC represents a given node’s errors and REC indicates the other nodes’ errors. Bus Off: As mentioned, if a transmitting node detects it has put too many bad frames on the bus, it will disconnect itself. It will assume that there is something very wrong with itself. To get back on the bus depends on how you configure the controller. This can require a controller RESET or a certain number of good frames received. See your controller docs. BUS Faults: This is different (sort of) from a bus error. We normally think of a bus fault as something that has happened to the “wires” or the output transistors of the transceiver chip. Not all bus faults will result in a bus error. A bus error can be thought as the CAN controllers’ reaction to a bus fault such as noise, a faulty node or other errors. What happens if one of the twisted pair opens or is shorted out ? CAN has automatic mechanisms for this. Not all transceiver chips implement all of them. You can usually short CAN Lo to ground (ISO 11898 says you can short Hi also) or open one CAN line. The ground needs to be connected for this case. You can’t short both Hi and Lo together (Fault Tolerant will work) or open both up. You can cut the ground or have a large ground loop present and CAN will still work. Serious bus faults may be reported as a bus error as described above. At least one node must try to transmit a frame in a bus fault condition to trigger a bus error. A bus in idle mode can’t trigger a bus error. When the bus fault is removed, in many systems the network will come back to life if so configured. CAN has excellent noise immunity because of the twisted pair that are 180 degrees out of phase. The common mode noise is cancelled out and the differential CAN signal is not affected. The Ground: Strictly speaking, the ground is not needed for CAN operation if the twisted pair is intact. This is readily shown with simple experiments. One experiment showed a small network still worked properly with two nodes having a 40 volts DC ground difference ! However, it is a good idea to include a good ground in your system design. Some bus faults need the ground to allow the transceiver to compensate. This is good engineering practice. Watch out for ground loops ! For a practical demonstration of BUS faults: see the section on getting a real system working. TIP: How can you create a Bus Error for testing ? Easy: have a node send a message at the wrong frequency. When this frame tries to get on the bus this is certain to create a bus error condition. Some CAN controllers can send a one-shot frame. This is useful if the ACK bit does not get set by other nodes and you do not want this frame being sent forever. 8 CAN: Controller Area Network Lab using ST STM32 Cortex-M processors. Copyright © 2013 ARM Ltd. All rights reserved www.keil.com Bonus TIPS: Here some items NOT part of the CAN specification but might prove helpful in your system: 1) Transmitting data sets greater than 8 bytes: Clearly, transmitting a data set greater than 8 bytes will require multiple frames and this will require some planning. Such schemes can become very complicated as they have to deal with a wide-ranging set of contingencies. If you can focus on a narrow requirement set, design of a simpler protocol is possible. Most current schemes use the first data byte to contain the number of total data bytes to follow plus a counter to help determine which data byte is which. The ID usually identifies the node plus whether it is a request or response message. If you want to use an existing protocol see ISO 15765. This is what automobiles use. OBDII diagnostics on vehicles also use this protocol. OBDII is an example where one message can be comprised of many CAN frames. Diagnostics are common. 2) Periodic, Request/Response and Command Frames: Periodic: This technique sends a frame out periodically – several times a second is usual. This frame will contain data that any node can use if it wants to and is identified by its ID. Examples are speed, position, pressure and events. Messages that are lost (usually because the processor fails to empty the controller input queue fast enough) are replaced quickly. Request/Response: A node sends out a frame requesting certain specified information. Any other nodes that have the requested information then put it on the bus. The ID identifies the Request and the Response frames by changing one bit of the ID. An example is that ID 0x248 is a Request frame and 0x648 is its Response frame. The Request frame data bytes indicate what information is requested. The Response frame will contain the requested information or an error indication. Command: A frame commanding some event to be performed. The ID usually contains the address of the commanded node and the data bytes the actual command(s). An ID signifying a broadcast message will be sent to all nodes. Technically all nodes can see all messages anyhow: but this can allow a message to get past a filter or from being ignored by a node. Sometimes an Acknowledge frame will be returned. Note: This is not the ACK bit. TIP: You might want to consider a blend of these types of traffic depending on your system’s needs. 3) Time-outs: Automotive CAN networks use time-outs and this concept is easily and effectively transferred to systems in other fields. A time-out occurs when a node fails to respond to a request in a timely fashion. Time-outs are handled completely by software and not by the CAN specification. A time-out is helpful to recover from problems with the network such as severe bus errors, catastrophic bus faults, faulty nodes, intermittent connections or a user abort. The result is usually a limp-home mode where a node will attempt to run itself without information from the rest of the network. In some cases, a punitive limp-home mode is entered that forces the user to perform repairs. Another result is to revert back to normal operation. This is common when a user stops making inputs for a long time. You do not want a system to sit in a configuration mode forever. You must control your processes. A time-out consequence can be a system RESET or less likely, a shutdown. In any case, notification to an operator is a very good idea. In extreme circumstances, such as a remote system not accessible: a mode to download new firmware is effective. A good example is if the vehicle transmission fails and proper gear shifting becomes impossible. In this case, the module will go into limp-home mode and the transmission might be put into one gear such as second to allow the vehicle to still be driven. This can be for safety reasons or to prevent further damage to the power train. Another example of a time-out is when the setting of the clock by a user is started but stopped midway. After the time-out, the clock will revert to its normal operating mode. Another good example is the MARS Rovers. If communication stopped for a certain period of time: it will be assumed that a catastrophic event has occurred. Hopefully this will be a software bug and not a hardware failure. The Rover will go into a special mode where it listens for a software update or if really bad, a complete firmware replacement to be sent from Earth. Heart-beats and Address Claiming: The other side to a time-out is a heart beat. Periodic messages can be sent out to determine that all nodes are on the bus and active. CANopen uses such heart-beats. J1939 has a software mechanism where each node can declare itself to be on the bus and be recognized by the other nodes. This is called “Address Claiming” and occurs during the system startup. None of these mechanisms are provided by the CAN specification but rather by your software or a suitable specification or protocol. 9 CAN: Controller Area Network Lab using ST STM32 Cortex-M processors. Copyright © 2013 ARM Ltd. All rights reserved www.keil.com Sequence of Transmitting Data on the CAN Bus: 1. You give the transmitter the ID, the size of the ID (IDE), the number of data bytes (DLC) and the data if any. 2. You then set a bit to tell the transmitter in the CAN controller to send this frame. 3. Any node(s), seeing the bus idle for the required minimum time, can start sending a CAN frame. 4. All other nodes start receiving it except those also starting to transmit a message at the same time. 5. If any other node starts transmitting: the arbitration process starts – the node with the highest priority (lower ID value) continues and lesser priority nodes stop sending and immediately turn into receivers and receive the priority message. Note: The losing node “knows” the beginning ID of the other message. CAN arbitration is non-destructive. 6. At this point, only one node is transmitting a message and no other will start during this time else a bus error happens. 7. When the transmitting node has completed sending its message, it waits one bit time for the 1 bit ACK field to be pulled to a logic 0 by any other node (normally all of them) to signify the frame was received without errors. 8. If this happens, the transmitting node assumes the message reached its recipient, sends the end-of-frame bits and goes into receive mode or starts to send its next message if it has one. The receiving nodes pass the received message to their host processors for processing unless the acceptance filtering prevents this action. 9. At this time, any node can start sending any message or the bus goes into the idle state if none do. Go to 1. 10. If # 7 does not happen (ACK bit not set) then the transmitting retransmits the message at the earliest time allowed. If the ACK bit is never set, the transmitting node will send its initial message forever. Transmitting Notes: How do I transmit my message ? Easy – you create the CAN frame you want to send by loading up the IDE, ID, DLC and any data byte registers in the CAN controller and then, in most controllers, you set a bit that triggers sending the frame as soon as legally possible. After this, the controller takes care of sending all frame bits. Unless the controller signals otherwise to the processor, you can assume the message was sent. How does a node know when it should transmit a message ? The CAN controller continuously monitors the bus. When it sees > = required number of idle bits (11 after ACK bit), it starts transmitting. It is quite possible for other node(s) to start transmitting at the same time. Arbitration decides which message is actually transmitted. What if there is an error ? All nodes, including the transmitting node, monitor the bus for any errors. If an error condition is detected – a node or nodes signal to the other nodes there is an error by holding the bus at logical 0 for at least 6 bus cycles. At this point, all nodes note this error event and take appropriate action. The message being sent (and now aborted) will be resent but only for a certain number of times. See Bus Errors on page 8. What if no node wants or uses the message ? Nothing. The ACK bit only says that the CAN frame was transmitted without errors and at least one node saw this frame error free. Remember the transmitting frame can’t ACK itself. CAN does not provide any acknowledgment mechanism that a frame was used or not by its intended recipient. If needed, you will have to provide this in your software as many systems do. TIP: In a periodic system, if a node misses a message, it doesn’t matter much as a copy frame will be along shortly. How do I add a node ? Just attach CAN-Hi and CAN-Lo signals to the existing network. If your CAN controller is not initialized, nothing will happen. If it is initialized to the correct frequency, it will start listening to the bus and set the ACK bit if appropriate. Until your software reads messages out of the buffer, messages will be lost. What happens if I “hot plug” a node on the bus ? Usually any disturbances will be taken care of by the CAN error detection schemes. A message that is sufficiently corrupted will result in a bus error and subsequent retransmission. If the TEC register is high or the disturbances are of a long duration, a bus-off might result. Arbitration Notes: 1. Arbitration is performed bit-wise. That is, bit by bit on the ID (11 or 29 bit) and the IDE bit. No other bits are used. 2. The node that wins arbitration is not slowed or delayed by this process. CAN arbitration is non-destructive. 3. The losing nodes, if there are any, will attempt to retransmit at the next idle bus time. 4. CAN is not deterministic. This means you are usually never sure when a CAN message will appear on the bus. 5. If you need determinism, try Time Triggered CAN. TTCAN is described in ISO 11898-4. It is a software layer that sits on top of regular CAN. It places frames into specified time slots. 10 CAN: Controller Area Network Lab using ST STM32 Cortex-M processors. Copyright © 2013 ARM Ltd. All rights reserved www.keil.com Sequence of Receiving data from the CAN Bus: 1. All nodes except those currently transmitting frames and those in bus-off mode are in listening mode. 2. A CAN frame is sent using the procedure as described previously: Sequence of Transmitting Data on the CAN Bus: 3. This sent frame is received by all listening nodes. If deemed to be a valid CAN message with no errors – the ACK bit is set by all listeners. In CAN terminology, this set to the “dominant” state as opposed to the recessive state. 4. The frame is sent through the controller’s acceptance filter mechanism if it is enabled. If this frame is rejected: it is discarded. If accepted, it is sent to the controller FIFO memory. If the FIFO is full, the oldest frame is lost. 5. The host processor is alerted to the fact a valid frame is ready to be read from the FIFO. This is done either by an interrupt or a bit set in a controller register. This frame must be read as soon as possible. 6. You do not tell the receiver what the ID size is or the number of data bytes to be received. When the receiver gets a valid frame, it deciphers this information and provides you with the appropriate IDE and DLC register values. 7. The host processor decides what to do with this message as determined by your software. TIP: You must decide whether to use polling or interrupts to alert the host processor a frame is available. Polling is where the host processor “polls” or continuously tests the bit mentioned in # 5. Polling runs the risk of losing or “dropping” a frame but is sometimes easier to implement and debug. Using interrupts is the recommended method and causes the CPU to jump to a handler to read the frame from the controller. Make sure your processor can handle 100% bus load bursts. Receiving Notes: 1. What happens if a message is “dropped” ? This can cause some problems as CAN itself does not have a mechanism for acknowledging a CAN frame. If you want this, you must add it to your software. In the case of Periodic Messages, it doesn’t normally matter much as a replacement message will be along shortly. This appears to be designed into CAN to handle dropped messages. 2. How fast do I have to read the FIFO to not drop messages ? It depends on the CAN speed, frame size, and bus loading. It is a good idea to read these frames as soon as possible since once a frame is dropped, it cannot be recovered or automatically resent by the transmitting node. It is gone forever unless you provide a suitable mechanism in your software to have it resent. It is possible to have a burst of CAN traffic approaching 100% bus loading when the controller dumps all its data on the bus. Your system must be prepared for this event. The CAN specification does not space out frames. 3. How do the CAN controllers stay in sync when there is only the bus idle voltage (0) and no transistions: The CAN controller depends on its internal clock to stay as close to the design frequency as possible. Upon receipt of the start bit, an internal counter starts counting the “time quanta” (TQ) that further divide the bit time. The number of TQs in a bit period is set in the controller by the user. The controller will automatically add or subtract TQs to adjust its effective operation frequency. CAN bit time transitions are used to calculate the correct number of TQs needed to keep the receivers in sync. See the data sheet for your CAN controller for details. 4. I have a high bus loading factor. How can I reduce the pressure on my CAN controller ? There are many ways and here are several: 5. Use the acceptance filters to ignore any messages your processor does not need. Ignored messages will never be sent to the processor. They are discarded very quickly by the CAN controller. Use more than one CAN controller in your processor to receive CAN frames. Set the acceptance filters to divide the messages by ID (or even 1st data byte) to each of the controllers. Your processor must still have the ability to process the messages. For transmit: use mailboxes to alternatively transmit the CAN frames. Space the messages sent by the nodes. Use sub-nodes. Sometimes using a different protocol than CAN is appropriate. Use a faster ARM processor or increase the bus speed if practical. Or use a combination of these tactics. Where do I get the values for the timing registers BTR0 and BTR1 ? The controller data sheet will provide the formulae to configure these timing registers. Suggested values for various bus frequencies are usually provided. It is especially important to get the sampling point correctly set. 11 CAN: Controller Area Network Lab using ST STM32 Cortex-M processors. Copyright © 2013 ARM Ltd. All rights reserved www.keil.com CAN FD: CAN with Flexible Data Rate: CAN FD is a new extension to the standard CAN 2.0 protocol. For more information search the internet for the files can_fd_spec.pdf and can_fd.pdf . CAN FD was created by Robert Bosch GmbH. The CAN frequency and bit overhead added to information carrying bits (ID + data bytes) (also called payload) are limitations to the effective maximum data rate transmission. CAN FD is one solution to this. In a CAN system, once the frequency is chosen and implemented, it is difficult to change. Changes are easier if you know exactly what nodes are in a system such as in a passenger vehicle. In systems where the nodes can be supplied from different manufacturers depending on customer options or added by after-market users, the change problem is usually a problem. This is certainly true for SAE J1939. J1939 is used in heavy duty trucks, buses, marine and in construction and farm equipment. It uses CAN at 250 Kbps. This speed is not fast enough for larger, more bus intensive J1939 systems. CAN FD might be a good solution as systems can slowly migrate from CAN to CAN FD. CAN FD provides: 1. Up to 64 bytes of data bytes. Remember regular CAN has from 0 to 8 data bytes. 2. It is possible to increase the bus speed during the transmission of the DLC, data and CRC fields and before ACK bit. This time period occurs just after arbitration is complete. Features of CAN FD: 1. A CAN FD controller will be different than regular CAN. It can also transmit and receive regular CAN frames. 2. Uses the same physical layer as regular CAN. 3. Can use the same transceiver although specialized ones might be made available. 4. CAN FD can be used for specific applications such as programming, large data transfers or general use. 5. When CAN FD is transmitting, regular CAN must be in standby. CAN and FD collisions will result in Bus errors. 6. Regular CAN uses bits 0000 through 1000 of the 4 bits of DLC (Data Length Code). CAN FD adds 1001 through 1111 to extend the data field. 7. Reserve bit R0 (in 11 bit) or R1 (in 29 bit) are used to signify the frame is CAN FD. This is the EDL bit. 8. Three new bits are added: They are added just before the DLC field. a. EDL: (Extended Data Length): specifies a CAN or CAN FD frame (EDL was called R0 or R1). b. BRS: (Bit Rate Switch): switches the bit rate after arbitration and before ACK bit. c. ESI: (Error State Indicator): denotes if the node is in error-active or error-passive mode. Selection of Data Bytes: The DLC has 4 bits: b0000 through b1000 are used by regular CAN and CAN FD to signify from 0 to 8 data bytes. CAN FD uses b1001 through b1111. Each of these bits represents not one byte as in regular CAN, but map into a table. This makes a total of up 64 data bytes. See this table to the right: With this scheme it is not possible to select some byte numbers. The rest of the story- The Details: DLC Number of Data Bytes There are many details covered in the Bosch and other documents. When this was written, no CAN FD controllers are yet available but NXP might be first. For details visit http://can-newsletter.org/ and search for FD TechDay. 1001 12 1010 16 1011 20 Other useful network protocols: 1100 24 Here are some other protocols that might prove useful to complement CAN: 1101 32 FlexRay: High speed dual channel Time Triggered network. You can use one or two channels. www.flexray.com It is used for redundancy in safety critical applications. 1110 48 1111 64 LIN: Single wire network using a common UART. Nearly any controller can be used to implement LIN. LIN is a very low cost network. It is often used as a sub-network to CAN. See www.lin-subbus.org Safe-by-Wire: A very reliable network used to activate vehicle airbags. Search the web for safebywire.pdf. Ethernet: It is very common to use CAN for a small, local network (such as on one machine) and then use a gateway to ethernet for the long distances or to connect to the other machines. It can handle the traffic load of multiple CAN networks. Wireless: WiFi, ZigBee, Bluetooth and NFC (Near Field Communication) are all useful in small networks attached to CAN. 12 CAN: Controller Area Network Lab using ST STM32 Cortex-M processors. Copyright © 2013 ARM Ltd. All rights reserved www.keil.com CAN Controllers and their Errata Sheets: CAN controllers are very sophisticated modules. Many times someone is experiencing trouble getting something to work or has an unexpected crash or result and they desperately search their code for the error causing this. Sometimes the answer lies in the errata sheet and not in your software. This document lists all known deviant behaviour from that claimed in the device datasheet. Some CAN controllers have bugs and you should find out what they are. Note that technical support staff statistics show that many errors are in the user software code so check this carefully. You should get the latest errata sheets and read them. You can potentially save an enormous amount of time. Sometimes the weirdest problems are caused by these defects. Then you have to be prepared for the day these bugs get fixed and show up in silicon on your board. Most issues will be in the controllers and not the rather simpler transceivers. TIP: There are several Internet CAN newsgroups and mailing lists that can help you with your network. Remember that not all people on these groups are experts and there is some risk of getting poor information. Fortunately, these self-proclaimed experts are in the minority. See http://tech.groups.yahoo.com/group/CANbus/ and www.canlist.org. For CANopen and other information see: www.can-cia.org/ Most CANopen docs are free. Most other documents are not. Test Tools: The biggest problem in getting your first CAN network running is that in order to see some messages, you have to have both a receiving node and a transmitting node properly working at the same time. This can be quite an onerous task. There are two ways to help here. One is to use a working node such as an evaluation board with some proven CAN examples provided. You can attempt to receive these known good CAN frames with your node. Second, you can purchase a CAN test tool. This is the best idea. These provide both sending and receiving capabilities and usually (optionally) act as a CAN node. There are two types: simple low cost devices that provide basic creating and displaying bus traffic and those offering advanced capabilities such as translation that can save some serious cash and time. Typical sources for inexpensive tools are SYS TEC (www.phytec.com/products/can/), www.kvaser.com and PEAK www.peak-system.com which is also sold in the USA through www.phytec.com. There are many other companies that sell these types of inexpensive tools. Search the Internet to find these. U U U U Oscilloscopes are quite useful in making sure the CAN waveforms are not distorted. This can disclose the causes of some very strange network behavior. For a combination CAN analyzer and oscilloscope see www.phytec.com/pcan-diag.html or search the web for Phytec PCAN-Diag. Standard scopes also work well and of these, memory scopes work best. CAN aware scopes can provide the most useful testing abilities available. If you are developing a more capable and powerful CAN system, you might want to consider a CAN analyzer. These offer very advanced features such as triggering, filtering and best of all; a database where your ID and data bytes are displayed in words rather than raw hex numbers. This will save a lot of time and make for a better, more reliable product. Normally, you can construct your own database to convert numbers embedded in the CAN frames to your own custom descriptive words. Typical suppliers are Dearborn Group www.dgtech.com, National Instruments www.ni.com, Intrepid www.intrepidcs.com and Vector CANalyzer www.vector.com. Do not be afraid to use an automotive type device even if your application is something else. CAN is CAN no matter where it is used and no matter what anybody says. Everything else sits on top of CAN. Even so, it would be good to check if an analyzer is sufficiently adaptable for your needs. U U U U U U U U As with all tools, buy the best analyzer you can afford ! You are rarely disappointed with fine products…only cheap ones… CAN Documents: CAN documents are available for ISO (ISO 11898) and SAE (J1939). They are not free. www.iso.org and www.sae.org. The original Bosch 2.0 document is free: Search the web for can2spec.pdf. Keil provided Software: Keil sells CAN middleware for many ARM Cortex-M processors. Visit www.keil.com/rl-arm/rl-can.asp The Keil RTX RTOS is now available free with a BSD type license. Ports are available for Keil MDK, IAR and GCC. See www.arm.com/cmsis for more information. See http://forums.arm.com for general information. What’s ahead: Now, on the next few pages, we will look at how we can program a real CAN controller to transmit and receive messages. There are some hands-on experiments you can try – the Keil evaluation software is free and for most exercises no hardware is needed. We will use the Keil simulator which is part of MDK. No license is needed. For the others, you will need a STM32F400 Discovery board. No hardware debug adapter is needed. We will use the on-board ST-Link V2. 13 CAN: Controller Area Network Lab using ST STM32 Cortex-M processors. Copyright © 2013 ARM Ltd. All rights reserved www.keil.com CAN Demonstration Software: In order to experiment with a CAN network it is useful to try a simulator before the real hardware. This document shows how to use the complete device simulation included in the Keil® Microcontroller Development Kit (MDK-ARM) for the STM32 ARM® Cortex™-M3 microcontroller. No hardware is needed. We provide an example for the Discovery STM32F4. You can download the latest version of MDK-ARM (4.70 or later) at: www.keil.com/arm/mdk.asp There is no charge for this software. Please install this software on your PC in the default directory. This is C:\Keil. Complete technical information on the ST CAN module is found in the Reference Manual RM0008 and RM0090 available from www.st.com/stm32 . Other manufacturers have similar documentation available on their websites. STMicroelectronics CAN Controller for Cortex-M3 Processors. Shown is a block diagram of the CAN controller. Here are the main points of all CAN controllers: 1. I/O Pins: These connect to the CAN transceiver chip pins R and D as already described. 2. Parallel-Serial Converters: CAN is a serial bus while the processor is parallel. Conversion happens here. 3. Tx mailbox: The messages to be transmitted are written here. ID, data (if any) and the DLC go here. 4. Acceptance Filter: This passes only specified messages to the processor via the FIFOs. By default at RESET, these filters pass all messages to the FIFOs. Your software must configure them to filter messages. 5. FIFO 0 & 1: Each Receive FIFO can hold 3 CAN messages. They provide a buffering system to the processor. 6. Control, Status, Configuration registers: Your software must configure these registers, usually at initialization. Various flags and switches are found here. Examples are set CAN speed, request transmission, manage receive messages, enable interrupts and obtain diagnostic information. Keil provides examples on how to set and use these registers. All CAN controllers have the same basic architecture. Different controllers will have differences in the number of receive FIFO buffers, transmit buffers, size of acceptance filters and the bit mapping, addresses and definitions of the various configuration registers. All CAN controllers are licensed by Robert Bosch GmbH in Germany and therefore they are able to exert considerable control over basic CAN attributes to make them consistent with various manufacturers. This means that all CAN controllers can communicate with other brands in a reliable and predictable manner. ARM Cortex-M3 Processor I/O Pins Tx Mailbox (3) Parallel-Serial Converter CAN Tx PB9 To transceiver Control, Status, Config Registers CAN Rx PB8 Acceptance Filter FIFO 0 (14) Serial-Parallel FIFO 1 Converter Note: Your ST CAN controller might be slightly different from this model. Check your datasheet. 14 CAN: Controller Area Network Lab using ST STM32 Cortex-M processors. Copyright © 2013 ARM Ltd. All rights reserved www.keil.com Keil Example CAN Program: Using the Keil Simulator: 1. Start µVision® by clicking on its icon on your Desktop. 2. Select Project/Open Project. Open the file C:\Keil\ARM\Boards\Keil\MCBSTM32E\CAN\CAN.uvproj. 3. Select “Simulator” in the Target window. 4. In the file GLCD_16bitIF_STM32.c, change #define DELAY_2N (near line 32) to have a value of 2 instead of 18 in order to start the messages faster the very first time. This is a delay for the LCD which we are not using here. Any source file can be opened in µVision if not already visible by clicking on File/Open and selecting it or doubleclicking on the file name in the Project window. 5. Compile the source files by clicking on the Rebuild icon. 6. Click on the Target Options icon. 7. Enter the Debug mode by clicking on the Debug icon. 8. Position the Toolbox, CAN: Communication and CAN: Controller windows as appropriate. 9. Click on the RUN icon. Consider making a backup copy of the example files. . They will compile with no errors or warnings. Select the Debug tab and confirm “Use Simulator” is checked. Click OK. Select OK if the Evaluation Mode box appears. Note: you can stop the program with the STOP icon. 10. Note CAN messages with an ID of 0x21 will appear in the CAN: Communications window. You can see both the transmit and receive frames. The CAN controller is in a special Test Mode that allows it to see its own messages. 11. In the Toolbox window, click on the “Analog Sweep 0…3.3v” button. 12. Changing data values representing output from the A/D convertor will now appear inside the CAN messages. 13. Stop the program. You can stay in Debug mode unless you want to exit µVision. The Keil CAN Demonstration Software: How it works… Note: The following source code is from the MCBSTM32E CAN example you loaded above. This uses one CAN controller set to loop-back mode. The source files for the STM32F4 Discovery board are slightly different as two CAN controllers are used. You can view and edit the C source files whether in debug mode or edit mode, but to compile them you must be in edit mode. This example is entirely written in C. There are three source files we will look at: CAN.h: This file defines a structure to contain the information used to construct the CAN frame and create two instances of it. The prototypes for functions used in CAN.c are listed in CAN.h in lines 34 to 40. CAN.c: This C code initializes the CAN controller, writes and transmits a message, receives a message, configures the Acceptance Filters and provide the transmit and receive interrupt handlers. CanDemo.c: The main function is located in this file. CanDemo.c calls the functions in CAN.C. 1) CAN.h TIP: To make this file visible, in the Project window, expand CanDemo.c and double-click on Can.h. The CAN Structure CAN_Msg: (These are MCBSTM32E line numbers but might change without notice) Shown is the structure declaration in Can.h. You should now be able to recognize each of these elements. You can enter either an 11 or 29 bit identifier. Two instances of CAN.msg are invoked and are shown below: CAN_TxMsg and CAN_RxMsg. CanDemo.c writes to CAN_TxMsg to create the CAN messages to be transmitted. 25 typedef struct 26 unsigned int { id; // 29 bit identifier 27 unsigned char data[8]; // Data field 28 unsigned char len; // Length of data field in bytes 29 unsigned char format; // 0 - STANDARD, 1- EXTENDED IDENTIFIER 30 unsigned char type; // 0 - DATA FRAME, 1 - REMOTE FRAME 31 } CAN_msg; 44 extern CAN_msg CAN_TxMsg; // CAN message for sending 45 extern CAN_msg CAN_RxMsg; // CAN message for receiving 15 CAN: Controller Area Network Lab using ST STM32 Cortex-M processors. Copyright © 2013 ARM Ltd. All rights reserved www.keil.com 2) CAN.c (These are MCBSTM32E example line numbers but might change without notice) Configuring the CAN Controller: (CAN.C) There are several things that must be done to properly configure the CAN controller. These are done in CAN.c by functions that are called by CanDemo.c. Examples are found in the function CAN_setup (lines 37 to 70) as shown in µVision: 1. Enable and set the clock for the CAN controller. TIP: The clock must be stable for CAN. No R-C oscillators here. 2. Configure GPIO ports PB8 and PB9 for the transmit and receive lines to the transceiver chip. 3. Enable the interrupts for the transmit and receive functions. 4. Set CAN_BTR: This is a 32 CAN controller register where things such as bit timing, bus frequency, sample point and silent and loop back modes are set. In the Keil example, the baudrate is set to 500 Kbps (bits per second). TIP: Sometimes timing settings can cause strange problems. If you experience some unusual problems you might want to study CAN timing in greater detail. For small systems, the default settings or those suggested by the processor manufacturer will work satisfactorily. You can experimentally adjust these settings for the most robust bus performance. All CAN controllers have the same general settings for bit timing because of the licensing agreements with Robert Bosch GmbH. For a detailed explanation of CAN bit timing see www.port.de/pdf/CAN_Bit_Timing.pdf and for the calculations see the ST Reference Manual RM0008 or RM0090 (STM32F4). TIP: All CAN controllers on a network should have consistent BTR values for stable operation. Other Functions in CAN.c: CAN_start: Starts the CAN controller by ending the initialization sequence. CAN_waitReady: Waits until transmit mailbox is ready – then can add another message to be transmitted. CAN_wrMsg: Write a message to the CAN controller and transmit it. CAN_rdMsg: Read a message from the CAN controller and releases it to be sent to the STM32 processor. CAN_wrFilter: Configure the acceptance filter. This is not discussed in detail in this article. USB_HP_CAN1_TX_IRQHandler and USB_LP_CAN1_RX0_IRQHandler: The interrupt handlers. CANx_TX_IRQHandler and CANx_RX0_IRQHandler: The interrupt handlers in Discovery CAN.c. 3) CanDemo.c (These are MCBSTM32E example line numbers but might change without notice) This contains the main function and contains the example program that reads the voltage on the A/D converter and sends its value as a CAN data byte with an 11 bit ID of 0x21. CanDemo.c contains functions to configure and read the A/D converter, display the A/D values on the LCD and call the functions that initialize the CAN controller. Transmitting a CAN Message: Lines 102 to 106 puts the frame values into the structure CAN_TxMsg. (Except for the data byte from the variable val_Tx) 118 CAN_TxMsg.id = 33; 119 for (i = 0; i < 8; i++) CAN_TxMsg.data[i] = 0; // initialize message to send 120 CAN_TxMsg.len = 1; 121 CAN_TxMsg.format = STANDARD_FORMAT; 122 CAN_TxMsg.type = DATA_FRAME; This CAN message will send one data byte. For example, if you change the value in the member CAN_TxMsg.len to “3”, three data bytes will be sent on the bus. What data will be in them depends on the contents of the array CAN_TxMsg.data. TIP: If you send more data bytes than you have data, it is a good idea to fill the empty data bytes with either 0 or 0xFF. Lines 133 puts the val_Tx value into the data member CAN_TxMsg.data[0] in data byte 0 and line 134 transmits it. 130 if (CAN_TxRdy) { 131 CAN_TxRdy = 0; /* tx msg on CAN Ctrl */ 133 134 CAN_TxMsg.data[0] = val_Tx; /* data[0] = ADC value */ CAN_wrMsg (&CAN_TxMsg); /* transmit message */ 16 CAN: Controller Area Network Lab using ST STM32 Cortex-M processors. } Copyright © 2013 ARM Ltd. All rights reserved www.keil.com Receiving a CAN Message: Lines 139 to 142 indicate when a CAN message is received. But something more must be going on here. Line 142 shows that the data byte received and inserted in the array[0] is stored in variable val_Rx. How exactly does the CAN data byte get into the member array CAN_RxMsg[0].data[0] ? 139 if (CAN_RxRdy) { /* rx msg on CAN Ctrl #1 140 CAN_RxRdy = 0; 142 val_Rx = CAN_RxMsg.data[0]; */ } Recall we said before that the function to read the CAN data from the controller is located in CAN.c. If we look in CAN.c, we find the function CAN_rdMsg at lines 141 to 170. Examining it, clearly the array[0] is loaded at line 159: msg->data[0] = (CAN1->sFIFOMailBox[0].RDLR ) & 0xFF; But how does this function get called ? 1. Set a breakpoint on CAN.c line near 143 (the first assembly instruction of the function CAN_rdMsg) by clicking on the green or gray block on the beside line 143. You can open CAN.c by double-clicking on it in the Project window. 2. Run the program and it will soon stop at this breakpoint. 3. Open the Call Stack + Locals window: Clearly function CAN_rdMsg was called by USB_LP_CAN1_RX0_IRQHandler. When a message was received by the controller, it created an interrupt that activated this handler. 4. Click on Step Out and you will exit to main. We can also use the Trace function of µVision that is available in Simulator mode to figure out how CAN_rdMsg is called. 1. Click on the small triangle beside the Trace Windows icon: 2. Select both Enable Trace Recording and Trace Data. 3. Run the program to the breakpoint set previously at Line 143. 4. In the Trace Data window, you can see the assembly instructions in the order they were executed (as opposed to which they were written). Their relationship to source code is displayed. An interrupt caused the program to jump to USB_LP_CAN1_RX0_IRQHandler at line 32,761. You can see where CAN_RdMsg was called at line 32,766. Look in the Src Code column to see these events. 1. Confirm the Call Stack window confirms this. 2. Double-click on any line in the Trace Data window before 32,761. This instruction will be highlighted in the Disassembly window. 3. Set a breakpoint on this line in the Disassembly window and run the program. 4. Confirm the Call Stack windows shows this instruction is in the function USB_HP_CAN1_TX_IRQHandler. 5. You can single-step 6. Delete Breakpoints: Open the Breakpoints window (Ctrl-B) or select Debug/Breakpoints and select Kill All and then Close. and Step-Out and set other breakpoints to view what the program has done. TIP: Instruction Trace (ETM) is also available on most ST processors. A Keil ULINKpro is needed to access the special 4 bit Trace Port. ST-Link or ULINK2 adapters do not support ETM trace. 17 CAN: Controller Area Network Lab using ST STM32 Cortex-M processors. Copyright © 2013 ARM Ltd. All rights reserved www.keil.com Viewing the CAN Frames with the Logic Analyzer (LA): µVision has a Logic Analyzer (LA). This feature is also available using Serial Wire Viewer (SWV) on a real processor or the simulator. You will also get the LA working with the Discovery board. ST-LINK V2 supports SWV. V1 does not. All Keil ULINKs and J-Link (black case V 6 and later) support SWV. This is a very powerful ARM CoreSight debugging feature. 1. Close the Trace Data window and remove all breakpoints. (Type Ctrl-B). Click on RUN. 2. You can configure the LA while the program is running or while it is stopped. 3. Can_Demo.c has two global variables val_Tx and val_Rx. Find where these are declared near line 28. 4. Right click on val_Tx and select Add val_Tx to… and select Logic Analyzer. This will also open the LA up. 5. Repeat for val_Rx. Both variables will now be visible in the LA as shown below. Adjust the LA window size. 6. Adjust the range: Click on Setup… and highlight each variable in turn and set Display Range: MAX: to 0xFF. 7. Click on Close to return to the main µVision window. Select File/Save All. (optional) 8. If the program is not running, click on RUN to start it. 9. Click on Analog sweep 0…3.3V in the Toolbox as shown here: 10. Click on Zoom All and/or IN and Out to get an appropriate screen as shown below. 11. The values of the CAN Data byte 1 are displayed as they change. 12. You can select Signal Info, Show Cycles, Amplitude and Cursor. 13. Click on Stop in Update Screen if desired. You can also stop the program if you prefer. 14. Select Signal Info, Show Cycles, Amplitude and Cursor. 15. Move your cursor over the waveform to see the effects and the information about timings provided shown below: TIP: If you have more than one CAN controller in your processor you can operate these as parallel receivers. Divide the messages up with the Acceptance Filters. This will help capture all the messages on a very busy bus without losing any. Each CAN controller will handle its share of the messages. This effectively multiplies the number of FIFO buffer memories which is an excellent method of capturing all the CAN frames. 18 CAN: Controller Area Network Lab using ST STM32 Cortex-M processors. Copyright © 2013 ARM Ltd. All rights reserved www.keil.com Code Coverage: (Available with the Keil Simulator or ULINKpro and ETM Trace) 1. Click on the RUN icon. After a second or so stop the program with the STOP icon. 2. Examine the Disassembly and CanDemo.c windows. Scroll and notice different color blocks in the left margin: 3. This is Code Coverage provided by the Keil Simulator and also the ETM trace. This indicates if an instruction has been executed or not. Colour blocks indicate which assembly instructions were executed: 1. Green: this assembly instruction was executed. 2. Gray: this assembly instruction was not executed. 3. Orange: a Branch is has not been taken. 4. Cyan: a Branch has always been taken. 5. Light Gray: there is no assembly instruction at this point. 6. RED: Breakpoint is set here. Is actually a circle. 7. Points to the next instruction to be executed. Why was the branch BCC always taken resulting in 0x0800_1048 never being executed ? Or why the branch BGE at 0x800_105C was never taken ? You should devise tests to execute these instructions so you can test them. Good programming practice requires that these unexecuted instructions be identified and tested. 4. Select View/Analysis Windows and select Code Coverage. Click on the Update button if necessary. 5. This window will show how many instructions were executed or not. Performance Analyzer: (Available with the Keil Simulator or ULINKpro and ETM Trace) 16. Start the program if necessary. 17. Open View/Analysis Windows/Performance Analyzer. Expand on some of the module names. 18. Note the information provided as shown below: Click on the RESET button and see the values refresh. 19. Performance Analysis is also provided with ETM trace and a ULINKpro. Execution Profiler: (Available with the Keil Simulator or ULINKpro and ETM Trace) 1. Select Debug/Execution Profiling and select Show Times you can see information in times executed or time here: Note: You might have to stop and start the program or click in the margin. 2. Hover the mouse over a value and it will display both Time and Calls. 3. Stop the program and leave Debug mode. 19 CAN: Controller Area Network Lab using ST STM32 Cortex-M processors. Copyright © 2013 ARM Ltd. All rights reserved www.keil.com Experimenting with the CAN software: The default MCBSTM32E CAN example produces a CAN frame with an ID of 0x21 and one data byte. We will make some modifications to CanDemo.c to show how easy it is to modify it for your own uses. Have the CAN project loaded as before. Be in Edit (not Debug) mode. We will modify these settings first: they are located in CanDemo.c near the lines as indicated: 118 CAN_TxMsg.id = 33; /* initialize msg to send 119 for (i = 0; i < 8; i++) CAN_TxMsg.data[i] = 0; 120 CAN_TxMsg.len = 1; 121 CAN_TxMsg.format = STANDARD_FORMAT; 122 CAN_TxMsg.type = DATA_FRAME; */ 1) How to change the ID from 11 to 29 bit and also change the ID value: 1. Modify line 118 from CAN_TxMsg.id = 33; to this: CAN_TxMsg.id = 0x1234567; 2. Change the value in line 121 from STANDARD_FORMAT to EXTENDED_FORMAT. You can also use a 1. 3. Click on Rebuild. 4. The CAN Communication window will display the new ID: Enter Debug mode. Click on the RUN icon. This was really easy to do ! 2) Create more than one Data Byte in a message: and exit Debug mode. 1. Stop the program STOP icon. 2. Modify line 120 from CAN_TxMsg.len = 1; to: CAN_TxMsg.len = 8; 3. Click on Rebuild. 4. Click on the RUN icon. 5. Note the eight data bytes but only the first one has a value: Enter Debug mode. Select Analog Sweep ..3.3V. This was also really easy to do ! 3) Fill in the Seven Data Bytes: 1) Stop the program STOP icon. and exit Debug mode. 2) Just after line 133: CAN_TxMsg.data[0] = val_Tx; ADD this line to fill in the data bytes: 3) Click on Build. /* data[0] = ADC value */ for (i = 1; i < 8; i++) CAN_TxMsg.data[i] = 0x77; Enter Debug mode. 4) Click on the RUN icon. 5) Select Analog Sweep ..3.3V 6) Now you can see 0x77 added to the seven data bytes. You should have no trouble to insert your own data values with suitable software changes. 4) Acceptance Filter: If you look in the data members for CAN_RxMsg in the Watch 1 window, you will not see the data changing. The Acceptance Filter (setup in Can.c) is turned on blocking everything except ID 0x21. However, the CAN Communication window can see IDs other than 0x21. The LA will not display the variable val_Rx. On a real CAN board (see the next page), Rx will not display any data. Page 28 describes how to turn the filters off. 6. After you make changes it is advisable to save them and all of your other settings (such as trace and breakpoints). Select File/Save All. Closing µVision also saves all modified files and settings. This is the end of the Simulator exercises. For the next exercises, you need a STM32 CAN board such as the STM32F4 Discovery. 20 CAN: Controller Area Network Lab using ST STM32 Cortex-M processors. Copyright © 2013 ARM Ltd. All rights reserved www.keil.com Getting a CAN Network to work on the Discovery board: with Serial Wire Viewer… Below is a real two node CAN network using a STMicroelectronics STM32F4 Discovery board. You can substitute other boards as long as you have at least two CAN nodes. The Discovery board contains two separate CAN nodes but no transceiver chips. You will need to add three parts to create a simple network. We will then make one node talk to the other. The Discovery has a ST-Link V2 debug adapter on board which supports JTAG, Serial Wire Debug (SWD) and Serial Wire Viewer (SWV. We will use this to connect to the target. Other boards may need a JTAG/SWD adapter such as a ULINK2, ULINK-ME, ULINKpro or a J-Link. ULINKpro, also provides ETM (Embedded Trace Macrocell) support. Modifying the STM32F4 Discovery: In order to connect the two CAN controllers together, you must add two signal diodes (1N914, 1N4148 or similar) and one 3.3 KΩ resistor as shown on this schematic. The connections are easily accessible. 1. Add the three parts as shown on the schematic and in the photo. 2. Connect the resistor to the 3 volt supply as shown. 3. Add a jumper wire (not shown) from PB5 to PB8. 4. Note: I used a 2.7KΩ resistor and it seems to work well. 5. I soldered the components to the board. 6. Note: you will need to open the resistor for a step later. You cannot connect this to a real CAN network as the voltages are wrong and it is not differential. It is suitable for small experiments. TIP: To view CAN frames on an oscilloscope: connect to the low side of the resistor. This will give a clean waveform. Configuring the ST-Link V2: Note: ST-Link V1 does not support SWV and can’t be updated to V2. The ST-Link is selected as the default debug adapter for the Keil examples for the Discovery board. Detailed instructions for configuring µVision with various debug adapters including ST-Link see this: www.keil.com/appnotes/docs/apnt_230.asp Installing the ST-Link USB Drivers: (you need to do only this the first time) 1. Do not have the Discovery board USB port connected to your PC at this time. 2. The USB drivers must be installed manually by executing ST-Link_V2_USBdriver.exe. This file is found in C:\Keil\ARM\STLink\USBDriver. Find this file and double click on it. 3. Plug in the Discovery board to USB CN1. The USB drivers will now finish installing in the normal fashion. Super TIP: The ST-Link V2 firmware update files are located here: C:\Keil\ARM\STLink. This updates the Discovery STLink firmware by executing ST-LinkUpgrade.exe. Find this file and double click on it. It will check and report the current firmware version. It is important you are using firmware V2.J16.S0 or later for proper SWV operation. To confirm you are connected to the Cortex-M4 Processor: 1. Connect the Discovery board CN1 USB to your PC. PWR LD2 must illuminate. Start µVision. 2. Select Project/Open Project. Open the file C:\Keil\ARM\Boards\ST\STM32F4-Discovery\CAN\CAN.uvproj. 3. Select the Click on the Target Options icon. 4. ST-Link Debugger must be visible. Do not use ST-Link (deprecated version). Select Settings: 5. In the SW Device box: ARM CoreSight SW-DP MUST be displayed as shown below. This confirms you are connected to the target processor. If there is an error displayed or it is blank this must be fixed before you can continue. Check the target power supply. Cycle the power to the board. To refresh SWD, select JTAG and then back to SW. JTAG is not a valid operation with this configuration and will normally show an error. This is OK. 6. Click on OK once. Click on Utilities. Confirm ST-Link Debugger is selected. 7. Click on Settings. STM32F4xx Flash must be selected. 8. Click on OK twice to return to the main µVision menu. Select the Debug tab. 21 CAN: Controller Area Network Lab using ST STM32 Cortex-M processors. Copyright © 2013 ARM Ltd. All rights reserved www.keil.com Running the Example CAN Program on the Discovery: 1. Consider making a copy of the CAN project directory: C:\Keil\ARM\Boards\ST\STM32F4-Discovery\CAN 2. Connect the STM32F4 Discovery CN1 USB connector to a USB port on your PC. 3. Start µVision by clicking on its icon on your Desktop. 4. Select Project/Open Project. Open the file C:\Keil\ARM\Boards\ST\STM32F4-Discovery\CAN\CAN.uvproj. 5. Make sure “STM32F407 Flash” is selected in the Target window. You need MDK 4.70 or later for the CAN software. Compile the project: 6. Compile the source files by clicking on the Rebuild icon. 7. Click the “Target Options” icon. . They will compile with 0 errors and 0 warnings. Select Debug tab and confirm it is set to “ST-Link Debugger”. Confirm the Serial Wire Viewer (SWV) Configuration: (this is set by default with this project). 8. Select Settings: and then the Trace tab. Confirm SWV is configured as such: 168 MHz and Trace Enable is set. 9. Select EXCTRC and unselect Periodic. Select Timestamps Enable. 10. Select ITM Stimulus Ports 31 and 0. 11. Click OK twice. Optional: Select File/Save All. Program the Flash: (you can also run in RAM by selecting RAM in Step 4. 12. Program the STM32F4 Flash by clicking on the Load icon. The COM led will blink red and green and stop red. Enter Debug mode and RUN the program: Select OK if the Evaluation Mode box appears. The 13. Enter the Debug mode by clicking on the debug icon. COM led will go out and briefly blink when a subsequent command is sent over the USB link. 14. Select View/Serial Windows and select Debug (printf) Viewer if it is not already open. The window below opens: 15. Click on the RUN icon. Note: you can stop the program with the STOP icon. 16. The four colour LEDs will blink in succession. 17. Select View/Serial Windows and select Debug (printf) Viewer. 18. CAN messages with Tx and Rx values will appear in the Debug Viewer as shown below: 19. If you see this you have a successful minimum two CAN nodes network operating. TIP: If Tx changes and Rx doesn’t – the most likely cause is the CAN ports are not wired together correctly or SWV is not configured correctly. The most likely problem is Core Clock: has the wrong value entered. Setup Watch Window: 9. In CanDemo.c, find the global variable val_Tx near line 23. 10. Right click on it and select Add val_Tx to… and select Watch 1. 11. Repeat for the variable val_Rx. Note these were configured and are updated while the program is running. TIP: If Watch 1 data changes and Debug Viewer is blank: the most likely cause is the SWV is not configured correctly. 1. In the function val_display in CanDemo.c near line 51, click in the left margin on a grey block to set a hardware breakpoint. The program will stop here. 2. Click on RUN several times and CAN frames are added. 3. Please remove the breakpoint. TIP: You can set/unset hardware breakpoints while the program is running on any ARM Cortex processor. 22 CAN: Controller Area Network Lab using ST STM32 Cortex-M processors. Copyright © 2013 ARM Ltd. All rights reserved www.keil.com Exception Tracing: CAN1 (the receiver) and CAN2 (the transmitter) use interrupts to tell the processor that a) a CAN message has been received and b) the controller is ready to be loaded with a frame to transmit. These interrupts can easily be displayed with SWV. 1. Enter the Debug mode by clicking on the debug icon. 2. Click on the RUN icon. 3. Click on the arrow beside the Trace Windows icon and select Exceptions: 4. The window similar to the one below appears. Note all exceptions (RESET, NMI etc.) are listed 5. Scroll down to Num: 36 ExtIRQ 20: Note interrupt 20 is occurring. ExtIRQ 20 is CAN1_RX0. 6. Scroll down to Num: 79 ExtIRQ 63. This is being updated in real-time. ExtIRQ 63 is CAN2_TX. 7. This window shows how many times this exception has occurred with various times. This is a very useful feature to debug IRQs and determine how often they are triggered or if not at all because of a bug in the program. Select OK if the Evaluation Mode box appears. TIP: Exceptions (including interrupts) are listed in the ST document RM0090 in the Vector table section. TIP: Num is the exception number: RESET is 1. NMI is 2 and so on. They are listed in the Exception Trace window. External exceptions start at Num 16. For example, ExtIRQ 20 is the same CAN1 RX0 listed in RM0090 in the Vector Table. Num 41 is also known as 41-20 = External IRQ 20. Num is not the same as the ST Priority Levels listed in RM0090. 8. Click on the arrow beside the Trace icon and select Records. (similar to Step 4). 9. The Trace window that opens will contain many ITM frames. Right click in this window and deselect ITM Events. TIP: ITM Events are sending ASCII characters out to the Debug (printf) Viewer window. You can also deselect ITM 0 in the Trace setup menu. 10. In CAN.c, set a breakpoint on the Tx function CAN2_TX_IRQHandler near line 256. The program will stop when IRQ Num 79 occurs. Scroll to the bottom of the Trace Records window. The entry of Num 79 (ExtIrq 63) will be displayed. 11. Click RUN to see the interrupts occur. 12. You can set a breakpoint at the receive interrupt handler in a similar fashion in CAN1_RX0_IRQHandler line 267. 13. Remove all breakpoints. Select Debug/Breakpoints (3or Ctrl-B) and select Kill All and then Close. TIP: - Exception Entry is when the exception occurs. - Exception Exit is when the exception returns. - Exception Return is when the ALL exceptions return. They are all unloaded from the stack. In this example, Num 79 does not return to 0: this is Cortex “tail-chaining” happening. 79 goes directly to 36 saving time. The “x” in Dly (delay) means the timestamp was delayed and might not be accurate due to overloading of the SWO pin. An “x” in the Ovf (overflow) column means at least one frame was lost for probably the same reason. TIP: Double-click inside any trace window to clear it. TIP: All of these features and more are included with the Keil MDK. There is nothing more to purchase. SWV works with the Keil ULINK2, ULINK-ME, ULINKpro, J-Link (V 6 and later black case) and St-Link V2. (V1 does not support SWV) 23 CAN: Controller Area Network Lab using ST STM32 Cortex-M processors. Copyright © 2013 ARM Ltd. All rights reserved www.keil.com Data Tracing: displaying the data writes… The ARM CoreSight technology with the STM32 family also includes data tracing – and of course, it is in real-time. 1. Open Debug/Debug Settings and select the Trace tab. Select “on Data R/W sample”. Click OK. 2. Select OK when a window opens asking to stop the program and take new values. 3. Find the global variables val_Tx and val_Rx in CanDemo.c. 4. Right click on val_Tx and select Add val_Tx to… and then select Logic Analyzer. Repeat for val_Rx. TIP: You can add up to four variables for display in the LA. 5. A Logic Analyzer window like the one shown below will open. Adjust the window height if necessary. 6. Click on Setup and highlight val_Tx. Set Display Range Max: to 0x0F. Repeat for val_Rx. Click on Close. 7. Click on Out or In until Range: equals 0.5 s or so. 8. Click Run. Shown here is an example display: 9. Select the four boxes on the right and move the cursor over the waveform. You can stop the data selection with the Update Screen: STOP icon. This leaves the program running. 10. You should be able to determine the time between each CAN message. With a scope, I got 191 msec. 11. Click on the arrow beside the Trace icon and select Trace Records. Trace Records below will open. 12. Right click in this window and unselect ITM Events. You could also unselect ITM 0 in the Trace Config window. 13. What we are seeing in the Trace Records columns: Address: The physical address of the variables val_Tx (0x2000002C) and val_Rx (0x20000030). Data: The data values being read or written. PC: the address of the instruction responsible for the read or write cycle. This was activated by the setting “on Data R/W Sample”. Cycles and Time: when the operations occurred. Time(s) comes from the box t1: in the main µVision window. The X in DLY indicates a delay in the timestamp. TIP: It is not possible to send everything out the SWV. Overflows are common and normal with SWV and it is good practice to limit what information you ask to be sent out. A ULINKpro using the 4 bit Trace Port has a greater bandwidth to display SWV frames. Limit how many boxes you check to the necessities. Overflows are indicated in the Ovf column in the Trace Records window. µVision recovers gracefully from these overflows. TIP: Right click in the Trace Records window and you can filter out those types of records you do not want to see. It is better if you unselect them in the Trace Config window to not send them in the first place. Filtering in the Trace Records does stop the time consumed outputting these frames: it merely prevents them being displayed. Note: Currently only Data Write frames are displayed. Data Read frames are not displayed to reduce the traffic on the SWO pin. This might be added soon to µVision. 24 CAN: Controller Area Network Lab using ST STM32 Cortex-M processors. Copyright © 2013 ARM Ltd. All rights reserved www.keil.com CAN Waveform: This is an oscilloscope photo of a CAN frame from our example. The first negative edge is the SOF (start of frame). The last negative pulse is the ACK bit. It moves about due to stuffed bits. The first five positive pulses stay the same. They are the ID field. The others change as the data field and CRC change. The most narrow pulse is 2 µsec wide and ½ µsec = 500 kHz. This is the CAN frequency in our example. The base is 0.665 volts and the top is at 3.0 volts. The P-P voltage is ~ 2.375 volts positive going. Remember this is not a valid CAN physical layer. You will not be able to connect this to a real CAN network. If you did, I expect there will be many bus errors created. But as you can see, it is very useful for small experimental networks. Data Tracing: a practical debugging example… (for reference only) 1. This is an example ran on a particular Cortex-M3 board. Val_Tx is displayed in the Logic Analyzer (LA). 2. The variable CAN_RxMsg[0].data[0] is also displayed in the Logic Analyzer as shown here: 3. With the program running, the potentiometer was varied which varied val_Tx. The screen displayed the value of val_Tx in real-time as shown here in the Logic Analyzer: If you think this graph doesn’t reflect what you think a pot rotated should look like you are correct ! The pot on this particular board is defective (it has many bad spots) and I have saved it for demonstrations like this. This problem was not apparent by turning the pot and watching the LCD. However, watching the data writes in the Trace Records reveals what is really happening. See in the Data column as I rotate from 77 to C1 there is a short drop down to the 30s – this in one of the bad spots and this is why the graph has the sharp jumps. This problem was confirmed with a CAN analyzer attached to the bus and an oscilloscope on the pot. Usefulness of Serial Wire Viewer (SWV): This is one example of the usefulness of Serial Wire Viewer. It could be otherwise very difficult to find this problem with without Serial Wire Viewer. There are many instances SWV is useful and here are a few examples: Another good use is finding interrupts that fire too often using up CPU time and slowing your program down. I saw this once where the developer thought he had disabled the DMA. The DMA interrupts in the Exceptions window told a different story. Once he actually disabled the DMA and made its interrupts stop, his program ran much faster. Viewing variables that do not exist in the real world and only in formulae and variables (and therefore cannot be measured with instruments) is another good example. The data displayed by SWV (except for the Debug (printf) Viewer) is non-intrusive and no CPU cycles are stolen. ETM Trace: ETM trace, available with nearly all ST STM32 processors, captures and displays all the instructions executed. It works in conjunction with SWV. ETM is extremely useful in program flow problems or when the processor “goes-into-the-weeds”. ETM also provides Code Coverage, Performance Analysis and Instruction Execution capabilities. A Keil ULINKpro is needed to collect ETM trace frames from the STM32 Trace Port. See www.keil.com/appnotes/docs/apnt_230.asp 25 CAN: Controller Area Network Lab using ST STM32 Cortex-M processors. Copyright © 2013 ARM Ltd. All rights reserved www.keil.com Watchpoints: (also known as Access Breaks in Keil products) Watchpoints provide breaks on data and address values. There are four Watchpoints in STM32 series. 1. Enter Debug mode. Do not run the program or stop if it is. The program must be stopped to configure Watchpoints. 2. Close the Exceptions window. 3. Open Debug/Breakpoints and an empty window below opens up. You can also use Ctrl-B. 4. Enter in the field Expression: val_tx == 0x6. Don’t hit Enter yet ! 5. Check the Read and Write boxes in Access and click on Define. The expression will move into Current Breakpoints as shown here: 6. Click on Close. 7. Open Debug/Debug Settings and click on the Trace tab. Select on Data R/W sample and unselect EXCTRC. Click OK and then Close. 8. Confirm the val_Tx in the Watch window is not equal to 0x6. Highlight val_Tx’s value and doubleclick and change it to something else. 0x0 will do. 9. Double-click the Trace Records window to clear it. 10. RUN the program. 11. When val_Tx equals 0x6 the program will stop. This is how a Watchpoint works. 12. The last entry in the Trace Records will be the write of 0x6 as shown here: 13. Open Debug/Breakpoints (or Ctrl-B) and remove the Watchpoint by using the Kill All button. 14. Click on Close to return to the main µVision menu. TIP: If the SWV stops working: stop the program, leave debug mode and cycle the power on the Discovery board. Reenter Debug mode and click on RUN to repeat. Number of Watchpoints: The number of Watchpoints is normally four in STM32 processors. There are four comparators used by Watchpoints. These are shared by the LA. µVision will warn you if you have too many comparators configured. The same is true for the hardware breakpoints. Eight are possible in CoreSight and most STM32 have six enabled. Watchpoints and hardware breakpoints are non-intrusive and do not slow your program down during their tests…until they become true and then, of course, they stop your program. TIP: When the Breakpoints window is open you can modify a Watchpoint by double-clicking on it and it will move below into the Expression: box. When you are finished editing it click on Define again. Note that the old Watchpoint will still be listed. Click on it to highlight it and click on Kill Selected to remove it. TIP: Click on Help while in the Breakpoints window and information will be displayed on other types of expressions. Not all options are currently implemented in µVision. TIP: You can temporarily “park” Watchpoints and Breakpoints by unselecting the appropriate box. 26 CAN: Controller Area Network Lab using ST STM32 Cortex-M processors. Copyright © 2013 ARM Ltd. All rights reserved www.keil.com PC Tracing: Program Counter samples… 1. Open Debug/Debug Settings and click on the Trace tab. Unselect EXCTRC and on Data R/W sample. 2. Select Periodic. Click OK and click RUN. Double-click in the Trace Records window to clear it. 3. Program samples will now be displayed with a timestamp in both CPU cycles and the time in seconds. TIP: In this example every 16,384th PC is displayed. PC Samples are useful as they can give good indication where your CPU is spending its time. Use ETM trace with a ULINKpro if you need to see every instruction executed for advanced program flow debugging, Code Coverage, Execution Profiling or Performance Analysis. 1. Open Debug/Debug Settings and unselect PC Samples. They consume a great deal of the SWV bandwidth. They are best left off if you are not using them. Click on Close. Watch and Memory windows: Updated in real-time… The STM32F400 is an ARM Cortex-M4 processor which incorporates CoreSight debugging technology. CoreSight provides a means to update the µVision Watch and Memory windows without stealing CPU cycles to do so. TIP: In addition, you are able, in real-time, to insert values into the Memory window. Right click on the memory location you want to change, select Modify Memory, enter the new value and press OK. Recall we have a structure can_msg that contains the CAN frame information. We have two instances of this: CAN_TxMsg and CAN_RxMsg which are arrays for each of the two CAN controllers. 1. Click on RUN and confirm the CAN values val_Tx and val_Rx are still changing in Watch 1. 2. In a Watch window, double-click on <Enter expression> and enter CAN_TxMsg. Repeat with CAN_RxMsg. 3. In CAN_RxMsg, open to display [0] and data[0]. Note this value changes while the program is running. 4. In CAN_TxMsg, open to display [1] and data[0]. Note this value changes while the program is running. 5. In a memory window, enter &CAN_TxMsg[1].data and press Enter. You will see the appropriate memory locations change value as the program runs. 6. Stop the program and exit Debug mode. TIP: Note you can enter these variables when the program is still running. You can also highlight, drag and drop or right click on a variable and select Add varname to… TIP: CoreSight debug technology with Cortex-M processors enables you to set/unset hardware breakpoints while the program is running. This finishes a partial demonstration of the Serial Wire Viewer trace feature of Cortex-M processors. Visit www.keil.com for more information concerning the Serial Wire Viewer interface in Cortex-M processors. U U 27 CAN: Controller Area Network Lab using ST STM32 Cortex-M processors. Copyright © 2013 ARM Ltd. All rights reserved www.keil.com Experimenting with the CAN software: The default CAN example produces a CAN frame with an ID of 0x21 and one data byte. We will make some modifications to CanDemo.c to show how easy it is to modify it for your own uses. 1. Have the CAN project loaded as before. Close the Trace Records window. Exit Debug mode. Close the LA. 1) Turn OFF CAN Filters and configure Watch 1: 1. Go near lines 223 and 229 in CAN.c. Swap the two comment fields as indicated: //!!* To disable the CAN Filters: 2. In Watch 1 add these two structures if needed: CAN_TxMsg and CAN_RxMsg as shown below: We will modify various CAN fields to see the effect: they are located in CanDemo.c near the lines as indicated: 102 CAN_TxMsg.id = 33; /* initialize msg to send 103 for (i = 0; i < 8; i++) CAN_TxMsg.data[i] = 0; 104 CAN_TxMsg.len = 1; 105 CAN_TxMsg.format = STANDARD_FORMAT; 106 CAN_TxMsg.type = DATA_FRAME; */ 2) How to change the ID from 11 to 29 bit and also change the ID value: 7. Modify line 102 in CanDemo.c from CAN_TxMsg[1].id = 33; to this: CAN_TxMsg[1].id = 0x12345678; 8. Change the value in line 105 from STANDARD_FORMAT to EXTENDED_FORMAT. You can also use a 1. 9. Click on Rebuild. Program the Flash. Enter Debug mode. 10. Select CAN_RxMsg[0] in the Watch 1 window: The new ID is displayed as shown here: 11. Click on the RUN icon. Note that these values are updated in real-time as the program runs. This was really easy to do ! 3) Create more than one Data Byte in a message: 6. Stop the program STOP icon. 7. Modify line 104 in CanDemo.c from CAN_TxMsg[1].len = 1; to: CAN_TxMsg[1].len = 8; 8. Click on Rebuild. 9. Click on the RUN icon. and exit Debug mode. Program the Flash. Enter Debug mode. : 10. Note first data byte changes and the rest are 0x77: This was also really easy to do ! 4) Change the Seven Data Bytes: 7) Stop the program STOP icon. and exit Debug mode. 8) Near line 117: for (i = 1; i < 8; i++) CAN_TxMsg[1].data[i] = 0x77; 9) Change 0x77 to 0x23. This will change the data bytes 1 through 7. 10) Click on Rebuild. Program the Flash. Enter Debug mode. 11) Click on the RUN icon. 12) In CAN_Msg[0] you can see the data bytes 1 through 7 are now 0x23. You should have no trouble to put your own data in with suitable source code. This is the end of the exercises. I hope they have been informative. The rest of this document offers some useful information about CAN and debugging in general. 28 CAN: Controller Area Network Lab using ST STM32 Cortex-M processors. Copyright © 2013 ARM Ltd. All rights reserved www.keil.com TIP: If you have more than one CAN controller in your processor you can operate these as parallel receivers. Divide the messages up with the Acceptance Filters. This will help capture all the messages on a very busy bus minimizing or eliminating data frame losses. Each CAN controller will handle its share of the messages. This effectively multiplies the number of FIFO buffer memories which is an excellent method of capturing all the CAN frames How to determine the frequency of a CAN signal: This is the best and sometimes only way to determine this. 1. Connect an oscilloscope to CAN Hi or CAN Lo and ground. You do not need a high speed scope – almost any will suffice. You can also connect a scope to the CAN controller Tx output pin and ground for a very clean signal. 2. Display a trace. You might need a storage scope to see just one trace due to the non-repetitive nature of CAN. 3. Pick the smallest width signal pulse and measure its time period in seconds as accurately as you can. 4. Invert this value (divide into 1) and you have the CAN speed in bits per second. i.e. 2 µsec = 500 Kbps. Four Newbie CAN Mistakes you can avoid: 1. You need at least two CAN nodes in order to get past the first initial message. This is a very common mistake. 2. There is a bug in CAN that was turned into a feature. What happens is some noise on the bus causes a transmitter to think its first message was corrupted and it sends out a copy. However, the other nodes think the first message was valid and accept it and also the second copy. Therefore, they see two identical and valid messages. Therefore do not increment or toggle values or states. Send the actual value you want to nodes to receive. This situation occurs rarely but with millions of CAN frames and millions of networks, it does happen and it can be a problem. 3. The CAN controller will add (or not) a bit to the bitstream to ensure there are never more than five unchanging bits. This changes the CAN message length. When such messages are viewed on an oscilloscope – they look like jitter. It is not: this is how CAN works. Do not chase problems in your network on a false assumption you have jitter. 4. Avoid doing tricky and complicated things like changing the CAN frequency. Just keep it simple and stable. 5. One more tip just for luck: Do not try and design your own CAN controller. There are secrets that will stop you. Useful Documents: 1. The Definitive Guide to the ARM Cortex-M3 by Joseph Yiu. (he has one for the Cortex-M0) Search the web. 2. MDK-ARM Compiler Optimizations: Appnote 202: www.keil.com/appnotes/files/apnt202.pdf 3. Lazy Stacking and Context Switching Appnote 298: www.arm.com and search for 298 4. A list of resources is located at: http://www.arm.com/products/processors/cortex-m/index.php Click on the Resources tab. Or search for “Cortex-M3” on www.arm.com and click on the Resources tab. 5. ARM Infocenter: http://infocenter.arm.com Look for Application Notes and Cortex-M listings. 6. http://forums.arm.com How can I learn more about these CAN examples ? Easy ! With a hardware board you can generate and receive real CAN messages and connect to other nodes or a CAN test analyzer. You can use the Cortex-M Serial Wire Viewer to see the CAN messages and interrupts displayed in real time. You can compile these examples with the evaluation version of the software. Keil has evaluation boards for the many ST processors. See http://www.keil.com/arm/boards/cortexm.asp. Keil supports many STMicroelectronics boards. Many have CAN examples. See www.keil.com/st for more information. Keil completely supports the new Cortex-M0 and Cortex-M0+ processors. DS-5 supports ST Cortex-A9 processors such as SPEAr. See www.arm.com/ds5. You now know how CAN works and are familiar with the Keil software and will have no problem getting a real CAN system operating. You have already ran an accurate simulation of a CAN network. If you obtain other target hardware such as the MCBSTM32F400, you can connect up to any CAN network and communicate with it. Keil offers a complete CAN stack for all ARM7™, ARM9™ and Cortex-M4/M3/M1/M0/M0+ processors. This comes as part of MDK Professional. It was previously known as RL-ARM™. Please visit www.keil.com/rl-arm/ for details. U U This middleware package contains USB, TCP/IP networking, Flash file system and the CAN interface. The Keil RTX™ RTOS now comes with a BSD type license. Source is provided. See www.arm.com/cmsis. 29 CAN: Controller Area Network Lab using ST STM32 Cortex-M processors. Copyright © 2013 ARM Ltd. All rights reserved www.keil.com How can trace help me find problems ? Trace, either SWV or ETM, adds significant power to debugging efforts. Tells you where the program has been, how it got there, how long it took, when did the interrupts fire and all about data reads and writes. With RTOS and interrupt driven events – many programs are now asynchronous. Trace helps sort this out and provides for the dynamic analysis of running code. Putting test or printf code in your project sometimes changes or erases the problem. Trace is non-intrusive. Trace can often find nasty problems very quickly. Weeks or months can be replaced by minutes. Really ! ….especially where the bug occurs a long time before the consequences are seen. Or where the state of the system disappears with a change in scope(s). Plus – you don’t have to stop the program t see the trace. This is crucial to some applications. No trace availability is responsible for unsolved bugs – some of these problems are too hard to find without it. Pointer problems. Is your pointer really reading or writing what you think it is ? Where is it pointing to ? Illegal instructions and data aborts (such as misaligned writes). Code overwrites – writes to Flash, unexpected writes to peripheral registers. Profile Analyzer. Where is the CPU spending its time ? Where should I start to optimize my program ? Code Coverage. Can be a certification requirement. Was this instruction executed ? Serial Wire Viewer and ETM Trace Summary: Serial Wire Viewer can see: Global variables. Static variables. Structures. Peripheral registers – just read or write to them. Can’t see local variables. (just make them global or static). Can’t see DMA transfers – DMA bypasses CPU and CoreSight by definition. Serial Wire Viewer displays in various ways: PC Samples. Data reads and writes. Exception and interrupt events. CPU counters. Timestamps for these. These are the types of problems that can be found with a quality ETM trace: Pointer problems. Illegal instructions and data aborts (such as misaligned writes). Code overwrites – writes to Flash, unexpected writes to peripheral registers (SFRs), a corrupted stack. How did I get here ? Out of bounds data. Uninitialized variables and arrays. Stack overflows. What causes the stack to grow bigger than it should ? Runaway programs: your program has gone off into the weeds and you need to know what instruction caused this. Is very tough to find these problems without a trace. ETM trace is best for this. Communication protocol and timing issues. System timing problems. 30 CAN: Controller Area Network Lab using ST STM32 Cortex-M processors. Copyright © 2013 ARM Ltd. All rights reserved www.keil.com Keil Products: Keil Microcontroller Development Kit (MDK-ARM™) MDK-Lite™ (Evaluation version) $0 NEW !! MDK-ARM-CM™ (for Cortex-M series processors only – unlimited code limit) - $3,200 MDK-Standard™ (unlimited compile and debug code and data size) - $4,895 MDK-Professional™ (Includes Flash File, TCP/IP, CAN and USB driver libraries) $9,995 For special promotional pricing and offers, please contact Keil Sales for details. All versions, including MDK-Lite, includes Keil RTX RTOS with source code ! Call Keil Sales for more details on current pricing. All products are available. All products include Technical Support for 1 year. This can easily be renewed. Call Keil Sales for special university pricing. For the ARM University program: go to www.arm.com and search for university. USB-JTAG adapter (for Flash programming too) ULINK2™ - $395 (ULINK2 and ME - SWV only – no ETM) ULINK-ME™ – sold only with a board by Keil or OEM. ULINKpro™ - $1,395 – Cortex-Mx SWV & ETM trace Note: USA prices. Contact [email protected] for pricing in other countries. Prices are for reference only and are subject to change without notice. For the entire Keil catalog see www.keil.com, contact Keil Sales or your local distributor. For Linux, Android, Bare Metal or other OS support for Cortex-A processors: see www.arm.com/ds5 For more information: Keil products can be purchased directly from ARM or through various distributors. Keil Direct Sales: In the USA: [email protected] or 800-348-8051. Outside the USA: [email protected] Keil Distributors: See www.keil.com/distis/ or www.embeddedsoftwarestore.com Keil Technical Support in USA: [email protected] or 800-348-8051. Outside the US: [email protected]. For comments or corrections please email [email protected]. For more information regarding Keil support of ST processors, see www.keil.com/st For the latest version of this document: see www.keil.com/appnotes/docs/apnt_236.asp For more information about ARM processors and products: http://forums.arm.com 31 CAN: Controller Area Network Lab using ST STM32 Cortex-M processors. Copyright © 2013 ARM Ltd. All rights reserved www.keil.com