1
32MF301B
19MF301B
/CD TV
Thank you for choosing
Gradas
aide
Need help fast?
Read your Owner's Manual
first for
quick tips that make using your
Magnavox
product
more enjoyable.
If you have read your instructions
and still need assistance,
www.magnavox.comlsupport
or call
with
Manuel
number)
du Propri_talre
d'astuces
regorgent
destin6es _ simphfier
pas _ r_soudre
votre probt_me,
vous pouvez
acceder
Magnavox.
Si despu6s de leerlo a6n necesita ayuda,
consulte nuestro servtcio de
asistencia en linea en
lsupport
www.magnavox.comlsupport
produit
y tenga
_ avoir
votre
pottle
de main
o Ilame
al tel_fono
1-866-341-3738
a mano
(y n_mero
I serial nombre)
m
a disfrutar plenamente
de su producto
ou formez le
1-866-341-3738
(et model
DOLBY
DIGITAL
NODEL NUNBER
le ayudargn
notre aide en tigne i_ I'adresse
www.magnavox.com
Veillez
ayuda
Lea primero el Manual del Propietario,
en donde encontrar6 consejos que
Toutefois, si vous ne parvenez
your product
I Serial
Magnavox.
inmediata?
l_utihsation de votre produit Magnavox.
1=866-341-3738
while
Necesita
rapide?
you may access our online help at
(and Model
pot escoger
votreconfiance.
Magnavox
I
SERIAL NUNBER
el producto
de model
/ serial)
2
Registering your model with MAGNAVOX makes you eligible for all of the valuable benefits listed below, so don't miss out. Complete and
return your Product Registration Card at once, or register online at www.magnavox.comlsupport
to ensure:
Know these
safety
symbols
A
This "bolt of lightning" indicates uninsulated material
within your unit may cause an electrical shock. For the
safety of everyone in your household, please do not
remove
product
covering.
_IL
The "exclamation
calls
attention literature
to features
for
which
you should point"
read the
enclosed
closely
prevent operating and maintenance problems.
CAUTION:
TOaEDUCE
THE
_SK
OFELECTalC
SHOC_
DONOT
_NOVE
COVEa
(OaBACK)
NOUSEa.SEaVlC_LE
PAaTS
INS
DEaEFEa
SEaVlClNG
TO®ALIFIED
SEaVlCE
_a_NNEL
WARNING:
with
To reduce the
CAUTION:
To prevent
Wall
Hount
Brand:
Model
Wall
shock, this apparatus
should
wide blade of plug to wide
introduire
not be exposed
to rain or moisture
and objects
Bracket
Kit:
Funai
not
injury
noted
liable
for
these
correspondante
types
of
de la prise et
accidents
or
below.
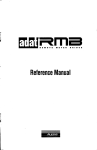
Install theWall
Mount Bracket on a sturdy vertical wall.
If installed onto a ceiling or slanted wall, the qV and Wall
nt
32MF301B
FSS
Mount
19MF301B
[10
Do not use screws that are longer or shorter
32 inches
filled
slot, fully insert.
la lame la plus large de la fiche dans la borne
Kit
Mount
SanusVuepo
#:
shock, match
les choc 61ectriques,
Bracket
Recommended
or electric
not be placed on this apparatus.
electric
ATTENTION:
Pour 6viter
pousser jusqu'au fond.
<for
risk of fire
liquids, such as vases, should
to
Bracket
may fall which
could
result in a severe injur)4
than their
specified length. If screws too long are used this may cause
mechanical or electr ca[ damage nside the [V set. If screws
only>
too
short are used ths may cause the[V
set to fail
Do not fasten the soews by excess ve foree;th s may damage
the product or cause the product to fall, leading to an injur_
For safety reasons use 2_people to mount
Mount ng Bracket.
Do not mount theIV
Recommended
Screw
32MF301
dimension
B
+ Washer
M4x0.472"
Wall Mount
allows the mounting
purchased:
F14 x 0.787"
19MF301B
The recommended
when
oftheqV
Bracket
your/V
(20mm)
0.07g"(F2_mm)
(12mm)
K_ (sold separately)
product
refer to
or njury
to yourself or others if you elect to nstall theqVVVall
Mount
Bracket or mount the IV onto the Bracket on your own.
TheWall
Mount
Bracket
must be installed by experts.
onto
the VVall Mounting
in or turned
onto
aVVall
Bracket whle
on. It may _esuft in an electrical
shock injur)4
When
installing
the unit on the wall, allow
Top:
Left and right
on the wall.
For detailed informat on on nstalling the wall mount,
the Wall Mount Instruct on Book
Funal is not respons ble for any damage to the
is plumed
theTV
Bottom:
this much
11.8 inches (30cm)
side:
5.9 inches (15cm)
3,9 inches (10cm)
space.
IMPORTANT
SAFETY
Read before
INSTRUCTIONS
operating
equipment
1,
Read theseinstructions,
_.
Keep these
3,
4,
Heed al warnings,
Follow a nstructions,
S.
Do not use this apparatus nea_-wate_
excessve
6.
F.
Clean only wth a dry coth.
Do not beck any of the vent at op opep n£s,
Instal n acco/dapce with the manufactulor's instruct ons,
which could ultimately overtul-n the p_x_duct,
&
Do not nstsll near any heat sources such as radiators
I6. TilrJStability A t_,evisons must comply wth recommended
nstructions,
international goba saf_,ty stand /ds for tt
and stabilty properties of its cabinet design,
• Do not comp_x_mise these design standards by applying
• Also, do not endanger yourself, or children, by placing
electronic equipment/toys
on the top of the cabinet Such
heat
terns could unsuspecting y fall f_-om the top of the set and
regi£ers, stoves, or other appal-atus (inc ud ng amplifiers)
9.
cause product
that produce heat,
Do not det_,at the safl,ty purpose of the polarized or
g_x_ur,ding type pug.A
polarized pug/,as
I7.
blades arid th/d ground ng prong, The wde blade or thtd
prong arc, prey ded for your satct}4When the prey ded
I8.
Power Lines
I9.
dW_y from power lines,
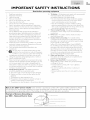
Outdoor Antenna Grounding
An outdoor
rels scerner,t of the obsolete
grounded
out et,
Protect the power cold from being walked on or pinched
Only use alSschments/accessodes
manu_actu reds
tus.When
No, 701984,
specified by the
provides
informatiof
ing of the leadn
15,
to avoid inju_-y from tip ove_
serv ce personne.
wth
ground ng of the mast and supporting
20.
wire to an antenna d scharge unit, sze of
Iocat on of antennad
Object
and Liquid Entry
Care shoud
that objects do not fJI ar, d quds
Serv cing is
respect to proper
structul e, ground
scharge unt,
cor, nection to grounding electrodes, and requ mments for
the ground n£ e ectrode, See Figure below,
Unp ug this appa/stus during ghtning storms or when un
used for long per ods of time,
Refl, r all serv cing to qualified
system s
so as to prey de some p_otection against votage
surges and built up state charges,
Section 810 of the Nat onal Electric Code, ANSI/NFP/\
a cart s used, use taut on when movn£ the
cart/@pa_ _tus combination
14,
If an outside antenna
is connected to the recevec be sule the antenn
ground ng connectors,
13,
antenna should be located
pug does not fit into your outlet, copsult an electric at, for
particularly at plugs, convenience receptacles, and the point
where they exit from the ppa_atus,
11,
damage and/or personal mjur)4
Wall or Ceiling Mounting The appliance should be
mounted to a wall or ceiling only as recommended by the
manufdcture_
two blades wth
one wider than the othet_ A g_ound ng type pug has two
I0,
pull force to the f'_ont, or top, of the cabinet
21,
enc osure through open ngs,
Battery Usage CAUTION
[o
requ red when the apparatus has been damaged n any way,
leakage that may result n body
such as power supply cord or plug is damaged, qud
or dam48e to the unit:
has
be taken so
am not sped
prevent
into the
battery
it,jury, p_sperty
damage,
been sped or objects have faen into apparatus, the appara
tus has been exposed to rain o_- moisture, does not operate
• InsMI a batteries correctly, with + and - aligned as
marked on the unt,
norma y, or has been dropped.
• Do not mix batteries (old and new or cadson and
Damage Requiring
Service
The appliance shou d be
serv ted by qua ified service personnel
a ka ine, e,tc,).
when:
• Remove batteries when the unit is not used for a long
time,
A. The power supply cord or the pug has been damaged;
B. Obiects hdve fden, or liquid has been spilled nto the
@p ante;
¢-, The app snce has been exposed to rain
D, lhe appli nce does not appear to operate normally
exhibits
marked change in perfo_-mance;
E, lhe
Note
83_040
appliance has been dropped, or the enclosure damaged,
to the
of the
be connected
or
CATV
NEC
system
that provides
to the _roundin8
installer
:This
_uidelines
system
reminder
for proper
of the building,
s prey ded to call the
_round
C/_FV
n£ and, in particulac
as close to the
pont
of cable
system
nstaller's
specifies
that the
entry
as pract cal.
attent
on to Art
cable 8round
shall
cie
4
FCC
WARNING
This apparatus may generate or use radio frequency energy. Changes or modifications to this apparatus may cause harmful
unless the modifications are expressly approved in the manual. The user could lose the authority to operate this apparatus
unauthorized
change or modification
RADIO-TV
interference
if an
is made.
INTERFERENCE
This apparatus has been tested and found to comply with the limits for a Class B digital device, pursuant to Part 15 of the FCC Rules.
These limits are designed to provide reasonable protection
against harmful interference
in a residential installation. This apparatus
generates, uses, and can radiate radio frequency energy and, if not installed and used in accordance with the instructions, may cause
harmful interference
to radio communications.
However, there is no guarantee that interference will not occur in a particular installation.
If this apparatus does cause harmful interference
to radio or television reception, which can be determined by turning the apparatus off
and on, the user is encouraged to try to correct the interference
by one or more of the following measures:
1) Reorient or relocate the receiving antenna.
2) Increase the separation between the apparatus and receiver.
3) Connect the apparatus into an outlet on a circuit different from that to which the receiver is connected.
4) Consult the dealer or an experienced radio/TV technician for help.
DECLARATION
Trade
OF
Name:
Model:
CONFORMITY
HAGNAVOX
32MF301 B
Responsible
Party:
Address:
19MF301 B
Telephone
This Class B digital apparatus complies with Canadian
CAUTION:
Danger
of explosion
WARNING
:
Batteries
Disconnect
the
mains
This apparatus
Nake
sure
not
X
plug to shut off when
should
To
place
climbing
if battery
not
be placed
the
prevent
unit
on the
on it. A falling
ike all LCD
Federal
injury,
unit
For
(10cm)
this apparatus
that
the
this
set contains
disposal
or
www.mygreenelectronics.com
•
installed)
must
injury
not
ABOUT
At east 2 peope are i-equ red wl,en
carry ng this unt,
• Hake sure to hold the upper dnd bottom
fi-ames of the unit firmy as ustrated,
•
Do
Do
/_(.
Do
•
•
•
with
Mercury,
information,
•
with
mains
the
same or equivalent
type.
heat such as sunshine, fire or the like.
plug shall remain
or rack
readily
unless proper
to the wall in accordance
by a child
death.
operable.
ventilation
is provided.
please
and an adult
dispose
with
leaning,
of according
the instructions.
pulling,
standing
to all Local,
or
State
and
contact:
www.eiae.org
Trademark
THE
HAZARDS
SHOCK
AND
OF
FIRE
_
,
",
/_
I-iii ml
Information
AND
°
HDFII, the HDFII Logo, and High Definit on Multimedia Inte_ffsce are
trademarks or i-eglstered trademad<s of HDMI Lcens ng LLC in the
United States and other countres,
I']"1DOLBY
_
I
DIGITAL
]
blanufactured under Ncense fi-om Dolby Lsborator es, Dolby and the
double_D symbol am trademad<s of Doby Laboratories,
\,
"
HANDLING
Do riot nstall the unit n direct sur, light or it, a pace subjr, ct to dust
or strorlg vibt _tiorl,
/'wod a place wth drastic temperature
changes.
Install the unit n a horizontal and stable poston, Do not place
anything dilect y on top or bottom of the unit. Depending or, youlexternal devices, noise or disturbance of the picture nd/or
sound
ms>, be generatr, d if the unit is placed too close to them. In this
case, pease ensure enough space between the external dev ces and
the unit,
•
only
to excessive
apparatus.
even
riot hndle the AC power cord wth wet har'ds.
not pu} on the AC power cold when disconnect ng it flsm an
outlet, Grasp it by the pug,
not put your fingers or obiects into the unit,
LOCATION
U.S.A.
RECYCLING
•
•
•
this
of being tilted
or
• Ths unit's pdck_Jging mater s arc, recyclable nd
can be reused, Please dispose of any materia s r,
accordance with your Iota recyc ng regu at ons,
Batter es shoud never be thrown away or inciperated
but disposed of n accordar, ce with your Iota
regu ations concern ng chemical wastes,
• For product mcyclir_g ir_forrnaton, pease vsit
www, magr_avox,com
/- 7
c-,,
WHEN
CARRYINGTHIS
UNIT
_
>
TO AVOID
ELECTRICAL
in use.The
be securely attached
The American Academy of Pediatrics discourages television
viewing for children younger than two years of age.
NOTE
Replace
be exposed
such as a bookcase
around
a lamp
recycling
or
replaced.
shall not
installation
CA 90501
1-866-341-3738
Standard Television Receiving Apparatus, Canada BETS-7/NTNR-7
or
or more
is capable
can cause serious
products,
laws.
ICES-003.
find trouble
in a built-in
furniture
Number:
is incorrectly
pack or battery
to leave a space of 4 inches
WARNING:
Do
(battery
FUNAI CORPORATION,
Inc.
19900 Van Ness Avenue, Torrance,
Depend ng on the environment, the tempe/ature of this un t may
increase s ght y,This is not a ma fur, or on.
Be sure to unpug the AC power cord flsm the AC out r,t before
moving or carry ng the unit,
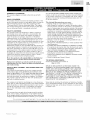
Congratulations on your purchase! As you enjoy your new product, please
keep these safety tips in mind:
THE ISSUE
• [he t-ome ti_ealerenle a nr<-entexper ence s a growh'g rend and large
flat panel displays are popular purchases However, flal panel displays
are not always suppored on the proper stonds or inslalled accord ng to the
manufacturer'srecommendalions
• Flat panel displays that are inappropriately s tuated on dressers,bookcases,
shelves,desks, speakers, chestsor carts may fall over and cause injury
THIS MANUFACTURER CARES!
• Tt'e consumer electron cs induslry is committed to r,,aking home enterta nn"ent
enjoyable and safe
TUNE INTO SAFETY
• One sze does NOT f all Follow the r_anufacturer'secommer_dations
for the safe rTstallotionar'd useof your flat panel display
• Carefully read ar,d ur,derstar,d all er,closed instructionsfor orooer useof
this product
• Don't allow children to clmb on or play with furnitJre and telev sion sets
• Don't place flat panel displays on turn tare that can easily be used as steps,
such as a chest of drawers
• Rememberthai children can become excited while watching a program,
especially on a "larger tha_"life" flal panel display Care should be iaken to
place or install _hedisplay wf'e_e it cannol be pushed, pulled over,
or knocked dowr"
• Care should be taken to routeall cords and cables cant'eared to the flat
panel display so that they cannot be pulled or grabbed by curious children
WALL MOUNTING: IF YOU DECIDE
TOWALLMOUNT
YOURFLATPANELDISPLAY,
ALWAYS:
• Use a mountthat has been recommended by he display _anufacturer
and/or Ised by an ndepe_'dent laboratory (suchas UI, CSA, Erl)
• Follovvall inslructionssupplied by the display and wall mount manufacturers
• If you have any doubts abou your ability 1osately install your flal panel
d splay, contact your retailer about professonal installaton
• Make sure that the wall where you are mounting the display s appropriate
Some wall mountsare not designed to be mounted to walls with steel
studs or old cnder block construction If you are unsure, contact a
professional nstaller
• A '_qnimumof _o people are requi ed for ins_allaton Flal panel displays
can be heavy
www.CE.org/safety
6
INTRODUCTION
Features
DTV/TV/CATV
You cars use your remote contro to seect channels whch are
broadcast in dgiM format and convent ona ar,aog format.Also,
cable subscribers can access ther cable IV channels,
Contents
Important Safety Instruct ons
h-ademark Information
3
4
5
Child Saf_,ty
Featul es
Supplied Accessor es
Symbos Used n ths Mdnual
Attachin S the Base
Mounting the Unit on Your Fumture
Remote Control Function
Installing the Batter es
Contro Panel
of the
6
7
Ntis unit automat cal y scans and memorzes channels avai abe it,
your area, e m nat ng d fficut setup pl_cedures,
7
7
Child Loci<
This Matul e allows you to block ch drorl's access to indppropr ate
7
8
8
9
lbrmina s
9
PREPARATION
Cor'nr'ction
Connectior,
nbrmation
Autoprogram
INTRODUCTION
Antenna
Information
Display (/XT SC only)
You can disp ay the tire, contents and other
current DTV pl_gram on theTV screen,
to Cable Receiwr
or Sate te Box
Plug In the AC Power Cord
10
I0
pl_grams,
Closed Caption
Decoder
Built n cosed caption decoder disp ays text for closed rapt on
supported
programs,
MTS / SAP Tuner
Audo cars be selocted fl_m the remote
contro,
Auto Standby
If there s no input sgnl and no operat on for I5 minutes, the
unit will go into standby mode automaticall)4
I0
11
Sleep Timer
You can set the unt to go into standby mode after a specific
amount of time,
Sleep limer
Switching Each Input Mode
Freeze Mode
Chdnnel Select or1
12
Choices
12
Stereo
TV Screen Dispby Mode
Sound Functions
TV Screen Information
13
13
14
ECO
14
14
PLL Frequency
Synthesized
Tuning
Prov des flee and easy channe se ection and r,ts you tune
di_ect y to any channel usng the number and dec real point","
buttons on the remote contro,
Initial Setup
WATCHING
fun-Link
TV
Options
12
12
USING FUNCTIONS
Picturo
Sound
for
On-screen
Language
Select your on s@een anguage:
Eng sh, Span sh or French,
Sound
Function
Various Adjustment
for Picture and Sound
Customizes mage quaty suitable fur your- room and sets your
sound prefiw, nce,
16
fun-Link
Setup
Featul es
16
17
18
(HDMI
Cable not Included)
fun L nk alows your other HDMI link dev ces to be contro
the HDMI cable connected to yourTV,
Ldnguage
USB
23
HDMI
24
HDMI-DVI
CONNECTING
DEVICES
External Device Connect on
25
via HDMI
Link
Input
Input
If your vdeo devce hs DVI output jack, use an HDMI DVI
convers on cabe to connect the unt,
ComponentVideo
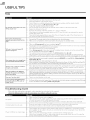
USEFULTIPS
PC
FAQ
28
5-oub eshoot n£ Guide
28
INFORMATION
AV Input
USB Terminal
lhe picture @PEG) and vdr, o (Mot or1 jPEG) files storod on a
USB storage devce can be pdyed back on this unit,
30
30
Digital
General Spec float orls
3I
<1961F301
E ectrica
31
Specification
Input
Input
Glossary
Maintenance
Other Specifications
Limited Wan-arty
ed by
Audio
Output
B only>
Headphone
Audio
Output
3I
33
© 2011 Funa Electric Co., Ltd,
All rghts reserved, No part of this manua may be reproduced, copied, transm tted, disseminated, transcribed, downloaded or stored n an7 storage
medium, n any form or for any purpose without the express prior wrrLt_,n consent of Funa, Ful thermore, any unaufl,orizc, d commerc al distlibution of
ths manu or any revison he/eto s stricty pl_hibited.
Information in this document s subject to change without
any person or o%ar, ization of such changes,
FUNAI with the t_
o_ Funa. All other
construed s glint
any other content
notice. Funai reserves the right to change the content heron w thout the obligat on to hotly
design s a legistered trademad< of Funs E ectr c Co., Ltd, and may not be used n any way wthout the express wr tten consent
trademad<s used heron reman the exclusive property of ther respect ve owners, Noth ng contained n ths manua shoud be
ng, by implication or otherw se, any license or rght to use any of the trademarks displayed herein. Msuse of any trademarks or
in this manua is strict y prohibited, Funi shall aggressive y enforce ts ntr, ectua property rghts to the fullest extent o_the law,
MAGNAVOX
is a i_gistered trddemdrk of Philips Electronics North America Corporation
Inc under cense flom Philips Electronics North Am@-cd,
and isused by Funai Electric Co, Ltd, and Funai Corporation,
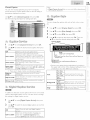
Supplied Accessories
Owner's
Manual
Quick
Start Guide
Registration
card
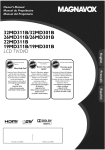
Attaching
the Base
You must
the
attach
unit, Be sure the
direction,
1
base to the
unt
and rear
of the
front
At least 2_people
Check
the text
bolCom
base match
the
are requ red for these
"FRONT"
to ensure
to have it as a table
w_th "an ow"
t is being installed
steps,
on the
n the
top
proper
Base's
correct
direct on, Spread a thck and soft cloth over a table as shown
at step 2, Place the man
unit face down
onto
it, Make sure
not to damage the screen,
Remote
Control
TV base and 3 screws
32MF301B M4 x 14
(NF805UD)
Batteries
19MF301B M4 x 12
2
Insert 2 hooks
the bottom
unit nto
then
of the
main
base holes
(shown
(AAA, 1.5V x 2)
i!i_ii!;
under
by arrow
move the
d;,),
base in
the direct
on as shown
by arrow
,'.2.'until it
stops
and the screw
holes
are aigned.
b'lal<e sure not to put the AC
power
cord
between
the
base and the unit.
211
3
Drve
Ph Ilips head
screws
nto
threaded
[4o
_'
bottom
If you
lose the
Phips
head
screws
If you
r, eed
name
or No,
support
V_el
to
at your
the
sure
the
contro
purchase
Iota
on the
cover
_e_o
for
We
do not £uarantee
romote
contro
s,
es, please
code
to the
more
dora
100%
call our
of this
e col
Re@r
above
merit
oned
3
of the
base
until they are tght
stole,
accessor
component
brand,
the
luss atior, s and
a unverss
s set to our
romote
please
i ep ace these
with
ne found
s_£
Nake
scrows,
the
holes at the
or,
refer
toll
to
flee
the
part
customer
manual,
ro
your
manua
o
opIse
rhs
universa
_s
i emote
accompanyln£
Ion,hove
b, basefo_
/s
_r_
• Unscrew the Phillips head screws in step 3,
After the screws alO removed, pul the base up toward the rear of
the unit, Be ca1_'fu not to drop the base when you remove It,
i!i"i_
control
your
s.
nteroperabilty
wth
all
universa
Symbols Used in this Manual
The following
manuak
s the
Description
: D gital]V
ctescr ption
refers
for the
symbols
used n ths
to:
operat
:AnaJog/CableTV
Mounting the Unit on Your Furniture
on
Screw
operation
this unt
supplied)
If neither
both,
symbol
appears,
the
operation
s applicable
in the
on your
furnture
hole at the
t ghtiy
back of the
usng
wood
screw
(not
base as shown.
to
[
•
Recommended
screw dimens on : 3/16 x 3/4 inches (5,1 x 20 mm)
rear of this unit
hole
8
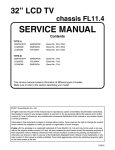
Remote Control
Function
,,,_
p.11
(_(power)
Press to turn
the
3o completely
power
unit on and go into standby
turn
off the unit, you must
mode.
unplug
1
2
SAP
,,i_
p.13
2
3
3
SOURCE
,,i_
p.12
4
FREEZE
Press to freeze
film.p.12
S
OK
6
A/V/_/I_(cursor)
iiiii_
p,11
7
BACK
IIII1_
8
VOL
9
PREV CH
screen
image.
llllI_
p.11
_
+/-
p.14
IIII_p.13
IIII_
Press to return
to previously
wewed
p,12
channel.
10
SLEEP
11
FORMAT
IlII_ p.13
Press to select aspect rs_o s_u ab e for the TV screen.
12
RED/GREEN/BLUE/YELLOW
I unctionally
useful for fun
llI@"
p.12
,,,_p.23
Link,
13 MENU
IIII_
14 INFO
Jill
p.14
15
REV
,_II!FWD
_
_ress to search
,D
backward
°_ess I0 begin tne
of the
17
18
I0
]ls£
.i_
"d
or
forM/a_
p.23
chaDtel-<
titles
or
msc
J
p.23
,,. p.23
•
_dSS
tne
aisc pla/OaC t
PAUSE II
S_ess io pause The alsc olaYDaCK
STOP
p.23
,,,,
p.23
SKIP I_I_I/SKIP
_
Dress to SKID OaCKWa
tracks
p.lS
or forvva _athrOUgh
PLAY I_
16
the AC
cord,
SZOD
lne
aisc
DI_
'DaCI
MUTE
illi_ p.13
CH
illi_ p.12
+/-
ECO
illi_ p.14
Press to reduce power consumption,
19
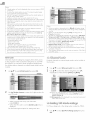
Installing the Batteries
Install the
batteries
indicated
insde
(AAA,
battery
1,5V x 2) matching
compartment
of the
the
polar ty
remote
control,
• Be sure to follow the correct polarity as nd cated in the battery
compal-tmept, Reversed batteries mdy cause damage to the
device,
•
Do riot mx d fferer,t types of batteries together (e,£,A kaline arid
Carbon Zinc, or rechargeab e bstteries lib' r,i cad, nrrfls _,tc) or
o!d batteries with fresh ones,
•
If the device is not to be used f_r a Ion£ period of time, remove
the batteries to prevent damase ol- njury from possible battery
leakage.
• Do not try to recharge batLer es; they can overheat and iupture,
Number buttons
IIIII_
p.12
• (dot)
Press to shift the subchannel from the main channel,
20 "Fun'L,nHOPTIONS_
,i,!. p.14, 23
Press to call up various menu from your fun Link device
connected through an HDNI cable.
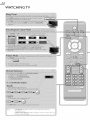
Control
Panel
1 VOLUME
+/,,_ p.13
Press to adjust the volume up/down or move rigbt
(+)/left (-) through the main menu terns,
2 CHANNEL
+/,,,,_ p.12
Press to select channels or move up (+)/down
through the main menu items,
3 MENU
,,,_ p.15
4 SOURCE
,,,,,_ p.12
(-)
:2i
!iq
5 (!) POWER
,,,,,_
p.11
Press to turn the unit on and go into standby mode.
[o completely turn off the unit, you must unplug the AC
power cord.
6 Infrared
Standby
3
4
flashes
i
from the remote
{%
indicator
Lights up red when
5
&i
i!i!i
i i/
sensor window
Receives inflated rays transmtted
control.
1
/
when
the
unt
is n standby
the unit goes nto
standby
mode
and
mode.
!2!
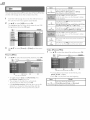
Terminals
Side
Panel
(i;,
D
13
9 AnalogAudio
(L/R)Input
Analog
Audio
PC Connection/Analog
14
10 Antenna
26, 27
!i!i!i!!
Audio (L/R)jacks
signal or
(L/R) jacks signal or
Audio (L/R) jacks signal or
Audio
the
Input jacks.When
the Audio is
only connect to the Audio L input jack,
Input jack
n,,_ p.10
<32MF301 B only>
11 USBTerminal
....• p.27
Use this term nal only to play back the picture (}PEG) and
video (Notion jPEG) flies stored on a USB storage device.
12
HDMI
2 Input jack
<19MF301 B only>
13 HDMI (HDMI-DVl)
n,_ p.10, 25
Input jack
,,,,_ p.10, 25
14
Headphone Audio Output jack
Headphone connect on for personal listen ng.
Rear
Panel
15 AC power
cord
16
Digital Audio
17
PC (VGA)Input
,,,_ p.10
Output
jack
jack
<32MF301 B only>
18 HDMI 1 (HDMI-DVl)
,,,_ p.26
,,_ p.27
Input jack
,,,,_ p.10, 25
<19MF301 B only>
19 USBTerminal
to do the software update themse ves,
Use this term
video (Notion
i!;'
(L/R) jacks signal with
mini plug conversion
cable jack on PC.
Audio (L/R) input jacks are right below
ComponentVideo
monaural, then
lO
25,
signals fi'om
ComponentVideo/Analog
HDMI DVI/Analog
Audio
CompositeVideo/Analog
stereo
Analog
(3'
ii;_i{
jacks
,,,,,_
p.10,
Connect
15
i{i!
8 Component/CompositeVideo
Input jacks
forVIDEO
,,,,_
p.26
CompositeVideo input jack is shared jack wth
ComponentVideo input (Y)jack,
,,,,_ p.27
nal only to play back the picture (}PEG) and
jPEG) _les stored on a USB storage device.
_ _....
10
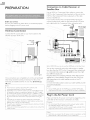
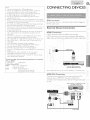
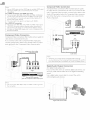
Connection to Cable Receiver or
Satellite Box
PREPARATION
Use an HDbql
or ComponentV
ComponentV
deo input
HDPll
or the
ComponentV
deo output
if/ou
Be sure your
Delore
antenna
plu,_gng
connect
connect
you connect:
or other
In the AC
device
_ower
s connected
properl/
cables to connect
or the
race ver/satellite
Before
deo
HDMI
the
unit to the
jacks of the
cable
box.
to the
Analog
jacks right
jacks of the
unit's ComponentVideo
Audio
below
input
cables to the Analog
the ComponentVideo
jacks,
Audo
L/R input
connector
jacks.
satellite dish
cote1
cable TV signal
including PPV
Antenna Connection
Connect
the
_[/_enna
IRDU_ ack of this unit
Rt coa×lal
cable o
_our home
outlet
to the
RF coaxial cabl_.
VHF/UHF
DTV antenna
analog
or
®
®
®
®
®
e
®
_ompone
....
(red/blu6/green)
and
audio cables
®®®®
cable receiver/satellite
_.F coaxial cable
box
®
$ For 32NF301B, you can also use the HDNI jack on the Rear Panel.
You can also connect
box other than the
or CompositeV
have different
cable TV signal
Once
nitial
connect
setup. Channel
memorize
,,_
ons are completed.turn
all available
on the
scann ng s necessary
channels
n your
unt
and begin
for the unit to
area. [Initial
Setup]
p.11
this unit to the
HDMI
deo output
output
cable receiver
or satellite
or the ComponentVideo
jack (n,_ p.26)
output
jacks.
Requ red cables and connecting
methods
of the
cable receiver/
satellite box, or the ava lability channel for the dear QAbq
dffer depend
jacks
because they might
ng on the cable/satellite
may
prov der or IocaF[V
broadcasler:
For more
nformation,
or local IV
please contact
your cable/satellite
provider
broadcasten
No_,
If you have any quest on about the ©TV's antenna, vsit
Noe
www.antennsweb.o%
for further nformation.
Depending on your antenna system, you ms>, need d fierent types
• Use an HDPII cabe with the HDPll logo (a ca/tiffed HDbll cable),
of comb nets (mixers) ol- separators (sp tters) for HDTV signa
the rain mum RF bandpass or, these devces is 2,000b1Hz ol- 2GHz.
For your safe,t>, nd to avod damage to this unt, please unpu£ the
RF coaxa cable flsm the antenna input jack before movng the
unit.
If you did use an antenna to rc.ceve ana ogTV, t should aso
wofl< for DTV mcept or,. Outdoor or stt}c antennas w be more
eff_,ct ve than a sot top or inside antenna.
lb switch your mcept on source easily br,tween antenna and cabe,
nstall an antenna selectoE
If you a_r, not receiv ng a sgna flsm your cable serv ca, contact the
Cabe prov dens
Hgh Speed HDISl cable s recommended
Plug In theAC
Nake
sure that
outlet
after all the
for the better compat bi i%
Power Cord
the AC power
necessary
cord
must
connections
be plugged
to an AC
are made.
C_ut o/:
Do not connect the AC power colx) to a powor
suppy outs de
the nd catr'd vo}tage ofths unit (AC 120V).
Connect ng the AC power cord to a power suppy outs de of this
range may re,sut in fire or eectr ca shocks.
Noe
Each timr, you pug n the AC power
performed
colx:], no operations
for a f_,w seconds.This is not a malfunct on.
will be
4
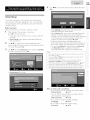
Use _1/1_ to select the desired location setting, then press
OK,
Initial Setup
7his section
which
wili guide you through
ndudes
selecting
and autoprogram,
v ewabie
Before
Hake
1
which
tally
setting
on screen
menu
scans and memorizes
you begin:
sure the
After
unt
is connected
It may take
first time.
•
[Initial Setup] menu
unt is turned on.
A/V
]V
a few moments
appears
to turn
automatcall7
unt
for the
through
to your
after the
to select [Antenna]
for
channels, then
store, the
unit will
be set up with
from
s) on the rght
a choice of picture and sound quality accord
preference.
Use this setting to remove the
E St cker
fvis
the
the
ble from
nitial
memorized
the
sde of the
the
setup
channel
displa}4 ,,_
is completed,
with
the
ng
p.23
the lowest
confirmation
Iocat on sett ng will be d splayed
message
on the IV
of
screen.
You must set [Home]
in step 4. Otherwise,
[Picture]
and [Sound]
settings you adjusted will not be
press OK.
Use A/V
[Retail]
predefined
setting for retail d splays.
Select [Home], the unit s set to maxmze
the energy
efl]c ency for home setting and t can be adjusted
on the
to select the on screen language
screen, then
Select
When
(Engl sh / Espa_ol/Franca
C,_[V
or cable.
connections,
on the unit,
•
Use
to antenna
making all the necessary
choices
3
automat
unit's nital
for your
channels.
press _ to turn
2
the
a language
forIV
channels
or [Cable]
memorized
after the
unt
goes into standby
mode.
press OK.
If you are, not receiv ng a sgnal fl_m your cable serv ce, contact
the Cabe prov de_:
If you Dess _ or MENU durng
channels w be canceed.
The init al autoprogram
autoplsgram,
ths setup of TV
function can be exr, cuted for ether
[Antenna] or [Cable] ony once.When you change the
connect on (Antenn / Cabe), set [Autoprogram]
gan. ,,_ p.17
If them is no signa input fi-om the antenn terminal and no
operat on for several seconds after you turn or, the unit, he pful
hints appears. Follow the instruct ons isted on theTV
• [Autoprogram]
screen.
wii] begin.
After
an initial
setup is completed...
• If/ou
want to scan the channels
[Autoprogram]
•
You can add the
unmemorized
[Add
desired
to change
[Language]
• If you want
[Location]
cable
and analog
by autoprogram.
Channels]
• If you want
automatically
again.
nlmi,p.17
n,_ p.18
to another
language.
n,_ p.23
to change
the
location
n,_ p.23
setting.
channels
i_i;ii!_i
12
WATCHING
Note
•
[No
Signal]
broadcast
•
TV
w+l appear
on the lV
screen
after
the
subchannel
s ovr,_:
[Audio
only
program]
roceive
orgy
sound
message
sgna,
w
appeal-
or_ theTV
scroen,
wher_
you
14
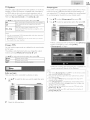
TV Screen Information
You can d splaythe
nformation
In the
digital
mode,
for the current
program
1
currently
such as the
off the
gGdes
selected
audio
the
ECO
channel
mode
detailed
on the
broadcast
air channel
or other
You can turn
TV screen,
ng nformat
such as program
on
ttle
on ECO
Press ECO
power
and
once
Node
to conserve
to turn
powen
on ECO
Node
and reduce
offECO
Node.
consumption.
Press ECO
again to turn
are displayed.
Press INFO
1
2
Note
• You must set [Home] it, [Location]. ,,i- p.23
Other/se,
the sett n% you adjusted will not be saved when the
unit goes into standby mode.
-9
-10
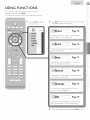
fun-Link Options
If you have our brand
recorder
them
1
programttle
2
progrsm
(lhe
3
broadcast
4
channel
5
audio
guide added
Before
you begin:
You must
set [On]
Control].
,,_
ths
such as Blura 7 player
with
via an HDNI
terns flora
fun
cable
or DVD
ons, connect
so you can simply operate
unit's remote
n [Device
Link funct
control.
Control]
and [fun-Link
p.22, 23
Otherwise,
_un-L,nH
even
connected
_l_b_}oyfmL
to broadcasting
is d splayed to a max mum
of 4 lines.)
OPTIONS
our brand
_'
devces
does
not work
to this unt,
nd
dnv::ns
MAGNAVOX
staton
language
fl< vn_find
fo}}ows
number
(AIgC)/audo
mode
[SwitchingAudio
Node]
6
effective
lines and scan mode
2
TV
8
program's
9
CC (not
scanning
(N]SC)
avalable
NB620gL2
NBP2100
NRD410B
NB620$L1
rapt
NB6?_1 SLI
P_ess fun-L,n_
[fun-Link
ratio
if dosed
NRD723B
NBP5130
1
image aspect
SYLVANIA
NBP5230
NBP5120F
n,mi.p.13
format
chid
to this unt
various
fyou
products
are compatible
guide
program
information
10
that
OPTIONS
Options]
_
to display
menu,
on is set to [Off])
lock ratng
Devwe-menu
2
Press INFO
or BACK
_'_to
hde
the
nformat
on.
Note
When the pro%am zude corls sts of more tf,ar, 4 nes, use •/•
to sclm to the next/previous
Ines,
[No description
provided.] is displayed when the program £ude
is not provided.
While the program £ude is d splayed, the closed caption function
is interrupted,
In externa input mode, the follow % screen is disp syed;
e.g,) When an external devce s connected to Video Input jack,
Device-menu
This functon alows you to cont_sl the menu of
,our connected fun-Lnk device,
Devicecontents
This funct on alows you to contro
of your DVD or Blu r_y discs.
the top menu
Devicefavorite
This funct on aows you to contro
menu of your Blu ray discs.
the popup
2
Use
A/T/OK
the des_ed
The informat on d splay will automatica
y disappear n I m nute,
on this unit's _emote
funct ons for your
devices.
control
to operate
15
12!i
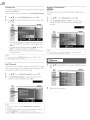
USING FUNCTIONS
Ibis
section
describes
d splayed when
]be
main
menu
tbe
overview
of the
main
S
menu
i__
'!,
iii!
you press MENU,
consists
of the
function
sett ng tems
below,
:2;
1
Use A/V
Press MENU to display
the main menu.
to select a desired
press OK to determine
menu and an _tem, then
the setting.
Page 16
Adjusting
picture
the
p cture
quality
mode,
as your
or customize
!iiiii
Adjusting
other
Page
16
the
sound
sound
mode,
equalizer
Page 17
Scann ng the channels
see what the antenna
available n your
levels are.
_atures
parental
_nguage_
You can choose
language.
Page24
You can view
When
and
English, Spanish, or French
_B
3
gude
Page 23
on screen
files
area and
Page 18
Adjusting the Closed Caption,
some other useful funct ons.
jPE(})
and some
functions.
_tUp
as your
the
preference,
p cture
stored
the setting
(]PEG)
and video
on a USB storage
s completed,
(Notion
devce.
press MENU
to exit.
16
Before
you begin:
You must
Otherwise,
n [Location],
the settings
after the
1
Before
set [Home]
unit goes nto
Use
i,/y
,,B p.23
you adjusted
standby
to select the
win not
be memorized
mode.
after the
item you want to adjus%then
press
1
following
items,
2
Smart Picture
i/Y
unit goes
Use
des red sett ng, then
[Standard],
[Sports],
Brightness, Contrast,
Color Temperature
You can only adjust the
[Personal]
Adjust
in [Smart
[Movie],
Color,
Use
press OK.
i/•
use _1/1_
i/•
following
opt ons when
Use
Picture],
to select the
des red sett ng, then
to adjust the
sett ng.
_1
press OK.Then
Cursor
to ncredse brightness
Contrast
to decredse contrast
to ncredse contrast
Color
to dea c,ase coot
intensity
to naease
ntensty
Tint
to add red
to add green
Sharpness
to soften
to sbal-pen
to ddd wdrm colors
to add coo colors
to select the item you want
be memorized
to adjus%then
press
Temperature
V rtual
Use
Noise Reduction
of the
to select the
Use
picture.
desired
option,
then
press OK,
Off
[hs function
in grdy,)
s d sabled when
[Movie],
setting, then
quality
each frequency.
[Music],
press OK,
and [News])
for
specific
level,then
press OK.
Surround
Sound
surround
i/•
sound
your
and use i/•
gives you the stereophonic
existing
to select the
frequency
2_channel
desired
stereo
opt on, then
to
w_tual
system.
press OK.
coot
Votume
function
theJV
nose
desired
[Standard],
space through
Ths
the
terns.
_1/1_ to select the
Auto
Color
•
win not
mode,
to select the
tonal
Virtual
•
to decredse brightness
t°°
standby
you set to
Brightness
i/•
,,B p.23
Equalizer
Tint, Sharpness,
Adjust
Cursor
Use
nto
the f01iowing
([Personal],
and [Game])
adjust the
Reduces
i,/y
n [Location].
sett ngs you adjusted
Smart Sound
to select the
([Personal],
Use
the
OK,
Adjustthe
Use
set [Home]
Otherwise,
OK,
2
you begin:
You must
PC ir,put is seected, (Sett ng will be
t
Leveling
keeps
commerc
i/•
a constant
als and the
to select the
loudness
d fferential
between
programs.
desired
opt on, then
press OK,
TV Speakers
Select the
amplifier
Autoprogram
aucto
output
s HDbql
an HDbq
volume
cable
link function
A/•
speakers,
sound
operations
option,
then
by
such as
unit's remote
is set to [On].
desired
or not. If your
ble and connected
by usng ths
Control]
to select the
unit's
compa£
to this unit, some
up can be changed
Make sure [fun-Link
Use
from the
control.
If you switch
move the
you restore the D]V
to use Autoprogram
The sound wil be output
The sound wil not be output fi_om the unit's
speakers,
and C/_l V) or
nitial
f you
setting, or f
channeB you deleted, t s recommended
to perform
a new channel search.
1
Use
&IV
to select [Autoprogram],then
2
Use
A/•
to seJect an appropriate
press OK.
flsm the unt's speakers.
option,
then
press OK.
You can contro audio output fix_m your
connected HDMI nk devices by usng this unt's
remote control.
Ext. Amp
Primary MTS
You can set the
• When
connected
toVHF/UHF
• When
connected
to C/X[V,
• [Autoprogram]
output
mode
as a default
for the
sound
antenna, select [Antenna].
select [Cable].
will begin.
mode
only).
This sett ng is not
Use
antenna
area after the
press OK.
Off
mode
(e.g. between
n,=. p.22
On
(NJSC
wires
unit to a d fferent
nterlocl<ed
when
by press ng SAR [Sound
&/•
to select the
IOutputs
Mono
st....
IOutputs
SAP
you change
Functions]
desh'ed
mol,o
_d
option,
the output
n,=, p.13
then
press OK.
Judw.
aud o program.
• When
tup
lowest
the
scanning
memorized
and memorzing
channel
will
are completed.the
be d splayed.
Noe
Before you begin:
Make sure the unt is connected to antenna or cable.
Use •/•
to select the
item you want to adjust, then
OK.
press
After sett n£ [Autoprogram].
using CH+/on the remote contro
skips unavailable pro%ares automat Cd }4
If yOU are' not receiv ng a sgnal flsm your cable serv ce, contact
the Cabe prov de_:
If you press (_ or MENU durng autoplsgram, the setup of TV
chdnnels w be canceed.
Even f [Autoprogram]
s completed, the channe} st,ICing w be
oat fthe AC power cord s unplu%ed br'_ore the unit goes nto
Autoprogram
star'dby mode by press n£ _).
The PIN code wll be requ red once you set a PIN code n the
[Child Loci<i. ,,,,_ p.20
If you want to change your PIN code, foow
[Change PIN]. ,. p.21
2
Ad]us_L the following
items.
the
nstruction
of
;i
18
Channel List
The channels
channels
[hose
1
2
Antenna Confirmation
selected
here can be skipped
when
selecting
the
using CH +/-.
channels
can s_LIIbe selected
with
Use
A/V
to select [Channel
Use
A/V
to select the channel
the
List],then
Number
buttons.
press OK,
you want to remove,
then
[hs funct on lets you check the digital sgnal strength of each
channel.
1
Use
_-
Use the
Number
channel
for which
press OK,
A/V
to select [Antenna],
buttons
then
or CH
+/-
press OK.
to select the
you want to ched< the digital signal
strength.
• 7he
channel
d splay for the
removed
You will not be able to select the
CH +/-.
•
[b reactivate
OK.
fhe
• When
a removed
reg stered
7ou remove
removed
channel,
channels
a main
channel
channel
darkens.
again usng
use A/V
and press
are highl ghted.
channel,
its subchannels
are
as well,
• If the charlne is set to analog channel or ext@nal it,put, you
cannot confirm the antenna condt on,
No/e
•
The channe
Othewse
with
the
the
[DTV]
channe
Jrld cated
on
the
d splay
JsKTSC,
s NTSC,
Add Channels
[his
function
Cable channels
to reception
1
lets you add the offthe
that
were
conditions
air along NISC
not
added
by the
at the
intal
setting.
or analog
autoprogram
Use A/y
OK.
to select the item you want to adjust, then press
due
Closed
1
Use
_-
Use the
Number
channel
you want to add, then
Air
to selec± [Add
buttons
Channels],then
to enter
press OK.
the number
press OK,
of the
Caption
Closed
Caption
Note
• [Digital Caption Service] that you can swtch
the broddcast descr pt orL
You can view closed captioning (CC) forTY programs,
movies and news, Closed caption refers to text of dialog or
descript ons displayed on screen,
Use A/•
d ff_,rs depending on
to select [Closed Caption], then press OK,
See the following description for setting each item,
::iiiil
{iq
You can change
A
B
C
_/_ .....
.....
;
,,
1
Use
A/•
to
select
[Caption
1
Use
A/V
to select [Caption
2
Use
A/•
to select [User
3
Use
A/•
to select [On],
4
Use
A/•
to select an item, then
2
Use
A/•
to
select
the desred
then
closed
capt
press
Style],
color
then
Setting],
then
or sze,
then
press OK,
press OK,
press OK.
to select the des red setting
Picture
Service],
style such as font,
etc.
A/•
_}_
the caption
(•}
press OK.
Then
use
and press OK.
display
OK,
on, then
press
OK,
Off
Seect fyou
CC-1
and T-I
[he pr mary capt on and tt, xt serv£es,The
capt oning or t_,xt s displayed in the same language
as the program's diaog (up to 4 Ines of scnpt on the
[V screen, where _t does not obstruct mloval¢ parts
o_the picture,),
CC-3
and T-3
Serve as the pref_,rmd data channels,
The caption % or text is often a secondary
language,
CC-2, CC-4,
T-2 and T-4
• [here
do not want caption service,
are 3 display
modes
accord
Disp ays input chal_cters
immed ately,
mode
Roll-up
• Revew
the
Font
the
1
2
to the
basic closed
caption,
called d gital capt on servce.
D]V
Use ths
choce
show the
made
of the
below
displayed
differences
or
by iooldng
setting
in
box (not
selected).
Font Size
-Font Color
Cosed capt on ng for't stye, sze,
color and opacty can be changed,
Font
n memory, they are
Opacity
ng
Background
Edge
caption
setting
right corner
Opacity
Font Style
Background
In addition
your
upper
all selections
ng to programs:
Disp ays the cl,aracters cont nuous y by scro
(max, 4 nes),
mode
!_
(Background Color and Background
Transparency)
on the TV screen
Once ch ratters are stored
d splayed al at once,
and EdgeType)
Backgroun_
Rasly ava lab e and broadcasters use them ony in
specia condtions, such as when [CC-1] and [CC-3]
or [T-l] dnd [m-3] dre not avdilab e,
Paint-on
mode
Pop-on
Edge
(Edge Color
Font
has its own closed
menu
to change
sett rigs for d gital capt on servce.
Use A/•
OK.
to select [Digital Caption Service], then press
Use _/•
to select the desred dgtaJ caption service, then
press OK,
Off
Select if you do not want digtaJ caption
service.
CS-I to CS-6
Select one of these before changing any
other item n [Closed Caption] menu,
Choose [CS-1] under normal circumstances.
Color
Background coor
Background
Opacity
dispayed caption can be switched.
dnd opacity oftl,e
Edge Color
Edge color and type of the dispayed
Edge Type
caption can be switched.
2O
No_e
Closed capt on will not be displayed when you are using an HDNI
connect on.
To show the closed caption on your 1V screen, broadcast signal
must contain the closed caption data,
A
B
c
Not all TV pr%rams and commercials hdve the closed caption or
all types of the closed caption,
Captions nd texts may not exactly match theTV voice,
Changing channels may delay the closed caption for a f_,w seconds.
D
Adiusting or muting the volume may delay the closed caption for
a f_,w seconds,
Abbreviations, symbols and other grammatical shortcuts md7 be
used in order to keep pace with the on screen action,This is not
a malfunction,
No_e
When you select a I_tng nd set it to [Block], the hgher/atngs
will be blocked automatca }4The owor 1at ngs w be avaiabe for
The caption or text characters will not be displayed while the
main menu ol-functions d splay is shown,
If a black box appears on theTV scl een, this means that the closed
caption is set to the text mode,]b tear the box, seect [CC-1],
[CC-2], [CC-3], [CC-4] or [Oq,
If the unt rece yes poor quilt 7 telev sion signa s,the capt ons may
VlOW
contain en_rs, ol-there might be no captions at all. Some possible
causes of poor quality signals am:
Automobile ignition noise
Electric motor noise
The chd lock sel_ ng will be _,ta ned after a power tJilul e or after
the power s mmow, d for !o%er thn I0 seconds (except the PIN
code reverts to 0000), [Child Lock] ,,,,Bp.20
If the ratng is b ocb, d, @ w appea£
[Region Ratings Lock] w be avai able when the unit receives a
digital broadcast using the new i sting system.
For the Unted States, the unt may download the Region Ratings
W_,ak signa reception
blult plex signa leception (ghosts or screen flutter)
Data dropout and Pix_,}ation (for DTV ony)
The unt i trains the cosed capt on setL ng if the power MIs.
When the unit receives special effects psyb ck signal (e,g, Seal_h,
Sow nd St) fi_om aVCR's video output channe (oh3 or oh4),
the unit may not display the correct
Ng,
When you set the highest rating to [View], all ratings turn to
[View] automat cal y,
1o block any in@propr ate programs, set your mrs n [US Movie
Ratings Loci<I, [US TV Ratings Lock] and [Region Ratings Loci<I,
Lock l_be, f requ rod,
The Canadian rati% systems on this unit am based on CEA 766 A
and CR[C pocy,
caption or text,
Child Lock
Child
lock reads the
to the
ths
programs
function,
for children
rati%s
whch
for
exceed
you can block
programs,
then
the rati%
level you set.Wth
certain
and any channels
denies
programs
or external
access
Use A/•
to select [Child
Lock],
then
channels
funct
on.
modes
Use the
your
Number
buttons
to enter
press OK.
1
Use
&/¥
to select [Channel
_-
Use
A/•
to select the desired
the 4dgt
numbers
for
$1
[HDMI
to switch
1], [HDMI
2 [Component]
video cables
set up your
• When
is correct,
the
PIN code
[Child
Lock]
menu
in
between
Lock], then
rati%,
[View]
press OK,
then
press OK
and [Block].
pu xhased
instead o
2]
will be displayed
to ths unit.
f you
connected
component
is
US Movie
descr ption
can be invisible
PIN code,
displayed.
See the foilowin£
modes
These may di%r
depending
on what product
you
For example,
19NF30I
B will be displayed
[HDll]
PIN code.
• When
you have not
enter 0, 0, 0, 0,
input
can be
_epeatedly
2
or external
nappropriate
input
nv sible.
1
Particular
ths
for setting
ratings lock
is the
rating
system
created
by MPAA.
each tern.
1
Use
OK.
&/•
to select [US Movie
Ratings
Lock],
then
press
21
2
iiii!,!'_!
Use i/V
to select the desired
repeatedly
to swrtch between
rating, then
[View]
i7
press OK
and [Block],
Sub Rating
Rating
Category
FV
Fantasy V olence
V
V olence
S
Se×ual Situation
L
Coarse Language
D
Su%estive Dialo£
Rating
T_Y7
T_NA
T_14
T_PG
Category
X
Mature aud ence ony
NC-I
7
No one under I £ admitted
R
Restr tied; under 17 requu es accompany %
parent or adut £uardian
PG-I 3
Unsu tab e for chil@ en under 13
PG
Parental £u dance su££ested
G
Genera
NR
No ratir_£
•
Blocked sub rati% w
T_I 4,T_PG
appear besde the map rating category in
[US TV Ratings Locl<] menu,
• You car,not block a sub ratn£ (D, L, S orV) if the main ratng s set
to [View],
• Chang ng the cdtegory to [Block] or [View] automdtCd y changes
aud ence
al its sub rdtn% to the sdme ([Block]
1
Use i/T
to select [USTV
2.
Use •/V
/ _1/1_ to select the
OK repeatedly
to switch
Ratings
Lock],
desired
between
then
press OK,
rating, then
[View]
press
or [View]),
Although
thede ult
PIN
code/0000/
supplwed
th
theunit
you can set your
own
PIN code.
and [Block].
1
Use
2.
Press the Number
•/1!'
to select [Change
buttons
PIN], then
press OK,
to enter the new 4 digit PIN
code.
• Enter
Rating
Category
TV-MA
Nature aud ence only
TV-I
Unsu tab e tot child1 en under 14
4
higher
TW-PG
Parental £u dance su££ested
TV-G
Genera
TV-Y7
Appropriate
older
fur a chdmn
TV-Y
Applopriate
fur a chdmn
aud ence
s÷
/
£ and
_ #
lower
To set the sub ratings
As foriV HA,T_I 4,T%PG, oriV Y7, you can further set the
sub ratings to block specific elements of programming, rb set
the sub ratings, follow the step below.
Use
•/1!'/_1/1_
repeatedly
to select the
to swtch
between
desired
[View]
rat ng, then
and [Block].
press OK
PIN code
again in [Confirm
PIN,]
entry
field,
22
Clock,
ECO
You can turn
on ECO
Node
to conserve
Use
poweK
Phase
_1/1_ to adjust
and [Phase]
1
Use A/V
_-
Use A/•
to select [ECO],then
[Clock]
setting
sett ng to mprove
Cursor
press OK,
to select the desred mode, then press OK,
the
to stab lize the
clarity
of the
•
PC screen
PC screen.
Cursor
Clock
to decrease sr,ttir_£
to increase
Phase
vaue
vaue
•
sett r_£
On
Off
Nov
•
You must set [Home] in [Location]. ,,_ p.23
Othetsu so, the sel¢ n£s you adjusted wil not be sdved when the
un}t goes into stsndby mode.
•
You can also press ECO d mctly to swtch
,,B p.14
the desmd sort n_.
fun-Link
[hs
PC Settings
This funct
between
on lets you adjust the
phase during
1
Use
2
Use A/•
PC screen
postion,
clock
to select [PC Settings],
to select the
then
on allows
our brand
CEC)
you to operate
devices
with
the
inked
functions
a fun Link feature
and ths
and
PC nput.
A/•
(HDMI
funct
press OK.
unit connecting
through
an HDNI
cable.
1
Use A/•
OK.
to select [fun-Link (HDMI CEC)],then
_-
Use
to select the desired
3
Adjust
press
setting you want to adjust, then
press OK.
3
Adjust the following items.
Auto Adjustment
Use A/•
to select [Adjust], then press OK.
fun-Link
the following
sett ng, then press OK.
terns.
Control
Set the
[he
A/V
fun Link [On]
following
or [Off].
additional
settings
will be grayed
desired
setting, then
out
when
you
set to [Off].
Use
A/•
to select the
01_
press OK.
/ Se ects if you have connected an external device
that s compat hie wth the fun-Lnk function.
t
D sabes all fun-Lnk
Auto
Device
Off"
You can set your
• The horizontal/vertical
PC screen are automat
position, clock
call• adjusted.
and phase
of the
Use
Horizontal
Use
Position,Vertical
Position
On
_1/1_ to adjust.
Cursor
_11
Cursor
•
Horizontal
Position
to mow' PC scroerl oft
to mow' PC screen rght
Vertical
Position
to mow' PC scroerl
down
to move PC screen up
devce
to turn
offby
interlock
desired
setting, then
ng from
this
unit's powen
Off
A/•
to select the
press OK.
Your connected fun Link devce turns off
automatica y when the unt £oes nto standby
mode.
Your cot, netted tun Link devce StdySon even f
the unit goes into standby mode.
23
Auto
TVOn
This
untwillturnonwhen
thepower
onsgnal
issent
fi'om
your
connected
funLink
device.
Use
•/• toselect
thedesired
sett
ng,
then
press
OK.
On
Ths
unit
turns
on
autom_Jt
ca
ywhen
you turn on
your- connected fun Link dev ce.
Off
Ths un_ Stays in standby mode even f you turn on
your connected fun Lnk device.
Device
i_i;ilfl
E-Sticker
When
you select
(Electronic
[Location]
Sticker)
to [Retail]
store,
E St cker
s displayed.
E Sticker can be turned
effusing
procedure
1
Use
•/•
to select [E-Sticker],then
2.
Use
•/•
to select [Off],then
below.
press OK,
press OK.
Control
You can operate some functions such as dsc playback or call
up the menu of the connected dev ces, by using ths unit's
remote control.
tom
Noe
Use
•/•
to select the
desired
sett ng, then
• If you seect [Home],
press OK,
On
_'/
•/V
/ • / I_/OK/BACK'S/the
Number buttons/
RED / GREEN / BLUE / YELLOW car, be used to
centre your connected fun Lnk devices by ths unt's
remote centre.
Off
E Sticker w
ill
not be displayed,
q
PLAYI_ /STOP II/FWDI_,
/REV_I_/SKIP
I_I/
SKIPI_I•/PAUSE
I I/_=un-LInH
OPTIONS
Current
Ths
funct
Software
on shows
Info
what
version
of the
software
currently
used.
D sabes the device centre.
Device
1
List
This function
lets you see the
of connected
dev ces.
product
model
number
Use •/•
OK.
to select [Current Software Info], then press
or name
2.
Confirm the version of the software currently used.
>_These may di,_er depending on wha¢ product you purchased
For example, 19NF30I B will be displayed [HDMI] instead of
[HDMI 1], [HDMI 2]
Location
You must
[Sound]
set [Home]
n ths
sett ngs you adjusted
setting. Otherwise,
will
not
offthe
1
Use •/•
to select [Location],
2
Use •/•
to select the des red location,
and
after you
unit.
then
press OK,
then
press OK,
The unt w be set up with predefined selC}ngs
for rc,t il d sp dys. In ths sett ng, you can set the
backlight brighte_
The unt
Home
[Picture]
be memorized
turn
Retail
i_i!:!!
s set to maximize the energy eff'c ency
for home setting and it can be adjusted through a
choice of picture and sound quality accord ng to
your- p__,f_,mnce,
Use •/•
to select [English], [Espafiol] or [Fran_ais],then
press OK.
24
Item
Detail
Press 1 to dispay f'e d€,ta s beow,
[Name], [Album], [Date], [Size] and [Next].
{1_
This unt
can play picture
Use the
USB storage
(jPEG)
device
and video
that contains
(Motion
those
jPEG)
[Hes,
More Detail
Press 1 agan to remove file details.
FJes.
Press 4 or OK to start the sde show,
While the slide show is on, the following
1
Insert the
USB storage
this untThe
2
main
Use
A/y
]he
h ghlghted
storage
device
menu
nto
appears
to select [USB]
the
automat
tally.
Press 2, then use • / •
_2)
Transitions
name of your USB
Use A/y
OK,
Press 4 or OK to stop the slide show.
Sto
While the slide,show is off, the following 2 settings
will be d splayed.
(_)
Rotate
Every press on :2 w
90 degrees,
(3)
Zoom
Press 3,then use •/•
to select the zoom factor
(Ix, 2x or 4×), Press OK to set the zoom facto_
Video
(JPEG)
1
A/y
to select the
desired
file, and then
(Motion
Use A/Y
press OK,
JPEG)
to select the desired file, and then press OK,
MOVIE1 .avi
Picture
Yo_, USB
jpg
Supported
@
@
Press
'OK
• Press CH-to
• The unit goes to the slide show
To pause/play
the
Use the Number
format;
motion ipeg, 320 × 240, 30FPS
• [b stop playback and return
BACK "_, OK or CH +.
to the
file list, press
key to play/pause
• To toggle between [List] and [Thumbnails]
the Number 2 button each time.
•
turn the p cture clockw se by
to select [Picture] or [Video] and then press
Picture
[:_ Image1
Press 3,then use •IV
to change the disp ay tme
choosing flsm; [Short], [Medium] and [Long],
.......
i: i_
1
Use
to select the transtion
mode choos n£ fi_om;
[None], [Dissolve], [Wipe right], [Wipe left], [Wipe
up], [Wipe down], [Box in] and [Box out],
press OK agah],
(_3_
Slide time
3
2 settings
will be d splayed.
on
and press OK,
text will move to the
device, then
USB terminal
Item
automa*Jcall)4
slide show, press OK,
buttons
(1 through
play back flom
the
begnnng.
press
4} to see the file
de'_ail (d}) or change the following se_ings (_}-_4}).
See the description
on the top of the nex_ coMsln,
{1_
More Detail
Detail
Press 1 to dispay fie dotas beow,
[Title], [Director],
[Date] and [Duration],
Press 1 agan to remove file details.
25
CONNECTING
No_e
DEVICES
The unit recognizes only a USB storage dev ce,
Do not use a USB hub or an extension cabe to connect an
external hard ds]< drve to the unit, (Not supported,)
A USB stol ge devce is alwd)'S nserted to ths unit d rectly.
A USB storage devce is not suppled wth ttqs unt,
W_, do not guarantee that all USB storage devices can be
supported by this unt
Be sure to keep a bad<up copy of the or g nal ties on your devce
before you pd 7 tl,em back on ths unitW_' have no responsib lities
tot- darr, sge or loss of your stored data,
I'o protect your USB storage device files from being erased place
the wrte plotect sliding tab in the protect posit on.
When you ale ready to i emove a USB storase dev ce, at first turn
the unit off so t w go into standby mode to dvod any damage
to your data and the unit,
A USB storage devce that requ res ts own dryer or the devce
with a spec al system such as fingerpr nt recognit or, arc, not
supported,
Ths unit is not allowed to use the USB £orage device which
requiles an extema power suppy (500mA or more),
Up to 2GB (FA116) or 8GB (FA132) capacity can be supported,
Up to I0,000 files or 1,000 fo ders wth I9 I'ierarch es can be
Before
you connect:
Be sure other
device
the AC
cord,
power
s connected
properly
before
plugging
n
External Device Connection
HDMI Connection
HDMI
connect
HDHI
(Higt, De£nit on lHulti Ylediantedac ) transports
d gital vdeo
on offers
and mult
the
h ghest
p cture qualit)4
high definition
channel digital audio through
a single cable,
recogn zed,
Up to 255 English characters can be lecognized.
Ths unit does not support NTP(Hed
h_nsfor Hotoco).
Ths unit supports F/\H 6 and F_q32 file systems.
!g!
If the file s not supported, an error message appears,
When the USB storage devce s not recogn zed, try reconnecting
it again.
Noton jPEG fie wth an extension of".dv" can only be
recognized.An extensiof of".mov" is not supported,
Ths unit doesn't support "pause", "forward" or"reverse" durng
vdeo
i!_}!il
i?i_i
(Motion jPEG) playback
The files recorded
<Picture (]PEG)>
Upper mt
<Video
Video
Zf_
:
under the following
specifications
are required.
24 Negapxel
(Motion JPEG)>
• Size : 320 x 240 (QVGA)
Blu-ray / DVD recorder
with the HDMI output jack
• Frame rate : 30 _s
Audio
•
LPCM
Sampn 8 fi-equenc7
(32 kHz, 44,I kHz or 48 kHz)
Quant zation bit rate (I6 bit)
$ For 32MF301B, you can also use the HDMI jack on the Rear Panel,
HDMI-DVI
Connection
Ths unt can be connected
to your device that has a ©VI
term hal. Use an HDMI DVI conversion
cable for this
connection
and it requ res audo
cable
for Analog
Audio
signal
as well.
cable receiver or satellite box with
the DVI output
_co HDMbDVI
_
nversi?n
i_i
cable
HDMI-DVI
conversion cable
audio
cables
jack
i
26
Composite
NoEe
Use an HDHI
cable wth
the HDbl] !ego (a cert tied HDNI cable),
Hgf, Speed HDNI cable s recommended for the better
compatibility,
For HDMI connection
(use HDMI Input jack)
Ths unit accepts ony signals n cornp ante wth
connechon
for wdeo
connected
devices
unit's Composite
Audio
The unt accepts 480,480p, 720p, I080 and 1080p 24/30/60Hz
of video s £r,als,and 32kHz, 44.1 kHz and 481<Hz of audio signs s,
Ths unit accepts 5.1 chsrlne audo sgnal (Dolby Digta) and 2
chanr, e audo signa (LPCN),
For HDMI-DVI
Video Connection
Compos_teVideo
V_deo
offers
to the
input
L/R Input jacks below
lack.When
Au@o
the Au@o
devices
connect
connected
to the
Analog
jacks right
quality
the ComposlteVideo
then
to the
au@o cables to the
connector
only connect
to the
L Input lack.
EIA861,
camcoraer
Video Connection
dee connection
If you connect
picture
connection
Component
vdeo
jack, connect
is monaura,
The unt accepts 480,480p, 720p, I080 and I080p video sgna s,
HDP11 DV] connection requires separate audo connect ons as
we and the audo sgr, a s are converted from digita to aria og,
DVI does not d splay 480 image whch is not n compliance wth
EFA/CEA_861/861 B,
ComponentV
standard
unit. If you connect
below
Audio
tbe
to the
offers
1_ _x_
be12er picture
quaity
VCR
for
unit.
unit's ComponentVideo
Input }acks,
cables to tbe Analog
ComponentVJdeo
Audo
connector
L/R Input
jacks,
____j_gu_
component
video
OUT
]
cables
audio cables
Whenever
Ju must
If you
ou
_'dVe Tr, osc
Digital Audio
(tO
connr,ct
d sconnect
to thr,
the
Qompos£eVdeo
(omDonen_
aCl<S connec_na,
Output
v aeo
• may
Input
jack,
InDU_ JACKS (Pb and
cause
of unstab}e
Connection
(]1_ taI D_OaclcaS_l_/_ only)
/OU
co[/[/ec].
at] en o
This
U[]I].
IO
_nultl channel
at]
ex_ern_
digital audio
device,
au@o hke 5.1ch d g_tal broadcasting
_ou[/c
!i
ii-- Blu-ray,DVD
.....
With the component
• The
No/e
this
urlt
accepts
480/480p/720p
and
I080
use
a
Cll_lIa aUGIO Loaxla
2x_eH]a
c _lta aualo
caDle ].C
connect
the
unit
aev_ces
video output jacks
of video
sgnals
PI),
p cture,
for
connection,
Dolby Digital
decoder
L
c gltal audio coaxlal CaDle
to
you
PC Connection
This unt
USB Storage Device
is equpped
unit to your
wth
a PC
PC, you can use this unt
Use aVGA
cable
stereo
plug conversion
min
nputjack,
for th sVideo
lfyou
connect
ths
as a PC montor:
connection
unt
offers
(Motion
and t requires
cable forAnalogAud
7hs
a
o signal as
well.
Insert
jPEG)
easy playback
of p cture
the USB stora;_e devce
below,
[USB]
(}PEG)
and video
files.
nto
the
USB term
hal shown
ulll. p.24
_]IF_jj
personal
computer
(•}
iiii iii iiii!_i
i !ii.........
!i!ii iii miniaudi°cable_
VGA cable should be
|__t_l_with
ferrite core.
voA
c.ble
The following
VGA
640
x
480
800
x
600
1,024
x
/68
1,280
x
768
1,360
x
/68
WXGA
formats
,!!_}!!i
iiiJii
s gnals can be displayed:
SVGA
XGA
Other
video
or nonstandard
s gnals will
60Hz
ii
!!iiii i
i
i!
not be displayed
correctly.
• Pease pul-chase the VGA cable that has afc, n_te coreL
The follow ng operst ons may reduce nose,
N oceAttach a f_,rr te col-e to the AC power cord of your PC,
Unpu£ the AC power cord and use the buit in battery of your- PC.
ii,iiii!
4
i
28
USEFULTIPS
FAQ
I_,i,l@l'_|,JI
iri_lFi,i,i_l
Check the antenna or cable connect on to the man unt,
Check the batteries of the remote centre.
Check #there
s an obstacle between the infrared sensor window
and the remote control,
%st the signal output use [IR Signal Check], m_ p.30
If okay, then poss ble nfi-ared sensor troube,
My remote control does not work.
What should I do?
•
Aim the remote cor,trol d rectly at the n{rared sensor wndow
Reduce the distar, ce to the unt
Re insert the batteres
with their polartes
When thel-e s an inflated equipped
cor,trol signa of this unit,
(+/
or, the fi-ont of the ur_t.
sgns) as indicated,
device sucl, as PC near ths unit, t may ir,terrupt
the remote
Hove the r,frared equipped device away flora ths unit, change the ar,gle of the inf_-ared sensor or
turn offthe infi-al-ed cornmun cat on funct on,
How Come the Initia! Setup
appears eyery tim e I turn o n th!s
unit?
N,Jke sul-e [Autoprogram]
has been complete'd, m_ p.17
Autoprogram
must be, completed when you set up the unt
where previous y unava abe char, ne s are broadcast,
Why can I not watch some RF
signalTV programs.
The selected channel may not be broadcasting,
When [Autoprogram]
s interrupted apd not competed,
sure to complete the Autoprogram.
m_-p.17
The selected channel cannot be vewed
by the [Child
for the, first time or move t to a Iocat on
some ct,ar, r,els w
pot be received. Hake
Lock] sett ng. m_-p.20
The unit requ res some knd of antenna input.An indoor antenna (VHF/UHF), n external antenna
(VHF/UHF)
or an RF coaxal cable from your wa cabe/sate te box needs to be plugged nto the unit.
HOW com e there is no image from
the connected external devices?
•
Checkifthecorrectinpu_modeissee_edbypressirlgSOuRCEOrUsngCH÷/-.[SWitchingEach
•
When usng the ComponentY
dee Connection check that the Green (Y), Bue (Pb/Cb)
Cr) Connectors are connected to their corresponding colored jacks on the unit.
•
and Red (Pr/
Nany digta ch nneB have atemate channel numbers.The unit changes the numbers automatic I y to
the ones s £nifying the bro dcast ng station channel numbe_These base numbers used re1-previous
anaog broadcasts. (e.£. input oh#30 auto changes to ch#6.I)
When I enter a channel number, it
changes automatically.
Why_re€+_!O
.... t aspleyod
entirely? Or, captions are delayed
behind _he dialog.
How can I set the clock ?
There is no clocl< {unct on on ths unit.
Troubleshooting
If the
unit does
check the
not
following
Guide
perform
chart
properly
when
operated
and all connections
once
If a power Mlum
button's do not work.
Power s ON
n this
calling
for
manual,
service.
Make sure the AC power cord is pugged n.
Make sure that the AC outlet supplies the proper votage, pug another
AC outlet to ensure that AC outer operates norton ly.
No power
Control
as nstructed
before
but no screen mage,
occurs, unplug the AC power
cord for I mnute
electrica
app ante into the
to now the unt to reset tsefi
Hess only one button at a time. Do NO[ press more thn one button at the same time.
Ensure that no buttons on the remote control am depressed and move ti eely.
Check whether
the connect on of the antenna, cabe lecewr
Check whether
a the cabes to the unit am connected to the correct output jack of your devce b'
Bu ray/DVD recolde_:
Hake sure that the se ected nput
or satellte box s connected
mode is connected to the working
correct y.
nput jack
Check if your computer s NO] n sleep mode when the nput mode ofths
any b'y on the keyboald to wake up your compute_
unit s n PC mode. [_p
29
Ii_'l
ulii
mm;_RiT_ai,
_1| I I
Check if the power is on,
Check if the correct nput
mode is selected.
Check whether a the cabes to the unit arc, connected to the con ect output jack of your devce kr,
Biu rdy/DVD I c'co_den
L!!
:q
Vew other 1V channels. I he problem might be imted to the broadcast ng station ol- weal< sgnal
stren_h,
Unplu S the AC power cold and wait for about 1 minute, then plug the AC power cold and turn on
the unt again,
Check whether the connect on of the antenna, cabe rece w,r or satel tc, box s connected correct y,
No p cture or sound
Make sure that the se ected input mode is connected to the working
nput jack
Check if your computer s NO] n sleep mode when the nput mode ofths unit s in PC mode, i_p
any key or, the keybo ld to wl<o up your computen
b11<e sure that the sound is not muted. Press MUTE so that the volume bar and current volume leve
w appear on the IV screen.
N kc, sure that the volume
volume,
No coot
Adjusted [Picture] or [Sound]
sett ngs are not effc,ct ve every time
the unit s turned on,
s NO]
set to [0] or [rdute].
If so, use VOL +/-
Vew otherTV
strength,
channels.The problem might be imbed to the bloadcast n£ station or weal< sgnal
Adjust [Color]
n the man menu.
You must set [Home] n [Location]. ,,,. p.23
Otherwise, the settings you adjusted wll not be memorized
Electr cal ir'tet%rence
after the unt goes nto
standby mode.
station or weal< sgnal
For the best p cture qua }by,watch "High Definition" wide soeen programs,
If the HD content s not ava abe, watch "Standard Definition" plograms nstead,
You see a d storted
an unUSUd sound.
,!!_}!!i
i771
Vew otherTV channels.The problem might be imbed to the bl-oadcast ng station or weal< sgnal
stren_h,
Check if the audo cable s connected n correctly,
P cture OK, sound poor
p cture or hear
You may be £ett n£ ntertrence
I ghts,
from
lry moving the unit to another
Iocat on to see fthis is the cause of the problem,
Eectrca
electr cal appliances, automob
intetfft, rence fiom nearby app antes may
es, motorcycles
or fluorescent
fleet picture quality,
Ghosts, nes or streaks n picture
Vew otherTV
strep£th,
You see "noise" or "trash" on the
scroen,
When the capab lities of the unit exceed the capab lities of the dgita broadcast n£, the signal will be
ncreased to match the capab ties of the disp ay of the un t,This may cause nose or trash,
D firw, nt color marks on theTV
scroen
Vew otherTV
pixr, ation,
You swtch to a diff.'rent
the volume changes,
This unt w
nput and
You swtch to a different nput and
the screen sze changes,
The d splay image does not covetthe entire screen.
channels.The problem might be imted
the voume
level fl-om the last time you adjusted it,
If the voume of the sound fl-om another
This
unt
If y....
n [PC
w
to the bl-oadcast ng station or weal< sgnal
channels.The problem might be imbed to the bloadcast ng station, missing data or
memorize
memorize
C}
flx_m nearby spp) antes may affect picture quality.
Adjust [Contrast] and [Brightness] n the man menu.
Vew otherTV channels.The problem might be imbed to the bloadcast}ng
strength,
Sound OK, picture poor
to adjust the desil ed
the
view
n£ mode
-e usirl S the unt as a PC rnon
Settings]
are set correct}4
If you are watching
[V or
press FORMAT
repeatedly
devce is hgher
toc
fi-om
mdke
the
sure
or lower, then the oudness will change.
ast tme
thdt
you
[Horizontal
usng the Compos}teV
deo, Component
to swtch
var ous screen
modes.
Capt ons re displayed s a whte
box, No caption s d splayed in
the Cosed Caption supported
program,
Interfc,_-ence fi-om bui dings or weather
Black box is disp ayed on theTV
screen,
The text mode is se ected for caption, Seect
used
the
part
Position]
Video
or
cular
input
dnd
[Vertical
HDNI
wth
480i
condit ons may cause capt on ng to be ncomplete,
Broadcasting stat on may shorten the program to insert advertisement.
The cosed caption decoder cannot read the informat on of the shortened
[CC-1],
[CC-2],
program,
[CC-B], [CC-4]
or [Off],
modes.
Position]
Input,
i _7"i
3O
INFORMATION
Glossary
Maintenance
ATSC
Acronym that stapds fer Adv riced 1. evision Systoms Committee
the r,dme of the di£td bl_adcdst ng standards.
Aspect
dnd
Wpe
The wdth of a TV screen m ative to its he gl,t. Convent onal TVs
are 4:3 (n other wolds, theTV sol een is amo£ square): w deso een
models ale, 16:9 (theTV scmer, s almo£ twce as wde as ts height),
CEC
the fiont
unit with
Ratio
(Consumer
Electronics
Never
liquid
panel
use a solvent
near the
d scolorat
and other
exter or surfaces
of the
a soft cloth.
or alcohol.
Do not
spray
nsect cide
unt, Such chem cais may cause damage
on to the exposed
and
sulfaces.
Control)
This dOWS yOU to operate the nked fur, ct or, s between our brand
dev ces with CEC f_,ature and this un tWt, do not guarantee 100%
interoperabilit/with
other brands of CEC compliant dev ces.
Wpe
ComponentVideo
This is a vdeo signa format that cor,veys each of 3 print pa colol-s
of ight (red, bue and green) through dfferent sgnal nes.Th s Ilows
the vewers to exper ence p ctule colors as origina as it s,There am
several signa formats, ncludingY/Pb/Pr
andY/Cb/Ct:
Dolby
Digital
The system deve oped by Dolby Laboratories to compress d £}tal
sound. It off_'rs stereo sound (2ch) or mult channel audo.
the
the
Should
the
your
problem
nside.
E-Sticker
panel of the unit with
panel, disconnect
unt
the AC
become
a soft cloth.
power
inoperat
yourseEThere
cleaning
ve, do not try to correct
are no user serviceable
Call our toll flee customer
cover of this manual
Before
cord.
to locate
support
an author
parts
line found
on the
zed servce
centen
E St cker s showing set f_,atures, techn ca informat on, etc on thisTV
set that is d splayed on the IV screen. Prey ously the nformat on was
on a pdnted st cker that was put on the disp ay.
H DMI
(High-Definition
Multimedia
Interface)
Interlace that supports II uncompressed, dgita audio/vdeo
formats
ir,cud ng sc,t top box, Bu rdy/DVD rocolder or dig}tal telev sion, over
a sn£ie cable,
H DTV (HighDefinition
digtal
remote
camera
control
is not working
( nduding
to see if it s sending
a cellular
high reso ution and hgh p cture
out an nfrared
With
a digital
(including
NTSC
Acronym that st4nds fol- Nationa l_,evis on Systems Committee
the name of nalog broadcssti% standa/ds,
Offthe si_-NTSC signa sarc, no longer beng sent by mdjor
blsadcast n£ stations in the USA,
and
code
A stored 4digt
number that aows
Audio
access to parental contro
f_,atures.
Program)
Second dud o channel de vorod sepdr3tely fl_m main-aud o channel.
This audo chdnnel s used as an alternate n bilingua bl_adcdst ng,
SDTV
(Standard
with
7, you can use a
bultn
camera)
sgnal.
Pont the
Definition
TV)
Stdndald dig}td format that is smar
to the NTSC p cture qualit}4
camera
built-in
cell phone
D gital Camera
cameras):
towards
remote
controk
Press any button
on the
remote
control
and look through
the
through
the camera,
sending
out
front
remote
infi ared diode
infrared
at the
the
control
d spia}4 if the
SAP (Secondary
proped
phone
TV)
Ultimatr, dig}td format that produces
qua ty.
PIN
If the
of the
camera
pulsat ng light appears
the remote
an IR signal.
control
s
General Specifications
TV format
Closed
Other
/v,TSC/NTgObq
Caption
IV
standard
Terminals
system
Antenna Input
Audio Input
§15i 22/FCC
(d gital CC)
§q5,1 q 9 / FCC (analog CC)
Channel
coverage
Terrestrial
DTV
Analog
UHF
14-51
(NTSC)
VHF
2-13
UHF
14-69
CATV
(each channel
has e.g,
2-fl
Tuning system
Input
HDMI
Input
USB Input
PC Input
3,A-W,
(analogW+l
_,W+84),
x 2
HDM119pn
x I
USB x I
DSub I5 pn x I (ROB)
Digital Audio
Output
(coaxial)
RCA jack x I
frequency
synthesized
tuning
system
<19MF301B
Headphone
<32MF301 B>
Output
%
inches x I(3,5mm)
control
DgM encodr,d rift-tired light system
Operating
Electrical Specification
p.p (75 0)
(•}
Audio
I/8
Remote
500mV
only>
Direct access keyboard,
Programmable
scan, and up/down
Output
HDM119pn
!g!
temperature
41 °F (5 °C) to 104% (40°C)
gXA/,8 D x 2
Power requirements
I20V- AC+/
I .SW, g_
[32MF301 B]
10%60Hz+/
0,5%
,!!_}!!i
<19MF301 B>
Audio
Output
x 2
Power
consumption
II0W
(maximum)
LCD
32inches
Dimensions
<without base>
(31,5 riches measured da£onally)
<with base>
Width
30.0nches
Height
Depth
19,6nches (497,0mm)
3,8 nches (95,0mm)
Weight
16,10 bs,
(760,0ram)
(7,30k8)
i!i"i_
30.0nches
(760,0mm)
21.4nches
9,5 nches
(543,0mm)
(240,4mm)
17,42 bs,
(7,90 k£)
[19MF301 B]
Power
notice
and without
If there
language
ons are sub/ect
to change without
our legal obligation.
is a discrepancy
will be English,
between
languages, the
default
consumption
40W
(maximum)
LCD
19ir, ches
Dimensions
<without base>
Weight
Designs and spedficat
ii
0o ,vpp(-J50
ii!)!!
<19MF301B>
Channel
Channel access
700 mV pp (750)
<32MF301B>
HDMI
(F type)
IV pp (750)
Pr/Cr
W+q _,W+94
A 5-A
1,5A
Audio
Y/VIDEO
Pb/Cb
(ATSC)
2_13
750 urlbdanced
500mV rms
Input jacks for VIDEO
RCA jacl< x 3
Z1 _,2,9, 3,1 _,3,9, etc,)
Terrestrial
VHF/UHF/C2qV
RCA jack (L/R) x 2
Component/CornpositeVideo
(ATSC/NTSC)
VHF
2'!
Specifications
(18,5 nches measured dagor, ally)
<with base>
Width
I8.9 nches
(478.0mm)
I8,9 nches
(478,0mm)
Height
Depth
IZgnches
(324.5mm)
3.3 nches (82,0mm)
14Snches
8.3 nches
(367.8mm)
(208,3mm)
726
7,81 bs,
(3S41<£)
bs,
(3,29 k£)
32
33
117'
( )
WARRANTY
COVERAGE:
This warranty
below.
obligation
WHO
IS COVERED:
This product warranty
or a part that has been modified without written company permission, or (d) if any serial number has been removed or defaced,
or (e) product, accessories or consumables sold "AS IS" without
warranty of any kind by including refurbished product sold "AS
IS" by some retailers.
is limited to the terms as set forth
is issued to the original purchaser
or the
person receiving the product as a gift against defects in materials
and workmanship as based on the date of original purchase
("Warranty
Period") from an Authorized
Dealer. The original
sales receipt showing the product name and the purchase date
from an authorized retailer is considered such proof.
!iiii!
This Limited Warranty
does not cover:
• Shipping charges to return defective product.
• Labor charges for installation or setup of the product, adjustment of customer
controls
on the product, and installation or
repair of antenna/signal
source systems outside of the product.
•
WHAT
This
IS
COVERED:
warranty
covers
workmanship
occurs
Warranty
repair
Period.
the
to the
date
against
remaining
given,
Note:
defects
item
Any
renewed
new
will
or
or
within
the
either
(1)
refurbished
original
for
replacement
becomes
product
product
sold
carries
requirements
are
inventory,
or
(3)
this
(90)
When
becomes
a product
your
property.
When
day
Failure
be
to
or
Damage from mishandled
returning
product.
A product that requires modification or adaptation to enable
it to operate in any country other than the country for which
it was designed, manufactured, approved and/or authorized, or
repair of products damaged by these modifications.
A product used for commercial or institutional purposes
(including but not limited to rental purposes).
the
whichever
or
part
property
a refund
is
•
and the
•
is
as refurbished
limited
sent
or
warranty.
if all
follow
all
•
shipments
or transit
accidents
when
!i!l!
Product lost in shipment and no signature verification
can be provided.
Failure to operate per Owner's Manual.
TO OBTAIN
ASSISTANCE...
Contact the Customer
Care Center
warranty
Z
cause not within the control of the company.
Damage or claims for products
not being available for use, or
for lost data or lost software.
•
the
for
Product repair and/or part replacement
because of improper
installation or maintenance,
connections
to improper
voltage
supply, power line surge, lightning damage, retained images or
screen markings resulting from viewing fixed stationary
content for extended
periods, product
cosmetic appearance
items
due to normal wear and tear, unauthorized
repair or other
•
property.
identified
only
are
from
days
warranty,
you.
(90)
warranty
workmanship
ninety
item
and
can
met.
for
company
a ninety
most
under
product's
company
becomes
or
product.
and
repair
•
equivalent
in current
of the
provided
in materials
of the
product
result
is received
functionally
price
or
Replacement
can
in material
company
using
parts
coverage
any
your
claim
the
product
or
replacement
longer
replaced
original
purchase
portion
exchanged,
if a defect
is at least
products
of the
provides
and
original
Replacement
covered
a valid
its option,
at no charge,
parts
comparable
the
products
parts, or (2) exchange
the product
with
a product
or which
has been manufactured
from
new, or ser-
used
refund
and
At
product
replacement
that is new
viceable
new
ii_iii!
_ii!_!_!i
_
: ,!!_i_!!i
receipt
i _7_i
""
at:
i!i"i
1-866-341-3738
requirements
in delay.
WHAT
IS NOT
TATIONS:
COVERED
This Limited Warranty
- EXCLUSIONS
AND
LIHI-
applies only to new company manufac-
tured products that can be identified by the trademark,
trade
name, or logo affixed to it. This Limited Warranty
does not apply
to any hardware
product or any software, even if packaged or
sold with the product, as manufacturers,
suppliers, or publishers
may provide a separate warranty for their own products
packaged with the bundled product.
The company is not liable for any damage to or
grams, data, or other information
stored on any
within the product, or other additional product
ered by this warranty.
Recovery or reinstallation
data or other information
is not covered under
loss of any promedia contained
or part not covof programs,
this Limited
REPAIR OR REPLACEMENT AS PROVIDED UNDER THIS
WARRANTY
IS THE EXCLUSIVE REMEDY FOR THE CONSUMER, WITH THE ISSUING COMPANY
NOT LIABLE FOR
ANY INCIDENTAL
OR CONSEQUENTIAL
DAMAGES FOR
BREACH OF ANY EXPRESS OR IMPLIED WARRANTY
ON
THIS PRODUCT. EXCEPT TO THE EXTENT PROHIBITED BY
APPLICABLE LAW, ANY IMPLIED WARRANTY
OF MERCHANTABILITY
OR FITNESS FOR A PARTICULAR PURPOSE
ON THIS PRODUCT IS LIMITED IN DURATION
TO THE
DURATION
OF THIS WARRANTY.
Some
states
tal
consequential
or
implied
not
apply
do
warranty
not
allow
the
damages,
lasts,
so
exclusions
or
the
allow
above
or
limitation
limitations
limitations
of incidenon
or
exclusions
to you.
Warranty.
This warranty does not apply (a) to damage caused by accident,
abuse, misuse, neglect, misapplication, or non-supplied product,
(b) to damage caused by service performed by anyone other than
company approved Authorized Service Location, (c) to a product
This warranty gives you specific legal nghts. You may have other nghts which vary [tom state/province to state/province.
Printed n lhailand
how
long
an
may
!i!iiill