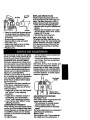
1
Operator's Manual
CRRFT 4RN
1.4 cu. in./24cc 2-Cycle
195 MPH/405 CFM
GASOLINE
POWERED BLOWER
Model No.
358,797320
:_11
Read
and follow all Safety Rules and Operating
AFINING:
Instructions before first use of this product.
For
to your
questions
thispm,
product:
Call answers
7 am-7 pm,
Mon.-Sat.,
or about
10 am-7
Sun.
Sears, Roebuck and Co., HoffrnanEstates,IL 60179 USA
Warranty Statement
Safety Rules
Assembly
Operation
Maintenance
Service & Adjustments
2
2
4
5
8
9
Storage
Troubleshooting Chart
Parts List
Spanish
Parts and Ordedng
9
10
12
15
Back
FULL TWO YEAR WARRANTY ON CRAFTSMAN ® GAS BLOWER
For two (2) years from date of purchase, when this Gas Blower is maintained,
lubdceted, end tuned up according to the instructionsIn the operator's manual,
Sears will repair, free of charge, any defects in matedal or workmanship.
This warranty excludes blower tubes, spark plug, and air cleaner, which are expondable paris and become worn dudng normal use.
Ifthis bloweris used for commercialpurposes,this warranty appliesfor 90 days from
the date of purchase. Ifthis Bloweris used for rentalpurposes, this warranty applies
for 30 days from the date of purchase.This warranty applies only while this product
is in use in the United States.
WARRANTYSERVICE IS AVAILABLEBYRETURNINGTHE BLOWERTO THE NEAREST
SEARS SERVICECENTERIN THEUNITEDSTATES.
This warranty gives you specific legal rights, and you may also have other rights
which vary from state to state.
Sears, Roebuck and Co. D/817WA Hoffman Estates, IL 60179
Failure tofollowallSafety Rulesand Precautionscan result in serious injury.
KNOW YOUR UNIT
• Read your Oporator's Manual carefully untilyou completely understand
and can follow all warnings and
safety rules before operating the unit.
• Restrict unitto users who understand
and willfollow all warnings and safety
_ rules in this manual.
PLAN AHEAD
• Always wear eye protectionwhen operating,servicing,or performingmaintanance on unit.Wearing eye protection will help to preventrocks or debris
frombeing blown or rico_
into
eyes and face which can resultin
blindnessand/or serious injury.
• Always wear respirator or face mask
when working with unit in dusty environments.
• Secure hair above shoulder length.
Secure or remove jewelry, loose
-- clothing, or clothing with loosely
hanging straps, ties, tassels, etc.
They can be caught in moving parts.
-2-
• Do not operate unitwhen you are tired,
i11,upset, or if you are underthe influence of alcohol,drugs, or medicaticn.
• Keep children, bystanders, and anF
reals away from work area a minimum of 50 feet (15 m) when starting
or operating unit.
• inspectarea beforestartingunit.Remove all debrisand hard objectssuch
as rocks,glass,wire, etc. that can ricochet, be thrown, or otherwisecause
injuryordamage duringoperation.
HANDLE FUEL WITH CAUTION
• Eliminate all sources of sparks or
flame (includingsmoking, open
flames, or work that can cause
sparks) in the areas where fuel is
mixed, poured, or stored.
• Mix end pourfuel in en outdoorarea;
storefuel In a cool, dry,woll venhlated
place;useanapproved,
markedcontainerfor all fuet ,_.,rpose_
• Do not smoke who• hand lng fuel or
while operating the unit.
• Do not till fuel tank while engine is
running.
• Wipe up fuel spills before starting engine.
• Move at least 10 feet (3 meters)
away from fuel and fueling site before
starling engine.
-,,
:....
- OPERATE YOUR UNIT SAFELY
• Stop the engine before opening the
vacuum inlet door.The engine must
be stopped and the impeller blades
no longer turning to avoid serious injury from the rotating blades.
• Inspect unit before each use for
worn, loose, missing, or damaged
parts. Do not use until unit is in
proper working order.
• Keep outside surfacas fres from oil
and fuel.
• Never start or run engine inside a
closed room or building. Breathing
exhaust fumes can kill.
• To avoid static electricity shock, do
not wear rubber gloves or any other
insulated gloves while operating unit.
• Do not set'unit on any surface except
a clean, hard area while engine is
running.Debris such as gravel, sand,
dust, grass, etc. could be picked up
by the air intake and thrown out
through discharge opening, damaging unit, pmperb], or causing sedous
injuryto bystanders or operator.
• Avoid dangerous environments. Do
not use in unventilated areas or
where explosive vapors or carbon
monoxide build up could be present.
• Do not overreach or use from unstable surfaces such as ladders, trees,
steep slopes, rooftops, etc. Keep firm
footing and balance at all times.
• Never place objects inside the blower
tube._;;'a_ays direct the blowing debris away from people, animals,
glass, and solid objects such as
trees, automobiles, walls, etc. The
force of air can cause rocks, dirt, or
sticks to be thrown or to ricochet
which can hurt people or animals,
break glass, or cause other damage.
• • Never run unit without the proper
equipment attached. When usi'ng
your unit as a blower, always _nstell
blower tubes. When using the optional vacuum kit, always install vacuum
tubes_and vacuum bag assembly.
Makt"s'urevacuum bag assembly is
completely zipped.
• Check air intake opening, blower
tubes, andvacuum tubes frequently,
always with engine stopped and
spark plugdisconnected. Keep vents
and dischargetubes free of debris
which can accumulate and restrict
proper air flow.
• Never l_ca Imy obje_ in 8it ir_ke
openinges thiscculdreslzict
prcperair
flowand cause _
to the urd.
• Never use for spreading chemicals,
fertilizers,or other substances which
may contain toxic materials.
• To avoid spreading fire, do not use
near leaf or brush rims, fireplaces,
barbecue pits, ashtrays, etc.
• Use only for jobs explained in this
manuel.
MAINTAIN YOUR UNIT PROPERLY
• Have all maintenance other than the
recommended procedures descdbed
in the Operator's Manuel performed
by Sears Service.
• Disconnect spark plug before performing maintenance except for carburetor adjustments.
• Use only recommended CRAFTSMAN® replacement parts; use of any
other parts may void your warranty
and cause damage to your unit.
• Empty fuel tank before stodng the unit.
Use up fuel left in carburetor by staning
engine and letting it run until it stops.
• Do not use any accessoryor attachment otherthan those recommended
by manufacturerfor use with your un'_
• Do not store the unit or fuel in a
closed area where fuel vapors can
reach sparks or an open flame from
hot water heaters, electric motors or
switches, furnaces, etc.
• Store in a dry area out of reach of
children.
SPECIAL NOTICE: For users on U.S.
Forest Land and in some states, includingCalifornia(Public Resources
Codes 4442 and 4443), Idaho, Maine,
Minnesota, New Jersey, Oregon, and
Washington:Certain internal combustion engines operated on forest, brush,
and/or grass covered land in the above
areas are requiredto _ equipped with
a spark arrestor, maintained in effective
workingorder, or the engine m.ust.be
constructed,equipped, and maintained
for the prevention of tire. Check with
your state or local authoritiesfor regulationspertainingto these requirements. Failure to follow these requirements is a violationof the law. Thi_ unit
is not factoryequippedwitha sparkar-
Prolongeduse in cold weather has been
restor; however, a spark arrestor is
linkedto bloodvessel damage in otheravailable as an optional part. If a spark
wise healthypeople. If symptomsoccur
arrestor is required in your area, consuchas numbness, pain, lossof
tact Sears Service for the correct kit.
strength,change in sldncolor or texture,
The spark arrestor, blower tubes, and
or lossof feelingin the fingers,hands, or
nozzles must I_ assembled to unit to
• joints,dscor_e
the use of this tool
a_ ssek _
att_
An
be in full compliance with regulations.
SPECIAL NOTICE: Exposureto vibraan_tJon
systemdoes not guarantee
tionsthrou9|l prolongeduse of gasoline
the avoidance of these problems.Users
poweredhand toolscould cause blood
who operate power tools on a continual
vessel or ne_e damage in the fingers,
and regularbasis must monitorclosely
hands,and jointsof people proneto cirtheir physicalcondition and the condtion
of this tool.
culationdisordersor abnormalsweging.
CARTON CONTENTS
Check carton contents against the following list.
Model 358.797320
• Blower
• Blowertube
• 2-Cycle Engine Oil
NOTE: It is normal for the fuel filter to
rattle in the empty fuel tank.
VACUUM BAG ASSEMBLY
If you have already assembled your
unit for use as a blower,remove the
blower tube.
• Race the small end of vacuum bag
overthe bloweroutletand clamp knob.
Blower
Velcm Strap
ASSEMBLY
WARNING: If received assembled,
repeat all steps to ensure your unit is
properlyassembled and all fasteners
are secure.
• No tools are required for assembly.
BLOWER TUBE ASSEMBLY
If you have already assembled your
unit for use as a vacuum, remove the
vacuum tubes and collection bag.
• Alignthe rib on the blower tube with
the groove in the blower outlet;,slide
the tube into place.
-_
///"_ _'_
_3_ql_t,.
Blower
Outlet
_.;
_
• Tighten the Velcro strap securely.
• Make sure the zipper on the bag is
closed completely.
• Secure the ends of the shoulder
strap by routingthe strap through the
buckle as shown.
Blower
Tube
Rib
VACUUM
• Tighten the tube clamp by tuming the
knob clockwise.
• To remove the tube, turn the knob
counterclockwise to loosen clamp;
remove tube.
OPTIONAL VACUUM KIT
. Your blower can be converted to a vacuum by installingoptional Vacuum Kit
#358.799900. This kit can be purchased at your nearest Sears store.
-4-
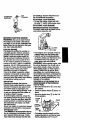
TUBE ASSEMBLY
WARNING
Stop engine and be sure
the impeller blades have stopped tuming before opening the vacuum inlet
door or attempting to insert or remove
the vacuum tubes. The rotating blades
can cause serious injury.
• Remove blower tube from engine.
• Align the lower vacuum tube as
shown. Push lower vacuum tube into
upper vacuum tube.
Lower
Vacuum
Tube
Hooks
• insert a screwdriver into the latch
area on the vacuum inlet cover.
• Gently flit the handle of the screwdriver toward the back of the unit while
pulling up on the vacuum inlet cover
with your other hand.
• Hold the vacuum Inlet cover open until upper vacuum tube is installed.
Vacuum Inlet
Retaining Post
Vacuum x,_
Inlet
Cover
• Place the hooks on the vacuum tube
on the retaining posts; pivot tube into
position.Secure vacuum tube by
turning-the Imob clockwise untiltight.
• When converting back to the blower
feature, makesure latch on the vacuum inlet cover is sacumly fastened.
SHOULDER STRAP ADJUSTMENT
(for vacuum use only)
• Hold the unitas shown.
• Pass the shoulder strap over your
head and onto your left shoulder.
• Snap the hook onto the retainer on
the top handle.
• Extendyou dghtarmtowardthe rear
of the vacuum bag.
• Adjustshoulderstrap untilthe vacuum bag/shoulder strap seam lies between your thumb and index finger.
• Make sure air flows freely from the
elbow tube into bag. If bag is kinked,
the unitwill not operater properly.
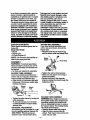
KNOW YOUR BLOWER
READTHISOPERATOR'S MANUAL AND SAFETY RULES BEFORE
OPERATING YOUR UNIT. Compare the illustrationswith your unit to familiarize
youmeit with th_ location-ofthe vadous controlsand adjustments. Save this
manual for future reference.
Throttle Lever (_)
Pdmert_._
Button'_'_
Choke
Blower Lever
Tube
\
ON/STOP
Switch
Fuel Mix
Rfl Cap
Starter
Rope
Rear
Handle
ON/STOP SWITCH
The ON/STOP switch is used to stop
the engine. The switch stays in the ON
position. To stop engine, push and hold
the switch in the STOP position until
the engine comes to a complete stop.
THROTTLE LEVER (_)
The Throttle Lever(_
controls engine
speed. Move it all the way forward for
full speed operation. Move it all the way
rearward for idle speed.
PRIMER BUTTON (_)
The Pdmer Button (_) removes air from
OPERATING TIPS
• To reduce the risk of hearing loss
associated with sound level(s), hear-ing protection is required.
• To reducethe "_risk
of injuryassociated
withcontacting rotatingparts,stopthe
engine beforeinstallingor removing
attachments.Do not operatewithout
guard(s)Inp e.
• Operate power equipmentonly at reasonable hours-not early in the morning
or late at nightwhen peoplemightbe
disturbed Complywith times listedin
local ordinanoss.Usual recommendationsare 9.00 a.m. to 5:00 p.m.,
Monday
though
Saturday.
.__Toreduce noise levels, limitthe number of pieces of equipment used at
any one time.
-6-
the fuel lines and fillsthem with fuel.
This allows you to start the engine with
fewer pulls on the starter rope. Activate
Primer Button_) by pressing it and allowing it to return to its originalposition.
CHOKE LEVER (_)
The choke helpsto supply fuel to the
carburetor duringstarting. This allows
you to start a cold engine. A_ctivatethe
choke by moving the choke lever to the
FULL position.After the engine has
started, mo0ve the choke to the RUN
position.
• To reduce noise levels, operate power blowers at the lowestpossible
throttlespeed to do the job.
• Use rakes and brooms to loosen
debrisbefore blowing.
• In dusty conditions, slightlydampen
surfaces or use a misterattachment
when water is available.
• Conserve water by usingpower blowem insteadof hosesfor many lawn
andgarden
ap_ic_ons,including
areas such ss guttem,scrsens,pa_os,
gdgs,porches,end gardens.
• Use the full blower nozzle extension
so the air stream can work close to
the ground.
• After using blowers and other equip
ment, CLEANUP! Dispose of debrisin
trash receptacles.
OPERATING
POSITION"
fuel stabilizer. See the STORAGE section for additional information.
STOPPING YOUR ENGINE
• To stopthe engine, pr.._ and hold
the stop 0 switchuntilengine stops.
STARTINGYOUR ENGINE
BEFORE STARTING THE ENGINE
You MUSTmake sure the tubes are secure before using the unit.
BEFORE STARTING ENGINE
WARNING: Be sure to read the fuel
informationin the safety rules before
you begin. If you do not understand the
safety rules, do not attempt to fuel your
unit.Call 1-800-235-5878.
FUELING ENGINE
This engine is certified to operate on
• Fuel engine. Move at least 10 feet (3
unleaded gasoline. Before operation,
meters) away from the fueling site.
gasoline must be mixed with a good
• Hold the unit in the starting position
quality2-cycle alr-cooled engine oil.
as shown. Make sure the blower end
We recommend Craftsman brand oil.
is directed away from people, aniMix gasoline and oil at a ratio of 40:1
mals, glass, and solidobjects.
(A 40:1 ratio is obtained by mixing3.2
ounces of oil with 1 gallon of unleaded
WARNING: When startingengine, hold
the unitas illustrated.Do not set uniton
gasoline). DO NOT USE automotive oil
or boat oil. These oils will cause engine any surfaceexcept a dean, hard area
damage. When mixing fuel, fol!ow
when startingengineor while engineis
instructionsprinted on container.
running.Debrissuch as gravel,sand,
Once oil is added to gasoline, shake
dust, grass, etc. couldbe pickedup by
container momentadly to assure that
the air intakeand thrown out through the
the fuel is thoroughly mixed. Always
d_
opening,damagingthe unitor
read and follow the safety rules relating property,or causing sedous injury to byto fuel before fueling your unit.
standersor the operator.
STARTING A COLD ENGINE OR A
IMPORTANT
WARM
ENGINE AFTER RUNNING
Experience indicates that alcohol
OUT
OF
FUEL
blended fuels (called gasohol or using
• Move the throttle lever (_) to the fast
ethanol or rhethanol) can attract moisposition.
ture which leads to separation and
formationof acids during _ora'ge. Acid- • Press the primer button(_) slowly 12
times.
ic gas can damage the fuel system of
an engine while in storage.
• Move the choke lever (_) to the Full
• To avoid engine problems, empty the
Choke position.
fuel system before storage for 30 days
ThmtUe
or longer. Drain the gas tank, start the
Switch
Lever
_,
• engine and let it run untilthe fuel lines
and carburetor are empty. Use fresh
fuel next season.
Never use engine or carburetor cleaner
products in the fuel tank or permanent
Choke
damage may occur.
Lever
Fuef_ll_er
b an acceptable alternative in minimizing.theformation of fuel
• Pullstarter handle sharply untilthe
gum depositsdunng storage. Craftsengine attempts to run, but no more
man brand o11is already blended with
that 5 pulis (below 30°F, 8 pu!!_
®
NOTE: If the engine attempts to start
• Pull the starter handle sharply until
before the 5th pull, go to the next
the engine starts, but no more then 5
step immediately.
pulls. ,
NOTE: If the engine has not started,
• Move choke lever (_ to Half Choke.
pull starter handle sharply for 5 more
• Pullthe starter handle sharply until
pulls. If engine still does not run, it is
the engine runs, but no more than 5
probably flooded. Proceed to Starting
pulls (below3Q°F, tOpulfs).
a Flooded Engine.
• After a 5 second warm-up, move the
•
To stop the engine, press and hold
choke lever (_ to the Run position.
the stop O switch untilengine stops.
• Allow the unit to run for 30 more seDIFFICULT STARTING OR STARTING
conds at Run before moving the
A FLOODED ENGINE
throttle lever (_ to the -_ position.
Rood anguscanbestm'ed
byp cIf the engine has not started after 5
in9 the choke lever in 1heOil Choke
pulls (at Half Choke), repeat the Startposition.Move throttlelever to fast _ ;
ing a Cold En_ne Procedure. If the enthen, pull rope untilenginestarts.After
gine still does not start, proceed to
engine stsds, rnovethe throttla leverto
Starting a Flooded Engine.
.A. toallowenginetoldla.
• To stop the engine, press and hold
Starlingcould requirepullingthe starter
the stop (_) switch untilengine stops. rope meny lfmesdependingon how
FOR A WARM ENGINE
badlythe unitis flooded, it the unitstill
• Move the throttle lever (_) to the fast
doesn'tstart, referto the Troubleshooting
• Chartor cell 1-800-235-5878.
position.
CUSTOMER RESPONSIBILITIES
CARE & MAINTENANCE TASK
Check for Loose fasteners and parts
Check for damaged or worn parts ,
Clean unit and labels
Clean air filter
R.eplace spark plug
Replace fuel filter
GENERALRECOMMENDATIONS
The warranty on this unit does not cover items that have been subjected to
operator abuse or negligence. To receive fullvalue from the warranty, the
operator must maintain unitas instructed in this manual. Various adjustments
willneed to be made-periodicallyto
properlymaintain your unit.
CHECK FOR LOOSE
FASTENERS AND PARTS
• Spark Plug Boot
• Air Filter
• Housing Screws
CHECK FOR DAMAGED OR
WORN PARTS
Refer replacement of damaged/worn
parts to your Sears Sennce Center.
_On/Stop Switch- EnsureOn/stop
switchfunclkx_ properly.Tostop engine,push and hold switchb the STOP
-8-
WHEN TO PERFORM
Before each use
Before each use
After each use
Every 5 hours of opemdon
Yearly
Yearly
_sition
until
enginecemss toa complete
stop.Make sureenginestops;
then restartangine and continue.
• Fuel Tank- Do not use unitiffuet tank
• Optional Vacuum Bag Do not use
vacuum bag if it is tom or damaged.
CLEAN UNIT & LABELS
• Clean the unitusing a damp cloth
with a mild detergent.
• Wipe off unitwith a clean dry cloth.
CLEAN AIR FILTER
Do not clean filter in gasoline or other
flammable solvent. Doing so can
create a fire hazard or produce harmful
evaporative emissions.
Cleaning the air filter:
,
A dirty air filter decreases engine psrformanse and increases fuel consumption and harmful emissions. Always
clean after every 5 hours of operation.
Air Filter
Air Filter
Cover
Scr6ws
• Clean the cover and the area around
it to keep debds from falling into the
carburetor chamber when the cover
is removed.
• Remove parts as illustrated.
• Wash the filter in soap and water.
• Allow filter to dw.
• Apply a few drops of oil to the filter;,
squeeze filter to distribute oil.
• Replace parts.
We recommend all service and adjustments not listed in this manual be pep
formed by your Sears Service Center.
CARBURETOR
ADJUSTMENT
Carburetor adjustment is critical and if
done impropedy can permanently damage the engine as well as the carburetor. If you require further assistance or
are unsure about performing this procedure, call our customer assistance
help line at 1-800-235-5878.
Old fuel, a dirty air filter, a dirty fuel filter, or flooding may give the impression
of an improperly adjusted carburetor.
Check these conditions before adjustingthe carburetor.
The carburetor has been carefully set
at the factory.Adjustments may be
necesshry if you notice any of the following conditions:
• Engine will not idle. See_ldld Spaed,
and "Mixture" under adjusting
procedure.
• Engine dies or hesitates instead of
accelerating. See =Acceleration
Check" under adjusting procedure.
• Loss of power. See "Mixture"under
adjustingprocedure.
CARBURETOR
PRESETS
When making carburetor preset adjustments, do not force plastic limiter caps
beyopd_the_stopsor damage will occur.
If carbu'Fe-'tor
presets are not needed,
proceed to "ADJUSTINGPROCEDURE,
Idle Speed."
To adjust presets:
REPLACE SPARK PLUG
Replace spark plug each year to ensure the engine starts easier and runs
better. Set spark plug gap at .025 in.
Ignitiontiming is fixed, nonadjustable.
• Twist, then pull off spark plug booL
• Remove spark plugfrom cylinder and
discard.
• Replace with Champion CJ-SYspark
plug and tightenwith a 3/4 in. socket
wrench (10-12 ft.-lbs).
• Reinstall the spark plug booL
REPLACE FUEL RLTER
To replace fuel filter,drain unit by runningit dry of fuel, then remove fuel cap/
retainer assembly from tank. Pull filter
from tank and remove itfrom the fuel
line. Install new fuel filter on fuel line;
reinstallparts.
• Turn the mixturescrew counterclockwise untilit stops.
• Turn the idle speed screw clockwise
untilit stops. Now turn counterclockwise 4-1/2 turns.
Start motor, let it run for 3 minutes, and
proceed to the adjustment section. If
engine does not start, refer to troubleshootingchad or call 1-800-235-5878.
If engine performance is acceptable at
the preset positions,no further adjustments are necessary.
Idle Speed
Screw
MixtureScrew
(withUmiterCap)
ADJUSTING PROCEDURE
Idle Speed "IDLE"
Allow engine to idle. Adjust speed until
engine runs without stalling.
• Turn clockwiseto increase engine
speed if engine stalls or dies.
• Turn counterclockwise to decrease
speed.
No further adjustments are necessary if
performance is satisfactory.
Mixture "MIX"
Allow engine to idle. Then accelerate
the engine and note pedormanoe !f
engine hesitates, bogs down, or
smokes dudng acceleration, tum mixture screw clockwise in 1/16-turnincrements until performance is satisfactory.
Repeat this procedure as necessary
for proper adjustment. After completing
Reset if necessary.
Acceleration Check
If engine dies or hesitates instead of
accelerating,turn mixture screw counterclookwiseuntil you have smooth acceleration. Recheck and adjust as necessary for acceptable performance.
Prepare unit for storage at end of season or if it will not be used for 30 days
or more.
WARNING:
• Allow engine to cool, and secure the
unit before stodng or transporting.
• Store unit and fuel in a well ventilated
area where fuel vapors cannot reach
sparks or open flames from water
heaters, electric motors or switches,
fumaces, etc.
• Store unit with all guards in place.
Pos'dionunit so that any sharp object
cannot accidentally cause injury.
• Store unit and fuel well out of the
reach of children.
EXTERNAL SURFACES
• If your unit is to be stored for a period
of time, clean it thoroughlybefore
storage. Store in a clean dry area.
• Lightlyoil external metal surfaces.
FUEL SYSTEM
Under Fueling Engine in the Operating
Section of this manual, see message
labeled IMPORTANTregarding the use
of gasohol in your engine.
Fuel stabgizeris an acceptablealternative in minimizingthe formationof fuel
gum depositsduringstorage.Add stabi-
lizertogasorme
infuettankorfuelstor-
-10-
fo_lccntainer.Fdlow h_ernix[_buc_.
on stabilizercontainer.Run engne
at lesst5 rninutesafler addingstabizer.
CRAFTSMAN40:1, 2-cycle engine oil
(air cooled) is already blended with fuel
stabilizer.If you do not use this Sears
oil, you can add a fuel stabilizerto your
fuel tank.
INTERNAL ENGINE
• Remove spark plug and pour 1 teaspoonof 40:1, 2-cycle engine oil (air
cooled) through the spark plug opening. Slowly pull the starter rope 8 to
10 timesto distributeoil.
• Replace spark plug with new one of
recommendedtype and heat range.
• Clean air filter.
• Check entire unitfor loose screws,
nuts, and bolts. Replace any damaged, broken, or worn parts.
• At the beginning of the next season,
use only fresh fuel having the proper
gasoline to oil ratio.
OTHER
• Do not store gasoline from one season to another.
• Replace your gasoline can if itstarts
to rust.
TROUBLESHOOTING CHART
TROUBLE
CAUSE
Engine vall not
starL
Fu_ tanl_empty__ ._
i Spark
nginep_:led.
l_ notn_ing.
Fuel not roaching carburetor.
REMEDY
: See
"Stalling
Instxuctior_."
RII tank
wi_ correct
fuel mixture.
: Checkfor ld_/_
•
or =bar;
rel_ca"
;)lltfuel
line;
• Compression low.
See "CarburetorAdjuslmeots."
Engine will not
• Carburetorrequiresedjustmant.
; ContaofSears Ser_ce.
Crankshaft seals worn.
idle properly.
• Contest Seare Servine.
• Compression low.
Engine will not
accelerate,
lacks power, or
dies under a
load.
Engine
smokes
excessively.
Engine
runs hot.
Spark plug fouled.
Carbumfor requiresadjustment.
_'
_r build
dirty. up.
Carbon
Compression low.
Chokepar /on.
: Fuel mixture Incorrect.
Clean or replace spark plug; regal:
Clean or replace air filter.
Emptyfuel tank and refillwith
correctfuel mixture.
Air filter dirty.
or replace air filter,
•" Carburetor requires adjustment. • Clean
See "Carburetor A_ustments."
• Fuel mixture Incorrect.
• See'Fuailng Your Unit."
• Spark plug incorrect.
• Replace with correct spark plug.
• Carburetorrequirasadjustment. • See "CarburetorAdjustments.• Contact Sears Service.
• Carbon buildup.
If situationsoccur which are not covered in this manual, use care and good
judgement. If you need assistance, contact your Sears Service Center/Department or call the Customer Assistance Helpline at 1-800-235-5878.
mentangine owner,youare recponelblefor the
performance of the required maintenance
listedinyourOwnar's Manual.SEARS recommends that you retain all receipts covering
maintenanceon your lawn and garden equip
mentengine, butS EARS cannotdeny warranYOUR WARRANTY RIGHTS AND OBUGAty solelyforthe lack of receiptsor for yourfailTIONS: The U. S. Environmental Protection
ureto ansure theperformanceofallscheduied
Agency/CaliforniaAir Rasourcas Board and
maintenance.
As the lawn and garden equip
SEARS, ROEBUCK AND CO., USA are
merit engineowner, you shouidbe aware that
pleased to explain the emissions controlsysSEARS may deny you warranty coverage if
tem warrantyon yourlawn and garden equip
yourlawn and garden equipment engine or a
ment en_line.Allnew utilityand lawn and gar- part of it hasfailed due to abuse, neglect, imden equipment engines must be designed,
proper maintenance, unapproved rnodificabuilt,and eguippedto meet the stringentantismog stewards. SEARS must warrant the tions,or theuseof partsnot mede or approved
by the odginelequipment manufacturer. You
emissioncontrolsystem on your lawnand _arare responsiblefor presenting your lawn and
den equipment engine for the_eri6ds of time
listed below provided there has been no garden equipment engine to a SEARS authorized repair center as soon as • problemexabuse, neglect, or improper maintenance of
yourlawn and garden equipment engine.Your ists.Wanantyrepalrsshouldbe completed ina
em".=sioncortl_olsystem includes parts ,such reasonableamount of lime, not to exceed 30
as me carburetor and the igni_on system. days. if you have any questions regarding
yourwarrantyrightsand responsibilities, you
Where a warrantable conditionexits, SEARS
shouldcontact your nearest authorized sarwillrepairyour lawnand_gardenequipmentangine at no cost to you. P.xpaneascovered un- vicecenter or call SEARS at 1-800-473-7247
der warranty includediagnosis, parts and la- WARRANTY COMMENCEMENT DATE: Tha
bor.
MANUFACTURER'S WARRANTY
warrantyperiod begins on the date the lawn
COVERAGE: Ifany emissionsrelated patton
and ga_isn equipment eng_e is purchased.
yourengine (aslistedunder EmiselonsControl LENGTH OF COVERAGE. This warranty
Warranty P_utsList)is defective o{ a defect in shallbe fora periodoftwo yearefromthe initial
the ._..or
workmanship of the engine date of purchase. WHAT IS COVERED: REcauses me failure ofsuch an emission related PAIR OR REPLACEMENT OF PARTS. RePsart,the part wig be repaired or replaced by pairor replacement of any warranted part will
EARS. OWNER'SWARRANTY RESPONbe Pedormed at no charge fo the owner at an
SIBILITIES: As the lawn and garden equip
approvedSEARS servicingcanter. Ifyouhave
any questions regardingyour w.arrantyfights
rasponsibll_as: you s.noula_
you..r
nearest euthodzea sennce center or ca==
SEARS at 1-800-473-'/247. WARRANTY PERIOD: Any warranted partwhlchls not scheduledforrep]acementasrequiredmalnt.end,
or which is scheduledonly for .mgu_r mspectlontothe effect of'repair or repeace a._necas-
can be groundsfords_lowlnga warrantyclaim.
SEARS Is not liable to cover failures oTwarranted parts/:aused by the use of _d-on or
modilledparts.HOWTO RLE ACLAIM: Ifyou
have any que_ons regardingyour warranty
rightsand rasponslbtl_.as,you shouldcon_.
your nearest euthorlzeoservice canter or ca,
SEARS at 1,800-473-7247. WltERE TO GET
sani'shall
bewarrented
for2y_._..P_ywar- _pairs_
beproeded
ateliSEARSsense
as required rnal.ntenancp_._ll oe ....
cente_calI.1-800-473-?247,MAINTENANCE,
for the period of time up to me fltet scne_uzeo REPLACEMENTANDREPAIROFEMISSION
replacemantp0tntforthatparL DIAGNO:SI_: RELATEDPARTS:AffySEARSspprovedmThe ownershall not be charged for dlagnos_
ptacementpartusodlnthe parforrnance ofany
labor which leads to the datermlnabonthat a
warranted part is defective if the diagnostic warranty maintenance or repair on emissk)n
work is performed at an
roved DAM . theownerifthepartis uoderwarranty. EMISservldng center. CONSEQ_ NTIAL
SEARS
re_atedpartswillbeprov'Kledw'_l_>utchargnzo
AGES. SEARS may be liable for damages to SlON CONTROLWARRANTY PARTS US_.
other engine components ¢ausecl.by the fai.'l- Carburetor, IgnitionSystem: Spark Plug {covure of a warranted part still unaer warranty, ered up to maintenance schedule), Ignition
WHATISNOTCOVERED:AIIfaliumscaused
Module. MAINTENARCE STATEMENT: The
by abuse, negleCt,or Impr_o_ real.nte._.nan_,.eownerIsresponsibleforthe performanceof_11
am not covema. *tuu--,Jr* ,Jn muu,r,;u
required maintenance as defined in the ownPARTS: The use of add-on or _
pads er's manual.
-12-
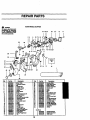
REPAIR PARTS
,_
SEARSMODEL3,58,797320
WARHING
24 25 26
24
36
5
18
I
21 789
35
I
34
31 3
I t
38
g 15 78
11
9 47
18 2223
37
39
4O
45
I
41
27 14
46
1630 29
44
12
47
32
28
43
_o
Ref.
Pan No.
1÷
2.
&
4.
5.
6.
7.
8.
g.
10.
11.
12.
13.
14.
15.
16,
17.
18.
19.
20.
21.
22.
23.
26.
$3004Q_2
r_qOOl(_og
S300/,_26
S3004_.4
S3001S2S4
53OO15852
530015775
53006mW2
53OO494O5
S3004e494
Sa006S_4
S300494_
5,3O052293
5304_L_4
530015S67
rl3001,_49
$3004_1S
S3004S3a3
S300493_
53001 g246
53001_11
"rl_
Pkm
Ch_l Levw_
W',.d_
c_oMSp_r
Screw
Kn_ Re_mmmt _
t.udwke-Swi_
Ch_l Pk_te
Spm_ Co_ I.a_h
Screw
8€_w
Nr RIt_
Seal-CtmkePrate
Rela_r0e
Bun_
_1_12
28.
29.
30.
31.
32_
33.
34.
35.
36.
37.
38.
3_.
40.
41.
42.
43.
44,
45.
445.
P_I I_.
Sa00_
m17
S,_04_23
5300_'nl2
53005388O
530O15886
530015880
530015820
5,30095_2
S300954_
53004_
530015880
_47
5300143_
S,_0494_1
S30041_7
53006g216
530041m6
47.
_30_13
48.
530048318
NotS;_*m
ml
urge6uuon
Nu_
53O053855
13
_Co,_
_,,'_
_1
mk
Une I_',-.Tml_urge
Fu_ Capw4_mner
G_klt I_t
AirB00(
Q_m_r ManW
F.n_eSm_
R_
17
REPAIR PARTS
I
34
35
Gasket
Kit
293031
1
361
36
37
36
38
7
17
I
25
-I
49
2627
18
15
45
3
5
28
6
16
Rid'.
Dem:rl_on
1.
2.
&
4.
s.
6.
7.
8.
9.
10.
11.
I_'
14.
15.
'16.
17.
18.
19.
2O.
21.
22.
23.
24.
530015880
53006S2_
53(x)6ses5
53002"/5w
sa_420ee
53004s601
530015810
530015815
_10019240
530_192
B_10068817
53004_13
5_4_R043
530019181
53O049429
5300_12S
5300_124
530019179
S3001S04S
5300m818
25. U
26.
27.
Screw
Pm'l K_.
28. 530049713
29. 53001eL_03
30. 530049454
31. 5300_14
32. 530015941
33. 53004_
34. S30015_53
_S. Ctw,pi_
36. 530069813
37. 830019247
38. 53_0_2266
39. S3(X)li820e
40. 5300160eO
41..S300499_
42. 5300151e2
43. 530069945
Rope_
Stwtm'_
suL_ s_,o
FanHo_s_g
w_
o.-R_
E_
_mpeller Ass'y.
l._:kwasher
Nut
Inl_ Door
Crankcue
Ges_mud
Cranksha_am'y.
44.
,53¢(_12
4,5.
46.
47.
48.
49.
530016226
5300_10e
53006_5
530019182
S30015149
(Ind. 20-23)
Not S_,own
530023817
830016190
U
S30Qe4404
14
SeaI-FI¢_ Hsg.- Foam
Muf_ Bol
UuffiorCo',_orPk_te
MulP_ mt
Rlllk_ mbO-C+cha_
Shkl_
Sp_k Pl_g {CJ-SY)
Nt Darn
I_n_n Module
Bolt
SCnm-SW_ P.l_y
P_n P_ _)
Rm;r_r
c_n_ng _od
REPAIR PARTS
Carburetor ASininely Pitt Numl_rE3_M_
-_IW_"
Oo_onal - Va_JUm Klt _8._B4JO0
NO.
1
2
_
53006_11
IJmilerCap
Cad=. Re_lr Kit
2
3
15
For the repair or replacement parts you need
:lelivered directly to your home
3all 7 am - 7 pm, 7 days a week
1-800-366-PART
-
€1-800-366-7278)
Para ordenar piezas con entrega a
:lomicUio - 1-800-859-7084
:or in-home major brand repair service
3all 24 hours a day, 7 days a week
!-800-4-REPAIR
11-800-473-7247)
)ara pedir servicio de reparaci6n a
_omicilio - 1-800-676-5811
For the location of a Sears Parts and
Repair Center in your area
Call 24 hours a day, 7 days a week
1-800-488-1222
Blllm
mll
==BBmm
Illllll
For information on purchasing a Sears
Maintenance Agreement or to inquire
about an existing Agreement
Call 9 am - 5 pm, Monday-Saturday
1-800-827-6655
/Vhen requesting service or ordering
)arts, always provide the following
nformation:
P,roductType
Model Number
• Part Number
• Part Description
SEARS
America_
Repair Specialists