Download Model SD7+FLC
Transcript
U.S. Pat. Pend. BRITE BOX™ SD7+FLC KIT www.thebritebox.com "BETTER LIGHTING FOR SAFER DRIVING" INSTALLATION INSTRUCTIONS FOR 02-05 DODGE RAM 1500 AND 03-05 DODGE RAM HEAVY DUTY Made In U.S.A. This kit contains two self contained devices that illuminate your low beams and factory installed fog lights when your high beams are on. This provides you with an even carpet of light that stretches from near to far. Without BRITE BOX, your low beams and fog lights drop out when your high beams are on. On many vehicles, you can simulate the operation of the BRITE BOX by activating the "flash to pass" function when your low beams are on. When doing this, you will see an increase in lighting brightness and the quality of the headlight's beam pattern. Many people try to drive like this, but often find out that the headlight switch or wiring of their vehicles burn out since they are not designed to handle these increased loads on a continual basis. With BRITE BOX, you can enjoy the benefits of this improved beam pattern, automatically, without placing any additional loads on the vehicle's stock headlight switches or wiring. Installing your BRITE BOX is easily accomplished with common hand tools in a short period of time. In order to make your installation go as smoothly as possible, it is recommended that you read the instructions and plan your installation before starting. PARTS LIST: 1 - Brite BoxSD7 1 - Brite Box SD7+FLC 1 -10 Amp ATC Fuse 1- 20 Amp ATC Fuse 16 - Cable (Wire) Ties 1 - Power Extension Kit (Used only with single battery vehicles) 2 - Alcohol Pads Plug Receptacle BRITE BOX FIGURE 1 TOOLS REQUIRED: Wrench to fit your positive battery post / clamp - usually a 10mm, 13mm, or 1/2 inch. 10 mm Socket, Socket Wrench, Long extension Philips Screwdriver Medium slotted screwdriver Masking or Duct Tape Wire Cutters, Strippers, and Crimpers (Single battery vehicles only) BRITE BOX Fog Light Wire / Harness STEP 1: UNBOLT DRIVER SIDE HEADLIGHT Figure Reference: Figure 2 Remove two (2) plastic clips as shown in FIG 1. that secures rubber trim piece to vehicle. Use Philips screwdriver to unscrew center section. When center section is removed, clips will pull straight out . " Remove three (3) 10mm bolts in positions shown in FIG 1. " Bottom bolt is located under headlight and will require you to use a long socket extension to reach it. Take care not to drop this bolt when you remove it. " Please note that some (NOT ALL) trucks have a sensor bolted to the Driver side headlight assembly in location indicated in FIG 2. If your vehicle, has this sensor, simply let it dangle until you reinstall headlight. STEP 2: REMOVE DRIVER SIDE HEADLIGHT Figure Reference: Figure 3 " There is a "pop" clip that holds the headlight in even though it is unbolted. You will need to release this clip in order to remove the headlight from the vehicle. " Releasing this clip requires that you pry the headlight forward at the location indicated in FIG 3. " Use masking or duct tape to PAD the shaft of your screwdriver to avoid damaging the headlight or fender of vehicle. Insert screwdriver between fender and headlight and GENTLY pry it forward. Headlight will pop free from vehicle. " When headlight is free, unplug headlight harness from headlight bulb (blue connector) and remove side marker bulb from headlight assembly by twisting it. " Place headlight where it cannot be damaged while you are installing Brite Box. STEP 3: INSTALL FOG LIGHT CONTROL BRITE BOX (HAS BROWN WIRE EXITING ENCLOSURE) ON DRIVER SIDE HEADLIGHT Figure Reference: Figure 1 " Plug vehicle's headlight plug (removed in Step 2) into receptacle of Brite Box. " Mount Brite Box to vehicle using double stick tape (clean surface tape will mount to with supplied alcohol pad) or by wire tying it to an existing harness. Make sure you mount Brite Box far enough back so as to allow headlight to be reinstalled. " Be sure to observe UP orientation on Brite Box's label to allow for drainage should water enter unit. NOTE: Water damage is NOT covered under warranty! " Run fog light harness (see Fig. 1) to fog light in bumper. Remove 2 Clips STEP 4: POLARIZE FOG LIGHT CONNECTOR Plug connector from Brite Box's single brown wire into fog light harness wire in the following manner: FOR ALL 2003 - 2004 TRUCKS: Plug BROWN single wire from Brite Box into BROWN wire in fog light harness. FOR 2005 TRUCKS WHERE FOG LIGHTS WERE INSTALLED BY FACTORY: Plug BROWN single wire from Brite Box into BROWN wire in fog light harness. FOR 2005 TRUCKS WHERE FOG LIGHTS WERE ADDED USING MOPAR FOG LIGHT KIT: Plug BROWN single wire from Brite Box into BLACK wire in fog light harness. Remove 3 - 10mm Bolts Note: Circled bolt on Driver side headlight may also secure a sensor on some vehicles STEP 5: Route fog light harness (see Fig. 1) to fog light on same side of truck where you installed Brite Box. Make sure wires do not pass over any rough / sharp edges that can wear through the insulation and cause a short circuit over time. Use FIGURE 2 supplied cable ties to secure wires from fog light harness in a neat and tidy manner. STEP 6: Unplug Dodge's factory harness from fog light bulb and plug it into the female connector from Brite Box's fog light harness. Note: It is NOT necessary to remove fog light bulb from fog light assembly! STEP 7: Plug male connector from Brite Box's fog light harness into fog light bulb. STEP 8: ATTACH POWER LEAD FROM BRITE BOX Figure Reference: NONE " Attach ring on Power lead from Brite Box directly to positive terminal of battery. " Install 20 Amp fuse into fuse holder. STEP 10: INSTALL NON FOG LIGHT CONTROL BRITE BOX (NO BROWN WIRE EXITING ENCLOSURE) ON PASSENGER SIDE HEADLIGHT Figure Reference: Figures 1-3 " Repeat steps 1 thru 4 to install Brite Box behind passenger side headlight. " For single battery vehicles, hook Brite Box's power lead to power extension. " For dual battery vehicles, attach ring on power lead from Brite Box directly to positive (+) terminal of passenger side battery. Fender p STEP 9: RUN POWER EXTENSION - SINGLE BATTERY VEHICLES ONLY! Figure Reference: NONE " If your vehicle has TWO batteries, skip this step entirely. " This step is required on single battery vehicles to get power to the Brite Box that you will be installing behind the passenger side headlight. " Follow instructions provided in the power extension kit. Return to these instructions when you are finished. Pry headlight this direction Pry area GENTLY pry headlight forward in circled area to release pop clip FIGURE 3 
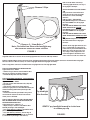
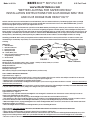
" NOTE: NON FOG LIGHT CONTROL BRITE BOX REQUIRES 10 AMP FUSE! STEP 11: REINSTALL BOTH HEADLIGHTS Figure Reference: Figure 2 " Plug Brite Box's plug into headlight bulb (both sides of vehicle). " Reinstall side marker light into headlight assembly (both sides of vehicle). " Reinstall headlights by first reinstalling pop clip and then the expander clips and bolts. " IMPORTANT! IF YOU REMOVED ANY SENSORS FROM DRIVER'S HEADLIGHT, MAKE SURE THEY ARE REINSTALLED! STEP 12: TEST BRITE BOX FOR PROPER OPERATION " Turn low beams ON, keep fog light switch OFF " Turn on HIGH beams on. You will notice greatly improved headlight output and coverage due to the low beams and fog light illuminating. NOTE: DO NOT USE BRITE BOX WITH SO CALLED "EXTRA OR SUPER BRIGHT BULBS". EXPERIENCE HAS SHOWN THAT THESE BULBS ARE NOT MUCH BRIGHTER THAN STOCK BULBS, BURN OUT QUICKLY, ARE VERY COSTLY AND GENERATE MORE HEAT THAN MOST HEADLIGHT SYSTEMS CAN WITHSTAND. INSTALLING BRITE BOX WITH STANDARD WATTAGE BULBS (120 WATTS OR LESS FOR HIGH + LOW BEAM) PROVIDES SUPERIOR ILLUMINATION (BETTER BEAM PATTERN WITH LESS FATIGUE) THAN A SLIGHTLY BRIGHTER INFERIOR BEAM PATTERN PROVIDED BY THESE "SUPER BRIGHT BULBS". BECAUSE OF THEIR SUPERIOR QUALITY, MORE AUTO MANUFACTURERS SPECIFY OSRAM / SYLVANIA HEADLIGHT BULBS AS OEM EQUIPMENT THAN ALL OTHER BRANDS COMBINED. OUR EXPERIENCE CONFIRMS THE QUALITY OF OSRAM / SYLVANIA BULBS IN THAT THEY LAST THE LONGEST AND HAVE THE LOWEST FAILURE RATE. We have seen bulb brands that you should avoid. These brands are WAGNER and GE (General Electric). These brands are poorly designed (in our opinion) in that they use VERY thin wires to deliver current to the bulb filaments. This causes problems in bulb life and reliability. It is common to see these wires break or deform which causes the bulb to prematurely fail. In fact, it is probably best to avoid any headlight bulbs whose reliability you are not sure of. SOME FREE ADVICE ABOUT HEADLIGHT BULBS: • Stick with Osram / Sylvania brand bulbs. Don't second guess the car makers. • Carry spares in your glove box. It's cheap insurance. Changing a bulb usually takes only a few minutes, but you cannot replace a burned out one without a spare. If you have quality spares, you will never have to settle for cheap bulbs because that is the only thing that "Bob's Boonie Market And Service Station" stocks (if any at all). TECH AND ORDER LINE: (970) 879-4201 BAKER AUTO ACCESSORIES 2955 Village Dr. #5 Steamboat Springs, CO 80488 Fax: (970) 879-6097 BOOST YOUR FACTORY INSTALLED FOG LIGHT OUTPUT BY 70% WITH THE FAMOUS BULBZILLA / FOGZILLA HARNESS KIT! SEE: http://thebritebox.com/bulbzilla.fogzilla.mod.html FOR COMPLETE DETAILS! BRITE BOX POWER EXTENSION KIT PART NO. PEK Some vehicles require a Brite Box unit for each headlight. This kit allows you to extend the power lead on a Brite Box so that it can reach the battery located on the other side of the vehicle. KIT CONTENTS: 1 - Power Wire 2 - Pink Butt Connectors 2 - Pieces of Shrink Tubing TOOLS REQUIRED: Heat gun or butane lighter Wire Crimpers, Cutters & Strippers INSTALLATION INSTRUCTIONS: STEP 1: CUT fuse holder off of Brite Box midway between Brite Box enclosure and fuse holder body. STEP 2: Attach ring of fuse holder directly to positive(+) battery terminal. STEP 3: Strip insulation off of loose end of fuse holder and one end of supplied power wire. Connect wires together using supplied butt connector. Place shrink tubing over butt connector and use lighter or heat gun to shrink. STEP 4: Run power wire across vehicle (over radiator brace or behind bumper) to location where you are going to mount the Brite Box. STEP 5: Use supplied wire ties to secure wire where necessary. MAKE SURE WIRE CANNOT BECOME TANGLED IN RADIATOR FAN! STEP 6: Cut power wire to appropriate length and attach to Brite Box. Repeat connection procedure used in STEP 3. BRITE BOX X EXTENSION WIRE BRITE BOX BUTT CONNECTORS AND SHRINK TUBING CUT WIRE BRITE BOX LIMITED WARRANTY Baker Auto Accessories (B.A.A.) warrants Brite Box to be free from manufacturing defects under normal use and conditions for three (3) years from date of original user purchase. Baker Auto Accessories, at its sole discretion, will either repair the product or replace the product, provided the manufacturing defect is verified along with proof of purchase. To obtain warrant service call 1-970-879-4201. This warranty is void if the product is: A) Damaged through negligence, misuse, abuse or accident. B) Modified, repaired, or tampered with by anyone other than B.A.A. C) Units on which the serial number has been defaced, modified or removed. This warranty does not cover: A) Damage due to improper installation. B) Water, smoke, or heat damage. C) Damage or improper operation of unit caused by customer abuse, misuse, negligence, or failure to follow correct installation procedures as provided with product. D) Costs of shipping of the product to and from B.A.A. This warranty is non-transferable and applies only to the original purchaser and does not extend to subsequent owners of the product. Any applicable implied warranties, including the warranty of merchantability, are limited in duration to a period of the expressed warranty as provided herein beginning with the date of original purchase at retail and no warranties, whether expressed or implied, shall apply to the product thereafter. Baker Auto Accessories makes no warranty as to the fitness of the product for any particular purpose or use. The extent of Baker Auto Accessories' liability under this limited warranty is the repair or replacement provided above and, in no event , shall Baker Auto Accessories' liability exceed the purchase price paid by the purchaser of the product. Under no circumstances shall Baker Auto Accessories be liable for any loss, direct, indirect, incidental, special, or consequential damage arising out of or in connection with the use of this product. Baker Auto Accessories 2955 Village Dr. #5 P.O. Box 880707 Steamboat Springs, CO 80488 (970) 879-4201